Composable image
Back to home
On this page
Beta Feature
The Platform.sh composable image is currently available in Beta. This feature as well as its documentation is subject to change.
The Platform.sh composable image provides enhanced flexibility when defining your app. It allows you to install several runtimes and tools in your application container, in a “one image to rule them all” approach.
The composable image is built on Nix, which offers the following benefits:
- You can add as many packages to your application container as you need, choosing from over 120,000 packages from the Nixpkgs collection.
- The packages you add are built in total isolation, so you can install different versions of the same package.
- With Nix, there are no undeclared dependencies in your source code. What works on your local machine is guaranteed to work on any other machine.
This page introduces all the settings available to configure your composable image from your .platform.app.yaml file
(usually located at the root of your Git repository).
Note that multi-app projects can be set in various ways.
If you’re pressed for time, jump to this comprehensive configuration example.
Top-level properties 
The following table presents all the properties you can use at the top level of your app’s YAML configuration file.
The column Set in instance? defines whether the given property can be overridden within a web or workers instance.
To override any part of a property, you have to provide the entire property.
| Name | Type | Required | Set in instance? | Description |
|---|---|---|---|---|
name |
string |
Yes | No | A unique name for the app. Must be lowercase alphanumeric characters. Changing the name destroys data associated with the app. |
type |
A type | Yes | No | Defines the version of the Nix channel. Example: type: "composable:25.05" |
stack |
An array of Nix packages | Yes | No | A list of packages from the Platform.sh collection of supported runtimes and/or from Nixpkgs. |
size |
A size | Yes | How much resources to devote to the app. Defaults to AUTO in production environments. |
|
relationships |
A dictionary of relationships | Yes | Connections to other services and apps. | |
disk |
integer or null |
Yes | The size of the disk space for the app in MB. Minimum value is 128. Defaults to null, meaning no disk is available. See note on available space. |
|
mounts |
A dictionary of mounts | Yes | Directories that are writable even after the app is built. If set as a local source, disk is required. |
|
web |
A web instance | N/A | How the web application is served. | |
workers |
A worker instance | N/A | Alternate copies of the application to run as background processes. | |
timezone |
string |
No | The timezone for crons to run. Format: a TZ database name. Defaults to UTC, which is the timezone used for all logs no matter the value here. See also app runtime timezones. |
|
access |
An access dictionary | Yes | Access control for roles accessing app environments. | |
variables |
A variables dictionary | Yes | Variables to control the environment. | |
firewall |
A firewall dictionary | Yes | Outbound firewall rules for the application. | |
hooks |
A hooks dictionary | No | What commands run at different stages in the build and deploy process. | |
crons |
A cron dictionary | No | Scheduled tasks for the app. | |
source |
A source dictionary | No | Information on the app’s source code and operations that can be run on it. | |
additional_hosts |
An additional hosts dictionary | Yes | Maps of hostnames to IP addresses. | |
operations |
A dictionary of Runtime operations | No | Runtime operations for the application. |
Note
The build, dependencies, and runtime keys are only supported when using a single-runtime image.
They are not supported when using the composable image.
They are replaced by the stack key.
Stack
Use the stack key to define which runtimes and binaries you want to install in your application container.
Define them as a YAML array as follows:
myapp:
  stack: [ "<nixpackage>@<version>" ]
  # OR
  stack:
    - "<nixpackage>@<version>"
To add a language to your stack, use the <nixpackage>@<version> format.
To add a tool to your stack, use the <nixpackage> format, as no version is needed.
Warning
While technically available during the build phase, nix commands aren’t supported at runtime as the image becomes read-only.
When using the Platform.sh composable image, you don’t need nix commands.
Everything you install using the stack key is readily available to you as the binaries are linked and included in $PATH.
For instance, to start a secondary runtime,
just issue the command (e.g. in the start command) instead of the nix run command.
Primary runtime
If you add multiple runtimes to your application container, the first declared runtime becomes the primary runtime. The primary runtime is the one that is automatically started.
To start other declared runtimes, you need to start them manually, using web commands. To find out which start command to use, go to the Languages section, and visit the documentation page dedicated to your runtime.
Note
If you use PHP, note that PHP-FPM is only started automatically if PHP is defined as the primary runtime.
Supported Nix channels
A Nix channel represents a curated, tested snapshot of the Nixpkgs repository, which contains a collection of Nix expressions (code for building packages and configuring systems).
Using the latest stable Nix channel ensures that you get stable, verified packages (not all git commits are heavily tested before being merged into the master branch).
Upsun typically supports only the most recent channel, but sometimes support for a previous channel is extended.
The following channels are supported:
25.0524.05
Configure Nix channels
The Nix channel can be configured with the top-level property type.
For example, to use the Nix channel 25.05, you would use the following syntax:
type: "composable:25.05" Supported Nix packages
Note
The Nix packages listed in the following table are officially supported by Platform.sh to provide optimal user experience.
However, you can add any other packages from the Nixpkgs collection to your stack.
This includes packages from the unstable channel,
like FrankenPHP.
While available for you to install, packages that aren’t listed in the following table are supported by Nix itself, not Platform.sh.
Depending on the Nix package, you can select only the major runtime version, or the major and minor runtime versions as shown in the table. Security and other patches are applied automatically.
| Language | Nix package | Supported version(s) |
|---|---|---|
| Clojure | clojure |
1 |
| Elixir | elixir |
1.15 1.14 |
| Go | golang |
1.22 1.21 |
| Java | java |
22 21 |
| Javascript/Bun | bun |
1 |
| JavaScript/Node.js | nodejs |
24 22 20 18 |
| Perl | perl |
5 |
| PHP | php |
8.4 8.3 8.2 8.1 |
| Python | python |
3.12 3.11 3.10 3.9 2.7 |
| Ruby | ruby |
3.4 3.3 3.2 3.1 |
Example:
You want to add PHP version 8.4 and facedetect to your application container.
To do so, use the following configuration:
myapp:
  stack: [ "php@8.4", "facedetect" ]
  # OR
  stack:
    - "php@8.4"
    - "facedetect"
PHP extensions and Python packages
When you add PHP or Python to your application container, you can define which extensions (for PHP) or packages (for Python) you also want to add to your stack.
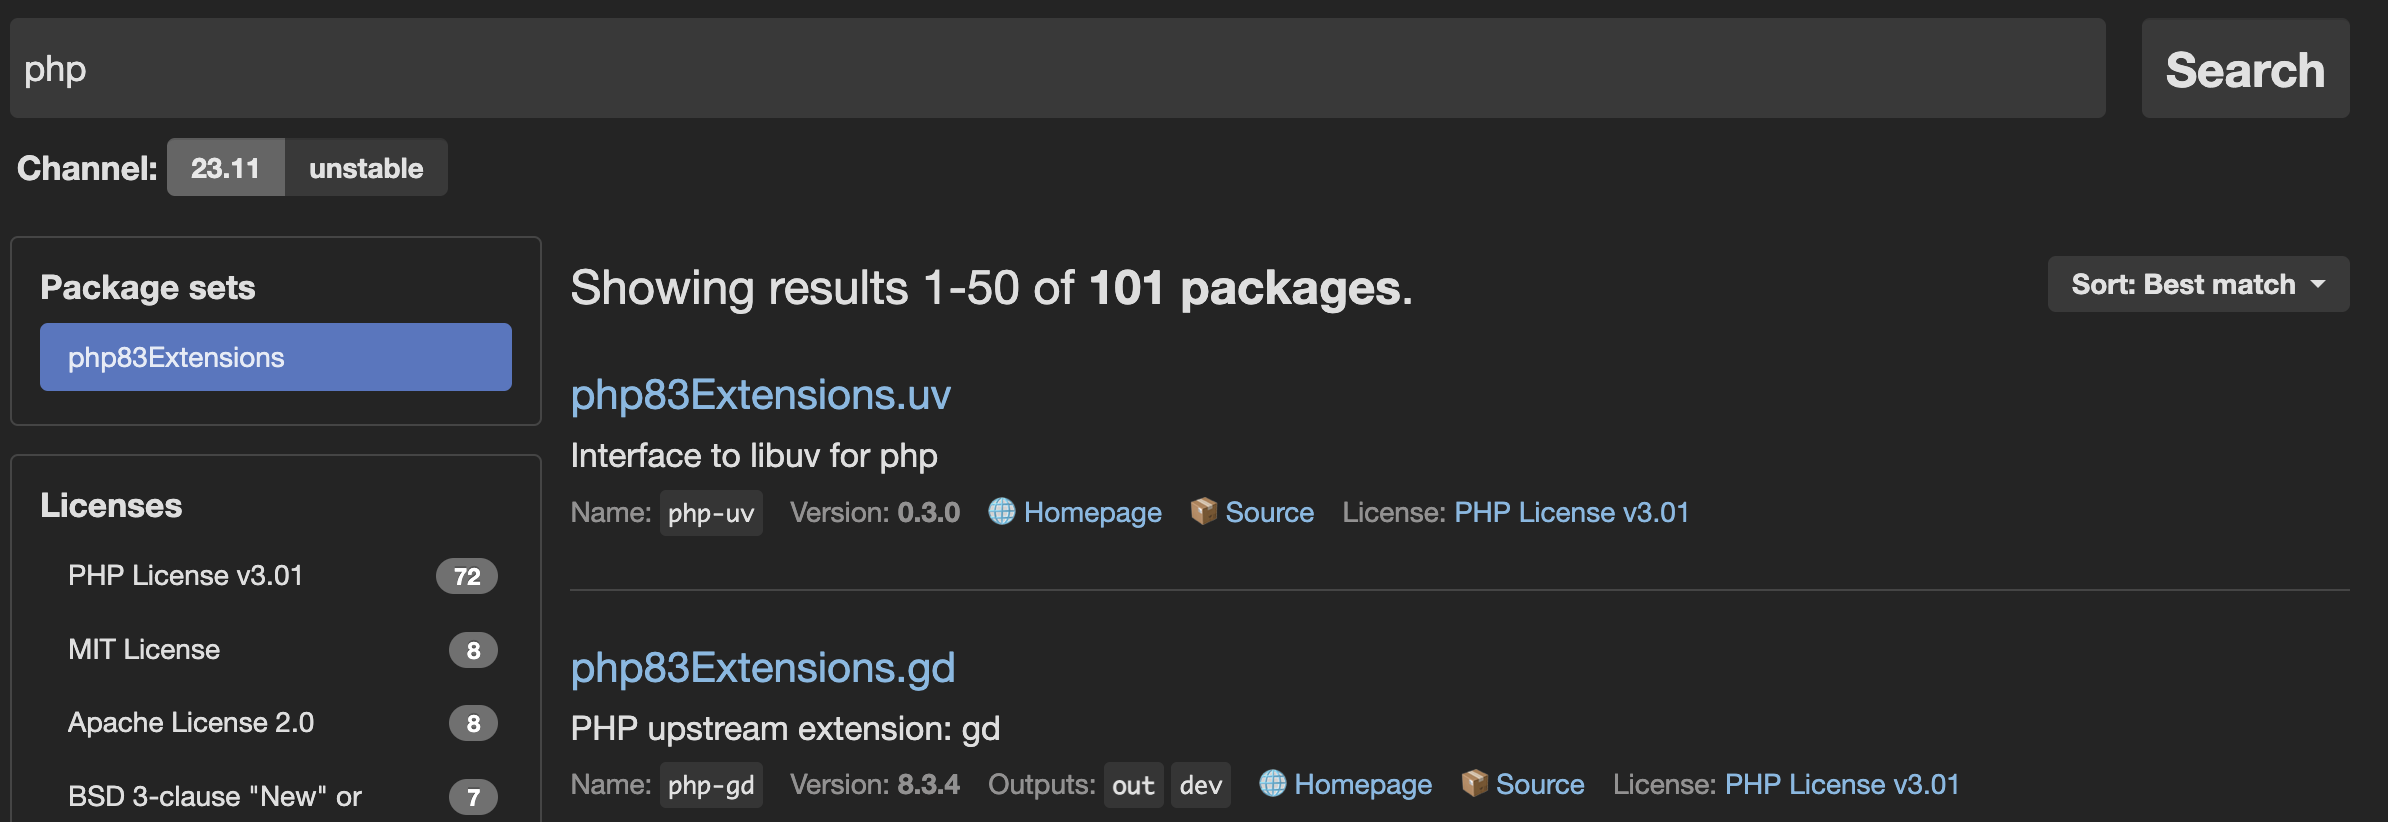
To find out which extensions you can install with your runtime, follow these steps:
- Go to the NixOS search.
- Enter a runtime and click Search.
- In the Package sets side bar, select the right set of extensions/packages for your runtime version. You can choose the desired extensions/packages from the filtered results.
Install PHP extensions
To enable PHP extensions,
specify a list of extensions below the language definition.
To disable PHP extensions,
specify a list of disabled_extensions below the language definition.
For instance:
myapp:
  source:
    root: "/"
  stack:
    - "php@8.4":
        extensions:
          - apcu
          - sodium
          - xsl
          - pdo_sqlite
        disabled_extensions:
          - gd
Note
To help you find out the name of the PHP package you want to use,
some maintainers provide a PHP upstream extension value in the NixOS search engine.
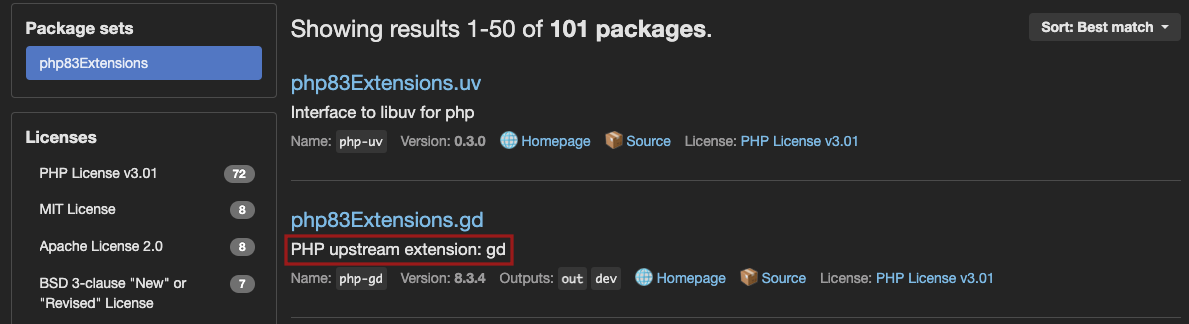
If this information is not provided, note that PHP package names on NixOS always respect the <PHP><VERSION>Extensions.<EXTENSION-NAME> format.
Therefore, you can copy the <EXTENSION-NAME> as shown in the NixOS search results, and use it in your configuration.
Note that you can use environment variables or your php.ini file to include further configuration options for your PHP extensions.
Install Python packages
To install Python packages, add them to your stack as new packages. To do so, use the full name of the package.
For instance, to install python312Packages.yq,
use the following configuration:
myapp:
  stack:
    - "python@3.12"
    - "python312Packages.yq" # python package specific
Alternatively, if you need to include configuration options for your extensions, use either your php.ini file or environment variables.
Example configuration
Here is a full composable image configuration example. Note the use of the <nixpackage>@<version> format.
myapp:
  stack:
    - "php@8.4":
        extensions:
          - apcu
          - sodium
          - xsl
          - pdo_sqlite
    - "python@3.12"
    - "python312Packages.yq" # python package specific
    - "yq"                   # tool
Combine single-runtime and composable images
In a multiple application context,
you can use a mix of single-runtime images
and composable images.
Here is an example configuration including a frontend app and a backend app:
backend:
    stack:
      - "php@8.4":
          extensions:
            - apcu
            - sodium
            - xsl
            - pdo_sqlite
      - "python@3.12"
      - "python312Packages.yq" # python package specific
frontend:
    type: 'nodejs:22
Note
If you add multiple runtimes to your application container, the first declared runtime becomes the primary runtime. The primary runtime is the one that is automatically started.
To start other declared runtimes, you need to start them manually, using web commands. To find out which start command to use, go to the Languages section, and visit the documentation page dedicated to your language.
If you use PHP, note that PHP-FPM is only started automatically if PHP is defined as the primary runtime.
Sizes
Resources are distributed across all containers in an environment from the total available from your plan size. So if you have more than just a single app, it doesn’t get all of the resources available. Each environment has its own resources and there are different sizing rules for preview environments.
By default, resource sizes (CPU and memory) are chosen automatically for an app based on the plan size and the number of other containers in the cluster. Most of the time, this automatic sizing is enough.
You can set sizing suggestions for production environments when you know a given container has specific needs.
Such as a worker that doesn’t need much and can free up resources for other apps.
To do so, set size to one of the following values:
SMLXL2XL4XL
The total resources allocated across all apps and services can’t exceed what’s in your plan.
Container profiles: CPU and memory
By default, Platform.sh allocates a container profile to each app and service depending on:
- The range of resources it’s expected to need
- Your plan size, as resources are distributed across containers. Ideally you want to give databases the biggest part of your memory, and apps the biggest part of your CPU.
The container profile and the size of the container determine how much CPU and memory (in MB) the container gets.
There are three container profiles available: HIGH_CPU, BALANCED, and HIGH_MEMORY.
HIGH_CPU container profile
| Size | CPU | MEMORY |
|---|---|---|
| S | 0.40 | 128 MB |
| M | 0.40 | 128 MB |
| L | 1.20 | 256 MB |
| XL | 2.50 | 384 MB |
| 2XL | 5.00 | 768 MB |
| 4XL | 10.00 | 1536 MB |
BALANCED container profile
| Size | CPU | MEMORY |
|---|---|---|
| S | 0.05 | 32 MB |
| M | 0.05 | 64 MB |
| L | 0.08 | 256 MB |
| XL | 0.10 | 512 MB |
| 2XL | 0.20 | 1024 MB |
| 4XL | 0.40 | 2048 MB |
HIGH_MEMORY container profile
| Size | CPU | MEMORY |
|---|---|---|
| S | 0.25 | 128 MB |
| M | 0.25 | 288 MB |
| L | 0.40 | 1280 MB |
| XL | 0.75 | 2624 MB |
| 2XL | 1.50 | 5248 MB |
| 4XL | 3.00 | 10496 MB |
Container profile reference
The following table shows which container profiles Platform.sh applies when deploying your project.
| Container | Profile |
|---|---|
| Chrome Headless | HIGH_CPU |
| .NET | HIGH_CPU |
| Elasticsearch | HIGH_MEMORY |
| Elasticsearch Premium | HIGH_MEMORY |
| Elixir | HIGH_CPU |
| Go | HIGH_CPU |
| Gotenberg | HIGH_MEMORY |
| InfluxDB | HIGH_MEMORY |
| Java | HIGH_MEMORY |
| Kafka | HIGH_MEMORY |
| Lisp | HIGH_CPU |
| MariaDB | HIGH_MEMORY |
| Memcached | BALANCED |
| MongoDB | HIGH_MEMORY |
| MongoDB Premium | HIGH_MEMORY |
| Network Storage | HIGH_MEMORY |
| Node.js | HIGH_CPU |
| OpenSearch | HIGH_MEMORY |
| Oracle MySQL | HIGH_MEMORY |
| PHP | HIGH_CPU |
| PostgreSQL | HIGH_MEMORY |
| Python | HIGH_CPU |
| RabbitMQ | HIGH_MEMORY |
| Redis ephemeral | BALANCED |
| Redis persistent | BALANCED |
| Ruby | HIGH_CPU |
| Rust | HIGH_CPU |
| Solr | HIGH_MEMORY |
| Varnish | HIGH_MEMORY |
| Vault KMS | HIGH_MEMORY |
Sizes in preview environments
Containers in preview environments don’t follow the size specification.
Application containers are set based on the plan’s setting for Environments application size.
The default is size S, but you can increase it by editing your plan.
(Service containers in preview environments are always set to size S.)
Relationships
To allow containers in your project to communicate with one another, you need to define relationships between them. You can define a relationship between an app and a service, or between two apps.
The quickest way to define a relationship between your app and a service is to use the service’s default endpoint. However, some services allow you to define multiple databases, cores, and/or permissions. In these cases, you can’t rely on default endpoints. Instead, you can explicitly define multiple endpoints when setting up your relationships.
Note
App containers don’t have a default endpoint like services.
To connect your app to another app in your project,
you need to explicitly define the http endpoint as the endpoint to connect both apps.
For more information, see how to define relationships between your apps.
Availability
New syntax (default and explicit endpoints) described below is supported by most, but not all, image types
(Relationship 'SERVICE_NAME' of application 'myapp' ... targets a service without a valid default endpoint configuration.).
This syntax is currently being rolled out for all images.
If you encounter this error, use the “legacy” Platform.sh configuration noted at the bottom of this section.
To define a relationship between your app and a service:
Use the following configuration:
relationships:
  SERVICE_NAME:
The SERVICE_NAME is the name of the service as defined in its configuration.
It is used as the relationship name, and associated with a null value.
This instructs Platform.sh to use the service’s default endpoint to connect your app to the service.
For example, if you define the following configuration:
relationships:
  mariadb:
Platform.sh looks for a service named mariadb in your .platform/services.yaml file,
and connects your app to it through the service’s default endpoint.
For reference, the equivalent configuration using explicit endpoints would be the following:
relationships:
  mariadb:
    service: mariadb
    endpoint: mysql
You can define any number of relationships in this way:
relationships:
  mariadb:
  redis:
  elasticsearch:
Tip
An even quicker way to define many relationships is to use the following single-line configuration:
relationships: {SERVICE_NAME_A, SERVICE_NAME_B, SERVICE_NAME_C}where
SERVICE_NAME_A:
  type: mariadb:11.8
  disk: 256
SERVICE_NAME_B:
  type: redis:8.0
  disk: 256
SERVICE_NAME_C:
  type: elasticsearch:8.5
  disk: 256
Use the following configuration:
relationships:
  RELATIONSHIP_NAME:
    service: SERVICE_NAME
endpoint: ENDPOINT_NAMERELATIONSHIP_NAMEis the name you want to give to the relationship.SERVICE_NAMEis the name of the service as defined in its configuration.ENDPOINT_NAMEis the endpoint your app will use to connect to the service (refer to the service reference to know which value to use).
For example, to define a relationship named database that connects your app to a service called mariadb through the db1 endpoint,
use the following configuration:
relationships:
  database: # The name of the relationship.
    service: mariadb
    endpoint: db1
For more information on how to handle multiple databases, multiple cores, and/or different permissions with services that support such features, see each service’s dedicated page:
- MariaDB/MySQL (multiple databases and permissions)
- PostgreSQL (multiple databases and permissions)
- Redis (multiple databases)
- Solr (multiple cores)
- Vault KMS (multiple permissions)
You can add as many relationships as you want to your app configuration, using both default and explicit endpoints according to your needs:
relationships:
  database1:
    service: mariadb
    endpoint: admin
  database2:
    service: mariadb
    endpoint: legacy
  cache:
    service: redis
  search:
    service: elasticsearch
Legacy
The following legacy syntax for specifying relationships is still supported by Platform.sh:
relationships:
  <RELATIONSHIP_NAME>: "<SERVICE_NAME>:<ENDPOINT_NAME>"
For example:
relationships:
  database: "mariadb:mysql"
Feel free to use this until the default and explicit endpoint syntax is supported on all images.
Available disk space
The maximum total space available to all apps and services is set by the storage in your plan settings.
When deploying your project, the sum of all disk keys defined in app and service configurations
must be equal or less than the plan storage size.
So if your plan storage size is 5 GB, you can, for example, assign it in one of the following ways:
- 2 GB to your app, 3 GB to your database
- 1 GB to your app, 4 GB to your database
- 1 GB to your app, 1 GB to your database, 3 GB to your OpenSearch service
If you exceed the total space available, you receive an error on pushing your code.
You need to either increase your plan’s storage or decrease the disk values you’ve assigned.
You configure the disk size in MB. Your actual available disk space is slightly smaller with some space used for formatting and the filesystem journal. When checking available space, note whether it’s reported in MB or MiB.
Downsize a disk
You can decrease the size of an existing disk for an app. If you do so, be aware that:
- The downsize fails if there’s more data on the disk than the desired size.
- Backups from before the downsize can still be restored.
Mounts
After your app is built, its file system is read-only. To make changes to your app’s code, you need to use Git.
For enhanced flexibility, Platform.sh allows you to define and use writable directories called “mounts”. Mounts give you write access to files generated by your app (such as cache and log files) and uploaded files without going through Git.
When you define a mount, you are mounting an external directory to your app container, much like you would plug a hard drive into your computer to transfer data.
Note
- Mounts aren’t available during the build
- When you back up an environment, the mounts on that environment are backed up too
Define a mount
To define a mount, use the following configuration:
mounts:
  'MOUNT_PATH':
    source: MOUNT_TYPE
    source_path: SOURCE_PATH_LOCATION
MOUNT_PATH is the path to your mount within the app container (relative to the app’s root). If you already have a directory with that name, you get a warning that it isn’t accessible after the build. See how to troubleshoot the warning.
| Name | Type | Required | Description |
|---|---|---|---|
source |
local, service, or tmp |
Yes | Specifies the type of the mount: - local mounts are unique to your app. They can be useful to store files that remain local to the app instance, such as application logs. local mounts require disk space. To successfully set up a local mount, set the disk key in your app configuration. - service mounts point to Network Storage services that can be shared between several apps. - tmp mounts are local ephemeral mounts, where an external directory is mounted to the /tmp directory of your app. The content of a tmp mount may be removed during infrastructure maintenance operations. Therefore, tmp mounts allow you to store files that you’re not afraid to lose, such as your application cache that can be seamlessly rebuilt. Note that the /tmp directory has a maximum allocation of 8 GB. |
source_path |
string |
No | Specifies where the mount points inside the external directory. - If you explicitly set a source_path, your mount points to a specific subdirectory in the external directory. - If the source_path is an empty string (""), your mount points to the entire external directory.- If you don’t define a source_path, Platform.sh uses the MOUNT_PATH as default value, without leading or trailing slashes.For example, if your mount lives in the /web/uploads/ directory in your app container, it will point to a directory named web/uploads in the external directory. WARNING: Changing the name of your mount affects the source_path when it’s undefined. See how to ensure continuity and maintain access to your files. |
service |
string |
Only for service mounts: the name of the Network Storage service. |
The accessibility to the web of a mounted directory depends on the web.locations configuration.
Files can be all public, all private, or with different rules for different paths and file types.
Note that when you remove a local mount from your .platform.app.yaml file,
the mounted directory isn’t deleted.
The files still exist on disk until manually removed
(or until the app container is moved to another host during a maintenance operation in the case of a tmp mount).
Example configuration
mounts:
  'web/uploads':
    source: local
    source_path: uploads
  '/.tmp_platformsh':
    source: tmp
    source_path: files/.tmp_platformsh
  '/build':
    source: local
    source_path: files/build
  '/.cache':
    source: tmp
    source_path: files/.cache
  '/node_modules/.cache':
    source: tmp
    source_path: files/node_modules/.cache
For examples of how to set up a service mount, see the dedicated Network Storage page.
Ensure continuity when changing the name of your mount
Changing the name of your mount affects the default source_path.
Say you have a /my/cache/ mount with an undefined source_path:
mounts:
  '/my/cache/':
    source: tmp
If you rename the mount to /cache/files/, it will point to a new, empty /cache/files/ directory.
To ensure continuity, you need to explicitly define the source_path as the previous name of the mount, without leading or trailing slashes:
mounts:
 '/cache/files/':
   source: tmp
   source_path: my/cache
The /cache/files/ mount will point to the original /my/cache/ directory, maintaining access to all your existing files in that directory.
Overlapping mounts
The locations of mounts as they are visible to application containers can overlap somewhat. For example:
applications:
  myapp:
    # ...
    mounts:
      'var/cache_a':
        source: service
        service: ns_service
        source_path: cacheA
      'var/cache_b':
        source: tmp
        source_path: cacheB
      'var/cache_c':
        source: local
        source_path: cacheC
In this case, it does not matter that each mount is of a different source type.
Each mount is restricted to a subfolder within var, and all is well.
The following, however, is not allowed and will result in a failure:
applications:
  myapp:
    # ...
    mounts:
      'var/':
        source: service
        service: ns_service
        source_path: cacheA
      'var/cache_b':
        source: tmp
        source_path: cacheB
      'var/cache_c':
        source: local
        source_path: cacheC
The service mount type specifically exists to share data between instances of the same application, whereas tmp and instance are meant to restrict data to build time and runtime of a single application instance, respectively.
These allowances are not compatible, and will result in an error if pushed.
Web
Use the web key to configure the web server running in front of your app.
| Name | Type | Required | Description |
|---|---|---|---|
commands |
A web commands dictionary | See note | The command to launch your app. |
upstream |
An upstream dictionary | How the front server connects to your app. | |
locations |
A locations dictionary | How the app container responds to incoming requests. |
See some examples of how to configure what’s served.
Web commands
| Name | Type | Required | Description |
|---|---|---|---|
pre_start |
string |
Command runs just prior to start, which can be useful when you need to run per-instance actions. |
|
start |
string |
See note | The command to launch your app. If it terminates, it’s restarted immediately. |
post_start |
string |
Command runs before adding the container to the router and after the start command. |
Note
The post_start feature is experimental and may change. Please share your feedback in the
Platform.sh discord.
Example:
web:
  commands:
    start: 'uwsgi --ini conf/server.ini'
This command runs every time your app is restarted, regardless of whether or not new code is deployed.
Note
Never “background” a start process using &.
That’s interpreted as the command terminating and the supervisor process starts a second copy,
creating an infinite loop until the container crashes.
Just run it as normal and allow the Platform.sh supervisor to manage it.
Required command
On all containers other than PHP, the value for start should be treated as required.
On PHP containers, it’s optional and defaults to starting PHP-FPM (/usr/bin/start-php-app).
It can also be set explicitly on a PHP container to run a dedicated process,
such as React PHP
or Amp.
See how to set up alternate start commands on PHP.
Upstream
| Name | Type | Required | Description | Default |
|---|---|---|---|---|
socket_family |
tcp or unix |
Whether your app listens on a Unix or TCP socket. | Defaults to tcp for all primary runtimes except PHP; for PHP the default is unix. |
|
protocol |
http or fastcgi |
Whether your app receives incoming requests over HTTP or FastCGI. | Default varies based on the primary runtimes. |
For PHP, the defaults are configured for PHP-FPM and shouldn’t need adjustment.
For all other containers, the default for protocol is http.
The following example is the default on non-PHP containers:
web:
  upstream:
    socket_family: tcp
    protocol: http
Where to listen
Where to listen depends on your setting for web.upstream.socket_family (defaults to tcp).
socket_family |
Where to listen |
|---|---|
tcp |
The port specified by the PORT environment variable |
unix |
The Unix socket file specified by the SOCKET environment variable |
If your application isn’t listening at the same place that the runtime is sending requests,
you see 502 Bad Gateway errors when you try to connect to your website.
Locations
Each key in the locations dictionary is a path on your site with a leading /.
For example.com, a / matches example.com/ and /admin matches example.com/admin.
When multiple keys match an incoming request, the most-specific applies.
The following table presents possible properties for each location:
| Name | Type | Default | Description |
|---|---|---|---|
root |
string |
The directory to serve static assets for this location relative to the app’s root directory (see source.root). Must be an actual directory inside the root directory. |
|
passthru |
boolean or string |
false |
Whether to forward disallowed and missing resources from this location to the app. A string is a path with a leading / to the controller, such as /index.php. If your app is in PHP, when setting passthru to true, you might want to set scripts to false for enhanced security. This prevents PHP scripts from being executed from the specified location. You might also want to set allow to false so that not only PHP scripts can’t be executed, but their source code also can’t be delivered. |
index |
Array of strings or null |
Files to consider when serving a request for a directory. When set, requires access to the files through the allow or rules keys. |
|
expires |
string |
-1 |
How long static assets are cached. The default means no caching. Setting it to a value enables the Cache-Control and Expires headers. Times can be suffixed with ms = milliseconds, s = seconds, m = minutes, h = hours, d = days, w = weeks, M = months/30d, or y = years/365d. |
allow |
boolean |
true |
Whether to allow serving files which don’t match a rule. |
scripts |
boolean |
Whether to allow scripts to run. Doesn’t apply to paths specified in passthru. Meaningful only on PHP containers. |
|
headers |
A headers dictionary | Any additional headers to apply to static assets, mapping header names to values (see Set custom headers on static content). Responses from the app aren’t affected. | |
request_buffering |
A request buffering dictionary | See below | Handling for chunked requests. |
rules |
A rules dictionary | Specific overrides for specific locations. |
Rules
The rules dictionary can override most other keys according to a regular expression.
The key of each item is a regular expression to match paths exactly.
If an incoming request matches the rule, it’s handled by the properties under the rule,
overriding any conflicting rules from the rest of the locations dictionary.
Under rules, you can set all the other possible locations properties
except root, index, rules and request_buffering.
In the following example, the allow key disallows requests for static files anywhere in the site.
This is overridden by a rule that explicitly allows common image file formats.
web:
  locations:
    '/':
      # Handle dynamic requests
      root: 'public'
      passthru: '/index.php'
      # Disallow static files
      allow: false
      rules:
        # Allow common image files only.
        '\.(jpe?g|png|gif|svgz?|css|js|map|ico|bmp|eot|woff2?|otf|ttf)$':
          allow: true
Request buffering
Request buffering is enabled by default to handle chunked requests as most app servers don’t support them.
The following table shows the keys in the request_buffering dictionary:
| Name | Type | Required | Default | Description |
|---|---|---|---|---|
enabled |
boolean |
Yes | true |
Whether request buffering is enabled. |
max_request_size |
string |
250m |
The maximum size to allow in one request. |
The default configuration would look like this:
web:
  locations:
    '/':
      passthru: true
      request_buffering:
        enabled: true
        max_request_size: 250m
Workers
Workers are exact copies of the code and compilation output as a web instance after a build hook.
They use the same container image.
Workers can’t accept public requests and so are suitable only for background tasks. If they exit, they’re automatically restarted.
The keys of the workers definition are the names of the workers.
You can then define how each worker differs from the web instance using
the top-level properties.
Each worker can differ from the web instance in all properties except for:
cronsas cron jobs don’t run on workershooksas thebuildhook must be the same and thedeployandpost_deployhooks don’t run on workers.
A worker named queue that was small and had a different start command could look like this:
workers:
  queue:
    size: S
    commands:
      start: |
        ./worker.sh
For resource allocation, using workers in your project requires a Medium plan or larger.
Access
The access dictionary has one allowed key:
| Name | Allowed values | Default | Description |
|---|---|---|---|
ssh |
admin, contributor, or viewer |
contributor |
Defines the minimum role required to access app environments via SSH. |
In the following example, only users with admin permissions for the
given environment type
can access the deployed environment via SSH:
access:
  ssh: admin
Variables
Platform.sh provides a number of ways to set variables. Variables set in your app configuration have the lowest precedence, meaning they’re overridden by any conflicting values provided elsewhere.
All variables set in your app configuration must have a prefix. Some prefixes have specific meanings.
Variables with the prefix env are available as a separate environment variable.
All other variables are available in
the PLATFORM_VARIABLES environment variable.
The following example sets two variables:
- A variable named
env:AUTHORwith the valueJuanthat’s available in the environment asAUTHOR - A variable named
d8config:system.site:namewith the valueMy site rocksthat’s available in thePLATFORM_VARIABLESenvironment variable
variables:
  env:
    AUTHOR: 'Juan'
  d8config:
    "system.site:name": 'My site rocks'
You can also define and access more complex values.
Firewall
Tier availability
This feature is available for Elite and Enterprise customers. Compare the tiers on our pricing page, or contact our sales team for more information.
Set limits in outbound traffic from your app with no impact on inbound requests.
The outbound key is required and contains one or more rules.
The rules define what traffic is allowed; anything unspecified is blocked.
Each rule has the following properties where at least one is required and ips and domains can’t be specified
together:
| Name | Type | Default | Description |
|---|---|---|---|
ips |
Array of strings |
["0.0.0.0/0"] |
IP addresses in CIDR notation. See a CIDR format converter. |
domains |
Array of strings |
Fully qualified domain names to specify specific destinations by hostname. | |
ports |
Array of integers |
Ports from 1 to 65535 that are allowed. If any ports are specified, all unspecified ports are blocked. If no ports are specified, all ports are allowed. Port 25, the SMTP port for sending email, is always blocked. |
The default settings would look like this:
firewall:
  outbound:
    - ips: [ "0.0.0.0/0" ]
Support for rules
Where outbound rules for firewalls are supported in all environments. For Dedicated Gen 2 projects, contact support for configuration.
Multiple rules
Multiple firewall rules can be specified. In such cases, a given outbound request is allowed if it matches any of the defined rules.
So in the following example requests to any IP on port 80 are allowed and requests to 1.2.3.4 on either port 80 or 443 are allowed:
firewall:
  outbound:
    - ips: [ "1.2.3.4/32" ]
      ports: [ 443 ]
    - ports: [ 80 ]
Outbound traffic to CDNs
Be aware that many services are behind a content delivery network (CDN). For most CDNs, routing is done via domain name, not IP address, so thousands of domain names may share the same public IP addresses at the CDN. If you allow the IP address of a CDN, you are usually allowing many or all of the other customers hosted behind that CDN.
Outbound traffic by domain
You can filter outbound traffic by domain. Using domains in your rules rather than IP addresses is generally more specific and secure. For example, if you use an IP address for a service with a CDN, you have to allow the IP address for the CDN. This means that you allow potentially hundreds or thousands of other servers also using the CDN.
An example rule filtering by domain:
firewall:
  outbound:
    - protocol: tcp
      domains: ["api.stripe.com", "api.twilio.com"]
      ports: [80, 443]
    - protocol: tcp
      ips: ["1.2.3.4/29","2.3.4.5"]
      ports: [22]
Determine which domains to allow
To determine which domains to include in your filtering rules,
find the domains your site has requested the DNS to resolve.
Run the following command to parse your server’s dns.log file
and display all Fully Qualified Domain Names that have been requested:
awk '/query\[[^P]\]/ { print $6 | "sort -u" }' /var/log/dns.logThe output includes all DNS requests that were made, including those blocked by your filtering rules. It doesn’t include any requests made using an IP address.
Example output:
facebook.com
fastly.com
platform.sh
www.google.com
www.platform.sh
Hooks
There are three different hooks that run as part of the process of building and deploying your app.
These are places where you can run custom scripts.
They are: the build hook, the deploy hook, and the post_deploy hook.
Only the build hook is run for worker instances, while web instances run all three.
The process is ordered as:
- Variables accessible at build time become available.
- The
buildhook is run. - The file system is changed to read only (except for any mounts).
- The app container starts. Variables accessible at runtime and services become available.
- The
deployhook is run. - The app container begins accepting requests.
- The
post_deployhook is run.
Note that if an environment changes by no code changes, only the last step is run. If you want the entire process to run, see how to manually trigger builds.
Writable directories during build
During the build hook, there are three writeable directories:
PLATFORM_APP_DIR: Where your code is checked out and the working directory when thebuildhook starts. Becomes the app that gets deployed.PLATFORM_CACHE_DIR: Persists between builds, but isn’t deployed. Shared by all builds on all branches./tmp: Isn’t deployed and is wiped between each build. Note thatPLATFORM_CACHE_DIRis mapped to/tmpand together they offer about 8GB of free space.
Hook failure
Each hook is executed as a single script, so they’re considered to have failed only if the final command in them fails.
To cause them to fail on the first failed command, add set -e to the beginning of the hook.
If a build hook fails for any reason, the build is aborted and the deploy doesn’t happen.
Note that this only works for build hooks –
if other hooks fail, the app is still deployed.
Automated testing
It’s preferable that you set up and run automated tests in a dedicated CI/CD tool. Relying on Platform.sh hooks for such tasks can prove difficult.
During the build hook, you can halt the deployment on a test failure but the following limitations apply:
- Access to services such as databases, Redis, Vault KMS, and even writable mounts is disabled. So any testing that relies on it is sure to fail.
- If you haven’t made changes to your app, an existing build image is reused and the build hook isn’t run.
- Test results are written into your app container, so they might get exposed to a third party.
During the deploy hook, you can access services but you can’t halt the deployment based on a test failure.
Note that there are other downsides:
- Your app container is read-only during the deploy hook, so if your tests need to write reports and other information, you need to create a file mount for them.
- Your app can only be deployed once the deploy hook has been completed. Therefore, running automated testing via the deploy hook generates slower deployments.
- Your environment isn’t available externally during the deploy hook. Unit and integration testing might work without the environment being available, but you can’t typically perform end-to-end testing until after the environment is up and available.
Crons
The keys of the crons definition are the names of the cron jobs.
The names must be unique.
If an application defines both a web instance and worker instances, cron jobs run only on the web instance.
See how to get cron logs.
The following table shows the properties for each job:
| Name | Type | Required | Description |
|---|---|---|---|
spec |
string |
Yes | The cron specification. To prevent competition for resources that might hurt performance, use H in definitions to indicate an unspecified but invariant time. For example, instead of using 0 * * * * to indicate the cron job runs at the start of every hour, you can use H * * * * to indicate it runs every hour, but not necessarily at the start. This prevents multiple cron jobs from trying to start at the same time. |
commands |
A cron commands dictionary | Yes | A definition of what commands to run when starting and stopping the cron job. |
shutdown_timeout |
integer |
No | When a cron is canceled, this represents the number of seconds after which a SIGKILL signal is sent to the process to force terminate it. The default is 10 seconds. |
timeout |
integer |
No | The maximum amount of time a cron can run before it’s terminated. Defaults to the maximum allowed value of 86400 seconds (24 hours). |
Note that you can cancel pending or running crons.
Note
The use of the cmd key is now deprecated in favor of the commandskey.
Make sure you set your new cron jobs using the commands key,
and update your existing cron jobs to ensure continuity.
Cron commands
| Name | Type | Required | Description |
|---|---|---|---|
start |
string |
Yes | The command that’s run. It’s run in Dash. |
stop |
string |
No | The command that’s issued to give the cron command a chance to shutdown gracefully, such as to finish an active item in a list of tasks. Issued when a cron task is interrupted by a user through the CLI or Console. If not specified, a SIGTERM signal is sent to the process. |
crons:
  mycommand:
    spec: 'H * * * *'
    commands:
      start: sleep 60 && echo sleep-60-finished && date
      stop: killall sleep
    shutdown_timeout: 18
In this example configuration, the cron specification uses the H syntax.
Note that this syntax is only supported on Grid and Dedicated Gen 3 projects. On Dedicated Gen 2 projects, use the standard cron syntax.
Example cron jobs
stack: [ "php@8.4" ]
crons:
  # Run Drupal's cron tasks every 19 minutes.
  drupal:
    spec: '*/19 * * * *'
    commands:
      start: 'cd web ; drush core-cron'
  # But also run pending queue tasks every 7 minutes.
  # Use an odd number to avoid running at the same time as the `drupal` cron.
  drush-queue:
    spec: '*/7 * * * *'
    commands:
start: 'cd web ; drush queue-run aggregator_feeds'stack: [ "ruby@3.4" ]
crons:
# Execute a rake script every 19 minutes.
ruby:
spec: '*/19 * * * *'
commands:
start: 'bundle exec rake some:task'stack: [ "php@8.4" ]
crons:
# Run Laravel's scheduler every 5 minutes.
scheduler:
spec: '*/5 * * * *'
commands:
start: 'php artisan schedule:run'stack: [ "php@8.4" ]
crons:
# Take a backup of the environment every day at 5:00 AM.
snapshot:
spec: 0 5 * * *
commands:
start: |
# Only run for the production environment, aka main branch
if [ "$PLATFORM_ENVIRONMENT_TYPE" = "production" ]; then
croncape symfony ...
fi Conditional crons
If you want to set up customized cron schedules depending on the environment type, define conditional crons. To do so, use a configuration similar to the following:
crons:
  update:
    spec: '0 0 * * *'
    commands:
      start: |
        if [ "$PLATFORM_ENVIRONMENT_TYPE" = production ]; then
          platform backup:create --yes --no-wait
          platform source-operation:run update --no-wait --yes
        fi
Cron job timing
Minimum time between cron jobs being triggered:
| Plan | Time |
|---|---|
| Professional | 5 minutes |
| Elite or Enterprise | 1 minute |
For each app container, only one cron job can run at a time. If a new job is triggered while another is running, the new job is paused until the other completes.
To minimize conflicts, a random offset is applied to all triggers. The offset is a random number of seconds up to 20 minutes or the cron frequency, whichever is smaller.
Crons are also paused while activities such as backups are running. The crons are queued to run after the other activity finishes.
To run cron jobs in a timezone other than UTC, set the timezone property.
Paused crons
Preview environments are often used for a limited time and then abandoned. While it’s useful for environments under active development to have scheduled tasks, unused environments don’t need to run cron jobs. To minimize unnecessary resource use, crons on environments with no deployments are paused.
This affects all environments that aren’t live environments. This means all environments on Development plans and all preview environments on higher plans.
Such environments with deployments within 14 days have crons with the status running.
If there haven’t been any deployments within 14 days, the status is paused.
You can see the status in the Console
or using the CLI by running platform environment:info and looking under deployment_state.
Restarting paused crons
If the crons on your preview environment are paused but you’re still using them, you can push changes to the environment or redeploy it.
To restart crons without changing anything:
- In the Console, navigate to your project.
- Open the environment where you’d like the crons to run.
- Click
Redeploynext to the cron status ofPaused.
Run the following command:
platform redeploy Sizing hints
The following table shows the properties that can be set in sizing_hints:
| Name | Type | Default | Minimum | Description |
|---|---|---|---|---|
request_memory |
integer |
45 | 10 | The average memory consumed per request in MB. |
reserved_memory |
integer |
70 | 70 | The amount of memory reserved in MB. |
See more about PHP-FPM workers and sizing.
Source
The following table shows the properties that can be set in source:
| Name | Type | Required | Description |
|---|---|---|---|
operations |
An operations dictionary | Operations that can be applied to the source code. See source operations | |
root |
string |
The path where the app code lives. Defaults to the root project directory. Useful for multi-app setups. |
Additional hosts
If you’re using a private network with specific IP addresses you need to connect to, you might want to map those addresses to hostnames to better remember and organize them. In such cases, you can add a map of those IP addresses to whatever hostnames you like. Then when your app tries to access the hostname, it’s sent to the proper IP address.
So in the following example, if your app tries to access api.example.com, it’s sent to 192.0.2.23.
additional_hosts:
  api.example.com: "192.0.2.23"
  web.example.com: "203.0.113.42"
This is equivalent to adding the mapping to the /etc/hosts file for the container.