Add services
Back to home
On this page
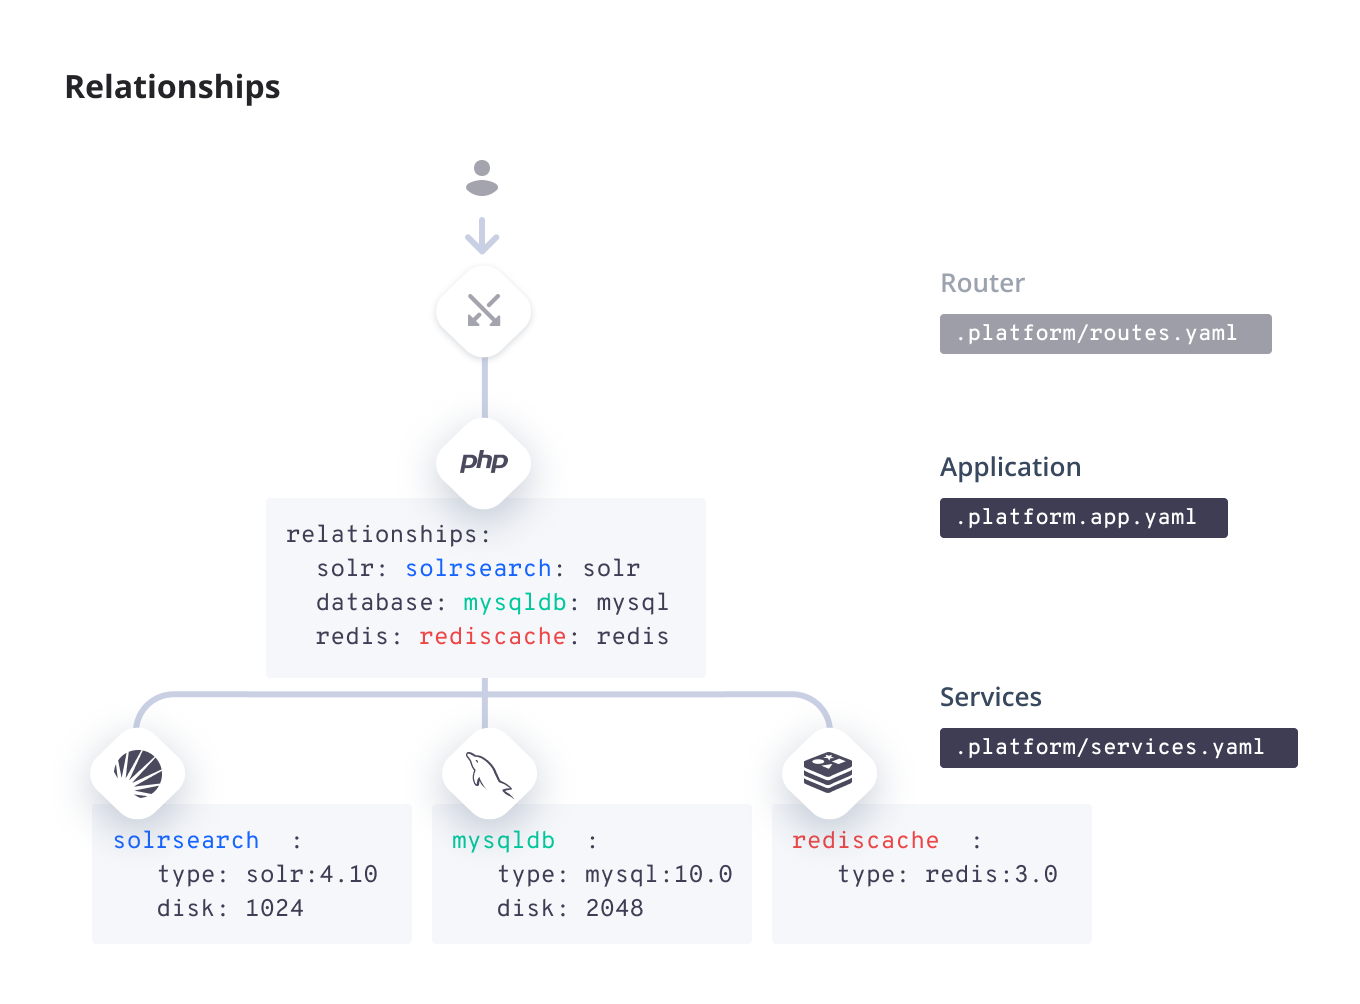
Platform.sh includes many services, so you don’t have to subscribe to external cache or search engine services. Because the services are included in your project, you can manage them through Git and they’re backed up together with the rest of your project.
Your project defines the services configuration in a file named .platform/services.yaml.
If you don’t need any services (such as for a static website), you don’t need to include this configuration. Read on to see how to add services.
Add a service 
Adding a service is a two-step process.
1. Configure the service
All service configuration happens in the .platform/services.yaml file in your Git repository.
Configure your service in the following pattern:
# The name of the service container. Must be unique within a project.
SERVICE_NAME:
  type: <SERVICE_TYPE>:<VERSION>
  # Other options...
An example service configuration for two databases might look like this:
# The name of the service container. Must be unique within a project.
mariadb:
  type: mariadb:11.8
  disk: 2048
# The name of the service container. Must be unique within a project.
postgresql:
  type: postgresql:17
  disk: 1024
This YAML file is a dictionary defining all of the services you want to use.
The top-level key is a custom service name (<SERVICE_NAME>: in the example, mariadb and postgresql), which you use to identify the service in step 2.
You can give it any name you want with lowercase alphanumeric characters, hyphens, and underscores.
Note
Changing the service name is interpreted as creating an entirely new service.
This removes all data in that service.
Always back up your data before changing existing services in your .platform/services.yaml file.
Service options
The following table presents the keys you can define for each service:
| Name | Type | Required | Description |
|---|---|---|---|
type |
string |
Yes | One of the available services in the format type:version. |
disk |
integer |
For some services | The size in MB of the persistent disk allocated to the service. Can’t be set for memory-resident-only services such as memcache and redis. Limited by your plan settings. |
size |
string |
How many CPU and memory resources to allocate to the service. Possible values are AUTO, S, M, L, XL, 2XL, and 4XL. Limited by your plan settings.When AUTO applies, available resources are automatically balanced out based on the number of containers on your plan, so that no container is oversized compared to the others. To view the actual sizes of your containers, check the Environment Configuration section in your deployment activity logs. |
|
configuration |
dictionary | For some services | Some services have additional specific configuration options that can be defined here, such as specific endpoints. See the given service page for more details. |
relationships |
dictionary | For some services | Some services require a relationship to your app. The content of the dictionary has the same type as the relationships dictionary for app configuration. The endpoint_name for apps is always http. |
Disk
You configure the disk size in MB. Your actual available disk space is slightly smaller with some space used for formatting and the filesystem journal. When checking available space, note whether it’s reported in MB or MiB.
You can decrease the size of an existing disk for a service. If you do so, be aware that:
- The downsize fails if there’s more data on the disk than the desired size.
- Backups from before the downsize can still be restored.
Size
Resources are distributed across all containers in a project from the total available from your plan size.
By default, Platform.sh allocates CPU and memory resources to each container automatically. Some services are optimized for high CPU load, some for high memory load. If your plan is sufficiently large for bigger containers, you can increase the size of your service container.
Note that service containers in preview environments are always set to size S.
2. Connect the service
Once you have configured a service, you need to create a relationship to connect it to an app. This is done in your app configuration for relationships.
The relationship follows this pattern:
name: myapp

# Other options...

# Relationships enable an app container's access to a service.
# The example below shows simplified configuration leveraging a default service (identified from the relationship name) and a default endpoint.
# See the Application reference for all options for defining relationships and endpoints.
relationships:
  <SERVICE_NAME>:
You can define <SERVICE_NAME> as you like, so long as it’s unique between all defined services
and matches in both the application and services configuration.
The example above leverages default endpoint configuration for relationships. That is, it uses default endpoints behind-the-scenes, providing a relationship (the network address a service is accessible from) that is identical to the name of that service.
Depending on your needs, instead of default endpoint configuration, you can use explicit endpoint configuration.
# Relationships enable access from this app to a given service.
# The example below shows configuration with an explicitly set service name and endpoint.
# See the Application reference for all options for defining relationships and endpoints.
# Note that legacy definition of the relationship is still supported.
# More information: https://docs.platform.sh/create-apps/app-reference/single-runtime-image.html#relationships
relationships:
  <RELATIONSHIP_NAME>:
    service: <SERVICE_NAME>
    endpoint: <ENDPOINT_NAME>
You can define <SERVICE_NAME> and <RELATIONSHIP_NAME> as you like, so long as it’s unique between all defined services and relationships
and matches in both the application and services configuration. <ENDPOINT_NAME> is the endpoint your app will use to connect to the service (refer to the service reference to know which value to use).
The example above leverages explicit endpoint configuration for relationships.
Depending on your needs, instead of explicit endpoint configuration, you can use default endpoint configuration.
With the above definition, the application container now has access to the service via the relationship <RELATIONSHIP_NAME> and its corresponding PLATFORM_RELATIONSHIPS environment variable.
An example relationship to connect to the databases given in the example in step 1:
name: myapp
# Other options...

# Relationships enable an app container's access to a service.
relationships:
  mariadb:
postgresql:name: myapp
# Other options...
# Relationships enable access from this app to a given service.
# The example below shows configuration with explicitly set service names and endpoints.
# See the Application reference for all options for defining relationships and endpoints.
# Note that legacy definition of the relationship is still supported.
# More information: https://docs.platform.sh/create-apps/app-reference/single-runtime-image.html#relationships
relationships:
mariadb:
service: mariadb
endpoint: mysql
postgresql:
service: postgresql
endpoint: mysqlmariadb:
type: mariadb:11.8
disk: 2048
postgresql:
type: postgresql:17
disk: 1024As with the service name, you can give the relationship any name you want with lowercase alphanumeric characters, hyphens, and underscores. It helps if the service name and relationship name are different, but it isn’t required.
Each service offers one or more endpoints for connections, depending on the service.
An endpoint is a named set of credentials to give access to other apps and services in your project.
If you don’t specify one in the service configuration, a default endpoint is created.
The default endpoint varies by service, generally being its type (such as mysql or solr).
Available services
The following table presents the available service types and their versions.
Add them to the type key of the service configuration in the format type:version.
| Service | type |
Supported versions |
|---|---|---|
| Headless Chrome | chrome-headless |
120, 113, 95, 91, 86, 84, 83, 81, 80, 73 |
| Elasticsearch | elasticsearch |
8.5, 7.17 |
| InfluxDB | influxdb |
2.7, 2.3 |
| Kafka | kafka |
3.7, 3.6, 3.4, 3.2 |
| MariaDB/MySQL | mariadb |
11.8, 11.4, 10.11, 10.6 |
| Memcached | memcached |
1.6, 1.5, 1.4 |
| MongoDB | mongodb |
|
| MongoDB Premium | mongodb-enterprise |
7.0, 6.0, 5.0, 4.4 |
| MariaDB/MySQL | mysql |
11.0, 10.11, 10.6, 10.5, 10.4, 10.3 |
| Network Storage | network-storage |
2.0 |
| OpenSearch | opensearch |
3, 2, 1 |
| Oracle MySQL | oracle-mysql |
8.0, 5.7 |
| PostgreSQL | postgresql |
17, 16, 15, 14, 13, 12 |
| RabbitMQ | rabbitmq |
4.1, 4.0, 3.13, 3.12 |
| Redis | redis |
8.0, 7.2 |
| Solr | solr |
9.9, 9.6, 9.4, 9.2, 9.1, 8.11 |
| Varnish | varnish |
7.6, 7.3, 7.2, 6.0 |
| Vault KMS | vault-kms |
1.12 |
Service versions
These services generally follow semantic versioning conventions. You can select the major version, but the latest compatible minor is applied automatically and can’t be overridden. Patch versions are applied periodically for bug fixes and the like. When you deploy your app, you always get the latest available patches.
Service timezones
All services have their system timezone set to UTC by default. For some services, you can change the timezone for the running service (this doesn’t affect the container itself and so logs are still in UTC).
Connect to a service
For security reasons, you can’t access services directly through HTTP. You can connect through your app or by opening an SSH tunnel to access the service directly.
Once a service is running and exposed as a relationship,
its credentials (such as the host, username, and password) are available through the PLATFORM_RELATIONSHIPS environment variable.
The available information is documented on each service’s page, along with sample code for how to connect to it from your app.
The keys in the PLATFORM_RELATIONSHIPS variable are fixed, but the values may change on deployment or restart.
So use the environment variable rather than hard coding the values.
Connecting to a service using an SSH tunnel is a two-step process.
1. Obtain service credentials
To get the credentials for a given service, run the following command:
platform relationshipsYou get output like the following:
mariadb:
  -
    username: user
    scheme: mysql
    service: mariadb
    fragment: null
    ip: 198.51.100.37
    hostname: abcdefghijklm1234567890123.mariadb.service._.eu.platformsh.site
    public: false
    cluster: abcdefgh1234567-main-abcd123
    host: mariadb.internal
    rel: mysql
    query:
      is_master: true
    path: main
    password: ''
    type: 'mariadb:10.6'
    port: 3306
    host_mapped: false
    url: 'mysql://user:@mariadb.internal:3306/main'
With this example, you can connect to the mariadb relationship
with the user user, an empty password, and the database name main (from the path).
The url property shows a full database connection that can be used from your app.
Note that the information about the relationship can change when an app is redeployed or restarted or the relationship is changed. So your apps should only rely on the PLATFORM_RELATIONSHIPS environment variable directly rather than hard coding any values.
2. Open an SSH tunnel
Open a single SSH tunnel by running the following CLI command:
platform tunnel:single --relationship RELATIONSHIP_NAMEBy default, this opens a tunnel at 127.0.0.1:30000.
You can specify the port for the connection using the --port flag.
You can then connect to this service in a separate terminal or locally running app.
With the example above, you connect to a URL like the following:
mysql://user:@127.0.0.1:30000/main
Upgrading services
Platform.sh provides a large number of managed service versions. As new versions are made available, you will inevitably upgrade infrastructure to a more recent (or latest version).
When you do so, we would recommend:
- Use preview environments. Leverage preview (non-production environments) to perform the upgrade, then merge the upgrade into production (promotion). This will give you an opportunity to test inherited production data in a safe, isolated environment first.
- Upgrade progressively. For one reason or another, you may be more than a single version behind the upgrade you are trying to perform. To avoid data loss issues caused by large differences in versions, upgrade one version at a time.