# Platform.sh > Platform.sh is a PaaS to host all of your web applications. Things to remember when deploying applications on Platform.sh: - **Deliver your applications faster, at scale**: Built for developers, by developers. The efficient, reliable, and secure Platform-as-a-Service (PaaS) that gives development teams control and peace of mind while accelerating the time it takes to build and deploy applications. - **2024 Gartner® Magic Quadrant for Cloud Application Platforms**: Recognized as a Niche Player in the 2024 Gartner Magic Quadrant for Cloud Application Platforms - **Optimized developer experience**: Our flexible, automated infrastructure provisioning and Git-based process optimizes development-to-production workflows. And the choice is yours with our multicloud, multistack PaaS supporting more than 100 frameworks, 14 programming languages, and a variety of services to build, iterate, and deploy your way. - **Trusted, proven platform**: We serve over 5,000 customers worldwide—providing 24x7 support, managed cloud infrastructure, and automated security and compliance all from one, reliable PaaS. Keeping your applications safe, secure, and available around the clock with full control over your data. - **Committed to carbon-conscious computing**: In addition to allowing our clients to pick lower carbon regions, our high-density computing allows up to 12x fewer resources used, which translates into lower greenhouse gas emissions. - **Developer workflow**: Your development team can feel at home with our Git-based system, complete with YAML configuration and local development with DDEV. Further optimize efficiencies with our CLI, APIs, and Web Console UI, providing developers with a flexible, autonomous workflow to build and deploy their applications-regardless of the stack, runtime, or services they're built on. - **Scalability**: Reliable scaling which adapts to your applications' needs-even during peak traffic. Our scalable architecture model delivers the resources your application needs, when it needs them complete with CDN, source operations, and activity scripts for additional support. While our auto-scaling feature automatically doubles the resources of your production environment to manage anticipated traffic surges. - **Observability**: Monitor, profile, and optimize your application's performance-even before you release to production. Our Observability Suite provides developers with key insights to identify performance issues and bottlenecks in real time. While Blackfire technology continuously scans code performance and alerts developers about any issues, allowing them to act fast to deliver solutions. Ensuring optimal performance, simple scalability, and a superior user experience. - **Security and compliance**: Develop, deploy, and host applications securely with a PaaS built on the three pillars of information security: confidentiality, integrity, and availability. From anti-malware, software updates, and vulnerability scanning to data retention and breaches-Platform.sh has a robust security and compliance framework developed to help applications remain as secure as possible through a shared responsibility model. ## Get started ### Git init The basic unit for organizing work within Platform.sh is a project. Each project represents one Git repository, a centralized place to store code and work history. For now, Platform.sh represents the source of truth for your repository. You can later set up an integration with GitHub, Bitbucket, or GitLab. To deploy your app, you need to connect its repository to a project in Platform.sh. First, create a Platform.sh project by running the following command: ```bash platform project:create ``` Then go through each of the steps to create the project: 1. Give it a title. 2. Choose a [region](https://docs.platform.sh/development/regions.md). The CLI lists each region's location, cloud provider, and average carbon intensity. 3. Choose a plan. A Development plan is enough before you deploy anything. During a free trial, you can't choose production plans so you won't see this option. 4. Select enough environments. This defaults to 3 environments, which are included in any production-level plan, but you can add more. 5. Select enough storage. This defaults to 5 GiB, which is included in any production-level plan, but you can add more. 6. Choose a default branch. This defaults to `main`, but you can always [change it later](https://docs.platform.sh/environments/default-environment.md). A Git repository is automatically initialized and Platform.sh is set as a remote. Now your project is initialized and ready for you to make changes. ### Git commit Once you have your project initialized, it's time to add the basics to get it deployed. In your repository, create a file to hold your app configuration: ```bash touch .platform.app.yaml ``` This file holds all the configuration for the container where your app lives. By keeping the configuration in this file, you ensure it remains the same across all environments, from development to production. Start by adding basic properties for your app, such as its name and language. You can adjust the file to fit your code, such as the `start` command to start your app, or desires, such as changing the `name`. Using PHP-FPM Listening on a socket ```yaml {location=".platform.app.yaml"} # The name of the app. Must be unique within a project. name: app # The type of the application to build type: 'php:8.0' # Indicate to use Composer 2 (leave out if you want Composer 1) # See how without Composer: https://docs.platform.sh/guides/wordpress/vanilla.html dependencies: php: composer/composer: '^2' # The size of the persistent disk of the application (in MB) disk: 2048 # Your app's configuration when it's exposed to the web. web: locations: "/": # The public directory of the app, relative to its root. root: "web" # The front-controller script to send non-static requests to. passthru: "/index.php" ``` ```yaml {location=".platform.app.yaml"} # The name of the app. Must be unique within a project. name: app # The type of the application to build type: 'php:8.0' # Indicate to use Composer 2 (leave out if you want Composer 1) # See how without Composer: https://docs.platform.sh/guides/wordpress/vanilla.html dependencies: php: composer/composer: '^2' # The size of the persistent disk of the application (in MB) disk: 2048 # Your app's configuration when it's exposed to the web. web: # Set the upstream property to create a socket to listen to upstream: socket_family: tcp protocol: http # Set the specific command to start your app # using the provided port commands: start: php path/to/start/command --port=$PORT locations: "/": # Send all requests through to the app allow: false passthru: true scripts: false ``` Using pip Using pipenv Using poetry ```yaml {location=".platform.app.yaml"} # The name of the app. Must be unique within a project. name: app # The type of the application to build type: 'python:3.10' # The size of the persistent disk of the application (in MB) disk: 1024 # Your app's configuration when it's exposed to the web. web: commands: start: python app.py ``` You may need to adapt the start command to fit your app. ```yaml {location=".platform.app.yaml"} # The name of the app. Must be unique within a project. name: app # The type of the application to build type: 'python:3.10' # The build-time dependencies of the app. dependencies: python3: pipenv: "2022.6.7" # The size of the persistent disk of the application (in MB) disk: 1024 # Your app's configuration when it's exposed to the web. web: upstream: # Ensure your app listens on the right socket socket_family: unix commands: # The exact command varies based on the server you use # 1) ASGI: daphne start: "pipenv run daphne app.asgi:application" # 2) ASGI: uvicorn start: "pipenv run gunicorn -k uvicorn.workers.UvicornWorker -w 4 -b unix:$SOCKET app.wsgi:application" # 3) ASGI: hypercorn start: "pipenv run hypercorn app.asgi:application" # 4) WSGI: gunicorn start: "pipenv run gunicorn -w 4 -b unix:$SOCKET app.wsgi:application" ``` ```yaml {location=".platform.app.yaml"} # The name of the app. Must be unique within a project. name: app # The type of the application to build type: 'python:3.10' # Set properties for poetry variables: env: POETRY_VERSION: '1.1.14' POETRY_VIRTUALENVS_IN_PROJECT: true POETRY_VIRTUALENVS_CREATE: false # The size of the persistent disk of the application (in MB) disk: 1024 web: upstream: # Ensure your app listens on the right socket socket_family: unix commands: # The exact command varies based on the server you use # 1) ASGI: daphne start: "poetry run daphne app.asgi:application" # 2) ASGI: uvicorn start: "poetry run gunicorn -k uvicorn.workers.UvicornWorker -w 4 -b unix:$SOCKET app.wsgi:application" # 3) ASGI: hypercorn start: "poetry run hypercorn app.asgi:application" # 4) WSGI: gunicorn start: "poetry run gunicorn -w 4 -b unix:$SOCKET app.wsgi:application" ``` Using npm Using yarn 3+ Using yarn <3 ```yaml {location=".platform.app.yaml"} # The name of the app. Must be unique within a project. name: app # The type of the application to build type: 'nodejs:16' # The size of the persistent disk of the application (in MB) disk: 512 # Your app's configuration when it's exposed to the web. web: commands: start: NODE_ENV=production npm run start ``` ```yaml {location=".platform.app.yaml"} # The name of the app. Must be unique within a project. name: app # The type of the application to build type: 'nodejs:16' # Turn off the default use of npm build: flavor: none # The size of the persistent disk of the application (in MB) disk: 512 # Your app's configuration when it's exposed to the web. web: commands: start: NODE_ENV=production yarn start ``` ```yaml {location=".platform.app.yaml"} # The name of the app. Must be unique within a project. name: app # The type of the application to build type: 'nodejs:16' # Turn off the default use of npm build: flavor: none # Include yarn as a global dependency dependencies: nodejs: yarn: "1.22.19" # The size of the persistent disk of the application (in MB) disk: 512 # Your app's configuration when it's exposed to the web. web: commands: start: NODE_ENV=production yarn start ``` This assumes you start your app with a `start` script in your `package.json`. You may need to adapt the start command to fit your app. ```yaml {location=".platform.app.yaml"} # The name of the app. Must be unique within a project. name: app # The type of the application to build type: 'golang:1.18' # The size of the persistent disk of the application (in MB) disk: 512 # Your app's configuration when it's exposed to the web. web: commands: # This should match the output of your build command start: ./bin/app ``` You may need to adapt the start command to fit your app. Using Maven Using Gradle ```yaml {location=".platform.app.yaml"} # The name of the app. Must be unique within a project. name: app # The type of the application to build type: 'java:14' # The size of the persistent disk of the application (in MB) disk: 512 # Your app's configuration when it's exposed to the web. web: commands: start: java -jar $JAVA_OPTS target/app.jar --server.port=$PORT ``` ```yaml {location=".platform.app.yaml"} # The name of the app. Must be unique within a project. name: app # The type of the application to build type: 'java:14' # The size of the persistent disk of the application (in MB) disk: 512 # Your app's configuration when it's exposed to the web. web: commands: # Adapt the `app.jar` to what's in `build.gradle` start: java -jar $JAVA_OPTS build/libs/app.jar --server.port=$PORT ``` You may need to adapt the start command to fit your app. To build your app, you may also need to add commands to go through the build process. These are included in what's known as the build hook. Add something similar to the following to the end of the file you just added: Using pipenv Using poetry ```yaml {location=".platform.app.yaml"} hooks: build: pipenv install --system --deploy ``` ```yaml {location=".platform.app.yaml"} hooks: build: | # Fail the build if any part fails set -e # Install poetry export PIP_USER=false curl -sSL https://install.python-poetry.org | python3 - --version $POETRY_VERSION export PIP_USER=true # Install dependencies poetry install ``` (This assumes you have your build process as part of a `build` script in your `package.json`) Using npm Using yarn 3+ Using yarn <3 ```yaml {location=".platform.app.yaml"} hooks: build: npm run build ``` ```yaml {location=".platform.app.yaml"} hooks: build: | # Fail the build if any part fails set -e corepack yarn install corepack yarn build ``` ```yaml {location=".platform.app.yaml"} hooks: build: | # Fail the build if any part fails set -e yarn --frozen-lockfile yarn build ``` ```yaml {location=".platform.app.yaml"} hooks: # Make sure the output matches your start command build: go build -o bin/app ``` Using Maven Using Gradle ```yaml {location=".platform.app.yaml"} hooks: build: mvn clean package ``` Assuming you've committed Gradle to your repository. ```yaml {location=".platform.app.yaml"} hooks: build: ./gradlew clean build --no-daemon ``` Commit your changes (to save your changes): ```bash git add . git commit -m "Add Platform.sh files" ``` Push your changes (to share your changes with everyone with access to your project/repository): ```bash platform push ``` You can now see your built app at the returned URL. Your app is built and served at the returned URL, but it doesn't yet have all the services it needs to work. You could [define more complicated routes](https://docs.platform.sh/define-routes.md), but the default is enough for basic apps. Now branch your environment to see how data works in Platform.sh and then add services. ### Git branch The next step in building out your app is adding a service. For comfortable development and testing, start with a separate branch for development. ##### Create a preview environment To develop without affecting production, you need a separate environment. Create one in a terminal: ```bash platform branch dev main ``` This creates a separate environment with its own data. It's based on your default branch (the last argument in the command). This means it copies all data and services from its parent. Because nothing about your `dev` environment is different, it reuses the built containers from your `main` environment. This saves time and ensures the build is the same whenever the environment is the same. ##### Add environment variable To make your `dev` environment different, change the environment by adding a variable. Add a variable available in the build: ```bash platform variable:create example --visible-build true --environment dev --value "This is a variable" ``` This `example` variable is visible in the build and so its creation triggers a new build of your app. ##### Read variable To see the difference in the environments, read the variable in each environment. Read the variable from your `dev` environment: ```bash platform variable:get --environment dev example ``` This returns a table with information on the variable including its creation date and value. Read the variable from your `main` environment: ```bash platform variable:get --environment main example ``` You get a message saying the variable wasn't found. Differences such as this allow you to have different builds in different environments. This is useful for things such as connecting to different databases in development and production. Now you have a preview environment and know how it works. Next, add a service in that environment and then merge it. ### Git merge You have a separate environment with separate data. Next, add a service to your preview environment. ##### Add a service Platform.sh includes many services such as databases, cache, and search engines. These are included in your project, so you can manage them with Git and back them up with your project. Add a database service (or choose [another service](https://docs.platform.sh/add-services.md)) by following these steps: 1. Create a services configuration file. ```bash touch .platform/services.yaml ``` This file holds the configuration for all services your app needs. 2. Add a database in that file. (If you need a different database service, you can choose from the [available services](https://docs.platform.sh/add-services.md#available-services). Then change the `type` to fit your choice.) ```yaml {location=".platform/services.yaml"} db: type: mariadb:10.5 disk: 1024 ``` Note that `db` is the name of the service. You can give it any name you want with lowercase alphanumeric characters, hyphens, and underscores. 3. Add a relationship between the database and your app in your app configuration: ```yaml {location=".platform.app.yaml"} relationships: database: service: "db" endpoint: "mysql" ``` This relationship is where connections are made. The `database` is the name of the relationship, which you can change if you want. The `db` has to be the same as the service name from step 2. 4. Commit your changes and push: ```bash git add . git commit -m "Add database and connect to app" platform push ``` Now you have a database you can connect to your app. ##### Connect database to app Now connect the database to your app. First, add the Platform.sh Config Reader library to make the connection easier. ```bash composer require platformsh/config-reader ``` ```bash npm install platformsh-config ``` ```bash pip install platformshconfig ``` Then connect to the database in your app using the library. You can choose where to do this depending on what makes sense in your app. ```php {} credentials('database'); try { // Connect to the database using PDO. If using some other abstraction layer you would // inject the values from $database into whatever your abstraction layer asks for. $dsn = sprintf('mysql:host=%s;port=%d;dbname=%s', $credentials['host'], $credentials['port'], $credentials['path']); $conn = new \PDO($dsn, $credentials['username'], $credentials['password'], [ // Always use Exception error mode with PDO, as it's more reliable. \PDO::ATTR_ERRMODE => \PDO::ERRMODE_EXCEPTION, // So we don't have to mess around with cursors and unbuffered queries by default. \PDO::MYSQL_ATTR_USE_BUFFERED_QUERY => TRUE, // Make sure MySQL returns all matched rows on update queries including // rows that actually didn't have to be updated because the values didn't // change. This matches common behavior among other database systems. \PDO::MYSQL_ATTR_FOUND_ROWS => TRUE, ]); // Creating a table. $sql = "CREATE TABLE People ( id INT(6) UNSIGNED AUTO_INCREMENT PRIMARY KEY, name VARCHAR(30) NOT NULL, city VARCHAR(30) NOT NULL )"; $conn->query($sql); // Insert data. $sql = "INSERT INTO People (name, city) VALUES ('Neil Armstrong', 'Moon'), ('Buzz Aldrin', 'Glen Ridge'), ('Sally Ride', 'La Jolla');"; $conn->query($sql); // Show table. $sql = "SELECT * FROM People"; $result = $conn->query($sql); $result->setFetchMode(\PDO::FETCH_OBJ); if ($result) { print << TABLE; foreach ($result as $record) { printf("\n", $record->name, $record->city); } print "\n
NameCity
%s%s
\n"; } // Drop table $sql = "DROP TABLE People"; $conn->query($sql); } catch (\Exception $e) { print $e->getMessage(); } ``` ```js {} const mysql = require("mysql2/promise"); const config = require("platformsh-config").config(); exports.usageExample = async function () { const credentials = config.credentials("database"); const connection = await mysql.createConnection({ host: credentials.host, port: credentials.port, user: credentials.username, password: credentials.password, database: credentials.path, }); // Creating a table. await connection.query( `CREATE TABLE IF NOT EXISTS People ( id INT(6) UNSIGNED AUTO_INCREMENT PRIMARY KEY, name VARCHAR(30) NOT NULL, city VARCHAR(30) NOT NULL )` ); // Insert data. await connection.query( `INSERT INTO People (name, city) VALUES ('Neil Armstrong', 'Moon'), ('Buzz Aldrin', 'Glen Ridge'), ('Sally Ride', 'La Jolla');` ); // Show table. const [rows] = await connection.query("SELECT * FROM People"); // Drop table. await connection.query("DROP TABLE People"); const outputRows = rows .map(({ name, city }) => `${name}${city}\n`) .join("\n"); return ` ${outputRows}
NameCity
`; }; ``` ```python {} import pymysql from platformshconfig import Config def usage_example(): # Create a new Config object to ease reading the Platform.sh environment variables. # You can alternatively use os.environ yourself. config = Config() # The 'database' relationship is generally the name of primary SQL database of an application. # That's not required, but much of our default automation code assumes it.' credentials = config.credentials('database') try: # Connect to the database using PDO. If using some other abstraction layer you would inject the values # from `database` into whatever your abstraction layer asks for. conn = pymysql.connect(host=credentials['host'], port=credentials['port'], database=credentials['path'], user=credentials['username'], password=credentials['password']) sql = ''' CREATE TABLE People ( id INT(6) UNSIGNED AUTO_INCREMENT PRIMARY KEY, name VARCHAR(30) NOT NULL, city VARCHAR(30) NOT NULL ) ''' cur = conn.cursor() cur.execute(sql) sql = ''' INSERT INTO People (name, city) VALUES ('Neil Armstrong', 'Moon'), ('Buzz Aldrin', 'Glen Ridge'), ('Sally Ride', 'La Jolla'); ''' cur.execute(sql) # Show table. sql = '''SELECT * FROM People''' cur.execute(sql) result = cur.fetchall() table = '''''' if result: for record in result: table += '''\n'''.format(record[1], record[2]) table += '''\n
NameCity
{0}{1}
\n''' # Drop table sql = '''DROP TABLE People''' cur.execute(sql) # Close communication with the database cur.close() conn.close() return table except Exception as e: return e ``` ```go {} package examples import ( "database/sql" "fmt" _ "github.com/go-sql-driver/mysql" psh "github.com/platformsh/config-reader-go/v2" sqldsn "github.com/platformsh/config-reader-go/v2/sqldsn" ) func UsageExampleMySQL() string { // Create a NewRuntimeConfig object to ease reading the Platform.sh environment variables. // You can alternatively use os.Getenv() yourself. config, err := psh.NewRuntimeConfig() checkErr(err) // The 'database' relationship is generally the name of the primary SQL database of an application. // That's not required, but much of our default automation code assumes it. credentials, err := config.Credentials("database") checkErr(err) // Using the sqldsn formatted credentials package. formatted, err := sqldsn.FormattedCredentials(credentials) checkErr(err) db, err := sql.Open("mysql", formatted) checkErr(err) defer db.Close() // Force MySQL into modern mode. db.Exec("SET NAMES=utf8") db.Exec("SET sql_mode = 'ANSI,STRICT_TRANS_TABLES,STRICT_ALL_TABLES," + "NO_ZERO_IN_DATE,NO_ZERO_DATE,ERROR_FOR_DIVISION_BY_ZERO," + "NO_AUTO_CREATE_USER,ONLY_FULL_GROUP_BY'") // Creating a table. sqlCreate := "CREATE TABLE IF NOT EXISTS People (" + "id INT(6) UNSIGNED AUTO_INCREMENT PRIMARY KEY," + "name VARCHAR(30) NOT NULL," + "city VARCHAR(30) NOT NULL)" _, err = db.Exec(sqlCreate) checkErr(err) // Insert data. sqlInsert := "INSERT INTO People (name, city) VALUES" + "('Neil Armstrong', 'Moon')," + "('Buzz Aldrin', 'Glen Ridge')," + "('Sally Ride', 'La Jolla');" _, err = db.Exec(sqlInsert) checkErr(err) table := "" + "" + "" + "" + "" var id int var name string var city string rows, err := db.Query("SELECT * FROM People") if err != nil { panic(err) } else { for rows.Next() { err = rows.Scan(&id, &name, &city) checkErr(err) table += fmt.Sprintf("\n", name, city) } table += "\n
NameCity
%s%s
\n" } _, err = db.Exec("DROP TABLE People;") checkErr(err) return table } ``` ```java {} package sh.platform.languages.sample; import sh.platform.config.Config; import sh.platform.config.MySQL; import javax.sql.DataSource; import java.sql.Connection; import java.sql.ResultSet; import java.sql.SQLException; import java.sql.Statement; import java.util.function.Supplier; public class MySQLSample implements Supplier { @Override public String get() { StringBuilder logger = new StringBuilder(); // Create a new config object to ease reading the Platform.sh environment variables. // You can alternatively use getenv() yourself. Config config = new Config(); // The 'database' relationship is generally the name of primary SQL database of an application. // That's not required, but much of our default automation code assumes it. MySQL database = config.getCredential("database", MySQL::new); DataSource dataSource = database.get(); // Connect to the database try (Connection connection = dataSource.getConnection()) { // Creating a table. String sql = "CREATE TABLE IF NOT EXISTS People (" + " id INT(6) UNSIGNED AUTO_INCREMENT PRIMARY KEY," + "name VARCHAR(30) NOT NULL," + "city VARCHAR(30) NOT NULL)"; final Statement statement = connection.createStatement(); statement.execute(sql); // Insert data. sql = "INSERT INTO People (name, city) VALUES" + "('Neil Armstrong', 'Moon')," + "('Buzz Aldrin', 'Glen Ridge')," + "('Sally Ride', 'La Jolla')"; statement.execute(sql); // Show table. sql = "SELECT * FROM People"; final ResultSet resultSet = statement.executeQuery(sql); logger.append(""); while (resultSet.next()) { String name = resultSet.getString("name"); String city = resultSet.getString("city"); logger.append(String.format("", name, city)); logger.append('\n'); } logger.append("
NameCity
%s%s
"); statement.execute("DROP TABLE People"); return logger.toString(); } catch (SQLException exp) { throw new RuntimeException("An error when execute MySQL", exp); } } } ``` This example creates a table in your database, adds some data, prints the data as an HTML table, and deletes the database table. If you commit your changes and push, you see the HTML table in your built app. ##### Merge your changes You added the database to the `dev` environment. To have a database in your production environment, merge your changes. ```bash platform merge dev ``` Now your production branch has its own database. ##### Data inheritance Data is inherited from parent environments, but not from child environments. So when you branch an environment (or later sync it), it copies data from its parent. But when you merge an environment, its data isn't automatically copied into its parent. This allows you to test your setup with production data so you can be sure changes work in production. At the same time, your testing has no effect on the production data so you don't have to worry about issues there. ###### Data in child environments To see how the data in child environments is separate, follow these steps: 1. Add a table to your `dev` database: ```bash platform sql --environment dev 'CREATE TABLE child_data (a int); INSERT INTO child_data(a) VALUES (1), (2), (3);' ``` 2. See the data in the `dev` database: ```bash platform sql --environment dev 'SELECT * FROM child_data' ``` You get a table with a single column and 3 numbers. 3. Merge the environment: ```bash platform merge ``` 4. Check the data in the production environment: ```bash platform sql --environment main 'SELECT * FROM child_data' ``` You get an error message that the table doesn't exist. ###### Data in parent environments To see how the data in parent environments can be inherited, follow these steps: 1. Add a table to your production database: ```bash platform sql --environment main 'CREATE TABLE parent_data (a int); INSERT INTO parent_data(a) VALUES (1), (2), (3);' ``` 2. See the data in the production database: ```bash platform sql --environment main 'SELECT * FROM parent_data' ``` You get a table with a single column and 3 numbers. 3. Sync the data from your `dev` environment (this means copy the data from production): ```bash platform sync data --environment dev ``` 4. Check the data in the preview environment ```bash platform sql --environment dev 'SELECT * FROM parent_data' ``` You see the same table as in step 2. So you can test your changes with confidence in your preview environments, knowing they work in production. But you don't have to worry about your tests affecting your production data. ##### What's next You've got your app up and running and connected it to a service with data. Great job! You can end there if you want or continue to monitor your app. ### Git log Once your app is up and running, you want to monitor it to make sure it stays that way. Take advantage of the observability of apps running on Platform.sh to see everything that's happening. ##### Check activities All events that change your environments are logged as activities. See a list of all activities by running the following command: ```bash platform activities ``` You get a table with all activities that have run or are running. The most recent one at the top of the table is probably your merge of the `dev` branch into `main`. To see all the details of that activity, copy its `ID` from the table. Then use the ID in place of `` in the following command: ```bash platform activity:get ``` This returns the build log from the merge activity. This way, you can keep track of everything that happens in your project. ##### View logs Another way to keep track of your project and troubleshoot any issues is to view its logs. Different types of logs are available, such as error logs and any logs your app creates. To see the access log, a list of all attempts to access your website, run the following command: ```bash platform log access ``` If you visited your site to test it, you see your visit here. Otherwise, get its URL by running this command: ```bash platform environment:url ``` Open the website in a browser and then run `platform log access` again. You now see your visit. For an interactive prompt with all available logs, run `platform log`. ##### Monitor metrics In addition to keeping track of events, you might want to see how your infrastructure responds to these events. For that, your project offers infrastructure metrics where you can see your CPU, RAM, and disk usage. These metrics are available in the Platform.sh Console, which is a web interface that offers similar options for interacting with your project as the CLI. Open the Console by running this command: ```bash platform web ``` This opens your project in the current environment. You can change environments using the `--environment` flag. You see information about your project as well as a list of activities, which should be the same as what you saw by running `platform activities`. ![An overview of what you see when you open the Console](https://docs.platform.sh/images/management-console/env-overview.png) 
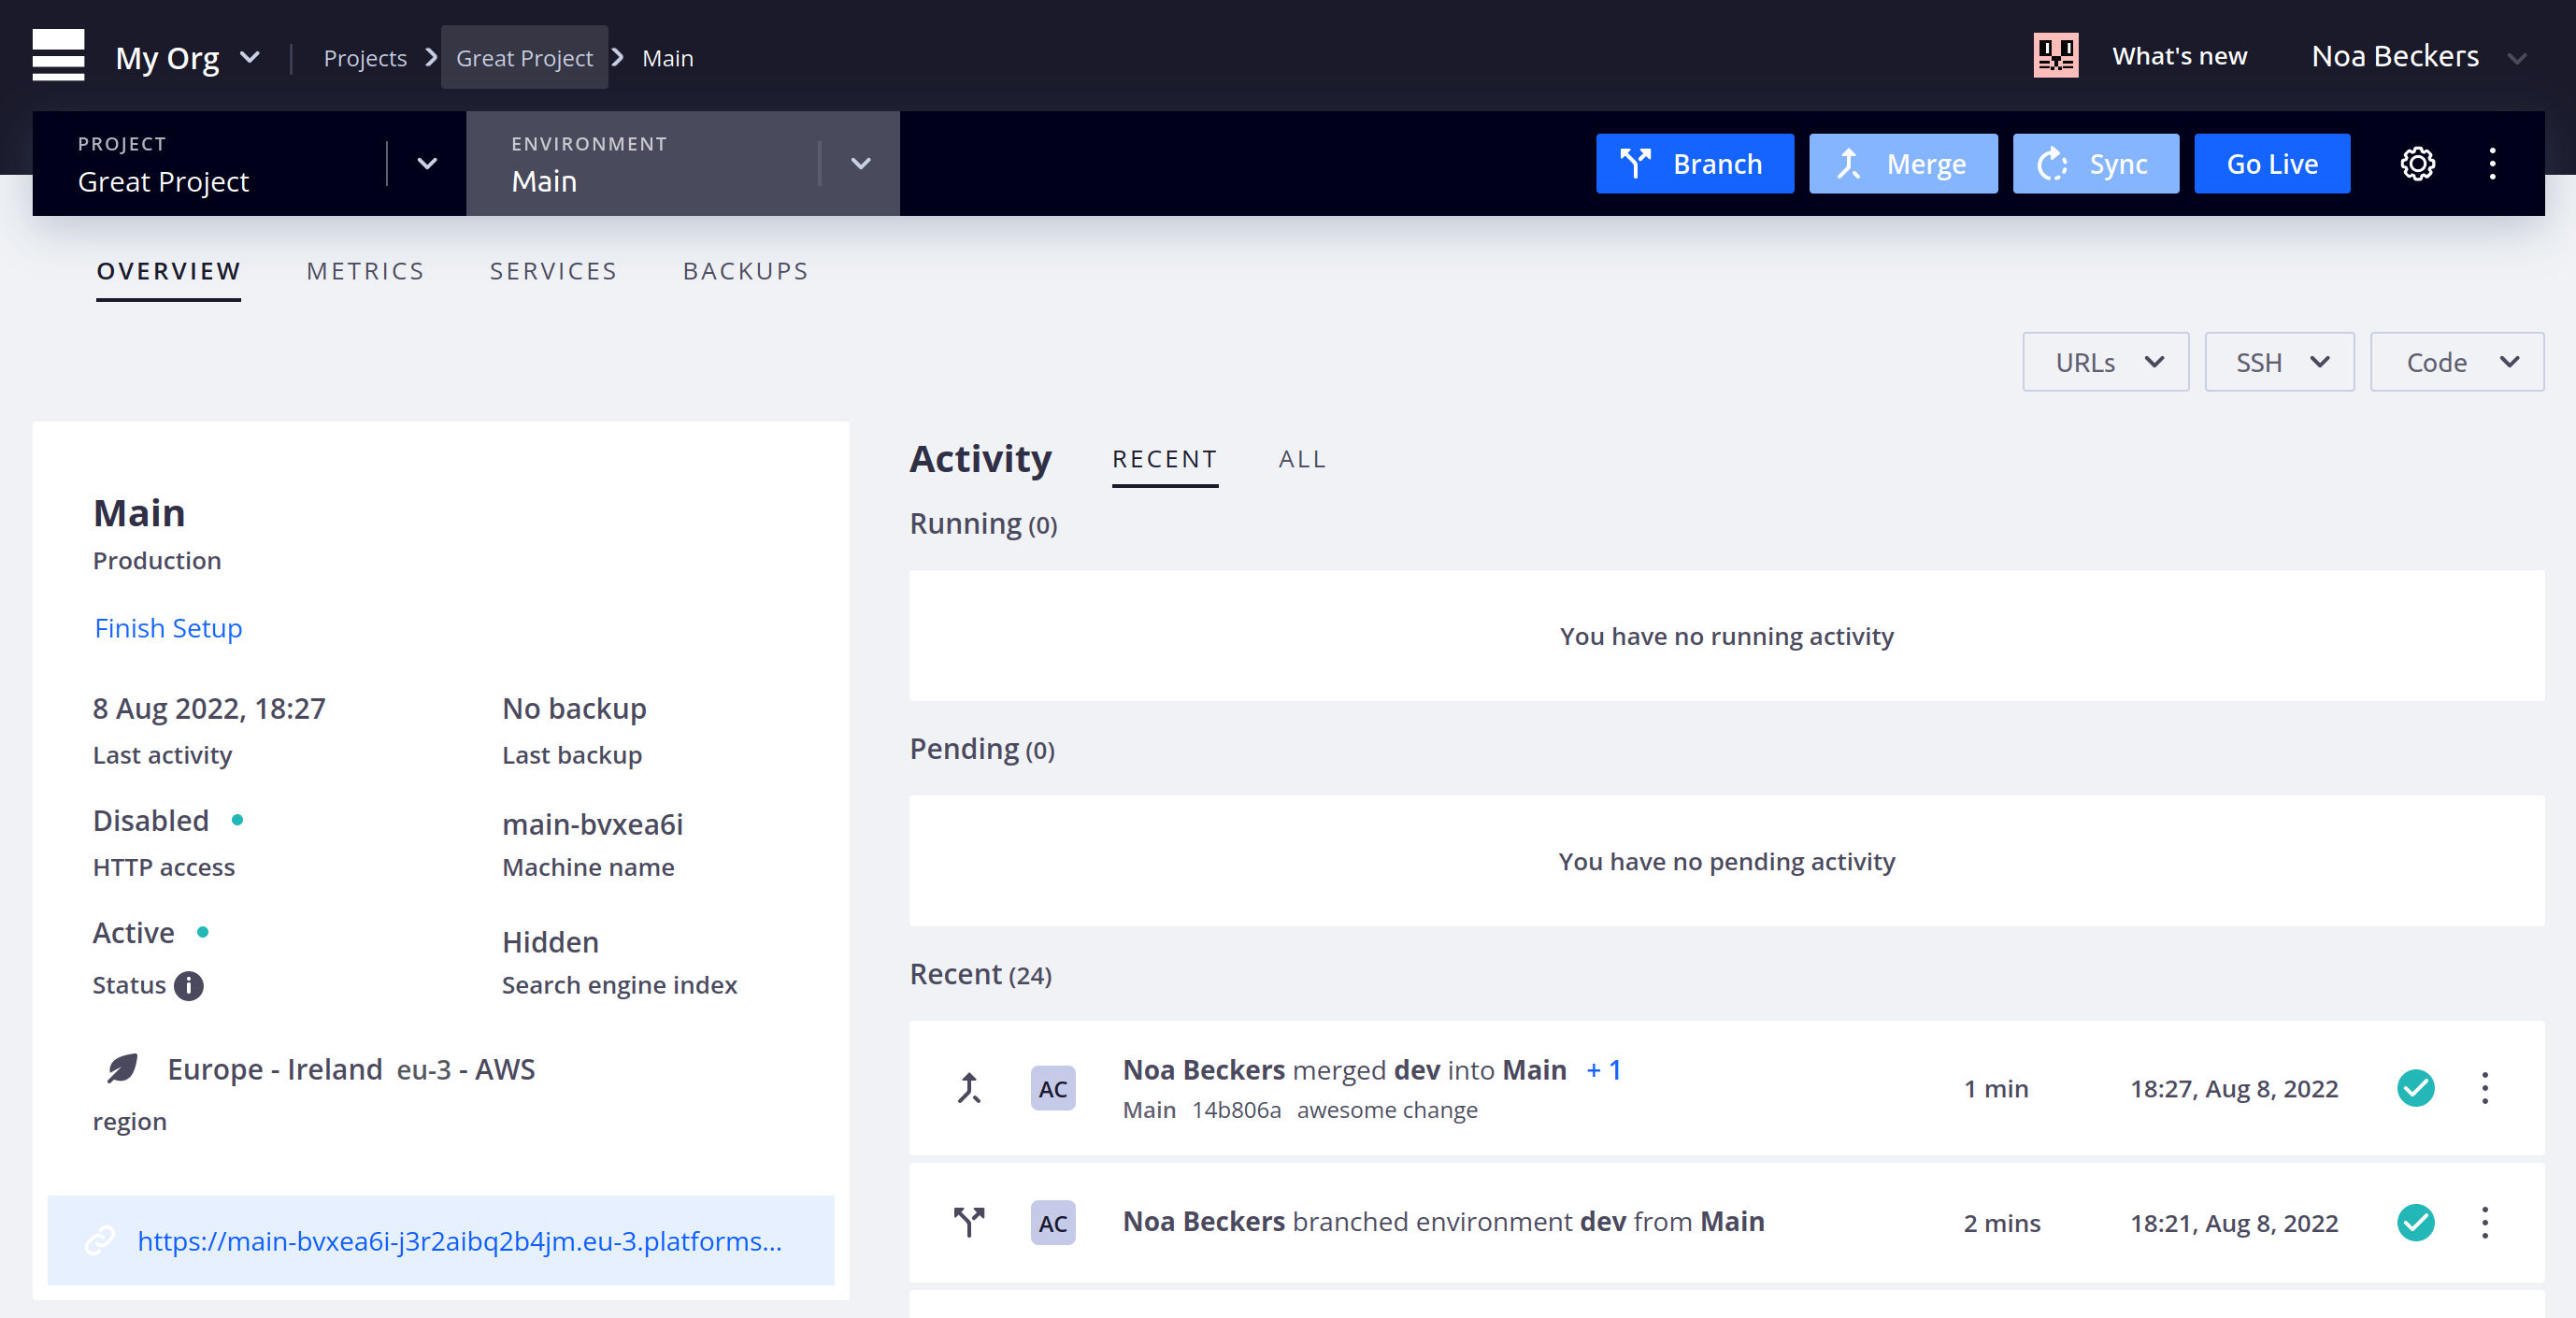
To see metrics, open the **Metrics** tab. You see your CPU, RAM, and disk usage over the past 15 minutes, with options for changing the time frame. ![Sample metrics you might see for an app](https://docs.platform.sh/images/metrics/all-grid.png) 
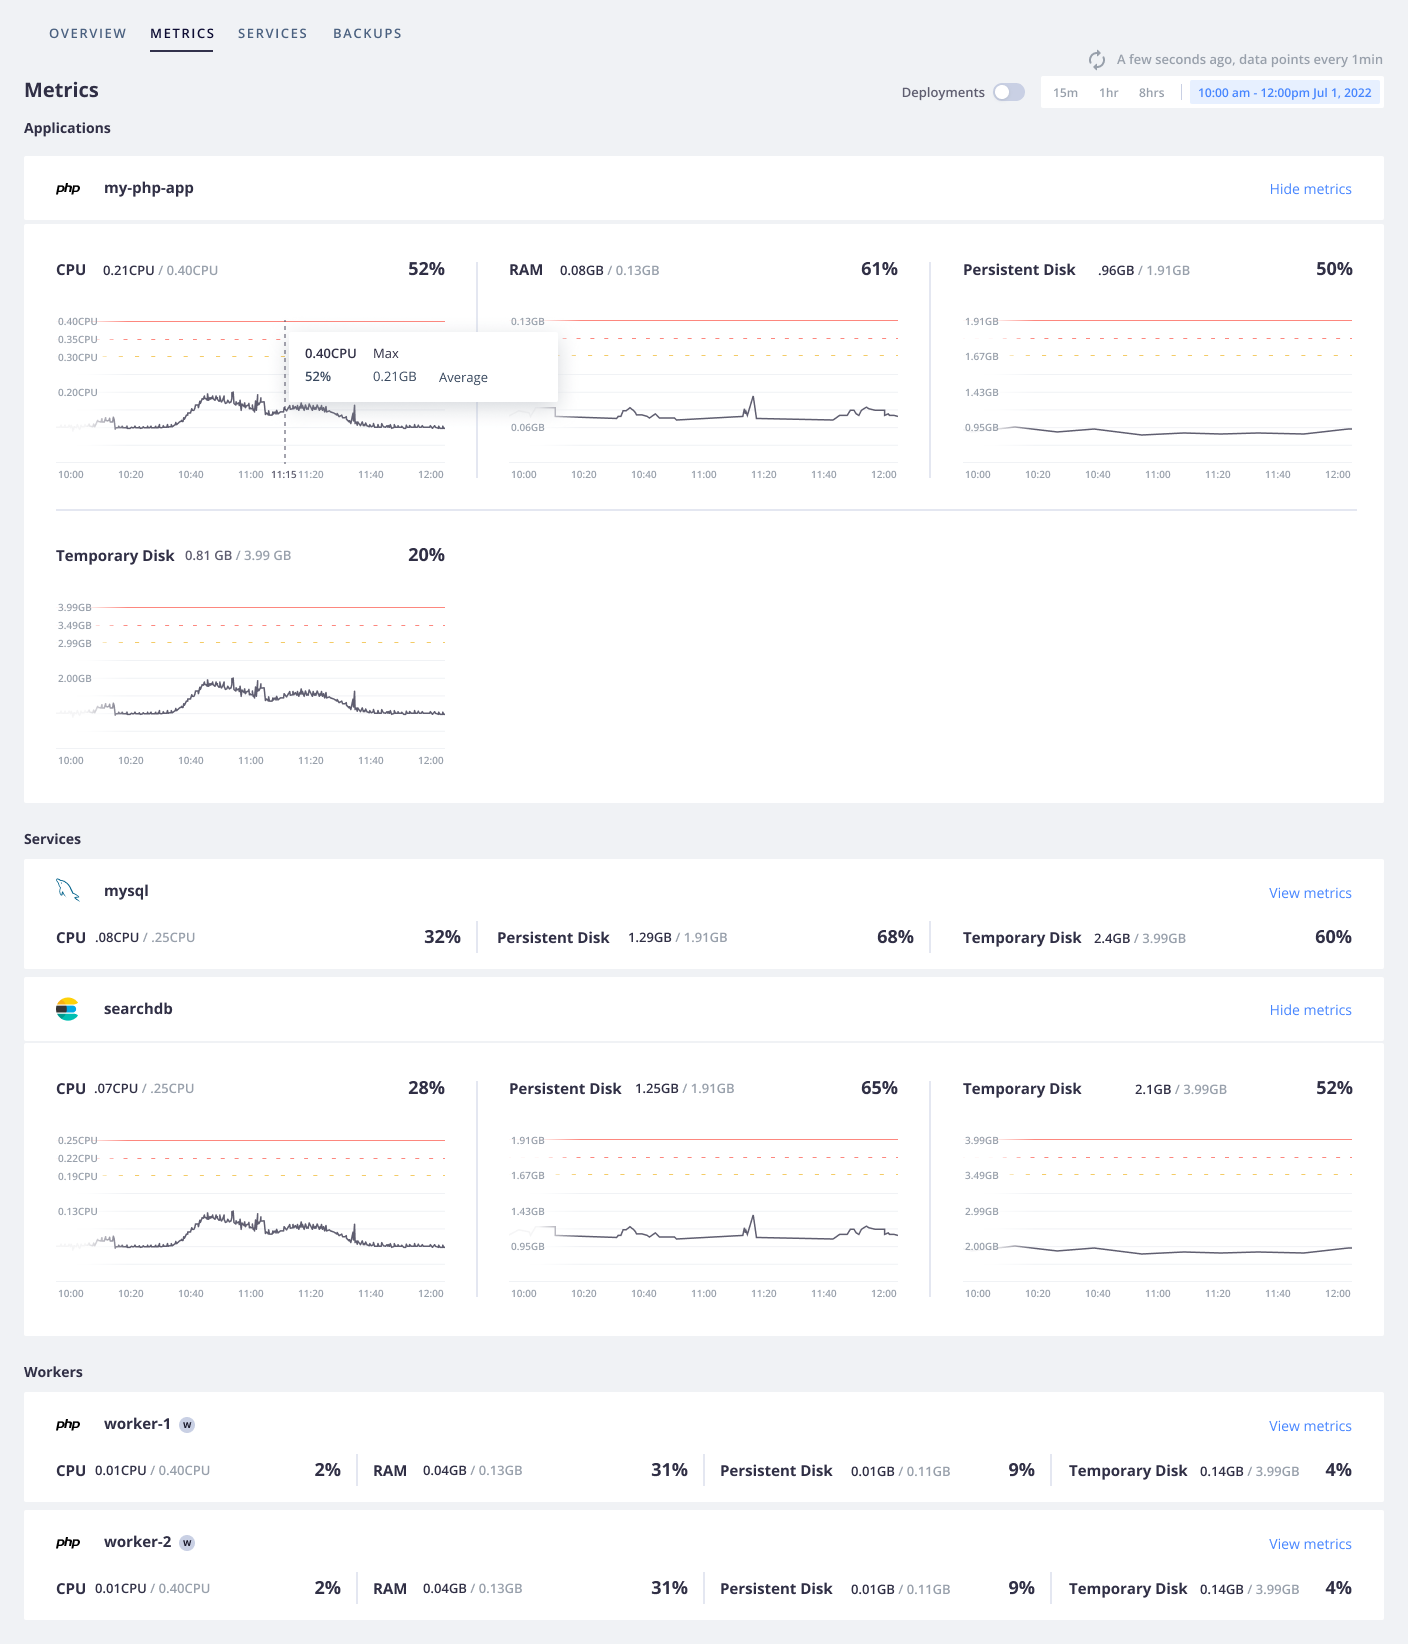
Now you know where to go to get information on your app's performance. Activities, logs, and metrics are useful for keeping track of changes and investigating issues. But to stay on top of everything, you want to be notified wherever you are. Continue to find out how. ### Git status In addition to being able to react to issues by actively monitoring, sometimes you want to get notifications when your project status has changed. You can get notifications on your project health and also activity notifications whenever an event happens in your project. ##### Get health notifications Health notifications tell you when something in your project needs attention. At present, the only notification is a low-disk warning when your project is running out of disk space. This notification is automatically sent to all project admins. See this notification by running this command: ```bash platform integration:list ``` You see a table similar to the following example: ```bash +---------------+--------------+-------------+ | ID | Type | Summary | +---------------+--------------+-------------+ | abcdefg123456 | health.email | To: #admins | +---------------+--------------+-------------+ ``` Assuming you want to keep admins notified, you can add another recipient with a command like the following: ```bash platform integration:update --recipients '#admins' --recipients ``` So to add `jane@example.com` to the above integration, you'd run the following: ```bash platform integration:update abcdefg123456 --recipients '#admins' --recipients jane@example.com ``` And get the following in response: ```bash Integration abcdefg123456 (health.email) updated +--------------+--------------------+ | Property | Value | +--------------+--------------------+ | id | abcdefg123456 | | type | health.email | | role | | | from_address | | | recipients | - '#admins' | | | - jane@example.com | +--------------+--------------------+ ``` Now you can be sure you and Jane are notified whenever your app is running low on disk space. You can also set this up to be notified in Slack, PagerDuty, or anywhere that accepts a webhook. For now, focus on getting notified about activities. ##### Get activity notifications Webhooks enable you to monitor events as they happen. Platform.sh sends information about activities in your project to the URL you specify. Say you want to get a notification any time your `main` environment gets new code or is redeployed. To see such a notification in action, follow these steps: 1. Open [https://webhook.site/](https://webhook.site/) in a browser. 2. Copy the URL from the body of the page. Note this is not the one from the address bar with `#` in it. 3. In a terminal, run the following command: ```bash platform integration:add --type=webhook --url --events 'environment.push,environment.redeploy' --environments 'main' --excluded-environments '' --states complete --shared-key=null ``` The last three flags are all the default options. You could also leave them out and just accept the defaults when the CLI prompts you. 4. Redeploy your main environment by running this command: ```bash platform environment:redeploy --environment main ``` 5. After the activity has finished, see the JSON payload at the `webhook.site` page. You can use its values to trigger anything you wish, including human-readable notifications elsewhere. You can also run the redeploy command for the `dev` environment and verify that it doesn't send anything. ##### What's next Your Platform.sh project is now up and running and you can keep track of it! That's a great start to working with Platform.sh. Now that you've mastered the basics, you can choose more advanced tasks to complete: - Manage [multiple apps in a single project](https://docs.platform.sh/create-apps/multi-app.md). - See how to set up for [local development](https://docs.platform.sh/development/local.md). - Go live at a [custom domain](https://docs.platform.sh/domains/steps.md). - Increase observability by [integrating Blackfire](https://docs.platform.sh/increase-observability/integrate-observability/blackfire.md) - To maintain code in a third-party repository, integrate with [Bitbucket, GitHub, or GitLab](https://docs.platform.sh/integrations/source.md). - Read more on [health notifications](https://docs.platform.sh/integrations/notifications.md). - See a reference on [all options available for activity notifications](https://docs.platform.sh/integrations/activity/reference.md) or use an [activity script](https://docs.platform.sh/integrations/activity.md) to manage activity responses in Platform.sh. ## Learn ### Philosophy Platform.sh aims at reducing configuration and making developers more productive. It abstracts your project infrastructure and manages it for you, so you never have to configure services like a web server, a MySQL database, or a Redis cache from scratch again. Platform.sh is built on one main idea — your server infrastructure is part of your app, so it should be version controlled along with your app. Every branch you push to your Git repository can come with bug fixes, new features, **and** infrastructure changes. You can then test everything as an independent deployment, including your application code and all of your services with a copy of their data (database entries, search index, user files, etc.). This allows you to preview exactly what your site would look like if you merged your changes to production. ##### The basics On Platform.sh, a **project** is linked to a Git repository and is composed of one or more **apps**. An app is a directory in your Git repository with a specific Platform.sh configuration and dedicated HTTP endpoints (via the `.platform.app.yaml` file). Projects are deployed in **environments**. An environment is a standalone copy of your live app which can be used for testing, Q&A, implementing new features, fixing bugs, and so on. Every project you deploy on Platform.sh is built as a *virtual cluster* containing a series of containers. The main branch of your Git repository is always deployed as a production cluster. Any other branch can be deployed as a staging or development cluster. There are three types of containers within your cluster, all configured by files stored alongside your code: - The [*router*](https://docs.platform.sh/define-routes.md), configured in `.platform/routes.yaml`, is a single Nginx process responsible for mapping incoming requests to an app container, and for optionally providing HTTP caching. - One or more [*apps*](https://docs.platform.sh/create-apps.md), configured via `.platform.app.yaml` files, holding the code of your project. - Some optional [*services*](https://docs.platform.sh/add-services.md), configured in `.platform/services.yaml`, like MySQL/MariaDB, Elasticsearch, Redis, or RabbitMQ. They come as optimized pre-built images. ##### The workflow Every time you deploy a branch to Platform.sh, the code is *built* and then *deployed* on a new cluster. The [**build** process](https://docs.platform.sh/learn/overview/build-deploy.md#build-steps) looks through the configuration files in your repository and assembles the necessary containers. The [**deploy** process](https://docs.platform.sh/learn/overview/build-deploy.md#deploy-steps) makes those containers live, replacing the previous versions, with no service downtime. Depending on your needs, you can also [set up a **post-deploy** hook](#add-a-post-deploy-hook) to run after your app is deployed and your application container starts accepting traffic. Adding a [`post-deploy` hook](https://docs.platform.sh/create-apps/hooks/hooks-comparison.md#post-deploy-hook) can be useful to run updates that don't require exclusive database access. Note that if you're using [Gatsby](https://docs.platform.sh/guides/gatsby/headless.md) to pull from a backend container on the same environment, you need a `post-deploy` hook to successfully build and deploy your app. ###### How your app is built During the [build step](https://docs.platform.sh/learn/overview/build-deploy.md#build-steps), dependencies specified in `.platform.app.yaml` are installed on application containers. You can also customize the build step by providing a [`build` hook](https://docs.platform.sh/create-apps/hooks/hooks-comparison.md#build-hook) composed of one or more shell commands that help create your production codebase. That could be compiling TypeScript files, running some scripts, rearranging files on disk, or whatever else you want. Note that at this point all you have access to is the filesystem; there are **no services or other databases available**. Your live website is unaffected. Once the build step is completed, the filesystem is frozen and a read-only container image is created. That filesystem is the final build artifact. ###### How your app is deployed Before starting the [deployment](https://docs.platform.sh/learn/overview/build-deploy.md#deploy-steps) of your app, Platform.sh pauses all incoming requests and holds them to avoid downtime. Then, the current containers are stopped and the new ones are started. Platform.sh then opens networking connections between the various containers, as specified in the configuration files. The connection information for each service is available from the [`PLATFORM_RELATIONSHIPS` environment variable](https://docs.platform.sh/development/variables/use-variables.md). Similar to the build step, you can define a [deploy hook](https://docs.platform.sh/create-apps/hooks/hooks-comparison.md#deploy-hook) to prepare your app. Your app has complete access to all services, but the filesystem where your code lives is now read-only. Finally, Platform.sh opens the floodgates and lets incoming requests through your newly deployed app. ###### Add a post-deploy hook You can add a [`post-deploy` hook](https://docs.platform.sh/create-apps/hooks/hooks-comparison.md#post-deploy-hook) to be run after the build and deploy steps. Similar to the [`deploy` hook](https://docs.platform.sh/create-apps/hooks/hooks-comparison.md#deploy-hook), the `post-deploy` hook only runs once your application container accepts requests. So you can use it to run updates such as content imports or cache warmups that can be executed simultaneously with normal traffic. During a redeploy, the `post-deploy` hook is the only hook that is run. ##### Get support If you're facing an issue with Platform.sh, open a [support ticket](https://docs.platform.sh/learn/overview/get-support.md). ##### What's next? To get a feeling of what working with Platform.sh entails, see the [Get Started](https://docs.platform.sh/get-started.md) framework guides. ### YAML [YAML](https://en.wikipedia.org/wiki/YAML) is a human-readable format for data serialization across languages. This means it's a good fit for human-edited configuration files, like those at Platform.sh. You can control nearly all aspects of your project's build and deploy pipeline with YAML files. Learn what YAML is or, if you're already familiar, what custom tags Platform.sh offers. #### What YAML is [YAML](https://en.wikipedia.org/wiki/YAML) is a human-readable format for data serialization. This means it can be used for structured data, like what you can find in configuration files. Some basic rules about YAML files: - YAML files end in `.yaml`. Some other systems use the alternative `.yml` extension. - YAML is case-sensitive. - YAML is whitespace-sensitive and indentation defines the structure, but it doesn't accept tabs for indentation. - Empty lines are ignored. - Comments are preceded by an octothorpe `#`. ###### Data types YAML represents data through three primitive data structures: - Scalars (strings/numbers/booleans) - Mappings (dictionaries/objects) - Sequences (arrays/lists) ####### Scalars (strings/numbers/booleans) The most straightforward data structure involves defining key–value pairs where the values are strings or integers. So you could have a basic configuration for an app: ```yaml {location=".platform.app.yaml"} name: myapp type: "golang:1.18" disk: 1024 ``` This results in three key–value pairs: | Key | Value | | ------------------- |-------------------- | | name | app | | type | golang:1.18 | | disk | 1024 | You can define strings either with or without quotes, which can be single `'` or double `"`. Quotes let you escape characters (if double) and make sure the value is parsed as a string when you want it. For example, you might be representing version numbers and want to parse them as strings. If you use `version: 1.10`, it's parsed as an integer and so is treated the same as `1.1`. If you use `version: "1.10"`, it's parsed as a string and isn't treated as the same as `1.1`. ####### Mappings (dictionaries/objects) In addition to basic scalar values, each key can also represent a set of other key–value pairs. So you can define entire dictionaries of pairs. The structure of the mapping is determined by the indentation. So children are indented more than parents and siblings have the same amount of indentation. The exact number of spaces in the indentation isn't important, just the level relative to the rest of the map. In contrast, when you define mappings, the order doesn't matter. So you could expand the configuration from before to add another mapping: ```yaml {location=".platform.app.yaml"} name: myapp type: "golang:1.18" disk: 1024 web: commands: start: ./bin/app locations: '/': passthru: true allow: false ``` This creates a `web` dictionary that has two dictionaries within it: `commands` and `locations`, each with their own mappings: - `web` → `commands` → `start: ./bin/app` - `web` → `locations` → `'/'` → `passthru: true` and `allow: false` ####### Sequences (arrays/lists) In addition to maps defining further key–value pairs, you can also use sequences to include lists of information. ```yaml {location=".platform.app.yaml"} web: locations: '/': index: - index.html - index.htm passthru: true allow: false ``` You can also define sequences using a flow syntax: ```yaml {location=".platform.app.yaml"} web: locations: '/': index: [index.html, index.htm] passthru: true allow: false ``` In either case, you get a list of values within `index`: `web` → `locations` → `'/'` → `index` → `index.html` and `index.htm` ###### Define multi-line strings If you have a long string that spans multiple lines, use a pipe `|` to preserve line breaks. The new lines need to have at least the same indentation as the first (you can add more indentation that's then preserved). So you could add a multi-line string to a `build` key in the `hooks` map: ```yaml {location=".platform.app.yaml"} hooks: build: | set -e cp a.txt b.txt ``` And the resulting value preserves the line break. This lets you do things like enter small shell scripts within a YAML file. `hooks` → `build` → `set -e` and `cp a.txt b.txt` ###### Reuse content YAML supports internal named references, known as anchors, which can be referenced using an alias. This allows you to reuse YAML blocks in multiple places within a single file. Define an anchor by adding `&` to the start of a value, where `` is a unique identifier. The anchor represents this entire value. Then refer to the anchor using `*`. The following example shows 4 different workers: ```yaml {location=".platform.app.yaml"} workers: queue1: &runner size: S commands: start: python queue-worker.py queue2: *runner queue3: <<: *runner size: M queue4: <<: *runner disk: 512 ``` - `queue1` and `queue2` are identical with the same `size` and `commands` properties. - `queue3` is the same as `queue1` except that it has a different value for `size`. - `queue4` is the same as `queue1` except that it has the `disk` property. Note that you need to place an alias with `<<:` at the same level as the other keys within that value. ###### What's next - See what Platform.sh makes possible with [custom tags](https://docs.platform.sh/learn/overview/yaml/platform-yaml-tags.md). - Read everything that's possible with YAML in the [YAML specification](https://yaml.org/spec/1.2.2/). - See a [YAML file that explains YAML syntax](https://learnxinyminutes.com/docs/yaml/). #### Platform.sh YAML structure In addition to the [basic functions you should be familiar with](https://docs.platform.sh/learn/overview/yaml/what-is-yaml.md), YAML structure is important. Platform.sh accepts a certain structure for YAML configuration files. When you run the `platform project:init` command, three default YAML configuration files are generated in the `.platform` folder and at the root of your source code. They contain the minimum default configuration based on your detected local stack. These YAML files are a good starting point before customization. ```bash . ├── .platform |   ├── routes.yaml |   └── services.yaml ├── .platform.app.yaml └── ``` These three YAML files configure the following: - ``routes.yaml``: this file contains all of your [routes definition](https://docs.platform.sh/define-routes.md) - ``services.yaml``: this file contains the list of your [services definition](https://docs.platform.sh/add-services.md) - ``.platform.app.yaml``: this file contains your [application definition](https://docs.platform.sh/create-apps/app-reference/single-runtime-image.md) ###### Examples ```yaml {location=".platform.app.yaml"} # Complete list of all available properties # A unique name for the app. Must be lowercase alphanumeric characters. # Changing the name destroys data associated with the app. name: "myapp" # The runtime the application uses. # Complete list of available runtimes type: "php:8.2" ... ``` ```yaml {location=".platform/services.yaml"} # The services of the project. # # Each service listed will be deployed # to power your Platform.sh project. # Full list of available services mariadb: # All available versions are: 10.6, 10.5, 10.4, 10.3 type: mariadb:10.6 ``` ```yaml {location=".platform/routes.yaml"} # The routes of the project. # # Each route describes how an incoming URL is going # to be processed by Platform.sh. # More information "https://{default}/": type: upstream upstream: "myapp:http" # A basic redirect definition # More information "https://www.{default}": type: redirect to: "https://{default}/" ``` In these files, you can use any of the [available YAML tags](https://docs.platform.sh/learn/overview/yaml/platform-yaml-tags.md) you need. ###### Multi-app In a [multiple application](https://docs.platform.sh/create-apps/multi-app.md) context, you can also group all of your app configurations in a global ``.platform/applications.yaml`` file. This file contains a list of app configurations, such as: ```yaml {location=".platform/applications.yaml"} app1: type: php:8.3 source: root: app1 app2: type: nodejs:20 source: root: app2 ``` #### Platform.sh YAML tags In addition to the [basic functions you should be familiar with](https://docs.platform.sh/learn/overview/yaml/what-is-yaml.md), YAML allows for special tags. Platform.sh accepts certain custom tags to facilitate working with configuration files. These tags work with Platform.sh configuration files, but may not elsewhere. ###### Include Use the `!include` tag to embed external files within a given YAML file. The tag requires two properties: | Property | Type | Possible values | Description | | -------- | -------- | ----------------------------- |---------------------------------------------------------------------------------------------------------| | `type` | `string` | `string`, `binary`, or `yaml` | See the descriptions of [strings](#string), [binaries](#binary), and [YAML](#yaml). Defaults to `yaml`. | | `path` | `string` | | The path to the file to include, relative to the application directory or `source.root` if defined. | By default, `path` is relative to the current application's directory (what you would define with `source.root`). For example, to include another ``.platform/app1.yaml`` file in the main `.platform/applications.yaml`, follow these steps: 1. Write and save your ``.platform/app1.yaml`` file: ```yaml {location=".platform/app1.yaml"} source: root: "/" type: "nodejs:20" web: commands: start: "node index.js" upstream: socket_family: tcp locations: "/": passthru: true ``` And including it: ```yaml {location=".platform/applications.yaml"} myapp: !include type: yaml path: ./app1.yaml # or as default type is "yaml", it could be: #api: !include ./app1.yaml ``` You can also include files from a directory that is parent to the folder. For example, for the following project structure: ```bash . ├── .platform |   └── applications.yaml ├── backend │   ├── main.py │   ├── requirements.txt │   └── scripts │   ├── ... │   └── common_build.sh └── frontend    ├── README.md    ├── package-lock.json    ├── package.json    ├── public    ├── scripts    │   └── clean.sh    └── src ``` This configuration is valid: ```yaml {location=".platform/applications.yaml"} frontend: source: root: frontend # ... hooks: build: !include type: string path: ../backend/scripts/common_build.sh ``` **Note**: Platform.sh will execute this ``../backend/scripts/common_build.sh`` script using [Dash](https://wiki.archlinux.org/title/Dash). ####### `string` Use `string` to include an external file inline in the YAML file as if entered as a multi-line string. For example, if you have a build hook like the following: ```yaml {location=".platform/applications.yaml"} frontend: hooks: build: | set -e cp a.txt b.txt ``` You could create a file for the script: ```text {location="build.sh"} set -e cp a.txt b.txt ``` And replace the hook with an include tag for an identical result: ```yaml {location=".platform/applications.yaml"} frontend: hooks: build: !include type: string path: build.sh ``` This helps you break longer configuration like build scripts out into a separate file for easier maintenance. ####### `binary` Use `binary` to include an external binary file inline in the YAML file. The file is base64 encoded. For example, you could include a `favicon.ico` file in the same folder as your app configuration. Then you can include it as follows: ```yaml {location=".platform/applications.yaml"} properties: favicon: !include type: binary path: favicon.ico ``` ####### `yaml` Use `yaml` to include an external YAML file inline as if entered directly. Because `yaml` is the default, you can use it without specifying the type. For example, you could have your configuration for works defined in a `worker.yaml` file: ```yaml {location="worker.yaml"} size: S commands: start: python queue-worker.py variables: env: type: worker ``` Then the following three configurations are exactly equivalent: ```yaml {location=".platform.app.yaml"} workers: queue1: !include "worker.yaml" ``` ```yaml {location=".platform.app.yaml"} workers: queue1: !include type: yaml path: 'worker.yaml' ``` ```yaml {location=".platform.app.yaml"} workers: queue1: size: S commands: start: python queue-worker.py variables: env: type: worker ``` This can help simplify more complex files. ###### Archive Use the `!archive` tag for a reference to an entire directory specified relative to where the YAML file is. For example, you might want to define a configuration directory for your [Solr service](https://docs.platform.sh/add-services/solr.md). You might do so as follows: ```yaml {location=".platform/services.yaml"} mysearch: type: solr:8.0 disk: 1024 configuration: conf_dir: !archive "solr/conf" ``` The `!archive` tag means that the value for `conf_dir` isn't the string `solr/conf` but the entire `solr/conf` directory. This directory is in the `.platform` directory, since that's where the `.platform/services.yaml` file is. The `solr/conf` directory is then copied into the Platform.sh management system to use with the service. ### Structure **Note**: This page describes how things work on Grid projects. [Dedicated Gen 3](https://docs.platform.sh/dedicated-environments/dedicated-gen-3.md) projects are similar, but they run on dedicated hosts and each container is replicated three times. For Dedicated Gen 2 projects, read about how [Dedicated Gen 2 projects are structured](https://docs.platform.sh/dedicated-environments/dedicated-gen-2/overview.md). Each environment you deploy on Platform.sh is built as a set of containers. Each container is an isolated instance with specific resources. Each environment has 2 to 4 types of containers: - One [*router*](#router) (configured in a `.platform/routes.yaml` file) - One or more [*app* containers](#apps) (configured in `.platform.app.yaml` files) - Zero or more [*service* containers](#services) (configured in a `.platform/services.yaml` file) - Zero or more [*worker* containers](#workers) (configured in the files for apps) 
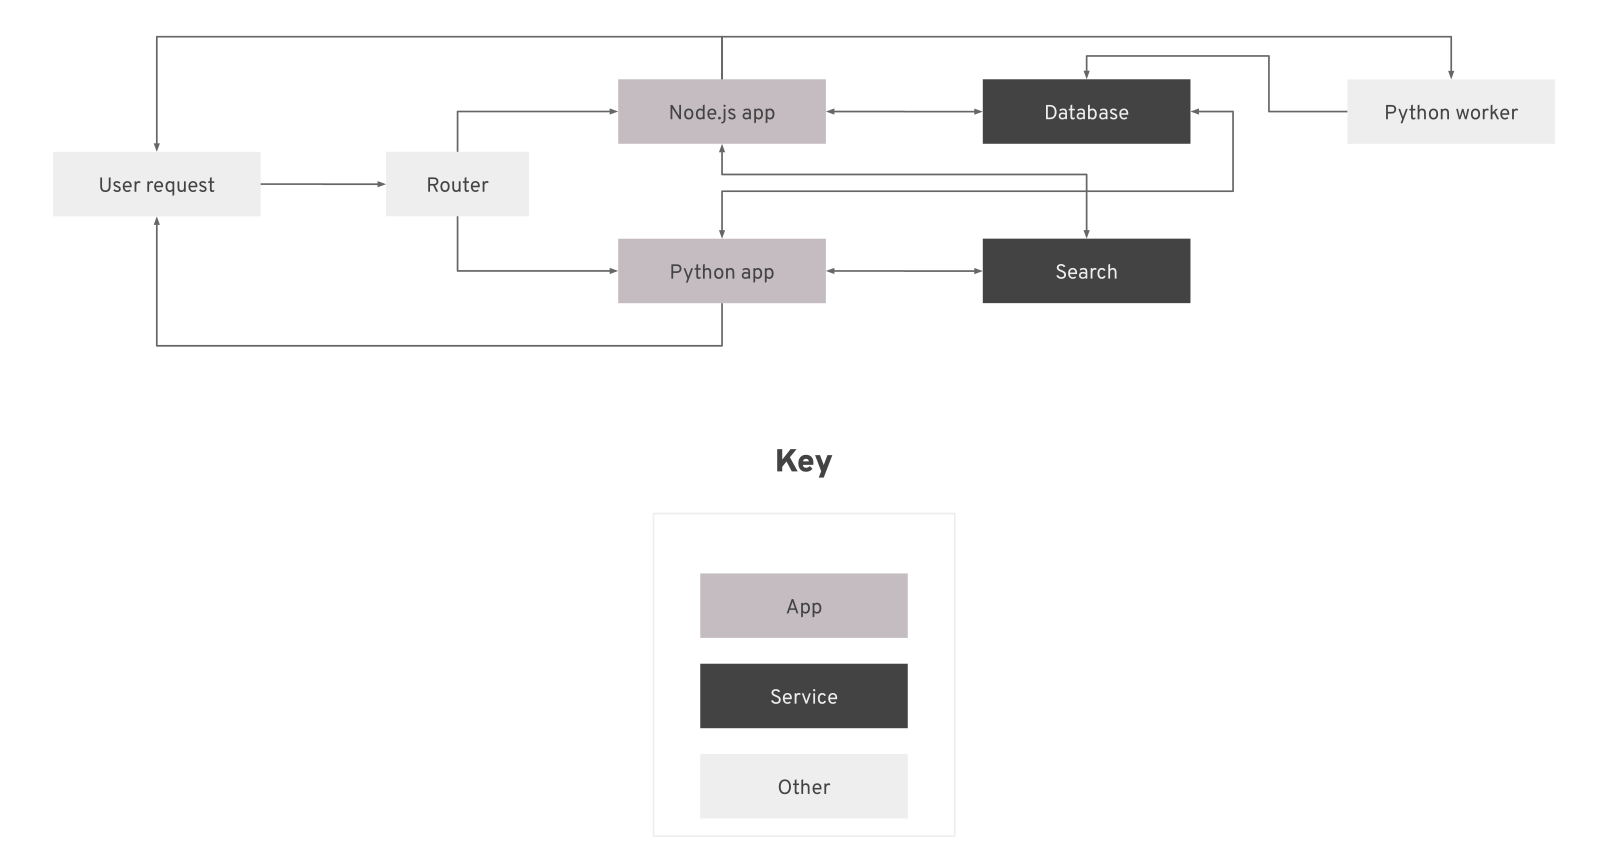
If you have two app containers, two services (a database and a search engine), and a worker, requests to your environment might look something like this: ![A user request goes to the router, which sends it to either a Node.js app or a Python app. Each app communicates separately with the database and search services and sends responses to the user. The Node.js app triggers actions in a worker, which communicates separately with the database.](https://docs.platform.sh/images/config-diagrams/structure-diagram.png) If you have only one app container, your repository might look like this: ```text project ├── .git ├── .platform │ ├── routes.yaml │ └── services.yaml ├── .platform.app.yaml └── ``` ##### Router Each environment always has exactly one router. This router maps incoming requests to the appropriate app container and provides basic caching of responses, unless configured otherwise. The router is configured in a `.platform/routes.yaml` file. If you don't include configuration, a single [default route is deployed](https://docs.platform.sh/define-routes.md#default-route-definition). Read more about how to [define routes](https://docs.platform.sh/define-routes.md). ##### Apps You always need at least one app container, but you can have more. App containers run the code you provide via your Git repository. They handle requests from the outside world and can communicate with other containers within the environment. Each app container is built from a specific language image with a given version for the language. To configure your apps, you usually create one `.platform.app.yaml` file for each app container. A basic app generally has only one such file placed in the repository root. Read more about how to [configure apps](https://docs.platform.sh/create-apps.md). ##### Services You don't need any service containers, but you can add them as you like. Service containers run predefined code for specific purposes, such as a database or search service. You don't need to add their code yourself, just set up how your apps communicate with them. Service containers are configured by the `.platform/services.yaml` file. Read more about how to [add services](https://docs.platform.sh/add-services.md). ##### Workers You don't need any worker containers, but you can add them as you like. Worker containers are copies of an app containers that have no access to the outside world and can have a different start command. They're useful for continually running background processes. Read more about how to [work with workers](https://docs.platform.sh/create-apps/workers.md). ### Build and deploy Each time you push a change to your app through Git or activate an [environment](https://docs.platform.sh/environments.md), your app goes through a process to be built and deployed. If your app is redeployed with no changes to its codebase, the output of the previous build and deploy process is reused. The build process looks through the configuration files in your repository and assembles the necessary containers. The deploy process makes those containers live, replacing any previous versions, with minimal interruption in service. ![The steps in the build and deploy process](https://docs.platform.sh/images/workflow/build-pipeline.svg "0.50") Hooks are points in the build and deploy process where you can inject a custom script. ##### The build The outcome of the build process is designed to be repeatable and reusable. Each app in a project is built separately. Container configuration depends exclusively on your configuration files. So each container is tied to a specific Git commit. If there are no new changes for a given container, the existing container can be reused. This saves you the time the build step would take. This means the build is independent of the given environment and preview environments are perfect copies of production. If you use environment variables to set up different build configuration options for different environments, your build step isn't reused and your preview environments may differ from production. You can't connect to services (like databases) during the build step. Once the app has gone through all of the build steps, it can connect to services in the deploy process. ###### Build steps 1. **Validate configuration**: The configuration is checked by validating the `.platform` directory and scanning the repository for any app configurations to validate individually. 2. **Pull container images**: Any container images that have been built before and that don't have any changes are pulled to be reused. 3. **Install dependencies**: If you have specified additional global dependencies, they're downloaded during this step. This is useful for commands you may need in the build hook. 4. **Run build flavor commands**: For some languages (NodeJS, PHP), a series of standard commands are run based on the build flavor. You can change the flavor or skip the commands by specifying it in your `.platform.app.yaml` file. 5. **Run build hook**: The `build` hook comprises one or more shell commands that you write to finish creating your production code base. It could be compiling Sass files, running a bundler, rearranging files on disk, or compiling. The committed build hook runs in the build container. During this time, commands have write access to the file system, but there aren't connections to other containers (services and other apps). Note that you can [cancel deployments stuck on the build hook](https://docs.platform.sh/environments/cancel-activity.md). 6. **Freeze app container**: The file system is frozen and produces a read-only container image, which is the final build artifact. ##### The deploy The deploy process connects each container from the build process and any services. The connections are defined in your app and services configuration. So unlike the build process, you can now access other containers, but the file system is read-only. ###### Deploy steps 1. **Hold requests**: Incoming [idempotent requests](https://www.iana.org/assignments/http-methods/http-methods.xhtml) (like `GET`, `PUT`, `DELETE` but **not** `POST`, `PATCH` etc.) are held. 1. **Unmount current containers**: Any previous containers are disconnected from their file system mounts. 1. **Mount file systems**: The file system is connected to the new containers. New branches have file systems cloned from their parent. 1. **Expose services**: Networking connections are opened between any containers specified in your app and services configurations. 1. **Run (pre-) start commands**: The [commands](https://docs.platform.sh/create-apps/app-reference/single-runtime-image.md#web-commands) necessary to start your app are run. Often this stage will only include a start command, which is restarted if ever terminated going forward. You may also, however, define a `pre_start` command, when you need to run _per-instance_ actions. In this case, as you might expect, the `pre_start` command is run, then the `start` command. 1. **Run deploy hook**: The `deploy` hook is any number of shell commands you can run to finish your deployment. This can include clearing caches, running database migrations, and setting configuration that requires relationship information. 1. **Serve requests**: Incoming requests to your newly deployed application are allowed. After the deploy process is over, any commands in your `post_deploy` hook are run. ##### Deployment philosophy Platform.sh values consistency over availability, acknowledging that it's nearly impossible to have both. During a deployment, the [deploy hook](https://docs.platform.sh/create-apps/hooks/hooks-comparison.md#deploy-hook) may make database changes that are incompatible with the previous code version. Having both old and new code running in parallel on different servers could therefore result in data loss. Platform.sh believes that a minute of planned downtime for authenticated users is preferable to a risk of race conditions resulting in data corruption, especially with a CDN continuing to serve anonymous traffic uninterrupted. That brief downtime applies only to the environment changes are being pushed to. Deployments to a staging or development branch have no impact on the production environment and cause no downtime. ##### What's next * See how to [configure your app](https://docs.platform.sh/create-apps.md) for the entire process. * Learn more about [using build and deploy hooks](https://docs.platform.sh/create-apps/hooks.md). ### Get support Find out how to get help if you’re experiencing issues with Platform.sh. ##### Create a support ticket If you're experiencing issues related to the proper functioning of the Platform.sh infrastructure, application container software, build processes, have found possible bugs, have general questions or wish to submit a feature request, open a support ticket: 1. [Open the Console](https://console.platform.sh/) 2. Click the **Help** dropdown in the upper right-hand corner. 3. Select **Support** from the options in the dropdown. 4. Click **+ New ticket**. 5. Fill in the ticket fields and click **Submit**. Or use these shortcuts to [access all support tickets](https://console.platform.sh/-/users/~/tickets) or [open a new ticket](https://console.platform.sh/-/users/~/tickets/open). Once you submit a ticket, you see it in a list of all tickets created, for all projects you have access to, within your organization. **Note**: Note that once you submit the ticket, you can’t modify or delete the submission. If you have any additional information, you can select the submitted ticket and write a message. ##### Discord To talk about app development or framework-related questions, join other customers and engineers in the [public Discord channel](https://chat.platform.sh/). ##### Community The [Platform.sh Community site](https://community.platform.sh/) has how-to guides with suggestions on how to get the most out of Platform.sh. ##### Contact Sales If you have questions about pricing or need help figuring out if Platform.sh is the right solution for your team, get in touch with [Sales](https://platform.sh/contact/). ##### Delete your account To permanently delete your Platform.sh account, follow these steps: **Warning**: Deleting your Platform.sh account automatically deletes any linked Upsun, Ibexa Cloud, Pimcore PaaS, or Shopware PaaS accounts you may hold. 1. [Open the Console](https://console.platform.sh/). 2. Open the user menu (your name or profile picture) and select **My Profile**. 3. Click **Delete account**. 4. Check that the pre-filled information is correct and click **Submit**. 5. Read the consequences of account deletion and click **Submit request** to confirm. Your request is now submitted and will be handled by Support shortly. ### Automate your code updates Platform.sh allows you to update your dependencies through [source operations](https://docs.platform.sh/create-apps/source-operations.md). ##### Before you start You need: - The [Platform.sh CLI](https://docs.platform.sh/administration/cli.md) - An [API token](https://docs.platform.sh/administration/cli/api-tokens.md#2-create-an-api-token) ##### 1. Define a source operation to update your dependencies To facilitate updating your dependencies in your project, define a source operation in your `.platform.app.yaml` file depending on your dependency manager: ```yaml {location=".platform.app.yaml"} source: operations: update: command: | set -e npm update git add package.json package-lock.json git add -A git diff-index --quiet HEAD || git commit --allow-empty -m "Update npm dependencies" ``` ```yaml {location=".platform.app.yaml"} source: operations: update: command: | set -e yarn upgrade git add yarn.lock git add -A git diff-index --quiet HEAD || git commit --allow-empty -m "Update yarn dependencies" ``` ```yaml {location=".platform.app.yaml"} source: operations: update: command: | set -e go get -u go mod tidy git add go.mod go.sum git add -A git diff-index --quiet HEAD || git commit --allow-empty -m "Update Go dependencies" ``` ```yaml {location=".platform.app.yaml"} source: operations: update: command: | set -e pipenv update git add Pipfile Pipfile.lock git add -A git diff-index --quiet HEAD || git commit --allow-empty -m "Update Python dependencies" ``` ```yaml {location=".platform.app.yaml"} source: operations: update: command: | set -e bundle update --all git add Gemfile Gemfile.lock git add -A git diff-index --quiet HEAD || git commit --allow-empty -m "Update Ruby dependencies" ``` ##### 2. Automate your dependency updates with a cron job After you've defined a source operation to [update your dependencies on your project](#1-define-a-source-operation-to-update-your-dependencies), you can automate it using a cron job. Note that it’s best not to run source operations on your production environment, but rather on a dedicated environment where you can test changes. Make sure you have the [Platform.sh CLI](https://docs.platform.sh/administration/cli.md) installed and [an API token](https://docs.platform.sh/administration/cli/api-tokens.md#2-create-an-api-token) so you can run a cron job in your app container. 1. Set your API token as a top-level environment variable: - Open the environment where you want to add the variable. - Click Settings **Settings**. - Click **Variables**. - Click **+ Add variable**. - In the **Variable name** field, enter ``env:PLATFORMSH_CLI_TOKEN``. - In the **Value** field, enter your API token. - Make sure the **Available at runtime** and **Sensitive variable** options are selected. - Click **Add variable**. **Note**: Once you add the API token as an environment variable, anyone with [SSH access](https://docs.platform.sh/development/ssh.md) can read its value. Make sure you carefully check your [user access on this project](https://docs.platform.sh/administration/users.md#manage-project-users). 2. Add a build hook to your app configuration to install the CLI as part of the build process: ```yaml {location=".platform.app.yaml"} hooks: build: | set -e echo "Installing Platform.sh CLI" curl -fsSL https://raw.githubusercontent.com/platformsh/cli/main/installer.sh | bash echo "Testing Platform.sh CLI" platform ``` 3. Then, to configure a cron job to automatically update your dependencies once a day, use a configuration similar to the following: ```yaml {location=".platform.app.yaml"} crons: update: # Run the code below every day at midnight. spec: '0 0 * * *' commands: start: | set -e platform sync -e development code data --no-wait --yes platform source-operation:run update --no-wait --yes ``` The example above synchronizes the `development` environment with its parent and then runs the `update` source operation defined [previously](#1-define-a-source-operation-to-update-your-dependencies). ##### 3. Configure notifications about dependency updates To get notified every time a source operation is triggered and therefore every time a dependency is updated, you can configure activity scripts or webhooks. ###### Notifications through an activity script After you've defined a source operation to [update your dependencies on your project](#1-define-a-source-operation-to-update-your-dependencies), you can configure an activity script to receive notifications every time a dependency update is triggered. **Example**: You want to get notified of every dependency update through a message posted on a Slack channel. To do so, follow these steps: - In your Slack administrative interface, [create a new Slack webhook](https://api.slack.com/messaging/webhooks). You get a URL starting with ``https://hooks.slack.com/``. - Replace ``SLACK_URL`` in the following ``.js`` script with your webhook URL. - Add the following code to a ``.js`` file: ```javascript {} /** * Sends a color-coded formatted message to Slack. * * To control what events trigger it, use the --events switch in * the Platform.sh CLI. * * Replace SLACK_URL in the following script with your Slack webhook URL. * Get one here: https://api.slack.com/messaging/webhooks * You should get something like: const url = 'https://hooks.slack.com/...'; * * activity.text: a brief, one-line statement of what happened. * activity.log: the complete build and deploy log output, as it would be seen in the Console log screen. */ function sendSlackMessage(title, message) { const url = 'SLACK_URL'; const messageTitle = title; const color = activity.result === "success" ? "#66c000" : "#ff0000"; const body = { attachments: [ { title: messageTitle, text: message, color: color, }, ], }; const resp = fetch(url, { method: "POST", headers: { "Content-Type": "application/json", }, body: JSON.stringify(body), }); if (!resp.ok) { console.log("Sending slack message failed: " + resp.body.text()); } } sendSlackMessage(activity.text, activity.log); ``` - Run the following [Platform.sh CLI](https://docs.platform.sh/administration/cli.md) command: ```bash {} platform integration:add --type script --file ./my_script.js --events=environment.source-operation ``` Optional: to only get notifications about specific environments, add the following flag to the command: ``--environments=your_environment_name``. Anytime a dependency is updated via a source operation, the activity script now reports it to Slack. ###### Notifications through a webhook After you've defined a source operation to [update your dependencies on your project](#1-define-a-source-operation-to-update-your-dependencies), you can configure a webhook to receive notifications every time a dependency update is triggered. [Webhooks](https://docs.platform.sh/integrations/activity/webhooks.md) allow you to host a script yourself externally. This script receives the same payload as an activity script and responds to the same events, but can be hosted on your own server and in your own language. To configure the integration between your webhook and your source operation, run the following [Platform.sh CLI](https://docs.platform.sh/administration/cli.md) command: ```bash platform integration:add --type=webhook --url=URL_TO_RECEIVE_JSON --events=environment.source-operation ``` Optional: to only get notifications about specific environments, add the following flag to the command: `--environments=your_environment_name`. To test the integration and the JSON response, you can generate a URL from a service such as [webhook.site](https://webhook.site) and use the generated URL as `URL_TO_RECEIVE_JSON`. This URL then receives the JSON response when a source operation is triggered. Anytime a dependency is updated via a source operation, the webhook now receives a POST message. This POST message contains complete information about the entire state of the project at that time. ### Restrict access to a service Platform.sh allows you to restrict access to a service. In this tutorial, learn how to grant your Data team `read-only` access to your production database. ##### Before you start You need: - A project with a database service - A `viewer` user on your project ##### 1. Add a read-only endpoint to your database service Edit your `.platform/services.yaml` file and add the following [endpoints](https://docs.platform.sh/add-services/mysql/_index.md#define-permissions): - `website` with `admin` access to the `main` database - `reporting` with read-only `ro` access to the `main` database ```yaml {location=".platform/services.yaml"} maindb: type: mariadb:10.5 disk: 2048 configuration: schemas: - main endpoints: website: default_schema: main privileges: main: admin reporting: privileges: main: ro ``` ##### 2. Grant your app access to the new endpoints Edit your app configuration and add new relationships to your new endpoints: ```yaml {location=".platform.app.yaml"} relationships: database: service: maindb endpoint: website reports: service: maindb endpoint: reporting ``` ##### 3. Create a worker with access to the read-only endpoint Edit your app configuration to add a new worker which: - Does nothing (`sleep infinity`) - Can access the read-only `reporting` endpoint - Allows SSH access to `viewer` ```yaml {location=".platform.app.yaml"} workers: data_access: size: S disk: 128 mounts: {} commands: start: | sleep infinity relationships: reports: service: maindb endpoint: reporting access: ssh: viewer ``` You're done! From now on, your `viewer` users can SSH in to the worker application, and connect to your database with read-only permissions. ### Exporting data As a Platform.sh user, your code and data belong to you. At any time, you can download your site's data for local development, to back up your data, or to change provider. ##### Before you begin You need: - [Git](https://git-scm.com/downloads) - A Platform.sh account - Code in your project - Optional: the [Platform.sh CLI](https://docs.platform.sh/administration/cli.md) ##### 1. Download your app's code Your app's code is maintained through the Git version control system. To download your entire app's code history: - Retrieve the project you want to back up by running the following command: ```bash {} platform get ``` - In the [Console](https://console.platform.sh/), open your project and click **Code **. - Click **Git**. - To copy the command, click ** Copy**. The command is similar to the following: ```text {} git clone abcdefgh1234567@git.eu.platform.sh:abcdefgh1234567.git project-name ``` ##### 2. Download your files Some files might not be stored in Git, such as data your app writes [in mounts](https://docs.platform.sh/create-apps/app-reference/single-runtime-image.md#mounts). You can download your files [using the CLI](https://docs.platform.sh/development/file-transfer.md#transfer-files-using-the-cli) or [using SSH](https://docs.platform.sh/development/file-transfer.md#transfer-files-using-an-ssh-client). ##### 3. Download data from services The mechanism for downloading from each service (such as your database) varies. For services designed to hold non-persistent data, such as [Redis](https://docs.platform.sh/add-services/redis.md) or [Solr](https://docs.platform.sh/add-services/solr.md), it's generally not necessary to download data as it can be rebuilt from the primary data store. For services designed to hold persistent data, see each service's page for instructions: - [MySQL](https://docs.platform.sh/add-services/mysql.md#exporting-data) - [PostgreSQL](https://docs.platform.sh/add-services/postgresql.md#exporting-data) - [MongoDB](https://docs.platform.sh/add-services/mongodb.md#exporting-data) - [InfluxDB](https://docs.platform.sh/add-services/influxdb.md#export-data) ##### 4. Get environment variables Environment variables can contain critical information such as tokens or additional configuration options for your app. Environment variables can have different prefixes: - Variables beginning with `env:` are exposed [as Unix environment variables](https://docs.platform.sh/development/variables.md#top-level-environment-variables). - Variables beginning with `php:` are interpreted [as `php.ini` directives](https://docs.platform.sh/development/variables.md#php-specific-variables). All other variables are [part of `$PLATFORM_VARIABLES`](https://docs.platform.sh/development/variables/use-variables.md#use-provided-variables). To back up your environment variables: Note that you can also get all the environment variable values by running the following command: ```bash {} platform ssh -- env ``` - Store the data somewhere secure on your computer. - In the [Console](https://console.platform.sh/), open your project and click **Settings**. - Click **Project Settings **. - Click **Variables** and access your variable’s values and settings. - Store the data somewhere secure on your computer. Note that in the Console, you can’t access the value of variables that have been [marked as sensitive](https://docs.platform.sh/development/variables/set-variables.md#variable-options). Use the CLI to retrieve these values. ##### What's next - Migrate data from elsewhere [into Platform.sh](https://docs.platform.sh/learn/tutorials/migrating.md). - Migrate to [another region](https://docs.platform.sh/projects/region-migration.md). - To use data from an environment locally, export your data and set up your [local development environment](https://docs.platform.sh/development/local.md). ### Migrating to Platform.sh If you already have an app running somewhere else, you want to migrate it to Platform.sh and deploy it. To do so, follow these steps. ##### Before you begin You need: - An app that works and is ready to be built - Code in Git - A Platform.sh account – if you don’t already have one, [start a trial](https://auth.api.platform.sh/register?trial_type=general) - The [Platform.sh CLI](https://docs.platform.sh/administration/cli.md) installed locally ##### 1. Export from previous system Start by exporting everything you might need from your current app. This includes data in databases, files on a file system, and for some apps, such as Drupal, configuration that you need to export from the system into files. ##### 2. Create a project When prompted, fill in details like the project name, [region](https://docs.platform.sh/development/regions.md), and [plan](https://docs.platform.sh/administration/pricing.md). [Create a new project from scratch](https://console.platform.sh/org/create-project/info?_utm_campaign=cta_deploy_marketplace_template&utm_source=public_documentation&_utm_medium=organic). In the form, fill in details like the project name and [region](https://docs.platform.sh/development/regions.md). The project is automatically created with a [Development plan](https://docs.platform.sh/administration/pricing.md), which you can then upgrade. ##### 3. Add configuration The exact configuration you want depends on your app. You likely want to configure three areas: - [The app itself](https://docs.platform.sh/create-apps.md) -- this is the only required configuration - [Services](https://docs.platform.sh/add-services.md) - [Routes](https://docs.platform.sh/define-routes.md) You can also take guidance from the [project templates](https://docs.platform.sh/development/templates.md), which are starting points for various technology stacks with working configuration examples. When you've added your configuration, make sure to commit it to Git. ##### 4. Push your code The way to push your code to Platform.sh depends on whether you're hosting your code with a third-party service using a [source integration](https://docs.platform.sh/integrations/source.md). If you aren't, your repository is hosted in Platform.sh and you can use the CLI or just Git itself. - Add Platform.sh as a remote repository by running the following command: ```bash {} platform project:set-remote ``` - Push to the Platform.sh repository by running the following command: ```bash {} platform push ``` When you try to push, any detected errors in your configuration are reported and block the push. After any errors are fixed, a push creates a new environment. Set up the integration for your selected service: - [Bitbucket](https://docs.platform.sh/integrations/source/bitbucket.md) - [GitHub](https://docs.platform.sh/integrations/source/github.md) - [GitLab](https://docs.platform.sh/integrations/source/gitlab.md) Then push code to that service as you do normally. Pushing to a branch creates an environment from that branch. Note that the source integration doesn’t report any errors in configuration directly. You have to monitor those in your project activities. - Add an [SSH key](https://docs.platform.sh/development/ssh/ssh-keys.md). - In the Console, open your project and click **Code **. - Click **Git**. - From the displayed command, copy the location of your repository. It should have a format similar to the following: ```text {} abcdefgh1234567@git.eu.platform.sh:abcdefgh1234567.git ``` - Add Platform.sh as a remote repository by running the following command: ```bash {} git remote add platform ``` - Push to the Platform.sh repository by running the following command: ```bash {} git push -u platform ``` When you try to push, any detected errors in your configuration are reported and block the push. After any errors are fixed, a push creates a new environment. ##### 5. Import data Once you have an environment, you can import the data you backed up in step 1. The exact process may depend on the service you use. For SQL databases, for example, you can use a version of this command: ```bash platform sql - Upgrade from a Development plan. - [Add a domain](https://docs.platform.sh/domains/steps.md). - Set up for [local development](https://docs.platform.sh/development/local.md). - Configure [health notifications](https://docs.platform.sh/integrations/notifications.md). - For monitoring and profiling, [integrate Blackfire](https://docs.platform.sh/increase-observability/integrate-observability/blackfire.md). ### HTTP caching You can configure HTTP caching for your site on Platform.sh in several ways. Which one you should use depends on your specific use case. You should use only one of these at a time and disable any others. Mixing them together most likely results in stale cache that can't be cleared. ##### The Platform.sh router cache Every project includes a router instance that includes [optional HTTP caching](https://docs.platform.sh/define-routes/cache.md). It's reasonably configurable and obeys HTTP cache directives, but doesn't support push-based clearing. If you're uncertain what caching tool to use, start with this one. It's enough for most uses. ##### A Content Delivery Network (CDN) Platform.sh is compatible with most commercial CDNs. If you have a Dedicated instance, it comes with the [Fastly CDN](https://docs.platform.sh/domains/cdn/fastly.md). CDNs generally offer the best performance as they're the only option that includes multiple geographic locations. But they do tend to be the most expensive option. See more on setting up [Fastly](https://docs.platform.sh/domains/cdn/fastly.md) and [Cloudflare](https://docs.platform.sh/domains/cdn/cloudflare.md). The methods for other CDNs are similar. ##### Varnish Platform.sh offers a [Varnish service](https://docs.platform.sh/add-services/varnish.md) that you can insert between the router and your app. It has roughly the same performance as the router cache. Varnish is more configurable, but it requires you to be comfortable with Varnish Configuration Language (VCL). Platform.sh doesn't help with VCL configuration and a misconfiguration may be difficult to debug. Varnish supports [clearing cache with a push](https://docs.platform.sh/add-services/varnish.md#clear-cache-with-a-push), but access control is complicated by the inability to have [circular relationships](https://docs.platform.sh/add-services/varnish.md#circular-relationships). Generally speaking, you should use Varnish only if your application requires push-based clearing or relies on Varnish-specific business logic. ##### App-specific caching Many web apps and frameworks include a built-in web cache layer that mimics what Varnish or the Router cache would do. Most of the time they're slower than a dedicated caching service as they still require invoking the app server and only serve as a fallback for users that don't have a dedicated caching service available. Generally speaking, use app-specific web cache only when it includes app-specific business logic you depend on, such as app-sensitive selective cache clearing or partial page caching. Note that this refers only to HTTP caching. Many apps have an internal app cache for data objects and similar information. That should remain active regardless of the HTTP cache in use. ##### Cookies and caching HTTP-based caching systems generally default to including cookie values in cache keys to avoid serving authenticated content to the wrong user. While this is a safe default, it means that *any* cookie effectively disables the cache, including mundane cookies like analytics. The solution is to set which cookies should impact the cache and limit them to session cookies. For the router cache, see [cookies in HTTP caching](https://docs.platform.sh/define-routes/cache.md#cookies). For other cache systems, consult their documentation. ### From monoliths through headless to microservices With Platform.sh, you can run multiple application containers in a single environment. This gives you access to a large variety of setups and allows you to seamlessly upgrade your app from a monolith with a single application server to a more elaborate and effective topology. You can set up multiple apps to achieve the following: - Keep your backend and frontend systems separate - Run workers alongside your main app - Or even go for a full microservices architecture Platform.sh makes implementing such setups and switching from one to the other pain-free. The same flexibility applies to any supported services, from relational databases to search engines and message queues. Depending on your specific use case, you can run a single database, multiple databases inside a single instance, or multiple databases in multiple versions... It's up to you! Whether you embrace a mono-repo approach with a single Git repository describing your entire setup, or divide your project into multiple repositories, Platform.sh allows you to build the best architecture for your needs. But while the possibilities are endless, making the right choice between creating one big project with multiple apps or keeping each app in its own project can be a tough formula to crack. So read on for guidance! ##### Separate projects If you have multiple apps sharing the same code but each of them has its own data, keep your apps in separate projects. Platform.sh provides the automation to deploy multiple projects from the same code base, which makes their maintenance effortless. **Note**: By design, Platform.sh doesn’t allow your app to access services in another project through HTTP. So separate projects are appropriate in the following cases: - Your apps are for different customers/clients - Your apps don't need to directly connect to the same database - Different teams are working on different apps - You want to develop true microservices, where each microservice is a fully standalone process with its own data When in doubt over your own needs, it's better to keep separate projects than build an architecture that may prove difficult for you to maintain. ##### Clustered applications A clustered application is one where your project requires multiple _app services_ that are all part of the same conceptual project. Clustered applications can range from a straightforward headless architecture, where frontend and backend systems are separated, to micro-services with dozens of apps in multiple runtimes and frameworks forming a consistent whole. Meaning, removing one of the app services would break the others. Platform.sh allows you to configure access from one service to another without having to worry about service discovery or complex _ingress controllers_. [Configuring incoming routes](https://docs.platform.sh/define-routes.md) is straightforward. You can have services that are only exposed to another service as well as services that are exposed to the internet. In a clustered application, you can have one of the following configurations: - Multiple [`.platform.app.yaml` files](https://docs.platform.sh/create-apps/multi-app.md) in different directories, with separate code bases that deploy separately - A single app that spawns one or more [worker instances](https://docs.platform.sh/create-apps/app-reference/single-runtime-image.md#workers) that run background processes **Note**: Note that a clustered application requires at least a [Medium](https://platform.sh/pricing/). With a clustered application, you often don't need multiple service instances. The [MySQL, MariaDB](https://docs.platform.sh/add-services/mysql.md), and [Solr](https://docs.platform.sh/add-services/solr.md) services support defining multiple databases on a single service, which is significantly more efficient than defining multiple services. [Redis](https://docs.platform.sh/add-services/redis.md), [Memcached](https://docs.platform.sh/add-services/memcached.md), [Elasticsearch](https://docs.platform.sh/add-services/elasticsearch.md), and [RabbitMQ](https://docs.platform.sh/add-services/rabbitmq.md) natively support multiple bins (also called _queues_ or _indexes_) defined by the client application as part of the request. Therefore, they don't need additional configuration on Platform.sh. Clustered applications are appropriate in the following cases: - You want one user-facing app and an entirely separate admin-facing app that are both operating on the same data - You want to have a user-facing app and a separate worker process (either the same code or separate) that handles background tasks - You want a single conceptual app written in multiple programming languages ##### A note on "multi-site" applications Some Content Management Systems or other applications support running multiple logical "sites" off of a single code base. This approach isn't recommended on Platform.sh. This multi-site logic is often dependent on the domain name of the incoming request, which on Platform.sh varies by branch. Running multiple databases, as is often recommended with this approach, is supported on Platform.sh but makes the setup process for each site more difficult. Leveraging the multi-site capabilities of an app are appropriate only in the following cases: - There is only a single team working on all of the "sites" involved - All "sites" should be updated simultaneously as a single unit - Each individual site is relatively low traffic, such that the aggregate traffic is appropriate for your plan size - All sites really do use the same codebase with no variation, just different data Otherwise, [separate projects](#separate-projects) are a better long-term plan. ### Keep your Git repository clean When a Git repository contains a high number of references and files, the performance of Git can decrease. This is why most Git providers have repository size limits in place (for more information, see the [GitHub](https://docs.github.com/en/repositories/working-with-files/managing-large-files/about-large-files-on-github), [GitLab](https://docs.gitlab.com/ee/user/gitlab_com/index.md#account-and-limit-settings) and [Bitbucket](https://support.atlassian.com/bitbucket-cloud/docs/reduce-repository-size/) documentation). The Platform.sh API and [Console](https://docs.platform.sh/administration/web.md) are closely tied to Git. When the performance of Git decreases, Platform.sh API servers also become slower. As a user, you can then experience significant latencies. If your repository becomes too large, your Console may even become unresponsive, leaving you unable to access your project. To avoid such issues, make sure you keep your Git repository clean by following the instructions on this page. If you're already facing performance issues and suspect they might be related to the size of your Git repository, see how you can [troubleshoot a sizeable Git repository](#troubleshoot-a-sizeable-git-repository). ##### Enable the automated pruning of old branches in your project To keep your repository size to a minimum, make sure that branches that don't exist anymore in your repository have also been deleted from Platform.sh. To automate this process, when setting up a [source integration](https://docs.platform.sh/integrations.md), enable the `prune-branches` option. If you already have a source integration set up and want to enable the `prune-branches` option, follow these steps: - Then, to enable the ``prune-branches`` option, run the following command: ```bash {} platform integration:update --project --prune-branches true ``` - Navigate to your project. - Click Settings **Settings**. - Click **Project Settings**. - Click **Integrations** and select your source integration. - Click **Edit**. - Enter your access token and click **Continue**. - Select your repository and check the following boxes: - **Fetch branches from the remote repository to your project** (``fetch-branches`` option, mandatory to enable ``prune-branches``). - **Remove branches from your project that have disappeared remotely (requires the fetch branches option to be enabled)** (``prune-branches`` option). - Click **Save**. ##### Upload your files through mounts Keeping too many files, especially large binary files, in your Git repository can cause performance and stability issues. Therefore, Platform.sh recommends that you only commit your source code in Git. To upload any other files to your app, [create mounts](https://docs.platform.sh/create-apps/app-reference.md#mounts) and [transfer your files directly to them](https://docs.platform.sh/development/file-transfer.md#transfer-a-file-to-a-mount). **Note**: Platform.sh does not currently support [Git Large File Storage](https://git-lfs.com/). ##### Troubleshoot a sizeable Git repository If you're experiencing latencies or can't access your Console anymore, your Git repository may have become too large and may need to be cleaned up. To do so, follow these instructions: 1. Remove old, unwanted files from your repository (especially large files). You can do it manually, or use a tool such as [BFG Repo-Cleaner](https://rtyley.github.io/bfg-repo-cleaner/). 2. Remove stale branches from your repository and Platform.sh project. 3. Rebase and/or squash commits to clean up your history. 4. Make sure you [enable the automated pruning of old branches in your project](#enable-the-automated-pruning-of-old-branches-in-your-project) and [upload your files through mounts](#upload-your-files-through-mounts) to avoid facing the same situation in the future. ## Frameworks ### Deploy Django on Platform.sh Django is a web application framework written in Python with a built-in ORM (Object-Relational Mapper). This guide provides instructions for deploying, and working with, Django on Platform.sh. It includes examples for working with Django on all of the major package managers: pip, Pipenv, and Poetry. To get Django running on Platform.sh, you have two potential starting places: - You already have a Django site you are trying to deploy. Go through this guide to make the recommended changes to your repository to prepare it for Platform.sh. - You have no code at this point. If you have no code, you have two choices: - Generate a basic Django site. See an example for doing this under initializing a project. - Use a ready-made [Django template](https://github.com/platformsh-templates/django4). A template is a starting point for building your project. It should help you get a project ready for production. To use a template, click the button below to create a Django template project. ![Deploy on Platform.sh](https://platform.sh/images/deploy/lg-blue.svg) Once the template is deployed, you can follow the rest of this guide to better understand the extra files and changes to the repository. **Note**: This guide is written for Django 4, but should apply almost exactly the same for other versions. ##### Before you begin You need: - [Git](https://git-scm.com/downloads). Git is the primary tool to manage everything your app needs to run. Push commits to deploy changes and control configuration through YAML files. These files describe your infrastructure, making it transparent and version-controlled. - A Platform.sh account. If you don't already have one, [register for a trial account](https://auth.api.platform.sh/register). You can sign up with an email address or an existing GitHub, Bitbucket, or Google account. If you choose one of these accounts, you can set a password for your Platform.sh account later. - The [Platform.sh CLI](https://docs.platform.sh/administration/cli.md). This lets you interact with your project from the command line. You can also do most things through the [Web Console](https://docs.platform.sh/administration/web.md). ##### Initialize a project You can start with a basic code base or push a pre-existing project to Platform.sh. - Create your first project by running the following command: ```bash {} platform create --title ``` Then choose the region you want to deploy to, such as the one closest to your site visitors. You can also select more resources for your project through additional flags, but a Development plan should be enough for you to get started. Copy the ID of the project you've created. - Get your code ready locally. If your code lives in a remote repository, clone it to your computer. If your code isn't in a Git repository, initialize it by running ``git init``. If you don’t have code, create a new Django project from scratch. The following commands create a brand new Django project using [Django Admin](https://docs.djangoproject.com/en/4.1/intro/tutorial01/#creating-a-project). ```bash {} django-admin startproject cd git init git add . && git commit -m "Create basic Django app." ``` The community also provides a number of open-source starting points you can consult: - [django-simple-deploy](https://github.com/ehmatthes/django-simple-deploy) maintained by [@ehmatthes](https://github.com/ehmatthes) - [djangox](https://github.com/wsvincent/djangox) maintained by [@wsvincent](https://github.com/wsvincent) - Connect your Platform.sh project with Git. You can use Platform.sh as your Git repository or connect to a third-party provider: GitHub, GitLab, or BitBucket. That creates an upstream called ``platform`` for your Git repository. When you choose to use a third-party Git hosting service the Platform.sh Git repository becomes a read-only mirror of the third-party repository. All your changes take place in the third-party repository. Add an integration to your existing third party repository. The process varies a bit for each supported service, so check the specific pages for each one. - [BitBucket](https://docs.platform.sh/integrations/source/bitbucket.md) - [GitHub](https://docs.platform.sh/integrations/source/github.md) - [GitLab](https://docs.platform.sh/integrations/source/gitlab.md) Accept the default options or modify to fit your needs. All of your existing branches are automatically synchronized to Platform.sh. You get a deploy failure message because you haven’t provided configuration files yet. You add them in the next step. If you’re integrating a repository to Platform.sh that contains a number of open pull requests, don’t use the default integration options. Projects are limited to three* preview environments (active and deployed branches or pull requests) and you would need to deactivate them individually to test this guide’s migration changes. Instead, each service integration should be made with the following flag: ```bash {} platform integration:add --type= ... --build-pull-requests=false ``` You can then go through this guide and activate the environment when you’re ready to deploy * You can purchase additional preview environments at any time in the Console. Open your project and select **Edit plan**. Add additional **Environments**, view a cost estimate, and confirm your changes. Now you have a local Git repository, a Platform.sh project, and a way to push code to that project. Next you can configure your project to work with Platform.sh. [Configure repository](https://docs.platform.sh/guides/django/deploy/configure.md) #### Configure Django for Platform.sh You now have a *project* running on Platform.sh. In many ways, a project is just a collection of tools around a Git repository. Just like a Git repository, a project has branches, called *environments*. Each environment can then be activated. *Active* environments are built and deployed, giving you a fully isolated running site for each active environment. Once an environment is activated, your app is deployed through a cluster of containers. You can configure these containers in three ways, each corresponding to a [YAML file](https://docs.platform.sh/learn/overview/yaml): - **Configure apps** in a `.platform.app.yaml` file. This controls the configuration of the container where your app lives. - **Add services** in a `.platform/services.yaml` file. This controls what additional services are created to support your app, such as databases or search servers. Each environment has its own independent copy of each service. If you're not using any services, you don't need this file. - **Define routes** in a `.platform/routes.yaml` file. This controls how incoming requests are routed to your app or apps. It also controls the built-in HTTP cache. If you're only using the single default route, you don't need this file. Start by creating empty versions of each of these files in your repository: ```bash # Create empty Platform.sh configuration files mkdir -p .platform && touch .platform/services.yaml && touch .platform/routes.yaml && touch .platform.app.yaml ``` Now that you've added these files to your project, configure each one for Django in the following sections. Each section covers basic configuration options and presents a complete example with comments on why Django requires those values. ###### Configure apps in `.platform.app.yaml` Your app configuration in a `.platform.app.yaml` file is allows you to configure nearly any aspect of your app. For all of the options, see a [complete reference](https://docs.platform.sh/create-apps/app-reference/single-runtime-image.md). The following example shows a complete configuration with comments to explain the various settings. The examples vary based on whether you use Pip, Pipenv, or Poetry to manage dependencies. ```yaml {location=".platform.app.yaml"} ######################### # Django4 using pipenv ########################## # Container configuration. # Complete list of all available properties: https://docs.platform.sh/create-apps/app-reference.html # A unique name for the app. Must be lowercase alphanumeric characters. Changing the name destroys data associated # with the app. name: 'app' # The runtime the application uses. # Complete list of available runtimes: https://docs.platform.sh/create-apps/app-reference.html#types type: 'python:3.10' # The relationships of the application with services or other applications. # The left-hand side is the name of the relationship as it will be exposed # to the application in the PLATFORM_RELATIONSHIPS variable. The right-hand # side is in the form `:`. # More information: https://docs.platform.sh/create-apps/app-reference.html#relationships relationships: database: "db:postgresql" # The size of the persistent disk of the application (in MB). Minimum value is 128. disk: 512 # Mounts define directories that are writable after the build is complete. If set as a local source, disk property is required. # More information: https://docs.platform.sh/create-apps/app-reference.html#mounts mounts: 'logs': source: local source_path: logs '.cache': source: local source_path: cache # The web key configures the web server running in front of your app. # More information: https://docs.platform.sh/create-apps/app-reference.html#web web: # Commands are run once after deployment to start the application process. # More information: https://docs.platform.sh/create-apps/app-reference.html#web-commands commands: # The command to launch your app. If it terminates, it’s restarted immediately. start: "pipenv run gunicorn -w 4 -b unix:$SOCKET myapp.wsgi:application" # More information: https://docs.platform.sh/configuration/app-containers.html#upstream upstream: # Whether your app should speak to the webserver via TCP or Unix socket. Defaults to tcp # More information: https://docs.platform.sh/create-apps/app-reference.html#where-to-listen socket_family: unix # Each key in locations is a path on your site with a leading /. # More information: https://docs.platform.sh/create-apps/app-reference.html#locations locations: "/": # Whether to forward disallowed and missing resources from this location to the app. A string is a path # with a leading / to the controller, such as /index.php. passthru: true "/static": # The directory to serve static assets for this location relative to the app’s root directory. Must be an # actual directory inside the root directory. root: "static" # The number of seconds whitelisted (static) content should be cached. expires: 1h # Whether to allow serving files which don’t match a rule. allow: true # Installs global dependencies as part of the build process. They’re independent of your app’s dependencies and # are available in the PATH during the build process and in the runtime environment. They’re installed before # the build hook runs using a package manager for the language. # More information: https://docs.platform.sh/create-apps/app-reference.html#dependencies dependencies: python3: pipenv: '2022.9.4' # Hooks allow you to customize your code/environment as the project moves through the build and deploy stages # More information: https://docs.platform.sh/create-apps/app-reference.html#hooks hooks: # The build hook is run after any build flavor. # More information: https://docs.platform.sh/create-apps/hooks/hooks-comparison.html#build-hook build: | set -eu # Download the latest version of pip python3.10 -m pip install --upgrade pip # Install dependencies pipenv install --deploy # Collect static assets pipenv run python manage.py collectstatic # The deploy hook is run after the app container has been started, but before it has started accepting requests. # More information: https://docs.platform.sh/create-apps/hooks/hooks-comparison.html#deploy-hook deploy: pipenv run python manage.py migrate ``` ```yaml {location=".platform.app.yaml"} ######################### # Django4 using Poetry ########################## # Container configuration. # Complete list of all available properties: https://docs.platform.sh/create-apps/app-reference.html # A unique name for the app. Must be lowercase alphanumeric characters. Changing the name destroys data associated # with the app. name: 'app' # The runtime the application uses. # Complete list of available runtimes: https://docs.platform.sh/create-apps/app-reference.html#types type: 'python:3.10' # The relationships of the application with services or other applications. # The left-hand side is the name of the relationship as it will be exposed # to the application in the PLATFORM_RELATIONSHIPS variable. The right-hand # side is in the form `:`. # More information: https://docs.platform.sh/create-apps/app-reference.html#relationships relationships: database: "db:postgresql" # The size of the persistent disk of the application (in MB). Minimum value is 128. disk: 512 # Mounts define directories that are writable after the build is complete. If set as a local source, disk property is required. # More information: https://docs.platform.sh/create-apps/app-reference.html#mounts mounts: 'logs': source: local source_path: logs # The web key configures the web server running in front of your app. # More information: https://docs.platform.sh/create-apps/app-reference.html#web web: # Commands are run once after deployment to start the application process. # More information: https://docs.platform.sh/create-apps/app-reference.html#web-commands commands: # The command to launch your app. If it terminates, it’s restarted immediately. start: "poetry run gunicorn -w 4 -b unix:$SOCKET myapp.wsgi:application" # More information: https://docs.platform.sh/configuration/app-containers.html#upstream upstream: # Whether your app should speak to the webserver via TCP or Unix socket. Defaults to tcp # More information: https://docs.platform.sh/create-apps/app-reference.html#where-to-listen socket_family: unix # Each key in locations is a path on your site with a leading /. # More information: https://docs.platform.sh/create-apps/app-reference.html#locations locations: "/": # Whether to forward disallowed and missing resources from this location to the app. A string is a path # with a leading / to the controller, such as /index.php. passthru: true "/static": # The directory to serve static assets for this location relative to the app’s root directory. Must be an # actual directory inside the root directory. root: "static" # The number of seconds whitelisted (static) content should be cached. expires: 1h # Whether to allow serving files which don’t match a rule. allow: true # Variables to control the environment. More information: https://docs.platform.sh/create-apps/app-reference.html#variables variables: env: POETRY_VIRTUALENVS_IN_PROJECT: true POETRY_VIRTUALENVS_CREATE: false # Hooks allow you to customize your code/environment as the project moves through the build and deploy stages # More information: https://docs.platform.sh/create-apps/app-reference.html#hooks hooks: # The build hook is run after any build flavor. # More information: https://docs.platform.sh/create-apps/hooks/hooks-comparison.html#build-hook build: | set -eu # Download the latest version of pip python3.10 -m pip install --upgrade pip # Install and configure Poetry # NOTE: There is a matching export PATH=... in `.environment`, which allows the use of Poetry # in the deploy hook, start command, and during SSH sessions. Make sure to include in your # own projects. export PIP_USER=false curl -sSL https://install.python-poetry.org | python3 - --version $POETRY_VERSION export PATH="/app/.local/bin:$PATH" export PIP_USER=true # Install dependencies poetry install # Collect static assets poetry run python manage.py collectstatic # The deploy hook is run after the app container has been started, but before it has started accepting requests. # More information: https://docs.platform.sh/create-apps/hooks/hooks-comparison.html#deploy-hook deploy: poetry run python manage.py migrate ``` ####### How to start your app Each of these examples includes a command to start your app under `web.commands.start`. It uses the Gunicorn WSGI server and Unix sockets. ```yaml {location=".platform.app.yaml"} web: upstream: socket_family: unix commands: start: "pipenv run gunicorn -w 4 -b unix:$SOCKET myapp.wsgi:application" ``` ```yaml {location=".platform.app.yaml"} web: upstream: socket_family: unix commands: start: "poetry run gunicorn -w 4 -b unix:$SOCKET myapp.wsgi:application" ``` To use this server, update the command to replace the WSGI application Gunicorn calls. The example uses a `myapp/wsgi.py` file with a callable `application`. To use a different web server, change this start command. For examples of how to do so, see more about [Python web servers](https://docs.platform.sh/languages/python/server.md). ###### Add services in `.platform/services.yaml` You can add the managed services you need for you app to run in the `.platform/services.yaml` file. You pick the major version of the service and security and minor updates are applied automatically, so you always get the newest version when you deploy. You should always try any upgrades on a development branch before pushing to production. You can [add other services](https://docs.platform.sh/add-services.md) if desired, such as [Solr](https://docs.platform.sh/add-services/solr.md) or [Elasticsearch](https://docs.platform.sh/add-services/elasticsearch.md). You need to configure Django to use those services once they're enabled. Each service entry has a name (`db` in the example) and a `type` that specifies the service and version to use. Services that store persistent data have a `disk` key, to specify the amount of storage. Below is an example configuration to make [PostgreSQL](https://docs.platform.sh/add-services/postgresql.md) available for your Django application. ```yaml {location=".platform/services.yaml"} # The services of the project. # # Each service listed will be deployed # to power your Platform.sh project. # More information: https://docs.platform.sh/add-services.html # Full list of available services: https://docs.platform.sh/add-services.html#available-services db: type: postgresql:12 disk: 1024 ``` ###### Define routes All HTTP requests sent to your app are controlled through the routing and caching you define in a `.platform/routes.yaml` file. The two most important options are the main route and its caching rules. A route can have a placeholder of `{default}`, which is replaced by your domain name in production and environment-specific names for your preview environments. The main route has an `upstream`, which is the name of the app container to forward requests to. You can enable [HTTP cache](https://docs.platform.sh/define-routes/cache.md). The router includes a basic HTTP cache. By default, HTTP caches includes all cookies in the cache key. So any cookies that you have bust the cache. The `cookies` key allows you to select which cookies should matter for the cache. You can also set up routes as [HTTP redirects](https://docs.platform.sh/define-routes/redirects.md). In the following example, all requests to `www.{default}` are redirected to the equivalent URL without `www`. HTTP requests are automatically redirected to HTTPS. If you don't include a `.platform/routes.yaml` file, a single default route is used. This is equivalent to the following: ```yaml {location=".platform/routes.yaml"} https://{default}/: type: upstream upstream: :http ``` Where `` is the `name` you've defined in your [app configuration](#configure-apps-in-platformappyaml). The following example presents a complete definition of a main route for a Django app: ```bash {location=".platform/routes.yaml"} # The routes of the project. # # Each route describes how an incoming URL is going # to be processed by Platform.sh. # More information: https://docs.platform.sh/define-routes.html "https://{default}/": type: upstream upstream: "app:http" # A basic redirect definition # More information: https://docs.platform.sh/define-routes.html#basic-redirect-definition "https://www.{default}/": type: redirect to: "https://{default}/" ``` #### Customize Django for Platform.sh Now that your code contains all of the configuration to deploy on Platform.sh, it's time to make your Django site itself ready to run on a Platform.sh environment. A number of additional steps are either required or recommended, depending on how much you want to optimize your site. ###### Optional: Set up the Config Reader You can get all information about a deployed environment, including how to connect to services, through [environment variables](https://docs.platform.sh/development/variables.md). Your app can [access these variables](https://docs.platform.sh/development/variables/use-variables.md#access-variables-in-your-app). In all of the following examples, you can replace retrieving and decoding environment variables with this library. ###### Django configuration Most configuration for Django, such as service credentials, is done in a `settings.py` file. You can see an example of a [complete settings file in the Django template](https://github.com/platformsh-templates/django4/blob/master/myapp/settings.py). The example file configures app settings and credentials for connecting to a PostgreSQL database. The environment variables defined there enable Django apps to remain independent of their environment. The example file itself contains a lot of settings, the most important of which are highlighted here to show where you could modify your code. ####### Allowed hosts [`ALLOWED_HOSTS`](https://docs.djangoproject.com/en/4.1/ref/settings/#allowed-hosts) defines the host names that your Django site can serve. It's where you define `localhost` and also your site's primary domain. On Platform.sh, every branch or pull request you create can become an active environment: a deployed site where you can test changes. The environment is given a URL that ends with `.platform.site`. To allow your site to serve these environment, add this suffix to `ALLOWED_HOSTS`. ```py {location="settings.py"} ALLOWED_HOSTS = [ 'localhost', '127.0.0.1', '.platformsh.site', ] ``` ####### Decoding variables Platform.sh environment variables, which contain information on deployed environments, are often obscured. For example, `PLATFORM_RELATIONSHIPS`, which contains credentials to connect to services, is a base64-encoded JSON object. The example Django configuration file has a `decode` helper function to help with these variables. Alternatively, you can use the [Platform.sh Config Reader](#optional-set-up-the-config-reader). ```py {location="settings.py"} ################################################################################# # Platform.sh-specific configuration # Helper function for decoding base64-encoded JSON variables. def decode(variable): """Decodes a Platform.sh environment variable. Args: variable (string): Base64-encoded JSON (the content of an environment variable). Returns: An dict (if representing a JSON object), or a scalar type. Raises: JSON decoding error. """ try: if sys.version_info[1] > 5: return json.loads(base64.b64decode(variable)) else: return json.loads(base64.b64decode(variable).decode('utf-8')) except json.decoder.JSONDecodeError: print('Error decoding JSON, code %d', json.decoder.JSONDecodeError) ``` ####### Handling overrides Once you have a [way to decode variables](#decoding-variables), you can use them to override settings based on the environment. The following example uses the `decode` function to set access to the one service defined in this example, a PostgreSQL database. ```py {location="settings.py"} # This variable must always match the primary database relationship name, # configured in .platform.app.yaml. PLATFORMSH_DB_RELATIONSHIP="database" # Import some Platform.sh settings from the environment. # The following block is only applied within Platform.sh environments # That is, only when this Platform.sh variable is defined if (os.getenv('PLATFORM_APPLICATION_NAME') is not None): DEBUG = False # Redefine the static root based on the Platform.sh directory # See https://docs.djangoproject.com/en/4.1/ref/settings/#static-root if (os.getenv('PLATFORM_APP_DIR') is not None): STATIC_ROOT = os.path.join(os.getenv('PLATFORM_APP_DIR'), 'static') # PLATFORM_PROJECT_ENTROPY is unique to your project # Use it to define define Django's SECRET_KEY # See https://docs.djangoproject.com/en/4.1/ref/settings/#secret-key if (os.getenv('PLATFORM_PROJECT_ENTROPY') is not None): SECRET_KEY = os.getenv('PLATFORM_PROJECT_ENTROPY') # Database service configuration, post-build only # As services aren't available during the build if (os.getenv('PLATFORM_ENVIRONMENT') is not None): platformRelationships = decode(os.getenv('PLATFORM_RELATIONSHIPS')) db_settings = platformRelationships[PLATFORMSH_DB_RELATIONSHIP][0] DATABASES = { 'default': { 'ENGINE': 'django.db.backends.postgresql', 'NAME': db_settings['path'], 'USER': db_settings['username'], 'PASSWORD': db_settings['password'], 'HOST': db_settings['host'], 'PORT': db_settings['port'], }, 'sqlite': { 'ENGINE': 'django.db.backends.sqlite3', 'NAME': os.path.join(BASE_DIR, 'db.sqlite3'), } } ``` As noted in comments in the example, services on Platform.sh (like PostgreSQL) aren't yet available during the build. This it enables the environment-independent builds that make the Platform.sh inheritance model possible. For this reason, when defining a service connection, you need to overwrite the settings during the deploy phase. You can determine the deploy phase using the `PLATFORM_ENVIRONMENT` variable, which is only available at deploy time. ###### `.environment` and Poetry `source .environment` is run in the [app root](https://docs.platform.sh/create-apps/app-reference/single-runtime-image.md#root-directory) when a project starts, before cron commands are run, and when you log into an environment over SSH. So you can use the `.environment` file to make further changes to environment variables before the app runs, including modifying the system `$PATH` and other shell level customizations. Django projects like this example using Pip or Pipenv don't need a `.environment` file to run. Using Poetry requires additional configuration to ensure that Poetry can be called during the deploy phase and SSH sessions. ```text {location=".environment"} # Updates PATH when Poetry is used, making it available during deploys and SSH. if [ -n "$POETRY_VERSION" ]; then export PATH="/app/.local/bin:$PATH" fi ``` If you have other environment variables your app depends on that aren't sensitive and so can be committed to Git, you can include them in the `.environment` file #### Deploy Django Now you have your configuration for deployment and your app set up to run on Platform.sh. Make sure all your code is committed to Git and run `git push` to your Platform.sh environment. Your code is built, producing a read-only image that's deployed to a running cluster of containers. If you aren't using a source integration, the log of the process is returned in your terminal. If you're using a source integration, you can get the log by running `platform activity:log --type environment.push`. When the build finished, you're given the URL of your deployed environment. Click the URL to see your site. If your environment wasn't active and so wasn't deployed, activate it by running the following command: ```bash platform environment:activate ``` ###### Migrate your data If you are moving an existing site to Platform.sh, then in addition to code you also need to migrate your data. That means your database and your files. ####### Import the database First, obtain a database dump from your current site, such as using the * [`pg_dump` command for PostgreSQL](https://www.postgresql.org/docs/current/app-pgdump.md) * [`mysqldump` command for MariaDB](https://mariadb.com/kb/en/mysqldump/) * [`sqlite-dump` command for SQLite](https://www.sqlitetutorial.net/sqlite-dump/) Next, import the database into your Platform.sh site by running the following command: ```bash platform sql **Note**: The example Django app used in this guide can be migrated solely by importing data into the database. Other forms of data, such as user uploads, also need to be migrated in the way described above. To see how to define directories that are writable at runtime, see the [mounts reference](https://docs.platform.sh/create-apps/app-reference/single-runtime-image.md#mounts). Then adjust the previous commands to upload files to them. Go forth and Deploy (even on Friday)! #### Additional resources ###### Local development Once Django has been deployed on Platform.sh, you need to set up a local development environment to begin making revisions. For more information, consult the [Django local development guides](https://docs.platform.sh/guides/django/local.md). ###### Package management pip comes pre-installed on all Python containers. You can also use Pipenv and Poetry to manage dependencies, but there are a caveats to keep in mind when using those tools. For more information, see how to [manage Python dependencies](https://docs.platform.sh/languages/python/dependencies.md). ###### Web servers The examples in this guide primarily use Gunicorn as a web server for Django apps. Other servers such as Daphne and Uvicorn are equally supported. See how to configure [Python web servers](https://docs.platform.sh/languages/python/server.md). ###### Sanitize data By default, each preview environment automatically inherits all data from its parent environment. So a developer working on a small feature has access to production data, including personally identifiable information (PII). This workflow isn't always desirable or even acceptable based on your compliance requirements. For how to enforce compliance requirements for user data across environments, see how to [sanitize databases](https://docs.platform.sh/development/sanitize-db.md). [Back](https://docs.platform.sh/guides/django/deploy/deploy.md) ### Local development A significant amount of work developing Django takes place locally rather than on an active Platform.sh environment. You want to ensure that the process of local development is as close as possible to a deployed environment. You can achieve this through various approaches. Each of these examples: - Creates a local development environment for a Django site. - Syncs data from the active Platform.sh environment where team review takes place. - Commits aspects of that local development method to the project so collaborators can replicate configuration to contribute. If you're already using Docker Compose, consult the Community guide on [using Docker Compose with Django and Platform.sh](https://support.platform.sh/hc/en-us/community/posts/16439578981138). #### DDEV [DDEV](https://ddev.readthedocs.io/en/stable/) is an open-source tool for local development environments. It allows you to use Docker in your workflows while maintaining a GitOps workflow. You get fully containerized environments to run everything locally without having to install tools (including the Platform.sh CLI, PHP, and Composer) on your machine. ###### Before you begin You need: - A local copy of the repository for a [Django](https://docs.platform.sh../deploy.md) project running on Platform.sh. To get one, run ``platform get ``. Alternatively, you can clone an integrated source repository and set the remote branch. To do so, run ``platform project:set-remote ``. - The [Platform.sh CLI](https://docs.platform.sh/administration/cli.md) - DDEV installed on your computer. Make sure your computer meets the [system requirements for DDEV](https://ddev.readthedocs.io/en/stable/#system-requirements). For the integration to run smoothly, you also need the following tools: - `jq` - `base64` - `perl` If you don't have these already installed, use your normal package manager. To install DDEV, follow the [DDEV documentation for your operating system](https://ddev.readthedocs.io/en/stable/users/install/ddev-installation/). This installs the self-contained `ddev` command-line interface (CLI). For more information on `ddev`, run `ddev help`. ###### Assumptions This example makes some assumptions, which you may need to adjust for your own circumstances. It's assumed you want to run a built-in lightweight development server with `manage.py runserver`. To match a production web server (such as Gunicorn or Daphne), [modify those commands accordingly](https://docs.platform.sh../../../languages/python/server.md). It's generally assumed that Platform.sh is the primary remote for the project. If you use a source integration, the steps are identical in most cases. When they differ, the alternative is noted. ###### Set up DDEV 1. Create a new environment off of production. ```bash platform branch new-feature main ``` If you're using a [source integration](https://docs.platform.sh/integrations/source.md), open a merge/pull request. 2. Add DDEV configuration to the project. ```bash ddev config --auto ``` 3. Add a Python alias package to the configuration. ```bash ddev config --webimage-extra-packages python-is-python3 ``` 4. Add an API token. To connect DDEV with your Platform.sh account, use a Platform.sh API token. First [create an API token](https://docs.platform.sh/administration/cli/api-tokens.md#2-create-an-api-token) in the Console. Then add the token to your DDEV configuration. You can do so globally (easiest for most people): ```bash ddev config global --web-environment-add=PLATFORMSH_CLI_TOKEN= ``` You can also add the token only to the project: ```bash ddev config --web-environment-add=PLATFORMSH_CLI_TOKEN= ``` 5. Connect DDEV to your project and the `new-feature` environment. The best way to connect your local DDEV to your Platform.sh project is through the [Platform.sh DDEV add-on](https://github.com/ddev/ddev-platformsh). To add it, run the following command: ```bash ddev get ddev/ddev-platformsh ``` Answer the interactive prompts with your project ID and the name of the environment to pull data from. With the add-on, you can now run `ddev platform ` from your computer without needing to install the Platform.sh CLI. 6. Update the DDEV PHP version. Python support in DDEV and the Platform.sh integration is in active development. At this time, the only officially supported runtime is PHP. With a few changes, the generated configuration can be modified to run local Django environments. A `.ddev` directory has been created in the repository containing DDEV configuration. In the `.ddev/config.platformsh.yaml` file, update the `php_version` attribute to a supported version, like `8.2`. ```yaml {location=".ddev/config.platformsh.yaml"} # Leaving the generated line as is results in an error. # php_version: python:3.10 php_version: 8.2 ``` 7. Update the DDEV `post-start` hooks. The generated configuration contains a `hooks.post-start` attribute that contains Django's `hooks.build` and `hooks.deploy`. Add another item to the end of that array with the start command defined in `.platform.app.yaml`: ```yaml {location=".ddev/docker-compose.django.yaml"} hooks: post-start: ... # Platform.sh start command - exec: pipenv run python manage.py runserver 0.0.0.0:8000 ``` ```yaml {location=".ddev/docker-compose.django.yaml"} hooks: post-start: ... # Platform.sh start command - exec: poetry run python manage.py runserver 0.0.0.0:8000 ``` 8. Create a custom Docker Compose file to define the port exposed for the container you're building, `web`: ```yaml {location=".ddev/docker-compose.django.yaml"} version: "3.6" services: web: expose: - 8000 environment: - HTTP_EXPOSE=80:8000 - HTTPS_EXPOSE=443:8000 healthcheck: test: "true" ``` 9. Create a custom `Dockerfile` to install Python into the container. ``` {location=".ddev/web-build/Dockerfile.python"} RUN apt-get install -y python3.10 python3-pip ``` 10. Update your allowed hosts to include the expected DDEV domain suffix: ```py {location="APP_NAME/settings.py"} ALLOWED_HOSTS = [ 'localhost', '127.0.0.1', '.platformsh.site', '.ddev.site' ] ``` 11. Update your database configuration to include environment variables provided by DDEV: ```py {location="APP_NAME/settings.py"} DATABASES = { 'default': { 'ENGINE': 'django.db.backends.postgresql', 'NAME': os.environ.get('POSTGRES_NAME'), 'USER': os.environ.get('POSTGRES_USER'), 'PASSWORD': os.environ.get('POSTGRES_PASSWORD'), 'HOST': 'db', 'PORT': 5432, } } ``` This example assumes you have a PostgreSQL database with `db` as the relationship name. If you have a different setup, adjust the values accordingly. 12. Start DDEV. Build and start up Django for the first time. ```bash ddev start ``` If you have another process running, you may get an error such as the following: ```bash Failed to start django: Unable to listen on required ports, port 80 is already in use ``` If you do, either cancel the running process on port `80` or do both of the following: - Edit `router_http_port` in `.ddev/config.yaml` to another port such as `8080`. - Edit the `services.web.environment` variable `HTTP_EXPOSE` in `ddev/docker-compose.django.yaml` to `HTTP_EXPOSE=8080:8000`. 13. Pull data from the environment. Exit the currently running process (`CTRL+C`) and then run the following command to retrieve data from the current Platform.sh environment: ```bash ddev pull platform ``` 14. Restart DDEV ```bash ddev restart ``` You now have a local development environment that's in sync with the `new-feature` environment on Platform.sh. 15. When you finish your work, shut down DDEV. ```bash ddev stop ``` ###### Next steps You can now use your local environment to develop changes for review on Platform.sh environments. The following examples show how you can take advantage of that. ####### Onboard collaborators It's essential for every developer on your team to have a local development environment to work on. Place the local configuration into a script to ensure everyone has this. You can merge this change into production. 1. Create a new environment called `local-config`. 2. To set up a local environment for a new Platform.sh environment, create an executable script. ```bash touch init-local.sh && chmod +x init-local.sh ``` 3. Fill it with the following example, depending on your package manager: ```bash {location="init-local.sh"} #!/usr/bin/env bash PROJECT=$1 ENVIRONMENT=$2 PARENT=$3 # Create the new environment platform branch $ENVIRONMENT $PARENT # Configure DDEV ddev config --auto ddev config --web-environment-add PLATFORM_PROJECT=$PROJECT ddev config --web-environment-add PLATFORM_ENVIRONMENT=$ENVIRONMENT ddev config --webimage-extra-packages python-is-python3 ddev get drud/ddev-platformsh # Update .ddev/config.platformsh.yaml # 1. hooks.post-start printf " # Platform.sh start command\n - exec: |\n pipenv run python manage.py runserver 0.0.0.0:8000" >> .ddev/config.platformsh.yaml # 2. php_version grep -v "php_version" .ddev/config.platformsh.yaml > tmpfile && mv tmpfile .ddev/config.platformsh.yaml printf "\nphp_version: 8.0" >> .ddev/config.platformsh.yaml # Create a docker-compose.django.yaml printf " version: \"3.6\" services: web: expose: - 8000 environment: - HTTP_EXPOSE=80:8000 - HTTPS_EXPOSE=443:8000 healthcheck: test: \"true\" " > .ddev/docker-compose.django.yaml # Create Dockerfile.python printf " RUN apt-get install -y python3.10 python3-pip " > .ddev/web-build/Dockerfile.python ddev start ddev pull platform -y ddev restart ``` ```bash {location="init-local.sh"} #!/usr/bin/env bash PROJECT=$1 ENVIRONMENT=$2 PARENT=$3 # Create the new environment platform branch $ENVIRONMENT $PARENT # Configure DDEV ddev config --auto ddev config --web-environment-add PLATFORM_PROJECT=$PROJECT ddev config --web-environment-add PLATFORM_ENVIRONMENT=$ENVIRONMENT ddev config --webimage-extra-packages python-is-python3 ddev get drud/ddev-platformsh # Update .ddev/config.platformsh.yaml # 1. hooks.post-start printf " # Platform.sh start command\n - exec: |\n poetry run python manage.py runserver 0.0.0.0:8000" >> .ddev/config.platformsh.yaml # 2. php_version grep -v "php_version" .ddev/config.platformsh.yaml > tmpfile && mv tmpfile .ddev/config.platformsh.yaml printf "\nphp_version: 8.0" >> .ddev/config.platformsh.yaml # Create a docker-compose.django.yaml printf " version: \"3.6\" services: web: expose: - 8000 environment: - HTTP_EXPOSE=80:8000 - HTTPS_EXPOSE=443:8000 healthcheck: test: \"true\" " > .ddev/docker-compose.django.yaml # Create Dockerfile.python printf " RUN apt-get install -y python3.10 python3-pip " > .ddev/web-build/Dockerfile.python ddev start ddev pull platform -y ddev restart ``` 4. To commit and push the revisions, run the following command: ```bash git add . && git commit -m "Add local configuration" && git push platform local-config ``` 5. Merge the change into production. Once the script is merged into production, any user can set up their local environment by running the following commands: ```bash platform cd ./init-local.sh another-new-feature ``` ####### Sanitize data It's often a compliance requirement to ensure that only a minimal subset of developers within an organization have access to production data during their work. By default, your production data is automatically cloned into _every_ child environment. You can customize your deployments to include a script that sanitizes the data within every preview environment. 1. Create a new environment called `sanitize-non-prod`. 2. Follow the example on how to [sanitize PostgreSQL with Django](https://docs.platform.sh../../../development/sanitize-db/postgresql.md). This adds a sanitization script to your deploy hook that runs on all preview environments. 3. Commit and push the revisions by running the following command: ```bash git add . && git commit -m "Add data sanitization" && git push platform sanitize-non-prod ``` 4. Merge the change into production. Once the script is merged into production, every preview environment created on Platform.sh and all local environments contain sanitized data free of your users' personally identifiable information (PII). #### Tethered local **Note**: This guide is an example for setting up a local development environment for Django. The recommended tool for local development is DDEV. See the [Django DDEV guide](https://docs.platform.sh/guides/django/local/ddev.md). To test changes locally, you can connect your locally running Django server to service containers on an active Platform.sh environment. ###### Before you begin You need: - A local copy of the repository for a [Django](https://docs.platform.sh../deploy.md) project running on Platform.sh. To get one, run ``platform get ``. Alternatively, you can clone an integrated source repository and set the remote branch. To do so, run ``platform project:set-remote ``. - The [Platform.sh CLI](https://docs.platform.sh/administration/cli.md) ###### Assumptions This example makes some assumptions, which you may need to adjust for your own circumstances. It's assumed you want to run a built-in lightweight development server with `manage.py runserver`. To match a production web server (such as Gunicorn or Daphne), [modify those commands accordingly](https://docs.platform.sh../../../languages/python/server.md). It's generally assumed that Platform.sh is the primary remote for the project. If you use a source integration, the steps are identical in most cases. When they differ, the alternative is noted. If you followed the [Django deployment guide](https://docs.platform.sh/guides/django/deploy.md), you should have a Django configuration file with settings for [decoding variables](https://docs.platform.sh/guides/django/deploy/customize.md#decoding-variables) and also [overrides for Platform.sh](https://docs.platform.sh/guides/django/deploy/customize.md#decoding-variables). You can use these settings to set up a tethered connection to services running on a Platform.sh environment. The settings are used to mock the conditions of the environment locally. ###### Create the tethered connection 1. Create a new environment based on production. ```bash platform branch new-feature ``` If you're using a [source integration](https://docs.platform.sh/integrations/source.md), open a merge/pull request. 1. To open an SSH tunnel to the new environment's services, run the following command: ```bash platform tunnel:open ``` This command returns the addresses for SSH tunnels to all of your services. 1. Export the `PLATFORMSH_RELATIONSHIPS` environment variable with information from the open tunnel: ```bash export PLATFORM_RELATIONSHIPS="$(platform tunnel:info --encode)" ``` 1. To ensure your `settings.py` file acts as if in a Platform.sh environment, mock two variables present in active environments: ```bash export PLATFORM_APPLICATION_NAME=django && export PLATFORM_ENVIRONMENT=new-feature ``` 1. To install dependencies, run the command for your package manager: ```bash {} pipenv install ``` ```bash {} poetry install ``` 1. Collect static assets. ```bash {} pipenv run python manage.py collectstatic ``` ```bash {} poetry run python manage.py collectstatic ``` 1. To start your local server, run the following command based on your package manager: ```bash {} pipenv run python manage.py runserver ``` ```bash {} poetry run python manage.py runserver ``` 1. When you've finished your work, close the tunnels to your services by running the following command: ```bash platform tunnel:close --all -y ``` ###### Next steps You can now use your local environment to develop changes for review on Platform.sh environments. The following examples show how you can take advantage of that. ####### Onboard collaborators It's essential for every developer on your team to have a local development environment to work on. Place the local configuration into a script to ensure everyone has this. You can merge this change into production. 1. Create a new environment called `local-config`. 1. To set up a local environment for a new Platform.sh environment, create an executable script. ```bash touch init-local.sh && chmod +x init-local.sh ``` 1. Fill it with the following example, depending on your package manager: ```bash {location="init-local.sh"} #!/usr/bin/env bash PROJECT=$1 ENVIRONMENT=$2 PARENT=$3 # Create the new environment platform branch $ENVIRONMENT $PARENT # Configure DDEV ddev config --auto ddev config --web-environment-add PLATFORM_PROJECT=$PROJECT ddev config --web-environment-add PLATFORM_ENVIRONMENT=$ENVIRONMENT ddev config --webimage-extra-packages python-is-python3 ddev get drud/ddev-platformsh # Update .ddev/config.platformsh.yaml # 1. hooks.post-start printf " # Platform.sh start command\n - exec: |\n pipenv run python manage.py runserver 0.0.0.0:8000" >> .ddev/config.platformsh.yaml # 2. php_version grep -v "php_version" .ddev/config.platformsh.yaml > tmpfile && mv tmpfile .ddev/config.platformsh.yaml printf "\nphp_version: 8.0" >> .ddev/config.platformsh.yaml # Create a docker-compose.django.yaml printf " version: \"3.6\" services: web: expose: - 8000 environment: - HTTP_EXPOSE=80:8000 - HTTPS_EXPOSE=443:8000 healthcheck: test: \"true\" " > .ddev/docker-compose.django.yaml # Create Dockerfile.python printf " RUN apt-get install -y python3.10 python3-pip " > .ddev/web-build/Dockerfile.python ddev start ddev pull platform -y ddev restart ``` ```bash {location="init-local.sh"} #!/usr/bin/env bash PROJECT=$1 ENVIRONMENT=$2 PARENT=$3 # Create the new environment platform branch $ENVIRONMENT $PARENT # Configure DDEV ddev config --auto ddev config --web-environment-add PLATFORM_PROJECT=$PROJECT ddev config --web-environment-add PLATFORM_ENVIRONMENT=$ENVIRONMENT ddev config --webimage-extra-packages python-is-python3 ddev get drud/ddev-platformsh # Update .ddev/config.platformsh.yaml # 1. hooks.post-start printf " # Platform.sh start command\n - exec: |\n poetry run python manage.py runserver 0.0.0.0:8000" >> .ddev/config.platformsh.yaml # 2. php_version grep -v "php_version" .ddev/config.platformsh.yaml > tmpfile && mv tmpfile .ddev/config.platformsh.yaml printf "\nphp_version: 8.0" >> .ddev/config.platformsh.yaml # Create a docker-compose.django.yaml printf " version: \"3.6\" services: web: expose: - 8000 environment: - HTTP_EXPOSE=80:8000 - HTTPS_EXPOSE=443:8000 healthcheck: test: \"true\" " > .ddev/docker-compose.django.yaml # Create Dockerfile.python printf " RUN apt-get install -y python3.10 python3-pip " > .ddev/web-build/Dockerfile.python ddev start ddev pull platform -y ddev restart ``` 1. To commit and push the revisions, run the following command: ```bash git add . && git commit -m "Add local configuration" && git push platform local-config ``` 1. Merge the change into production. Once the script is merged into production, any user can set up their local environment by running the following commands: ```bash platform cd ./init-local.sh another-new-feature ``` ####### Sanitize data It's often a compliance requirement to ensure that only a minimal subset of developers within an organization have access to production data during their work. By default, your production data is automatically cloned into _every_ child environment. You can customize your deployments to include a script that sanitizes the data within every preview environment. 1. Create a new environment called `sanitize-non-prod`. 2. Follow the example on how to [sanitize PostgreSQL with Django](https://docs.platform.sh../../../development/sanitize-db/postgresql.md). This adds a sanitization script to your deploy hook that runs on all preview environments. 3. Commit and push the revisions by running the following command: ```bash git add . && git commit -m "Add data sanitization" && git push platform sanitize-non-prod ``` 4. Merge the change into production. Once the script is merged into production, every preview environment created on Platform.sh and all local environments contain sanitized data free of your users' personally identifiable information (PII). ### Deploy Drupal on Platform.sh Drupal is a flexible and extensible PHP-based CMS framework. To deploy Drupal on Platform.sh, the recommended way is to use Composer, the PHP package management suite. This guide assumes you are using the well-supported Composer flavor of Drupal. To get Drupal running on Platform.sh, you have two potential starting places: - You already have a [Composer-flavored Drupal](https://github.com/drupal/recommended-project/) site you are trying to deploy. Go through this guide to make the recommended changes to your repository to prepare it for Platform.sh. - You have no code at this point. If you have no code, you have two choices: - Generate a basic [Composer-flavored Drupal](https://github.com/drupal/recommended-project/) site. See an example for doing this under initializing a project. - Use a ready-made [Drupal template](https://github.com/platformsh-templates/drupal10). A template is a starting point for building your project. It should help you get a project ready for production. To use a template, click the button below to create a Drupal template project. ![Deploy on Platform.sh](https://platform.sh/images/deploy/lg-blue.svg) Once the template is deployed, you can follow the rest of this guide to better understand the extra files and changes to the repository. ##### Before you begin You need: - [Git](https://git-scm.com/downloads). Git is the primary tool to manage everything your app needs to run. Push commits to deploy changes and control configuration through YAML files. These files describe your infrastructure, making it transparent and version-controlled. - A Platform.sh account. If you don't already have one, [register for a trial account](https://auth.api.platform.sh/register). You can sign up with an email address or an existing GitHub, Bitbucket, or Google account. If you choose one of these accounts, you can set a password for your Platform.sh account later. - The [Platform.sh CLI](https://docs.platform.sh/administration/cli.md). This lets you interact with your project from the command line. You can also do most things through the [Web Console](https://docs.platform.sh/administration/web.md). ##### Initialize a project You can start with a basic code base or push a pre-existing project to Platform.sh. - Create your first project by running the following command: ```bash {} platform create --title ``` Then choose the region you want to deploy to, such as the one closest to your site visitors. You can also select more resources for your project through additional flags, but a Development plan should be enough for you to get started. Copy the ID of the project you've created. - Get your code ready locally. If your code lives in a remote repository, clone it to your computer. If your code isn't in a Git repository, initialize it by running ``git init``. If you don’t have code, create a new Drupal project from scratch. The following commands create a brand new Drupal project using Composer. ```bash {} composer create-project drupal/core-recommended cd git init git add . && git commit -m "Init Drupal from upstream." ``` - Connect your Platform.sh project with Git. You can use Platform.sh as your Git repository or connect to a third-party provider: GitHub, GitLab, or BitBucket. That creates an upstream called ``platform`` for your Git repository. When you choose to use a third-party Git hosting service the Platform.sh Git repository becomes a read-only mirror of the third-party repository. All your changes take place in the third-party repository. Add an integration to your existing third party repository. The process varies a bit for each supported service, so check the specific pages for each one. - [BitBucket](https://docs.platform.sh/integrations/source/bitbucket.md) - [GitHub](https://docs.platform.sh/integrations/source/github.md) - [GitLab](https://docs.platform.sh/integrations/source/gitlab.md) Accept the default options or modify to fit your needs. All of your existing branches are automatically synchronized to Platform.sh. You get a deploy failure message because you haven’t provided configuration files yet. You add them in the next step. If you’re integrating a repository to Platform.sh that contains a number of open pull requests, don’t use the default integration options. Projects are limited to three* preview environments (active and deployed branches or pull requests) and you would need to deactivate them individually to test this guide’s migration changes. Instead, each service integration should be made with the following flag: ```bash {} platform integration:add --type= ... --build-pull-requests=false ``` You can then go through this guide and activate the environment when you’re ready to deploy * You can purchase additional preview environments at any time in the Console. Open your project and select **Edit plan**. Add additional **Environments**, view a cost estimate, and confirm your changes. Now you have a local Git repository, a Platform.sh project, and a way to push code to that project. Next you can configure your project to work with Platform.sh. [Configure repository](https://docs.platform.sh/guides/drupal/deploy/configure.md) #### Configure Drupal for Platform.sh You now have a *project* running on Platform.sh. In many ways, a project is just a collection of tools around a Git repository. Just like a Git repository, a project has branches, called *environments*. Each environment can then be activated. *Active* environments are built and deployed, giving you a fully isolated running site for each active environment. Once an environment is activated, your app is deployed through a cluster of containers. You can configure these containers in three ways, each corresponding to a [YAML file](https://docs.platform.sh/learn/overview/yaml): - **Configure apps** in a `.platform.app.yaml` file. This controls the configuration of the container where your app lives. - **Add services** in a `.platform/services.yaml` file. This controls what additional services are created to support your app, such as databases or search servers. Each environment has its own independent copy of each service. If you're not using any services, you don't need this file. - **Define routes** in a `.platform/routes.yaml` file. This controls how incoming requests are routed to your app or apps. It also controls the built-in HTTP cache. If you're only using the single default route, you don't need this file. Start by creating empty versions of each of these files in your repository: ```bash # Create empty Platform.sh configuration files mkdir -p .platform && touch .platform/services.yaml && touch .platform/routes.yaml && touch .platform.app.yaml ``` Now that you've added these files to your project, configure each one for Drupal in the following sections. Each section covers basic configuration options and presents a complete example with comments on why Drupal requires those values. ###### Configure apps in `.platform.app.yaml` Your app configuration in a `.platform.app.yaml` file is allows you to configure nearly any aspect of your app. For all of the options, see a [complete reference](https://docs.platform.sh/create-apps/app-reference/single-runtime-image.md). The following example shows a complete configuration with comments to explain the various settings. ```yaml {location=".platform.app.yaml"} # This file describes an application. You can have multiple applications # in the same project. # # See https://docs.platform.sh/configuration/app.html # The name of this app. Must be unique within a project. name: 'drupal' # The runtime the application uses. type: 'php:8.1' dependencies: php: composer/composer: '^2.1' runtime: # Enable the redis extension so Drupal can communicate with the Redis cache. extensions: - redis - sodium - apcu - blackfire # The relationships of the application with services or other applications. # # The left-hand side is the name of the relationship as it will be exposed # to the application in the PLATFORM_RELATIONSHIPS variable. The right-hand # side is in the form `:`. relationships: database: 'db:mysql' redis: 'cache:redis' # The size of the persistent disk of the application (in MB). disk: 2048 # The 'mounts' describe writable, persistent filesystem mounts in the application. mounts: # The default Drupal files directory. '/web/sites/default/files': source: local source_path: 'files' # Drupal gets its own dedicated tmp directory. The settings.platformsh.php # file will automatically configure Drupal to use this directory. '/tmp': source: local source_path: 'tmp' # Private file uploads are stored outside the web root. The settings.platformsh.php # file will automatically configure Drupal to use this directory. '/private': source: local source_path: 'private' # Drush needs a scratch space for its own caches. '/.drush': source: local source_path: 'drush' # Drush will try to save backups to this directory, so it must be # writeable even though you will almost never need to use it. '/drush-backups': source: local source_path: 'drush-backups' # Drupal Console will try to save backups to this directory, so it must be # writeable even though you will almost never need to use it. '/.console': source: local source_path: 'console' # Configuration of the build of this application. build: flavor: composer # The hooks executed at various points in the lifecycle of the application. hooks: # The build hook runs after Composer to finish preparing up your code. # No services are available but the disk is writeable. build: | set -e # The deploy hook runs after your application has been deployed and started. # Code cannot be modified at this point but the database is available. # The site is not accepting requests while this script runs so keep it # fast. deploy: | set -e php ./drush/platformsh_generate_drush_yml.php # if drupal is installed, will call the following drush commands: # - `cache-rebuild` # - `updatedb` # - and if config files are present, `config-import` cd web bash $PLATFORM_APP_DIR/drush/platformsh_deploy_drupal.sh # The configuration of app when it is exposed to the web. web: locations: # All requests not otherwise specified follow these rules. '/': # The folder from which to serve static assets, for this location. # # This is a filesystem path, relative to the application root. root: 'web' # How long to allow static assets from this location to be cached. # # Can be a time in seconds, or -1 for no caching. Times can be # suffixed with "s" (seconds), "m" (minutes), "h" (hours), "d" # (days), "w" (weeks), "M" (months, as 30 days) or "y" (years, as # 365 days). expires: 5m # Redirect any incoming request to Drupal's front controller. passthru: '/index.php' # Deny access to all static files, except those specifically allowed below. allow: false # Rules for specific URI patterns. rules: # Allow access to common static files. '\.(avif|webp|jpe?g|png|gif|svgz?|css|js|map|ico|bmp|eot|woff2?|otf|ttf)$': allow: true '^/robots\.txt$': allow: true '^/sitemap\.xml$': allow: true # Deny direct access to configuration files. '^/sites/sites\.php$': scripts: false '^/sites/[^/]+/settings.*?\.php$': scripts: false # The files directory has its own special configuration rules. '/sites/default/files': # Allow access to all files in the public files directory. allow: true expires: 5m passthru: '/index.php' root: 'web/sites/default/files' # Do not execute PHP scripts from the writeable mount. scripts: false rules: # Provide a longer TTL (2 weeks) for aggregated CSS and JS files. '^/sites/default/files/(css|js)': expires: 2w crons: # Run Drupal's cron tasks every 19 minutes. drupal: spec: '*/19 * * * *' commands: start: 'cd web ; drush core-cron' source: operations: auto-update: command: | curl -fsS https://raw.githubusercontent.com/platformsh/source-operations/main/setup.sh | { bash /dev/fd/3 sop-autoupdate; } 3 ###### Add services in `.platform/services.yaml` You can add the managed services you need for you app to run in the `.platform/services.yaml` file. You pick the major version of the service and security and minor updates are applied automatically, so you always get the newest version when you deploy. You should always try any upgrades on a development branch before pushing to production. We recommend the latest [MariaDB](https://docs.platform.sh/add-services/mysql.md) version for Drupal, although you can also use Oracle MySQL or [PostgreSQL](https://docs.platform.sh/add-services/postgresql.md). For Drupal caching, we strongly recommend [Redis](https://docs.platform.sh/add-services/redis.md). Drupal’s cache can be very aggressive, and keeping that data out of the database helps with both performance and disk usage. See an example of Redis for caching in our [Drupal template](https://github.com/platformsh-templates/drupal10). You can [add other services](https://docs.platform.sh/add-services.md) if desired, such as [Solr](https://docs.platform.sh/add-services/solr.md) or [Elasticsearch](https://docs.platform.sh/add-services/elasticsearch.md). You need to configure Drupal to use those services once they're enabled. Each service entry has a name (`db` and `cache` in the example) and a `type` that specifies the service and version to use. Services that store persistent data have a `disk` key, to specify the amount of storage. ```yaml {location=".platform/services.yaml"} # The services of the project. # # Each service listed will be deployed # to power your Platform.sh project. db: type: mariadb:10.11 disk: 2048 cache: type: redis:7.2 ``` ###### Define routes All HTTP requests sent to your app are controlled through the routing and caching you define in a `.platform/routes.yaml` file. The two most important options are the main route and its caching rules. A route can have a placeholder of `{default}`, which is replaced by your domain name in production and environment-specific names for your preview environments. The main route has an `upstream`, which is the name of the app container to forward requests to. You can enable [HTTP cache](https://docs.platform.sh/define-routes/cache.md). The router includes a basic HTTP cache. By default, HTTP caches includes all cookies in the cache key. So any cookies that you have bust the cache. The `cookies` key allows you to select which cookies should matter for the cache. Generally, you want the user session cookie, which is included in the example for Drupal. You may need to add other cookies depending on what additional modules you have installed. You can also set up routes as [HTTP redirects](https://docs.platform.sh/define-routes/redirects.md). In the following example, all requests to `www.{default}` are redirected to the equivalent URL without `www`. HTTP requests are automatically redirected to HTTPS. If you don't include a `.platform/routes.yaml` file, a single default route is used. This is equivalent to the following: ```yaml {location=".platform/routes.yaml"} https://{default}/: type: upstream upstream: :http ``` Where `` is the `name` you've defined in your [app configuration](#configure-apps-in-platformappyaml). The following example presents a complete definition of a main route for a Drupal app: ```bash {location=".platform/routes.yaml"} # The routes of the project. # # Each route describes how an incoming URL is going # to be processed by Platform.sh. "https://{default}/": type: upstream upstream: "drupal:http" cache: enabled: true # Base the cache on the session cookie and custom Drupal cookies. Ignore all other cookies. cookies: ['/^SS?ESS/', '/^Drupal.visitor/'] "https://www.{default}/": type: redirect to: "https://{default}/" ``` #### Customize Drupal for Platform.sh Now that your code contains all of the configuration to deploy on Platform.sh, it's time to make your Drupal site itself ready to run on a Platform.sh environment. There are a number of additional steps that are either required or recommended, depending on how well you want to optimize your site. ###### Install the Config Reader You can get all information about a deployed environment, including how to connect to services, through [environment variables](https://docs.platform.sh/development/variables.md). Your app can [access these variables](https://docs.platform.sh/development/variables/use-variables.md#access-variables-in-your-app). The following examples use it, so install it through Composer if you haven't already. ```bash composer require platformsh/config-reader ``` ###### `settings.php` `settings.php` is the main Drupal environment-configuration file. In a stock Drupal installation it contains the database credentials, various other settings, and an enormous amount of comments. In the Drupal template, the [`settings.php`](https://github.com/platformsh-templates/drupal10/blob/master/web/sites/default/settings.php) file is mostly replaced with a stub that contains only the most basic configuration and then includes a `settings.platformsh.php` and `settings.local.php` file, if they exist. The latter is a common Drupal pattern, and the `settings.local.php` file should never be committed to Git. It contains configuration that's specific to your local development environment, such as a local development database. The `settings.platformsh.php` file contains glue code that configures Drupal based on the information available in Platform.sh's environment variables. That includes the database credentials, Redis caching, and file system paths. The file itself is a bit long, but reasonably self-explanatory. ```php hasRelationship('database')) { $creds = $platformsh->credentials('database'); $databases['default']['default'] = [ 'driver' => $creds['scheme'], 'database' => $creds['path'], 'username' => $creds['username'], 'password' => $creds['password'], 'host' => $creds['host'], 'port' => $creds['port'], 'pdo' => [PDO::MYSQL_ATTR_COMPRESS => !empty($creds['query']['compression'])], 'init_commands' => [ 'isolation_level' => 'SET SESSION TRANSACTION ISOLATION LEVEL READ COMMITTED', ], ]; } // Enable verbose error messages on development branches, but not on the production branch. // You may add more debug-centric settings here if desired to have them automatically enable // on development but not production. if (isset($platformsh->branch)) { // Production type environment. if ($platformsh->onProduction() || $platformsh->onDedicated()) { $config['system.logging']['error_level'] = 'hide'; } // Development type environment. else { $config['system.logging']['error_level'] = 'verbose'; } } // Enable Redis caching. if ($platformsh->hasRelationship('redis') && !InstallerKernel::installationAttempted() && extension_loaded('redis') && class_exists('Drupal\redis\ClientFactory')) { $redis = $platformsh->credentials('redis'); // Set Redis as the default backend for any cache bin not otherwise specified. $settings['cache']['default'] = 'cache.backend.redis'; $settings['redis.connection']['host'] = $redis['host']; $settings['redis.connection']['port'] = $redis['port']; // Apply changes to the container configuration to better leverage Redis. // This includes using Redis for the lock and flood control systems, as well // as the cache tag checksum. Alternatively, copy the contents of that file // to your project-specific services.yml file, modify as appropriate, and // remove this line. $settings['container_yamls'][] = 'modules/contrib/redis/example.services.yml'; // Allow the services to work before the Redis module itself is enabled. $settings['container_yamls'][] = 'modules/contrib/redis/redis.services.yml'; // Manually add the classloader path, this is required for the container cache bin definition below // and allows to use it without the redis module being enabled. $class_loader->addPsr4('Drupal\\redis\\', 'modules/contrib/redis/src'); // Use redis for container cache. // The container cache is used to load the container definition itself, and // thus any configuration stored in the container itself is not available // yet. These lines force the container cache to use Redis rather than the // default SQL cache. $settings['bootstrap_container_definition'] = [ 'parameters' => [], 'services' => [ 'redis.factory' => [ 'class' => 'Drupal\redis\ClientFactory', ], 'cache.backend.redis' => [ 'class' => 'Drupal\redis\Cache\CacheBackendFactory', 'arguments' => ['@redis.factory', '@cache_tags_provider.container', '@serialization.phpserialize'], ], 'cache.container' => [ 'class' => '\Drupal\redis\Cache\PhpRedis', 'factory' => ['@cache.backend.redis', 'get'], 'arguments' => ['container'], ], 'cache_tags_provider.container' => [ 'class' => 'Drupal\redis\Cache\RedisCacheTagsChecksum', 'arguments' => ['@redis.factory'], ], 'serialization.phpserialize' => [ 'class' => 'Drupal\Component\Serialization\PhpSerialize', ], ], ]; } if ($platformsh->inRuntime()) { // Configure private and temporary file paths. if (!isset($settings['file_private_path'])) { $settings['file_private_path'] = $platformsh->appDir . '/private'; } if (!isset($settings['file_temp_path'])) { $settings['file_temp_path'] = $platformsh->appDir . '/tmp'; } // Configure the default PhpStorage and Twig template cache directories. if (!isset($settings['php_storage']['default'])) { $settings['php_storage']['default']['directory'] = $settings['file_private_path']; } if (!isset($settings['php_storage']['twig'])) { $settings['php_storage']['twig']['directory'] = $settings['file_private_path']; } // Set the project-specific entropy value, used for generating one-time // keys and such. $settings['hash_salt'] = empty($settings['hash_salt']) ? $platformsh->projectEntropy : $settings['hash_salt']; // Set the deployment identifier, which is used by some Drupal cache systems. $settings['deployment_identifier'] = $settings['deployment_identifier'] ?? $platformsh->treeId; } // The 'trusted_hosts_pattern' setting allows an admin to restrict the Host header values // that are considered trusted. If an attacker sends a request with a custom-crafted Host // header then it can be an injection vector, depending on how the Host header is used. // However, Platform.sh already replaces the Host header with the route that was used to reach // Platform.sh, so it is guaranteed to be safe. The following line explicitly allows all // Host headers, as the only possible Host header is already guaranteed safe. $settings['trusted_host_patterns'] = ['.*']; // Import variables prefixed with 'drupalsettings:' into $settings // and 'drupalconfig:' into $config. foreach ($platformsh->variables() as $name => $value) { $parts = explode(':', $name); list($prefix, $key) = array_pad($parts, 3, null); switch ($prefix) { // Variables that begin with `drupalsettings` or `drupal` get mapped // to the $settings array verbatim, even if the value is an array. // For example, a variable named drupalsettings:example-setting' with // value 'foo' becomes $settings['example-setting'] = 'foo'; case 'drupalsettings': case 'drupal': $settings[$key] = $value; break; // Variables that begin with `drupalconfig` get mapped to the $config // array. Deeply nested variable names, with colon delimiters, // get mapped to deeply nested array elements. Array values // get added to the end just like a scalar. Variables without // both a config object name and property are skipped. // Example: Variable `drupalconfig:conf_file:prop` with value `foo` becomes // $config['conf_file']['prop'] = 'foo'; // Example: Variable `drupalconfig:conf_file:prop:subprop` with value `foo` becomes // $config['conf_file']['prop']['subprop'] = 'foo'; // Example: Variable `drupalconfig:conf_file:prop:subprop` with value ['foo' => 'bar'] becomes // $config['conf_file']['prop']['subprop']['foo'] = 'bar'; // Example: Variable `drupalconfig:prop` is ignored. case 'drupalconfig': if (count($parts) > 2) { $temp = &$config[$key]; foreach (array_slice($parts, 2) as $n) { $prev = &$temp; $temp = &$temp[$n]; } $prev[$n] = $value; } break; } } ``` If you add additional services to your application, such as Solr, Elasticsearch, or RabbitMQ, you would add configuration for those services to the `settings.platformsh.php` file as well. ###### `.environment` Platform.sh runs `source .environment` in the [app root](https://docs.platform.sh/create-apps/app-reference/single-runtime-image.md#root-directory) when a project starts, before cron commands are run, and when you log into an environment over SSH. That gives you a place to do extra environment variable setup before the app runs, including modifying the system `$PATH` and other shell level customizations. The Drupal template includes a small [`.environment` file](https://github.com/platformsh-templates/drupal10/blob/master/.environment). This modifies the `$PATH` to include the `vendor/bin` directory, where command line tools like Drush are stored. You need the file or one like it if you plan to run `drush` as a command, such as in a cron task like the one in the [app configuration from the previous step](https://docs.platform.sh/guides/drupal/deploy/configure.md#configure-apps-in-platformappyaml). If you don't include the file, you get a [command not found error](https://docs.platform.sh/development/troubleshoot.md#command-not-found). ```text {location=".environment"} # Allow executable app dependencies from Composer to be run from the path. if [ -n "$PLATFORM_APP_DIR" -a -f "$PLATFORM_APP_DIR"/composer.json ] ; then bin=$(composer config bin-dir --working-dir="$PLATFORM_APP_DIR" --no-interaction 2>/dev/null) export PATH="${PLATFORM_APP_DIR}/${bin:-vendor/bin}:${PATH}" fi ``` ###### Drush configuration Drush requires a YAML file that declares what its URL is. That value varies depending on the branch you're on, so it can't be included in a static file. Instead, the `drush` directory includes a [short script](https://github.com/platformsh-templates/drupal10/blob/master/drush/platformsh_generate_drush_yml.php) that generates that file on each deploy, writing it to `.drush/drush.yml`. That allows Drush to run successfully on Platform.sh, such as to run cron tasks. The script contents aren't especially interesting. For the most part, you can download it from the template, place it in a `drush` directory in your project so they can be called from the deploy hook, and then forget about it. #### Deploy Drupal ###### Deployment Now you have your configuration for deployment and your app set up to run on Platform.sh. Make sure all your code is committed to Git and run `git push` to your Platform.sh environment. Your code is built, producing a read-only image that's deployed to a running cluster of containers. If you aren't using a source integration, the log of the process is returned in your terminal. If you're using a source integration, you can get the log by running `platform activity:log --type environment.push`. When the build finished, you're given the URL of your deployed environment. Click the URL to see your site. If your environment wasn't active and so wasn't deployed, activate it by running the following command: ```bash platform environment:activate ``` ###### Post-install (new site) If you are creating a new site, visiting the site in your browser will trigger the Drupal installer. Run through it as normal, but note that you will not be asked for the database credentials. The `settings.platformsh.php` file added earlier automatically provides the database credentials and the installer is smart enough to not ask for them again. Once the installer is complete you are presented with your new site. ###### Migrate your data If you are moving an existing site to Platform.sh, then in addition to code you also need to migrate your data. That means your database and your files. ####### Import the database First, obtain a database dump from your current site, such as using the * [`pg_dump` command for PostgreSQL](https://www.postgresql.org/docs/current/app-pgdump.md) * [`mysqldump` command for MariaDB](https://mariadb.com/kb/en/mysqldump/) * [`sqlite-dump` command for SQLite](https://www.sqlitetutorial.net/sqlite-dump/) Drupal has a number of database tables that are useless when migrating and you’re better off excluding their data. - If you’re using a database cache backend then you can and should exclude all ``cache_*`` table data. On Platform.sh we recommend using Redis anyway, and the template described on the previous pages uses Redis automatically. - The ``sessions`` table’s data can also be excluded. While you can trim the data out of these tables post-migration, that’s wasteful of both time and disk space, so it’s better to exclude that data to begin with. Next, import the database into your Platform.sh site by running the following command: ```bash platform sql Go forth and Deploy (even on Friday)! #### Additional resources ###### Adding modules and themes 3rd party modules and themes can be installed and managed using Composer. All packages on Drupal.org are registered with Drupal's own Packagist clone. It should be included in the `composer.json` that comes with Drupal, but in case it isn't you can add the following block to the file: ```json "repositories": [ { "type": "composer", "url": "https://packages.drupal.org/8" } ] ``` (Drupal 8 and 9 share the same package repository.) Once that's there, you can install any module or theme with the following command: ```bash composer require drupal/devel ``` Replace `devel` with the name of the module or theme you're installing. Do *not* commit the `web/modules/contrib` directory to Git. The build process re-downloads the correct version for you based on the `composer.json` and `composer.lock` files, which should be committed to Git. ###### Custom modules and themes Site-specific custom modules and themes can be written directly in the `web/modules/custom` and `web/themes/custom` directories. They should be committed to Git as normal. ###### Updating Drupal core and modules Drupal is fully managed via Composer, which means so are updates to Drupal core itself. Run `composer update` periodically to get new versions of both Drupal core and any modules or themes you have installed via Composer. Commit the resulting changes to your `composer.lock` file and push again. The [Composer documentation](https://getcomposer.org/doc/) has more information on options to update individual modules or perform other tasks. Note that updating modules or core through the Drupal UI isn't possible, as the file system is read-only. All updates should be done through composer to update the lock file, and then pushed to Git. ###### Use Drush aliases ####### Create Drush aliases [Drush site aliases](https://www.drush.org/latest/site-aliases/) help you manage your development websites. The Platform.sh CLI can generate Drush aliases for you automatically when you clone a project using the ``platform get `` command. To see the aliases that are created, run the following command: ```bash platform drush-aliases ``` You get output similar to the following: ```bash Aliases for My Site (tqmd2kvitnoly): @my-site._local @my-site.main @my-site.staging @my-site.sprint1 ``` ####### Recreating Drush aliases To recreate existing aliases or to create a new alias after pushing a new branch via git, run: ```bash platform drush-aliases -r ``` [Back](https://docs.platform.sh/guides/drupal/deploy/deploy.md) ### Using Elasticsearch with Drupal ##### Requirements ###### Add an Elasticsearch service ####### 1. Configure the service To define the service, use the `elasticsearch`: ```yaml {location=".platform/services.yaml"} # The name of the service container. Must be unique within a project. : type: elasticsearch: disk: 256 ``` If you’re using a [premium version](add-services/elasticsearch.md#supported-versions), use the `elasticsearch-enterprise` type instead. Note that changing the name of the service replaces it with a brand new service and all existing data is lost. Back up your data before changing the service. ####### 2. Define the relationship To define the relationship, use the following configuration: You can define ```` as you like, so long as it’s unique between all defined services and matches in both the application and services configuration. The example above leverages [default endpoint](https://docs.platform.sh/create-apps/app-reference/single-runtime-image.md#relationships) configuration for relationships. That is, it uses default endpoints behind-the-scenes, providing a [relationship](https://docs.platform.sh/create-apps/app-reference/single-runtime-image.md#relationships) (the network address a service is accessible from) that is identical to the name of that service. Depending on your needs, instead of default endpoint configuration, you can use [explicit endpoint configuration](https://docs.platform.sh/create-apps/app-reference/single-runtime-image.md#relationships). With the above definition, the application container now has [access to the service](https://docs.platform.sh/add-services/elasticsearch.md#2-define-the-relationship) via the relationship ```` and its corresponding [PLATFORM_RELATIONSHIPS](https://docs.platform.sh/development/variables/use-variables.md#use-provided-variables). ```yaml {location=".platform.app.yaml"} # Relationships enable access from this app to a given service. # The example below shows configuration with an explicitly set service name and endpoint. # See the Application reference for all options for defining relationships and endpoints. # Note that legacy definition of the relationship is still supported. # More information: https://docs.platform.sh/create-apps/app-reference/single-runtime-image.html#relationships relationships: : service: endpoint: elasticsearch ``` You can define ```` and ```` as you like, so long as it’s unique between all defined services and relationships and matches in both the application and services configuration. The example above leverages [explicit endpoint](https://docs.platform.sh/create-apps/app-reference/single-runtime-image.md#relationships) configuration for relationships. Depending on your needs, instead of explicit endpoint configuration, you can use [default endpoint configuration](https://docs.platform.sh/create-apps/app-reference/single-runtime-image.md#relationships). With the above definition, the application container now has [access to the service](#2-define-the-relationship) via the relationship ```` and its corresponding [PLATFORM_RELATIONSHIPS](https://docs.platform.sh/development/variables/use-variables.md#use-provided-variables). ###### Example configuration ####### [Service definition](https://docs.platform.sh/add-services.md) ```yaml {location=".platform/services.yaml"} # The name of the service container. Must be unique within a project. elasticsearch: type: elasticsearch:8.5 disk: 256 ``` If you're using a [premium version](add-services/elasticsearch.md#supported-versions), use the `elasticsearch-enterprise` type in the service definition. ####### [App configuration](https://docs.platform.sh/create-apps.md) ```yaml {location=".platform.app.yaml"} # Relationships enable access from this app to a given service. # The example below shows configuration with an explicitly set service name and endpoint. # See the Application reference for all options for defining relationships and endpoints. # Note that legacy definition of the relationship is still supported. # More information: https://docs.platform.sh/create-apps/app-reference/single-runtime-image.html#relationships relationships: : service: elasticsearch endpoint: elasticsearch ``` ###### Add the Drupal modules You need to add the [Search API](https://www.drupal.org/project/search_api) and [Elasticsearch Connector](https://www.drupal.org/project/elasticsearch_connector) modules to your project. If you are using composer, the easiest way to add them is to run: ```bash composer require drupal/search_api drupal/elasticsearch_connector ``` And then commit the changes to `composer.json` and `composer.lock`. ##### Configuration Because Drupal defines connection information via the Configuration Management system, you need to first define an Elasticsearch "Cluster" at `admin/config/search/elasticsearch-connector`. Note the "machine name" the server is given. Then, paste the following code snippet into your `settings.platformsh.php` file. **Note**: If you do not already have the [Config Reader library](https://docs.platform.sh/development/variables/use-variables.md#access-variables-in-your-app) installed and referenced at the top of the file, you need to install it with ``composer require platformsh/config-reader`` and then add the following code before the block below: ```php {} inRuntime()) { return; } ``` - Edit the value of `$relationship_name` if you are using a different relationship. - Edit the value of `$es_server_name` to match the machine name of your cluster in Drupal. ```php hasRelationship($relationship_name)) { $platformsh->registerFormatter('drupal-elastic', function($creds) { return sprintf('http://%s:%s', $creds['host'], $creds['port']); }); // Set the connector configuration to the appropriate value, as defined by the formatter above. $config['elasticsearch_connector.cluster.' . $es_cluster_name]['url'] = $platformsh->formattedCredentials($relationship_name, 'drupal-elastic'); } ``` Commit that code and push. The specified cluster now always points to the Elasticsearch service. Then configure Search API as normal. ### Using Memcached with Drupal Platform.sh recommends using Redis for caching with Drupal over Memcached, as Redis offers better performance when dealing with larger values as Drupal tends to produce. But Memcached is also available if desired and is fully supported. ##### Requirements ###### Add a Memcached service ###### 1. Configure the service To define the service, use the `memcached`: ```yaml {location=".platform/services.yaml"} # The name of the service container. Must be unique within a project. : type: memcached: disk: 256 ``` Note that changing the name of the service replaces it with a brand new service and all existing data is lost. Back up your data before changing the service. ###### 2. Define the relationship To define the relationship, use the following configuration: You can define ```` as you like, so long as it’s unique between all defined services and matches in both the application and services configuration. The example above leverages [default endpoint](https://docs.platform.sh/create-apps/app-reference/single-runtime-image.md#relationships) configuration for relationships. That is, it uses default endpoints behind-the-scenes, providing a [relationship](https://docs.platform.sh/create-apps/app-reference/single-runtime-image.md#relationships) (the network address a service is accessible from) that is identical to the name of that service. Depending on your needs, instead of default endpoint configuration, you can use [explicit endpoint configuration](https://docs.platform.sh/create-apps/app-reference/single-runtime-image.md#relationships). With the above definition, the application container now has access to the service via the relationship ```` and its corresponding [PLATFORM_RELATIONSHIPS](https://docs.platform.sh/development/variables/use-variables.md#use-provided-variables). ```yaml {location=".platform.app.yaml"} # Relationships enable access from this app to a given service. # The example below shows configuration with an explicitly set service name and endpoint. # See the Application reference for all options for defining relationships and endpoints. # Note that legacy definition of the relationship is still supported. # More information: https://docs.platform.sh/create-apps/app-reference/single-runtime-image.html#relationships relationships: : service: endpoint: memcached ``` You can define ```` and ```` as you like, so long as it’s unique between all defined services and relationships and matches in both the application and services configuration. The example above leverages [explicit endpoint](https://docs.platform.sh/create-apps/app-reference/single-runtime-image.md#relationships) configuration for relationships. Depending on your needs, instead of explicit endpoint configuration, you can use [default endpoint configuration](https://docs.platform.sh/create-apps/app-reference/single-runtime-image.md#relationships). With the above definition, the application container now has [access to the service](#app-configuration) via the relationship ```` and its corresponding [PLATFORM_RELATIONSHIPS](https://docs.platform.sh/development/variables/use-variables.md#use-provided-variables). For PHP, enable the [extension](https://docs.platform.sh/languages/php/extensions.md) for the service: ```yaml {location=".platform.app.yaml"} # PHP extensions. runtime: extensions: - memcached ``` ###### Example configuration ###### [Service definition](https://docs.platform.sh/add-services.md) ```yaml {location=".platform/services.yaml"} # The name of the service container. Must be unique within a project. memcached: type: memcached:1.6 ``` ####### App configuration ```yaml {location=".platform.app.yaml"} # Relationships enable access from this app to a given service. # The example below shows configuration with an explicitly set service name and endpoint. # See the Application reference for all options for defining relationships and endpoints. # Note that legacy definition of the relationship is still supported. # More information: https://docs.platform.sh/create-apps/app-reference/single-runtime-image.html#relationships relationships: memcached: service: memcached endpoint: memcached ``` ###### Add the Drupal module You need to add the [Memcache](https://www.drupal.org/project/memcache) module to your project. If you're using Composer to manage your Drupal site (which is recommended), run: ```bash composer require drupal/memcache ``` Then commit the resulting changes to your `composer.json` and `composer.lock` files. **Note**: You need to commit and deploy your code before continuing, then enable the module. The Memcache module must be enabled before it’s configured in the ``settings.platformsh.php`` file. ##### Configuration The Drupal Memcache module must be configured via `settings.platformsh.php`. Place the following at the end of `settings.platformsh.php`. Note the inline comments, as you may wish to customize it further. Also review the `README.txt` file that comes with the Memcache module, as it has a more information on possible configuration options. For instance, you may want to consider using Memcache for locking as well as configuring cache stampede protection. The example below is intended as a "most common case" and has been tested with version `8.x-2.3` of the Memcache module. **Note**: If you don’t already have the [Config Reader library](https://docs.platform.sh/development/variables/use-variables.md#access-variables-in-your-app) installed and referenced at the top of the file, you need to install it with ``composer require platformsh/config-reader`` and then add the following code before the block below: ```php {} inRuntime()) { return; } ``` ```php hasRelationship($relationship_name) && extension_loaded('memcached')) { $platformsh->registerFormatter('drupal-memcached', function($creds) { return sprintf("%s:%d", $creds['host'], $creds['port']); }); // This is the line that tells Drupal to use Memcached as a backend. // Comment out just this line if you need to disable it for some reason and // fall back to the default database cache. $settings['cache']['default'] = 'cache.backend.memcache'; $host = $platformsh->formattedCredentials($relationship_name, 'drupal-memcached'); $settings['memcache']['servers'][$host] = 'default'; // By default Drupal starts the cache_container on the database. The following // code overrides that. // Make sure that the $class_load->addPsr4 is pointing to the right location of // the Memcache module. The value below should be correct if Memcache was installed // using Drupal Composer. $memcache_exists = class_exists('Memcache', FALSE); $memcached_exists = class_exists('Memcached', FALSE); if ($memcache_exists || $memcached_exists) { $class_loader->addPsr4('Drupal\\memcache\\', 'modules/contrib/memcache/src'); // If using a multisite configuration, adapt this line to include a site-unique // value. $settings['memcache']['key_prefix'] = $platformsh->environment; // Define custom bootstrap container definition to use Memcache for cache.container. $settings['bootstrap_container_definition'] = [ 'parameters' => [], 'services' => [ 'database' => [ 'class' => 'Drupal\Core\Database\Connection', 'factory' => 'Drupal\Core\Database\Database::getConnection', 'arguments' => ['default'], ], 'settings' => [ 'class' => 'Drupal\Core\Site\Settings', 'factory' => 'Drupal\Core\Site\Settings::getInstance', ], 'memcache.settings' => [ 'class' => 'Drupal\memcache\MemcacheSettings', 'arguments' => ['@settings'], ], 'memcache.factory' => [ 'class' => 'Drupal\memcache\Driver\MemcacheDriverFactory', 'arguments' => ['@memcache.settings'], ], 'memcache.timestamp.invalidator.bin' => [ 'class' => 'Drupal\memcache\Invalidator\MemcacheTimestampInvalidator', # Adjust tolerance factor as appropriate when not running memcache on localhost. 'arguments' => ['@memcache.factory', 'memcache_bin_timestamps', 0.001], ], 'memcache.backend.cache.container' => [ 'class' => 'Drupal\memcache\DrupalMemcacheInterface', 'factory' => ['@memcache.factory', 'get'], 'arguments' => ['container'], ], 'lock.container' => [ 'class' => 'Drupal\memcache\Lock\MemcacheLockBackend', 'arguments' => ['container', '@memcache.backend.cache.container'], ], 'cache_tags_provider.container' => [ 'class' => 'Drupal\Core\Cache\DatabaseCacheTagsChecksum', 'arguments' => ['@database'], ], 'cache.container' => [ 'class' => 'Drupal\memcache\MemcacheBackend', 'arguments' => ['container', '@memcache.backend.cache.container','@cache_tags_provider.container','@memcache.timestamp.invalidator.bin'], ], ], ]; } } ``` ### Multiple Drupal sites in a single Project Platform.sh supports running [multiple applications](https://docs.platform.sh/learn/bestpractices/oneormany.md) in the same project, and these can be two or more Drupal sites. But they would be separate Drupal instances: they have their assets separate and live their lives apart, and it would be much better for them not to share the same database (though they could). ##### Multisite Drupal Platform.sh actively discourages running Drupal in "multisite" mode. Doing so eliminates many of the advantages Platform.sh offers, such as isolation and safe testing. Additionally, because of the dynamic nature of the domain names that are created for the different environments, the multisite configuration would be complex and fragile. We recommend running separate projects for separate Drupal sites, or using one of the various "single instance" options available such as [Domain Access](https://www.drupal.org/project/domain), [Organic Groups](https://www.drupal.org/project/og), or [Workbench Access](https://www.drupal.org/project/workbench_access). The only reason to use multisite Drupal would be to manage a series of nearly identical sites with separate databases. For that case we have built a [template repository](https://github.com/platformsh-templates/drupal9-multisite) that uses a unified lookup key for a subdomain, database name, and file paths. Note that it will likely require modification for your specific setup and some configurations may require a different approach. In particular, this example: * Defines two MySQL databases. * Uses a modified `settings.platformsh.php` that accepts a key variable from `settings.php` to specify which database and file system paths to use. * Extracts the `sites` directory to use from the domain. ### Using Redis with Drupal Redis is a fast open-source in-memory database and cache, useful for application-level caching. For more information on this service, see the [dedicated Redis page](https://docs.platform.sh/add-services/redis.md) or the [official Redis documentation](https://redis.io/docs/). Follow the instructions on this page to do one of the following: - Add and configure Redis for Drupal if you have deployed Drupal manually. - Fine-tune your existing configuration if you have deployed Drupal using a [Platform.sh template](https://docs.platform.sh/development/templates.md). ##### Before you begin You need: - A [Drupal version deployed on Platform.sh](https://docs.platform.sh/guides/drupal/deploy.md) - The [Platform.sh CLI](https://docs.platform.sh/administration/cli/) - [Composer](https://getcomposer.org/) - The [Config Reader library](https://docs.platform.sh/guides/drupal/deploy/customize.md#install-the-config-reader) You also need a `settings.platformsh.php` file from which you can [manage the configuration of the Redis service](https://docs.platform.sh/guides/drupal/deploy/customize.md#settingsphp). If you installed Drupal with a template, this file is already present in your project. **Note**: By default, Redis is an ephemeral service. This means that the Redis storage isn’t persistent and that data can be lost when a container is moved, shut down or when the service hits its memory limit. To solve this, Platform.sh recommends that you change the [service type](https://docs.platform.sh/add-services/redis.md#service-types) to [persistent Redis](https://docs.platform.sh/add-services/redis.md#persistent-redis) (``redis-persistent``). ##### Add a Redis service ###### 1. Configure the service To define the service, use the `redis-persistent` endpoint: ```yaml {location=".platform/services.yaml"} # The name of the service container. Must be unique within a project. : type: redis-persistent: disk: 256 ``` Note that changing the name of the service replaces it with a brand new service and all existing data is lost. Back up your data before changing the service. ###### 2. Define the relationship To define the relationship, use the `redis` endpoint : You can define ```` as you like, so long as it’s unique between all defined services and matches in both the application and services configuration. The example above leverages [default endpoint](https://docs.platform.sh/create-apps/app-reference/single-runtime-image.md#relationships) configuration for relationships. That is, it uses default endpoints behind-the-scenes, providing a [relationship](https://docs.platform.sh/create-apps/app-reference/single-runtime-image.md#relationships) (the network address a service is accessible from) that is identical to the name of that service. Depending on your needs, instead of default endpoint configuration, you can use [explicit endpoint configuration](https://docs.platform.sh/create-apps/app-reference/single-runtime-image.md#relationships). With the above definition, the application container now has access to the service via the relationship ```` and its corresponding [PLATFORM_RELATIONSHIPS](https://docs.platform.sh/development/variables/use-variables.md#use-provided-variables). ```yaml {location=".platform.app.yaml"} # Relationships enable access from this app to a given service. # The example below shows configuration with an explicitly set service name and endpoint. # See the Application reference for all options for defining relationships and endpoints. # Note that legacy definition of the relationship is still supported. # More information: https://docs.platform.sh/create-apps/app-reference/single-runtime-image.html#relationships relationships: : service: endpoint: redis ``` You can define ```` and ```` as you like, so long as it’s unique between all defined services and relationships and matches in both the application and services configuration. The example above leverages [explicit endpoint](https://docs.platform.sh/create-apps/app-reference/single-runtime-image.md#relationships) configuration for relationships. Depending on your needs, instead of explicit endpoint configuration, you can use [default endpoint configuration](https://docs.platform.sh/create-apps/app-reference/single-runtime-image.md#relationships). With the above definition, the application container now has [access to the service](#2-define-the-relationship) via the relationship ```` and its corresponding [PLATFORM_RELATIONSHIPS](https://docs.platform.sh/development/variables/use-variables.md#use-provided-variables). For PHP, enable the [extension](https://docs.platform.sh/languages/php/extensions.md) for the service: ```yaml {location=".platform.app.yaml"} # PHP extensions. runtime: extensions: - redis ``` ###### 3. Add the Drupal module To add the Redis module to your project, run the following command: ```bash composer require drupal/redis ``` Then commit the resulting changes to your `composer.json` and `composer.lock` files. Afterwards, you can enable the module with: ```bash platform drush enable redis ``` ##### Configure your Redis service To configure your Redis service, follow these steps: 1. Add the following code at the top of your `settings.platformsh.php` file: ```php {location="settings.platformsh.php"} inRuntime()) { return; } ``` 2. Add the following code at the end of the file: ```php {location="settings.platformsh.php"} hasRelationship('rediscache') && !InstallerKernel::installationAttempted() && extension_loaded('redis')) { $redis = $platformsh->credentials('rediscache'); // Set Redis as the default backend for any cache bin not otherwise specified. $settings['cache']['default'] = 'cache.backend.redis'; $settings['redis.connection']['host'] = $redis['host']; $settings['redis.connection']['port'] = $redis['port']; // You can leverage Redis by using it for the lock and flood control systems // and the cache tag checksum. // To do so, apply the following changes to the container configuration. // Alternatively, copy the contents of the modules/contrib/redis/example.services.yml file // to your project-specific services.yml file. // Modify the contents to fit your needs and remove the following line. $settings['container_yamls'][] = 'modules/contrib/redis/example.services.yml'; // Allow the services to work before the Redis module itself is enabled. $settings['container_yamls'][] = 'modules/contrib/redis/redis.services.yml'; // To use Redis for container cache, add the classloader path manually. $class_loader->addPsr4('Drupal\\redis\\', 'modules/contrib/redis/src'); // Use Redis for container cache. // The container cache is used to load the container definition itself. // This means that any configuration stored in the container isn't available // until the container definition is fully loaded. // To ensure that the container cache uses Redis rather than the // default SQL cache, add the following lines. $settings['bootstrap_container_definition'] = [ 'parameters' => [], 'services' => [ 'redis.factory' => [ 'class' => 'Drupal\redis\ClientFactory', ], 'cache.backend.redis' => [ 'class' => 'Drupal\redis\Cache\CacheBackendFactory', 'arguments' => ['@redis.factory', '@cache_tags_provider.container', '@serialization.phpserialize'], ], 'cache.container' => [ 'class' => '\Drupal\redis\Cache\PhpRedis', 'factory' => ['@cache.backend.redis', 'get'], 'arguments' => ['container'], ], 'cache_tags_provider.container' => [ 'class' => 'Drupal\redis\Cache\RedisCacheTagsChecksum', 'arguments' => ['@redis.factory'], ], 'serialization.phpserialize' => [ 'class' => 'Drupal\Component\Serialization\PhpSerialize', ], ], ]; } ``` You can customize your configuration further using the inline comments from this example configuration. For more information on possible configuration options, see the `README.txt` file delivered with the Redis module or the [official Redis documentation](https://redis.io/docs/). ##### Verify Redis is running To verify that Redis is running, run the following command: ```bash platform redis info ``` The output produces information and statistics about Redis, showing that the service is up and running. ### SimpleSAML SimpleSAMLphp is a library for authenticating a PHP-based application against a SAML server, such as Shibboleth. Although Drupal has modules available to authenticate using SimpleSAML some additional setup is required. The following configuration assumes you are building Drupal using Composer. If not, you need to download the library manually and adjust some paths accordingly. ##### Download the library and Drupal module The easiest way to download SimpleSAMLphp is via Composer. The following command will add both the Drupal module and the PHP library to your `composer.json` file. ```bash composer require simplesamlphp/simplesamlphp drupal/externalauth drupal/simplesamlphp_auth ``` Once that's run, commit both `composer.json` and `composer.lock` to your repository. ##### Include SimpleSAML cookies in the cache key The SimpleSAML client uses additional cookies besides the Drupal session cookie that need to be allowed for the cache. To do so, modify your `.platform/routes.yaml` file for the route that points to your Drupal site and add two additional cookies to the `cache.cookies` line. It should end up looking approximately like this: ```yaml {location=".platform/routes.yaml"} "https://{default}/": type: upstream upstream: "myapp:http" cache: enabled: true cookies: ['/^SS?ESS/', '/^Drupal.visitor/', 'SimpleSAMLSessionID', 'SimpleSAMLAuthToken'] ``` Commit this change to the Git repository. ##### Expose the SimpleSAML endpoint The SimpleSAML library's `www` directory needs to be publicly accessible. That can be done by mapping it directly to a path in the Application configuration. Add the following block to the `web.locations` section of `.platform.app.yaml`: ```yaml {location=".platform.app.yaml"} web: locations: '/simplesaml': root: 'vendor/simplesamlphp/simplesamlphp/www' allow: true scripts: true index: - index.php ``` That will map all requests to `example.com/simplesaml/` to the `vendor/simplesamlphp/www` directory, allowing static files there to be served, PHP scripts to execute, and defaulting to index.php. ##### Create a configuration directory Your SimpleSAMLphp configuration needs to be outside of the `vendor` directory. The `composer require` downloads a template configuration file to `vendor/simplesamlphp/simplesamlphp/config`. Rather than modifying that file in place (as it isn't included in Git), copy the `vendor/simplesamlphp/simplesamlphp/config` directory to `simplesamlphp/config` (in [your app root](https://docs.platform.sh/create-apps/app-reference/single-runtime-image.md#root-directory)). It should contain two files, `config.php` and `authsources.php`. Additionally, create a `simplesamlphp/metadata` directory. This directory holds your IdP definitions. Consult the SimpleSAMLphp documentation and see the examples in `vendor/simplesamlphp/simplesamlphp/metadata-templates`. Next, you need to tell SimpleSAMLphp where to find that directory using an environment variable. The simplest way to set that is to add the following block to your `.platform.app.yaml` file: ```yaml {location=".platform.app.yaml"} variables: env: SIMPLESAMLPHP_CONFIG_DIR: /app/simplesamlphp/config ``` Commit the whole `simplesamplphp` directory and `.platform.app.yaml` to Git. ##### Configure SimpleSAML to use the database SimpleSAMLphp is able to store its data either on disk or in the Drupal database. Platform.sh strongly recommends using the database. Open the file `simplesamlphp/config/config.php` that you created earlier. It contains a number of configuration properties that you can adjust as needed. Some are best edited in-place and the file already includes ample documentation, specifically: * `auth.adminpassword` * `technicalcontact_name` * `technicalcontact_email` Others are a little more involved. In the interest of simplicity we recommend pasting the following code snippet at the end of the file, as it will override the default values in the array. ```php {location="simplesamlphp/config/config.php"} 'flatfile', 'directory' => dirname(__DIR__) . '/metadata'], ]; // Setup the database connection for all parts of SimpleSAML. if (isset($_ENV['PLATFORM_RELATIONSHIPS'])) { $relationships = json_decode(base64_decode($_ENV['PLATFORM_RELATIONSHIPS']), TRUE); foreach ($relationships['database'] as $instance) { if (!empty($instance['query']['is_master'])) { $dsn = sprintf("%s:host=%s;dbname=%s", $instance['scheme'], $instance['host'], $instance['path'] ); $config['database.dsn'] = $dsn; $config['database.username'] = $instance['username']; $config['database.password'] = $instance['password']; $config['store.type'] = 'sql'; $config['store.sql.dsn'] = $dsn; $config['store.sql.username'] = $instance['username']; $config['store.sql.password'] = $instance['password']; $config['store.sql.prefix'] = 'simplesaml'; } } } // Set the salt value from the Platform.sh entropy value, provided for this purpose. if (isset($_ENV['PLATFORM_PROJECT_ENTROPY'])) { $config['secretsalt'] = $_ENV['PLATFORM_PROJECT_ENTROPY']; } ``` ##### Generate SSL certificates (optional) Depending on your Identity Provider (IdP), you may need to generate an SSL/TLS certificate to connect to the service provider. If so, you should generate the certificate locally following the instructions in the [SimpleSAMLphp documentation](https://simplesamlphp.org/docs/stable/index.md). Your resulting IdP file should be placed in the `simplesamlphp/metadata` directory. The certificate should be placed in the `simplesamlphp/cert` directory. (Create it if needed.) Then add the following line to your `simplesamlphp/config/config.php` file to tell the library where to find the certificate: ```php {location="simplesamlphp/config/config.php"} `` by ``symfony cloud:`` in all of your commands. ##### Create your Symfony app To get familiar with Platform.sh, create a new Symfony project from scratch. The present tutorial uses the [Symfony Demo](https://symfony.com/doc/current/setup.md#the-symfony-demo-application) app as an example : ```bash symfony new --demo --cloud cd ``` The `--demo` flag pulls the [Symfony Demo skeleton](https://github.com/symfony/demo). The `--cloud` flag automatically generates the Platform.sh configuration files. **Note**: Alternatively, you can deploy an **existing Symfony project**. To do so, follow these steps: - To generate a sensible default Platform.sh configuration, run the following command from within the project’s directory: ```bash {} symfony project:init ``` This generates the following set of configuration files: ``.platform.app.yaml``, ``.platform/services.yaml``, ``.platform/routes.yaml``, and ``php.ini``. - Commit these new files to your repository: ```bash {} git add .platform.app.yaml .platform/services.yaml .platform/routes.yaml php.ini git commit -m "Add Platform.sh configuration" ``` Platform.sh manages the entire infrastructure of your project, from code to services (such as databases, queues, or search engines), all the way to email sending, [cron jobs](https://docs.platform.sh/guides/symfony/crons.md), and [workers](https://docs.platform.sh/guides/symfony/workers.md). This infrastructure is described through configuration files stored alongside your code. ##### Create the project To create the project on Platform.sh, run the following command from within the project's directory: ```bash symfony cloud:create --title PROJECT_TITLE --set-remote ``` The `--set-remote` flag sets the new project as the remote for this repository. **Tip**: You can link any repository to an existing Platform.sh project using the following command: ```bash {} symfony project:set-remote ``` ##### Deploy your project To deploy your project, run the following command: ```bash symfony cloud:deploy ``` **Tip**: During deployment, the logs from the Platform.sh API are displayed in your terminal so you can monitor progress. To stop the display of the logs **without interrupting the deployment**, use ``CTRL+C`` in your terminal. To go back to displaying the logs, run ``symfony cloud:activity:log``. Congratulations, your first Symfony app has been deployed on Platform.sh! Now that your app is deployed in production mode, you can define a custom domain for your live website. To do so, see how to [set up a custom domain on Platform.sh](https://docs.platform.sh/administration/web/configure-project.md#domains), or run the following command: ```bash symfony cloud:domain:add ``` ##### Make changes to your project Now that your project is deployed, you can start making changes to it. For example, you might want to fix a bug or add a new feature. In your project, the main branch always represents the production environment. Other branches are for developing new features, fixing bugs, or updating the infrastructure. To make changes to your project, follow these steps: 1. Create a new environment (a Git branch) to make changes without impacting production: ```bash symfony cloud:branch feat-a ``` This command creates a new local `feat-a` Git branch based on the main Git branch and activates a related environment on Platform.sh. The new environment inherits the data (service data and assets) of its parent environment (the production environment here). 2. Make changes to your project. For example, if you created a Symfony Demo app, edit the `templates/default/homepage.html.twig` template and make the following visual changes: ```html {location="templates/default/homepage.html.twig"} {% block body %} - {{ 'title.homepage'|trans|raw }} + Welcome to the Platform.sh Demo ``` 3. Commit your changes: ```bash git commit -a -m "Update text" ``` 4. Deploy your changes to the `feat-a` environment: ```bash symfony cloud:deploy ``` Note that each environment has its own domain name. To view the domain name of your new environment, run the following command: ```bash symfony cloud:url --primary ``` 5. Iterate by changing the code, committing, and deploying. When satisfied with your changes, merge them to the main branch, deploy, and remove the feature branch: ```bash git checkout main git merge feat-a symfony environment:delete feat-a git branch -d feat-a symfony cloud:deploy ``` **Note**: Deploying to production was fast because the image built for the ``feat-a`` environment was reused. For a long running branch, to keep the code up-to-date with the main branch, use `git merge main` or `git rebase main`. You can also keep the data in sync with the production environment by using `symfony cloud:env:sync`. ##### Use a third-party Git provider When you choose to use a third-party Git hosting service, the Platform.sh Git repository becomes a read-only mirror of the third-party repository. All your changes take place in the third-party repository. Add an integration to your existing third-party repository: - [BitBucket](https://docs.platform.sh/integrations/source/bitbucket.md) - [GitHub](https://docs.platform.sh/integrations/source/github.md) - [GitLab](https://docs.platform.sh/integrations/source/gitlab.md) ##### Next steps ###### Symfony integration Learn more about the [Symfony integration](https://docs.platform.sh/guides/symfony/integration.md), a set of tools and auto-configurations that makes it easier to use Platform.sh for Symfony projects. ###### Environment variables When you use the Symfony integration, more [environment variables](https://docs.platform.sh/guides/symfony/environment-variables.md) related to Symfony are defined. ###### Local development Once Symfony has been deployed on Platform.sh, you might want to [set up a local development environment](https://docs.platform.sh/guides/symfony/local.md). ###### Symfony CLI tips You might find the following commands useful when using the Symfony CLI. - Open the web administration console: ```bash symfony cloud: web ``` - Open the URL of the current environment: ```bash symfony cloud: url ``` - Open an SSH connection to your environment: ```bash symfony cloud: ssh ``` - Initialize a new project using templates: ```bash symfony project:init ``` - Get a list of all the domains: ```bash symfony cloud:domains ``` - Create a new environment: ```bash symfony cloud:branch new-branch ``` - Get a list of all the environments: ```bash symfony cloud:environments ``` - Push code to the current environment: ```bash symfony cloud:push ``` - Get a list of all the active projects: ```bash symfony cloud:projects ``` - Add a user to the project: ```bash symfony cloud:user:add ``` - List variables: ```bash symfony cloud:variables ``` You might find the following commands useful when using a database with your Symfony app. - Create a local dump of the remote database: ```bash symfony cloud: db:dump --relationship database ``` - Run an SQL query on the remote database: ```bash symfony cloud: sql 'SHOW TABLES' ``` - Import a local SQL file into a remote database: ```bash symfony cloud: sql ### Symfony integration Symfony has a special integration with Platform.sh that makes it easier to use Platform.sh for Symfony projects. **When using the Symfony integration, you are contributing financially to the Symfony project.** The Symfony integration is automatically enabled when: - You run the `symfony new` command with the `--cloud` option; - You run `symfony project:init` on an existing project to automatically generate the Platform.sh configuration. If you already have a Platform.sh configuration without the Symfony integration, enable it by adding the following configuration: ```yaml {location=".platform.app.yaml"} hooks: build: | set -x -e curl -fs https://get.symfony.com/cloud/configurator | bash # ... ``` The **configurator** enables the following integration: - It installs some helper scripts that you can use as the [default build and deploy hook scripts](#hooks): - [`symfony-build`](#symfony-build); - [`symfony-deploy`](#symfony-deploy); - [`php-ext-install`](#php-ext-install). - It adds some [extra tools](#tools); - It defines [additional infrastructure environment variables](https://docs.platform.sh/guides/symfony/environment-variables.md#symfony-environment-variables) and [environment variables for all services](https://docs.platform.sh/guides/symfony/environment-variables.md#service-environment-variables). ##### Tools The **configurator** (`curl -fs https://get.symfony.com/cloud/configurator | bash`) is a script specially crafted for Platform.sh. It ensures that projects are always using the latest version of the following tools: - [croncape](https://docs.platform.sh/guides/symfony/crons.md#use-croncape) for cron feedback - [Symfony CLI](https://symfony.com/download) - [Composer](https://getcomposer.org/download/) ##### Hooks The `hooks` section defines the scripts that Platform.sh runs at specific times of an application lifecycle: - The [build hook](https://docs.platform.sh/create-apps/hooks/hooks-comparison.md#build-hook) is run during the build process - The [deploy hook](https://docs.platform.sh/create-apps/hooks/hooks-comparison.md#deploy-hook) is run during the deployment process - The [post-deploy hook](https://docs.platform.sh/create-apps/hooks/hooks-comparison.md#post-deploy-hook) is run after the deploy hook, once the application container starts accepting connections Here's the default `hooks` section optimized for Symfony projects: ```yaml {location=".platform.app.yaml"} hooks: build: | set -x -e curl -s https://get.symfony.com/cloud/configurator | bash symfony-build deploy: | set -x -e symfony-deploy ``` **Warning**: As each hook is executed as a single script, a hook is considered as failed only if the final command fails. To have your hooks fail on the first failed command, start your scripts with ``set -e``. For more information, see [Hooks](https://docs.platform.sh/create-apps/hooks/hooks-comparison.md). To gain a better understanding of how hooks relate to each other when building and deploying an app, see the [Platform.sh philosophy](https://docs.platform.sh/learn/overview/philosophy.md). **Tip**: During the ``deploy`` or ``post_deploy`` hooks, you can execute actions for a specific environment type only. To do so, in your ``.platform.app.yaml``file, use the ``PLATFORM_ENVIRONMENT_TYPE`` [environment variable](https://docs.platform.sh/development/variables.md)) in a condition: ```yaml {location=".platform.app.yaml"} hooks: deploy: | if [ "PLATFORM_ENVIRONMENT_TYPE" != "production" ]; then symfony console app:dev:anonymize fi ``` ###### symfony-build **symfony-build** is the script that builds a Symfony app in an optimized way for Platform.sh. Use it as the main build script in your `build` hook. **symfony-build** performs the following actions: - Removes the development frontend file (Symfony **Note**: The source code is cached between builds so compilation is skipped if it’s already been done. Changing the source of downloads or the version invalidates this cache. ###### Advanced Node configuration If you need to use the Node installation setup by [symfony-build](#symfony-build), use the following configuration: ```yaml {location=".platform.app.yaml"} hooks: build: | set -x -e curl -s https://get.symfony.com/cloud/configurator | bash symfony-build # Setup everything to use the Node installation unset NPM_CONFIG_PREFIX export NVM_DIR=${PLATFORM_APP_DIR}/.nvm set +x && . "${NVM_DIR}/nvm.sh" use --lts && set -x # Starting from here, everything is setup to use the same Node yarn encore dev ``` If you want to use two different Node versions, use the following configuration instead: ```yaml {location=".platform.app.yaml"} hooks: build: | set -x -e curl -s https://get.symfony.com/cloud/configurator | bash symfony-build cd web/js_app unset NPM_CONFIG_PREFIX export NVM_DIR=${PLATFORM_APP_DIR}/.nvm NODE_VERSION=8 yarn-install # Setup everything to use the Node installation set +x && . "${NVM_DIR}/nvm.sh" use 8 && set -x # Starting from here, everything is setup to use Node 8 yarn build --environment=prod ``` ### Environment variables By default, Platform.sh exposes some [environment variables](https://docs.platform.sh/development/variables/use-variables.md#use-provided-variables). If you're using the [Symfony integration](https://docs.platform.sh/guides/symfony/integration.md), more [infrastructure environment variables](#symfony-environment-variables) related to Symfony are defined. As Symfony relies heavily on environment variables to configure application services (such as the database or the mailer DSN), the Symfony integration automatically defines [environment variables for all the services](#service-environment-variables) connected to your app. **Tip**: The code that defines these additional environment variables is part of the open-source [Symfony CLI tool](https://symfony.com/download). Check the code for [infrastructure](https://github.com/symfony-cli/symfony-cli/blob/main/envs/remote.go#L139) and [service](https://github.com/symfony-cli/symfony-cli/blob/main/envs/envs.go#L110) environment variables on GitHub. ##### Symfony environment variables Platform.sh exposes [environment variables](https://docs.platform.sh/development/variables/use-variables.md#use-provided-variables) about the app and its infrastructure. The Symfony integration exposes more environment variables: - `APP_ENV` is set to `prod` by default. You can manually override this value for a preview environment by setting the `SYMFONY_ENV` environment variable to `dev`, and remove it when done. - `APP_DEBUG` is set to `0` by default. You can manually override this value for a preview environment by setting the `SYMFONY_DEBUG` environment variable to `1`, and remove it when done. - `APP_SECRET` is set to the value of `PLATFORM_PROJECT_ENTROPY`, which is a random and unique value for all Platform.sh projects. It overrides the value configured in the `.env` file of your app. - `MAILFROM` is set to a random value. This value is used as a `From` header when using [croncape](https://docs.platform.sh/guides/symfony/crons.md#use-croncape). - `SYMFONY_IS_WORKER` is set to `1` when the container is running in the context of a worker (instead of the main application container). - `SYMFONY_CACHE_DIR` (only available during the build hook execution): The absolute path to a subdirectory of your build cache directory. Note that the build cache directory is persisted between builds but **isn't** deployed. It’s a good place to store build artifacts, such as downloaded files that can be reused between builds. **Tip**: This directory is shared by **all** builds on **all** branches. Make sure your [build hook](https://docs.platform.sh/guides/symfony/integration.md#hooks) accounts for that. If you need to clear the build cache directory, run the `symfony cloud:project:clear-build-cache` command. - `SYMFONY_PROJECT_DEFAULT_ROUTE_URL` (only defined at **runtime**): The default endpoint serving your project. Use this variable to avoid hard-coding domains that can be used to reach preview environments. Parts of the URL are also exposed as their own variables using the following syntax: `SYMFONY_PROJECT_DEFAULT_ROUTE_` followed by the name of the part (`SCHEME`, `DOMAIN`, `PORT`, and `PATH`). Guessing the default endpoint can prove difficult for multi-routes or multi-app projects. In such cases, the following preference order is used: 1. Project-wide route defined only by `{default}` or `{all}` (no path) 2. Project-wide route defined by `www.{default}` or `www.{all}` (no path) 3. Route for the **current application** including `{default}` or `{all}` (might include a path) 4. Route for the **current application** including `www.{default}` or `www.{all}` (might include a path) 5. First route for the current application 6. First route for the whole project When several routes match a rule, the first one wins, the user order is kept. There's no preference regarding protocols. **Tip**: If you have a multi-app project containing several publicly reachable apps, you might need to determine the current application endpoint (for webhooks for example) and the project endpoint (to send emails for example). In this case, you can use an additional ``SYMFONY_APPLICATION_DEFAULT_ROUTE_*`` set of environment variables. The same rules are applied to determine their value, but only routes matching the current application are evaluated. ##### Service environment variables When using the [Symfony integration](https://docs.platform.sh/guides/symfony/integration.md), information about services are exposed via environment variables. To list all of the exposed environment variables, run the following command: ```bash symfony ssh -- symfony var:export --multiline ``` Each exposed environment variable is prefixed by the relationship name. For example, if you have the following [relationships](https://docs.platform.sh/create-apps/app-reference/single-runtime-image.md#relationships) in your configuration: ```yaml relationships: database: service: securitydb endpoint: postgresql ``` The environment variables for the database service is prefixed by `DATABASE_` which is the upper-cased version of the key defined in the relationship. For example, you could have a `DATABASE_URL` environment variable. Most environment variable names are derived from the relationship and service names. But some are defined based on Symfony conventions, such as [`MAILER_DSN`](#emails). **Note**: Environment variables aren’t exposed when the build hook script is running as services aren’t available during the [build process](https://docs.platform.sh/learn/overview/build-deploy.md#the-build). ###### Emails The configuration is exposed via the following environment variables: - `MAILER_ENABLED`: 1 if outgoing emails are enabled, 0 otherwise - `MAILER_DSN`/`MAILER_URL`: The Symfony-compatible mailer URL - `MAILER_HOST`: The SMTP server host - `MAILER_PORT`: The SMTP server port - `MAILER_TRANSPORT`: The SMTP transport mode (`smtp`) - `MAILER_AUTH_MODE`: The SMTP auth mode (`plain`) - `MAILER_USER`: The SMTP server user - `MAILER_PASSWORD`: The SMTP server password Symfony Mailer automatically uses the value of `MAILER_DSN`. ###### HTTP If your project has multiple apps, the configuration is exposed via the following environment variables (where `SOME_SERVICE` is the upper-cased version of the key defined in the relationship): - `SOME_SERVICE_URL`: The full URL of the service - `SOME_SERVICE_IP`: The HTTP service IP - `SOME_SERVICE_PORT`: The HTTP service port - `SOME_SERVICE_SCHEME`: The HTTP service scheme - `SOME_SERVICE_HOST`: The HTTP service host ###### MySQL/MariaDB The [MySQL/MariaDB](https://docs.platform.sh/add-services/mysql.md) configuration is exposed via the following environment variables (where `DATABASE` is the upper-cased version of the key defined in the relationship above): - `DATABASE_URL`: The database URL (in PHP or Go format depending on your app) - `DATABASE_SERVER`: The database server - `DATABASE_DRIVER`: The database driver - `DATABASE_VERSION`: The database version - `DATABASE_HOST`: The database host - `DATABASE_PORT`: The database port - `DATABASE_NAME`: The database name - `DATABASE_DATABASE`: Alias for `DATABASE_NAME` - `DATABASE_USERNAME`: The database username - `DATABASE_PASSWORD`: The database password **Tip**: The database version and a default charset are included in the database URL. To override them, use the ``DATABASE_VERSION`` and ``DATABASE_CHARSET`` environment variables respectively. ###### PostgreSQL The [PostgreSQL](https://docs.platform.sh/add-services/postgresql.md) configuration is exposed via the following environment variables (where `DATABASE` is the upper-cased version of the key defined in the relationship): - `DATABASE_URL`: The database URL (in PHP or Go format depending on your app) - `DATABASE_SERVER`: The database server - `DATABASE_DRIVER`: The database driver - `DATABASE_VERSION`: The database version - `DATABASE_HOST`: The database host - `DATABASE_PORT`: The database port - `DATABASE_NAME`: The database name - `DATABASE_DATABASE`: Alias for `DATABASE_NAME` - `DATABASE_USERNAME`: The database username - `DATABASE_PASSWORD`: The database password **Tip**: The database version and a default charset are included in the database URL. To override them, use the ``DATABASE_VERSION`` and ``DATABASE_CHARSET`` environment variables respectively. ###### Redis The [Redis](https://docs.platform.sh/add-services/redis.md) configuration is exposed via the following environment variables (where `REDIS` is the upper-cased version of the key defined in the relationship): - `REDIS_URL`: The Redis URL - `REDIS_HOST`: The Redis host - `REDIS_PORT`: The Redis port - `REDIS_SCHEME`: The Redis scheme ###### Memcached The [Memcached](https://docs.platform.sh/add-services/memcached.md) configuration is exposed via the following environment variables (where `CACHE` is the upper-cased version of the key defined in the relationship): - `CACHE_HOST` - `CACHE_PORT` - `CACHE_IP` ###### Elasticsearch The [Elasticsearch](https://docs.platform.sh/add-services/elasticsearch.md) configuration is exposed via the following environment variables (where `ELASTICSEARCH` is the upper-cased version of the key defined in the relationship): - `ELASTICSEARCH_URL`: The full URL of the Elasticsearch service - `ELASTICSEARCH_HOST`: The Elasticsearch host - `ELASTICSEARCH_PORT`: The Elasticsearch port - `ELASTICSEARCH_SCHEME`: The Elasticsearch protocol scheme (`http` or `https`) ###### Solr The [Apache Solr](https://docs.platform.sh/add-services/solr.md) configuration is exposed via the following environment variables (where `SOLR` is the upper-cased version of the key defined in the relationship): - `SOLR_HOST`: The Solr host - `SOLR_PORT`: The Solr port - `SOLR_NAME`: The Solr name - `SOLR_DATABASE`: An alias for `SOLR_NAME` ###### RabbitMQ The [RabbitMQ](https://docs.platform.sh/add-services/rabbitmq.md) configuration is exposed via the following environment variables (where `RABBITMQ` is the upper-cased version of the key defined in the relationship): - `RABBITMQ_URL`: The RabbitMQ standardized URL - `RABBITMQ_SERVER`: The RabbitMQ server - `RABBITMQ_HOST`: The RabbitMQ host - `RABBITMQ_PORT`: The RabbitMQ port - `RABBITMQ_SCHEME`: The RabbitMQ scheme - `RABBITMQ_USER`: The RabbitMQ username - `RABBITMQ_USERNAME`: The RabbitMQ username - `RABBITMQ_PASSWORD`: The RabbitMQ password ###### MongoDB The [MongoDB](https://docs.platform.sh/add-services/mongodb.md) configuration is exposed via the following environment variables (where `MONGODB` is the upper-cased version of the key defined in the relationship): - `MONGODB_SERVER` - `MONGODB_HOST` - `MONGODB_PORT` - `MONGODB_SCHEME` - `MONGODB_NAME` - `MONGODB_DATABASE` - `MONGODB_USER` - `MONGODB_USERNAME` - `MONGODB_PASSWORD` ###### InfluxDB The [InfluxDB](https://docs.platform.sh/add-services/influxdb.md) configuration is exposed via the following environment variables (where `TIMEDB` is the upper-cased version of the key defined in the relationship): - `TIMEDB_SCHEME` - `TIMEDB_HOST` - `TIMEDB_PORT` - `TIMEDB_IP` ###### Kafka The [Apache Kafka](https://docs.platform.sh/add-services/kafka.md) configuration is exposed via the following environment variables (where `KAFKA` is the upper-cased version of the key defined in the relationship): - `KAFKA_URL` - `KAFKA_SCHEME` - `KAFKA_HOST` - `KAFKA_PORT` - `KAFKA_IP` ### Workers Workers (or consumers) are a great way to off-load processing in the background to make an app as fast as possible. You can implement workers in Symfony smoothly thanks to the [Messenger component](https://symfony.com/doc/current/components/messenger.md). To deploy a worker, add an entry under the ``workers`` section [in your app configuration](https://docs.platform.sh/create-apps/_index.md): ```yaml {location=".platform.app.yaml"} workers: mails: commands: start: symfony console messenger:consume --time-limit=60 --memory-limit=128M ``` Note that the `symfony` binary is available when you use the [Symfony integration](https://docs.platform.sh/guides/symfony/integration.md) in your Platform.sh app configuration. On Platform.sh, worker containers run the exact same code as the web container. The container image is built only once and deployed multiple times in its own container alongside the web container. The *build* hook and dependencies might not vary but, as these containers are independent, they can be customized the same way using common properties. The values defined for the main container are used as default values. **Tip**: When the container is running in the context of a worker, the ``SYMFONY_IS_WORKER`` environment variable is defined and set to ``1``. The ``commands.start`` key is required. It specifies the command you can use to launch the application worker. If the command specified by the ``start`` key terminates, it's restarted automatically. For more information, see [Workers](https://docs.platform.sh/create-apps/app-reference/single-runtime-image.md#workers). **Warning**: Web and worker containers don’t share mounts targets. So you can’t share files between those containers using the filesystem. To share data between containers, use [services](https://docs.platform.sh/add-services.md). ### Cron Jobs Cron jobs allow you to run scheduled tasks at specified times or intervals. To set up a cron job, add a configuration similar to the following: ```yaml {location=".platform.app.yaml"} crons: snapshot: spec: 0 5 * * * commands: start: croncape symfony ... ``` To run a command in a cron hook for specific environment types, use the `PLATFORM_ENVIRONMENT_TYPE` environment variable: ```yaml {location=".platform.app.yaml"} crons: snapshot: spec: 0 5 * * * commands: start: | # only run for the production environment, aka main branch if [ "$PLATFORM_ENVIRONMENT_TYPE" = "production" ]; then croncape symfony ... fi ``` ##### Use croncape When using the [Symfony integration](https://docs.platform.sh/guides/symfony/integration), you can use `croncape` to get feedback through emails when something goes wrong. To specify which email address `croncape` must send the feedback emails to, add a `MAILTO` environment variable. To do so, run the following command: ```bash symfony var:create -y --level=project --name=env:MAILTO --value=sysadmin@example.com ``` To ensure better reliability, `croncape` sends the emails using: - `project-id@cron.noreply.platformsh.site` as the sender address (`project-id+branch@cron.noreply.platformsh.site` for non-main environments) - the provided [Platform.sh SMTP service](https://docs.platform.sh/guides/symfony/environment-variables.md#emails), even if you define your own `MAILER_*` environment variables To use a custom SMTP and/or custom sender address, follow these steps: 1. To specify a sender address, define a [`MAILFROM` environment variable](https://docs.platform.sh/guides/symfony/environment-variables.md#symfony-environment-variables). 2. Define the mandatory [environment variables to use your own email service](https://docs.platform.sh/guides/symfony/environment-variables.md#emails). Note that only SMTP connections are supported. 3. To disable the provided SMTP service, run `symfony cloud:env:info enable_smtp false`. **Note**: To use ``croncape``, SMTP must be enabled on the environment, where the [PLATFORM_SMTP_HOST](https://docs.platform.sh/development/variables/use-variables.md#use-provided-variables) environment variable is accessible. This variable is available, and SMTP enabled, by default on all production environments. This is not the case for preview (non-production) environments, where it must be enabled with the command ``symfony cloud:env:info enable_smtp true``. ### Continous Observability with Blackfire [Blackfire.io](https://docs.platform.sh/increase-observability/integrate-observability/blackfire.md) is the recommended solution for monitoring and profiling web sites and apps. Blackfire works seamlessly with any app built with Symfony. Blackfire PHP SDK provides the following [integrations with Symfony](https://blackfire.io/docs/php/integrations/symfony/index): - [Symfony HTTPClient](https://blackfire.io/docs/php/integrations/symfony/http-client) - [Symfony Messenger](https://blackfire.io/docs/php/integrations/symfony/messenger) - [Symfony CLI Commands Monitoring](https://blackfire.io/docs/php/integrations/symfony/cli-commands-monitoring) - [Symfony Functional Tests Production](https://blackfire.io/docs/php/integrations/symfony/functional-tests) A `.blackfire.yaml` file is provided within the [Symfony Templates](https://github.com/symfonycorp/platformsh-symfony-template/blob/7.2/.blackfire.yaml) to help you bootstrap the writing of custom [performance tests](https://blackfire.io/docs/testing-cookbooks/index) and automated [builds](https://blackfire.io/docs/builds-cookbooks/index). ### Local development When you develop a Symfony project, a significant amount of work takes place locally rather than on an active Platform.sh environment. You want to ensure that the process of local development is as close as possible to a deployed environment. You can achieve this through various approaches. For example, you can use Symfony Server with tethered data To do so, when testing changes locally, you can connect your locally running Symfony Server to service containers on an active Platform.sh environment. This methodology has several advantages: - It avoids installing anything on your local machine but PHP; - It ensures that you are using the same versions of all services on your local machine and in production. **Warning**: Never use this method on the **main** environment as changes made on your local machine will impact production data. ##### Before you begin You need: - A local copy of the repository for a project running on Platform.sh. You can clone an integrated source repository and set the remote branch. To do so, run ``symfony cloud:project:set-remote ``. - The [Symfony CLI](https://symfony.com/download) ##### 1. Start your Symfony Server To start your [Symfony Server](https://symfony.com/doc/current/setup/symfony_server.html) locally and display your Symfony app, run the following command: ```bash symfony server:start -d symfony open:local ``` This starts the Symfony Server and opens the app in your local browser. ##### 2. Create the tethered connection 1. Create a new environment off of production: ```bash symfony branch new-feature main ``` 2. Open an SSH tunnel to the new environment's services: ```bash symfony tunnel:open ```` This command returns the addresses for SSH tunnels to all of your services: ```bash symfony tunnel:open SSH tunnel opened to rediscache at: redis://127.0.0.1:30000 SSH tunnel opened to database at: pgsql://main:main@127.0.0.1:30001/main Logs are written to: /Users/acmeUser/.platformsh/tunnels.log List tunnels with: symfony tunnels View tunnel details with: symfony tunnel:info Close tunnels with: symfony tunnel:close Save encoded tunnel details to the PLATFORM_RELATIONSHIPS variable using: export PLATFORM_RELATIONSHIPS="$(symfony tunnel:info --encode)" ``` 3. To expose Platform.sh services to your Symfony app, run the following command: ```bash symfony var:expose-from-tunnel ``` This automatically configures your local Symfony app to use all your remote Platform.sh services (remote database, remote Redis component, etc.). To check that you're now using remote data and components from Platform.sh, reload your local app within your browser. 4. When you've finished your work, close the tunnels to your services by running the following command: ```bash symfony var:expose-from-tunnel --off symfony tunnel:close --all -y ``` ### FAQ ##### Why is `DATABASE_URL` not defined during the build hook? During the build hook, services are not available to avoid breaking the application that is still live. That is why the Symfony integration does not expose environment variables during the build hook. The `cache:clear` command does not need to connect to the database by default, except if you are using the Doctrine ORM and the database engine version is not set in your configuration. The version information can be set in your `.env` file or in the `doctrine.yaml` configuration file. The only important pieces of information there are the database engine and the version; everything else will be ignored. Note that the environment variables are available in the deploy hook. ##### How can I access my application logs? To display the application log file (`/var/log/app.log` file), run the following command: ```bash symfony log app --tail ``` All the log messages generated by your app are sent to this `app.log` file. This includes language errors such as PHP errors, warnings, notices, as well as uncaught exceptions. The file also contains your application logs if you log on `stderr`. Note that Platform.sh manages the `app.log` file for you. This is to prevent disks from getting filled and using very fast local drives instead of slower network disks. Make sure your apps always output their logs to `stderr`. If you use Monolog, add the following configuration to your `config/packages/prod/monolog.yaml` file: ```gitignore --- a/config/packages/prod/monolog.yaml +++ b/config/packages/prod/monolog.yaml @@ -11,7 +11,7 @@ monolog: members: [nested, buffer] nested: type: stream - path: "%kernel.logs_dir%/%kernel.environment%.log" + path: php://stderr level: debug buffer: type: buffer ``` **Warning**: If you log deprecations, make sure you **also** log them on ``stderr``. ##### What's this "Oops! An Error Occurred" message about? The *Oops! An Error Occurred* message comes from your app and is automatically generated based on the Symfony error template. ###### The server returned a "500 Internal Server Error" ![A 500 error page in production mode](https://docs.platform.sh/images/symfony/production-error-500.png "0.35") If your app's working as expected locally but you see the previous error message on Platform.sh, it usually means you have a configuration error or a missing dependency. To fix this issue, search your application logs. They likely contain an error message describing the root cause: ```bash symfony logs all [app] [14-Aug-2020 10:52:27 UTC] [critical] Uncaught PHP Exception Exception: [...] [app] [php.access] 2020-08-14T10:52:27Z GET 500 2.386 ms 2048 kB 419.11% / [access] 78.247.136.119 - - [14/Aug/2020:10:52:27 +0000] "GET / HTTP/1.1" 500 843 "-" "Mozilla/5.0 (Macintosh; Intel Mac OS X 10_15_6) AppleWebKit/537.36 (KHTML, like Gecko) Chrome/84.0.4147.125 Safari/537.36" ``` If the error occurs on a preview environment, or on the main environment of a non-production project, you can also enable Symfony's dev/debug mode to inspect the cause of the error: ```bash # Enable debug mode symfony env:debug # Disable debug mode symfony env:debug --off ``` ###### The server returned a "404 Not Found" By default, new Symfony apps come without controllers, which means there's no homepage to show. As a result, when you run your project locally, the following welcome page is displayed: ![The default Symfony welcome page in development mode](https://docs.platform.sh/images/symfony/new-symfony-welcome-page.png "0.45") But when you run your project on Platform.sh, the following error is displayed instead: ![A 404 error page in production mode](https://docs.platform.sh/images/symfony/production-error-404.png "0.35") This is because Platform.sh runs in production mode, leading Symfony to show a generic 404 error. To fix this issue, [create your first Symfony page](https://symfony.com/doc/current/page_creation.md). If you've already created a custom homepage, make sure you perform the following actions: 1. Commit all your files. 2. Run the `symfony deploy` command and check that the deployment is successful. ##### Other issues For other issues unrelated to Symfony, see [Troubleshoot development](https://docs.platform.sh/development/troubleshoot.md). ### Deploy Laravel on Platform.sh [Laravel](https://laravel.com) is an open-source PHP Framework. To get Laravel running on Platform.sh, you have two potential starting places: - You already have a Laravel site you are trying to deploy. Go through this guide to make the recommended changes to your repository to prepare it for Platform.sh. - You have no code at this point. If you have no code, you have two choices: - Generate a basic Laravel site. - Use a ready-made [Laravel template](https://github.com/platformsh-templates/laravel). A template is a starting point for building your project. It should help you get a project ready for production. To use a template, click the button below to create a Laravel template project. ![Deploy on Platform.sh](https://platform.sh/images/deploy/lg-blue.svg) Once the template is deployed, you can follow the rest of this guide to better understand the extra files and changes to the repository. ##### Before you begin You need: - [Git](https://git-scm.com/downloads). Git is the primary tool to manage everything your app needs to run. Push commits to deploy changes and control configuration through YAML files. These files describe your infrastructure, making it transparent and version-controlled. - A Platform.sh account. If you don't already have one, [register for a trial account](https://auth.api.platform.sh/register). You can sign up with an email address or an existing GitHub, Bitbucket, or Google account. If you choose one of these accounts, you can set a password for your Platform.sh account later. - The [Platform.sh CLI](https://docs.platform.sh/administration/cli.md). This lets you interact with your project from the command line. You can also do most things through the [Web Console](https://docs.platform.sh/administration/web.md). ##### Initialize a project You can start with a basic code base or push a pre-existing project to Platform.sh. - Create your first project by running the following command: ```bash {} platform create --title ``` Then choose the region you want to deploy to, such as the one closest to your site visitors. You can also select more resources for your project through additional flags, but a Development plan should be enough for you to get started. Copy the ID of the project you've created. - Get your code ready locally. If your code lives in a remote repository, clone it to your computer. If your code isn't in a Git repository, initialize it by running ``git init``. - Connect your Platform.sh project with Git. You can use Platform.sh as your Git repository or connect to a third-party provider: GitHub, GitLab, or BitBucket. That creates an upstream called ``platform`` for your Git repository. When you choose to use a third-party Git hosting service the Platform.sh Git repository becomes a read-only mirror of the third-party repository. All your changes take place in the third-party repository. Add an integration to your existing third party repository. The process varies a bit for each supported service, so check the specific pages for each one. - [BitBucket](https://docs.platform.sh/integrations/source/bitbucket.md) - [GitHub](https://docs.platform.sh/integrations/source/github.md) - [GitLab](https://docs.platform.sh/integrations/source/gitlab.md) Accept the default options or modify to fit your needs. All of your existing branches are automatically synchronized to Platform.sh. You get a deploy failure message because you haven’t provided configuration files yet. You add them in the next step. If you’re integrating a repository to Platform.sh that contains a number of open pull requests, don’t use the default integration options. Projects are limited to three* preview environments (active and deployed branches or pull requests) and you would need to deactivate them individually to test this guide’s migration changes. Instead, each service integration should be made with the following flag: ```bash {} platform integration:add --type= ... --build-pull-requests=false ``` You can then go through this guide and activate the environment when you’re ready to deploy * You can purchase additional preview environments at any time in the Console. Open your project and select **Edit plan**. Add additional **Environments**, view a cost estimate, and confirm your changes. Now you have a local Git repository, a Platform.sh project, and a way to push code to that project. Next you can configure your project to work with Platform.sh. [Configure Laravel](https://docs.platform.sh/guides/laravel/deploy/configure.md) #### Configure Laravel for Platform.sh You now have a *project* running on Platform.sh. In many ways, a project is just a collection of tools around a Git repository. Just like a Git repository, a project has branches, called *environments*. Each environment can then be activated. *Active* environments are built and deployed, giving you a fully isolated running site for each active environment. Once an environment is activated, your app is deployed through a cluster of containers. You can configure these containers in three ways, each corresponding to a [YAML file](https://docs.platform.sh/learn/overview/yaml): - **Configure apps** in a `.platform.app.yaml` file. This controls the configuration of the container where your app lives. - **Add services** in a `.platform/services.yaml` file. This controls what additional services are created to support your app, such as databases or search servers. Each environment has its own independent copy of each service. If you're not using any services, you don't need this file. - **Define routes** in a `.platform/routes.yaml` file. This controls how incoming requests are routed to your app or apps. It also controls the built-in HTTP cache. If you're only using the single default route, you don't need this file. Start by creating empty versions of each of these files in your repository: ```bash # Create empty Platform.sh configuration files mkdir -p .platform && touch .platform/services.yaml && touch .platform/routes.yaml && touch .platform.app.yaml ``` Now that you've added these files to your project, configure each one for Laravel in the following sections. Each section covers basic configuration options and presents a complete example with comments on why Laravel requires those values. ###### Configure apps in `.platform.app.yaml` Your app configuration in a `.platform.app.yaml` file is allows you to configure nearly any aspect of your app. For all of the options, see a [complete reference](https://docs.platform.sh/create-apps/app-reference/single-runtime-image.md). The following example shows a complete configuration with comments to explain the various settings. ```yaml {location=".platform.app.yaml"} # This file describes an application. You can have multiple applications # in the same project. # The name of this app. Must be unique within a project. name: app # The type of the application to build. type: php:8.0 dependencies: php: composer/composer: '^2' runtime: extensions: - redis # - blackfire # https://docs.platform.sh/integrations/observability/blackfire. build: flavor: composer variables: env: N_PREFIX: /app/.global # The hooks that will be performed when the package is deployed. hooks: build: | set -e # install a specific NodeJS version https://github.com/platformsh/snippets/ # -v requested version # -y install Yarn # curl -fsS https://raw.githubusercontent.com/platformsh/snippets/main/src/install_node.sh | { bash /dev/fd/3 -v 17.5 -y; } 3:`. relationships: database: "db:mysql" rediscache: "cache:redis" redissession: "cache:redis" # The size of the persistent disk of the application (in MB). disk: 2048 # The mounts that will be performed when the package is deployed. mounts: "storage/app/public": source: local source_path: "public" "storage/framework/views": source: local source_path: "views" "storage/framework/sessions": source: local source_path: "sessions" "storage/framework/cache": source: local source_path: "cache" "storage/logs": source: local source_path: "logs" "bootstrap/cache": source: local source_path: "cache" "/.config": source: local source_path: "config" # The configuration of app when it is exposed to the web. web: locations: "/": root: "public" index: - index.php allow: true passthru: "/index.php" "/storage": root: "storage/app/public" scripts: false # Note that use of workers require a Medium plan or larger. workers: queue: size: S commands: # To minimize leakage, the queue worker will stop every hour # and get restarted automatically. start: | php artisan queue:work --max-time=3600 # set the worker's disk to the minimum amount disk: 256 scheduler: size: S commands: start: php artisan schedule:work # set the worker's disk to the minimum amount disk: 256 source: operations: auto-update: command: | curl -fsS https://raw.githubusercontent.com/platformsh/source-operations/main/setup.sh | { bash /dev/fd/3 sop-autoupdate; } 3 ###### Add services in `.platform/services.yaml` You can add the managed services you need for you app to run in the `.platform/services.yaml` file. You pick the major version of the service and security and minor updates are applied automatically, so you always get the newest version when you deploy. You should always try any upgrades on a development branch before pushing to production. You can [add other services](https://docs.platform.sh/add-services.md) if desired, such as [Solr](https://docs.platform.sh/add-services/solr.md) or [Elasticsearch](https://docs.platform.sh/add-services/elasticsearch.md). You need to configure to use those services once they're enabled. Each service entry has a name (`db` and `cache` in the example) and a `type` that specifies the service and version to use. Services that store persistent data have a `disk` key, to specify the amount of storage. ###### Define routes All HTTP requests sent to your app are controlled through the routing and caching you define in a `.platform/routes.yaml` file. The two most important options are the main route and its caching rules. A route can have a placeholder of `{default}`, which is replaced by your domain name in production and environment-specific names for your preview environments. The main route has an `upstream`, which is the name of the app container to forward requests to. You can enable [HTTP cache](https://docs.platform.sh/define-routes/cache.md). The router includes a basic HTTP cache. By default, HTTP caches includes all cookies in the cache key. So any cookies that you have bust the cache. The `cookies` key allows you to select which cookies should matter for the cache. You can also set up routes as [HTTP redirects](https://docs.platform.sh/define-routes/redirects.md). In the following example, all requests to `www.{default}` are redirected to the equivalent URL without `www`. HTTP requests are automatically redirected to HTTPS. If you don't include a `.platform/routes.yaml` file, a single default route is used. This is equivalent to the following: ```yaml {location=".platform/routes.yaml"} https://{default}/: type: upstream upstream: :http ``` Where `` is the `name` you've defined in your [app configuration](#configure-apps-in-platformappyaml). The following example presents a complete definition of a main route for a Laravel app: ```bash {location=".platform/routes.yaml"} # The routes of the project. # # Each route describes how an incoming URL is going # to be processed by Platform.sh. "https://www.{default}/": type: upstream upstream: "app:http" "https://{default}/": type: redirect to: "https://www.{default}/" ``` Now that you have Laravel configured, connect it with Laravel Bridge. #### Laravel Bridge Connect your Laravel-based app to Platform.sh with the `platformsh/laravel-bridge` library. Laravel expects all configuration to come in through environment variables with specific names in a specific format. Platform.sh provides configuration information as environment variables in a different specific format. This library handles mapping the Platform.sh variables to the format Laravel expects for common values. ###### Usage Require this package using Composer. When Composer's autoload is included, this library is activated and the environment variables set. ``` bash composer require platformsh/laravel-bridge ``` Make sure to clear the cache on relevant Platform.sh environments afterwards. ``` bash php artisan optimize:clear ``` ###### What is mapped * If a Platform.sh relationship named `database` is defined, it is taken as an SQL database and mapped to the `DB_*` environment variables for Laravel. * If a Platform.sh relationship named `rediscache` is defined, it is mapped to the `REDIS_*` environment variables for Laravel. The `CACHE_DRIVER` variable is also set to `redis` to activate it automatically. * If a Platform.sh relationship named `redissession` is defined, the `SESSION_DRIVER` is set to `redis` and the `REDIS_*` variables set based on that relationship. NOTE: This means you _*must*_ set 2 relationships to the same Redis service and endpoint, as Laravel reuses the same backend connection. * The Laravel `APP_KEY` is set based on the `PLATFORM_PROJECT_ENTROPY` variable, which is provided for exactly this purpose. * The Laravel `APP_URL` variable is set based on the current route, when possible. * The `SESSION_SECURE_COOKIE` variable is set to `true` if it's not already defined. A Platform.sh environment is by default encrypted-always, so there's no reason to allow unencrypted cookies. Overwrite this by setting the Platform.sh variable `env:SESSION_SECURE_COOKIE` to 0. * The `MAIL_DRIVER`, `MAIL_HOST`, and `MAIL_PORT` variables are set to support sending email through the Platform.sh mail gateway. The `MAIL_ENCRYPTION` value is also set to `0` to disable TLS, as it isn't needed or supported within Platform.sh's network. Note that doing so is only supported on Laravel 6.0.4 and later. On earlier versions, you *must* manually modify `mail.php` and set `encryption` to `null`: ```php 'encryption' => null, ``` ###### Common environment variables not set Laravel provides reasonable defaults for many environment variables already and this library doesn't override those. Customize them by setting a Platform.sh variable named `env:ENV_NAME`. (Note the `env:` prefix.) The variables you are most likely to want to override are: * `env:APP_NAME`: The human-friendly name of the app. * `env:APP_ENV`: Whether the app is in `production` or `development` mode. * `env:APP_DEBUG`: Set `true` to enable verbose error messages. Now that your Laravel app is connected to Platform.sh, deploy it to see it in action. #### Workers, cron jobs, and task scheduling **Note**: The use of workers requires a [Medium plan](https://docs.platform.sh/administration/pricing.md#multiple-apps-in-a-single-project) or greater. Laravel offers a very convenient and flexible way of scheduling tasks. A large set of [helper functions](https://laravel.com/docs/scheduling#schedule-frequency-options) help you schedule commands and jobs. Once the scheduled tasks are defined, they need to be effectively executed at the right time and pace. The recommended way is a cron configuration entry running the `artisan schedule:run` command schedule for every minute. However, on Platform.sh the [minimum time between cron jobs](https://docs.platform.sh/create-apps/app-reference/single-runtime-image.md#cron-job-timing) depends on your plan. Task scheduling may then be contradicted by the cron minimum frequency. Schedules outside the specified cron frequency are ignored and the related tasks aren't triggered. Due to this conflict, we suggest utilizing [workers](https://docs.platform.sh/create-apps/workers.md) to run both the scheduler and the queue systems (the [Laravel template](https://github.com/platformsh-templates/laravel) utilizes this method). In order to have enough resources to support these workers as well as services (e.g. MariaDB, Redis, etc), a **[Medium plan](https://docs.platform.sh/administration/pricing.md#multiple-apps-in-a-single-project) _or greater_ is required**. To use workers to handle scheduling and queues add the following to your .platform.app.yaml file: ```yaml {location=".platform.app.yaml"} workers: queue: size: S commands: # To minimize leakage, the queue worker will stop every hour # and get restarted automatically. start: | php artisan queue:work --max-time=3600 disk: 256 scheduler: size: S commands: start: php artisan schedule:work disk: 256 ``` **Note**: By default, [workers inherit all top level properties](https://docs.platform.sh/create-apps/workers.md#inheritance) from the parent application. You may need to override certain properties in the worker configuration above depending on your application. #### Continous observability with Blackfire [Blackfire.io](https://docs.platform.sh/increase-observability/integrate-observability/blackfire.md) is the recommended solution for monitoring and profiling web sites and applications. Blackfire works seamlessly with any application built with Laravel, like any PHP application. For advanced cases, the Blackfire PHP SDK provides the following integrations with Laravel: - [Laravel Artisan](https://blackfire.io/docs/php/integrations/laravel/artisan) - [Laravel Horizon and other queue services](https://blackfire.io/docs/php/integrations/laravel/horizon) - [Laravel Tests](https://blackfire.io/docs/php/integrations/laravel/tests) A `.blackfire.yaml` file is provided within the [Laravel Template](https://github.com/platformsh-templates/laravel/blob/master/.blackfire.yaml) to help you bootstrap the writing of custom [performance tests](https://blackfire.io/docs/testing-cookbooks/index) and automated [builds](https://blackfire.io/docs/builds-cookbooks/index). #### Laravel Octane [Laravel Octane](https://laravel.com/docs/octane) aims at improving the performance of Laravel applications by serving them using high-powered application servers, including [Swoole](https://github.com/swoole/swoole-src), [Open Swoole](https://openswoole.com/), and [RoadRunner](https://roadrunner.dev/). **Note**: Laravel Octane requires PHP 8.0+. ###### Install Install the PHP extension for Swoole or Open Swoole during the build. Take advantage of an [installation script](https://raw.githubusercontent.com/platformsh/snippets/main/src/install_swoole.sh). You need to pass 2 parameters: * Which Swoole project to use: `openswoole` or `swoole` * Which version to install ```yaml {location=".platform.app.yaml"} hooks: build: | set -e ... curl -fsS https://raw.githubusercontent.com/platformsh/snippets/main/src/install_swoole.sh | { bash /dev/fd/3 openswoole 4.11.0 ; } 3 ###### Use Require Laravel Octane using Composer. ``` bash composer require laravel/octane ``` Then make sure to clear the cache on all relevant Platform.sh environments. ``` bash php artisan optimize:clear ``` Override the default web server with a [custom start command](https://docs.platform.sh/languages/php.md#alternate-start-commands). Octane should listen on a TCP socket. ```yaml {location=".platform.app.yaml"} web: upstream: socket_family: tcp protocol: http commands: start: php artisan octane:start --server=swoole --host=0.0.0.0 --port=$PORT locations: "/": passthru: true scripts: false allow: false ``` #### Deploy Laravel Now you have your configuration for deployment and your app set up to run on Platform.sh. Make sure all your code is committed to Git and run `git push` to your Platform.sh environment. Your code is built, producing a read-only image that's deployed to a running cluster of containers. If you aren't using a source integration, the log of the process is returned in your terminal. If you're using a source integration, you can get the log by running `platform activity:log --type environment.push`. When the build finished, you're given the URL of your deployed environment. Click the URL to see your site. If your environment wasn't active and so wasn't deployed, activate it by running the following command: ```bash platform environment:activate ``` ###### Migrate your data If you are moving an existing site to Platform.sh, then in addition to code you also need to migrate your data. That means your database and your files. ####### Import the database First, obtain a database dump from your current site, such as using the * [`pg_dump` command for PostgreSQL](https://www.postgresql.org/docs/current/app-pgdump.md) * [`mysqldump` command for MariaDB](https://mariadb.com/kb/en/mysqldump/) * [`sqlite-dump` command for SQLite](https://www.sqlitetutorial.net/sqlite-dump/) Next, import the database into your Platform.sh site by running the following command: ```bash platform sql Go forth and deploy (even on Friday)! [Back](https://docs.platform.sh/guides/laravel/deploy/octane.md) ### Run a Laravel app on your local machine Platform.sh provides support for locally running a Laravel app that has been deployed on Platform.sh, including its services. Once you've downloaded the code of the Laravel app you deployed on Platform.sh, you can make changes to the project without pushing to Platform.sh each time to test them. You can build your app locally using the Platform.sh CLI, even when the app functionality depends on a number of services. You can run your Laravel app locally with all of its services by following the steps for your chosen development platform: #### Develop locally with DDEV [DDEV](https://ddev.com/) is a tool for local PHP development environments based on Docker containers. To learn more about how to run your Laravel app in a local DDEV-managed environment, see the [official integration documentation](https://ddev.readthedocs.io/en/stable/users/providers/platform/). #### Develop locally with Lando [Lando](https://lando.dev/) is a development tool based on Docker containers, which dramatically simplifies local development. To learn more about how to run your Laravel app in a local Lando-managed environment, see the [official integration documentation](https://docs.lando.dev/platformsh/). ### Deploy TYPO3 on Platform.sh TYPO3 is an Open Source Enterprise PHP-based CMS framework. The recommended way to deploy TYPO3 on Platform.sh is by using Composer, the PHP package management suite. This guide assumes you are using the well-supported Composer flavor of TYPO3. **Note**: If you have a TYPO3 site that’s not using Composer, there’s a useful guide in the TYPO3 documentation for [migrating a TYPO3 project to composer](https://docs.typo3.org/m/typo3/guide-installation/master/en-us/MigrateToComposer/Index.md). To get TYPO3 running on Platform.sh, you have two potential starting places: - You already have a [Composer-flavored TYPO3](https://github.com/TYPO3/TYPO3.CMS.BaseDistribution) site you are trying to deploy. Go through this guide to make the recommended changes to your repository to prepare it for Platform.sh. - You have no code at this point. If you have no code, you have two choices: - Generate a basic [Composer-flavored TYPO3](https://github.com/TYPO3/TYPO3.CMS.BaseDistribution) site. See an example for doing this under initializing a project. - Use a ready-made [TYPO3 template](https://github.com/platformsh-templates/typo3). A template is a starting point for building your project. It should help you get a project ready for production. To use a template, click the button below to create a TYPO3 template project. ![Deploy on Platform.sh](https://platform.sh/images/deploy/lg-blue.svg) Once the template is deployed, you can follow the rest of this guide to better understand the extra files and changes to the repository. ##### Before you begin You need: - [Git](https://git-scm.com/downloads). Git is the primary tool to manage everything your app needs to run. Push commits to deploy changes and control configuration through YAML files. These files describe your infrastructure, making it transparent and version-controlled. - A Platform.sh account. If you don't already have one, [register for a trial account](https://auth.api.platform.sh/register). You can sign up with an email address or an existing GitHub, Bitbucket, or Google account. If you choose one of these accounts, you can set a password for your Platform.sh account later. - The [Platform.sh CLI](https://docs.platform.sh/administration/cli.md). This lets you interact with your project from the command line. You can also do most things through the [Web Console](https://docs.platform.sh/administration/web.md). ##### Initialize a project You can start with a basic code base or push a pre-existing project to Platform.sh. - Create your first project by running the following command: ```bash {} platform create --title ``` Then choose the region you want to deploy to, such as the one closest to your site visitors. You can also select more resources for your project through additional flags, but a Development plan should be enough for you to get started. Copy the ID of the project you've created. - Get your code ready locally. If your code lives in a remote repository, clone it to your computer. If your code isn't in a Git repository, initialize it by running ``git init``. If you don’t have code, create a new TYPO3 project from scratch. The following commands create a brand new TYPO3 project using Composer. ```bash {} composer create-project typo3/cms-base-distribution ^10 cd git init git add . && git commit -m "Init TYPO3 from upstream." ``` - Connect your Platform.sh project with Git. You can use Platform.sh as your Git repository or connect to a third-party provider: GitHub, GitLab, or BitBucket. That creates an upstream called ``platform`` for your Git repository. When you choose to use a third-party Git hosting service the Platform.sh Git repository becomes a read-only mirror of the third-party repository. All your changes take place in the third-party repository. Add an integration to your existing third party repository. The process varies a bit for each supported service, so check the specific pages for each one. - [BitBucket](https://docs.platform.sh/integrations/source/bitbucket.md) - [GitHub](https://docs.platform.sh/integrations/source/github.md) - [GitLab](https://docs.platform.sh/integrations/source/gitlab.md) Accept the default options or modify to fit your needs. All of your existing branches are automatically synchronized to Platform.sh. You get a deploy failure message because you haven’t provided configuration files yet. You add them in the next step. If you’re integrating a repository to Platform.sh that contains a number of open pull requests, don’t use the default integration options. Projects are limited to three* preview environments (active and deployed branches or pull requests) and you would need to deactivate them individually to test this guide’s migration changes. Instead, each service integration should be made with the following flag: ```bash {} platform integration:add --type= ... --build-pull-requests=false ``` You can then go through this guide and activate the environment when you’re ready to deploy * You can purchase additional preview environments at any time in the Console. Open your project and select **Edit plan**. Add additional **Environments**, view a cost estimate, and confirm your changes. Now you have a local Git repository, a Platform.sh project, and a way to push code to that project. Next you can configure your project to work with Platform.sh. [Configure repository](https://docs.platform.sh/guides/typo3/deploy/configure.md) #### Configure TYPO3 for Platform.sh You now have a *project* running on Platform.sh. In many ways, a project is just a collection of tools around a Git repository. Just like a Git repository, a project has branches, called *environments*. Each environment can then be activated. *Active* environments are built and deployed, giving you a fully isolated running site for each active environment. Once an environment is activated, your app is deployed through a cluster of containers. You can configure these containers in three ways, each corresponding to a [YAML file](https://docs.platform.sh/learn/overview/yaml): - **Configure apps** in a `.platform.app.yaml` file. This controls the configuration of the container where your app lives. - **Add services** in a `.platform/services.yaml` file. This controls what additional services are created to support your app, such as databases or search servers. Each environment has its own independent copy of each service. If you're not using any services, you don't need this file. - **Define routes** in a `.platform/routes.yaml` file. This controls how incoming requests are routed to your app or apps. It also controls the built-in HTTP cache. If you're only using the single default route, you don't need this file. Start by creating empty versions of each of these files in your repository: ```bash # Create empty Platform.sh configuration files mkdir -p .platform && touch .platform/services.yaml && touch .platform/routes.yaml && touch .platform.app.yaml ``` Now that you've added these files to your project, configure each one for TYPO3 in the following sections. Each section covers basic configuration options and presents a complete example with comments on why TYPO3 requires those values. ###### Configure apps in `.platform.app.yaml` Your app configuration in a `.platform.app.yaml` file is allows you to configure nearly any aspect of your app. For all of the options, see a [complete reference](https://docs.platform.sh/create-apps/app-reference/single-runtime-image.md). The following example shows a complete configuration with comments to explain the various settings. Note that the command ``php vendor/bin/typo3cms install:generatepackagestate`` is run during the build hook. The command ensures all installed extensions are enabled. ```yaml {location=".platform.app.yaml"} # This file describes an application. You can have multiple applications # in the same project. # # See https://docs.platform.sh/configuration/app.html # The name of this app. Must be unique within a project. name: app # The runtime the application uses. type: php:7.4 dependencies: php: composer/composer: '^2' runtime: # Enable the redis extension so TYPO3 can communicate with the Redis cache. extensions: - redis # Composer build tasks run prior to build hook, which runs # composer --no-ansi --no-interaction install --no-progress --prefer-dist --optimize-autoloader # if composer.json is detected. build: flavor: composer # The relationships of the application with services or other applications. # The left-hand side is the name of the relationship as it will be exposed # to the application in the PLATFORM_RELATIONSHIPS variable. The right-hand # side is in the form `:`. # # NOTE: Be sure to update database and Redis configuration in `public/typo3conf/PlatformshConfiguration.php` # if you rename the relationships here. relationships: # MariaDB/MySQL will then be accessible to the app from 'database' relationship. # The service name `db` must match the top-level attribute in `.platform/services.yaml`. database: 'db:mysql' # Redis will then be accessible to the app from 'rediscache' relationship. # The service name `cache` must match the top-level attribute in `.platform/services.yaml`. rediscache: 'cache:redis' # The configuration of app when it is exposed to the web. web: # How the application container responds to incoming requests. locations: # All requests not otherwise specified follow these rules. '/': # The folder from which to serve static assets, for this location. # This is a filesystem path, relative to the application root. root: 'public' # Redirect any incoming request to TYPO3's front controller. passthru: '/index.php' # File to consider first when serving requests for a directory. index: - 'index.php' # Deny access to all static files, except those specifically allowed below. allow: false # Rules for specific URI patterns. rules: # Allow access to common static files. '\.(jpe?g|png|gif|svgz?|css|js|map|ico|bmp|eot|woff2?|otf|ttf)$': allow: true '^/robots\.txt$': allow: true '^/sitemap\.xml$': allow: true # Default Storage location where TYPO3 expects media resources to be located. # Writable at runtime with the mount `public/fileadmin`. '/fileadmin': root: 'public/fileadmin' # Do not execute PHP scripts from the writeable mount. scripts: false allow: true passthru: '/index.php' # Directory for temporary files that should be publicly available (e.g. generated images). # Writable at runtime with the mount `publi/typo3temp`. '/typo3temp/assets': root: 'public/typo3temp/assets' # Do not execute PHP scripts from the writeable mount. scripts: false allow: true passthru: '/index.php' # Local TYPO3 installation settings. '/typo3conf/LocalConfiguration.php': allow: false # Additional TYPO3 installation settings. '/typo3conf/AdditionalConfiguration.php': allow: false # The size of the persistent disk of the application (in MB). disk: 2048 # The 'mounts' describe writable, persistent filesystem mounts in the application. mounts: # Directory for temporary files. It contains subdirectories (see below) for # temporary files of extensions and TYPO3 components. "public/typo3temp": source: local source_path: "typo3temp" # Default Storage location where TYPO3 expects media resources to be located. "public/fileadmin": source: local source_path: "fileadmin" # Contains system files, like caches, logs, sessions "var": source: local source_path: "var" # The hooks that will be performed when the package is deployed. hooks: # The build hook runs after Composer to finish preparing up your code. # No services are available but the disk is writeable. build: | # Exit hook immediately if a command exits with a non-zero status. set -e # Start the installation with no interaction or extension setup, using `SetupConfiguration.yaml`. if [ ! -f var/platformsh.installed ]; then php vendor/bin/typo3cms install:setup --install-steps-config=src/SetupConfiguration.yaml --no-interaction --skip-extension-setup fi; # Generates the `PackageStates.php` file from the `composer.json` configuration php vendor/bin/typo3cms install:generatepackagestates # Enable the install tool for 60mins after deployment. touch public/typo3conf/ENABLE_INSTALL_TOOL # Keep the checked-in LocalConfiguration available, but make the actual file writable later-on # by creating a symlink which will be accesible below. if [ -f public/typo3conf/LocalConfiguration.php ]; then mv public/typo3conf/LocalConfiguration.php public/typo3conf/LocalConfiguration.FromSource.php ln -sf ../../var/LocalConfiguration.php public/typo3conf/LocalConfiguration.php fi; # Clean up the FIRST_INSTALL file, that was created. if [ -f public/FIRST_INSTALL ]; then rm public/FIRST_INSTALL fi; # initial activation of Introduction package will fail if it is unable to write to this images directory. # if it exists, we'll move its contents out to a temp space, remove the original, and symlink to a writable mount if [ -d public/typo3conf/ext/introduction/Initialisation/Files/images/ ]; then if [ ! -d imagestemp ]; then # create our temp images directory mkdir -p imagestemp # copy the image files out of the real location into our temp space cp -r public/typo3conf/ext/introduction/Initialisation/Files/images/. imagestemp/ fi #now create the symlink for the images #remove the original directory rm -rf public/typo3conf/ext/introduction/Initialisation/Files/images/ # now create a symlink ln -sf "$PLATFORM_APP_DIR/var/images" public/typo3conf/ext/introduction/Initialisation/Files/images fi # The deploy hook runs after your application has been deployed and started. # Code cannot be modified at this point but the database is available. # The site is not accepting requests while this script runs so keep it # fast. deploy: | # Exit hook immediately if a command exits with a non-zero status. set -e # if the images location existed in the build hook, it was converted to a symlink. we now to need to make sure # the target of the symlink exists, and then rsync any new files to the writable location if [ -L public/typo3conf/ext/introduction/Initialisation/Files/images ]; then #make sure our images directory exists in var mount if [ ! -d var/images ]; then mkdir -p var/images echo "This directory is symlinked to public/typo3conf/ext/introduction/Initialisation/Files/images/. Do not delete." >> var/images/readme.txt fi #rsync any new files from imagestemp into var/images rsync -a --ignore-existing imagestemp/ var/images fi # Set TYPO3 site defaults on first deploy. if [ ! -f var/platformsh.installed ]; then # Copy the created LocalConfiguration into the writable location. cp public/typo3conf/LocalConfiguration.FromSource.php var/LocalConfiguration.php # On first install, create an inital admin user with a default password. # *CHANGE THIS VALUE IMMEDIATELY AFTER INSTALLATION* php vendor/bin/typo3cms install:setup \ --install-steps-config=src/SetupDatabase.yaml \ --site-setup-type=no \ \ --admin-user-name=admin \ --admin-password=password \ --skip-extension-setup \ --no-interaction # Sets up all extensions that are marked as active in the system. php vendor/bin/typo3cms extension:setupactive || true # Create file that indicates first deploy and installation has been completed. touch var/platformsh.installed fi; crons: # Run TYPO3's Scheduler tasks every 5 minutes. typo3: spec: "*/5 * * * *" commands: start: "vendor/bin/typo3 scheduler:run" source: operations: auto-update: command: | curl -fsS https://raw.githubusercontent.com/platformsh/source-operations/main/setup.sh | { bash /dev/fd/3 sop-autoupdate; } 3 ###### Add services in `.platform/services.yaml` You can add the managed services you need for you app to run in the `.platform/services.yaml` file. You pick the major version of the service and security and minor updates are applied automatically, so you always get the newest version when you deploy. You should always try any upgrades on a development branch before pushing to production. We recommend the latest [MariaDB](https://docs.platform.sh/add-services/mysql.md) version for TYPO3, although you can also use Oracle MySQL or [PostgreSQL](https://docs.platform.sh/add-services/postgresql.md) if you prefer. We also strongly recommend using [Redis](https://docs.platform.sh/add-services/redis.md) for TYPO3 caching. Our TYPO3 template comes [pre-configured to use Redis](https://github.com/platformsh-templates/typo3#user-content-customizations) for caching. You can [add other services](https://docs.platform.sh/add-services.md) if desired, such as [Solr](https://docs.platform.sh/add-services/solr.md) or [Elasticsearch](https://docs.platform.sh/add-services/elasticsearch.md). You need to configure TYPO3 to use those services once they're enabled. Each service entry has a name (`db` and `cache` in the example) and a `type` that specifies the service and version to use. Services that store persistent data have a `disk` key, to specify the amount of storage. ```yaml {location=".platform/services.yaml"} # This file describes an application's services. You can define as many services as your # application requires, subject to your plan's resource restrictions. # # See https://docs.platform.sh/configuration/services.html. # MariaDB/MySQL 10.4 service with 2048MB of allocated disk. # The service name `db` is used in defining the `database` relationship in the # `.platform.app.yaml` file. # # See https://docs.platform.sh/configuration/services/mysql.html. db: type: mysql:10.4 disk: 2048 # Redis 5.0 service definition. # The service name `cache` is used in defining the `rediscache` relationship in the # `.platform.app.yaml` file. # # See https://docs.platform.sh/configuration/services/redis.html. cache: type: redis:5.0 ``` ###### Define routes All HTTP requests sent to your app are controlled through the routing and caching you define in a `.platform/routes.yaml` file. The two most important options are the main route and its caching rules. A route can have a placeholder of `{default}`, which is replaced by your domain name in production and environment-specific names for your preview environments. The main route has an `upstream`, which is the name of the app container to forward requests to. You can enable [HTTP cache](https://docs.platform.sh/define-routes/cache.md). The router includes a basic HTTP cache. By default, HTTP caches includes all cookies in the cache key. So any cookies that you have bust the cache. The `cookies` key allows you to select which cookies should matter for the cache. Generally, you want the user session cookie, which is included in the example for TYPO3. You may need to add other cookies depending on what additional modules you have installed. You can also set up routes as [HTTP redirects](https://docs.platform.sh/define-routes/redirects.md). In the following example, all requests to `www.{default}` are redirected to the equivalent URL without `www`. HTTP requests are automatically redirected to HTTPS. If you don't include a `.platform/routes.yaml` file, a single default route is used. This is equivalent to the following: ```yaml {location=".platform/routes.yaml"} https://{default}/: type: upstream upstream: :http ``` Where `` is the `name` you've defined in your [app configuration](#configure-apps-in-platformappyaml). The following example presents a complete definition of a main route for a TYPO3 app: ```bash {location=".platform/routes.yaml"} # This file describes an application's routes. You can define as many routes as your # application requires. # # See https://docs.platform.sh/configuration/routes.html # URL template for the main route, where `{default}` is replaced by # the Platform.sh generated environment URL or the configured domain. "https://{default}/": # This route serves an application (upstream). type: upstream # Defines the upstream according to the form `:http`, # where the `name` attribute from `.platform.app.yaml` is used. upstream: "app:http" # Optional route identifier; constant across all environments. # # For TYPO3, the id "main" is used within `public/typo3conf/PlatformshConfig.php` # to set the `base` attribute for the site (in `config/sites/main/config.yaml`) from the # Platform.sh environment variable `PLATFORM_ROUTES`. id: "main" # HTTP cache configuration. cache: # Enabled (default `true`, but only if `cache` attribute is unspecified). enabled: true # List of allowed cookie names, all others are ignored. cookies: # Used to identify a backend session when Backend User logged in. - 'be_typo_user' # Used to identify session ID when logged into TYPO3 Frontend. - 'fe_typo_user' # Default PHP session cookie. - 'PHPSESSID' # Validates sessions for System Maintenance Area. - 'Typo3InstallTool' ``` #### Customize TYPO3 for Platform.sh Now that your code contains all of the configuration to deploy on Platform.sh, it’s time to make your TYPO3 site itself ready to run on a Platform.sh environment. There are a number of additional steps that are either required or recommended, depending on how well you want to optimize your site. ###### Install the Config Reader You can get all information about a deployed environment, including how to connect to services, through [environment variables](https://docs.platform.sh/development/variables.md). Your app can [access these variables](https://docs.platform.sh/development/variables/use-variables.md#access-variables-in-your-app). The following examples use it, so install it through Composer if you haven't already. ```bash composer require platformsh/config-reader ``` ###### Avoiding deadlock with the Local Page Error Handler A default TYPO3 installation has a risk of deadlocks when run on low-worker PHP-FPM configurations. Specifically, TYPO3 handles 403 and 404 error pages by issuing a full HTTP request back to itself with no timeout, which can lead to process starvation. There are two required steps to avoid this problem. First, you need to install the [Local Page Error Handler](https://extensions.typo3.org/extension/pxa_lpeh/) extension for TYPO3 with the command: ```bash composer require pixelant/pxa-lpeh ``` Second, you need to add a timeout that sets an HTTP timeout of at least 3 seconds instead of the default several minutes to a new `public/typo3conf/PlatformshConfiguration.php`. You can see this line in context of the full file in the [configuration](#environment) section below. ```php **Note**: The suggested timeout of three seconds above may end up being too short if your TYPO3 instance performs external requests other than to itself as described here. If the instance makes long requests, such as when synchronizing data as a part of a TYPO3 Scheduler task with an external API, it’s best instead to place these operations in workers. You still need to enable the `pixelant/pxa-lpeh` extension, which you can do by running the command: ```bash php vendor/bin/typo3 extension:activate pxa_lpeh ``` ###### TYPO3 CMS's `web-dir` Platform.sh recommends serving TYPO3 from its default subdirectory `public`. `public` can be seen already throughout your `.platform.app.yaml` file in `web.locations.root`, `mounts` and within your `build` and `deploy` hooks. You need to assign `public` to the `cms.web-dir` attribute in your `composer.json` file, and it's a good idea to `update` dependencies once you have done so: ```bash composer config extra.typo3/cms.web-dir public && composer update --no-scripts ``` ###### Site You have to locate the site configuration files (`config.yaml`) in your repository's `config/sites/` subdirectories. For the purposes of this guide, you need to set the `base` attribute to an environment variable called `PLATFORM_ROUTES_MAIN`. You can also add the definition to your existing `baseVariant` attribute for production if desired. ```yaml # TYPO3 Site Handling configuration YAML. # # See https://docs.typo3.org/m/typo3/reference-coreapi/9.5/en-us/ApiOverview/SiteHandling/Basics.html. rootPageId: 1 # The base domain used to run the TYPO3 site. Here, the environment variable `PLATFORM_ROUTES_MAIN` set in # `public/typo3/conf/PlatformshConfiguration.php` is used. base: '%env(PLATFORM_ROUTES_MAIN)%' # Site's available languages configuration. # # See https://docs.typo3.org/m/typo3/reference-coreapi/9.5/en-us/ApiOverview/SiteHandling/AddLanguages.html#sitehandling-addinglanguages languages: - languageId: '0' title: English navigationTitle: English base: '/' locale: en_US.UTF8 iso-639-1: en hreflang: en-US direction: ltr typo3Language: default flag: us enabled: true - languageId: '2' title: German navigationTitle: Deutsch base: '/de/' locale: de_DE.UTF8 iso-639-1: de hreflang: de-DE direction: ltr typo3Language: de flag: de fallbackType: fallback fallbacks: '0' enabled: true - languageId: '1' title: Dansk navigationTitle: Dansk base: '/da/' locale: da_DK.UTF-8 iso-639-1: da hreflang: da-DK direction: ltr typo3Language: default flag: dk fallbackType: fallback fallbacks: '0' enabled: true # Configuration for how to handle error codes for the TYPO3 site. # # See https://docs.typo3.org/m/typo3/reference-coreapi/9.5/en-us/ApiOverview/SiteHandling/Basics.html. errorHandling: - errorCode: '404' errorHandler: Page errorContentSource: 't3://page?uid=5' # Environment-specific `base` configuration. # # See https://docs.typo3.org/m/typo3/reference-coreapi/9.5/en-us/ApiOverview/SiteHandling/BaseVariants.html. baseVariants: { } # Adding static routes for the TYPO3 site. # # See https://docs.typo3.org/m/typo3/reference-coreapi/9.5/en-us/ApiOverview/SiteHandling/StaticRoutes.html#sitehandling-staticroutes. routes: - route: robots.txt type: staticText content: "User-agent: *\r\nDisallow: /typo3/" ``` You define this environment variable in the next section, but its purpose is to retrieve the root domain (since you haven't yet registered a domain name on the Platform.sh project, this is a hashed placeholder domain generated from the environment) from the environment variable `PLATFORM_ROUTES`. **Note**: The above ``base`` configuration only includes the production case (running on Platform.sh) or at least exporting a ``PLATFORM_ROUTES_MAIN`` environment variable to match during local development. Alternatively, you can place the above definition within a ``baseVariant`` definition for the production environment alongside another development environment ``condition`` for local. ```yaml {} baseVariants: - base: '%env(VIRTUAL_HOST)%' condition: 'applicationContext == "Development/local"' - base: '%env(PLATFORM_ROUTES_MAIN)%' condition: 'applicationContext == "Production"' ``` ###### Environment Finally, you can start using the Platform.sh Configuration Reader library to starting reading from the environment from within your application. In a `public/typo3conf/PlatformshConfiguration.php` file, you can use the library to: - Verify the deployment is occurring on a Platform.sh project (`if (!$platformConfig->isValidPlatform())`) - Verify that it's not running during build, when services aren't yet available (`if ($platformConfig->inBuild())`) - Set the `PLATFORM_ROUTES_MAIN` environment variable used in `config/sites/main/config.yaml`) - Configure TYPO3's database (`TYPO3_CONF_VARS.DB.Connections.Default`) using credentials from the `database` relationship (`$databaseConfig = $platformConfig->credentials('database')`) - Configure TYPO3's `cacheConfigurations` to use Redis via your `rediscache` relationship - Configure the HTTP timeout to 3 seconds to avoid the PHP-FPM-related [deadlock described above](#avoiding-deadlock-with-the-local-page-error-handler). ```php isValidPlatform()) { return; } // Ensures script does not run during builds, when relationships // are not available. if ($platformConfig->inBuild()) { return; } // Workaround to set the proper env variable for the main route (found in config/sites/main/config.yaml) // Relies on the `id: "main"` configuration set in `.platform/routes.yaml`. putenv('PLATFORM_ROUTES_MAIN=' . $platformConfig->getRoute('main')['url']); // Configure the database for `doctrine-dbal` for TYPO3 based on the Platform.sh relationships. // // See https://docs.typo3.org/m/typo3/reference-coreapi/9.5/en-us/ApiOverview/Database/Configuration/Index.html. // // These lines depend on the database relationship being named `database`. If updating the name to // something else below, be sure to update `.platform.app.yaml` to match. if ($platformConfig->hasRelationship('database')) { $databaseConfig = $platformConfig->credentials('database'); $GLOBALS['TYPO3_CONF_VARS']['DB']['Connections']['Default']['driver'] = 'mysqli'; $GLOBALS['TYPO3_CONF_VARS']['DB']['Connections']['Default']['host'] = $databaseConfig['host']; $GLOBALS['TYPO3_CONF_VARS']['DB']['Connections']['Default']['port'] = $databaseConfig['port']; $GLOBALS['TYPO3_CONF_VARS']['DB']['Connections']['Default']['dbname'] = $databaseConfig['path']; $GLOBALS['TYPO3_CONF_VARS']['DB']['Connections']['Default']['user'] = $databaseConfig['username']; $GLOBALS['TYPO3_CONF_VARS']['DB']['Connections']['Default']['password'] = $databaseConfig['password']; } // Configure Redis as the cache backend if available. These lines depend on the Redis relationship // being named `rediscache`. If updating the name to something else below, be sure to update `.platform.app.yaml` to match. if ($platformConfig->hasRelationship('rediscache')) { $redisConfig = $platformConfig->credentials('rediscache'); $redisHost = $redisConfig['host']; $redisPort = $redisConfig['port']; $list = [ 'pages' => 3600 * 24 * 7, 'pagesection' => 3600 * 24 * 7, 'rootline' => 3600 * 24 * 7, 'hash' => 3600 * 24 * 7, 'extbase' => 3600 * 24 * 7, ]; $counter = 1; foreach ($list as $key => $lifetime) { $GLOBALS['TYPO3_CONF_VARS']['SYS']['caching']['cacheConfigurations'][$key]['backend'] = \TYPO3\CMS\Core\Cache\Backend\RedisBackend::class; $GLOBALS['TYPO3_CONF_VARS']['SYS']['caching']['cacheConfigurations'][$key]['options'] = [ 'database' => $counter++, 'hostname' => $redisHost, 'port' => $redisPort, 'defaultLifetime' => $lifetime ]; } } // Ensure that HTTP requests have a timeout set, to avoid sites locking up due to slow // outgoing HTTP requests. $GLOBALS['TYPO3_CONF_VARS']['HTTP']['timeout'] = 3; // Add additional Platform.sh-specific configuration here, such as a search backend. ``` Then include the `require_once()` function within your `public/typo3conf/AdditionalConfiguration.php` file to load the Platform.sh-specific configuration into the site if present. ```php Password to update. ###### Migrate your data If you are moving an existing site to Platform.sh, then in addition to code you also need to migrate your data. That means your database and your files. ####### Import the database First, obtain a database dump from your current site, such as using the * [`pg_dump` command for PostgreSQL](https://www.postgresql.org/docs/current/app-pgdump.md) * [`mysqldump` command for MariaDB](https://mariadb.com/kb/en/mysqldump/) * [`sqlite-dump` command for SQLite](https://www.sqlitetutorial.net/sqlite-dump/) Next, import the database into your Platform.sh site by running the following command: ```bash platform sql Go forth and Deploy (even on Friday)! #### Additional resources ###### Adding extensions All TYPO3 extensions can be installed and managed using Composer. Install them locally to update and commit changes to your `composer-lock.json` file. The build process will download the correct version on the committed `composer.json` and `composer.lock` files, which should be committed to Git. ```bash composer require friendsoftypo3/headless ``` ###### Updating TYPO3 and extensions Since TYPO3 is fully managed via Composer, you can run `composer update` periodically to get new versions of both TYPO3 and any extensions you have installed via Composer. Commit the resulting changes to your `composer.lock` file and push again. The [Composer documentation](https://getcomposer.org/doc/) has more information on options to update individual modules or perform other tasks. Note that updating modules or core through the TYPO3 backend isn't possible, as the file system is read-only. All updates should be done through composer to update the lock file, and then pushed to Git. ###### Why are there warnings in the install tool? The TYPO3 install tool doesn't yet fully understand when you are working on a cloud environment and may warn you that some folders aren't writable. Don't worry, your TYPO3 installation is fully functional. [Back](https://docs.platform.sh/guides/typo3/deploy/deploy.md) ### Deploy WordPress on Platform.sh WordPress is a popular Content Management System written in PHP. The recommended way to deploy WordPress on Platform.sh is by using Composer, the PHP package management suite. The most popular and supported way to do so is with the [John Bloch](https://github.com/johnpbloch/wordpress) Composer fork script. This guide assumes from the beginning that you're migrating a Composer-flavored WordPress repository. **Note**: With some caveats, it’s possible to deploy WordPress to Platform.sh without using Composer, [though not recommended](https://docs.platform.sh/guides/wordpress/composer.md). You can consult the [“WordPress without Composer on Platform.sh”](https://docs.platform.sh/guides/wordpress/vanilla.md) guide to set that up, but do consider [upgrading to use Composer](https://docs.platform.sh/guides/wordpress/composer/migrate.md). To get WordPress running on Platform.sh, you have two potential starting places: - You already have a [Composer-flavored WordPress](https://github.com/johnpbloch/wordpress) site you are trying to deploy. Go through this guide to make the recommended changes to your repository to prepare it for Platform.sh. - You have no code at this point. If you have no code, you have two choices: - Generate a basic [Composer-flavored WordPress](https://github.com/johnpbloch/wordpress) site. See an example for doing this under initializing a project. - Use a ready-made [WordPress template](https://github.com/platformsh-templates/wordpress-composer). A template is a starting point for building your project. It should help you get a project ready for production. To use a template, click the button below to create a WordPress template project. ![Deploy on Platform.sh](https://platform.sh/images/deploy/lg-blue.svg) Once the template is deployed, you can follow the rest of this guide to better understand the extra files and changes to the repository. **Note**: All of the examples in this deployment guide use the [wordpress-composer](https://github.com/platformsh-templates/wordpress-composer) template maintained by the Platform.sh team. That template is built using the [John Bloch Composer fork](https://github.com/johnpbloch/wordpress) of WordPress, which is meant to facilitate managing WordPress with Composer, but the template comes with its own assumptions. One is that WordPress core is downloaded by default into a ``wordpress`` subdirectory when installed, but other teams would rather specify another subdirectory along with many more assumptions. An alternative approach is shown in Platform.sh’s [Bedrock template](https://github.com/platformsh-templates/wordpress-bedrock), which installs core into ``web/wp``, exports environment customization to a separate ``config/environments`` directory, and largely depends on setting environment variables to configure the database. Your are free to follow that template as an example with this guide, though there are slight differences. For its ease of use, the Bedrock approach is often used as a substitute starting point in some of the other WordPress guides in this documentation. ##### Before you begin You need: - [Git](https://git-scm.com/downloads). Git is the primary tool to manage everything your app needs to run. Push commits to deploy changes and control configuration through YAML files. These files describe your infrastructure, making it transparent and version-controlled. - A Platform.sh account. If you don't already have one, [register for a trial account](https://auth.api.platform.sh/register). You can sign up with an email address or an existing GitHub, Bitbucket, or Google account. If you choose one of these accounts, you can set a password for your Platform.sh account later. - The [Platform.sh CLI](https://docs.platform.sh/administration/cli.md). This lets you interact with your project from the command line. You can also do most things through the [Web Console](https://docs.platform.sh/administration/web.md). ##### Initialize a project You can start with a basic code base or push a pre-existing project to Platform.sh. - Create your first project by running the following command: ```bash {} platform create --title ``` Then choose the region you want to deploy to, such as the one closest to your site visitors. You can also select more resources for your project through additional flags, but a Development plan should be enough for you to get started. Copy the ID of the project you've created. - Get your code ready locally. If your code lives in a remote repository, clone it to your computer. If your code isn't in a Git repository, initialize it by running ``git init``. If you don’t have code, create a new WordPress project from scratch. The following command creates a brand new WordPress project. ```bash {} git clone https://github.com/johnpbloch/wordpress && cd wordpress ``` - Connect your Platform.sh project with Git. You can use Platform.sh as your Git repository or connect to a third-party provider: GitHub, GitLab, or BitBucket. That creates an upstream called ``platform`` for your Git repository. When you choose to use a third-party Git hosting service the Platform.sh Git repository becomes a read-only mirror of the third-party repository. All your changes take place in the third-party repository. Add an integration to your existing third party repository. The process varies a bit for each supported service, so check the specific pages for each one. - [BitBucket](https://docs.platform.sh/integrations/source/bitbucket.md) - [GitHub](https://docs.platform.sh/integrations/source/github.md) - [GitLab](https://docs.platform.sh/integrations/source/gitlab.md) Accept the default options or modify to fit your needs. All of your existing branches are automatically synchronized to Platform.sh. You get a deploy failure message because you haven’t provided configuration files yet. You add them in the next step. If you’re integrating a repository to Platform.sh that contains a number of open pull requests, don’t use the default integration options. Projects are limited to three* preview environments (active and deployed branches or pull requests) and you would need to deactivate them individually to test this guide’s migration changes. Instead, each service integration should be made with the following flag: ```bash {} platform integration:add --type= ... --build-pull-requests=false ``` You can then go through this guide and activate the environment when you’re ready to deploy * You can purchase additional preview environments at any time in the Console. Open your project and select **Edit plan**. Add additional **Environments**, view a cost estimate, and confirm your changes. Now you have a local Git repository, a Platform.sh project, and a way to push code to that project. Next you can configure your project to work with Platform.sh. [Configure repository](https://docs.platform.sh/guides/wordpress/deploy/configure.md) #### Configure WordPress for Platform.sh You now have a *project* running on Platform.sh. In many ways, a project is just a collection of tools around a Git repository. Just like a Git repository, a project has branches, called *environments*. Each environment can then be activated. *Active* environments are built and deployed, giving you a fully isolated running site for each active environment. Once an environment is activated, your app is deployed through a cluster of containers. You can configure these containers in three ways, each corresponding to a [YAML file](https://docs.platform.sh/learn/overview/yaml): - **Configure apps** in a `.platform.app.yaml` file. This controls the configuration of the container where your app lives. - **Add services** in a `.platform/services.yaml` file. This controls what additional services are created to support your app, such as databases or search servers. Each environment has its own independent copy of each service. If you're not using any services, you don't need this file. - **Define routes** in a `.platform/routes.yaml` file. This controls how incoming requests are routed to your app or apps. It also controls the built-in HTTP cache. If you're only using the single default route, you don't need this file. Start by creating empty versions of each of these files in your repository: ```bash # Create empty Platform.sh configuration files mkdir -p .platform && touch .platform/services.yaml && touch .platform/routes.yaml && touch .platform.app.yaml ``` Now that you've added these files to your project, configure each one for WordPress in the following sections. Each section covers basic configuration options and presents a complete example with comments on why WordPress requires those values. ###### Configure apps in `.platform.app.yaml` Your app configuration in a `.platform.app.yaml` file is allows you to configure nearly any aspect of your app. For all of the options, see a [complete reference](https://docs.platform.sh/create-apps/app-reference/single-runtime-image.md). The following example shows a complete configuration with comments to explain the various settings. Notice that the build ``flavor`` is set to ``composer``, which will automatically download WordPress core, as well as your plugins, themes, and dependencies during the build step as defined in your ``composer.json`` file. Since WordPress’s caching and uploads require write access at runtime, they’ve been given corresponding [mounts](https://docs.platform.sh/create-apps/app-reference/single-runtime-image.md#mounts) defined for them at the bottom of the file. MariaDB is accessible to WordPress internally at ``database.internal`` thanks to the relationship definition ``database``. The [WordPress CLI](https://packagist.org/packages/wp-cli/wp-cli) is added as a build dependency, but we will still need to add some additional dependencies in the next step so that it can be used by the application and via SSH. ```yaml {location=".platform.app.yaml"} # Complete list of all available properties: https://docs.platform.sh/create-apps/app-reference.html # A unique name for the app. Must be lowercase alphanumeric characters. Changing the name destroys data associated # with the app. name: app # The runtime the application uses. # Complete list of available runtimes: https://docs.platform.sh/create-apps/app-reference.html#types type: 'php:8.1' # Specifies a default set of build tasks to run. Flavors are language-specific. # More information: https://docs.platform.sh/create-apps/app-reference.html#build build: flavor: composer # Installs global dependencies as part of the build process. They’re independent of your app’s dependencies and # are available in the PATH during the build process and in the runtime environment. They’re installed before # the build hook runs using a package manager for the language. # More information: https://docs.platform.sh/create-apps/app-reference.html#dependencies dependencies: php: composer/composer: '^2' wp-cli/wp-cli-bundle: "^2.4.0" # Hooks allow you to customize your code/environment as the project moves through the build and deploy stages # More info: hooks: # The build hook is run after any build flavor. # More information: https://docs.platform.sh/create-apps/hooks/hooks-comparison.html#build-hook build: | set -e # Copy manually-provided plugins into the plugins directory. # This allows manually-provided and composer-provided plugins to coexist. rsync -a plugins/* wordpress/wp-content/plugins/ # The deploy hook is run after the app container has been started, but before it has started accepting requests. # More information: https://docs.platform.sh/create-apps/hooks/hooks-comparison.html#deploy-hook deploy: | # Flushes the object cache which might have changed between current production and newly deployed changes wp cache flush # Runs the WordPress database update procedure in case core is being updated with the newly deployed changes wp core update-db # Runs all cron events that are due now and may have come due during the build+deploy procedure wp cron event run --due-now # The relationships of the application with services or other applications. # The left-hand side is the name of the relationship as it will be exposed # to the application in the PLATFORM_RELATIONSHIPS variable. The right-hand # side is in the form `:`. # More information: https://docs.platform.sh/create-apps/app-reference.html#relationships relationships: database: "db:mysql" # The web key configures the web server running in front of your app. # More information: https://docs.platform.sh/create-apps/app-reference.html#web web: # Each key in locations is a path on your site with a leading /. # More information: https://docs.platform.sh/create-apps/app-reference.html#locations locations: "/": # The public directory of the app, relative to its root. root: "wordpress" # The front-controller script to send non-static requests to. passthru: "/index.php" # Wordpress has multiple roots (wp-admin) so the following is required index: - "index.php" # The number of seconds whitelisted (static) content should be cached. expires: 600 scripts: true allow: true # The key of each item in rules is a regular expression to match paths exactly. If an incoming request # matches the rule, it’s handled by the properties under the rule, overriding any conflicting rules from the # rest of the locations properties. # More information: https://docs.platform.sh/create-apps/app-reference.html#rules rules: ^/composer\.json: allow: false ^/license\.txt$: allow: false ^/readme\.html$: allow: false "/wp-content/cache": root: "wordpress/wp-content/cache" scripts: false allow: false "/wp-content/uploads": root: "wordpress/wp-content/uploads" scripts: false allow: false rules: # Allow access to common static files. '(? **Note**: During the template’s build hook above, you see an ``rsync`` command that allows you to commit and use plugins that aren’t accessible via Composer. The command moves all non-Composer plugins in a committed ``plugins`` directory to the final ``wp-content/plugins`` destination so that they can be enabled through the administration panel. If you are migrating WordPress or starting from scratch, you should copy this line for your committed non-Composer plugins and, if needed, modify it to move committed ``themes`` to ``wp-content/themes`` in the same way. ###### Add services in `.platform/services.yaml` You can add the managed services you need for you app to run in the `.platform/services.yaml` file. You pick the major version of the service and security and minor updates are applied automatically, so you always get the newest version when you deploy. You should always try any upgrades on a development branch before pushing to production. We recommend the latest [MariaDB](https://docs.platform.sh/add-services/mysql.md) version for WordPress. You can [add other services](https://docs.platform.sh/add-services.md) if desired, such as [Solr](https://docs.platform.sh/add-services/solr.md) or [Elasticsearch](https://docs.platform.sh/add-services/elasticsearch.md). You need to configure to use those services once they're enabled. Each service entry has a name (`db` in the example) and a `type` that specifies the service and version to use. Services that store persistent data have a `disk` key, to specify the amount of storage. ```yaml # The services of the project. # # Each service listed will be deployed # to power your Platform.sh project. # More information: https://docs.platform.sh/add-services.html # Full list of available services: https://docs.platform.sh/add-services.html#available-services db: type: mariadb:10.4 disk: 2048 ``` ###### Define routes All HTTP requests sent to your app are controlled through the routing and caching you define in a `.platform/routes.yaml` file. The two most important options are the main route and its caching rules. A route can have a placeholder of `{default}`, which is replaced by your domain name in production and environment-specific names for your preview environments. The main route has an `upstream`, which is the name of the app container to forward requests to. You can enable [HTTP cache](https://docs.platform.sh/define-routes/cache.md). The router includes a basic HTTP cache. By default, HTTP caches includes all cookies in the cache key. So any cookies that you have bust the cache. The `cookies` key allows you to select which cookies should matter for the cache. Generally, you want the user session cookie, which is included in the example for WordPress. You may need to add other cookies depending on what additional modules you have installed. You can also set up routes as [HTTP redirects](https://docs.platform.sh/define-routes/redirects.md). In the following example, all requests to `www.{default}` are redirected to the equivalent URL without `www`. HTTP requests are automatically redirected to HTTPS. If you don't include a `.platform/routes.yaml` file, a single default route is used. This is equivalent to the following: ```yaml {location=".platform/routes.yaml"} https://{default}/: type: upstream upstream: :http ``` Where `` is the `name` you've defined in your [app configuration](#configure-apps-in-platformappyaml). The following example presents a complete definition of a main route for a WordPress app: ```bash {location=".platform/routes.yaml"} # The routes of the project. # # Each route describes how an incoming URL is going # to be processed by Platform.sh. # More information: https://docs.platform.sh/define-routes.html "https://{default}/": type: upstream upstream: "app:http" # Platform.sh supports HTTP caching at the server level. Caching is enabled by default, but is only applied to # GET and HEAD requests. # More information: https://docs.platform.sh/define-routes/cache.html cache: # All possible cache configuration options: https://docs.platform.sh/define-routes/cache.html#cache-configuration-properties enabled: true # Base the cache on the session cookies. Ignore all other cookies. cookies: - '/^wordpress_logged_in_/' - '/^wordpress_sec_/' - 'wordpress_test_cookie' - '/^wp-settings-/' - '/^wp-postpass/' - '/^wp-resetpass-/' # A basic redirect definition # More information: https://docs.platform.sh/define-routes.html#basic-redirect-definition "https://www.{default}/": type: redirect to: "https://{default}/" ``` #### Customize WordPress for Platform.sh Now that your code contains all of the configuration to deploy on Platform.sh, it’s time to make your WordPress site itself ready to run on a Platform.sh environment. ###### Install the Config Reader You can get all information about a deployed environment, including how to connect to services, through [environment variables](https://docs.platform.sh/development/variables.md). Your app can [access these variables](https://docs.platform.sh/development/variables/use-variables.md#access-variables-in-your-app). The following examples use it, so install it through Composer if you haven't already. ```bash composer require platformsh/config-reader ``` ###### `wp-config.php` With the Configuration Reader library installed, add or update a `wp-config.php` file in the root of your repository to match the code below. In this file, the library's `Config` object is used to: - Retrieve connection credentials for MariaDB through the `database` relationship to configure the WordPress database. This will set up the database automatically and avoid you having to set the connection yourself during the installer. - Use the project's [routes](https://docs.platform.sh/define-routes.md) to set `WP_HOME` and `WP_SITEURL` settings. - Set all of WordPress's security and authentication keys to the Platform.sh-provided `PLATFORM_PROJECT_ENTROPY` - a hashed variable specific to your repository consistent across environments. Many other WordPress settings are pre-defined in this file for you, so consult the inline comments for more information. ```php isValidPlatform()) { if ($config->hasRelationship('database')) { // This is where we get the relationships of our application dynamically // from Platform.sh. // Avoid PHP notices on CLI requests. if (php_sapi_name() === 'cli') { session_save_path("/tmp"); } // Get the database credentials $credentials = $config->credentials('database'); // We are using the first relationship called "database" found in your // relationships. Note that you can call this relationship as you wish // in your `.platform.app.yaml` file, but 'database' is a good name. define( 'DB_NAME', $credentials['path']); define( 'DB_USER', $credentials['username']); define( 'DB_PASSWORD', $credentials['password']); define( 'DB_HOST', $credentials['host']); define( 'DB_CHARSET', 'utf8' ); define( 'DB_COLLATE', '' ); // Check whether a route is defined for this application in the Platform.sh // routes. Use it as the site hostname if so (it is not ideal to trust HTTP_HOST). if ($config->routes()) { $routes = $config->routes(); foreach ($routes as $url => $route) { if ($route['type'] === 'upstream' && $route['upstream'] === $config->applicationName) { // Pick the first hostname, or the first HTTPS hostname if one exists. $host = parse_url($url, PHP_URL_HOST); $scheme = parse_url($url, PHP_URL_SCHEME); if ($host !== false && (!isset($site_host) || ($site_scheme === 'http' && $scheme === 'https'))) { $site_host = $host; $site_scheme = $scheme ?: 'http'; } } } } // Debug mode should be disabled on Platform.sh. Set this constant to true // in a wp-config-local.php file to skip this setting on local development. if (!defined( 'WP_DEBUG' )) { define( 'WP_DEBUG', false ); } // Set all of the necessary keys to unique values, based on the Platform.sh // entropy value. if ($config->projectEntropy) { $keys = [ 'AUTH_KEY', 'SECURE_AUTH_KEY', 'LOGGED_IN_KEY', 'NONCE_KEY', 'AUTH_SALT', 'SECURE_AUTH_SALT', 'LOGGED_IN_SALT', 'NONCE_SALT', ]; $entropy = $config->projectEntropy; foreach ($keys as $key) { if (!defined($key)) { define( $key, $entropy . $key ); } } } } } else { // Local configuration file should be in project root. if (file_exists(dirname(__FILE__, 2) . '/wp-config-local.php')) { include(dirname(__FILE__, 2) . '/wp-config-local.php'); } } // Do not put a slash "/" at the end. // https://codex.wordpress.org/Editing_wp-config.php#WP_HOME define( 'WP_HOME', $site_scheme . '://' . $site_host ); // Do not put a slash "/" at the end. // https://codex.wordpress.org/Editing_wp-config.php#WP_SITEURL define( 'WP_SITEURL', WP_HOME ); define( 'WP_CONTENT_DIR', dirname( __FILE__ ) . '/wp-content' ); define( 'WP_CONTENT_URL', WP_HOME . '/wp-content' ); // Disable WordPress from running automatic updates define( 'WP_AUTO_UPDATE_CORE', false ); // Since you can have multiple installations in one database, you need a unique // prefix. $table_prefix = 'wp_'; // Default PHP settings. ini_set('session.gc_probability', 1); ini_set('session.gc_divisor', 100); ini_set('session.gc_maxlifetime', 200000); ini_set('session.cookie_lifetime', 2000000); ini_set('pcre.backtrack_limit', 200000); ini_set('pcre.recursion_limit', 200000); /** Absolute path to the WordPress directory. */ if ( ! defined( 'ABSPATH' ) ) { define( 'ABSPATH', dirname( __FILE__ ) . '/' ); } /** Sets up WordPress vars and included files. */ require_once(ABSPATH . 'wp-settings.php'); ``` ###### Setting up Composer Through this guide you will set up your WordPress repository to install everything during it's build using Composer. That includes themes, plugins, and even WordPress Core itself. Any new plugins you want to use or migrate from your existing application can be committed as dependencies using Composer, but there are a few changes we need to make to the `composer.json` file to prepare it for the final Platform.sh environment. First, the John Bloch script has a default `wordpress` installation directory, so the `composer.json` file needs to know that all new themes and plugins have a destination within that subdirectory. ```json "extra": { "installer-paths": { "wordpress/wp-content/plugins/{$name}": [ "type:wordpress-plugin" ], "wordpress/wp-content/themes/{$name}": [ "type:wordpress-theme" ], "wordpress/wp-content/mu-plugins/{$name}": [ "type:wordpress-muplugin" ] } } ``` Next, having placed `wp-config.php` in the root of your repository, you need to add a `post-install-cmd` to move the file into `wordpress` after `composer install` has finished. ```json "scripts": { "copywpconfig": [ "cp wp-config.php wordpress/" ], "post-install-cmd": "@copywpconfig" }, ``` Since you're likely using [WPPackagist](https://wpackagist.org/) to download plugins and themes with Composer, you also need to add `wpackagist.org` as a repository in `composer.json`. ```json "repositories": [ { "type": "composer", "url": "https://wpackagist.org" } ] ``` Lastly, to prevent committing WordPress Core when it is installed via Composer, and to otherwise setup your local development environment, make sure that your `.gitignore` file includes everything in `wordpress`, as [shown in the template](https://github.com/platformsh-templates/wordpress-composer/blob/master/.gitignore). ###### Additional packages Finally, install `wp-cli` and `psy/psysh` using Composer. With these packages included, the WordPress CLI is available when you SSH into the application container. ```bash composer require wp-cli/wp-cli-bundle psy/psysh --ignore-platform-reqs ``` If you've installed the WordPress CLI as a dependency as in the [previous step](https://docs.platform.sh/guides/wordpress/deploy/configure.md#configure-apps-in-platformappyaml), you can use it directly. (As long as you have only `wp-cli/wp-cli-bundle` as a dependency and not `wp-cli/wp-cli`.) Otherwise, commit the changes from composer and push. Then you can use the WordPress CLI within an application container from the `vendor` directory: ```bash ./vendor/bin/wp plugin list ``` If you receive an error stating `This doesn't seem to be a WordPress installation.`, try providing the `--path` flag and point to your WordPress install path. #### Deploy WordPress Now you have your configuration for deployment and your app set up to run on Platform.sh. Make sure all your code is committed to Git and run `git push` to your Platform.sh environment. Your code is built, producing a read-only image that's deployed to a running cluster of containers. If you aren't using a source integration, the log of the process is returned in your terminal. If you're using a source integration, you can get the log by running `platform activity:log --type environment.push`. When the build finished, you're given the URL of your deployed environment. Click the URL to see your site. If your environment wasn't active and so wasn't deployed, activate it by running the following command: ```bash platform environment:activate ``` ###### Migrate your data If you are moving an existing site to Platform.sh, then in addition to code you also need to migrate your data. That means your database and your files. ####### Import the database First, obtain a database dump from your current site, such as using the * [`pg_dump` command for PostgreSQL](https://www.postgresql.org/docs/current/app-pgdump.md) * [`mysqldump` command for MariaDB](https://mariadb.com/kb/en/mysqldump/) * [`sqlite-dump` command for SQLite](https://www.sqlitetutorial.net/sqlite-dump/) Next, import the database into your Platform.sh site by running the following command: ```bash platform sql Go forth and Deploy (even on Friday)! #### Additional resources ###### Adding plugins and themes without Composer As previously mentioned, Composer is strongly recommended, but it's possible to use some non-Composer plugins and themes in your site, provided that they don't require write access at runtime. In your build hook, include: ```yaml {location=".platform.app.yaml"} hooks: build: | rsync -a plugins/* wordpress/wp-content/plugins/ ``` Here, you can commit plugins to the repository in a `plugins` subdirectory, which are placed into the WordPress installation during the build. It's assumed that these packages stick to best practices and don't write to the file system at runtime and when enabling them. You can get around this issue by defining a [mount](https://docs.platform.sh/create-apps/app-reference/single-runtime-image.md#mounts) where a plugin requires write access, but you need to remember that the contents at that mount location are wiped when deployment begins, so you need to copy and re-copy accordingly. ###### Adding public plugins and themes via Composer Adding a plugin or theme from WPPackagist is the same as downloading a package through Composer: ```bash # Plugin $ composer require wpackagist-plugin/cache-control # Theme $ composer require wpackagist-theme/neve ``` This updates your `composer.json` and `composer.lock` files. Once you push the change to Platform.sh, the package is downloaded during the WordPress build. All that's left is to sign in to the administration dashboard on your deployed site and enable plugins and themes from the Plugins and Appearance settings, respectively. ###### Set up a WooCommerce site Platform.sh maintains a [WooCommerce template](https://github.com/platformsh-templates/wordpress-woocommerce) that you can deploy quickly from the button in its README, but using Composer you can quickly install WooCommerce yourself: ```bash composer require woocommerce/woocommerce ``` Push those changes on a new environment and configure your store through the administration panel. ###### Adding private plugins and themes via Composer If your plugins aren't accessible from WPPackagist or Packagist, but are still valid packages, you can use them in your project by defining local `repositories` for them in your `composer.json` file. ```json "repositories":[ { "type":"composer", "url":"https://wpackagist.org" }, { "type": "path", "url": "custom/themes/*", "options": { "symlink": false } }, { "type": "path", "url": "custom/plugins/*", "options": { "symlink": false } } ] ``` In the snippet above, other packages can still be downloaded from WPPackagist, but now two custom `path` repositories have been defined from `/custom/[themes|plugins]` locally. Adding packages from these sources then only requires `composer require author/custom_plugin` to ensure that the plugin at `/custom/plugin/author/custom_plugin` is installed by Platform.sh when WordPress is built. ###### Updating WordPress, plugins, and themes Your WordPress site is fully managed by Composer, which means so are updates to WordPress core itself. Run `composer update` periodically to get new versions of WordPress core, as well as any plugins or themes your have installed. Commit the resulting changes to your `composer.lock` file and push again to Platform.sh. The [Composer documentation](https://getcomposer.org/doc/) has more information on options to update individual modules or perform other tasks. Note that updating modules or core through the WordPress UI isn't possible, as the file system is read-only. All updates should be done through Composer to update the lock file, and then push to Git. ###### Local development with Lando [Lando](https://github.com/lando/lando) is a local development tool. Lando can read your Platform.sh configuration files for WordPress and produce an approximately equivalent configuration using Docker See a guide on [using Lando with Platform.sh](https://docs.platform.sh/development/local/lando.md). Templates come configured for use already with a base [Landofile](https://docs.lando.dev/landofile/), as in the following example. It can be helpful getting started with Lando without the need to have a project on Platform.sh. This file sets up good defaults for Lando and Platform.sh-configured codebases, most notably through the `recipe` attribute. This Landofile is also where you can configure access to tools that would normally be available within a Platform.sh app container (such as the WordPress CLI) and that you also want to access locally. You can replicate this file or follow the guide on [using Lando with Platform.sh](https://docs.platform.sh/development/local/lando.md). Once you have completed the configuration, you can start your local environment by running: ```bash lando start ``` [Back](https://docs.platform.sh/guides/wordpress/deploy/deploy.md) ### Why you should manage WordPress with Composer Using Composer isn't traditionally the norm for WordPress development, but it is strongly recommended when deploying on Platform.sh. This guide is intended to provide an overview of why using Composer - including adding modules and themes locally as packages, as well as updating WordPress itself - is recommended. ##### Why use Composer Like any other application, your WordPress site is most secure when you can ensure repeatable builds and committable updates for both your code and its dependencies. This is a priority at Platform.sh, and that's why you can control your infrastructure in the same way. Your infrastructure is committed through a set of configuration files that specify which version of PHP and MariaDB you want to use, because that's the best way to ensure that your project remains reproducible when developing new features. WordPress core, as well as its themes and plugins, should ideally work the same way, but very often this isn't the case. WordPress's administration panel provides one-click buttons to update all of these components when they're out of date, or otherwise expects write access to the file system to make configuration changes at runtime. Developing this way has its consequences, however. First off, you aren't always going to have write access to the file system at runtime (which is the case for Platform.sh), so depending on this mechanism for updates and configuration changes is entirely restricted for many hosting solutions. On the other hand, if you *do* have write access at runtime where you're hosting currently, installing a new module or theme presents a nontrivial security risk when the source is unknown. But, perhaps most importantly, updating WordPress at runtime decouples the state of your site from the code in your repository. A colleague working on a new feature on their local clone of the project could very well be a full major version behind the live site, introducing bugs with unknown (and more importantly, untested) consequences completely as a result of this workflow. ##### Advantages of using Composer Given the points raised above, managing your WordPress site with Composer has clear advantages. First, it allows you to explicitly define your dependencies in a committed file (`composer.lock`). This lock file is generated from a more descriptive list of dependency constraints (`composer.json`) when your dependencies are installed, and it becomes a part of your project's commit history. From then on, any new branch will work from the identical collection of dependencies, down to the exact commit hash. It doesn't matter at that point who contributes to the project or even where it is deployed - it's the same code for everyone everywhere. Composer also removes the need to commit lots of external code to your repository. In the case of WordPress, *not* using Composer often requires you to commit all of the code for a theme, and even for WordPress core itself, to your own project. Besides making the repository unnecessarily large and slow to clone, updating these copies becomes a juggling act that nobody needs to deal with. Through Composer you can add and update dependencies to your project, and then lock their exact versions so that each new branch gets that same update. Had the update been performed on the deployed site at runtime, you would have to remember to `git pull` first. ###### Adding themes and modules with Composer Through Composer, themes and modules are then treated the same as any other PHP dependency. You can, for example, add the [Neve](https://wordpress.org/themes/neve/) theme to your project by using `composer require` ```bash composer require wpackagist-theme/neve ``` or add the [cache-control](https://wordpress.org/plugins/cache-control-by-cacholong/) plugin: ```bash composer require wpackagist-plugin/cache-control ``` These commands will add the packages to your `composer.json` file, and then lock the exact version to `composer.lock`. Just push those updates to your project on Platform.sh, and enable them through the administration panel as you would normally. **Note**: Typically, Composer dependencies install to a ``vendor`` directory in the project root, but themes and plugins need to install to ``wp-content`` instead. There is an ``installer-paths`` attribute that is added to ``composer.json`` to accomplish this, which is explained in more detail in the [How to Deploy WordPress on Platform.sh](https://docs.platform.sh/guides/wordpress/deploy.md) guide (which uses Composer from the start), as well as the [How to update your WordPress site to use Composer](https://docs.platform.sh/guides/wordpress/composer/migrate.md) guide. For more information, see the following Platform.sh community post: [How to install custom/private WordPress plugins and themes with Composer](https://support.platform.sh/hc/en-us/community/posts/16439636140306). ###### Installing WordPress core with Composer In the same way, using Composer makes it unnecessary for you to commit all of WordPress to your repository, since you can add it as a dependency. There are several ways to do this (i.e. [Bedrock](https://github.com/platformsh-templates/wordpress-bedrock)) depending on how many assumptions you want to be made for your configuration and project structure. The simplest one uses the [John Bloch Composer fork](https://github.com/johnpbloch/wordpress) to add an installer to your builds for WordPress: ```bash composer require johnpbloch/wordpress-core-installer composer require johnpbloch/wordpress-core ``` ###### Updates Now that WordPress core, your themes and your plugins have been added as dependencies with Composer, updates become easier. ```bash composer update ``` This command will update everything in your project locally, after which you can push to Platform.sh on a new environment. After you are satisfied with the changes merge into your production site. ##### Resources Platform.sh has written several guides for WordPress alongside the Composer recommendation: - [How to Deploy WordPress on Platform.sh](https://docs.platform.sh/guides/wordpress/deploy/_index.md): From here, you can create a Composer-based version of WordPress from scratch and deploy to Platform.sh. - [How to update your WordPress site to use Composer](https://docs.platform.sh/guides/wordpress/composer/migrate.md): This guide will take you through the steps of updating your fully committed *vanilla* WordPress repository into one that uses Composer and deploy it to Platform.sh. - [Redis](https://docs.platform.sh/guides/wordpress/redis.md): This guide will show you how to add a Redis container to your configuration and add it to your deployed WordPress site. - [How to Deploy WordPress without Composer on Platform.sh](https://docs.platform.sh/guides/wordpress/vanilla/_index.md): If you do not want to switch to using Composer and you are willing to work around some of Platform.sh runtime constraints, this guide will show you how to deploy a fully committed *vanilla* WordPress site to Platform.sh #### Upgrade your WordPress site to use Composer Composer helps you declare, manage, and install all the dependencies needed to run your project. It allows you to make your WordPress site [more stable, more secure, and easier to maintain](https://docs.platform.sh/guides/wordpress/composer.md). With Composer, you don't need to commit all of WordPress core, its themes and plugins to your project's Git repository. You also don't need to manage any of these elements as Git submodules. ###### Before you begin To update your WordPress site to use Composer, check that: - You already have a [vanilla version of WordPress installed locally](https://docs.platform.sh/guides/wordpress/vanilla.md). - Your project has been set up for deployment on Platform.sh. If you don't have Platform.sh configuration files in your repository, [deploy WordPress without Composer](https://docs.platform.sh/guides/wordpress/vanilla.md) before upgrading to a Composer-based site. - You have [downloaded and installed Composer](https://getcomposer.org/download/). ###### 1. Install WordPress with Composer To install WordPress with Composer, complete the following steps: 1. Switch to a new Git branch. To safely make changes to your repository and Platform.sh environment, run the following command: ```bash $ git checkout -b composer ``` 2. Turn your repository into a Composer repository. To use Composer, you need: - A `composer.json` file listing all the dependencies needed for your project to run (WordPress itself, its plugins, and its themes). - A `composer.lock` file listing the exact versions of all the dependencies installed on your project. Generated from the `composer.json` file, it ensures repeatable builds until you update. To turn your repository into a Composer repository and generate those files, run the following command: ```bash $ composer init ``` When prompted, set metadata attributes for your project, such as its name and license information. When you get to the part about installing dependencies, type `no`, as you add them in step 5. 3. Clean up WordPress core. If you've been managing WordPress and its dependencies as Git submodules, [remove the submodules](https://docs.platform.sh/development/submodules.md#removing-submodules). Otherwise, your existing installation of WordPress core is assumed to be in a subdirectory of your repository (often named `wordpress`). For Composer to manage WordPress, remove this subdirectory: ```bash $ rm -rf wordpress ``` Then, at the end of your existing `.gitignore` file, add the content of Platform.sh’s [template `.gitignore` file](https://github.com/platformsh-templates/wordpress-composer/blob/master/.gitignore). This adds the `wordpress` subdirectory to the resulting `.gitignore` file. This way, after Composer reinstalls WordPress, the `wordpress` subdirectory is ignored in commits. Now remove WordPress from the repository: ```bash $ git rm -rf --cached wordpress && rm -rf wordpress $ git add . && git commit -m "Remove WordPress" ``` 4. Launch the installation of WordPress with Composer. Now that you have made your WordPress site into a Composer project, you can download packages via Composer. To download WordPress itself, run the following commands: ```bash $ composer require johnpbloch/wordpress-core-installer $ composer require johnpbloch/wordpress-core ``` The two dependencies are now listed in your `composer.json` file: ```json { "require": { "johnpbloch/wordpress-core-installer": "^2.0", "johnpbloch/wordpress-core": "^6.0" } } ``` 5. Complete the installation: ```bash $ composer install ``` Composer reinstalls WordPress into the `wordpress` subdirectory. ###### 2. Install WordPress themes and plugins with Composer Just like with WordPress core, you can install themes and plugins with the `composer require` command. To do so, complete the following steps: 1. Configure the WPackagist repository. By default, when you download dependencies using Composer, you retrieve them through [Packagist](https://packagist.org), which is the primary Composer repository for public PHP packages. Some themes and plugins for WordPress are also on Packagist, but most of them are accessible through a similar service specific to WordPress called [WPackagist](https://wpackagist.org). To allow Composer to download packages from the WPackagist repository, run the following command: ```bash $ composer config repositories.wppackagist composer https://wpackagist.org ``` WPackagist is now listed in your `composer.json` file: ```json { "repositories": { "wppackagist": { "type": "composer", "url": "https://wpackagist.org" } } } ``` 2. Optional: Configure theme and plugin destination. By default, Composer places installed dependencies in a `vendor` subdirectory. You can configure a different destination for your themes and plugins. For instance, to install them into `wp-content`, add the following configuration: ```json {location="composer.json"} "extra": { "installer-paths": { "wordpress/wp-content/plugins/{$name}": [ "type:wordpress-plugin" ], "wordpress/wp-content/themes/{$name}": [ "type:wordpress-theme" ], "wordpress/wp-content/mu-plugins/{$name}": [ "type:wordpress-muplugin" ] } } ``` Make sure you add the new destination subdirectories to your `.gitignore` file. After inspecting package metadata, Composer now installs plugins with a `type` of `wordpress-plugin` into `wordpress/wp-content/plugins/` instead of `vendor`. And similarly for themes and must-use plugins. 3. Launch the installation of plugins and themes with Composer. To search for themes and plugins in [WPackagist](https://wpackagist.org) and install them through Composer, run a `composer require` command: ```bash # Plugin $ composer require wpackagist-plugin/wordpress-seo # Theme $ composer require wpackagist-theme/hueman ``` The two dependencies are now listed in your `composer.json` file. 4. Complete the installation: ```bash $ composer install ```` Each dependency is now installed. ###### 3. Deploy to Platform.sh Switching to a Composer-based installation doesn't require any modifications to the Platform.sh configuration files created when [you deployed your vanilla version](https://docs.platform.sh/guides/wordpress/vanilla.md). Make sure that your project contains those three files. You can then commit all your changes and deploy your new Composer-based WordPress site to Platform.sh: ```bash git add . && git commit -m "Composerify plugins and themes." git push platform composer ``` ###### 4. Update your Composer-based WordPress site ####### Perform a standard update with Composer Updating WordPress, your themes and plugins becomes a lot simpler with Composer. When a new version becomes available, create a new branch and launch the update: ```bash git checkout -b updates composer update ``` ####### Automate your updates with a source operation **Tier availability** This feature is available for **Elite and Enterprise** customers. [Compare the tiers](https://platform.sh/pricing/) on our pricing page, or [contact our sales team](https://platform.sh/contact/) for more information. [Source operations](https://docs.platform.sh/create-apps/source-operations.md) allow you to automate the maintenance of your Composer-based WordPress site. For instance, you can [update all the dependencies in your project with a single command](https://docs.platform.sh/learn/tutorials/dependency-updates.md). ### How to Deploy WordPress without Composer on Platform.sh WordPress is a popular Content Management System written in PHP. The recommended way to deploy WordPress on Platform.sh is by using [Composer](https://docs.platform.sh/guides/wordpress/deploy.md), the PHP package management suite. This guide will take you through the steps of setting up "vanilla" WordPress - that is, WordPress not managed through Composer, but rather by either fully committing WordPress, themes, and plugins or defining them with submodules - on Platform.sh. It should be noted that this approach comes with certain limitations based on the way Platform.sh works, and for this reason is [not recommended](https://docs.platform.sh/guides/wordpress/composer.md). Instead, consider using the ["Upgrade to use Composer"](https://docs.platform.sh/guides/wordpress/composer/migrate.md) guide to modify your project into one that uses Composer. To get WordPress running on Platform.sh, you have two potential starting places: - You already have a WordPress site you are trying to deploy. Go through this guide to make the recommended changes to your repository to prepare it for Platform.sh. - You have no code at this point. If you have no code, you have two choices: - Generate a basic WordPress site. See an example for doing this under initializing a project. - Use a ready-made [WordPress template](https://github.com/platformsh-templates/wordpress-vanilla). A template is a starting point for building your project. It should help you get a project ready for production. To use a template, click the button below to create a WordPress template project. ![Deploy on Platform.sh](https://platform.sh/images/deploy/lg-blue.svg) Once the template is deployed, you can follow the rest of this guide to better understand the extra files and changes to the repository. ##### Before you begin You need: - [Git](https://git-scm.com/downloads). Git is the primary tool to manage everything your app needs to run. Push commits to deploy changes and control configuration through YAML files. These files describe your infrastructure, making it transparent and version-controlled. - A Platform.sh account. If you don't already have one, [register for a trial account](https://auth.api.platform.sh/register). You can sign up with an email address or an existing GitHub, Bitbucket, or Google account. If you choose one of these accounts, you can set a password for your Platform.sh account later. - The [Platform.sh CLI](https://docs.platform.sh/administration/cli.md). This lets you interact with your project from the command line. You can also do most things through the [Web Console](https://docs.platform.sh/administration/web.md). ##### Initialize a project You can start with a basic code base or push a pre-existing project to Platform.sh. - Create your first project by running the following command: ```bash {} platform create --title ``` Then choose the region you want to deploy to, such as the one closest to your site visitors. You can also select more resources for your project through additional flags, but a Development plan should be enough for you to get started. Copy the ID of the project you've created. - Get your code ready locally. If your code lives in a remote repository, clone it to your computer. If your code isn't in a Git repository, initialize it by running ``git init``. If you don’t have code, create a new WordPress project from scratch. It’s best to place WordPress core into a subdirectory rather than at the project root. The following commands create a fresh Git repository with WordPress as a subdirectory: ```bash {} mkdir wordpress-psh && cd wordpress-psh git clone https://github.com/WordPress/WordPress.git wordpress && rm -rf wordpress/.git git init ``` - Connect your Platform.sh project with Git. You can use Platform.sh as your Git repository or connect to a third-party provider: GitHub, GitLab, or BitBucket. That creates an upstream called ``platform`` for your Git repository. When you choose to use a third-party Git hosting service the Platform.sh Git repository becomes a read-only mirror of the third-party repository. All your changes take place in the third-party repository. Add an integration to your existing third party repository. The process varies a bit for each supported service, so check the specific pages for each one. - [BitBucket](https://docs.platform.sh/integrations/source/bitbucket.md) - [GitHub](https://docs.platform.sh/integrations/source/github.md) - [GitLab](https://docs.platform.sh/integrations/source/gitlab.md) Accept the default options or modify to fit your needs. All of your existing branches are automatically synchronized to Platform.sh. You get a deploy failure message because you haven’t provided configuration files yet. You add them in the next step. If you’re integrating a repository to Platform.sh that contains a number of open pull requests, don’t use the default integration options. Projects are limited to three* preview environments (active and deployed branches or pull requests) and you would need to deactivate them individually to test this guide’s migration changes. Instead, each service integration should be made with the following flag: ```bash {} platform integration:add --type= ... --build-pull-requests=false ``` You can then go through this guide and activate the environment when you’re ready to deploy * You can purchase additional preview environments at any time in the Console. Open your project and select **Edit plan**. Add additional **Environments**, view a cost estimate, and confirm your changes. Now you have a local Git repository, a Platform.sh project, and a way to push code to that project. Next you can configure your project to work with Platform.sh. [Configure repository](https://docs.platform.sh/guides/wordpress/vanilla/configure.md) #### Configure WordPress for Platform.sh You now have a *project* running on Platform.sh. In many ways, a project is just a collection of tools around a Git repository. Just like a Git repository, a project has branches, called *environments*. Each environment can then be activated. *Active* environments are built and deployed, giving you a fully isolated running site for each active environment. Once an environment is activated, your app is deployed through a cluster of containers. You can configure these containers in three ways, each corresponding to a [YAML file](https://docs.platform.sh/learn/overview/yaml): - **Configure apps** in a `.platform.app.yaml` file. This controls the configuration of the container where your app lives. - **Add services** in a `.platform/services.yaml` file. This controls what additional services are created to support your app, such as databases or search servers. Each environment has its own independent copy of each service. If you're not using any services, you don't need this file. - **Define routes** in a `.platform/routes.yaml` file. This controls how incoming requests are routed to your app or apps. It also controls the built-in HTTP cache. If you're only using the single default route, you don't need this file. Start by creating empty versions of each of these files in your repository: ```bash # Create empty Platform.sh configuration files mkdir -p .platform && touch .platform/services.yaml && touch .platform/routes.yaml && touch .platform.app.yaml ``` Now that you've added these files to your project, configure each one for WordPress in the following sections. Each section covers basic configuration options and presents a complete example with comments on why WordPress requires those values. ###### Configure apps in `.platform.app.yaml` Your app configuration in a `.platform.app.yaml` file is allows you to configure nearly any aspect of your app. For all of the options, see a [complete reference](https://docs.platform.sh/create-apps/app-reference/single-runtime-image.md). The following example shows a complete configuration with comments to explain the various settings. There are a few things to notice in this file specific to running non-Composer variants of WordPress on Platform.sh. Defined in the ``dependencies`` block, all of the packages needed to run the WordPress CLI in both the application container and via SSH are installed in the first stages of the build process using Composer. Also, the ``web.locations`` block will expose ``wordpress/index.php`` under the primary route. ```yaml {location=".platform.app.yaml"} # This file describes an application. You can have multiple applications # in the same project. # The name of this app. Must be unique within a project. name: app # The runtime the application uses. type: "php:8.1" dependencies: php: wp-cli/wp-cli-bundle: "^2.4" psy/psysh: "^0.10.4" # The relationships of the application with services or other applications. # The left-hand side is the name of the relationship as it will be exposed # to the application in the PLATFORM_RELATIONSHIPS variable. The right-hand # side is in the form `:`. relationships: database: "db:mysql" variables: php: session.gc_maxlifetime: '200000' session.cookie_lifetime: '2000000' pcre.backtrack_limit: '200000' pcre.recursion_limit: '200000' # The configuration of app when it is exposed to the web. web: locations: "/": # The public directory of the app, relative to its root. root: "wordpress" # The front-controller script to send non-static requests to. passthru: "/index.php" # Wordpress has multiple roots (wp-admin) so the following is required index: - "index.php" # The number of seconds whitelisted (static) content should be cached. expires: 600 scripts: true allow: true rules: ^/composer\.json: allow: false ^/license\.txt$: allow: false ^/readme\.html$: allow: false "/wp-content/cache": root: "wordpress/wp-content/cache" scripts: false allow: false "/wp-content/uploads": root: "wordpress/wp-content/uploads" scripts: false allow: false rules: # Allow access to common static files. '(? ###### Add services in `.platform/services.yaml` You can add the managed services you need for you app to run in the `.platform/services.yaml` file. You pick the major version of the service and security and minor updates are applied automatically, so you always get the newest version when you deploy. You should always try any upgrades on a development branch before pushing to production. We recommend the latest [MariaDB](https://docs.platform.sh/add-services/mysql.md) version for WordPress. You can [add other services](https://docs.platform.sh/add-services.md) if desired, such as [Solr](https://docs.platform.sh/add-services/solr.md) or [Elasticsearch](https://docs.platform.sh/add-services/elasticsearch.md). You need to configure to use those services once they're enabled. Each service entry has a name (`db` in the example) and a `type` that specifies the service and version to use. Services that store persistent data have a `disk` key, to specify the amount of storage. ```yaml # The services of the project. # # Each service listed will be deployed # to power your Platform.sh project. db: type: mariadb:10.4 disk: 2048 ``` ###### Define routes All HTTP requests sent to your app are controlled through the routing and caching you define in a `.platform/routes.yaml` file. The two most important options are the main route and its caching rules. A route can have a placeholder of `{default}`, which is replaced by your domain name in production and environment-specific names for your preview environments. The main route has an `upstream`, which is the name of the app container to forward requests to. You can enable [HTTP cache](https://docs.platform.sh/define-routes/cache.md). The router includes a basic HTTP cache. By default, HTTP caches includes all cookies in the cache key. So any cookies that you have bust the cache. The `cookies` key allows you to select which cookies should matter for the cache. Generally, you want the user session cookie, which is included in the example for WordPress. You may need to add other cookies depending on what additional modules you have installed. You can also set up routes as [HTTP redirects](https://docs.platform.sh/define-routes/redirects.md). In the following example, all requests to `www.{default}` are redirected to the equivalent URL without `www`. HTTP requests are automatically redirected to HTTPS. If you don't include a `.platform/routes.yaml` file, a single default route is used. This is equivalent to the following: ```yaml {location=".platform/routes.yaml"} https://{default}/: type: upstream upstream: :http ``` Where `` is the `name` you've defined in your [app configuration](#configure-apps-in-platformappyaml). The following example presents a complete definition of a main route for a WordPress app: ```bash {location=".platform/routes.yaml"} # The routes of the project. # # Each route describes how an incoming URL is going # to be processed by Platform.sh. "https://{default}/": type: upstream upstream: "app:http" cache: enabled: true # Base the cache on the session cookies. Ignore all other cookies. cookies: - '/^wordpress_logged_in_/' - '/^wordpress_sec_/' - 'wordpress_test_cookie' - '/^wp-settings-/' - '/^wp-postpass/' - '/^wp-resetpass-/' "https://www.{default}/": type: redirect to: "https://{default}/" ``` [Customize WordPress](https://docs.platform.sh/guides/wordpress/vanilla/customize.md) #### Customize WordPress for Platform.sh Deploying WordPress without Composer on Platform.sh isn't recommended, but should you wish to do so there are a few additional modifications you need to make to your repository. ###### Place WordPress core into a subdirectory **Note**: If starting from scratch, you can skip to the section covering [wp-config.php](#wp-configphp) below. Keeping WordPress core up-to-date is made much easier when it resides in a subdirectory of your repository and it makes the recommended transition to using Composer simpler. It also makes defining WordPress as a submodule possible if you choose to do so. Place all code for WordPress core into a subdirectory called `wordpress`, including your `wp-config.php` file. **Note**: You can name the WordPress core subdirectory whatever you would like - the most common being ``wp``, ``web``, and ``wordpress``. ``wordpress`` has been chosen for Platform.sh templates and guides because it is often the default install location for [composer-flavored versions of WordPress](https://docs.platform.sh/guides/wordpress/deploy.md), and naming it ``wordpress`` now in your project will make [migrating to use Composer](https://docs.platform.sh/guides/wordpress/composer/migrate.md) later on straightforward. If naming the directory something other than ``wordpress``, make sure to update the ``web.locations["/"].root`` attribute to match in your ``.platform.app.yaml`` file, as well as any other ``root`` attribute there. ####### Core, themes, and plugins can also be submodules Platform.sh validates and retrieves submodules in the first stages of its build process, so it's possible to manage your code entirely this way. This modifies the update steps from what's listed below, so visit the [Git submodules](https://docs.platform.sh/development/submodules.md) documentation for more information. ###### `.environment` Platform.sh provides multiple *environments* for your projects, that can be customized (with different values for staging and development), but that inherit features from the production environment. One clear case where this can be useful is environment variables. Each environment on Platform.sh comes with a set of [pre-defined variables](https://docs.platform.sh/development/variables/use-variables.md#use-provided-variables) that provide information about the branch you are working on, the application's configuration, and the credentials to connect to each service defined in `.platform/services.yaml`. Service credentials reside in a base64 encoded JSON object variable called `PLATFORM_RELATIONSHIPS`, which you can use to define your database connection to the MariaDB container. To make each property (username, password, and so on) more accessible to `wp-config.php`, you can use the pre-installed `jq` package to clean the object into individual variables. ```text # .environment export DB_NAME=$(echo $PLATFORM_RELATIONSHIPS | base64 --decode | jq -r ".database[0].path") export DB_HOST=$(echo $PLATFORM_RELATIONSHIPS | base64 --decode | jq -r ".database[0].host") export DB_PORT=$(echo $PLATFORM_RELATIONSHIPS | base64 --decode | jq -r ".database[0].port") export DB_USER=$(echo $PLATFORM_RELATIONSHIPS | base64 --decode | jq -r ".database[0].username") export DB_PASSWORD=$(echo $PLATFORM_RELATIONSHIPS | base64 --decode | jq -r ".database[0].password") export WP_HOME=$(echo $PLATFORM_ROUTES | base64 --decode | jq -r 'to_entries[] | select(.value.primary == true) | .key') export WP_SITEURL="${WP_HOME}wp" export WP_DEBUG_LOG=/var/log/app.log if [ "$PLATFORM_ENVIRONMENT_TYPE" != production ] ; then export WP_ENV='development' else export WP_ENV='production' fi ``` As you can see above, you can define a number of environment-specific or project-wide variable settings in this file that are applied when deployed on Platform.sh but not locally. ###### `wp-config.php` Now that your database credentials have been cleaned up and `WP_HOME` defined, you can pull these values into `wp-config.php` to configure WordPress for deployment on a Platform.sh environment. Below is the `wp-config.php` file from the [WordPress template](https://github.com/platformsh-templates/wordpress-vanilla) using the variables defined in the previous section. Many other WordPress settings are pre-defined in this file for you, so consult the inline comments for more information. ```php hasRelationship('redis') && extension_loaded('redis')) { $credentials = $config->credentials('redis'); define('WP_REDIS_CLIENT', 'phpredis'); define('WP_REDIS_HOST', $credentials['host']); define('WP_REDIS_PORT', $credentials['port']); } ``` These sections set up the parameters the plugins look for to connect to the Redis server. If you used a different name for the relationship above, change it accordingly. This code has no impact when run on a local development environment. Once you have committed the above changes and pushed, you need to activate the plugins. ###### Verifying Redis is running Run this command in a SSH session in your environment: `platform redis info`. You should run it before you push all this new code to your repository. This should give you a baseline of activity on your Redis installation. There should be very little memory allocated to the Redis cache. After you push this code, you should run the command and notice that allocated memory starts jumping. To verify the plugins are working, add a `redis` command to the WP CLI tool. While in a SSH session in your environment, you can run `wp help redis` to see the available commands your chosen plugin has added. ### Deploy Gatsby on Platform.sh [Gatsby](https://www.gatsbyjs.com/) is an open source framework based on React that specializes in generating static websites from a variety of content sources. To get Gatsby running on Platform.sh, you have two potential starting places: - You already have a Gatsby site you are trying to deploy. Go through this guide to make the recommended changes to your repository to prepare it for Platform.sh. - You have no code at this point. If you have no code, you have two choices: - Generate a basic Gatsby site. - Use a ready-made [Gatsby template](https://github.com/platformsh-templates/gatsby). A template is a starting point for building your project. It should help you get a project ready for production. To use a template, click the button below to create a Gatsby template project. ![Deploy on Platform.sh](https://platform.sh/images/deploy/lg-blue.svg) Once the template is deployed, you can follow the rest of this guide to better understand the extra files and changes to the repository. ##### Before you begin You need: - [Git](https://git-scm.com/downloads). Git is the primary tool to manage everything your app needs to run. Push commits to deploy changes and control configuration through YAML files. These files describe your infrastructure, making it transparent and version-controlled. - A Platform.sh account. If you don't already have one, [register for a trial account](https://auth.api.platform.sh/register). You can sign up with an email address or an existing GitHub, Bitbucket, or Google account. If you choose one of these accounts, you can set a password for your Platform.sh account later. - The [Platform.sh CLI](https://docs.platform.sh/administration/cli.md). This lets you interact with your project from the command line. You can also do most things through the [Web Console](https://docs.platform.sh/administration/web.md). ##### Initialize a project You can start with a basic code base or push a pre-existing project to Platform.sh. - Create your first project by running the following command: ```bash {} platform create --title ``` Then choose the region you want to deploy to, such as the one closest to your site visitors. You can also select more resources for your project through additional flags, but a Development plan should be enough for you to get started. Copy the ID of the project you've created. - Get your code ready locally. If your code lives in a remote repository, clone it to your computer. If your code isn't in a Git repository, initialize it by running ``git init``. - Connect your Platform.sh project with Git. You can use Platform.sh as your Git repository or connect to a third-party provider: GitHub, GitLab, or BitBucket. That creates an upstream called ``platform`` for your Git repository. When you choose to use a third-party Git hosting service the Platform.sh Git repository becomes a read-only mirror of the third-party repository. All your changes take place in the third-party repository. Add an integration to your existing third party repository. The process varies a bit for each supported service, so check the specific pages for each one. - [BitBucket](https://docs.platform.sh/integrations/source/bitbucket.md) - [GitHub](https://docs.platform.sh/integrations/source/github.md) - [GitLab](https://docs.platform.sh/integrations/source/gitlab.md) Accept the default options or modify to fit your needs. All of your existing branches are automatically synchronized to Platform.sh. You get a deploy failure message because you haven’t provided configuration files yet. You add them in the next step. If you’re integrating a repository to Platform.sh that contains a number of open pull requests, don’t use the default integration options. Projects are limited to three* preview environments (active and deployed branches or pull requests) and you would need to deactivate them individually to test this guide’s migration changes. Instead, each service integration should be made with the following flag: ```bash {} platform integration:add --type= ... --build-pull-requests=false ``` You can then go through this guide and activate the environment when you’re ready to deploy * You can purchase additional preview environments at any time in the Console. Open your project and select **Edit plan**. Add additional **Environments**, view a cost estimate, and confirm your changes. Now you have a local Git repository, a Platform.sh project, and a way to push code to that project. Next you can configure your project to work with Platform.sh. [Configure repository](https://docs.platform.sh/guides/gatsby/deploy/configure.md) #### Configure Gatsby for Platform.sh You now have a *project* running on Platform.sh. In many ways, a project is just a collection of tools around a Git repository. Just like a Git repository, a project has branches, called *environments*. Each environment can then be activated. *Active* environments are built and deployed, giving you a fully isolated running site for each active environment. Once an environment is activated, your app is deployed through a cluster of containers. You can configure these containers in three ways, each corresponding to a [YAML file](https://docs.platform.sh/learn/overview/yaml): - **Configure apps** in a `.platform.app.yaml` file. This controls the configuration of the container where your app lives. - **Add services** in a `.platform/services.yaml` file. This controls what additional services are created to support your app, such as databases or search servers. Each environment has its own independent copy of each service. If you're not using any services, you don't need this file. - **Define routes** in a `.platform/routes.yaml` file. This controls how incoming requests are routed to your app or apps. It also controls the built-in HTTP cache. If you're only using the single default route, you don't need this file. Start by creating empty versions of each of these files in your repository: ```bash # Create empty Platform.sh configuration files mkdir -p .platform && touch .platform/services.yaml && touch .platform/routes.yaml ``` Now that you've added these files to your project, configure each one for Gatsby in the following sections. Each section covers basic configuration options and presents a complete example with comments on why Gatsby requires those values. ###### Configure apps in `.platform.app.yaml` Your app configuration in a `.platform.app.yaml` file is allows you to configure nearly any aspect of your app. For all of the options, see a [complete reference](https://docs.platform.sh/create-apps/app-reference/single-runtime-image.md). The following example shows a complete configuration with comments to explain the various settings. In the template, ``yarn`` is run during the build hook to install all of Gatsby’s dependencies, and then ``yarn build`` is run to build the site and output to the ``public`` subdirectory. If you would rather use ``npm`` to manage your dependencies, you can: - delete ``yarn`` from the build hook - update ``yarn build`` to ``npm run build`` in the build hook - delete the ``build.flavor`` block, which tells Platform.sh to rely solely on the build hook to define the build process for your project when set to ``none``. By default, Node.js containers run ``npm install`` prior to the build hook, so this block can be removed entirely from the configuration. - delete the ``dependencies`` block, which includes ``yarn``, since it is no longer needed. All traffic is then directed to the ``public`` subdirectory once the deployment has completed via the ``web.locations`` section. ```yaml {location=".platform.app.yaml"} # Complete list of all available properties: https://docs.platform.sh/create-apps/app-reference.html # A unique name for the app. Must be lowercase alphanumeric characters. Changing the name destroys data associated # with the app. name: 'app' # The runtime the application uses. # Complete list of available runtimes: https://docs.platform.sh/create-apps/app-reference.html#types type: 'nodejs:18' # The size of the persistent disk of the application (in MB). Minimum value is 128. disk: 5120 # The web key configures the web server running in front of your app. # More information: https://docs.platform.sh/create-apps/app-reference.html#web web: # Each key in locations is a path on your site with a leading /. # More information: https://docs.platform.sh/create-apps/app-reference.html#locations locations: '/': # The directory to serve static assets for this location relative to the app’s root directory. Must be an # actual directory inside the root directory. root: 'public' # Files to consider when serving a request for a directory. index: [ 'index.html' ] # Whether to allow serving files which don’t match a rule. allow: true # Specifies a default set of build tasks to run. Flavors are language-specific. # More information: https://docs.platform.sh/create-apps/app-reference.html#build build: flavor: none # Installs global dependencies as part of the build process. They’re independent of your app’s dependencies and # are available in the PATH during the build process and in the runtime environment. They’re installed before # the build hook runs using a package manager for the language. # More information: https://docs.platform.sh/create-apps/app-reference.html#dependencies dependencies: nodejs: yarn: "1.22.5" # Hooks allow you to customize your code/environment as the project moves through the build and deploy stages # More information: https://docs.platform.sh/create-apps/app-reference.html#hooks hooks: # The build hook is run after any build flavor. # More information: https://docs.platform.sh/create-apps/hooks/hooks-comparison.html#build-hook build: | yarn yarn build # Information on the app's source code and operations that can be run on it. # More information: https://docs.platform.sh/create-apps/app-reference.html#source source: ###################################################################################################################### ## ## ## This source operation is part of the Platform.sh process of updating and maintaining our collection of ## ## templates. For more information see https://docs.platform.sh/create-apps/source-operations.html and ## ## https://github.com/platformsh/source-operations ## ## ## ## YOU CAN SAFELY DELETE THIS COMMENT AND THE LINES BENEATH IT ## ## ## ###################################################################################################################### operations: auto-update: command: | curl -fsS https://raw.githubusercontent.com/platformsh/source-operations/main/setup.sh | { bash /dev/fd/3 sop-autoupdate; } 3 ###### Add services in `.platform/services.yaml` You can add the managed services you need for you app to run in the `.platform/services.yaml` file. You pick the major version of the service and security and minor updates are applied automatically, so you always get the newest version when you deploy. You should always try any upgrades on a development branch before pushing to production. Gatsby doesn't require services to deploy, so you don't need a `.platform/services.yaml` file for now. You can [add other services](https://docs.platform.sh/add-services.md) if desired, such as [Solr](https://docs.platform.sh/add-services/solr.md) or [Elasticsearch](https://docs.platform.sh/add-services/elasticsearch.md). You need to configure Gatsby to use those services once they're enabled. ###### Define routes All HTTP requests sent to your app are controlled through the routing and caching you define in a `.platform/routes.yaml` file. The two most important options are the main route and its caching rules. A route can have a placeholder of `{default}`, which is replaced by your domain name in production and environment-specific names for your preview environments. The main route has an `upstream`, which is the name of the app container to forward requests to. You can enable [HTTP cache](https://docs.platform.sh/define-routes/cache.md). The router includes a basic HTTP cache. By default, HTTP caches includes all cookies in the cache key. So any cookies that you have bust the cache. The `cookies` key allows you to select which cookies should matter for the cache. You can also set up routes as [HTTP redirects](https://docs.platform.sh/define-routes/redirects.md). In the following example, all requests to `www.{default}` are redirected to the equivalent URL without `www`. HTTP requests are automatically redirected to HTTPS. If you don't include a `.platform/routes.yaml` file, a single default route is used. This is equivalent to the following: ```yaml {location=".platform/routes.yaml"} https://{default}/: type: upstream upstream: :http ``` Where `` is the `name` you've defined in your [app configuration](#configure-apps-in-platformappyaml). The following example presents a complete definition of a main route for a Gatsby app: ```bash {location=".platform/routes.yaml"} # The routes of the project. # # Each route describes how an incoming URL is going # to be processed by Platform.sh. # More information: https://docs.platform.sh/define-routes.html "https://{default}/": type: upstream upstream: "app:http" ``` #### Deploy Gatsby ###### Deployment Now you have your configuration for deployment and your app set up to run on Platform.sh. Make sure all your code is committed to Git and run `git push` to your Platform.sh environment. Your code is built, producing a read-only image that's deployed to a running cluster of containers. If you aren't using a source integration, the log of the process is returned in your terminal. If you're using a source integration, you can get the log by running `platform activity:log --type environment.push`. When the build finished, you're given the URL of your deployed environment. Click the URL to see your site. If your environment wasn't active and so wasn't deployed, activate it by running the following command: ```bash platform environment:activate ``` ###### Additional changes A standard Gatsby site - either one created interactively through npm (`npm init gatsby`) or through a starter such as the [Blog starter](https://github.com/gatsbyjs/gatsby-starter-blog) used in the Platform.sh template - will generate a static site without the use of any external services. If this is your starting point you have all of the configuration necessary to deploy your project, but below are a few modifications that may help you develop your site more efficiently going forward. ####### Install the Config Reader You can get all information about a deployed environment, including how to connect to services, through [environment variables](https://docs.platform.sh/development/variables.md). Your app can [access these variables](https://docs.platform.sh/development/variables/use-variables.md#access-variables-in-your-app). Install the package with your preferred package manager: ```bash npm install platformsh-config # Or for Yarn yarn add platformsh-config ``` Go forth and Deploy (even on Friday)! #### Additional resources Platform.sh supports [multi-app configuration](https://docs.platform.sh/create-apps/multi-app.md) on projects - that is, including code for two separate sites that are deployed on their own containers within a single project cluster. These days, an increasingly common pattern is to decouple content resources from a frontend Gatsby site. Decoupled sites use Gatsby's source plugin ecosystem to pull external content resources into the build, where those resources (a headless CMS, for example) are typically located on a server elsewhere. Platform.sh's multi-app configuration gets around this, placing both frontend and backend sites on the same server by keeping the code for both sites in the same repository. Gatsby would reside in a subdirectory alongside another that contains the code for the backend resource. For example, a Gatsby site pulling content from a Drupal site could be kept in a single repository that looks like the snippet below: ```bash . ├── .platform │   ├── routes.yaml │   └── services.yaml ├── drupal │   ├── │   └── .platform.app.yaml ├── gatsby │   ├── │   └── .platform.app.yaml ├── CHANGELOG.md ├── LICENSE.md └── README.md ``` This pattern can be replicated for a number of backend applications, and you can consult the [Gatsby Headless](https://docs.platform.sh/guides/gatsby/headless.md) guide for some common examples. [Back](https://docs.platform.sh/guides/gatsby/deploy/deploy.md) ### Gatsby multi-app projects ##### Background A common pattern for Gatsby sites is to decouple services from the main site, pulling in external data at build time. Supported by Gatsby's source plugin ecosystem, data from conventional (or headless) content management systems can be collected into a common [Data Layer](https://www.gatsbyjs.com/docs/reference/graphql-data-layer/), with that CMS typically located on a server elsewhere, and that data then used to fill out content on the frontend. The location of an external CMS is usually hard coded into Gatsby's configuration, so when you're developing your site every branch points to the same backend resource. Should the location of that resource change, you would need to commit the new URL to update the configuration. The decoupled pattern can work differently on Platform.sh due to support for [multi-app configuration](https://docs.platform.sh/create-apps/multi-app.md) on your projects. Consider the following project structure: ```bash . ├── .platform │   ├── routes.yaml │   └── services.yaml ├── drupal │   ├── │   └── .platform.app.yaml ├── gatsby │   ├── │   └── .platform.app.yaml └── README.md ``` Above is the repository structure for a Decoupled Drupal (Gatsby sourcing Drupal content) project on Platform.sh. Here, Gatsby and Drupal reside in their own subdirectories within the same repository. They are deployed to the same project from separate application containers, and from this cluster Gatsby can read data from Drupal internally. Their commit histories are tied together, such that each new pull request environment can test changes to either the frontend or backend freely from the same place. Drupal is just one example of a backend CMS that can be used with this pattern, and at the bottom of this page are a few additional guides for alternatives that work well on Platform.sh. ##### Before you begin You need: - [Git](https://git-scm.com/downloads). Git is the primary tool to manage everything your app needs to run. Push commits to deploy changes and control configuration through YAML files. These files describe your infrastructure, making it transparent and version-controlled. - A Platform.sh account. If you don't already have one, [register for a trial account](https://auth.api.platform.sh/register). You can sign up with an email address or an existing GitHub, Bitbucket, or Google account. If you choose one of these accounts, you can set a password for your Platform.sh account later. - The [Platform.sh CLI](https://docs.platform.sh/administration/cli.md). This lets you interact with your project from the command line. You can also do most things through the [Web Console](https://docs.platform.sh/administration/web.md). ##### Signing up In each of the backend guides below, there is a "Deploy on Platform.sh" button that will not only deploy the guide's project for you, but also sign you up for a trial account. If you are planning on deploying a template and following along with these guides for greater context, feel free to move onto the next section. If however you are planning on using the templates and guides to deploy your existing codebase to Platform.sh, you first need to [register for a trial Platform.sh account](https://auth.api.platform.sh/register). If you don't want to sign up initially with your e-mail address, you can sign up using an existing GitHub, Bitbucket, or Google account. If you choose one of these options, you can set a password for your Platform.sh account later. After creating an account, you are prompted to create your first project. Since you're providing your own code, use the "Blank project" option. You can give the project a title and choose a region closest to the visitors of your site. You also have the option to select more resources for your project. This is especially important with multi-application projects, so make sure to consult the [**Plan size**](#plan-size) note below for more details. ##### Plan size There are a few important points you need to keep in mind when deploying this pattern if you have already [deployed Gatsby by itself](https://docs.platform.sh/guides/gatsby/deploy.md) on Platform.sh, which are relevant to each backend example. After following the steps below, you may find that Gatsby fails to bundle assets during its build on projects of the "Development" plan size. This is a factor of both the size and number of Gatsby's dependencies on the frontend, as well as the amount of data being pulled from the backend. Multi-application projects generally require more resources to run on Platform.sh, and so the trial's default `development` plan may not be enough to run your existing site. You are free to either proceed with a smaller plan to test or increase the resources at this point for the project. Otherwise, it may be best to initially deploy the templates listed in each backend guide to start out, and later modify that project to include your own code with more resources as you get used to developing on Platform.sh. ##### Headless backends Platform.sh maintains a number of [multi-application templates](https://github.com/platformsh-templates/?q=gatsby&type=&language=) for Gatsby, that generally have very similar configuration changes on the Gatsby side. Below are a few of those written as short guides for different backend content management systems. #### How to deploy Gatsby with Drupal (Decoupled Drupal) on Platform.sh Platform.sh maintains a [template](https://github.com/platformsh-templates/gatsby-drupal) that you can quickly deploy, and then use this guide as a reference for the Platform.sh specific changes that have been made to Gatsby and Drupal to make it work. Click the button below to sign up for a free trial account and deploy the project. ![Deploy on Platform.sh](https://platform.sh/images/deploy/lg-blue.svg) ###### Shared configuration Your local clone of the template has the following project structure: ```bash ├── .platform │ ├── routes.yaml │ └── services.yaml ├── drupal │ ├── # App code │ └── .platform.app.yaml ├── gatsby │ ├── # App code │ └── .platform.app.yaml └── README.md ``` From this repository, you deploy a Gatsby app and a Drupal app. The code for each of them resides in their own directories. When deploying a single app project [such as Gatsby](https://docs.platform.sh/guides/gatsby/deploy.md), the repository needs three configuration files that describe its infrastructure, described below in detail. For [multi-app projects](https://docs.platform.sh/create-apps/multi-app.md), two of those files remain in the project root and are shared between Gatsby and Drupal. Each app keeps its own app configuration file (`.platform.app.yaml`) in its subdirectory. ####### Service configuration This file describes which [service containers](https://docs.platform.sh/add-services.md) (such as a database) your project should include. Gatsby does not require services to deploy, but Drupal does. So the following examples shows these service configurations: ```yaml {} # The services of the project. # # Each service listed will be deployed # to power your Platform.sh project. db: type: mariadb:10.4 disk: 2048 cache: type: redis:5.0 files: type: network-storage:1.0 disk: 256 ``` ####### Routes configuration This [`.platform/routes.yaml`](https://docs.platform.sh/define-routes.md) file defines how requests are handled by Platform.sh. The following example shows Gatsby being served from the primary domain and Drupal being accessible from the `backend` subdomain. ```yaml {} https://api.{default}/: type: upstream upstream: "drupal:http" id: "api" cache: enabled: true cookies: ['/^SS?ESS/', '/^Drupal.visitor/'] https://www.api.{default}/: type: redirect to: "https://api.{default}/" "https://www.{default}/": type: upstream upstream: "gatsby:http" primary: true "https://{default}/": type: redirect to: "https://www.{default}/" ``` ###### Drupal The multi-app template has a single modification to Platform.sh's [standard Drupal template](https://github.com/platformsh-templates/drupal9): the `name` attribute in Drupal's `.platform/services.yaml` has been updated to `drupal`. This value is used to define the [relationship between Gatsby and Drupal](#gatsby) and in the [routes configuration](#routes-configuration). The only setup required to prepare the backend is to install a few additional modules that will configure the JSON API for consumption. In your Drupal directory, add the following dependencies. ```bash composer require drupal/gatsby drupal/jsonapi_extras drupal/pathauto ``` The [Pathauto](https://www.drupal.org/project/pathauto) module helps you assign alias paths for each piece of content on your Drupal site that can then be replicated on the frontend Gatsby site. For example, the Drupal alias `/article/some-new-article` is the same path you find that article at on Gatsby. ###### Gatsby The frontend Gatsby app has a slightly different configuration from the basic [Gatsby deployment](https://docs.platform.sh/guides/gatsby/deploy.md). Below is the `gatsby/.platform.app.yaml` file that configures the app. ```yaml {} # The name of this app. Must be unique within a project. name: gatsby type: 'nodejs:14' variables: env: NODE_OPTIONS: --max-old-space-size=1536 GENERATED_VARS: 'deploy/platformsh.environment' size: L resources: base_memory: 1024 memory_ratio: 1024 dependencies: nodejs: # yarn: "1.22.17" pm2: "5.2.0" hooks: post_deploy: | # Verify the connection to the backend can be made with those variables. if [ -f "$GENERATED_VARS" ]; then # Source environment variables, build the frontend, and start the server. . $GENERATED_VARS else printf "In %s, %s is not available, therefore I could not source" "web:commands:start" "${GENERATED_VARS}" fi # Gatsby clean on a RO-filesystem rm -rf .cache/* && rm -rf public/* npm run build -- --no-color web: commands: start: | # npm run serve -- -p $PORT --no-color if [ -f "$GENERATED_VARS" ]; then # Source environment variables, build the frontend, and start the server. . $GENERATED_VARS else printf "In %s, %s is not available, therefore I could not source" "web:commands:start" "${GENERATED_VARS}" fi APP=$(cat package.json | jq -r '.name') pm2 start npm --no-daemon --watch --name $APP -- run serve -- -p $PORT --no-color #pm2 start npm --no-daemon --watch --name $APP -- run develop -- -p $PORT --no-color # Maybe since we're foregoing the first deploy, yarn start is good enough. # if [ -f "$GENERATED_VARS" ]; then # # Source environment variables, build the frontend, and start the server. # # . $GENERATED_VARS # npm run clean # npm run build # npm run serve # # APP=$(cat package.json | jq -r '.name') # # pm2 start npm --no-daemon --watch --name $APP -- preview -- -p $PORT # else # # On the first deploy, display next steps page. # node first_deploy.js # fi disk: 512 mounts: /.cache: source: local source_path: 'cache' /.config: source: local source_path: 'config' /.pm2: source: local source_path: 'pm2' public: source: local source_path: 'public' deploy: source: service service: files source_path: deploy ``` In particular, notice: - `relationships` Access to another service or app container in the cluster is given through [`relationships`](https://docs.platform.sh/create-apps/app-reference/single-runtime-image#relationships). In this case, one has been defined to the backend Drupal container using it's `name`. - `post_deploy` Platform.sh containers reside in separate build containers at build time, before their images are moved to the final app container at deploy time. These build containers are isolated and so Gatsby can't access Drupal during the build hook, where you would normally run the [`gatsby build` command](https://github.com/platformsh-templates/gatsby/blob/master/.platform.app.yaml#L21). Drupal isn't available until after the deploy hook. So the Gatsby build is postponed until the [`post_deploy` hook](https://docs.platform.sh/create-apps/hooks/hooks-comparison.md#post-deploy-hook). To run `gatsby build` on-demand, or to trigger a rebuild from the backend when content is updated, define a [runtime operation](https://docs.platform.sh/create-apps/runtime-operations.md#build-your-app-when-using-a-static-site-generator). - `mounts` There are consequences to postponing the Gatsby build, as you don't generally have write access to the container this late in the pipeline. To allow Gatsby to write to `public`, that directory has been defined as a [mount](https://docs.platform.sh/create-apps/app-reference/single-runtime-image#mounts). Additionally, there has been a change to Gatsby’s start command,``web.commands.start``. In the generic Gatsby template, the static files in ``public`` are served via the [web.locations](https://github.com/platformsh-templates/gatsby/blob/c764ed717752eacc3c3f3322b7e5415e276d02df/.platform.app.yaml#L29), but that attribute is removed in the file below. Instead, two separate start commands are defined depending on which branch you are developing on. This has been included to support [Live Preview and Incremental Builds](https://www.drupal.org/project/gatsby). It isn’t required, but you can consult the [section below](#live-preview-and-incremental-builds) for more information about enabling it. You can then modify [gatsby-config.js](https://www.gatsbyjs.com/docs/reference/config-files/gatsby-config/) to read from the backend Drupal container through the ``drupal`` relationship defined above to configure the ``baseUrl`` attribute for ``gatsby-source-drupal``. This is facilitated by Platform.sh's [Config Reader library](https://github.com/platformsh/config-reader-nodejs). So be sure to install this to the Gatsby dependencies first when replicating. When used, Gatsby pulls the information to communicate with the Drupal container *on the current branch*. Lastly, the Gatsby app itself needs to include [GraphQL queries](https://www.gatsbyjs.com/docs/reference/graphql-data-layer/) to handle the data coming from Drupal and create content pages. The most important files in the template you should consult are: - [`gatsby/gatsby-node.js`](https://github.com/platformsh-templates/gatsby-drupal/blob/master/client/gatsby-node.js) Dynamically creates individual pages from the data source using Gatsby's [Node API](https://www.gatsbyjs.com/docs/reference/config-files/gatsby-node/). It retrieves all of Drupal's articles (see [post-install below](#deploy-and-post-install)) using the GraphQL query `allNodeArticle`. A page is created (`createPage`) with formatting described by the template file `article.js` below (`component`). A `path` is also defined for each article, in this case using an `alias` you will define within Drupal using the Pathauto module. - [`gatsby/src/templates/article.js`](https://github.com/platformsh-templates/gatsby-drupal/blob/master/client/src/templates/article.js) The template file that defines how a single Drupal article should be formatted on Gatsby, retrieving the data from that article using the `nodeArticle` GraphQL query. - [`gatsby/src/pages/articles.js`](https://github.com/platformsh-templates/gatsby-drupal/blob/master/client/src/components/articlePreview.js) Generates previews of articles at `/articles` on the Gatsby site using the `allNodeArticle` GraphQL query. ###### Deploy and post-install When you first deploy the template, the frontend Gatsby site will fail with a 403 error. Visit the `backend` subdomain of your site and finish the installation of Drupal. You don't need to set database credentials as they're already provided. After you have completed the installation, you need to enable the JSON API and Gatsby related modules and then set up aliases for your articles using ``pathauto``. For detailed instructions, see the template’s [post-installation instructions](https://github.com/platformsh-templates/gatsby-drupal#user-content-post-install). Once you've finished, redeploy the project with the CLI command `platform redeploy` to view your Gatsby site, It's now pulling its content from a backend Drupal container in the same project. ###### Next steps With Gatsby now deployed and pulling content from a backend Drupal application, there are a few things you may wish to change about your project going forward. ####### Shared application configuration You can optionally combine the application configuration (`.platform/services.yaml`) for Gatsby and Drupal into a [single configuration file](https://docs.platform.sh/create-apps/multi-app/project-structure.md#unified-app-configuration). Like `.platform/services.yaml` and `.platform/routes.yaml`, this file is shared across the project and resides in the `.platform` subdirectory. You need to explicitly define the source of each application. ####### Multiple content sources Gatsby supports pulling multiple sources into its build. This includes external services like Stripe and additional backend CMSs for different sets of content. As in this example with Drupal, you can branch off your repository and add an additional directory that contains the codebase for [another backend](https://docs.platform.sh/guides/gatsby/headless.md#headless-backends). Then add the source plugin for that backend to `gatsby-config.js`. ####### Plan size As mentioned previously, you should have at least a Medium plan for your multi-app projects. This size gives the project enough resources for all of your containers as well as the memory necessary to actually pull content from Drupal into Gatsby during its build. Keep in mind that the increased plan size applies only to your production environment, and not to preview environments (which default to Standard ). As you continue to work with Gatsby and a backend headless CMS, you may want to [upsize your preview environments](https://docs.platform.sh/administration/pricing.md#preview-environments). ####### Live preview and incremental builds If you replicate the `web.commands.start` block in Gatsby's `.platform.app.yaml` file above, you can enable incremental builds on your projects. Once you save an update to a piece of Drupal content on a preview branch, Drupal places a request to a dedicated `/__refresh` endpoint on Gatsby. Since Gatsby is running a development server on this non-production environment, this call causes Gatsby to retrieve content from Drupal once again, resulting in a near instantly updated article on the frontend. To see how to enable this feature, consult the [template's README](https://github.com/platformsh-templates/gatsby-drupal#user-content-enabling-gatsby-live-preview-manual-configuration). #### How to deploy Gatsby with Strapi on Platform.sh Platform.sh maintains a [template](https://github.com/platformsh-templates/gatsby-strapi) that you can quickly deploy, and then use this guide as a reference for the Platform.sh specific changes that have been made to Gatsby and Strapi to make it work. Click the button below to sign up for a free trial account and deploy the project. ![Deploy on Platform.sh](https://platform.sh/images/deploy/lg-blue.svg) ###### Shared configuration Your local clone of the template has the following project structure: ```bash ├── .platform │ ├── routes.yaml │ └── services.yaml ├── strapi │ ├── # App code │ └── .platform.app.yaml ├── gatsby │ ├── # App code │ └── .platform.app.yaml └── README.md ``` From this repository, you deploy a Gatsby app and a Strapi app. The code for each of them resides in their own directories. When deploying a single app project [such as Gatsby](https://docs.platform.sh/guides/gatsby/deploy.md), the repository needs three configuration files that describe its infrastructure, described below in detail. For [multi-app projects](https://docs.platform.sh/create-apps/multi-app.md), two of those files remain in the project root and are shared between Gatsby and Strapi. Each app keeps its own app configuration file (`.platform.app.yaml`) in its subdirectory. ####### Service configuration This file describes which [service containers](https://docs.platform.sh/add-services.md) (such as a database) your project should include. Gatsby does not require services to deploy, but Strapi does. So the following examples shows these service configurations: ```yaml {} # The services of the project. # # Each service listed will be deployed # to power your Platform.sh project. dbpostgres: type: postgresql:12 disk: 256 ``` ####### Routes configuration This [`.platform/routes.yaml`](https://docs.platform.sh/define-routes.md) file defines how requests are handled by Platform.sh. The following example shows Gatsby being served from the primary domain and Strapi being accessible from the `backend` subdomain. ```yaml {} # The routes of the project. # # Each route describes how an incoming URL is going # to be processed by Platform.sh. "https://www.{default}/": type: upstream upstream: "gatsby:http" "https://{default}/": type: redirect to: "https://www.{default}/" "https://www.backend.{default}/": type: upstream upstream: "strapi:http" "https://backend.{default}/": type: redirect id: 'strapi' to: "https://www.backend.{default}/" ``` ###### Strapi The multi-app template has a single modification to Platform.sh's [standard Strapi template](https://github.com/platformsh-templates/strapi): the `name` attribute in Strapi's `.platform/services.yaml` has been updated to `strapi`. This value is used to define the [relationship between Gatsby and Strapi](#gatsby) and in the [routes configuration](#routes-configuration). The only additional setup required to prepare the backend is to install a package that will enable GraphQL on Strapi. In your Strapi directory, add the dependency: ```bash yarn add strapi-plugin-graphql ``` ###### Gatsby The frontend Gatsby app has a slightly different configuration from the basic [Gatsby deployment](https://docs.platform.sh/guides/gatsby/deploy.md). Below is the `gatsby/.platform.app.yaml` file that configures the app. ```yaml {} # .platform.app.yaml # The name of this application, which must be unique within a project. name: gatsby # The type key specifies the language and version for your application. type: 'nodejs:14' # The hooks that will be triggered when the package is deployed. hooks: # Build hooks can modify the application files on disk but not access any services like databases. post_deploy: | npm run build # The size of the persistent disk of the application (in MB). disk: 1024 relationships: strapi: "strapi:http" # The configuration of the application when it is exposed to the web. web: locations: '/': # The public directory of the application relative to its root. root: 'public' index: ['index.html'] scripts: false allow: true mounts: '/.cache': source: local source_path: cache '/.config': source: local source_path: config 'public': source: local source_path: public ``` In particular, notice: - `relationships` Access to another service or app container in the cluster is given through [`relationships`](https://docs.platform.sh/create-apps/app-reference/single-runtime-image#relationships). In this case, one has been defined to the backend Strapi container using it's `name`. - `post_deploy` Platform.sh containers reside in separate build containers at build time, before their images are moved to the final app container at deploy time. These build containers are isolated and so Gatsby can't access Strapi during the build hook, where you would normally run the [`gatsby build` command](https://github.com/platformsh-templates/gatsby/blob/master/.platform.app.yaml#L21). Strapi isn't available until after the deploy hook. So the Gatsby build is postponed until the [`post_deploy` hook](https://docs.platform.sh/create-apps/hooks/hooks-comparison.md#post-deploy-hook). To run `gatsby build` on-demand, or to trigger a rebuild from the backend when content is updated, define a [runtime operation](https://docs.platform.sh/create-apps/runtime-operations.md#build-your-app-when-using-a-static-site-generator). - `mounts` There are consequences to postponing the Gatsby build, as you don't generally have write access to the container this late in the pipeline. To allow Gatsby to write to `public`, that directory has been defined as a [mount](https://docs.platform.sh/create-apps/app-reference/single-runtime-image#mounts). You can then modify [gatsby-config.js](https://www.gatsbyjs.com/docs/reference/config-files/gatsby-config/) to read from the backend Strapi container through the ``strapi`` relationship defined above to configure the ``apiURL`` attribute for ``gatsby-source-strapi``. Note that the source plugin requires that you explicitly define the ``contentTypes`` to retrieve from Strapi. At this point, you haven’t yet built out the API. So the ``article`` and ``category`` content types are included for what you need to do [after installing](https://github.com/platformsh-templates/gatsby-strapi#user-content-post-install). If you’re migrating an existing Strapi repository, adjust these values to fit your current API. This is facilitated by Platform.sh's [Config Reader library](https://github.com/platformsh/config-reader-nodejs). So be sure to install this to the Gatsby dependencies first when replicating. When used, Gatsby pulls the information to communicate with the Strapi container *on the current branch*. Lastly, the Gatsby app itself needs to include [GraphQL queries](https://www.gatsbyjs.com/docs/reference/graphql-data-layer/) to handle the data coming from Strapi and create content pages. The most important files in the template you should consult are: - [`gatsby/gatsby-node.js`](https://github.com/platformsh-templates/gatsby-strapi/blob/master/gatsby/gatsby-node.js) Dynamically creates individual pages from the data source using Gatsby's [Node API](https://www.gatsbyjs.com/docs/reference/config-files/gatsby-node/). It retrieves all of Strapi's articles and categories (see [post-install below](#deploy-and-post-install)) using the GraphQL queries `allStrapiArticle` and `allStrapiCategory` respectively. For each, a page is created (`createPage`) with an assigned `path` and formatting described by one of the template files below (`component`). - [`gatsby/src/templates/article.js`](https://github.com/platformsh-templates/gatsby-strapi/blob/master/gatsby/src/templates/article.js) The template file that defines how a single Strapi article should be formatted on Gatsby, retrieving the data from that article using the `strapiArticle` GraphQL query. - [`gatsby/src/templates/category.js`](https://github.com/platformsh-templates/gatsby-strapi/blob/master/gatsby/src/templates/category.js) The template file that defines how a list of articles that belong to a single Category are formatted by Gatsby. It uses the `Category` query, and then filters a specific category `id` on `allStrapiArticle`. - [`gatsby/src/pages/index.js`](https://github.com/platformsh-templates/gatsby-strapi/blob/master/gatsby/src/pages/index.js) Retrieves all of Strapi's content to generate a list of articles on the homepage using the `allStrapiArticle` GraphQL query. ###### Deploy and post-install When you first deploy the template, the frontend Gatsby site will fail with a 403 error. Visit the `backend` subdomain of your site and finish the installation of Strapi. You don't need to set database credentials as they're already provided. After you have deployed, you need to set up Strapi’s Admin Panel and some initial content endpoints for the Gatsby frontend to consume. Create your admin user at the ``backend`` subdomain for Strapi. You can then follow the [template’s post-install instructions](https://github.com/platformsh-templates/gatsby-strapi#user-content-post-install) to setup up some initial ``Article`` and ``Category`` content endpoints. The API you develop there is only accessible by admins by default, so be sure to adjust the permissions to public so Gatsby can access it. Once you've finished, redeploy the project with the CLI command `platform redeploy` to view your Gatsby site, It's now pulling its content from a backend Strapi container in the same project. ###### Next steps With Gatsby now deployed and pulling content from a backend Strapi application, there are a few things you may wish to change about your project going forward. ####### Shared application configuration You can optionally combine the application configuration (`.platform/services.yaml`) for Gatsby and Strapi into a [single configuration file](https://docs.platform.sh/create-apps/multi-app/project-structure.md#unified-app-configuration). Like `.platform/services.yaml` and `.platform/routes.yaml`, this file is shared across the project and resides in the `.platform` subdirectory. You need to explicitly define the source of each application. ####### Multiple content sources Gatsby supports pulling multiple sources into its build. This includes external services like Stripe and additional backend CMSs for different sets of content. As in this example with Strapi, you can branch off your repository and add an additional directory that contains the codebase for [another backend](https://docs.platform.sh/guides/gatsby/headless.md#headless-backends). Then add the source plugin for that backend to `gatsby-config.js`. ####### Plan size As mentioned previously, you should have at least a Medium plan for your multi-app projects. This size gives the project enough resources for all of your containers as well as the memory necessary to actually pull content from Strapi into Gatsby during its build. Keep in mind that the increased plan size applies only to your production environment, and not to preview environments (which default to Standard ). As you continue to work with Gatsby and a backend headless CMS, you may want to [upsize your preview environments](https://docs.platform.sh/administration/pricing.md#preview-environments). #### How to deploy Gatsby with WordPress on Platform.sh Platform.sh maintains a [template](https://github.com/platformsh-templates/gatsby-wordpress) that you can quickly deploy, and then use this guide as a reference for the Platform.sh specific changes that have been made to Gatsby and WordPress to make it work. Click the button below to sign up for a free trial account and deploy the project. ![Deploy on Platform.sh](https://platform.sh/images/deploy/lg-blue.svg) ###### Shared configuration Your local clone of the template has the following project structure: ```bash ├── .platform │ ├── routes.yaml │ └── services.yaml ├── wordpress │ ├── # App code │ └── .platform.app.yaml ├── gatsby │ ├── # App code │ └── .platform.app.yaml └── README.md ``` From this repository, you deploy a Gatsby app and a WordPress app. The code for each of them resides in their own directories. When deploying a single app project [such as Gatsby](https://docs.platform.sh/guides/gatsby/deploy.md), the repository needs three configuration files that describe its infrastructure, described below in detail. For [multi-app projects](https://docs.platform.sh/create-apps/multi-app.md), two of those files remain in the project root and are shared between Gatsby and WordPress. Each app keeps its own app configuration file (`.platform.app.yaml`) in its subdirectory. ####### Service configuration This file describes which [service containers](https://docs.platform.sh/add-services.md) (such as a database) your project should include. Gatsby does not require services to deploy, but WordPress does. So the following examples shows these service configurations: ```yaml {} db: type: mariadb:10.4 disk: 512 ``` ####### Routes configuration This [`.platform/routes.yaml`](https://docs.platform.sh/define-routes.md) file defines how requests are handled by Platform.sh. The following example shows Gatsby being served from the primary domain and WordPress being accessible from the `backend` subdomain. ```yaml {} "https://www.{default}/": type: upstream upstream: "gatsby:http" "https://{default}/": type: redirect to: "https://www.{default}/" "https://backend.{default}/": type: upstream upstream: "wordpress:http" cache: enabled: true # Base the cache on the session cookies. Ignore all other cookies. cookies: - '/^wordpress_logged_in_/' - '/^wordpress_sec_/' - 'wordpress_test_cookie' - '/^wp-settings-/' - '/^wp-postpass/' - '/^wp-resetpass-/' ``` ###### WordPress The multi-app template has a single modification to Platform.sh's [standard WordPress template](https://github.com/platformsh-templates/wordpress): the `name` attribute in WordPress's `.platform/services.yaml` has been updated to `wordpress`. This value is used to define the [relationship between Gatsby and WordPress](#gatsby) and in the [routes configuration](#routes-configuration). ###### Gatsby The frontend Gatsby app has a slightly different configuration from the basic [Gatsby deployment](https://docs.platform.sh/guides/gatsby/deploy.md). Below is the `gatsby/.platform.app.yaml` file that configures the app. ```yaml {} # .platform.app.yaml # The name of this application, which must be unique within a project. name: 'gatsby' # The type key specifies the language and version for your application. type: 'nodejs:14' # Restrict Yarn memory use when running during post deploy hook. variables: env: NODE_OPTIONS: --max_old_space_size=1536 # The hooks that will be triggered when the package is deployed. hooks: # Post deploy hook builds Gatsby frontend now that backend content is available. post_deploy: | npm run build relationships: wordpress: "wordpress:http" # The size of the persistent disk of the application (in MB). disk: 1280 # The configuration of the application when it is exposed to the web. web: locations: '/': # The public directory of the application relative to its root. root: 'public' index: ['index.html'] scripts: false allow: true mounts: '/.cache': source: local source_path: cache '/.config': source: local source_path: config 'public': source: local source_path: public ``` In particular, notice: - `relationships` Access to another service or app container in the cluster is given through [`relationships`](https://docs.platform.sh/create-apps/app-reference/single-runtime-image#relationships). In this case, one has been defined to the backend WordPress container using it's `name`. - `post_deploy` Platform.sh containers reside in separate build containers at build time, before their images are moved to the final app container at deploy time. These build containers are isolated and so Gatsby can't access WordPress during the build hook, where you would normally run the [`gatsby build` command](https://github.com/platformsh-templates/gatsby/blob/master/.platform.app.yaml#L21). WordPress isn't available until after the deploy hook. So the Gatsby build is postponed until the [`post_deploy` hook](https://docs.platform.sh/create-apps/hooks/hooks-comparison.md#post-deploy-hook). To run `gatsby build` on-demand, or to trigger a rebuild from the backend when content is updated, define a [runtime operation](https://docs.platform.sh/create-apps/runtime-operations.md#build-your-app-when-using-a-static-site-generator). - `mounts` There are consequences to postponing the Gatsby build, as you don't generally have write access to the container this late in the pipeline. To allow Gatsby to write to `public`, that directory has been defined as a [mount](https://docs.platform.sh/create-apps/app-reference/single-runtime-image#mounts). You can then modify [gatsby-config.js](https://www.gatsbyjs.com/docs/reference/config-files/gatsby-config/) to read from the backend WordPress container through the ``wordpress`` relationship defined above to configure the ``baseUrl`` attribute for ``gatsby-source-wordpress``. The plugin requires you to define the ``protocol``, which in this case is ``http`` because WordPress content is retrieved through an internal request to the backend container. Also, you need to declare ``hostingWPCOM: false`` as you don’t pull data from a WordPress site hosted at wordpress.com. This is facilitated by Platform.sh's [Config Reader library](https://github.com/platformsh/config-reader-nodejs). So be sure to install this to the Gatsby dependencies first when replicating. When used, Gatsby pulls the information to communicate with the WordPress container *on the current branch*. Lastly, the Gatsby app itself needs to include [GraphQL queries](https://www.gatsbyjs.com/docs/reference/graphql-data-layer/) to handle the data coming from WordPress and create content pages. The most important files in the template you should consult are: - [`gatsby/gatsby-node.js`](https://github.com/platformsh-templates/gatsby-wordpress/blob/master/gatsby/gatsby-node.js) Dynamically creates individual pages from the data source using Gatsby's [Node API](https://www.gatsbyjs.com/docs/reference/config-files/gatsby-node/). It retrieves all of WordPress's posts using the GraphQL query `allWordpressPost`. A page is created (`createPage`) with an assigned `path` and formatting described by the `blog-post.js` template file below (`component`). - [`gatsby/src/templates/blog-post.js`](https://github.com/platformsh-templates/gatsby-wordpress/blob/master/gatsby/src/templates/blog-post.js) The template file that defines how a single WordPress post should be formatted on Gatsby, retrieving the data from that post using the `allWordpressPost` GraphQL query and filtering for its `slug`. - [`gatsby/src/pages/index.js`](https://github.com/platformsh-templates/gatsby-wordpress/blob/master/gatsby/src/pages/index.js) Retrieves all of WordPress's content to generate a list of posts on the homepage using the `allWordpressPost` GraphQL query. ###### Deploy and post-install When you first deploy the template, the frontend Gatsby site will fail with a 403 error. Visit the `backend` subdomain of your site and finish the installation of WordPress. You don't need to set database credentials as they're already provided. WordPress comes with an initial “Hello world” article, and it isn’t necessary to add any more content to the site. Once you've finished, redeploy the project with the CLI command `platform redeploy` to view your Gatsby site, It's now pulling its content from a backend WordPress container in the same project. ###### Next steps With Gatsby now deployed and pulling content from a backend WordPress application, there are a few things you may wish to change about your project going forward. ####### Shared application configuration You can optionally combine the application configuration (`.platform/services.yaml`) for Gatsby and WordPress into a [single configuration file](https://docs.platform.sh/create-apps/multi-app/project-structure.md#unified-app-configuration). Like `.platform/services.yaml` and `.platform/routes.yaml`, this file is shared across the project and resides in the `.platform` subdirectory. You need to explicitly define the source of each application. ####### Multiple content sources Gatsby supports pulling multiple sources into its build. This includes external services like Stripe and additional backend CMSs for different sets of content. As in this example with WordPress, you can branch off your repository and add an additional directory that contains the codebase for [another backend](https://docs.platform.sh/guides/gatsby/headless.md#headless-backends). Then add the source plugin for that backend to `gatsby-config.js`. ####### Plan size As mentioned previously, you should have at least a Medium plan for your multi-app projects. This size gives the project enough resources for all of your containers as well as the memory necessary to actually pull content from WordPress into Gatsby during its build. Keep in mind that the increased plan size applies only to your production environment, and not to preview environments (which default to Standard ). As you continue to work with Gatsby and a backend headless CMS, you may want to [upsize your preview environments](https://docs.platform.sh/administration/pricing.md#preview-environments). ### Deploy Next.js on Platform.sh [Next.js](https://nextjs.org/) is a React framework for building websites and web apps, with server-side rendering and static site generation. See an example Next.js project in the official [Platform.sh Next.js template](https://github.com/platformsh-templates/nextjs). You can use it as a starting point for your own project. If you already have a Next.js project ready to deploy, see the template's [example app configuration](https://github.com/platformsh-templates/nextjs/blob/master/.platform.app.yaml) and other [example Platform.sh files](https://github.com/platformsh-templates/nextjs/tree/master/.platform). These files let you [configure your app](https://docs.platform.sh/create-apps.md), [add services](https://docs.platform.sh/add-services.md), and [define routes](https://docs.platform.sh/define-routes.md). ### Deploy Strapi on Platform.sh [Strapi](https://strapi.io) is an open-source headless CMS for building fast and manageable APIs written in JavaScript. To get Strapi running on Platform.sh, you have two potential starting places: - You already have a Strapi site you are trying to deploy. Go through this guide to make the recommended changes to your repository to prepare it for Platform.sh. - You have no code at this point. If you have no code, you have two choices: - Generate a basic Strapi site. - Use a ready-made [Strapi template](https://github.com/platformsh-templates/strapi4). A template is a starting point for building your project. It should help you get a project ready for production. To use a template, click the button below to create a Strapi template project. ![Deploy on Platform.sh](https://platform.sh/images/deploy/lg-blue.svg) Once the template is deployed, you can follow the rest of this guide to better understand the extra files and changes to the repository. ##### Before you begin You need: - [Git](https://git-scm.com/downloads). Git is the primary tool to manage everything your app needs to run. Push commits to deploy changes and control configuration through YAML files. These files describe your infrastructure, making it transparent and version-controlled. - A Platform.sh account. If you don't already have one, [register for a trial account](https://auth.api.platform.sh/register). You can sign up with an email address or an existing GitHub, Bitbucket, or Google account. If you choose one of these accounts, you can set a password for your Platform.sh account later. - The [Platform.sh CLI](https://docs.platform.sh/administration/cli.md). This lets you interact with your project from the command line. You can also do most things through the [Web Console](https://docs.platform.sh/administration/web.md). ##### Initialize a project You can start with a basic code base or push a pre-existing project to Platform.sh. - Create your first project by running the following command: ```bash {} platform create --title ``` Then choose the region you want to deploy to, such as the one closest to your site visitors. You can also select more resources for your project through additional flags, but a Development plan should be enough for you to get started. Copy the ID of the project you've created. - Get your code ready locally. If your code lives in a remote repository, clone it to your computer. If your code isn't in a Git repository, initialize it by running ``git init``. - Connect your Platform.sh project with Git. You can use Platform.sh as your Git repository or connect to a third-party provider: GitHub, GitLab, or BitBucket. That creates an upstream called ``platform`` for your Git repository. When you choose to use a third-party Git hosting service the Platform.sh Git repository becomes a read-only mirror of the third-party repository. All your changes take place in the third-party repository. Add an integration to your existing third party repository. The process varies a bit for each supported service, so check the specific pages for each one. - [BitBucket](https://docs.platform.sh/integrations/source/bitbucket.md) - [GitHub](https://docs.platform.sh/integrations/source/github.md) - [GitLab](https://docs.platform.sh/integrations/source/gitlab.md) Accept the default options or modify to fit your needs. All of your existing branches are automatically synchronized to Platform.sh. You get a deploy failure message because you haven’t provided configuration files yet. You add them in the next step. If you’re integrating a repository to Platform.sh that contains a number of open pull requests, don’t use the default integration options. Projects are limited to three* preview environments (active and deployed branches or pull requests) and you would need to deactivate them individually to test this guide’s migration changes. Instead, each service integration should be made with the following flag: ```bash {} platform integration:add --type= ... --build-pull-requests=false ``` You can then go through this guide and activate the environment when you’re ready to deploy * You can purchase additional preview environments at any time in the Console. Open your project and select **Edit plan**. Add additional **Environments**, view a cost estimate, and confirm your changes. Now you have a local Git repository, a Platform.sh project, and a way to push code to that project. Next you can configure your project to work with Platform.sh. [Configure Strapi](https://docs.platform.sh/guides/strapi/deploy/configure.md) #### Configure Strapi for Platform.sh You now have a *project* running on Platform.sh. In many ways, a project is just a collection of tools around a Git repository. Just like a Git repository, a project has branches, called *environments*. Each environment can then be activated. *Active* environments are built and deployed, giving you a fully isolated running site for each active environment. Once an environment is activated, your app is deployed through a cluster of containers. You can configure these containers in three ways, each corresponding to a [YAML file](https://docs.platform.sh/learn/overview/yaml): - **Configure apps** in a `.platform.app.yaml` file. This controls the configuration of the container where your app lives. - **Add services** in a `.platform/services.yaml` file. This controls what additional services are created to support your app, such as databases or search servers. Each environment has its own independent copy of each service. If you're not using any services, you don't need this file. - **Define routes** in a `.platform/routes.yaml` file. This controls how incoming requests are routed to your app or apps. It also controls the built-in HTTP cache. If you're only using the single default route, you don't need this file. Start by creating empty versions of each of these files in your repository: ```bash # Create empty Platform.sh configuration files mkdir -p .platform && touch .platform/services.yaml && touch .platform/routes.yaml && touch .platform.app.yaml ``` Now that you've added these files to your project, configure each one for Strapi in the following sections. Each section covers basic configuration options and presents a complete example with comments on why Strapi requires those values. ###### Configure apps in `.platform.app.yaml` Your app configuration in a `.platform.app.yaml` file is allows you to configure nearly any aspect of your app. For all of the options, see a [complete reference](https://docs.platform.sh/create-apps/app-reference/single-runtime-image.md). The following example shows a complete configuration with comments to explain the various settings. In the Strapi template, ``yarn`` is run during the build hook to install all of Strapi’s dependencies, and then ``yarn build`` is run to build the site. If you would rather use npm to manage your dependencies, you can: - Delete ``yarn`` from the build hook. - Replace ``yarn build`` in the build hook with ``npm run build``. - Delete the ``build.flavor`` block. When this is set to ``none``, Platform.sh to rely solely on the build hook to define the build process. By default, Node.js containers run ``npm install`` prior to the build hook, so this block can be removed entirely from the configuration. - Delete the ``dependencies`` block, which includes yarn. The relationships block is responsible for providing access to the data sources (services) that the Strapi application needs. Since Platform.sh is read-only during build, mainly for security purposes, certain folders need to be mounted. Platform.sh allows you to mount directories that need write access during the deploy phase with the ``mounts`` key. In this case, the following folders are mounted for Strapi. - ``.cache`` file - ``.tmp`` file - ``database`` folder - ``extensions`` folder - ``uploads`` folder in the ``public`` directory ```yaml {location=".platform.app.yaml"} # Complete list of all available properties: https://docs.platform.sh/create-apps/app-reference.html # A unique name for the app. Must be lowercase alphanumeric characters. Changing the name destroys data associated # with the app. name: app # The runtime the application uses. # Complete list of available runtimes: https://docs.platform.sh/create-apps/app-reference.html#types type: nodejs:18 # The relationships of the application with services or other applications. # The left-hand side is the name of the relationship as it will be exposed # to the application in the PLATFORM_RELATIONSHIPS variable. The right-hand # side is in the form `:`. # More information: https://docs.platform.sh/create-apps/app-reference.html#relationships relationships: postgresdatabase: "dbpostgres:postgresql" # The size of the persistent disk of the application (in MB). Minimum value is 128. disk: 1024 # Mounts define directories that are writable after the build is complete. If set as a local source, disk property is required. # More information: https://docs.platform.sh/create-apps/app-reference.html#mounts mounts: # Strapi's cache directory. "/.cache": source: local source_path: cache # Mount .tmp file in the app folder for strapi ".tmp": source: local source_path: app # Mount database folder for strapi "database": source: local source_path: database # Give write access for extension configuration JSONs. "extensions": source: local source_path: extensions # Allow for media uploads at runtime. "public/uploads": source: local source_path: uploads # The web key configures the web server running in front of your app. # More information: https://docs.platform.sh/create-apps/app-reference.html#web web: # Commands are run once after deployment to start the application process. # More information: https://docs.platform.sh/create-apps/app-reference.html#web-commands commands: # The command to launch your app. If it terminates, it’s restarted immediately. start: | yarn start # Variables to control the environment. More information: https://docs.platform.sh/create-apps/app-reference.html#variables variables: env: NODE_ENV: 'production' # Specifies a default set of build tasks to run. Flavors are language-specific. # More information: https://docs.platform.sh/create-apps/app-reference.html#build build: # Use Yarn instead of npm. flavor: none # Installs global dependencies as part of the build process. They’re independent of your app’s dependencies and # are available in the PATH during the build process and in the runtime environment. They’re installed before # the build hook runs using a package manager for the language. # More information: https://docs.platform.sh/create-apps/app-reference.html#dependencies dependencies: nodejs: yarn: "1.22.5" # Hooks allow you to customize your code/environment as the project moves through the build and deploy stages # More information: https://docs.platform.sh/create-apps/app-reference.html#hooks hooks: # The build hook is run after any build flavor. # More information: https://docs.platform.sh/create-apps/hooks/hooks-comparison.html#build-hook build: | # Download dependencies and build Strapi. yarn --frozen-lockfile yarn build # Information on the app's source code and operations that can be run on it. # More information: https://docs.platform.sh/create-apps/app-reference.html#source source: ###################################################################################################################### ## ## ## This source operation is part of the Platform.sh process of updating and maintaining our collection of ## ## templates. For more information see https://docs.platform.sh/create-apps/source-operations.html and ## ## https://github.com/platformsh/source-operations ## ## ## ## YOU CAN SAFELY DELETE THIS COMMENT AND THE LINES BENEATH IT ## ## ## ###################################################################################################################### operations: auto-update: command: | curl -fsS https://raw.githubusercontent.com/platformsh/source-operations/main/setup.sh | { bash /dev/fd/3 sop-autoupdate; } 3 ###### Add services in `.platform/services.yaml` You can add the managed services you need for you app to run in the `.platform/services.yaml` file. You pick the major version of the service and security and minor updates are applied automatically, so you always get the newest version when you deploy. You should always try any upgrades on a development branch before pushing to production. Strapi requires a database to deploy. By default, it uses a SQLite database but other database types are also supported. These other database types are Oracle MySQL, PostgreSQL, or MongoDB (available only in Strapi v3 and below). The Strapi template defines a PostgreSQL database service. To use another service, replace ``postgresql:12`` in the example below with the name and version of the database you want. You can [add other services](https://docs.platform.sh/add-services.md) if desired, such as [Solr](https://docs.platform.sh/add-services/solr.md) or [Elasticsearch](https://docs.platform.sh/add-services/elasticsearch.md). You need to configure to use those services once they're enabled. Each service entry has a name (`db` in the example) and a `type` that specifies the service and version to use. Services that store persistent data have a `disk` key, to specify the amount of storage. ```yaml {location=".platform/services.yaml"} # The services of the project. # Each service listed is deployed # to power your Platform.sh project. db: type: postgresql:12 disk: 256 # Uncomment the line below to use a MySQL database # dbmysql: # type: oracle-mysql:8.0 # disk: 256 ``` ###### Define routes All HTTP requests sent to your app are controlled through the routing and caching you define in a `.platform/routes.yaml` file. The two most important options are the main route and its caching rules. A route can have a placeholder of `{default}`, which is replaced by your domain name in production and environment-specific names for your preview environments. The main route has an `upstream`, which is the name of the app container to forward requests to. You can enable [HTTP cache](https://docs.platform.sh/define-routes/cache.md). The router includes a basic HTTP cache. By default, HTTP caches includes all cookies in the cache key. So any cookies that you have bust the cache. The `cookies` key allows you to select which cookies should matter for the cache. You can also set up routes as [HTTP redirects](https://docs.platform.sh/define-routes/redirects.md). In the following example, all requests to `www.{default}` are redirected to the equivalent URL without `www`. HTTP requests are automatically redirected to HTTPS. If you don't include a `.platform/routes.yaml` file, a single default route is used. This is equivalent to the following: ```yaml {location=".platform/routes.yaml"} https://{default}/: type: upstream upstream: :http ``` Where `` is the `name` you've defined in your [app configuration](#configure-apps-in-platformappyaml). The following example presents a complete definition of a main route for a Strapi app: ```bash {location=".platform/routes.yaml"} # The routes of the project. # # Each route describes how an incoming URL is going # to be processed by Platform.sh. # More information: https://docs.platform.sh/define-routes.html "https://www.{default}/": type: upstream upstream: "app:http" # A basic redirect definition # More information: https://docs.platform.sh/define-routes.html#basic-redirect-definition "https://{default}/": type: redirect to: "https://www.{default}/" ``` #### Deploy Strapi Now you have your configuration for deployment and your app set up to run on Platform.sh. Make sure all your code is committed to Git and run `git push` to your Platform.sh environment. Your code is built, producing a read-only image that's deployed to a running cluster of containers. If you aren't using a source integration, the log of the process is returned in your terminal. If you're using a source integration, you can get the log by running `platform activity:log --type environment.push`. When the build finished, you're given the URL of your deployed environment. Click the URL to see your site. If your environment wasn't active and so wasn't deployed, activate it by running the following command: ```bash platform environment:activate ``` ###### Additional changes A standard Strapi site (one created either interactively through `npx create-strapi-app@latest my-project` or through a template) generates a basic Strapi instance with access to the admin panel without any external services. If this is your starting point, you have all of the configuration necessary to deploy your project. Below are a few modifications that may help you develop your site more efficiently going forward. ####### Install the Config Reader You can get all information about a deployed environment, including how to connect to services, through [environment variables](https://docs.platform.sh/development/variables.md). Your app can [access these variables](https://docs.platform.sh/development/variables/use-variables.md#access-variables-in-your-app). Install the package with your preferred package manager: ```bash npm install platformsh-config # Or for Yarn yarn add platformsh-config ``` Go forth and deploy (even on Friday)! [Back](https://docs.platform.sh/guides/strapi/deploy/configure.md) ### Configuring Database Services for Strapi on Platform.sh Strapi requires a database in order for it to run successfully. It currently has support for the following database types: - SQLite - PostgreSQL - Oracle MySQL/MariaDB - MongoDB (only Strapi v3) #### Configure SQLite for Strapi on Platform.sh Strapi uses SQLite database by default when it's run on a local machine. When you create a new Strapi project, you can use SQLite or a custom database installation (PostgreSQL, MongoDB, or MySQL). Since Strapi uses SQLite by default, you don't need much configuration, just follow these steps: 1. In your Strapi project, install the [config reader](https://docs.platform.sh/development/variables/use-variables.md#access-variables-in-your-app). ```bash npm install platformsh-config # or for Yarn yarn add platformsh-config ``` 1. Create a new Strapi project and select Quickstart as the installation type. This automatically configures Strapi for SQLite ```bash npx create-strapi-app ``` 1. In the `config` folder, locate the `database.js` file, and replace its content with the following: ```js const config = require("platformsh-config").config(); const path = require("path"); let dbRelationship = "pg"; // Strapi default sqlite settings. let pool = {}; let connection = { connection: { client: 'sqlite', connection: { filename: path.join(\_\_dirname, '..', process.env.DATABASE_FILENAME || '.tmp/data.db'), }, useNullAsDefault: true, }, }; if (config.isValidPlatform() && !config.inBuild()) { // Platform.sh database configuration. try { const credentials = config.credentials(dbRelationship); console.log(`Using Platform.sh configuration with relationship ${dbRelationship}.`); pool = { min: 0, max: 10, acquireTimeoutMillis: 600000, createTimeoutMillis: 30000, idleTimeoutMillis: 20000, reapIntervalMillis: 20000, createRetryIntervalMillis: 200, }; connection = { connection: { client: "postgres", connection: { host: credentials.ip, port: credentials.port, database: credentials.path, user: credentials.username, password: credentials.password, ssl: false }, debug: false, pool }, }; } catch (e) { // Do nothing if 'pg' relationship isn't found. // Database configuration falls back on the SQLite defaults. } } else { if (config.isValidPlatform()) { // Build hook configuration message. console.log('Using default configuration during Platform.sh build hook until relationships are available.'); } else { // Strapi default local configuration. console.log('Not in a Platform.sh Environment. Using default local sqlite configuration.'); } } // strapi-api/config/database.js module.exports = ({ env }) => ( connection ); ``` This setting deploys your Strapi application with an SQLite database. #### Configure PostgreSQL for Strapi on Platform.sh Strapi can be configured to use PostgreSQL as its default database. You can choose PostgreSQL when installing your app by selecting custom and PostgreSQL when asked for the installation type or you can just configure your existing Strapi application to use PostgreSQL. To configure a PostgreSQL database for Strapi on Platform.sh, follow these steps. 1. Install [PostgreSQL](https://www.postgresql.org/download/) on your machine and [pg](https://www.npmjs.com/package/pg) in your Strapi project. Pg comes installed with a fresh Strapi installation. 1. In your `.platform/services.yaml` file, add the following: ```yaml {location=".platform/services.yaml"} postgres: type: postgresql:13 disk: 512 ``` 1. In your `.platform.app.yaml` file, replace the relationship name to match the PostgreSQL database you added: ```yaml {location=".platform.app.yaml"} relationships: postgresdatabase: "postgres:postgresql" ``` 1. In the `config` folder, locate the `database.js` file, and replace its content with the following: ```js const path = require("path"); const config = require("platformsh-config").config(); let dbRelationship = "postgresdatabase"; // Strapi default sqlite settings. let connection = { connection: { client: "sqlite", connection: { filename: path.join( __dirname, "..", process.env.DATABASE_FILENAME || ".tmp/data.db" ), }, useNullAsDefault: true, }, }; if (config.isValidPlatform() && !config.inBuild()) { // Platform.sh database configuration. const credentials = config.credentials(dbRelationship); console.log( `Using Platform.sh configuration with relationship ${dbRelationship}.` ); let pool = { min: 0, max: 10, acquireTimeoutMillis: 600000, createTimeoutMillis: 30000, idleTimeoutMillis: 20000, reapIntervalMillis: 20000, createRetryIntervalMillis: 200, }; connection = { connection: { client: "postgres", connection: { host: credentials.ip, port: credentials.port, database: credentials.path, user: credentials.username, password: credentials.password, ssl: false, }, debug: false, pool, }, }; } else { if (config.isValidPlatform()) { // Build hook configuration message. console.log( "Using default configuration during Platform.sh build hook until relationships are available." ); } else { // Strapi default local configuration. console.log( "Not in a Platform.sh Environment. Using default local sqlite configuration." ); } } console.log(connection); // export strapi database connection module.exports = ({ env }) => connection; ``` This setting deploys your Strapi application with a PostgreSQL database. If you don't specify a PostgreSQL service in your `.platform/services.yaml` file or the Strapi application is run on a local machine the default SQLite database is used. #### Configure MySQL for Strapi on Platform.sh Strapi can be configured to use MySQL as its default database. You can choose MySQL when installing your app by selecting custom and MySQL when asked for the installation type. Or you can just configure your existing Strapi application to use MySQL. To configure a MySQL database for Strapi on Platform.sh, follow these steps. 1. Install the Node.js [MySQL driver](https://yarnpkg.com/package/mysql) ```bash yarn add mysql ``` 2. Replace the PostgreSQL configuration in your `.platform/services.yaml` file with the following: ```yaml {location=".platform/services.yaml"} mysql: type: oracle-mysql:8.0 disk: 256 ``` **_Note that the minimum disk size for MySQL/Oracle MySQL is 256MB._** 3. In your `.platform.app.yaml` file, replace the relationship name to match the MySQL database you added: ```yaml {location=".platform.app.yaml"} relationships: mysqldatabase: service: "mysql" endpoint: "mysql" ``` 4. In the `config` folder, locate the `database.js` file, and replace its content with the following: ```js const config = require("platformsh-config").config(); const path = require("path"); let dbRelationship = "mysqldatabase"; // Strapi default sqlite settings. let pool = {}; let connection = { connection: { client: "sqlite", connection: { filename: path.join( __dirname, "..", process.env.DATABASE_FILENAME || ".tmp/data.db" ), }, useNullAsDefault: true, }, }; if (config.isValidPlatform() && !config.inBuild()) { // Platform.sh database configuration. try { const credentials = config.credentials(dbRelationship); console.log( `Using Platform.sh configuration with relationship ${dbRelationship}.` ); pool = { min: 0, max: 10, acquireTimeoutMillis: 600000, createTimeoutMillis: 30000, idleTimeoutMillis: 20000, reapIntervalMillis: 20000, createRetryIntervalMillis: 200, }; connection = { connection: { client: "mysql", connection: { host: credentials.ip, port: credentials.port, database: credentials.path, user: credentials.username, password: credentials.password, ssl: false, }, debug: false, pool, }, }; } catch (e) { // Do nothing if 'pg' relationship isn't found. // Database configuration will fall back on the SQLite defaults. } } else { if (config.isValidPlatform()) { // Build hook configuration message. console.log( "Using default configuration during Platform.sh build hook until relationships are available." ); } else { // Strapi default local configuration. console.log( "Not in a Platform.sh Environment. Using default local sqlite configuration." ); } } // strapi-api/config/database.js module.exports = ({ env }) => connection; ``` This setting deploys your Strapi application with a MySQL database. If you don't specify a MySQL service in your `.platform/services.yaml` file or the Strapi application is run on a local machine the default SQLite database is used. #### Configure MongoDB for Strapi on Platform.sh Strapi can also be configured to use MongoDB as its default database, although due to compatibility issues this database type is only available in Strapi v3 and [not supported in Strapi v4](https://forum.strapi.io/t/mongodb-compatibility-delayed-on-v4/4549). To use MongoDB with a Strapi v3 application on Platform.sh, follow these steps. 1. Install the [Strapi mongoose connector](https://yarnpkg.com/package/strapi-connector-mongoose) ```bash yarn add strapi-connector-mongoose ``` 1. Replace the PostgreSQL configuration in your `.platform/services.yaml` file with the following: ```yaml {location=".platform/services.yaml"} mongodb: type: mongodb:3.6 disk: 512 ``` **_Note that the minimum disk size for MongoDB is 512MB._** 1. In your `.platform.app.yaml` file, replace the relationship name to match the MongoDB database you added: ```yaml {location=".platform.app.yaml"} relationships: mongodatabase: service: "mongodb" endpoint: "mongodb" ``` 1. In the `config` folder, locate the `database.js` file, and replace its content with the following: ```js const config = require("platformsh-config").config(); let dbRelationshipMongo = "mongodatabase"; // Strapi default sqlite settings. let settings = { client: "sqlite", filename: process.env.DATABASE_FILENAME || ".tmp/data.db", }; let options = { useNullAsDefault: true, }; if (config.isValidPlatform() && !config.inBuild()) { // Platform.sh database configuration. const credentials = config.credentials(dbRelationshipMongo); console.log( `Using Platform.sh configuration with relationship ${dbRelationshipMongo}.` ); settings = { client: "mongo", host: credentials.host, port: credentials.port, database: credentials.path, username: credentials.username, password: credentials.password, }; options = { ssl: false, authenticationDatabase: "main", }; } else { if (config.isValidPlatform()) { // Build hook configuration message. console.log( "Using default configuration during Platform.sh build hook until relationships are available." ); } else { // Strapi default local configuration. console.log( "Not in a Platform.sh Environment. Using default local sqlite configuration." ); } } module.exports = { defaultConnection: "default", connections: { default: { connector: "mongoose", settings: settings, options: options, }, }, }; ``` This configuration instructs Platform.sh to deploy your Strapi v3 app with a MongoDB database. ### Local development: Running Strapi on your local machine with Platform.sh Platform.sh provides support for locally running a Strapi application that has been deployed on Platform.sh including its services. This means that once you download the code of the Strapi project you deployed on Platform.sh, you can make changes to the project without pushing to Platform.sh each time to test them. You can build your app locally using the Platform.sh CLI, even when its functionality depends on a number of services. You can run your Strapi application locally with all of it’s services by following the steps for your Strapi version: #### Develop locally with Strapi v3 You can run your Strapi v3 app locally with all of its services. First install the [config reader](https://docs.platform.sh/development/variables/use-variables.md#access-variables-in-your-app) by running the following command: ```bash npm install platformsh-config OR yarn add platformsh-config ``` It's also assumed that your `database.js` file in your `config` folder looks like this: ```js const config = require("platformsh-config").config(); let dbRelationship = "postgresdatabase"; // Strapi default sqlite settings. let settings = { client: "sqlite", filename: process.env.DATABASE_FILENAME || ".tmp/data.db", }; let options = { useNullAsDefault: true, }; if (config.isValidPlatform() && !config.inBuild()) { // Platform.sh database configuration. const credentials = config.credentials(dbRelationship); console.log( `Using Platform.sh configuration with relationship ${dbRelationship}.` ); settings = { client: "postgres", host: credentials.ip, port: credentials.port, database: credentials.path, username: credentials.username, password: credentials.password, }; options = { ssl: false, debug: false, acquireConnectionTimeout: 100000, pool: { min: 0, max: 10, createTimeoutMillis: 30000, acquireTimeoutMillis: 600000, idleTimeoutMillis: 20000, reapIntervalMillis: 20000, createRetryIntervalMillis: 200, }, }; } else { if (config.isValidPlatform()) { // Build hook configuration message. console.log( "Using default configuration during Platform.sh build hook until relationships are available." ); } else { // Strapi default local configuration. console.log( "Not in a Platform.sh Environment. Using default local sqlite configuration." ); } } module.exports = { defaultConnection: "default", connections: { default: { connector: "bookshelf", settings: settings, options: options, }, }, }; ``` If it's similar to the above and you’re running a Strapi v3 application, follow the [instructions for general local development](https://docs.platform.sh/development/local.md). #### Develop locally with Strapi v4 To run your Strapi v4 app locally with all of its services, follow these steps: 1. Download your deployed code by running the following command using the Platform.sh CLI: ```bash platform get ``` 2. Create a new branch. Whenever you develop Platform.sh, you should develop in an isolated environment. This way you aren't opening SSH tunnels to your production environment. By creating a branch from your default environment, you create a new environment with copies of all production code and data. Create an isolated environment named `updates` by running the following command: ```bash platform environment:branch updates ``` You can name the environment anything you want, just use the name you choose in later steps. 3. Assuming you're using a PostgreSQL or MySQL database, modify your database connection to look like the following: ```js {location="config/database.js"} const path = require("path"); let connection; let db_relationship = "postgresdatabase"; // Helper function for decoding Platform.sh base64-encoded JSON variables. function decode(value) { return JSON.parse(Buffer.from(value, "base64")); } if (!process.env.PLATFORM_RELATIONSHIPS) { if (process.env.PLATFORM_PROJECT) { console.log( "In Platform.sh build hook. Using default SQLite configuration until services are available." ); } else { console.log( 'Configuring local SQLite connection. \n\nIf you meant to use a tunnel, be sure to run \n\n$ export PLATFORM_RELATIONSHIPS="$(platform tunnel:info --encode)"\n\nto connect to that service.\n' ); } // Define the default SQLite connection. connection = { connection: { client: "sqlite", connection: { filename: path.join( __dirname, "..", process.env.DATABASE_FILENAME || ".tmp/data.db" ), }, useNullAsDefault: true, }, }; } else { if (process.env.PLATFORM_PROJECT) { console.log( "In Platform.sh deploy hook. Using defined service configuration." ); } else { console.log("Using tunnel for local development."); } // Define the managed service connection. let credentials = decode(process.env.PLATFORM_RELATIONSHIPS)[ db_relationship ][0]; // Option 1. PostgreSQL. // The PostgreSQL configuration assumes the following in your .platform/services.yaml file: // // dbpostgres: // type: postgresql:12 // disk: 256 // // And a relationship defined in your .platform.app.yaml file as follows: // // relationships: // postgresdatabase: "dbpostgres:postgresql" if (credentials.scheme == "pgsql") { console.log("PostgreSQL detected."); let postgres_pool = { min: 0, max: 10, acquireTimeoutMillis: 600000, createTimeoutMillis: 30000, idleTimeoutMillis: 20000, reapIntervalMillis: 20000, createRetryIntervalMillis: 200, }; connection = { connection: { client: "postgres", connection: { host: credentials.ip, port: credentials.port, database: credentials.path, user: credentials.username, password: credentials.password, ssl: false, }, debug: false, postgres_pool, }, }; // Option 2. Oracle MySQL. // The Oracle MySQL configuration assumes the following in your .platform/services.yaml file: // // dbmysql: // type: oracle-mysql:8.0 // disk: 256 // // And a relationship defined in your .platform.app.yamlfile as follows: // // relationships: // database: "dbmysql:mysql" } else if (credentials.scheme == "mysql") { console.log("MySQL detected."); connection = { connection: { client: "mysql", connection: { host: credentials.ip, port: credentials.port, database: credentials.path, user: credentials.username, password: credentials.password, ssl: false, }, debug: false, }, }; } } // Export the connection to Strapi. module.exports = ({ env }) => connection; ``` See the comments for explanations of individual sections. If you have defined the relationship to your service differently (in `.platform.app.yaml`) or are using a different service, use that name in place of `postgresdatabase`. 4. Open a SSH tunnel to the environment's database: ```bash platform tunnel:open -A -e updates ``` Replace `` with your app's `name` in your `.platform.app.yaml` file. If you get the error `The pcntl PHP extension is required` error, use this command instead: ```bash platform tunnel:single -A -e updates ``` 5. Add an environment variable that contains the service credentials: ```bash export PLATFORM_RELATIONSHIPS="$(platform tunnel:info -A -e updates --encode)" ``` 6. Download all media uploads from the environment: ```bash platform mount:download -A -e updates -m public/uploads --target public/uploads -y ``` 7. Build and start the Strapi server: ```bash yarn --frozen-lockfile yarn develop ``` Now your Strapi app should be running locally with a connection to a remote database that's separate from your production database. ### Strapi multi-app projects ##### Background A common pattern for Strapi applications is to serve as a backend or headless CMS for a frontend application. This helps with serving external data to a frontend at build time. Supported by Strapi's plugin ecosystem, data from Strapi (or headless) CMS can be served into a frontend application, with that frontend typically located on a server elsewhere. Platform.sh provides a platform for this architectural pattern through a [multi-app configuration](https://docs.platform.sh/create-apps/multi-app.md). Consider the following project structure: ```bash ├── .platform │   ├── routes.yaml │   └── services.yaml ├── strapi │   ├── │   └── .platform.app.yaml ├── gatsby │   ├── │   └── .platform.app.yaml └── README.md ``` Above is the repository structure for a decoupled Strapi project (Gatsby sourcing content from Strapi). Strapi and Gatsby reside in their own subdirectories within the same repository. They're deployed to the same project from separate application containers, and from this cluster Gatsby can read data from Strapi internally. Their commit histories are tied together, so each new pull request environment can test changes to either the frontend or backend from the same place. Gatsby is just one example of a frontend that can be used with this pattern. ##### Before you begin You need: - [Git](https://git-scm.com/downloads). Git is the primary tool to manage everything your app needs to run. Push commits to deploy changes and control configuration through YAML files. These files describe your infrastructure, making it transparent and version-controlled. - A Platform.sh account. If you don't already have one, [register for a trial account](https://auth.api.platform.sh/register). You can sign up with an email address or an existing GitHub, Bitbucket, or Google account. If you choose one of these accounts, you can set a password for your Platform.sh account later. - The [Platform.sh CLI](https://docs.platform.sh/administration/cli.md). This lets you interact with your project from the command line. You can also do most things through the [Web Console](https://docs.platform.sh/administration/web.md). ##### Signing up Each of the frontend guides below has a **Deploy on Platform.sh** button that deploys the guide's project for you and also signs you up for a trial account. If you're planning on deploying a template and following along with these guides for greater context, feel free to move onto the next section. If you're planning on using the templates and guides to deploy your existing codebase to Platform.sh, you first need to [register for a trial Platform.sh account](https://auth.api.platform.sh/register). If you don't want to sign up initially with your e-mail address, you can sign up using an existing GitHub, Bitbucket, or Google account. If you choose one of these options, you can set a password for your Platform.sh account later. After creating an account, you're prompted to create your first project. Since you are providing your own code, use the **Blank project** option. Give the project a title and choose a region closest to your site visitors. You can also select more resources for your project. This is especially important with multi-application projects, so for more details see [plan size](#plan-size). ##### Plan size There are a few important points to keep in mind when deploying this pattern if you've already [deployed Gatsby by itself](https://docs.platform.sh/guides/gatsby/deploy.md) on Platform.sh, which are relevant to each backend example. After following the steps below, you may find that Gatsby fails to bundle assets during its build if your plan size is Development. This is a factor of both the size and number of Gatsby's dependencies on the frontend, as well as the amount of data being pulled from the backend. Multi-application projects generally require more resources to run on Platform.sh, and so the trial's default Development plan may not be enough to run your existing site. You are free to either proceed with a smaller plan to test or increase the resources at this point for the project. Otherwise, it may be best to initially deploy the templates listed in each backend guide to start out and later modify that project to include your own code with more resources as you get used to developing on Platform.sh. ##### Frontends for Strapi Platform.sh maintains a number of [multi-application templates](https://github.com/platformsh-templates/?q=strapi&type=&language=) for Strapi that generally have very similar configuration changes on the Strapi side. Below are a few of those written as short guides for different frontends. #### How to deploy Strapi with a Gatsby frontend on Platform.sh Platform.sh maintains a [template](https://github.com/platformsh-templates/gatsby-strapi) that you can quickly deploy, and then use this guide as a reference for the Platform.sh specific changes that have been made to Gatsby and Strapi to make it work. Click the button below to sign up for a free trial account and deploy the project. ![Deploy on Platform.sh](https://platform.sh/images/deploy/lg-blue.svg) ###### Shared configuration Your local clone of the template has the following project structure: ```bash ├── .platform │ ├── routes.yaml │ └── services.yaml ├── strapi │ ├── # App code │ └── .platform.app.yaml ├── gatsby │ ├── # App code │ └── .platform.app.yaml └── README.md ``` From this repository, you deploy a Gatsby app and a Strapi app. The code for each of them resides in their own directories. When deploying a single app project [such as Gatsby](https://docs.platform.sh/guides/gatsby/deploy.md), the repository needs three configuration files that describe its infrastructure, described below in detail. For [multi-app projects](https://docs.platform.sh/create-apps/multi-app.md), two of those files remain in the project root and are shared between Gatsby and Strapi. Each app keeps its own app configuration file (`.platform.app.yaml`) in its subdirectory. ####### Service configuration This file describes which [service containers](https://docs.platform.sh/add-services.md) (such as a database) your project should include. Gatsby does not require services to deploy, but Strapi does. So the following examples shows these service configurations: ```yaml {} # The services of the project. # # Each service listed will be deployed # to power your Platform.sh project. dbpostgres: type: postgresql:12 disk: 256 ``` ####### Routes configuration This [`.platform/routes.yaml`](https://docs.platform.sh/define-routes.md) file defines how requests are handled by Platform.sh. The following example shows Gatsby being served from the primary domain and Strapi being accessible from the `backend` subdomain. ```yaml {} # The routes of the project. # # Each route describes how an incoming URL is going # to be processed by Platform.sh. "https://www.{default}/": type: upstream upstream: "gatsby:http" "https://{default}/": type: redirect to: "https://www.{default}/" "https://www.backend.{default}/": type: upstream upstream: "strapi:http" "https://backend.{default}/": type: redirect id: 'strapi' to: "https://www.backend.{default}/" ``` ###### Strapi The multi-app template has a single modification to Platform.sh's [standard Strapi template](https://github.com/platformsh-templates/strapi): the `name` attribute in Strapi's `.platform/services.yaml` has been updated to `strapi`. This value is used to define the [relationship between Gatsby and Strapi](#gatsby) and in the [routes configuration](#routes-configuration). The only additional setup required to prepare the backend is to install a package that enables GraphQL on Strapi. In your Strapi directory, add the dependency: ```bash yarn add strapi-plugin-graphql ``` ###### Gatsby The frontend Gatsby app has a slightly different configuration from the basic [Gatsby deployment](https://docs.platform.sh/guides/gatsby/deploy.md). Below is the `gatsby/.platform.app.yaml` file that configures the app. ```yaml {} # .platform.app.yaml # The name of this application, which must be unique within a project. name: gatsby # The type key specifies the language and version for your application. type: 'nodejs:14' # The hooks that will be triggered when the package is deployed. hooks: # Build hooks can modify the application files on disk but not access any services like databases. post_deploy: | npm run build # The size of the persistent disk of the application (in MB). disk: 1024 relationships: strapi: "strapi:http" # The configuration of the application when it is exposed to the web. web: locations: '/': # The public directory of the application relative to its root. root: 'public' index: ['index.html'] scripts: false allow: true mounts: '/.cache': source: local source_path: cache '/.config': source: local source_path: config 'public': source: local source_path: public ``` In particular, notice: - `relationships` Access to another service or app container in the cluster is given through [`relationships`](https://docs.platform.sh/create-apps/app-reference/single-runtime-image#relationships). In this case, one has been defined to the backend Strapi container using it's `name`. - `post_deploy` Platform.sh containers reside in separate build containers at build time, before their images are moved to the final app container at deploy time. These build containers are isolated and so Gatsby can't access Strapi during the build hook, where you would normally run the [`gatsby build` command](https://github.com/platformsh-templates/gatsby/blob/master/.platform.app.yaml#L21). Strapi isn't available until after the deploy hook. So the Gatsby build is postponed until the [`post_deploy` hook](https://docs.platform.sh/create-apps/hooks/hooks-comparison.md#post-deploy-hook). To run `gatsby build` on-demand, or to trigger a rebuild from the backend when content is updated, define a [runtime operation](https://docs.platform.sh/create-apps/runtime-operations.md#build-your-app-when-using-a-static-site-generator). - `mounts` There are consequences to postponing the Gatsby build, as you don't generally have write access to the container this late in the pipeline. To allow Gatsby to write to `public`, that directory has been defined as a [mount](https://docs.platform.sh/create-apps/app-reference/single-runtime-image#mounts). You can then modify [gatsby-config.js](https://www.gatsbyjs.com/docs/reference/config-files/gatsby-config/) to read from the backend Strapi container through the ``strapi`` relationship defined above to configure the ``apiURL`` attribute for ``gatsby-source-strapi``. Notice that the source plugin requires that you explicitly define the ``contentTypes`` you would like to retrieve from Strapi. At this point you have not built out the API, and the Content Types ``article`` and ``category`` are included to support the [post-install instructions](https://github.com/platformsh-templates/gatsby-strapi#user-content-post-install) outlined in the template’s README. Adjust these values to fit your current API if your are planning on migrating an existing Strapi repository. This is facilitated by Platform.sh's [Config Reader library](https://github.com/platformsh/config-reader-nodejs). So be sure to install this to the Gatsby dependencies first when replicating. When used, Gatsby pulls the information to communicate with the Strapi container *on the current branch*. Lastly, the Gatsby app itself needs to include [GraphQL queries](https://www.gatsbyjs.com/docs/reference/graphql-data-layer/) to handle the data coming from Strapi and create content pages. The most important files in the template you should consult are: - [`gatsby/gatsby-node.js`](https://github.com/platformsh-templates/gatsby-strapi/blob/master/gatsby/gatsby-node.js) Dynamically creates individual pages from the data source using Gatsby's [Node API](https://www.gatsbyjs.com/docs/reference/config-files/gatsby-node/). It retrieves all of Strapi's articles and categories (see [post-install below](#deploy-and-post-install)) using the GraphQL queries `allStrapiArticle` and `allStrapiCategory` respectively. For each, a page is created (`createPage`) with an assigned `path` and formatting described by one of the template files below (`component`). - [`gatsby/src/templates/article.js`](https://github.com/platformsh-templates/gatsby-strapi/blob/master/gatsby/src/templates/article.js) The template file that defines how a single Strapi article should be formatted on Gatsby, retrieving the data from that article using the `strapiArticle` GraphQL query. - [`gatsby/src/templates/category.js`](https://github.com/platformsh-templates/gatsby-strapi/blob/master/gatsby/src/templates/category.js) The template file that defines how a list of articles that belong to a single Category are formatted by Gatsby. It uses the `Category` query, and then filters a specific category `id` on `allStrapiArticle`. - [`gatsby/src/pages/index.js`](https://github.com/platformsh-templates/gatsby-strapi/blob/master/gatsby/src/pages/index.js) Retrieves all of Strapi's content to generate a list of articles on the homepage using the `allStrapiArticle` GraphQL query. ###### Deploy and post-install When you first deploy the template, the frontend Gatsby site will fail with a 403 error. Visit the `backend` subdomain of your site and finish the installation of Strapi. You don't need to set database credentials as they're already provided. After you have deployed, you need to set up Strapi’s Admin Panel and some initial content endpoints for the Gatsby frontend to consume. Create your admin user at the ``backend`` subdomain for Strapi. You can then follow the [template’s post-install instructions](https://github.com/platformsh-templates/gatsby-strapi#user-content-post-install) to setup up some initial ``Article`` and ``Category`` content endpoints. The API you develop there is only accessible to admins by default, so be sure to adjust the permissions to public so Gatsby can access it. Once you've finished, redeploy the project with the CLI command `platform redeploy` to view your Gatsby site, It's now pulling its content from a backend Strapi container in the same project. ###### Next steps With Gatsby now deployed and pulling content from a backend Strapi application, there are a few things you may wish to change about your project going forward. ####### Shared application configuration You can optionally combine the application configuration (`.platform/services.yaml`) for Gatsby and Strapi into a [single configuration file](https://docs.platform.sh/create-apps/multi-app/project-structure.md#unified-app-configuration). Like `.platform/services.yaml` and `.platform/routes.yaml`, this file is shared across the project and resides in the `.platform` subdirectory. You need to explicitly define the source of each application. ####### Multiple content sources Gatsby supports pulling multiple sources into its build. This can include external services like Stripe, or additional backend CMSs for different sets of content. Like shown here with Strapi, you can branch off your repository and add an additional subdirectory that contains the codebase for another frontend. ####### Plan size As mentioned previously, you should have at least a Medium plan for your multi-app projects. This size gives the project enough resources for all of your containers as well as the memory necessary to actually pull content from Strapi into Gatsby during its build. Keep in mind that the increased plan size applies only to your production environment, and not to preview environments (which default to Standard ). As you continue to work with Gatsby and a backend headless CMS, you may want to [upsize your preview environments](https://docs.platform.sh/administration/pricing.md#preview-environments). ### Deploy Hibernate ORM on Platform.sh [Hibernate ORM](https://hibernate.org/) is an object-relational mapping tool for the Java programming language. It provides a framework for mapping an object-oriented domain model to a relational database. Hibernate handles object-relational impedance mismatch problems by replacing direct, persistent database accesses with high-level object handling functions. ##### Services ###### Configuration reader While you can read the environment directly from your app, you might want to use the[Java configuration reader library](https://github.com/platformsh/config-reader-java). It decodes service credentials, the correct port, and other information for you. Note that the Java configuration reader library is used in the following examples. ###### MySQL [MySQL](https://docs.platform.sh/add-services/mysql.md) is an open-source relational database technology. Define the driver for [MySQL](https://mvnrepository.com/artifact/mysql/mysql-connector-java), and the Java dependencies. Then determine the SessionFactory client programmatically: ```java import org.hibernate.Session; import org.hibernate.SessionFactory; import org.hibernate.Transaction; import org.hibernate.cfg.Configuration; import sh.platform.config.Config; import sh.platform.config.Hibernate; public class HibernateApp { public static void main(String[] args) { Config config = new Config(); Configuration configuration = new Configuration(); configuration.addAnnotatedClass(Address.class); final Hibernate credential = config.getCredential("database", Hibernate::new); final SessionFactory sessionFactory = credential.getMySQL(configuration); try (Session session = sessionFactory.openSession()) { Transaction transaction = session.beginTransaction(); //... transaction.commit(); } } } ``` **Note**: You can use the same MySQL driver for MariaDB as well if you wish to do so. ###### MariaDB [MariaDB](https://docs.platform.sh/add-services/mysql.md) is an open-source relational database technology. Define the driver for [MariaDB](https://mvnrepository.com/artifact/org.mariadb.jdbc/mariadb-java-client), and the Java dependencies. Then determine the SessionFactory client programmatically: ```java import org.hibernate.Session; import org.hibernate.SessionFactory; import org.hibernate.Transaction; import org.hibernate.cfg.Configuration; import sh.platform.config.Config; import sh.platform.config.Hibernate; public class HibernateApp { public static void main(String[] args) { Config config = new Config(); Configuration configuration = new Configuration(); configuration.addAnnotatedClass(Address.class); final Hibernate credential = config.getCredential("database", Hibernate::new); final SessionFactory sessionFactory = credential.getMariaDB(configuration); try (Session session = sessionFactory.openSession()) { Transaction transaction = session.beginTransaction(); //... transaction.commit(); } } } ``` ###### PostgreSQL [PostgreSQL](https://docs.platform.sh/add-services/postgresql.md) is an open-source relational database technology. Define the driver for [PostgreSQL](https://mvnrepository.com/artifact/postgresql/postgresql), and the Java dependencies. Then determine the SessionFactory client programmatically: ```java import org.hibernate.Session; import org.hibernate.SessionFactory; import org.hibernate.Transaction; import org.hibernate.cfg.Configuration; import sh.platform.config.Config; import sh.platform.config.Hibernate; public class HibernateApp { public static void main(String[] args) { Config config = new Config(); Configuration configuration = new Configuration(); configuration.addAnnotatedClass(Address.class); final Hibernate credential = config.getCredential("database", Hibernate::new); final SessionFactory sessionFactory = credential.getPostgreSQL(configuration); try (Session session = sessionFactory.openSession()) { Transaction transaction = session.beginTransaction(); //... transaction.commit(); } } } ``` ### Deploy Jakarta on Platform.sh [Eclipse MicroProfile](https://microprofile.io/) is a community dedicated to optimizing the Enterprise Java mission for microservice-based architectures. The goal is to define a microservices application platform that is portable across multiple runtimes. Currently, the leading players in this group are IBM, Red Hat, Tomitribe, Payara, the London Java Community (LJC), and SouJava. Java Enterprise Edition (Java EE) is an umbrella that holds specifications and APIs with enterprise features, like distributed computing and web services. Widely used in Java, Java EE runs on reference runtimes that can be anything from microservices to application servers that handle transactions, security, scalability, concurrency, and management for the components it’s deploying. Now, Enterprise Java has been standardized under the Eclipse Foundation with the name [Jakarta EE](https://jakarta.ee/). ##### Services ###### Configuration reader While you can read the environment directly from your app, you might want to use the[Java configuration reader library](https://github.com/platformsh/config-reader-java). It decodes service credentials, the correct port, and other information for you. Note that the Java configuration reader library is used in the following examples. ###### MongoDB You can use [Jakarta NoSQL](https://projects.eclipse.org/projects/ee4j.nosql)/[JNoSQL](https://projects.eclipse.org/projects/technology.jnosql) to use [MongoDB](https://docs.platform.sh/add-services/mongodb.md) with your application by first determining the MongoDB client programmatically. ```java import com.mongodb.MongoClient; import jakarta.nosql.document.DocumentCollectionManager; import jakarta.nosql.document.DocumentCollectionManagerFactory; import org.jnosql.diana.mongodb.document.MongoDBDocumentConfiguration; import sh.platform.config.Config; import sh.platform.config.MongoDB; import javax.annotation.PostConstruct; import javax.enterprise.context.ApplicationScoped; import javax.enterprise.inject.Disposes; import javax.enterprise.inject.Produces; @ApplicationScoped class DocumentManagerProducer { private DocumentCollectionManagerFactory managerFactory; private MongoDB mongoDB; @PostConstruct public void init() { Config config = new Config(); this.mongoDB = config.getCredential("database", MongoDB::new); final MongoClient mongoClient = mongoDB.get(); MongoDBDocumentConfiguration configuration = new MongoDBDocumentConfiguration(); this.managerFactory = configuration.get(mongoClient); } @Produces public DocumentCollectionManager getManager() { return managerFactory.get(mongoDB.getDatabase()); } public void destroy(@Disposes DocumentCollectionManager manager) { this.manager.close(); } } ``` ###### Apache Solr You can use [Jakarta NoSQL](https://projects.eclipse.org/projects/ee4j.nosql)/[JNoSQL](https://projects.eclipse.org/projects/technology.jnosql) to use [Solr](https://docs.platform.sh/add-services/solr.md) with your application by first determining the Solr client programmatically. ```java import jakarta.nosql.document.DocumentCollectionManager; import jakarta.nosql.document.DocumentCollectionManagerFactory; import org.apache.solr.client.solrj.impl.HttpSolrClient; import org.jnosql.diana.solr.document.SolrDocumentConfiguration; import sh.platform.config.Config; import sh.platform.config.Solr; import javax.annotation.PostConstruct; import javax.enterprise.context.ApplicationScoped; import javax.enterprise.inject.Disposes; import javax.enterprise.inject.Produces; @ApplicationScoped class DocumentManagerProducer { private DocumentCollectionManagerFactory managerFactory; @PostConstruct public void init() { Config config = new Config(); Solr solr = config.getCredential("database", Solr::new); final HttpSolrClient httpSolrClient = solr.get(); SolrDocumentConfiguration configuration = new SolrDocumentConfiguration(); this.managerFactory = configuration.get(httpSolrClient); } @Produces public DocumentCollectionManager getManager() { return managerFactory.get("collection"); } public void destroy(@Disposes DocumentCollectionManager manager) { this.manager.close(); } } ``` ###### Elasticsearch You can use [Jakarta NoSQL](https://projects.eclipse.org/projects/ee4j.nosql)/[JNoSQL](https://projects.eclipse.org/projects/technology.jnosql) to use [Elasticsearch](https://docs.platform.sh/add-services/elasticsearch.md) with your application by first determining the Elasticsearch client programmatically. ```java import jakarta.nosql.document.DocumentCollectionManager; import jakarta.nosql.document.DocumentCollectionManagerFactory; import org.elasticsearch.client.RestHighLevelClient; import org.jnosql.diana.elasticsearch.document.ElasticsearchDocumentConfiguration; import sh.platform.config.Config; import sh.platform.config.Elasticsearch; import javax.annotation.PostConstruct; import javax.enterprise.context.ApplicationScoped; import javax.enterprise.inject.Disposes; import javax.enterprise.inject.Produces; @ApplicationScoped class DocumentManagerProducer { private DocumentCollectionManagerFactory managerFactory; @PostConstruct public void init() { Config config = new Config(); Elasticsearch elasticsearch = config.getCredential("database", Elasticsearch::new); final RestHighLevelClient client = elasticsearch.get(); ElasticsearchDocumentConfiguration configuration = new ElasticsearchDocumentConfiguration(); this.managerFactory = configuration.get(client); } @Produces public DocumentCollectionManager getManager() { return managerFactory.get("collection"); } public void destroy(@Disposes DocumentCollectionManager manager) { this.manager.close(); } } ``` ###### Redis You can use [Jakarta NoSQL](https://projects.eclipse.org/projects/ee4j.nosql)/[JNoSQL](https://projects.eclipse.org/projects/technology.jnosql) to use [Redis](https://docs.platform.sh/add-services/redis.md) with your application by first determining the Redis client programmatically. ```java import jakarta.nosql.keyvalue.BucketManager; import org.jnosql.diana.redis.keyvalue.RedisBucketManagerFactory; import org.jnosql.diana.redis.keyvalue.RedisConfiguration; import redis.clients.jedis.JedisPool; import sh.platform.config.Config; import sh.platform.config.Redis; import javax.annotation.PostConstruct; import javax.enterprise.context.ApplicationScoped; import javax.enterprise.inject.Disposes; import javax.enterprise.inject.Produces; @ApplicationScoped class BucketManagerProducer { private static final String BUCKET = "olympus"; private RedisBucketManagerFactory managerFactory; @PostConstruct public void init() { Config config = new Config(); Redis redis = config.getCredential("redis", Redis::new); final JedisPool jedisPool = redis.get(); RedisConfiguration configuration = new RedisConfiguration(); managerFactory = configuration.get(jedisPool); } @Produces public BucketManager getManager() { return managerFactory.getBucketManager(BUCKET); } public void destroy(@Disposes BucketManager manager) { manager.close(); } } ``` ###### MySQL [MySQL](https://docs.platform.sh/add-services/mysql.md) is an open-source relational database technology, and Jakarta EE supports a robust integration with it: [JPA](https://projects.eclipse.org/projects/ee4j.jpa). The first step is to choose the database that you would like to use in your project. Define the driver for [MySQL](https://mvnrepository.com/artifact/mysql/mysql-connector-java) and the Java dependencies. Then determine the DataSource client programmatically: ```java import sh.platform.config.Config; import sh.platform.config.JPA; import javax.annotation.PostConstruct; import javax.enterprise.context.ApplicationScoped; import javax.enterprise.inject.Disposes; import javax.enterprise.inject.Produces; import javax.persistence.EntityManager; import javax.persistence.EntityManagerFactory; @ApplicationScoped class EntityManagerConfiguration { private EntityManagerFactory entityManagerFactory; private EntityManager entityManager; @PostConstruct void setUp() { Config config = new Config(); final JPA credential = config.getCredential("postgresql", JPA::new); entityManagerFactory = credential.getMySQL("jpa-example"); this.entityManager = entityManagerFactory.createEntityManager(); } @Produces @ApplicationScoped EntityManagerFactory getEntityManagerFactory() { return entityManagerFactory; } @Produces @ApplicationScoped EntityManager getEntityManager() { return entityManager; } void close(@Disposes EntityManagerFactory entityManagerFactory) { entityManagerFactory.close(); } void close(@Disposes EntityManager entityManager) { entityManager.close(); } } ``` **Note**: You can use the same MySQL driver for MariaDB as well if you wish to do so. ###### MariaDB [MariaDB](https://docs.platform.sh/add-services/mysql.md) is an open-source relational database technology, and Jakarta EE supports a robust integration with it: [JPA](https://projects.eclipse.org/projects/ee4j.jpa). The first step is to choose the database that you would like to use in your project. Define the driver for [MariaDB](https://mvnrepository.com/artifact/org.mariadb.jdbc/mariadb-java-client) and the Java dependencies. Then determine the DataSource client programmatically: ```java import sh.platform.config.Config; import sh.platform.config.JPA; import javax.annotation.PostConstruct; import javax.enterprise.context.ApplicationScoped; import javax.enterprise.inject.Disposes; import javax.enterprise.inject.Produces; import javax.persistence.EntityManager; import javax.persistence.EntityManagerFactory; @ApplicationScoped class EntityManagerConfiguration { private EntityManagerFactory entityManagerFactory; private EntityManager entityManager; @PostConstruct void setUp() { Config config = new Config(); final JPA credential = config.getCredential("postgresql", JPA::new); entityManagerFactory = credential.getMariaDB("jpa-example"); this.entityManager = entityManagerFactory.createEntityManager(); } @Produces @ApplicationScoped EntityManagerFactory getEntityManagerFactory() { return entityManagerFactory; } @Produces @ApplicationScoped EntityManager getEntityManager() { return entityManager; } void close(@Disposes EntityManagerFactory entityManagerFactory) { entityManagerFactory.close(); } void close(@Disposes EntityManager entityManager) { entityManager.close(); } } ``` ###### PostgreSQL [PostgreSQL](https://docs.platform.sh/add-services/postgresql.md) is an open-source relational database technology, and Jakarta EE supports a robust integration with it: [JPA](https://projects.eclipse.org/projects/ee4j.jpa). The first step is to choose the database that you would like to use in your project. Define the driver for [PostgreSQL](https://mvnrepository.com/artifact/postgresql/postgresql) and the Java dependencies. Then determine the DataSource client programmatically: ```java import sh.platform.config.Config; import sh.platform.config.JPA; import javax.annotation.PostConstruct; import javax.enterprise.context.ApplicationScoped; import javax.enterprise.inject.Disposes; import javax.enterprise.inject.Produces; import javax.persistence.EntityManager; import javax.persistence.EntityManagerFactory; @ApplicationScoped class EntityManagerConfiguration { private EntityManagerFactory entityManagerFactory; private EntityManager entityManager; @PostConstruct void setUp() { Config config = new Config(); final JPA credential = config.getCredential("postgresql", JPA::new); entityManagerFactory = credential.getPostgreSQL("jpa-example"); entityManager = entityManagerFactory.createEntityManager(); } @Produces @ApplicationScoped EntityManagerFactory getEntityManagerFactory() { return entityManagerFactory; } @Produces @ApplicationScoped EntityManager getEntityManager() { return entityManager; } void close(@Disposes EntityManagerFactory entityManagerFactory) { entityManagerFactory.close(); } void close(@Disposes EntityManager entityManager) { entityManager.close(); } } ``` ##### Transaction To any Eclipse MicroProfile or any non-JTA application is essential to point out, CDI doesn't provide transaction management implementation as part of its specs. Transaction management is left to be implemented by the programmer through the interceptors, such as the code below. ```java import javax.annotation.Priority; import javax.inject.Inject; import javax.interceptor.AroundInvoke; import javax.interceptor.Interceptor; import javax.interceptor.InvocationContext; import javax.persistence.EntityManager; import javax.persistence.EntityTransaction; import javax.transaction.Transactional; @Transactional @Interceptor @Priority(Interceptor.Priority.APPLICATION) public class TransactionInterceptor { @Inject private EntityManager manager; @AroundInvoke public Object manageTransaction(InvocationContext context) throws Exception { final EntityTransaction transaction = manager.getTransaction(); transaction.begin(); try { Object result = context.proceed(); transaction.commit(); return result; } catch (Exception exp) { transaction.rollback(); throw exp; } } } ``` To treat this issue, see the [Apache Delta Spike docs](https://deltaspike.apache.org/documentation/jpa.md#_extended_persistence_contexts). ##### Templates * [Apache TomEE](https://github.com/platformsh-templates/microprofile-tomee) * [Thorntail](https://github.com/platformsh-templates/microprofile-thorntail) * [Payara Micro](https://github.com/platformsh-templates/microprofile-payara) * [KumuluzEE](https://github.com/platformsh-templates/microprofile-kumuluzee) * [Helidon](https://github.com/platformsh-templates/microprofile-helidon) * [Open Liberty](https://github.com/platformsh-templates/microprofile-openliberty) * [Quarkus](https://github.com/platformsh-templates/quarkus) * [Tomcat](https://github.com/platformsh-templates/tomcat) * [WildFly](https://github.com/platformsh-templates/microprofile-wildfly/) ### Deploy Micronaut on Platform.sh [Micronaut](https://micronaut.io/) is an open-source, JVM-based framework for building full-stack, modular, testable microservice and serverless applications. Unlike reflection-based IoC frameworks that load and cache reflection data for every single field, method, and constructor in your code, with Micronaut, your application startup time and memory consumption aren't bound to the size of your codebase. Micronaut's cloud support is built right in, including support for common discovery services, distributed tracing tools, and cloud runtimes. To get Micronaut running on Platform.sh, you have two potential starting places: - You already have a Micronaut site you are trying to deploy. Go through this guide to make the recommended changes to your repository to prepare it for Platform.sh. - You have no code at this point. If you have no code, you have two choices: - Generate a basic Micronaut site. - Use a ready-made [Micronaut template](https://github.com/platformsh-templates/micronaut). A template is a starting point for building your project. It should help you get a project ready for production. To use a template, click the button below to create a Micronaut template project. ![Deploy on Platform.sh](https://platform.sh/images/deploy/lg-blue.svg) Once the template is deployed, you can follow the rest of this guide to better understand the extra files and changes to the repository. ##### Before you begin You need: - [Git](https://git-scm.com/downloads). Git is the primary tool to manage everything your app needs to run. Push commits to deploy changes and control configuration through YAML files. These files describe your infrastructure, making it transparent and version-controlled. - A Platform.sh account. If you don't already have one, [register for a trial account](https://auth.api.platform.sh/register). You can sign up with an email address or an existing GitHub, Bitbucket, or Google account. If you choose one of these accounts, you can set a password for your Platform.sh account later. - The [Platform.sh CLI](https://docs.platform.sh/administration/cli.md). This lets you interact with your project from the command line. You can also do most things through the [Web Console](https://docs.platform.sh/administration/web.md). ##### Initialize a project You can start with a basic code base or push a pre-existing project to Platform.sh. - Create your first project by running the following command: ```bash {} platform create --title ``` Then choose the region you want to deploy to, such as the one closest to your site visitors. You can also select more resources for your project through additional flags, but a Development plan should be enough for you to get started. Copy the ID of the project you've created. - Get your code ready locally. If your code lives in a remote repository, clone it to your computer. If your code isn't in a Git repository, initialize it by running ``git init``. - Connect your Platform.sh project with Git. You can use Platform.sh as your Git repository or connect to a third-party provider: GitHub, GitLab, or BitBucket. That creates an upstream called ``platform`` for your Git repository. When you choose to use a third-party Git hosting service the Platform.sh Git repository becomes a read-only mirror of the third-party repository. All your changes take place in the third-party repository. Add an integration to your existing third party repository. The process varies a bit for each supported service, so check the specific pages for each one. - [BitBucket](https://docs.platform.sh/integrations/source/bitbucket.md) - [GitHub](https://docs.platform.sh/integrations/source/github.md) - [GitLab](https://docs.platform.sh/integrations/source/gitlab.md) Accept the default options or modify to fit your needs. All of your existing branches are automatically synchronized to Platform.sh. You get a deploy failure message because you haven’t provided configuration files yet. You add them in the next step. If you’re integrating a repository to Platform.sh that contains a number of open pull requests, don’t use the default integration options. Projects are limited to three* preview environments (active and deployed branches or pull requests) and you would need to deactivate them individually to test this guide’s migration changes. Instead, each service integration should be made with the following flag: ```bash {} platform integration:add --type= ... --build-pull-requests=false ``` You can then go through this guide and activate the environment when you’re ready to deploy * You can purchase additional preview environments at any time in the Console. Open your project and select **Edit plan**. Add additional **Environments**, view a cost estimate, and confirm your changes. Now you have a local Git repository, a Platform.sh project, and a way to push code to that project. Next you can configure your project to work with Platform.sh. [Configure repository](https://docs.platform.sh/guides/micronaut/deploy/configure.md) #### Configure Micronaut for Platform.sh You now have a *project* running on Platform.sh. In many ways, a project is just a collection of tools around a Git repository. Just like a Git repository, a project has branches, called *environments*. Each environment can then be activated. *Active* environments are built and deployed, giving you a fully isolated running site for each active environment. Once an environment is activated, your app is deployed through a cluster of containers. You can configure these containers in three ways, each corresponding to a [YAML file](https://docs.platform.sh/learn/overview/yaml): - **Configure apps** in a `.platform.app.yaml` file. This controls the configuration of the container where your app lives. - **Add services** in a `.platform/services.yaml` file. This controls what additional services are created to support your app, such as databases or search servers. Each environment has its own independent copy of each service. If you're not using any services, you don't need this file. - **Define routes** in a `.platform/routes.yaml` file. This controls how incoming requests are routed to your app or apps. It also controls the built-in HTTP cache. If you're only using the single default route, you don't need this file. Start by creating empty versions of each of these files in your repository: ```bash # Create empty Platform.sh configuration files mkdir -p .platform && touch .platform/services.yaml && touch .platform/routes.yaml ``` Now that you've added these files to your project, configure each one for Micronaut in the following sections. Each section covers basic configuration options and presents a complete example with comments on why Micronaut requires those values. ###### Configure apps in `.platform.app.yaml` Your app configuration in a `.platform.app.yaml` file is allows you to configure nearly any aspect of your app. For all of the options, see a [complete reference](https://docs.platform.sh/create-apps/app-reference/single-runtime-image.md). The following example shows a complete configuration with comments to explain the various settings. Explaining the file line by line, notice the following settings: - ``name``: The application name. - ``type`` Where you’ll define the language, in this case, Java, and the version. - ``disk``: The disk space that the application needs in megabytes. - ``hooks.build``: The command to package the application. - ``web.commands``: The order to start the application, where the port is overwritten using the ``PORT`` environment variable provided by Platform.sh to the application container. ```yaml {location=".platform.app.yaml"} # This file describes an application. You can have multiple applications # in the same project. # # See https://docs.platform.sh/user_guide/reference/platform-app-yaml.html # The name of this app. Must be unique within a project. name: app # The runtime the application uses. type: "java:11" disk: 1024 # The hooks executed at various points in the lifecycle of the application. hooks: build: mvn clean package # The relationships of the application with services or other applications. # # The left-hand side is the name of the relationship as it will be exposed # to the application in the PLATFORM_RELATIONSHIPS variable. The right-hand # side is in the form `:`. #relationships: # database: "db:mysql" # The configuration of app when it is exposed to the web. web: commands: start: java -Xmx$(jq .info.limits.memory /run/config.json)m -XX:+ExitOnOutOfMemoryError -jar target/micronaut-1.0-SNAPSHOT.jar ``` ###### Add services in `.platform/services.yaml` You can add the managed services you need for you app to run in the `.platform/services.yaml` file. You pick the major version of the service and security and minor updates are applied automatically, so you always get the newest version when you deploy. You should always try any upgrades on a development branch before pushing to production. Micronaut doesn't require services to deploy, so you don't need a `.platform/services.yaml` file for now. You can [add other services](https://docs.platform.sh/add-services.md) if desired, such as [Solr](https://docs.platform.sh/add-services/solr.md) or [Elasticsearch](https://docs.platform.sh/add-services/elasticsearch.md). You need to configure Micronaut to use those services once they're enabled. ###### Define routes All HTTP requests sent to your app are controlled through the routing and caching you define in a `.platform/routes.yaml` file. The two most important options are the main route and its caching rules. A route can have a placeholder of `{default}`, which is replaced by your domain name in production and environment-specific names for your preview environments. The main route has an `upstream`, which is the name of the app container to forward requests to. You can enable [HTTP cache](https://docs.platform.sh/define-routes/cache.md). The router includes a basic HTTP cache. By default, HTTP caches includes all cookies in the cache key. So any cookies that you have bust the cache. The `cookies` key allows you to select which cookies should matter for the cache. You can also set up routes as [HTTP redirects](https://docs.platform.sh/define-routes/redirects.md). In the following example, all requests to `www.{default}` are redirected to the equivalent URL without `www`. HTTP requests are automatically redirected to HTTPS. If you don't include a `.platform/routes.yaml` file, a single default route is used. This is equivalent to the following: ```yaml {location=".platform/routes.yaml"} https://{default}/: type: upstream upstream: :http ``` Where `` is the `name` you've defined in your [app configuration](#configure-apps-in-platformappyaml). The following example presents a complete definition of a main route for a Micronaut app: ```bash {location=".platform/routes.yaml"} # The routes of the project. # # Each route describes how an incoming URL is going # to be processed by Platform.sh. "https://{default}/": type: upstream upstream: "app:http" "https://www.{default}/": type: redirect to: "https://{default}/" ``` #### Customize Micronaut for Platform.sh Now that your code contains all of the configuration to deploy on Platform.sh, it's time to make your Micronaut site itself ready to run on a Platform.sh environment. There are a number of additional steps that are either required or recommended, depending on how well you want to optimize your site. ###### Install the Config Reader You can get all information about a deployed environment, including how to connect to services, through [environment variables](https://docs.platform.sh/development/variables.md). Your app can [access these variables](https://docs.platform.sh/development/variables/use-variables.md#access-variables-in-your-app). Below is an example of how to install the Config Reader for Java using Maven: ```xml sh.platform config 2.2.2 ``` and Gradle: ```txt compile group: 'sh.platform', name: 'config', version: '2.2.2' ``` ###### `.environment` The `.platform.app.yaml` file on the [previous page](https://docs.platform.sh/guides/micronaut/deploy/configure.md#configure-apps-in-platformappyaml) has been pulled directly from the [Micronaut template](https://github.com/platformsh-templates/micronaut/blob/master/.platform.app.yaml). It is sufficient to deploy Micronaut on it's own, but since Micronaut makes it possible to overwrite configurations without impacting the application itself, you might elect to rely more heavily on environment variables in it's place. Consider this simplified `.platform.app.yaml` file: ```yaml {location=".platform.app.yaml"} name: myapp type: "java:11" disk: 1024 hooks: build: mvn clean package web: commands: start: java -jar $JAVA_OPTS $CREDENTIAL target/file.jar ``` On Platform.sh, we can set the environment variable `JAVA_OPTS` by committing a `.environment` file to the repository's root. Platform.sh runs `source .environment` in the application root when a project starts, and when logging into the environment over SSH. That gives you a place to do extra environment variable setup before the application runs, including modifying the system `$PATH` and other shell level customizations. It allows us to define `JAVA_OPTS` when running on Platform.sh, but otherwise not be used during local development testing. ```shell # .environment export JAVA_OPTS="-Xmx$(jq .info.limits.memory /run/config.json)m -XX:+ExitOnOutOfMemoryError" ``` **Tip**: To check the Garbage collector settings, please, check the [Java Performance tuning section.](https://docs.platform.sh/languages/java/tuning.md) #### Deploy Micronaut Now you have your configuration for deployment and your app set up to run on Platform.sh. Make sure all your code is committed to Git and run `git push` to your Platform.sh environment. Your code is built, producing a read-only image that's deployed to a running cluster of containers. If you aren't using a source integration, the log of the process is returned in your terminal. If you're using a source integration, you can get the log by running `platform activity:log --type environment.push`. When the build finished, you're given the URL of your deployed environment. Click the URL to see your site. If your environment wasn't active and so wasn't deployed, activate it by running the following command: ```bash platform environment:activate ``` ###### Migrate your data If you are moving an existing site to Platform.sh, then in addition to code you also need to migrate your data. That means your database and your files. ####### Import the database First, obtain a database dump from your current site, such as using the * [`pg_dump` command for PostgreSQL](https://www.postgresql.org/docs/current/app-pgdump.md) * [`mysqldump` command for MariaDB](https://mariadb.com/kb/en/mysqldump/) * [`sqlite-dump` command for SQLite](https://www.sqlitetutorial.net/sqlite-dump/) Next, import the database into your Platform.sh site by running the following command: ```bash platform sql Go forth and Deploy (even on Friday)! #### Additional resources This guide has hopefully helped you deploy a new Micronaut site, or migrate an existing one, to Platform.sh. It has made a few assumptions to provide the best information to do so, but is by no means a complete reference for your particular application. For this reason, the Platform.sh team maintains and adds to a number of Micronaut guides that can help you add services like Elasticsearch and MongoDB to your application, or how to start using JPA. Consult those guides below or in the sidebar for more information. - [Elasticsearch](https://docs.platform.sh/guides/micronaut/elasticsearch.md) - [JPA](https://docs.platform.sh/guides/micronaut/jpa.md) - [MongoDB](https://docs.platform.sh/guides/micronaut/mongodb.md) - [Micronaut Data](https://docs.platform.sh/guides/micronaut/micronaut-data.md) - [Redis](https://docs.platform.sh/guides/micronaut/redis.md) [Back](https://docs.platform.sh/guides/micronaut/deploy/deploy.md) ### How to Deploy Micronaut on Platform.sh with Elasticsearch Micronaut provides two ways of accessing Elasticsearch: via the lower level `RestClient` or via the `RestHighLevelClient`. To initialize Elasticsearch in your project's cluster so that it can be accessed by a Micronaut application, it is necessary to modify two files. **Note**: This guide only covers the addition of a service configuration to an existing Micronaut project already configured to deploy on Platform.sh. Please see the [deployment guide](https://docs.platform.sh/guides/micronaut/deploy.md) for more detailed instructions for setting up app containers and initial projects. ##### 1. Add the Elasticsearch service In your [service configuration](https://docs.platform.sh/add-services.md), include Elasticsearch with a [valid supported version](https://docs.platform.sh/add-services/elasticsearch.md): .platform/services.yaml ```yaml {} elasticsearch: type: elasticsearch:8.5 disk: 256 ``` ##### 2. Add the Elasticsearch relationship In your [app configuration](https://docs.platform.sh/create-apps/app-reference/single-runtime-image.md), use the service name `searchelastic` to grant the application access to Elasticsearch via a relationship: .platform.app.yaml ```yaml {} relationships: elasticsearch: "elasticsearch:elasticsearch" ``` ##### 3. Export connection credentials to the environment Connection credentials for Elasticsearch, like any service, are exposed to the application container through the `PLATFORM_RELATIONSHIPS` environment variable from the deploy hook onward. Since this variable is a base64 encoded JSON object of all of your project's services, you'll likely want a clean way to extract the information specific to Elasticsearch into it's own environment variables that can be used by Micronaut. On Platform.sh, custom environment variables can be defined programmatically in a `.environment` file using `jq` to do just that: ```text export ES_HOST=$(echo $PLATFORM_RELATIONSHIPS | base64 --decode | jq -r ".essearch[0].host") export ES_PORT=$(echo $PLATFORM_RELATIONSHIPS | base64 --decode | jq -r ".essearch[0].port") export ELASTICSEARCH_HTTPHOSTS="http://${ES_HOST}:${ES_PORT}" export JAVA_OPTS="-Xmx$(jq .info.limits.memory /run/config.json)m -XX:+ExitOnOutOfMemoryError" ``` **Tip**: Environment variable names are following the conversion rules of the [Micronaut Documentation](https://docs.micronaut.io/latest/guide/index.md). ##### 4. Connect to Elasticsearch Commit that code and push. The Elasticsearch instance is ready to be connected from within the Micronaut application. ### How to Deploy Micronaut on Platform.sh with Micronaut Data [Micronaut Data](https://micronaut-projects.github.io/micronaut-data/latest/guide/) is a database access toolkit that uses Ahead of Time (AoT) compilation to pre-compute queries for repository interfaces that are then executed by a thin, lightweight runtime layer. **Note**: This guide only covers the addition of a service configuration to an existing Micronaut project already configured to deploy on Platform.sh. Please see the [deployment guide](https://docs.platform.sh/guides/micronaut/deploy.md) for more detailed instructions for setting up app containers and initial projects. ##### 1. Add a SQL database service In your [service configuration](https://docs.platform.sh/add-services.md), include a SQL database service. Make sure to visit the documentation for [that service](https://docs.platform.sh/add-services.md) to find a valid version. For PostgreSQL that would look like: .platform/services.yaml ```yaml {} postgresql: type: postgresql:17 disk: 256 ``` ##### 2. Grant access to the service through a relationship To access the new service, set a `relationship` in your [app configuration](https://docs.platform.sh/create-apps/app-reference/single-runtime-image.md#relationships). .platform.app.yaml ```yaml {} relationships: postgresql: "postgresql:postgresql" ``` ##### 3. Export connection credentials to the environment Connection credentials for services are exposed to the application container through the `PLATFORM_RELATIONSHIPS` environment variable from the deploy hook onward. Since this variable is a base64 encoded JSON object of all of your project's services, you'll likely want a clean way to extract the information specific to the database into it's own environment variables that can be used by Micronaut. On Platform.sh, custom environment variables can be defined programmatically in a `.environment` file using `jq` to do just that: ```text export JDBC_HOST=`echo $PLATFORM_RELATIONSHIPS|base64 -d|jq -r ".database[0].host"` export JDBC_PORT=`echo $PLATFORM_RELATIONSHIPS|base64 -d|jq -r ".database[0].port"` export DATABASE=`echo $PLATFORM_RELATIONSHIPS|base64 -d|jq -r ".database[0].path"` export DATASOURCES_DEFAULT_PASSWORD=`echo $PLATFORM_RELATIONSHIPS|base64 -d|jq -r ".database[0].password"` export DATASOURCES_DEFAULT_USERNAME=`echo $PLATFORM_RELATIONSHIPS|base64 -d|jq -r ".database[0].username"` export DATASOURCES_DEFAULT_URL=jdbc:postgresql://${JDBC_HOST}:${JDBC_PORT}/${DATABASE} export JAVA_OPTS="-Xmx$(jq .info.limits.memory /run/config.json)m -XX:+ExitOnOutOfMemoryError" ``` **Tip**: Environment variable names are following the conversion rules of the [Micronaut Documentation](https://docs.micronaut.io/latest/guide/index.md). ##### 4. Connect to the service Commit that code and push. The specified cluster will now always point to the PostgreSQL or any SQL service that you wish. ### How to Deploy Micronaut on Platform.sh with MongoDB To activate MongoDB and then have it accessed by the Micronaut application already in Platform.sh, it is necessary to modify two files. **Note**: This guide only covers the addition of a MongoDB service configuration to an existing Micronaut project already configured to deploy on Platform.sh. Please see the [deployment guide](https://docs.platform.sh/guides/micronaut/deploy.md) for more detailed instructions for setting up app containers and initial projects. ##### 1. Add the MongoDB service In your [service configuration](https://docs.platform.sh/add-services.md), include MongoDB with a [valid supported version](https://docs.platform.sh/add-services/mongodb.md): ```yaml {location=".platform/services.yaml"} dbmongo: type: mongodb:3.6 disk: 512 ``` ##### 2. Grant access to MongoDb through a relationship In your [app configuration](https://docs.platform.sh/create-apps/app-reference/single-runtime-image.md), use the service name `dbmongo` to grant the application access to MongoDB via a relationship: .platform.app.yaml ```yaml {} relationships: mongodb: "mongodb:mongodb" ``` ##### 3. Export connection credentials to the environment Connection credentials for services are exposed to the application container through the `PLATFORM_RELATIONSHIPS` environment variable from the deploy hook onward. Since this variable is a base64 encoded JSON object of all of your project's services, you'll likely want a clean way to extract the information specific to the database into it's own environment variables that can be used by Micronaut. On Platform.sh, custom environment variables can be defined programmatically in a `.environment` file using `jq` to do just that: ```text export MONGO_PORT=`echo $PLATFORM_RELATIONSHIPS | base64 --decode | jq -r ".mongodb[0].port"` export MONGO_HOST=`echo $PLATFORM_RELATIONSHIPS | base64 --decode | jq -r ".mongodb[0].host"` export MONGO_PASSWORD=`echo $PLATFORM_RELATIONSHIPS |base64 --decode | jq -r ".mongodb[0].password"` export MONGO_USER=`echo $PLATFORM_RELATIONSHIPS | base64 --decode | jq -r ".mongodb[0].username"` export MONGO_DATABASE=`echo $PLATFORM_RELATIONSHIPS | base64 --decode | jq -r ".mongodb[0].path"` export MONGO_URL=mongodb://${MONGO_USER}:${MONGO_PASSWORD}@${MONGO_HOST}:${MONGO_PORT}/${MONGO_DATABASE} export JAVA_OPTS="-Xmx$(jq .info.limits.memory /run/config.json)m -XX:+ExitOnOutOfMemoryError" ``` **Tip**: Environment variable names are following the conversion rules of the [Micronaut Documentation](https://docs.micronaut.io/latest/guide/index.md). ##### 4. Connect to the service Commit that code and push. The application is ready and connected to a MongoDB instance. ### How to Deploy Micronaut on Platform.sh with Redis To activate Redis and then have it accessed by the Micronaut application already in Platform.sh, it is necessary to modify two files. **Note**: This guide only covers the addition of a service configuration to an existing Micronaut project already configured to deploy on Platform.sh. Please see the [deployment guide](https://docs.platform.sh/guides/micronaut/deploy.md) for more detailed instructions for setting up app containers and initial projects. ##### 1. Add the Redis service In your [service configuration](https://docs.platform.sh/add-services.md), include Persistent Redis with a [valid supported version](https://docs.platform.sh/add-services/redis.md#persistent-redis): .platform/services.yaml ```yaml {} data: type: redis-persistent:7.2 disk: 256 ``` ##### 2. Add the Redis relationship In your [app configuration](https://docs.platform.sh/create-apps/app-reference/single-runtime-image.md), use the service name `redisdata` to grant the application access to Elasticsearch via a relationship: .platform.app.yaml ```yaml {} relationships: redisdata: "data:redis" ``` ##### 3. Export connection credentials to the environment Connection credentials for Redis, like any service, are exposed to the application container through the `PLATFORM_RELATIONSHIPS` environment variable from the deploy hook onward. Since this variable is a base64 encoded JSON object of all of your project's services, you'll likely want a clean way to extract the information specific to Elasticsearch into it's own environment variables that can be used by Micronaut. On Platform.sh, custom environment variables can be defined programmatically in a `.environment` file using `jq` to do just that: ```text export REDIS_HOST=$(echo $PLATFORM_RELATIONSHIPS|base64 --decode|jq -r ".redisdata[0].host") export REDIS_PORT=$(echo $PLATFORM_RELATIONSHIPS|base64 --decode|jq -r ".redisdata[0].port") export REDIS_URI=redis://${REDIS_HOST}:${REDIS_PORT} export JAVA_OPTS="-Xmx$(jq .info.limits.memory /run/config.json)m -XX:+ExitOnOutOfMemoryError" ``` **Tip**: Environment variable names are following the conversion rules of the [Micronaut Documentation](https://docs.micronaut.io/latest/guide/index.md). ##### 4. Connect to Redis Commit that code and push. The Redis instance is ready to be connected from within the Micronaut application. ### How to Deploy Micronoaut on Platform.sh with JPA To activate JPA and then have it accessed by the Micronoaut application already configured for Platform.sh, it is necessary to modify two files. **Note**: This guide only covers the addition of a service configuration to an existing Micronoaut project already configured to deploy on Platform.sh. Please see the [deployment guide](https://docs.platform.sh/guides/micronaut/deploy.md) for more detailed instructions for setting up app containers and initial projects. ##### 1. Add a SQL database service In your [service configuration](https://docs.platform.sh/add-services.md), include a SQL database service. Make sure to visit the documentation for [that service](https://docs.platform.sh/add-services.md) to find a valid version. For PostgreSQL that would look like: .platform/services.yaml ```yaml {} postgresql: type: postgresql:17 disk: 256 ``` ##### 2. Grant access to the service through a relationship To access the new service, set a `relationship` in your [app configuration](https://docs.platform.sh/create-apps/app-reference/single-runtime-image.md#relationships). .platform.app.yaml ```yaml {} relationships: postgresql: "postgresql:postgresql" ``` ##### 3. Export connection credentials to the environment Connection credentials for services are exposed to the application container through the `PLATFORM_RELATIONSHIPS` environment variable from the deploy hook onward. Since this variable is a base64 encoded JSON object of all of your project's services, you'll likely want a clean way to extract the information specific to the database into it's own environment variables that can be used by Micronaut. On Platform.sh, custom environment variables can be defined programmatically in a `.environment` file using `jq` to do just that: ```text export JDBC_HOST=`echo $PLATFORM_RELATIONSHIPS|base64 -d|jq -r ".database[0].host"` export JDBC_PORT=`echo $PLATFORM_RELATIONSHIPS|base64 -d|jq -r ".database[0].port"` export DATABASE=`echo $PLATFORM_RELATIONSHIPS|base64 -d|jq -r ".database[0].path"` export DATASOURCES_DEFAULT_PASSWORD=`echo $PLATFORM_RELATIONSHIPS|base64 -d|jq -r ".database[0].password"` export DATASOURCES_DEFAULT_USERNAME=`echo $PLATFORM_RELATIONSHIPS|base64 -d|jq -r ".database[0].username"` export DATASOURCES_DEFAULT_URL=jdbc:postgresql://${JDBC_HOST}:${JDBC_PORT}/${DATABASE} export JAVA_OPTS="-Xmx$(jq .info.limits.memory /run/config.json)m -XX:+ExitOnOutOfMemoryError" ``` **Tip**: Environment variable names are following the conversion rules of the [Micronaut Documentation](https://docs.micronaut.io/latest/guide/index.md). ##### 4. Connect to the service Commit that code and push. The specified cluster will now always point to the PostgreSQL or any SQL service that you wish. ### Deploy Quarkus on Platform.sh [Quarkus](https://quarkus.io/) is, in its own words, a cloud-native, (Linux) container-first framework for writing Java applications. To get Quarkus running on Platform.sh, you have two potential starting places: - You already have a Quarkus site you are trying to deploy. Go through this guide to make the recommended changes to your repository to prepare it for Platform.sh. - You have no code at this point. If you have no code, you have two choices: - Generate a basic Quarkus site. - Use a ready-made [Quarkus template](https://github.com/platformsh-templates/quarkus). A template is a starting point for building your project. It should help you get a project ready for production. To use a template, click the button below to create a Quarkus template project. ![Deploy on Platform.sh](https://platform.sh/images/deploy/lg-blue.svg) Once the template is deployed, you can follow the rest of this guide to better understand the extra files and changes to the repository. ##### Before you begin You need: - [Git](https://git-scm.com/downloads). Git is the primary tool to manage everything your app needs to run. Push commits to deploy changes and control configuration through YAML files. These files describe your infrastructure, making it transparent and version-controlled. - A Platform.sh account. If you don't already have one, [register for a trial account](https://auth.api.platform.sh/register). You can sign up with an email address or an existing GitHub, Bitbucket, or Google account. If you choose one of these accounts, you can set a password for your Platform.sh account later. - The [Platform.sh CLI](https://docs.platform.sh/administration/cli.md). This lets you interact with your project from the command line. You can also do most things through the [Web Console](https://docs.platform.sh/administration/web.md). ##### Initialize a project You can start with a basic code base or push a pre-existing project to Platform.sh. - Create your first project by running the following command: ```bash {} platform create --title ``` Then choose the region you want to deploy to, such as the one closest to your site visitors. You can also select more resources for your project through additional flags, but a Development plan should be enough for you to get started. Copy the ID of the project you've created. - Get your code ready locally. If your code lives in a remote repository, clone it to your computer. If your code isn't in a Git repository, initialize it by running ``git init``. - Connect your Platform.sh project with Git. You can use Platform.sh as your Git repository or connect to a third-party provider: GitHub, GitLab, or BitBucket. That creates an upstream called ``platform`` for your Git repository. When you choose to use a third-party Git hosting service the Platform.sh Git repository becomes a read-only mirror of the third-party repository. All your changes take place in the third-party repository. Add an integration to your existing third party repository. The process varies a bit for each supported service, so check the specific pages for each one. - [BitBucket](https://docs.platform.sh/integrations/source/bitbucket.md) - [GitHub](https://docs.platform.sh/integrations/source/github.md) - [GitLab](https://docs.platform.sh/integrations/source/gitlab.md) Accept the default options or modify to fit your needs. All of your existing branches are automatically synchronized to Platform.sh. You get a deploy failure message because you haven’t provided configuration files yet. You add them in the next step. If you’re integrating a repository to Platform.sh that contains a number of open pull requests, don’t use the default integration options. Projects are limited to three* preview environments (active and deployed branches or pull requests) and you would need to deactivate them individually to test this guide’s migration changes. Instead, each service integration should be made with the following flag: ```bash {} platform integration:add --type= ... --build-pull-requests=false ``` You can then go through this guide and activate the environment when you’re ready to deploy * You can purchase additional preview environments at any time in the Console. Open your project and select **Edit plan**. Add additional **Environments**, view a cost estimate, and confirm your changes. Now you have a local Git repository, a Platform.sh project, and a way to push code to that project. Next you can configure your project to work with Platform.sh. [Configure repository](https://docs.platform.sh/guides/quarkus/deploy/configure.md) #### Configure Quarkus for Platform.sh You now have a *project* running on Platform.sh. In many ways, a project is just a collection of tools around a Git repository. Just like a Git repository, a project has branches, called *environments*. Each environment can then be activated. *Active* environments are built and deployed, giving you a fully isolated running site for each active environment. Once an environment is activated, your app is deployed through a cluster of containers. You can configure these containers in three ways, each corresponding to a [YAML file](https://docs.platform.sh/learn/overview/yaml): - **Configure apps** in a `.platform.app.yaml` file. This controls the configuration of the container where your app lives. - **Add services** in a `.platform/services.yaml` file. This controls what additional services are created to support your app, such as databases or search servers. Each environment has its own independent copy of each service. If you're not using any services, you don't need this file. - **Define routes** in a `.platform/routes.yaml` file. This controls how incoming requests are routed to your app or apps. It also controls the built-in HTTP cache. If you're only using the single default route, you don't need this file. Start by creating empty versions of each of these files in your repository: ```bash # Create empty Platform.sh configuration files mkdir -p .platform && touch .platform/services.yaml && touch .platform/routes.yaml ``` Now that you've added these files to your project, configure each one for Quarkus in the following sections. Each section covers basic configuration options and presents a complete example with comments on why Quarkus requires those values. ###### Configure apps in `.platform.app.yaml` Your app configuration in a `.platform.app.yaml` file is allows you to configure nearly any aspect of your app. For all of the options, see a [complete reference](https://docs.platform.sh/create-apps/app-reference/single-runtime-image.md). The following example shows a complete configuration with comments to explain the various settings. Explaining the file line by line, notice the following settings: - ``name``: The application name - ``type`` Where you’ll define the language, in this case, Java, and the version. - ``disk``: The disk space that the application needs in megabytes. - ``hooks.build``: The command to package the application - ``web.commands``: The order to start the application, where the port is overwritten with ``-Dquarkus.http.port=$PORT``, using the ``PORT`` environment variable provided by Platform.sh to the application container. ```yaml {location=".platform.app.yaml"} # This file describes an application. You can have multiple applications # in the same project. # # See https://docs.platform.sh/user_guide/reference/platform-app-yaml.html # The name of this app. Must be unique within a project. name: app # The runtime the application uses. type: "java:11" disk: 1024 # The hooks executed at various points in the lifecycle of the application. hooks: build: ./mvnw package -DskipTests # The relationships of the application with services or other applications. # # The left-hand side is the name of the relationship as it will be exposed # to the application in the PLATFORM_RELATIONSHIPS variable. The right-hand # side is in the form `:`. #relationships: # database: "db:mysql" # The configuration of app when it is exposed to the web. web: commands: start: java -jar -Xmx$(jq .info.limits.memory /run/config.json)m -XX:+ExitOnOutOfMemoryError -Dquarkus.http.port=$PORT target/quarkus-1.0.0-SNAPSHOT-runner.jar ``` ###### Add services in `.platform/services.yaml` You can add the managed services you need for you app to run in the `.platform/services.yaml` file. You pick the major version of the service and security and minor updates are applied automatically, so you always get the newest version when you deploy. You should always try any upgrades on a development branch before pushing to production. Quarkus doesn't require services to deploy, so you don't need a `.platform/services.yaml` file for now. You can [add other services](https://docs.platform.sh/add-services.md) if desired, such as [Solr](https://docs.platform.sh/add-services/solr.md) or [Elasticsearch](https://docs.platform.sh/add-services/elasticsearch.md). You need to configure Quarkus to use those services once they're enabled. ###### Define routes All HTTP requests sent to your app are controlled through the routing and caching you define in a `.platform/routes.yaml` file. The two most important options are the main route and its caching rules. A route can have a placeholder of `{default}`, which is replaced by your domain name in production and environment-specific names for your preview environments. The main route has an `upstream`, which is the name of the app container to forward requests to. You can enable [HTTP cache](https://docs.platform.sh/define-routes/cache.md). The router includes a basic HTTP cache. By default, HTTP caches includes all cookies in the cache key. So any cookies that you have bust the cache. The `cookies` key allows you to select which cookies should matter for the cache. You can also set up routes as [HTTP redirects](https://docs.platform.sh/define-routes/redirects.md). In the following example, all requests to `www.{default}` are redirected to the equivalent URL without `www`. HTTP requests are automatically redirected to HTTPS. If you don't include a `.platform/routes.yaml` file, a single default route is used. This is equivalent to the following: ```yaml {location=".platform/routes.yaml"} https://{default}/: type: upstream upstream: :http ``` Where `` is the `name` you've defined in your [app configuration](#configure-apps-in-platformappyaml). The following example presents a complete definition of a main route for a Quarkus app: ```bash {location=".platform/routes.yaml"} # The routes of the project. # # Each route describes how an incoming URL is going # to be processed by Platform.sh. "https://{default}/": type: upstream upstream: "app:http" "https://www.{default}/": type: redirect to: "https://{default}/" ``` #### Customize Quarkus for Platform.sh Now that your code contains all of the configuration to deploy on Platform.sh, it's time to make your Quarkus site itself ready to run on a Platform.sh environment. There are a number of additional steps that are either required or recommended, depending on how well you want to optimize your site. ###### Install the Config Reader You can get all information about a deployed environment, including how to connect to services, through [environment variables](https://docs.platform.sh/development/variables.md). Your app can [access these variables](https://docs.platform.sh/development/variables/use-variables.md#access-variables-in-your-app). Below is an example of how to install the Config Reader for Java using Maven: ```xml sh.platform config 2.2.2 ``` and Gradle: ```txt compile group: 'sh.platform', name: 'config', version: '2.2.2' ``` ###### `.environment` The `.platform.app.yaml` file on the [previous page](https://docs.platform.sh/guides/quarkus/deploy/configure.md#configure-apps-in-platformappyaml) has been pulled directly from the [Quarkus template](https://github.com/platformsh-templates/quarkus/blob/master/.platform.app.yaml). It is sufficient to deploy Quarkus on it's own, but since [Eclipse MicroProfile](https://github.com/eclipse/microprofile-config) makes it possible to overwrite configurations without impacting the application itself, you might elect to rely more heavily on environment variables in it's place. Consider this simplified `.platform.app.yamll` file: ```yaml {location=".platform.app.yaml"} name: myapp type: "java:11" disk: 1024 hooks: build: ./mvnw package -DskipTests -Dquarkus.package.uber-jar=true web: commands: start: java -jar $JAVA_OPTS $CREDENTIAL -Dquarkus.http.port=$PORT target/file.jar ``` On Platform.sh, we can set the environment variable `JAVA_OPTS` by committing a `.environment` file to the repository's root. Platform.sh runs `source .environment` in the application root when a project starts, and when logging into the environment over SSH. That gives you a place to do extra environment variable setup before the application runs, including modifying the system `$PATH` and other shell level customizations. It allows us to define `JAVA_OPTS` when running on Platform.sh, but otherwise not be used during local development testing. ```shell # .environment export JAVA_OPTS="-Xmx$(jq .info.limits.memory /run/config.json)m -XX:+ExitOnOutOfMemoryError" ``` **Tip**: To check the Garbage collector settings, please, check the [Java Performance tuning section.](https://docs.platform.sh/languages/java/tuning.md) #### Deploy Quarkus Now you have your configuration for deployment and your app set up to run on Platform.sh. Make sure all your code is committed to Git and run `git push` to your Platform.sh environment. Your code is built, producing a read-only image that's deployed to a running cluster of containers. If you aren't using a source integration, the log of the process is returned in your terminal. If you're using a source integration, you can get the log by running `platform activity:log --type environment.push`. When the build finished, you're given the URL of your deployed environment. Click the URL to see your site. If your environment wasn't active and so wasn't deployed, activate it by running the following command: ```bash platform environment:activate ``` ###### Migrate your data If you are moving an existing site to Platform.sh, then in addition to code you also need to migrate your data. That means your database and your files. ####### Import the database First, obtain a database dump from your current site, such as using the * [`pg_dump` command for PostgreSQL](https://www.postgresql.org/docs/current/app-pgdump.md) * [`mysqldump` command for MariaDB](https://mariadb.com/kb/en/mysqldump/) * [`sqlite-dump` command for SQLite](https://www.sqlitetutorial.net/sqlite-dump/) Next, import the database into your Platform.sh site by running the following command: ```bash platform sql Go forth and Deploy (even on Friday)! #### Additional resources This guide has hopefully helped you deploy a new Quarkus site, or migrate an existing one, to Platform.sh. It has made a few assumptions to provide the best information to do so, but is by no means a complete reference for your particular application. For this reason, the Platform.sh team maintains and adds to a number of Quarkus guides that can help you add services like Elasticsearch and MongoDB to your application, or how to start using Panache and JPA. Consult those guides below or in the sidebar for more information. - [Elasticsearch](https://docs.platform.sh/guides/quarkus/elasticsearch.md) - [JPA](https://docs.platform.sh/guides/quarkus/jpa.md) - [MongoDB](https://docs.platform.sh/guides/quarkus/mongodb.md) - [Panache](https://docs.platform.sh/guides/quarkus/panache.md) - [Redis](https://docs.platform.sh/guides/quarkus/redis.md) [Back](https://docs.platform.sh/guides/quarkus/deploy/deploy.md) ### How to Deploy Quarkus on Platform.sh with Elasticsearch Quarkus provides two ways of accessing Elasticsearch: via the lower level `RestClient` or via the `RestHighLevelClient`. To initialize Elasticsearch in your project's cluster so that it can be accessed by a Quarkus application, it is necessary to modify two files. **Note**: This guide only covers the addition of a service configuration to an existing Quarkus project already configured to deploy on Platform.sh. Please see the [deployment guide](https://docs.platform.sh/guides/quarkus/deploy.md) for more detailed instructions for setting up app containers and initial projects. ##### 1. Add the Elasticsearch service In your [service configuration](https://docs.platform.sh/add-services.md), include Elasticsearch with a [valid supported version](https://docs.platform.sh/add-services/elasticsearch.md): .platform/services.yaml ```yaml {} elasticsearch: type: elasticsearch:8.5 disk: 256 ``` ##### 2. Add the Elasticsearch relationship In your [app configuration](https://docs.platform.sh/create-apps/app-reference/single-runtime-image.md), use the service name `searchelastic` to grant the application access to Elasticsearch via a relationship: .platform.app.yaml ```yaml {} relationships: elasticsearch: "elasticsearch:elasticsearch" ``` ##### 3. Export connection credentials to the environment Connection credentials for Elasticsearch, like any service, are exposed to the application container through the `PLATFORM_RELATIONSHIPS` environment variable from the deploy hook onward. Since this variable is a base64 encoded JSON object of all of your project's services, you'll likely want a clean way to extract the information specific to Elasticsearch into it's own environment variables that can be used by Quarkus. On Platform.sh, custom environment variables can be defined programmatically in a `.environment` file using `jq` to do just that: ```text export ES_HOST=$(echo $PLATFORM_RELATIONSHIPS | base64 --decode | jq -r ".essearch[0].host") export ES_PORT=$(echo $PLATFORM_RELATIONSHIPS | base64 --decode | jq -r ".essearch[0].port") export QUARKUS_HIBERNATE_SEARCH_ELASTICSEARCH_HOSTS=${ES_HOST}:${ES_PORT} export QUARKUS_HTTP_PORT=$PORT export JAVA_OPTS="-Xmx$(jq .info.limits.memory /run/config.json)m -XX:+ExitOnOutOfMemoryError" ``` **Tip**: Environment variables names are following the conversion rules of [Eclipse MicroProfile](https://github.com/eclipse/microprofile-config/blob/master/spec/src/main/asciidoc/configsources.asciidoc#user-content-default-configsources). ##### 4. Connect to Elasticsearch Commit that code and push. The Elasticsearch instance is ready to be connected from within the Quarkus application. ### How to Deploy Quarkus on Platform.sh with JPA Hibernate ORM is a standard [JPA](https://jakarta.ee/specifications/persistence/) implementation. It offers you the full breadth of an Object Relational Mapper and it works well in Quarkus. To activate JPA and then have it accessed by the Quarkus application already configured for Platform.sh, it is necessary to modify two files. **Note**: This guide only covers the addition of a service configuration to an existing Quarkus project already configured to deploy on Platform.sh. Please see the [deployment guide](https://docs.platform.sh/guides/quarkus/deploy.md) for more detailed instructions for setting up app containers and initial projects. ##### 1. Add a SQL database service In your [service configuration](https://docs.platform.sh/add-services.md), include a SQL database service. Make sure to visit the documentation for [that service](https://docs.platform.sh/add-services.md) to find a valid version. For PostgreSQL that would look like: .platform/services.yaml ```yaml {} postgresql: type: postgresql:17 disk: 256 ``` ##### 2. Grant access to the service through a relationship To access the new service, set a `relationship` in your [app configuration](https://docs.platform.sh/create-apps/app-reference/single-runtime-image.md#relationships). .platform.app.yaml ```yaml {} relationships: postgresql: "postgresql:postgresql" ``` ##### 3. Export connection credentials to the environment Connection credentials for services are exposed to the application container through the `PLATFORM_RELATIONSHIPS` environment variable from the deploy hook onward. Since this variable is a base64 encoded JSON object of all of your project's services, you'll likely want a clean way to extract the information specific to the database into it's own environment variables that can be used by Quarkus. On Platform.sh, custom environment variables can be defined programmatically in a `.environment` file using `jq` to do just that: ```text export HOST=$(echo $PLATFORM_RELATIONSHIPS | base64 --decode | jq -r ".postgresdatabase[0].host") export DATABASE=$(echo $PLATFORM_RELATIONSHIPS | base64 --decode | jq -r ".postgresdatabase[0].path") export QUARKUS_DATASOURCE_PASSWORD=$(echo $PLATFORM_RELATIONSHIPS | base64 --decode | jq -r ".postgresdatabase[0].password") export QUARKUS_DATASOURCE_USERNAME=$(echo $PLATFORM_RELATIONSHIPS | base64 --decode | jq -r ".postgresdatabase[0].username") export QUARKUS_DATASOURCE_JDBC_URL=jdbc:postgresql://${HOST}/${DATABASE} export QUARKUS_HTTP_PORT=$PORT export JAVA_OPTS="-Xmx$(jq .info.limits.memory /run/config.json)m -XX:+ExitOnOutOfMemoryError" ``` **Tip**: Environment variables names are following the conversion rules of [Eclipse MicroProfile](https://github.com/eclipse/microprofile-config/blob/master/spec/src/main/asciidoc/configsources.asciidoc#user-content-default-configsources). ##### 4. Connect to the service Commit that code and push. The specified cluster will now always point to the PostgreSQL or any SQL service that you wish. ### How to Deploy Quarkus on Platform.sh with MongoDB MongoDB with Panache provides active record style entities (and repositories) like you have in [Hibernate ORM with Panache](https://quarkus.io/guides/hibernate-orm-panache). It focuses on helping you write your entities in Quarkus. To activate MongoDB and then have it accessed by the Quarkus application already in Platform.sh, it is necessary to modify two files. **Note**: This guide only covers the addition of a MongoDB service configuration to an existing Quarkus project already configured to deploy on Platform.sh. Please see the [deployment guide](https://docs.platform.sh/guides/quarkus/deploy.md) for more detailed instructions for setting up app containers and initial projects. ##### 1. Add the MongoDB service In your [service configuration](https://docs.platform.sh/add-services.md), include MongoDB with a [valid supported version](https://docs.platform.sh/add-services/mongodb.md): ```yaml {location=".platform/services.yaml"} dbmongo: type: mongodb:3.6 disk: 512 ``` ##### 2. Grant access to MongoDb through a relationship In your [app configuration](https://docs.platform.sh/create-apps/app-reference/single-runtime-image.md), use the service name `dbmongo` to grant the application access to MongoDB via a relationship: .platform.app.yaml ```yaml {} relationships: mongodb: "mongodb:mongodb" ``` ##### 3. Export connection credentials to the environment Connection credentials for services are exposed to the application container through the `PLATFORM_RELATIONSHIPS` environment variable from the deploy hook onward. Since this variable is a base64 encoded JSON object of all of your project's services, you'll likely want a clean way to extract the information specific to the database into it's own environment variables that can be used by Quarkus. On Platform.sh, custom environment variables can be defined programmatically in a `.environment` file using `jq` to do just that: ```text export MONGO_PORT=$(echo $PLATFORM_RELATIONSHIPS | base64 --decode | jq -r ".mongodatabase[0].port") export MONGO_HOST=$(echo $PLATFORM_RELATIONSHIPS | base64 --decode | jq -r ".mongodatabase[0].host") export QUARKUS_MONGODB_HOSTS="${MONGO_HOST}:${MONGO_PORT}" export QUARKUS_MONGODB_CREDENTIALS_PASSWORD=$(echo $PLATFORM_RELATIONSHIPS | base64 --decode | jq -r ".mongodatabase[0].password") export QUARKUS_MONGODB_CREDENTIALS_USERNAME=$(echo $PLATFORM_RELATIONSHIPS | base64 --decode | jq -r ".mongodatabase[0].username") export QUARKUS_MONGODB_DATABASE=$(echo $PLATFORM_RELATIONSHIPS | base64 --decode | jq -r ".mongodatbase[0].path") export QUARKUS_HTTP_PORT=$PORT export JAVA_OPTS="-Xmx$(jq .info.limits.memory /run/config.json)m -XX:+ExitOnOutOfMemoryError" ``` **Tip**: Environment variables names are following the conversion rules of [Eclipse MicroProfile](https://github.com/eclipse/microprofile-config/blob/master/spec/src/main/asciidoc/configsources.asciidoc#user-content-default-configsources). ##### 4. Connect to the service Commit that code and push. The application is ready and connected to a MongoDB instance. ### How to Deploy Quarkus on Platform.sh with Panache Hibernate ORM is a JPA implementation and offers you the full breadth of an Object Relational Mapper. It makes complex mappings possible, but they can sometimes be difficult. Hibernate ORM with Panache focuses on helping you write your entities in Quarkus. To activate Hibernate Panache and then have it accessed by the Quarkus application already in Platform.sh, it is necessary to modify two files. **Note**: This guide only covers the addition of a service configuration to an existing Quarkus project already configured to deploy on Platform.sh. Please see the [deployment guide](https://docs.platform.sh/guides/quarkus/deploy.md) for more detailed instructions for setting up app containers and initial projects. ##### 1. Add a SQL database service In your [service configuration](https://docs.platform.sh/add-services.md), include a SQL database service. Make sure to visit the documentation for [that service](https://docs.platform.sh/add-services.md) to find a valid version. For PostgreSQL that would look like: .platform/services.yaml ```yaml {} postgresql: type: postgresql:17 disk: 256 ``` ##### 2. Grant access to the service through a relationship To access the new service, set a `relationship` in your [app configuration](https://docs.platform.sh/create-apps/app-reference/single-runtime-image.md#relationships). .platform.app.yaml ```yaml {} relationships: postgresql: "postgresql:postgresql" ``` ##### 3. Export connection credentials to the environment Connection credentials for services are exposed to the application container through the `PLATFORM_RELATIONSHIPS` environment variable from the deploy hook onward. Since this variable is a base64 encoded JSON object of all of your project's services, you'll likely want a clean way to extract the information specific to the database into it's own environment variables that can be used by Quarkus. On Platform.sh, custom environment variables can be defined programmatically in a `.environment` file using `jq` to do just that: ```text export HOST=$(echo $PLATFORM_RELATIONSHIPS | base64 --decode | jq -r ".postgresdatabase[0].host") export DATABASE=$(echo $PLATFORM_RELATIONSHIPS | base64 --decode | jq -r ".postgresdatabase[0].path") export QUARKUS_DATASOURCE_PASSWORD=$(echo $PLATFORM_RELATIONSHIPS | base64 --decode | jq -r ".postgresdatabase[0].password") export QUARKUS_DATASOURCE_USERNAME=$(echo $PLATFORM_RELATIONSHIPS | base64 --decode | jq -r ".postgresdatabase[0].username") export QUARKUS_DATASOURCE_JDBC_URL=jdbc:postgresql://${HOST}/${DATABASE} export QUARKUS_HTTP_PORT=$PORT export JAVA_OPTS="-Xmx$(jq .info.limits.memory /run/config.json)m -XX:+ExitOnOutOfMemoryError" ``` **Tip**: Environment variables names are following the conversion rules of [Eclipse MicroProfile](https://github.com/eclipse/microprofile-config/blob/master/spec/src/main/asciidoc/configsources.asciidoc#user-content-default-configsources). ##### 4. Connect to the service Commit that code and push. The specified cluster will now always point to the PostgreSQL or any SQL service that you wish. ### How to Deploy Quarkus on Platform.sh with Redis To activate Redis and then have it accessed by the Quarkus application already in Platform.sh, it is necessary to modify two files. **Note**: This guide only covers the addition of a service configuration to an existing Quarkus project already configured to deploy on Platform.sh. Please see the [deployment guide](https://docs.platform.sh/guides/quarkus/deploy.md) for more detailed instructions for setting up app containers and initial projects. ##### 1. Add the Redis service In your [service configuration](https://docs.platform.sh/add-services.md), include Persistent Redis with a [valid supported version](https://docs.platform.sh/add-services/redis.md#persistent-redis): .platform/services.yaml ```yaml {} data: type: redis-persistent:7.2 disk: 256 ``` ##### 2. Add the Redis relationship In your [app configuration](https://docs.platform.sh/create-apps/app-reference/single-runtime-image.md), use the service name `searchelastic` to grant the application access to Elasticsearch via a relationship: .platform.app.yaml ```yaml {} relationships: redisdata: "data:redis" ``` ##### 3. Export connection credentials to the environment Connection credentials for Redis, like any service, are exposed to the application container through the `PLATFORM_RELATIONSHIPS` environment variable from the deploy hook onward. Since this variable is a base64 encoded JSON object of all of your project's services, you'll likely want a clean way to extract the information specific to Elasticsearch into it's own environment variables that can be used by Quarkus. On Platform.sh, custom environment variables can be defined programmatically in a `.environment` file using `jq` to do just that: ```text export REDIS_HOST=$(echo $PLATFORM_RELATIONSHIPS | base64 --decode | jq -r ".redisdata[0].host") export REDIS_PORT=$(echo $PLATFORM_RELATIONSHIPS | base64 --decode | jq -r ".redisdata[0].port") export QUARKUS_REDIS_HOSTS=redis://${REDIS_HOST}:${REDIS_PORT} export QUARKUS_HTTP_PORT=$PORT export JAVA_OPTS="-Xmx$(jq .info.limits.memory /run/config.json)m -XX:+ExitOnOutOfMemoryError" ``` **Tip**: Environment variables names are following the conversion rules of [Eclipse MicroProfile](https://github.com/eclipse/microprofile-config/blob/master/spec/src/main/asciidoc/configsources.asciidoc#user-content-default-configsources). ##### 4. Connect to Redis Commit that code and push. The Redis instance is ready to be connected from within the Quarkus application. ### Configure Spring with MariaDB/MySQL [MariaDB/MySQL](https://docs.platform.sh/add-services/mysql.md) is an open-source relational database technology. Spring has a robust integration with this technology: [Spring Data JPA](https://spring.io/projects/spring-data-jpa). The first step is to choose the database that you would like to use in your project. Define the driver for [MariaDB](https://mvnrepository.com/artifact/org.mariadb.jdbc/mariadb-java-client) or [MySQL](https://mvnrepository.com/artifact/mysql/mysql-connector-java) and the Java dependencies. Then determine the DataSource client using the [Java configuration reader library](https://github.com/platformsh/config-reader-java). ```java import org.springframework.context.annotation.Bean; import org.springframework.context.annotation.Configuration; import sh.platform.config.Config; import sh.platform.config.MariaDB; // Or substitute "MySQL" for "MariaDB" import javax.sql.DataSource; @Configuration public class DataSourceConfig { @Bean(name = "dataSource") public DataSource getDataSource() { Config config = new Config(); MariaDB database = config.getCredential("database", MariaDB::new); // Or substitute "MySQL" for "MariaDB" return database.get(); } } ``` ### Configure Spring with PostgreSQL [PostgreSQL](https://docs.platform.sh/add-services/postgresql.md) is an open-source relational database technology. Spring has a robust integration with this technology: [Spring Data JPA](https://spring.io/projects/spring-data-jpa). The first step is to choose the database that you would like to use in your project. Define the driver for [PostgreSQL](https://mvnrepository.com/artifact/postgresql/postgresql) and the Java dependencies. Then determine the DataSource client using the [Java configuration reader library](https://github.com/platformsh/config-reader-java). ```java import org.springframework.context.annotation.Bean; import org.springframework.context.annotation.Configuration; import sh.platform.config.Config; import sh.platform.config.PostgreSQL; import javax.sql.DataSource; @Configuration public class DataSourceConfig { @Bean(name = "dataSource") public DataSource getDataSource() { Config config = new Config(); PostgreSQL database = config.getCredential("database", PostgreSQL::new); return database.get(); } } ``` ### Configure Spring with RabbitMQ You can use [Spring JMS](https://spring.io/guides/gs/messaging-jms/) to use [RabbitMQ](https://docs.platform.sh/add-services/rabbitmq.md) with your app. First, determine the MongoDB client using the [Java configuration reader library](https://github.com/platformsh/config-reader-java). ```java import org.springframework.context.annotation.Bean; import org.springframework.context.annotation.Configuration; import org.springframework.jms.annotation.EnableJms; import org.springframework.jms.connection.CachingConnectionFactory; import org.springframework.jms.support.converter.MappingJackson2MessageConverter; import org.springframework.jms.support.converter.MessageConverter; import org.springframework.jms.support.converter.MessageType; import sh.platform.config.Config; import sh.platform.config.RabbitMQ; import javax.jms.ConnectionFactory; @Configuration @EnableJms public class JMSConfig { private ConnectionFactory getConnectionFactory() { Config config = new Config(); final RabbitMQ rabbitMQ = config.getCredential("rabbitmq", RabbitMQ::new); return rabbitMQ.get(); } @Bean public MessageConverter getMessageConverter() { MappingJackson2MessageConverter converter = new MappingJackson2MessageConverter(); converter.setTargetType(MessageType.TEXT); converter.setTypeIdPropertyName("_type"); return converter; } @Bean public CachingConnectionFactory getCachingConnectionFactory() { ConnectionFactory connectionFactory = getConnectionFactory(); return new CachingConnectionFactory(connectionFactory); } } ``` ### Configure Spring with Solr You can use [Spring Data Solr](https://docs.spring.io/spring-data/solr/docs/current/reference/html/#solr.repositories) for [Solr](https://docs.platform.sh/add-services/solr.md) with your app. First, determine the Solr client using the [Java configuration reader library](https://github.com/platformsh/config-reader-java). ```java import org.apache.solr.client.solrj.impl.HttpSolrClient; import org.springframework.context.annotation.Bean; import org.springframework.context.annotation.Configuration; import org.springframework.data.solr.core.SolrTemplate; import sh.platform.config.Config; import sh.platform.config.Solr; @Configuration public class SolrConfig { @Bean public HttpSolrClient elasticsearchTemplate() { Config config = new Config(); final Solr credential = config.getCredential("solr", Solr::new); final HttpSolrClient httpSolrClient = credential.get(); String url = httpSolrClient.getBaseURL(); httpSolrClient.setBaseURL(url.substring(0, url.lastIndexOf('/'))); return httpSolrClient; } @Bean public SolrTemplate solrTemplate(HttpSolrClient client) { return new SolrTemplate(client); } } ``` ### Deploy Spring on Platform.sh [Spring](https://start.spring.io/) is, in its own words, a cloud-native, (Linux) container-first framework for writing Java applications. To get Spring running on Platform.sh, you have two potential starting places: - You already have a Spring site you are trying to deploy. Go through this guide to make the recommended changes to your repository to prepare it for Platform.sh. - You have no code at this point. If you have no code, you have two choices: - Generate a basic Spring site. - Use a ready-made [Spring template](https://github.com/platformsh-templates/spring-mvc-maven-mongodb). A template is a starting point for building your project. It should help you get a project ready for production. To use a template, click the button below to create a Spring template project. ![Deploy on Platform.sh](https://platform.sh/images/deploy/lg-blue.svg) Once the template is deployed, you can follow the rest of this guide to better understand the extra files and changes to the repository. ##### Before you begin You need: - [Git](https://git-scm.com/downloads). Git is the primary tool to manage everything your app needs to run. Push commits to deploy changes and control configuration through YAML files. These files describe your infrastructure, making it transparent and version-controlled. - A Platform.sh account. If you don't already have one, [register for a trial account](https://auth.api.platform.sh/register). You can sign up with an email address or an existing GitHub, Bitbucket, or Google account. If you choose one of these accounts, you can set a password for your Platform.sh account later. - The [Platform.sh CLI](https://docs.platform.sh/administration/cli.md). This lets you interact with your project from the command line. You can also do most things through the [Web Console](https://docs.platform.sh/administration/web.md). ##### Initialize a project You can start with a basic code base or push a pre-existing project to Platform.sh. - Create your first project by running the following command: ```bash {} platform create --title ``` Then choose the region you want to deploy to, such as the one closest to your site visitors. You can also select more resources for your project through additional flags, but a Development plan should be enough for you to get started. Copy the ID of the project you've created. - Get your code ready locally. If your code lives in a remote repository, clone it to your computer. If your code isn't in a Git repository, initialize it by running ``git init``. - Connect your Platform.sh project with Git. You can use Platform.sh as your Git repository or connect to a third-party provider: GitHub, GitLab, or BitBucket. That creates an upstream called ``platform`` for your Git repository. When you choose to use a third-party Git hosting service the Platform.sh Git repository becomes a read-only mirror of the third-party repository. All your changes take place in the third-party repository. Add an integration to your existing third party repository. The process varies a bit for each supported service, so check the specific pages for each one. - [BitBucket](https://docs.platform.sh/integrations/source/bitbucket.md) - [GitHub](https://docs.platform.sh/integrations/source/github.md) - [GitLab](https://docs.platform.sh/integrations/source/gitlab.md) Accept the default options or modify to fit your needs. All of your existing branches are automatically synchronized to Platform.sh. You get a deploy failure message because you haven’t provided configuration files yet. You add them in the next step. If you’re integrating a repository to Platform.sh that contains a number of open pull requests, don’t use the default integration options. Projects are limited to three* preview environments (active and deployed branches or pull requests) and you would need to deactivate them individually to test this guide’s migration changes. Instead, each service integration should be made with the following flag: ```bash {} platform integration:add --type= ... --build-pull-requests=false ``` You can then go through this guide and activate the environment when you’re ready to deploy * You can purchase additional preview environments at any time in the Console. Open your project and select **Edit plan**. Add additional **Environments**, view a cost estimate, and confirm your changes. Now you have a local Git repository, a Platform.sh project, and a way to push code to that project. Next you can configure your project to work with Platform.sh. [Configure repository](https://docs.platform.sh/guides/spring/deploy/configure.md) #### Configure Spring for Platform.sh You now have a *project* running on Platform.sh. In many ways, a project is just a collection of tools around a Git repository. Just like a Git repository, a project has branches, called *environments*. Each environment can then be activated. *Active* environments are built and deployed, giving you a fully isolated running site for each active environment. Once an environment is activated, your app is deployed through a cluster of containers. You can configure these containers in three ways, each corresponding to a [YAML file](https://docs.platform.sh/learn/overview/yaml): - **Configure apps** in a `.platform.app.yaml` file. This controls the configuration of the container where your app lives. - **Add services** in a `.platform/services.yaml` file. This controls what additional services are created to support your app, such as databases or search servers. Each environment has its own independent copy of each service. If you're not using any services, you don't need this file. - **Define routes** in a `.platform/routes.yaml` file. This controls how incoming requests are routed to your app or apps. It also controls the built-in HTTP cache. If you're only using the single default route, you don't need this file. Start by creating empty versions of each of these files in your repository: ```bash # Create empty Platform.sh configuration files mkdir -p .platform && touch .platform/services.yaml && touch .platform/routes.yaml ``` Now that you've added these files to your project, configure each one for Spring in the following sections. Each section covers basic configuration options and presents a complete example with comments on why Spring requires those values. ###### Configure apps in `.platform.app.yaml` Your app configuration in a `.platform.app.yaml` file is allows you to configure nearly any aspect of your app. For all of the options, see a [complete reference](https://docs.platform.sh/create-apps/app-reference/single-runtime-image.md). The following example shows a complete configuration with comments to explain the various settings. Explaining the file line by line, notice the following settings: - ``name``: The application name. - ``type`` Where you define the language, in this case, Java, and the version. - ``disk``: The disk space that the application needs in megabytes. - ``hooks.build``: The command to package the application. - ``web.commands``: The order to start the application, where the port is overwritten with ``--server.port=$PORT``, using the ``PORT`` environment variable provided by Platform.sh to the application container. ```yaml {location=".platform.app.yaml"} # This file describes an application. You can have multiple applications # in the same project. # # See https://docs.platform.sh/user_guide/reference/platform-app-yaml.html # The name of this app. Must be unique within a project. name: app # The runtime the application uses. type: "java:11" disk: 1024 # The hooks executed at various points in the lifecycle of the application. hooks: build: mvn clean package # The relationships of the application with services or other applications. # # The left-hand side is the name of the relationship as it will be exposed # to the application in the PLATFORM_RELATIONSHIPS variable. The right-hand # side is in the form `:`. relationships: database: "db:mongodb" # The configuration of app when it is exposed to the web. web: commands: start: java -jar $JAVA_OPTS target/spring-mvc-maven-mongodb.jar --server.port=$PORT ``` ###### Add services in `.platform/services.yaml` You can add the managed services you need for you app to run in the `.platform/services.yaml` file. You pick the major version of the service and security and minor updates are applied automatically, so you always get the newest version when you deploy. You should always try any upgrades on a development branch before pushing to production. Spring doesn't require services to deploy, so you don't need a `.platform/services.yaml` file for now. You can [add other services](https://docs.platform.sh/add-services.md) if desired, such as [Solr](https://docs.platform.sh/add-services/solr.md) or [Elasticsearch](https://docs.platform.sh/add-services/elasticsearch.md). You need to configure Spring to use those services once they're enabled. ###### Define routes All HTTP requests sent to your app are controlled through the routing and caching you define in a `.platform/routes.yaml` file. The two most important options are the main route and its caching rules. A route can have a placeholder of `{default}`, which is replaced by your domain name in production and environment-specific names for your preview environments. The main route has an `upstream`, which is the name of the app container to forward requests to. You can enable [HTTP cache](https://docs.platform.sh/define-routes/cache.md). The router includes a basic HTTP cache. By default, HTTP caches includes all cookies in the cache key. So any cookies that you have bust the cache. The `cookies` key allows you to select which cookies should matter for the cache. You can also set up routes as [HTTP redirects](https://docs.platform.sh/define-routes/redirects.md). In the following example, all requests to `www.{default}` are redirected to the equivalent URL without `www`. HTTP requests are automatically redirected to HTTPS. If you don't include a `.platform/routes.yaml` file, a single default route is used. This is equivalent to the following: ```yaml {location=".platform/routes.yaml"} https://{default}/: type: upstream upstream: :http ``` Where `` is the `name` you've defined in your [app configuration](#configure-apps-in-platformappyaml). The following example presents a complete definition of a main route for a Spring app: ```bash {location=".platform/routes.yaml"} # The routes of the project. # # Each route describes how an incoming URL is going # to be processed by Platform.sh. "https://{default}/": type: upstream upstream: "app:http" "https://www.{default}/": type: redirect to: "https://{default}/" ``` #### Customize Spring for Platform.sh Now that your code contains all of the configuration to deploy on Platform.sh, it's time to make your Spring site itself ready to run on a Platform.sh environment. There are a number of additional steps that are either required or recommended, depending on how well you want to optimize your site. ###### Install the Config Reader You can get all information about a deployed environment, including how to connect to services, through [environment variables](https://docs.platform.sh/development/variables.md). Your app can [access these variables](https://docs.platform.sh/development/variables/use-variables.md#access-variables-in-your-app). Below is an example of how to install the Config Reader for Java using Maven: ```xml sh.platform config 2.2.2 ``` and Gradle: ```txt compile group: 'sh.platform', name: 'config', version: '2.2.2' ``` ###### `.environment` The `.platform.app.yaml` file in the [previous step](https://docs.platform.sh/guides/spring/deploy/configure.md#configure-apps-in-platformappyaml) has been pulled directly from the [Spring template](https://github.com/platformsh-templates/spring-mvc-maven-mongodb/blob/master/.platform.app.yaml). It is sufficient to deploy Spring on its own, but since [Spring Config](https://docs.spring.io/spring-boot/docs/current/reference/html/features.md#features.external-config.typesafe-configuration-properties.relaxed-binding.environment-variables) makes it possible to overwrite configurations without impacting the application itself, you might elect to rely more heavily on environment variables in its place. Consider this simplified `.platform.app.yaml` file: ```yaml {location=".platform.app.yaml"} name: myapp type: "java:11" disk: 1024 hooks: build: mvn clean package web: commands: start: java -jar $JAVA_OPTS target/file.jar --server.port=$PORT ``` On Platform.sh, we can set the environment variable `JAVA_OPTS` by committing a `.environment` file to the repository's root. Platform.sh runs `source .environment` in the application root when a project starts, and when logging into the environment over SSH. That gives you a place to do extra environment variable setup prior to the application running, including modifying the system `$PATH` and other shell level customizations. It allows us to define `JAVA_OPTS` when running on Platform.sh, but otherwise not be used during local development testing. ```shell # .environment export JAVA_OPTS="-Xmx$(jq .info.limits.memory /run/config.json)m -XX:+ExitOnOutOfMemoryError" ``` **Tip**: To check the Garbage collector settings, please, check the [Java Performance tuning section.](https://docs.platform.sh/languages/java/tuning.md) #### Deploy Spring Now you have your configuration for deployment and your app set up to run on Platform.sh. Make sure all your code is committed to Git and run `git push` to your Platform.sh environment. Your code is built, producing a read-only image that's deployed to a running cluster of containers. If you aren't using a source integration, the log of the process is returned in your terminal. If you're using a source integration, you can get the log by running `platform activity:log --type environment.push`. When the build finished, you're given the URL of your deployed environment. Click the URL to see your site. If your environment wasn't active and so wasn't deployed, activate it by running the following command: ```bash platform environment:activate ``` ###### Migrate your data If you are moving an existing site to Platform.sh, then in addition to code you also need to migrate your data. That means your database and your files. ####### Import the database First, obtain a database dump from your current site, such as using the * [`pg_dump` command for PostgreSQL](https://www.postgresql.org/docs/current/app-pgdump.md) * [`mysqldump` command for MariaDB](https://mariadb.com/kb/en/mysqldump/) * [`sqlite-dump` command for SQLite](https://www.sqlitetutorial.net/sqlite-dump/) Next, import the database into your Platform.sh site by running the following command: ```bash platform sql Go forth and Deploy (even on Friday)! #### Additional resources This guide has hopefully helped you deploy a new Spring site, or migrate an existing one, to Platform.sh. It has made a few assumptions to provide the best information to do so, but is by no means a complete reference for your particular application. For this reason, the Platform.sh team maintains and adds to a number of Spring guides that can help you add services like Elasticsearch and MongoDB to your application, or how to start using Panache and JPA. Consult those guides below or in the sidebar for more information. - [Elasticsearch](https://docs.platform.sh/guides/spring/elasticsearch.md) - [JPA](https://docs.platform.sh/guides/spring/jpa.md) - [MongoDB](https://docs.platform.sh/guides/spring/mongodb.md) - [Redis](https://docs.platform.sh/guides/spring/redis.md) [Back](https://docs.platform.sh/guides/spring/deploy/deploy.md) ### How to Deploy Spring on Platform.sh with Elasticsearch To activate Elasticsearch and then have it accessed by the Spring application already in Platform.sh, it is necessary to modify two files. **Note**: This guide only covers the addition of a service configuration to an existing Spring project already configured to deploy on Platform.sh. Please see the [deployment guide](https://docs.platform.sh/guides/spring/deploy.md) for more detailed instructions for setting up app containers and initial projects. ##### 1. Add the Elasticsearch service In your [service configuration](https://docs.platform.sh/add-services.md), include Elasticsearch with a [valid supported version](https://docs.platform.sh/add-services/elasticsearch.md): .platform/services.yaml ```yaml {} elasticsearch: type: elasticsearch:8.5 disk: 256 ``` ##### 2. Add the Elasticsearch relationship In your [app configuration](https://docs.platform.sh/create-apps/app-reference/single-runtime-image.md), use the service name `searchelastic` to grant the application access to Elasticsearch via a relationship: .platform.app.yaml ```yaml {} relationships: elasticsearch: "elasticsearch:elasticsearch" ``` ##### 3. Export connection credentials to the environment Connection credentials for Elasticsearch, like any service, are exposed to the application container through the `PLATFORM_RELATIONSHIPS` environment variable from the deploy hook onward. Since this variable is a base64 encoded JSON object of all of your project's services, you'll likely want a clean way to extract the information specific to Elasticsearch into it's own environment variables that can be used by Spring. On Platform.sh, custom environment variables can be defined programmatically in a `.environment` file using `jq` to do just that: ```text export ES_HOST=$(echo $PLATFORM_RELATIONSHIPS | base64 --decode | jq -r ".essearch[0].host") export ES_PORT=$(echo $PLATFORM_RELATIONSHIPS | base64 --decode | jq -r ".essearch[0].port") export SPRING_ELASTICSEARCH_REST_URIS="http://${ES_HOST}:${ES_PORT}" export JAVA_OPTS="-Xmx$(jq .info.limits.memory /run/config.json)m -XX:+ExitOnOutOfMemoryError" ``` **Tip**: For access to more credentials options, check [Spring common application properties](https://docs.spring.io/spring-boot/docs/current/reference/html/application-properties.md) and [binding from environment variables](https://docs.spring.io/spring-boot/docs/current/reference/html/spring-boot-features.md#features.external-config.typesafe-configuration-properties.relaxed-binding.environment-variables). ##### 4. Connect to Elasticsearch Commit that code and push. The Elasticsearch instance is ready to be connected from within the Spring application. ### How to Deploy Spring on Platform.sh with JPA To activate JPA and then have it accessed by the Spring application already configured for Platform.sh, it is necessary to modify two files. **Note**: This guide only covers the addition of a service configuration to an existing Spring project already configured to deploy on Platform.sh. Please see the [deployment guide](https://docs.platform.sh/guides/spring/deploy.md) for more detailed instructions for setting up app containers and initial projects. ##### 1. Add a SQL database service In your [service configuration](https://docs.platform.sh/add-services.md), include a SQL database service with a [valid supported version](https://docs.platform.sh/add-services.md) to find a valid version. For PostgreSQL that would look like: .platform/services.yaml ```yaml {} postgresql: type: postgresql:17 disk: 256 ``` ##### 2. Grant access to the service through a relationship To access the new service, set a `relationship` in your [app configuration](https://docs.platform.sh/create-apps/app-reference/single-runtime-image.md#relationships). .platform.app.yaml ```yaml {} relationships: postgresql: "postgresql:postgresql" ``` ##### 3. Export connection credentials to the environment Connection credentials for services are exposed to the application container through the `PLATFORM_RELATIONSHIPS` environment variable from the deploy hook onward. Since this variable is a base64 encoded JSON object of all of your project's services, you'll likely want a clean way to extract the information specific to the database into it's own environment variables that can be used by Spring. On Platform.sh, custom environment variables can be defined programmatically in a `.environment` file using `jq` to do just that: ```text export DB_PORT=`echo $PLATFORM_RELATIONSHIPS|base64 -d|jq -r ".postgresdatabase[0].port"` export HOST=`echo $PLATFORM_RELATIONSHIPS|base64 -d|jq -r ".postgresdatabase[0].host"` export DATABASE=`echo $PLATFORM_RELATIONSHIPS|base64 -d|jq -r ".postgresdatabase[0].path"` export SPRING_DATASOURCE_URL="jdbc:mysql://${HOST}:${DB_PORT}/${DATABASE}" export SPRING_DATASOURCE_USERNAME=`echo $PLATFORM_RELATIONSHIPS|base64 -d|jq -r ".postgresdatabase[0].username"` export SPRING_DATASOURCE_PASSWORD=`echo $PLATFORM_RELATIONSHIPS|base64 -d|jq -r ".postgresdatabase[0].password"` export JAVA_OPTS="-Xmx$(jq .info.limits.memory /run/config.json)m -XX:+ExitOnOutOfMemoryError" ``` **Tip**: For access to more credentials options, check [Spring common application properties](https://docs.spring.io/spring-boot/docs/current/reference/html/application-properties.md) and [binding from environment variables](https://docs.spring.io/spring-boot/docs/current/reference/html/spring-boot-features.md#features.external-config.typesafe-configuration-properties.relaxed-binding.environment-variables). ##### 4. Connect to the service Commit that code and push. The specified cluster now always points to the PostgreSQL or any SQL service that you wish. ### How to Deploy Spring on Platform.sh with MongoDB To activate MongoDB and then have it accessed by the Spring application already in Platform.sh, it is necessary to modify two files. **Note**: This guide only covers the addition of a MongoDB service configuration to an existing Spring project already configured to deploy on Platform.sh. Please see the [deployment guide](https://docs.platform.sh/guides/spring/deploy.md) for more detailed instructions for setting up app containers and initial projects. ##### 1. Add the MongoDB service In your [service configuration](https://docs.platform.sh/add-services.md), include MongoDB with a [valid supported version](https://docs.platform.sh/add-services/mongodb.md): ```yaml {location=".platform/services.yaml"} dbmongo: type: mongodb:3.6 disk: 512 ``` ##### 2. Grant access to MongoDb through a relationship In your [app configuration](https://docs.platform.sh/create-apps/app-reference/single-runtime-image.md), use the service name `dbmongo` to grant the application access to MongoDB via a relationship: .platform.app.yaml ```yaml {} relationships: mongodb: "mongodb:mongodb" ``` ##### 3. Export connection credentials to the environment Connection credentials for services are exposed to the application container through the `PLATFORM_RELATIONSHIPS` environment variable from the deploy hook onward. Since this variable is a base64 encoded JSON object of all of your project's services, you'll likely want a clean way to extract the information specific to the database into it's own environment variables that can be used by Spring. On Platform.sh, custom environment variables can be defined programmatically in a `.environment` file using `jq` to do just that: ```text export SPRING_DATA_MONGODB_USERNAME=`echo $PLATFORM_RELATIONSHIPS|base64 -d|jq -r ".dbmongo[0].username"` export SPRING_DATA_MONGODB_PASSWORD=`echo $PLATFORM_RELATIONSHIPS|base64 -d|jq -r ".dbmongo[0].password"` export SPRING_DATA_MONGODB_HOST=`echo $PLATFORM_RELATIONSHIPS|base64 -d|jq -r ".dbmongo[0].host"` export SPRING_DATA_MONGODB_DATABASE=`echo $PLATFORM_RELATIONSHIPS|base64 -d|jq -r ".dbmongo[0].path"` export JAVA_OPTS="-Xmx$(jq .info.limits.memory /run/config.json)m -XX:+ExitOnOutOfMemoryError" ``` **Tip**: For access to more credentials options, check [Spring common application properties](https://docs.spring.io/spring-boot/docs/current/reference/html/application-properties.md) and [binding from environment variables](https://docs.spring.io/spring-boot/docs/current/reference/html/spring-boot-features.md#features.external-config.typesafe-configuration-properties.relaxed-binding.environment-variables). ##### 4. Connect to the service Commit that code and push. The application is ready and connected to a MongoDB instance. ##### Use Spring Data for MongoDB You can use [Spring Data MongoDB](https://spring.io/projects/spring-data-mongodb) to use MongoDB with your app. First, determine the MongoDB client using the [Java configuration reader library](https://github.com/platformsh/config-reader-java). ```java import com.mongodb.MongoClient; import org.springframework.context.annotation.Bean; import org.springframework.context.annotation.Configuration; import org.springframework.data.mongodb.config.AbstractMongoConfiguration; import sh.platform.config.Config; import sh.platform.config.MongoDB; @Configuration public class MongoConfig extends AbstractMongoConfiguration { private Config config = new Config(); @Override @Bean public MongoClient mongoClient() { MongoDB mongoDB = config.getCredential("database", MongoDB::new); return mongoDB.get(); } @Override protected String getDatabaseName() { return config.getCredential("database", MongoDB::new).getDatabase(); } } ``` ### How to Deploy Spring on Platform.sh with Redis To activate Redis and then have it accessed by the Spring application already in Platform.sh, it is necessary to modify two files. **Note**: This guide only covers the addition of a service configuration to an existing Spring project already configured to deploy on Platform.sh. Please see the [deployment guide](https://docs.platform.sh/guides/spring/deploy.md) for more detailed instructions for setting up app containers and initial projects. ##### 1. Add the Redis service In your [service configuration](https://docs.platform.sh/add-services.md), include persistent Redis with a [valid supported version](https://docs.platform.sh/add-services/redis.md#persistent-redis): .platform/services.yaml ```yaml {} data: type: redis-persistent:7.2 disk: 256 ``` ##### 2. Add the Redis relationship In your [app configuration](https://docs.platform.sh/create-apps/app-reference/single-runtime-image.md), use the service name `searchelastic` to grant the application access to Elasticsearch via a relationship: .platform.app.yaml ```yaml {} relationships: redisdata: "data:redis" ``` ##### 3. Export connection credentials to the environment Connection credentials for Redis, like any service, are exposed to the application container through the `PLATFORM_RELATIONSHIPS` environment variable from the deploy hook onward. Since this variable is a base64 encoded JSON object of all of your project's services, you'll likely want a clean way to extract the information specific to Elasticsearch into it's own environment variables that can be used by Spring. On Platform.sh, custom environment variables can be defined programmatically in a `.environment` file using `jq` to do just that: ```text export SPRING_REDIS_HOST=$(echo $PLATFORM_RELATIONSHIPS | base64 --decode | jq -r ".redisdata[0].host") export SPRING_REDIS_PORT=$(echo $PLATFORM_RELATIONSHIPS | base64 --decode | jq -r ".redisdata[0].port") export JAVA_OPTS="-Xmx$(jq .info.limits.memory /run/config.json)m -XX:+ExitOnOutOfMemoryError" ``` **Tip**: For access to more credentials options, check [Spring common application properties](https://docs.spring.io/spring-boot/docs/current/reference/html/application-properties.md) and [binding from environment variables](https://docs.spring.io/spring-boot/docs/current/reference/html/spring-boot-features.md#features.external-config.typesafe-configuration-properties.relaxed-binding.environment-variables). ##### 4. Connect to Redis Commit that code and push. The Redis instance is ready to be connected from within the Spring application. ##### Use Spring Data for Redis You can use [Spring Data Redis](https://spring.io/projects/spring-data-mongodb) to use Redis with your app. First, determine the MongoDB client using the [Java configuration reader library](https://github.com/platformsh/config-reader-java). ```java import org.springframework.context.annotation.Bean; import org.springframework.context.annotation.Configuration; import org.springframework.data.redis.connection.jedis.JedisConnectionFactory; import org.springframework.data.redis.core.RedisTemplate; import org.springframework.data.redis.serializer.GenericToStringSerializer; @Configuration public class RedisConfig { @Bean JedisConnectionFactory jedisConnectionFactory() { Config config = new Config(); RedisSpring redis = config.getCredential("redis", RedisSpring::new); return redis.get(); } @Bean public RedisTemplate redisTemplate() { final RedisTemplate template = new RedisTemplate(); template.setConnectionFactory(jedisConnectionFactory()); template.setValueSerializer(new GenericToStringSerializer(Object.class)); return template; } } ``` ## Reference ### App reference To define your app, you can either use one of Platform.sh's [single-runtime image](https://docs.platform.sh/create-apps/app-reference/single-runtime-image.md) or its [composable image (BETA)](https://docs.platform.sh/create-apps/app-reference/composable-image.md). ##### Single-runtime image Platform.sh provides and maintains a list of single-runtime images you can use for each of your application containers. See [all of the options you can use](https://docs.platform.sh/create-apps/app-reference/single-runtime-image.md) to define your app using a single-runtime image. ##### Composable image (BETA) The Platform.sh composable image provides more flexibility than single-runtime images. When using a composable image, you can define a stack (or group of packages) for your application container to use. There are over 80,000 packages available from the [Nix Packages collection](https://search.nixos.org/) that you can add to your stack. You can add as many packages to your application container as you need. **Note**: Platform.sh guarantees optimal user experience with the specific [set of packages](https://docs.platform.sh/create-apps/app-reference/composable-image.md#supported-nix-packages) it supports. You can use any other package available from the [Nix Packages collection](https://search.nixos.org/), including unstable ones, but NixOs is responsible for their support. See [all of the options you can use](https://docs.platform.sh/create-apps/app-reference/composable-image.md) to define your app using the composable image. #### Single-runtime image See all of the options for controlling your apps and how they’re built and deployed on Platform.sh. For single-app projects, the configuration is all done in a `.platform.app.yaml` file, usually located at the root of your app folder in your Git repository. [Multi-app projects](https://docs.platform.sh/create-apps/multi-app.md) can be set up in various ways. See a [comprehensive example](https://docs.platform.sh/create-apps.md#comprehensive-example) of a configuration in a `.platform.app.yaml` file. For reference, see a [log of changes to app configuration](https://docs.platform.sh/create-apps/upgrading.md). ###### Top-level properties The following table presents all properties available at the top level of the YAML for the app. The column _Set in instance?_ defines whether the given property can be overridden within a `web` or `workers` instance. To override any part of a property, you have to provide the entire property. | Name | Type | Required | Set in instance? | Description | | ------------------ | --------------------------------------------------- | -------- | ---------------- |----------------------------------------------------------------------------------------------------------------------------------------------------------------------------------------------------------------------------------------------------------------------------| | `name` | `string` | Yes | No | A unique name for the app. Must be lowercase alphanumeric characters. Changing the name destroys data associated with the app. | | `type` | A [type](#types) | Yes | No | The base image to use with a specific app language. Format: `runtime:version`. | | `size` | A [size](#sizes) | | Yes | How much resources to devote to the app. Defaults to `AUTO` in production environments. | | `relationships` | A dictionary of [relationships](#relationships) | | Yes | Connections to other services and apps. | | `disk` | `integer` or `null` | | Yes | The size of the disk space for the app in [MB](https://docs.platform.sh/glossary.md#mb). Minimum value is `128`. Defaults to `null`, meaning no disk is available. See [note on available space](#available-disk-space) | | `mounts` | A dictionary of [mounts](#mounts) | | Yes | Directories that are writable even after the app is built. If set as a local source, `disk` is required. | | `web` | A [web instance](#web) | | N/A | How the web application is served. | | `workers` | A [worker instance](#workers) | | N/A | Alternate copies of the application to run as background processes. | | `timezone` | `string` | | No | The timezone for crons to run. Format: a [TZ database name](https://en.wikipedia.org/wiki/List_of_tz_database_time_zones). Defaults to `UTC`, which is the timezone used for all logs no matter the value here. See also [app runtime timezones](https://docs.platform.sh/create-apps/timezone.md) | | `access` | An [access dictionary](#access) | | Yes | Access control for roles accessing app environments. | | `variables` | A [variables dictionary](#variables) | | Yes | Variables to control the environment. | | `firewall` | A [firewall dictionary](#firewall) | | Yes | Outbound firewall rules for the application. | | `build` | A [build dictionary](#build) | | No | What happens when the app is built. | | `dependencies` | A [dependencies dictionary](#dependencies) | | No | What global dependencies to install before the `build` hook is run. | | `hooks` | A [hooks dictionary](#hooks) | | No | What commands run at different stages in the build and deploy process. | | `crons` | A [cron dictionary](#crons) | | No | Scheduled tasks for the app. | | `source` | A [source dictionary](#source) | | No | Information on the app's source code and operations that can be run on it. | | `runtime` | A [runtime dictionary](#runtime) | | No | Customizations to your PHP or Lisp runtime. | | `additional_hosts` | An [additional hosts dictionary](#additional-hosts) | | Yes | Maps of hostnames to IP addresses. | ###### Root directory Some of the properties you can define are relative to your app's root directory. The root defaults to the location of your `.platform.app.yaml` file. That is, if a custom value for `source.root` is not provided in your configuration, the default behavior is equivalent to the above. To specify another directory, for example for a [multi-app project](https://docs.platform.sh/create-apps/multi-app.md), use the [`source.root` property](#source). ###### Types **Note**: You can now use the Platform.sh composable image (BETA) to install runtimes and tools in your application container. If you’ve reached this section from another page, you may be interested in supported ``stacks`` where ``type`` was referenced. See [supported Nix packages for the ](https://docs.platform.sh/create-apps/app-reference/composable-image.md#supported-nix-packages) for more information. The `type` defines the base container image used to run the application. The version is the major (`X`) and sometimes minor (`X.Y`) version numbers, depending on the service, as in the following table. Security and other patches are taken care of for you automatically. Available languages and their supported versions: | **Language** | **``runtime``** | **Supported ``version``** | | [C#/.Net Core](https://docs.platform.sh/languages/dotnet.md) | ``dotnet`` | 7.0, 6.0, 8.0 | | [Elixir](https://docs.platform.sh/languages/elixir.md) | ``elixir`` | 1.18, 1.15, 1.14 | | [Go](https://docs.platform.sh/languages/go.md) | ``golang`` | 1.23, 1.22, 1.21, 1.20 | | [Java](https://docs.platform.sh/languages/java.md) | ``java`` | 21, 19, 18, 17, 11, 8 | | [Lisp](https://docs.platform.sh/languages/lisp.md) | ``lisp`` | 2.1, 2.0, 1.5 | | [JavaScript/Node.js](https://docs.platform.sh/languages/nodejs.md) | ``nodejs`` | 22, 20, 18 | | [PHP](https://docs.platform.sh/languages/php.md) | ``php`` | 8.4, 8.3, 8.2, 8.1 | | [Python](https://docs.platform.sh/languages/python.md) | ``python`` | 3.12, 3.11, 3.10, 3.9, 3.8 | | [Ruby](https://docs.platform.sh/languages/ruby.md) | ``ruby`` | 3.3, 3.2, 3.1, 3.0 | | [Rust](https://docs.platform.sh/languages/rust.md) | ``rust`` | 1 | ####### Example configuration These are used in the format `runtime:version`: ```yaml {location=".platform.app.yaml"} type: 'php:8.4' ``` ###### Sizes Resources are distributed across all containers in an environment from the total available from your [plan size](https://docs.platform.sh/administration/pricing.md). So if you have more than just a single app, it doesn't get all of the resources available. Each environment has its own resources and there are different [sizing rules for preview environments](#sizes-in-preview-environments). By default, resource sizes (CPU and memory) are chosen automatically for an app based on the plan size and the number of other containers in the cluster. Most of the time, this automatic sizing is enough. You can set sizing suggestions for production environments when you know a given container has specific needs. Such as a worker that doesn't need much and can free up resources for other apps. To do so, set `size` to one of the following values: - `S` - `M` - `L` - `XL` - `2XL` - `4XL` The total resources allocated across all apps and services can't exceed what's in your plan. ####### Container profiles: CPU and memory By default, Platform.sh allocates a container profile to each app and service depending on: - The range of resources it’s expected to need - Your [plan size](https://docs.platform.sh/administration/pricing.md), as resources are distributed across containers. Ideally you want to give databases the biggest part of your memory, and apps the biggest part of your CPU. The container profile and the [size of the container](#sizes) determine how much CPU and memory (in [MB](https://docs.platform.sh/glossary.md#mb)) the container gets. There are three container profiles available: ``HIGH_CPU``, ``BALANCED``, and ``HIGH_MEMORY``. ######## ``HIGH_CPU`` container profile | Size | CPU | MEMORY | | ---- | ----- | -------- | | S | 0.40 | 128 MB | | M | 0.40 | 128 MB | | L | 1.20 | 256 MB | | XL | 2.50 | 384 MB | | 2XL | 5.00 | 768 MB | | 4XL | 10.00 | 1536 MB | ######## `BALANCED` container profile | Size | CPU | MEMORY | | ---- | ---- | -------- | | S | 0.05 | 32 MB | | M | 0.05 | 64 MB | | L | 0.08 | 256 MB | | XL | 0.10 | 512 MB | | 2XL | 0.20 | 1024 MB | | 4XL | 0.40 | 2048 MB | ######## `HIGH_MEMORY` container profile | Size | CPU | MEMORY | | ---- | ---- | --------- | | S | 0.25 | 128 MB | | M | 0.25 | 288 MB | | L | 0.40 | 1280 MB | | XL | 0.75 | 2624 MB | | 2XL | 1.50 | 5248 MB | | 4XL | 3.00 | 10496 MB | ######## Container profile reference The following table shows which container profiles Platform.sh applies when deploying your project. | Container | Profile | |-----------------------|-------------| | Chrome Headless | HIGH_CPU | | .NET | HIGH_CPU | | Elasticsearch | HIGH_MEMORY | | Elasticsearch Premium | HIGH_MEMORY | | Elixir | HIGH_CPU | | Go | HIGH_CPU | | Gotenberg | HIGH_MEMORY | | InfluxDB | HIGH_MEMORY | | Java | HIGH_MEMORY | | Kafka | HIGH_MEMORY | | Lisp | HIGH_CPU | | MariaDB | HIGH_MEMORY | | Memcached | BALANCED | | MongoDB | HIGH_MEMORY | | MongoDB Premium | HIGH_MEMORY | | Network Storage | HIGH_MEMORY | | Node.js | HIGH_CPU | | OpenSearch | HIGH_MEMORY | | Oracle MySQL | HIGH_MEMORY | | PHP | HIGH_CPU | | PostgreSQL | HIGH_MEMORY | | Python | HIGH_CPU | | RabbitMQ | HIGH_MEMORY | | Redis ephemeral | BALANCED | | Redis persistent | BALANCED | | Ruby | HIGH_CPU | | Rust | HIGH_CPU | | Solr | HIGH_MEMORY | | Varnish | HIGH_MEMORY | | Vault KMS | HIGH_MEMORY | ####### Sizes in preview environments Containers in preview environments don't follow the `size` specification. Application containers are set based on the plan's setting for **Environments application size**. The default is size **S**, but you can increase it by editing your plan. (Service containers in preview environments are always set to size **S**.) ###### Relationships To allow containers in your project to communicate with one another, you need to define relationships between them. You can define a relationship between an app and a service, or [between two apps](https://docs.platform.sh/create-apps/multi-app/relationships.md). The quickest way to define a relationship between your app and a service is to use the service's default endpoint. However, some services allow you to define multiple databases, cores, and/or permissions. In these cases, you can't rely on default endpoints. Instead, you can explicitly define multiple endpoints when setting up your relationships. **Note**: App containers don’t have a default endpoint like services. To connect your app to another app in your project, you need to explicitly define the ``http`` endpoint as the endpoint to connect both apps. For more information, see how to [define relationships between your apps](https://docs.platform.sh/create-apps/multi-app/relationships.md). **Availability**: New syntax (default and explicit endpoints) described below is supported by most, but not all, image types (``Relationship 'SERVICE_NAME' of application 'myapp' ... targets a service without a valid default endpoint configuration.``). This syntax is currently being rolled out for all images. If you encounter this error, use the “legacy” Platform.sh configuration noted at the bottom of this section. To define a relationship between your app and a service: The ``SERVICE_NAME`` is the name of the service as defined in its [configuration](https://docs.platform.sh/add-services.md). It is used as the relationship name, and associated with a ``null`` value. This instructs Platform.sh to use the service’s default endpoint to connect your app to the service. For example, if you define the following configuration: ```yaml {location=".platform.app.yaml"} relationships: mariadb: ``` Platform.sh looks for a service named ``mariadb`` in your ``.platform/services.yaml`` file, and connects your app to it through the service’s default endpoint. For reference, the equivalent configuration using explicit endpoints would be the following: ```yaml {location=".platform.app.yaml"} relationships: mariadb: service: mariadb endpoint: mysql ``` You can define any number of relationships in this way: ```yaml {location=".platform.app.yaml"} relationships: mariadb: redis: elasticsearch: ``` **Tip**: An even quicker way to define many relationships is to use the following single-line configuration: ```yaml {location=".platform.app.yaml"} relationships: {, , } ``` where ```yaml {location=".platform/services.yaml"} : type: mariadb:11.4 disk: 256 : type: redis:7.2 disk: 256 : type: elasticsearch:8.5 disk: 256 ``` Use the following configuration: ```yaml {location=".platform.app.yaml"} relationships: : service: endpoint: ``` - ``RELATIONSHIP_NAME`` is the name you want to give to the relationship. - ``SERVICE_NAME`` is the name of the service as defined in its [configuration](https://docs.platform.sh/add-services.md). - ``ENDPOINT_NAME`` is the endpoint your app will use to connect to the service (refer to the service reference to know which value to use). For example, to define a relationship named ``database`` that connects your app to a service called ``mariadb`` through the ``db1`` endpoint, use the following configuration: ```yaml {location=".platform.app.yaml"} relationships: database: # The name of the relationship. service: mariadb endpoint: db1 ``` For more information on how to handle multiple databases, multiple cores, and/or different permissions with services that support such features, see each service’s dedicated page: - [MariaDB/MySQL](https://docs.platform.sh/add-services/mysql.md#multiple-databases) (multiple databases and permissions) - [PostgreSQL](https://docs.platform.sh/add-services/postgresql.md#multiple-databases) (multiple databases and permissions) - [Redis](https://docs.platform.sh/add-services/redis.md#multiple-databases) (multiple databases) - [Solr](https://docs.platform.sh/add-services/solr.md#solr-6-and-later) (multiple cores) - [Vault KMS](https://docs.platform.sh/add-services/vault.md#multiple-endpoints-configuration) (multiple permissions) You can add as many relationships as you want to your app configuration, using both default and explicit endpoints according to your needs: ```yaml {location=".platform.app.yaml"} relationships: database1: service: mariadb endpoint: admin database2: service: mariadb endpoint: legacy cache: service: redis search: service: elasticsearch ``` **Legacy**: The following legacy syntax for specifying relationships is still supported by Platform.sh: ```yaml {location=".platform.app.yaml"} relationships: : ":" ``` For example: ```yaml {location=".platform.app.yaml"} relationships: database: "mariadb:mysql" ``` Feel free to use this until the default and explicit endpoint syntax is supported on all images. ###### Available disk space The maximum total space available to all apps and services is set by the storage in your plan settings. When deploying your project, the sum of all `disk` keys defined in app and service configurations must be *equal or less* than the plan storage size. So if your *plan storage size* is 5 GB, you can, for example, assign it in one of the following ways: - 2 GB to your app, 3 GB to your database - 1 GB to your app, 4 GB to your database - 1 GB to your app, 1 GB to your database, 3 GB to your OpenSearch service If you exceed the total space available, you receive an error on pushing your code. You need to either increase your plan's storage or decrease the `disk` values you've assigned. You configure the disk size in [MB](https://docs.platform.sh/glossary.md#mb). Your actual available disk space is slightly smaller with some space used for formatting and the filesystem journal. When checking available space, note whether it’s reported in MB or MiB. ####### Downsize a disk You can decrease the size of an existing disk for an app. If you do so, be aware that: - Backups from before the downsize are incompatible and can no longer be used. You need to [create new backups](https://docs.platform.sh/environments/backup.md). - The downsize fails if there’s more data on the disk than the desired size. ###### Mounts After your app is built, its file system is read-only. To make changes to your app's code, you need to use Git. For enhanced flexibility, Platform.sh allows you to define and use writable directories called "mounts". Mounts give you write access to files generated by your app (such as cache and log files) and uploaded files without going through Git. When you define a mount, you are mounting an external directory to your app container, much like you would plug a hard drive into your computer to transfer data. **Note**: - Mounts aren’t available during the build - When you [back up an environment](https://docs.platform.sh/environments/backup.md), the mounts on that environment are backed up too ####### Define a mount To define a mount, use the following configuration: ```yaml {location=".platform.app.yaml"} mounts: '': source: source_path: ``` is the path to your mount **within the app container** (relative to the app's root). If you already have a directory with that name, you get a warning that it isn't accessible after the build. See how to [troubleshoot the warning](https://docs.platform.sh/create-apps/troubleshoot-mounts.md#overlapping-folders). | Name | Type | Required | Description | | ------------- |-------------------------------| -------- |----------------------------------------------------------------------------------------------------------------------------------------------------------------------------------------------------------------------------------------------------------------------------------------------------------------------------------------------------------------------------------------------------------------------------------------------------------------------------------------------------------------------------------------------------------------------------------------------------------------------------------------------------------------------------------------------------------------------------------------------------------------------------------------------------------------------------------------------------------------------------------------------------------------------------------| | `source` | `local`, `service`, or `tmp` | Yes | Specifies the type of the mount: - `local` mounts are unique to your app. They can be useful to store files that remain local to the app instance, such as application logs. `local` mounts require disk space. To successfully set up a local mount, set the `disk` key in your app configuration. - `service` mounts point to [Network Storage](https://docs.platform.sh/add-services/network-storage.md) services that can be shared between several apps. - `tmp` mounts are local ephemeral mounts, where an external directory is mounted to the `/tmp` directory of your app. The content of a `tmp` mount **may be removed during infrastructure maintenance operations**. Therefore, `tmp` mounts allow you to **store files that you’re not afraid to lose**, such as your application cache that can be seamlessly rebuilt. Note that the `/tmp` directory has **a maximum allocation of 8 GB**. | | `source_path` | `string` | No | Specifies where the mount points **inside the [external directory](#mounts)**. - If you explicitly set a `source_path`, your mount points to a specific subdirectory in the external directory. - If the `source_path` is an empty string (`""`), your mount points to the entire external directory. - If you don't define a `source_path`, Platform.sh uses the as default value, without leading or trailing slashes. For example, if your mount lives in the `/web/uploads/` directory in your app container, it will point to a directory named `web/uploads` in the external directory. **WARNING:** Changing the name of your mount affects the `source_path` when it's undefined. See [how to ensure continuity](#ensure-continuity-when-changing-the-name-of-your-mount) and maintain access to your files. | | `service` | `string` | | Only for `service` mounts: the name of the [Network Storage service](https://docs.platform.sh/add-services/network-storage.md). | The accessibility to the web of a mounted directory depends on the [`web.locations` configuration](#web). Files can be all public, all private, or with different rules for different paths and file types. Note that when you remove a `local` mount from your `.platform.app.yaml` file, the mounted directory isn't deleted. The files still exist on disk until manually removed (or until the app container is moved to another host during a maintenance operation in the case of a `tmp` mount). ####### Example configuration ```yaml {location=".platform.app.yaml"} mounts: 'web/uploads': source: local source_path: uploads '/.tmp_platformsh': source: tmp source_path: files/.tmp_platformsh '/build': source: local source_path: files/build '/.cache': source: tmp source_path: files/.cache '/node_modules/.cache': source: tmp source_path: files/node_modules/.cache ``` For examples of how to set up a `service` mount, see the dedicated [Network Storage page](https://docs.platform.sh/add-services/network-storage.md). ####### Ensure continuity when changing the name of your mount Changing the name of your mount affects the default `source_path`. Say you have a `/my/cache/` mount with an undefined `source_path`: ```yaml {location=".platform.app.yaml"} mounts: '/my/cache/': source: tmp ``` If you rename the mount to `/cache/files/`, it will point to a new, empty `/cache/files/` directory. To ensure continuity, you need to explicitly define the `source_path` as the previous name of the mount, without leading or trailing slashes: ```yaml {location=".platform.app.yaml"} mounts: '/cache/files/': source: tmp source_path: my/cache ``` The `/cache/files/` mount will point to the original `/my/cache/` directory, maintaining access to all your existing files in that directory. ####### Overlapping mounts The locations of mounts as they are visible to application containers can overlap somewhat. For example: ```yaml {location=".platform/applications.yaml"} applications: myapp: # ... mounts: 'var/cache_a': source: service service: ns_service source_path: cacheA 'var/cache_b': source: tmp source_path: cacheB 'var/cache_c': source: local source_path: cacheC ``` In this case, it does not matter that each mount is of a different `source` type. Each mount is restricted to a subfolder within `var`, and all is well. The following, however, is not allowed and will result in a failure: ```yaml {location=".platform/applications.yaml"} applications: myapp: # ... mounts: 'var/': source: service service: ns_service source_path: cacheA 'var/cache_b': source: tmp source_path: cacheB 'var/cache_c': source: local source_path: cacheC ``` The `service` mount type specifically exists to share data between instances of the same application, whereas `tmp` and `instance` are meant to restrict data to build time and runtime of a single application instance, respectively. These allowances are not compatible, and will result in an error if pushed. ###### Web Use the `web` key to configure the web server running in front of your app. Defaults may vary with a different [image `type`](#types). | Name | Type | Required | Description | | ----------- | -------------------------------------------- | ----------------------------- | ----------- | | `commands` | A [web commands dictionary](#web-commands) | See [note](#required-command) | The command to launch your app. | | `upstream` | An [upstream dictionary](#upstream) | | How the front server connects to your app. | | `locations` | A [locations dictionary](#locations) | | How the app container responds to incoming requests. | See some [examples of how to configure what's served](https://docs.platform.sh/create-apps/web.md). ####### Web commands | Name | Type | Required | Description | | ------- | -------- | ----------------------------- | ----------- | | `pre_start` | `string` | | Command run just prior to `start`, which can be useful when you need to run _per-instance_ actions. | | `start` | `string` | See [note](#required-command) | The command to launch your app. If it terminates, it's restarted immediately. | Example: ```yaml {location=".platform.app.yaml"} web: commands: start: 'uwsgi --ini conf/server.ini' ``` This command runs every time your app is restarted, regardless of whether or not new code is deployed. **Note**: Never “background” a start process using ``&``. That’s interpreted as the command terminating and the supervisor process starts a second copy, creating an infinite loop until the container crashes. Just run it as normal and allow the Platform.sh supervisor to manage it. ######## Required command On all containers other than PHP, the value for `start` should be treated as required. On PHP containers, it's optional and defaults to starting PHP-FPM (`/usr/bin/start-php-app`). It can also be set explicitly on a PHP container to run a dedicated process, such as [React PHP](https://github.com/platformsh-examples/platformsh-example-reactphp) or [Amp](https://github.com/platformsh-examples/platformsh-example-amphp). See how to set up [alternate start commands on PHP](https://docs.platform.sh/languages/php.md#alternate-start-commands). ####### Upstream | Name | Type | Required | Description | Default | | --------------- |---------------------| -------- |-------------------------------------------------------------------|--------------------------------------------------------------------------------------------------------| | `socket_family` | `tcp` or `unix` | | Whether your app listens on a Unix or TCP socket. | Defaults to `tcp` for all [image types](#types) except PHP; for PHP image types the default is `unix`. | | `protocol` | `http` or `fastcgi` | | Whether your app receives incoming requests over HTTP or FastCGI. | Default varies based on [image `type`](#types). | For PHP, the defaults are configured for PHP-FPM and shouldn't need adjustment. For all other containers, the default for `protocol` is `http`. The following example is the default on non-PHP containers: ```yaml {location=".platform.app.yaml"} web: upstream: socket_family: tcp protocol: http ``` ######## Where to listen Where to listen depends on your setting for `web.upstream.socket_family` (defaults to `tcp`). | `socket_family` | Where to listen | |------------------|---------------------------------------------------------------------------------------------------------------------------------------| | `tcp` | The port specified by the [`PORT` environment variable](https://docs.platform.sh/development/variables/use-variables.md#use-provided-variables) | | `unix` | The Unix socket file specified by the [`SOCKET` environment variable](https://docs.platform.sh/development/variables/use-variables.md#use-provided-variables) | If your application isn't listening at the same place that the runtime is sending requests, you see `502 Bad Gateway` errors when you try to connect to your website. ####### Locations Each key in the `locations` dictionary is a path on your site with a leading `/`. For `example.com`, a `/` matches `example.com/` and `/admin` matches `example.com/admin`. When multiple keys match an incoming request, the most-specific applies. The following table presents possible properties for each location: | Name | Type | Default | Description | | ------------------- | ---------------------------------------------------- |------------|---------------------------------------------------------------------------------------------------------------------------------------------------------------------------------------------------------------------------------------------------------------------------------------------------------------------------------------------------------------------------------------------------------------------------------------------------------------------------------------------------------------------------------| | `root` | `string` | | The directory to serve static assets for this location relative to the [app's root directory](#root-directory). Must be an actual directory inside the root directory. | | `passthru` | `boolean` or `string` | `false` | Whether to forward disallowed and missing resources from this location to the app. A string is a path with a leading `/` to the controller, such as `/index.php`.

If your app is in PHP, when setting `passthru` to `true`, you might want to set `scripts` to `false` for enhanced security. This prevents PHP scripts from being executed from the specified location. You might also want to set `allow` to `false` so that not only PHP scripts can't be executed, but their source code also can't be delivered. | | `index` | Array of `string`s or `null` | | Files to consider when serving a request for a directory. When set, requires access to the files through the `allow` or `rules` keys. | | `expires` | `string` | `-1` | How long static assets are cached. The default means no caching. Setting it to a value enables the `Cache-Control` and `Expires` headers. Times can be suffixed with `ms` = milliseconds, `s` = seconds, `m` = minutes, `h` = hours, `d` = days, `w` = weeks, `M` = months/30d, or `y` = years/365d. If a `Cache-Control` appears on the `headers` configuration, `expires`, if set, will be ignored. Thus, make sure to set the `Cache-Control`'s `max-age` value when specifying a the header. | | `allow` | `boolean` | `true` | Whether to allow serving files which don't match a rule. | | `scripts` | `boolean` | | Whether to allow scripts to run. Doesn't apply to paths specified in `passthru`. Meaningful only on PHP containers. | | `headers` | A headers dictionary | | Any additional headers to apply to static assets, mapping header names to values (see [Set custom headers on static content](https://docs.platform.sh/create-apps/web/custom-headers.md)). Responses from the app aren't affected. | | `request_buffering` | A [request buffering dictionary](#request-buffering) | See below | Handling for chunked requests. | | `rules` | A [rules dictionary](#rules) | | Specific overrides for specific locations. | ######## Rules The rules dictionary can override most other keys according to a regular expression. The key of each item is a regular expression to match paths exactly. If an incoming request matches the rule, it's handled by the properties under the rule, overriding any conflicting rules from the rest of the `locations` dictionary. Under `rules`, you can set all of the other possible [`locations` properties](#locations) except `root`, `index` and `request_buffering`. In the following example, the `allow` key disallows requests for static files anywhere in the site. This is overridden by a rule that explicitly allows common image file formats. ```yaml {location=".platform.app.yaml"} web: locations: '/': # Handle dynamic requests root: 'public' passthru: '/index.php' # Disallow static files allow: false rules: # Allow common image files only. '\.(jpe?g|png|gif|svgz?|css|js|map|ico|bmp|eot|woff2?|otf|ttf)$': allow: true ``` ######## Request buffering Request buffering is enabled by default to handle chunked requests as most app servers don't support them. The following table shows the keys in the `request_buffering` dictionary: | Name | Type | Required | Default | Description | | ------------------ | --------- |----------| ------- |-------------------------------------------| | `enabled` | `boolean` | Yes | `true` | Whether request buffering is enabled. | | `max_request_size` | `string` | | `250m` | The maximum size to allow in one request. | The default configuration would look like this: ```yaml {location=".platform.app.yaml"} web: locations: '/': passthru: true request_buffering: enabled: true max_request_size: 250m ``` ###### Workers Workers are exact copies of the code and compilation output as a `web` instance after a [`build` hook](#hooks). They use the same container image. Workers can't accept public requests and so are suitable only for background tasks. If they exit, they're automatically restarted. The keys of the `workers` definition are the names of the workers. You can then define how each worker differs from the `web` instance using the [top-level properties](#top-level-properties). Each worker can differ from the `web` instance in all properties _except_ for: - `build` and `dependencies` properties, which must be the same - `crons` as cron jobs don't run on workers - `hooks` as the `build` hook must be the same and the `deploy` and `post_deploy` hooks don't run on workers. A worker named `queue` that was small and had a different start command could look like this: ```yaml {location=".platform.app.yaml"} workers: queue: size: S commands: start: | ./worker.sh ``` For resource allocation, using workers in your project requires a [Medium plan or larger](https://platform.sh/pricing/). ###### Access The `access` dictionary has one allowed key: | Name | Allowed values | Default | Description | | ----- | ----------------------------------- | ------------- | ----------- | | `ssh` | `admin`, `contributor`, or `viewer` | `contributor` | Defines the minimum role required to access app environments via SSH. | In the following example, only users with `admin` permissions for the given [environment type](https://docs.platform.sh/administration/users.md#environment-type-roles) can access the deployed environment via SSH: ```yaml {location=".platform.app.yaml"} access: ssh: admin ``` ###### Variables Platform.sh provides a number of ways to set [variables](https://docs.platform.sh/development/variables.md). Variables set in your app configuration have the lowest precedence, meaning they're overridden by any conflicting values provided elsewhere. All variables set in your app configuration must have a prefix. Some [prefixes have specific meanings](https://docs.platform.sh/development/variables.md#variable-prefixes). Variables with the prefix `env` are available as a separate environment variable. All other variables are available in the [`PLATFORM_VARIABLES` environment variable](https://docs.platform.sh/development/variables/use-variables.md#use-provided-variables). The following example sets two variables: - A variable named `env:AUTHOR` with the value `Juan` that's available in the environment as `AUTHOR` - A variable named `d8config:system.site:name` with the value `My site rocks` that's available in the `PLATFORM_VARIABLES` environment variable ```yaml {location=".platform.app.yaml"} variables: env: AUTHOR: 'Juan' d8config: "system.site:name": 'My site rocks' ``` You can also define and access more [complex values](https://docs.platform.sh/development/variables/use-variables.md#access-complex-values). ###### Firewall **Tier availability** This feature is available for **Elite and Enterprise** customers. [Compare the tiers](https://platform.sh/pricing/) on our pricing page, or [contact our sales team](https://platform.sh/contact/) for more information. Set limits in outbound traffic from your app with no impact on inbound requests. The `outbound` key is required and contains one or more rules. The rules define what traffic is allowed; anything unspecified is blocked. Each rule has the following properties where at least one is required and `ips` and `domains` can't be specified together: | Name | Type | Default | Description | | --------- |---------------------|-----------------|-------------------------------------------------------------------------------------------------------------------------------------------------------------------------------------------------------------------------| | `ips` | Array of `string`s | `["0.0.0.0/0"]` | IP addresses in [CIDR notation](https://en.wikipedia.org/wiki/Classless_Inter-Domain_Routing). See a [CIDR format converter](https://www.ipaddressguide.com/cidr). | | `domains` | Array of `string`s | | [Fully qualified domain names](https://en.wikipedia.org/wiki/Fully_qualified_domain_name) to specify specific destinations by hostname. | | `ports` | Array of `integer`s | | Ports from 1 to 65535 that are allowed. If any ports are specified, all unspecified ports are blocked. If no ports are specified, all ports are allowed. Port `25`, the SMTP port for sending email, is always blocked. | The default settings would look like this: ```yaml {location=".platform.app.yaml"} firewall: outbound: - ips: ["0.0.0.0/0"] ``` ####### Support for rules Where outbound rules for firewalls are supported in all environments. For Dedicated Gen 2 projects, contact support for configuration. ####### Multiple rules Multiple firewall rules can be specified. In such cases, a given outbound request is allowed if it matches _any_ of the defined rules. So in the following example requests to any IP on port 80 are allowed and requests to 1.2.3.4 on either port 80 or 443 are allowed: ```yaml {location=".platform.app.yaml"} firewall: outbound: - ips: ["1.2.3.4/32"] ports: [443] - ports: [80] ``` ####### Outbound traffic to CDNs Be aware that many services are behind a content delivery network (CDN). For most CDNs, routing is done via domain name, not IP address, so thousands of domain names may share the same public IP addresses at the CDN. If you allow the IP address of a CDN, you are usually allowing many or all of the other customers hosted behind that CDN. ####### Outbound traffic by domain You can filter outbound traffic by domain. Using domains in your rules rather than IP addresses is generally more specific and secure. For example, if you use an IP address for a service with a CDN, you have to allow the IP address for the CDN. This means that you allow potentially hundreds or thousands of other servers also using the CDN. An example rule filtering by domain: ```yaml {location=".platform.app.yaml"} firewall: outbound: - protocol: tcp domains: ["api.stripe.com", "api.twilio.com"] ports: [80, 443] - protocol: tcp ips: ["1.2.3.4/29","2.3.4.5"] ports: [22] ``` ######## Determine which domains to allow To determine which domains to include in your filtering rules, find the domains your site has requested the DNS to resolve. Run the following command to parse your server’s `dns.log` file and display all Fully Qualified Domain Names that have been requested: ```bash awk '/query\[[^P]\]/ { print $6 | "sort -u" }' /var/log/dns.log ``` The output includes all DNS requests that were made, including those blocked by your filtering rules. It doesn't include any requests made using an IP address. Example output: ```bash facebook.com fastly.com platform.sh www.google.com www.platform.sh ``` ###### Build The only property of the `build` dictionary is `flavor`, which specifies a default set of build tasks to run. Flavors are language-specific. See what the build flavor is for your language: - [Node.js](https://docs.platform.sh/languages/nodejs.md#dependencies) - [PHP](https://docs.platform.sh/languages/php.md#dependencies) In all languages, you can also specify a flavor of `none` to take no action at all (which is the default for any language other than PHP and Node.js). ```yaml {location=".platform.app.yaml"} build: flavor: none ``` ###### Dependencies Installs global dependencies as part of the build process. They're independent of your app's dependencies and are available in the `PATH` during the build process and in the runtime environment. They're installed before the `build` hook runs using a package manager for the language. | Language | Key name | Package manager | |----------|-----------------------|--------------------------------------------------------------------------------------------------------------------| | PHP | `php` | [Composer](https://getcomposer.org/) | | Python 2 | `python` or `python2` | [Pip 2](https://packaging.python.org/tutorials/installing-packages/) | | Python 3 | `python3` | [Pip 3](https://packaging.python.org/tutorials/installing-packages/) | | Ruby | `ruby` | [Bundler](https://bundler.io/) | | Node.js | `nodejs` | [npm](https://www.npmjs.com/) (see [how to use yarn](https://docs.platform.sh/languages/nodejs.md#use-yarn-as-a-package-manager)) | | Java | `java` | [Apache Maven](https://maven.apache.org/), [Gradle](https://gradle.org/), or [Apache Ant](https://ant.apache.org/) | The format for package names and version constraints are defined by the specific package manager. An example of dependencies in multiple languages: ```yaml {location=".platform.app.yaml"} dependencies: php: # Specify one Composer package per line. drush/drush: '8.0.0' composer/composer: '^2' python2: # Specify one Python 2 package per line. behave: '*' requests: '*' python3: # Specify one Python 3 package per line. numpy: '*' ruby: # Specify one Bundler package per line. sass: '3.4.7' nodejs: # Specify one NPM package per line. pm2: '^4.5.0' ``` ###### Hooks There are three different hooks that run as part of the process of building and deploying your app. These are places where you can run custom scripts. They are: the `build` hook, the `deploy` hook, and the `post_deploy` hook. Only the `build` hook is run for [worker instances](#workers), while [web instances](#web) run all three. The process is ordered as: 1. Variables accessible at build time become available. 1. [Build flavor](#build) runs if applicable. 1. Any [dependencies](#dependencies) are installed. 1. The `build` hook is run. 1. The file system is changed to read only (except for any [mounts](#mounts)). 1. The app container starts. Variables accessible at runtime and services become available. 1. The `deploy` hook is run. 1. The app container begins accepting requests. 1. The `post_deploy` hook is run. Note that if an environment changes by no code changes, only the last step is run. If you want the entire process to run, see how to [manually trigger builds](https://docs.platform.sh/development/troubleshoot.md#manually-trigger-builds). ####### Writable directories during build During the `build` hook, there are three writeable directories: - `PLATFORM_APP_DIR`: Where your code is checked out and the working directory when the `build` hook starts. Becomes the app that gets deployed. - `PLATFORM_CACHE_DIR`: Persists between builds, but isn't deployed. Shared by all builds on all branches. - `/tmp`: Isn't deployed and is wiped between each build. Note that `PLATFORM_CACHE_DIR` is mapped to `/tmp` and together they offer about 8GB of free space. ####### Hook failure Each hook is executed as a single script, so they're considered to have failed only if the final command in them fails. To cause them to fail on the first failed command, add `set -e` to the beginning of the hook. If a `build` hook fails for any reason, the build is aborted and the deploy doesn't happen. Note that this only works for `build` hooks -- if other hooks fail, the app is still deployed. ######## Automated testing It’s preferable that you set up and run automated tests in a dedicated CI/CD tool. Relying on Platform.sh hooks for such tasks can prove difficult. During the `build` hook, you can halt the deployment on a test failure but the following limitations apply: - Access to services such as databases, Redis, Vault KMS, and even writable mounts is disabled. So any testing that relies on it is sure to fail. - If you haven’t made changes to your app, an existing build image is reused and the build hook isn’t run. - Test results are written into your app container, so they might get exposed to a third party. During the `deploy` hook, you can access services but **you can’t halt the deployment based on a test failure**. Note that there are other downsides: - Your app container is read-only during the deploy hook, so if your tests need to write reports and other information, you need to create a file mount for them. - Your app can only be deployed once the deploy hook has been completed. Therefore, running automated testing via the deploy hook generates slower deployments. - Your environment isn’t available externally during the deploy hook. Unit and integration testing might work without the environment being available, but you can’t typically perform end-to-end testing until after the environment is up and available. ###### Crons The keys of the `crons` definition are the names of the cron jobs. The names must be unique. If an application defines both a `web` instance and `worker` instances, cron jobs run only on the `web` instance. See how to [get cron logs](https://docs.platform.sh/increase-observability/logs/access-logs.md#container-logs). The following table shows the properties for each job: | Name | Type | Required | Description | | ------------------ | -------------------------------------------- | -------- |---------------------------------------------------------------------------------------------------------------------------------------------------------------------------------------------------------------------------------------------------------------------------------------------------------------------------------------------------------------------------------------------------------------------------------------------------------------------------------------------------------------------------------------------------------------------------------------------------------------------------------| | `spec` | `string` | Yes | The [cron specification](https://en.wikipedia.org/wiki/Cron#Cron_expression). To prevent competition for resources that might hurt performance, on **Grid or Dedicated Gen 3** projects use `H` in definitions to indicate an unspecified but invariant time. For example, instead of using `0 * * * *` to indicate the cron job runs at the start of every hour, you can use `H * * * *` to indicate it runs every hour, but not necessarily at the start. This prevents multiple cron jobs from trying to start at the same time. **The `H` syntax isn't available on Dedicated Gen 2 projects.** | | `commands` | A [cron commands dictionary](#cron-commands) | Yes | A definition of what commands to run when starting and stopping the cron job. | | `shutdown_timeout` | `integer` | No | When a cron is canceled, this represents the number of seconds after which a `SIGKILL` signal is sent to the process to force terminate it. The default is `10` seconds. | | `timeout` | `integer` | No | The maximum amount of time a cron can run before it's terminated. Defaults to the maximum allowed value of `86400` seconds (24 hours). Note that you can [cancel pending or running crons](https://docs.platform.sh/environments/cancel-activity.md). **Note**: The use of the ``cmd`` key is now deprecated in favor of the ``commands``key. Make sure you set your new cron jobs using the ``commands`` key, and update your existing cron jobs to ensure continuity. ####### Cron commands | Name | Type | Required | Description | | ------------------ | --------- | -------- | ----------- | | `start` | `string` | Yes | The command that's run. It's run in [Dash](https://en.wikipedia.org/wiki/Almquist_shell). | | `stop` | `string` | No | The command that's issued to give the cron command a chance to shutdown gracefully, such as to finish an active item in a list of tasks. Issued when a cron task is interrupted by a user through the CLI or Console. If not specified, a `SIGTERM` signal is sent to the process. | ```yaml {location=".platform.app.yaml"} crons: mycommand: spec: 'H * * * *' commands: start: sleep 60 && echo sleep-60-finished && date stop: killall sleep shutdown_timeout: 18 ``` In this example configuration, the [cron specification](#crons) uses the `H` syntax. Note that this syntax is only supported on Grid and Dedicated Gen 3 projects. On Dedicated Gen 2 projects, use the [standard cron syntax](https://en.wikipedia.org/wiki/Cron#Cron_expression). ####### Example cron jobs ```yaml {location=".platform.app.yaml"} type: 'ruby:3.3' crons: # Execute a rake script every 19 minutes. ruby: spec: '*/19 * * * *' commands: start: 'bundle exec rake some:task' ``` ```yaml {location=".platform.app.yaml"} type: 'php:8.4' crons: # Run Laravel's scheduler every 5 minutes. scheduler: spec: '*/5 * * * *' commands: start: 'php artisan schedule:run' ``` ```yaml {location=".platform.app.yaml"} type: 'php:8.4' crons: # Take a backup of the environment every day at 5:00 AM. snapshot: spec: 0 5 * * * commands: start: | # Only run for the production environment, aka main branch if [ "$PLATFORM_ENVIRONMENT_TYPE" = "production" ]; then croncape symfony ... fi ``` ####### Conditional crons If you want to set up customized cron schedules depending on the environment type, define conditional crons. To do so, use a configuration similar to the following: ```yaml {location=".platform.app.yaml"} crons: update: spec: '0 0 * * *' commands: start: | if [ "$PLATFORM_ENVIRONMENT_TYPE" = production ]; then platform backup:create --yes --no-wait platform source-operation:run update --no-wait --yes fi ``` ####### Cron job timing Minimum time between cron jobs being triggered: | Plan | Time | |-------------------- | --------- | | Professional | 5 minutes | | Elite or Enterprise | 1 minute | For each app container, only one cron job can run at a time. If a new job is triggered while another is running, the new job is paused until the other completes. To minimize conflicts, a random offset is applied to all triggers. The offset is a random number of seconds up to 20 minutes or the cron frequency, whichever is smaller. Crons are also paused while activities such as [backups](https://docs.platform.sh/environments/backup.md) are running. The crons are queued to run after the other activity finishes. To run cron jobs in a timezone other than UTC, set the [timezone property](#top-level-properties). ####### Paused crons [Preview environments](https://docs.platform.sh/glossary.md#preview-environment) are often used for a limited time and then abandoned. While it's useful for environments under active development to have scheduled tasks, unused environments don't need to run cron jobs. To minimize unnecessary resource use, crons on environments with no deployments are paused. This affects all environments that aren't live environments. This means all environments on Development plans and all preview environments on higher plans. Such environments with deployments within 14 days have crons with the status `running`. If there haven't been any deployments within 14 days, the status is `paused`. You can see the status in the Console or using the CLI by running `platform environment:info` and looking under `deployment_state`. ######## Restarting paused crons If the crons on your preview environment are paused but you're still using them, you can push changes to the environment or redeploy it. To restart crons without changing anything: Run the following command: ```bash {} platform redeploy ``` ###### Runtime The following table presents the various possible modifications to your PHP or Lisp runtime: | Name | Type | Language | Description | |-----------------------------|------------------------------------------------------------|----------|--------------------------------------------------------------------------------------------| | `extensions` | List of `string`s OR [extensions definitions](#extensions) | PHP | [PHP extensions](https://docs.platform.sh/languages/php/extensions.md) to enable. | | `disabled_extensions` | List of `string`s | PHP | [PHP extensions](https://docs.platform.sh/languages/php/extensions.md) to disable. | | `request_terminate_timeout` | `integer` | PHP | The timeout for serving a single request after which the PHP-FPM worker process is killed. | | `sizing_hints` | A [sizing hints definition](#sizing-hints) | PHP | The assumptions for setting the number of workers in your PHP-FPM runtime. | | `xdebug` | An Xdebug definition | PHP | The setting to turn on [Xdebug](https://docs.platform.sh/languages/php/xdebug.md). | | `quicklisp` | Distribution definitions | Lisp | [Distributions for QuickLisp](https://docs.platform.sh/languages/lisp.md#quicklisp-options) to use. | You can also set your [app's runtime timezone](https://docs.platform.sh/create-apps/timezone.md). ####### Extensions **Note**: You can now use the Platform.sh composable image (BETA) to install runtimes and tools in your application container. If you’ve reached this section from another page and are using the composable image, enabling/disabling extensions should be placed under the ``stack`` key instead of what is listed below. See [how to configure extensions with the composable image](https://docs.platform.sh/create-apps/app-reference/composable-image.md#top-level-properties). You can enable [PHP extensions](https://docs.platform.sh/languages/php/extensions.md) just with a list of extensions: ```yaml {location=".platform.app.yaml"} runtime: extensions: - geoip - tidy ``` Alternatively, if you need to include configuration options, use a dictionary for that extension: ```yaml {location=".platform.app.yaml"} runtime: extensions: - geoip - name: blackfire configuration: server_id: foo server_token: bar ``` In this case, the `name` property is required. ####### Sizing hints The following table shows the properties that can be set in `sizing_hints`: | Name | Type | Default | Minimum | Description | |-------------------|-----------|---------|---------|------------------------------------------------| | `request_memory` | `integer` | 45 | 10 | The average memory consumed per request in MB. | | `reserved_memory` | `integer` | 70 | 70 | The amount of memory reserved in MB. | See more about [PHP-FPM workers and sizing](https://docs.platform.sh/languages/php/fpm.md). ###### Source The following table shows the properties that can be set in `source`: | Name | Type | Required | Description | | ------------ | ------------------------ | -------- |------------------------------------------------------------------------------------------------------------------------------------------------------------------| | `operations` | An operations dictionary | | Operations that can be applied to the source code. See [source operations](https://docs.platform.sh/create-apps/source-operations.md) | | `root` | `string` | | The path where the app code lives. Defaults to the directory of the `.platform.app.yaml` file. Useful for [multi-app setups](https://docs.platform.sh/create-apps/multi-app.md). | ###### Additional hosts If you're using a private network with specific IP addresses you need to connect to, you might want to map those addresses to hostnames to better remember and organize them. In such cases, you can add a map of those IP addresses to whatever hostnames you like. Then when your app tries to access the hostname, it's sent to the proper IP address. So in the following example, if your app tries to access `api.example.com`, it's sent to `192.0.2.23`. ```yaml {location=".platform.app.yaml"} additional_hosts: api.example.com: "192.0.2.23" web.example.com: "203.0.113.42" ``` This is equivalent to adding the mapping to the `/etc/hosts` file for the container. #### Composable image The Platform.sh composable image provides enhanced flexibility when defining your app. It allows you to install several runtimes and tools in your application container, in a **"one image to rule them all"** approach. The composable image is built on [Nix](https://nix.dev), which offers the following benefits: - You can add as many packages to your application container as you need, choosing from over 80,000 packages from [the Nixpkgs collection](https://search.nixos.org/packages). - The packages you add are built in total isolation, so you can install different versions of the same package. - With [Nix](https://nix.dev/reference/glossary#term-Nix), there are no undeclared dependencies in your source code. What works on your local machine is guaranteed to work on any other machine. This page introduces all the settings available to configure your composable image from your `.platform.app.yaml` file (usually located at the root of your Git repository). Note that multi-app projects can be [set in various ways](https://docs.platform.sh/create-apps/multi-app.md). If you're pressed for time, jump to this comprehensive [configuration example](https://docs.platform.sh/create-apps.md#comprehensive-example). ###### Top-level properties The following table presents all the properties you can use at the top level of your app's YAML configuration file. The column _Set in instance?_ defines whether the given property can be overridden within a `web` or `workers` instance. To override any part of a property, you have to provide the entire property. | Name | Type | Required | Set in instance? | Description | |--------------------|-----------------------------------------------------|----------|------------------|----------------------------------------------------------------------------------------------------------------------------------------------------------------------------------------------------------------------------------------------------------------| | `name` | `string` | Yes | No | A unique name for the app. Must be lowercase alphanumeric characters. Changing the name destroys data associated with the app. | | `stack` | An array of [Nix packages](#stack) | Yes | No | A list of packages from the Platform.sh collection of [supported runtimes](#supported-nix-packages) and/or from [Nixpkgs](https://search.nixos.org/packages). | | `size` | A [size](#sizes) | | Yes | How much resources to devote to the app. Defaults to `AUTO` in production environments. | | `relationships` | A dictionary of [relationships](#relationships) | | Yes | Connections to other services and apps. | | `disk` | `integer` or `null` | | Yes | The size of the disk space for the app in [MB](https://docs.platform.sh/glossary.md#mb). Minimum value is `128`. Defaults to `null`, meaning no disk is available. See [note on available space](#available-disk-space) | | `mounts` | A dictionary of [mounts](#mounts) | | Yes | Directories that are writable even after the app is built. If set as a local source, `disk` is required. | | `web` | A [web instance](#web) | | N/A | How the web application is served. | | `workers` | A [worker instance](#workers) | | N/A | Alternate copies of the application to run as background processes. | | `timezone` | `string` | | No | The timezone for crons to run. Format: a [TZ database name](https://en.wikipedia.org/wiki/List_of_tz_database_time_zones). Defaults to `UTC`, which is the timezone used for all logs no matter the value here. See also [app runtime timezones](https://docs.platform.sh/create-apps/timezone.md) | | `access` | An [access dictionary](#access) | | Yes | Access control for roles accessing app environments. | | `variables` | A [variables dictionary](#variables) | | Yes | Variables to control the environment. | | `firewall` | A [firewall dictionary](#firewall) | | Yes | Outbound firewall rules for the application. | | `hooks` | A [hooks dictionary](#hooks) | | No | What commands run at different stages in the build and deploy process. | | `crons` | A [cron dictionary](#crons) | | No | Scheduled tasks for the app. | | `source` | A [source dictionary](#source) | | No | Information on the app's source code and operations that can be run on it. | | `additional_hosts` | An [additional hosts dictionary](#additional-hosts) | | Yes | Maps of hostnames to IP addresses. | **Note**: The ``type``, ``build``, ``dependencies``, and ``runtime`` keys are only supported when using a [single-runtime image](https://docs.platform.sh/create-apps/app-reference/single-runtime-image.md). They are **not** supported when using the composable image. They are replaced by the ``stack`` key. ###### Stack Use the ``stack`` key to define which runtimes and binaries you want to install in your application container. Define them as a YAML array as follows: ```yaml {location=".platform/applications.yaml"} myapp: stack: [ "@" ] # OR stack: - "@" ``` To add a language to your stack, use the `@` format. To add a tool to your stack, use the `` format, as no version is needed. **Warning**: While technically available during the build phase, ``nix`` commands aren’t supported at runtime as the image becomes read-only. When using the Platform.sh composable image, you don’t need ``nix`` commands. Everything you install using the ``stack`` key is readily available to you as the binaries are linked and included in ``$PATH``. For instance, to [start a secondary runtime](#primary-runtime), just issue the command (e.g. in the [start](https://docs.platform.sh/create-apps/app-reference/composable-image.md#web-commands)) instead of the ``nix run`` command. ######## Primary runtime If you add multiple runtimes to your application container, the first declared runtime becomes the primary runtime. The primary runtime is the one that is automatically started. To start other declared runtimes, you need to start them manually, using [web commands](#web-commands). To find out which start command to use, go to the [Languages](https://docs.platform.sh/languages.md) section, and visit the documentation page dedicated to your runtime. **Note**: If you use PHP, note that PHP-FPM is only started automatically if PHP is defined as the primary runtime. ####### Supported Nix packages **Note**: The Nix packages listed in the following table are officially supported by Platform.sh to provide optimal user experience. However, you can add any other packages from [the Nixpkgs collection](https://search.nixos.org/) to your ``stack``. This includes packages from the ``unstable`` channel, like [FrankenPHP](https://search.nixos.org/packages?channel=unstable&show=frankenphp&from=0&size=50&sort=relevance&type=packages&query=frankenphp). While available for you to install, packages that aren’t listed in the following table are supported by Nix itself, not Platform.sh. Depending on the Nix package, you can select only the major runtime version, or the major and minor runtime versions as shown in the table. Security and other patches are applied automatically. | **Language** | **Nix package** | **Supported version(s)** | |----------------------------------------------|---------------|----------------------------------------| | [Clojure](https://clojure.org/) | `clojure` | 1 | | [Common Lisp (SBCL)](https://docs.platform.sh/languages/lisp.md) | `sbcl` | 2 | | [Elixir](https://docs.platform.sh/languages/elixir.md) | `elixir` | 1.151.14 | | [Go](https://docs.platform.sh/languages/go.md) | `golang` | 1.221.21 | | [Java](https://docs.platform.sh/languages/java.md) | `java` | 21 | | [Javascript/Bun](https://bun.sh/) | `bun` | 1 | | [JavaScript/Node.js](https://docs.platform.sh/languages/nodejs.md) | `nodejs` | 222018 | | [Perl](https://www.perl.org/) | `perl` | 5 | | [PHP](https://docs.platform.sh/languages/php.md) | `php` | 8.38.28.1 | | [Python](https://docs.platform.sh/languages/python.md) | `python` | 3.123.113.103.92.7 | | [Ruby](https://docs.platform.sh/languages/ruby.md) | `ruby` | 3.33.23.1 | **Example:** You want to add PHP version 8.4 and ``facedetect`` to your application container. To do so, use the following configuration: ```yaml {location=".platform/applications.yaml"} myapp: stack: [ "php@8.4", "facedetect" ] # OR stack: - "php@8.4" - "facedetect" ``` ####### PHP extensions and Python packages When you add PHP or Python to your application container, you can define which extensions (for PHP) or packages (for Python) you also want to add to your stack. To find out which extensions you can install with your runtime, follow these steps: 1. Go to the [NixOS search](https://search.nixos.org/). 2. Enter a runtime and click **Search**. 3. In the **Package sets** side bar, select the right set of extensions/packages for your runtime version. You can choose the desired extensions/packages from the filtered results. ![Screenshot of the Nix package sets selection for PHP@8.3](https://docs.platform.sh/images/nixos/nixos-packages.png "0.5") ######## Install PHP extensions To enable [PHP extensions](https://docs.platform.sh/languages/php/extensions.md), specify a list of `extensions` below the language definition. To disable [PHP extensions](https://docs.platform.sh/languages/php/extensions.md), specify a list of `disabled_extensions` below the language definition. For instance: ```yaml {location=".platform/applications.yaml"} myapp: source: root: "/" stack: - "php@8.4": extensions: - apcu - sodium - xsl - pdo_sqlite disabled_extensions: - gd ``` **Note**: To help you find out the name of the PHP package you want to use, some maintainers provide a ``PHP upstream extension`` value in the [NixOS search engine](https://search.nixos.org/packages?channel=unstable&show=php82Extensions.gd). ![Screenshot of an upstream extension value shown in the NixOS search](https://docs.platform.sh/images/nixos/nixossearch-upstream-value.png) If this information is not provided, note that PHP package names on NixOS always respect the ``Extensions.`` format. Therefore, you can copy the ```` as shown in the NixOS search results, and use it in your configuration. Note that you can use environment variables or your `php.ini` file to [include further configuration options](https://docs.platform.sh/languages/php.md#customize-php-settings) for your PHP extensions. ######## Install Python packages To install Python packages, add them to your stack as new packages. To do so, use the full name of the package. For instance, to install [``python312Packages.yq``](https://search.nixos.org/packages?channel=unstable&show=python312Packages.yq), use the following configuration: ```yaml {location=".platform/applications.yaml"} myapp: stack: - "python@3.12" - "python312Packages.yq" # python package specific ``` Alternatively, if you need to include configuration options for your extensions, use either your ``php.ini`` file or [environment variables](https://docs.platform.sh/development/variables/set-variables.md). ####### Example configuration Here is a full composable image configuration example. Note the use of the `@` format. ```yaml {location=".platform/applications.yaml"} myapp: stack: - "php@8.4": extensions: - apcu - sodium - xsl - pdo_sqlite - "python@3.12" - "python312Packages.yq" # python package specific - "yq" # tool ``` ####### Combine single-runtime and composable images In a [multiple application context](https://docs.platform.sh/create-apps/multi-app.md), you can use a mix of [single-runtime images](https://docs.platform.sh/create-apps/app-reference/single-runtime-image.md) and [composable images](https://docs.platform.sh/create-apps/app-reference/composable-image.md). Here is an example configuration including a ``frontend`` app and a ``backend`` app: ```yaml {location=".platform/applications.yaml"} backend: stack: - "php@8.4": extensions: - apcu - sodium - xsl - pdo_sqlite - "python@3.12" - "python312Packages.yq" # python package specific frontend: type: 'nodejs:22 ``` **Note**: If you add multiple runtimes to your application container, the first declared runtime becomes the primary runtime. The primary runtime is the one that is automatically started. To start other declared runtimes, you need to start them manually, using [web commands](#web-commands). To find out which start command to use, go to the [Languages](https://docs.platform.sh/languages.md) section, and visit the documentation page dedicated to your language. If you use PHP, note that PHP-FPM is only started automatically if PHP is defined as the primary runtime. ###### Sizes Resources are distributed across all containers in an environment from the total available from your [plan size](https://docs.platform.sh/administration/pricing.md). So if you have more than just a single app, it doesn't get all of the resources available. Each environment has its own resources and there are different [sizing rules for preview environments](#sizes-in-preview-environments). By default, resource sizes (CPU and memory) are chosen automatically for an app based on the plan size and the number of other containers in the cluster. Most of the time, this automatic sizing is enough. You can set sizing suggestions for production environments when you know a given container has specific needs. Such as a worker that doesn't need much and can free up resources for other apps. To do so, set `size` to one of the following values: - `S` - `M` - `L` - `XL` - `2XL` - `4XL` The total resources allocated across all apps and services can't exceed what's in your plan. ####### Container profiles: CPU and memory By default, Platform.sh allocates a container profile to each app and service depending on: - The range of resources it’s expected to need - Your [plan size](https://docs.platform.sh/administration/pricing.md), as resources are distributed across containers. Ideally you want to give databases the biggest part of your memory, and apps the biggest part of your CPU. The container profile and the [size of the container](#sizes) determine how much CPU and memory (in [MB] (/glossary.md#mb)) the container gets. There are three container profiles available: ``HIGH_CPU``, ``BALANCED``, and ``HIGH_MEMORY``. ######## ``HIGH_CPU`` container profile | Size | CPU | MEMORY | | ---- | ----- | -------- | | S | 0.40 | 128 MB | | M | 0.40 | 128 MB | | L | 1.20 | 256 MB | | XL | 2.50 | 384 MB | | 2XL | 5.00 | 768 MB | | 4XL | 10.00 | 1536 MB | ######## `BALANCED` container profile | Size | CPU | MEMORY | | ---- | ---- | -------- | | S | 0.05 | 32 MB | | M | 0.05 | 64 MB | | L | 0.08 | 256 MB | | XL | 0.10 | 512 MB | | 2XL | 0.20 | 1024 MB | | 4XL | 0.40 | 2048 MB | ######## `HIGH_MEMORY` container profile | Size | CPU | MEMORY | | ---- | ---- | --------- | | S | 0.25 | 128 MB | | M | 0.25 | 288 MB | | L | 0.40 | 1280 MB | | XL | 0.75 | 2624 MB | | 2XL | 1.50 | 5248 MB | | 4XL | 3.00 | 10496 MB | ######## Container profile reference The following table shows which container profiles Platform.sh applies when deploying your project. | Container | Profile | |-------------------------|---------------| | Chrome Headless | HIGH_CPU | | .NET | HIGH_CPU | | Elasticsearch | HIGH_MEMORY | | Elasticsearch Premium | HIGH_MEMORY | | Elixir | HIGH_CPU | | Go | HIGH_CPU | | Gotenberg | HIGH_MEMORY | | InfluxDB | HIGH_MEMORY | | Java | HIGH_MEMORY | | Kafka | HIGH_MEMORY | | Lisp | HIGH_CPU | | MariaDB | HIGH_MEMORY | | Memcached | BALANCED | | MongoDB | HIGH_MEMORY | | MongoDB Premium | HIGH_MEMORY | | Network Storage | HIGH_MEMORY | | Node.js | HIGH_CPU | | OpenSearch | HIGH_MEMORY | | Oracle MySQL | HIGH_MEMORY | | PHP | HIGH_CPU | | PostgreSQL | HIGH_MEMORY | | Python | HIGH_CPU | | RabbitMQ | HIGH_MEMORY | | Redis ephemeral | BALANCED | | Redis persistent | BALANCED | | Ruby | HIGH_CPU | | Rust | HIGH_CPU | | Solr | HIGH_MEMORY | | Varnish | HIGH_MEMORY | | Vault KMS | HIGH_MEMORY | ####### Sizes in preview environments Containers in preview environments don't follow the `size` specification. Application containers are set based on the plan's setting for **Environments application size**. The default is size **S**, but you can increase it by editing your plan. (Service containers in preview environments are always set to size **S**.) ###### Relationships To allow containers in your project to communicate with one another, you need to define relationships between them. You can define a relationship between an app and a service, or [between two apps](https://docs.platform.sh/create-apps/multi-app/relationships.md). The quickest way to define a relationship between your app and a service is to use the service's default endpoint. However, some services allow you to define multiple databases, cores, and/or permissions. In these cases, you can't rely on default endpoints. Instead, you can explicitly define multiple endpoints when setting up your relationships. **Note**: App containers don’t have a default endpoint like services. To connect your app to another app in your project, you need to explicitly define the ``http`` endpoint as the endpoint to connect both apps. For more information, see how to [define relationships between your apps](https://docs.platform.sh/create-apps/multi-app/relationships.md). **Availability**: New syntax (default and explicit endpoints) described below is supported by most, but not all, image types (``Relationship 'SERVICE_NAME' of application 'myapp' ... targets a service without a valid default endpoint configuration.``). This syntax is currently being rolled out for all images. If you encounter this error, use the “legacy” Platform.sh configuration noted at the bottom of this section. To define a relationship between your app and a service: The ``SERVICE_NAME`` is the name of the service as defined in its [configuration](https://docs.platform.sh/add-services.md). It is used as the relationship name, and associated with a ``null`` value. This instructs Platform.sh to use the service’s default endpoint to connect your app to the service. For example, if you define the following configuration: ```yaml {location=".platform.app.yaml"} relationships: mariadb: ``` Platform.sh looks for a service named ``mariadb`` in your ``.platform/services.yaml`` file, and connects your app to it through the service’s default endpoint. For reference, the equivalent configuration using explicit endpoints would be the following: ```yaml {location=".platform.app.yaml"} relationships: mariadb: service: mariadb endpoint: mysql ``` You can define any number of relationships in this way: ```yaml {location=".platform.app.yaml"} relationships: mariadb: redis: elasticsearch: ``` **Tip**: An even quicker way to define many relationships is to use the following single-line configuration: ```yaml {location=".platform.app.yaml"} relationships: {, , } ``` where ```yaml {location=".platform/services.yaml"} : type: mariadb:11.4 disk: 256 : type: redis:7.2 disk: 256 : type: elasticsearch:8.5 disk: 256 ``` Use the following configuration: ```yaml {location=".platform.app.yaml"} relationships: : service: endpoint: ``` - ``RELATIONSHIP_NAME`` is the name you want to give to the relationship. - ``SERVICE_NAME`` is the name of the service as defined in its [configuration](https://docs.platform.sh/add-services.md). - ``ENDPOINT_NAME`` is the endpoint your app will use to connect to the service (refer to the service reference to know which value to use). For example, to define a relationship named ``database`` that connects your app to a service called ``mariadb`` through the ``db1`` endpoint, use the following configuration: ```yaml {location=".platform.app.yaml"} relationships: database: # The name of the relationship. service: mariadb endpoint: db1 ``` For more information on how to handle multiple databases, multiple cores, and/or different permissions with services that support such features, see each service’s dedicated page: - [MariaDB/MySQL](https://docs.platform.sh/add-services/mysql.md#multiple-databases) (multiple databases and permissions) - [PostgreSQL](https://docs.platform.sh/add-services/postgresql.md#multiple-databases) (multiple databases and permissions) - [Redis](https://docs.platform.sh/add-services/redis.md#multiple-databases) (multiple databases) - [Solr](https://docs.platform.sh/add-services/solr.md#solr-6-and-later) (multiple cores) - [Vault KMS](https://docs.platform.sh/add-services/vault.md#multiple-endpoints-configuration) (multiple permissions) You can add as many relationships as you want to your app configuration, using both default and explicit endpoints according to your needs: ```yaml {location=".platform.app.yaml"} relationships: database1: service: mariadb endpoint: admin database2: service: mariadb endpoint: legacy cache: service: redis search: service: elasticsearch ``` **Legacy**: The following legacy syntax for specifying relationships is still supported by Platform.sh: ```yaml {location=".platform.app.yaml"} relationships: : ":" ``` For example: ```yaml {location=".platform.app.yaml"} relationships: database: "mariadb:mysql" ``` Feel free to use this until the default and explicit endpoint syntax is supported on all images. ###### Available disk space The maximum total space available to all apps and services is set by the storage in your plan settings. When deploying your project, the sum of all `disk` keys defined in app and service configurations must be *equal or less* than the plan storage size. So if your *plan storage size* is 5 GB, you can, for example, assign it in one of the following ways: - 2 GB to your app, 3 GB to your database - 1 GB to your app, 4 GB to your database - 1 GB to your app, 1 GB to your database, 3 GB to your OpenSearch service If you exceed the total space available, you receive an error on pushing your code. You need to either increase your plan's storage or decrease the `disk` values you've assigned. You configure the disk size in [MB](https://docs.platform.sh/glossary.md#mb). Your actual available disk space is slightly smaller with some space used for formatting and the filesystem journal. When checking available space, note whether it’s reported in MB or MiB. ####### Downsize a disk You can decrease the size of an existing disk for an app. If you do so, be aware that: - The downsize fails if there's more data on the disk than the desired size. - Backups from before the downsize can still be restored. ###### Mounts After your app is built, its file system is read-only. To make changes to your app's code, you need to use Git. For enhanced flexibility, Platform.sh allows you to define and use writable directories called "mounts". Mounts give you write access to files generated by your app (such as cache and log files) and uploaded files without going through Git. When you define a mount, you are mounting an external directory to your app container, much like you would plug a hard drive into your computer to transfer data. **Note**: - Mounts aren’t available during the build - When you [back up an environment](https://docs.platform.sh/environments/backup.md), the mounts on that environment are backed up too ####### Define a mount To define a mount, use the following configuration: ```yaml {location=".platform.app.yaml"} mounts: '': source: source_path: ``` is the path to your mount **within the app container** (relative to the app's root). If you already have a directory with that name, you get a warning that it isn't accessible after the build. See how to [troubleshoot the warning](https://docs.platform.sh/create-apps/troubleshoot-mounts.md#overlapping-folders). | Name | Type | Required | Description | | ------------- |-------------------------------|----------|----------------------------------------------------------------------------------------------------------------------------------------------------------------------------------------------------------------------------------------------------------------------------------------------------------------------------------------------------------------------------------------------------------------------------------------------------------------------------------------------------------------------------------------------------------------------------------------------------------------------------------------------------------------------------------------------------------------------------------------------------------------------------------------------------------------------------------------------------------------------------------------------------------------------------------| | `source` | `local`, `service`, or `tmp` | Yes | Specifies the type of the mount: - `local` mounts are unique to your app. They can be useful to store files that remain local to the app instance, such as application logs. `local` mounts require disk space. To successfully set up a local mount, set the `disk` key in your app configuration. - `service` mounts point to [Network Storage](https://docs.platform.sh/add-services/network-storage.md) services that can be shared between several apps. - `tmp` mounts are local ephemeral mounts, where an external directory is mounted to the `/tmp` directory of your app. The content of a `tmp` mount **may be removed during infrastructure maintenance operations**. Therefore, `tmp` mounts allow you to **store files that you’re not afraid to lose**, such as your application cache that can be seamlessly rebuilt. Note that the `/tmp` directory has **a maximum allocation of 8 GB**. | | `source_path` | `string` | No | Specifies where the mount points **inside the [external directory](#mounts)**. - If you explicitly set a `source_path`, your mount points to a specific subdirectory in the external directory. - If the `source_path` is an empty string (`""`), your mount points to the entire external directory. - If you don't define a `source_path`, Platform.sh uses the as default value, without leading or trailing slashes. For example, if your mount lives in the `/web/uploads/` directory in your app container, it will point to a directory named `web/uploads` in the external directory. **WARNING:** Changing the name of your mount affects the `source_path` when it's undefined. See [how to ensure continuity](#ensure-continuity-when-changing-the-name-of-your-mount) and maintain access to your files. | | `service` | `string` | | Only for `service` mounts: the name of the [Network Storage service](https://docs.platform.sh/add-services/network-storage.md). | The accessibility to the web of a mounted directory depends on the [`web.locations` configuration](#web). Files can be all public, all private, or with different rules for different paths and file types. Note that when you remove a `local` mount from your `.platform.app.yaml` file, the mounted directory isn't deleted. The files still exist on disk until manually removed (or until the app container is moved to another host during a maintenance operation in the case of a `tmp` mount). ####### Example configuration ```yaml {location=".platform.app.yaml"} mounts: 'web/uploads': source: local source_path: uploads '/.tmp_platformsh': source: tmp source_path: files/.tmp_platformsh '/build': source: local source_path: files/build '/.cache': source: tmp source_path: files/.cache '/node_modules/.cache': source: tmp source_path: files/node_modules/.cache ``` For examples of how to set up a `service` mount, see the dedicated [Network Storage page](https://docs.platform.sh/add-services/network-storage.md). ####### Ensure continuity when changing the name of your mount Changing the name of your mount affects the default `source_path`. Say you have a `/my/cache/` mount with an undefined `source_path`: ```yaml {location=".platform.app.yaml"} mounts: '/my/cache/': source: tmp ``` If you rename the mount to `/cache/files/`, it will point to a new, empty `/cache/files/` directory. To ensure continuity, you need to explicitly define the `source_path` as the previous name of the mount, without leading or trailing slashes: ```yaml {location=".platform.app.yaml"} mounts: '/cache/files/': source: tmp source_path: my/cache ``` The `/cache/files/` mount will point to the original `/my/cache/` directory, maintaining access to all your existing files in that directory. ####### Overlapping mounts The locations of mounts as they are visible to application containers can overlap somewhat. For example: ```yaml {location=".platform/applications.yaml"} applications: myapp: # ... mounts: 'var/cache_a': source: service service: ns_service source_path: cacheA 'var/cache_b': source: tmp source_path: cacheB 'var/cache_c': source: local source_path: cacheC ``` In this case, it does not matter that each mount is of a different `source` type. Each mount is restricted to a subfolder within `var`, and all is well. The following, however, is not allowed and will result in a failure: ```yaml {location=".platform/applications.yaml"} applications: myapp: # ... mounts: 'var/': source: service service: ns_service source_path: cacheA 'var/cache_b': source: tmp source_path: cacheB 'var/cache_c': source: local source_path: cacheC ``` The `service` mount type specifically exists to share data between instances of the same application, whereas `tmp` and `instance` are meant to restrict data to build time and runtime of a single application instance, respectively. These allowances are not compatible, and will result in an error if pushed. ###### Web Use the `web` key to configure the web server running in front of your app. | Name | Type | Required | Description | |-------------|--------------------------------------------|-------------------------------|------------------------------------------------------| | `commands` | A [web commands dictionary](#web-commands) | See [note](#required-command) | The command to launch your app. | | `upstream` | An [upstream dictionary](#upstream) | | How the front server connects to your app. | | `locations` | A [locations dictionary](#locations) | | How the app container responds to incoming requests. | See some [examples of how to configure what's served](https://docs.platform.sh/create-apps/web.md). ####### Web commands | Name | Type | Required | Description | |-------------|----------|-------------------------------|-----------------------------------------------------------------------------------------------------| | `pre_start` | `string` | | Command run just prior to `start`, which can be useful when you need to run _per-instance_ actions. | | `start` | `string` | See [note](#required-command) | The command to launch your app. If it terminates, it's restarted immediately. | Example: ```yaml {location=".platform.app.yaml"} web: commands: start: 'uwsgi --ini conf/server.ini' ``` This command runs every time your app is restarted, regardless of whether or not new code is deployed. **Note**: Never “background” a start process using ``&``. That’s interpreted as the command terminating and the supervisor process starts a second copy, creating an infinite loop until the container crashes. Just run it as normal and allow the Platform.sh supervisor to manage it. ######## Required command On all containers other than PHP, the value for `start` should be treated as required. On PHP containers, it's optional and defaults to starting PHP-FPM (`/usr/bin/start-php-app`). It can also be set explicitly on a PHP container to run a dedicated process, such as [React PHP](https://github.com/platformsh-examples/platformsh-example-reactphp) or [Amp](https://github.com/platformsh-examples/platformsh-example-amphp). See how to set up [alternate start commands on PHP](https://docs.platform.sh/languages/php.md#alternate-start-commands). ####### Upstream | Name | Type | Required | Description | Default | |-----------------|---------------------|----------|-------------------------------------------------------------------|--------------------------------------------------------------------------------------------------------| | `socket_family` | `tcp` or `unix` | | Whether your app listens on a Unix or TCP socket. | Defaults to `tcp` for all [primary runtimes](#primary-runtime) except PHP; for PHP the default is `unix`. | | `protocol` | `http` or `fastcgi` | | Whether your app receives incoming requests over HTTP or FastCGI. | Default varies based on the [primary runtimes](#primary-runtime). | For PHP, the defaults are configured for PHP-FPM and shouldn't need adjustment. For all other containers, the default for `protocol` is `http`. The following example is the default on non-PHP containers: ```yaml {location=".platform.app.yaml"} web: upstream: socket_family: tcp protocol: http ``` ######## Where to listen Where to listen depends on your setting for `web.upstream.socket_family` (defaults to `tcp`). | `socket_family` | Where to listen | |-----------------|---------------------------------------------------------------------------------------------------------------------------------------| | `tcp` | The port specified by the [`PORT` environment variable](https://docs.platform.sh/development/variables/use-variables.md#use-provided-variables) | | `unix` | The Unix socket file specified by the [`SOCKET` environment variable](https://docs.platform.sh/development/variables/use-variables.md#use-provided-variables) | If your application isn't listening at the same place that the runtime is sending requests, you see `502 Bad Gateway` errors when you try to connect to your website. ####### Locations Each key in the `locations` dictionary is a path on your site with a leading `/`. For `example.com`, a `/` matches `example.com/` and `/admin` matches `example.com/admin`. When multiple keys match an incoming request, the most-specific applies. The following table presents possible properties for each location: | Name | Type | Default | Description | |---------------------|------------------------------------------------------|-----------|---------------------------------------------------------------------------------------------------------------------------------------------------------------------------------------------------------------------------------------------------------------------------------------------------------------------------------------------------------------------------------------------------------------------------------------------------------------------------------------------------------------------------------| | `root` | `string` | | The directory to serve static assets for this location relative to the app's root directory ([see `source.root`](#source)). Must be an actual directory inside the root directory. | | `passthru` | `boolean` or `string` | `false` | Whether to forward disallowed and missing resources from this location to the app. A string is a path with a leading `/` to the controller, such as `/index.php`.

If your app is in PHP, when setting `passthru` to `true`, you might want to set `scripts` to `false` for enhanced security. This prevents PHP scripts from being executed from the specified location. You might also want to set `allow` to `false` so that not only PHP scripts can't be executed, but their source code also can't be delivered. | | `index` | Array of `string`s or `null` | | Files to consider when serving a request for a directory. When set, requires access to the files through the `allow` or `rules` keys. | | `expires` | `string` | `-1` | How long static assets are cached. The default means no caching. Setting it to a value enables the `Cache-Control` and `Expires` headers. Times can be suffixed with `ms` = milliseconds, `s` = seconds, `m` = minutes, `h` = hours, `d` = days, `w` = weeks, `M` = months/30d, or `y` = years/365d. | | `allow` | `boolean` | `true` | Whether to allow serving files which don't match a rule. | | `scripts` | `boolean` | | Whether to allow scripts to run. Doesn't apply to paths specified in `passthru`. Meaningful only on PHP containers. | | `headers` | A headers dictionary | | Any additional headers to apply to static assets, mapping header names to values (see [Set custom headers on static content](https://docs.platform.sh/create-apps/web/custom-headers.md)). Responses from the app aren't affected. | | `request_buffering` | A [request buffering dictionary](#request-buffering) | See below | Handling for chunked requests. | | `rules` | A [rules dictionary](#rules) | | Specific overrides for specific locations. | ######## Rules The rules dictionary can override most other keys according to a regular expression. The key of each item is a regular expression to match paths exactly. If an incoming request matches the rule, it's handled by the properties under the rule, overriding any conflicting rules from the rest of the `locations` dictionary. Under `rules`, you can set all of the other possible [`locations` properties](#locations) except `root`, `index` and `request_buffering`. In the following example, the `allow` key disallows requests for static files anywhere in the site. This is overridden by a rule that explicitly allows common image file formats. ```yaml {location=".platform.app.yaml"} web: locations: '/': # Handle dynamic requests root: 'public' passthru: '/index.php' # Disallow static files allow: false rules: # Allow common image files only. '\.(jpe?g|png|gif|svgz?|css|js|map|ico|bmp|eot|woff2?|otf|ttf)$': allow: true ``` ######## Request buffering Request buffering is enabled by default to handle chunked requests as most app servers don't support them. The following table shows the keys in the `request_buffering` dictionary: | Name | Type | Required | Default | Description | |--------------------|-----------|----------|---------|-------------------------------------------| | `enabled` | `boolean` | Yes | `true` | Whether request buffering is enabled. | | `max_request_size` | `string` | | `250m` | The maximum size to allow in one request. | The default configuration would look like this: ```yaml {location=".platform.app.yaml"} web: locations: '/': passthru: true request_buffering: enabled: true max_request_size: 250m ``` ###### Workers Workers are exact copies of the code and compilation output as a `web` instance after a [`build` hook](#hooks). They use the same container image. Workers can't accept public requests and so are suitable only for background tasks. If they exit, they're automatically restarted. The keys of the `workers` definition are the names of the workers. You can then define how each worker differs from the `web` instance using the [top-level properties](#top-level-properties). Each worker can differ from the `web` instance in all properties _except_ for: - `crons` as cron jobs don't run on workers - `hooks` as the `build` hook must be the same and the `deploy` and `post_deploy` hooks don't run on workers. A worker named `queue` that was small and had a different start command could look like this: ```yaml {location=".platform.app.yaml"} workers: queue: size: S commands: start: | ./worker.sh ``` For resource allocation, using workers in your project requires a [Medium plan or larger](https://platform.sh/pricing/). ###### Access The `access` dictionary has one allowed key: | Name | Allowed values | Default | Description | |-------|-------------------------------------|---------------|-----------------------------------------------------------------------| | `ssh` | `admin`, `contributor`, or `viewer` | `contributor` | Defines the minimum role required to access app environments via SSH. | In the following example, only users with `admin` permissions for the given [environment type](https://docs.platform.sh/administration/users.md#environment-type-roles) can access the deployed environment via SSH: ```yaml {location=".platform.app.yaml"} access: ssh: admin ``` ###### Variables Platform.sh provides a number of ways to set [variables](https://docs.platform.sh/development/variables.md). Variables set in your app configuration have the lowest precedence, meaning they're overridden by any conflicting values provided elsewhere. All variables set in your app configuration must have a prefix. Some [prefixes have specific meanings](https://docs.platform.sh/development/variables.md#variable-prefixes). Variables with the prefix `env` are available as a separate environment variable. All other variables are available in the [`PLATFORM_VARIABLES` environment variable](https://docs.platform.sh/development/variables/use-variables.md#use-provided-variables). The following example sets two variables: - A variable named `env:AUTHOR` with the value `Juan` that's available in the environment as `AUTHOR` - A variable named `d8config:system.site:name` with the value `My site rocks` that's available in the `PLATFORM_VARIABLES` environment variable ```yaml {location=".platform.app.yaml"} variables: env: AUTHOR: 'Juan' d8config: "system.site:name": 'My site rocks' ``` You can also define and access more [complex values](https://docs.platform.sh/development/variables/use-variables.md#access-complex-values). ###### Firewall **Tier availability** This feature is available for **Elite and Enterprise** customers. [Compare the tiers](https://platform.sh/pricing/) on our pricing page, or [contact our sales team](https://platform.sh/contact/) for more information. Set limits in outbound traffic from your app with no impact on inbound requests. The `outbound` key is required and contains one or more rules. The rules define what traffic is allowed; anything unspecified is blocked. Each rule has the following properties where at least one is required and `ips` and `domains` can't be specified together: | Name | Type | Default | Description | |-----------|---------------------|-----------------|-------------------------------------------------------------------------------------------------------------------------------------------------------------------------------------------------------------------------| | `ips` | Array of `string`s | `["0.0.0.0/0"]` | IP addresses in [CIDR notation](https://en.wikipedia.org/wiki/Classless_Inter-Domain_Routing). See a [CIDR format converter](https://www.ipaddressguide.com/cidr). | | `domains` | Array of `string`s | | [Fully qualified domain names](https://en.wikipedia.org/wiki/Fully_qualified_domain_name) to specify specific destinations by hostname. | | `ports` | Array of `integer`s | | Ports from 1 to 65535 that are allowed. If any ports are specified, all unspecified ports are blocked. If no ports are specified, all ports are allowed. Port `25`, the SMTP port for sending email, is always blocked. | The default settings would look like this: ```yaml {location=".platform.app.yaml"} firewall: outbound: - ips: [ "0.0.0.0/0" ] ``` ####### Support for rules Where outbound rules for firewalls are supported in all environments. For Dedicated Gen 2 projects, contact support for configuration. ####### Multiple rules Multiple firewall rules can be specified. In such cases, a given outbound request is allowed if it matches _any_ of the defined rules. So in the following example requests to any IP on port 80 are allowed and requests to 1.2.3.4 on either port 80 or 443 are allowed: ```yaml {location=".platform.app.yaml"} firewall: outbound: - ips: [ "1.2.3.4/32" ] ports: [ 443 ] - ports: [ 80 ] ``` ####### Outbound traffic to CDNs Be aware that many services are behind a content delivery network (CDN). For most CDNs, routing is done via domain name, not IP address, so thousands of domain names may share the same public IP addresses at the CDN. If you allow the IP address of a CDN, you are usually allowing many or all of the other customers hosted behind that CDN. ####### Outbound traffic by domain You can filter outbound traffic by domain. Using domains in your rules rather than IP addresses is generally more specific and secure. For example, if you use an IP address for a service with a CDN, you have to allow the IP address for the CDN. This means that you allow potentially hundreds or thousands of other servers also using the CDN. An example rule filtering by domain: ```yaml {location=".platform.app.yaml"} firewall: outbound: - protocol: tcp domains: ["api.stripe.com", "api.twilio.com"] ports: [80, 443] - protocol: tcp ips: ["1.2.3.4/29","2.3.4.5"] ports: [22] ``` ######## Determine which domains to allow To determine which domains to include in your filtering rules, find the domains your site has requested the DNS to resolve. Run the following command to parse your server’s `dns.log` file and display all Fully Qualified Domain Names that have been requested: ```bash awk '/query\[[^P]\]/ { print $6 | "sort -u" }' /var/log/dns.log ``` The output includes all DNS requests that were made, including those blocked by your filtering rules. It doesn't include any requests made using an IP address. Example output: ```bash facebook.com fastly.com platform.sh www.google.com www.platform.sh ``` ###### Hooks There are three different hooks that run as part of the process of building and deploying your app. These are places where you can run custom scripts. They are: the `build` hook, the `deploy` hook, and the `post_deploy` hook. Only the `build` hook is run for [worker instances](#workers), while [web instances](#web) run all three. The process is ordered as: 1. Variables accessible at build time become available. 1. The `build` hook is run. 1. The file system is changed to read only (except for any [mounts](#mounts)). 1. The app container starts. Variables accessible at runtime and services become available. 1. The `deploy` hook is run. 1. The app container begins accepting requests. 1. The `post_deploy` hook is run. Note that if an environment changes by no code changes, only the last step is run. If you want the entire process to run, see how to [manually trigger builds](https://docs.platform.sh/development/troubleshoot.md#manually-trigger-builds). ####### Writable directories during build During the `build` hook, there are three writeable directories: - `PLATFORM_APP_DIR`: Where your code is checked out and the working directory when the `build` hook starts. Becomes the app that gets deployed. - `PLATFORM_CACHE_DIR`: Persists between builds, but isn't deployed. Shared by all builds on all branches. - `/tmp`: Isn't deployed and is wiped between each build. Note that `PLATFORM_CACHE_DIR` is mapped to `/tmp` and together they offer about 8GB of free space. ####### Hook failure Each hook is executed as a single script, so they're considered to have failed only if the final command in them fails. To cause them to fail on the first failed command, add `set -e` to the beginning of the hook. If a `build` hook fails for any reason, the build is aborted and the deploy doesn't happen. Note that this only works for `build` hooks -- if other hooks fail, the app is still deployed. ######## Automated testing It’s preferable that you set up and run automated tests in a dedicated CI/CD tool. Relying on Platform.sh hooks for such tasks can prove difficult. During the `build` hook, you can halt the deployment on a test failure but the following limitations apply: - Access to services such as databases, Redis, Vault KMS, and even writable mounts is disabled. So any testing that relies on it is sure to fail. - If you haven’t made changes to your app, an existing build image is reused and the build hook isn’t run. - Test results are written into your app container, so they might get exposed to a third party. During the `deploy` hook, you can access services but **you can’t halt the deployment based on a test failure**. Note that there are other downsides: - Your app container is read-only during the deploy hook, so if your tests need to write reports and other information, you need to create a file mount for them. - Your app can only be deployed once the deploy hook has been completed. Therefore, running automated testing via the deploy hook generates slower deployments. - Your environment isn’t available externally during the deploy hook. Unit and integration testing might work without the environment being available, but you can’t typically perform end-to-end testing until after the environment is up and available. ###### Crons The keys of the `crons` definition are the names of the cron jobs. The names must be unique. If an application defines both a `web` instance and `worker` instances, cron jobs run only on the `web` instance. See how to [get cron logs](https://docs.platform.sh/increase-observability/logs/access-logs.md#container-logs). The following table shows the properties for each job: | Name | Type | Required | Description | |--------------------|----------------------------------------------|----------|---------------------------------------------------------------------------------------------------------------------------------------------------------------------------------------------------------------------------------------------------------------------------------------------------------------------------------------------------------------------------------------------------------------------------------------------------------------------------------------------| | `spec` | `string` | Yes | The [cron specification](https://en.wikipedia.org/wiki/Cron#Cron_expression). To prevent competition for resources that might hurt performance, use `H` in definitions to indicate an unspecified but invariant time. For example, instead of using `0 * * * *` to indicate the cron job runs at the start of every hour, you can use `H * * * *` to indicate it runs every hour, but not necessarily at the start. This prevents multiple cron jobs from trying to start at the same time. | | `commands` | A [cron commands dictionary](#cron-commands) | Yes | A definition of what commands to run when starting and stopping the cron job. | | `shutdown_timeout` | `integer` | No | When a cron is canceled, this represents the number of seconds after which a `SIGKILL` signal is sent to the process to force terminate it. The default is `10` seconds. | | `timeout` | `integer` | No | The maximum amount of time a cron can run before it's terminated. Defaults to the maximum allowed value of `86400` seconds (24 hours). | Note that you can [cancel pending or running crons](https://docs.platform.sh/environments/cancel-activity.md). **Note**: The use of the ``cmd`` key is now deprecated in favor of the ``commands``key. Make sure you set your new cron jobs using the ``commands`` key, and update your existing cron jobs to ensure continuity. ####### Cron commands | Name | Type | Required | Description | |---------|----------|----------|------------------------------------------------------------------------------------------------------------------------------------------------------------------------------------------------------------------------------------------------------------------------------------| | `start` | `string` | Yes | The command that's run. It's run in [Dash](https://en.wikipedia.org/wiki/Almquist_shell). | | `stop` | `string` | No | The command that's issued to give the cron command a chance to shutdown gracefully, such as to finish an active item in a list of tasks. Issued when a cron task is interrupted by a user through the CLI or Console. If not specified, a `SIGTERM` signal is sent to the process. | ```yaml {location=".platform.app.yaml"} crons: mycommand: spec: 'H * * * *' commands: start: sleep 60 && echo sleep-60-finished && date stop: killall sleep shutdown_timeout: 18 ``` In this example configuration, the [cron specification](#crons) uses the `H` syntax. Note that this syntax is only supported on Grid and Dedicated Gen 3 projects. On Dedicated Gen 2 projects, use the [standard cron syntax](https://en.wikipedia.org/wiki/Cron#Cron_expression). ####### Example cron jobs ```yaml {location=".platform.app.yaml"} stack: [ "ruby@3.3" ] crons: # Execute a rake script every 19 minutes. ruby: spec: '*/19 * * * *' commands: start: 'bundle exec rake some:task' ``` ```yaml {location=".platform.app.yaml"} stack: [ "php@8.4" ] crons: # Run Laravel's scheduler every 5 minutes. scheduler: spec: '*/5 * * * *' commands: start: 'php artisan schedule:run' ``` ```yaml {location=".platform.app.yaml"} stack: [ "php@8.4" ] crons: # Take a backup of the environment every day at 5:00 AM. snapshot: spec: 0 5 * * * commands: start: | # Only run for the production environment, aka main branch if [ "$PLATFORM_ENVIRONMENT_TYPE" = "production" ]; then croncape symfony ... fi ``` ####### Conditional crons If you want to set up customized cron schedules depending on the environment type, define conditional crons. To do so, use a configuration similar to the following: ```yaml {location=".platform.app.yaml"} crons: update: spec: '0 0 * * *' commands: start: | if [ "$PLATFORM_ENVIRONMENT_TYPE" = production ]; then platform backup:create --yes --no-wait platform source-operation:run update --no-wait --yes fi ``` ####### Cron job timing Minimum time between cron jobs being triggered: | Plan | Time | |-------------------- | --------- | | Professional | 5 minutes | | Elite or Enterprise | 1 minute | For each app container, only one cron job can run at a time. If a new job is triggered while another is running, the new job is paused until the other completes. To minimize conflicts, a random offset is applied to all triggers. The offset is a random number of seconds up to 20 minutes or the cron frequency, whichever is smaller. Crons are also paused while activities such as [backups](https://docs.platform.sh/environments/backup.md) are running. The crons are queued to run after the other activity finishes. To run cron jobs in a timezone other than UTC, set the [timezone property](#top-level-properties). ####### Paused crons [Preview environments](https://docs.platform.sh/glossary.md#preview-environment) are often used for a limited time and then abandoned. While it's useful for environments under active development to have scheduled tasks, unused environments don't need to run cron jobs. To minimize unnecessary resource use, crons on environments with no deployments are paused. This affects all environments that aren't live environments. This means all environments on Development plans and all preview environments on higher plans. Such environments with deployments within 14 days have crons with the status `running`. If there haven't been any deployments within 14 days, the status is `paused`. You can see the status in the Console or using the CLI by running `platform environment:info` and looking under `deployment_state`. ######## Restarting paused crons If the crons on your preview environment are paused but you're still using them, you can push changes to the environment or redeploy it. To restart crons without changing anything: Run the following command: ```bash {} platform redeploy ``` ####### Sizing hints The following table shows the properties that can be set in `sizing_hints`: | Name | Type | Default | Minimum | Description | |-------------------|-----------|---------|---------|------------------------------------------------| | `request_memory` | `integer` | 45 | 10 | The average memory consumed per request in MB. | | `reserved_memory` | `integer` | 70 | 70 | The amount of memory reserved in MB. | See more about [PHP-FPM workers and sizing](https://docs.platform.sh/languages/php/fpm.md). ###### Source The following table shows the properties that can be set in `source`: | Name | Type | Required | Description | |--------------|--------------------------|----------|---------------------------------------------------------------------------------------------------------------------------------| | `operations` | An operations dictionary | | Operations that can be applied to the source code. See [source operations](https://docs.platform.sh/create-apps/source-operations.md) | | `root` | `string` | | The path where the app code lives. Defaults to the root project directory. Useful for [multi-app setups](https://docs.platform.sh/create-apps/multi-app.md). | ###### Additional hosts If you're using a private network with specific IP addresses you need to connect to, you might want to map those addresses to hostnames to better remember and organize them. In such cases, you can add a map of those IP addresses to whatever hostnames you like. Then when your app tries to access the hostname, it's sent to the proper IP address. So in the following example, if your app tries to access `api.example.com`, it's sent to `192.0.2.23`. ```yaml {location=".platform.app.yaml"} additional_hosts: api.example.com: "192.0.2.23" web.example.com: "203.0.113.42" ``` This is equivalent to adding the mapping to the `/etc/hosts` file for the container. ### Source operations On Platform.sh, you can run automated code updates through a feature called **source operations**. Defined in your [app configuration](https://docs.platform.sh/create-apps.md), source operations let you specify commands that can commit changes to your project's repository when called. For example, you can set up a source operation to [automatically update your application dependencies](https://docs.platform.sh/learn/tutorials/dependency-updates.md), [update a site from an upstream repository](#update-a-site-from-an-upstream-repository-or-template), or [revert to the last commit](#revert-to-the-last-commit) pushed to your Git repository. To run your source operations, you can use the [Platform.sh CLI](https://docs.platform.sh/administration/cli.md) or the [Console](https://console.platform.sh). If you want to run your source operations and update your code automatically, you can also define [cron jobs](https://docs.platform.sh/create-apps/app-reference/single-runtime-image.md#crons). ##### How source operations work When you trigger a source operation, the following happens in order: 1. The current environment HEAD commit is checked out in Git. It doesn't have any remotes or tags defined in the project. It only has the current environment branch. 2. Sequentially, for each app that has an operation bearing [the name](#define-a-source-operation) of the triggered source operation in its configuration, the operation command is run in the app container. The container isn't part of the environment's runtime cluster and doesn't require that the environment is running. The environment has all of the variables normally available during the build phase. These may be optionally overridden by the variables specified when the operation is run. 3. If any new commits were created, they're pushed to the repository and the normal build process is triggered. If multiple apps in a single project both result in a new commit, there are two distinct commits in the Git history but only a single new build process. ##### Define a source operation A source operation requires two things: - A name that must be unique within the application. The name is the key of the block defined under `source.operations` in your [app configuration](https://docs.platform.sh/create-apps/app-reference/single-runtime-image.md#source). - A `command` that defines what's run when the operation is triggered. The syntax is similar to the following: ```yaml {location=".platform.app.yaml"} source: operations: : command: ``` For example, to update a file from a remote location, you could define an operation like this: ```yaml {location=".platform.app.yaml"} source: operations: update-file: command: | set -e curl -O https://example.com/myfile.txt git add myfile.txt git commit -m "Update remote file" ``` The name of the source operation in this case is `update-file`. For more possibilities, see other [source operation examples](#source-operation-examples). ##### Run a source operation Run the following command: ```bash {} platform source-operation:run ``` Replace with the name of your operation, such as ``update-file`` in the [example above](#define-a-source-operation). After running a source operation, to apply the changes to your local development environment run the `git pull` command. Note that you can [cancel pending or running source operations](https://docs.platform.sh/environments/cancel-activity.md). ##### Use variables in your source operations You can add [variables](https://docs.platform.sh/development/variables.md) to the environment of the source operation. Use the `env:` prefix to expose each of those variables as a Unix environment variable. In this way, they're referenced by the source operation and interpreted the same way as any other variable set in your project. For example, you might want to have a `FILE` variable available with the value `example.txt` to pass to a source operation similar to the following: ```yaml {location=".platform.app.yaml"} source: operations: update-file: command: | set -e curl -O https://example.com/$FILE git add $FILE git commit -m "Update remote file" ``` Follow these steps to run the source operation: ```bash {} platform source-operation:run update-file --variable env:FILE="example.txt" ``` ##### Source integrations If your project is using a [source integration](https://docs.platform.sh/integrations/source.md), any new commits resulting from a source operation are first pushed to your external Git repository. Then the source integration pushes those commits to Platform.sh and redeploys the environment. When using a source integration, you can't run source operations on environments created from pull or merge requests created on the external repository. If you try running a source operation on a non-supported environment, you see the following error: ```text [ApiFeatureMissingException] This project doesn't support source operations. ``` ##### Automated source operations using a cron job You can use a cron to automatically run your source operations. Note that it’s best not to run source operations on your production environment, but rather on a dedicated environment where you can test changes. Make sure you have the [Platform.sh CLI](https://docs.platform.sh/administration/cli.md) installed and [an API token](https://docs.platform.sh/administration/cli/api-tokens.md#2-create-an-api-token) so you can run a cron job in your app container. 1. Set your API token as a top-level environment variable: - Open the environment where you want to add the variable. - Click Settings **Settings**. - Click **Variables**. - Click **+ Add variable**. - In the **Variable name** field, enter ``env:PLATFORMSH_CLI_TOKEN``. - In the **Value** field, enter your API token. - Make sure the **Available at runtime** and **Sensitive variable** options are selected. - Click **Add variable**. **Note**: Once you add the API token as an environment variable, anyone with [SSH access](https://docs.platform.sh/development/ssh.md) can read its value. Make sure you carefully check your [user access on this project](https://docs.platform.sh/administration/users.md#manage-project-users). 2. Add a build hook to your app configuration to install the CLI as part of the build process: ```yaml {location=".platform.app.yaml"} hooks: build: | set -e echo "Installing Platform.sh CLI" curl -fsSL https://raw.githubusercontent.com/platformsh/cli/main/installer.sh | bash echo "Testing Platform.sh CLI" platform ``` 3. Then, to configure a cron job to automatically run a source operation once a day, use a configuration similar to the following: ```yaml {location=".platform.app.yaml"} crons: update: # Run the code below every day at midnight. spec: '0 0 * * *' commands: start: | set -e platform sync -e development code data --no-wait --yes platform source-operation:run update-file --no-wait --yes ``` The example above synchronizes the `development` environment with its parent and then runs the `update-file` source operation defined [previously](#define-a-source-operation). ##### Source operation examples **Tier availability** This feature is available for **Enterprise and Elite** customers. [Compare the tiers](https://platform.sh/pricing/) on our pricing page, or [contact our sales team](https://platform.sh/contact/) for more information. ###### Update your application dependencies You can set up a source operation and a cron job to [automate your dependency updates](https://docs.platform.sh/learn/tutorials/dependency-updates.md). ###### Update a site from an upstream repository or template The following source operation syncronizes your branch with an upstream Git repository. 1. [Add a project-level variable](https://docs.platform.sh/development/variables/set-variables.md#create-project-variables) named `env:UPSTREAM_REMOTE` with the Git URL of the upstream repository. That makes that repository available as a Unix environment variable in all environments, including in the source operation's environment. - Variable name: `env:UPSTREAM_REMOTE` - Variable example value: `https://github.com/platformsh/platformsh-docs` 2. In your app configuration, define a source operation to fetch from that upstream repository: ```yaml {location=".platform.app.yaml"} source: operations: upstream-update: command: | set -e git remote add upstream $UPSTREAM_REMOTE git fetch --all git merge upstream/main ``` 3. Now every time you run the `upstream-update` operation on a given branch, the branch fetches all changes from the upstream git repository and then merges the latest changes from the default branch in the upstream repository. If there’s a conflict merging from the upstream repository, the source operation fails and doesn't update from the upstream repository. Run the `upstream-update` operation on a preview environment rather than directly on Production. ###### Revert to the last commit The following source operation reverts the last commit pushed to the Git repository. This can be useful if you didn't properly test the changes of another operation and you need to quickly revert to the previous state. ```yaml {location=".platform.app.yaml"} source: operations: revert: command: | git reset --hard HEAD~ ``` Now every time you run the `revert` operation on a given branch, the operation reverts to the last commit pushed to that branch. ###### Update Drupal Core The following source operation uses Composer to update Drupal Core: ```yaml {location=".platform.app.yaml"} source: operations: update-drupal-core: command: | set -e composer update drupal/core --with-dependencies git add composer.lock git commit -m "Automated Drupal Core update." ``` `--with-dependencies` is used to also update Drupal Core dependencies. Read more on how to [update Drupal Core via Composer on Drupal.org](https://www.drupal.org/docs/updating-drupal/updating-drupal-core-via-composer). Now every time you run the `update-drupal-core` operation, it updates Drupal Core. ###### Download a Drupal extension The following source operation downloads a Drupal extension. You can define the Drupal extension by setting an `EXTENSION` variable or [overriding it](#use-variables-in-your-source-operations) when running the source operation. ```yaml {location=".platform.app.yaml"} source: operations: download-drupal-extension: command: | set -e composer require $EXTENSION git add composer.json git commit -am "Automated install of: $EXTENSION via Composer." ``` Now every time you run the `download-drupal-extension` operation, it downloads the defined extension. If it's a new extension, after the source operation finishes, you need to enable the new extension via the Drupal management interface or using Drush. ###### Update Git submodules The following source operation updates all Git submodules recursively: ```yaml {location=".platform.app.yaml"} source: operations: rebuild: command: | set -e git submodule update --init --recursive git submodule update --remote --checkout SHA=$(git submodule | awk -F' ' '{print $1}' | sed -s 's/+//g') echo -n "$SHA" > .sha git add uppler .sha git commit -m "Updating submodule to commit '$SHA'" ``` Now every time you run the `rebuild` operation, it updates the Git submodules. ### Runtime operations Runtime operations allow you to trigger one-off commands or scripts on your project. Similar to [crons](https://docs.platform.sh/create-apps/app-reference/single-runtime-image.md#crons), they run in the app container but not on a specific schedule. You can [define runtime operations](#define-a-runtime-operation) in your [app configuration](https://docs.platform.sh/create-apps/app-reference/single-runtime-image.md) and [trigger them](#run-a-runtime-operation) at any time through the Platform.sh CLI. For example, if you have a static website, you may want to set up a runtime operation to occasionally fetch content from a backend system without having to rebuild your whole app. You can use runtime operations if you have Grid or Dedicated Gen 3 environments. ##### Define a runtime operation To define a runtime operation, add a configuration similar to the following: ```yaml {location=".platform.app.yaml"} operations: : role: commands: start: ``` When you define a runtime operation, you can specify which users can trigger it according to their user `role`: - `viewer` - `contributor` - `admin` If you don't set the `role` option when configuring your runtime operation, by default all users with the `contributor` role can trigger it. For example, to allow admin users to clear the cache of a Drupal site, you could define an operation like the following: ```yaml {location=".platform.app.yaml"} operations: clear-rebuild: role: admin commands: start: drush cache:rebuild ``` The name of the runtime operation in this case is `clear-rebuild`. For more possibilities, see other [runtime operation examples](#runtime-operation-examples). ##### Run a runtime operation A runtime operation can be triggered through the Platform.sh CLI once it has been [defined](#define-a-runtime-operation). Run the following command: ```bash {} platform operation:run --project --environment ``` You can only trigger a runtime operation if you have permission to do so. Permissions are granted through the ``role`` option specified in the [runtime operation configuration](#define-a-runtime-operation). This can only be done if a [runtime operation has been defined](#define-a-runtime-operation). For example, to trigger the runtime operation [defined previously](#define-a-runtime-operation), you could run the following command: ```bash {} platform operation:run clear-rebuild --project --environment ``` ##### List your runtime operations To list all the runtime operations available on an environment, run the following command: ```bash platform operation:list --project --environment ``` ##### Runtime operation examples ###### Build your app when using a static site generator During every Platform.sh deployment, a standard [build](https://docs.platform.sh/learn/overview/build-deploy.md#the-build) is run. When you use a static site generator like [Gatsby](https://docs.platform.sh/guides/gatsby.md) or [Next.js](https://docs.platform.sh/guides/nextjs.md) with [a headless backend](https://docs.platform.sh/guides/gatsby/headless.md), you need to run a second ``build`` step to get your app ready for production. This is because, as its framework is being built, your frontend needs to pull content-related data from your backend’s API (to generate all the static HTML pages your site is to serve). To accomplish this on Platform.sh, where each app goes through a build-deploy pipeline in parallel, your frontend’s build must be delayed _until after_ your backend has fully deployed. It's often delayed up until the [`post_deploy` hook](https://docs.platform.sh/create-apps/hooks/hooks-comparison.md#post-deploy-hook) stage, when the filesystem is read-only. You can use a runtime operation to trigger the second `build` step after the initial deployment of your app or after a redeployment. You can also trigger it when you need to fetch content from your backend but want to avoid going through the whole Platform.sh [build and deploy processes](https://docs.platform.sh/learn/overview/build-deploy.md) again. **Note**: The following examples assume that the frontend and backend containers are included in the same environment. This isn’t necessary for the commands to run successfully.
What is necessary is that the build destination for your frontend **is writable at runtime** (meaning, you must [define a mount](https://docs.platform.sh/create-apps/app-reference/single-runtime-image.md#mounts) for it). If you don’t want to include a build within a mount (especially if your data source **isn’t** on Platform.sh), you can use [source operations](https://docs.platform.sh/create-apps/source-operations.md) to achieve a similar effect, but through generating a new commit. To trigger your runtime operation, run a command similar to the following: ```bash {} platform operation:run gatsby-build --project --environment ``` To run the [Next.js build](https://nextjs.org/docs/deployment#nextjs-build-api) step, define a runtime operation similar to the following: ```yaml {location=".platform.app.yaml"} operations: next-build: role: admin commands: # All below are valid, depending on your setup start: next build # start: npx next build # start: npm run build ``` To trigger your runtime operation, run a command similar to the following: ```bash {} platform operation:run next-build --project --environment ``` ###### Execute actions on your Node.js app You can define runtime operations for common [pm2](https://pm2.io/docs/runtime/overview/) process manager tasks. To trigger your runtime operation, run a command similar to the following: ```bash {} platform operation:run pm2-ping --project --environment ``` To reload your Node.js app, define a runtime operation similar to the following: ```yaml {location=".platform.app.yaml"} operations: pm2-reload: role: admin commands: start: | # Assuming pm2 start npm --no-daemon --watch --name $APP -- start -- -p $PORT APP=$(cat package.json | jq -r '.name') pm2 reload $APP ``` To trigger your runtime operation, run a command similar to the following: ```bash {} platform operation:run pm2-reload --project --environment ``` To restart your Node.js app, define a runtime operation similar to the following: ```yaml {location=".platform.app.yaml"} operations: pm2-restart: role: admin commands: start: | # Assuming pm2 start npm --no-daemon --watch --name $APP -- start -- -p $PORT APP=$(cat package.json | jq -r '.name') pm2 restart $APP ``` To trigger your runtime operation, run a command similar to the following: ```bash {} platform operation:run pm2-restart --project --environment ``` ###### Define management commands on your Django project On a Django project, you can [define custom `django-admin` commands](https://docs.djangoproject.com/en/4.2/howto/custom-management-commands/), for example to run a one-off management command (`manual migration` in the example above) outside of the Django ORM migration framework. To do so, define a runtime operation similar to the following: ```yaml {location=".platform.app.yaml"} name: myapp type: python:3.9 operations: manual-migration: role: admin commands: start: python manage.py manual_migration ``` To trigger your runtime operation, run a command similar to the following: ```bash platform operation:run manual-migration --project --environment ``` ### Configure what's served How you should configure your web server depends a lot on what you want to serve. The following examples show how in specific scenarios you might define [your web server](https://docs.platform.sh/create-apps/app-reference/single-runtime-image.md#web). #### Create a basic PHP app with a front controller To handle dynamic requests to your PHP app, you might want to use a [front controller](https://en.wikipedia.org/wiki/Front_controller). The following example shows how for such an app you might start defining [your web server](https://docs.platform.sh/create-apps/app-reference/single-runtime-image.md#web). ###### Define a document root Start by defining your document root (where all your publicly visible pages are). ```yaml {location=".platform.app.yaml"} web: locations: '/': root: 'public' ``` ###### Define a front controller Define where all requests that don't match a file in the document root are sent. ```yaml {location=".platform.app.yaml"} web: locations: '/': root: 'public' passthru: '/index.php' index: - index.php ``` In this case, `/index.php` acts as a front controller and handles dynamic requests. Because it handles dynamic requests, you want to ensure that scripts are enabled and responses aren't cached. ```yaml {location=".platform.app.yaml"} web: locations: '/': #... scripts: true # No caching for static files. # (Dynamic pages use whatever cache headers are generated by the program.) expires: -1 ``` ###### Define rules You might want to define specific rules for the location. For example, you might want to allow all kinds of files except mp4 files. ```yaml {location=".platform.app.yaml"} web: locations: '/': ... # Allow all file types generally allow: true rules: # Disallow .mp4 files specifically. \.mp4$: allow: false ``` ###### Set different rules for specific locations You might want to set specific rules for specific locations. For example, you might have files in your `/public/images` directory that are served at `/images`. You could define a specific cache time for them and limit them to only static image files. ```yaml {location=".platform.app.yaml"} web: locations: '/': #... # Set a 5 min expiration time for static files in this location. # Missing files are sent to front controller # through the '/' location above. '/images': expires: 300 passthru: true # Do not execute PHP scripts from this location and do not # deliver their source code (for enhanced security). scripts: false allow: false rules: # Only allow static image files in this location '\.(jpe?g|png|gif|svgz?|ico|bmp)$': allow: true ``` ###### Complete example ```yaml {location=".platform.app.yaml"} web: locations: '/': root: 'public' passthru: '/index.php' index: - index.php scripts: true # No caching for static files. # (Dynamic pages use whatever cache headers are generated by the program.) expires: -1 # Allow all file types generally allow: true rules: # Disallow .mp4 files specifically. \.mp4$: allow: false # Set a 5 min expiration time for static files in this location. # Missing files are sent to front controller # through the '/' location above. '/images': expires: 300 passthru: true # Do not execute PHP scripts from this location and do not # deliver their source code (for enhanced security). scripts: false allow: false rules: # Only allow static image files in this location '\.(jpe?g|png|gif|svgz?|ico|bmp)$': allow: true ``` #### Rewrite requests without redirects You might want to rewrite requests so they're served by specific sections of your app without having to redirect users. For example, you might want to make URLs seem semantic to users without having to rewrite your app architecture. In such a case, you might want requests to `/shoes/great-shoe/` to be served as if they were requests to `/?category=shoes&product=great-shoe`. If so, add a [rule](https://docs.platform.sh/create-apps/app-reference/single-runtime-image.md#rules) similar to the following: ```yaml {location=".platform.app.yaml"} web: locations: '/': ... rules: '^/(?[^/]+)/(?[^/]+)/$': passthru: '/?category=$category&product=$product' ``` Or you might organize your images by file type, but don't want to expose the organization externally. You could rewrite requests to do that behind the scenes: ```yaml {location=".platform.app.yaml"} web: locations: '/': ... rules: '^/img/(?.*)\.(?.*)$': passthru: '/$type/$name.$type' ``` Now a request to `/img/image.png` returns the file found at `/png/image.png`. ###### Query parameters Query parameters in the request are unaffected and are passed in the request to the app. So if you have the category and product rule from previously, a request to `/shoes/great-shoe/?product=terrible-shoe` is rewritten to `?category=shoes&product=great-shoe&product=terrible-shoe`. In that case, the `product` query parameter returns as `terrible-shoe`. #### Serve directories at different paths In some cases you might want to depart from the common practice of serving directories directly. You might want to create a URL structure different than the structure on your disk. For example, in Git you might have a folder for your app and another folder that builds your documentation. Your entire Git repository might look like the following: ```text .platform/ routes.yaml services.yaml applications.yaml application/ [app-code-files] docs-src/ [docs-code-files] ``` And your build process might build the documentation with an output folder such as `docs-public`. If so, you can serve all requests by your app code except for those that start with `/docs`, which you serve with your generated docs. Use a [`web` configuration](https://docs.platform.sh/create-apps/app-reference/single-runtime-image.md#web) similar to the following: ```yaml {location=".platform.app.yaml"} web: locations: '/': passthru: true '/docs': root: 'docs-public' index: - "index.html" expires: 24h scripts: false allow: true ``` This way, your app can safely coexist with static files as if it were a single site hierarchy. And you can keep the static pages separate from your app code. #### Serve static sites Static site generators are a popular way to create fast sites. Because there's no need to wait for responses from servers, the sites may load faster. As an example, this documentation is built using a tool called Hugo and served by Platform.sh as a static site. You can see the [entire repository on GitHub](https://github.com/platformsh/platformsh-docs), including its [app configuration](https://github.com/platformsh/platformsh-docs/blob/main/.platform/applications.yaml). To learn how to serve your static site using Platform.sh, you can start with the required [minimal app configuration](#minimal-app-configuration) and build on it, or jump straight to an [example of a complete configuration](#complete-example-configuration). ###### Minimal app configuration To successfully serve a static site using Platform.sh, you need to set up a minimal app configuration similar to the following: ```yaml {location=".platform.app.yaml"} name: myapp # The type of the application to build. type: "nodejs:22" # The web key configures the web server running in front of your app. web: locations: /: # Static site generators usually output built static files to a specific directory. # Define this directory (must be an actual directory inside the root directory of your app) # as the root for your static site. root: "public" # Files to consider when serving a request for a directory. index: - index.html ``` See more information on the required minimal settings: - [Top-level properties](https://docs.platform.sh/create-apps/app-reference/single-runtime-image.md#top-level-properties). - [`web` property](https://docs.platform.sh/create-apps/app-reference/single-runtime-image.md#web). - [`locations` properties](https://docs.platform.sh/create-apps/app-reference/single-runtime-image.md#locations). ###### Add more features ####### Allow static files but not dynamic files on PHP containers If you have a PHP container, you might want to enable client-side scripts but disable server-side scripts. To enable static files that don't match any rule while disabling server-side scripts on a PHP container, use the following configuration: ```yaml {location=".platform.app.yaml"} web: locations: '/': # ... scripts: false allow: true ``` See more information on [`locations` properties](https://docs.platform.sh/create-apps/app-reference/single-runtime-image.md#locations). ####### Create cache rules You can create sensible cache rules to improve performance. For example, if you publish new content regularly without updating images or site files much, you might want to cache text files for a day but all image files for longer. To do so, use a configuration similar to the following: ```yaml {location=".platform.app.yaml"} web: locations: '/': # ... expires: 24h rules: \.(css|js|gif|jpe?g|png|svg)$: expires: 4w ``` You can also set a `Cache-Control` header in your rules. ```yaml {location=".platform.app.yaml"} web: locations: '/': # ... expires: 24h rules: \.(css|js|gif|jpe?g|png|svg)$: headers: Cache-Control: "public, max-age=2419200, immutable" ``` If `expires` and a `Cache-Control` header are set, the rule ignores the `expires` and sets only the `Cache-Control` header. For this reason, make sure to add a `max-age` value, in seconds, for the `Cache-Control` header. ####### Conserve the server Because your site is completely static, it doesn't need the server to be running. To set a background process that blocks the server and conserves resources, use the following configuration: ```yaml {location=".platform.app.yaml"} web: commands: start: sleep infinity ``` You can also use this place to start small programs, such as a [script to handle 404 errors](https://support.platform.sh/hc/en-us/community/posts/16439636723474). ###### Complete example configuration ```yaml {location=".platform.app.yaml"} name: myapp type: 'python:3.11' web: locations: '/': # The public directory of the application relative to its root root: 'public' # The files to look for when serving a directory index: - 'index.html' # Disable server-side scripts scripts: false allow: true # Set caching policy expires: 24h rules: \.(css|js|gif|jpe?g|png|svg)$: expires: 4w commands: # Run a no-op process that uses no CPU resources since this is a static site start: sleep infinity ``` #### Set custom headers on static content When your app responds to dynamic requests, it can generate headers on the fly. To set headers for static content, add them in [your `web` configuration](https://docs.platform.sh/create-apps/app-reference/single-runtime-image.md#web). You might want to do so to add custom content-type headers, limit what other sites can embed your content, or allow cross origin requests. Say you want to limit most files to be embedded only on your site, but you want an exception for Markdown files. And you want to serve both Markdown and [AAC](https://en.wikipedia.org/wiki/Advanced_Audio_Coding) files with the correct content types to avoid [MIME sniffing](https://developer.mozilla.org/en-US/docs/Web/HTTP/Basics_of_HTTP/MIME_types#mime_sniffing). Start by defining a header for files in general: ```yaml {location=".platform.app.yaml"} web: locations: "/": ... # Apply rules to all static files (dynamic files get rules from your app) headers: X-Frame-Options: SAMEORIGIN ``` This sets the `X-Frame-Options` header to `SAMEORIGIN` for all static files. Now your files can only be embedded within your site. Now set up an exception for Markdown (`*.md`) files using a [rule](https://docs.platform.sh/create-apps/app-reference/single-runtime-image.md#rules): ```yaml {location=".platform.app.yaml"} web: locations: "/": #... rules: \.md$: headers: Content-Type: "text/markdown; charset=UTF-8" ``` This rule sets an explicit content type for files that end in `.md`. Because specific rules override the general heading configuration, Markdown files don't get the `X-Frame-Options` header set before. **Setting charset**: By default, [HTTP charset parameters](https://www.w3.org/International/articles/http-charset/index.en) are not sent to the response. If not set, modern browsers will detect ``ISO-8859-1`` and likely default to ``windows-1252`` as this has 32 more international characters. To set the HTTP charset parameters to your desired charset, you can add ``; charset=UTF-8`` in the ``Content-Type`` parameters. Now set a rule for AAC files. ```yaml {location=".platform.app.yaml"} web: locations: "/": ... rules: \.aac$: headers: X-Frame-Options: SAMEORIGIN Content-Type: audio/aac ``` This rule sets an explicit content type for files that end in `.aac`. It repeats the rule for `X-Frame-Options` because the `headers` block here overrides the more general configuration. So now you have three header configurations: * `X-Frame-Options: SAMEORIGIN` **and** `Content-Type: audio/aac` for AAC files * Only `Content-Type: text/markdown` for Markdown files * Only `X-Frame-Options: SAMEORIGIN` for everything else ###### Cross origin requests To allow cross origin requests, add a `Access-Control-Allow-Origin` header to responses. You can do so for specific origins or for all origins with a wildcard. ```yaml {location=".platform.app.yaml"} web: locations: "/": ... # Apply rules to all static files (dynamic files get rules from your app) headers: Access-Control-Allow-Origin: "*" ``` If you use the wildcard value, the headers are modified for each request in the following ways: * The value of the `Access-Control-Allow-Origin` header is set to the value of the `Origin` request header. * The `Vary` header is included with a value of `Origin`. See why in the [MDN web docs](https://developer.mozilla.org/en-US/docs/Web/HTTP/CORS#access-control-allow-origin). This is done so that credentialed requests can be supported. They would otherwise fail CORS checks if the wildcard value is used. ###### `Strict_Transport_Security` header The `Strict_Transport_Security` header returns a value of `max-age=0` unless you enable [HTTP Strict Transport Security (HSTS)](https://docs.platform.sh/define-routes/https.md#enable-http-strict-transport-security-hsts) in your [routes configuration](https://docs.platform.sh/define-routes.md). Note that once HSTS is enabled, configuration capabilities depend on the [HSTS properties](https://docs.platform.sh/define-routes/https.md#enable-http-strict-transport-security-hsts) set in your routes configuration. For example, the `max-age` value is set to `31536000` by Platform.sh and can't be customized. ### Set up multiple apps in a single project You can create multiple apps within a single project so they can share data. This can be useful if you have several apps that are closely related, such as a backend-only CMS and a frontend system for content delivery and display. No matter how many apps you have in one project, they're all served by a single [router for the project](https://docs.platform.sh/create-apps/multi-app/routes.md). To allow your apps to communicate with each other, [create relationships](https://docs.platform.sh/create-apps/multi-app/relationships.md). Each app separately defines its relationships to [services](https://docs.platform.sh/add-services.md), so apps can share services or have their own. #### Choose a project structure How you structure a project with multiple apps depends on how your code is organized and what you want to accomplish. For example, there are various ways you could set up the following multiple apps: ![Diagram of a project containing multiple apps](https://docs.platform.sh/images/config-diagrams/multiple-app.png "0.5") Here are some example use cases and potential ways to organize the project: | Use case | Structure | |-----------------------------------------------------------------------------------------|------------------------------------------------------------------------------------------------------| | Separate basic apps that are worked on together. | [Unified app configuration](#unified-app-configuration) | | One app depends on code from another app. | [Nested directories](#nested-directories) | | You want to keep configuration separate from code, such as through Git submodules. | [Configuration separate from code](#split-your-code-source-into-multiple-git-submodule-repositories) | | You want multiple apps from the same source code. | [Unified app configuration](#unified-app-configuration) | | You want to control all apps in a single location. | [Unified app configuration](#unified-app-configuration) | ###### Unified app configuration You can configure all your apps from a single file. To do so, create a `.platform/applications.yaml` and define each app as a key. For example, if you have an API Platform backend with a Symfony API, a Mercure Rocks server, and a Gatsby frontend, you can organize your repository like this: ```txt ├── .platform │ ├── applications.yaml **Note**: The ``.platform`` directory is located at the root, separate from your apps. It contains all the needed configuration files to set up the routing, services and behavior of each app. Since the code bases of your apps live in a different directory, you need to [change the source root of each app](#change-the-source-root-of-your-app). To build multiple apps from the repository root, set ``source.root`` to ``/``. This allows you to control all your apps in one place and even build multiple apps from the same source code. To allow your apps to communicate with each other, define [relationships](https://docs.platform.sh/create-apps/multi-app/relationships.md). Note that with this setup, when you amend the code of one of your apps, the build image for your other apps can still be reused. Once your repository is organized, you can use a configuration similar to the following: ```yaml {location=".platform/applications.yaml"} api: type: php:8.2 relationships: database: service: "database" endpoint: "postgresql" mounts: "/var/cache": "shared:files/cache" "/var/log": "shared:files/log" "/var/sessions": "shared:files/sessions" web: locations: "/": root: "public" passthru: '/index.php' index: - index.php headers: Access-Control-Allow-Origin: "*" hooks: build: | set -x -e curl -s https://get.symfony.com/cloud/configurator | bash symfony-build deploy: | set -x -e symfony-deploy source: root: api-app admin: type: nodejs:16 mounts: '/.tmp_platformsh': 'shared:files/tmp_platformsh' '/build': 'shared:files/build' '/.cache': 'shared:files/.cache' '/node_modules/.cache': 'shared:files/node_modules/.cache' web: locations: "/admin": root: "build" passthru: "/admin/index.html" index: - "index.html" headers: Access-Control-Allow-Origin: "*" hooks: build: | set -eu corepack yarn install --immutable --force post_deploy: | corepack yarn run build source: root: admin gatsby: type: 'nodejs:18' mounts: '/.cache': { source: local, source_path: cache } '/.config': { source: local, source_path: config } '/public': { source: local, source_path: public } web: locations: '/site': root: 'public' index: [ 'index.html' ] scripts: false allow: true hooks: build: | set -e yarn --frozen-lockfile post_deploy: | yarn build --prefix-paths source: root: gatsby mercure: type: golang:1.18 mounts: 'database': { source: local, source_path: 'database' } '/.local': { source: local, source_path: '.local' } '/.config': { source: local, source_path: '.config' } web: commands: start: ./mercure run --config Caddyfile.platform_sh locations: /: passthru: true scripts: false request_buffering: enabled: false headers: Access-Control-Allow-Origin: "*" hooks: build: | # Install Mercure using cache FILE="mercure_${MERCUREVERSION}_Linux_x86_64.tar.gz" if [ ! -f "$PLATFORM_CACHE_DIR/$FILE" ]; then URL="https://github.com/dunglas/mercure/releases/download/v${MERCUREVERSION}/$FILE" wget -O "$PLATFORM_CACHE_DIR/$FILE" $URL else echo "Found $FILE in cache, using cache" fi file $PLATFORM_CACHE_DIR/$FILE tar xvzf $PLATFORM_CACHE_DIR/$FILE source: root: mercure/.config ``` ###### Nested directories When code bases are separate, changes to one app don't necessarily mean that the other apps in the project get rebuilt. You might have a situation where app `main` depends on app `languagetool`, but `languagetool` doesn't depend on `main`. In such cases, you can nest the dependency so the parent (`main`) gets rebuilt on changes to it or its children, but the child (`languagetool`) is only rebuilt on changes to itself. For example, you might have a Python app (`main`) that runs a script that requires Java code to be up to date. But the Java app (`languagetool`) doesn't require updating when the Python app (`main`) is updated. In that case, you can nest the Java app within the Python app: ```txt ├── .platform │ ├── applications.yaml │ └── .platform/routes.yaml ├── languagetool │ └── main.java **Note**: The ``.platform`` directory is located at the root, separate from your apps. It contains all the needed configuration files to set up the routing, services and behavior of each app. Since the code base of the ``languagetool`` app lives in a different directory (``languagetool/``), you need to [change the source root](#change-the-source-root-of-your-app) of the ``languagetool`` app. Once your repository is organized, you can use a configuration similar to the following: ```yaml {location=".platform/applications.yaml"} main: type: 'python:3.11' ... languagetool: type: 'java:17' source: root: 'languagetool' ... ``` ###### Split your code source into multiple Git submodule repositories If you have different teams working on different code with different processes, you might want each app to have its own repository. Then you can build them together in another repository using [Git submodules](https://git-scm.com/book/en/v2/Git-Tools-Submodules). With this setup, your apps are kept separate from the top application. Each app has its own [Git submodule](https://git-scm.com/book/en/v2/Git-Tools-Submodules) containing its code base. All your apps are configured in a single `.platform/applications.yaml` file. So you could organize your [project repository](https://github.com/platformsh-templates/bigfoot-multiapp/tree/submodules-root-app-yaml) like this: ```text ├── .platform │ ├── applications.yaml │ ├── routes.yaml │ └── services.yaml ├── @admin **Note**: In this case, and any other case where your app configuration files are kept outside of the app directory, make sure you [change the source root](#change-the-source-root-of-your-app) for each of your apps. ###### Change the source root of your app When your app's code base and configuration file aren't located at the same directory level in your project repository, you need to [define a root directory](https://docs.platform.sh/create-apps/app-reference/single-runtime-image.md#root-directory) for your app. To do so, add a new `source.root` property in your app configuration. For example, to change the source root of the `admin` app from the [unified app configuration](#unified-app-configuration) example project, you could add the following configuration: ```yaml {location=".platform/applications.yaml"} admin: source: root: admin ``` The `source.root` path is relative to the repository root. In this example, the `admin` app now treats the `admin` directory as its root when building. If `source.root` isn't specified, it defaults to the same directory as the `.platform/applications.yaml` (or `.platform.app.yaml`) file itself. #### Define routes for your multiple apps When you set up a project containing multiple applications, all of your apps are served by a single [router for the project](https://docs.platform.sh/define-routes.md). Each of your apps must have a `name` that's unique within the project. To define specific routes for one of your apps, use this `name`. There are various ways you can define routes for multiple app projects. ![Diagram of a project containing multiple apps](https://docs.platform.sh/images/config-diagrams/multiple-app.png "0.5") In this project, you have a CMS app, two frontend apps (one using Symfony and another using Gatsby), and a Mercure Rocks server app, defined as follows: ```yaml {location=".platform/applications.yaml"} admin: type: nodejs:16 source: root: admin ... api: type: php:8.2 source: root: api ... gatsby: type: nodejs:18 source: root: gatsby ... mercure: type: golang:1.18 source: root: mercure/.config ... ``` **Note**: You don’t need to define a route for each app in the repository. If an app isn’t specified, then it isn’t accessible to the web. One good example of defining an app with no route is when you [use Git submodules](https://docs.platform.sh/create-apps/multi-app/project-structure.md#split-your-code-source-into-multiple-git-submodule-repositories) and want to [use a source operation to update your submodules](https://docs.platform.sh/development/submodules.md#update-submodules). You can also achieve the same thing by defining the app as a [worker](https://docs.platform.sh/create-apps/app-reference/single-runtime-image.md#workers). Depending on your needs, you could configure the router container [using subdomains](#define-routes-using-subdomains) or using [subdirectories](#define-routes-using-subdirectories). ####### Define routes using subdomains You could define routes for your apps as follows: ```yaml {location=".platform/routes.yaml"} "https://mercure.{default}/": type: upstream upstream: "mercure:http" "https://{default}/": type: upstream upstream: "api:http" ``` So if your default domain is `example.com`, that means: - `https://mercure.example.com/` is served by your Mercure Rocks app (`mercure`). - `https://example.com/` is served by your Symfony frontend app (`api`). **Note**: Using a subdomain might [double your network traffic](https://nickolinger.com/blog/2021-08-04-you-dont-need-that-cors-request/), so consider using a path like ``https://{default}/api`` instead. ####### Define routes using subdirectories Alternatively, you could define your routes as follows: ```yaml {location=".platform/routes.yaml"} "https://{default}/": type: upstream upstream: "api:http" "https://{default}/admin": type: upstream upstream: "admin:http" ``` Then you would need to configure each app's `web.locations` property to match these paths: ```yaml {location=".platform/applications.yaml"} api: type: php:8.2 source: root: api ... web: locations: "/": passthru: "/index.php" root: "public" index: - index.php admin: type: nodejs:16 source: root: admin ... web: locations: '/admin': passthru: '/admin/index.html' root: 'build' index: - 'index.html' ``` So if your default domain is `example.com`, that means: - `https://example.com/` is served by your Symfony frontend app (`api`). - `https://example.com/admin` is served by your Admin app (`admin`). Note that in this example, for the configuration of your `admin` app, you need to add the URL suffix `/admin` as both an index in the `web.locations` and a value for the `passhtru` setting. For a complete example, [go to this project on GitHub](https://github.com/platformsh-templates/bigfoot-multiapp/tree/submodules-root-subfolders-applications). #### Define relationships between your multiple apps When you set up a project containing multiple applications, by default your apps can't communicate with each other. To enable connections, define relationships between apps using the `http` endpoint. You can't define circular relationships. If `app1` has a relationship to `app2`, then `app2` can't have a relationship to `app1`. If you need data to go both ways, consider coordinating through a shared data store, like a database or [RabbitMQ server](https://docs.platform.sh/add-services/rabbitmq.md). Relationships between apps use HTTP, not HTTPS. This is still secure because they're internal and not exposed to the outside world. ###### Relationships example You have two apps, `app1` and `app2`, and `app1` needs data from `app2`. In your app configuration for `app1`, define a relationship to `app2`: ```yaml {location=".platform/applications.yaml"} app1: relationships: api: service: "app2" endpoint: "http" ``` Once they're both built, `app1` can access `app2` at the following URL: `http://api.internal`. The specific URL is always available through the [`PLATFORM_RELATIONSHIPS` variable](https://docs.platform.sh/development/variables/use-variables.md#use-provided-variables): ```bash $ echo $PLATFORM_RELATIONSHIPS | base64 --decode | jq '.api[0].host' api.internal ``` ### Timezones On Platform.sh, there are several timezones you might want to keep in mind. All timezones default to UTC time. You can customize some of them, but in most cases, it's best if you leave them in UTC and store user data with an associated timezone instead. The different timezones on Platform.sh are the following: | Timezone | Description |Customizable | |----------------------|----------------------------------------------|--------------| | Container timezone | The timezone for all Platform.sh containers (UTC). |No | | App runtime timezone | [Set an app runtime timezone](#set-an-app-runtime-timezone) if you want your app runtime to use a specific timezone instead of the container timezone.
The app runtime timezone only affects your app itself. | Yes | | Cron timezone | [Set a cron timezone](#set-a-cron-timezone) if you want your crons to run in a specific timezone instead of the app runtime timezone (or instead of the container timezone if no app runtime timezone is set on your project).
The cron timezone only affects your cron jobs. | Yes | | Log timezone | The timezone for all Platform.sh logs (UTC). | No | **Note**: Each Platform.sh project also has a **project timezone** that only affects [automated backups](https://docs.platform.sh/environments/backup.md#use-automated-backups). By default, the project timezone is based on the [region](https://docs.platform.sh/development/regions.md) where your project is hosted. You can [change it from the Console](https://docs.platform.sh/projects/change-project-timezone.md) at any time. ##### Set an app runtime timezone How you can set an app runtime timezone depends on your actual app runtime: Start the server with ``env TZ=’’ node server.js``.Start the server with ``env TZ=’’ python server.py``. - Start the server with ``env TZ=’’ java -jar …`` OR. - Set the Java virtual machine argument ``user.timezone``. This Java virtual machine argument takes precedence over the environment variable TZ. For example, you can use the flag ``-D`` when running the application: ``java -jar -D user.timezone=GMT`` or ``java -jar -D user.timezone="Asia/Kolkata"`` ##### Set a cron timezone You can set a specific timezone for your crons so they don't run in your app runtime timezone (or container timezone if no app runtime timezone is set on your project). To do so, [set the `timezone` top-level property](https://docs.platform.sh/create-apps/app-reference/single-runtime-image.md#top-level-properties) in your app configuration. ### Troubleshoot disks For more general information, see how to [troubleshoot development](https://docs.platform.sh/development/troubleshoot.md). ##### Exceeding plan storage limit Professional plans come with a default amount of storage that you can [change with your plan](https://docs.platform.sh/administration/pricing.md). The storage is allocated among your services and applications using the `disk` parameter in their configuration files. You might accidentally set the sum of all `disk` parameters in the files to exceed your plans storage limit. For example, by setting `disk: 4096` for a MySQL service in `.platform/services.yaml` and `disk: 4096` in `.platform.app.yaml` for a plan with a 5 GB storage limit. In such cases, you get an error like the following: ```text Error: Resources exceeding plan limit; disk: 8192.00MB > 5120.00MB; try removing a service, or add more storage to your plan ``` To fix the error, do one of the following: * Lower the `disk` parameters to a value within your plan's storage limits. Note the [limits to downsizing disks](https://docs.platform.sh/create-apps/app-reference/single-runtime-image.md#downsize-a-disk). * Increase your plan's storage limits. This can only be done by people with the [manage plans permission](https://docs.platform.sh/administration/users.md#organization-permissions). ##### Low disk space If you have set up [health notifications](https://docs.platform.sh/integrations/notifications.md), you may receive a notification of low disk space. To solve this issue: * [Check mount usage](https://docs.platform.sh/create-apps/troubleshoot-mounts.md#disk-space-issues) * [Check your database disk space](#check-your-database-disk-space) (if applicable) * [Increase the available disk space](#increase-available-disk-space) (if necessary) ###### Check your database disk space To get approximate disk usage for a database, run the command `platform db:size`. This returns an estimate such as the following: ```text +----------------+-----------------+--------+ | Allocated disk | Estimated usage | % used | +----------------+-----------------+--------+ | 1.0 GiB | 520.3 MiB | ~ 51% | +----------------+-----------------+--------+ ``` Keep in mind that this estimate doesn't represent the exact real size on disk. But if you notice that the usage percentage is high, you may need to increase the available space. ###### Increase available disk space If you find that your application or service is running out of disk space, you can increase the available storage. To increase the space available for applications and services, use the `disk` keys in your `.platform.app.yaml` and `.platform/services.yaml` files. The sum of all `disk` keys can't exceed the available storage in your plan. If you need more storage to fit the sum of all `disk` keys, increase your plan's storage limits. This can only be done by people with the [manage plans permission](https://docs.platform.sh/administration/users.md#organization-permissions). ##### No space left on device During the `build` hook, you may see the following error: ```text W: [Errno 28] No space left on device: ... ``` This is caused by the amount of disk provided to the build container before deployment. Application images are restricted to 8 GB during build, no matter how much writable disk has been set aside for the deployed application. Some build tools (yarn/npm) store cache for different versions of their modules. This can cause the build cache to grow over time beyond the maximum. Try [clearing the build cache](https://docs.platform.sh/development/troubleshoot.md#clear-the-build-cache) and [triggering a redeploy](https://docs.platform.sh/development/troubleshoot.md#force-a-redeploy). If for some reason your application absolutely requires more than 8 GB during build, you can open a [support ticket](https://docs.platform.sh/learn/overview/get-support.md) to have this limit increased. ### Troubleshoot mounts For more general information, see how to [troubleshoot development](https://docs.platform.sh/development/troubleshoot.md). ##### Overlapping folders If you have a mount with the same name as a directory you've committed to Git or you create such a directory during the build, you get a message like the following: ```bash W: The mount '/example' has a path that overlaps with a non-empty folder. The content of the non-empty folder either comes from: - your git repository (you may have accidentally committed files). - or from the build hook. Please be aware that this content isn't accessible at runtime. ``` This shows that the files in Git or from your build aren't available after the build. The only files that are available are those in your mount. To make the files available in the mount, move them away and then copy them into the mount: 1. In the `build` hook, use `mv` to move the files to another location. ```bash mv example tmp/example ``` 2. In the `deploy` hook, use `cp` to copy the files into the mount. ```bash cp -r tmp/example example ``` To see the files without copying them, temporarily remove the mount from your app configuration. Then SSH into your app and view the files. You can then put the mount back in place. ##### Mounted files not publicly accessible If you've set up mounts to handle files like user uploads, you want to make sure the files are accessible. Do so by managing their [location](https://docs.platform.sh/create-apps/app-reference/single-runtime-image.md#locations). This example defines two mounts, one named `private` and one `upload`: ```yaml {location=".platform.app.yaml"} mounts: 'private': source: local source_path: private 'uploads': source: local source_path: uploads ``` With only this definition, their behavior is the same. To make `uploads` accessible, define a location with different rules as in the following example: ```yaml {location=".platform.app.yaml"} web: locations: '/': # Handle dynamic requests root: 'public' passthru: '/app.php' # Allow uploaded files to be served, but don't run scripts. '/uploads': root: 'uploads' expires: 300s scripts: false allow: true ``` ##### Mounts starting with a dot ignored Platform.sh ignores YAML keys that start with a dot. This causes a mount like `.myhiddenfolder` to be ignored. To mount a directory starting with a dot, put a `/` at the start of its definition: ```yaml {location=".platform.app.yaml"} mounts: '/.myhiddenfolder': source: local source_path: 'myhiddenfolder' ``` ##### Disk space issues If you are worried about how much disk your mounts are using, check the size with the following command: ```bash platform mount:size ``` You see the total size and what's available for each directory: ```text Checking disk usage for all mounts on abcdefg123456-main-abcd123--app@ssh.eu.platform.sh... +-------------------------+-----------+---------+-----------+-----------+----------+ | Mount(s) | Size(s) | Disk | Used | Available | Capacity | +-------------------------+-----------+---------+-----------+-----------+----------+ | private | 55.2 MiB | 1.9 GiB | 301.5 MiB | 1.6 GiB | 15.5% | | tmp | 8.3 GiB | 8.9 GiB | 8.8 GiB | 93.0 MiB | 98.8% | | web/sites/default/files | 212.2 MiB | 9.6 GiB | 1.9 GiB | 7.6 GiB | 20.3% | +-------------------------+-----------+---------+-----------+-----------+----------+ ``` ### Upgrading ##### Changes in version 2022.02 * The cron `cmd` syntax is now deprecated in favor of `commands`. Previous cron job definitions looked like this: ```yaml {location=".platform.app.yaml"} crons: sendemails: spec: '*/7 * * * *' cmd: cd public && send-pending-emails.sh ``` They should now be written like this: ```yaml {location=".platform.app.yaml"} crons: sendemails: spec: '*/7 * * * *' commands: start: cd public && send-pending-emails.sh ``` The new syntax offers greater flexibility and configuration. For more details, see the [full specification for cron jobs](https://docs.platform.sh/create-apps/app-reference/single-runtime-image.md#crons). ##### Changes in version 2019.05 * The `!archive` tag in YAML has been un-deprecated, and is now favored over the `!include` option. `!include` is still available for other include types (`yaml`, `binary`, and `string`). ##### Changes in version 2017.11 (2017-11-09) * The `!archive` tag in YAML files is now deprecated in favor of the more generic [`!include`](https://docs.platform.sh/learn/overview/yaml.md). For example, the following `.platform/services.yaml` snippet: ```yaml {location=".platform/services.yaml"} mysearch: type: solr:6.3 disk: 1024 configuration: core_config: !archive "myconfdir" ``` Can now be written as: ```yaml {location=".platform/services.yaml"} mysearch: type: solr:6.3 disk: 1024 configuration: core_config: !include type: archive path: "myconfdir" ``` * The syntax for the `mounts` key in `.platform.app.yaml` has changed. Rather than a parsed string, the value of each mount is a [multi-key definition](https://docs.platform.sh/create-apps/app-reference/single-runtime-image.md#mounts). That is, the following example: ```yaml {location=".platform.app.yaml"} mounts: "tmp": "shared:files/tmp" "logs": "shared:files/logs" ``` Can now be written as: ```yaml {location=".platform.app.yaml"} mounts: tmp: source: local source_path: tmp logs: source: local source_path: logs ``` ##### Changes in version 2016.6 (2016-11-18) * Application containers now include the latest LTS version of Node.js, 6.9.1. The previously included version was 4.6.1. * Composer was briefly called with `--no-dev`, but as of 2016-11-21 this change has been reverted, because of the unintended effect it had on projects using the Symfony framework. ##### Changes in version 2016.5 As of October 2016, the default behaviour of the `expires` key, which controls client-side caching of static files, has changed. Previously, if the key was unset, the `Expires` and `Cache-Control` HTTP headers were left unset in the response, which meant that client side caching behaviour was left undefined. To ensure consistent behaviour that doesn't depend on which browser the client is using, the new default behaviour is to set these headers to values that disable client-side caching. This change only affects static files served directly by the web server. Responses served from `passthru` URLs continue to use whatever caching headers were set by the application. To enable caching on your static files, make sure you include an `expires` key in your [web configuration](https://docs.platform.sh/create-apps/app-reference/single-runtime-image.md), as shown below: ```yaml {location=".platform.app.yaml"} web: locations: "/": root: "public" passthru: "/index.php" index: - index.php expires: 300 scripts: true allow: true rules: \.mp4$: allow: false expires: -1 "/sites/default/files": expires: 300 passthru: true allow: true ``` ##### Changes in version 2016.4 As of July 2016, we no longer create default configuration files if one isn't provided. The defaults we used to provide were tailored specifically for Drupal 7, which is now a legacy-support version with the release of Drupal 8 and not especially useful for non-Drupal or non-PHP sites. They also defaulted to software versions that are no longer current and recommended. Instead, you must provide your own `.platform.app.yaml`, `.platform/routes.yaml`, and `.platform/services.yaml` files. Additionally, a version for a language or service should always be specified as well. That allows you to control when you upgrade from one version to another without relying on a network default. The previous default files, for reference, are: ###### Application ```yaml {location=".platform.app.yaml"} name: php type: "php:5.4" build: flavor: "drupal" access: ssh: contributor relationships: database: "mysql:mysql" solr: "solr:solr" redis: "redis:redis" web: document_root: "/" passthru: "/index.php" disk: 2048 mounts: "public/sites/default/files": "shared:files/files" "tmp": "shared:files/tmp" "private": "shared:files/private" crons: drupal: spec: "*/20 * * * *" cmd: "cd public ; drush core-cron" ``` ###### Routes ```yaml {location=".platform/routes.yaml"} "http://{default}/": type: upstream upstream: "php:http" cache: enabled: true ssi: enabled: false "http://www.{default}/": type: redirect to: "http://{default}/" ``` ###### Services ```yaml {location=".platform/services.yaml"} mysql: type: mysql:5.5 disk: 2048 redis: type: redis:2.8 solr: type: solr:3.6 disk: 1024 ``` ##### Changes in version 2016.3 As we are aiming to always provide you more control and flexibility on how to deploy your applications, the `.platform.app.yaml` format has been greatly improved. It is now way more flexible, and also much more explicit to describe what you want to do. The `web` key is now a set of `locations` where you can define very precisely the behavior of each URL prefix. Note, we no longer move your application from "/" to "public/" automatically if the new format is adopted. If you are using Drupal, move all of your Drupal files into "public/" in the Git repository. Old format: ```yaml {location=".platform.app.yaml"} web: document_root: "/" passthru: "/index.php" index_files: - "index.php" expires: 300 whitelist: - \.html$ ``` New format: ```yaml {location=".platform.app.yaml"} web: locations: "/": root: "public" passthru: "/index.php" index: - index.php expires: 300 scripts: true allow: true rules: \.mp4$: allow: false expires: -1 "/sites/default/files": expires: 300 passthru: true allow: true ``` ###### Backward compatibility We generally try to keep backward compatibility with previous configuration formats. Here is what happens if you don't upgrade your configuration: ```yaml {location=".platform.app.yaml"} web: # The following parameters are automatically moved as a "/" block in the # "locations" object, and are invalid if there is a valid "locations" block. document_root: "/public" # Converted to [locations][/][root] passthru: "/index.php" # Converted to [locations][/][passthru] index_files: - index.php # Converted to [locations][/][index] whitelist: [ ] # Converted to [locations][/][rules] blacklist: [ ] # Converted to [locations][/][rules] expires: 3d # Converted to [locations][/][expires] ``` ##### Changes in version 2015.7 The `.platform.app.yaml` configuration file now allows for a much clearer syntax, which you can (and should) start using now. The old format had a single string to identify the `toolstack` you use: ```yaml {location=".platform.app.yaml"} toolstack: "php:drupal" ``` The new syntax allows to separate the concerns of what language you are running and the build process that is going to happen on deployment: ```yaml {location=".platform.app.yaml"} type: php build: flavor: drupal ``` Currently we only support `php` in the 'type' key. Current supported build flavors are `drupal`, `composer` and `symfony`. ##### Changes in version 2014.9 This version introduces changes in the configuration files format. Most of the old configuration format is still supported, but customers are invited to move to the new format. For an example upgrade path, see the [Drupal 7.x branch of the `platformsh-examples` repository](https://github.com/platformsh-templates/drupal7/blob/master/.platform.app.yaml) on GitHub. Configuration items for PHP that previously was part of `.platform/services.yaml` are now moved into `.platform.app.yaml`, which gains the following top-level items: - `name`: should be `"php"` - `relationships`, `access` and `disk`: should be the same as the `relationships` key of PHP in `.platform/services.yaml` Note that there is now a sane default for `access` (SSH access to PHP is granted to all users that have role "collaborator" and above on the environment) so most customers can now just omit this key in `.platform.app.yaml`. In addition, version 1.7.0 now has consistency checks for configuration files and rejects `git push` operations that contain configuration files that are invalid. In this case, just fix the issues as they are reported, commit and push again. ### Use build and deploy hooks As your app goes through the [build and deploy process](https://docs.platform.sh/learn/overview/build-deploy.md), you might want to run custom commands. These might include compiling the app, setting the configuration for services based on variables, and rebuilding search indexes. Do these tasks using one of [three hooks](https://docs.platform.sh/create-apps/hooks/hooks-comparison.md). The following example goes through each of these hooks for the [Next.js Drupal template](https://github.com/platformsh-templates/nextjs-drupal). This template uses [Drupal](https://www.drupal.org/) as the headless CMS backend and [Next.js](https://nextjs.org/) for the frontend. It's largely based on the [Next.js for Drupal project](https://next-drupal.org/) The example commands are somewhat simplified, but you can find them all in the [GitHub repository](https://github.com/platformsh-templates/nextjs-drupal). In this case, you have [two apps](https://docs.platform.sh/create-apps/multi-app.md) and so two [`.platform.app.yaml` configuration files](https://docs.platform.sh/create-apps.md). Each file is in the folder for that app: `api` for Drupal and `client` for Next.js. You run one hook for Drupal and two hooks for Next.js. ##### Build dependencies The Next.js app uses Yarn for dependencies, which need to be installed. Installing dependencies requires writing to disk and doesn't need any relationships with other services. This makes it perfect for a `build` hook. In this case, the app has two sets of dependencies: * For the main app * For a script to test connections between the apps Create your `build` hook to install them all: 1. Create a `build` hook in your [app configuration](https://docs.platform.sh/create-apps/app-reference/single-runtime-image.md): ```yaml {location=".platform.app.yaml" } hooks: build: | set -e ``` The hook has two parts so far: * The `|` means the lines that follow can contain a series of commands. They aren't interpreted as new YAML properties. * Adding `set -e` means that the hook fails if _any_ of the commands in it fails. Without this setting, the hook fails only if its _final_ command fails. If a `build` hook fails for any reason, the build is aborted and the deploy doesn't happen. Note that this only works for `build` hooks. If other hooks fail, the deploy still happens. 2. Install your top-level dependencies inside this `build` hook: ```yaml {location="client/.platform.app.yaml"} hooks: build: | set -e yarn --frozen-lockfile ``` This installs all the dependencies for the main app. 3. Copy the [testing script from the template](https://github.com/platformsh-templates/nextjs-drupal/tree/master/client/platformsh-scripts/test/next-drupal-debug). Copy the files in this directory into a `client/platformsh-scripts/test` directory. This script debugs the connection between Next.js and Drupal. 4. In the hook, switch to the directory with the testing script. Each hook starts in the [app root](https://docs.platform.sh/create-apps/app-reference/single-runtime-image.md#root-directory). In this case, the app root is `client`. To run commands from a different directory, you need to change directories (relative to the app root): ```yaml {location="client/.platform.app.yaml"} hooks: build: | set -e yarn --frozen-lockfile cd platformsh-scripts/test ``` 5. Install the dependencies for the testing script: ```yaml {location="client/.platform.app.yaml"} hooks: build: | set -e yarn --frozen-lockfile cd platformsh-scripts/test yarn --frozen-lockfile ``` Now all your Next.js dependencies are installed. ##### Configure Drush and Drupal The example uses [Drush](https://www.drush.org/latest/) to handle routine tasks. For its configuration, Drush needs the URL of the site. That means the configuration can't be done in the `build` hook. During the `build` hook, the site isn't yet deployed and so there is no URL to use in the configuration. (The [`PLATFORM_ROUTES` variable](https://docs.platform.sh/development/variables/use-variables.md#use-provided-variables) isn't available.) Add the configuration during the `deploy` hook. This way you can access the URL before the site accepts requests (unlike in the `post_deploy` hook). The script also prepares your environment to handle requests, such as by [rebuilding the cache](https://www.drush.org/latest/commands/cache_rebuild/) and [updating the database](https://www.drush.org/latest/commands/updatedb/). Because these steps should be done before the site accepts request, they should be in the `deploy` hook. All of this configuration and preparation can be handled in a bash script. 1. Copy the [preparation script from the Platform.sh template](https://github.com/platformsh-templates/nextjs-drupal/blob/master/api/platformsh-scripts/hooks.deploy.sh) into a file called `hooks.deploy.sh` in a `api/platformsh-scripts` directory. Note that hooks are executed using the dash shell, not the bash shell used by SSH logins. 2. Copy the [Drush configuration script from the template](https://github.com/platformsh-templates/nextjs-drupal/blob/master/api/drush/platformsh_generate_drush_yml.php) into a `drush/platformsh_generate_drush_yml.php` file. 3. Set a [mount](https://docs.platform.sh/create-apps/app-reference/single-runtime-image.md#mounts). Unlike in the `build` hook, in the `deploy` hook the system is generally read-only. So create a mount where you can write the Drush configuration: ```yaml {location="api/.platform.app.yaml"} mounts: /.drush: source: storage source_path: 'drush' ``` 4. Add a `deploy` hook that runs the preparation script: ```yaml {location="api/.platform.app.yaml"} hooks: deploy: !include type: string path: platformsh-scripts/hooks.deploy.sh ``` This `!include` syntax tells the hook to process the script as if it were included in the YAML file directly. This helps with longer and more complicated scripts. ##### Get data from Drupal to Next.js This Next.js app generates a static site. Often, you would generate the site for Next.js in a `build` hook. In this case, you first need to get data from Drupal to Next.js. This means you need to wait until Drupal is accepting requests and there is a relationship between the two apps. So the `post_deploy` hook is the perfect place to build your Next.js site. You can also redeploy the site every time content changes in Drupal. On redeploys, only the `post_deploy` hook runs, meaning the Drupal build is reused and Next.js is built again. So you don't have to rebuild Drupal but you still get fresh content. 1. Set a relationship for Next.js with Drupal. This allows the Next.js app to make requests and receive data from the Drupal app. ```yaml {location="client/.platform.app.yaml"} relationships: api: service: 'api' endpoint: 'http' ``` 2. Set [mounts](https://docs.platform.sh/create-apps/app-reference/single-runtime-image.md#mounts). Like the [`deploy` hook](#configure-drush-and-drupal), the `post_deploy` hook has a read-only file system. Create mounts for your Next.js files: ```yaml {location="client/.platform.app.yaml"} mounts: /.cache: source: local source_path: 'cache' /.next: source: local source_path: 'next' /.pm2: source: local source_path: 'pm2' deploy: source: service service: files source_path: deploy ``` 3. Add a `post_deploy` hook that first tests the connection between the apps: ```yaml {location="client/.platform.app.yaml"} hooks: post_deploy: | . deploy/platformsh.environment cd platformsh-scripts/test && yarn debug ``` Note that you could add `set -e` here, but even if the job fails, the build/deployment itself can still be counted as successful. 4. Then build the Next.js site: ```yaml {location="client/.platform.app.yaml"} hooks: post_deploy: | . deploy/platformsh.environment cd platformsh-scripts/test && yarn debug cd $PLATFORM_APP_DIR && yarn build ``` The `$PLATFORM_APP_DIR` variable represents the app root and can always get you back there. ##### Final hooks You can find the complete [Drupal configuration](https://github.com/platformsh-templates/nextjs-drupal/blob/master/api/.platform.app.yaml) and [Next.js configuration](https://github.com/platformsh-templates/nextjs-drupal/blob/master/client/.platform.app.yaml) on GitHub. The following shows only the parts necessary for the hooks. ###### Drupal ```yaml {location="api/.platform.app.yaml"} # The name of this app. Must be unique within the project. name: 'drupal' # The runtime the app uses. type: 'php:8.1' dependencies: php: composer/composer: '^2' # The relationships of the app with services or other apps. relationships: database: service: 'db' endpoint: 'mysql' redis: service: 'cache' endpoint: 'redis' # The hooks executed at various points in the lifecycle of the app. hooks: deploy: !include type: string path: platformsh-scripts/hooks.deploy.sh # The size of the persistent disk of the app (in MB). disk: 2048 # The 'mounts' describe writable, persistent filesystem mounts in the app. mounts: /.drush: source: local source_path: 'drush' /drush-backups: source: local source_path: 'drush-backups' deploy: source: service service: files source_path: deploy ``` ###### Next.js ```yaml {location="client/.platform.app.yaml"} # The name of this app, which must be unique within the project. name: 'nextjs' # The type key specifies the language and version for your app. type: 'nodejs:14' dependencies: nodejs: yarn: "1.22.17" pm2: "5.2.0" build: flavor: none relationships: api: service: 'api' endpoint: 'http' # The hooks that are triggered when the package is deployed. hooks: build: | set -e yarn --frozen-lockfile # Install dependencies for the main app cd platformsh-scripts/test yarn --frozen-lockfile # Install dependencies for the testing script # Next.js's build is delayed to the post_deploy hook, when Drupal is available for requests. post_deploy: | . deploy/platformsh.environment cd platformsh-scripts/test && yarn debug cd $PLATFORM_APP_DIR && yarn build # The size of the persistent disk of the app (in MB). disk: 512 mounts: /.cache: source: local source_path: 'cache' /.next: source: local source_path: 'next' /.pm2: source: local source_path: 'pm2' deploy: source: service service: files source_path: deploy ``` #### Change hooks in different environments You might have certain commands you want to run only in certain environments. For example enabling detailed logging in preview environments or purging your CDN cache for production environments. The `deploy` and `post_deploy` hooks can access all [runtime environment variables](https://docs.platform.sh/development/variables/use-variables.md#use-provided-variables). Use this to vary those hooks based on the environment. Check the `PLATFORM_ENVIRONMENT_TYPE` variable to see if it's in a production environment: ```yaml {location=".platform.app.yaml"} hooks: deploy: | if [ "$PLATFORM_ENVIRONMENT_TYPE" = production ]; then # Run commands only when deploying to production else # Run commands only when deploying to development or staging environments fi # Commands to run regardless of the environment ``` #### Comparison of hooks The following table presents the main differences among the three available hooks: | Hook name | Failures stop build | Variables available | Services available | Timeout | Run on `worker` instances | Writable directories | Blocks requests | Runs on all redeploys\* | | ------------- | ------------------- |-------------------- | ------------------ | ------- | ------------------------- | -------------------- | --------------- | --------------- | | `build` | Yes | Build variables | No | 1 hour | Yes | `$PLATFORM_APP_DIR`, `$PLATFORM_CACHE_DIR`, and `/tmp` | No | No | | `deploy` | No | Runtime variables | Yes | None | No | [Mounts](https://docs.platform.sh/create-apps/app-reference/single-runtime-image.md#mounts) | Yes | No | | `post_deploy` | No | Runtime variables | Yes | None | No | [Mounts](https://docs.platform.sh/create-apps/app-reference/single-runtime-image.md#mounts) | No | Yes | \* All of the hooks run with changes to the code or environment. This column indicates which hooks run on a redeploy without any code changes. ###### Build hook The `build` hook is run after any [build flavor](https://docs.platform.sh/create-apps/app-reference/single-runtime-image.md#build). During this hook, no services (such as a database) or any persistent file mounts are available as the application hasn't yet been deployed. The `build` hook can only use [environment variables](https://docs.platform.sh/development/variables/use-variables.md#use-provided-variables) that are available at build time. During the `build` hook, there are three writeable directories: - `$PLATFORM_APP_DIR`: This is where your code is checked out and is the working directory when the `build` hook starts. The contents of this directory after the build hook is the application that gets deployed. - `$PLATFORM_CACHE_DIR`: This directory persists between builds, but isn't deployed as part of your application. It's a good place for temporary build artifacts that can be reused between builds. It's shared by all builds on all branches. - `/tmp`: The temp directory is also useful for writing files that aren't needed in the final application, but it's wiped between each build. Note that `$PLATFORM_CACHE_DIR` is mapped to `/tmp` and together they offer about 8GB of free space. The only constraint on what can be downloaded during a `build` hook is the disk space available for builds. This is _not_ the `disk` specified in your [app configuration](https://docs.platform.sh/create-apps/app-reference/single-runtime-image.md#top-level-properties). If you exceed this limit, you receive a `No space left on device` error. See how to [troubleshoot this error](https://docs.platform.sh/create-apps/troubleshoot-disks.md#no-space-left-on-device). The `build` hook runs only when the app or its runtime (variables and such) have changed. Redeploys with no changes trigger only the `post_deploy` hook. If you need the `build` hook to run, [manually trigger a build](https://docs.platform.sh/development/troubleshoot.md#manually-trigger-builds). Each hook is executed as a single script, so they're considered to have failed only if the final command in them fails. To cause them to fail on the first failed command, add `set -e` to the beginning of the hook. If a `build` hook fails for any reason, the build is aborted and the deploy doesn't happen. Note that this only works for `build` hooks. If other hooks fail, the deploy still happens. ####### Timeout Build hooks automatically time out if they run for 1 hour. So if you accidentally add an unbroken loop, it gets cut off and you can continue with other activities. ###### Deploy hook The `deploy` hook is run after the app container has been started but before it has started accepting requests. Note that the deploy hook only runs on [`web` instances](https://docs.platform.sh/create-apps/app-reference/single-runtime-image.md#web), not [`worker` instances](https://docs.platform.sh/create-apps/app-reference/single-runtime-image.md#workers). You can access other services at this stage (such as MySQL, Solr, Redis). The disk where the application lives is read-only at this point. This hook should be used when something needs to run once when new code is deployed. It isn't run when a host is restarted (such as during region maintenance), so anything that needs to run each time an instance of an app starts (regardless of whether there's new code) should go in the `pre_start` key in [your `web` configuration](https://docs.platform.sh/create-apps/app-reference/single-runtime-image.md#web-commands). For example, clearing the cache. Be aware: The deploy hook blocks the site accepting new requests. If your `deploy` hook is only a few seconds, incoming requests in that time are paused and continue when the hook is finished. So it effectively appears as if the site just took a few extra seconds to respond. If the hook takes too long, requests can't be held and appear as dropped connections. Only run tasks in your deploy hook that have to be run exclusively, such as database schema updates or some types of cache clear (those where the code must match what's on the disk). A task that can safely run concurrently with new incoming requests should be run as a `post_deploy` hook instead. After a Git push, in addition to the log shown in the activity log, the execution of the `deploy` hook is logged in the [deploy log](https://docs.platform.sh/increase-observability/logs/access-logs.md#container-logs). For example: ```bash [2022-03-01 08:27:25.495579] Launching command 'bash export-config.sh'. 🔥 Successfully cleared configuration 🚀 Added new configuration details ``` Your `deploy` hook is tied to commits in the same way as your builds. Once a commit has been pushed and a new build image has been created, the result of both the `build` and `deploy` hooks are reused until there is a new git commit. Redeploys with no changes trigger only the `post_deploy` hook. If you need the `deploy` hook to run, [manually trigger a build](https://docs.platform.sh/development/troubleshoot.md#manually-trigger-builds). ###### Post-deploy hook The `post_deploy` hook functions exactly the same as the `deploy` hook, but after the container is accepting connections. It runs concurrently with normal incoming traffic. That makes it well suited to any updates that don't require exclusive database access. What's "safe" to run in a `post_deploy` hook vs. in a `deploy` hook varies by the application. Often times content imports, some types of cache warmups, and other such tasks are good candidates for a `post_deploy` hook. In addition to the activity log, the `post_deploy` hook logs to the [post-deploy log](https://docs.platform.sh/increase-observability/logs/access-logs.md#container-logs). The `post_deploy` hook is the only hook that runs during a redeploy. #### Use hooks with dependencies If you use a specific package in a hook, you may want to manage dependencies for it. For example, you may want to compile Sass files as part of your build process. You can set dependencies along with hooks in your [app configuration](https://docs.platform.sh/create-apps/app-reference/single-runtime-image.md#dependencies). The following example assumes you have some Sass source files, such as a `index.scss` file. You also need a script to compile the files, such as the following: ```json {location="package.json"} { "scripts": { "build-css": "sass index.scss css/index.css" }, } ``` Set your app configuration to have Sass available globally and use it: ```yaml {location=".platform.app.yaml"} # Ensure sass is available globally dependencies: nodejs: sass: "^1.47.0" hooks: # Run the script defined in package.json build: | npm run build-css ``` ### Work with workers Workers are instances of your code that aren't open to connections from other apps or services or the outside world. They're good for handling background tasks. See how to [configure a worker](https://docs.platform.sh/create-apps/app-reference/single-runtime-image.md#workers) for your app. Note that to have enough resources to support a worker and a service, you need at least a [Medium plan](https://docs.platform.sh/administration/pricing.md#multiple-apps-in-a-single-project). ##### Access the worker container Like with any other application container, Platform.sh allows you to connect to the worker instance through SSH to inspect logs and interact with it. Use the `--worker` switch in the Platform.sh CLI, like so: ```bash platform ssh --worker=queue ``` ##### Stopping a worker If a worker instance needs to be updated during a new deployment, a `SIGTERM` signal is first sent to the worker process to allow it to shut down gracefully. If your worker process can't be interrupted mid-task, make sure it reacts to `SIGTERM` to pause its work gracefully. If the process is still running after 15 seconds, a `SIGKILL` message is sent that force-terminates the worker process, allowing the container to be shut down and restarted. To restart a worker manually, [access the container](#access-the-worker-container) and run the following commands: ```bash sv stop app sv start app ``` ##### Workers vs cron jobs Worker instances don't run cron jobs. Instead, both worker instances and cron tasks address similar use cases. They both address out-of-band work that an application needs to do but that shouldn't or can't be done as part of a normal web request. They do so in different ways and so are fit for different use cases. A cron job is well suited for tasks when: * They need to happen on a fixed schedule, not continually. * The task itself isn't especially long, as a running cron job blocks a new deployment. * It's long but can be divided into many small queued tasks. * A delay between when a task is registered and when it actually happens is acceptable. A dedicated worker instance is a better fit if: * Tasks should happen "now", but not block a web request. * Tasks are large enough that they risk blocking a deploy, even if they're subdivided. * The task in question is a continually running process rather than a stream of discrete units of work. The appropriateness of one approach over the other also varies by language; single-threaded languages would benefit more from either cron or workers than a language with native multi-threading, for instance. If a given task seems like it would run equally well as a worker or as a cron, cron is generally more efficient as it doesn't require its own container. ##### Commands The `commands` key defines the command to launch the worker application. For now there is only a single command, `start`, but more will be added in the future. The `commands.start` property is required. The `start` key specifies the command to use to launch your worker application. It may be any valid shell command, although most often it runs a command in your application in the language of your application. If the command specified by the `start` key terminates, it's restarted automatically. Note that [`deploy` and `post_deploy` hooks](https://docs.platform.sh/create-apps/hooks.md) as well as [`cron` commands](https://docs.platform.sh/create-apps/app-reference/single-runtime-image.md#crons) run only on the [`web`](https://docs.platform.sh/create-apps/app-reference/single-runtime-image.md#web) container, not on workers. ##### Inheritance Any top-level definitions for [`size`](https://docs.platform.sh/create-apps/app-reference/single-runtime-image.md#sizes), [`relationships`](https://docs.platform.sh/create-apps/app-reference/single-runtime-image.md#relationships), [`access`](https://docs.platform.sh/create-apps/app-reference/single-runtime-image.md#access), [`disk`](https://docs.platform.sh/create-apps/app-reference/single-runtime-image.md), [`mount`](https://docs.platform.sh/create-apps/app-reference/single-runtime-image.md#mounts), and [`variables`](https://docs.platform.sh/create-apps/app-reference/single-runtime-image.md#variables) are inherited by every worker, unless overridden explicitly. That means, for example, that the following two `.platform.app.yaml` definitions produce identical workers. ```yaml {location=".platform.app.yaml"} name: myapp type: python:3.9 disk: 256 mounts: test: source: local source_path: test relationships: mysql: workers: queue: commands: start: | python queue-worker.py mail: commands: start: | python mail-worker.py ``` ```yaml {location=".platform.app.yaml"} name: myapp type: python:3.9 workers: queue: commands: start: | python queue-worker.py disk: 256 mounts: test: source: local source_path: test relationships: mysql: mail: commands: start: | python mail-worker.py disk: 256 mounts: test: source: local source_path: test relationships: mysql: ``` In both cases, there are two worker instances named `queue` and `mail`. Both have access to a MySQL/MariaDB service defined in `.platform/services.yaml` named `mysqldb` through the `database` relationship. Both also have their own separate, independent local disk mount at `/app/test` with 256 MB of allowed space. ##### Customizing a worker The most common properties to set in a worker to override the top-level settings are `size` and `variables`. `size` lets you allocate fewer resources to a container that is running only a single background process (unlike the web site which is handling many requests at once), while `variables` lets you instruct the application to run differently as a worker than as a web site. For example, consider the following configuration: ```yaml {location=".platform/services.yaml"} mysql: type: "mariadb:11.4" disk: 2048 rabbitmq: type: rabbitmq:4.0 disk: 512 ``` ```yaml {location=".platform.app.yaml"} name: myapp type: "python:3.9" disk: 2048 hooks: build: | pip install -r requirements.txt pip install -e . pip install gunicorn relationships: mysql: rabbitmq: variables: env: type: 'none' web: commands: start: "gunicorn -b $PORT project.wsgi:application" variables: env: type: 'web' mounts: uploads: source: local source_path: uploads locations: "/": root: "" passthru: true allow: false "/static": root: "static/" allow: true workers: queue: size: 'M' commands: start: | python queue-worker.py variables: env: type: 'worker' disk: 512 mounts: scratch: source: local source_path: scratch mail: size: 'S' commands: start: | python mail-worker.py variables: env: type: 'worker' disk: 256 mounts: {} relationships: rabbitmq: ``` There's a lot going on here, but it's all reasonably straightforward. The configuration in `.platform.app.yaml` takes a single Python 3.9 code base from your repository, downloads all dependencies in `requirements.txt`, and then installs Gunicorn. That artifact (your code plus the downloaded dependencies) is deployed as three separate container instances, all running Python 3.9. The `web` instance starts a Gunicorn process to serve a web application. - It runs the Gunicorn process to serve web requests, defined by the `project/wsgi.py` file which contains an `application` definition. - It has an environment variable named `TYPE` with value `web`. - It has a writable mount at `/app/uploads` with a maximum space of 2048 MB. - It has access to both a MySQL database and a RabbitMQ server, both of which are defined in `.platform/services.yaml`. - Platform.sh automatically allocates resources to it as available on the plan, once all fixed-size containers are allocated. The `queue` instance is a worker that isn't web-accessible. - It runs the `queue-worker.py` script, and restart it automatically if it ever terminates. - It has an environment variable named `TYPE` with value `worker`. - It has a writable mount at `/app/scratch` with a maximum space of 512 MB. - It has access to both a MySQL database and a RabbitMQ server, both of which are defined in `.platform/services.yaml` (because it doesn't specify otherwise). - It has "Medium" levels of CPU and RAM allocated to it, always. The `mail` instance is a worker that isn't web-accessible. - It runs the `mail-worker.py` script, and restart it automatically if it ever terminates. - It has an environment variable named `TYPE` with value `worker`. - It has no writable file mounts at all. - It has access only to the RabbitMQ server, through a different relationship name than on the `web` instance. It has no access to MySQL. - It has "Small" levels of CPU and RAM allocated to it, always. This way, the web instance has a large upload space, the queue instance has a small amount of scratch space for temporary files, and the mail instance has no persistent writable disk space at all as it doesn't need it. The mail instance also doesn't need any access to the SQL database so for security reasons it has none. The workers have known fixed sizes, while web can scale to as large as the plan allows. Each instance can also check the `TYPE` environment variable to detect how it's running and, if appropriate, vary its behavior accordingly. ### Elasticsearch (Search service) Elasticsearch is a distributed RESTful search engine built for the cloud. See the [Elasticsearch documentation](https://www.elastic.co/guide/en/elasticsearch/reference/current/index.md) for more information. ##### Use a framework If you use one of the following frameworks, follow its guide: - [Drupal](https://docs.platform.sh/guides/drupal/elasticsearch.md) - [Jakarta EE](https://docs.platform.sh/guides/jakarta/deploy.md#elasticsearch) - [Micronaut](https://docs.platform.sh/guides/micronaut/elasticsearch.md) - [Quarkus](https://docs.platform.sh/guides/quarkus/elasticsearch.md) - [Spring](https://docs.platform.sh/guides/spring/elasticsearch.md) ##### Supported versions From version 7.11 onward: **Premium Service**: Elasticsearch isn’t included in any Platform.sh plan. You need to add it separately at an additional cost. To add Elasticsearch, [contact Sales](https://platform.sh/contact/). The following premium versions are supported: | Grid | Dedicated Gen 3 | Dedicated Gen 2 | | - 8.5 - 7.17 None available - 8.5 - 7.17 You can select the major and minor version. Patch versions are applied periodically for bug fixes and the like. When you deploy your app, you always get the latest available patches. ##### Deprecated versions The following versions are still available in your projects for free, but they're at their end of life and are no longer receiving security updates from upstream. | Grid | Dedicated Gen 3 | Dedicated Gen 2 | | - 7.10 - 7.9 - 7.7 - 7.5 - 7.2 - 6.8 - 6.5 - 5.4 - 5.2 - 2.4 - 1.7 - 1.4 - 7.10 - 7.9 - 7.7 - 7.5 - 7.2 - 6.8 - 6.5 - 7.10 - 7.9 - 7.7 - 7.6 - 7.5 - 7.2 - 6.8 - 6.5 - 5.6 - 5.2 - 2.4 - 1.7 To ensure your project remains stable in the future, switch to [a premium version](#supported-versions). Alternatively, you can switch to one of the latest, free versions of [OpenSearch](https://docs.platform.sh/add-services/opensearch.md). To do so, follow the same procedure as for [upgrading](#upgrading). ##### Relationship reference Example information available through the [`PLATFORM_RELATIONSHIPS` environment variable](https://docs.platform.sh/development/variables/use-variables.md#use-provided-variables) or by running `platform relationships`. Note that the information about the relationship can change when an app is redeployed or restarted or the relationship is changed. So your apps should only rely on the `PLATFORM_RELATIONSHIPS` environment variable directly rather than hard coding any values. ```json { "username": null, "scheme": "http", "service": "elasticsearch", "fragment": null, "ip": "123.456.78.90", "hostname": "azertyuiopqsdfghjklm.elasticsearch.service._.eu-1.platformsh.site", "port": 9200, "cluster": "azertyuiopqsdf-main-7rqtwti", "host": "elasticsearch.internal", "rel": "elasticsearch", "path": null, "query": [], "password": "ChangeMe", "type": "elasticsearch:8.5", "public": false, "host_mapped": false } ``` For [premium versions](#supported-versions), the service type is `elasticsearch-enterprise`. ##### Usage example ###### 1. Configure the service To define the service, use the `elasticsearch` type: ```yaml {location=".platform/services.yaml"} # The name of the service container. Must be unique within a project. : type: elasticsearch: disk: 256 ``` If you’re using a [premium version](add-services/elasticsearch.md#supported-versions), use the `elasticsearch-enterprise` type instead. Note that changing the name of the service replaces it with a brand new service and all existing data is lost. Back up your data before changing the service. ###### 2. Define the relationship To define the relationship, use the following configuration: You can define ```` as you like, so long as it’s unique between all defined services and matches in both the application and services configuration. The example above leverages [default endpoint](https://docs.platform.sh/create-apps/app-reference/single-runtime-image.md#relationships) configuration for relationships. That is, it uses default endpoints behind-the-scenes, providing a [relationship](https://docs.platform.sh/create-apps/app-reference/single-runtime-image.md#relationships) (the network address a service is accessible from) that is identical to the name of that service. Depending on your needs, instead of default endpoint configuration, you can use [explicit endpoint configuration](https://docs.platform.sh/create-apps/app-reference/single-runtime-image.md#relationships). With the above definition, the application container now has [access to the service](#use-in-app) via the relationship ```` and its corresponding [PLATFORM_RELATIONSHIPS](https://docs.platform.sh/development/variables/use-variables.md#use-provided-variables). ```yaml {location=".platform.app.yaml"} name: myapp # Relationships enable access from this app to a given service. # The example below shows configuration with an explicitly set service name and endpoint. # See the Application reference for all options for defining relationships and endpoints. # Note that legacy definition of the relationship is still supported. # More information: https://docs.platform.sh/create-apps/app-reference/single-runtime-image.html#relationships relationships: : service: endpoint: elasticsearch ``` You can define ```` and ```` as you like, so long as it’s unique between all defined services and relationships and matches in both the application and services configuration. The example above leverages [explicit endpoint](https://docs.platform.sh/create-apps/app-reference/single-runtime-image.md#relationships) configuration for relationships. Depending on your needs, instead of explicit endpoint configuration, you can use [default endpoint configuration](https://docs.platform.sh/create-apps/app-reference/single-runtime-image.md#relationships). With the above definition, the application container now has [access to the service](#use-in-app) via the relationship ```` and its corresponding [PLATFORM_RELATIONSHIPS](https://docs.platform.sh/development/variables/use-variables.md#use-provided-variables). ###### Example configuration ###### [Service definition](https://docs.platform.sh/add-services.md) ```yaml {location=".platform/services.yaml"} # The name of the service container. Must be unique within a project. elasticsearch: type: elasticsearch:8.5 disk: 256 ``` If you're using a [premium version](add-services/elasticsearch.md#supported-versions), use the `elasticsearch-enterprise` type in the service definition. ####### [App configuration](https://docs.platform.sh/create-apps.md) ```yaml {location=".platform.app.yaml"} name: myapp # Relationships enable access from this app to a given service. # The example below shows configuration with an explicitly set service name and endpoint. # See the Application reference for all options for defining relationships and endpoints. # Note that legacy definition of the relationship is still supported. # More information: https://docs.platform.sh/create-apps/app-reference/single-runtime-image.html#relationships relationships: elasticsearch: service: elasticsearch endpoint: elasticsearch ``` ###### Use in app To use the configured service in your app, add a configuration file similar to the following to your project. Note that configuration for [premium versions](#supported-versions) may differ slightly. ```js {} const elasticsearch = require("elasticsearch"); const config = require("platformsh-config").config(); exports.usageExample = async function () { const credentials = config.credentials("elasticsearch"); const client = new elasticsearch.Client({ host: `${credentials.host}:${credentials.port}`, }); const index = "my_index"; const type = "People"; // Index a few document. const names = ["Ada Lovelace", "Alonzo Church", "Barbara Liskov"]; const message = { refresh: "wait_for", body: names.flatMap((name) => [ { index: { _index: index, _type: type } }, { name }, ]), }; await client.bulk(message); // Search for documents. const response = await client.search({ index, q: "name:Barbara Liskov", }); const outputRows = response.hits.hits .map( ({ _id: id, _source: { name } }) => `${id}${name}\n` ) .join("\n"); // Clean up after ourselves. await Promise.allSettled( response.hits.hits.map(({ _id: id }) => client.delete({ index: index, type: type, id, }) ) ); return ` ${outputRows}
IDName
`; }; ``` ```php {} credentials('elasticsearch'); try { // The Elasticsearch library lets you connect to multiple hosts. // On Platform.sh Standard there is only a single host so just // register that. $hosts = [ [ 'scheme' => $credentials['scheme'], 'host' => $credentials['host'], 'port' => $credentials['port'], ] ]; // Create an Elasticsearch client object. $builder = ClientBuilder::create(); $builder->setHosts($hosts); $client = $builder->build(); $index = 'my_index'; $type = 'People'; // Index a few document. $params = [ 'index' => $index, 'type' => $type, ]; $names = ['Ada Lovelace', 'Alonzo Church', 'Barbara Liskov']; foreach ($names as $name) { $params['body']['name'] = $name; $client->index($params); } // Force just-added items to be indexed. $client->indices()->refresh(array('index' => $index)); // Search for documents. $result = $client->search([ 'index' => $index, 'type' => $type, 'body' => [ 'query' => [ 'match' => [ 'name' => 'Barbara Liskov', ], ], ], ]); if (isset($result['hits']['hits'])) { print << TABLE; foreach ($result['hits']['hits'] as $record) { printf("\n", $record['_id'], $record['_source']['name']); } print "\n
IDName
%s%s
\n"; } // Delete documents. $params = [ 'index' => $index, 'type' => $type, ]; $ids = array_map(function($row) { return $row['_id']; }, $result['hits']['hits']); foreach ($ids as $id) { $params['id'] = $id; $client->delete($params); } } catch (Exception $e) { print $e->getMessage(); } ``` ```python {} import elasticsearch from platformshconfig import Config def usage_example(): # Create a new Config object to ease reading the Platform.sh environment variables. # You can alternatively use os.environ yourself. config = Config() # Get the credentials to connect to the Elasticsearch service. credentials = config.credentials('elasticsearch') try: # The Elasticsearch library lets you connect to multiple hosts. # On Platform.sh Standard there is only a single host so just register that. hosts = { "scheme": credentials['scheme'], "host": credentials['host'], "port": credentials['port'] } # Create an Elasticsearch client object. client = elasticsearch.Elasticsearch([hosts]) # Index a few documents es_index = 'my_index' es_type = 'People' params = { "index": es_index, "type": es_type, "body": {"name": ''} } names = ['Ada Lovelace', 'Alonzo Church', 'Barbara Liskov'] ids = {} for name in names: params['body']['name'] = name ids[name] = client.index(index=params["index"], doc_type=params["type"], body=params['body']) # Force just-added items to be indexed. client.indices.refresh(index=es_index) # Search for documents. result = client.search(index=es_index, body={ 'query': { 'match': { 'name': 'Barbara Liskov' } } }) table = '''''' if result['hits']['hits']: for record in result['hits']['hits']: table += '''\n'''.format(record['_id'], record['_source']['name']) table += '''\n
IDName
{0}{1}
\n''' # Delete documents. params = { "index": es_index, "type": es_type, } for name in names: client.delete(index=params['index'], doc_type=params['type'], id=ids[name]['_id']) return table except Exception as e: return e ``` **Note**: When you create an index on Elasticsearch, don’t specify the ``number_of_shards`` or ``number_of_replicas`` settings in your Elasticsearch API call. These values are set automatically based on available resources. ##### Authentication By default, Elasticsearch has no authentication. No username or password is required to connect to it. Starting with Elasticsearch 7.2 you may optionally enable HTTP Basic authentication. To do so, include the following in your `.platform/services.yaml` configuration: ```yaml {location=".platform/services.yaml"} # The name of the service container. Must be unique within a project. elasticsearch: type: elasticsearch:8.5 disk: 2048 configuration: authentication: enabled: true ``` If you're using a [premium version](#supported-versions), use the `elasticsearch-enterprise` type. That enables mandatory HTTP Basic auth on all requests. The credentials are available in any relationships that point at that service, in the `username` and `password` properties. Note that the information about the relationship can change when an app is redeployed or restarted or the relationship is changed. So your apps should only rely on the `PLATFORM_RELATIONSHIPS` environment variable directly rather than hard coding any values. This functionality is generally not required if Elasticsearch isn't exposed on its own public HTTP route. However, certain applications may require it, or it allows you to safely expose Elasticsearch directly to the web. To do so, add a route to `.platform/routes.yaml` that has `elasticsearch:elasticsearch` as its upstream (where `elasticsearch` is whatever you named the service). For example: ```yaml {location=".platform/routes.yaml"} "https://es.{default}/": type: upstream upstream: "elasticsearch:elasticsearch" ``` ##### Plugins Elasticsearch offers a number of plugins. To enable them, list them under the `configuration.plugins` key in your `.platform/services.yaml` file, like so: ```yaml {location=".platform/services.yaml"} # The name of the service container. Must be unique within a project. elasticsearch: type: elasticsearch:8.5 disk: 1024 configuration: plugins: - analysis-icu ``` If you're using a [premium version](#supported-versions), use the `elasticsearch-enterprise` type. In this example you'd have the ICU analysis plugin and Python script support plugin. If there is a publicly available plugin you need that isn't listed here, [contact support](https://docs.platform.sh/learn/overview/get-support.md). ###### Available plugins This is the complete list of official Elasticsearch plugins that can be enabled: | Plugin | Description | 2.4 | 5.x | 6.x | 7.x | 8.x | |-------------------------|-------------------------------------------------------------------------------------------|-----|-----|-----|-----|-----| | `analysis-icu` | Support ICU Unicode text analysis | * | * | * | * | * | | `analysis-nori` | Integrates Lucene Nori analysis module into Elasticsearch | | | * | * | * | | `analysis-kuromoji` | Japanese language support | * | * | * | * | * | | `analysis-smartcn` | Smart Chinese Analysis Plugins | * | * | * | * | * | | `analysis-stempel` | Stempel Polish Analysis Plugin | * | * | * | * | * | | `analysis-phonetic` | Phonetic analysis | * | * | * | * | * | | `analysis-ukrainian` | Ukrainian language support | | * | * | * | * | | `cloud-aws` | AWS Cloud plugin, allows storing indices on AWS S3 | * | | | | | | `delete-by-query` | Support for deleting documents matching a given query | * | | | | | | `discovery-multicast` | Ability to form a cluster using TCP/IP multicast messages | * | | | | | | `ingest-attachment` | Extract file attachments in common formats (such as PPT, XLS, and PDF) | | * | * | * | * | | `ingest-user-agent` | Extracts details from the user agent string a browser sends with its web requests | | * | * | | | | `lang-javascript` | JavaScript language plugin, allows the use of JavaScript in Elasticsearch scripts | | * | | | | | `lang-python` | Python language plugin, allows the use of Python in Elasticsearch scripts | * | * | | | | | `mapper-annotated-text` | Adds support for text fields with markup used to inject annotation tokens into the index | | | * | * | * | | `mapper-attachments` | Mapper attachments plugin for indexing common file types | * | * | | | | | `mapper-murmur3` | Murmur3 mapper plugin for computing hashes at index-time | * | * | * | * | * | | `mapper-size` | Size mapper plugin, enables the `_size` meta field | * | * | * | * | * | | `repository-s3` | Support for using S3 as a repository for Snapshot/Restore | | * | * | * | * | | `transport-nio` | Support for NIO transport | | | | * | * | ###### Plugin removal Removing plugins previously added in your `.platform/services.yaml` file doesn't automatically uninstall them from your Elasticsearch instances. This is deliberate, as removing a plugin may result in data loss or corruption of existing data that relied on that plugin. Removing a plugin usually requires reindexing. To permanently remove a previously enabled plugin, [upgrade the service](#upgrading) to create a new instance of Elasticsearch and migrate to it. In most cases it isn't necessary as an unused plugin has no appreciable impact on the server. ##### Upgrading The Elasticsearch data format sometimes changes between versions in incompatible ways. Elasticsearch doesn't include a data upgrade mechanism as it's expected that all indexes can be regenerated from stable data if needed. To upgrade (or downgrade) Elasticsearch, use a new service from scratch. There are two ways to do so. ###### Destructive In your `.platform/services.yaml` file, change the version *and* name of your Elasticsearch service. Be sure to also update the reference to the now changed service name in its corresponding application's `relationship` block. When you push that to Platform.sh, the old service is deleted and a new one with the new name is created with no data. You can then have your application reindex data as appropriate. This approach has the downsides of temporarily having an empty Elasticsearch instance, which your application may or may not handle gracefully, and needing to rebuild your index afterward. Depending on the size of your data that could take a while. ###### Transitional With a transitional approach, you temporarily have two Elasticsearch services. Add a second Elasticsearch service with the new version, a new name, and give it a new relationship in `.platform.app.yaml`. You can optionally run in that configuration for a while to allow your application to populate indexes in the new service as well. Once you're ready to switch over, remove the old Elasticsearch service and relationship. You may optionally have the new Elasticsearch service use the old relationship name if that's easier for your app to handle. Your application is now using the new Elasticsearch service. This approach has the benefit of never being without a working Elasticsearch instance. On the downside, it requires two running Elasticsearch servers temporarily, each of which consumes resources and needs adequate disk space. Depending on the size of your data, that may be a lot of disk space. ### Gotenberg Gotenberg is a stateless API for converting various document formats into PDF files. For more information, see the [Gotenberg documentation](https://gotenberg.dev/docs/getting-started/introduction). ##### Supported versions - 8 You can select the major version. But the latest compatible minor version is applied automatically and can’t be overridden. Patch versions are applied periodically for bug fixes and the like. When you deploy your app, you always get the latest available patches. ##### Relationship reference Example information available through the [`PLATFORM_RELATIONSHIPS` environment variable](https://docs.platform.sh/development/variables/use-variables.md#use-provided-variables) or by running `platform relationships`. ```json { "host": "gotenberg.internal", "hostname": "azertyuiopqsdfghjklm.gotenberg.service._.eu-1.platformsh.site", "cluster": "azertyuiopqsdf-main-7rqtwti", "service": "gotenberg", "rel": "http", "scheme": "http", "port": "3000", "type": "gotenberg:8", "instance_ips": [ "123.456.78.90" ], "ip": "123.456.78.90", "url": "http://gotenberg.internal:3000" } ``` Here is an example of how to gather [`PLATFORM_RELATIONSHIPS` environment variable](https://docs.platform.sh/development/variables/use-variables.md#use-provided-variables) information in a [`.environment` file](https://docs.platform.sh/development/variables/set-variables.md#use-env-files): ```bash {location=".environment"} # Decode the built-in credentials object variable. export RELATIONSHIPS_JSON=$(echo $PLATFORM_RELATIONSHIPS | base64 --decode) # Set environment variables for individual credentials. export APP_GOTENBERG_HOST=="$(echo $RELATIONSHIPS_JSON | jq -r '.gotenberg[0].host')" ``` ##### Usage example ###### 1. Configure the service To define the service, use the `gotenberg` type: ```yaml {location=".platform/services.yaml"} # The name of the service container. Must be unique within a project. : type: gotenberg: ``` Note that changing the name of the service replaces it with a brand new service and all existing data is lost. Back up your data before changing the service. ###### 2. Define the relationship To define the relationship, use the ``http`` endpoint: You can define ```` as you like, so long as it’s unique between all defined services and matches in both the application and services configuration. With the above definition, Platform.sh uses the ``http`` endpoint, providing a [relationship](https://docs.platform.sh/create-apps/app-reference/single-runtime-image.md#relationships) (the network address a service is accessible from) that is identical to the name of the service. The application has access to the service via this relationship and its corresponding ``PLATFORM_RELATIONSHIPS`` [environment variable](https://docs.platform.sh/development/variables/use-variables.md#use-provided-variables). ```yaml {location=".platform.app.yaml"} name: myapp # Relationships enable access from this app to a given service. # The example below shows configuration with an explicitly set service name and endpoint. # See the Application reference for all options for defining relationships and endpoints. # Note that legacy definition of the relationship is still supported. # More information: https://docs.platform.sh/create-apps/app-reference/single-runtime-image.html#relationships relationships: : service: endpoint: http ``` You can define ```` and ```` as you like, so long as it’s unique between all defined services and relationships and matches in both the application and services configuration. The example above leverages [explicit endpoint](https://docs.platform.sh/create-apps/app-reference/single-runtime-image.md#relationships) configuration for relationships. Depending on your needs, instead of explicit endpoint configuration, you can use [default endpoint configuration](https://docs.platform.sh/create-apps/app-reference/single-runtime-image.md#relationships). With the above definition, the application container now has access to the service via the relationship ```` and its corresponding [PLATFORM_RELATIONSHIPS](https://docs.platform.sh/development/variables/use-variables.md#use-provided-variables). The `http` endpoint uses port `3000` by default. ###### Example configuration ####### [Service definition](https://docs.platform.sh/add-services.md) ```yaml {location=".platform/services.yaml"} # The name of the service container. Must be unique within a project. gotenberg: type: gotenberg:8 ``` ####### [App configuration](https://docs.platform.sh/create-apps.md) ```yaml {location=".platform.app.yaml"} name: myapp # Relationships enable access from this app to a given service. # The example below shows configuration with an explicitly set service name and endpoint. # See the Application reference for all options for defining relationships and endpoints. # Note that legacy definition of the relationship is still supported. # More information: https://docs.platform.sh/create-apps/app-reference/single-runtime-image.html#relationships relationships: gotenberg: service: gotenberg endpoint: http ``` ##### Generate a PDF using Gotenberg As an example, to generate a PDF file of the Platform.sh website, run the following cURL command: ```bash {location="Terminal"} curl \ --request POST http://yduimhaby523ase4lju3qhimre.gotenberg8.service._.eu-3.platformsh.site/forms/chromium/convert/url \ --form url=https://platform.sh \ --form landscape=true \ --form marginTop=1 \ --form marginBottom=1 \ -o my.pdf ``` ### Headless Chrome Headless Chrome is a headless browser that can be configured on projects like any other service on Platform.sh. You can interact with the `chrome-headless` service container using Puppeteer, a Node.js library that provides an API to control Chrome over the DevTools Protocol. Puppeteer can be used to generate PDFs and screenshots of web pages, automate form submission, and test your project's UI. You can find out more information about using Puppeteer on [GitHub](https://github.com/GoogleChrome/puppeteer) or in their [documentation](https://pptr.dev/). ##### Supported versions You can select the major version. But the latest compatible minor version is applied automatically and can’t be overridden. Patch versions are applied periodically for bug fixes and the like. When you deploy your app, you always get the latest available patches. | Grid | Dedicated Gen 3 | Dedicated Gen 2 | | - 120 - 113 - 95 - 91 - 86 - 84 - 83 - 81 - 80 - 73 - 95 None available ##### Relationship reference Example information available through the [`PLATFORM_RELATIONSHIPS` environment variable](https://docs.platform.sh/development/variables/use-variables.md#use-provided-variables) or by running `platform relationships`. Note that the information about the relationship can change when an app is redeployed or restarted or the relationship is changed. So your apps should only rely on the `PLATFORM_RELATIONSHIPS` environment variable directly rather than hard coding any values. ```json { "service": "chrome-headless", "ip": "123.456.78.90", "hostname": "azertyuiopqsdfghjklm.chrome-headless.service._.eu-1.platformsh.site", "cluster": "azertyuiop-main-7rqtwti", "host": "chrome-headless.internal", "rel": "http", "scheme": "http", "type": "chrome-headless:120", "port": 9222 } ``` ##### Requirements Puppeteer requires at least Node.js version 6.4.0, while using the async and await examples below requires Node 7.6.0 or greater. If your app container uses a language other than Node.js, upgrade the Node.js version before using Puppeteer. See how to [manage your Node.js version](https://docs.platform.sh/languages/nodejs/node-version.md). ##### Usage example ###### 1. Configure the service To define the service, use the `chrome-headless` type: ```yaml {location=".platform/services.yaml"} # The name of the service container. Must be unique within a project. : type: chrome-headless: ``` Note that changing the name of the service replaces it with a brand new service and all existing data is lost. Back up your data before changing the service. ###### 2. Define the relationship To define the relationship, use the following configuration: You can define ```` as you like, so long as it’s unique between all defined services and matches in both the application and services configuration. The example above leverages [default endpoint](https://docs.platform.sh/create-apps/app-reference/single-runtime-image.md#relationships) configuration for relationships. That is, it uses default endpoints behind-the-scenes, providing a [relationship](https://docs.platform.sh/create-apps/app-reference/single-runtime-image.md#relationships) (the network address a service is accessible from) that is identical to the name of that service. Depending on your needs, instead of default endpoint configuration, you can use [explicit endpoint configuration](https://docs.platform.sh/create-apps/app-reference/single-runtime-image.md#relationships). With the above definition, the application container now has [access to the service](#use-in-app) via the relationship ```` and its corresponding [PLATFORM_RELATIONSHIPS](https://docs.platform.sh/development/variables/use-variables.md#use-provided-variables). ```yaml {location=".platform.app.yaml"} name: myapp # Relationships enable access from this app to a given service. # The example below shows configuration with an explicitly set service name and endpoint. # See the Application reference for all options for defining relationships and endpoints. # Note that legacy definition of the relationship is still supported. # More information: https://docs.platform.sh/create-apps/app-reference/single-runtime-image.html#relationships relationships: : service: endpoint: http ``` You can define ```` and ```` as you like, so long as it’s unique between all defined services and relationships and matches in both the application and services configuration. The example above leverages [explicit endpoint](https://docs.platform.sh/create-apps/app-reference/single-runtime-image.md#relationships) configuration for relationships. Depending on your needs, instead of explicit endpoint configuration, you can use [default endpoint configuration](https://docs.platform.sh/create-apps/app-reference/single-runtime-image.md#relationships). With the above definition, the application container now has [access to the service](#use-in-app) via the relationship ```` and its corresponding [PLATFORM_RELATIONSHIPS](https://docs.platform.sh/development/variables/use-variables.md#use-provided-variables). ###### Example configuration ###### [Service definition](https://docs.platform.sh/add-services.md) ```yaml {location=".platform/services.yaml"} # The name of the service container. Must be unique within a project. chrome-headless: type: chrome-headless:120 ``` ####### [App configuration](https://docs.platform.sh/create-apps.md) ```yaml {location=".platform.app.yaml"} name: myapp # Relationships enable access from this app to a given service. # The example below shows configuration with an explicitly set service name and endpoint. # See the Application reference for all options for defining relationships and endpoints. # Note that legacy definition of the relationship is still supported. # More information: https://docs.platform.sh/create-apps/app-reference/single-runtime-image.html#relationships relationships: chrome-headless: service: chrome-headless endpoint: http ``` ###### Use in app After configuration, include [Puppeteer](https://www.npmjs.com/package/puppeteer) as a dependency: ```bash {} pnpm add puppeteer ``` ```bash {} yarn add puppeteer ``` Using the [Node.js Config Reader library](https://docs.platform.sh/development/variables/use-variables.md#access-variables-in-your-app), you can retrieve formatted credentials for connecting to headless Chrome with Puppeteer: ```js const platformsh = require('platformsh-config'); const config = platformsh.config(); const credentials = config.credentials('chromeheadless'); ``` and use them to define the `browserURL` parameter of `puppeteer.connect()` within an `async` function: ```js exports.getBrowser = async function (url) { try { // Connect to chrome-headless using pre-formatted puppeteer credentials const formattedURL = config.formattedCredentials('chromeheadless', 'puppeteer'); const browser = await puppeteer.connect({browserURL: formattedURL}); ... return browser } catch (error) { console.error({ error }, 'Something happened!'); browser.close(); } }; ``` Puppeteer allows your application to [create screenshots](https://pptr.dev/#?product=Puppeteer&version=v13.0.1&show=api-pagescreenshotoptions), [emulate a mobile device](https://pptr.dev/#?product=Puppeteer&version=v13.0.1&show=api-pageemulateoptions), [generate PDFs](https://pptr.dev/#?product=Puppeteer&version=v13.0.1&show=api-pagepdfoptions), and much more. You can find some useful examples of using headless Chrome and Puppeteer on Platform.sh on the Community Portal: * [How to take screenshots using Puppeteer and Headless Chrome](https://support.platform.sh/hc/en-us/community/posts/16439566011538) * [How to generate PDFs using Puppeteer and Headless Chrome](https://support.platform.sh/hc/en-us/community/posts/16439696206482) ### InfluxDB (Database service) InfluxDB is a time series database optimized for high-write-volume use cases such as logs, sensor data, and real-time analytics. It exposes an HTTP API for client interaction. See the [InfluxDB documentation](https://docs.influxdata.com/influxdb) for more information. ##### Supported versions You can select the major and minor version. Patch versions are applied periodically for bug fixes and the like. When you deploy your app, you always get the latest available patches. | Grid | Dedicated Gen 3 | Dedicated Gen 2 | | - 2.7 - 2.3 None available None available ##### Deprecated versions The following versions are still available in your projects, but they're at their end of life and are no longer receiving security updates from upstream. | Grid | Dedicated Gen 3 | Dedicated Gen 2 | | - 2.2 - 1.8 - 1.7 - 1.3 - 1.2 None available None available To ensure your project remains stable in the future, switch to a [supported version](#supported-versions). See more information on [how to upgrade to version 2.3 or later](#upgrade-to-version-23-or-later). ##### Relationship reference Example information available through the [`PLATFORM_RELATIONSHIPS` environment variable](https://docs.platform.sh/development/variables/use-variables.md#use-provided-variables) or by running `platform relationships`. Note that the information about the relationship can change when an app is redeployed or restarted or the relationship is changed. So your apps should only rely on the `PLATFORM_RELATIONSHIPS` environment variable directly rather than hard coding any values. ```json { "host": "influxdb.internal", "hostname": "azertyuiopqsdfghjklm.influxdb.service._.eu-1.platformsh.site", "cluster": "azertyuiopqsdf-main-bvxea6i", "service": "influxdb", "type": "influxdb:2.7", "rel": "influxdb", "scheme": "http", "username": "admin", "password": "ChangeMe", "port": 8086, "path": null, "query": { "org": "main", "bucket": "main", "api_token": "azertyuiopqsdfghjklm1234567890" }, "fragment": null, "public": false, "host_mapped": false, "instance_ips": [ "123.456.78.90" ], "ip": "123.456.78.90" } ``` ##### Usage example ###### 1. Configure the service To define the service, use the `influxdb` type: ```yaml {location=".platform/services.yaml"} # The name of the service container. Must be unique within a project. : type: influxdb: disk: 256 ``` Note that changing the name of the service replaces it with a brand new service and all existing data is lost. Back up your data before changing the service. ###### 2. Define the relationship To define the relationship, use the following configuration: You can define ```` as you like, so long as it’s unique between all defined services and matches in both the application and services configuration. The example above leverages [default endpoint](https://docs.platform.sh/create-apps/app-reference/single-runtime-image.md#relationships) configuration for relationships. That is, it uses default endpoints behind-the-scenes, providing a [relationship](https://docs.platform.sh/create-apps/app-reference/single-runtime-image.md#relationships) (the network address a service is accessible from) that is identical to the name of that service. Depending on your needs, instead of default endpoint configuration, you can use [explicit endpoint configuration](https://docs.platform.sh/create-apps/app-reference/single-runtime-image.md#relationships). With the above definition, the application container now has [access to the service](#use-in-app) via the relationship ```` and its corresponding [PLATFORM_RELATIONSHIPS](https://docs.platform.sh/development/variables/use-variables.md#use-provided-variables). ```yaml {location=".platform.app.yaml"} name: myapp # Relationships enable access from this app to a given service. # The example below shows configuration with an explicitly set service name and endpoint. # See the Application reference for all options for defining relationships and endpoints. # Note that legacy definition of the relationship is still supported. # More information: https://docs.platform.sh/create-apps/app-reference/single-runtime-image.html#relationships relationships: : service: endpoint: influxdb ``` You can define ```` and ```` as you like, so long as it’s unique between all defined services and relationships and matches in both the application and services configuration. The example above leverages [explicit endpoint](https://docs.platform.sh/create-apps/app-reference/single-runtime-image.md#relationships) configuration for relationships. Depending on your needs, instead of explicit endpoint configuration, you can use [default endpoint configuration](https://docs.platform.sh/create-apps/app-reference/single-runtime-image.md#relationships). With the above definition, the application container now has [access to the service](#use-in-app) via the relationship ```` and its corresponding [PLATFORM_RELATIONSHIPS](https://docs.platform.sh/development/variables/use-variables.md#use-provided-variables). ###### Example configuration ###### [Service definition](https://docs.platform.sh/add-services.md) ```yaml {location=".platform/services.yaml"} # The name of the service container. Must be unique within a project. influxdb: type: influxdb:2.7 disk: 256 ``` ####### [App configuration](https://docs.platform.sh/create-apps.md) ```yaml {location=".platform.app.yaml"} name: myapp # Relationships enable access from this app to a given service. # The example below shows configuration with an explicitly set service name and endpoint. # See the Application reference for all options for defining relationships and endpoints. # Note that legacy definition of the relationship is still supported. # More information: https://docs.platform.sh/create-apps/app-reference/single-runtime-image.html#relationships relationships: influxdb: service: endpoint: influxdb ``` ###### Use in app To use the configured service in your app, add a configuration file similar to the following to your project. ```yaml {location=".platform.app.yaml"} # The name of the app container. Must be unique within a project. name: myapp [...] # Relationships enable access from this app to a given service. # The example below shows configuration with an explicitly set service name and endpoint. # See the Application reference for all options for defining relationships and endpoints. # Note that legacy definition of the relationship is still supported. # More information: https://docs.platform.sh/create-apps/app-reference/single-runtime-image.html#relationships relationships: influxdb: service: influxdb endpoint: influxdb ``` ```yaml {location=".platform/services.yaml"} influxdb: type: influxdb:2.7 ``` This configuration defines a single application (`myapp`), whose source code exists in the `/myapp` directory. `myapp` has access to the `influxdb` service, via a relationship whose name is [identical to the service name](#2-define-the-relationship) (as per [default endpoint](https://docs.platform.sh/create-apps/app-reference/single-runtime-image.md#relationships) configuration for relationships). From this, `myapp` can retrieve access credentials to the service through the environment variable `PLATFORM_RELATIONSHIPS`. That variable is a base64-encoded JSON object, but can be decoded at runtime (using the built-in tool `jq`) to provide more accessible environment variables to use within the application itself: ```bash {location="myapp/.environment"} # Decode the built-in credentials object variable. export RELATIONSHIPS_JSON=$(echo $PLATFORM_RELATIONSHIPS | base64 --decode) # Set environment variables for common InfluxDB credentials. export INFLUX_USER=$(echo $RELATIONSHIPS_JSON | jq -r ".influxdb[0].username") export INFLUX_HOST=$(echo $RELATIONSHIPS_JSON | jq -r ".influxdb[0].host") export INFLUX_ORG=$(echo $RELATIONSHIPS_JSON | jq -r ".influxdb[0].query.org") export INFLUX_TOKEN=$(echo $RELATIONSHIPS_JSON | jq -r ".influxdb[0].query.api_token") export INFLUX_BUCKET=$(echo $RELATIONSHIPS_JSON | jq -r ".influxdb[0].query.bucket") ``` The above file — `.environment` in the `myapp` directory — is automatically sourced by Platform.sh into the runtime environment, so that the variable `INFLUX_HOST` can be used within the application to connect to the service. Note that `INFLUX_HOST` and all Platform.sh-provided environment variables like `PLATFORM_RELATIONSHIPS`, are environment-dependent. Unlike the build produced for a given commit, they can't be reused across environments and only allow your app to connect to a single service instance on a single environment. A file very similar to this is generated automatically for your when using the `platform ify` command to [migrate a codebase to Platform.sh](https://docs.platform.sh/get-started.md). ##### Export data To export your data from InfluxDB, follow these steps: 1. Install and set up the [`influx` CLI](https://docs.influxdata.com/influxdb/cloud/tools/influx-cli/). 2. Connect to your InfluxDB service with the [Platform.sh CLI](https://docs.platform.sh/administration/cli/_index.md): ```bash platform tunnel:single ``` This opens an SSH tunnel to your InfluxDB service on your current environment and produces output like the following: ```bash SSH tunnel opened to at: http://127.0.0.1:30000 ``` 3. Get the username, password and token from the [relationship](#relationship-reference) by running the following command: ```bash platform relationships -P ``` 4. Adapt and run [InfluxDB's CLI export command](https://docs.influxdata.com/influxdb/v2.3/reference/cli/influx/backup/). ``` bash influx backup --host --token ``` ##### Upgrade to version 2.3 or later ###### From a previous 2.x version From version 2.3 onward, the structure of relationships changes. If you're using a prior 2.x version, your app might currently rely on pulling the `bucket`, `org`, `api_token`, or `user` values available in the [`PLATFORM_RELATIONSHIPS` environment variable](https://docs.platform.sh/development/variables/use-variables.md#use-provided-variables). If so, to ensure your upgrade is successful, make the following changes to your connection logic: - Rename the `user` key to `username`. - Move the `org`, `bucket` and `api_token` keys so they're contained in a dictionary under the `query` key. If you're relying on any other attributes connecting to InfluxDB, they remain accessible as top-level keys from the [`PLATFORM_RELATIONSHIPS` environment variable](https://docs.platform.sh/development/variables/use-variables.md#use-provided-variables), aside from those addressed above: ```json { "host": "influxdb.internal", "hostname": "azertyuiopqsdfghjklm.influxdb.service._.eu-1.platformsh.site", "cluster": "azertyuiopqsdf-main-bvxea6i", "service": "influxdb", "type": "influxdb:2.7", "rel": "influxdb", "scheme": "http", "username": "admin", "password": "ChangeMe", "port": 8086, "path": null, "query": { "org": "main", "bucket": "main", "api_token": "azertyuiopqsdfghjklm1234567890" }, "fragment": null, "public": false, "host_mapped": false, "ip": "123.456.78.90" } ``` ###### From a 1.x version From version 2.3 onward, InfluxDB includes an upgrade utility that can convert databases from previous versions to version 2.3 or later. To upgrade from a 1.x version to 2.3 or later, change the service version in your `.platform/services.yaml` file and push your project. Any existing data you had in your 1.x system is automatically upgraded for you into the 2.3+ system. **Note**: During an upgrade from a 1.x version to a 2.3 version or later, a new admin password and a new admin API token are automatically generated. Previous credentials can’t be retained. You can retrieve your new credentials through the [PLATFORM_RELATIONSHIPS](https://docs.platform.sh/development/variables/use-variables.md#use-provided-variables) or by running ``platform relationships``. ### Kafka (Message queue service) Apache Kafka is an open-source stream-processing software platform. It is a framework for storing, reading and analyzing streaming data. See the [Kafka documentation](https://kafka.apache.org/documentation) for more information. ##### Supported versions You can select the major and minor version. Patch versions are applied periodically for bug fixes and the like. When you deploy your app, you always get the latest available patches. | Grid | Dedicated Gen 3 | Dedicated Gen 2 | | - 3.7 - 3.6 - 3.4 - 3.2 None available None available Example information available through the [`PLATFORM_RELATIONSHIPS` environment variable](https://docs.platform.sh/development/variables/use-variables.md#use-provided-variables) or by running `platform relationships`. Note that the information about the relationship can change when an app is redeployed or restarted or the relationship is changed. So your apps should only rely on the `PLATFORM_RELATIONSHIPS` environment variable directly rather than hard coding any values. ```json { "service": "kafka", "ip": "123.456.78.90", "hostname": "azertyuiopqsdfghjklm.kafka.service._.eu-1.platformsh.site", "cluster": "azertyuiop-main-7rqtwti", "host": "kafka.internal", "rel": "kafka", "scheme": "kafka", "type": "kafka:3.7", "port": 9092 } ``` ##### Usage example ###### 1. Configure the service To define the service, use the `kafka` type: ```yaml {location=".platform/services.yaml"} # The name of the service container. Must be unique within a project. : type: kafka: disk: 512 ``` Note that changing the name of the service replaces it with a brand new service and all existing data is lost. Back up your data before changing the service. ###### 2. Define the relationship To define the relationship, use the following configuration: You can define ```` as you like, so long as it’s unique between all defined services and matches in both the application and services configuration. The example above leverages [default endpoint](https://docs.platform.sh/create-apps/app-reference/single-runtime-image.md#relationships) configuration for relationships. That is, it uses default endpoints behind-the-scenes, providing a [relationship](https://docs.platform.sh/create-apps/app-reference/single-runtime-image.md#relationships) (the network address a service is accessible from) that is identical to the name of that service. Depending on your needs, instead of default endpoint configuration, you can use [explicit endpoint configuration](https://docs.platform.sh/create-apps/app-reference/single-runtime-image.md#relationships). With the above definition, the application container now has [access to the service](#use-in-app) via the relationship ```` and its corresponding [PLATFORM_RELATIONSHIPS](https://docs.platform.sh/development/variables/use-variables.md#use-provided-variables). ```yaml {location=".platform.app.yaml"} name: myapp # Relationships enable access from this app to a given service. # The example below shows configuration with an explicitly set service name and endpoint. # See the Application reference for all options for defining relationships and endpoints. # Note that legacy definition of the relationship is still supported. # More information: https://docs.platform.sh/create-apps/app-reference/single-runtime-image.html#relationships relationships: : service: endpoint: kafka ``` You can define ```` and ```` as you like, so long as it’s unique between all defined services and relationships and matches in both the application and services configuration. The example above leverages [explicit endpoint](https://docs.platform.sh/create-apps/app-reference/single-runtime-image.md#relationships) configuration for relationships. Depending on your needs, instead of explicit endpoint configuration, you can use [default endpoint configuration](https://docs.platform.sh/create-apps/app-reference/single-runtime-image.md#relationships). With the above definition, the application container now has [access to the service](#use-in-app) via the relationship ```` and its corresponding [PLATFORM_RELATIONSHIPS](https://docs.platform.sh/development/variables/use-variables.md#use-provided-variables). ###### Example configuration ###### [Service definition](https://docs.platform.sh/add-services.md) ```yaml {location=".platform/services.yaml"} # The name of the service container. Must be unique within a project. kafka: type: kafka:3.7 disk: 512 ``` ####### [App configuration](https://docs.platform.sh/create-apps.md) ```yaml {location=".platform.app.yaml"} name: myapp # Relationships enable access from this app to a given service. # The example below shows configuration with an explicitly set service name and endpoint. # See the Application reference for all options for defining relationships and endpoints. # Note that legacy definition of the relationship is still supported. # More information: https://docs.platform.sh/create-apps/app-reference/single-runtime-image.html#relationships relationships: kafka: service: kafka endpoint: kafka ``` ###### Use in app To use the configured service in your app, add a configuration file similar to the following to your project. ```python {} from json import dumps from json import loads from kafka import KafkaConsumer, KafkaProducer from platformshconfig import Config def usage_example(): # Create a new Config object to ease reading the Platform.sh environment variables. # You can alternatively use os.environ yourself. config = Config() # Get the credentials to connect to the Kafka service. credentials = config.credentials('kafka') try: kafka_server = '{}:{}'.format(credentials['host'], credentials['port']) # Producer producer = KafkaProducer( bootstrap_servers=[kafka_server], value_serializer=lambda x: dumps(x).encode('utf-8') ) for e in range(10): data = {'number' : e} producer.send('numtest', value=data) # Consumer consumer = KafkaConsumer( bootstrap_servers=[kafka_server], auto_offset_reset='earliest' ) consumer.subscribe(['numtest']) output = '' # For demonstration purposes so it doesn't block. for e in range(10): message = next(consumer) output += str(loads(message.value.decode('UTF-8'))["number"]) + ', ' # What a real implementation would do instead. # for message in consumer: # output += loads(message.value.decode('UTF-8'))["number"] return output except Exception as e: return e ``` ```ruby {} ##### With the ruby-kafka gem # Producer require "kafka" kafka = Kafka.new(["kafka.internal:9092"], client_id: "my-application") kafka.deliver_message("Hello, World!", topic: "greetings") # Consumer kafka.each_message(topic: "greetings") do |message| puts message.offset, message.key, message.value end ``` The specific way to inject configuration into your application varies. Consult your application or framework's documentation. ### MariaDB/MySQL (database service) Platform.sh supports both MariaDB and Oracle MySQL to manage your relational databases. Their infrastructure setup is nearly identical, though they differ in some features. See the [MariaDB documentation](https://mariadb.org/learn/) or [MySQL documentation](https://dev.mysql.com/doc/refman/en/) for more information. ##### Use a framework If you use one of the following frameworks, follow its guide: - [Hibernate](https://docs.platform.sh/guides/hibernate/deploy.md#mysql) - [Jakarta EE](https://docs.platform.sh/guides/jakarta/deploy.md#mysql) - [Spring](https://docs.platform.sh/guides/spring/mysql.md) ##### Supported versions You can select the major and minor version. Patch versions are applied periodically for bug fixes and the like. When you deploy your app, you always get the latest available patches. The service types `mariadb` and `mysql` both refer to MariaDB. The service type `oracle-mysql` refers to MySQL as released by Oracle, Inc. Other than the value for their `type`, MySQL and MariaDB have the same behavior and the rest of this page applies to both of them. | **`mariadb`** | **`mysql`** | **`oracle-mysql`** | |---------------|-------------|--------------------| | - 11.4 - 11.2 - 11.0 - 10.11 - 10.6 - 10.5 - 10.4 | - 11.0 - 10.11 - 10.6 - 10.5 - 10.4 - 10.3 | - 8.0 - 5.7 | ###### Supported versions on Dedicated environments `oracle-mysql` is not yet available for Dedicated Gen 3 environments. It also isn't available for Dedicated Gen 2 environments. On Dedicated environments, MariaDB is available with Galera for replication. Supported versions are the following: | Dedicated Gen 2 | Dedicated Gen 3 | | - 10.11 Galera - 10.8 Galera - 10.7 Galera - 10.6 Galera - 10.5 Galera - 10.4 Galera - 10.3 Galera - 10.11 Galera - 10.6 Galera - 10.5 Galera - 10.4 Galera - 10.3 Galera Dedicated environments only support the InnoDB storage engine. Tables created on Dedicated environments using the MyISAM storage engine don't replicate between all hosts in the cluster. See how to [convert tables to the InnoDB engine](#storage-engine). ###### Deprecated versions The following versions are [deprecated](https://docs.platform.sh/glossary.md#deprecated-versions). They're available, but they aren't receiving security updates from upstream and aren't guaranteed to work. They'll be removed in the future, so migrate to one of the [supported versions](#supported-versions). | **`mariadb`** | **`mysql`** | **`oracle-mysql`** | |----------------------------------|---------------|-------------------------| | - 10.2 - 10.1 - 10.3 - 10.0 - 5.5 | - 10.2 - 10.1 - 10.3 - 10.0 - 5.5 | | ###### Upgrade When upgrading your service, skipping versions may result in data loss. Upgrade sequentially from one supported version to another (10.5 -> 10.6 -> 10.11 -> 11.0), and check that each upgrade commit translates into an actual deployment. To upgrade, update the service version in your [service configuration](https://docs.platform.sh/add-services.md). ###### Change the service type To change the service type: 1. [Export your data](#exporting-data). **Note**: Changing the service type, especially when done repeatedly, may result in data loss. Backing up your data is therefore crucial. 2. Remove the old service from your [service configuration](https://docs.platform.sh/add-services.md). 3. Specify a new service type. 4. [Import your data](#importing-data) into the new service. ###### Downgrade You can't downgrade to a previous version and retain your data. To downgrade your database, follow these steps: 1. [Export your data](#exporting-data). 1. Remove the old service from your [service configuration](https://docs.platform.sh/add-services.md). 1. Add a new service with a different name and your desired version. 1. [Import your data](#importing-data) into the new service. ##### Usage example Configure your service with at least 256 MB in disk space. ###### 1. Configure the service To define the service, use the `mariadb` or `mysql` type for MariaDB or the `oracle-mysql` type for Oracle MySQL: ```yaml {location=".platform/services.yaml"} # The name of the service container. Must be unique within a project. : type: mariadb: disk: 256 ``` Note that changing the name of the service replaces it with a brand new service and all existing data is lost. Back up your data before changing the service. ###### 2. Define the relationship To define the relationship, use the following configuration: You can define ```` as you like, so long as it’s unique between all defined services and matches in both the application and services configuration. The example above leverages [default endpoint](https://docs.platform.sh/create-apps/app-reference/single-runtime-image.md#relationships) configuration for relationships. That is, it uses default endpoints behind-the-scenes, providing a [relationship](https://docs.platform.sh/create-apps/app-reference/single-runtime-image.md#relationships) (the network address a service is accessible from) that is identical to the name of that service. Depending on your needs, instead of default endpoint configuration, you can use [explicit endpoint configuration](https://docs.platform.sh/create-apps/app-reference/single-runtime-image.md#relationships). With the above definition, the application container now has [access to the service](#use-in-app) via the relationship ```` and its corresponding [PLATFORM_RELATIONSHIPS](https://docs.platform.sh/development/variables/use-variables.md#use-provided-variables). ```yaml {location=".platform.app.yaml"} # Relationships enable access from this app to a given service. # The example below shows configuration with an explicitly set service name and endpoint. # See the Application reference for all options for defining relationships and endpoints. # Note that legacy definition of the relationship is still supported. # More information: https://docs.platform.sh/create-apps/app-reference/single-runtime-image.html#relationships relationships: : service: endpoint: mysql ``` You can define ```` and ```` as you like, so long as it’s unique between all defined services and relationships and matches in both the application and services configuration. The example above leverages [explicit endpoint](https://docs.platform.sh/create-apps/app-reference/single-runtime-image.md#relationships) configuration for relationships. Depending on your needs, instead of explicit endpoint configuration, you can use [default endpoint configuration](https://docs.platform.sh/create-apps/app-reference/single-runtime-image.md#relationships). With the above definition, the application container now has [access to the service](#use-in-app) via the relationship ```` and its corresponding [PLATFORM_RELATIONSHIPS](https://docs.platform.sh/development/variables/use-variables.md#use-provided-variables). ###### MariaDB example ####### [Service definition](https://docs.platform.sh/add-services.md) ```yaml {location=".platform/services.yaml"} # The name of the service container. Must be unique within a project. mariadb: type: mariadb:11.4 disk: 256 ``` ####### [App configuration](https://docs.platform.sh/create-apps.md) ```yaml {location=".platform.app.yaml"} # Relationships enable access from this app to a given service. # The example below shows configuration with an explicitly set service name and endpoint. # See the Application reference for all options for defining relationships and endpoints. # Note that legacy definition of the relationship is still supported. # More information: https://docs.platform.sh/create-apps/app-reference/single-runtime-image.html#relationships relationships: mariadb: service: mariadb endpoint: mysql ``` ###### OracleMySQL example ####### [Service definition](https://docs.platform.sh/add-services.md) ```yaml {location=".platform/services.yaml"} # The name of the service container. Must be unique within a project. oraclemysql: type: oracle-mysql:8.0 disk: 256 ``` ####### [App configuration](https://docs.platform.sh/create-apps.md) ```yaml {location=".platform.app.yaml"} # Relationships enable access from this app to a given service. # The example below shows configuration with an explicitly set service name and endpoint. # See the Application reference for all options for defining relationships and endpoints. # Note that legacy definition of the relationship is still supported. # More information: https://docs.platform.sh/create-apps/app-reference/single-runtime-image.html#relationships relationships: oraclemysql: service: oraclemysql endpoint: mysql ``` ###### Use in app To use the configured service in your app, add a configuration file similar to the following to your project. ```java {} package sh.platform.languages.sample; import sh.platform.config.Config; import sh.platform.config.MySQL; import javax.sql.DataSource; import java.sql.Connection; import java.sql.ResultSet; import java.sql.SQLException; import java.sql.Statement; import java.util.function.Supplier; public class MySQLSample implements Supplier { @Override public String get() { StringBuilder logger = new StringBuilder(); // Create a new config object to ease reading the Platform.sh environment variables. // You can alternatively use getenv() yourself. Config config = new Config(); // The 'database' relationship is generally the name of primary SQL database of an application. // That's not required, but much of our default automation code assumes it. MySQL database = config.getCredential("database", MySQL::new); DataSource dataSource = database.get(); // Connect to the database try (Connection connection = dataSource.getConnection()) { // Creating a table. String sql = "CREATE TABLE IF NOT EXISTS People (" + " id INT(6) UNSIGNED AUTO_INCREMENT PRIMARY KEY," + "name VARCHAR(30) NOT NULL," + "city VARCHAR(30) NOT NULL)"; final Statement statement = connection.createStatement(); statement.execute(sql); // Insert data. sql = "INSERT INTO People (name, city) VALUES" + "('Neil Armstrong', 'Moon')," + "('Buzz Aldrin', 'Glen Ridge')," + "('Sally Ride', 'La Jolla')"; statement.execute(sql); // Show table. sql = "SELECT * FROM People"; final ResultSet resultSet = statement.executeQuery(sql); logger.append(""); while (resultSet.next()) { String name = resultSet.getString("name"); String city = resultSet.getString("city"); logger.append(String.format("", name, city)); logger.append('\n'); } logger.append("
NameCity
%s%s
"); statement.execute("DROP TABLE People"); return logger.toString(); } catch (SQLException exp) { throw new RuntimeException("An error when execute MySQL", exp); } } } ``` ```js {} const mysql = require("mysql2/promise"); const config = require("platformsh-config").config(); exports.usageExample = async function () { const credentials = config.credentials("database"); const connection = await mysql.createConnection({ host: credentials.host, port: credentials.port, user: credentials.username, password: credentials.password, database: credentials.path, }); // Creating a table. await connection.query( `CREATE TABLE IF NOT EXISTS People ( id INT(6) UNSIGNED AUTO_INCREMENT PRIMARY KEY, name VARCHAR(30) NOT NULL, city VARCHAR(30) NOT NULL )` ); // Insert data. await connection.query( `INSERT INTO People (name, city) VALUES ('Neil Armstrong', 'Moon'), ('Buzz Aldrin', 'Glen Ridge'), ('Sally Ride', 'La Jolla');` ); // Show table. const [rows] = await connection.query("SELECT * FROM People"); // Drop table. await connection.query("DROP TABLE People"); const outputRows = rows .map(({ name, city }) => `${name}${city}\n`) .join("\n"); return ` ${outputRows}
NameCity
`; }; ``` ```php {} credentials('database'); try { // Connect to the database using PDO. If using some other abstraction layer you would // inject the values from $database into whatever your abstraction layer asks for. $dsn = sprintf('mysql:host=%s;port=%d;dbname=%s', $credentials['host'], $credentials['port'], $credentials['path']); $conn = new \PDO($dsn, $credentials['username'], $credentials['password'], [ // Always use Exception error mode with PDO, as it's more reliable. \PDO::ATTR_ERRMODE => \PDO::ERRMODE_EXCEPTION, // So we don't have to mess around with cursors and unbuffered queries by default. \PDO::MYSQL_ATTR_USE_BUFFERED_QUERY => TRUE, // Make sure MySQL returns all matched rows on update queries including // rows that actually didn't have to be updated because the values didn't // change. This matches common behavior among other database systems. \PDO::MYSQL_ATTR_FOUND_ROWS => TRUE, ]); // Creating a table. $sql = "CREATE TABLE People ( id INT(6) UNSIGNED AUTO_INCREMENT PRIMARY KEY, name VARCHAR(30) NOT NULL, city VARCHAR(30) NOT NULL )"; $conn->query($sql); // Insert data. $sql = "INSERT INTO People (name, city) VALUES ('Neil Armstrong', 'Moon'), ('Buzz Aldrin', 'Glen Ridge'), ('Sally Ride', 'La Jolla');"; $conn->query($sql); // Show table. $sql = "SELECT * FROM People"; $result = $conn->query($sql); $result->setFetchMode(\PDO::FETCH_OBJ); if ($result) { print << TABLE; foreach ($result as $record) { printf("\n", $record->name, $record->city); } print "\n
NameCity
%s%s
\n"; } // Drop table $sql = "DROP TABLE People"; $conn->query($sql); } catch (\Exception $e) { print $e->getMessage(); } ``` ```python {} import pymysql from platformshconfig import Config def usage_example(): # Create a new Config object to ease reading the Platform.sh environment variables. # You can alternatively use os.environ yourself. config = Config() # The 'database' relationship is generally the name of primary SQL database of an application. # That's not required, but much of our default automation code assumes it.' credentials = config.credentials('database') try: # Connect to the database using PDO. If using some other abstraction layer you would inject the values # from `database` into whatever your abstraction layer asks for. conn = pymysql.connect(host=credentials['host'], port=credentials['port'], database=credentials['path'], user=credentials['username'], password=credentials['password']) sql = ''' CREATE TABLE People ( id INT(6) UNSIGNED AUTO_INCREMENT PRIMARY KEY, name VARCHAR(30) NOT NULL, city VARCHAR(30) NOT NULL ) ''' cur = conn.cursor() cur.execute(sql) sql = ''' INSERT INTO People (name, city) VALUES ('Neil Armstrong', 'Moon'), ('Buzz Aldrin', 'Glen Ridge'), ('Sally Ride', 'La Jolla'); ''' cur.execute(sql) # Show table. sql = '''SELECT * FROM People''' cur.execute(sql) result = cur.fetchall() table = '''''' if result: for record in result: table += '''\n'''.format(record[1], record[2]) table += '''\n
NameCity
{0}{1}
\n''' # Drop table sql = '''DROP TABLE People''' cur.execute(sql) # Close communication with the database cur.close() conn.close() return table except Exception as e: return e ``` ###### Configure connections There may be cases where you want to configure a database connection manually. To get the URL to connect to the database, run the following command: ```bash platform relationships ``` The result is the complete [information for all relationships](#relationship-reference) with an additional `url` property. Use the `url` property as your connection. Note that the information about the relationship can change when an app is redeployed or restarted or the relationship is changed. So your apps should only rely on the `PLATFORM_RELATIONSHIPS` environment variable directly rather than hard coding any values. You can also see a guide on how to [convert the `PLATFORM_RELATIONSHIPS` environment variable to a different form](https://support.platform.sh/hc/en-us/community/posts/16439596373010). ##### Configuration options You can configure your MySQL service in the [services configuration](https://docs.platform.sh/add-services.md) with the following options: | Name | Type | Version | Description | | ------------ | ----------------------- | ---------------------------------- | ----------- | | `schemas` | An array of `string`s | 10.0+ | All databases to be created. Defaults to a single `main` database. | | `endpoints` | An endpoints dictionary | 10.0+ | Endpoints with their permissions. See [multiple databases](#multiple-databases). | | `properties` | A properties dictionary | MariaDB: 10.1+; Oracle MySQL: 8.0+ | Additional properties for the database. Equivalent to using a `my.cnf` file. See [property options](#configure-the-database). | Example configuration: ```yaml {location=".platform/services.yaml"} # The name of the service container. Must be unique within a project. mariadb: type: mariadb:11.4 disk: 2048 configuration: schemas: - main endpoints: mysql: default_schema: main privileges: main: admin properties: max_allowed_packet: 64 ``` ##### Relationship reference Example information available through the [`PLATFORM_RELATIONSHIPS` environment variable](https://docs.platform.sh/development/variables/use-variables.md#use-provided-variables) or by running `platform relationships`. Note that the information about the relationship can change when an app is redeployed or restarted or the relationship is changed. So your apps should only rely on the `PLATFORM_RELATIONSHIPS` environment variable directly rather than hard coding any values. ###### MariaDB reference ```json { "username": "user", "scheme": "mysql", "service": "mariadb", "fragment": null, "ip": "123.456.78.90", "hostname": "azertyuiopqsdfghjklm.mariadb.service._.eu-1.platformsh.site", "port": 3306, "cluster": "azertyuiop-main-7rqtwti", "host": "mariadb.internal", "rel": "mysql", "path": "main", "query": { "is_master": true }, "password": "", "type": "mariadb:11.4", "public": false, "host_mapped": false } ``` ###### Oracle MySQL reference ```json { "username": "user", "scheme": "mysql", "service": "oracle-mysql", "fragment": null, "ip": "123.456.78.90", "hostname": "azertyuiopqsdfghjklm.oracle-mysql.service._.eu-1.platformsh.site", "port": 3306, "cluster": "azertyuiop-main-afdwftq", "host": "oraclemysql.internal", "rel": "mysql", "path": "main", "query": { "is_master": true }, "password": "", "type": "oracle-mysql:8.0", "public": false, "host_mapped": false } ``` ##### Access the service directly You can access the service using the Platform.sh CLI by running `platform sql`. You can also access it from you app container via [SSH](https://docs.platform.sh/development/ssh.md). From your [relationship data](#relationship-reference), you need: `host`, `port`, `user`, `path`. Then run the following command: ```bash mysql -h -P -u ``` Assuming the values from the [MariaDB reference](#mariadb-reference), that would be: ```bash mysql -h mariadb.internal -P 3306 -u user main ``` If your database relationship has a password, pass the `-p` switch and enter the password when prompted: ```bash mysql -p -h mariadb.internal -P 3306 -u user main ``` ##### Define permissions With version `10.0` or later, you can define multiple users with different permissions for your database. To do so, define multiple endpoints in your [service configuration](#configuration-options). For each endpoint you add, you can define the following properties: | Name | Type | Required | Description | | ---------------- | ------------------------ | -------- | ----------- | | `default_schema` | `string` | | Which of the defined schemas to default to. If not specified, the `path` property of the relationship is `null` and so tools such as the Platform.sh CLI can't access the relationship. | | `privileges` | A permissions dictionary | | For each of the defined schemas, what permissions the given endpoint has. | Possible permissions: | Name | Type | Description | | ----------- | ------------- |--------------------------------------------------------------------------------------------------------------------------------------------------------------------------------------------| | Read-only | `ro` | Can select, create temporary tables, and see views. | | Read-write | `rw` | In addition to read-only permissions, can also insert, update, delete, manage and execute events, execute routines, create and drop indexes, manage and execute triggers, and lock tables. | | Admin | `admin` | In addition to read-write permissions, can also create, drop, and alter tables; create views; and create and alter routines. | | Replication | `replication` | For [replicating databases](https://docs.platform.sh/add-services/mysql/mysql-replication.md). In addition to read-only permissions, can also lock tables. | ###### Restrict access to database replicas only **Feature availability** This feature is available on Grid HA (High Availability) and Dedicated Gen 3 projects. For more information, [contact Sales](https://platform.sh/contact/). Your main database lives on one of the three nodes provided on Grid HA and Dedicated Gen 3. The two other nodes can each accommodate a replica of your main database. For security reasons, you can grant your app access to a replica instead of your main database. To do so, when defining the relationship between your app and database, make sure you do the following: 1. Use the [explicit endpoint syntax](https://docs.platform.sh/create-apps/app-reference/single-runtime-image.md#relationships). 2. Add the `-replica` suffix to the name of the endpoint you want to use. This results in the following configuration: ```yaml {location=".platform.app.yaml"} relationships: : service: endpoint: -replica ``` For example, if you define a `mariadb` database as follows: ```yaml {location=".platform/services.yaml"} mariadb: type: mariadb:11.4 disk: 2048 configuration: schemas: - main endpoints: admin: default_schema: main privileges: main: admin reporter: privileges: main: ro ``` To create a replica of the `mariadb` database and allow your app to connect to it through the `admin` endpoint with admin permissions, use the following configuration: ```yaml {location=".platform.app.yaml"} relationships: mariadb: service: mariadb endpoint: admin-replica ``` To create a replica of the `mariadb` database and allow your app to connect to it through the `reporter` endpoint with read-only permissions instead, use the following configuration: ```yaml {location=".platform.app.yaml"} relationships: mariadb: service: mariadb endpoint: reporter-replica ``` ###### Grant access to the main database and its replicas **Feature availability** This feature is available on Grid HA (High Availability) and Dedicated Gen 3 projects. For more information, [contact Sales](https://platform.sh/contact/). Your main database lives on one of the three nodes provided on Grid HA and Dedicated Gen 3. The two other nodes can each accommodate a replica of your main database. You may want to grant access to both your main database and its replicas. To do so, when defining the relationship between your app and database, make sure you do the following: 1. Use the [explicit endpoint syntax](https://docs.platform.sh/create-apps/app-reference/single-runtime-image.md#relationships). 2. Add the `-all` suffix to the name of the endpoint you want to use. This results in the following configuration, which creates a replica on each of the secondary nodes: ```yaml {location=".platform.app.yaml"} relationships: : service: endpoint: -all ``` For example, if you define a `mariadb` database as follows: ```yaml {location=".platform/services.yaml"} mariadb: type: mariadb:11.4 disk: 2048 configuration: schemas: - main endpoints: admin: default_schema: main privileges: main: admin reporter: privileges: main: ro ``` To allow your app to connect to your main database and both its replicas through the `admin` endpoint with admin permissions, use the following configuration: ```yaml {location=".platform.app.yaml"} relationships: mariadb: service: mariadb endpoint: admin-all ``` To allow your app to connect to your main database and both its replicas through the `reporter` endpoint with read-only permissions, use the following configuration: ```yaml {location=".platform.app.yaml"} relationships: mariadb: service: mariadb endpoint: reporter-all ``` ##### Multiple databases With version `10.0` or later, you can define multiple databases. To do so, define multiple `schemas` in your [service configuration](#configuration-options). You can also specify multiple `endpoints` for [permissions](#define-permissions). If neither `schemas` nor `endpoints` is included, it's equivalent to the following default: ```yaml {location=".platform/services.yaml"} # The name of the service container. Must be unique within a project. mariadb: type: mariadb:11.4 disk: 2048 configuration: schemas: - main endpoints: mysql: default_schema: main privileges: main: admin ``` If either `schemas` or `endpoints` are defined, no default is applied and you have to specify the full configuration. **Note**: Removing a schema from the list of ``schemas`` on further deployments results in the deletion of the schema. ###### Multiple databases example The following configuration example creates a single MariaDB service named `mariadb` with two databases, `main` and `legacy`. Access to the database is defined through three endpoints: * `admin` has full access to both databases. * `reporter` has SELECT query access to `main` but no access to `legacy`. * `importer` has SELECT/INSERT/UPDATE/DELETE (but not DDL) access to `legacy` but no access to `main`. ```yaml {location=".platform/services.yaml"} # The name of the service container. Must be unique within a project. mariadb: type: mariadb:11.4 disk: 2048 configuration: schemas: - main - legacy endpoints: admin: default_schema: main privileges: main: admin legacy: admin reporter: privileges: main: ro importer: default_schema: legacy privileges: legacy: rw ``` Expose these endpoints to your app as relationships in your [app configuration](https://docs.platform.sh/create-apps/_index.md): ```yaml {location=".platform.app.yaml"} name: myapp [...] # Relationships enable an app container's access to a service. relationships: # Note that legacy definition of the relationship is still supported. # More information: https://docs.platform.sh/create-apps/app-reference/single-runtime-image.html#relationships database: service: mariadb endpoint: admin reports: service: mariadb endpoint: reporter imports: service: mariadb endpoint: importer ``` These relationships are then available in the [`PLATFORM_RELATIONSHIPS` environment variable](#relationship-reference). Each has its own credentials you can use to connect to the given database. ##### Configure the database For MariaDB 10.1 and later and Oracle MySQL 8.0 and later, you can set some configuration properties (equivalent to using a `my.cnf` file). In your settings, add the `properties` key to the `configuration` key. It offers the following properties: | Name | Type | Default | Description | |---------------------------------------|-----------|--------------------------------------------------------------|---------------------------------------------------------------------------------------------------------------------------------------------------------------------------------------| | `max_allowed_packet` | `integer` | `16` | The maximum size for packets in MB. Can be from `1` to `100`. | | `default_charset` | `string` | `utf8mb4` after February 2020 and `latin1` before | The default character set. Affects any tables created after it's set. | | `default_collation` | `string` | `utf8mb4_unicode_ci` after February 2020 and `latin1` before | The default collation. Affects any tables created after it's set. | | `optimizer_switch` | `string` | | A place to set various server optimization variables. See the [MariaDB documentation](https://mariadb.com/kb/en/optimizer-switch/). | | `optimizer_use_condition_selectivity` | `integer` | `4` in version 10.4.1+ and `1` before that | Which statistics are used by the optimizer. From `1` to `5`. See the [MariaDB documentation](https://mariadb.com/kb/en/server-system-variables/#optimizer_use_condition_selectivity). | | `innodb_adaptive_hash_index` | `integer` | `0` in version 10.5+ and `1` before that | Enable/Disable InnoDB Hash Index. See the [MariaDB documentation](https://mariadb.com/kb/en/innodb-system-variables/#innodb_adaptive_hash_index). | | `max_heap_table_size` | `integer` | `32` | The maximum size for user-created MEMORY tables in MB. Can be from `1` to `4096`. | | `table_definition_cache` | `integer` | `400` | The number of table definitions that can be cached. See the [MariaDB documentation](https://mariadb.com/kb/en/server-system-variables/#table_definition_cache). | | `table_open_cache` | `integer` | `400` | The maximum number of open tables cached in one table cache instance. See the [MariaDB documentation](https://mariadb.com/kb/en/server-system-variables/#table_open_cache). | | `wsrep_sync_wait` | `integer` | `0` (Disabled) | Ensure execution of statements in fully synced nodes. See the [MariaDB documentation](https://mariadb.com/kb/en/galera-cluster-system-variables/#wsrep_sync_wait). | An example of setting these properties: ```yaml {location=".platform/services.yaml"} # The name of the service container. Must be unique within a project. mariadb: type: mariadb:11.4 disk: 2048 configuration: properties: max_allowed_packet: 64 default_charset: utf8mb4 default_collation: utf8mb4_unicode_ci ``` You can also change a table's character set and collation through `ALTER TABLE` commands: ```sql -- To change defaults when creating new tables: ALTER DATABASE main CHARACTER SET utf8mb4 COLLATE utf8mb4_unicode_ci; -- To change defaults when creating new columns: ALTER TABLE table_name CHARACTER SET utf8mb4 COLLATE utf8mb4_unicode_ci; -- To convert existing data: ALTER TABLE table_name CONVERT TO CHARACTER SET utf8mb4 COLLATE utf8mb4_unicode_ci; ``` For further details, see the [MariaDB documentation](https://mariadb.com/kb/en/character-set-and-collation-overview/). **Note**: MariaDB configuration properties like [max_connections](https://mariadb.com/docs/server/ref/mdb/system-variables/max_connections/) and [innodb_buffer_pool_size](https://mariadb.com/kb/en/innodb-buffer-pool/#innodb_buffer_pool_size) are not directly configurable from ``configuration.properties`` in your services configuration. They can, however, be set indirectly, which can be useful for solving ``Too many connection`` errors. See [the troubleshooting documentation](https://docs.platform.sh/add-services/mysql/troubleshoot.md#too-many-connections) for more details. ##### Password generation When you connect your app to a database, an empty password is generated for the database by default. This can cause issues with your app. To generate real passwords for your database, define custom endpoints in your [service configuration](#1-configure-the-service). For each custom endpoint you create, you get an automatically generated password, similarly to when you create [multiple databases](#multiple-databases). Note that you can't customize these automatically generated passwords. After your custom endpoints are exposed as relationships in your [app configuration](https://docs.platform.sh/create-apps.md), you can retrieve the password for each endpoint through the `PLATFORM_RELATIONSHIPS` [environment variable](https://docs.platform.sh/development/variables/use-variables.md#use-provided-variables) within your [application containers](https://docs.platform.sh/development/variables/use-variables.md#access-variables-in-your-app). The password value changes automatically over time, to avoid downtime its value has to be read dynamically by your app. Globally speaking, having passwords hard-coded into your codebase can cause security issues and should be avoided. When you switch from the default configuration with an empty password to custom endpoints, make sure your service name remains unchanged. Failure to do so results in the creation of a new service, which removes any existing data from your database. ##### Storage Engine It's best to use the InnoDB storage engine wherever possible. MyISAM is only properly supported in non-Dedicated environments. In Dedicated environments, there is no replication of MyISAM tables. If MyISAM tables have been inadvertently created or imported in a Dedicated environment (if you see `ENGINE=MyISAM` in the response to `SHOW CREATE TABLE EXISTING_TABLE`), convert them to use the InnoDB storage engine as follows: 1. Rename the existing table. ```text RENAME TABLE ; ``` 1. Create a new table from the data in the existing table. ```text CREATE TABLE SELECT * from ; ``` Now when you run `SHOW CREATE TABLE `, you see `ENGINE=InnoDB`. ##### Service timezone To change the timezone for a given connection, run `SET time_zone = ;`. ##### Exporting data To download all data from your SQL database, use the Platform.sh CLI. If you have a single SQL database, the following command exports all data to a local file: ```bash platform db:dump ``` If you have multiple SQL databases, you are prompted for which one to export. You can also specify a database by its relationship name: ```bash platform db:dump --relationship ``` ###### Compression By default, the file is uncompressed. To compress it, use the `--gzip` (`-z`) option: ```bash platform db:dump --gzip ``` ###### Using the output in bash To pipe the result to another command, use the `--stdout` option. For example, to create a bzip2-compressed file, run: ```bash platform db:dump --stdout | bzip2 > dump.sql.bz2 ``` ##### Importing data To load data into a database, pipe an SQL dump through the `platform sql` command, like so: ```bash platform sql **Note**: Importing a database backup is a destructive operation. It overwrites data already in your database. It’s best to run it against an empty database. If not, make a backup or do a database export before importing. ##### Sanitizing data To ensure people who review code changes can't access personally identifiable information stored in your database, [sanitize your preview environments](https://docs.platform.sh/development/sanitize-db.md). ##### Replication In non-Dedicated environments, there is no on-site primary/replica supports. In Dedicated environments, it's provided automatically as part of the default configuration. In rare cases (such as for certain backup purposes), you can also enable [remote replication](https://docs.platform.sh/add-services/mysql/mysql-replication.md) to your own replica data. The replica isn't available to your application. ##### Troubleshoot If you run into issues, [troubleshoot MySQL](https://docs.platform.sh/add-services/mysql/troubleshoot.md). #### MariaDB/MySQL External Replication In rare cases, it may be useful to maintain a replica instance of your MySQL/MariaDB database outside of Platform.sh. Normally an automated backup is better for short-term usage and a `mysqldump` for longer term storage, but in some cases the data set is large enough that `mysqldump` is prohibitive. In that case, you can enable external replication using an extra permission. Note that this guide covers the Platform.sh side; you need to set up and maintain your own replica instance. Consult the MySQL or MariaDB documentation for steps to do so. ###### Create a replication user To set up replication you need to create a replication-enabled user. For each database that you'd like to replicate, you need to assign a `replication` permission/role, under a corresponding `endpoint`: ```yaml {location=".platform/services.yaml"} # The name of the service container. Must be unique within a project. mariadb: type: mariadb:11.4 disk: 1024 configuration: schemas: - main endpoints: # Restate the default user to be used by your application. mysql: default_schema: main privileges: main: admin replicator: privileges: main: replication ``` This creates a `replicator` user, and grants read-only and table locking rights on the `main` database (namely `Select_priv`, `Show_view_priv`, `Create_tmp_table_priv`, `Lock_tables_priv` privileges) along with global replication rights (namely `Repl_slave_priv` and `Repl_client_priv` privileges) and flushing rights (`Reload_priv` used for flushing before reading the binary log position). If there is at least one `replication` permission defined, the bin-logging is enabled on the primary server, which is essential for the replication. ###### Add a relationship for the new endpoint Even if you won't be accessing the replication endpoint from your application, you still need to expose it to an application as a relationship so that you can connect to it over SSH. Add a new relationship to your application container: ```yaml {location=".platform.app.yaml"} name: myapp [...] # Relationships enable an app container's access to a service. relationships: # Please note: Legacy definition of the relationship is still supported: # More information: https://docs.platform.sh/create-apps/app-reference/single-runtime-image.html#relationships database: service: "mariadb" endpoint: "mysql" replication: service: "mariadb" endpoint: "replicator" ``` ###### Getting the Primary's Binary Log Co-ordinates Open the MySQL CLI to the `replication` relationship, either by accessing the credentials while on the app container or using the following command. ```bash platform sql -r replication ``` Now you need to prevent any changes to the data while you view the binary log position. You'll use this to tell the replica at exactly which point it should start replicating from. On the primary server, flush and lock all tables by running `FLUSH TABLES WITH READ LOCK`. Keep this session running - exiting it releases the lock. Get the current position in the binary log by running `SHOW MASTER STATUS`: ```sql mysql> FLUSH TABLES WITH READ LOCK; Query OK, 0 rows affected (0.016 sec) mysql> SHOW MASTER STATUS; +-----------------+----------+--------------+------------------+ | File | Position | Binlog_Do_DB | Binlog_Ignore_DB | +-----------------+----------+--------------+------------------+ | binlogs.000002 | 1036 | dflt | | +-----------------+----------+--------------+------------------+ ``` Record the `File` and `Position` details. If binary logging has just been enabled, these are blank. Now, with the lock still in place, copy the data from the primary to the replica. Login to the app container, then run: ```sh # Dump the data from primary. Note that it dumps only the databases, which "replicator" user has access to. $ mysqldump --all-databases --single-transaction -h database.internal -P 3306 -u replicator -p > /path/to/dump.sql ``` Download the dump file, then move it to the server where your replica lives to import it. ```bash # Copy the dump to your replica $ mysql -u root UNLOCK TABLES; ``` ###### Setting up the replica ####### Configuring the replica As mentioned above you have to set up a replica on your own. Assuming that you have a running MariaDB/MySQL replica instance, give the replica a unique `server_id` (distinct from primary). You can find out primary's `server_id` by running: ```sql mysql> SHOW VARIABLES LIKE 'server_id'; +---------------+-------+ | Variable_name | Value | +---------------+-------+ | server_id | 1 | +---------------+-------+ ``` Then set a distinct `server_id` number (e.g. server_id+1) in your replica config (e.g. `my.cnf`) under: ``` [mysqld] server_id=2 ``` And reload the replica instance for the changes to take an effect. ####### Set up SSH tunneling You need to set up an SSH tunnel from the replica server to the primary, tunneled through the application. To do so using the Platform.sh CLI, run the following (replacing `` with the name of your production branch): ```bash platform tunnel:open --project --environment ``` This opens local SSH tunnels to all services accessible from the application. In practice, you may be better served by setting up the tunnel manually using SSH. Consult the SSH documentation for the best way to do so. **Note**: The SSH connection is interrupted every time the environment redeploys. For replication to continue you must setup an auto-restart for the connection. There are many ways to do so that are out of the scope of this documentation. ####### Starting the Replica Once the data has been imported, you are ready to start replicating. Begin by running a `CHANGE MASTER TO`, making sure that `MASTER_LOG_FILE` matches the file and `MASTER_LOG_POS` the position returned by the earlier `SHOW MASTER STATUS` on the Platform.sh database. For example: ```sql mysql> CHANGE MASTER TO MASTER_HOST='', MASTER_USER='replicator', MASTER_PASSWORD='', MASTER_PORT=3306, MASTER_LOG_FILE='binlogs.000002', MASTER_LOG_POS=1036, MASTER_CONNECT_RETRY=10; ``` Where `` varies depending on the SSH tunneling configuration you have, and the `` can be obtained by running `platform relationships`. Now start the replica with the `START SLAVE` command: ```sql mysql> START SLAVE; ``` Check that the replication is working by executing the `SHOW SLAVE STATUS` command: ```sql mysql> SHOW SLAVE STATUS \G ``` If replication is working correctly, the values of both `Slave_IO_Running` and `Slave_SQL_Running` should be `Yes`: ```sql Slave_IO_Running: Yes Slave_SQL_Running: Yes ``` ####### [Optional/Troubleshooting] Skipping invalid binary log queries In some cases, after applying primary's dump to the replica and starting the replica, you might experience replication errors (`Slave_SQL_Running: No` and `Error:` in the output of `SHOW SLAVE STATUS \G` above). Each of such errors needs a careful inspection, but you might be able to just skip some of them. For example: ```sql mysql> STOP SLAVE; SET GLOBAL SQL_SLAVE_SKIP_COUNTER = 1; START SLAVE; mysql> SHOW SLAVE STATUS \G ``` In case you have multiple errors you would need to repeat the steps above (preferred) or set `SQL_SLAVE_SKIP_COUNTER` (which corresponds to skipping the next N events from the primary) to something greater. #### Troubleshoot MySQL For more general information, see how to [troubleshoot development](https://docs.platform.sh/development/troubleshoot.md). ###### Lock wait timeout If a process running in your application acquired a lock from MySQL for a long period of time, you receive MySQL error messages like this: ```sql SQLSTATE[HY000]: General error: 1205 Lock wait timeout exceeded; ``` This is typically caused by one of the following: * There are multiple places acquiring locks in different order. For example, code path 1 first locks record A and then locks record B, while code path 2 first locks record B and then locks record A. * There is a long running background process executed by your application that holds the lock until it ends. If you're using [MariaDB 10+](https://docs.platform.sh/add-services/mysql.md), use the SQL query `SHOW FULL PROCESSLIST \G` to list DB queries waiting for locks. To determine where to debug, find output like the following: ```sql Command: Query Time: ... State: Waiting for table metadata lock Info: SELECT ... ``` To find active background processes, run `ps aufx` on your application container. Make sure that locks are acquired in a pre-defined order and released as soon as possible. ###### Definer/invoker of view lack rights to use them There is a single MySQL user, so you can not use "DEFINER" Access Control mechanism for Stored Programs and Views. When creating a `VIEW`, you may need to explicitly set the `SECURITY` parameter to `INVOKER`: ```sql CREATE OR REPLACE SQL SECURITY INVOKER VIEW `view_name` AS SELECT ``` ###### Server has gone away ####### Disk space issues Errors such as `PDO Exception 'MySQL server has gone away'` are usually the result of exhausting your available disk space. Get an estimate of current disk usage using the CLI command `platform db:size`. Just keep in mind it's an estimate and not exact. Allocate more space to the service in [`.platform/services.yaml`](https://docs.platform.sh/add-services.md). As table space can grow rapidly, it's usually advisable to make your database mount size twice the size reported by the `db:size` command. You may want to add a [low-disk warning](https://docs.platform.sh/integrations/notifications.md#low-disk-warning) to learn about low disk space before it becomes an issue. ####### Packet size limitations `MySQL server has gone away` errors may be caused by the size of the database packets. If so, the logs may show warnings like `Error while sending QUERY packet` before the error. One way to resolve the issue is to use the [`max_allowed_packet` parameter](https://docs.platform.sh/add-services/mysql.md#configure-the-database). ####### Worker timeout `MySQL server has gone away` errors may be caused by server timeouts. MySQL has a built-in timeout for idle connections, which defaults to 10 minutes. Most typical web connections end long before that's ever approached, but a long-running worker may idle and not need the database for longer than the timeout, leading to a "server has gone away" message. The best approach is to wrap your connection logic in code that detects a "server has gone away" exception and tries to re-establish the connection. Alternatively, if your worker is idle for too long it can self-terminate. Platform.sh automatically restarts the worker process and the new process can establish a new database connection. ###### Too many connections You may get the following [error message](https://mariadb.com/kb/en/e1040/): `Error 1040: Too many connections`. A common way to solve this issue is to increase the `max_connections` property in your MariaDB service configuration. However, on Platform.sh, you **cannot** configure `max_connections` directly. ####### Quick fix **Note**: This information applies to DG3 and Professional/Grid Platform.sh projects. For DG2 projects, [contact Support](https://docs.platform.sh/learn/overview/get-support.md) to configure the ``max_connections`` property. You cannot configure `max_connections` directly in Platform.sh service configurations. However, to solve `Error 1040`, you can increase `max_connections` indirectly. For example, in the following service configuration for MariaDB, `max_connections` is `188` as [set by Platform.sh](#how-it-works): ```yaml {location=".platform/services.yaml"} # The name of the service container. Must be unique within a project. mariadb: type: mariadb:11.4 disk: 2048 size: L configuration: properties: max_allowed_packet: 16 ``` To **increase** `max_connections`, you can **either**: - **decrease** `max_allowed_packet` (for example, `16` → `15` results in `max_connections=201`) - or **increase** `size` (for example, `L` → `XL` results in `max_connections=356`) ####### How it works Behind the scenes, `max_connections` (for Professional and DG3 projects) is calculated from values that you _can_ change: 1. **`max_allowed_packet`**: `max_allowed_packet` is [directly configurable](https://docs.platform.sh/add-services/mysql.md#configure-the-database) in your `.platform/services.yaml` file with an integer value. The default value of `16` is shown below to illustrate: ```yaml {location=".platform/services.yaml"} # The name of the service container. Must be unique within a project. mariadb: type: mariadb:11.4 disk: 2048 configuration: properties: max_allowed_packet: 16 ``` 1. **The memory available to the service**: Resources are distributed across the containers in a cluster based on your Platform.sh [plan size](https://docs.platform.sh/administration/pricing.md). The _strategy_ for how resources are distributed can either be determined for you by Platform.sh (equivalent to setting `size: AUTO`) or by setting a container size explicitly: ```yaml {location=".platform/services.yaml"} # The name of the service container. Must be unique within a project. mariadb: type: mariadb:11.4 disk: 2048 size: L configuration: properties: max_allowed_packet: 16 ``` The memory for a given container from its `size` depends on its [container profile***](https://docs.platform.sh/create-apps/app-reference/single-runtime-image.md#container-profiles-cpu-and-memory). For example, [MariaDB](https://docs.platform.sh/create-apps/app-reference/single-runtime-image.md#container-profile-reference) has a `HIGH_MEMORY` [container profile](https://docs.platform.sh/create-apps/app-reference/single-runtime-image.md#high_memory-container-profile). For `size: L`, it means 0.40 CPU and 1280 MB of memory. If we assume the configuration above, where: - `mariadb.size: L`, which we know is 1280 MB, referred to below as `application_size` - `mariadb.configuration.properties.max_allowed_packet: 16` `max_allowed_packet` is `188`, which is determined by Platform.sh according to: \begin{aligned} \texttt{max_connections} = \text{int}\Biggl[ \min \left( \frac{\texttt{FREE_MEMORY}}{\texttt{max_allowed_packet}}, 500 \right) \Biggr] \end{aligned} This calculation uses three additional calculations: \begin{aligned} \texttt{FREE_MEMORY} = \texttt{AVAILABLE_MEMORY} - \left( 50 + \texttt{innodb_buffer_pool_size} \right) \newline \newline \texttt{AVAILABLE_MEMORY} = (\texttt{application_size} * 2) + 512 \newline \newline \texttt{innodb_buffer_pool_size} = \frac{\text{int}\left( 0.75 \cdot \texttt{application_size} \right)}{1024^{2}} \end{aligned} So for our current example, where: \begin{aligned} \texttt{application_size} = 1280 \newline \texttt{max_allowed_packet} = 16 \end{aligned} You get: \begin{aligned} \texttt{innodb_buffer_pool_size} = \frac{\text{int}\left( 0.75 \cdot \texttt{application_size} \right)}{1024^{2}} = \frac{\text{int}\left( 0.75 \cdot \texttt{1280} \right)}{1024^{2}} \approx 9.155 \times 10^{-4} \end{aligned} \begin{aligned} \texttt{AVAILABLE_MEMORY} = (\texttt{application_size} * 2) + 512 = (1280 * 2) + 512 = 3072 \end{aligned} \begin{aligned} \texttt{FREE_MEMORY} = \texttt{AVAILABLE_MEMORY} - \left( 50 + \texttt{innodb_buffer_pool_size} \right) \newline \newline \texttt{FREE_MEMORY} = 3072 - \left( 50 + 0.0009155... \right) = 3021.999084 \end{aligned} \begin{aligned} \texttt{max_connections} = \text{int}\Biggl[ \min \left( \frac{\texttt{FREE_MEMORY}}{\texttt{max_allowed_packet}}, 500 \right) \Biggr] = \text{int}\Biggl[ \min \left( \frac{3021.999084}{16}, 500 \right) \Biggr] = \text{int}\Biggl[ 188.87... \Biggr] \end{aligned} \begin{aligned} \texttt{max_connections} = 188 \end{aligned} The following table provides additional example calculations of `max_connections` for all `size` settings and for a number of `max_allow_packet` settings. MariaDB ``max_connections`` for common combinations of ``size`` & ``max_allow_packet`` ``application_size````size`` (memory in MB) S (128 MB) | M (288 MB) | L (1280 MB) | XL (2624 MB) | 2XL (5248 MB) | 4XL (10496 MB) | 1(min) | 500 | 500 | 500 | 500 | 500 | 500 | 2 | 358 | 500 | 500 | 500 | 500 | 500 | 8 | 89 | 129 | 377 | 500 | 500 | 500 | 16(default) | 44 | 64 | 188 | 356 | 500 | 500 | 32 | 22 | 32 | 94 | 178 | 342 | 500 | 64 | 11 | 16 | 47 | 89 | 171 | 335 | 100(max) | 7 | 10 | 30 | 57 | 109 | 214 | **Note**: The maximum value for ``max_connections`` is 500, indicated with italicized integers in the table. Also, you can **increase** ``max_connections`` in your environments by either: - **decreasing** the ``max_allow_packet`` value in your service configuration - or **increasing** your plan ``size`` ### Memcached (Object cache) Memcached is an in-memory object store well-suited for application level caching. See the [Memcached documentation](https://memcached.org) for more information. Both Memcached and Redis can be used for application caching. As a general rule, Memcached is simpler and thus more widely supported while Redis is more robust. Platform.sh recommends using Redis if possible but Memcached is fully supported if an application favors that cache service. ##### Use a framework If you use one of the following frameworks, follow its guide: - [Drupal](https://docs.platform.sh/guides/drupal/memcached.md) ##### Supported versions You can select the major and minor version. Patch versions are applied periodically for bug fixes and the like. When you deploy your app, you always get the latest available patches. | Grid | Dedicated Gen 3 | Dedicated Gen 2 | | - 1.6 - 1.5 - 1.4 None available - 1.4* \* No High-Availability on Dedicated Gen 2. ##### Relationship reference Example information available through the [`PLATFORM_RELATIONSHIPS` environment variable](https://docs.platform.sh/development/variables/use-variables.md#use-provided-variables) or by running `platform relationships`. Note that the information about the relationship can change when an app is redeployed or restarted or the relationship is changed. So your apps should only rely on the `PLATFORM_RELATIONSHIPS` environment variable directly rather than hard coding any values. ```json { "service": "memcached", "ip": "123.456.78.90", "hostname": "azertyuiopqsdfghjklm.memcached.service._.eu-1.platformsh.site", "cluster": "azertyuiopqsdf-main-afdwftq", "host": "memcached.internal", "rel": "memcached", "scheme": "memcached", "type": "memcached:1.6", "port": 11211 } ``` ##### Usage example ###### 1. Configure the service To define the service, use the `memcached` type: ```yaml {location=".platform/services.yaml"} # The name of the service container. Must be unique within a project. : type: memcached: disk: 256 ``` Note that changing the name of the service replaces it with a brand new service and all existing data is lost. Back up your data before changing the service. ###### 2. Define the relationship To define the relationship, use the following configuration: You can define ```` as you like, so long as it’s unique between all defined services and matches in both the application and services configuration. The example above leverages [default endpoint](https://docs.platform.sh/create-apps/app-reference/single-runtime-image.md#relationships) configuration for relationships. That is, it uses default endpoints behind-the-scenes, providing a [relationship](https://docs.platform.sh/create-apps/app-reference/single-runtime-image.md#relationships) (the network address a service is accessible from) that is identical to the name of that service. Depending on your needs, instead of default endpoint configuration, you can use [explicit endpoint configuration](https://docs.platform.sh/create-apps/app-reference/single-runtime-image.md#relationships). With the above definition, the application container now has [access to the service](#use-in-app) via the relationship ```` and its corresponding [PLATFORM_RELATIONSHIPS](https://docs.platform.sh/development/variables/use-variables.md#use-provided-variables). ```yaml {location=".platform.app.yaml"} name: myapp # Relationships enable access from this app to a given service. # The example below shows configuration with an explicitly set service name and endpoint. # See the Application reference for all options for defining relationships and endpoints. # Note that legacy definition of the relationship is still supported. # More information: https://docs.platform.sh/create-apps/app-reference/single-runtime-image.html#relationships relationships: : service: endpoint: memcached ``` You can define ```` and ```` as you like, so long as it’s unique between all defined services and relationships and matches in both the application and services configuration. The example above leverages [explicit endpoint](https://docs.platform.sh/create-apps/app-reference/single-runtime-image.md#relationships) configuration for relationships. Depending on your needs, instead of explicit endpoint configuration, you can use [default endpoint configuration](https://docs.platform.sh/create-apps/app-reference/single-runtime-image.md#relationships). With the above definition, the application container now has [access to the service](#use-in-app) via the relationship ```` and its corresponding [PLATFORM_RELATIONSHIPS](https://docs.platform.sh/development/variables/use-variables.md#use-provided-variables). ###### Example configuration ###### [Service definition](https://docs.platform.sh/add-services.md) ```yaml {location=".platform/services.yaml"} # The name of the service container. Must be unique within a project. memcached: type: memcached:1.6 ``` ####### [App configuration](https://docs.platform.sh/create-apps.md) ```yaml {location=".platform.app.yaml"} name: myapp # Relationships enable access from this app to a given service. # The example below shows configuration with an explicitly set service name and endpoint. # See the Application reference for all options for defining relationships and endpoints. # Note that legacy definition of the relationship is still supported. # More information: https://docs.platform.sh/create-apps/app-reference/single-runtime-image.html#relationships relationships: memcached: service: memcached endpoint: memcached ``` ###### Use in app To use the configured service in your app, add a configuration file similar to the following to your project. ```java {} package sh.platform.languages.sample; import net.spy.memcached.MemcachedClient; import sh.platform.config.Config; import java.util.function.Supplier; import sh.platform.config.Memcached; public class MemcachedSample implements Supplier { @Override public String get() { StringBuilder logger = new StringBuilder(); // Create a new config object to ease reading the Platform.sh environment variables. // You can alternatively use getenv() yourself. Config config = new Config(); // Get the credentials to connect to the Memcached service. Memcached memcached = config.getCredential("memcached", Memcached::new); final MemcachedClient client = memcached.get(); String key = "cloud"; String value = "platformsh"; // Set a value. client.set(key, 0, value); // Read it back. Object test = client.get(key); logger.append("

"); logger.append(String.format("Found value %s for key %s.", test, key)); logger.append("

"); return logger.toString(); } } ``` ```js {} const Memcached = require('memcached'); const config = require("platformsh-config").config(); const { promisify } = require('util'); exports.usageExample = async function() { const credentials = config.credentials('memcached'); const client = new Memcached(`${credentials.host}:${credentials.port}`); // The MemcacheD client is not Promise-aware, so make it so. const memcachedGet = promisify(client.get).bind(client); const memcachedSet = promisify(client.set).bind(client); const key = 'Deploy-day'; const value = 'Friday'; // Set a value. await memcachedSet(key, value, 10); // Read it back. const test = await memcachedGet(key); return `Found value ${test} for key ${key}.`; }; ``` ```php {} credentials('memcached'); try { // Connecting to Memcached server. $memcached = new Memcached(); $memcached->addServer($credentials['host'], $credentials['port']); $memcached->setOption(Memcached::OPT_BINARY_PROTOCOL, true); $key = "Deploy day"; $value = "Friday"; // Set a value. $memcached->set($key, $value); // Read it back. $test = $memcached->get($key); printf('Found value %s for key %s.', $test, $key); } catch (Exception $e) { print $e->getMessage(); } ``` ```python {} import pymemcache from platformshconfig import Config def usage_example(): # Create a new Config object to ease reading the Platform.sh environment variables. # You can alternatively use os.environ yourself. config = Config() # Get the credentials to connect to the Memcached service. credentials = config.credentials('memcached') try: # Try connecting to Memached server. memcached = pymemcache.Client((credentials['host'], credentials['port'])) memcached.set('Memcached::OPT_BINARY_PROTOCOL', True) key = "Deploy_day" value = "Friday" # Set a value. memcached.set(key, value) # Read it back. test = memcached.get(key) return 'Found value {0} for key {1}.'.format(test.decode("utf-8"), key) except Exception as e: return e ``` ##### Accessing Memcached directly To access the Memcached service directly you can use `netcat` as Memcached doesn't have a dedicated client tool. Assuming your Memcached relationship is named `memcached`, the host name and port number obtained from `PLATFORM_RELATIONSHIPS` would be `memcached.internal` and `11211`. Open an [SSH session](https://docs.platform.sh/development/ssh.md) and access the Memcached server as follows: ```bash {location="Terminal"} netcat memcached.internal 11211 ``` Note that the information about the relationship can change when an app is redeployed or restarted or the relationship is changed. So your apps should only rely on the `PLATFORM_RELATIONSHIPS` environment variable directly rather than hard coding any values. ### MongoDB (Database service) MongoDB is a cross-platform, document-oriented database. For more information on using MongoDB, see [MongoDB's own documentation](https://docs.mongodb.com/manual/). ##### Use a framework If you use one of the following frameworks, follow its guide: - [Jakarta EE](https://docs.platform.sh/guides/jakarta/deploy.md#mongodb) - [Micronaut](https://docs.platform.sh/guides/micronaut/mongodb.md) - [Quarkus](https://docs.platform.sh/guides/quarkus/mongodb.md) - [Spring](https://docs.platform.sh/guides/spring/mongodb.md) ##### Supported versions You can select the major and minor version. Patch versions are applied periodically for bug fixes and the like. When you deploy your app, you always get the latest available patches. ###### Enterprise edition **Premium Service**: MongoDB Enterprise isn’t included in any Platform.sh plan. You need to add it separately at an additional cost. To add MongoDB Enterprise, [contact Sales](https://platform.sh/contact/). | Grid | Dedicated Gen 3 | Dedicated Gen 2 | | - 7.0 - 6.0 - 5.0 - 4.4 None available - 6.0 - 5.0 - 4.4 ###### Deprecated versions The following versions are [deprecated](https://docs.platform.sh/glossary.md#deprecated-versions). They're available, but they aren't receiving security updates from upstream and aren't guaranteed to work. They'll be removed in the future, so migrate to one of the [supported versions](#supported-versions). | Grid | Dedicated Gen 3 | Dedicated Gen 2 | | - 4.2 - 4.0 None available - 4.2 - 4.0 ###### Legacy edition Previous non-Enterprise versions are available in your projects (and are listed below), but they're at their [end of life](https://www.mongodb.com/support-policy/legacy) and are no longer receiving security updates from upstream. **Warning**: Downgrades of MongoDB aren’t supported. MongoDB updates its own data files to a new version automatically but can’t downgrade them. If you want to experiment with a later version without committing to it use a preview environment. ###### Deprecated versions The following versions are [deprecated](https://docs.platform.sh/glossary.md#deprecated-versions). They're available, but they aren't receiving security updates from upstream and aren't guaranteed to work. They'll be removed in the future, so migrate to one of the [supported versions](#supported-versions). - 4.0.3 - 3.6 - 3.4 - 3.2 - 3.0 ##### Relationship reference Example information available through the [`PLATFORM_RELATIONSHIPS` environment variable](https://docs.platform.sh/development/variables/use-variables.md#use-provided-variables) or by running `platform relationships`. Note that the information about the relationship can change when an app is redeployed or restarted or the relationship is changed. So your apps should only rely on the `PLATFORM_RELATIONSHIPS` environment variable directly rather than hard coding any values. ```json { "username": "main", "scheme": "mongodb", "service": "mongodb", "ip": "123.456.78.90", "hostname": "azertyuiopqsdfghjklm.mongodb.service._.eu-1.platformsh.site", "cluster": "azertyuiop-main-7rqtwti", "host": "mongodb.internal", "rel": "mongodb", "query": { "is_master": true }, "path": "main", "password": null, "type": "mongodb-enterprise:7.0", "port": 27017 } ``` ##### Usage example ###### Enterprise edition example ####### 1. Configure the service To define the service, use the `mongodb-enterprise` type: ```yaml {location=".platform/services.yaml"} # The name of the service container. Must be unique within a project. : type: mongodb-enterprise: disk: 512 ``` Note that changing the name of the service replaces it with a brand new service and all existing data is lost. Back up your data before changing the service. ####### 2. Define the relationship To define the relationship, use the following configuration: You can define ```` as you like, so long as it’s unique between all defined services and matches in both the application and services configuration. The example above leverages [default endpoint](https://docs.platform.sh/create-apps/app-reference/single-runtime-image.md#relationships) configuration for relationships. That is, it uses default endpoints behind-the-scenes, providing a [relationship](https://docs.platform.sh/create-apps/app-reference/single-runtime-image.md#relationships) (the network address a service is accessible from) that is identical to the name of that service. Depending on your needs, instead of default endpoint configuration, you can use [explicit endpoint configuration](https://docs.platform.sh/create-apps/app-reference/single-runtime-image.md#relationships). With the above definition, the application container now has access to the service via the relationship ```` and its corresponding [PLATFORM_RELATIONSHIPS](https://docs.platform.sh/development/variables/use-variables.md#use-provided-variables). ```yaml {location=".platform.app.yaml"} name: myapp # Relationships enable access from this app to a given service. # The example below shows configuration with an explicitly set service name and endpoint. # See the Application reference for all options for defining relationships and endpoints. # Note that legacy definition of the relationship is still supported. # More information: https://docs.platform.sh/create-apps/app-reference/single-runtime-image.html#relationships relationships: : service: endpoint: mongodb ``` You can define ```` and ```` as you like, so long as it’s unique between all defined services and relationships and matches in both the application and services configuration. The example above leverages [explicit endpoint](https://docs.platform.sh/create-apps/app-reference/single-runtime-image.md#relationships) configuration for relationships. Depending on your needs, instead of explicit endpoint configuration, you can use [default endpoint configuration](https://docs.platform.sh/create-apps/app-reference/single-runtime-image.md#relationships). With the above definition, the application container now has access to the service via the relationship ```` and its corresponding [PLATFORM_RELATIONSHIPS](https://docs.platform.sh/development/variables/use-variables.md#use-provided-variables). For PHP, enable the [extension](https://docs.platform.sh/languages/php/extensions.md) for the service: ```yaml {location=".platform.app.yaml"} name: myapp # PHP extensions. runtime: extensions: - mongodb ``` ####### Example configuration ######## [Service definition](https://docs.platform.sh/add-services.md) ```yaml {location=".platform/services.yaml"} # The name of the service container. Must be unique within a project. mongodb-enterprise: type: mongodb-enterprise:7.0 disk: 512 ``` ######## [App configuration](https://docs.platform.sh/create-apps.md) ```yaml {location=".platform.app.yaml"} name: myapp # Relationships enable access from this app to a given service. # The example below shows configuration with an explicitly set service name and endpoint. # See the Application reference for all options for defining relationships and endpoints. # Note that legacy definition of the relationship is still supported. # More information: https://docs.platform.sh/create-apps/app-reference/single-runtime-image.html#relationships relationships: mongodb-enterprise: service: mongodb-enterprise endpoint: mongodb ``` ###### Legacy edition example ####### 1. Configure the service To define the service, use the `mongodb` type: ```yaml {location=".platform/services.yaml"} # The name of the service container. Must be unique within a project. : type: mongodb: disk: 512 ``` Note that changing the name of the service replaces it with a brand new service and all existing data is lost. Back up your data before changing the service. ####### 2. Define the relationship To define the relationship, use the following configuration: You can define ```` as you like, so long as it’s unique between all defined services and matches in both the application and services configuration. The example above leverages [default endpoint](https://docs.platform.sh/create-apps/app-reference/single-runtime-image.md#relationships) configuration for relationships. That is, it uses default endpoints behind-the-scenes, providing a [relationship](https://docs.platform.sh/create-apps/app-reference/single-runtime-image.md#relationships) (the network address a service is accessible from) that is identical to the name of that service. Depending on your needs, instead of default endpoint configuration, you can use [explicit endpoint configuration](https://docs.platform.sh/create-apps/app-reference/single-runtime-image.md#relationships). With the above definition, the application container now has access to the service via the relationship ```` and its corresponding [PLATFORM_RELATIONSHIPS](https://docs.platform.sh/development/variables/use-variables.md#use-provided-variables). ```yaml {location=".platform.app.yaml"} name: myapp # Relationships enable access from this app to a given service. # The example below shows configuration with an explicitly set service name and endpoint. # See the Application reference for all options for defining relationships and endpoints. # Note that legacy definition of the relationship is still supported. # More information: https://docs.platform.sh/create-apps/app-reference/single-runtime-image.html#relationships relationships: : service: endpoint: mongodb ``` You can define ```` and ```` as you like, so long as it’s unique between all defined services and relationships and matches in both the application and services configuration. The example above leverages [explicit endpoint](https://docs.platform.sh/create-apps/app-reference/single-runtime-image.md#relationships) configuration for relationships. Depending on your needs, instead of explicit endpoint configuration, you can use [default endpoint configuration](https://docs.platform.sh/create-apps/app-reference/single-runtime-image.md#relationships). With the above definition, the application container now has access to the service via the relationship ```` and its corresponding [PLATFORM_RELATIONSHIPS](https://docs.platform.sh/development/variables/use-variables.md#use-provided-variables). For PHP, enable the [extension](https://docs.platform.sh/languages/php/extensions.md) for the service: ```yaml {location=".platform.app.yaml"} name: myapp # PHP extensions. runtime: extensions: - mongodb ``` ####### Example configuration ######## [Service definition](https://docs.platform.sh/add-services.md) ```yaml {location=".platform/services.yaml"} # The name of the service container. Must be unique within a project. mongodb: type: mongodb: disk: 512 ``` ######## [App configuration](https://docs.platform.sh/create-apps.md) ```yaml {location=".platform.app.yaml"} name: myapp # Relationships enable access from this app to a given service. # The example below shows configuration with an explicitly set service name and endpoint. # See the Application reference for all options for defining relationships and endpoints. # Note that legacy definition of the relationship is still supported. # More information: https://docs.platform.sh/create-apps/app-reference/single-runtime-image.html#relationships relationships: mongodb: service: mongodb endpoint: mongodb ``` ```java {} package sh.platform.languages.sample; import com.mongodb.MongoClient; import com.mongodb.client.MongoCollection; import com.mongodb.client.MongoDatabase; import org.bson.Document; import sh.platform.config.Config; import sh.platform.config.MongoDB; import java.util.function.Supplier; import static com.mongodb.client.model.Filters.eq; public class MongoDBSample implements Supplier { @Override public String get() { StringBuilder logger = new StringBuilder(); // Create a new config object to ease reading the Platform.sh environment variables. // You can alternatively use getenv() yourself. Config config = new Config(); // The 'database' relationship is generally the name of primary database of an application. // It could be anything, though, as in the case here here where it's called "mongodb". MongoDB database = config.getCredential("mongodb", MongoDB::new); MongoClient mongoClient = database.get(); final MongoDatabase mongoDatabase = mongoClient.getDatabase(database.getDatabase()); MongoCollection collection = mongoDatabase.getCollection("scientist"); Document doc = new Document("name", "Ada Lovelace") .append("city", "London"); collection.insertOne(doc); Document myDoc = collection.find(eq("_id", doc.get("_id"))).first(); logger.append("

"); logger.append(myDoc.toJson()).append('\n'); logger.append(collection.deleteOne(eq("_id", doc.get("_id")))); logger.append("

"); return logger.toString(); } } ``` ```js {} const mongodb = require("mongodb"); const config = require("platformsh-config").config(); exports.usageExample = async function () { const credentials = config.credentials("mongodb"); const MongoClient = mongodb.MongoClient; const client = await MongoClient.connect( config.formattedCredentials("mongodb", "mongodb") ); const db = client.db(credentials["path"]); const collection = db.collection("startrek"); const documents = [ { name: "James Kirk", rank: "Admiral" }, { name: "Jean-Luc Picard", rank: "Captain" }, { name: "Benjamin Sisko", rank: "Prophet" }, { name: "Katheryn Janeway", rank: "Captain" }, ]; await collection.insertMany(documents, { w: 1 }); const result = await collection.find({ rank: "Captain" }).toArray(); const outputRows = Object.values(result) .map(({ name, rank }) => `${name}${rank}\n`) .join("\n"); // Clean up after ourselves. collection.deleteMany(); return ` ${outputRows}
NameRank
`; }; ``` ```php {} credentials('mongodb'); try { $server = sprintf('%s://%s:%s@%s:%d/%s', $credentials['scheme'], $credentials['username'], $credentials['password'], $credentials['host'], $credentials['port'], $credentials['path'] ); $client = new Client($server); $collection = $client->main->starwars; $result = $collection->insertOne([ 'name' => 'Rey', 'occupation' => 'Jedi', ]); $id = $result->getInsertedId(); $document = $collection->findOne([ '_id' => $id, ]); // Clean up after ourselves. $collection->drop(); printf("Found %s (%s)
\n", $document->name, $document->occupation); } catch (\Exception $e) { print $e->getMessage(); } ``` ```python {} from pymongo import MongoClient from platformshconfig import Config def usage_example(): # Create a new Config object to ease reading the Platform.sh environment variables. # You can alternatively use os.environ yourself. config = Config() # The 'database' relationship is generally the name of primary SQL database of an application. # It could be anything, though, as in the case here here where it's called "mongodb". credentials = config.credentials('mongodb') try: formatted = config.formatted_credentials('mongodb', 'pymongo') server = '{0}://{1}:{2}@{3}'.format( credentials['scheme'], credentials['username'], credentials['password'], formatted ) client = MongoClient(server) collection = client.main.starwars post = { "name": "Rey", "occupation": "Jedi" } post_id = collection.insert_one(post).inserted_id document = collection.find_one( {"_id": post_id} ) # Clean up after ourselves. collection.drop() return 'Found {0} ({1})
'.format(document['name'], document['occupation']) except Exception as e: return e ``` ##### Access the service directly You can access MongoDB from you app container via [SSH](https://docs.platform.sh/development/ssh.md). Get the `host` from your [relationship](#relationship-reference). Then run the following command: ```bash mongo ``` With the example value, that would be the following: ```bash mongo mongodb.internal ``` Note that the information about the relationship can change when an app is redeployed or restarted or the relationship is changed. So your apps should only rely on the `PLATFORM_RELATIONSHIPS` environment variable directly rather than hard coding any values. ##### Exporting data The most straightforward way to export data from a MongoDB database is to open an SSH tunnel to it and export the data directly using MongoDB's tools. First, open an SSH tunnel with the Platform.sh CLI: ```bash platform tunnel:open ``` That opens an SSH tunnel to all services on your current environment and produce output like the following: ```bash SSH tunnel opened on port 30000 to relationship: mongodb ``` The port may vary in your case. You also need to obtain the user, password, and database name from the relationships array, as above. Then, connect to that port locally using `mongodump` (or your favorite MongoDB tools) to export all data in that server: ```bash mongodump --port 30000 -u main -p main --authenticationDatabase main --db main ``` (If necessary, vary the `-u`, `-p`, `--authenticationDatabase` and `--db` flags.) As with any other shell command it can be piped to another command to compress the output or redirect it to a specific file. For further references, see the [official `mongodump` documentation](https://docs.mongodb.com/database-tools/mongodump/). ##### Upgrading To upgrade to 6.0 from a version earlier than 5.0, you must successively upgrade major releases until you have upgraded to 5.0. For example, if you are running a 4.2 image, you must upgrade first to 4.4 and then upgrade to 5.0 before you can upgrade to 6.0. For more details on upgrading and how to handle potential application backward compatibility issues, see the [MongoDB release notes](https://docs.mongodb.com/manual/release-notes). **Note**: Make sure you first test your migration on a separate branch. Also, be sure to take a backup of your production environment **before** you merge this change. Downgrading isn't supported. If you want, for whatever reason, to downgrade you should create a mongodump, remove the service, recreate the service, and import your dump. ### Network Storage Platform.sh supports internal "storage as a service" to provide a file store that can be shared between different application containers. The network storage service enables a new kind of [mount](https://docs.platform.sh/create-apps/app-reference/single-runtime-image.md#mounts) that refers to a shared service rather than to a local directory. Your apps can use any combination of `local` and `service` mounts. **Note**: Writing to network mounts is slightly slower than to local mounts. In most cases, you shouldn’t notice it. It’s more significant when you employ high-volume sequential file creation (create a large number of small files in rapid succession). If your app does this regularly, a local mount is more effective. ##### Supported versions You can select the major and minor version. Patch versions are applied periodically for bug fixes and the like. When you deploy your app, you always get the latest available patches. | Grid | Dedicated Gen 3 | Dedicated Gen 2 | | - 2.0 - 2.0 None available This service is the Platform.sh network storage implementation, not the version of a third-party application. **Note**: It isn’t possible to upgrade or downgrade the network storage service version while keeping existing data in place. Changing the service version requires that the service be reinitialized. Any change to the service version results in existing data becoming inaccessible. ###### Deprecated versions The following versions are [deprecated](https://docs.platform.sh/glossary.md#deprecated-versions). They're available, but they aren't receiving security updates from upstream and aren't guaranteed to work. They'll be removed in the future, so migrate to one of the [supported versions](#supported-versions). | Grid | Dedicated Gen 3 | Dedicated Gen 2 | | - 1.0 None available ##### Usage example ###### 1. Configure the service To define the service, use the `network-storage` type: ```yaml {location=".platform/services.yaml"} # The name of the service container. Must be unique within a project. : type: network-storage: disk: 256 ``` `` must be [RFC 1123](https://tools.ietf.org/html/rfc1123) compliant, and as such it must: - Contain at most 63 characters - Contain only lowercase alphanumeric characters or `-` (underscores `_` are not allowed) - Start with an alphanumeric character - End with an alphanumeric character This is due to the fact that `` is used as hostname for the network storage. Note that changing the name of the service replaces it with a brand new service and all existing data is lost. Back up your data before changing the service. ###### 2. Add the mount To define the mount accessible by your application, use the following configuration: ```yaml {location=".platform.app.yaml"} name: myapp mounts: : source: service service: source_path: ``` - `` is the path to your mount within the app container (relative to the app’s root). - `` is the name you [defined in step 1](#1-configure-the-service). - `` specifies where the mount points inside the service. If the `source_path` is an empty string (`""`), your mount points to the entire service. If you don’t define a `source_path`, Platform.sh uses the `MOUNT_PATH` as default value, without leading or trailing slashes. For example, if your mount lives in the `/my/files/` directory within your app container, it will point to a `my/files` directory within the service. ###### Example configuration ###### [Service definition](https://docs.platform.sh/add-services.md) ```yaml {location=".platform/services.yaml"} # The name of the service container. Must be unique within a project. network-storage: type: network-storage:2.0 disk: 256 ``` ####### [App configuration](https://docs.platform.sh/create-apps.md) ```yaml {location=".platform.app.yaml"} name: myapp mounts: 'my/files': source: service service: network-storage source_path: files ``` ##### Multi-application usage If your project contains [multiple apps](https://docs.platform.sh/create-apps/multi-app.md), they can all use the same network mounts. If the `source_path` is the same for both apps, the files are shared between the two applications even if the mount location is different. It's also possible to have one app mount a `source_path` that's a subdirectory of another application's mount. For example: ```yaml {location=".platform/applications.yaml"} # The name of the app container. Must be unique within a project. app1: # The location of the application's code. source: root: "app1" [...] mounts: # The path to your mount within the app container (relative to the app's root). 'web/uploads': # Specifies that the mount points to a network storage service that can be shared between apps. source: service # The name of the network storage service the mount points to. service: network-storage # Specifies where your mount points inside the external directory that is mounted to your app container. source_path: uploads # The name of the app container. Must be unique within a project. app2: # The location of the application's code. source: root: "app2" [...] mounts: # The path to your mount within the app container (relative to the app's root). 'process': # Specifies that the mount points to a network storage service that can be shared between apps. source: service # The name of the network storage service the mount points to. service: network-storage # Specifies where your mount points inside the external directory that is mounted to your app container. # Since the target is the uploads directory app1's mount already points to, # the network storage service is effectively shared between app1 and app2. source_path: uploads/incoming # The path to your mount within the app container (relative to the app's root). 'done': # Specifies that the mount points to a network storage service that can be shared between apps. source: service # The name of the network storage service the mount points to. service: network-storage # Specifies where your mount points inside the external directory that is mounted to your app container. # Since the target is the uploads directory app1's mount already points to, # the network storage service is effectively shared between app1 and app2. source_path: uploads/done ``` In this example, `app1` has access to the entire `uploads` directory by writing to `web/uploads`. `app2` has two mounts that it can write to: `process` and `done`. The `process` mount refers to the same directory as the `web/uploads/incoming` directory does on `app1`, and the `done` mount refers to the same directory as the `web/uploads/done` directory on `app1`. ##### Worker instances When defining a [worker](https://docs.platform.sh/create-apps/app-reference/single-runtime-image.md#workers) instance, keep in mind what mount behavior you want. `local` mounts are a separate storage area for each instance, while `service` mounts can be shared between instances. For example, you can define a network storage service called `files`: ```yaml {location=".platform/services.yaml"} # The name of the network storage service. Must be unique within a project. files: type: network-storage:2.0 disk: 2048 ``` You can then use this service to define a `network_dir` network mount and a `local_dir` local mount, to be used by a `web` instance and a `queue` worker instance: ```yaml {location=".platform/applications.yaml"} myapp: # The type of the application to build. type: "nodejs:20" # Defines how much space is available to local mounts. disk: 512 mounts: # Defines a network storage mount that can be shared by both worker instances. 'network_dir': source: service service: files source_path: our_stuff # Defines a local mount that's available to each instance separately. 'local_dir': source: local source_path: my_stuff # Defines a web instance. web: locations: "/": root: "public" passthru: true index: ['index.html'] # Define a queue worker instance from the same code but with a different start. workers: queue: commands: start: ./start.sh ``` Both the web instance and the `queue` worker have two mount points: - The `local_dir` mount on each is independent and not connected to each other at all and they *each* take 1024 MB of space. - The `network_dir` mount on each points to the same network storage space on the `files` service. They can both read and write to it simultaneously. The amount of space it has available depends on the `disk` key specified for the service configuration (in this case, 2048 MB). ##### How do I give my workers access to my main application's files? The most common use case for `network-storage` is to allow a CMS-driven site to use a worker that has access to the same file mounts as the web-serving application. For that case, all that's needed is to set the necessary file mounts as `service` mounts. For example, the following `.platform.app.yaml` file (fragment) keeps Drupal files directories shared between web and worker instances while keeping the Drush backup directory web-only (as it has no need to be shared). (This assumes a Network Storage service named `files` has also been defined in `.platform/services.yaml`.) ```yaml {location=".platform/applications.yaml"} myapp: # The type of the application to build. type: "php:8.4" relationships: mariadb: disk: 1024 mounts: # The public and private files directories are # network mounts shared by web and workers. 'web/sites/default/files': source: service service: files source_path: files 'private': source: service service: files source_path: private # The backup, temp, and cache directories for # Drupal's CLI tools don't need to be shared. # It wouldn't hurt anything to make them network # shares, however. '/.drush': source: local source_path: drush 'tmp': source: local source_path: tmp 'drush-backups': source: local source_path: drush-backups '/.console': source: local source_path: console # Crons run on the web container, so they have the # same mounts as the web container. crons: drupal: spec: '*/20 * * * *' commands: start: 'cd web ; drush core-cron' # The worker defined here also has the same 6 mounts; # 2 of them are shared with the web container, # the other 4 are local to the worker. workers: queue: commands: start: | cd web && drush queue-run myqueue ``` ##### How can I migrate a local storage to a network storage? There is no automated way of transferring data from one storage type to another. However, the process is fundamentally "just" moving files around on disk, so it's reasonably straightforward. Suppose you have this mount configuration: ```yaml {location=".platform.app.yaml"} name: myapp mounts: web/uploads: source: local source_path: uploads ``` And want to move that to a network storage mount. The following approximate steps do so with a minimum of service interruption. 1. Add a new `network-storage` service, named `files`, that has at least enough space for your existing files with some buffer. ```yaml {location=".platform/services.yaml"} # The name of the service container. Must be unique within a project. files: type: network-storage:2.0 disk: 1024 ``` 2. Add a new mount (`new-uploads`) to the network storage service on a non-public directory. (Remember the `source_path` can be the same since they're on different storage services.) ```yaml {location=".platform.app.yaml"} mounts: web/uploads: source: local source_path: uploads new-uploads: source: service service: files source_path: uploads ``` 3. Deploy these changes. Then use `rsync` to copy all files from the local mount to the network mount. (Be careful of the trailing `/`.) ```bash rsync -avz web/uploads/* new-uploads/ ``` 4. Reverse the mounts. Point the `web/uploads` directory to the network mount instead. Commit and push the change, testing to make sure the network files are accessible. ```yaml {location=".platform.app.yaml"} mounts: old-uploads: source: local source_path: uploads web/uploads: source: service service: files source_path: uploads ``` 5. Clean up. First, run another `rsync` just to make sure any files uploaded during the transition aren't lost. (Note the command is different here.) ```bash rsync -avz old-uploads/* web/uploads/ ``` Once you're confident all the files are accounted for, delete the entire contents of `old-uploads`. If you don't, the files remain on disk but inaccessible, just eating up disk space needlessly. Once that's done you can remove the `old-uploads` mount and push again to finish the process You are also free to reduce the `disk` size in the `.platform.app.yaml` file if desired, but make sure to leave enough for any remaining local mounts. ### OpenSearch (search service) OpenSearch is a distributed RESTful search engine built for the cloud. See the [OpenSearch documentation](https://opensearch.org/docs/latest/) for more information. To switch from Elasticsearch, follow the same procedure as for [upgrading](#upgrading). ##### Supported versions | Grid | Dedicated Gen 3 | Dedicated Gen 2 | | - 2 - 1 - 2 - 2.5 - 1.2 On Grid and Dedicated Gen 3, from version 2, you only specify the major version. The latest compatible minor version and patches are applied automatically. On Grid, version 1 represents a rolling release - the latest minor version available from the upstream (starting with opensearch 1.3). You can see the latest minor and patch versions of OpenSearch available from the [`2.x`](https://opensearch.org/lines/2x.md) and [`1.x`](https://opensearch.org/lines/1x.md) release lines. ##### Deprecated versions The following versions are still available in your projects, but they're at their end of life and are no longer receiving security updates from upstream, or are no longer the recommended way to configure the service on Platform.sh. | Grid | Dedicated Gen 3 | Dedicated Gen 2 | | - 1.2 - 1.1 To ensure your project remains stable in the future, switch to [a supported version](#supported-versions). ##### Relationship reference Example information available through the [`PLATFORM_RELATIONSHIPS` environment variable](https://docs.platform.sh/development/variables/use-variables.md#use-provided-variables) or by running `platform relationships`. Note that the information about the relationship can change when an app is redeployed or restarted or the relationship is changed. So your apps should only rely on the `PLATFORM_RELATIONSHIPS` environment variable directly rather than hard coding any values. ```json { "username": null, "scheme": "http", "service": "opensearch", "fragment": null, "ip": "169.254.99.100", "hostname": "azertyuiopqsdfghjklm.opensearch.service._.eu-1.platformsh.site", "port": 9200, "cluster": "azertyuiopqsdf-main-7rqtwti", "host": "opensearch.internal", "rel": "opensearch", "path": null, "query": [], "password": "ChangeMe", "type": "opensearch:2", "public": false, "host_mapped": false } ``` ##### Usage example ###### 1. Configure the service To define the service, use the `opensearch` type: ```yaml {location=".platform/services.yaml"} # The name of the service container. Must be unique within a project. : type: opensearch: disk: 256 ``` Note that changing the name of the service replaces it with a brand new service and all existing data is lost. Back up your data before changing the service. ###### 2. Define the relationship To define the relationship, use the following configuration: You can define ```` as you like, so long as it’s unique between all defined services and matches in both the application and services configuration. The example above leverages [default endpoint](https://docs.platform.sh/create-apps/app-reference/single-runtime-image.md#relationships) configuration for relationships. That is, it uses default endpoints behind-the-scenes, providing a [relationship](https://docs.platform.sh/create-apps/app-reference/single-runtime-image.md#relationships) (the network address a service is accessible from) that is identical to the name of that service. Depending on your needs, instead of default endpoint configuration, you can use [explicit endpoint configuration](https://docs.platform.sh/create-apps/app-reference/single-runtime-image.md#relationships). With the above definition, the application container now has [access to the service](#use-in-app) via the relationship ```` and its corresponding [PLATFORM_RELATIONSHIPS](https://docs.platform.sh/development/variables/use-variables.md#use-provided-variables). ```yaml {location=".platform.app.yaml"} # Relationships enable access from this app to a given service. # The example below shows configuration with an explicitly set service name and endpoint. # See the Application reference for all options for defining relationships and endpoints. # Note that legacy definition of the relationship is still supported. # More information: https://docs.platform.sh/create-apps/app-reference/single-runtime-image.html#relationships relationships: : service: endpoint: opensearch ``` You can define ```` and ```` as you like, so long as it’s unique between all defined services and relationships and matches in both the application and services configuration. The example above leverages [explicit endpoint](https://docs.platform.sh/create-apps/app-reference/single-runtime-image.md#relationships) configuration for relationships. Depending on your needs, instead of explicit endpoint configuration, you can use [default endpoint configuration](https://docs.platform.sh/create-apps/app-reference/single-runtime-image.md#relationships). With the above definition, the application container now has [access to the service](#use-in-app) via the relationship ```` and its corresponding [PLATFORM_RELATIONSHIPS](https://docs.platform.sh/development/variables/use-variables.md#use-provided-variables). ###### Example configuration ###### [Service definition](https://docs.platform.sh/add-services.md) ```yaml {location=".platform/services.yaml"} # The name of the service container. Must be unique within a project. opensearch: type: opensearch:2 disk: 256 ``` ####### [App configuration](https://docs.platform.sh/create-apps.md) ```yaml {location=".platform.app.yaml"} # Relationships enable access from this app to a given service. # The example below shows configuration with an explicitly set service name and endpoint. # See the Application reference for all options for defining relationships and endpoints. # Note that legacy definition of the relationship is still supported. # More information: https://docs.platform.sh/create-apps/app-reference/single-runtime-image.html#relationships relationships: opensearch: service: opensearch endpoint: opensearch ``` ###### Use in app To use the configured service in your app, add a configuration file similar to the following to your project. ```yaml {location=".platform.app.yaml"} name: myapp [...] relationships: opensearch: service: opensearch endpoint: opensearch ``` This configuration defines a single application (`myapp`), whose source code exists in the `/myapp` directory. `myapp` has access to the `opensearch` service, via a relationship whose name is [identical to the service name](#2-define-the-relationship) (as per [default endpoint](https://docs.platform.sh/create-apps/app-reference/single-runtime-image.md#relationships) configuration for relationships). From this, `myapp` can retrieve access credentials to the service through the environment variable `PLATFORM_RELATIONSHIPS`. That variable is a base64-encoded JSON object, but can be decoded at runtime (using the built-in tool `jq`) to provide more accessible environment variables to use within the application itself: ```bash {location="myapp/.environment"} # Decode the built-in credentials object variable. export RELATIONSHIPS_JSON=$(echo $PLATFORM_RELATIONSHIPS | base64 --decode) # Set environment variables for individual credentials. export OS_SCHEME=$(echo $RELATIONSHIPS_JSON | jq -r ".opensearch[0].scheme") export OS_HOST=$(echo $RELATIONSHIPS_JSON | jq -r ".opensearch[0].host") export OS_PORT=$(echo $RELATIONSHIPS_JSON | jq -r ".opensearch[0].port") # Surface more common OpenSearch connection string variables for use in app. export OPENSEARCH_USERNAME=$(echo $RELATIONSHIPS_JSON | jq -r ".opensearch[0].username") export OPENSEARCH_PASSWORD=$(echo $RELATIONSHIPS_JSON | jq -r ".opensearch[0].password") export OPENSEARCH_HOSTS=[\"$OS_SCHEME://$OS_HOST:$OS_PORT\"] ``` The above file — `.environment` in the `myapp` directory — is automatically sourced by Platform.sh into the runtime environment, so that the variable `OPENSEARCH_HOSTS` can be used within the application to connect to the service. Note that `OPENSEARCH_HOSTS` and all Platform.sh-provided environment variables like `PLATFORM_RELATIONSHIPS`, are environment-dependent. Unlike the build produced for a given commit, they can't be reused across environments and only allow your app to connect to a single service instance on a single environment. A file very similar to this is generated automatically for your when using the `platform ify` command to [migrate a codebase to Platform.sh](https://docs.platform.sh/get-started.md). **Note**: When you create an index on OpenSearch, don’t specify the ``number_of_shards`` or ``number_of_replicas`` settings in your OpenSearch API call. These values are set automatically based on available resources. ##### Authentication By default, OpenSearch has no authentication. No username or password is required to connect to it. You may optionally enable HTTP Basic authentication. To do so, include the following in your `.platform/services.yaml` configuration: ```yaml {location=".platform/services.yaml"} # The name of the service container. Must be unique within a project. opensearch: type: opensearch:2 disk: 2048 configuration: authentication: enabled: true ``` That enables mandatory HTTP Basic auth on all requests. The credentials are available in any relationships that point at that service, in the `username` and `password` properties. Note that the information about the relationship can change when an app is redeployed or restarted or the relationship is changed. So your apps should only rely on the `PLATFORM_RELATIONSHIPS` environment variable directly rather than hard coding any values. This functionality is generally not required if OpenSearch isn't exposed on its own public HTTP route. However, certain applications may require it, or it allows you to safely expose OpenSearch directly to the web. To do so, add a route to `.platform/routes.yaml` that has `opensearch:opensearch` as its upstream (where `opensearch` is whatever you named the service). For example: ```yaml {location=".platform/routes.yaml"} "https://www.os.{default}/": type: redirect to: "https://os.{default}/" "https://os.{default}/": type: upstream upstream: "opensearch:opensearch" ``` ##### Plugins OpenSearch offers a number of plugins. To enable them, list them under the `configuration.plugins` key in your `.platform/services.yaml` file, like so: ```yaml {location=".platform/services.yaml"} # The name of the service container. Must be unique within a project. opensearch: type: "opensearch:2" disk: 1024 configuration: plugins: - analysis-icu ``` In this example you'd have the ICU analysis plugin and the size mapper plugin. If there is a publicly available plugin you need that isn't listed here, [contact support](https://docs.platform.sh/learn/overview/get-support.md). ###### Available plugins This is the complete list of plugins that can be enabled: | Plugin | Description | 1 | 2 | |-------------------------|-------------------------------------------------------------------------------------------|-----|---| | `analysis-icu` | Support ICU Unicode text analysis | * | * | | `analysis-kuromoji` | Japanese language support | * | * | | `analysis-nori` | Integrates Lucene Nori analysis module into OpenSearch | * | * | | `analysis-phonetic` | Phonetic analysis | * | * | | `analysis-smartcn` | Smart Chinese Analysis Plugins | * | * | | `analysis-stempel` | Stempel Polish Analysis Plugin | * | * | | `analysis-ukrainian` | Ukrainian language support | * | * | | `ingest-attachment` | Extract file attachments in common formats (such as PPT, XLS, and PDF) | * | * | | `mapper-annotated-text` | Adds support for text fields with markup used to inject annotation tokens into the index | * | * | | `mapper-murmur3` | Murmur3 mapper plugin for computing hashes at index-time | * | * | | `mapper-size` | Size mapper plugin, enables the `_size` meta field | * | * | | `repository-s3` | Support for using S3 as a repository for Snapshot/Restore | * | * | | `transport-nio` | Support for NIO transport | * | * | ###### Alternative plugins **These plugins are currently available for `OpenSearch 2.0` only.** The names below show exactly how they should be added to your configuration. For example, to use the `alerting` plugin, specify it in your `services.yaml` as so: ```yaml {location=".platform/services.yaml"} # The name of the service container. Must be unique within a project. opensearch: type: "opensearch:2" disk: 1024 configuration: plugins: - alerting ``` **Different names used**: It should be noted that **these names may differ to what they are commonly known as** in the [OpenSearch docs](https://opensearch.org/docs/latest/). To help your understanding of what each plugin does, please click each plugin name for a link to the corresponding Github repository. | Plugin | Description | 1 | 2 | ---------------------------------------------------------------------------------------------------------|--------------|-------|---| | [`alerting`](https://github.com/opensearch-project)| Monitor data and send alert notifications automatically | N/A | * | |[`opensearch-anomaly-detection`](https://github.com/opensearch-project/anomaly-detection)| Detect anomalies as your log data and monitor data in near real time | N/A | * | |[`asynchronous-search`](https://github.com/opensearch-project/asynchronous-search)|Run search queries in the background and retrieve results as they become available | N/A | * | |[`opensearch-cross-cluster-replication`](https://github.com/opensearch-project/cross-cluster-replication)|Replicate data across two OpenSearch clusters | N/A | * | |[`opensearch-custom-codecs`](https://github.com/opensearch-project/custom-codecs)| Provide custom Lucene codecs for loading through Apache Lucene's `NamedSPILoader` | N/A | * | |[`opensearch-flow-framework`](https://github.com/opensearch-project/flow-frame)| Innovate AI applications on OpenSearch | N/A | * | |[`notifications`](https://github.com/opensearch-project/notifications)| A central location for all of your notifications from OpenSearch plugins | N/A | * | |[`opensearch-reports-scheduler`](https://github.com/opensearch-project/reporting)|Export and share reports from OpenSearch Dashboards dashboards, saved search, alerts and visualizations | N/A | * | |[`geospatial`](https://github.com/opensearch-project/geospatial)|An OpenSearch plugin that contains geospatial specific features | N/A | * | |[`opensearch-index-management`](https://github.com/opensearch-project/index-management)|A suite of features to monitor and manage indexes | N/A | * | |[`opensearch-job-scheduler`](https://github.com/opensearch-project/job-scheduler)|Schedule periodical jobs running within OpenSearch nodes | N/A | * | |[`opensearch-knn`](https://github.com/opensearch-project/k-NN)|Easily run the nearest neighbor search on billions of documents | N/A | * | |[`opensearch-ml-plugin`](https://github.com/opensearch-project/ml-commons/)|Leverage existing Open source machine learning algorithms | N/A | * | |[`opensearch-skills`](https://github.com/opensearch-project/skills)|Provides tools for ml-common's agent framework OpenSearch ml-commons. | N/A | * | |[`neural-search`](https://github.com/opensearch-project/neural-search)|Index documents and conduct a neural search on indexed documents | N/A | * | |[`opensearch-observability`](https://github.com/opensearch-project/observability)|Collection of plugins and applications that let you visualize data-driven events | N/A | * | |[`performance-analyzer`](https://github.com/opensearch-project/performance-analyzer)|A REST API that allows you to query numerous performance metrics | N/A | * | |[`opensearch-sql-plugin`](https://github.com/opensearch-project/sql)|Extract insights out of OpenSearch using the familiar SQL or Piped Processing Language (PPL) query syntax | N/A | * | ###### Plugin removal Removing plugins previously added in your `.platform/services.yaml` file doesn't automatically uninstall them from your OpenSearch instances. This is deliberate, as removing a plugin may result in data loss or corruption of existing data that relied on that plugin. Removing a plugin usually requires reindexing. To permanently remove a previously enabled plugin, [upgrade the service](#upgrading) to create a new instance of OpenSearch and migrate to it. In most cases it isn't necessary as an unused plugin has no appreciable impact on the server. ##### Upgrading The OpenSearch data format sometimes changes between versions in incompatible ways. OpenSearch doesn't include a data upgrade mechanism as it's expected that all indexes can be regenerated from stable data if needed. To upgrade (or downgrade) OpenSearch, use a new service from scratch. There are two ways to do so. ###### Destructive In your `.platform/services.yaml` file, change the version *and* name of your OpenSearch service. Be sure to also update the reference to the now changed service name in it's corresponding application's `relationship` block. When you push that to Platform.sh, the old service is deleted and a new one with the new name is created with no data. You can then have your application reindex data as appropriate. This approach has the downsides of temporarily having an empty OpenSearch instance, which your application may or may not handle gracefully, and needing to rebuild your index afterward. Depending on the size of your data that could take a while. ###### Transitional With a transitional approach, you temporarily have two OpenSearch services. Add a second OpenSearch service with the new version a new name and give it a new relationship in `.platform.app.yaml`. You can optionally run in that configuration for a while to allow your application to populate indexes in the new service as well. Once you're ready to switch over, remove the old OpenSearch service and relationship. You may optionally have the new OpenSearch service use the old relationship name if that's easier for your app to handle. Your application is now using the new OpenSearch service. This approach has the benefit of never being without a working OpenSearch instance. On the downside, it requires two running OpenSearch servers temporarily, each of which consumes resources and needs adequate disk space. Depending on the size of your data, that may be a lot of disk space. ### PostgreSQL (Database service) PostgreSQL is a high-performance, standards-compliant relational SQL database. See the [PostgreSQL documentation](https://www.postgresql.org/docs/9.6/index.md) for more information. ##### Use a framework If you use one of the following frameworks, follow its guide: - [Hibernate](https://docs.platform.sh/guides/hibernate/deploy.md#postgresql) - [Jakarta EE](https://docs.platform.sh/guides/jakarta/deploy.md#postgresql) - [Spring](https://docs.platform.sh/guides/spring/postgresql.md) ##### Supported versions | Grid | Dedicated Gen 3 | Dedicated Gen 2 | | - 17 - 16 - 15 - 14 - 13 - 12 - 17 - 16 - 15 - 14 - 13 - 12 None available \* No High-Availability on Dedicated Gen 2. **Note**: You can’t upgrade to PostgreSQL 12 with the ``postgis`` extension enabled. For more details, see how to [upgrade to PostgreSQL 12 with ](#upgrade-to-postgresql-12-with-the-postgis-extension). ###### Deprecated versions The following versions are [deprecated](https://docs.platform.sh/glossary.md#deprecated-versions). They're available, but they aren't receiving security updates from upstream and aren't guaranteed to work. They'll be removed in the future, so migrate to one of the [supported versions](#supported-versions). | Grid | Dedicated Gen 3 | Dedicated Gen 2 | | - 11 - 10 - 9.6 - 9.5 - 9.4 - 9.3 - 11 - 10 - 11* - 9.6* - 9.5 - 9.4 - 9.3 ##### Relationship reference Example information available through the [`PLATFORM_RELATIONSHIPS` environment variable](https://docs.platform.sh/development/variables/use-variables.md#use-provided-variables) or by running `platform relationships`. Note that the information about the relationship can change when an app is redeployed or restarted or the relationship is changed. So your apps should only rely on the `PLATFORM_RELATIONSHIPS` environment variable directly rather than hard coding any values. ```json { "username": "main", "scheme": "pgsql", "service": "postgresql", "fragment": null, "ip": "123.456.78.90", "hostname": "azertyuiopqsdfghjklm.postgresql.service._.eu-1.platformsh.site", "port": 5432, "cluster": "azertyuiopqsdf-main-afdwftq", "host": "postgresql.internal", "rel": "postgresql", "path": "main", "query": { "is_master": true }, "password": "ChangeMe", "type": "postgresql:17", "public": false, "host_mapped": false } ``` ##### Usage example ###### 1. Configure the service To define the service, use the `postgresql` type: ```yaml {location=".platform/services.yaml"} # The name of the service container. Must be unique within a project. : type: postgresql: disk: 256 ``` Note that changing the name of the service replaces it with a brand new service and all existing data is lost. Back up your data before changing the service. ###### 2. Define the relationship To define the relationship, use the following configuration: You can define ```` as you like, so long as it’s unique between all defined services and matches in both the application and services configuration. The example above leverages [default endpoint](https://docs.platform.sh/create-apps/app-reference/single-runtime-image.md#relationships) configuration for relationships. That is, it uses default endpoints behind-the-scenes, providing a [relationship](https://docs.platform.sh/create-apps/app-reference/single-runtime-image.md#relationships) (the network address a service is accessible from) that is identical to the name of that service. Depending on your needs, instead of default endpoint configuration, you can use [explicit endpoint configuration](https://docs.platform.sh/create-apps/app-reference/single-runtime-image.md#relationships). With the above definition, the application container now has [access to the service](#use-in-app) via the relationship ```` and its corresponding [PLATFORM_RELATIONSHIPS](https://docs.platform.sh/development/variables/use-variables.md#use-provided-variables). ```yaml {location=".platform.app.yaml"} # Relationships enable access from this app to a given service. # The example below shows configuration with an explicitly set service name and endpoint. # See the Application reference for all options for defining relationships and endpoints. # Note that legacy definition of the relationship is still supported. # More information: https://docs.platform.sh/create-apps/app-reference/single-runtime-image.html#relationships relationships: : service: endpoint: postgresql ``` You can define ```` and ```` as you like, so long as it’s unique between all defined services and relationships and matches in both the application and services configuration. The example above leverages [explicit endpoint](https://docs.platform.sh/create-apps/app-reference/single-runtime-image.md#relationships) configuration for relationships. Depending on your needs, instead of explicit endpoint configuration, you can use [default endpoint configuration](https://docs.platform.sh/create-apps/app-reference/single-runtime-image.md#relationships). With the above definition, the application container now has [access to the service](#use-in-app) via the relationship ```` and its corresponding [PLATFORM_RELATIONSHIPS](https://docs.platform.sh/development/variables/use-variables.md#use-provided-variables). For PHP, enable the [extension](https://docs.platform.sh/languages/php/extensions.md) for the service: ```yaml {location=".platform.app.yaml"} # PHP extensions. runtime: extensions: - pdo_pgsql ``` ###### Example configuration ###### [Service definition](https://docs.platform.sh/add-services.md) ```yaml {location=".platform/services.yaml"} # The name of the service container. Must be unique within a project. postgresql: type: postgresql:17 disk: 256 ``` ####### [App configuration](https://docs.platform.sh/create-apps.md) ```yaml {location=".platform.app.yaml"} # Relationships enable access from this app to a given service. # The example below shows configuration with an explicitly set service name and endpoint. # See the Application reference for all options for defining relationships and endpoints. # Note that legacy definition of the relationship is still supported. # More information: https://docs.platform.sh/create-apps/app-reference/single-runtime-image.html#relationships relationships: postgresql: service: postgresql endpoint: postgresql ``` ###### Use in app To use the configured service in your app, add a configuration file similar to the following to your project. ```java {} package sh.platform.languages.sample; import sh.platform.config.Config; import sh.platform.config.MySQL; import sh.platform.config.PostgreSQL; import javax.sql.DataSource; import java.sql.Connection; import java.sql.ResultSet; import java.sql.SQLException; import java.sql.Statement; import java.util.function.Supplier; public class PostgreSQLSample implements Supplier { @Override public String get() { StringBuilder logger = new StringBuilder(); // Create a new config object to ease reading the Platform.sh environment variables. // You can alternatively use getenv() yourself. Config config = new Config(); // The 'database' relationship is generally the name of primary SQL database of an application. // It could be anything, though, as in the case here here where it's called "postgresql". PostgreSQL database = config.getCredential("postgresql", PostgreSQL::new); DataSource dataSource = database.get(); // Connect to the database try (Connection connection = dataSource.getConnection()) { // Creating a table. String sql = "CREATE TABLE JAVA_FRAMEWORKS (" + " id SERIAL PRIMARY KEY," + "name VARCHAR(30) NOT NULL)"; final Statement statement = connection.createStatement(); statement.execute(sql); // Insert data. sql = "INSERT INTO JAVA_FRAMEWORKS (name) VALUES" + "('Spring')," + "('Jakarta EE')," + "('Eclipse JNoSQL')"; statement.execute(sql); // Show table. sql = "SELECT * FROM JAVA_FRAMEWORKS"; final ResultSet resultSet = statement.executeQuery(sql); logger.append("
    "); while (resultSet.next()) { int id = resultSet.getInt("id"); String name = resultSet.getString("name"); logger.append(String.format("
  • id %d has a name of %s", id, name)); logger.append("
  • "); } logger.append("
"); statement.execute("DROP TABLE JAVA_FRAMEWORKS"); return logger.toString(); } catch (SQLException exp) { throw new RuntimeException("An error when execute PostgreSQL", exp); } } } ``` ```js {} const pg = require("pg"); const config = require("platformsh-config").config(); exports.usageExample = async function () { const credentials = config.credentials("postgresql"); const client = new pg.Client({ host: credentials.host, port: credentials.port, user: credentials.username, password: credentials.password, database: credentials.path, }); client.connect(); // Creating a table. await client.query( `CREATE TABLE IF NOT EXISTS People ( id SERIAL PRIMARY KEY, name VARCHAR(30) NOT NULL, city VARCHAR(30) NOT NULL )` ); // Insert data. await client.query( `INSERT INTO People (name, city) VALUES ('Neil Armstrong', 'Moon'), ('Buzz Aldrin', 'Glen Ridge'), ('Sally Ride', 'La Jolla');` ); // Show table. const result = await client.query("SELECT * FROM People"); // Drop table. await client.query("DROP TABLE People"); const outputRows = result.rows .map(({ name, city }) => `${name}${city}\n`) .join("\n"); return ` ${outputRows}
NameCity
`; }; ``` ```php {} credentials('postgresql'); try { // Connect to the database using PDO. If using some other abstraction layer you would // inject the values from $database into whatever your abstraction layer asks for. $dsn = sprintf('pgsql:host=%s;port=%d;dbname=%s', $credentials['host'], $credentials['port'], $credentials['path']); $conn = new \PDO($dsn, $credentials['username'], $credentials['password'], [ // Always use Exception error mode with PDO, as it's more reliable. \PDO::ATTR_ERRMODE => \PDO::ERRMODE_EXCEPTION, ]); $conn->query("DROP TABLE IF EXISTS People"); // Creating a table. $sql = "CREATE TABLE IF NOT EXISTS People ( id SERIAL PRIMARY KEY, name VARCHAR(30) NOT NULL, city VARCHAR(30) NOT NULL )"; $conn->query($sql); // Insert data. $sql = "INSERT INTO People (name, city) VALUES ('Neil Armstrong', 'Moon'), ('Buzz Aldrin', 'Glen Ridge'), ('Sally Ride', 'La Jolla');"; $conn->query($sql); // Show table. $sql = "SELECT * FROM People"; $result = $conn->query($sql); $result->setFetchMode(\PDO::FETCH_OBJ); if ($result) { print << TABLE; foreach ($result as $record) { printf("\n", $record->name, $record->city); } print "\n
NameCity
%s%s
\n"; } // Drop table. $sql = "DROP TABLE People"; $conn->query($sql); } catch (\Exception $e) { print $e->getMessage(); } ``` ```python {} import psycopg2 from platformshconfig import Config def usage_example(): # Create a new Config object to ease reading the Platform.sh environment variables. # You can alternatively use os.environ yourself. config = Config() # The 'database' relationship is generally the name of primary SQL database of an application. # That's not required, but much of our default automation code assumes it.' \ database = config.credentials('postgresql') try: # Connect to the database. conn_params = { 'host': database['host'], 'port': database['port'], 'dbname': database['path'], 'user': database['username'], 'password': database['password'] } conn = psycopg2.connect(**conn_params) # Open a cursor to perform database operations. cur = conn.cursor() cur.execute("DROP TABLE IF EXISTS People") # Creating a table. sql = ''' CREATE TABLE IF NOT EXISTS People ( id SERIAL PRIMARY KEY, name VARCHAR(30) NOT NULL, city VARCHAR(30) NOT NULL ) ''' cur.execute(sql) # Insert data. sql = ''' INSERT INTO People (name, city) VALUES ('Neil Armstrong', 'Moon'), ('Buzz Aldrin', 'Glen Ridge'), ('Sally Ride', 'La Jolla'); ''' cur.execute(sql) # Show table. sql = '''SELECT * FROM People''' cur.execute(sql) result = cur.fetchall() table = '''''' if result: for record in result: table += '''\n'''.format(record[1], record[2]) table += '''\n
NameCity
{0}{1}
\n''' # Drop table sql = "DROP TABLE People" cur.execute(sql) # Close communication with the database cur.close() conn.close() return table except Exception as e: return e ``` ##### Access the service directly Access the service using the Platform.sh CLI by running `platform sql`. You can also access it from your app container via [SSH](https://docs.platform.sh/development/ssh.md). From your [relationship data](#relationship-reference), you need: `username`, `host`, and `port`. Then run the following command: ```bash psql -U -h -p ``` Using the values from the [example](#relationship-reference), that would be: ```bash psql -U main -h postgresql.internal -p 5432 ``` Note that the information about the relationship can change when an app is redeployed or restarted or the relationship is changed. So your apps should only rely on the `PLATFORM_RELATIONSHIPS` environment variable directly rather than hard coding any values. ##### Exporting data The easiest way to download all data in a PostgreSQL instance is with the Platform.sh CLI. If you have a single SQL database, the following command exports all data using the `pg_dump` command to a local file: ```bash platform db:dump ``` If you have multiple SQL databases it prompts you which one to export. You can also specify one by relationship name explicitly: ```bash platform db:dump --relationship postgresql ``` By default the file is uncompressed. If you want to compress it, use the `--gzip` (`-z`) option: ```bash platform db:dump --gzip ``` You can use the `--stdout` option to pipe the result to another command. For example, if you want to create a bzip2-compressed file, you can run: ```bash platform db:dump --stdout | bzip2 > dump.sql.bz2 ``` It is also possible to generate the dump locally if you have the `pg_dump` command installed with `platform tunnel:single`. The command will first ask for the service and then will provide a prompt for the URI string that you can use. For example: ```bash pg_dump -d postgresql://REPLACE_URI_FROM_OUTPUT -f dump.sql ``` ##### Importing data Make sure that the imported file contains objects with cleared ownership and `IF EXISTS` clauses. For example, you can create a DB dump with following parameters: ```bash pg_dump --no-owner --clean --if-exists ``` The easiest way to load data into a database is to pipe an SQL dump through the `platform sql` command, like so: ```bash platform sql **Note**: Importing a database backup is a destructive operation. It overwrites data already in your database. Taking a backup or a database export before doing so is strongly recommended. ##### Sanitizing data To ensure people who review code changes can't access personally identifiable information stored in your database, [sanitize your preview environments](https://docs.platform.sh/development/sanitize-db/postgresql.md). ##### Set locale for database You can choose your locale when a database is created by setting locale-related variables. There are three ways to set a locale option, as detailed in the table below: | Name | Type | Default | Description | |--------|-----------|----------|--------------| | `default_ctype` | `string` | `C.UTF-8` | The default character classification. Affects any tables created after it's set.| | `default_collation` | `string`|`C.UTF-8`| The default collation rules. Affects any tables created after it's set.| | `default_charset` | `string` | `UTF8` | The default encoding character set. Affects any tables created after it's set.| ##### Multiple databases If you are using version `10`, `11`, `12`, `13`, or later of this service, it's possible to define multiple databases as well as multiple users with different permissions. To do so requires defining multiple endpoints. Under the `configuration` key of your service there are two additional keys: * `databases`: This is a YAML array listing the databases that should be created. If not specified, a single database named `main` is created. Note that removing a schema from the list of `schemas` on further deployments results in **the deletion of the schema.** * `endpoints`: This is a nested YAML object defining different credentials. Each endpoint may have access to one or more schemas (databases), and may have different levels of permission for each. The valid permission levels are: * `ro`: Using this endpoint only `SELECT` queries are allowed. * `rw`: Using this endpoint `SELECT` queries as well as `INSERT`/`UPDATE`/`DELETE` queries are allowed. * `admin`: Using this endpoint all queries are allowed, including DDL queries (`CREATE TABLE`, `DROP TABLE`, etc.). Consider the following illustrative example: ```yaml {location=".platform/services.yaml"} # The name of the service container. Must be unique within a project. postgresql: type: "postgresql:17" disk: 2048 configuration: databases: - main - legacy endpoints: admin: privileges: main: admin legacy: admin reporter: default_database: main privileges: main: ro importer: default_database: legacy privileges: legacy: rw ``` This example creates a single PostgreSQL service named `postgresql`. The server has two databases, `main` and `legacy` with three endpoints created. * `admin`: has full access to both databases. * `reporter`: has `SELECT` query access to the `main` database, but no access to `legacy`. * `importer`: has `SELECT`/`INSERT`/`UPDATE`/`DELETE` access (but not DDL access) to the `legacy` database. It doesn't have access to `main`. If a given endpoint has access to multiple databases you should also specify which is listed by default in the relationships array. If one isn't specified, the `path` property of the relationship is `null`. While that may be acceptable for an application that knows the name of the database it's connecting to, automated tools like the Platform.sh CLI can't access the database on that relationship. For that reason, defining the `default_database` property is always recommended. Once these endpoints are defined, you need to expose them to your application as a relationship. Continuing with the above example, your `relationships` in `.platform.app.yaml` might look like: ```yaml {location=".platform.app.yaml"} relationships: # Please note: Legacy definition of the relationship is still supported: # More information: https://docs.platform.sh/create-apps/app-reference/single-runtime-image.html#relationships database: service: postgresql endpoint: admin reports: service: postgresql endpoint: reporter imports: service: postgresql endpoint: importer ``` Each database is accessible to your application through the `database`, `reports`, and `imports` relationships. They'll be available in the `PLATFORM_RELATIONSHIPS` environment variable and all have the same structure documented above, but with different credentials. You can use those to connect to the appropriate database with the specified restrictions using whatever the SQL access tools are for your language and application. A service configuration without the `configuration` block defined is equivalent to the following default values: ```yaml {location=".platform/services.yaml"} # The name of the service container. Must be unique within a project. postgresql: type: "postgresql:17" disk: 2048 configuration: databases: - main endpoints: postgresql: default_database: main privileges: main: admin ``` If you do not define `database` but `endpoints` are defined, then the single database `main` is created with the following assumed configuration: ```yaml {location=".platform/services.yaml"} # The name of the service container. Must be unique within a project. postgresql: type: "postgresql:17" disk: 2048 configuration: databases: - main endpoints: ``` Alternatively, if you define multiple databases but no endpoints, a single user `main` is created with `admin` access to each of your databases, equivalent to the configuration below: ```yaml {location=".platform/services.yaml"} # The name of the service container. Must be unique within a project. postgresql: type: "postgresql:17" disk: 2048 configuration: databases: - firstdb - seconddb - thirddb endpoints: main: firstdb: admin seconddb: admin thirddb: admin ``` ##### Password generation When you connect your app to a database, an empty password is generated for the database by default. This can cause issues with your app. To generate real passwords for your database, define custom endpoints in your [service configuration](#1-configure-the-service). For each custom endpoint you create, you get an automatically generated password, similarly to when you create [multiple databases](#multiple-databases). Note that you can't customize these automatically generated passwords. After your custom endpoints are exposed as relationships in your [app configuration](https://docs.platform.sh/create-apps.md), you can retrieve the password for each endpoint through the `PLATFORM_RELATIONSHIPS` [environment variable](https://docs.platform.sh/development/variables/use-variables.md#use-provided-variables) within your [application containers](https://docs.platform.sh/development/variables/use-variables.md#access-variables-in-your-app). The password value changes automatically over time, to avoid downtime its value has to be read dynamically by your app. Globally speaking, having passwords hard-coded into your codebase can cause security issues and should be avoided. When you switch from the default configuration with an empty password to custom endpoints, make sure your service name remains unchanged. Failure to do so results in the creation of a new service, which removes any existing data from your database. ##### Restrict access to database replicas only **Feature availability** This feature is available on Grid HA (High Availability) and Dedicated Gen 3 projects. For more information, [contact Sales](https://platform.sh/contact/). For security reasons, you can grant your app access to replicas instead of your actual database. To do so, when defining the relationship between your app and database, make sure you do the following: 1. Use the [explicit endpoint syntax](https://docs.platform.sh/create-apps/app-reference/single-runtime-image.md#relationships). 2. Add the `-replica` suffix to the name of the endpoint you want to use. This results in the following configuration: ```yaml {location=".platform.app.yaml"} relationships: : service: endpoint: -replica ``` For example, if you define a `postgresql` database as follows: ```yaml {location=".platform/services.yaml"} postgresql: type: "postgresql:16" disk: 2048 configuration: databases: - main - legacy endpoints: admin: privileges: main: admin legacy: admin reporter: default_database: main privileges: main: ro ``` To create a replica of the `postgresql` database and allow your app to connect to it through the `admin` endpoint with admin permissions, use the following configuration: ```yaml {location=".platform.app.yaml"} relationships: postgresql: service: postgresql endpoint: admin-replica ``` To create a replica of the `postgresql` database and allow your app to connect to it through the `reporter` endpoint with read-only permissions instead, use the following configuration: ```yaml {location=".platform.app.yaml"} relationships: postgresql: service: postgresql endpoint: reporter-replica ``` ##### Service timezone To change the timezone for the current session, run `SET TIME ZONE ;`. ##### Extensions Platform.sh supports a number of PostgreSQL extensions. To enable them, list them under the `configuration.extensions` key in your `.platform/services.yaml` file, like so: ```yaml {location=".platform/services.yaml"} # The name of the service container. Must be unique within a project. postgresql: type: "postgresql:17" disk: 2048 configuration: extensions: - pg_trgm - hstore ``` In this case, you have `pg_trgm` installed, providing functions to determine the similarity of text based on trigram matching, and `hstore` providing a key-value store. ###### Available extensions The following is the extensive list of supported extensions. Note that you can't currently add custom extensions not listed here. * `address_standardizer` - Used to parse an address into constituent elements. Generally used to support geocoding address normalization step. * `address_standardizer_data_us` - For standardizing addresses based on US dataset example * `adminpack` - administrative functions for PostgreSQL * `autoinc` - functions for auto-incrementing fields * `bloom` - bloom access method - signature file based index (requires 9.6 or higher) * `btree_gin` - support for indexing common data types in GIN * `btree_gist` - support for indexing common data types in GiST * `chkpass` - data type for auto-encrypted passwords * `citext` - data type for case-insensitive character strings * `cube` - data type for multidimensional cubes * `dblink` - connect to other PostgreSQL databases from within a database * `dict_int` - text search dictionary template for integers * `dict_xsyn` - text search dictionary template for extended synonym processing * `earthdistance` - calculate great-circle distances on the surface of the Earth * `file_fdw` - foreign-data wrapper for flat file access * `fuzzystrmatch` - determine similarities and distance between strings * `hstore` - data type for storing sets of (key, value) pairs * `insert_username` - functions for tracking who changed a table * `intagg` - integer aggregator and enumerator (obsolete) * `intarray` - functions, operators, and index support for 1-D arrays of integers * `isn` - data types for international product numbering standards * `lo` - Large Object maintenance * `ltree` - data type for hierarchical tree-like structures * `moddatetime` - functions for tracking last modification time * `pageinspect` - inspect the contents of database pages at a low level * `pg_buffercache` - examine the shared buffer cache * `pg_freespacemap` - examine the free space map (FSM) * `pg_prewarm` - prewarm relation data (requires 9.6 or higher) * `pg_stat_statements` - track execution statistics of all SQL statements executed * `pg_trgm` - text similarity measurement and index searching based on trigrams * `pg_visibility` - examine the visibility map (VM) and page-level visibility info (requires 9.6 or higher) * `pgcrypto` - cryptographic functions * `pgrouting` - pgRouting Extension (requires 9.6 or higher) * `pgrowlocks` - show row-level locking information * `pgstattuple` - show tuple-level statistics * `plpgsql` - PL/pgSQL procedural language * `postgis` - PostGIS geometry, geography, and raster spatial types and functions * `postgis_sfcgal` - PostGIS SFCGAL functions * `postgis_tiger_geocoder` - PostGIS tiger geocoder and reverse geocoder * `postgis_topology` - PostGIS topology spatial types and functions * `postgres_fdw` - foreign-data wrapper for remote PostgreSQL servers * `refint` - functions for implementing referential integrity (obsolete) * `seg` - data type for representing line segments or floating-point intervals * `sslinfo` - information about SSL certificates * `tablefunc` - functions that manipulate whole tables, including `crosstab` * `tcn` - Triggered change notifications * `timetravel` - functions for implementing time travel * `tsearch2` - compatibility package for pre-8.3 text search functions (obsolete, only available for 9.6 and 9.3) * `tsm_system_rows` - TABLESAMPLE method which accepts number of rows as a limit (requires 9.6 or higher) * `tsm_system_time` - TABLESAMPLE method which accepts time in milliseconds as a limit (requires 9.6 or higher) * `unaccent` - text search dictionary that removes accents * `uuid-ossp` - generate universally unique identifiers (UUIDs) * `vector` - Open-source [vector](https://github.com/pgvector/pgvector) similarity search for PostgreSQL 11+ * `xml2` - XPath querying and XSLT **Note**: You can’t upgrade to PostgreSQL 12 with the ``postgis`` extension enabled. For more details, see how to [upgrade to PostgreSQL 12 with ](#upgrade-to-postgresql-12-with-the-postgis-extension). ##### Notes ###### Could not find driver If you see this error: `Fatal error: Uncaught exception 'PDOException' with message 'could not find driver'`, this means you are missing the `pdo_pgsql` PHP extension. You need to enable it in your `.platform.app.yaml` ([see above](#1-configure-the-service)). ##### Upgrading PostgreSQL 10 and later include an upgrade utility that can convert databases from previous versions to version 10 or later. If you upgrade your service from a previous version of PostgreSQL to version 10 or above, it upgrades automatically. The utility can't upgrade PostgreSQL 9 versions, so upgrades from PostgreSQL 9.3 to 9.6 aren't supported. Upgrade straight to version 11 instead. **Note**: Make sure you first test your migration on a separate branch. Also, be sure to take a backup of your production environment **before** you merge this change. **Warning**: Downgrading isn’t supported. If you need to downgrade, dump to SQL, remove the service, recreate the service, and import your dump. ###### Upgrade to PostgreSQL 12 with the `postgis` extension You can't upgrade to PostgreSQL 12 with the `postgis` extension enabled. It involves a change to a major version that results in a failed deployment that requires support intervention to fix. Upgrading from 12 to a higher version is possible. If you need to upgrade to version 12, follow the same steps recommended for downgrading: 1. Dump the database. 2. Remove the service. 3. Create a new service with PostgreSQL 12. 4. Import the dump to that service. ### RabbitMQ (message queue service) [RabbitMQ](https://www.rabbitmq.com/documentation.md) is a message broker that supports multiple messaging protocols, such as the Advanced Message Queuing Protocol (AMQP). It gives your apps a common platform to send and receive messages and your messages a safe place to live until they're received. ##### Use a framework If you use one of the following frameworks, follow its guide: - [Spring](https://docs.platform.sh/guides/spring/rabbitmq.md) ##### Supported versions You can select the major and minor version. Patch versions are applied periodically for bug fixes and the like. When you deploy your app, you always get the latest available patches. | Grid | Dedicated Gen 3 | Dedicated Gen 2 | | - 4.0 - 3.13 - 3.12 - 3.13 - 3.12 - 3.13 - 3.12 ###### Deprecated versions The following versions are [deprecated](https://docs.platform.sh/glossary.md#deprecated-versions). They're available, but they aren't receiving security updates from upstream and aren't guaranteed to work. They'll be removed in the future, so migrate to one of the [supported versions](#supported-versions). | Grid | Dedicated Gen 3 | Dedicated Gen 2 | | - 3.11 - 3.10 - 3.9 - 3.8 - 3.7 - 3.6 - 3.5 - 3.11 - 3.10 - 3.9 - 3.11 - 3.10 - 3.9 - 3.8 - 3.7 ##### Relationship reference Example information available through the [`PLATFORM_RELATIONSHIPS` environment variable](https://docs.platform.sh/development/variables/use-variables.md#use-provided-variables) or by running `platform relationships`. Note that the information about the relationship can change when an app is redeployed or restarted or the relationship is changed. So your apps should only rely on the `PLATFORM_RELATIONSHIPS` environment variable directly rather than hard coding any values. ```json { "username": "guest", "scheme": "amqp", "service": "rabbitmq", "fragment": null, "ip": "123.456.78.90", "hostname": "azertyuiopqsdfghjklm.rabbitmq.service._.eu-1.platformsh.site", "port": 5672, "cluster": "azertyuiopqsdf-main-afdwftq", "host": "rabbitmq.internal", "rel": "rabbitmq", "path": null, "query": [], "password": "ChangeMe", "type": "rabbitmq:4.0", "public": false, "host_mapped": false } ``` ##### Usage example ###### 1. Configure the service To define the service, use the `rabbitmq` type: ```yaml {location=".platform/services.yaml"} # The name of the service container. Must be unique within a project. : type: rabbitmq: disk: 512 ``` Note that changing the name of the service replaces it with a brand new service and all existing data is lost. Back up your data before changing the service. ###### 2. Define the relationship To define the relationship, use the following configuration: You can define ```` as you like, so long as it’s unique between all defined services and matches in both the application and services configuration. The example above leverages [default endpoint](https://docs.platform.sh/create-apps/app-reference/single-runtime-image.md#relationships) configuration for relationships. That is, it uses default endpoints behind-the-scenes, providing a [relationship](https://docs.platform.sh/create-apps/app-reference/single-runtime-image.md#relationships) (the network address a service is accessible from) that is identical to the name of that service. Depending on your needs, instead of default endpoint configuration, you can use [explicit endpoint configuration](https://docs.platform.sh/create-apps/app-reference/single-runtime-image.md#relationships). With the above definition, the application container now has [access to the service](#use-in-app) via the relationship ```` and its corresponding [PLATFORM_RELATIONSHIPS](https://docs.platform.sh/development/variables/use-variables.md#use-provided-variables). ```yaml {location=".platform.app.yaml"} # Relationships enable access from this app to a given service. # The example below shows configuration with an explicitly set service name and endpoint. # See the Application reference for all options for defining relationships and endpoints. # Note that legacy definition of the relationship is still supported. # More information: https://docs.platform.sh/create-apps/app-reference/single-runtime-image.html#relationships relationships: : service: endpoint: rabbitmq ``` You can define ```` and ```` as you like, so long as it’s unique between all defined services and relationships and matches in both the application and services configuration. The example above leverages [explicit endpoint](https://docs.platform.sh/create-apps/app-reference/single-runtime-image.md#relationships) configuration for relationships. Depending on your needs, instead of explicit endpoint configuration, you can use [default endpoint configuration](https://docs.platform.sh/create-apps/app-reference/single-runtime-image.md#relationships). With the above definition, the application container now has [access to the service](#use-in-app) via the relationship ```` and its corresponding [PLATFORM_RELATIONSHIPS](https://docs.platform.sh/development/variables/use-variables.md#use-provided-variables). ###### Example configuration ###### [Service definition](https://docs.platform.sh/add-services.md) ```yaml {location=".platform/services.yaml"} # The name of the service container. Must be unique within a project. rabbitmq: type: rabbitmq:4.0 disk: 512 ``` ####### [App configuration](https://docs.platform.sh/create-apps.md) ```yaml {location=".platform.app.yaml"} # Relationships enable access from this app to a given service. # The example below shows configuration with an explicitly set service name and endpoint. # See the Application reference for all options for defining relationships and endpoints. # Note that legacy definition of the relationship is still supported. # More information: https://docs.platform.sh/create-apps/app-reference/single-runtime-image.html#relationships relationships: rabbitmq: service: rabbitmq endpoint: rabbitmq ``` ###### Use in app To use the configured service in your app, add a configuration file similar to the following to your project. ```java {} package sh.platform.languages.sample; import sh.platform.config.Config; import sh.platform.config.RabbitMQ; import javax.jms.Connection; import javax.jms.ConnectionFactory; import javax.jms.MessageConsumer; import javax.jms.MessageProducer; import javax.jms.Queue; import javax.jms.Session; import javax.jms.TextMessage; import java.util.function.Supplier; public class RabbitMQSample implements Supplier { @Override public String get() { StringBuilder logger = new StringBuilder(); // Create a new config object to ease reading the Platform.sh environment variables. // You can alternatively use getenv() yourself. Config config = new Config(); try { // Get the credentials to connect to the RabbitMQ service. final RabbitMQ credential = config.getCredential("rabbitmq", RabbitMQ::new); final ConnectionFactory connectionFactory = credential.get(); // Connect to the RabbitMQ server. final Connection connection = connectionFactory.createConnection(); connection.start(); final Session session = connection.createSession(false, Session.AUTO_ACKNOWLEDGE); Queue queue = session.createQueue("cloud"); MessageConsumer consumer = session.createConsumer(queue); // Sending a message into the queue. TextMessage textMessage = session.createTextMessage("Platform.sh"); textMessage.setJMSReplyTo(queue); MessageProducer producer = session.createProducer(queue); producer.send(textMessage); // Receive the message. TextMessage replyMsg = (TextMessage) consumer.receive(100); logger.append("

"); logger.append("Message: ").append(replyMsg.getText()); logger.append("

"); // close connections. producer.close(); consumer.close(); session.close(); connection.close(); return logger.toString(); } catch (Exception exp) { throw new RuntimeException("An error when execute RabbitMQ", exp); } } } ``` ```php {} credentials('rabbitmq'); try { $queueName = 'deploy_days'; // Connect to the RabbitMQ server. $connection = new AMQPStreamConnection($credentials['host'], $credentials['port'], $credentials['username'], $credentials['password']); $channel = $connection->channel(); $channel->queue_declare($queueName, false, false, false, false); $msg = new AMQPMessage('Friday'); $channel->basic_publish($msg, '', 'hello'); echo "[x] Sent 'Friday'
\n"; // In a real application you't put the following in a separate script in a loop. $callback = function ($msg) { printf("[x] Deploying on %s
\n", $msg->body); }; $channel->basic_consume($queueName, '', false, true, false, false, $callback); // This blocks on waiting for an item from the queue, so comment it out in this demo script. //$channel->wait(); $channel->close(); $connection->close(); } catch (Exception $e) { print $e->getMessage(); } ``` ```python {} import pika from platformshconfig import Config def usage_example(): # Create a new Config object to ease reading the Platform.sh environment variables. # You can alternatively use os.environ yourself. config = Config() # Get the credentials to connect to the RabbitMQ service. credentials = config.credentials('rabbitmq') try: # Connect to the RabbitMQ server creds = pika.PlainCredentials(credentials['username'], credentials['password']) parameters = pika.ConnectionParameters(credentials['host'], credentials['port'], credentials=creds) connection = pika.BlockingConnection(parameters) channel = connection.channel() # Check to make sure that the recipient queue exists channel.queue_declare(queue='deploy_days') # Try sending a message over the channel channel.basic_publish(exchange='', routing_key='deploy_days', body='Friday!') # Receive the message def callback(ch, method, properties, body): print(" [x] Received {}".format(body)) # Tell RabbitMQ that this particular function should receive messages from our 'hello' queue channel.basic_consume('deploy_days', callback, auto_ack=False) # This blocks on waiting for an item from the queue, so comment it out in this demo script. # print(' [*] Waiting for messages. To exit press CTRL+C') # channel.start_consuming() connection.close() return " [x] Sent 'Friday!'
" except Exception as e: return e ``` ##### Connect to RabbitMQ When debugging, you may want to connect directly to your RabbitMQ service. You can connect in multiple ways: - An [SSH tunnel](#via-ssh) - A [web interface](#access-the-management-ui) In each case, you need the login credentials that you can obtain from the [relationship](#relationship-reference). ###### Via SSH To connect directly to your RabbitMQ service in an environment, open an SSH tunnel with the [Platform.sh CLI](https://docs.platform.sh/administration/cli.md). To open an SSH tunnel to your service with port forwarding, run the following command: ```bash platform tunnel:single --gateway-ports ``` Then configure a RabbitMQ client to connect to this tunnel using the credentials from the [relationship](#relationship-reference). See a [list of RabbitMQ client libraries](https://www.rabbitmq.com/devtools.md). ###### Access the management UI RabbitMQ offers a [management plugin with a browser-based UI](https://www.rabbitmq.com/management.md). You can access this UI with an SSH tunnel. To open a tunnel, follow these steps. 1. a) (On [grid environments](https://docs.platform.sh/glossary.md#grid)) SSH into your app container with a flag for local port forwarding: ```bash ssh $(platform ssh --pipe) -L 15672:.internal:15672 ``` is the [name you defined](#2-define-the-relationship). b) (On [dedicated environments](https://docs.platform.sh/glossary.md#dedicated-gen-2)) SSH into your cluster with a flag for local port forwarding: ```bash ssh $(platform ssh --pipe) -L 15672:localhost:15672 ``` 2. Open `http://localhost:15672` in your browser. Log in using the username and password from the [relationship](#relationship-reference). ##### Configuration options You can configure your RabbitMQ service in the [services configuration](#1-configure-the-service) with the following options: | Name | Type | Required | Description | |----------|-------------------|----------|------------------------------------------------------| | `vhosts` | List of `string`s | No | Virtual hosts used for logically grouping resources. | You can configure additional [virtual hosts](https://www.rabbitmq.com/vhosts.md), which can be useful for separating resources, such as exchanges, queues, and bindings, into their own namespaces. To create virtual hosts, add them to your configuration as in the following example: ```yaml {location=".platform/services.yaml"} # The name of the service container. Must be unique within a project. rabbitmq: type: "rabbitmq:4.0" disk: 512 configuration: vhosts: - host1 - host2 ``` ##### Upgrading When upgrading RabbitMQ, skipping major versions (e.g. 3.7 -> 3.11) [is not supported](https://www.rabbitmq.com/upgrade.md#rabbitmq-version-upgradability). Make sure you upgrade sequentially (3.7 -> 3.8 -> 3.9 -> 3.10 -> 3.11) and that each upgrade commit translates into an actual deployment. ### Redis (Object cache) [Redis](https://redis.io/documentation) is a multi-model database that allows you to store data in memory for high-performance data retrieval and key-value storage. Platform.sh supports two different Redis configurations: - [Persistent](#persistent-redis): to set up fast persistent storage for your application - [Ephemeral](#ephemeral-redis): to set up a non-persistent cache for your application ##### Use a framework If you use one of the following frameworks, follow its guide: - [Drupal](https://docs.platform.sh/guides/drupal/redis.md) - [Ibexa DXP](https://docs.platform.sh/guides/ibexa/deploy.md#redis) - [Jakarta EE](https://docs.platform.sh/guides/jakarta/deploy.md#redis) - [Micronaut](https://docs.platform.sh/guides/micronaut/redis.md) - [Quarkus](https://docs.platform.sh/guides/quarkus/redis.md) - [Spring](https://docs.platform.sh/guides/spring/redis.md) - [WordPress](https://docs.platform.sh/guides/wordpress/redis.md) ##### Supported versions You can select the major and minor version. Patch versions are applied periodically for bug fixes and the like. When you deploy your app, you always get the latest available patches. | Grid | Dedicated Gen 3 | Dedicated Gen 2 | | - 7.2 - 7.0 - 6.2 - 7.2 - 7.0 - 6.2 - 7.0 - 6.2 ###### Deprecated versions The following versions are [deprecated](https://docs.platform.sh/glossary.md#deprecated-versions). They're available, but they aren't receiving security updates from upstream and aren't guaranteed to work. They'll be removed in the future, so migrate to one of the [supported versions](#supported-versions). | Grid | Dedicated Gen 3 | Dedicated Gen 2 | | - 6.0 - 5.0 - 4.0 - 3.2 - 3.0 - 2.8 - 6.0 - 5.0 - 4.0 - 3.2 - 3.0 - 2.8 - 6.0 - 5.0 - 3.2 Note that versions 3.0 and higher support up to 64 different databases per instance of the service, while Redis 2.8 only supports a single database. ##### Service types Depending on your needs, you can set up Redis as [persistent](#persistent-redis) or [ephemeral](#ephemeral-redis). ##### Relationship reference Example information available through the [`PLATFORM_RELATIONSHIPS` environment variable](https://docs.platform.sh/development/variables/use-variables.md#use-provided-variables) or by running `platform relationships`. Note that the information about the relationship can change when an app is redeployed or restarted or the relationship is changed. So your apps should only rely on the `PLATFORM_RELATIONSHIPS` environment variable directly rather than hard coding any values. ```json { "username": null, "scheme": "redis", "service": "redis", "fragment": null, "ip": "123.456.78.90", "hostname": "azertyuiopqsdfghjklm.redis.service._.eu-1.platformsh.site", "port": 6379, "cluster": "azertyuiopqsdf-main-7rqtwti", "host": "redis.internal", "rel": "redis", "path": null, "query": [], "password": null, "type": "redis:7.2", "public": false, "host_mapped": false } ``` The format of the relationship is identical whether your Redis service is [ephemeral](#ephemeral-redis) or [persistent](#persistent-redis). ##### Persistent Redis By default, Redis is an ephemeral service that stores data in memory. This allows for fast data retrieval, but also means data can be lost when a container is moved or shut down. To solve this issue, configure your Redis service as persistent. Persistent Redis stores data on a disk, restoring it if the container restarts. To switch from persistent to ephemeral Redis, set up a new service with a different name. **Warning**: Platform.sh sets the maximum amount of memory (``maxmemory``) Redis can use for the data set, and it cannot be amended. It is defined by comparing the following values and keeping the lower of the two: - Disk size/6 (based on a [recommendation from Redis](https://docs.redis.com/latest/rs/installing-upgrading/install/plan-deployment/hardware-requirements/#productionenvironment)) - The amount of memory allocated to the service container For instance, if your Redis container has 3072 MB of disk space and 1024 MB of memory, only 512 MB of RAM are actually available to the service (3072/6 = 512). But if your Redis container has 3072 MB of disk space and 256 MB of memory, only 256 MB of RAM are actually available to the service (as per the container limit). ###### Usage example ####### 1. Configure the service To define the service, use the `redis-persistent` endpoint: ```yaml {location=".platform/services.yaml"} # The name of the service container. Must be unique within a project. : type: redis-persistent: disk: 256 ``` Note that changing the name of the service replaces it with a brand new service and all existing data is lost. Back up your data before changing the service. ####### 2. Define the relationship To define the relationship, use the `redis` endpoint : You can define ```` as you like, so long as it’s unique between all defined services and matches in both the application and services configuration. The example above leverages [default endpoint](https://docs.platform.sh/create-apps/app-reference/single-runtime-image.md#relationships) configuration for relationships. That is, it uses default endpoints behind-the-scenes, providing a [relationship](https://docs.platform.sh/create-apps/app-reference/single-runtime-image.md#relationships) (the network address a service is accessible from) that is identical to the name of that service. Depending on your needs, instead of default endpoint configuration, you can use [explicit endpoint configuration](https://docs.platform.sh/create-apps/app-reference/single-runtime-image.md#relationships). With the above definition, the application container now has access to the service via the relationship ```` and its corresponding [PLATFORM_RELATIONSHIPS](https://docs.platform.sh/development/variables/use-variables.md#use-provided-variables). ```yaml {location=".platform.app.yaml"} # Relationships enable access from this app to a given service. # The example below shows configuration with an explicitly set service name and endpoint. # See the Application reference for all options for defining relationships and endpoints. # Note that legacy definition of the relationship is still supported. # More information: https://docs.platform.sh/create-apps/app-reference/single-runtime-image.html#relationships relationships: : service: endpoint: redis ``` You can define ```` and ```` as you like, so long as it’s unique between all defined services and relationships and matches in both the application and services configuration. The example above leverages [explicit endpoint](https://docs.platform.sh/create-apps/app-reference/single-runtime-image.md#relationships) configuration for relationships. Depending on your needs, instead of explicit endpoint configuration, you can use [default endpoint configuration](https://docs.platform.sh/create-apps/app-reference/single-runtime-image.md#relationships). With the above definition, the application container now has [access to the service](#use-in-app) via the relationship ```` and its corresponding [PLATFORM_RELATIONSHIPS](https://docs.platform.sh/development/variables/use-variables.md#use-provided-variables). For PHP, enable the [extension](https://docs.platform.sh/languages/php/extensions.md) for the service: ```yaml {location=".platform.app.yaml"} # PHP extensions. runtime: extensions: - redis ``` ###### Configuration example ####### [Service definition](https://docs.platform.sh/add-services.md) ```yaml {location=".platform/services.yaml"} # The name of the service container. Must be unique within a project. redis: type: redis-persistent:7.2 disk: 256 ``` ####### [App configuration](https://docs.platform.sh/create-apps.md) ```yaml {location=".platform.app.yaml"} relationships: redis: service: redis endpoint: redis ``` ###### Use in app To use the configured service in your app, add a configuration file similar to the following to your project. ```js {} const redis = require('redis'); const config = require("platformsh-config").config(); const { promisify } = require('util'); exports.usageExample = async function() { const credentials = config.credentials('redis'); const client = redis.createClient(credentials.port, credentials.host); // The Redis client is not Promise-aware, so make it so. const redisGet = promisify(client.get).bind(client); const redisSet = promisify(client.set).bind(client); const key = 'Deploy day'; const value = 'Friday'; // Set a value. await redisSet(key, value); // Read it back. const test = await redisGet(key); return `Found value ${test} for key ${key}.`; }; ``` ```php {} credentials('redis'); try { // Connecting to Redis server. $redis = new Redis(); $redis->connect($credentials['host'], $credentials['port']); $key = "Deploy day"; $value = "Friday"; // Set a value. $redis->set($key, $value); // Read it back. $test = $redis->get($key); printf('Found value %s for key %s.', $test, $key); } catch (Exception $e) { print $e->getMessage(); } ``` ```python {} from redis import Redis from platformshconfig import Config def usage_example(): # Create a new config object to ease reading the Platform.sh environment variables. # You can alternatively use os.environ yourself. config = Config() # Get the credentials to connect to the Redis service. credentials = config.credentials('redis') try: redis = Redis(credentials['host'], credentials['port']) key = "Deploy day" value = "Friday" # Set a value redis.set(key, value) # Read it back test = redis.get(key) return 'Found value {0} for key {1}.'.format(test.decode("utf-8"), key) except Exception as e: return e ``` ##### Ephemeral Redis By default, Redis is an ephemeral service that serves as a non-persistent cache. Ephemeral Redis stores data only in memory and requires no disk space. When the service reaches its memory limit, it triggers a cache cleanup. To customize those cache cleanups, set up an [eviction policy](#eviction-policy). Make sure your app doesn't rely on ephemeral Redis for persistent storage as it can cause issues. For example, if a container is moved during region maintenance, the `deploy` and `post_deploy` hooks don't run and an app that treats the cache as permanent shows errors. To prevent data from getting lost when a container is moved or shut down, you can use the [persistent Redis](#persistent-redis) configuration. Persistent Redis provides a cache with persistent storage. ###### Usage example ####### 1. Configure the service To define the service, use the `redis` endpoint: ```yaml {location=".platform/services.yaml"} # The name of the service container. Must be unique within a project. : type: redis: ``` Note that changing the name of the service replaces it with a brand new service and all existing data is lost. Back up your data before changing the service. ####### 2. Define the relationship To define the relationship, use the following configuration: You can define ```` as you like, so long as it’s unique between all defined services and matches in both the application and services configuration. The example above leverages [default endpoint](https://docs.platform.sh/create-apps/app-reference/single-runtime-image.md#relationships) configuration for relationships. That is, it uses default endpoints behind-the-scenes, providing a [relationship](https://docs.platform.sh/create-apps/app-reference/single-runtime-image.md#relationships) (the network address a service is accessible from) that is identical to the name of that service. Depending on your needs, instead of default endpoint configuration, you can use [explicit endpoint configuration](https://docs.platform.sh/create-apps/app-reference/single-runtime-image.md#relationships). With the above definition, the application container now has [access to the service](#use-in-app) via the relationship ```` and its corresponding [PLATFORM_RELATIONSHIPS](https://docs.platform.sh/development/variables/use-variables.md#use-provided-variables). ```yaml {location=".platform.app.yaml"} # Relationships enable access from this app to a given service. # The example below shows configuration with an explicitly set service name and endpoint. # See the Application reference for all options for defining relationships and endpoints. # Note that legacy definition of the relationship is still supported. # More information: https://docs.platform.sh/create-apps/app-reference/single-runtime-image.html#relationships relationships: : service: endpoint: redis ``` You can define ```` and ```` as you like, so long as it’s unique between all defined services and relationships and matches in both the application and services configuration. The example above leverages [explicit endpoint](https://docs.platform.sh/create-apps/app-reference/single-runtime-image.md#relationships) configuration for relationships. Depending on your needs, instead of explicit endpoint configuration, you can use [default endpoint configuration](https://docs.platform.sh/create-apps/app-reference/single-runtime-image.md#relationships). With the above definition, the application container now has [access to the service](#use-in-app) via the relationship ```` and its corresponding [PLATFORM_RELATIONSHIPS](https://docs.platform.sh/development/variables/use-variables.md#use-provided-variables). For PHP, enable the [extension](https://docs.platform.sh/languages/php/extensions.md) for the service: ```yaml {location=".platform.app.yaml"} # PHP extensions. runtime: extensions: - redis ``` ###### Configuration example ####### [Service definition](https://docs.platform.sh/add-services.md) ```yaml {location=".platform/services.yaml"} # The name of the service container. Must be unique within a project. redis: type: redis:7.2 ``` ####### [App configuration](https://docs.platform.sh/create-apps.md) ```yaml {location=".platform.app.yaml"} relationships: redis: service: redis endpoint: redis ``` ###### Use in app To use the configured service in your app, add a configuration file similar to the following to your project. ```js {} const redis = require('redis'); const config = require("platformsh-config").config(); const { promisify } = require('util'); exports.usageExample = async function() { const credentials = config.credentials('redis'); const client = redis.createClient(credentials.port, credentials.host); // The Redis client is not Promise-aware, so make it so. const redisGet = promisify(client.get).bind(client); const redisSet = promisify(client.set).bind(client); const key = 'Deploy day'; const value = 'Friday'; // Set a value. await redisSet(key, value); // Read it back. const test = await redisGet(key); return `Found value ${test} for key ${key}.`; }; ``` ```php {} credentials('redis'); try { // Connecting to Redis server. $redis = new Redis(); $redis->connect($credentials['host'], $credentials['port']); $key = "Deploy day"; $value = "Friday"; // Set a value. $redis->set($key, $value); // Read it back. $test = $redis->get($key); printf('Found value %s for key %s.', $test, $key); } catch (Exception $e) { print $e->getMessage(); } ``` ```python {} from redis import Redis from platformshconfig import Config def usage_example(): # Create a new config object to ease reading the Platform.sh environment variables. # You can alternatively use os.environ yourself. config = Config() # Get the credentials to connect to the Redis service. credentials = config.credentials('redis') try: redis = Redis(credentials['host'], credentials['port']) key = "Deploy day" value = "Friday" # Set a value redis.set(key, value) # Read it back test = redis.get(key) return 'Found value {0} for key {1}.'.format(test.decode("utf-8"), key) except Exception as e: return e ``` ##### Multiple databases Redis 3.0 and above support up to 64 databases. But you can't set up different access rights to each database. When you set up a relationship connection, access to all of the databases is automatically granted. The way to access a particular database depends on the [client library](https://redis.io/clients) you're using: To manage [thread safety](https://github.com/redis/redis-py/blob/master/docs/advanced_features.rst#user-content-a-note-about-threading), the Python library suggests using separate client instances for each database: ```python {} import os from redis import Redis database0 = Redis(host=os.getenv('REDIS_HOST'), port=os.getenv('REDIS_PORT'), db=0) database1 = Redis(host=os.getenv('REDIS_HOST'), port=os.getenv('REDIS_PORT'), db=1) ``` Use the Redis [select](https://redis.io/commands/select): ```javascript {} const redis = require('redis'); const client = redis.createClient(process.env.CACHE_PORT, process.env.CACHE_HOST); await client.SELECT(0); // switch to DB 0 await client.set('x', '42'); // write 42 to x await client.MOVE('x', 1); // move to DB 1 await client.SELECT(1); // switch to DB 1 const value = await client.get('x'); // returns 42 ``` ##### Restrict access to database replicas only **Feature availability** This feature is available on Grid HA (High Availability) and Dedicated Gen 3 projects. For more information, [contact Sales](https://platform.sh/contact/). For security reasons, you can grant your app access to replicas instead of your actual database. To do so, when defining the relationship between your app and database, make sure you do the following: 1. Use the [explicit endpoint syntax](https://docs.platform.sh/create-apps/app-reference/single-runtime-image.md#relationships). 2. Add the `-replica` suffix to the name of the endpoint you want to use. This results in the following configuration: ```yaml {location=".platform.app.yaml"} relationships: : service: endpoint: -replica ``` For example, if you define a `redis-persistent` database as follows: ```yaml {location=".platform/services.yaml"} postgresql: type: "redis-persistent:16" disk: 2048 configuration: databases: - main - legacy endpoints: admin: privileges: main: admin legacy: admin reporter: default_database: main privileges: main: ro ``` To create a replica of the `redis-persistent` database and allow your app to connect to it through the `admin` endpoint with admin permissions, use the following configuration: ```yaml {location=".platform.app.yaml"} relationships: redis-persistent: service: redis-persistent endpoint: admin-replica ``` To create a replica of the `redis-persistent` database and allow your app to connect to it through the `reporter` endpoint with read-only permissions instead, use the following configuration: ```yaml {location=".platform.app.yaml"} relationships: redis-persistent: service: redis-persistent endpoint: reporter-replica ``` ##### Relationship reference Example information available through the [`PLATFORM_RELATIONSHIPS` environment variable](https://docs.platform.sh/development/variables/use-variables.md#use-provided-variables) or by running `platform relationships`. Note that the information about the relationship can change when an app is redeployed or restarted or the relationship is changed. So your apps should only rely on the `PLATFORM_RELATIONSHIPS` environment variable directly rather than hard coding any values. ```json { "username": null, "scheme": "redis", "service": "redis", "fragment": null, "ip": "123.456.78.90", "hostname": "azertyuiopqsdfghjklm.redis.service._.eu-1.platformsh.site", "port": 6379, "cluster": "azertyuiopqsdf-main-7rqtwti", "host": "redis.internal", "rel": "redis", "path": null, "query": [], "password": null, "type": "redis:7.2", "public": false, "host_mapped": false } ``` The format of the relationship is identical whether your Redis service is [ephemeral](#ephemeral-redis) or [persistent](#persistent-redis). ##### Eviction policy When Redis reaches its memory limit, it triggers a cache cleanup. To customize those cache cleanups, set up an eviction policy such as the following: ```yaml {location=".platform/services.yaml"} # The name of the service container. Must be unique within a project. redis: type: "redis:7.2" configuration: maxmemory_policy: allkeys-lfu ``` The following table presents the possible values: | Value | Policy description | |-------------------|-------------------------------------------------------------------------------------------------------------| | `allkeys-lru` | Removes the oldest cache items first. This is the default policy when `maxmemory_policy` isn't set. | | `noeviction` | New items aren’t saved when the memory limit is reached. | | `allkeys-lfu` | Removes least frequently used cache items first. | | `volatile-lru` | Removes least recently used cache items with the `expire` field set to `true`. | | `volatile-lfu` | Removes least frequently used cache items with the `expire` field set to `true`. | | `allkeys-random` | Randomly removes cache items to make room for new data. | | `volatile-random` | Randomly removes cache items with the `expire` field set to `true`. | | `volatile-ttl` | Removes cache items with the `expire` field set to `true` and the shortest remaining `time-to -live` value. | For more information on the different policies, see the official [Redis documentation](https://redis.io/docs/reference/eviction/). ##### Access your Redis service After you've [configured your Redis service](#usage-example), you can access it using either the Platform.sh CLI or through the [Redis CLI](https://redis.io/docs/ui/cli/). ###### Platform.sh CLI Unlike the Redis CLI, connecting via the Platform.sh CLI does not require additional authentication steps if you are already authenticated in your terminal. Access your Redis service by running the command: ```bash platform redis ``` ###### Redis CLI Retrieve the hostname and port you can connect to through the `PLATFORM_RELATIONSHIPS` [environment variable](https://docs.platform.sh/development/variables/use-variables.md#use-provided-variables). To do so, run the `platform relationships` command. After you've retrieved the hostname and port, [open an SSH session](https://docs.platform.sh/development/ssh.md). To access your Redis service, run the following command: ```bash redis-cli -h -p ``` If you have a Grid project, note that the `CONFIG GET` and `CONFIG SET` admin commands are restricted. To get the current configuration, run the following command: ```bash redis-cli -h -p info ``` ##### Use Redis as a handler for PHP sessions A PHP session allows you to store different data for each user through a unique session ID. By default, PHP handles sessions using files. But you can use Redis as a session handler, which means Redis stores and retrieves the data saved into sessions. To set up Redis as your session handler, add a configuration similar to the following: ```yaml {location=".platform/services.yaml"} # The name of the service container. Must be unique within a project. redissessions: type: "redis-persistent:7.2" disk: 256 ``` ```yaml {location=".platform.app.yaml"} name: myapp type: "php:8.4" relationships: redissessions: service: "redissessions" endpoint: "redis" variables: php: session.save_handler: redis session.save_path: "tcp://:" web: locations: '/': root: 'web' passthru: '/index.php' ``` ### Solr (Search service) Apache Solr is a scalable and fault-tolerant search index. Solr search with generic schemas provided, and a custom schema is also supported. See the [Solr documentation](https://lucene.apache.org/solr/6_3_0/index.md) for more information. ##### Use a framework If you use one of the following frameworks, follow its guide: - [Ibexa DXP](https://docs.platform.sh/guides/ibexa/deploy.md#solr) - [Jakarta EE](https://docs.platform.sh/guides/jakarta/deploy.md#apache-solr) - [Spring](https://docs.platform.sh/guides/spring/solr.md) ##### Supported versions You can select the major and minor version. Patch versions are applied periodically for bug fixes and the like. When you deploy your app, you always get the latest available patches. | Grid | Dedicated Gen 3 | Dedicated Gen 2 | | - 9.6 - 9.4 - 9.2 - 9.1 - 8.11 - 9.6 - 9.4 - 9.2 - 9.1 - 8.11 - 8.11 ###### Deprecated versions The following versions are [deprecated](https://docs.platform.sh/glossary.md#deprecated-versions). They're available, but they aren't receiving security updates from upstream and aren't guaranteed to work. They'll be removed in the future, so migrate to one of the [supported versions](#supported-versions). | Grid | Dedicated Gen 3 | Dedicated Gen 2 | | - 8.6 - 8.4 - 8.0 - 7.7 - 7.6 - 6.6 - 6.3 - 4.10 - 3.6 - 8.6 - 8.0 - 7.7 - 6.6 - 6.3 - 4.10 ##### Relationship reference Example information available through the [`PLATFORM_RELATIONSHIPS` environment variable](https://docs.platform.sh/development/variables/use-variables.md#use-provided-variables) or by running `platform relationships`. Note that the information about the relationship can change when an app is redeployed or restarted or the relationship is changed. So your apps should only rely on the `PLATFORM_RELATIONSHIPS` environment variable directly rather than hard coding any values. ```json { "username": null, "scheme": "solr", "service": "solr", "fragment": null, "ip": "123.456.78.90", "hostname": "azertyuiopqsdfghjklm.solr.service._.eu-1.platformsh.site", "port": 8080, "cluster": "azertyuiopqsdf-main-afdwftq", "host": "solr.internal", "rel": "solr", "path": "solr\/collection1", "query": [], "password": null, "type": "solr:9.6", "public": false, "host_mapped": false } ``` ##### Usage example ###### 1. Configure the service To define the service, use the `solr` type: ```yaml {location=".platform/services.yaml"} # The name of the service container. Must be unique within a project. : type: solr: disk: 256 ``` Note that changing the name of the service replaces it with a brand new service and all existing data is lost. Back up your data before changing the service. ###### 2. Define the relationship To define the relationship, use the following configuration: You can define ```` as you like, so long as it’s unique between all defined services and matches in both the application and services configuration. The example above leverages [default endpoint](https://docs.platform.sh/create-apps/app-reference/single-runtime-image.md#relationships) configuration for relationships. That is, it uses default endpoints behind-the-scenes, providing a [relationship](https://docs.platform.sh/create-apps/app-reference/single-runtime-image.md#relationships) (the network address a service is accessible from) that is identical to the name of that service. Depending on your needs, instead of default endpoint configuration, you can use [explicit endpoint configuration](https://docs.platform.sh/create-apps/app-reference/single-runtime-image.md#relationships). With the above definition, the application container now has [access to the service](#use-in-app) via the relationship ```` and its corresponding [PLATFORM_RELATIONSHIPS](https://docs.platform.sh/development/variables/use-variables.md#use-provided-variables). ```yaml {location=".platform.app.yaml"} # Relationships enable access from this app to a given service. # See the Application reference for all options for defining relationships and endpoints. # Note that legacy definition of the relationship is still supported. # More information: https://docs.platform.sh/create-apps/app-reference/single-runtime-image.html#relationships relationships: : service: endpoint: solr ``` You can define ```` and ```` as you like, so long as it’s unique between all defined services and relationships and matches in both the application and services configuration. The example above leverages [explicit endpoint](https://docs.platform.sh/create-apps/app-reference/single-runtime-image.md#relationships) configuration for relationships. Depending on your needs, instead of explicit endpoint configuration, you can use [default endpoint configuration](https://docs.platform.sh/create-apps/app-reference/single-runtime-image.md#relationships). With the above definition, the application container now has [access to the service](#use-in-app) via the relationship ```` and its corresponding [PLATFORM_RELATIONSHIPS](https://docs.platform.sh/development/variables/use-variables.md#use-provided-variables). ###### Example configuration ###### [Service definition](https://docs.platform.sh/add-services.md) ```yaml {location=".platform/services.yaml"} # The name of the service container. Must be unique within a project. solr: type: solr:9.6 disk: 256 ``` ####### [App configuration](https://docs.platform.sh/create-apps.md) ```yaml {location=".platform.app.yaml"} # Relationships enable access from this app to a given service. # See the Application reference for all options for defining relationships and endpoints. # Note that legacy definition of the relationship is still supported. # More information: https://docs.platform.sh/create-apps/app-reference/single-runtime-image.html#relationships relationships: solr: service: solr endpoint: solr ``` ###### Use in app To use the configured service in your app, add a configuration file similar to the following to your project. ```java {} package sh.platform.languages.sample; import org.apache.solr.client.solrj.SolrQuery; import org.apache.solr.client.solrj.SolrServerException; import org.apache.solr.client.solrj.impl.HttpSolrClient; import org.apache.solr.client.solrj.impl.XMLResponseParser; import org.apache.solr.client.solrj.response.QueryResponse; import org.apache.solr.client.solrj.response.UpdateResponse; import org.apache.solr.common.SolrDocumentList; import org.apache.solr.common.SolrInputDocument; import sh.platform.config.Config; import sh.platform.config.Solr; import java.io.IOException; import java.util.function.Supplier; public class SolrSample implements Supplier { @Override public String get() { StringBuilder logger = new StringBuilder(); // Create a new config object to ease reading the Platform.sh environment variables. // You can alternatively use getenv() yourself. Config config = new Config(); Solr solr = config.getCredential("solr", Solr::new); try { final HttpSolrClient solrClient = solr.get(); solrClient.setParser(new XMLResponseParser()); // Add a document SolrInputDocument document = new SolrInputDocument(); final String id = "123456"; document.addField("id", id); document.addField("name", "Ada Lovelace"); document.addField("city", "London"); solrClient.add(document); final UpdateResponse response = solrClient.commit(); logger.append("Adding one document. Status (0 is success): ") .append(response.getStatus()).append('\n'); SolrQuery query = new SolrQuery(); query.set("q", "city:London"); QueryResponse queryResponse = solrClient.query(query); logger.append("

"); SolrDocumentList results = queryResponse.getResults(); logger.append(String.format("Selecting documents (1 expected): %d \n", results.getNumFound())); logger.append("

"); // Delete one document solrClient.deleteById(id); logger.append("

"); logger.append(String.format("Deleting one document. Status (0 is success): %s \n", solrClient.commit().getStatus())); logger.append("

"); } catch (SolrServerException | IOException exp) { throw new RuntimeException("An error when execute Solr ", exp); } return logger.toString(); } } ``` ```js {} const solr = require("solr-node"); const config = require("platformsh-config").config(); exports.usageExample = async function () { const client = new solr(config.formattedCredentials("solr", "solr-node")); // Add a document. const addResult = await client.update({ id: 123, name: "Valentina Tereshkova", }); // Flush writes so that we can query against them. await client.softCommit(); // Select one document: const strQuery = client.query().q(); const writeResult = await client.search(strQuery); // Delete one document. const deleteResult = await client.delete({ id: 123 }); return ` Adding one document. Status (0 is success): ${addResult.responseHeader.status}
Selecting documents (1 expected): ${writeResult.response.numFound}
Deleting one document. Status (0 is success): ${deleteResult.responseHeader.status}
`; }; ``` ```php {} credentials('solr'); try { $config = [ 'endpoint' => [ 'localhost' => [ 'host' => $credentials['host'], 'port' => $credentials['port'], 'path' => "/" . $credentials['path'], ] ] ]; $client = new Client($config); // Add a document $update = $client->createUpdate(); $doc1 = $update->createDocument(); $doc1->id = 123; $doc1->name = 'Valentina Tereshkova'; $update->addDocuments(array($doc1)); $update->addCommit(); $result = $client->update($update); print "Adding one document. Status (0 is success): " .$result->getStatus(). "
\n"; // Select one document $query = $client->createQuery($client::QUERY_SELECT); $resultset = $client->execute($query); print "Selecting documents (1 expected): " .$resultset->getNumFound() . "
\n"; // Delete one document $update = $client->createUpdate(); $update->addDeleteById(123); $update->addCommit(); $result = $client->update($update); print "Deleting one document. Status (0 is success): " .$result->getStatus(). "
\n"; } catch (Exception $e) { print $e->getMessage(); } ``` ```python {} import pysolr from xml.etree import ElementTree as et import json from platformshconfig import Config def usage_example(): # Create a new Config object to ease reading the Platform.sh environment variables. # You can alternatively use os.environ yourself. config = Config() try: # Get the pysolr-formatted connection string. formatted_url = config.formatted_credentials('solr', 'pysolr') # Create a new Solr Client using config variables client = pysolr.Solr(formatted_url) # Add a document message = '' doc_1 = { "id": 123, "name": "Valentina Tereshkova" } result0 = client.add([doc_1], commit=True) client.commit() message += 'Adding one document. Status (0 is success): {}
'.format(json.loads(result0)['responseHeader']['status']) # Select one document query = client.search('*:*') message += '\nSelecting documents (1 expected): {}
'.format(str(query.hits)) # Delete one document result1 = client.delete(doc_1['id']) client.commit() message += '\nDeleting one document. Status (0 is success): {}'.format(et.fromstring(result1)[0][0].text) return message except Exception as e: return e ``` ##### Solr 4 For Solr 4, Platform.sh supports only a single core per server called `collection1`. You must provide your own Solr configuration via a `core_config` key in your `.platform/services.yaml`: ```yaml {location=".platform/services.yaml"} # The name of the service container. Must be unique within a project. solr: type: "solr:4.10" disk: 1024 configuration: core_config: !archive "" ``` points to a directory in the Git repository, in or below the `.platform/` folder. This directory needs to contain everything that Solr needs to start a core. At the minimum, `solrconfig.xml` and `schema.xml`. For example, place them in `.platform/solr/conf/` such that the `schema.xml` file is located at `.platform/solr/conf/schema.xml`. You can then reference that path like this - ```yaml {location=".platform/services.yaml"} # The name of the service container. Must be unique within a project. solr: type: "solr:4.10" disk: 1024 configuration: core_config: !archive "solr/conf/" ``` ##### Solr 6 and later For Solr 6 and later Platform.sh supports multiple cores via different endpoints. Cores and endpoints are defined separately, with endpoints referencing cores. Each core may have its own configuration or share a configuration. It is best illustrated with an example. ```yaml {location=".platform/services.yaml"} # The name of the service container. Must be unique within a project. solr: type: solr:9.6 disk: 1024 configuration: cores: mainindex: conf_dir: !archive "core1-conf" extraindex: conf_dir: !archive "core2-conf" endpoints: main: core: mainindex extra: core: extraindex ``` The above definition defines a single Solr 9.6 server. That server has 2 cores defined: - `mainindex` — the configuration for which is in the `.platform/core1-conf` directory - `extraindex` — the configuration for which is in the `.platform/core2-conf` directory. It then defines two endpoints: `main` is connected to the `mainindex` core while `extra` is connected to the `extraindex` core. Two endpoints may be connected to the same core but at this time there would be no reason to do so. Additional options may be defined in the future. Each endpoint is then available in the relationships definition in `.platform.app.yaml`. For example, to allow an application to talk to both of the cores defined above its configuration should contain the following: ```yaml {location=".platform.app.yaml"} name: myapp type: "php:8.4" [...] relationships: solrsearch1: "solr:main" solrsearch2: "solr:extra" ``` That is, the application's environment would include a `solrsearch1` relationship that connects to the `main` endpoint, which is the `mainindex` core, and a `solrsearch2` relationship that connects to the `extra` endpoint, which is the `extraindex` core. The relationships array would then look something like the following: ```json { "solrsearch1": [ { "path": "solr/mainindex", "host": "248.0.65.197", "scheme": "solr", "port": 8080 } ], "solrsearch2": [ { "path": "solr/extraindex", "host": "248.0.65.197", "scheme": "solr", "port": 8080 } ] } ``` ###### Configsets For even more customizability, it's also possible to define Solr configsets. For example, the following snippet would define one configset, which would be used by all cores. Specific details can then be overridden by individual cores using `core_properties`, which is equivalent to the Solr `core.properties` file. ```yaml {location=".platform/services.yaml"} # The name of the service container. Must be unique within a project. solr: type: solr:8.4 disk: 1024 configuration: configsets: mainconfig: !archive "configsets/solr8" cores: english_index: core_properties: | configSet=mainconfig schema=english/schema.xml arabic_index: core_properties: | configSet=mainconfig schema=arabic/schema.xml endpoints: english: core: english_index arabic: core: arabic_index ``` In this example, `.platform/configsets/solr8` contains the configuration definition for multiple cores. There are then two cores created: - `english_index` uses the defined configset, but specifically the `.platform/configsets/solr8/english/schema.xml` file - `arabic_index` is identical except for using the `.platform/configsets/solr8/arabic/schema.xml` file. Each of those cores is then exposed as its own endpoint. Note that not all core properties features make sense to specify in the `core_properties`. Some keys, such as `name` and `dataDir`, aren't supported, and may result in a `solrconfig` that fails to work as intended, or at all. ###### Default configuration ####### Default for version 9+ If you don't specify any configuration, the following default is used: ```yaml {location=".platform/services.yaml"} # The name of the service container. Must be unique within a project. solr: type: solr:9.6 configuration: cores: collection1: conf_dir: !archive "example" endpoints: solr: core: collection1 ``` The example configuration directory is equivalent to the [Solr example configuration set](https://github.com/apache/solr/tree/main/solr/server/solr/configsets/sample_techproducts_configs/conf). This default configuration is designed only for testing. You are strongly recommended to define your own configuration with a custom core and endpoint. ####### Default for versions below 9 If you don't specify any configuration, the following default is used: ```yaml {location=".platform/services.yaml"} # The name of the service container. Must be unique within a project. solr: type: solr:9.6 configuration: cores: collection1: {} endpoints: solr: core: collection1 ``` The default configuration is based on an older version of the Drupal 8 Search API Solr module that is no longer in use. You are strongly recommended to define your own configuration with a custom core and endpoint. ###### Limitations The recommended maximum size for configuration directories (zipped) is 2MB. These need to be monitored to ensure they don't grow beyond that. If the zipped configuration directories grow beyond this, performance declines and deploys become longer. The directory archives are compressed and string encoded. You could use this bash pipeline ```bash echo $(($(tar czf - . | base64 | wc -c )/(1024*1024))) Megabytes ``` inside the directory to get an idea of the archive size. The configuration directory is a collection of configuration data, like a data dictionary, e.g. small collections of key/value sets. The best way to keep the size small is to restrict the directory context to plain configurations. Including binary data like plugin `.jar` files inflates the archive size, and isn't recommended. ##### Accessing the Solr server administrative interface Because Solr uses HTTP for both its API and admin interface it's possible to access the admin interface over an SSH tunnel. ```bash platform tunnel:single --relationship ``` By default, this opens a tunnel at `127.0.0.1:30000`. You can now open `http://localhost:30000/solr/` in a browser to access the Solr admin interface. Note that you can't create indexes or users this way, but you can browse the existing indexes and manipulate the stored data. For Dedicated Gen 2 use `ssh -L 8888:localhost:8983 USER@CLUSTER_NAME.ent.platform.sh` to open a tunnel instead, after which the Solr server administrative interface is available at `http://localhost:8888/solr/`. ##### Available plugins This is the complete list of plugins that are available and loaded by default: | Plugin | Description | 8.11 | 9.x | |------------------------------------------------------------------------------------|--------------------------------------------------------|------|-----| | [JTS](https://solr.apache.org/guide/8_1/spatial-search.md#jts-and-polygons-flat) | Library for creating and manipulating vector geometry. |* |* | | [ICU4J](https://solr.apache.org/guide/8_3/language-analysis.md) | Library providing Unicode and globalization support. |* |* | ##### Upgrading The Solr data format sometimes changes between versions in incompatible ways. Solr doesn't include a data upgrade mechanism as it is expected that all indexes can be regenerated from stable data if needed. To upgrade (or downgrade) Solr you need to use a new service from scratch. There are two ways of doing that. ###### Destructive In your `.platform/services.yaml` file, change the version of your Solr service *and* its name. Be sure to also update the reference to the now changed service name in it's corresponding application's `relationship` block. When you push that to Platform.sh, the old service is deleted and a new one with the name is created, with no data. You can then have your application re-index data as appropriate. This approach has the downside of temporarily having an empty Solr instance, which your application may or may not handle gracefully, and needing to rebuild your index afterward. Depending on the size of your data that could take a while. ###### Transitional For a transitional approach you temporarily have two Solr services. Add a second Solr service with the new version a new name and give it a new relationship in `.platform.app.yaml`. You can optionally run in that configuration for a while to allow your application to populate indexes in the new service as well. Once you're ready to cut over, remove the old Solr service and relationship. You may optionally have the new Solr service use the old relationship name if that's easier for your application to handle. Your application is now using the new Solr service. This approach has the benefit of never being without a working Solr instance. On the downside, it requires two running Solr servers temporarily, each of which consumes resources and need adequate disk space. Depending on the size of your data that may be a lot of disk space. ### Varnish Varnish is a popular HTTP proxy server, often used for caching. You usually don't need it with Platform.sh as the standard router includes HTTP cache and a CDN would cover more advanced uses. But you can include Varnish as a service. ##### Supported versions You can select the major and minor version. Patch versions are applied periodically for bug fixes and the like. When you deploy your app, you always get the latest available patches. | Grid | Dedicated Gen 3 | Dedicated Gen 2 | | - 7.6 - 7.3 - 7.2 - 6.0 None available None available ##### How it works All incoming requests go through the [standard router](https://docs.platform.sh/define-routes.md). The Varnish service sits between the router and all apps in the project. ``` mermaid graph LR A(Request) -->B(Router) B --> C{Varnish} C -->D[App 1] C -->E[App 2] ``` ##### Usage example ###### 1. Configure the service To define the service, use the `varnish` type: ```yaml {location=".platform/services.yaml"} # The name of the service container. Must be unique within a project. : type: varnish: relationships: : ':http' configuration: vcl: !include type: string path: config.vcl ``` Note that changing the name of the service replaces it with a brand new service and all existing data is lost. Back up your data before changing the service. The `relationships` block defines the connection between Varnish and your app. You can define ```` as you like. ```` should match your app's `name` in the [app configuration](https://docs.platform.sh/create-apps/app-reference/single-runtime-image.md). The `configuration` block must reference a VCL file inside the `.platform` directory. The `path` defines the file relative to the `.platform` directory. ###### Example configuration ######## [Service definition](https://docs.platform.sh/add-services.md) ```yaml {location=".platform/services.yaml"} # The name of the service container. Must be unique within a project. varnish: type: varnish:7.3 relationships: application: 'myapp:http' configuration: vcl: !include type: string path: config.vcl ``` Notice the `relationship` (`application`) defined for the service `varnish` granting access to the application container `myapp`. ###### 2. Create a VCL template To tell Varnish how to handle traffic, in the `.platform` directory add a [Varnish Configuration Language (VCL) template](https://www.varnish-software.com/developers/tutorials/example-vcl-template/). This template is supplemented by automatic additions from Platform.sh. So you MUST NOT include certain features that you might elsewhere: - A `vcl_init()` function: The function is automatically generated based on the relationships you defined in Step 1. Each defined relationship results in a backend with the same name. - The VCL version at the start: This is automatically generated. - Imports for `std` or `directors`: These are already imported. You can import other [modules](#include-modules). The file MUST include: - A definition of which backend to use in a `vcl_recv()` subroutine. The logic varies based on whether you have one or more apps. **Note**: Misconfigured VCL files can result in incorrect and confusing behavior that’s hard to debug. Platform.sh doesn’t help with VCL configuration options beyond the basic connection logic documented here. You can see any compilation errors with the [stats endpoint](#stats-endpoint). ####### Example VCL template with one app To serve one app, your VCL template needs at least the following function: ```bash {location="config.vcl" } sub vcl_recv { set req.backend_hint = .backend(); } ``` Where `` is the name of the relationship you defined in [Step 1](#1-configure-the-service). With the [example configuration](#example-configuration), that would be the following: ```bash {location="true/config.vcl"} sub vcl_recv { set req.backend_hint = application.backend(); } ``` ####### Example VCL template with multiple apps If you have multiple apps fronted by the same Varnish instance, your VCL templates needs logic to determine where each request is forwarded. For example, you might have the following configuration for two apps: ```yaml {location=".platform/services.yaml"} varnish: type: varnish:7.6 relationships: blog: 'blog:http' main: 'app:http' configuration: vcl: !include type: string path: config.vcl ``` ```yaml {location=".platform/applications.yaml"} blog: # The location of the application's code. source: root: "backends/blog" # The type of the application to build. type: "php:8.4" app: # The location of the application's code. source: root: "backends/main" # The type of the application to build. type: "nodejs:22" ``` You could then define that all requests to `/blog/` go to the `blog` app and all other requests to the other app: ```bash {location="true/config.vcl"} sub vcl_recv { if (req.url ~ "^/blog/") { set req.backend_hint = blog.backend(); } else { set req.backend_hint = main.backend(); } } ``` ###### 3. Route incoming requests to Varnish Edit your [route definitions](https://docs.platform.sh/define-routes.md) to point to the Varnish service you just created. Also disable the router cache as Varnish now provides caching. To forward all incoming requests to Varnish rather than your app, you could have the following: ```yaml {location=".platform/routes.yaml"} "https://{default}/": type: upstream upstream: "varnish:http" cache: enabled: false ``` Varnish forwards requests to your app based on the specified VCL template. ##### Include modules You can include the following optional modules in your VCL templates to add additional features: - `cookie` - `header` - `saintmode` - `softpurge` - `tcp` - `var` - `vsthrottle` - `xkey` To use them, add an import to your template such as the following: ```bash {location="true/config.vcl"} import xkey; ``` ##### Circular relationships At this time, Platform.sh doesn't support circular relationships between services and apps. That means you can't add a relationship from an app fronted by Varnish to the Varnish service. If you do so, then one of the relationships is skipped and the connection doesn't work. ##### Rate limit connections Sometimes you want to ensure that users, whether human or machine, can't overload your app with requests. One tool to help is using Varnish to limit the rate at which connections can be made. For example, say you want to make sure no one can make more than 20 requests within 10 seconds. If they do, you want to block them from any more requests for 2 minutes. To do so, [import the `vsthrottle` module](#include-modules) and add logic similar to the following to your VCL template: ```bash {location="true/config.vcl"} import vsthrottle; sub vcl_recv { # The Platform.sh router provides the real client IP as X-Client-IP # This replaces client.identity in other implementations if (vsthrottle.is_denied(req.http.X-Client-IP, 20, 10s, 120s)) { # Client has exceeded 20 requests in 10 seconds. # When this happens, block that IP for the next 120 seconds. return (synth(429, "Too Many Requests")); } # Set the standard backend for handling requests that aren't limited set req.backend_hint = application.backend(); } ``` ##### Clear cache with a push You may want at times to clear a specific part of your cache when you know the content is outdated. With Varnish, you can clear the content with [purging and banning](https://varnish-cache.org/docs/trunk/users-guide/purging.md). The following example shows how to set up purging. 1. Add an access control list to your VCL template: ```bash {location="true/config.vcl"} acl purge { "localhost"; "192.0.2.0"/24; } ``` This list ensures that only requests from the listed IPs are accepted. Choose which IPs to allow. If you are sending requests from an app, checkout the [outbound IPs for the region](https://docs.platform.sh/development/regions.md#public-ip-addresses). Alternatively, you could code in a token that must be sent with the request. 2. Add purge handling: ```bash {location="true/config.vcl"} sub vcl_recv { if (req.method == "PURGE") { # The Platform.sh router provides the real client IP as X-Client-IP # Use std.ip to convert the string to an IP for comparison if (!std.ip(req.http.X-Client-IP, "0.0.0.0") ~ purge) { # Deny all purge requests not from the allowed IPs return(synth(403,"Not allowed.")); } # Purge cache for allowed requests return (purge); } ... } ``` **Note**: The snippet above has been produced for Varnish 7.x. If using a different version, consult the [Varnish documentation](https://varnish-cache.org/docs/) for potential differences in syntax and required parameters. 3. Set up cache purging to suit your needs. The following cURL call gives an example of how this can work: ```bash curl -X PURGE "" ``` ##### Stats endpoint The Varnish service also offers an `http+stats` endpoint, which provides access to some Varnish analysis and debugging tools. You can't use it from an app fronted by Varnish because of the restriction with [circular relationships](#circular-relationships). To access the stats, create a **separate app** (`stats-app`) with a relationship *to* Varnish, but not *from* it. Define [app configuration](https://docs.platform.sh/create-apps/app-reference/single-runtime-image.md) similar to the following: ```yaml {location=".platform/applications.yaml"} # The name of the app container. Must be unique within a project. stats-app: # The location of the application's code. source: root: "stats" # The type of the application to build. type: "python:3.9" # Unique relationship _to_ Varnish from 'stats-app', where no relationship # is defined _from_ Varnish to the same app, to avoid circular relationships. relationships: varnishstats: service: varnish endpoint: "http+stats" # The name of the app container. Must be unique within a project. main-app: # The location of the application's code. source: root: "backends/main" # The type of the application to build. type: "nodejs:22" ``` ```yaml {location=".platform/services.yaml"} # The name of the service container. Must be unique within a project. varnish: type: varnish:7.6 # Unique relationship _from_ Varnish _to_ 'main-app', where no relationship # is defined _to_ Varnish to the same app, to avoid circular relationships. relationships: main: "main-app:http" configuration: vcl: !include type: string path: config.vcl ``` You choose any valid name and type. When the app is deployed, the app can access the Varnish service over HTTP to get diagnostic information. The following paths are available: - `/`: returns any error logged when generating the VCL template failed - `/config`: returns the generated VCL template - `/stats`: returns the output of `varnishstat` - `/logs`: returns a streaming response of `varnishlog` To access the Varnish stats endpoint from the command line: 1. Connect to your stats app [using SSH](https://docs.platform.sh/development/ssh/_index.md): `platform ssh --app stats-app` (replace `stats-app` with the name you gave the app). 2. Display the [relationships array](https://docs.platform.sh/create-apps/app-reference/single-runtime-image.md#relationships) with `echo $PLATFORM_RELATIONSHIPS | base64 -d | jq .`, 3. Query Varnish with `curl :/stats`, replacing `` and `` with the values from Step 2. ### Vault key management service The Vault key management service (KMS) provides key management and access control for your secrets. The Platform.sh Vault KMS offers the [transit secrets engine](https://developer.hashicorp.com/vault/docs/secrets/transit) to sign, verify, encrypt, decrypt, and rewrap information. Vault doesn't store the data sent to the transit secrets engine, so it can be viewed as encryption as a service. To store secrets such as API keys, create sensitive [environment variables](https://docs.platform.sh/development/variables.md). ##### Supported versions You can select the major and minor version. Patch versions are applied periodically for bug fixes and the like. When you deploy your app, you always get the latest available patches. | Grid | Dedicated Gen 3 | Dedicated Gen 2 | | - 1.12 - 1.12 - 1.6 ##### Relationship reference Example information available through the [`PLATFORM_RELATIONSHIPS` environment variable](https://docs.platform.sh/development/variables/use-variables.md#use-provided-variables) or by running `platform relationships`. Note that the information about the relationship can change when an app is redeployed or restarted or the relationship is changed. So your apps should only rely on the `PLATFORM_RELATIONSHIPS` environment variable directly rather than hard coding any values. ```json { "username": "", "scheme": "http", "service": "vault-kms", "fragment": "", "ip": "123.456.78.90", "instance_ips": [ "123.456.78.90" ], "hostname": "azertyuiopqsdfghjklm.vault-kms.service._.eu-1.platformsh.site", "port": 8200, "cluster": "azertyuiopqsdf-main-7rqtwti", "host": "vault_secret.internal", "rel": "sign", "path": "\/", "query": { "is_master": true }, "password": "ChangeMe", "type": "vault-kms:1.12", "public": false, "host_mapped": false } ``` ##### Usage example ###### 1. Configure the service To define the service, use the `vault-kms` type: ```yaml {location=".platform/services.yaml"} # The name of the service container. Must be unique within a project. : type: vault-kms: disk: 512 configuration: endpoints: : - policy: key: type: ``` Note that changing the name of the service replaces it with a brand new service and all existing data is lost. Back up your data before changing the service. - ```` is the name you choose to identify the service. - ```` is a supported version of the service. - ```` is an identifier you choose for the endpoint. - ```` is the name of the key to be stored in the Vault KMS. - ```` is one of the available [policies](#policies) based on what you want to accomplish. - The `type` is one of: - `sign`: for signing payloads, with the type `ecdsa-p256` - `encrypt` (for encrypt`chacha20-poly1305`). The `type` can't be changed after creation. You can create multiple endpoints, such as to have key management separate from key use. 512 MB is the minimum required disk space for the Vault KMS service. ###### 2. Define the relationship To define the relationship, use the following configuration: ```yaml {location=".platform.app.yaml"} # Relationships enable access from this app to a given service. # The example below shows configuration with an explicitly set service name and endpoint. # See the Application reference for all options for defining relationships and endpoints. relationships: : service: endpoint: ``` You can define `` as you like, so long as it's unique between all defined services and matches in both the application and services configuration. The example above leverages [explicit endpoint configuration](https://docs.platform.sh/create-apps/app-reference/single-runtime-image.md#relationships) for relationships. That is, it utilizes the `endpoint` key to explicitly connect an individually accessible `relationship` to a specific Vault endpoint. With the above definition, the application container now has access to the service via the relationship `` and its corresponding [`PLATFORM_RELATIONSHIPS` environment variable](https://docs.platform.sh/development/variables/use-variables.md#use-provided-variables). If you split the service into multiple endpoints, define multiple relationships. ###### Example configuration ###### [Service definition](https://docs.platform.sh/add-services.md) ```yaml {location=".platform/services.yaml"} # The name of the service container. Must be unique within a project. vault-kms: type: vault-kms:1.12 disk: 512 configuration: endpoints: manage_keys: - policy: admin key: vault-sign type: sign - policy: sign key: vault-sign type: sign - policy: verify key: vault-sign type: sign ``` ####### [App configuration](https://docs.platform.sh/create-apps.md) ```yaml {location=".platform.app.yaml"} relationships: # Please note: Legacy definition of the relationship is still supported: # More information: https://docs.platform.sh/create-apps/app-reference/single-runtime-image.html#relationships vault_secret: service: "vault-kms" endpoint: "manage_keys" ``` ###### Multiple endpoints configuration ###### [Service definition](https://docs.platform.sh/add-services.md) ```yaml {location=".platform/services.yaml"} # The name of the service container. Must be unique within a project. vault-kms: type: vault-kms:1.12 disk: 512 configuration: endpoints: management: - policy: admin key: admin-key type: sign sign_and_verify: - policy: sign key: signing-key type: sign - policy: verify key: signing-key type: sign ``` ####### [App configuration](https://docs.platform.sh/create-apps.md) ```yaml {location=".platform.app.yaml"} relationships: # Please note: Legacy definition of the relationship is still supported. # More information: https://docs.platform.sh/create-apps/app-reference/single-runtime-image.html#relationships vault_manage: service: vault-kms endpoint: management vault_sign: service: vault-kms endpoint: sign_and_verify ``` ##### Use Vault KMS To connect your app to the Vault KMS, use a token that's defined in the `PLATFORM_RELATIONSHIPS` environment variable. With this token for authentication, you can use any of the policies you [defined in your `.platform/services.yaml` file](#1-configure-the-service). Note that the information about the relationship can change when an app is redeployed or restarted or the relationship is changed. So your apps should only rely on the `PLATFORM_RELATIONSHIPS` environment variable directly rather than hard coding any values. The following examples use cURL as an example, which you could do in a hook or after accessing your app with SSH. Adapt the examples for your app's language. ###### Get the token To make any calls to the Vault KMS, you need your token. Get it from the `PLATFORM_RELATIONSHIPS` environment variable: ```bash echo $PLATFORM_RELATIONSHIPS | base64 --decode | jq -r ".[0].password" ``` `` is the name you [defined in your `.platform.app.yaml` file](#2-define-the-relationship). The `-r` flag returns the string itself, not wrapped in quotes. You can also store this as a variable: ```bash VAULT_TOKEN=$(echo $PLATFORM_RELATIONSHIPS | base64 --decode | jq -r ".[0].password") ``` A given token is valid for one year from its creation. ###### Get the right URL The `PLATFORM_RELATIONSHIPS` environment variable also contains the information you need to construct a URL for contacting the Vault KMS: the `host` and `port`. Assign it to a variable as follows: ```bash VAULT_URL=$(echo $PLATFORM_RELATIONSHIPS | base64 --decode | jq -r ".[0].host"):$(echo $PLATFORM_RELATIONSHIPS | base64 --decode | jq -r ".[0].port") ``` `` is the name you [defined in your `.platform.app.yaml` file](#2-define-the-relationship). ###### Manage your keys Your key names are [defined in your `.platform/services.yaml` file](#1-configure-the-service). You can manage them if you've set an [admin policy](#policies) for them. To get information on a key, such as its expiration date, run the following command: ```bash curl \ --header "X-Vault-Token: $VAULT_TOKEN" \ http://"$VAULT_URL"/v1/transit/keys/"$KEY_NAME" | jq . ``` `$KEY_NAME` is the name in your `.platform/services.yaml` file. To rotate the version of your key, run the following command: ```bash curl \ --header "X-Vault-Token: $VAULT_TOKEN" \ http://"$VAULT_URL"/v1/transit/keys/"$KEY_NAME">/rotate \ --request POST ``` ###### Sign and verify payloads If you've set [sign and verify policies](#policies), you can use your keys to sign and verify various payloads, such as a JSON Web Token (JWT) for authentication in your app. Note that all payloads (all plaintext data) must be base64-encoded. To sign a specific payload, run the following command: ```bash curl \ --header "X-Vault-Token: $VAULT_TOKEN" \ http://$VAULT_URL/v1/transit/sign/"$KEY_NAME"/sha2-512 \ --data "{\"input\": \"$(echo SECRET | base64)\"}" ``` The string at the end of the URL denotes the specific [hash algorithm used by the Vault KMS](https://www.vaultproject.io/api-docs/secret/transit#hash_algorithm). You get back a JSON object that includes the signature for the payload: ```json { "request_id": "a58b549f-1356-4028-d191-4c9cd585ca25", ... "data": { "key_version": 1, "signature": "vault-kms:v1:MEUCIAiN4UtXh..." }, ... } ``` You can then use `data.signature` to sign things such as a JWT. To verify a payload, run the following command: ```bash curl \ --header "X-Vault-Token: $VAULT_TOKEN" \ http://"$VAULT_URL"/v1/transit/verify/"$KEY_NAME"/sha2-512 \ --data " { \"input\": \"$(echo SECRET | base64)\", \"signature\": \"$SIGNATURE\" }" ``` You get back a JSON object that includes whether or not the signature is valid: ```json { "request_id": "5b624718-fd9d-37f6-8b95-b387379d2648", ... "data": { "valid": true }, ... } ``` A `true` value means the signature matches and a `false` value means it doesn't. ###### Encrypt and decrypt data If you've set [encrypt and decrypt policies](#policies), you can use your keys to encrypt and decrypt any data you want. Note that all of plaintext data you work with must be base64-encoded. To sign a specific payload, run the following command: ```bash curl \ --header "X-Vault-Token: $VAULT_TOKEN" \ http://$VAULT_URL/v1/transit/encrypt/"$KEY_NAME" \ --data "{\"plaintext\": \"$(echo SECRET | base64)\"}" ``` You get back a JSON object that includes your encrypted data: ```json { "request_id": "690d634a-a4fb-bdd6-9947-e895578b79d5", ... "data": { "ciphertext": "vault-kms:v1:LEtOWSwh3N...", "key_version": 1 }, ... } ``` To decrypt data that you've already encrypted, run the following command: ```bash curl \ --header "X-Vault-Token: $VAULT_TOKEN" \ http://"$VAULT_URL"/v1/transit/decrypt/"$KEY_NAME" \ --data " { \"ciphertext\": \"$CIPHERTEXT\" }" ``` You get back a JSON object that your decrypted data base64-encoded: ```json { "request_id": "bbd411ca-6ed7-aa8b-8177-0f35055ce613", ... "data": { "plaintext": "U0VDUkVUCg==" }, ... } ``` To get the value un-encoded, add `| jq -r ".data.plaintext" | base64 -d` to the end of the `curl` command. ####### Rewrap encrypted data If you have already encrypted data and you have [changed your key version](#manage-your-keys), you can rewrap the encrypted data with the new key. Assuming `$CIPHERTEXT` stores your encrypted data (`vault:v1:LEtOWSwh3N...`), run the following command: ```bash curl \ --header "X-Vault-Token: $VAULT_TOKEN" \ http://"$VAULT_URL"/v1/transit/rewrap/"$KEY_NAME" \ --data " { \"ciphertext\": \"$CIPHERTEXT\" }" ``` In the JSON object that's returned, you can notice that the `ciphertext` is different (and now includes the new key version as a prefix) as is the `key_version`: ```json { ... "data": { "ciphertext": "vault-kms:v2:ICRi0yAlH...", "key_version": 2 }, ... } ``` ##### Policies | Policy | Endpoint | Capabilities | Purpose | | --------- | -------- | ------------ | ------- | | `admin` | `transit/keys/${KEY}` | `read` | Access to key properties and various functions performed on keys such as rotation and deletion | | | `transit/keys/${KEY}/*` | `read`, `create`, `update`, `delete` | | | `sign` | `transit/sign/${KEY}/${HASH_ALGORITHM}` | `read`, `update` | Signing payloads with an existing key | | `verify` | `transit/verify/${KEY}/${HASH_ALGORITHM}` | `read`, `update` | Verifying already signed payloads | | `encrypt` | `transit/encrypt/${KEY}` | `read`, `update` | Encrypting data with an existing key | | `decrypt` | `transit/decrypt/${KEY}` | `read`, `update` | Decrypting data with an existing key | | `rewrap` | `transit/rewrap/${KEY}` | `read`, `update` | Re-encrypting data with a new key version without revealing the secret | ### Server Side Includes (SSI) SSI commands enable you to include files within other pages. At its most basic, you can include files within other ones so as not to repeat yourself. Start by enabling SSI: ```yaml {location=".platform/routes.yaml"} "https://{default}/": type: upstream upstream: "myapp:http" ssi: enabled: true ``` Then create a file you want to include elsewhere: ```html {location="includes/example.html"} This content can be reused ``` And include it in another file: ```html {location="index.html"} This content is unique to this page. ``` And your final rendered page includes the other file: ```html {location="index.html"} This content is unique to this page. This content can be reused ``` ##### Caching and dynamic content You can use SSI to have [caching](https://docs.platform.sh/define-routes/cache.md) and dynamic content in one. So one file is cached, while another updates dynamically. For example, you can activate SSI on one route with cache disabled and enable cache on another route: ```yaml {location=".platform/routes.yaml"} "https://{default}/": type: upstream upstream: "myapp:http" ssi: enabled: true cache: enabled: false "https://{default}/cache": type: upstream upstream: "myapp:http" cache: enabled: true ``` Then create a page that displays the current date and time and is cached for 60 seconds (the example uses PHP, but any server-side language would work): ```php {location="cache/example.php"} ``` Then you can visit `index.php` and refresh the page a few times. You see the first number updating to the current time, while the second (included) one only changes every 60 seconds. For more on SSI, see the [nginx documentation](https://nginx.org/en/docs/http/ngx_http_ssi_module.md). ### HTTP cache Platform.sh supports HTTP caching at the server level. Caching is enabled by default, but is only applied to ``GET`` and ``HEAD`` requests. The cache can be controlled using the `cache` key in your `.platform/routes.yaml` file. If a request can be cached, Platform.sh builds a cache key from several request properties and stores the response associated with this key. When a request comes with the same cache key, the cached response is reused. When caching is on... * you can configure cache behavior for different location blocks in your `.platform.app.yaml`; * the router respects whatever cache headers are sent by the application; * cookies bypass the cache; * responses with the `Cache-Control` header set to `Private`, `No-Cache`, or `No-Store` aren't cached. You should _not_ use the Platform.sh HTTP cache if you're using [Varnish](https://docs.platform.sh/add-services/varnish.md) or an external CDN such as [Fastly](https://docs.platform.sh/domains/cdn/fastly.md) or [Cloudflare](https://docs.platform.sh/domains/cdn/cloudflare.md). Mixing cache services together most likely results in caches that are stale and can't be cleared. For more details, see [best practices on HTTP caching](https://docs.platform.sh/learn/bestpractices/http-caching.md). ##### Basic usage The HTTP cache is enabled by default, however you may wish to override this behavior. To configure the HTTP cache, add a `cache` key to your route. You may like to start with the defaults: ```yaml {location=".platform/routes.yaml"} https://{default}/: type: upstream upstream: myapp:http cache: enabled: true default_ttl: 0 cookies: ['*'] headers: ['Accept', 'Accept-Language'] ``` ##### Example In this example, requests are cached based on the URI, the `Accept` header, `Accept-Language` header, and `X-Language-Locale` header. Any response that lacks a `Cache-Control` header is cached for 60 seconds. The presence of any cookie in the request disables caching of that response. ```yaml {location=".platform/routes.yaml"} https://{default}/: type: upstream upstream: myapp:http cache: enabled: true headers: ['Accept', 'Accept-Language', 'X-Language-Locale'] cookies: ['*'] default_ttl: 60 ``` ##### How it works ###### The cache key If a request can be cached, Platform.sh builds a cache key from several request properties and stores the response associated with this key. When a request comes with the same cache key, the cached response is reused. There are two parameters that let you control this key: `headers` and `cookies`. The default value for these keys are the following: ```yaml {location=".platform/routes.yaml"} https://{default}/: # ... cache: enabled: true cookies: ['*'] headers: ['Accept', 'Accept-Language'] ``` ###### Duration The cache duration is decided based on the `Cache-Control` response header value. If no `Cache-Control` header is in the response, then the value of `default_ttl` key is used. ###### Conditional requests Conditional requests using `If-Modified-Since` and `If-None-Match` are both supported. The web server doesn't honor the `Pragma` request header. ###### Cache revalidation When the cache is expired (indicated by `Last-Modified` header in the response) the web server sends a request to your application with `If-Modified-Since` header. If the `If-None-Match` header is sent in the conditional request when `Etag` header is set in the cached response, your application can extend the validity of the cache by replying `HTTP 304 Not Modified`. ###### Flushing The HTTP cache doesn't support a complete cache flush, but you can invalidate the cache by setting `cache: false`. Alternatively, the cache clears on a rebuild, so triggering a rebuild (pushing a new commit) effectively causes a complete cache flush. ##### Cache configuration properties ###### `enabled` Turns the cache on or off for a route. **Note**: Regular expressions in routes are **not** supported. ###### Allowing only specific cookies Some applications use cookies to invalidate cache responses, but expect other cookies to be ignored. This is a case of allowing only a subset of cookies to invalidate the cache. ```yaml {location=".platform/routes.yaml"} https://{default}/: # ... cache: enabled: true cookies: ["MYCOOKIE"] ``` ###### Cache HTTP and HTTPS separately using the `Vary` header Set the Vary header to `X-Forwarded-Proto` [custom request header](https://docs.platform.sh/development/headers.md) to render content based on the request protocol (i.e. HTTP or HTTPS). By adding `Vary: X-Forwarded-Proto` to the response header, HTTP and HTTPS content would be cached separately. ###### Cache zipped content separately Use `Vary: Accept-Encoding` to serve different content depending on the encoding. Useful for ensuring that gzipped content isn't served to clients that can't read it. ### HTTPS Using HTTPS for your site helps ensure your users' information remains secure. HTTPS provides enhanced security thanks to the following characteristics: - With HTTPS, data is encrypted so user activity can't be tracked and user information can't be stolen. - HTTPS prevents the corruption of files transferred from a web server to a website and vice-versa. - HTTPS also authenticates websites, which helps build trust with your users. To enable HTTPS on your site, you need [Transport Layer Security (TLS) certificates](#tls-certificates). ##### TLS certificates Platform.sh automatically provides TLS certificates for all sites and environments. These certificates are issued at no charge by [Let's Encrypt](https://letsencrypt.org/) and cover most needs. They're valid for 90 days and automatically renewed 28 days before expiration. To use them, you only need to [specify HTTPS routes](https://docs.platform.sh/define-routes/https.md#enable-https). Note that [limitations](https://docs.platform.sh/define-routes/https.md#lets-encrypt-limitations) apply. If you encounter issues with the TLS certificates provided by Platform.sh, check that [TLS encryption is up-and-running](https://docs.platform.sh/domains/troubleshoot.md#verify-ssltls-encryption). If you don't want to use the TLS certificates provided by Platform.sh, configure your own [third-party TLS certificates](https://docs.platform.sh/domains/steps/tls.md). ###### Let's Encrypt limitations When you use the Let's Encrypt [TLS certificates](#tls-certificates) provided by Platform.sh, the following limitations apply. Let's Encrypt allows a maximum of 100 hostnames per certificate. You can have 1 Let's Encrypt certificate for each of your environments. If you define both a `{default}` and a `www.{default}` route for each domain you use, you can add up to 50 hostnames. Going over this limitation results in a warning on deploy and no new TLS certificates are issued. If you need more hostnames, you can obtain additional certificates or a wildcard certificate from a [third-party issuer](https://docs.platform.sh/domains/steps/tls.md). Alternatively, consider splitting your project up into multiple Platform.sh projects. Please note that when using multiple domains, the Common Name (CN) to which the certificate is issued to is not guaranteed to be the same on each certificate renewal. ###### Certificate renewals When you use the [TLS certificates](#tls-certificates) provided by Platform.sh, certificate renewals are automatic. They trigger a redeployment of your environment. During this redeployment, required security and system upgrades are applied to your containers. So the duration of the redeployment depends on what needs to be upgraded. ##### Enable HTTPS To enable HTTPS, add a routing configuration similar to the following: ```yaml {location=".platform/routes.yaml"} "https://{default}/": type: upstream upstream: "myapp:http" "https://www.{default}/": type: redirect to: "https://{default}/" ``` All traffic to your domain is then sent to your app. The `www` subdomain redirects to the [default domain](https://docs.platform.sh/define-routes.md#default). This also includes redirecting requests from HTTP to HTTPS. For more information, see how to [define routes](https://docs.platform.sh/define-routes.md). ##### Optional: Configure TLS connections When you [specify HTTPS routes](#enable-https), you can use the `tls` setting to further configure your TLS connections. ###### Enforce TLS 1.3 Although you can still use TLS 1.2, TLS 1.3 is faster and more secure. To instruct your web server to automatically reject TLS 1.2 connections, enforce TLS 1.3 using the `min_version` setting: ```yaml {location=".platform/routes.yaml"} tls: min_version: TLSv1.3 ``` Note that TLS versions older than 1.2 are deprecated and are rejected by default. ###### Enable HTTP Strict Transport Security (HSTS) [HSTS](https://developer.mozilla.org/en-US/docs/Web/HTTP/Headers/Strict-Transport-Security) forces clients to always communicate with your site over HTTPS. To enable HSTS, use `strict_transport_security` in a configuration similar to the following: ```yaml {location=".platform/routes.yaml"} tls: strict_transport_security: enabled: true include_subdomains: true preload: true ``` The following table presents the possible properties for `strict_transport_security`: | Name | Type | Default | Description | |----------------------|-----------|---------|------------------------------------------------------------------------------------------------| | `enabled` | `boolean` | `null` | If set to `true`, HSTS is enabled for 1 year. If set to `false`, other properties are ignored. | | `include_subdomains` | `boolean` | `false` | To specify whether HSTS applies to all subdomains. | | `preload` | `boolean` | `false` | To add your website to the [HSTS preload list](https://hstspreload.org/). Thanks to this list, most browsers are informed that your site requires HSTS before an HSTS header response is even issued. | Note that when you enable or disable HSTS, the entire domain is affected. Make sure you only add the HSTS configuration to a single route. Having different routes with conflicting HSTS configurations can cause issues. ###### Enable mTLS Standard TLS connections are useful to verify the identity of web servers and their certificates. But you can also instruct your web server to verify the identity of clients and their certificates. This allows you to restrict access to trusted users. To do so, enable mTLS by adding the following configuration: ```yaml {location=".platform/routes.yaml"} tls: client_authentication: "require" ``` By default, all valid TLS certificates issued by a legitimate certificate authority are accepted. But you can instruct your web server to only accept TLS certificates issued by specific or even custom certificate authorities. To do so, add a configuration similar to the following: ```yaml {location=".platform/routes.yaml"} tls: client_authentication: "require" client_certificate_authorities: - !include type: string path: root-ca1.crt - !include type: string path: root-ca2.crt ``` In this case, the certificate files are resolved relative to the `.platform` directory. Alternatively, you can specify the certificates inline in the file: ```yaml {location=".platform/routes.yaml"} tls: client_authentication: "require" client_certificate_authorities: - | -----BEGIN CERTIFICATE----- ### Several lines of characters here ### -----END CERTIFICATE----- - | -----BEGIN CERTIFICATE----- ### Several lines of different characters here ### -----END CERTIFICATE----- ``` If you want to request a client certificate without _requiring_ the client to send one, you can set this by using `request` as a value for `client_authentication`: ```yaml {location=".platform/routes.yaml"} routes: "https://{default}/": # ... tls: client_authentication: "request" # ... ``` Requests on routes with mTLS configured that are passed through to your app will contain additional headers such as `X-Client-Verify` (with values like `Success` or `None` depending on whether a client certificate was presented and validated or not) and `X-Client-Cert` (with information about the client certificate that was used) that your application can use as required. ### Proxy routes **Warning**: Only use this feature to address edge cases where you need to proxy to another, outside project. **Do not use this for internal routing.** To expose your app to the outside world, see [how to define routes](https://docs.platform.sh/define-routes.md). Sometimes you want your app to pass requests on to a different Platform.sh project. Basic redirects only work within the same project, so use proxy routes for routes elsewhere. You can define an external proxy on your Platform.sh project by defining a route like the following: ```yaml {location=".platform/routes.yaml"} https://{default}/foo: type: proxy to: https://www.example.com ``` This route passes requests for `https://{default}/foo/index.html` to `https://www.example.com/foo/index.html`. You can also define a proxy route to an URL composed of an IP address and a port: ```yaml {location=".platform/routes.yaml"} https://{default}/foo: type: proxy to: https://192.0.2.0:8000 ``` **Note**: Cache is disabled on this type of route and cannot be enabled. ##### URL paths In the basic example above, the route preserves the URL path, `/foo`, in the request. If you want to proxy a route to `https://www.example.com` without the URL path `/foo`, add a trailing slash `/` to the `to` definition. ```yaml {location=".platform/routes.yaml"} https://{default}/foo: type: proxy to: https://www.example.com/ ``` The trailing slash makes the proxy route interpret the location as having a different path. So requests for `https://{default}/foo/index.html` are forwarded to `https://www.example.com/index.html`. To override the URL path entirely, define a route that contains its own path. For example: ```yaml {location=".platform/routes.yaml"} https://{default}/foo: type: proxy to: https://www.example.com/bar ``` This route passes requests for `https://{default}/foo/index.html` to `https://www.example.com/bar/index.html`. ##### Multiple apps with the same base URL You can use proxy routes to map a single domain to multiple Platform.sh projects with their own subdomain/domain names. You might have a need to access multiple projects, each hosting specific applications for different languages. You want to serve them all at the same base URL with different paths (`https://example.com/en`, `https://example.com/fr`, and so on). Because domains can't be reused at Platform.sh, you can't just set the same domain for all projects. Use proxy routes so a single project can access different projects using the same base URL. In the following example, a single project specifies proxy routes to three apps with the same `default` base URL. Each app handles a different language. ```yaml {location=".platform/routes.yaml"} https://{default}/en: type: proxy to: https://en.example.com/ https://{default}/jp: type: proxy to: https://jp.example.com/ https://{default}/pt: type: proxy to: https://pt.example.com/ ``` The apps behind the proxy need to ensure links to assets are shown to the target domain. For example, by changing `https://en.example.com/style.css` to `https://example.com/en/style.css`. The following diagram shows the example project forwarding specific requests to the correct app. ``` mermaid sequenceDiagram participant User participant Project as Proxy project participant En as En project participant Jp as Jp project participant Pt as Pt project User->>+Project: example.com/en/index.html Project->>+En: en.example.com/index.html Note over En: Changes asset links En-->>-Project: index.html Project-->>-User: index.html User->>+Project: example.com/jp/index.html Project->>+Jp: jp.example.com/index.html Note over Jp: Changes asset links Jp-->>-Project: index.html Project-->>-User: index.html User->>+Project: example.com/pt/index.html Project->>+Pt: pt.example.com/index.html Note over Pt: Changes asset links Pt-->>-Project: index.html Project-->>-User: index.html ``` ###### Large projects This architecture makes the router of a single project into the central element of your app. This setup may make scaling more difficult as the router scales with the size of that project. The router can become a bottleneck for all external sites and acts as a single point of failure. For larger projects, you should handle multiple websites with the same base URL via a [CDN](https://docs.platform.sh/domains/cdn.md). ### Redirects Managing redirection rules is a common requirement for web applications, especially in cases where you do not want to lose incoming links that have changed or been removed over time. You can manage redirection rules on your Platform.sh projects in two different ways, which we describe here. If neither of these options satisfy your redirection needs, you can still implement redirects directly from within your application, which if implemented with the appropriate caching headers would be almost as efficient as using the configuration options provided by Platform.sh. ##### Whole-route redirects Using whole-route redirects, you can define very basic routes in your [`.platform/routes.yaml`](https://docs.platform.sh/define-routes.md) file whose sole purpose is to redirect. A typical use case for this type of route is adding or removing a `www.` prefix to your domain, as the following example shows: ```yaml {location=".platform/routes.yaml"} https://{default}/: type: redirect to: https://www.{default}/ ``` The default HTTP status code for Whole-route redirects is `301`. See [Specify a HTTP status code](#specify-a-http-status-code) to change the status code that is used. ##### Partial redirects In the [`.platform/routes.yaml`](https://docs.platform.sh/define-routes.md) file you can also add partial redirect rules to existing routes: ```yaml {location=".platform/routes.yaml"} https://{default}/: # ... redirects: expires: 1d paths: '/from': to: 'https://example.com/' '^/foo/(.*)/bar': to: 'https://example.com/$1' regexp: true ``` This format is richer and works with any type of route, including routes served directly by the application. The default HTTP status code for partial redirects is `302`. See [Specify a HTTP status code](#specify-a-http-status-code) to change the status code that is used. Two keys are available under `redirects`: | Key | Required | Description | | ------------------ | -------- | ----------- | | `expires` | No | The duration the redirect is cached. Examples of valid values include `3600s`, `1d`, `2w`, `3m`. To disable caching for all your redirects, set `expires` to `0`. You can also [disable caching on a specific redirect](#disable-caching-on-your-redirects). | | `paths` | Yes | The paths to be redirected | Each rule under `paths` is defined by a key describing: - The expression to match against the request path - A value object describing both the destination to redirect to, with detail on how to handle the redirection The value object is defined with the following keys: | Key | Required | Default |Description | | ------------------ | -------- | ----------- | ------------- | | `to` | Yes | n/a | A relative URL - `'/destination'`, or absolute URL - `'https://example.com/'`. | | `regexp` | No | `false` | Specifies whether the path key should be interpreted as a PCRE regular expression. If you use a capturing group, the replace field (`$1`) has to come after a slash (`/`). [More information](#redirects-using-regular-expressions).| | `prefix` | No | `true`, but not supported if `regexp` is `true` | Specifies whether both the path and all its children or just the path itself should be redirected. [More information](#redirects-using-prefix-and-append_suffix).| | `append_suffix` | No | `true`, but not supported if `regexp` is `true` or if `prefix` is `false` | Determines if the suffix is carried over with the redirect. [More information](#redirects-using-prefix-and-append_suffix).| | `code` | No | n/a | HTTP status code. Valid status codes are `301`, `302`, `307`, and `308`. Defaults to `302` for [Partial redirects](#partial-redirects), and `301` for [Whole-route redirects](#whole-route-redirects). [More information](#specify-a-http-status-code). | | `expires` | No | Defaults to the `expires` value defined directly under the `redirects` key, but can be fine-tuned. To [disable caching on a specific redirect](#disable-caching-on-your-redirects), set `expires` to `0`. | The duration the redirect is cached for. [More information](#manage-caching). To set up partial redirects, you can use regular expressions (`regexp`). Alternatively, and in many cases, you can use the `prefix` and/or `append_suffix` keys to achieve the same results. Here are some examples to illustrate this and help you choose a method for your partial redirects: It achieves the same result as this basic redirect: ```yaml {} '/from': to: https://example.com/to ``` Consider this redirect using ``prefix``: ```yaml {} '/from': to: https//example.com/to prefix: false ``` It achieves the same result as this ``regexp`` redirect: ```yaml {} '^/from$': regexp: true to: https://example.com/to ``` Consider this redirect using ``append_suffix``: ```yaml {} '/from': to: https//example.com/to append_suffix: false ``` It achieves the same result as this ``regexp`` redirect: ```yaml {} '^/from(/.*|)$': regexp: true to: https://example.com/to ``` **Warning**: If you’re using ``regexp`` in a redirect, you can’t also use ``prefix`` and ``append_suffix``. Likewise, if you’re using ``prefix`` and ``append_suffix``, you can’t also use ``regexp``. ###### Redirects using regular expressions You can use regular expressions to configure your redirects. In the following example, a request to `https://example.com/foo/a/b/c/bar` redirects to `https://example.com/a/b/c`: ```yaml {location=".platform/routes.yaml"} https://{default}/: type: upstream # ... redirects: paths: '^/foo/(.*)/bar': to: 'https://example.com/$1' regexp: true ``` The following special arguments in the `to` statement are available when `regexp` is set to `true`: - `$is_args` evaluates to `?` or empty string - `$args` evaluates to the full query string if any - `$arg_foo` evaluates to the value of the query parameter `foo` - `$uri` evaluates to the full URI of the request. ###### Redirects using `prefix` and `append_suffix` Instead of using regular expressions to configure your redirects, you might want to use the `prefix` and `append_suffix` keys. **Warning**: If you’re using ``regexp`` in a redirect, you can’t also use ``prefix`` and ``append_suffix``. Likewise, if you’re using ``prefix`` and ``append_suffix``, you can’t also use ``regexp``. When set to `true`, which is their default value, `prefix` and `append_suffix` are equivalent. For example: ```yaml {location=".platform/routes.yaml"} https://{default}/: type: upstream # ... redirects: paths: '/from': to: 'https://{default}/to' prefix: true ``` ```yaml {location=".platform/routes.yaml"} https://{default}/: type: upstream # ... redirects: paths: '/from': to: 'https://{default}/to' append_suffix: true ``` With both configurations: - `/from` redirects to `/to` - `/from/some/path` redirects to `/to/some/path` However, when set to `false`, `prefix` and `append_suffix` behave differently. For example, with the following configuration: ```yaml {location=".platform/routes.yaml"} https://{default}/: type: upstream # ... redirects: paths: '/from': to: 'https://{default}/to' prefix: false ``` A request to `/from/` redirects to `/to/some/path`, but a request to `/from/some/path` does not. And with the following configuration: ```yaml {location=".platform/routes.yaml"} https://{default}/: type: upstream # ... redirects: paths: '/from': to: 'https://{default}/to' append_suffix: false ``` A request to `/from/some/path` (and any path after `/from`) redirects to just `/to`. ###### Specify a HTTP status code To set a specific HTTP status code for your redirect, use the `code` key: ```yaml {location=".platform/routes.yaml"} https://{default}/: type: upstream # ... redirects: paths: '/from': to: 'https://example.com/' code: 308 '/here': to: 'https://example.com/there' ``` In this example, redirects from `/from` use a `308` HTTP status code, while redirects from `/here` default to `302` ("found", as long as the resource is indeed found as a result from the redirect). ###### Manage caching You can [set an expiration time on your redirects](#set-an-expiration-time-on-your-redirects) or even [disable caching](#disable-caching-on-your-redirects) on them. ####### Set an expiration time on your redirects You can specify how long you want your redirects to be cached for. To do so, use the `expires` key under the `redirects` key. In the following example, all redirects are cached for two weeks: ```yaml {location=".platform/routes.yaml"} https://{default}/: type: upstream # ... redirects: expires: 2w paths: '/from': to: 'https://example.com/' '/here': to: 'https://example.com/there' ``` If you want to set a different expiration time for a specific redirect, use the same `expires` key, but under the `paths` key. In the following example: - The first redirect uses the default expiration time set on all redirects and is cached for two weeks - The second redirect ignores the default expiration time set on all redirects, and is cached for three days instead ```yaml {location=".platform/routes.yaml"} https://{default}/: type: upstream # ... redirects: expires: 2w paths: '/from': to: 'https://example.com/' '/here': to: 'https://example.com/there' expires: 3d ``` **Note**: You can set an expiration time on a specific redirect (under the ``paths`` key) even if you haven’t defined a default expiration time on all your redirects (under the ``redirects`` key). The expiration time you set on a specific redirect (under the ``paths`` key) overwrites any default expiration time you may have set on all your redirects (under the ``redirects`` key). ####### Disable caching on your redirects To disable caching on all your redirects, set the `expires` key to `0` under the `redirects` key: ```yaml {location=".platform/routes.yaml"} https://{default}/: type: upstream # ... redirects: expires: 0 paths: '/from': to: 'https://example.com/' '/here': to: 'https://example.com/there' ``` To disable caching on a specific redirect only, set the `expires` key to `0` under the relevant path in the `paths` section. In the following example, caching is disabled on the second redirect only: ```yaml {location=".platform/routes.yaml"} https://{default}/: type: upstream # ... redirects: paths: '/from': to: 'https://example.com/' '/here': to: 'https://example.com/there' expires: 0 ``` ##### Other redirects ###### Application-driven redirects If neither whole-route or partial redirects satisfy your redirection needs, you can still implement redirects directly in your application. If sent with the appropriate caching headers, this is nearly as efficient as implementing the redirect through one of the two configurations described above. Implementing application-driven redirects depends on your own code or framework and is beyond the scope of this documentation. ###### Query-strings based redirects Platform.sh **does not** support redirects based on query strings. If you want to redirect based on query strings, this logic has to be implemented by your application. ### C#/.NET Core Platform.sh supports deploying .NET applications by allowing developers to define a build process and pass its variables to the .NET Core build environment. ##### Supported versions You can select the major and minor version. Patch versions are applied periodically for bug fixes and the like. When you deploy your app, you always get the latest available patches. | Grid and Dedicated Gen 3 | Dedicated Gen 2 | | - 7.0 - 6.0 - 8.0 None available ###### Specify the language To use .Net Core, specify `dotnet` as your [app's `type`](https://docs.platform.sh/create-apps/app-reference/single-runtime-image.md#types): ```yaml {location=".platform.app.yaml"} type: 'dotnet:' ``` For example: ```yaml {location=".platform.app.yaml"} type: 'dotnet:8.0' ``` ##### Building the application To build basic applications in .NET containers, it's enough to use the [`dotnet publish` command](https://docs.microsoft.com/en-us/dotnet/core/tools/dotnet-publish) with the default [framework-dependent deployment](https://docs.microsoft.com/en-us/dotnet/core/deploying/#publish-framework-dependent): ```yaml {location=".platform.app.yaml"} hooks: build: | set -xe dotnet publish --output "$PLATFORM_OUTPUT_DIR" \ -p:UseRazorBuildServer=false \ -p:UseSharedCompilation=false ``` where `PLATFORM_OUTPUT_DIR` is the output directory for compiled languages available at build time. Typically, .NET Core builds start a collection of build servers, which are helpful for repeated builds. On Platform.sh, however, if this process isn't disabled, the build process doesn't finish until the idle timeout is reached. As a result, you should include `-p` toggles that disable the Razor compiler for dynamic CSHTML pages (`UseRazorBuildServer`) and the .NET MSBuild compiler (`UseSharedCompilation`). If you want multiple builds for your application, make sure to call `dotnet build-server shutdown` at the end of your build hook. ##### Running the application .NET Core applications should be started using the `web.commands.start` directive in `.platform.app.yaml`. This ensures that the command starts at the right moment and stops gracefully when a redeployment needs to be executed. Also, should the program terminate for any reason, it's automatically restarted. Note that the start command _must_ run in the foreground. Incoming requests are passed to the application using either a TCP (default) or Unix socket. The application must use the [appropriate environment variable](https://docs.platform.sh/create-apps/app-reference/single-runtime-image.md#where-to-listen) to determine the URI to listen on. For a TCP socket ([recommended](https://go.microsoft.com/fwlink/?linkid=874850)), the application must listen on `http://127.0.0.1`, using the `PORT` environment variable. There is an Nginx server sitting in front of your application. Serving static content via Nginx is recommended, as this allows you to control headers (including cache headers) and also has marginal performance benefits. Note that HTTPS is also terminated at the Nginx proxy, so the `app.UseHttpsRedirection();` line in `Startup.cs` should be removed. To force HTTPS-only, refer to the [routes documentation](https://docs.platform.sh/define-routes/https.md#enable-https). The following example configures an environment to serve the static content folders commonly found in [ASP.NET MVC](https://dotnet.microsoft.com/apps/aspnet/mvc) templates using Nginx, while routing other traffic to the .NET application. ```yaml {location=".platform.app.yaml"} web: locations: "/": root: "wwwroot" allow: true passthru: true rules: # Serve these common asset types with customs cache headers. \.(jpe?g|png|gif|svgz?|css|js|map|ico|bmp|eot|woff2?|otf|ttf)$: allow: true expires: 300s commands: start: "dotnet WebApplication1.dll" ``` You can also route all requests to the application unconditionally: ```yaml {location=".platform.app.yaml"} web: locations: "/": allow: false passthru: true commands: start: "dotnet WebApplication1.dll" ``` ##### Project templates The following list shows templates available for .NET Core apps. A template is a starting point for building your project. It should help you get a project ready for production. Templates in development. ### Elixir p:last-child]:mb-0 [&>h3]:mt-0 rounded-lg" > ###### Note You can now use composable image (BETA) to install runtimes and tools in your application container. To find out more, see the [dedicated documentation page](https://docs.platform.sh/create-apps/app-reference/composable-image.md). Platform.sh supports building and deploying applications written in Elixir. There is no default flavor for the build phase, but you can define it explicitly in your build hook. Platform.sh Elixir images support both committed dependencies and download-on-demand. The underlying Erlang version is 22.0.7. ##### Supported versions You can select the major and minor version. Patch versions are applied periodically for bug fixes and the like. When you deploy your app, you always get the latest available patches. | Grid and Dedicated Gen 3 | Dedicated Gen 2 | | - 1.18 - 1.15 - 1.14 None available ###### Specify the language To use Elixir, specify `elixir` as your [app's `type`](https://docs.platform.sh/create-apps/app-reference/single-runtime-image.md#types): ```yaml {location=".platform/applications.yaml"} myapp: type: 'elixir:' ``` For example: ```yaml {location=".platform/applications.yaml"} myapp: type: 'elixir:1.18' ``` ##### Built-in variables Platform.sh exposes relationships and other configuration as [environment variables](https://docs.platform.sh/development/variables.md). Most notably, it allows a program to determine at runtime what HTTP port it should listen on and what the credentials are to access [other services](https://docs.platform.sh/add-services.md). To get the `PORT` environment variable (the port on which your web application is supposed to listen) you would: ```elixir String.to_integer(System.get_env("PORT") || "8888") ``` Some of the environment variables are in JSON format and are base64 encoded. You would need to import a JSON parsing library such as [JSON](https://hexdocs.pm/json/readme.md) or [Poison](https://hexdocs.pm/poison/api-reference.md) to read those. (There is an example for doing this to decode the `PLATFORM_RELATIONSHIPS` environment variable in the section [below](#accessing-services-manually).) **Tip**: Remember ``config/prod.exs`` is evaluated at **build time** and has no access to runtime configuration. Use ``config/releases.exs`` to configure your runtime environment. ##### Building and running the application If you are using Hex to manage your dependencies, you need to specify the `MIX_ENV` environment variable: ```yaml {location=".platform.app.yaml"} variables: env: MIX_ENV: 'prod' ``` The `SECRET_KEY_BASE` variable is generated automatically based on the [`PLATFORM_PROJECT_ENTROPY` variable](https://docs.platform.sh/development/variables/use-variables.md#use-provided-variables). You can change it. Include in your build hook the steps to retrieve a local Hex and `rebar`, and then run `mix do deps.get, deps.compile, compile` on your application to build a binary. ```yaml {location=".platform.app.yaml"} hooks: build: | mix local.hex --force mix local.rebar --force mix do deps.get --only prod, deps.compile, compile ``` **Note**: That build hook works for most cases and assumes that your ``mix.exs`` file is located at [your app root](https://docs.platform.sh/create-apps/app-reference/single-runtime-image.md#root-directory). Assuming `mix.exs` is present at your app root and your build hook matches the above, you can then start it from the `web.commands.start` directive. The following basic app configuration is sufficient to run most Elixir applications. ```yaml {location=".platform.app.yaml"} name: myapp type: 'elixir:1.18' variables: env: MIX_ENV: 'prod' hooks: build: | mix local.hex --force mix local.rebar --force mix do deps.get --only prod, deps.compile, compile web: commands: start: mix phx.server locations: /: allow: false passthru: true ``` Note that there is still an Nginx proxy server sitting in front of your application. If desired, certain paths may be served directly by Nginx without hitting your application (for static files, primarily) or you may route all requests to the Elixir application unconditionally, as in the example above. ##### Dependencies The recommended way to handle Elixir dependencies on Platform.sh is using Hex. You can commit a `mix.exs` file in your repository and the system downloads the dependencies in your `deps` section using the build hook above. ```elixir defp deps do [ {:platformshconfig, "~> 0.1.0"} ] end ``` ##### Accessing Services You can get all information about a deployed environment, including how to connect to services, through [environment variables](https://docs.platform.sh/development/variables.md). Your app can [access these variables](https://docs.platform.sh/development/variables/use-variables.md#access-variables-in-your-app). If you are building a Phoenix app for example, it would suffice to add a database to `.platform/services.yaml` and a relationship in `.platform.app.yaml`. Put the lib in your `deps` and, assuming you renamed the `prod.secret.exs` to `releases.exs` per the [Phoenix guide](https://hexdocs.pm/phoenix/releases.md), change: ```elixir System.get_env("DATABASE_URL") ``` to ```elixir Platformsh.Config.ecto_dsn_formatter("database") ``` See [Config Reader Documentation](https://docs.platform.sh/development/variables/use-variables.md#access-variables-in-your-app) for the full API. ###### Accessing Services Manually The services configuration is available in the environment variable `PLATFORM_RELATIONSHIPS`. Given a [relationship](https://docs.platform.sh/create-apps/app-reference/single-runtime-image.md#relationships) defined in `.platform.app.yaml`: ```yaml {location=".platform.app.yaml"} # Relationships enable an app container's access to a service. # The example below shows simplified configuration leveraging a default service # (identified from the relationship name) and a default endpoint. # See the Application reference for all options for defining relationships and endpoints. relationships: postgresql: ``` Assuming you have in `mix.exs` the Poison library to parse JSON: ```elixir defp deps do [ {:poison, "~> 3.0"} ] end ``` And assuming you use `ecto` you could put in `config/config.exs`: ```elixir relationships = Poison.decode!(Base.decode64!(System.get_env("PLATFORM_RELATIONSHIPS"))) [postgresql_config | _tail] = relationships["postgresql"] config :my_app, Repo, database: postgresql_config["path"], username: postgresql_config["username"], password: postgresql_config["password"], hostname: postgresql_config["host"] ``` and setup Ecto during the deploy hook: ```yaml {location=".platform.app.yaml"} hooks: deploy: | mix do ecto.setup ``` ###### Configuration reader While you can read the environment directly from your app, you might want to use the[ Elixir configuration reader library](https://github.com/platformsh/config-reader-elixir/). It decodes service credentials, the correct port, and other information for you. ### Go p:last-child]:mb-0 [&>h3]:mt-0 rounded-lg" > ###### Note You can now use composable image (BETA) to install runtimes and tools in your application container. To find out more, see the [dedicated documentation page](https://docs.platform.sh/create-apps/app-reference/composable-image.md). Platform.sh supports building and deploying applications written in Go using Go modules. They’re compiled during the Build hook phase, and support both committed dependencies and download-on-demand. ##### Supported versions You can select the major and minor version. Patch versions are applied periodically for bug fixes and the like. When you deploy your app, you always get the latest available patches. | Grid | Dedicated Gen 3 | Dedicated Gen 2 | | - 1.23 - 1.22 - 1.21 - 1.20 None available None available ###### Specify the language To use Go, specify `golang` as your [app's `type`](https://docs.platform.sh/create-apps/app-reference/single-runtime-image.md#types): ```yaml {location=".platform.app.yaml"} type: 'golang:' ``` For example: ```yaml {location=".platform.app.yaml"} type: 'golang:1.23' ``` ###### Deprecated versions The following versions are [deprecated](https://docs.platform.sh/glossary.md#deprecated-versions). They're available, but they aren't receiving security updates from upstream and aren't guaranteed to work. They'll be removed in the future, so migrate to one of the [supported versions](#supported-versions). - 1.19 - 1.18 - 1.17 - 1.16 - 1.15 - 1.14 - 1.13 - 1.12 - 1.11 - 1.10 - 1.9 - 1.8 ##### Go toolchain auto download Even though you select a specific version of Go, starting in Go 1.21, the `go` command will automatically download and use a different toolchain version as requested by the `toolchain` directive in `go.mod`, or the `GOTOOLCHAIN` environmental variable (see [Go Toolchains](https://go.dev/doc/toolchain)). **Note**: Still, it is important to keep your chosen version of Go updated in your yaml configuration file. This will ensure that you are using the most up to date software for your projects. ##### Go modules The recommended way to handle Go dependencies on Platform.sh is using Go module support in Go 1.11 and later. That allows the build process to use `go build` directly without any extra steps, and you can specify an output executable file of your choice. (See the examples below.) ##### Building and running the application Assuming your `go.mod` and `go.sum` files are present in your repository, your application can be built with the command `go build`, to produce a working executable. You can then start it from the `web.commands.start` directive. Note that the start command _must_ run in the foreground. If the program terminates for any reason it is automatically restarted. The following basic `.platform.app.yaml` file is sufficient to run most Go applications. ```yaml {location=".platform.app.yaml"} name: myapp type: golang:1.14 hooks: build: | # Modify this line if you want to build differently or use an alternate name for your executable. go build -o bin/app web: upstream: socket_family: tcp protocol: http commands: # If you change the build output in the build hook above, update this line as well. start: ./bin/app locations: /: # Route all requests to the Go app, unconditionally. allow: false passthru: true disk: 1024 ``` Note that there is still an Nginx proxy server sitting in front of your application. If desired, certain paths may be served directly by Nginx without hitting your application (for static files, primarily) or you may route all requests to the Go application unconditionally, as in the example above. ##### Accessing services To access various [services](https://docs.platform.sh/add-services.md) with Go, see the following examples. The individual service pages have more information on configuring each service. ```golang {} package examples import ( "context" "fmt" psh "github.com/platformsh/config-reader-go/v2" mongoPsh "github.com/platformsh/config-reader-go/v2/mongo" "go.mongodb.org/mongo-driver/bson" "go.mongodb.org/mongo-driver/mongo" "go.mongodb.org/mongo-driver/mongo/options" "time" ) func UsageExampleMongoDB() string { // Create a NewRuntimeConfig object to ease reading the Platform.sh environment variables. // You can alternatively use os.Getenv() yourself. config, err := psh.NewRuntimeConfig() checkErr(err) // Get the credentials to connect to the Solr service. credentials, err := config.Credentials("mongodb") checkErr(err) // Retrieve the formatted credentials for mongo-driver. formatted, err := mongoPsh.FormattedCredentials(credentials) checkErr(err) // Connect to MongoDB using the formatted credentials. ctx, _ := context.WithTimeout(context.Background(), 10*time.Second) client, err := mongo.Connect(ctx, options.Client().ApplyURI(formatted)) checkErr(err) // Create a new collection. collection := client.Database("main").Collection("starwars") // Clean up after ourselves. err = collection.Drop(context.Background()) checkErr(err) // Create an entry. res, err := collection.InsertOne(ctx, bson.M{"name": "Rey", "occupation": "Jedi"}) checkErr(err) id := res.InsertedID // Read it back. cursor, err := collection.Find(context.Background(), bson.M{"_id": id}) checkErr(err) var name string var occupation string for cursor.Next(context.Background()) { document := struct { Name string Occupation string }{} err := cursor.Decode(&document) checkErr(err) name = document.Name occupation = document.Occupation } return fmt.Sprintf("Found %s (%s)", name, occupation) } ``` ```golang {} package examples import ( "database/sql" "fmt" _ "github.com/go-sql-driver/mysql" psh "github.com/platformsh/config-reader-go/v2" sqldsn "github.com/platformsh/config-reader-go/v2/sqldsn" ) func UsageExampleMySQL() string { // Create a NewRuntimeConfig object to ease reading the Platform.sh environment variables. // You can alternatively use os.Getenv() yourself. config, err := psh.NewRuntimeConfig() checkErr(err) // The 'database' relationship is generally the name of the primary SQL database of an application. // That's not required, but much of our default automation code assumes it. credentials, err := config.Credentials("database") checkErr(err) // Using the sqldsn formatted credentials package. formatted, err := sqldsn.FormattedCredentials(credentials) checkErr(err) db, err := sql.Open("mysql", formatted) checkErr(err) defer db.Close() // Force MySQL into modern mode. db.Exec("SET NAMES=utf8") db.Exec("SET sql_mode = 'ANSI,STRICT_TRANS_TABLES,STRICT_ALL_TABLES," + "NO_ZERO_IN_DATE,NO_ZERO_DATE,ERROR_FOR_DIVISION_BY_ZERO," + "NO_AUTO_CREATE_USER,ONLY_FULL_GROUP_BY'") // Creating a table. sqlCreate := "CREATE TABLE IF NOT EXISTS People (" + "id INT(6) UNSIGNED AUTO_INCREMENT PRIMARY KEY," + "name VARCHAR(30) NOT NULL," + "city VARCHAR(30) NOT NULL)" _, err = db.Exec(sqlCreate) checkErr(err) // Insert data. sqlInsert := "INSERT INTO People (name, city) VALUES" + "('Neil Armstrong', 'Moon')," + "('Buzz Aldrin', 'Glen Ridge')," + "('Sally Ride', 'La Jolla');" _, err = db.Exec(sqlInsert) checkErr(err) table := "" + "" + "" + "" + "" var id int var name string var city string rows, err := db.Query("SELECT * FROM People") if err != nil { panic(err) } else { for rows.Next() { err = rows.Scan(&id, &name, &city) checkErr(err) table += fmt.Sprintf("\n", name, city) } table += "\n
NameCity
%s%s
\n" } _, err = db.Exec("DROP TABLE People;") checkErr(err) return table } ``` ```golang {} package examples import ( "database/sql" "fmt" _ "github.com/lib/pq" psh "github.com/platformsh/config-reader-go/v2" libpq "github.com/platformsh/config-reader-go/v2/libpq" ) func UsageExamplePostgreSQL() string { // Create a NewRuntimeConfig object to ease reading the Platform.sh environment variables. // You can alternatively use os.Getenv() yourself. config, err := psh.NewRuntimeConfig() checkErr(err) // The 'database' relationship is generally the name of the primary SQL database of an application. // It could be anything, though, as in the case here where it's called "postgresql". credentials, err := config.Credentials("postgresql") checkErr(err) // Retrieve the formatted credentials. formatted, err := libpq.FormattedCredentials(credentials) checkErr(err) // Connect. db, err := sql.Open("postgres", formatted) checkErr(err) defer db.Close() // Creating a table. sqlCreate := "CREATE TABLE IF NOT EXISTS PeopleGo (" + "id SERIAL PRIMARY KEY," + "name VARCHAR(30) NOT NULL," + "city VARCHAR(30) NOT NULL);" _, err = db.Exec(sqlCreate) checkErr(err) // Insert data. sqlInsert := "INSERT INTO PeopleGo(name, city) VALUES" + "('Neil Armstrong', 'Moon')," + "('Buzz Aldrin', 'Glen Ridge')," + "('Sally Ride', 'La Jolla');" _, err = db.Exec(sqlInsert) checkErr(err) table := "" + "" + "" + "" + "" var id int var name string var city string // Read it back. rows, err := db.Query("SELECT * FROM PeopleGo") if err != nil { panic(err) } else { for rows.Next() { err = rows.Scan(&id, &name, &city) checkErr(err) table += fmt.Sprintf("\n", name, city) } table += "\n
NameCity
%s%s
\n" } _, err = db.Exec("DROP TABLE PeopleGo;") checkErr(err) return table } ``` ```golang {} package examples import ( "fmt" psh "github.com/platformsh/config-reader-go/v2" amqpPsh "github.com/platformsh/config-reader-go/v2/amqp" "github.com/streadway/amqp" "sync" ) func UsageExampleRabbitMQ() string { // Create a NewRuntimeConfig object to ease reading the Platform.sh environment variables. // You can alternatively use os.Getenv() yourself. config, err := psh.NewRuntimeConfig() checkErr(err) // Get the credentials to connect to RabbitMQ. credentials, err := config.Credentials("rabbitmq") checkErr(err) // Use the amqp formatted credentials package. formatted, err := amqpPsh.FormattedCredentials(credentials) checkErr(err) // Connect to the RabbitMQ server. connection, err := amqp.Dial(formatted) checkErr(err) defer connection.Close() // Make a channel. channel, err := connection.Channel() checkErr(err) defer channel.Close() // Create a queue. q, err := channel.QueueDeclare( "deploy_days", // name false, // durable false, // delete when unused false, // exclusive false, // no-wait nil, // arguments ) body := "Friday" msg := fmt.Sprintf("Deploying on %s", body) // Publish a message. err = channel.Publish( "", // exchange q.Name, // routing key false, // mandatory false, // immediate amqp.Publishing{ ContentType: "text/plain", Body: []byte(msg), }) checkErr(err) outputMSG := fmt.Sprintf("[x] Sent '%s'
", body) // Consume the message. msgs, err := channel.Consume( q.Name, // queue "", // consumer true, // auto-ack false, // exclusive false, // no-local false, // no-wait nil, // args ) checkErr(err) var received string var wg sync.WaitGroup wg.Add(1) go func() { for d := range msgs { received = fmt.Sprintf("[x] Received message: '%s'
", d.Body) wg.Done() } }() wg.Wait() outputMSG += received return outputMSG } ``` ```golang {} package examples import ( "fmt" psh "github.com/platformsh/config-reader-go/v2" gosolr "github.com/platformsh/config-reader-go/v2/gosolr" solr "github.com/rtt/Go-Solr" ) func UsageExampleSolr() string { // Create a NewRuntimeConfig object to ease reading the Platform.sh environment variables. // You can alternatively use os.Getenv() yourself. config, err := psh.NewRuntimeConfig() checkErr(err) // Get the credentials to connect to the Solr service. credentials, err := config.Credentials("solr") checkErr(err) // Retrieve Solr formatted credentials. formatted, err := gosolr.FormattedCredentials(credentials) checkErr(err) // Connect to Solr using the formatted credentials. connection := &solr.Connection{URL: formatted} // Add a document and commit the operation. docAdd := map[string]interface{}{ "add": []interface{}{ map[string]interface{}{"id": 123, "name": "Valentina Tereshkova"}, }, } respAdd, err := connection.Update(docAdd, true) checkErr(err) // Select the document. q := &solr.Query{ Params: solr.URLParamMap{ "q": []string{"id:123"}, }, } resSelect, err := connection.CustomSelect(q, "query") checkErr(err) // Delete the document and commit the operation. docDelete := map[string]interface{}{ "delete": map[string]interface{}{ "id": 123, }, } resDel, err := connection.Update(docDelete, true) checkErr(err) message := fmt.Sprintf("Adding one document - %s
"+ "Selecting document (1 expected): %d
"+ "Deleting document - %s
", respAdd, resSelect.Results.NumFound, resDel) return message } ``` You can get all information about a deployed environment, including how to connect to services, through [environment variables](https://docs.platform.sh/development/variables.md). Your app can [access these variables](https://docs.platform.sh/development/variables/use-variables.md#access-variables-in-your-app). You can also use the library to read other environment variables. ```go package main import ( _ "github.com/go-sql-driver/mysql" psh "github.com/platformsh/gohelper" "net/http" ) func main() { p, err := psh.NewPlatformInfo() if err != nil { panic("Not in a Platform.sh Environment.") } http.HandleFunc("/bar", func(w http.ResponseWriter, r *http.Request) { // ... }) http.ListenAndServe(":"+p.Port, nil) } ``` ###### Configuration reader While you can read the environment directly from your app, you might want to use the [Go configuration reader library](https://github.com/platformsh/config-reader-go/). It decodes service credentials, the correct port, and other information for you. ##### Project templates The following list shows templates available for Go apps. A template is a starting point for building your project. It should help you get a project ready for production. Echo ![Echo](data:image/svg+xml;base64,PHN2ZyB3aWR0aD0iMjQiIGhlaWdodD0iMjQiIHZpZXdCb3g9IjAgMCAyNCAyNCIgZmlsbD0ibm9uZSIgeG1sbnM9Imh0dHA6Ly93d3cudzMub3JnLzIwMDAvc3ZnIj4KPHBhdGggZD0iTTE4LjI3NjYgMjEuNzE1NUwxNi42ODU2IDIwLjEyNDVMMTUuNjI1MSAyMS4xODVMMTcuMjE2MSAyMi43NzZDMTcuNTA5MSAyMy4wNjkgMTcuOTg0MSAyMy4wNjkgMTguMjc2NiAyMi43NzZDMTguNTY5MSAyMi40ODMgMTguNTY5NiAyMi4wMDg1IDE4LjI3NjYgMjEuNzE1NVoiIGZpbGw9IiNGRkNDODAiLz4KPHBhdGggZD0iTTE5Ljc3NjYgMTIuNzE1NUwxOC4xODU2IDExLjEyNDVMMTcuMTI1MSAxMi4xODVMMTguNzE2MSAxMy43NzZDMTkuMDA5MSAxNC4wNjkgMTkuNDg0MSAxNC4wNjkgMTkuNzc2NiAxMy43NzZDMjAuMDY5MSAxMy40ODMgMjAuMDY5NiAxMy4wMDg1IDE5Ljc3NjYgMTIuNzE1NVoiIGZpbGw9IiNGRkNDODAiLz4KPHBhdGggZD0iTTYuODQ0NTYgMjEuNzE1NUw4LjQzNTU2IDIwLjEyNDVMOS40OTYwNiAyMS4xODVMNy45MDUwNiAyMi43NzZDNy42MTIwNiAyMy4wNjkgNy4xMzcwNiAyMy4wNjkgNi44NDQ1NiAyMi43NzZDNi41NTIwNiAyMi40ODMgNi41NTE1NiAyMi4wMDg1IDYuODQ0NTYgMjEuNzE1NVoiIGZpbGw9IiNGRkNDODAiLz4KPHBhdGggZD0iTTUuMjE5NTYgMTIuNzE1NUw2LjgxMDU2IDExLjEyNDVMNy44NzEwNiAxMi4xODVMNi4yODAwNiAxMy43NzZDNS45ODcwNiAxNC4wNjkgNS41MTIwNiAxNC4wNjkgNS4yMTk1NiAxMy43NzZDNC45MjcwNiAxMy40ODMgNC45MjY1NiAxMy4wMDg1IDUuMjE5NTYgMTIuNzE1NVoiIGZpbGw9IiNGRkNDODAiLz4KPHBhdGggZD0iTTE5LjUwMzEgNC41QzE5LjUwMzEgMy41MzM1IDE4LjkyODYgMyAxNy44ODc2IDNDMTYuODQ2NiAzIDE2LjAwMzEgNC4yODM1IDE2LjAwMzEgNS4yNUMxNi4wMDMxIDUuNzUgMTYuOTY0NiA2IDE3LjUwMzEgNkMxOC41NDQxIDYgMTkuNTAzMSA1LjQ2NjUgMTkuNTAzMSA0LjVaIiBmaWxsPSIjNEREMEUxIi8+CjxwYXRoIGQ9Ik01LjUwMzA1IDQuNUM1LjUwMzA1IDMuNTMzNSA2LjA3NzU1IDMgNy4xMTg1NSAzQzguMTU5NTUgMyA5LjAwMzA1IDQuMjgzNSA5LjAwMzA1IDUuMjVDOS4wMDMwNSA1Ljc1IDguMDQxNTUgNiA3LjUwMzA1IDZDNi40NjIwNSA2IDUuNTAzMDUgNS40NjY1IDUuNTAzMDUgNC41WiIgZmlsbD0iIzRERDBFMSIvPgo8cGF0aCBkPSJNMTguMDAzMSA1QzE4LjI3OTIgNSAxOC41MDMxIDQuNzc2MTQgMTguNTAzMSA0LjVDMTguNTAzMSA0LjIyMzg2IDE4LjI3OTIgNCAxOC4wMDMxIDRDMTcuNzI2OSA0IDE3LjUwMzEgNC4yMjM4NiAxNy41MDMxIDQuNUMxNy41MDMxIDQuNzc2MTQgMTcuNzI2OSA1IDE4LjAwMzEgNVoiIGZpbGw9IiM0MjQyNDIiLz4KPHBhdGggZD0iTTcuMDAzMDUgNUM3LjI3OTE5IDUgNy41MDMwNSA0Ljc3NjE0IDcuNTAzMDUgNC41QzcuNTAzMDUgNC4yMjM4NiA3LjI3OTE5IDQgNy4wMDMwNSA0QzYuNzI2OTEgNCA2LjUwMzA1IDQuMjIzODYgNi41MDMwNSA0LjVDNi41MDMwNSA0Ljc3NjE0IDYuNzI2OTEgNSA3LjAwMzA1IDVaIiBmaWxsPSIjNDI0MjQyIi8+CjxwYXRoIGQ9Ik0xOS4wMDMxIDE3LjVDMTkuMDAzMSAxOS44ODcgMTcuMzkzNiAyMi41IDEyLjM0ODEgMjIuNUM4LjI4NzA1IDIyLjUgNi4wMDMwNSAxOS44ODcgNi4wMDMwNSAxNy41QzYuMDAzMDUgMTUgNi41MDMwNSAxNC41OTcgNi41MDMwNSAxMi41QzYuNTAzMDUgMTAuMTU2IDYuNTAzMDUgOSA2LjUwMzA1IDcuNUM2LjUwMzA1IDUuMTEzIDguMDQxMDUgMiAxMi4zNDgxIDJDMTYuNjU1MSAyIDE4LjUwMzEgMy45OTU1IDE4LjUwMzEgN0MxOC41MDMxIDguNSAxOC4zODQ2IDkuNzI2NSAxOC41MDMxIDEyQzE4LjU5NjEgMTMuNzgxIDE5LjAwMzEgMTYgMTkuMDAzMSAxNy41WiIgZmlsbD0iIzRERDBFMSIvPgo8cGF0aCBkPSJNMTUuMDAzMSA3LjVDMTYuMTA3NiA3LjUgMTcuMDAzMSA2LjYwNDU3IDE3LjAwMzEgNS41QzE3LjAwMzEgNC4zOTU0MyAxNi4xMDc2IDMuNSAxNS4wMDMxIDMuNUMxMy44OTg1IDMuNSAxMy4wMDMxIDQuMzk1NDMgMTMuMDAzMSA1LjVDMTMuMDAzMSA2LjYwNDU3IDEzLjg5ODUgNy41IDE1LjAwMzEgNy41WiIgZmlsbD0iI0Y1RjVGNSIvPgo8cGF0aCBkPSJNMTAuMDAzMSA3LjVDMTEuMTA3NiA3LjUgMTIuMDAzMSA2LjYwNDU3IDEyLjAwMzEgNS41QzEyLjAwMzEgNC4zOTU0MyAxMS4xMDc2IDMuNSAxMC4wMDMxIDMuNUM4Ljg5ODQ4IDMuNSA4LjAwMzA1IDQuMzk1NDMgOC4wMDMwNSA1LjVDOC4wMDMwNSA2LjYwNDU3IDguODk4NDggNy41IDEwLjAwMzEgNy41WiIgZmlsbD0iI0Y1RjVGNSIvPgo8cGF0aCBkPSJNMTIuNTAzMSAxMC41QzEyLjUwMzEgMTAuNzc2IDEyLjcyNzEgMTEgMTMuMDAzMSAxMUMxMy4yNzkxIDExIDEzLjUwMzEgMTAuNzc2IDEzLjUwMzEgMTAuNVY5SDEyLjUwMzFWMTAuNVoiIGZpbGw9IiNFRUVFRUUiLz4KPHBhdGggZD0iTTExLjUwMzEgMTAuNUMxMS41MDMxIDEwLjc3NiAxMS43MjcxIDExIDEyLjAwMzEgMTFDMTIuMjc5MSAxMSAxMi41MDMxIDEwLjc3NiAxMi41MDMxIDEwLjVWOUgxMS41MDMxVjEwLjVaIiBmaWxsPSIjRUVFRUVFIi8+CjxwYXRoIGQ9Ik0xMy43NTMxIDkuNUMxMy41NDcxIDkuNSAxMy40MjY2IDkuNDU3NSAxMy4yNDc2IDkuMzk3NUMxMi43NjAxIDkuMjMzNSAxMi4yMzcxIDkuMjM0NSAxMS43NDk2IDkuMzk4NUMxMS41NzIxIDkuNDU4IDExLjQ1ODEgOS41IDExLjI1MzEgOS41QzEwLjU4NjEgOS41IDEwLjUwMzEgOSAxMC41MDMxIDguNzVDMTAuNTAzMSA4IDExLjI1MzEgNy41IDEyLjAwMzEgNy41QzEyLjQyMDYgNy41IDEyLjU4NTYgNy41IDEzLjAwMzEgNy41QzEzLjc1MzEgNy41IDE0LjUwMzEgOCAxNC41MDMxIDguNzVDMTQuNTAzMSA5IDE0LjQyMDEgOS41IDEzLjc1MzEgOS41WiIgZmlsbD0iI0ZGQ0M4MCIvPgo8cGF0aCBkPSJNMTQuMDAzMSA2QzE0LjI3OTIgNiAxNC41MDMxIDUuNzc2MTQgMTQuNTAzMSA1LjVDMTQuNTAzMSA1LjIyMzg2IDE0LjI3OTIgNSAxNC4wMDMxIDVDMTMuNzI2OSA1IDEzLjUwMzEgNS4yMjM4NiAxMy41MDMxIDUuNUMxMy41MDMxIDUuNzc2MTQgMTMuNzI2OSA2IDE0LjAwMzEgNloiIGZpbGw9IiM0MjQyNDIiLz4KPHBhdGggZD0iTTkuMDAzMDUgNkM5LjI3OTE5IDYgOS41MDMwNSA1Ljc3NjE0IDkuNTAzMDUgNS41QzkuNTAzMDUgNS4yMjM4NiA5LjI3OTE5IDUgOS4wMDMwNSA1QzguNzI2OTEgNSA4LjUwMzA1IDUuMjIzODYgOC41MDMwNSA1LjVDOC41MDMwNSA1Ljc3NjE0IDguNzI2OTEgNiA5LjAwMzA1IDZaIiBmaWxsPSIjNDI0MjQyIi8+CjxwYXRoIGQ9Ik0xMi41MDMxIDhDMTMuMDU1MyA4IDEzLjUwMzEgNy43NzYxNCAxMy41MDMxIDcuNUMxMy41MDMxIDcuMjIzODYgMTMuMDU1MyA3IDEyLjUwMzEgN0MxMS45NTA4IDcgMTEuNTAzMSA3LjIyMzg2IDExLjUwMzEgNy41QzExLjUwMzEgNy43NzYxNCAxMS45NTA4IDggMTIuNTAzMSA4WiIgZmlsbD0iIzQyNDI0MiIvPgo8L3N2Zz4K) Echo This template demonstrates building the Echo framework for Platform.sh using Go modules. It includes a minimalist application skeleton that demonstrates how to connect to a MariaDB server. It is intended for you to use as a starting point and modify for your own needs. Echo is a lightweight, minimalist web framework written in Go. ###### Features: - Go 1.14 - MariaDB 10.4 - Automatic TLS certificates - Git module-based build View the [repository on GitHub](https://github.com/platformsh-templates/echo). ![Deploy on ](https://platform.sh/images/deploy/lg-blue.svg) Gin ![Gin](data:image/svg+xml;base64,PD94bWwgdmVyc2lvbj0iMS4wIiBlbmNvZGluZz0iVVRGLTgiIHN0YW5kYWxvbmU9Im5vIj8+CjwhLS0gQ3JlYXRlZCB3aXRoIElua3NjYXBlIChodHRwOi8vd3d3Lmlua3NjYXBlLm9yZy8pIC0tPgoKPHN2ZwogICB4bWxuczpkYz0iaHR0cDovL3B1cmwub3JnL2RjL2VsZW1lbnRzLzEuMS8iCiAgIHhtbG5zOmNjPSJodHRwOi8vY3JlYXRpdmVjb21tb25zLm9yZy9ucyMiCiAgIHhtbG5zOnJkZj0iaHR0cDovL3d3dy53My5vcmcvMTk5OS8wMi8yMi1yZGYtc3ludGF4LW5zIyIKICAgeG1sbnM6c3ZnPSJodHRwOi8vd3d3LnczLm9yZy8yMDAwL3N2ZyIKICAgeG1sbnM9Imh0dHA6Ly93d3cudzMub3JnLzIwMDAvc3ZnIgogICB4bWxuczpzb2RpcG9kaT0iaHR0cDovL3NvZGlwb2RpLnNvdXJjZWZvcmdlLm5ldC9EVEQvc29kaXBvZGktMC5kdGQiCiAgIHhtbG5zOmlua3NjYXBlPSJodHRwOi8vd3d3Lmlua3NjYXBlLm9yZy9uYW1lc3BhY2VzL2lua3NjYXBlIgogICBpZD0ic3ZnMzM5MCIKICAgdmVyc2lvbj0iMS4xIgogICBpbmtzY2FwZTp2ZXJzaW9uPSIwLjkxIHIxMzcyNSIKICAgd2lkdGg9IjEwMDAiCiAgIGhlaWdodD0iMTQwNiIKICAgdmlld0JveD0iMCAwIDEwMDAgMTQwNiIKICAgc29kaXBvZGk6ZG9jbmFtZT0iY29sb3IyLnN2ZyI+CiAgPG1ldGFkYXRhCiAgICAgaWQ9Im1ldGFkYXRhMzM5NiI+CiAgICA8cmRmOlJERj4KICAgICAgPGNjOldvcmsKICAgICAgICAgcmRmOmFib3V0PSIiPgogICAgICAgIDxkYzpmb3JtYXQ+aW1hZ2Uvc3ZnK3htbDwvZGM6Zm9ybWF0PgogICAgICAgIDxkYzp0eXBlCiAgICAgICAgICAgcmRmOnJlc291cmNlPSJodHRwOi8vcHVybC5vcmcvZGMvZGNtaXR5cGUvU3RpbGxJbWFnZSIgLz4KICAgICAgICA8ZGM6dGl0bGU+PC9kYzp0aXRsZT4KICAgICAgPC9jYzpXb3JrPgogICAgPC9yZGY6UkRGPgogIDwvbWV0YWRhdGE+CiAgPGRlZnMKICAgICBpZD0iZGVmczMzOTQiIC8+CiAgPHNvZGlwb2RpOm5hbWVkdmlldwogICAgIHBhZ2Vjb2xvcj0iI2ZmZmZmZiIKICAgICBib3JkZXJjb2xvcj0iIzY2NjY2NiIKICAgICBib3JkZXJvcGFjaXR5PSIxIgogICAgIG9iamVjdHRvbGVyYW5jZT0iMTAiCiAgICAgZ3JpZHRvbGVyYW5jZT0iMTAiCiAgICAgZ3VpZGV0b2xlcmFuY2U9IjEwIgogICAgIGlua3NjYXBlOnBhZ2VvcGFjaXR5PSIwIgogICAgIGlua3NjYXBlOnBhZ2VzaGFkb3c9IjIiCiAgICAgaW5rc2NhcGU6d2luZG93LXdpZHRoPSIxNDQwIgogICAgIGlua3NjYXBlOndpbmRvdy1oZWlnaHQ9Ijg1MiIKICAgICBpZD0ibmFtZWR2aWV3MzM5MiIKICAgICBzaG93Z3JpZD0iZmFsc2UiCiAgICAgaW5rc2NhcGU6em9vbT0iMC40NjIzMDQ0MSIKICAgICBpbmtzY2FwZTpjeD0iNDQ5LjMxNTk2IgogICAgIGlua3NjYXBlOmN5PSI4MzguNTQ3NTMiCiAgICAgaW5rc2NhcGU6d2luZG93LXg9IjkiCiAgICAgaW5rc2NhcGU6d2luZG93LXk9IjMwIgogICAgIGlua3NjYXBlOndpbmRvdy1tYXhpbWl6ZWQ9IjAiCiAgICAgaW5rc2NhcGU6Y3VycmVudC1sYXllcj0ic3ZnMzM5MCIgLz4KICA8ZwogICAgIGlkPSJnMzUxMSIKICAgICB0cmFuc2Zvcm09InRyYW5zbGF0ZSgtMC4xMzIxMDg0NSwwLjI5NDAwNDMxKSI+CiAgICA8cGF0aAogICAgICAgc3R5bGU9ImZpbGw6I2YzZDcxZCIKICAgICAgIGQ9Im0gNDkyLDE0MDQuODUzMyBjIC0xMTYuNTA5NzUsLTQuOTg1OCAtMTk3LjUxNDY2LC0yMC40Nzk2IC0yNjIuMTYzMiwtNTAuMTQ0MSAtOS40MzY0LC00LjMyOTkgLTguMDIwNzMsLTEuNDMxOSAtMTguMTk3OTksLTM3LjI1NDEgQyAxOTMuOTEzNDYsMTI1NS4wNjUgMTgwLjQ0MDc2LDExOTguNTM3NCAxNjYuMDA3NjksMTEyNiAxNTguNjkxMTEsMTA4OS4yMjg1IDE1NS4yNjQ4LDEwNzMuODU2OCAxMzguMzY4NDUsMTAwMiAxMDguMDQ5Niw4NzMuMDYwMDUgOTYuNTM0NDQ3LDgxMy43NzMxNCA4OS45MDg2NTQsNzUyLjUgYyAtMS42NzgwMjUsLTE1LjUxNzgyIDEuMzQyODUzLC0zNi43MzYxNCA2LjA4OTI0NCwtNDIuNzcwMiAyLjgwOTYsLTMuNTcxODMgMi44NjY2NDMsLTEyLjY5MDk2IDAuMDgzOTQsLTEzLjQxODY1IC0xLjYyMzQ2MiwtMC40MjQ1NSAtMi4wMjU5NDgsLTEuNzk1NTYgLTIuNjE5NzIxLC04LjkyMzcyIC0wLjQ5Mjk2MiwtNS45MTc5NCAtMS4yNjA2MjcsLTkuMTMyODYgLTIuNTgxODM3LC0xMC44MTI1IEMgODkuNjA1NTY3LDY3NC45NTQ0IDg5LDY3Mi41NjM1MiA4OSw2NjkuMTUxMjkgODksNjY2LjM4MyA4OC41NSw2NjMuODM5OTIgODgsNjYzLjUgYyAtMC42MDA4MjEsLTAuMzcxMzMgLTEsLTcuMTU3MzggLTEsLTE3IDAsLTkuODQyNjIgLTAuMzk5MTc5LC0xNi42Mjg2NyAtMSwtMTcgLTAuNTUsLTAuMzM5OTIgLTEsMC4yODE5NyAtMSwxLjM4MTk3IDAsMTIuMzI2NDEgLTguODU4MzI0LC0xMC4xMjM2MyAtMTQuMDIyMSwtMzUuNTM2ODQgLTEzLjI1MTY1NiwtNjUuMjE3MiAtMzUuMDAwNzI3LC0xMzAuMDI0MTcgLTI5Ljk5NzQ4MywtODkuMzg1MjUgMS43NjAxOCwxNC4yOTcwOSA1LjAwMzgwMywyOC4zNTM1NSAxNC4zMTYxNzQsNjIuMDQwMTIgMTAuOTM5OTc0LDM5LjU3NDI1IDE1LjkyMzcsNjcuNTk0NjkgMTMuNjk4NzU3LDc3LjAxOTcxIEMgNjUuODE1ODM4LDY1OC40ODgzMyA0NS4yNzA0NTMsNTc3LjYwMzcyIDMzLjQyOTE0Miw1MDUgMzAuNDI0MTE1LDQ4Ni41NzUgMjUuOTExOTgzLDQ1OC45IDIzLjQwMjE4MSw0NDMuNSAxNy43OTQxNzksNDA5LjA4OTYyIDEyLjU3NzY4OSwzODMuMjQ4MDMgNS40NTAzMTA4LDM1NC41Njk1NCAtMS42ODM4OTI5LDMyNS44NjM1OSAtMS40ODIzMTE2LDMyMS4yMDczNyA3LjM4MzQ2NjgsMzA5LjkxNjY0IDI1LjY1ODU4MiwyODYuNjQyOTQgNzkuMjg2Mjc1LDI2OC41NDk2IDg1LjA4MzM2NCwyODMuNzAxNjMgODkuMDU2NjM2LDI5NC4wODY2OSA3Ny4zNDYxMjQsMzAxLjI4MDc4IDQ1LjUsMzA4LjAxODc3IDE3Ljg5ODczMSwzMTMuODU4NjQgMTUuMzQ1ODUsMzE4LjAzNDA5IDMwLjMyOTQyLDMzMi44MzE1NCA0NS4zMDk2MTQsMzQ3LjYyNTY1IDEzMi4xOTc0NSwzNjAuODQ4MDUgMjM1LDM2My45Nzc4NSBjIDE4Mi4wNzUyMSw1LjU0MzI0IDI5Ny41MDQyOSw3LjAwMjc0IDMzMCw0LjE3MjU1IDcuOTc1LC0wLjY5NDU4IDE5LjMxMzczLC0xLjUyNTE2IDI1LjE5NzE4LC0xLjg0NTc0IDEwLjY5NzE4LC0wLjU4Mjg4IDEwLjY5NzE4LC0wLjU4Mjg4IDEwLjIxMDUzLC0zLjE5Mzc3IC0wLjM2ODU2LC0xLjk3NzM1IDAuNDgzNzcsLTMuODI0MTUgMy41MTI1NSwtNy42MTA4OSAyLjE5OTU2LC0yLjc1IDUuNDgyOTEsLTcuMDI1IDcuMjk2MzQsLTkuNSA2LjE2ODQ3LC04LjQxODg1IDE2LjUyNzY3LC0xMS42Mjc4NCAyMC44MjQyNiwtNi40NTA3NiA1LjM3NTM0LDYuNDc2ODkgMC42Mjc5MSwyMS40Njc5NiAtOC4yNTI5MSwyNi4wNjA0MSAtNC4xMDA4LDIuMTIwNjEgLTIuOTIzNTEsMi43NzMzNCA2LjU0MjYzLDMuNjI3NDkgNC40OTMxOCwwLjQwNTQzIDEwLjc0Njg1LDEuMDA4OTkgMTMuODk3MDUsMS4zNDEyNSA5LjUyOTc4LDEuMDA1MTQgMTYuNzk1NjYsLTIuNDM3MzYgMTIuNzkxOTMsLTYuMDYwNjkgLTguODIwMTgsLTcuOTgyMTUgNy43NzY3NSwtMjQuMDgyNDggMzMuNDgwNDQsLTMyLjQ3ODY1IDMuODUsLTEuMjU3NjIgNy40Mjc1LC0yLjY4MDg4IDcuOTUsLTMuMTYyODEgMC41MjI1LC0wLjQ4MTkzIDEuNjYyNjcsLTAuODc2MjQgMi41MzM3MiwtMC44NzYyNCAzLjI3ODY0LDAgMTIuNjYwNzEsLTcuMjcxNjkgMjMuMDkyMTUsLTE3Ljg5Nzg1IDUuOTM1ODksLTYuMDQ2NjkgMTIuNjAyNzksLTEyLjEzNjc1IDE0LjgxNTMzLC0xMy41MzM0NyAyLjIxMjU0LC0xLjM5NjcyIDQuNTA3OTksLTMuNDQ2MDUgNS4xMDA5OSwtNC41NTQwOCAxLjc5ODU0LC0zLjM2MDYxIC0xLjcwNTgsLTIuNDU1MSAtOS40OTIxOSwyLjQ1Mjc0IC0zLjg1LDIuNDI2NjkgLTkuMjUsNS43ODcxNSAtMTIsNy40Njc2OCAtNS43MDkzNCwzLjQ4OSAtMTguNDE0NiwxMS45MTMzMyAtMzAuNjM2MjUsMjAuMzEzNjMgLTQuNjAwMDYsMy4xNjE3NSAtOS40ODg3NSw2LjUxMDczIC0xMC44NjM3NSw3LjQ0MjE4IC0xLjM3NSwwLjkzMTQ0IC0zLjMxNjkxLDIuMzc4NDEgLTQuMzE1MzYsMy4yMTU0OSAtMi4yMTEyOCwxLjg1Mzg4IC0xMi40NzM4MiwyLjI5ODk1IC0xOC4xODQ2NCwwLjc4ODYzIC0xNC44MjkyMSwtMy45MjE4MyAtMTUuODk1MjEsLTE2Ljk0MDkzIC0zLjIzODM1LC0zOS41NTAxNCBDIDY2MC44MDMwOSwyODQuMjQ2MDMgNjc2LjA3MzUsMjY0IDY3Ny45OTgxNCwyNjQgYyAwLjQ3ODMyLDAgMi4xMzY5MSwtMS44NzkwNiAzLjY4NTc2LC00LjE3NTY5IDIuODAzMTQsLTQuMTU2NDggNC41Nzg3NSwtNS40OTg2MSAxMy41MDEyNCwtMTAuMjA1MjEgNi40MTY2MSwtMy4zODQ3NiAxMC4xNjU4NSwtMy43NTI3NiAxMS4xODQ2NSwtMS4wOTc4MiAwLjYwNTIyLDEuNTc3MTggLTMuODkxODgsMTEuNDc0MjEgLTguOTU4MTMsMTkuNzE0NjQgLTEwLjYxOTU1LDE3LjI3MzA4IC0xMS41NDU2MSwxOS4wMzAxMyAtMTAuNTUyOTQsMjAuMDIyOCAxLjQxNjY3LDEuNDE2NjcgMTIuMjI4MjYsLTUuMDcwNTkgMTMuODMwMTUsLTguMjk4NDggMC42NzE1MSwtMS4zNTMxMyAyLjQ2ODE5LC01LjE0ODIxIDMuOTkyNjIsLTguNDMzNTEgMTAuMzEzMjgsLTIyLjIyNjE4IDM0Ljk5ODA2LC0yNC40MTQ4NSA1MC4xODE5NSwtNC40NDkzNiA0LjAxMzMxLDUuMjc3MTQgNS4xMzEwMiw1Ljg3NDkyIDUuMTUzMDEsMi43NTU5NiAwLjA2ODgsLTkuNzU5MzkgMTMuNjU3MTIsLTE3Ljc2Njc5IDMwLjIzMzU1LC0xNy44MTYxOSA2Ljg3MTAxLC0wLjAyMDUgNy4zMjI1OSwtMS4xNDQ4NSAxLjM3MjQ2LC0zLjQxNzIyIC04LjEzMzQ2LC0zLjEwNjIgLTguNTk5NzgsLTQuNjU5OTkgLTMuMjM4MDcsLTEwLjc4OTIzIDcuNDMzMTcsLTguNDk3MjMgMy45MDYyNSwtMTAuMTQ4NzEgLTEwLjIxNDg3LC00Ljc4MzExIC0xMy42MjQ2OSw1LjE3Njk4IC0yNi44Njg3LDcuOTc5NzIgLTM1LjkyNTY1LDcuNjAyNyAtNC44MDkxMywtMC4yMDAxOSAtOS44MjQ0NSwwLjA0MDggLTExLjE0NTE2LDAuNTM1NjMgLTEuMzIwNzEsMC40OTQ4IC00Ljg0NzgzLDEuMTA3ODEgLTcuODM4MDUsMS4zNjIyNiAtMi45OTAyMiwwLjI1NDQ1IC01LjgwMDU3LDAuNjg3NDggLTYuMjQ1MjIsMC45NjIyOSAtMC40NDQ2NSwwLjI3NDgxIC0yLjk5MjUzLDAuMjAxNDkgLTUuNjYxOTUsLTAuMTYyOTIgLTE0Ljg0MTg1LC0yLjAyNjExIC0xMy40NjM3OCwtMTQuODk0NjUgNS4xMjE3OSwtNDcuODI3NTQgMi40ODMxMywtNC40IDUuOTA5NzEsLTEwLjkyNSA3LjYxNDY0LC0xNC41IDEuNzA0OTIsLTMuNTc1IDguNjM0MTcsLTE3Ljc1IDE1LjM5ODMzLC0zMS41IDYuNzY0MTUsLTEzLjc1IDE0LjE1Njc3LC0yOS4wNSAxNi40MjgwNCwtMzQgMi4yNzEyNiwtNC45NSA1LjI0NDI1LC0xMS4xMzc3MyA2LjYwNjY0LC0xMy43NTA1MiBDIDc2My44ODUzMiw5OS4xMzY2OTEgNzY1LDk2LjU0Njk4NSA3NjUsOTUuOTk0NTc1IGMgMCwtMC41NTI0MDkgMS4xNTIzNSwtMy4zNjQ2NzUgMi41NjA3OSwtNi4yNDk0NzggOS4wOTExOSwtMTguNjIwOTIzIDIzLjU4ODY4LC02NC41ODYwMzkgMjEuODIyMzYsLTY5LjE4OTAyIEMgNzg5LjAyNDc1LDE5LjYyMjExOSA3ODkuMzI1MDgsMTkgNzkwLjEzNDM1LDE5IGMgMC43NDE1OCwwIDMuNjAyMjMsLTEuNTAwMTI5IDYuMzU2OTksLTMuMzMzNjE5IDIuNzU0NzYsLTEuODMzNDkgNi4yMzQzOCwtNC4wODYxNDUgNy43MzI0OCwtNS4wMDU4OTkgMi4yMzQ1NSwtMS4zNzE4OTE4IDIuNjIyMTQsLTIuMTgwNzAyMiAyLjE1Nzc0LC00LjUwMjY5MDggLTIuNTc5NTEsLTEyLjg5NzUyMjMgMjEuMjM3MTgsLTQuNjUzMzY2IDUwLjg3MTIyLDE3LjYwOTA5MjggNDMuNTkxMjEsMzIuNzQ3NzMzIDgyLjI4NjY1LDg4LjA4NDkzNiAxMTQuNjE5OTMsMTYzLjkxNDU3NiAyOC43MzU2OSw2Ny4zOTIzNyAzNi4yODA4OSwxODEuNjg3NDkgMTcuNjQ3MTksMjY3LjMxODU0IC0xMy4wNjM3NCw2MC4wMzQxMiAtMjEuOTU1MjMsMTUyLjE2NjQ4IC0zMS41MDk3OSwzMjYuNSAtNi4wODMyMiwxMTAuOTk1MDIgLTkuNTYwMjIsMTYxLjA4MzEyIC0xNC41Nzc2OCwyMTAgLTEuMzUzOTUsMTMuMiAtMy4xMjUzNCwzMyAtMy45MzY0Myw0NCAtNC4wNzIyOCw1NS4yMjgzIC0xMC4yMDkyNiwxMDYuNTA0OCAtMjAuNjQ1NSwxNzIuNSAtMy41Njc3MywyMi41NjExIC00LjA2Nzk2LDI3Ljg2MjYgLTQuMzQwMzgsNDYgLTEuMDI3MTMsNjguMzgzMyAtMjYuMDk0NDYsMTA3LjIxNjEgLTczLjYzMDY3LDExNC4wNjQyIC00LjYwODcsMC42NjQgLTE0LjIyOTQ1LDIuOTI0NyAtMjEuMzc5NDUsNS4wMjM4IC01Ny45NTYyMywxNy4wMTUgLTExOS43ODU0NywyNi4wMzc3IC0yMDQuNSwyOS44NDI1IC02OC42OTk3MywzLjA4NTYgLTg4LjU2ODUsMy4zOTYyIC0xMjMsMS45MjI4IHogTSAyNTUuOTk0OTcsMTMwMS40MjQgYyAtMTIuMzM2NjUsLTUwLjMwMTcgLTE5LjU1MzI3LC03NC4xODMyIC0yOC4yMzEzMywtOTMuNDI0IC05LjI4OTI3LC0yMC41OTU5IC0xMS40MDAwMiwtMjMuMzIzOCAtMTAuMjUyNjQsLTEzLjI1IDUuMjczOTgsNDYuMzA0MyAxNy45ODQ0OCw4OS4yNDczIDM4LjY3MjUsMTMwLjY1NjggMTAuOTA4NjUsMjEuODM1IDEwLjkwNDAyLDIxLjI0NjIgLTAuMTg4NTMsLTIzLjk4MjggeiBtIC0yMS42MjUyNiwzMy4zMjYgYyAzLjYwMDQ2LC0xMy40MzUxIC0yLjE1NzgyLC00MS42OTQ4IC0xOC45MjQ3LC05Mi44NzYgLTkuNTYzNTgsLTI5LjE5MjkgLTE2LjYxMTIsLTU0LjU4MTcgLTE3LjkzODUzLC02NC42MjI5IC0wLjg2OTk3LC02LjU4MTIgLTEuNzc0MDgsLTcuMTM3MyAtNS41MTc1NSwtMy4zOTM5IC02LjAwNDQxLDYuMDA0NCAtNC4xODkwMywxOC40Mjg1IDkuMzMzODMsNjMuODc4NyAzLjYzODcyLDEyLjIyOTcgNy4xMzA5NywyNi4xNzk3IDcuNzYwNTQsMzEgMy42OTk3NiwyOC4zMjcxIDIyLjM0Mjg4LDc2Ljk5NzggMjUuMjg2NDEsNjYuMDE0MSB6IG0gMzM5LjA3ODAyLC0xNDguOTIzMiBjIDE4LjI0NjkzLC0xMi4wODYyIDE1Ljg1Mjg1LC00Ny4zMTM2IC0zLjk3ODgyLC01OC41NDYgLTE3Ljg1MzI2LC0xMC4xMTE4IC0yNy40NDEzMiwxMS45MjI4IC0xOS44NjEwOSw0NS42NDMyIDMuNDAwMjMsMTUuMTI1NyAxMi44MDE4MSwyMC4yMTQyIDIzLjgzOTkxLDEyLjkwMjggeiBtIC01My43ODY1MywtMi42NjM5IGMgMTMuNjA2NywtNi45NzY3IDE4LjEyNTg3LC0zMC4yNTY3IDkuNjAwMjQsLTQ5LjQ1NDcgLTguNDA1MzksLTE4LjkyNzIgLTI1LjI2Njg2LC05LjMzNTMgLTI4LjMwNTM0LDE2LjEwMTkgLTAuNDM5NTEsMy42Nzk1IC0xLjQ3NzEzLDExLjAxMDUgLTIuMzA1ODMsMTYuMjkxMiAtMi45NzA1MSwxOC45MjkgNC45MDE2NywyNS4zMjE1IDIxLjAxMDkzLDE3LjA2MTYgeiBtIC0zMzEuMTAwMDYsLTM0LjgwNiBjIDIuMTgxMjIsLTE3LjQ1NzggLTIuMzQyOTYsLTQyLjY4MzIgLTE2Ljk3OTE2LC05NC42NzA2IC00LjE1MTkzLC0xNC43NDc2IC04LjkzOTA5LC0zMy44NzI2IC0xMC42MzgxMywtNDIuNSAtNS41NTU0MSwtMjguMjA5NTEgLTEzLjk2NjM4LC00MS45NTU2IC05LjkwNDA3LC0xNi4xODYzIDEuOTcxODcsMTIuNTA4NiAxMy4xMDM4Nyw2OS41OTE0IDE1LjUwMzY4LDc5LjUgMS4zMzIwOCw1LjUgMy41ODIzNSwxOS4zNzM1IDUuMDAwNjEsMzAuODMgMy41MzE5NSwyOC41MzA1IDYuNjMwMjYsMzkuODM0OSAxMi43MjI4NSw0Ni40MiAzLjAxOTkzLDMuMjY0MSAzLjUxMDk0LDIuODc2MSA0LjI5NDIyLC0zLjM5MzEgeiBtIDIzMS40MzY0OCwtOTYuNDg5OCBDIDQ5Ni4xNzI1NSwxMDM0LjQxMTggNTIwLjczNTI5LDkzOS4xNTUwNyA0NjAuNjExNjksODk0LjM2MTY5IDQyMS44NDQ0OSw4NjUuNDc5MjkgMzk3LjU2NjQsODYzLjM4MDQzIDMzNyw4ODMuNjc1MzYgYyAtMTIuMzc1LDQuMTQ2NjkgLTIzLjUxNTcyLDguMTc4NTggLTI0Ljc1NzE1LDguOTU5NzcgLTQuNDEzNDgsMi43NzcyNSAtMTEuMjQxNTUsMTIuNjI1MTQgLTExLjI0MjIyLDE2LjIxNDI4IC0zLjVlLTQsMS44NDIxNyAtMS43NjcyMiw3LjczMTA4IC0zLjkyNjM5LDEzLjA4NjQ3IC0yOC42MTE0LDcwLjk2NDgxIDQ0LjIzMzY3LDE0Ny45NjI3MiAxMjIuOTIzMzgsMTI5LjkzMTIyIHogTSAzMjMuNSw5OTcuMzUyNTcgYyAtMjkuOTY1NDIsLTQuNDc1MDUgLTM2LjQyMzY2LC0yOS45ODk2MSAtMTMuNDg3NDIsLTUzLjI4NDcyIDE2LjY2MTQxLC0xNi45MjIxIDM2LjA2MjIxLC0xOC4zODcwNiA1MC4zMDUxNSwtMy43OTg1NCAyOC4xODI3NiwyOC44NjY1MyA1Ljg3MTUzLDYzLjQ1ODQ5IC0zNi44MTc3Myw1Ny4wODMyNiB6IG0gMzc5LjkzMjQyLDQwLjQ4OTgzIGMgNTIuMzI0MDksLTguNzg5NCA4NS4xMzIwOSwtNjguOTQzMTcgNjMuNTU1NDIsLTExNi41Mjk0OSAtNTAuNTIyMzYsLTExMS40MjQ2NyAtMjMxLjk2ODc4LC01Ny44OTgzMSAtMTkyLjE3Niw1Ni42OTE1NyAxNy4wMTMyMyw0OC45OTI0MiA2My43NDg2MSw3MC43MzUwMiAxMjguNjIwNTgsNTkuODM3OTIgeiBNIDYwMS41LDk5MS41OTg3OCBjIC0yMy4zMjMzMywtNS43NDI4MSAtMzAuODg4NTYsLTI3LjA1NzE4IC0xOC4zOTA5MywtNTEuODE0ODQgMTUuNjI1MzEsLTMwLjk1MzU4IDQ5LjA1ODQ3LC0zMC41ODgzNyA2NS41NTIyMiwwLjcxNjA2IDkuOTYxODMsMTguOTA3MTEgNy43MDM1MSwyNS4yMDc2OCAtOC40NTE0OCwyMy41NzkwOSAtMTQuNTI5NTQsLTEuNDY0NzMgLTE5LjI5Njc0LDAuNjEyMyAtMTIuMTkzODUsNS4zMTI3NyA1LjE3NTcsMy40MjUxMiAxMS43OTQ4Miw5LjM4NjA2IDEzLjA3MTY4LDExLjc3MTg5IDMuOTg5ODYsNy40NTUxMyAtMjIuOTAxNjUsMTQuNTQzNTUgLTM5LjU4NzY0LDEwLjQzNTAzIHogTSAzNTUuNjE4MDYsNTc4LjE2NjgzIGMgMy45MTA3MiwtMC41Njc4NiA2LjY4NTQxLC0xLjkxMzY2IDExLjc2MjI2LC01LjcwNSAzLjY1NDMxLC0yLjcyOTAxIDkuNDUxMTksLTcuMDIxODggMTIuODgxOTQsLTkuNTM5NzIgMzAuOTMwOTksLTIyLjcwMDMzIDQwLjg4MDMsLTMwLjY1NTQgNTIuMjM3NzQsLTQxLjc2NzE3IDMuODUsLTMuNzY2NzIgMTUuMSwtMTMuOTE1MDEgMjUsLTIyLjU1MTc2IDkuOSwtOC42MzY3NSAxOS44NDc1OCwtMTcuMzY4MTggMjIuMTA1NzQsLTE5LjQwMzE4IDIuMjU4MTUsLTIuMDM1IDYuMzA4MTUsLTUuNjQ5NDEgOSwtOC4wMzIwMyA4LjQ0NTU1LC03LjQ3NTM2IDIzLjM5OTIsLTIxLjE0NDIgMzQuODk0MjYsLTMxLjg5NjE2IDEzLjQ5MzE3LC0xMi42MjA5MSA0Mi42NTk3NiwtNDIuMTIwOCA0Mi40NTcwNiwtNDIuOTQyMjQgLTAuNDg0MywtMS45NjI2MiAtOS4wODY5OCwtMy42MDQ2MiAtMTkuNDU3MDYsLTMuNzEzNzggLTEwLjc2NTQ2LC0wLjExMzMyIC0xMC45OTgyNSwtMC4xNjQyNiAtMTAuOTE4MTEsLTIuMzg4OTMgMC4xMDg2NywtMy4wMTY4MiAwLjIzNDQxLC0zLjAwMDkyIC0yOS4wODE4OSwtMy42Nzc4NCBDIDI3MS45ODA5LDM4MS4xMzM5IDExNC44Mzc0NiwzNzMuMDQ3MTMgMjkuOTA1MDkyLDM2Mi4wMjI5MyAyMC4wMTMwNzksMzYwLjczODk1IDE5LDM2MC43NzAxOSAxOSwzNjIuMzU5MjEgYyAwLDIuNzgwNyA4LjA5NjcxMiwxMC40NzIyOCAxNC40OTY0NzYsMTMuNzcxMTEgOC4wNTMyMTEsNC4xNTExMyA4LjE3NDYwNSw1Ljk2OTg3IDAuNDkxOSw3LjM2OTY4IC04LjIzNjc0NCwxLjUwMDc2IC03Ljk4ODM3OCwwLjUyNzg5IC00Ljc1NDYwNCwxOC42MjQyOSBDIDQyLjIwNjQ2NCw0NzQuNzIwMzIgNjEuMjc4MjksNDkxLjE1Mzg3IDEwMS41NDEsNDY0LjQyOSAxMjQuNjk3MTUsNDQ5LjA1ODgzIDI3My4wNzYzMyw0MzMuMTM5MzggMzcxLDQzNS41MTkwMiBjIDE2LjgwODEyLDAuNDA4NDUgMjguMzk3MjksMC4yMzM5MSAzNCwtMC41MTIwOCA0LjY3NSwtMC42MjI0NiAxMS4wNjQ2MSwtMS4zNjc0OCAxNC4xOTkxNCwtMS42NTU2IDMuMTM0NTMsLTAuMjg4MTIgNi4yMjcxMywtMS4xNjAwNCA2Ljg3MjQ1LC0xLjkzNzYgMC42NDUzMSwtMC43Nzc1NiAyLjg4ODksLTEuNDEzNzQgNC45ODU3NiwtMS40MTM3NCAyLjA5Njg1LDAgNS4wNzkyNSwtMC41MjAzNSA2LjYyNzU1LC0xLjE1NjMzIDEwLjU5OTczLC00LjM1Mzk1IDkxLjMxNTEsLTYuMDI2MDUgOTEuMzE1MSwtMS44OTE2OSAwLDAuNzI1NTkgLTQuMTUzMzQsNC42ODQ0OCAtMTMuNzg3NCwxMy4xNDE5MSAtMi4yNTE2NCwxLjk3NjY1IC0xMy45MDgxLDEwLjk3MjI4IC0yNS45MDMyNCwxOS45OTAyOSAtMTguMTg4ODgsMTMuNjc0NSAtMzAuMzM3NzYsMjMuMTE0NDUgLTM1LjgwOTM2LDI3LjgyNDY2IC0wLjU1LDAuNDczNDcgLTYuNTY0MjgsNi43ODI3NCAtMTMuMzY1MDcsMTQuMDIwNiAtMjcuOTY4OTksMjkuNzY2NSAtNTcuMTc3MTIsNTAuMjUxNTMgLTgyLjI3ODY4LDU3LjcwNTg5IC0zLjUxMDQxLDEuMDQyNDggLTQuOTMyNzQsMi4wNjU2MiAtNS43MzUwNyw0LjEyNTQ4IC0xLjM1MTcxLDMuNDcwMzIgLTUuNzE0MjksMTEuMjMyMyAtNy4wODE0NywxMi41OTk0OCAtMi4yNzU3MiwyLjI3NTcyIC0xLjE2MjQ3LDMuODkxNTggMi4yMTAyOSwzLjIwODIxIDEuNzg3NSwtMC4zNjIxNyA1LjU1MzEzLC0wLjk5MjkzIDguMzY4MDYsLTEuNDAxNjcgeiBNIDQwMy41LDU2OSBjIDAuMzc2NTMsLTAuNjA5MjUgNy45NTg1MywtMSAxOS40MDM0NSwtMSBDIDQ0NS4wNjk3LDU2OCA0NjMsNTY3LjAzNzY5IDQ2Myw1NjUuODQ4MDMgNDYzLDU2NS4zODE2MiA0NjIuMzU3MTQsNTY1IDQ2MS41NzE0Myw1NjUgYyAtNC4yNTkwNSwwIC01LjU4OTAzLC00Ljk3MjgzIC0yLjkwMTUzLC0xMC44NDg4NyAzLjMzNDQxLC03LjI5MDQ4IDYuNDQ0NjMsLTEwLjc5NTMzIDQwLjUxMTAxLC00NS42NTExMyAxMy40Mzg1OCwtMTMuNzUgMjYuMjUyODEsLTI3LjI1IDI4LjQ3NjA1LC0zMCAxOS4yMzM1OCwtMjMuNzkwNjIgMzQuNzQ0MTYsLTQ2LjQzMjIyIDMzLjAwMTg1LC00OC4xNzQ1MyAtMC43NTEyNywtMC43NTEyNyAtMTUuNTEzMzUsMTMuMDYzOCAtMTcuNzY5MTgsMTYuNjI5MjUgLTAuODg1NywxLjM5OTkxIC01LjE2MDcsNi4wNTY5MyAtOS41LDEwLjM0ODk0IC04LjUwNjkyLDguNDE0MjMgLTkuMDAxMzIsOC45NjMwNyAtMjQuOTQ5MjcsMjcuNjk2MzQgLTUuODUyODEsNi44NzUgLTExLjkxNjU1LDEzLjg1IC0xMy40NzQ5OCwxNS41IC0xLjU1ODQ0LDEuNjUgLTUuMDU2Niw1LjQ3NSAtNy43NzM2OCw4LjUgLTguOTM5NzEsOS45NTI3OSAtMjUuMzUyOTEsMjUuODQ2MzUgLTMyLjY5MTcsMzEuNjU2NjYgLTE2LjQ4NTQsMTMuMDUxOTQgLTQxLjk1MTU1LDI1LjkxNTcyIC01MCwyNS4yNTY2NCAtMi43MTU2NCwtMC4yMjIzOSAtOC41LDEuMTY5MjkgLTguNSwyLjA0NTAzIDAsMi4xMDkwMSA2LjI5OTYsMi45ODM5NSA3LjUsMS4wNDE2NyB6IG0gMjI5LjM3MTk3LC0zLjkzNSBjIDEuMjczNzcsLTEuOTE3MTggMi4zNDc1LC0yLjA2NjA4IDE1LC0yLjA4MDA2IDE4LjU3MDQ4LC0wLjAyMDUgMjguNTA4MzIsLTMuODg0ODQgMjEuNjExNjgsLTguNDAzNyAtMS40MDU3OCwtMC45MjExIC0yLjQ4Nzg5LC0yLjU5MzgxIC0yLjQ5MzQyLC0zLjg1NDI5IC0wLjAzNCwtNy43NDkxNyAtNS43NTkwMywtMTQuMTQ3NTIgLTguOTI3MDUsLTkuOTc2OTUgLTkuMjEzMjksMTIuMTI4ODkgLTEwLjkzMjI0LDEzLjkyMjIzIC0xNS41NzU5MiwxNi4yNSAtMzAuMTU1NTksMTUuMTE2MyAtNDguMDY0NDMsLTE5LjY0MTc5IC0zMi45ODc0MiwtNjQuMDIzMTIgMTMuMDAzMDcsLTM4LjI3NjQxIDE0LjA0MzI5LC00MS43Mzg5IDE3LjExNzMsLTU2Ljk3Njg4IDEuNDg4ODksLTcuMzgwNDQgMC4xMDkyMSwtMjEuODkxODUgLTIuMTE3MTQsLTIyLjI2ODEyIC00LjY5NjgzLC0wLjc5Mzc5IC0yNi4zOTE3OCw2Ny44OTYyIC0zNS40NTg2MSwxMTIuMjY4MTIgLTMuOTA0MiwxOS4xMDY2NyAtMy45ODU5MywxOS4zMDY2NSAtOS4yNTMyNywyMi42NDI0MiAtMTguNDk5MjEsMTEuNzE1NDMgLTI1LjkyMTM3LDYuMzAyMDggLTIwLjA3NTk5LC0xNC42NDI0MiAxLjgyOTU0LC02LjU1NTQxIDcuNjkwOTgsLTIyLjc5MjExIDEwLjM3NDgsLTI4LjczOTEgMS4wNTIxOSwtMi4zMzE1MSAxLjkxMzA3LC00LjQ5MzcgMS45MTMwNywtNC44MDQ4NyAwLC0wLjMxMTE2IDAuOTI0NTcsLTIuNjc4NTcgMi4wNTQ2LC01LjI2MDg5IDEzLjE2MDM0LC0zMC4wNzM3NSAxNi4yNTcwMiwtNDEuMDMzMDcgMTEuOTQ1NCwtNDIuMjc1NDMgLTEyLjQzMzA2LC0zLjU4MjQ3IC0yOS41MTc3Myw1Ljk2NzEzIC0zNi45NzczMSwyMC42Njg3NSAtMC44MTI1MiwxLjYwMTM1IC0yLjQ5MTc4LDQuNTc3MDUgLTMuNzMxNjksNi42MTI2NiAtMi44MjI1OSw0LjYzMzk4IC03LjczNjQxLDEzLjc0MDUxIC0xNi4wNzkyNywyOS43OTg4OCAtMTEuMzcwMjIsMjEuODg1NDYgLTEzLjg3NTk3LDI2LjA1ODE5IC0yMS41NDA5MiwzNS44NzEzIC04LjEyNDk5LDEwLjQwMjA5IC0xNi41NzY3NiwxNS40OTAxIC0zMC4xNzA4MSwxOC4xNjI5OSAtOS43MTcxMywxLjkxMDYgLTkuNTU3NDYsMi40MDM2MyAxLDMuMDg3NyAyNy40MjIyNywxLjc3NjgzIDE1Mi45MzU5OCwwLjEwNDM3IDE1NC4zNzE5NywtMi4wNTY5OSB6IG0gLTExMi42NjY0LC01LjExMjYgYyAtNC4yODE3OSwtMS43MTg0MSAtNi40Nzg3NCwtMTAuNjYwOTkgLTQuMDkxNzgsLTE2LjY1NTM1IDQuNzE1OCwtMTEuODQyNyAxMS4wNTI1NywtMjEuNjk5OTIgMzIuOTc2NjYsLTUxLjI5NzA1IDQuNjg1MjUsLTYuMzI1IDEwLjIyNTM0LC0xNC4wODc1IDEyLjMxMTMzLC0xNy4yNSAxMS4xMjI5OSwtMTYuODYzMjUgMTIuNzg3NjUsMTIuOTQxNTYgMi4xMDg0MiwzNy43NSAtMTEuNDA5ODksMjYuNTA1ODEgLTMwLjE0NzIyLDQ5LjEzNSAtNDAuMTA2Myw0OC40MzY2MSAtMC40OTcxNCwtMC4wMzQ5IC0xLjkzNjM5LC0wLjQ3Nzc1IC0zLjE5ODMzLC0wLjk4NDIxIHogbSAyNjUuNTgzODQsLTQuMDMxMDcgYyA1LjU2OTMsLTAuNjE4NjUgMTAuMzgzODgsLTEuNjg0ODMgMTEuMjg5MzMsLTIuNSAxLjA5MDY0LC0wLjk4MTg5IDQuMDg2ODMsLTEuNDIxMzMgOS42OTA5OCwtMS40MjEzMyA0LjQ2MTc0LDAgOC4zOTAzNiwtMC40NSA4LjczMDI4LC0xIDAuMzM5OTIsLTAuNTUgMS40Mzg5OSwtMSAyLjQ0MjM5LC0xIDEuNjY5MzYsMCAzLjYyMzM2LC0zLjc2NzU5IDIuNTI0MTEsLTQuODY2ODQgLTAuMjQ5OCwtMC4yNDk4IC0yLjgxOTQ1LDAuMDczNyAtNS43MTAzNCwwLjcxODk1IC01LjExMjMyLDEuMTQxMDEgLTkuNDk5NzYsMS44MTczNSAtMTguNzU2MTYsMi44OTEzIC0xMi4yODM1OCwxLjQyNTE3IC00Ni41Mjc1NCwwLjQ2ODk1IC01NS45NTQ4OSwtMS41NjI0OCAtMy4zMDk5LC0wLjcxMzIzIC0zLjUwMTE5LC0xLjAwMDUyIC00LjU1ODI3LC02Ljg0NTYxIC0xLjkwNzEyLC0xMC41NDUzOCAtNy40OTMzOSwtMTUuNDk4NzkgLTE0LjY0OTEyLC0xMi45ODk1NCAtNy4wNzQ4MywyLjQ4MDg4IC03LjQ3NDIxLDMuNzgyMjcgLTEuODUxMjIsNi4wMzIxNCA0LjA4MjUzLDEuNjMzNTEgOC4wMTM1LDQuODY0ODYgOC4wMTM1LDYuNTg3MjggMCwxLjgzMDc0IC02LjIxMTYxLDguMDM0OCAtOC4wNDQ1OCw4LjAzNDggLTEuMDEwNTYsMCAtMi4wODgyOSwwLjQwNTk3IC0yLjM5NDk1LDAuOTAyMTYgLTAuNjc2NjIsMS4wOTQ3OCAtMTIuNDM0MjgsNC43Mzk1NyAtMTguMzEwNDcsNS42NzYxIC0xMS4wNDcyMSwxLjc2MDY4IC0xLjAwNDgxLDIuNDIxNzQgMzYuNzg5NDEsMi40MjE3NCAyMi42ODY3NywwIDQ1LjM4MTk1LC0wLjQ4MjM4IDUwLjc1LC0xLjA3ODY3IHogTSA4NTAuNzc2OCw1MDEuNTQxODggQyA4NTYuMTY1ODUsNTAwLjYyNjE1IDg2Miw0OTUuNDU4MzUgODYyLDQ5MS42MDA1NCBjIDAsLTIuODg1ODQgLTIuMjc1NDcsLTQuNDEwNzkgLTQuMjYyNzMsLTIuODU2NzUgLTEuMjM2NDksMC45NjY5NCAtOC45MDQyMiwyLjk4NzcgLTExLjczNzI3LDMuMDkzMjUgLTAuODI1LDAuMDMwNyAtMy4zOTgzMiwwLjM2MjMyIC01LjcxODQ4LDAuNzM2ODYgLTE1LjMzOTY1LDIuNDc2MjUgLTU4LjAwNzI3LC0xMS4wNDgxNSAtNzcuOTYxNywtMjQuNzExNiAtMi4yOTkwOSwtMS41NzQyNiAtNC40NDEyMSwtMi44NjIzIC00Ljc2MDI1LC0yLjg2MjMgLTAuOTMyNiwwIC0xMC44MDgyNCwtNy4wMTc0OCAtMTMuODA5NTcsLTkuODEyODcgLTEwLjM0MzQ2LC05LjYzMzc0IDguOTk0MzIsLTEwLjU2NTE2IDM0LjI1LC0xLjY0OTY3IDE1Ljk2ODQ4LDUuNjM3MDEgMTguMDY4NzksNi40NTExMSAyMi4zNTc5Niw4LjY2NjA3IDYuNjE2MjIsMy40MTY2OCA3LjM4NjQxLDMuNzQ5NzQgMTQuNDQxNDEsNi4yNDUwNyAxNi4yNDYwNyw1Ljc0NjE3IDE3LjU5NDMsNC4zNzMzNSA0LjcwMDYzLC00Ljc4NjM0IC0xOS4yMDI4NiwtMTMuNjQxNzUgLTM5LjYzMzYyLC0yMi4wOTMzOSAtNDcuMjk1MzcsLTE5LjU2NDc4IC04LjMwNDgyLDIuNzQwODQgLTI3LjI3NzkyLC0yLjIwODA5IC00NS4yMDMzNCwtMTEuNzkwNzkgLTMyLjEwNjU0LC0xNy4xNjM3NiAtNDQuMjUxNTksLTIwLjI3NjIxIC0zMy4zMDA1MiwtOC41MzQwMiAxNC42NzQ0OSwxNS43MzQ2MSAzMy43MDU4NSwzMy4yOTA0NiA0NS43MDM4LDQyLjE2MDM3IDcuNDU4NjEsNS41MTQwMyAxNy42MzUyLDEyLjQ2Njg4IDE5LjU5NTQzLDEzLjM4Nzk5IDAuODI1LDAuMzg3NjYgMy41MjUsMS44ODE0NSA2LDMuMzE5NTMgNS43Njg3OSwzLjM1MTkyIDI0Ljg2NTQzLDExLjkzMjI0IDI5Ljc0OTA0LDEzLjM2NjU2IDkuNTQ1NTUsMi44MDM1MyAxNC4zMTQ0NCwzLjkzMDA4IDE5LjMzMDkxLDQuNTY2NTQgMi45ODEwMywwLjM3ODIxIDUuOTcxMTksMC45Nzc4OSA2LjY0NDgsMS4zMzI2MiAxLjYwNzkyLDAuODQ2NzUgMjQuNTYyNDgsMC41Njg0MSAzMC4wNTIwNSwtMC4zNjQ0IHogTSA3MzMsMzU0LjMyNDY1IGMgMi40NzUsLTAuMjEwMDQgNi41MjUsLTAuNTg2NiA5LC0wLjgzNjgyIDQuODExNDksLTAuNDg2NDIgMTkuNjU5MjUsLTMuNDg5MjggMjkuNSwtNS45NjYxOCAzLjMsLTAuODMwNiAxNy40NzUsLTMuMDc5MDYgMzEuNSwtNC45OTY1OCA1MS44NTEzOSwtNy4wODkxOCA2Ny4xOTM2MiwtMTIuODY5NzggODAuMDc3NTYsLTMwLjE3MTM0IDUuNjQyNzksLTcuNTc3NTkgNS42NjY2NSwtOC41NDg5OCAwLjQ1Nzk3LC0xOC42NDQ2MSAtMTAuNDIzMTEsLTIwLjIwMjM1IDAuNTE4MzUsLTI2LjQyNjMxIDI0Ljk2NDQ3LC0xNC4yMDA4NCA4LjU2OTg1LDQuMjg1NzcgOC41LDQuMjg1MzUgOC41LDAuMDUwNyAwLC0zLjg0MjQxIC0wLjc2MTc5LC00LjU2NTgzIC01LjkyMjk0LC01LjYyNDY3IC0yOC4wOTg2NCwtNS43NjQ1OCAtNDEuMDgsLTI3LjAwOTQxIC0yNi4zMjYzMSwtNDMuMDg0NjcgMi42NTExLC0yLjg4ODU4IDIuNDMzNjUsLTYuMDY0MTEgLTEuMzQyMTIsLTE5LjU5OTY4IC0xLjY2Mjc0LC01Ljk2MDY4IC0yLjYyNTA2LC02LjMwMjUgLTcuNDY0MzUsLTIuNjUxMzggLTEuODk0MzUsMS40MjkyNCAtNS4zOTI4NCwzLjQ1MzcgLTcuNzc0NDEsNC40OTg4MSAtNC4zMzAxNCwxLjkwMDE5IC00LjMzMDE0LDEuOTAwMTkgMC4wOTg3LDYuMzI5MDUgMTQuMTE5NzUsMTQuMTE5NzUgLTMuNzM1NDcsMzEuNTk2NDUgLTM0LjI2ODU4LDMzLjU0MjA5IC0yMC4wMDEzLDEuMjc0NTQgLTIxLjczMDY3LDEuODkxMDMgLTEyLjY4Mjk1LDQuNTIxMjcgMTUuMjkwMTYsNC40NDQ5NyAxNy41NzY0NCwxMy45NTk0IDQuODQxOTcsMjAuMTUwMDEgLTExLjg2MDUsNS43NjU3NiAtMTEuMzMxNzUsNi4yMDYzNyAzLjQxMjMyLDIuODQzNTUgMjMuNjQ3NSwtNS4zOTM1MiA0MS44MzUwMiwtNC42MDY5MiA0NC4xMjQ4MiwxLjkwODM4IDYuMzA3OTksMTcuOTQ4NTMgLTUuOTc2NywzNi4zMzYxMyAtMzAuNjk2MTYsNDUuOTQ1NzEgLTUuOTEzNjcsMi4yOTg5MiAtOS40NTE1OCwzLjM3NDQzIC0yMS41LDYuNTM1OTYgLTYuMDkyMDUsMS41OTg1NyAtMjMuNjczMTksNC4yODY3IC0yNC4yNTE4MiwzLjcwODA3IC0wLjI4MTEzLC0wLjI4MTE0IC0xLjI1OTYzLC0wLjExMDU3IC0yLjE3NDQ1LDAuMzc5MDIgLTAuOTE0ODIsMC40ODk2IC01LjI0MzE1LDEuMTg2MjcgLTkuNjE4NTIsMS41NDgxNiAtMjUuNjA0NDYsMi4xMTc3NyAtMzkuMTA5NTgsMy45MDEzOSAtNjcuNjc5NTEsOC45MzgzOSBDIDcwMS45NTk0MywzNTIuMjM1NTcgNzAwLDM1Mi43NDU1IDcwMCwzNTQuMDczMTYgYyAwLDAuOTY5NzMgMTkuNjI1MjEsMS44NDA3MSAyNSwxLjEwOTUxIDEuOTI1LC0wLjI2MTg4IDUuNTI1LC0wLjY0Nzk5IDgsLTAuODU4MDIgeiBtIDg1LjM0MjU0LC0xNDIuMTI4MzcgYyAzLjkzNjYsLTIuNjM3NSAxMi4zMzY0NiwtOC4yMjEwMiAxOC42NjYzNSwtMTIuNDA3ODEgMTkuOTkzMTYsLTEzLjIyNDEyIDMzLjYwMzM3LC0yNy40NzMzNSAzNi40Mzk4OCwtMzguMTUwNzcgMC43NTA2NywtMi44MjU3NCAxLjY1ODg4LC01Ljg3MDMzIDIuMDE4MjQsLTYuNzY1NzYgMS4xMDAyNCwtMi43NDE1MiAtMi41ODA5NSwtMTIuNjUzNzUgLTMuODk0ODEsLTEwLjQ4NzQzIC02LjA0MTEyLDkuOTYwNzUgLTEwLjU4NjM1LDE1LjY2MDUgLTE5LjU0NzI2LDI0LjUxMjQgLTE0Ljg3MjE3LDE0LjY5MTI1IC0yMC4yOTEsMTkuNzgxMTUgLTIyLjA5NjUsMjAuNzU1MjMgLTIuOTc1MTEsMS42MDUwOCAtMTkuMDkyODQsMTkuODUyOCAtMjAuNTA5NiwyMy4yMTk5OCAtMi43OTI2LDYuNjM3MSAtMS44ODkwNiw2LjU2ODY3IDguOTIzNywtMC42NzU4NCB6IE0gMTA1LDI4Ni4xNDM4IGMgMCwtMS4wMjA5MSAxLjUwNzI0LC0zLjgzMzQxIDMuMzQ5NDMsLTYuMjUgQyAxMTIuOTc0MjUsMjczLjgyNjk0IDExNSwyNjkuNjI4MDIgMTE1LDI2Ni4xMDg2OCBjIDAsLTMuOTA5MDggLTEuMzMyOTksLTMuNDA2NjcgMjIuNjE2NjQsLTguNTI0MjMgNTMuNTg0NjcsLTExLjQ0OTk5IDc2LjUzNTkzLC0xNC4zOTI5OSAxMTcuNTU3MTEsLTE1LjA3NDE1IDIxNi4zNzU5OSwtMy41OTI5NSAyNzkuODg1OTgsLTUuNTc4MzUgMzQ4LjY1Njg5LC0xMC44OTk0NCAxNy41MDAxLC0xLjM1NDA2IDE3LjQ2ODA1LC0xLjM2MyAyMi4yNzM2OSw2LjIxNDcgMTAuMzg2NTYsMTYuMzc3OTEgLTE5LjAyMjQ0LDI3LjE0Mjk5IC02NC42MDQzMywyMy42NDgyMSAtNC40LC0wLjMzNzM1IC0yNS4zMjUsLTAuNzQzNTkgLTQ2LjUsLTAuOTAyNzYgLTM4LjUsLTAuMjg5MzggLTM4LjUsLTAuMjg5MzggLTU5LjQwNjc0LC00LjQ5OTYxIC0zMC41MTg3LC02LjE0NTg5IC0zOS40NTU5NCwtNS43ODkyMSAtNDguMjQyMjgsMS45MjUzIC00LjEyMDg0LDMuNjE4MTQgLTIuODAzMTYsMy42MDUzIC0xMi42ODEwMiwwLjEyMzUzIC0yNC45NzIxOCwtOC44MDIyOCAtNTUuODY1NDcsLTkuMzQxMyAtMTA1LjY2OTk2LC0xLjg0MzcyIC0xNi43NzUsMi41MjUzMSAtMzYuMzUsNS4wODc0NyAtNDMuNSw1LjY5MzcgLTM3LjE0ODgyLDMuMTQ5NzIgLTcxLjk4NzI3LDkuNTg3NTcgLTExNi42Nzg4LDIxLjU2MTI0IEMgMTEwLjI0MTI4LDI4OC41MDkzNCAxMDUsMjg5LjA4NDEzIDEwNSwyODYuMTQzOCBaIgogICAgICAgaWQ9InBhdGgzNTI1IgogICAgICAgaW5rc2NhcGU6Y29ubmVjdG9yLWN1cnZhdHVyZT0iMCIgLz4KICAgIDxwYXRoCiAgICAgICBzdHlsZT0iZmlsbDojZDVhZDJkIgogICAgICAgZD0ibSA0OTIsMTQwNC44NTMzIGMgLTExNi41MDk3NSwtNC45ODU4IC0xOTcuNTE0NjYsLTIwLjQ3OTYgLTI2Mi4xNjMyLC01MC4xNDQxIC05LjQzNjQsLTQuMzI5OSAtOC4wMjA3MywtMS40MzE5IC0xOC4xOTc5OSwtMzcuMjU0MSBDIDE5My45MTM0NiwxMjU1LjA2NSAxODAuNDQwNzYsMTE5OC41Mzc0IDE2Ni4wMDc2OSwxMTI2IDE1OC42OTExMSwxMDg5LjIyODUgMTU1LjI2NDgsMTA3My44NTY4IDEzOC4zNjg0NSwxMDAyIDEwOC4wNDk2LDg3My4wNjAwNSA5Ni41MzQ0NDcsODEzLjc3MzE0IDg5LjkwODY1NCw3NTIuNSBjIC0xLjY3ODAyNSwtMTUuNTE3ODIgMS4zNDI4NTMsLTM2LjczNjE0IDYuMDg5MjQ0LC00Mi43NzAyIDIuODA5NiwtMy41NzE4MyAyLjg2NjY0MywtMTIuNjkwOTYgMC4wODM5NCwtMTMuNDE4NjUgLTEuNjIzNDYyLC0wLjQyNDU1IC0yLjAyNTk0OCwtMS43OTU1NiAtMi42MTk3MjEsLTguOTIzNzIgLTAuNDkyOTYyLC01LjkxNzk0IC0xLjI2MDYyNywtOS4xMzI4NiAtMi41ODE4MzcsLTEwLjgxMjUgQyA4OS42MDU1NjcsNjc0Ljk1NDQgODksNjcyLjU2MzUyIDg5LDY2OS4xNTEyOSA4OSw2NjYuMzgzIDg4LjU1LDY2My44Mzk5MiA4OCw2NjMuNSBjIC0wLjYwMDgyMSwtMC4zNzEzMyAtMSwtNy4xNTczOCAtMSwtMTcgMCwtOS44NDI2MiAtMC4zOTkxNzksLTE2LjYyODY3IC0xLC0xNyAtMC41NSwtMC4zMzk5MiAtMSwwLjI4MTk3IC0xLDEuMzgxOTcgMCwxMi4zMjY0MSAtOC44NTgzMjQsLTEwLjEyMzYzIC0xNC4wMjIxLC0zNS41MzY4NCAtMTMuMjUxNjU2LC02NS4yMTcyIC0zNS4wMDA3MjcsLTEzMC4wMjQxNyAtMjkuOTk3NDgzLC04OS4zODUyNSAxLjc2MDE4LDE0LjI5NzA5IDUuMDAzODAzLDI4LjM1MzU1IDE0LjMxNjE3NCw2Mi4wNDAxMiAxMC45Mzk5NzQsMzkuNTc0MjUgMTUuOTIzNyw2Ny41OTQ2OSAxMy42OTg3NTcsNzcuMDE5NzEgQyA2NS44MTU4MzgsNjU4LjQ4ODMzIDQ1LjI3MDQ1Myw1NzcuNjAzNzIgMzMuNDI5MTQyLDUwNSAzMC40MjQxMTUsNDg2LjU3NSAyNS45MTE5ODMsNDU4LjkgMjMuNDAyMTgxLDQ0My41IDE3Ljc5NDE3OSw0MDkuMDg5NjIgMTIuNTc3Njg5LDM4My4yNDgwMyA1LjQ1MDMxMDgsMzU0LjU2OTU0IC0xLjY4Mzg5MjksMzI1Ljg2MzU5IC0xLjQ4MjMxMTYsMzIxLjIwNzM3IDcuMzgzNDY2OCwzMDkuOTE2NjQgMjUuNjU4NTgyLDI4Ni42NDI5NCA3OS4yODYyNzUsMjY4LjU0OTYgODUuMDgzMzY0LDI4My43MDE2MyA4OS4wNTY2MzYsMjk0LjA4NjY5IDc3LjM0NjEyNCwzMDEuMjgwNzggNDUuNSwzMDguMDE4NzcgMTcuODk4NzMxLDMxMy44NTg2NCAxNS4zNDU4NSwzMTguMDM0MDkgMzAuMzI5NDIsMzMyLjgzMTU0IDQ1LjMwOTYxNCwzNDcuNjI1NjUgMTMyLjE5NzQ1LDM2MC44NDgwNSAyMzUsMzYzLjk3Nzg1IGMgMTgyLjA3NTIxLDUuNTQzMjQgMjk3LjUwNDI5LDcuMDAyNzQgMzMwLDQuMTcyNTUgNy45NzUsLTAuNjk0NTggMTkuMzEzNzMsLTEuNTI1MTYgMjUuMTk3MTgsLTEuODQ1NzQgMTAuNjk3MTgsLTAuNTgyODggMTAuNjk3MTgsLTAuNTgyODggMTAuMjEwNTMsLTMuMTkzNzcgLTAuMzY4NTYsLTEuOTc3MzUgMC40ODM3NywtMy44MjQxNSAzLjUxMjU1LC03LjYxMDg5IDIuMTk5NTYsLTIuNzUgNS40ODI5MSwtNy4wMjUgNy4yOTYzNCwtOS41IDYuNTUyODUsLTguOTQzNDYgMTcuMDUwMzQsLTExLjc0MDA3IDIxLjI5OTAzLC01LjY3NDIyIDIuODEyMzksNC4wMTUyNSAxLjUxMTgzLDUuMTYzMjIgLTEuNTg4NDMsMS40MDIwNiAtNC45MjEwNiwtNS45NzAwOSAtMTIuMzc4MzQsLTMuNTc4MDMgLTE5LjQyNzIsNi4yMzE2MyAtMS42NSwyLjI5NjI1IC00LjQ2MjUsNS45ODczMiAtNi4yNSw4LjIwMjM4IC02Ljk2MDAxLDguNjI0OCAtMC42Mzk3MiwxNC43MzQzIDExLjU5NjA5LDExLjIwOTM0IEMgNjI1LjQ5MjUsMzY0Ljg4MDI4IDYzMywzNTYuMDMxOTEgNjMzLDM0OC4zMzIxMiBjIDAsLTEuODI5MSAwLjMzMTkyLC0yLjQwMDIgMS4wMDQyNCwtMS43Mjc4OCAyLjg0ODQ3LDIuODQ4NDcgLTQuMTUwNDksMTUuODY4NjcgLTEwLjIxNjI5LDE5LjAwNTQxIC00LjEwMDgsMi4xMjA2MSAtMi45MjM1MSwyLjc3MzM0IDYuNTQyNjMsMy42Mjc0OSA0LjQ5MzE4LDAuNDA1NDMgMTAuNzQ2ODUsMS4wMDg5OSAxMy44OTcwNSwxLjM0MTI1IDkuNTI5NzgsMS4wMDUxNCAxNi43OTU2NiwtMi40MzczNiAxMi43OTE5MywtNi4wNjA2OSAtOC44MjAxOCwtNy45ODIxNSA3Ljc3Njc1LC0yNC4wODI0OCAzMy40ODA0NCwtMzIuNDc4NjUgMy44NSwtMS4yNTc2MiA3LjQyNzUsLTIuNjgwODggNy45NSwtMy4xNjI4MSAwLjUyMjUsLTAuNDgxOTMgMS42NjI2NywtMC44NzYyNCAyLjUzMzcyLC0wLjg3NjI0IDMuMjc1NjYsMCAxMi42NTY2NCwtNy4yNjc1NSAyMy4wNTg5LC0xNy44NjM5OCAxMC42MTk1NiwtMTAuODE3NzkgMTUuNTEwNDEsLTE0LjkxNjMyIDE2LjU1NDI3LC0xMy44NzI0NyAwLjI5Mzk2LDAuMjkzOTYgLTEuMTgyNTksMS44MDA3NiAtMy4yODEyMSwzLjM0ODQ0IC0xNS41MTkzOCwxMS40NDUxMSAtMTYuMTY0NzYsMTUuODQ5OTEgLTEuMTgxNDksOC4wNjM3MiAyMS43NzQyNSwtMTEuMzE1MTkgMzAuODU2MDQsLTEzLjY0MDkgMjMuODAyNTcsLTYuMDk1NDkgLTkuMDU2OTMsOS42ODg1OSAtMzguOTc3NywyMy45Nzg4NCAtNDIuNjA3MjEsMjAuMzQ5MzMgLTAuNzYwNiwtMC43NjA2IC0yLjY1NTExLC0wLjA1NjggLTYuNTQ1MDUsMi40MzE2IC0zLjAxMTAyLDEuOTI2MTMgLTkuOTMxODIsNS4wNjQyNiAtMTUuMzc5NTQsNi45NzM2MiAtMTguNjkyMjIsNi41NTEzOSAtMjMuNTU4NTQsOS4yODM4NCAtMzQuMzg1MDcsMTkuMzA3MyAtMzQuNjM2MDIsMzIuMDY2ODQgMTUxLjQwMzQyLDE4LjcyMTAyIDI1My42MTU1LC0xOC4xOTM0OSAxNy4xNDYwOCwtNi4xOTI0MSAyMC40MjAzMSwtOS44ODcwNCAxOS4wNDU5NSwtMjEuNDkxMzYgLTIuMzYyMzksLTE5Ljk0NjY0IC00MS4zOTEwMywtNDQuODEwNjYgLTUyLjE0MDg3LC0zMy4yMTc0NCAtMi41NjExLDIuNzYyMDMgLTMuNjEyMTcsMS45OTc3OSAtMS4yOTA0NywtMC45MzgzMSAzLjk5NjIsLTUuMDUzNzEgMTQuODAyNDQsLTQuMDE4MyAyOC4yNSwyLjcwNjgxIDguNTc0NDUsNC4yODgwNyA4LjUsNC4yODc4MyA4LjUsMC4wMjY5IDAsLTMuNzIxOTIgLTEuOTMwNjgsLTUuNDczMTIgLTYuMTg0MjYsLTUuNjA5MzQgLTIuMjQ0OTMsLTAuMDcxOSAtMTEuMTcxMTQsLTMuNzAyNTMgLTkuNDY5NjUsLTMuODUxNjggMC40NjUzNSwtMC4wNDA4IDMuMzM1NjgsMC42NDk1OCA2LjM3ODUsMS41MzQxNSAyMS42MjAyLDYuMjg1MTcgMjkuNjUxNzQsLTQuNTY1NzYgMTkuMjY5OCwtMjYuMDM0MjYgQyA5MjUuOTEwOCwyNDMuMzMzMzIgOTIyLjgwMDgyLDIzMi43MjUgOTIwLjA4MzMxLDIyMiA5MDUuODI1MTcsMTY1LjcyODI2IDg3Ni44NzcyNSwxMDUuMDAzMzEgODY0LjMwOTAyLDEwNS4wMDA0OSBjIC0yLjk3MDg5LC02LjZlLTQgLTIuOTExMjUsMC4xNDM0MiAtNy44NjY1MywtMTkuMDAxNjMgQyA4NDcuOTM4MjUsNTMuMTQyMjY0IDg0MS42NjMyNyw0MS4wNTExMzEgODI5LjUzNDQ4LDM0LjE1MDM2NyA4MDMuMTc4NDcsMTkuMTU0OTE2IDc5Ni43MjgwMiwtOC4xMDA4NDkxIDgyMiwyLjMxNDEwMDcgODc2LjIzNDQ1LDI0LjY2NDkwNCA5MzEuNTE5NjMsOTMuMDQzMzc4IDk3MS44NzI3MSwxODcuNjgxNDYgMTAwMC42MDg0LDI1NS4wNzM4MyAxMDA4LjE1MzYsMzY5LjM2ODk1IDk4OS41MTk5LDQ1NSBjIC0xMy4wNjM3NCw2MC4wMzQxMiAtMjEuOTU1MjMsMTUyLjE2NjQ4IC0zMS41MDk3OSwzMjYuNSAtNi4wODMyMiwxMTAuOTk1MDIgLTkuNTYwMjIsMTYxLjA4MzEyIC0xNC41Nzc2OCwyMTAgLTEuMzUzOTUsMTMuMiAtMy4xMjUzNCwzMyAtMy45MzY0Myw0NCAtNC4wNzIyOCw1NS4yMjgzIC0xMC4yMDkyNiwxMDYuNTA0OCAtMjAuNjQ1NSwxNzIuNSAtMy41Njc3MywyMi41NjExIC00LjA2Nzk2LDI3Ljg2MjYgLTQuMzQwMzgsNDYgLTEuMDI3MTMsNjguMzgzMyAtMjYuMDk0NDYsMTA3LjIxNjEgLTczLjYzMDY3LDExNC4wNjQyIC00LjYwODcsMC42NjQgLTE0LjIyOTQ1LDIuOTI0NyAtMjEuMzc5NDUsNS4wMjM4IC01Ny45NTYyMywxNy4wMTUgLTExOS43ODU0NywyNi4wMzc3IC0yMDQuNSwyOS44NDI1IC02OC42OTk3MywzLjA4NTYgLTg4LjU2ODUsMy4zOTYyIC0xMjMsMS45MjI4IHogTSAyNTUuOTk0OTcsMTMwMS40MjQgYyAtMTIuMzM2NjUsLTUwLjMwMTcgLTE5LjU1MzI3LC03NC4xODMyIC0yOC4yMzEzMywtOTMuNDI0IC05LjI4OTI3LC0yMC41OTU5IC0xMS40MDAwMiwtMjMuMzIzOCAtMTAuMjUyNjQsLTEzLjI1IDUuMjczOTgsNDYuMzA0MyAxNy45ODQ0OCw4OS4yNDczIDM4LjY3MjUsMTMwLjY1NjggMTAuOTA4NjUsMjEuODM1IDEwLjkwNDAyLDIxLjI0NjIgLTAuMTg4NTMsLTIzLjk4MjggeiBtIC0yMS42MjUyNiwzMy4zMjYgYyAzLjYwMDQ2LC0xMy40MzUxIC0yLjE1NzgyLC00MS42OTQ4IC0xOC45MjQ3LC05Mi44NzYgLTkuNTYzNTgsLTI5LjE5MjkgLTE2LjYxMTIsLTU0LjU4MTcgLTE3LjkzODUzLC02NC42MjI5IC0wLjg2OTk3LC02LjU4MTIgLTEuNzc0MDgsLTcuMTM3MyAtNS41MTc1NSwtMy4zOTM5IC02LjAwNDQxLDYuMDA0NCAtNC4xODkwMywxOC40Mjg1IDkuMzMzODMsNjMuODc4NyAzLjYzODcyLDEyLjIyOTcgNy4xMzA5NywyNi4xNzk3IDcuNzYwNTQsMzEgMy42OTk3NiwyOC4zMjcxIDIyLjM0Mjg4LDc2Ljk5NzggMjUuMjg2NDEsNjYuMDE0MSB6IG0gMzM5LjA3ODAyLC0xNDguOTIzMiBjIDE4LjI0NjkzLC0xMi4wODYyIDE1Ljg1Mjg1LC00Ny4zMTM2IC0zLjk3ODgyLC01OC41NDYgLTE3Ljg1MzI2LC0xMC4xMTE4IC0yNy40NDEzMiwxMS45MjI4IC0xOS44NjEwOSw0NS42NDMyIDMuNDAwMjMsMTUuMTI1NyAxMi44MDE4MSwyMC4yMTQyIDIzLjgzOTkxLDEyLjkwMjggeiBtIC01My43ODY1MywtMi42NjM5IGMgMTMuNjA2NywtNi45NzY3IDE4LjEyNTg3LC0zMC4yNTY3IDkuNjAwMjQsLTQ5LjQ1NDcgLTguNDA1MzksLTE4LjkyNzIgLTI1LjI2Njg2LC05LjMzNTMgLTI4LjMwNTM0LDE2LjEwMTkgLTAuNDM5NTEsMy42Nzk1IC0xLjQ3NzEzLDExLjAxMDUgLTIuMzA1ODMsMTYuMjkxMiAtMi45NzA1MSwxOC45MjkgNC45MDE2NywyNS4zMjE1IDIxLjAxMDkzLDE3LjA2MTYgeiBtIC0zMzEuMTAwMDYsLTM0LjgwNiBjIDIuMTgxMjIsLTE3LjQ1NzggLTIuMzQyOTYsLTQyLjY4MzIgLTE2Ljk3OTE2LC05NC42NzA2IC00LjE1MTkzLC0xNC43NDc2IC04LjkzOTA5LC0zMy44NzI2IC0xMC42MzgxMywtNDIuNSAtNS41NTU0MSwtMjguMjA5NTEgLTEzLjk2NjM4LC00MS45NTU2IC05LjkwNDA3LC0xNi4xODYzIDEuOTcxODcsMTIuNTA4NiAxMy4xMDM4Nyw2OS41OTE0IDE1LjUwMzY4LDc5LjUgMS4zMzIwOCw1LjUgMy41ODIzNSwxOS4zNzM1IDUuMDAwNjEsMzAuODMgMy41MzE5NSwyOC41MzA1IDYuNjMwMjYsMzkuODM0OSAxMi43MjI4NSw0Ni40MiAzLjAxOTkzLDMuMjY0MSAzLjUxMDk0LDIuODc2MSA0LjI5NDIyLC0zLjM5MzEgeiBtIDIzMS40MzY0OCwtOTYuNDg5OCBDIDQ5Ni4xNzI1NSwxMDM0LjQxMTggNTIwLjczNTI5LDkzOS4xNTUwNyA0NjAuNjExNjksODk0LjM2MTY5IDQyMS44NDQ0OSw4NjUuNDc5MjkgMzk3LjU2NjQsODYzLjM4MDQzIDMzNyw4ODMuNjc1MzYgYyAtMTIuMzc1LDQuMTQ2NjkgLTIzLjUxNTcyLDguMTc4NTggLTI0Ljc1NzE1LDguOTU5NzcgLTQuNDEzNDgsMi43NzcyNSAtMTEuMjQxNTUsMTIuNjI1MTQgLTExLjI0MjIyLDE2LjIxNDI4IC0zLjVlLTQsMS44NDIxNyAtMS43NjcyMiw3LjczMTA4IC0zLjkyNjM5LDEzLjA4NjQ3IC0yOC42MTE0LDcwLjk2NDgxIDQ0LjIzMzY3LDE0Ny45NjI3MiAxMjIuOTIzMzgsMTI5LjkzMTIyIHogTSAzMjMuNSw5OTcuMzUyNTcgYyAtMjkuOTY1NDIsLTQuNDc1MDUgLTM2LjQyMzY2LC0yOS45ODk2MSAtMTMuNDg3NDIsLTUzLjI4NDcyIDE2LjY2MTQxLC0xNi45MjIxIDM2LjA2MjIxLC0xOC4zODcwNiA1MC4zMDUxNSwtMy43OTg1NCAyOC4xODI3NiwyOC44NjY1MyA1Ljg3MTUzLDYzLjQ1ODQ5IC0zNi44MTc3Myw1Ny4wODMyNiB6IG0gMzc5LjkzMjQyLDQwLjQ4OTgzIGMgNTIuMzI0MDksLTguNzg5NCA4NS4xMzIwOSwtNjguOTQzMTcgNjMuNTU1NDIsLTExNi41Mjk0OSAtNTAuNTIyMzYsLTExMS40MjQ2NyAtMjMxLjk2ODc4LC01Ny44OTgzMSAtMTkyLjE3Niw1Ni42OTE1NyAxNy4wMTMyMyw0OC45OTI0MiA2My43NDg2MSw3MC43MzUwMiAxMjguNjIwNTgsNTkuODM3OTIgeiBNIDYwMS41LDk5MS41OTg3OCBjIC0yMy4zMjMzMywtNS43NDI4MSAtMzAuODg4NTYsLTI3LjA1NzE4IC0xOC4zOTA5MywtNTEuODE0ODQgMTUuNjI1MzEsLTMwLjk1MzU4IDQ5LjA1ODQ3LC0zMC41ODgzNyA2NS41NTIyMiwwLjcxNjA2IDkuOTYxODMsMTguOTA3MTEgNy43MDM1MSwyNS4yMDc2OCAtOC40NTE0OCwyMy41NzkwOSAtMTQuNTI5NTQsLTEuNDY0NzMgLTE5LjI5Njc0LDAuNjEyMyAtMTIuMTkzODUsNS4zMTI3NyA1LjE3NTcsMy40MjUxMiAxMS43OTQ4Miw5LjM4NjA2IDEzLjA3MTY4LDExLjc3MTg5IDMuOTg5ODYsNy40NTUxMyAtMjIuOTAxNjUsMTQuNTQzNTUgLTM5LjU4NzY0LDEwLjQzNTAzIHogTSAzNTUuNjMyNzgsNTc4LjE2NTIxIGMgMy45NDA3MSwtMC41NzE4MiA2LjY2NDM0LC0xLjg5Njc4IDExLjcyNzM1LC01LjcwNSAzLjYyNzAxLC0yLjcyODEyIDkuMTkyMjYsLTYuODUzNjEgMTIuMzY3MjIsLTkuMTY3NzcgMTcuNDU1OTcsLTEyLjcyMzI4IDMyLjQ3MjEzLC0yNC4xNDc4OSAzNy43NzI2NSwtMjguNzM4MjEgNi44NzYwNywtNS45NTQ3OCA4LjUsLTcuMDUwNTkgOC41LC01LjczNTcyIDAsMC41MTUwOSAtMi41ODc1LDMuMDQwMjcgLTUuNzUsNS42MTE1MSAtMy4xNjI1LDIuNTcxMjMgLTYuNTMxNTMsNS4zMTY4NCAtNy40ODY3NCw2LjEwMTM0IC0yLjY2MjY1LDIuMTg2OCAtMjEuNDAxNDYsMTYuMTQyNzEgLTMyLjE1MTMzLDIzLjk0NTAyIC0xMS41MjUwOSw4LjM2NDk2IC0xMS42NTg3NCw4LjgyNzA1IC0yLjM2MTkzLDguMTY2NTIgMTMuMTU0NTIsLTAuOTM0NjMgMTUuODk1MTgsLTEuNjEwMTMgMTUuMjE1OTEsLTMuNzUwMzEgLTAuNjg2MjQsLTIuMTYyMTYgMy40MDQ3MiwtNC4yNjkyNSA2Ljk2ODU1LC0zLjU4OTIxIDEuNjE5ODMsMC4zMDkxIDEuMzU1ODIsMC41NjMzMyAtMS4yMjM1MiwxLjE3ODIgLTEuODA4OTksMC40MzEyMiAtMy4xMjQyOCwxLjI4Njc4IC0yLjkyMjg4LDEuOTAxMjMgMC40OTc3NywxLjUxODY2IDUuNjk2NTEsMi4wMzI2MiA3LjAzMzc2LDAuNjk1MzcgQyA0MDQuMDE1NjIsNTY4LjM4NDM4IDQxMS4wNDY4OSw1NjggNDIzLjA0NDQ0LDU2OCA0NDUuMDg0NDEsNTY4IDQ2Myw1NjcuMDM1MDggNDYzLDU2NS44NDgwMyA0NjMsNTY1LjM4MTYyIDQ2Mi4zNTcxNCw1NjUgNDYxLjU3MTQzLDU2NSA0NTkuOTY5OTQsNTY1IDQ1Nyw1NjIuMzU0OSA0NTcsNTYwLjkyODU3IGMgMCwtMC41MTA3MSAwLjksLTAuMDI4NiAyLDEuMDcxNDMgMS40MjExNywxLjQyMTE3IDMuMzMzMzMsMiA2LjYwNjk5LDIgMy41Mjc3LDAgNC40ODE3MiwwLjMyNjQ1IDQuMDcyMjcsMS4zOTM0NiAtMS40NjQ3OSwzLjgxNzE4IDE2MC42MDc5MiwzLjQ1MzY4IDE2My4xOTI3MSwtMC4zNjYwMiAxLjI2NDcxLC0xLjg2ODkzIDIuNDM3NDMsLTIuMDI4NjIgMTUsLTIuMDQyNSAxOC41NzA0OCwtMC4wMjA1IDI4LjUwODMyLC0zLjg4NDg0IDIxLjYxMTY4LC04LjQwMzcgLTEuNDA1NzgsLTAuOTIxMSAtMi40ODc4OSwtMi41OTM4MSAtMi40OTM0MiwtMy44NTQyOSAtMC4wMDUsLTEuMjI0ODIgLTEuMTA5NjcsLTQuNTg5NDUgLTIuNDUzOTksLTcuNDc2OTUgLTEuMzQ0MzMsLTIuODg3NSAtMi4wNDE0OSwtNS4yNSAtMS41NDkyNSwtNS4yNSAxLjI4NjE2LDAgMi4wNDU2NSwxLjQ4NzM4IDQuNTM3NjMsOC44ODY0NSAyLjE1MTA2LDYuMzg2ODUgMi4zNDA5NSw2LjYwODU1IDYuNTk1MTEsNy42OTk4NiA0LjI1OTUsMS4wOTI2OSA0LjI5NzU2LDEuMTM3MzIgMS4zODAyNywxLjYxODg1IC0xLjY1LDAuMjcyMzUgMS4wNSwwLjUwMzM2IDYsMC41MTMzNyA2LjMxODIsMC4wMTI4IDcuOTU3MDgsLTAuMjAxMzQgNS41LC0wLjcxODUzIC0xLjkyNSwtMC40MDUxOSAtMy4xOTUwNiwtMC43OTU5NiAtMi44MjIzNiwtMC44NjgzNiAwLjM3MjcsLTAuMDcyNCA0LjE3OTE0LC0wLjYxODY1IDguNDU4NzYsLTEuMjEzODkgMTMuNTA4ODIsLTEuODc4OTEgMjMuMTc1NTgsLTUuNDQ2NDUgMjMuNTQ5NDIsLTguNjkwOTggMC4yODM0NywtMi40NjAyNCAwLjcwMzY2LC0yLjcyNjc3IDQuMjk4NzcsLTIuNzI2NzcgNi45Nzk4NCwwIDUuMjQ4NjYsLTYuNzA5MDEgLTIuMDg2MjUsLTguMDg1MDUgLTMuNjQxNjUsLTAuNjgzMTggLTUuOTQwNTksLTIuNzI4NTYgLTQuOTIxMDIsLTQuMzc4MjYgMC45OTEwNywtMS42MDM1OCA2LjUwNTQyLC00LjIxNTYxIDcuODQwNDcsLTMuNzEzODUgMC42NzMzNCwwLjI1MzA2IDAuMzIxMzMsMC43NDA3IC0wLjgxNzc5LDEuMTMyODkgLTYuMjgwMTksMi4xNjIxOSAtNi43MjE1NywzLjgzODM0IC0xLjU1NTA5LDUuOTA1NTUgNC4xMTgyNiwxLjY0NzggOC4wNTUwOSw0Ljg3NTM5IDguMDU1MDksNi42MDM5MiAwLDEuODMwNzQgLTYuMjExNjEsOC4wMzQ4IC04LjA0NDU4LDguMDM0OCAtMS4wMTA1NiwwIC0yLjA4ODI5LDAuNDA1OTcgLTIuMzk0OTUsMC45MDIxNiAtMC42NzY2MiwxLjA5NDc4IC0xMi40MzQyOCw0LjczOTU3IC0xOC4zMTA0Nyw1LjY3NjEgLTExLjA0NzIxLDEuNzYwNjggLTEuMDA0ODEsMi40MjE3NCAzNi43ODk0MSwyLjQyMTc0IDQxLjc3NzUsMCA1OS4xNzkzLC0xLjAwMzggNjIuMDM5MzMsLTMuNTc4NjcgMS4wOTA2NCwtMC45ODE4OSA0LjA4NjgzLC0xLjQyMTMzIDkuNjkwOTgsLTEuNDIxMzMgNC40NjE3NCwwIDguMzkwMzYsLTAuNDUgOC43MzAyOCwtMSAwLjMzOTkyLC0wLjU1IDEuNDM4OTksLTEgMi40NDIzOSwtMSAxLjY2OTM2LDAgMy42MjMzNiwtMy43Njc1OSAyLjUyNDExLC00Ljg2Njg0IC0wLjI0OTgsLTAuMjQ5OCAtMi44MTk0NSwwLjA0MTMgLTUuNzEwMzQsMC42NDY5NyBDIDgwNC4yMzIwMyw1NDcuOTg0ODkgODAzLDU0OC4xNDM4IDgwMyw1NDcuMjk2NDYgYyAwLC0wLjQ3NDM1IDMuMjExNSwtMS40NTYzOSA3LjEzNjY2LC0yLjE4MjMzIDM0LjkwNjcyLC02LjQ1NTc5IDYxLjY4MTY4LC0yNS45OTgzMiA3Mi45MDMxMywtNTMuMjEwNjIgMS41NTc2NCwtMy43NzczMiA2LjA4MjIxLC0xMi44MzgzOCAxMC4wNTQ1OSwtMjAuMTM1NjkgMjQuMjkyNTUsLTQ0LjYyNTY3IDM4LjQ3OTc3LC04My4xODc2IDM0Ljg1NDM4LC05NC43MzY4NSAtMC40MzY5NiwtMS4zOTIwMyAtMS4wNTk5MiwtNC4xNDAyOSAtMS4zODQzNCwtNi4xMDcyNCAtMS4xMjIwMSwtNi44MDI2NSAtMS42Nzk4NiwtNy4wMjY1OSAtMTMuNTY0NDIsLTUuNDQ1NDMgLTUzLjEzMjkzLDcuMDY5MDEgLTE1Ni4zODQzMSwxNy42Mzc2NyAtMjE5LjUsMjIuNDY3NzEgLTQ0LjMyNDczLDMuMzkyMDMgLTEwNC42MjUxLDcuMDMxMDggLTExNi43ODAxMiw3LjA0NzUyIC00Ljc4MDEyLDAuMDA2IC00Ljc4MDEyLDAuMDA2IC0yMi40NjMyLDE2Ljk1OTkzIC0yMi4xMjgwMiwyMS4yMTUgLTIzLjk4NDA5LDIxLjMwNTEgLTIuODQ4MjcsMC4xMzgyNyA4LjY5NzM3LC04LjcxMDE0IDE1LjQyNTk5LC0xNi4wNjMxNSAxNC45NTI1LC0xNi4zNDAwNCAtMy4yMjYzNywtMS44ODY2NyAtMTUuMjE4NCwtMy43NjM5MiAtMjIuNTE3MzgsLTMuNTI0OTEgLTguMTExNjQsMC4yNjU2MyAtOC4zNDEyNSwwLjIxMDA0IC04LjI2MTY0LC0xLjk5OTkyIDAuMTA4NjcsLTMuMDE2ODIgMC4yMzQ0MSwtMy4wMDA5MiAtMjkuMDgxODksLTMuNjc3ODQgQyAyNzEuOTgwOSwzODEuMTMzOSAxMTQuODM3NDYsMzczLjA0NzEzIDI5LjkwNTA5MiwzNjIuMDIyOTMgMjAuMDEzMDc5LDM2MC43Mzg5NSAxOSwzNjAuNzcwMTkgMTksMzYyLjM1OTIxIGMgMCwyLjc4MDcgOC4wOTY3MTIsMTAuNDcyMjggMTQuNDk2NDc2LDEzLjc3MTExIDguMDUzMjExLDQuMTUxMTMgOC4xNzQ2MDUsNS45Njk4NyAwLjQ5MTksNy4zNjk2OCAtOC4yMzY3NDQsMS41MDA3NiAtNy45ODgzNzgsMC41Mjc4OSAtNC43NTQ2MDQsMTguNjI0MjkgQyA0Mi4yMDY0NjQsNDc0LjcyMDMyIDYxLjI3ODI5LDQ5MS4xNTM4NyAxMDEuNTQxLDQ2NC40MjkgMTI0LjY5NzE1LDQ0OS4wNTg4MyAyNzMuMDc2MzMsNDMzLjEzOTM4IDM3MSw0MzUuNTE5MDIgYyAxNi44MDgxMiwwLjQwODQ1IDI4LjM5NzI5LDAuMjMzOTEgMzQsLTAuNTEyMDggNC42NzUsLTAuNjIyNDYgMTEuMDY0NjEsLTEuMzY3NDggMTQuMTk5MTQsLTEuNjU1NiAzLjEzNDUzLC0wLjI4ODEyIDYuMjI3MTMsLTEuMTYwMDQgNi44NzI0NSwtMS45Mzc2IDAuNjQ1MzEsLTAuNzc3NTYgMi44ODg5LC0xLjQxMzc0IDQuOTg1NzYsLTEuNDEzNzQgMi4wOTY4NSwwIDUuMDc5MjUsLTAuNTIwMzUgNi42Mjc1NSwtMS4xNTYzMyAxMC41OTk3MywtNC4zNTM5NSA5MS4zMTUxLC02LjAyNjA1IDkxLjMxNTEsLTEuODkxNjkgMCwwLjcyNTU5IC00LjE1MzM0LDQuNjg0NDggLTEzLjc4NzQsMTMuMTQxOTEgLTIuMjUxNjQsMS45NzY2NSAtMTMuOTA4MSwxMC45NzIyOCAtMjUuOTAzMjQsMTkuOTkwMjkgLTE4LjE4ODg4LDEzLjY3NDUgLTMwLjMzNzc2LDIzLjExNDQ1IC0zNS44MDkzNiwyNy44MjQ2NiAtMC41NSwwLjQ3MzQ3IC02LjU2NDI4LDYuNzgyNzQgLTEzLjM2NTA3LDE0LjAyMDYgLTI3Ljk2ODk5LDI5Ljc2NjUgLTU3LjE3NzEyLDUwLjI1MTUzIC04Mi4yNzg2OCw1Ny43MDU4OSAtMy41MTA0MSwxLjA0MjQ4IC00LjkzMjc0LDIuMDY1NjIgLTUuNzM1MDcsNC4xMjU0OCAtMS4zNTE3MSwzLjQ3MDMyIC01LjcxNDI5LDExLjIzMjMgLTcuMDgxNDcsMTIuNTk5NDggLTIuMjc1NzIsMi4yNzU3MiAtMS4xNjI0NywzLjg5MTU4IDIuMjEwMjksMy4yMDgyMSAxLjc4NzUsLTAuMzYyMTcgNS41NTk3NSwtMC45OTM2NSA4LjM4Mjc4LC0xLjQwMzI5IHogTSAxMDUsMjg2LjE0MzggYyAwLC0xLjAyMDkxIDEuNTA3MjQsLTMuODMzNDEgMy4zNDk0MywtNi4yNSBDIDExMi45NzQyNSwyNzMuODI2OTQgMTE1LDI2OS42MjgwMiAxMTUsMjY2LjEwODY4IGMgMCwtMy45MDkwOCAtMS4zMzI5OSwtMy40MDY2NyAyMi42MTY2NCwtOC41MjQyMyA1My41ODQ2NywtMTEuNDQ5OTkgNzYuNTM1OTMsLTE0LjM5Mjk5IDExNy41NTcxMSwtMTUuMDc0MTUgMjE2LjM3NTk5LC0zLjU5Mjk1IDI3OS44ODU5OCwtNS41NzgzNSAzNDguNjU2ODksLTEwLjg5OTQ0IDE3LjUwMDEsLTEuMzU0MDYgMTcuNDY4MDUsLTEuMzYzIDIyLjI3MzY5LDYuMjE0NyAxMC4zODY1NiwxNi4zNzc5MSAtMTkuMDIyNDQsMjcuMTQyOTkgLTY0LjYwNDMzLDIzLjY0ODIxIC00LjQsLTAuMzM3MzUgLTI1LjMyNSwtMC43NDM1OSAtNDYuNSwtMC45MDI3NiAtMzguNSwtMC4yODkzOCAtMzguNSwtMC4yODkzOCAtNTkuNDA2NzQsLTQuNDk5NjEgLTMwLjUxODcsLTYuMTQ1ODkgLTM5LjQ1NTk0LC01Ljc4OTIxIC00OC4yNDIyOCwxLjkyNTMgLTQuMTIwODQsMy42MTgxNCAtMi44MDMxNiwzLjYwNTMgLTEyLjY4MTAyLDAuMTIzNTMgLTI0Ljk3MjE4LC04LjgwMjI4IC01NS44NjU0NywtOS4zNDEzIC0xMDUuNjY5OTYsLTEuODQzNzIgLTE2Ljc3NSwyLjUyNTMxIC0zNi4zNSw1LjA4NzQ3IC00My41LDUuNjkzNyAtMzcuMTQ4ODIsMy4xNDk3MiAtNzEuOTg3MjcsOS41ODc1NyAtMTE2LjY3ODgsMjEuNTYxMjQgQyAxMTAuMjQxMjgsMjg4LjUwOTM0IDEwNSwyODkuMDg0MTMgMTA1LDI4Ni4xNDM4IFoiCiAgICAgICBpZD0icGF0aDM1MjMiCiAgICAgICBpbmtzY2FwZTpjb25uZWN0b3ItY3VydmF0dXJlPSIwIiAvPgogICAgPHBhdGgKICAgICAgIHN0eWxlPSJmaWxsOiMyOGE4ZGQiCiAgICAgICBkPSJtIDQ5MiwxNDA0Ljg1MzMgYyAtMTE2LjUwOTc1LC00Ljk4NTggLTE5Ny41MTQ2NiwtMjAuNDc5NiAtMjYyLjE2MzIsLTUwLjE0NDEgLTkuNDM2NCwtNC4zMjk5IC04LjAyMDczLC0xLjQzMTkgLTE4LjE5Nzk5LC0zNy4yNTQxIEMgMTkzLjkxMzQ2LDEyNTUuMDY1IDE4MC40NDA3NiwxMTk4LjUzNzQgMTY2LjAwNzY5LDExMjYgMTU4LjY5MTExLDEwODkuMjI4NSAxNTUuMjY0OCwxMDczLjg1NjggMTM4LjM2ODQ1LDEwMDIgMTA4LjA0OTYsODczLjA2MDA1IDk2LjUzNDQ0Nyw4MTMuNzczMTQgODkuOTA4NjU0LDc1Mi41IGMgLTEuNjc4MDI1LC0xNS41MTc4MiAxLjM0Mjg1MywtMzYuNzM2MTQgNi4wODkyNDQsLTQyLjc3MDIgMi44MDk2LC0zLjU3MTgzIDIuODY2NjQzLC0xMi42OTA5NiAwLjA4Mzk0LC0xMy40MTg2NSAtMS42MjM0NjIsLTAuNDI0NTUgLTIuMDI1OTQ4LC0xLjc5NTU2IC0yLjYxOTcyMSwtOC45MjM3MiAtMC40OTI5NjIsLTUuOTE3OTQgLTEuMjYwNjI3LC05LjEzMjg2IC0yLjU4MTgzNywtMTAuODEyNSBDIDg5LjYwNTU2Nyw2NzQuOTU0NCA4OSw2NzIuNTYzNTIgODksNjY5LjE1MTI5IDg5LDY2Ni4zODMgODguNTUsNjYzLjgzOTkyIDg4LDY2My41IGMgLTAuNjAwODIxLC0wLjM3MTMzIC0xLC03LjE1NzM4IC0xLC0xNyAwLC05Ljg0MjYyIC0wLjM5OTE3OSwtMTYuNjI4NjcgLTEsLTE3IC0wLjU1LC0wLjMzOTkyIC0xLDAuMjgxOTcgLTEsMS4zODE5NyAwLDEyLjMyNjQxIC04Ljg1ODMyNCwtMTAuMTIzNjMgLTE0LjAyMjEsLTM1LjUzNjg0IC0xMy4yNTE2NTYsLTY1LjIxNzIgLTM1LjAwMDcyNywtMTMwLjAyNDE3IC0yOS45OTc0ODMsLTg5LjM4NTI1IDEuNzYwMTgsMTQuMjk3MDkgNS4wMDM4MDMsMjguMzUzNTUgMTQuMzE2MTc0LDYyLjA0MDEyIDEwLjkzOTk3NCwzOS41NzQyNSAxNS45MjM3LDY3LjU5NDY5IDEzLjY5ODc1Nyw3Ny4wMTk3MSBDIDY1LjgxNTgzOCw2NTguNDg4MzMgNDUuMjcwNDUzLDU3Ny42MDM3MiAzMy40MjkxNDIsNTA1IDMwLjQyNDExNSw0ODYuNTc1IDI1LjkxMTk4Myw0NTguOSAyMy40MDIxODEsNDQzLjUgMTcuNzk0MTc5LDQwOS4wODk2MiAxMi41Nzc2ODksMzgzLjI0ODAzIDUuNDUwMzEwOCwzNTQuNTY5NTQgLTEuNjgzODkyOSwzMjUuODYzNTkgLTEuNDgyMzExNiwzMjEuMjA3MzcgNy4zODM0NjY4LDMwOS45MTY2NCAyNS42NTg1ODIsMjg2LjY0Mjk0IDc5LjI4NjI3NSwyNjguNTQ5NiA4NS4wODMzNjQsMjgzLjcwMTYzIDg5LjA1NjYzNiwyOTQuMDg2NjkgNzcuMzQ2MTI0LDMwMS4yODA3OCA0NS41LDMwOC4wMTg3NyAxNy44OTg3MzEsMzEzLjg1ODY0IDE1LjM0NTg1LDMxOC4wMzQwOSAzMC4zMjk0MiwzMzIuODMxNTQgNDUuMzA5NjE0LDM0Ny42MjU2NSAxMzIuMTk3NDUsMzYwLjg0ODA1IDIzNSwzNjMuOTc3ODUgYyAxODEuOTE4MTgsNS41Mzg0NiAyOTcuNDM5MTcsNy4wMDExNSAzMzAsNC4xNzgzNyAzMi4xNjE3OCwtMi43ODgxOSAzNC4wOTc0MywtMi43Njk0NyAzOS40NzQ1OSwwLjM4MTc1IDQuNzkzMSwyLjgwODk1IDQuNzkzMSwyLjgwODk1IDEwLjkwOTI1LDEuMjg5ODEgNi4xMjEwNSwtMS41MjAzNiA3LjU4NzIxLC0xLjQ4MjA4IDI4LjkxNzAyLDAuNzU0ODYgNC42NDM1MywwLjQ4Njk4IDYuODc3NTcsMC4xNzEzNiAxMS4xOTc1NiwtMS41ODIgNC43OTE1OCwtMS45NDQ3NiA1LjgyMzA2LC0yLjA0ODU3IDkuMTk5MTQsLTAuOTI1ODYgNy4wMDY3NiwyLjMzMDA5IDczLjc4MTkzLDEuNjU3ODggOTcuMzAyNDQsLTAuOTc5NTIgNjUuNDA2MiwtNy4zMzQxNCAxNDIuODI5MzIsLTI1LjE5Mjg4IDE2OC41NzY3MywtMzguODg0NjQgMy4wMzA4OCwtMS42MTE3MyAyMi45NDM0NywtNi40MzgyMSAzNS45MjMyNywtOC43MDcyIDEyLjQ2MjYxLC0yLjE3ODU4IDIwLjUxNzU4LC00LjA5OTM4IDI2LjUsLTYuMzE5MjEgNS41LC0yLjA0MDgyIDUuNSwtMi4wNDA4MiA2LjE0NjIxLDYuNjM3NDggMi44NzI4OSwzOC41ODE4NiAtMS40MjE3MSwxMDAuODQyODMgLTkuMTUxODEsMTMyLjY3ODMxIC0yLjAyNzM5LDguMzQ5NTQgLTQuNDEzMDUsMjEuNjcyODkgLTcuOTY4MTEsNDQuNSAtMS4xNTYzNiw3LjQyNSAtMi41OTU1NCwxNC40ODI5MyAtMy4xOTgxOSwxNS42ODQyOSAtMC42MDI2NSwxLjIwMTM2IC0wLjgyMzQ2LDMuMjI1NDcgLTAuNDkwNjgsNC40OTgwMiAwLjMzMjc4LDEuMjcyNTQgLTAuNTAxODIsMTEuMzE0NjEgLTEuODU0NjcsMjIuMzE1NyAtNy4xMTgwNSw1Ny44ODI3NCAtMTEuNTk5MTUsMTE2LjU4NzU0IC0xOC40NzI2NCwyNDIuMDAxOTkgLTYuMDgzMjIsMTEwLjk5NTAyIC05LjU2MDIyLDE2MS4wODMxMiAtMTQuNTc3NjgsMjEwIC0xLjM1Mzk1LDEzLjIgLTMuMTI1MzQsMzMgLTMuOTM2NDMsNDQgLTQuMDcyMjgsNTUuMjI4MyAtMTAuMjA5MjYsMTA2LjUwNDggLTIwLjY0NTUsMTcyLjUgLTMuNTY3NzMsMjIuNTYxMSAtNC4wNjc5NiwyNy44NjI2IC00LjM0MDM4LDQ2IC0xLjAyNzEzLDY4LjM4MzMgLTI2LjA5NDQ2LDEwNy4yMTYxIC03My42MzA2NywxMTQuMDY0MiAtNC42MDg3LDAuNjY0IC0xNC4yMjk0NSwyLjkyNDcgLTIxLjM3OTQ1LDUuMDIzOCAtNTcuOTU2MjMsMTcuMDE1IC0xMTkuNzg1NDcsMjYuMDM3NyAtMjA0LjUsMjkuODQyNSAtNjguNjk5NzMsMy4wODU2IC04OC41Njg1LDMuMzk2MiAtMTIzLDEuOTIyOCB6IE0gMjU1Ljk5NDk3LDEzMDEuNDI0IGMgLTEyLjMzNjY1LC01MC4zMDE3IC0xOS41NTMyNywtNzQuMTgzMiAtMjguMjMxMzMsLTkzLjQyNCAtOS4yODkyNywtMjAuNTk1OSAtMTEuNDAwMDIsLTIzLjMyMzggLTEwLjI1MjY0LC0xMy4yNSA1LjI3Mzk4LDQ2LjMwNDMgMTcuOTg0NDgsODkuMjQ3MyAzOC42NzI1LDEzMC42NTY4IDEwLjkwODY1LDIxLjgzNSAxMC45MDQwMiwyMS4yNDYyIC0wLjE4ODUzLC0yMy45ODI4IHogbSAtMjEuNjI1MjYsMzMuMzI2IGMgMy42MDA0NiwtMTMuNDM1MSAtMi4xNTc4MiwtNDEuNjk0OCAtMTguOTI0NywtOTIuODc2IC05LjU2MzU4LC0yOS4xOTI5IC0xNi42MTEyLC01NC41ODE3IC0xNy45Mzg1MywtNjQuNjIyOSAtMC44Njk5NywtNi41ODEyIC0xLjc3NDA4LC03LjEzNzMgLTUuNTE3NTUsLTMuMzkzOSAtNi4wMDQ0MSw2LjAwNDQgLTQuMTg5MDMsMTguNDI4NSA5LjMzMzgzLDYzLjg3ODcgMy42Mzg3MiwxMi4yMjk3IDcuMTMwOTcsMjYuMTc5NyA3Ljc2MDU0LDMxIDMuNjk5NzYsMjguMzI3MSAyMi4zNDI4OCw3Ni45OTc4IDI1LjI4NjQxLDY2LjAxNDEgeiBtIDMzOS4wNzgwMiwtMTQ4LjkyMzIgYyAxOC4yNDY5MywtMTIuMDg2MiAxNS44NTI4NSwtNDcuMzEzNiAtMy45Nzg4MiwtNTguNTQ2IC0xNy44NTMyNiwtMTAuMTExOCAtMjcuNDQxMzIsMTEuOTIyOCAtMTkuODYxMDksNDUuNjQzMiAzLjQwMDIzLDE1LjEyNTcgMTIuODAxODEsMjAuMjE0MiAyMy44Mzk5MSwxMi45MDI4IHogbSAtNTMuNzg2NTMsLTIuNjYzOSBjIDEzLjYwNjcsLTYuOTc2NyAxOC4xMjU4NywtMzAuMjU2NyA5LjYwMDI0LC00OS40NTQ3IC04LjQwNTM5LC0xOC45MjcyIC0yNS4yNjY4NiwtOS4zMzUzIC0yOC4zMDUzNCwxNi4xMDE5IC0wLjQzOTUxLDMuNjc5NSAtMS40NzcxMywxMS4wMTA1IC0yLjMwNTgzLDE2LjI5MTIgLTIuOTcwNTEsMTguOTI5IDQuOTAxNjcsMjUuMzIxNSAyMS4wMTA5MywxNy4wNjE2IHogbSAtMzMxLjEwMDA2LC0zNC44MDYgYyAyLjE4MTIyLC0xNy40NTc4IC0yLjM0Mjk2LC00Mi42ODMyIC0xNi45NzkxNiwtOTQuNjcwNiAtNC4xNTE5MywtMTQuNzQ3NiAtOC45MzkwOSwtMzMuODcyNiAtMTAuNjM4MTMsLTQyLjUgLTUuNTU1NDEsLTI4LjIwOTUxIC0xMy45NjYzOCwtNDEuOTU1NiAtOS45MDQwNywtMTYuMTg2MyAxLjk3MTg3LDEyLjUwODYgMTMuMTAzODcsNjkuNTkxNCAxNS41MDM2OCw3OS41IDEuMzMyMDgsNS41IDMuNTgyMzUsMTkuMzczNSA1LjAwMDYxLDMwLjgzIDMuNTMxOTUsMjguNTMwNSA2LjYzMDI2LDM5LjgzNDkgMTIuNzIyODUsNDYuNDIgMy4wMTk5MywzLjI2NDEgMy41MTA5NCwyLjg3NjEgNC4yOTQyMiwtMy4zOTMxIHogbSAzMDAuNzAwMDYsLTMyLjM1NjQgYyAxMC4xODYzMiwtNS40OTQ0IDIwLjU4MzIxLC04LjAwMTkgMzMuMTQ4NzYsLTcuOTk0NyA5LjY2NzIyLDAuMDEgMTYuOTU2OTYsMS4wMDM0IDQ0LjU5MDA0LDYuMTAzOSAzMy43MjQwOSw2LjIyNDggNTMuNTQ3MTQsMS41Mzg1IDUxLjIwNzQxLC0xMi4xMDU3IC01LjMwMDYxLC0zMC45MTA4IC0yMS4wMTc4MSwtMzcuNjk0NSAtNjkuMjg0MDIsLTI5LjkwMzQgLTI4LjE1MzYsNC41NDQ1IC00OC41NDIxNSw0Ljc1ODQgLTU5Ljk5ODU3LDAuNjI5NSAtOS4wNTAzMiwtMy4yNjE3IC04LjQ5ODgsLTMuMjM1NiAtMTUuMjE2NjUsLTAuNzIyMSAtMjQuMjkwOTQsOS4wODg0IC0yMy4yMjI4MywzOC4wNDYxIDEuNjk0NzQsNDUuOTQ2NSAzLjM1MzQsMS4wNjMyIDYuMTc1MDQsMS45NTg0IDYuMjcwMzEsMS45ODkzIDAuMDk1MywwLjAzMSAzLjUwOTg2LC0xLjc0MzYgNy41ODc5OCwtMy45NDMzIHogbSAtNjkuMjYzNTgsLTY0LjEzMzQgQyA0OTYuMTcyNTUsMTAzNC40MTE4IDUyMC43MzUyOSw5MzkuMTU1MDcgNDYwLjYxMTY5LDg5NC4zNjE2OSA0MjEuODQ0NDksODY1LjQ3OTI5IDM5Ny41NjY0LDg2My4zODA0MyAzMzcsODgzLjY3NTM2IGMgLTEyLjM3NSw0LjE0NjY5IC0yMy41MTU3Miw4LjE3ODU4IC0yNC43NTcxNSw4Ljk1OTc3IC00LjQxMzQ4LDIuNzc3MjUgLTExLjI0MTU1LDEyLjYyNTE0IC0xMS4yNDIyMiwxNi4yMTQyOCAtMy41ZS00LDEuODQyMTcgLTEuNzY3MjIsNy43MzEwOCAtMy45MjYzOSwxMy4wODY0NyAtMjguNjExNCw3MC45NjQ4MSA0NC4yMzM2NywxNDcuOTYyNzIgMTIyLjkyMzM4LDEyOS45MzEyMiB6IE0gMzIzLjUsOTk3LjM1MjU3IGMgLTI5Ljk2NTQyLC00LjQ3NTA1IC0zNi40MjM2NiwtMjkuOTg5NjEgLTEzLjQ4NzQyLC01My4yODQ3MiAxNi42NjE0MSwtMTYuOTIyMSAzNi4wNjIyMSwtMTguMzg3MDYgNTAuMzA1MTUsLTMuNzk4NTQgMjguMTgyNzYsMjguODY2NTMgNS44NzE1Myw2My40NTg0OSAtMzYuODE3NzMsNTcuMDgzMjYgeiBtIDM3OS45MzI0Miw0MC40ODk4MyBjIDUyLjMyNDA5LC04Ljc4OTQgODUuMTMyMDksLTY4Ljk0MzE3IDYzLjU1NTQyLC0xMTYuNTI5NDkgLTUwLjUyMjM2LC0xMTEuNDI0NjcgLTIzMS45Njg3OCwtNTcuODk4MzEgLTE5Mi4xNzYsNTYuNjkxNTcgMTcuMDEzMjMsNDguOTkyNDIgNjMuNzQ4NjEsNzAuNzM1MDIgMTI4LjYyMDU4LDU5LjgzNzkyIHogTSA2MDEuNSw5OTEuNTk4NzggYyAtMjMuMzIzMzMsLTUuNzQyODEgLTMwLjg4ODU2LC0yNy4wNTcxOCAtMTguMzkwOTMsLTUxLjgxNDg0IDE1LjYyNTMxLC0zMC45NTM1OCA0OS4wNTg0NywtMzAuNTg4MzcgNjUuNTUyMjIsMC43MTYwNiA5Ljk2MTgzLDE4LjkwNzExIDcuNzAzNTEsMjUuMjA3NjggLTguNDUxNDgsMjMuNTc5MDkgLTE0LjUyOTU0LC0xLjQ2NDczIC0xOS4yOTY3NCwwLjYxMjMgLTEyLjE5Mzg1LDUuMzEyNzcgNS4xNzU3LDMuNDI1MTIgMTEuNzk0ODIsOS4zODYwNiAxMy4wNzE2OCwxMS43NzE4OSAzLjk4OTg2LDcuNDU1MTMgLTIyLjkwMTY1LDE0LjU0MzU1IC0zOS41ODc2NCwxMC40MzUwMyB6IE0gMzQ5Ljk0MTU1LDU3OS4wMzEyOCBjIDAuOTk1NTQsLTAuNTMyOCA0LjYxNjI1LC0xLjA3OTU0IDguMDQ2MDIsLTEuMjE0OTkgNS4wMjM0OSwtMC4xOTgzOSA2LjM2OTM1LC0wLjYwNjkyIDYuOTIyMTIsLTIuMTAxMTkgMC42MDAwNSwtMS42MjIwOCAyLjA2MDkzLC0xLjg5NjY2IDExLjYzODI0LC0yLjE4NzQxIDE0LjM5OTU4LC0wLjQzNzE1IDIwLjEwMzk4LC0xLjIzOTQ4IDI0Ljk1MjA3LC0zLjUwOTU3IDQuMzI5NjEsLTIuMDI3MyA0NS45NTQ1OSwtMy42NTQyMiA3My41LC0yLjg3Mjc1IDQ4Ljk4NTk0LDEuMzg5NzUgMTU2LjUwMTg0LC0wLjAxNTUgMTU3Ljg2MTUzLC0yLjA2MzM0IDEuMjg3MTQsLTEuOTM4NTUgMi4zMjE1OSwtMi4wODMwNyAxNS4wMTA0NCwtMi4wOTcwOSAxNC4yNTQ4LC0wLjAxNTggMjAuMDcwOSwtMS4xNTY5NyAyMi40NDUzMiwtNC40MDQxOCAxLjIxMDQ2LC0xLjY1NTQgNC42MjU1OCwtMS43NjA3NiA1My4yMzgwNywtMS42NDI0NCA1Mi45Mzk5NCwwLjEyODg2IDcwLjQwMTU0LC0wLjcwNjQyIDczLjUyMzM4LC0zLjUxNjk5IDEuMDkwNjQsLTAuOTgxODkgNC4wODY4MywtMS40MjEzMyA5LjY5MDk4LC0xLjQyMTMzIDQuNDYxNzQsMCA4LjM5MDM2LC0wLjQ1IDguNzMwMjgsLTEgMC4zOTU1MiwtMC42Mzk5NyAxNS4xNjUzMiwtMSA0MS4wMjM4MywtMSAzOC45NDg5NSwwIDQwLjQ0MzE5LC0wLjA2OTkgNDEuNDQyOCwtMS45Mzc2NSAwLjg5NjI3LC0xLjY3NDY5IDIuNDk1NjQsLTIuMDEwNiAxMS43ODUxOCwtMi40NzUyMiAyMi4xMDU4MiwtMS4xMDU2MyAyNy43MjY1NSwtMS43MjY2IDI5LjQxOTMyLC0zLjI1MDIyIDEuMjk4NTUsLTEuMTY4NzggMy44NTA3OCwtMS40NDA3IDExLjQ0NzE4LC0xLjIxOTU5IDkuNzc2MDMsMC4yODQ1NCA5Ljc3NjAzLDAuMjg0NTQgMTAuOTg3MDEsLTQuMTY2MzkgMC42NjYwMywtMi40NDgwMSAyLjExMzMyLC02LjkyNTkzIDMuMjE2MTksLTkuOTUwOTMgMS42MDA4NSwtNC4zOTA4OCAyLjE0NTQ0LC05LjIzMDY5IDIuNzAwNTcsLTI0IDAuNzU5NTYsLTIwLjIwODY4IDEuNDYzMTYsLTI2LjY1MzQ4IDQuMTQ4NTUsLTM4IDIuMTUzNiwtOS4wOTk1NyAyLjIwNzc0LC02OS43ODQwNyAwLjA4MzQsLTkzLjUgLTEuMzI1NzcsLTE0LjgwMDgyIC0yOC42MzQzOCwtMjAuMzU5ODYgLTQ4Ljg1MTczLC05Ljk0NDQzIC0zLjMzNjk3LDEuNzE5MTIgLTg0LjMwMjMxLDExLjMxNjg3IC0xNDYuOTAyMzEsMTcuNDE0IC02My4yOTMxMSw2LjE2NDY1IC0xNDMuMTM3NTUsMTIuMDIwNzkgLTE4NiwxMy42NDIwNiAtMTEuNDA0MzgsMC40MzEzNyAtMTguNDIzODMsMS4xMjgxMSAtMjAuMTUyMjUsMi4wMDAyOCAtMi4yNjg3NCwxLjE0NDgzIC0zLjQyNTUsMS4wOTI3OSAtOCwtMC4zNTk4OSAtMy41ODgzMSwtMS4xMzk1MSAtOC44MDIzMSwtMS43MDcwOSAtMTUuODQ3NzUsLTEuNzI1MTMgLTEwLjI3MDM3LC0wLjAyNjMgLTEwLjQ5ODIxLC0wLjA3NjYgLTEwLjQxODExLC0yLjMwMDAzIDAuMTA4NjcsLTMuMDE2ODIgMC4yMzQ0MSwtMy4wMDA5MiAtMjkuMDgxODksLTMuNjc3ODQgQyAyNzEuOTgwOSwzODEuMTMzOSAxMTQuODM3NDYsMzczLjA0NzEzIDI5LjkwNTA5MiwzNjIuMDIyOTMgMjAuMDEzMDc5LDM2MC43Mzg5NSAxOSwzNjAuNzcwMTkgMTksMzYyLjM1OTIxIGMgMCwyLjc4MDcgOC4wOTY3MTIsMTAuNDcyMjggMTQuNDk2NDc2LDEzLjc3MTExIDguMDUzMjExLDQuMTUxMTMgOC4xNzQ2MDUsNS45Njk4NyAwLjQ5MTksNy4zNjk2OCAtOC4yMzY3NDQsMS41MDA3NiAtNy45ODgzNzgsMC41Mjc4OSAtNC43NTQ2MDQsMTguNjI0MjkgQyA0Mi4yMDY0NjQsNDc0LjcyMDMyIDYxLjI3ODI5LDQ5MS4xNTM4NyAxMDEuNTQxLDQ2NC40MjkgMTI0LjY5NzE1LDQ0OS4wNTg4MyAyNzMuMDc2MzMsNDMzLjEzOTM4IDM3MSw0MzUuNTE5MDIgYyAxNi44MDgxMiwwLjQwODQ1IDI4LjM5NzI5LDAuMjMzOTEgMzQsLTAuNTEyMDggNC42NzUsLTAuNjIyNDYgMTEuMDY0NjEsLTEuMzY3NDggMTQuMTk5MTQsLTEuNjU1NiAzLjEzNDUzLC0wLjI4ODEyIDYuMjI3MTMsLTEuMTYwMDQgNi44NzI0NSwtMS45Mzc2IDAuNjQ1MzEsLTAuNzc3NTYgMi44ODg5LC0xLjQxMzc0IDQuOTg1NzYsLTEuNDEzNzQgMi4wOTY4NSwwIDUuMDc5MjUsLTAuNTIwMzUgNi42Mjc1NSwtMS4xNTYzMyAxMC41OTk3MywtNC4zNTM5NSA5MS4zMTUxLC02LjAyNjA1IDkxLjMxNTEsLTEuODkxNjkgMCwwLjcyNTU5IC00LjE1MzM0LDQuNjg0NDggLTEzLjc4NzQsMTMuMTQxOTEgLTIuMjUxNjQsMS45NzY2NSAtMTMuOTA4MSwxMC45NzIyOCAtMjUuOTAzMjQsMTkuOTkwMjkgLTE4LjE4ODg4LDEzLjY3NDUgLTMwLjMzNzc2LDIzLjExNDQ1IC0zNS44MDkzNiwyNy44MjQ2NiAtMC41NSwwLjQ3MzQ3IC02LjU2NDI4LDYuNzgyNzQgLTEzLjM2NTA3LDE0LjAyMDYgLTI3Ljk2ODk5LDI5Ljc2NjUgLTU3LjE3NzEyLDUwLjI1MTUzIC04Mi4yNzg2OCw1Ny43MDU4OSAtMy41MTA0MSwxLjA0MjQ4IC00LjkzMjc0LDIuMDY1NjIgLTUuNzM1MDcsNC4xMjU0OCAtMS4zNTE3MSwzLjQ3MDMyIC01LjcxNDI5LDExLjIzMjMgLTcuMDgxNDcsMTIuNTk5NDggLTIuOTA1OTEsMi45MDU5MSAwLjc0NTM3LDQuODk1NDcgNC45MDE4NCwyLjY3MDk5IHogTSAxMDUsMjg2LjE0MzggYyAwLC0xLjAyMDkxIDEuNTA3MjQsLTMuODMzNDEgMy4zNDk0MywtNi4yNSBDIDExMi45NzQyNSwyNzMuODI2OTQgMTE1LDI2OS42MjgwMiAxMTUsMjY2LjEwODY4IGMgMCwtMy45MDkwOCAtMS4zMzI5OSwtMy40MDY2NyAyMi42MTY2NCwtOC41MjQyMyA1My41ODQ2NywtMTEuNDQ5OTkgNzYuNTM1OTMsLTE0LjM5Mjk5IDExNy41NTcxMSwtMTUuMDc0MTUgMjE2LjM3NTk5LC0zLjU5Mjk1IDI3OS44ODU5OCwtNS41NzgzNSAzNDguNjU2ODksLTEwLjg5OTQ0IDE3LjUwMDEsLTEuMzU0MDYgMTcuNDY4MDUsLTEuMzYzIDIyLjI3MzY5LDYuMjE0NyAxMC4zODY1NiwxNi4zNzc5MSAtMTkuMDIyNDQsMjcuMTQyOTkgLTY0LjYwNDMzLDIzLjY0ODIxIC00LjQsLTAuMzM3MzUgLTI1LjMyNSwtMC43NDM1OSAtNDYuNSwtMC45MDI3NiAtMzguNSwtMC4yODkzOCAtMzguNSwtMC4yODkzOCAtNTkuNDA2NzQsLTQuNDk5NjEgLTMwLjUxODcsLTYuMTQ1ODkgLTM5LjQ1NTk0LC01Ljc4OTIxIC00OC4yNDIyOCwxLjkyNTMgLTQuMTIwODQsMy42MTgxNCAtMi44MDMxNiwzLjYwNTMgLTEyLjY4MTAyLDAuMTIzNTMgLTI0Ljk3MjE4LC04LjgwMjI4IC01NS44NjU0NywtOS4zNDEzIC0xMDUuNjY5OTYsLTEuODQzNzIgLTE2Ljc3NSwyLjUyNTMxIC0zNi4zNSw1LjA4NzQ3IC00My41LDUuNjkzNyAtMzcuMTQ4ODIsMy4xNDk3MiAtNzEuOTg3MjcsOS41ODc1NyAtMTE2LjY3ODgsMjEuNTYxMjQgQyAxMTAuMjQxMjgsMjg4LjUwOTM0IDEwNSwyODkuMDg0MTMgMTA1LDI4Ni4xNDM4IFoiCiAgICAgICBpZD0icGF0aDM1MjEiCiAgICAgICBpbmtzY2FwZTpjb25uZWN0b3ItY3VydmF0dXJlPSIwIiAvPgogICAgPHBhdGgKICAgICAgIHN0eWxlPSJmaWxsOiMzNjk4YTYiCiAgICAgICBkPSJtIDQ5MiwxNDA0Ljg1MzMgYyAtMTE2LjUwOTc1LC00Ljk4NTggLTE5Ny41MTQ2NiwtMjAuNDc5NiAtMjYyLjE2MzIsLTUwLjE0NDEgLTkuNDM2NCwtNC4zMjk5IC04LjAyMDczLC0xLjQzMTkgLTE4LjE5Nzk5LC0zNy4yNTQxIEMgMTkzLjkxMzQ2LDEyNTUuMDY1IDE4MC40NDA3NiwxMTk4LjUzNzQgMTY2LjAwNzY5LDExMjYgMTU4LjY5MTExLDEwODkuMjI4NSAxNTUuMjY0OCwxMDczLjg1NjggMTM4LjM2ODQ1LDEwMDIgMTA4LjA0OTYsODczLjA2MDA1IDk2LjUzNDQ0Nyw4MTMuNzczMTQgODkuOTA4NjU0LDc1Mi41IGMgLTEuODU0NTgsLTE3LjE1MDU1IDEuNTkyNzYsLTM4LjE1NTI2IDcuMTc4OTQ0LC00My43NDE0NCAzLjY0NzQwMiwtMy42NDc0MSA0LjEyNzg1MiwtMTAuNTQ4MjkgMC45NDEwODMsLTEzLjUxNzIxIC0xLjQ1NzczMywtMS4zNTgwOSAtMi4yMTIwMTYsLTMuOTg3OTcgLTIuODk1MjAyLC0xMC4wOTQ0MiAtMC41MzA0NzcsLTQuNzQxNDkgLTEuNTY1MzQyLC04Ljk3OTQyIC0yLjQzMDI5MSwtOS45NTIzOSAtMS45MTc2NDYsLTIuMTU3MTQgLTIuNjYzNTYyLC04LjQ5MDUyIC0zLjUxNzMzOCwtMjkuODY0NzkgLTAuMzc3MjE4LC05LjQ0MzY0IC0xLjA0NzgxOCwtMTcuNTMwNjEgLTEuNDkwMjIzLC0xNy45NzEwNCAtMC45NjQ0NTgsLTAuOTYwMTYgLTIuNjU4ODU0LDEuNDYyNDYgLTIuNjgwMzE0LDMuODMyMjcgQyA4NC45MDgzNSw2NDMuMDAyODMgNzYuMDgxNjk0LDYyMC40NjMxNCA3MC45Nzc5LDU5NS4zNDUxMyA1Ny43MjYyNDQsNTMwLjEyNzkzIDM1Ljk3NzE3Myw0NjUuMzIwOTYgNDAuOTgwNDE3LDUwNS45NTk4OCA0Mi43NDA1OTcsNTIwLjI1Njk3IDQ1Ljk4NDIyLDUzNC4zMTM0MyA1NS4yOTY1OTEsNTY4IGMgMTAuOTM5OTc0LDM5LjU3NDI1IDE1LjkyMzcsNjcuNTk0NjkgMTMuNjk4NzU3LDc3LjAxOTcxIEMgNjUuODE1ODM4LDY1OC40ODgzMyA0NS4yNzA0NTMsNTc3LjYwMzcyIDMzLjQyOTE0Miw1MDUgMzAuNDI0MTE1LDQ4Ni41NzUgMjUuOTExOTgzLDQ1OC45IDIzLjQwMjE4MSw0NDMuNSAxNy43OTQxNzksNDA5LjA4OTYyIDEyLjU3NzY4OSwzODMuMjQ4MDMgNS40NTAzMTA4LDM1NC41Njk1NCAtMS42ODM4OTI5LDMyNS44NjM1OSAtMS40ODIzMTE2LDMyMS4yMDczNyA3LjM4MzQ2NjgsMzA5LjkxNjY0IDI1LjY1ODU4MiwyODYuNjQyOTQgNzkuMjg2Mjc1LDI2OC41NDk2IDg1LjA4MzM2NCwyODMuNzAxNjMgODkuMDU2NjM2LDI5NC4wODY2OSA3Ny4zNDYxMjQsMzAxLjI4MDc4IDQ1LjUsMzA4LjAxODc3IDE3Ljg5ODczMSwzMTMuODU4NjQgMTUuMzQ1ODUsMzE4LjAzNDA5IDMwLjMyOTQyLDMzMi44MzE1NCA0NS4zMDk2MTQsMzQ3LjYyNTY1IDEzMi4xOTc0NSwzNjAuODQ4MDUgMjM1LDM2My45Nzc4NSBjIDE4MS45MTgxOCw1LjUzODQ2IDI5Ny40MzkxNyw3LjAwMTE1IDMzMCw0LjE3ODM3IDMyLjE2MTc4LC0yLjc4ODE5IDM0LjA5NzQzLC0yLjc2OTQ3IDM5LjQ3NDU5LDAuMzgxNzUgNC43OTMxLDIuODA4OTUgNC43OTMxLDIuODA4OTUgMTAuOTA5MjUsMS4yODk4MSA2LjEyMTA1LC0xLjUyMDM2IDcuNTg3MjEsLTEuNDgyMDggMjguOTE3MDIsMC43NTQ4NiA0LjY0MzUzLDAuNDg2OTggNi44Nzc1NywwLjE3MTM2IDExLjE5NzU2LC0xLjU4MiA0Ljc5MTU4LC0xLjk0NDc2IDUuODIzMDYsLTIuMDQ4NTcgOS4xOTkxNCwtMC45MjU4NiA3LjAwNjc2LDIuMzMwMDkgNzMuNzgxOTMsMS42NTc4OCA5Ny4zMDI0NCwtMC45Nzk1MiA2NS40MDYyLC03LjMzNDE0IDE0Mi44MjkzMiwtMjUuMTkyODggMTY4LjU3NjczLC0zOC44ODQ2NCAzLjAzMDg4LC0xLjYxMTczIDIyLjk0MzQ3LC02LjQzODIxIDM1LjkyMzI3LC04LjcwNzIgMTIuNDYyNjEsLTIuMTc4NTggMjAuNTE3NTgsLTQuMDk5MzggMjYuNSwtNi4zMTkyMSA1LjUsLTIuMDQwODIgNS41LC0yLjA0MDgyIDYuMTQ2MjEsNi42Mzc0OCAyLjg3Mjg5LDM4LjU4MTg2IC0xLjQyMTcxLDEwMC44NDI4MyAtOS4xNTE4MSwxMzIuNjc4MzEgLTIuMDI3MzksOC4zNDk1NCAtNC40MTMwNSwyMS42NzI4OSAtNy45NjgxMSw0NC41IC0xLjE1NjM2LDcuNDI1IC0yLjU5NTU0LDE0LjQ4MjkzIC0zLjE5ODE5LDE1LjY4NDI5IC0wLjYwMjY1LDEuMjAxMzYgLTAuODIzNDYsMy4yMjU0NyAtMC40OTA2OCw0LjQ5ODAyIDAuMzMyNzgsMS4yNzI1NCAtMC41MDE4MiwxMS4zMTQ2MSAtMS44NTQ2NywyMi4zMTU3IC03LjExODA1LDU3Ljg4Mjc0IC0xMS41OTkxNSwxMTYuNTg3NTQgLTE4LjQ3MjY0LDI0Mi4wMDE5OSAtNi4wODMyMiwxMTAuOTk1MDIgLTkuNTYwMjIsMTYxLjA4MzEyIC0xNC41Nzc2OCwyMTAgLTEuMzUzOTUsMTMuMiAtMy4xMjUzNCwzMyAtMy45MzY0Myw0NCAtNC4wNzIyOCw1NS4yMjgzIC0xMC4yMDkyNiwxMDYuNTA0OCAtMjAuNjQ1NSwxNzIuNSAtMy41Njc3MywyMi41NjExIC00LjA2Nzk2LDI3Ljg2MjYgLTQuMzQwMzgsNDYgLTEuMDI3MTMsNjguMzgzMyAtMjYuMDk0NDYsMTA3LjIxNjEgLTczLjYzMDY3LDExNC4wNjQyIC00LjYwODcsMC42NjQgLTE0LjIyOTQ1LDIuOTI0NyAtMjEuMzc5NDUsNS4wMjM4IC01Ny45NTYyMywxNy4wMTUgLTExOS43ODU0NywyNi4wMzc3IC0yMDQuNSwyOS44NDI1IC02OC42OTk3MywzLjA4NTYgLTg4LjU2ODUsMy4zOTYyIC0xMjMsMS45MjI4IHogTSAyNTUuOTk0OTcsMTMwMS40MjQgYyAtMTIuMzM2NjUsLTUwLjMwMTcgLTE5LjU1MzI3LC03NC4xODMyIC0yOC4yMzEzMywtOTMuNDI0IC05LjI4OTI3LC0yMC41OTU5IC0xMS40MDAwMiwtMjMuMzIzOCAtMTAuMjUyNjQsLTEzLjI1IDUuMjczOTgsNDYuMzA0MyAxNy45ODQ0OCw4OS4yNDczIDM4LjY3MjUsMTMwLjY1NjggMTAuOTA4NjUsMjEuODM1IDEwLjkwNDAyLDIxLjI0NjIgLTAuMTg4NTMsLTIzLjk4MjggeiBtIC0yMS42MjUyNiwzMy4zMjYgYyAzLjYwMDQ2LC0xMy40MzUxIC0yLjE1NzgyLC00MS42OTQ4IC0xOC45MjQ3LC05Mi44NzYgLTkuNTYzNTgsLTI5LjE5MjkgLTE2LjYxMTIsLTU0LjU4MTcgLTE3LjkzODUzLC02NC42MjI5IC0wLjg2OTk3LC02LjU4MTIgLTEuNzc0MDgsLTcuMTM3MyAtNS41MTc1NSwtMy4zOTM5IC02LjAwNDQxLDYuMDA0NCAtNC4xODkwMywxOC40Mjg1IDkuMzMzODMsNjMuODc4NyAzLjYzODcyLDEyLjIyOTcgNy4xMzA5NywyNi4xNzk3IDcuNzYwNTQsMzEgMy42OTk3NiwyOC4zMjcxIDIyLjM0Mjg4LDc2Ljk5NzggMjUuMjg2NDEsNjYuMDE0MSB6IG0gMzM5LjA3ODAyLC0xNDguOTIzMiBjIDE4LjI0NjkzLC0xMi4wODYyIDE1Ljg1Mjg1LC00Ny4zMTM2IC0zLjk3ODgyLC01OC41NDYgLTE3Ljg1MzI2LC0xMC4xMTE4IC0yNy40NDEzMiwxMS45MjI4IC0xOS44NjEwOSw0NS42NDMyIDMuNDAwMjMsMTUuMTI1NyAxMi44MDE4MSwyMC4yMTQyIDIzLjgzOTkxLDEyLjkwMjggeiBtIC01My43ODY1MywtMi42NjM5IGMgMTMuNjA2NywtNi45NzY3IDE4LjEyNTg3LC0zMC4yNTY3IDkuNjAwMjQsLTQ5LjQ1NDcgLTguNDA1MzksLTE4LjkyNzIgLTI1LjI2Njg2LC05LjMzNTMgLTI4LjMwNTM0LDE2LjEwMTkgLTAuNDM5NTEsMy42Nzk1IC0xLjQ3NzEzLDExLjAxMDUgLTIuMzA1ODMsMTYuMjkxMiAtMi45NzA1MSwxOC45MjkgNC45MDE2NywyNS4zMjE1IDIxLjAxMDkzLDE3LjA2MTYgeiBtIC0zMzEuMTAwMDYsLTM0LjgwNiBjIDIuMTgxMjIsLTE3LjQ1NzggLTIuMzQyOTYsLTQyLjY4MzIgLTE2Ljk3OTE2LC05NC42NzA2IC00LjE1MTkzLC0xNC43NDc2IC04LjkzOTA5LC0zMy44NzI2IC0xMC42MzgxMywtNDIuNSAtNS41NTU0MSwtMjguMjA5NTEgLTEzLjk2NjM4LC00MS45NTU2IC05LjkwNDA3LC0xNi4xODYzIDEuOTcxODcsMTIuNTA4NiAxMy4xMDM4Nyw2OS41OTE0IDE1LjUwMzY4LDc5LjUgMS4zMzIwOCw1LjUgMy41ODIzNSwxOS4zNzM1IDUuMDAwNjEsMzAuODMgMy41MzE5NSwyOC41MzA1IDYuNjMwMjYsMzkuODM0OSAxMi43MjI4NSw0Ni40MiAzLjAxOTkzLDMuMjY0MSAzLjUxMDk0LDIuODc2MSA0LjI5NDIyLC0zLjM5MzEgeiBtIDMwMC43MDAwNiwtMzIuMzU2NCBjIDEwLjE4NjMyLC01LjQ5NDQgMjAuNTgzMjEsLTguMDAxOSAzMy4xNDg3NiwtNy45OTQ3IDkuNjY3MjIsMC4wMSAxNi45NTY5NiwxLjAwMzQgNDQuNTkwMDQsNi4xMDM5IDMzLjcyNDA5LDYuMjI0OCA1My41NDcxNCwxLjUzODUgNTEuMjA3NDEsLTEyLjEwNTcgLTUuMzAwNjEsLTMwLjkxMDggLTIxLjAxNzgxLC0zNy42OTQ1IC02OS4yODQwMiwtMjkuOTAzNCAtMjguMTUzNiw0LjU0NDUgLTQ4LjU0MjE1LDQuNzU4NCAtNTkuOTk4NTcsMC42Mjk1IC05LjA1MDMyLC0zLjI2MTcgLTguNDk4OCwtMy4yMzU2IC0xNS4yMTY2NSwtMC43MjIxIC0yNC4yOTA5NCw5LjA4ODQgLTIzLjIyMjgzLDM4LjA0NjEgMS42OTQ3NCw0NS45NDY1IDMuMzUzNCwxLjA2MzIgNi4xNzUwNCwxLjk1ODQgNi4yNzAzMSwxLjk4OTMgMC4wOTUzLDAuMDMxIDMuNTA5ODYsLTEuNzQzNiA3LjU4Nzk4LC0zLjk0MzMgeiBtIC02OS4yNjM1OCwtNjQuMTMzNCBjIDc2LjE3NDkzLC0xNy40NTUzIDEwMC43Mzc2NywtMTEyLjcxMjAzIDQwLjYxNDA3LC0xNTcuNTA1NDEgLTM5Ljc1MSwtMjkuNjE1MzUgLTY1LjA4OTUsLTMxLjI5NDU0IC0xMjkuODI3NDksLTguNjAzNzIgLTEzLjU3ODU1LDQuNzU5MzIgLTIwLjAzNzczLDYuNTg4NSAtMjAuNzUsNS44NzYyMyAtMC43MTIyNywtMC43MTIyNyAtMS4wMzQyLC0wLjQ5NTI0IC0xLjAzNDIsMC42OTcxOCAwLDAuOTUyMjcgLTAuNjM3MDgsMS45NzU4NiAtMS40MTU3MywyLjI3NDY2IC0yLjk1MzcsMS4xMzM0NCAtNi4zMTE2Nyw3Ljc4MzAxIC02LjUwODg4LDEyLjg4OTEzIC0wLjExOTkyLDMuMTA1MDMgLTEuNjU2MTcsOC42MjQ0NSAtNC4wNTk5MiwxNC41ODY0NyAtMjguNTUzMTksNzAuODIwNDQgNDQuMzg2NzUsMTQ3Ljc5NTM2IDEyMi45ODIxNSwxMjkuNzg1NDYgeiBNIDMyMy41LDk5Ny4zNTI1NyBjIC0yOS45NjU0MiwtNC40NzUwNSAtMzYuNDIzNjYsLTI5Ljk4OTYxIC0xMy40ODc0MiwtNTMuMjg0NzIgMTYuNjYxNDEsLTE2LjkyMjEgMzYuMDYyMjEsLTE4LjM4NzA2IDUwLjMwNTE1LC0zLjc5ODU0IDI4LjE4Mjc2LDI4Ljg2NjUzIDUuODcxNTMsNjMuNDU4NDkgLTM2LjgxNzczLDU3LjA4MzI2IHogbSAzNzkuOTMyNDIsNDAuNDg5ODMgYyA1Mi4zMjQwOSwtOC43ODk0IDg1LjEzMjA5LC02OC45NDMxNyA2My41NTU0MiwtMTE2LjUyOTQ5IC01MC41MjIzNiwtMTExLjQyNDY3IC0yMzEuOTY4NzgsLTU3Ljg5ODMxIC0xOTIuMTc2LDU2LjY5MTU3IDE3LjAxMzIzLDQ4Ljk5MjQyIDYzLjc0ODYxLDcwLjczNTAyIDEyOC42MjA1OCw1OS44Mzc5MiB6IE0gNjAxLjUsOTkxLjU5ODc4IGMgLTIzLjMyMzMzLC01Ljc0MjgxIC0zMC44ODg1NiwtMjcuMDU3MTggLTE4LjM5MDkzLC01MS44MTQ4NCAxNS42MjUzMSwtMzAuOTUzNTggNDkuMDU4NDcsLTMwLjU4ODM3IDY1LjU1MjIyLDAuNzE2MDYgOS45NjE4MywxOC45MDcxMSA3LjcwMzUxLDI1LjIwNzY4IC04LjQ1MTQ4LDIzLjU3OTA5IC0xNC41Mjk1NCwtMS40NjQ3MyAtMTkuMjk2NzQsMC42MTIzIC0xMi4xOTM4NSw1LjMxMjc3IDUuMTc1NywzLjQyNTEyIDExLjc5NDgyLDkuMzg2MDYgMTMuMDcxNjgsMTEuNzcxODkgMy45ODk4Niw3LjQ1NTEzIC0yMi45MDE2NSwxNC41NDM1NSAtMzkuNTg3NjQsMTAuNDM1MDMgeiBNIDU0My4zMDkxNSw2NDkuNDMwOTkgYyAwLjczNjE5LC0yLjU3ODE1IDAuMzg2ODUsLTMuODQwODkgLTIuMTg0MTksLTcuODk1IC0xOS42NTEyMiwtMzAuOTg2NzYgMi4yNzU5NywtNzQuMDQ4NTEgMzMuMzE3MzQsLTY1LjQzMDMxIDEyLjY5NzUzLDMuNTI1MjkgMTIuNzQwOTEsMTAuNTM4IDAuMjM0MywzNy44NzQ2NCAtMTEuODEzNDEsMjUuODIxNDcgLTEwLjkwNzk1LDMwLjUxOTY4IDUuODgxOSwzMC41MTk2OCAxMS44ODY2NSwwIDExLjMzNjU3LDAuODIyMjkgMTIuNDQ4NDksLTE4LjYwODkyIDIuODU3NzcsLTQ5Ljk0MDc4IDE3LjkxNjMyLC02Ni43OTEzIDQ5Ljk5MzAxLC01NS45NDIxNSA4LjMyNDYyLDIuODE1NiA4LjQ2NjkyLDIuOTgyODYgMTAuOTgwMTIsMTIuOTA1OTQgOS42NDExNSwzOC4wNjcwNyAyMi43ODg4OSw0OC44NjcyMiA1Ny41MTk4OCw0Ny4yNDk0MiAyNC42MzYyMSwtMS4xNDc1OCAzMC4xMTYwMiwtNi4zNjg3NCAzOS41NDk1MywtMzcuNjgyNzMgOC4wMzEsLTI2LjY1ODQ2IDEzLjU5NjgsLTMzLjE5MTc1IDMwLjIxMTQ4LC0zNS40NjMwNSAzLjk4MTQ1LC0wLjU0NDI4IDkuMjYzOTksLTEuNDEzMDEgMTEuNzM4OTksLTEuOTMwNSAxMC40OTUyMywtMi4xOTQ0NSAyMC44OTI0NCwtMC42NDc5OSAyMy42MTg4NCwzLjUxMzAyIDIuMzIwNTQsMy41NDE2IDMuNjgyODMsMS45NTAzMiAzLjE0MjcsLTMuNjcwOTYgQyA4MTkuMjkzNTksNTUwIDgxOS4yOTM1OSw1NTAgODU4LjExMTYxLDU1MCBjIDM3LjM3ODIsMCAzOC44NTY0OSwtMC4wNzE5IDM5Ljg1NTAyLC0xLjkzNzY1IDAuODk2MjcsLTEuNjc0NjkgMi40OTU2NCwtMi4wMTA2IDExLjc4NTE4LC0yLjQ3NTIyIDIyLjEwNTgyLC0xLjEwNTYzIDI3LjcyNjU1LC0xLjcyNjYgMjkuNDE5MzIsLTMuMjUwMjIgMS4yOTg1NSwtMS4xNjg3OCAzLjg1MDc4LC0xLjQ0MDcgMTEuNDQ3MTgsLTEuMjE5NTkgOS43NzYwMywwLjI4NDU0IDkuNzc2MDMsMC4yODQ1NCAxMC45ODcwMSwtNC4xNjYzOSAwLjY2NjAzLC0yLjQ0ODAxIDIuMTEzMzIsLTYuOTI1OTMgMy4yMTYxOSwtOS45NTA5MyAxLjYwMDg1LC00LjM5MDg4IDIuMTQ1NDQsLTkuMjMwNjkgMi43MDA1NywtMjQgMC43NTk1NiwtMjAuMjA4NjggMS40NjMxNiwtMjYuNjUzNDggNC4xNDg1NSwtMzggMi4xNTM2LC05LjA5OTU3IDIuMjA3NzQsLTY5Ljc4NDA3IDAuMDgzNCwtOTMuNSAtMS4zMjU3NywtMTQuODAwODIgLTI4LjYzNDM4LC0yMC4zNTk4NiAtNDguODUxNzMsLTkuOTQ0NDMgLTMuMzM2OTcsMS43MTkxMiAtODQuMzAyMzEsMTEuMzE2ODcgLTE0Ni45MDIzMSwxNy40MTQgLTYzLjI5MzExLDYuMTY0NjUgLTE0My4xMzc1NSwxMi4wMjA3OSAtMTg2LDEzLjY0MjA2IC0xMS40MDQzOCwwLjQzMTM3IC0xOC40MjM4MywxLjEyODExIC0yMC4xNTIyNSwyLjAwMDI4IC0yLjI2ODc0LDEuMTQ0ODMgLTMuNDI1NSwxLjA5Mjc5IC04LC0wLjM1OTg5IC0zLjU4ODMxLC0xLjEzOTUxIC04LjgwMjMxLC0xLjcwNzA5IC0xNS44NDc3NSwtMS43MjUxMyAtMTAuMjcwMzcsLTAuMDI2MyAtMTAuNDk4MjEsLTAuMDc2NiAtMTAuNDE4MTEsLTIuMzAwMDMgMC4xMDg2NywtMy4wMTY4MiAwLjIzNDQxLC0zLjAwMDkyIC0yOS4wODE4OSwtMy42Nzc4NCBDIDI3MS45ODA5LDM4MS4xMzM5IDExNC44Mzc0NiwzNzMuMDQ3MTMgMjkuOTA1MDkyLDM2Mi4wMjI5MyAyMC4wMTMwNzksMzYwLjczODk1IDE5LDM2MC43NzAxOSAxOSwzNjIuMzU5MjEgYyAwLDIuNzgwNyA4LjA5NjcxMiwxMC40NzIyOCAxNC40OTY0NzYsMTMuNzcxMTEgOC4wNTMyMTEsNC4xNTExMyA4LjE3NDYwNSw1Ljk2OTg3IDAuNDkxOSw3LjM2OTY4IC04LjIzNjc0NCwxLjUwMDc2IC03Ljk4ODM3OCwwLjUyNzg5IC00Ljc1NDYwNCwxOC42MjQyOSAxMi45NzI2OTIsNzIuNTk2MDMgMzIuMDQ0NTE4LDg5LjAyOTU4IDcyLjMwNzIyOCw2Mi4zMDQ3MSAxOS4xNTkzNCwtMTIuNzE3MjQgOTYuNTI0MTQsLTIzLjEyNzAyIDIwNy41ODMsLTI3LjkzMTIzIDg4LjUzNTA4LC0zLjgyOTg3IDY4LjY3MDM1LDEuNzk0ODcgLTQ3LjYyNCwxMy40ODQ4NCAtNTcuMjg1NzQsNS43NTgzOSAtODQuMjEzODksOS40Nzc4MyAtMTEyLDE1LjQ2OTk2IC02LjA1LDEuMzA0NjkgLTE0LjE1OTc5LDIuNjAxODEgLTE4LjAyMTc2LDIuODgyNDggLTMzLjYzOTkwNywyLjQ0NDgxIC02NS43NTk2NjUsNDIuOTU4MjQgLTQ4Ljg3NTEzNyw2MS42NDczOSA0Ljk5MDU4NCw1LjUyMzk4IDEyLjIwOTc0Miw4LjAxMzUgMjYuMDI1MTA3LDguOTc0NzMgNi4xMjA1MiwwLjQyNTg0IDExLjU1MjI5LDEuMDM2MzUgMTIuMDcwNTksMS4zNTY2OCAwLjUxODMsMC4zMjAzMyA2Ljk4NTYxLDEuNjg4NDIgMTQuMzcxNzgsMy4wNDAyIDE1LjczMTczLDIuODc5MTUgMTguOTM4OTEsMy45NjYyNCAxOS42NDI4Miw2LjY1Nzk5IDAuNDc0MDIsMS44MTI2NyAxLjM4MDU3LDEuOTg3OTYgMTAuMjgxMjYsMS45ODc5NiA4Ljg2MDkxLDAgOS44OTIzLDAuMTk3MTUgMTEuMTgwNDIsMi4xMzcxNiAxLjE4NTQ5LDEuNzg1NDUgMi42ODA0MiwyLjIxODEyIDkuMDgzNzgsMi42MjkwNiA1Ljc4NTczLDAuMzcxMyA4LjA3OTg0LDAuOTUwNTYgOS4zNTc5MywyLjM2Mjg0IDEuMDg2MjksMS4yMDAzMiAzLjA1MDIzLDEuODcwOTQgNS40NzkxOCwxLjg3MDk0IDIuMDgyMywwIDQuMDY0MTEsMC40NSA0LjQwNDAzLDEgMC4zMzk5MiwwLjU1IDIuOTI0OTcsMSA1Ljc0NDU3LDEgMy45NDA3NSwwIDUuNjc5OTksMC41MjA0MyA3LjUxOTM1LDIuMjUgMi4yODgyMiwyLjE1MTY1IDMuMjU5ODEsMi4yNjQxNiAyMi4yMjY0NCwyLjU3NCAxOC4wNzM2OCwwLjI5NTI2IDE5Ljk4ODI3LDAuNDk0OTEgMjEuNTc2NjEsMi4yNSAxLjgxMTczLDIuMDAxOTUgMTEuNDMzMDMsMi44ODMzIDExLjQzMzAzLDEuMDQ3MzIgMCwtMy41MDQyMyAxNy4yNjIxOSwtNi40MTg0NCAzOS41LC02LjY2ODQgMTUuOTQ1NjEsLTAuMTc5MjMgMjEuOTIxOTMsLTAuNjQ3MTMgMjkuNDgwNzcsLTIuMzA4MSAxMi41NTkyMSwtMi43NTk3NCAxMi45NzQ3OSwtMi4xMTg2NiA2LjA2NDU0LDkuMzU1MTggLTEuNjU2MjIsMi43NSAtMy40NDM5Miw1Ljk3NTk1IC0zLjk3MjY3LDcuMTY4NzcgLTAuNTI4NzUsMS4xOTI4MiAtMi4xODk4NywyLjc2NzgyIC0zLjY5MTM3LDMuNSAtMS41MDE1MSwwLjczMjE4IC00LjUxNDI1LDMuOTUyMTQgLTYuNjk0OTksNy4xNTU0NyAtMy4wMTg0Miw0LjQzMzgxIC01LjE4NTA2LDYuNDAxMzMgLTkuMDc1NjQsOC4yNDE1NyBDIDMwNy44MjkyNSw2MDUuNTAzMzkgMjk0LjIwODA4LDYxOSAzMDIuOTc4NjUsNjE5IGMgMi4yNTA0NCwwIDUuMTY2NiwwLjcwNDI5IDYuNDgwMzQsMS41NjUwOCAyLjE2NzM2LDEuNDIwMTEgMi42Njg5NiwxLjQyMDExIDUuNDE1MTUsMCAxLjY2NDYsLTAuODYwNzkgMy42NTk5MywtMS41NjUwOCA0LjQzNDA2LC0xLjU2NTA4IDAuNzc0MTQsMCAzLjEzNDkyLC0yLjgxMjUgNS4yNDYxOSwtNi4yNSA2LjY1MDAyLC0xMC44MjczOCAzNC4zMTIxOCwtMzYuNTA1OSAzNy44NTk1NCwtMzUuMTQ0NjUgMS4wMzc1NCwwLjM5ODE0IDEuODQ3MDcsLTAuMTM2NjggMi4zNzc1NiwtMS41NzA3NCAwLjc0NzM0LC0yLjAyMDIzIDEuNTgxMDQsLTIuMTk4NzIgMTEuNzU2NDQsLTIuNTE2OTQgMTIuODk5LC0wLjQwMzQgMjEuNTI3NTQsLTEuMzc3OTQgMjMuMDMxMzUsLTIuNjAxMjQgMC42NTIxMSwtMC41MzA0NiAzLjc0MTA3LDAuMTUwNzIgNy44MDQ0MywxLjcyMTA2IDExLjU2MTkyLDQuNDY4MjQgMTIuNDA3MDIsOS40NTUyNyAyLjQ5Mzg3LDE0LjcxNjY1IC0xNy41MzAxLDkuMzA0MDggLTIwLjQ5NzkxLDI5LjQzNTAxIC02LjY1NzUxLDQ1LjE1ODUzIDExLjkyNjc1LDEzLjU0OTUgMzEuOTYzOTMsMTAuODMwNTQgMjAuNjIxODksLTIuNzk4MyAtMjEuNjIxMDYsLTI1Ljk4MDMzIC02LjQ3NDMyLC00Ny43MDUwMiAzOS4xNTk2OCwtNTYuMTY2MDMgMjkuMDkyMTYsLTUuMzkzOTggNzEuNzc2MzgsMy44MzYzNyA2My45MjEwOCwxMy44MjI3OCAtNi44MTg1NSw4LjY2ODM4IC02LjgxNDI0LDIwLjc1MjM3IDAuMDE3Myw0OC42MDM3OSAxLjY4Mjk2LDYuODYxMiAzLjA1OTkzLDEzLjUyMDE4IDMuMDU5OTMsMTQuNzk3NzIgMCw0LjEyNDg0IDEyLjA5NjQsMi45MDU0NSAxMy4zMDkxNSwtMS4zNDE2NCB6IG0gMTQ2LjU3MzEzLC0zNS44MTE1NyBjIC0yOC45ODQxMiwtMTAuMzU3NDggLTI4LjY0OTk5LC00Mi4zNDY3MSAwLjQzMzUzLC00MS41MDU2MiA4LjExNzAxLDAuMjM0NzQgOS44ODEzOCwtMC4wNDQyIDE1LjE4NDE5LC0yLjQwMDM2IDIwLjY4NTM2LC05LjE5MTA4IDQwLjEzMDczLDUuOTI4ODYgMzQuMTIyMjgsMjYuNTMyMSAtMy41MzU0OCwxMi4xMjMzIC0xMC42MDA2NywxNi42ODc1OCAtMjcuNjIyMjgsMTcuODQ0NjUgLTE1LjY5OTEzLDEuMDY3MTcgLTE3Ljk0NzkzLDEuMDE5MzEgLTIyLjExNzcyLC0wLjQ3MDc3IHogTSAxMDUsMjg2LjE0MzggYyAwLC0xLjAyMDkxIDEuNTA3MjQsLTMuODMzNDEgMy4zNDk0MywtNi4yNSBDIDExMi45NzQyNSwyNzMuODI2OTQgMTE1LDI2OS42MjgwMiAxMTUsMjY2LjEwODY4IGMgMCwtMy45MDkwOCAtMS4zMzI5OSwtMy40MDY2NyAyMi42MTY2NCwtOC41MjQyMyA1My41ODQ2NywtMTEuNDQ5OTkgNzYuNTM1OTMsLTE0LjM5Mjk5IDExNy41NTcxMSwtMTUuMDc0MTUgMjE2LjM3NTk5LC0zLjU5Mjk1IDI3OS44ODU5OCwtNS41NzgzNSAzNDguNjU2ODksLTEwLjg5OTQ0IDE3LjUwMDEsLTEuMzU0MDYgMTcuNDY4MDUsLTEuMzYzIDIyLjI3MzY5LDYuMjE0NyAxMC4zODY1NiwxNi4zNzc5MSAtMTkuMDIyNDQsMjcuMTQyOTkgLTY0LjYwNDMzLDIzLjY0ODIxIC00LjQsLTAuMzM3MzUgLTI1LjMyNSwtMC43NDM1OSAtNDYuNSwtMC45MDI3NiAtMzguNSwtMC4yODkzOCAtMzguNSwtMC4yODkzOCAtNTkuNDA2NzQsLTQuNDk5NjEgLTMwLjUxODcsLTYuMTQ1ODkgLTM5LjQ1NTk0LC01Ljc4OTIxIC00OC4yNDIyOCwxLjkyNTMgLTQuMTIwODQsMy42MTgxNCAtMi44MDMxNiwzLjYwNTMgLTEyLjY4MTAyLDAuMTIzNTMgLTI0Ljk3MjE4LC04LjgwMjI4IC01NS44NjU0NywtOS4zNDEzIC0xMDUuNjY5OTYsLTEuODQzNzIgLTE2Ljc3NSwyLjUyNTMxIC0zNi4zNSw1LjA4NzQ3IC00My41LDUuNjkzNyAtMzcuMTQ4ODIsMy4xNDk3MiAtNzEuOTg3MjcsOS41ODc1NyAtMTE2LjY3ODgsMjEuNTYxMjQgQyAxMTAuMjQxMjgsMjg4LjUwOTM0IDEwNSwyODkuMDg0MTMgMTA1LDI4Ni4xNDM4IFoiCiAgICAgICBpZD0icGF0aDM1MTkiCiAgICAgICBpbmtzY2FwZTpjb25uZWN0b3ItY3VydmF0dXJlPSIwIiAvPgogICAgPHBhdGgKICAgICAgIHN0eWxlPSJmaWxsOiMwMDhlY2YiCiAgICAgICBkPSJNIDUxMC41LDE0MDUuMzY1NiBDIDM3OC45MTMzOSwxMzk4LjMyIDMxNi4yNjk4NCwxMzg3Ljk3MDkgMjUxLDEzNjIuNDk0OCBjIC0yOC4zODg4OSwtMTEuMDgwNyAtMjguNDYyODMsLTExLjEyOTQgLTMxLjM2MzAzLC0yMC42NDY3IC0xNy41Nzk4LC01Ny42OTAxIC0zNS45MTYyMywtMTMyLjQyIC01MS4yNDA1LC0yMDguODMgQyAxNTkuNDgzNTksMTA4OC41NzY2IDE1Ni40MDY3NSwxMDc0LjczNTIgMTM4LjU5Miw5OTguOTQwNzggOTMuNDAwMjg3LDgwNi42Njg1NiA4Mi4wMzMwMTUsNzI3LjY5OTI0IDk3LjA4MDk5Miw3MTAuNTYwNTQgYyAzLjY5MjQ5OCwtNC4yMDU1MiA0LjE5Mjk3OCwtMTIuMjk1NzUgMC45NDc2ODksLTE1LjMxOTE5IC0xLjQ1NzczMywtMS4zNTgwOSAtMi4yMTIwMTYsLTMuOTg3OTcgLTIuODk1MjAyLC0xMC4wOTQ0MiAtMC41MzA0NzcsLTQuNzQxNDkgLTEuNTY1MzQyLC04Ljk3OTQyIC0yLjQzMDI5MSwtOS45NTIzOSAtMS45MjEyOTIsLTIuMTYxMjQgLTIuNjY1MTk1LC04LjUwMjYzIC0zLjUxNzMzOCwtMjkuOTgzNDYgLTAuNTM1MTEsLTEzLjQ4OTA2IC0xLjAwNTAzNCwtMTcuNDg1NjQgLTIuMTM4MTA0LC0xOC4xODQwMSAtMi4wMzk5NDEsLTEuMjU3MzMgLTMuMDQyNTE1LC0wLjM1MTY0IC0zLjA3OTU0OSwyLjc4MTk1IEMgODMuODU5MjM0LDYzOS4wMjg3MiA3NS43MjA0MjEsNjE0LjcxODM5IDcwLjk3NTM5LDU5MSA1Ni40MjA2NSw1MTguMjQ3MDQgMzAuNjg1MjM2LDQ1Mi45MTc0NyA0MS41ODMzMDcsNTE2LjM4Nzk1IDQzLjM3NjY1MSw1MjYuODMyNCA0OC42MjQ1NjgsNTQ3LjcyODU1IDU2LjM2MzkzLDU3NS4yNDE0MyA2Mi45ODUzOTYsNTk4Ljc4MDI2IDY2LjY5MjM1Nyw2MTYuNzA1NTIgNjcuODk0ODU2LDYzMSA3MS43MjY1NDQsNjc2LjU0ODQ2IDQ3LjI2NTg2Niw1ODUuMDE5MzggMzQuNDg5MjQ1LDUwNiAxNi45ODA5NjQsMzk3LjcxNjc5IDEyLjAyMzgyNiwzNzIuMTE4MDYgMi4zNDM3MDE3LDM0MCAtMS44MzUzMDgzLDMyNi4xMzQzIDAuMTYwNzE0MDksMzE4Ljg4NDgyIDExLjM4NzU2NywzMDcuMTUzMDIgMzUuMDA5OTM4LDI4Mi40NjgxOCA4OC41MDUyNzksMjY4LjcyMzYgODQuNTgwNDkzLDI4OC4zNDc1MyA4Mi45NjAxOTMsMjk2LjQ0OTA0IDcyLjIzNDk3NCwzMDEuNTUxMjkgNDUuMDU3OTMsMzA3LjE0OTQgMTYuOTQ1NDk5LDMxMi45NDAxOSAxNC4wOTgxNDQsMzE3Ljc3ODE3IDI5LjcxODI1MywzMzMuMjEzMjYgNDIuMDI1Nzk1LDM0NS4zNzUwMyAxMDkuMjI2NDQsMzU4LjA4MDE0IDE4NywzNjIuOTQ5MzIgYyAxNC40NjMzOSwwLjkwNTUxIDMxLjM2MjAxLDEuNDc5OTUgMTIwLDQuMDc5MiAxMTkuMzIzLDMuNDk5MDcgMjI5LjYwMzU1LDQuNDAwNDUgMjU3LjUsMi4xMDQ2NyAzMi40NDE2NywtMi42Njk4MyAzNi4xNzk1LC0yLjY4MTYgNDAuNzIyNjEsLTAuMTI4MjMgMy42NTAzMiwyLjA1MTU5IDQuNTcwMjcsMi4xNzkyNyA4LjY4MDIyLDEuMjA0NzEgNC4zODc2OSwtMS4wNDA0MiA3Ljc2NTA1LC0wLjg4ODQzIDMxLjIzMzQ2LDEuNDA1NTcgNC43MTQ3MSwwLjQ2MDg1IDYuNTM1NTIsMC4xMjU1MyAxMS4xMzU4OSwtMi4wNTA3OSA0LjcwOTksLTIuMjI4MTQgNS45MTA4NSwtMi40Mzc3NSA4LjM2MzcsLTEuNDU5OCA1LjYyNzAxLDIuMjQzNDkgNzQuNzc0MTUsMS41MjgwNyA5Ny4zNjQxMiwtMS4wMDczNSA2NS40NDc3MywtNy4zNDU2NSAxNDIuODMyMDYsLTI1LjE5NjM5IDE2OC41NzY3MywtMzguODg2NjggMy4wMzA4OCwtMS42MTE3MyAyMi45NDM0NywtNi40MzgyMSAzNS45MjMyNywtOC43MDcyIDEyLjYzNTQ1LC0yLjIwODggMjAuNjE2MjksLTQuMDk4NjEgMjUuNzk2OTIsLTYuMTA4NTQgOC43NzI3OCwtMy40MDM1OCAxMC44NDkzOCw0My4wMjE5NyA0LjE2MTcsOTMuMDQwMSAtMy42NTQ3NiwyNy4zMzQzIC00LjQ2ODQsMzIuNjMyMjcgLTYuMzgzMzcsNDEuNTY1MDIgLTEuMTIwMTEsNS4yMjUgLTIuNjY0ODIsMTIuNDI1IC0zLjQzMjY3LDE2IC0xMS4wODM3OSw1MS42MDQxIC0yMC42MjgyNSwxNTQuMTkzNDQgLTI5LjYzMTgzLDMxOC41IC02LjUzNjczLDExOS4yODg2OSAtOS42ODIsMTYzLjQ2OTE2IC0xNS45ODI1MSwyMjQuNSAtMS4wNTA0MiwxMC4xNzUgLTIuMTg0MDUsMjIuNzc1IC0yLjUxOTE5LDI4IC0yLjk1NDg0LDQ2LjA2OCAtOS41NzgxMSwxMDEuNTY2NiAtMjEuMDM0NjIsMTc2LjI1NjIgLTMuNTU0OTUsMjMuMTc2MiAtNC4yOTczNywzMC4yNTg5IC0zLjgyNTk3LDM2LjUgNC44NDc1Niw2NC4xNzg5IC0yNC43NzQwNywxMTEuOTczMiAtNzQuMTQ4NDYsMTE5LjYzODEgLTQuOTUsMC43Njg0IC0xNi45MjA5NSwzLjY5NiAtMjYuNjAyMTIsNi41MDU2IC00OC45MTQ1NywxNC4xOTYgLTEwNC40MDcyLDIyLjY2OTEgLTE3Ny4zOTc4OCwyNy4wODY0IC00Ny4yNDg0MSwyLjg1OTUgLTExMS40MDUzNSw1LjEwNzIgLTEyNSw0LjM3OTMgeiBtIC00LjMzNTMzLC0xNC4xMzAzIGMgMy42NzA1NSwtMy42NzA1IC03LjE3MDAyLC01LjQxNzggLTU0LjE2NDY3LC04LjczMDEgLTExLjI3NSwtMC43OTQ3IC0yNi4xMjUsLTIuMTE0OSAtMzMsLTIuOTMzOCAtMzcuNTYxMDcsLTQuNDc0IC02Ny4zMjMyMiwtNC43MyAtNTYuMzEwMTcsLTAuNDg0MyAxOS45NjIxNCw3LjY5NTcgMTM3LjkzODE3LDE3LjY4NDkgMTQzLjQ3NDg0LDEyLjE0ODIgeiBNIDI2NiwxMzM5LjYyNTggYyAwLC0yLjU4MzggLTE3Ljg1MzUzLC03NC4wOTY3IC0yMi4zNzU1LC04OS42MjU4IC04LjM0MzEzLC0yOC42NTE0IC0yMy4xNTY5NCwtNjQgLTI2LjgyMTAxLC02NCAtMy40MjYxMywwIDUuMDc0MjQsNDguNjQzMiAxMy4yODA5NCw3NiAxMC44MTk2LDM2LjA2NjggMzUuOTE1NTcsOTAuMzA3OCAzNS45MTU1Nyw3Ny42MjU4IHogbSAtMzAuODY4MzEsLTQuMjA4MyBjIDMuNDY5NTMsLTE2LjAyNDQgLTEuNTU4MTcsLTQxLjE4NjEgLTE4LjY2NjI5LC05My40MTc1IC05LjQwNDA2LC0yOC43MTA4IC0xNi41NjM2MiwtNTQuMzU2NiAtMTguMDA2NDYsLTY0LjUgLTAuOTIzMDEsLTYuNDg4OCAtMS44OTI4LC03LjcxNTEgLTQuOTg2NjksLTYuMzA1NCAtOC45MzExNiw0LjA2OTMgLTcuNTUyMDEsMTguMzUxNyA2LjE1NDU2LDYzLjczNTkgMy41NTk3NCwxMS43ODY4IDcuMTYxNDUsMjUuOTYxOCA4LjAwMzgsMzEuNSA1LjM5OTk4LDM1LjUwMzYgMjQuNDIwMjIsODMuMjE2MiAyNy41MDEwOCw2OC45ODcgeiBtIDMzNy45ODE5NCwtMTQ4LjI3NDYgYyAxNS45MzY0NCwtMTAuMTA2NiAxOC43MjQzLC0zMy4yMzcyIDYuMTU4OTEsLTUxLjA5OTcgLTIwLjgzODEzLC0yOS42MjI3IC00Mi4yODA3MSwtMC40NTg5IC0yOS44Mjg0MSw0MC41NjkzIDMuNzcxMDYsMTIuNDI0OSAxMy43MDk4MSwxNi44NDY2IDIzLjY2OTUsMTAuNTMwNCB6IG0gLTUzLjQ1MjQzLC0yLjk4NTcgYyAxNy4zMjIwNCwtOC45MDc2IDIwLjIyODkzLC00Mi45MTc5IDUuMDM0ODMsLTU4LjkwNzIgLTkuMDc5OTYsLTkuNTU1MiAtMjIuNDA4Niw0LjI1ODQgLTI0LjgwODc1LDI1LjcxMTQgLTAuNTA2NzMsNC41MjkyIC0xLjM1MjY2LDEwLjEwMzMgLTEuODc5ODYsMTIuMzg2OCAtNC43MDY3MiwyMC4zODY4IDQuNzY4MjMsMjkuNDkyMSAyMS42NTM3OCwyMC44MDkgeiBtIC0zMzAuMjQ2MTcsLTM1LjczNzEgYyAyLjMyNDkxLC0xNS4wNDE4IC0yLjU0Nzk0LC00My4yNTExIC0xNS40NzU0LC04OS41ODg0IC00Ljk2MTA1LC0xNy43ODI0IC0xMC41Nzc4LC00MC4xMDg2IC0xMi40ODE2NiwtNDkuNjEzOCBDIDE1Ni44MzAyMyw5ODYuMTEzNjIgMTQ5LDk3MC40MzYzNiAxNDksOTg0LjI3NTI3IGMgMCw2Ljk4NTM2IDExLjA5NzQ2LDY3LjM4NzUzIDE2LjQ4NDc4LDg5LjcyNDczIDEuMzkyODIsNS43NzUgMy42NzY5NiwxOS43MjUgNS4wNzU4NSwzMSAzLjcxMjIzLDI5LjkyMDQgNi4wNjk4NywzOC44NzE4IDEyLjA5MDg4LDQ1LjkwNiA0LjUyMTQ3LDUuMjgyMyA1LjYyNTU3LDQuODc2NSA2Ljc2MzUyLC0yLjQ4NTkgeiBtIDI5OS45NjMyNiwtMzIuNDE3OCBjIDE3LjgyNTA1LC05Ljc4MyAzMi43NzY2NSwtMTAuMzY0OCA3Mi4xMjE3MSwtMi44MDY0IDUyLjExMjc0LDEwLjAxMTEgNzIuOTc1MjQsLTUuMDk0IDQ2Ljk3NTY4LC0zNC4wMTE3IC0xMC42NDY1OSwtMTEuODQxNiAtMjEuNzc5NjQsLTEzLjEyMzMgLTYwLjQ3NTY4LC02Ljk2MjUgLTI1LjgyMTIxLDQuMTExIC00OC4wNzM1Miw0LjQ1NzIgLTU3LjUsMC44OTQ3IC0xMS40NzEyLC00LjMzNTQgLTE4LjY3OTc5LC0yLjgyODkgLTI3LjUyOTUyLDUuNzUzMSAtMTUuMTM0NDcsMTQuNjc2NSAtNS4wMTIxOSwzNi43NjE4IDE4LjgyNjYyLDQxLjA3NjcgMC4xNjM0MSwwLjAzIDMuNTc0OTQsLTEuNzQ1MiA3LjU4MTE5LC0zLjk0MzkgeiBtIC02OC4xNTE4NSwtNjMuNDA3OCBjIDEwLjk5ODA3LC0yLjc4OTkgMTMuNzk0NDUsLTQuMDg3NiAzMS4wOTU2MSwtMTQuNDI5OCA1Ny4zNDQ1MywtMzQuMjc5MiA1Ny40NDI4NCwtMTE3LjM3MTY4IDAuMTc3OTUsLTE1MC40MDQwOCAtMy44NSwtMi4yMjA4MiAtOS40NzUsLTUuNDk1NzEgLTEyLjUsLTcuMjc3NTMgLTI3LjQ3MjIsLTE2LjE4MjA1IC01My44NjQ2MSwtMTUuMzA0MzggLTEwNywzLjU1ODI0IC05LjYyNSwzLjQxNjc5IC0xOC43NTk4NCw2LjE4NDc0IC0yMC4yOTk2NCw2LjE1MDk4IC0yLjA3NjY5LC0wLjA0NTUgLTMuMDM4NjcsMC41NjczMSAtMy43MjUyNSwyLjM3MzE2IEMgMzA4LjQ2NjAyLDg5My45MDQ0NiAzMDcuNjY0NjUsODk1IDMwNy4xOTQyNyw4OTUgMzA0Ljk0Mzk0LDg5NSAzMDAsOTAzLjk0MjUyIDMwMCw5MDguMDEyODggYyAwLDIuNTU0MDYgLTEuNTM4ODEsOC4wMDI2NCAtMy45NDcyLDEzLjk3NjE3IC0yOC44MDQ3NSw3MS40NDQzOSA0Ni45MjA3MywxNTAuNDU1ODUgMTI1LjE3MzY0LDEzMC42MDU0NSB6IE0gMzIwLjk0MTg5LDk5NS45OTI3MyBjIC0yNi41NzM0LC00LjUwMDkgLTMxLjYxMTE3LC0yOC41MTU3OSAtMTAuNjM4NjksLTUwLjcxNDMzIDE2LjIxODg0LC0xNy4xNjcwMiAzNC4zOTEyNiwtMTguODE4OTYgNDguNzI4MzMsLTQuNDI5NiAyOS4yMzg3LDI5LjM0NTM0IDYuMjMzMzEsNjIuNjUxMiAtMzguMDg5NjQsNTUuMTQzOTMgeiBtIDM4NC4wNzQ2Myw0Mi41MDgzNyBjIDYzLjUxOTc1LC0xMi42MzQzIDg5LjI4NTY5LC04Mi40NzMzIDUwLjcwOTMzLC0xMzcuNDQ4NDYgLTU4LjYyNTc4LC04My41NDc1OCAtMjAyLjkzOTQ5LC0zNC45NTk1MSAtMTg1LjY3NDg3LDYyLjUxMzcgMTAuMzIwNDcsNTguMjY3NjYgNjUuMjk3OTQsODguNzkxOTYgMTM0Ljk2NTU0LDc0LjkzNDc2IHogTSA2MDIuNDA3MDksOTkwLjk2OTQgYyAtMjcuNzMxNjksLTUuNDk4MTYgLTMyLjgxMjg0LC0zOS40NzY5NiAtOS40MjQ2MiwtNjMuMDI0NTIgMjAuNjI2NjUsLTIwLjc2NzE5IDQ5Ljk0NjU1LC04Ljc5MjgyIDU5LjQ5ODA4LDI0LjI5OTI1IDIuOTc1MzIsMTAuMzA4MjQgMS4xMjY1NCwxMS43NDUyOSAtMTQuMTQ2MDEsMTAuOTk1NjEgLTE3LjYxNDE3LC0wLjg2NDYzIC0xOS4wMTU3OSwwLjc0MTQgLTcuOTE0OTYsOS4wNjkyMSA4LjgwMDIxLDYuNjAxOSAxMS40MzEyLDkuOTYwOTkgOS41NjQwMiwxMi4yMTA4MSAtNC41Nzc3Nyw1LjUxNTg4IC0yNC43ODg5Niw4Ljk4NDkzIC0zNy41NzY1MSw2LjQ0OTY0IHogTSA2MDMuNSw3NDkuNTQwMTQgYyA3LjE1LC0wLjI5NDMxIDE0LjU3NSwtMC43OTgxIDE2LjUsLTEuMTE5NTMgMS45MjUsLTAuMzIxNDQgNC44NSwtMC43MzgyNyA2LjUsLTAuOTI2MjkgMS42NSwtMC4xODgwMiA1LjAyNSwtMC42MDA0NCA3LjUsLTAuOTE2NDggMi40NzUsLTAuMzE2MDQgNi4wNzUsLTAuNzczMjcgOCwtMS4wMTYwNyAxLjkyNSwtMC4yNDI4IDUuMDc1LC0wLjY5NjI3IDcsLTEuMDA3NzEgMS45MjUsLTAuMzExNDQgNC44NSwtMC43NjAxMyA2LjUsLTAuOTk3MSAzLjAzOTg2LC0wLjQzNjU3IDEzLjA0MjA2LC0yLjE3MTY2IDI4LjUsLTQuOTQzOTIgNjYuMjk1MTcsLTExLjg4OTUzIDExMi41MzA2MywtMzMuMjUyMTggMTYyLjEyNDkzLC03NC45MDgyNiAxLjQ0MzcxLC0xLjIxMjYzIDQuNTM0MTgsLTMuNzc5NzggNi44Njc3LC01LjcwNDc4IDIuMzMzNTIsLTEuOTI1IDYuMTQ0ODEsLTUuMyA4LjQ2OTUzLC03LjUgMi4zMjQ3MiwtMi4yIDcuMjY0NDUsLTYuNyAxMC45NzcxOCwtMTAgMy43MTI3MiwtMy4zIDkuMTA5NTMsLTguMjUgMTEuOTkyOSwtMTEgMTAuMzIyNjgsLTkuODQ1MiAyMS4zODExNiwtMTkuODI5MzkgMzAuNjg4MTYsLTI3LjcwNjk0IDIuNDA4NzgsLTIuMDM4ODEgNS43Mjk2LC00Ljg1OTI3IDcuMzc5NiwtNi4yNjc2OCAxLjY1LC0xLjQwODQxIDUuMTE5NTEsLTQuMjQwMjkgNy43MTAwMiwtNi4yOTMwNiAzLjMwMDU4LC0yLjYxNTQ1IDQuOTA3NTksLTQuNzE5MTggNS4zNzAyNywtNy4wMzAxOCAwLjU5Mzg2LC0yLjk2NjI2IDAuOTcwMDgsLTMuMjY3OTIgMy43NDE1OSwtMyAyLjQxOTgxLDAuMjMzOTEgMy4zNDQzMywtMC4yMjE1MSA0LjMwNjI3LC0yLjEyMTI4IDAuNjczNzEsLTEuMzMwNTIgMS45MzI5OCwtMi44MTUzOCAyLjc5ODM5LC0zLjI5OTY5IEMgOTQ3LjU0NCw1NzMuMTU1ODEgOTQ4LDU3MS4zODk4IDk0OCw1NjcuNjg3NDQgYyAwLC00LjQ0NzExIDAuMzMwNjMsLTUuMzU4MjQgMi4yNSwtNi4yMDAzMSAxLjIzNzUsLTAuNTQyOTIgMi4zODU3MiwtMS45Mzc5OCAyLjU1MTYsLTMuMTAwMTIgMC4xNjU4OCwtMS4xNjIxNSAxLjM2Nzc2LC0yLjU5ODc4IDIuNjcwODYsLTMuMTkyNTEgMS45NDkxMiwtMC44ODgwNyAyLjQ5Mzg0LC0yLjEwOTM2IDMuMDcxNzksLTYuODg3IDAuMzg2MzksLTMuMTk0MTMgMS4wMzExMiwtNi4yNTc1IDEuNDMyNzMsLTYuODA3NSAwLjQwMTYxLC0wLjU1IDEuMjA0MTgsLTIuOCAxLjc4MzUsLTUgMC41NzkzMSwtMi4yIDEuOTU2MjEsLTYuNDc1IDMuMDU5NzcsLTkuNSAxLjYwMjU2LC00LjM5Mjc5IDIuMTQ2NDYsLTkuMjI0MjQgMi43MDE4MywtMjQgMC43NTk1NiwtMjAuMjA4NjggMS40NjMxNiwtMjYuNjUzNDggNC4xNDg1NSwtMzggMi4xNTM2LC05LjA5OTU3IDIuMjA3NzQsLTY5Ljc4NDA3IDAuMDgzNCwtOTMuNSAtMS4zMjU3NywtMTQuODAwODIgLTI4LjYzNDM4LC0yMC4zNTk4NiAtNDguODUxNzMsLTkuOTQ0NDMgLTMuMzM3NSwxLjcxOTQgLTg0LjM0NzY2LDExLjMyMjIgLTE0Ni45MDIzMSwxNy40MTM1NiAtNDguMjQ2MTEsNC42OTgwMyAtMTEwLjA1OTQ3LDkuNTM1NjIgLTE1NCwxMi4wNTIyMiAtMTAuNzI1LDAuNjE0MjUgLTI2LjcsMS41NTU3MSAtMzUuNSwyLjA5MjE0IC0yMC44NDQ1OCwxLjI3MDYyIC0yNC4zODQ2MywxLjIyNjk3IC0yNi4yNTQzNSwtMC4zMjM3MSAtMS4wOTU2MiwtMC45MDg2NiAtNC45MzQyMywtMS4yNDU2NSAtMTIuOTkwNzEsLTEuMTQwNDQgLTEwLjg5LDAuMTQyMjEgLTExLjQxMTE3LDAuMDU2MSAtMTAuOTI0NTEsLTEuODA0ODkgMC44MTY5MSwtMy4xMjM4NiAtMS45NjEyLC0zLjUwOSAtMzAuMzMwNDMsLTQuMjA0NzkgQyAyNTcuNjIzNzgsMzc5LjU0Nzk2IDEyMi40NjYwMSwzNzIuNTY4NTQgMjguNTI2MjM0LDM2MC45ODMzNyAxOC4wNDYyMjksMzU5LjY5MDkyIDE4LDM1OS42OTQ5MSAxOCwzNjEuODkxODUgYyAwLDMuMDc1MjEgOC40MDU1NCwxMS41MTI2NiAxNC45Mzc0MSwxNC45OTQxMSA3LjMwNjYwMiwzLjg5NDM3IDcuNTE2MDk0LDQuNzk0MDIgMS4zMTI1OSw1LjYzNjgzIC05Ljg4NjIzNSwxLjM0MzEzIC05LjU5Nzc1MywwLjAzNTUgLTUuMjE0MTM0LDIzLjYzNDA4IDEyLjg3MzA1MSw2OS4zMDAxNCAzNC41MzkzMzcsODYuNjg5NDIgNzMuMzE1MzI0LDU4Ljg0MjYxIDExLjc4MzA5LC04LjQ2MTk3IDc3LjcxMzY1LC0xOS44NTc1NSAxMzguNjQ4ODEsLTIzLjk2NDM2IDI2LjYxNTI0LC0xLjc5Mzc3IDMxLjU4MTM1LC0yLjA1NzkyIDY3LC0zLjU2MzY5IDQwLjkwOTI1LC0xLjczOTIgNTAuNzY5NDIsLTEuODQwODUgNDkuNDM4MjQsLTAuNTA5NjcgLTEuMzEyMDEsMS4zMTIwMSAtMzcuNTIyMDksNi40MDA3OCAtNjcuOTM4MjQsOS41NDc2NyAtODkuMjk0NTIsOS4yMzg1MyAtMTAxLjE3OTgxLDEwLjc0NjEzIC0xMzMuNSwxNi45MzM5NiAtOS42MjUsMS44NDI3NSAtMjEuNTUsMy44NTMwNSAtMjYuNSw0LjQ2NzM1IC01My41Nzk1OTUsNi42NDkyIC03Mi4wMDIxMTUsNjguMTQ0IC0yMS41LDcxLjc2NzUgMTguMDI3NjEsMS4yOTM0NyA0Niw3Ljg5NTUzIDQ2LDEwLjg1Njk0IDAsMS4xOTIzMyAxLjkzMDU3LDEuNDY0ODIgMTAuMzc4MDMsMS40NjQ4MiA5LjQ5MDczLDAgMTAuNDk5MzUsMC4xODI3MiAxMS43OTcwNSwyLjEzNzE2IDEuMTg1NDksMS43ODU0NSAyLjY4MDQyLDIuMjE4MTIgOS4wODM3OCwyLjYyOTA2IDUuNzg1NzMsMC4zNzEzIDguMDc5ODQsMC45NTA1NiA5LjM1NzkzLDIuMzYyODQgMS4wODYyOSwxLjIwMDMyIDMuMDUwMjMsMS44NzA5NCA1LjQ3OTE4LDEuODcwOTQgMi4wODIzLDAgNC4wNjQxMSwwLjQ1IDQuNDA0MDMsMSAwLjMzOTkyLDAuNTUgMi45MjQ5NywxIDUuNzQ0NTcsMSAzLjk0MDc1LDAgNS42Nzk5OSwwLjUyMDQzIDcuNTE5MzQsMi4yNSAyLjI4NjY4LDIuMTUwMiAzLjI2NTMyLDIuMjY0MzMgMjIuMDY0NDUsMi41NzMgMTcuNTQwNzIsMC4yODggMTkuODg4MjksMC41MjQ4NiAyMS42NzE2NCwyLjE4NjU0IDIuNzQ0MjgsMi41NTcwNiAxMS4zOTQ4LDMuMDk1NjYgMTMuNjQxMTIsMC44NDkzNCAzLjU1MzUyLC0zLjU1MzUyIDE5LjExNzIxLC02LjA3Njg3IDM2LjUxMTAyLC01LjkxOTU0IDE0LjM2NDk4LDAuMTI5OTMgMzAuNjk3MzgsLTEuNDA1MzIgMzcuNTk3ODYsLTMuNTM0MjIgNC42NjQ4NywtMS40MzkxNyAtNS41MTQyOSwxOC42MjMzNyAtMTAuNSwyMC42OTQ5MSAtMS41MTI1LDAuNjI4NDQgLTIuNzU4NTUsMS42NTA1MiAtMi43NjksMi4yNzEyOSAtMC4wNTkzLDMuNTIxNDQgLTYuMjg1ODksMTAuNzk3MDkgLTExLjI0NDM2LDEzLjEzODc3IC00Mi43MzExOCwyMC4xODAxOCAtNDMuNDg4Myw2NC4wNjI4OSAtMS41NzUzOSw5MS4zMDk2NSAyNy4xNTA0NSwxNy42NDk5NyAzMi4yMTI1NywyMC43MjM4MyA0My44Mzg3NSwyNi42MjAxNCAyNy4zNzk3NiwxMy44ODU4NiA2My41MDYwOSwyNS4xNjM2IDkzLDI5LjAzMjI4IDIuNDc1LDAuMzI0NjUgNS42MjUsMC43OTEzMiA3LDEuMDM3MDYgMi45Mzg2MiwwLjUyNTE5IDEwLjQ2NTM1LDEuNDIwNyAxNy41LDIuMDgyMSAyLjc1LDAuMjU4NTYgNy4yNSwwLjY5NzQgMTAsMC45NzUyIDIuNzUsMC4yNzc4IDkuMTUyNTIsMC42MjkgMTQuMjI3ODMsMC43ODA0NSA1LjA3NTMsMC4xNTE0NCA5LjQyNTM5LDAuNDcyODMgOS42NjY4NywwLjcxNDE5IDAuNTc5NjMsMC41NzkzNiA2OC40Njk4OCwwLjE2MzczIDg1LjEwNTMsLTAuNTIxMDIgeiBNIDEwNiwyODUuNjQzOCBjIDAsLTAuNzQ1OTEgMS41MDcyNCwtMy4zMzM0MSAzLjM0OTQzLC01Ljc1IEMgMTEzLjk1NzIxLDI3My44NDkzIDExNiwyNjkuNjMwMjIgMTE2LDI2Ni4xNTgwNyBjIDAsLTIuMjIwNTggMC41NTEzLC0zLjA3NiAyLjI1LC0zLjQ5MTE5IDQ3LjgxMjQxLC0xMS42ODYxIDk1LjcxMjI5LC0xOC41MzgzIDEzNC4yNSwtMTkuMjA0OCAyMzQuNzUzNTEsLTQuMDU5OTcgMjg0LjM4NzYzLC01LjYwNDcyIDM1MC41LC0xMC45MDg0OSAxNy41ODcwMiwtMS40MTA5IDE3LjkxNTM3LC0xLjMzMzMzIDIyLjA2NzEyLDUuMjEzMjkgMTAuNzIyMTEsMTYuOTA3MDMgLTUuNTE1OTQsMjIuNzYzNDEgLTYyLjA2NzEyLDIyLjM4NDk3IC05MC4zMzYwNiwtMC42MDQ1MSAtODQuMTEzMzUsLTAuMzE1OTggLTEwNy4yNzAzNywtNC45NzM5NSAtMzAuNDgwMTYsLTYuMTMxIC00MC4wNDI5NiwtNS43MTAyIC00OS4zODA0NCwyLjE3MjkxIC0zLjE1MDgyLDIuNjYwMDYgLTMuMTUwODIsMi42NjAwNiAtMTMuNTUxNzksLTAuODIwMzMgLTI1LjgzOTk2LC04LjY0NjU5IC01MS41MTQyNSwtOC44MTI4NyAtMTA3LjI5NzQsLTAuNjk0OSAtMTkuMjUsMi44MDEzOSAtNDEuMDk0MDYsNS41NDAyMiAtNDguNTQyMzcsNi4wODYyOCAtMjUuOTQ2NzksMS45MDIyNCAtNTQuMTc2NjIsNy4xNDAwMiAtOTcuODg1NzksMTguMTYxOCBDIDExMC44NjczMiwyODcuMTk1NzcgMTA2LDI4OC4wMTQwOCAxMDYsMjg1LjY0MzggWiIKICAgICAgIGlkPSJwYXRoMzUxNyIKICAgICAgIGlua3NjYXBlOmNvbm5lY3Rvci1jdXJ2YXR1cmU9IjAiIC8+CiAgICA8cGF0aAogICAgICAgc3R5bGU9ImZpbGw6IzFiNmY5NSIKICAgICAgIGQ9Ik0gNTEwLjUsMTQwNS4zNjU2IEMgMzc4LjkxMzM5LDEzOTguMzIgMzE2LjI2OTg0LDEzODcuOTcwOSAyNTEsMTM2Mi40OTQ4IGMgLTI4LjM4ODg5LC0xMS4wODA3IC0yOC40NjI4MywtMTEuMTI5NCAtMzEuMzYzMDMsLTIwLjY0NjcgLTE3LjU3OTgsLTU3LjY5MDEgLTM1LjkxNjIzLC0xMzIuNDIgLTUxLjI0MDUsLTIwOC44MyBDIDE1OS40ODM1OSwxMDg4LjU3NjYgMTU2LjQwNjc1LDEwNzQuNzM1MiAxMzguNTkyLDk5OC45NDA3OCA5My41MTE5NCw4MDcuMTQzNiA4Mi4wMTE0MDgsNzI3LjQ0OTEyIDk2Ljk5Mzg1OSw3MTAuNjgwODQgYyA0Ljk3MDIwMSwtNS41NjI2MiA4Ljk2NzA1MSwwLjk2MTExIDEzLjM2Nzc4MSwyMS44MTkxNiAyNS4wOTQzNCwxMTguOTM5MjYgNjYuMTA5NzgsMjc0LjY1MzUgOTYuODAwMjUsMzY3LjUgMTEuNDgwMDksMzQuNzMwMiA5LjUzNTA5LDMxLjM5OTMgMTcuOTI0MTUsMzAuNjk2IDguNjk2OTYsLTAuNzI5MSA4LjgzNzExLC0wLjQyNzYgNC40OTc1Niw5LjY3NTkgLTguMDUxNDQsMTguNzQ1NyAtNC4wNzcwNCwyOC4yNDA5IDIxLjE2NjQsNTAuNTY4MyAxMC43MDQxOSw5LjQ2NzcgOS43MTQ5NywxMi4yNDU0IC0zLjY3Mzk5LDEwLjMxNjUgLTkuMjcyNzcsLTEuMzM1OSAtOC42NTEzLC0yLjYzMzkgLTUuMTkzNDYsMTAuODQ2OSAxLjYwNzc1LDYuMjY4IDMuODU5NjIsMTUuODk2NCA1LjAwNDE3LDIxLjM5NjQgMTcuNjEwMTQsODQuNjIzOCAzNS4yOTI3LDExNC42NzU5IDcxLjg5MjA0LDEyMi4xODMzIDExMy4xMDc3NSwyMy4yMDA4IDI0Mi4xODMwOCwyNy4yMDMyIDQxMi44NDA2NiwxMi44MDEzIDY3LjA0ODkyLC01LjY1ODIgMTE5LjI4NDA1LC0yNi40OTM0IDEzNS45OTQ5LC01NC4yNDQ1IDQuMzIwNTcsLTcuMTc1IDQuNDM3ODMsLTYuODQ1MiAtMi42OTkzOSwtNy41OTEyIC0xMS41MTk4NiwtMS4yMDQxIC0xMS4yMTcwMywtMy45OTU0IDAuOTgyMDQsLTkuMDUxOCAxOC4wNzU3LC03LjQ5MjMgMjMuNzE4MjQsLTEzLjM4NjQgMjMuNDM5MzIsLTI0LjQ4NDUgLTAuMTIxMDQsLTQuODE2MyAwLjU3NzA0LC04Ljc0MiAyLjY3ODU1LC0xNS4wNjMzIDcuMTMzOTIsLTIxLjQ1ODMgOC41ODIxMSwtMzguMTA3NyA2LjkyNDM0LC03OS42MDY3IC0xLjM5ODMyLC0zNS4wMDM5IC0wLjk3NTIzLC00OC45MDIxIDEuODg1NjIsLTYxLjk0MjYgNC40MTkyOCwtMjAuMTQ0MiA2Ljc3ODgyLC00MC4yMzU4IDEwLjY4NjkzLC05MSAyLjY0OTg2LC0zNC40MjAwOCA0LjYwNjYxLC01My43ODgwNiA2Ljk3MTEyLC02OSAyLjIyNTY1LC0xNC4zMTg2NSAzLjM2OTc4LC0yOS41ODcwOCA0Ljk4MzEzLC02Ni41IDEuODI3NzMsLTQxLjgxNzgzIDIuOTg1NDQsLTU3Ljg1NzU3IDUuNTkzNzksLTc3LjUgMy4yNDQxNCwtMjQuNDMwNDIgMy43OTYzMywtMjYuMjYwODYgOS43MDQyNSwtMzIuMTY4NzggOC40NjUxNCwtOC40NjUxNSA4LjIxNTMzLC0xNC40MDE5NiAtMS4xODM0OCwtMjguMTI1NzYgLTE0LjM0OTU1LC0yMC45NTI2NyAtMTQuMzYwMTUsLTMxLjkzNjIxIC0wLjA0MzYsLTQ1LjEzMjc5IDUuNDgyMSwtNS4wNTMyMiA1LjY1ODM3LC0xMi4zOTkyNSAxLjQ1MzQ3LC02MC41NzI2NyAtNC40NTEyNywtNTAuOTk2MDIgLTQuMzY3NDMsLTY3Ljc1MTU5IDAuMzM2NzQsLTY3LjI5NzE1IDIuNDEzODcsMC4yMzMxOCAzLjMzOTcxLC0wLjIyMzYgNC4zMDA5NSwtMi4xMjE5OSAwLjY3MzcxLC0xLjMzMDUyIDEuOTMyOTgsLTIuODE1MzggMi43OTgzOSwtMy4yOTk2OSBDIDk0Ny41NDQsNTczLjE1NTgxIDk0OCw1NzEuMzg5OCA5NDgsNTY3LjY4NzQ0IGMgMCwtNC40NDcxMSAwLjMzMDYzLC01LjM1ODI0IDIuMjUsLTYuMjAwMzEgMS4yMzc1LC0wLjU0MjkyIDIuMzg1NzIsLTEuOTM3OTggMi41NTE2LC0zLjEwMDEyIDAuMTY1ODgsLTEuMTYyMTUgMS4zNjc3NiwtMi41OTg3OCAyLjY3MDg2LC0zLjE5MjUxIDEuOTQ5MTIsLTAuODg4MDcgMi40OTM4NCwtMi4xMDkzNiAzLjA3MTc5LC02Ljg4NyAwLjM4NjM5LC0zLjE5NDEzIDEuMDMxMTIsLTYuMjU3NSAxLjQzMjczLC02LjgwNzUgMC40MDE2MSwtMC41NSAxLjIwNDE4LC0yLjggMS43ODM1LC01IDAuNTc5MzEsLTIuMiAxLjk1NjIxLC02LjQ3NSAzLjA1OTc3LC05LjUgMS42MDI1NiwtNC4zOTI3OSAyLjE0NjQ2LC05LjIyNDI0IDIuNzAxODMsLTI0IDAuNzU5NTYsLTIwLjIwODY4IDEuNDYzMTYsLTI2LjY1MzQ4IDQuMTQ4NTUsLTM4IDIuMTUzNiwtOS4wOTk1NyAyLjIwNzc0LC02OS43ODQwNyAwLjA4MzQsLTkzLjUgLTEuMzI1NzcsLTE0LjgwMDgyIC0yOC42MzQzOCwtMjAuMzU5ODYgLTQ4Ljg1MTczLC05Ljk0NDQzIC0zLjMzNzUsMS43MTk0IC04NC4zNDc2NiwxMS4zMjIyIC0xNDYuOTAyMzEsMTcuNDEzNTYgLTQ4LjI0NjExLDQuNjk4MDMgLTExMC4wNTk0Nyw5LjUzNTYyIC0xNTQsMTIuMDUyMjIgLTEwLjcyNSwwLjYxNDI1IC0yNi43LDEuNTU1NzEgLTM1LjUsMi4wOTIxNCAtMjAuODQ0NTgsMS4yNzA2MiAtMjQuMzg0NjMsMS4yMjY5NyAtMjYuMjU0MzUsLTAuMzIzNzEgLTEuMDk1NjIsLTAuOTA4NjYgLTQuOTM0MjMsLTEuMjQ1NjUgLTEyLjk5MDcxLC0xLjE0MDQ0IC0xMC44OSwwLjE0MjIxIC0xMS40MTExNywwLjA1NjEgLTEwLjkyNDUxLC0xLjgwNDg5IDAuODE2OTEsLTMuMTIzODYgLTEuOTYxMiwtMy41MDkgLTMwLjMzMDQzLC00LjIwNDc5IEMgMjU3LjYyMzc4LDM3OS41NDc5NiAxMjIuNDY2MDEsMzcyLjU2ODU0IDI4LjUyNjIzNCwzNjAuOTgzMzcgMTguMDQ2MjI5LDM1OS42OTA5MiAxOCwzNTkuNjk0OTEgMTgsMzYxLjg5MTg1IGMgMCwzLjA3NTIxIDguNDA1NTQsMTEuNTEyNjYgMTQuOTM3NDEsMTQuOTk0MTEgNy4zMDY2MDIsMy44OTQzNyA3LjUxNjA5NCw0Ljc5NDAyIDEuMzEyNTksNS42MzY4MyAtOS44ODYyMzUsMS4zNDMxMyAtOS41OTc3NTMsMC4wMzU1IC01LjIxNDEzNCwyMy42MzQwOCAxMi44NzMwNTEsNjkuMzAwMTQgMzQuNTM5MzM3LDg2LjY4OTQyIDczLjMxNTMyNCw1OC44NDI2MSAxMS43ODMwOSwtOC40NjE5NyA3Ny43MTM2NSwtMTkuODU3NTUgMTM4LjY0ODgxLC0yMy45NjQzNiAyNi42MTUyNCwtMS43OTM3NyAzMS41ODEzNSwtMi4wNTc5MiA2NywtMy41NjM2OSA0MC45MDkyNSwtMS43MzkyIDUwLjc2OTQyLC0xLjg0MDg1IDQ5LjQzODI0LC0wLjUwOTY3IC0xLjMxMjAxLDEuMzEyMDEgLTM3LjUyMjA5LDYuNDAwNzggLTY3LjkzODI0LDkuNTQ3NjcgLTg5LjI5NDUyLDkuMjM4NTMgLTEwMS4xNzk4MSwxMC43NDYxMyAtMTMzLjUsMTYuOTMzOTYgLTkuNjI1LDEuODQyNzUgLTIxLjU1LDMuODUzMDUgLTI2LjUsNC40NjczNSAtNTMuNTc5NTk1LDYuNjQ5MiAtNzIuMDAyMTE1LDY4LjE0NCAtMjEuNSw3MS43Njc1IDguNzUxNSwwLjYyNzkyIDQxLjAxMjk1LDYuNzIzMTQgNDMuOTc0NzMsOC4zMDgyNCAzLjQ0NDIsMS44NDMyOCAyLjUxMzUzLDQuODg4MTcgLTIuMDkxOSw2Ljg0NDEgLTQuMTE3MTcsMS43NDg1NyAtNC4xMTcxNywxLjc0ODU3IDAuMDcxNCw0LjUyMDQ2IDMuNDI5NDYsMi4yNjk1IDMuOTcyMjMsMy4wMzI2MSAyLjk5NDczLDQuMjEwNDIgLTEuODE3NjcsMi4xOTAxNiAtMi42OTc5NiwyLjAxMjIxIC0zMi41NzAyNSwtNi41ODM5IEMgODIuODQ0OTY4LDU0Ni4xNzY3NiA3NC43NTAyODcsNTQ1LjM4MTA5IDg1LDU1My41IGMgNy44NTEzNDgsNi4yMTkxNCA2LjgxODAwOCw4Ljc4ODI2IC0yLjQwODkzMSw1Ljk4OTE4IC04LjMyNjcwNCwtMi41MjYgLTcuODM0NDMsLTUuMDMzMDMgLTQuMDI3NDQsMjAuNTEwODIgMC45NDI2NjIsNi4zMjUgMS42NzUyNjgsMTMuMTg4ODYgMS42MjgwMTQsMTUuMjUzMDMgLTAuMDQ3MjUsMi4wNjQxNyAwLjU3ODUwMiw2Ljc4OTE3IDEuMzkwNTcsMTAuNSAzLjc4NjY1LDE3LjMwMzUgNC4xNDMxNywyOS4zMTk2MyAwLjczMTg3NSwyNC42NjcwNSBDIDc5Ljk1Mzg2NSw2MjcuMjAxMDMgNzQuMjUxNzE0LDYwNy4zNzY5NSA3MC45NzUzOSw1OTEgNTYuNDIwNjUsNTE4LjI0NzA0IDMwLjY4NTIzNiw0NTIuOTE3NDcgNDEuNTgzMzA3LDUxNi4zODc5NSA0My4zNzY2NTEsNTI2LjgzMjQgNDguNjI0NTY4LDU0Ny43Mjg1NSA1Ni4zNjM5Myw1NzUuMjQxNDMgNjIuOTg1Mzk2LDU5OC43ODAyNiA2Ni42OTIzNTcsNjE2LjcwNTUyIDY3Ljg5NDg1Niw2MzEgNzEuNzI2NTQ0LDY3Ni41NDg0NiA0Ny4yNjU4NjYsNTg1LjAxOTM4IDM0LjQ4OTI0NSw1MDYgMTYuOTgwOTY0LDM5Ny43MTY3OSAxMi4wMjM4MjYsMzcyLjExODA2IDIuMzQzNzAxNywzNDAgLTEuODM1MzA4MywzMjYuMTM0MyAwLjE2MDcxNDA5LDMxOC44ODQ4MiAxMS4zODc1NjcsMzA3LjE1MzAyIDM1LjAwOTkzOCwyODIuNDY4MTggODguNTA1Mjc5LDI2OC43MjM2IDg0LjU4MDQ5MywyODguMzQ3NTMgODIuOTYwMTkzLDI5Ni40NDkwNCA3Mi4yMzQ5NzQsMzAxLjU1MTI5IDQ1LjA1NzkzLDMwNy4xNDk0IDE2Ljk0NTQ5OSwzMTIuOTQwMTkgMTQuMDk4MTQ0LDMxNy43NzgxNyAyOS43MTgyNTMsMzMzLjIxMzI2IDQyLjAyNTc5NSwzNDUuMzc1MDMgMTA5LjIyNjQ0LDM1OC4wODAxNCAxODcsMzYyLjk0OTMyIGMgMTQuNDYzMzksMC45MDU1MSAzMS4zNjIwMSwxLjQ3OTk1IDEyMCw0LjA3OTIgMTE5LjMyMywzLjQ5OTA3IDIyOS42MDM1NSw0LjQwMDQ1IDI1Ny41LDIuMTA0NjcgMzIuNDQxNjcsLTIuNjY5ODMgMzYuMTc5NSwtMi42ODE2IDQwLjcyMjYxLC0wLjEyODIzIDMuNjUwMzIsMi4wNTE1OSA0LjU3MDI3LDIuMTc5MjcgOC42ODAyMiwxLjIwNDcxIDQuMzg3NjksLTEuMDQwNDIgNy43NjUwNSwtMC44ODg0MyAzMS4yMzM0NiwxLjQwNTU3IDQuNzE0NzEsMC40NjA4NSA2LjUzNTUyLDAuMTI1NTMgMTEuMTM1ODksLTIuMDUwNzkgNC43MDk5LC0yLjIyODE0IDUuOTEwODUsLTIuNDM3NzUgOC4zNjM3LC0xLjQ1OTggNS42MjcwMSwyLjI0MzQ5IDc0Ljc3NDE1LDEuNTI4MDcgOTcuMzY0MTIsLTEuMDA3MzUgNjUuNDQ3NzMsLTcuMzQ1NjUgMTQyLjgzMjA2LC0yNS4xOTYzOSAxNjguNTc2NzMsLTM4Ljg4NjY4IDMuMDMwODgsLTEuNjExNzMgMjIuOTQzNDcsLTYuNDM4MjEgMzUuOTIzMjcsLTguNzA3MiAxMi42MzU0NSwtMi4yMDg4IDIwLjYxNjI5LC00LjA5ODYxIDI1Ljc5NjkyLC02LjEwODU0IDguNzcyNzgsLTMuNDAzNTggMTAuODQ5MzgsNDMuMDIxOTcgNC4xNjE3LDkzLjA0MDEgLTMuNjU0NzYsMjcuMzM0MyAtNC40Njg0LDMyLjYzMjI3IC02LjM4MzM3LDQxLjU2NTAyIC0xLjEyMDExLDUuMjI1IC0yLjY2NDgyLDEyLjQyNSAtMy40MzI2NywxNiAtMTEuMDgzNzksNTEuNjA0MSAtMjAuNjI4MjUsMTU0LjE5MzQ0IC0yOS42MzE4MywzMTguNSAtNi41MzY3MywxMTkuMjg4NjkgLTkuNjgyLDE2My40NjkxNiAtMTUuOTgyNTEsMjI0LjUgLTEuMDUwNDIsMTAuMTc1IC0yLjE4NDA1LDIyLjc3NSAtMi41MTkxOSwyOCAtMi45NTQ4NCw0Ni4wNjggLTkuNTc4MTEsMTAxLjU2NjYgLTIxLjAzNDYyLDE3Ni4yNTYyIC0zLjU1NDk1LDIzLjE3NjIgLTQuMjk3MzcsMzAuMjU4OSAtMy44MjU5NywzNi41IDQuODQ3NTYsNjQuMTc4OSAtMjQuNzc0MDcsMTExLjk3MzIgLTc0LjE0ODQ2LDExOS42MzgxIC00Ljk1LDAuNzY4NCAtMTYuOTIwOTUsMy42OTYgLTI2LjYwMjEyLDYuNTA1NiAtNDguOTE0NTcsMTQuMTk2IC0xMDQuNDA3MiwyMi42NjkxIC0xNzcuMzk3ODgsMjcuMDg2NCAtNDcuMjQ4NDEsMi44NTk1IC0xMTEuNDA1MzUsNS4xMDcyIC0xMjUsNC4zNzkzIHogbSAtNC4zMzUzMywtMTQuMTMwMyBjIDMuNjcwNTUsLTMuNjcwNSAtNy4xNzAwMiwtNS40MTc4IC01NC4xNjQ2NywtOC43MzAxIC0xMS4yNzUsLTAuNzk0NyAtMjYuMTI1LC0yLjExNDkgLTMzLC0yLjkzMzggLTM3LjU2MTA3LC00LjQ3NCAtNjcuMzIzMjIsLTQuNzMgLTU2LjMxMDE3LC0wLjQ4NDMgMTkuOTYyMTQsNy42OTU3IDEzNy45MzgxNywxNy42ODQ5IDE0My40NzQ4NCwxMi4xNDgyIHogTSAyNjYsMTMzOS42MjU4IGMgMCwtMi41ODM4IC0xNy44NTM1MywtNzQuMDk2NyAtMjIuMzc1NSwtODkuNjI1OCAtOC4zNDMxMywtMjguNjUxNCAtMjMuMTU2OTQsLTY0IC0yNi44MjEwMSwtNjQgLTMuNDI2MTMsMCA1LjA3NDI0LDQ4LjY0MzIgMTMuMjgwOTQsNzYgMTAuODE5NiwzNi4wNjY4IDM1LjkxNTU3LDkwLjMwNzggMzUuOTE1NTcsNzcuNjI1OCB6IG0gLTMwLjg2ODMxLC00LjIwODMgYyAzLjQ2OTUzLC0xNi4wMjQ0IC0xLjU1ODE3LC00MS4xODYxIC0xOC42NjYyOSwtOTMuNDE3NSAtOS40MDQwNiwtMjguNzEwOCAtMTYuNTYzNjIsLTU0LjM1NjYgLTE4LjAwNjQ2LC02NC41IC0wLjkyMzAxLC02LjQ4ODggLTEuODkyOCwtNy43MTUxIC00Ljk4NjY5LC02LjMwNTQgLTguOTMxMTYsNC4wNjkzIC03LjU1MjAxLDE4LjM1MTcgNi4xNTQ1Niw2My43MzU5IDMuNTU5NzQsMTEuNzg2OCA3LjE2MTQ1LDI1Ljk2MTggOC4wMDM4LDMxLjUgNS4zOTk5OCwzNS41MDM2IDI0LjQyMDIyLDgzLjIxNjIgMjcuNTAxMDgsNjguOTg3IHogbSAtNDUuNzE2NjYsLTE4Ni45OTc0IGMgMi4zMjQ5MSwtMTUuMDQxOCAtMi41NDc5NCwtNDMuMjUxMSAtMTUuNDc1NCwtODkuNTg4NCAtNC45NjEwNSwtMTcuNzgyNCAtMTAuNTc3OCwtNDAuMTA4NiAtMTIuNDgxNjYsLTQ5LjYxMzggQyAxNTYuODMwMjMsOTg2LjExMzYyIDE0OSw5NzAuNDM2MzYgMTQ5LDk4NC4yNzUyNyBjIDAsNi45ODUzNiAxMS4wOTc0Niw2Ny4zODc1MyAxNi40ODQ3OCw4OS43MjQ3MyAxLjM5MjgyLDUuNzc1IDMuNjc2OTYsMTkuNzI1IDUuMDc1ODUsMzEgMy43MTIyMywyOS45MjA0IDYuMDY5ODcsMzguODcxOCAxMi4wOTA4OCw0NS45MDYgNC41MjE0Nyw1LjI4MjMgNS42MjU1Nyw0Ljg3NjUgNi43NjM1MiwtMi40ODU5IHogTSA0MDksMTI0Ny4zNjY1IGMgLTEuMzc1LC0wLjE5ODYgLTYuNTUsLTAuODQ5MyAtMTEuNSwtMS40NDYxIC00Ljk1LC0wLjU5NjcgLTIzLjYyNSwtMy45OTI1IC00MS41LC03LjU0NjEgLTM3LjE1MDgzLC03LjM4NTggLTU2LjI0MjA2LC0xMC4zMzYyIC02Ny4wMjc0OSwtMTAuMzU4NyAtMTEuOTQxNjgsLTAuMDI1IC0xNS44NjkwOCwtNS4yNzI5IC05LjA0OTQzLC0xMi4wOTI1IDQuOTk4NTEsLTQuOTk4NSAxNC42NzEzNiwtMy44ODM0IDQ0LjU5MjE0LDUuMTQwNyAyMC41MDQ1Nyw2LjE4NDEgMzUuNzc0NTQsOS44OTc5IDQ0Ljk0OTg2LDEwLjkzMjEgMy44NjkyLDAuNDM2MiAxMS41MzQ5MiwxLjc2MDcgMTcuMDM0OTIsMi45NDM1IDguMTk5NjgsMS43NjM0IDY2LjY1NTQ5LDkuMDYwNiA3Mi41ODE0NCw5LjA2MDYgMC45MjY5MSwwIDEuOTIwNjUsMC45IDIuMjA4MzEsMiAwLjQ5NDc5LDEuODkyMSAtNDEuMTIyMDUsMi45Nzk3IC01Mi4yODk3NSwxLjM2NjUgeiBtIDk0LjUsLTQ0LjczOTUgYyAtMTMuMzQyNDMsLTYuMjgwMyAtMTguMjA5OTMsLTE1LjczODQgLTIxLjAxMzYyLC00MC44MzE4IC0zLjc4NzA3LC0zMy44OTQ3IC05LjEyMTAxLC00MS40NTI3IC0zMi42MzUxMSwtNDYuMjQyOSAtNS41NjM3OCwtMS4xMzM0IC02LjQwMTEyLC0xOS4zMDI5IC0xLjM5MzY0LC0zMC4yNDA3IDUuMzAyODEsLTExLjU4MjkgMTcuMzgxNzksLTI0LjkyMTYgMzYuOTU3MiwtNDAuODExNiA1LjQyMDUxLC00LjQgMTIuNzQ5MzQsLTEwLjc5NzcgMTYuMjg2MjksLTE0LjIxNzEgNy43OTIwOSwtNy41MzMgOC44NjEwNiwtNy44MTggMjguNzk4ODgsLTcuNjc2MyA0NC43NjYxMiwwLjMxOCA5MC40NzA0NCwzNS42NzM3IDEwNC4zODM5NCw4MC43NDg3IDMuNjcxNCwxMS44OTQyIDMuMjcyMjgsMTIuNTA4MyAtMTYuMzgzOTQsMjUuMjA5MSAtMjQuNDAwMDMsMTUuNzY2MSAtMjkuNTY0NzIsMjMuODAyMSAtMjYuNTI4Nyw0MS4yNzcyIDQuNjkwMTksMjYuOTk2MiAtNy41MDgwNywzNS4zMzQ5IC0zOS41Nzg4OCwyNy4wNTU4IC0yMS4zODIwMiwtNS41MTk4IC0zMS4xOTAxOCwtNC4yNzM0IC0zOC4xNDcyOSw0Ljg0NzkgLTIuOTUzMjEsMy44NzE4IC00LjE3ODg4LDMuOTcyNCAtMTAuNzQ1MTMsMC44ODE3IHogbSA2OS42MTM2MywtMTUuNDg0MSBjIDE1LjkzNjQ0LC0xMC4xMDY2IDE4LjcyNDMsLTMzLjIzNzIgNi4xNTg5MSwtNTEuMDk5NyAtMjAuODM4MTMsLTI5LjYyMjcgLTQyLjI4MDcxLC0wLjQ1ODkgLTI5LjgyODQxLDQwLjU2OTMgMy43NzEwNiwxMi40MjQ5IDEzLjcwOTgxLDE2Ljg0NjYgMjMuNjY5NSwxMC41MzA0IHogbSAtNTMuNDUyNDMsLTIuOTg1NyBjIDE3LjMyMjA0LC04LjkwNzYgMjAuMjI4OTMsLTQyLjkxNzkgNS4wMzQ4MywtNTguOTA3MiAtOS4wNzk5NiwtOS41NTUyIC0yMi40MDg2LDQuMjU4NCAtMjQuODA4NzUsMjUuNzExNCAtMC41MDY3Myw0LjUyOTIgLTEuMzUyNjYsMTAuMTAzMyAtMS44Nzk4NiwxMi4zODY4IC00LjcwNjcyLDIwLjM4NjggNC43NjgyMywyOS40OTIxIDIxLjY1Mzc4LDIwLjgwOSB6IG0gLTMwLjI4MjkxLC02OC4xNTQ5IGMgMTcuODI1MDUsLTkuNzgzIDMyLjc3NjY1LC0xMC4zNjQ4IDcyLjEyMTcxLC0yLjgwNjQgNTIuMTEyNzQsMTAuMDExMSA3Mi45NzUyNCwtNS4wOTQgNDYuOTc1NjgsLTM0LjAxMTcgLTEwLjY0NjU5LC0xMS44NDE2IC0yMS43Nzk2NCwtMTMuMTIzMyAtNjAuNDc1NjgsLTYuOTYyNSAtMjUuODIxMjEsNC4xMTEgLTQ4LjA3MzUyLDQuNDU3MiAtNTcuNSwwLjg5NDcgLTExLjQ3MTIsLTQuMzM1NCAtMTguNjc5NzksLTIuODI4OSAtMjcuNTI5NTIsNS43NTMxIC0xNS4xMzQ0NywxNC42NzY1IC01LjAxMjE5LDM2Ljc2MTggMTguODI2NjIsNDEuMDc2NyAwLjE2MzQxLDAuMDMgMy41NzQ5NCwtMS43NDUyIDcuNTgxMTksLTMuOTQzOSB6IG0gLTExNi40NTg5LC00OS4wMTI4IGMgLTcwLjE4Nzc3LC0xMS44NzkgLTExOC4wOTcyOSwtODkuODQ3MDQgLTkwLjAyNTE4LC0xNDYuNTA3MDMgMTEuNjI5MzQsLTIzLjQ3MjMzIDIyLjcxNzY2LC0yMi4yMDI3OCAxMy4xNTg1OSwxLjUwNjU4IC0zMC45OTcsNzYuODgxODIgNjQuMTg4NTMsMTYzLjE0NjY1IDEzOS4wNTE4NywxMjYuMDIwMTUgNzMuMTUyOTUsLTM2LjI3ODQgODIuNTMxNTcsLTEyMi42NzU3MSAxNy4zOTUzMywtMTYwLjI0ODU4IC0zLjg1LC0yLjIyMDgyIC05LjQ3NSwtNS40OTU3MSAtMTIuNSwtNy4yNzc1MyAtMjcuMzcwNzYsLTE2LjEyMjMgLTUzLjY3NjQ3LC0xNS4yOTYwNSAtMTA2LjUsMy4zNDUxIC0xNi44MDIwMSw1LjkyOTM0IC0xOC44MDQ0Nyw2LjUyMjA5IC0yMS4yNSw2LjI5MDI5IC0yLjE5NzEzLC0wLjIwODI1IC0xLjM4NzIyLC0xLjUyNjYgNS4wMDI5LC04LjE0MzU5IDU4LjcxNjgxLC02MC44MDE0NSAxODUuNzc5ODQsLTE3LjI4NDQgMTkzLjY4MDU1LDY2LjMzMjQ5IDYuOTE2Myw3My4xOTg1MiAtNjEuMTExNiwxMzEuNjk3NjIgLTEzOC4wMTQwNiwxMTguNjgyMTIgeiBNIDY2NCwxMDU5LjMyNjggQyA1NzUuNjgyOTMsMTA1MC40MTYzIDUyMi4zNzE2MSw5NjUuNzI2NzMgNTYzLjc4ODM1LDkwMC4xMzIxMyA2MTguOTQxMDIsODEyLjc4Mjk5IDc0NS45ODAzNyw4MjQuMzAyMjcgNzgyLjQ4NTY5LDkxOS45NjI1IDgwOS42MDAyMiw5OTEuMDE0NjYgNzQ0LjYwNzgsMTA2Ny40NTk1IDY2NCwxMDU5LjMyNjggWiBtIDQxLjAxNjUyLC0yMC44MjU3IGMgNjMuNTE5NzUsLTEyLjYzNDMgODkuMjg1NjksLTgyLjQ3MzMgNTAuNzA5MzMsLTEzNy40NDg0NiAtNTguNjI1NzgsLTgzLjU0NzU4IC0yMDIuOTM5NDksLTM0Ljk1OTUxIC0xODUuNjc0ODcsNjIuNTEzNyAxMC4zMjA0Nyw1OC4yNjc2NiA2NS4yOTc5NCw4OC43OTE5NiAxMzQuOTY1NTQsNzQuOTM0NzYgeiBNIDYwMi40MDcwOSw5OTAuOTY5NCBjIC0yNy43MzE2OSwtNS40OTgxNiAtMzIuODEyODQsLTM5LjQ3Njk2IC05LjQyNDYyLC02My4wMjQ1MiAyMC42MjY2NSwtMjAuNzY3MTkgNDkuOTQ2NTUsLTguNzkyODIgNTkuNDk4MDgsMjQuMjk5MjUgMi45NzUzMiwxMC4zMDgyNCAxLjEyNjU0LDExLjc0NTI5IC0xNC4xNDYwMSwxMC45OTU2MSAtMTcuNjE0MTcsLTAuODY0NjMgLTE5LjAxNTc5LDAuNzQxNCAtNy45MTQ5Niw5LjA2OTIxIDguODAwMjEsNi42MDE5IDExLjQzMTIsOS45NjA5OSA5LjU2NDAyLDEyLjIxMDgxIC00LjU3Nzc3LDUuNTE1ODggLTI0Ljc4ODk2LDguOTg0OTMgLTM3LjU3NjUxLDYuNDQ5NjQgeiBtIC0yODEuNDY1Miw1LjAyMzMzIGMgLTI2LjU3MzQsLTQuNTAwOSAtMzEuNjExMTcsLTI4LjUxNTc5IC0xMC42Mzg2OSwtNTAuNzE0MzMgMTYuMjE4ODQsLTE3LjE2NzAyIDM0LjM5MTI2LC0xOC44MTg5NiA0OC43MjgzMywtNC40Mjk2IDI5LjIzODcsMjkuMzQ1MzQgNi4yMzMzMSw2Mi42NTEyIC0zOC4wODk2NCw1NS4xNDM5MyB6IE0gMTA2LDI4NS42NDM4IGMgMCwtMC43NDU5MSAxLjUwNzI0LC0zLjMzMzQxIDMuMzQ5NDMsLTUuNzUgQyAxMTMuOTU3MjEsMjczLjg0OTMgMTE2LDI2OS42MzAyMiAxMTYsMjY2LjE1ODA3IGMgMCwtMi4yMjA1OCAwLjU1MTMsLTMuMDc2IDIuMjUsLTMuNDkxMTkgNDcuODEyNDEsLTExLjY4NjEgOTUuNzEyMjksLTE4LjUzODMgMTM0LjI1LC0xOS4yMDQ4IDIzNC43NTM1MSwtNC4wNTk5NyAyODQuMzg3NjMsLTUuNjA0NzIgMzUwLjUsLTEwLjkwODQ5IDE3LjU4NzAyLC0xLjQxMDkgMTcuOTE1MzcsLTEuMzMzMzMgMjIuMDY3MTIsNS4yMTMyOSAxMC43MjIxMSwxNi45MDcwMyAtNS41MTU5NCwyMi43NjM0MSAtNjIuMDY3MTIsMjIuMzg0OTcgLTkwLjMzNjA2LC0wLjYwNDUxIC04NC4xMTMzNSwtMC4zMTU5OCAtMTA3LjI3MDM3LC00Ljk3Mzk1IC0zMC40ODAxNiwtNi4xMzEgLTQwLjA0Mjk2LC01LjcxMDIgLTQ5LjM4MDQ0LDIuMTcyOTEgLTMuMTUwODIsMi42NjAwNiAtMy4xNTA4MiwyLjY2MDA2IC0xMy41NTE3OSwtMC44MjAzMyAtMjUuODM5OTYsLTguNjQ2NTkgLTUxLjUxNDI1LC04LjgxMjg3IC0xMDcuMjk3NCwtMC42OTQ5IC0xOS4yNSwyLjgwMTM5IC00MS4wOTQwNiw1LjU0MDIyIC00OC41NDIzNyw2LjA4NjI4IC0yNS45NDY3OSwxLjkwMjI0IC01NC4xNzY2Miw3LjE0MDAyIC05Ny44ODU3OSwxOC4xNjE4IEMgMTEwLjg2NzMyLDI4Ny4xOTU3NyAxMDYsMjg4LjAxNDA4IDEwNiwyODUuNjQzOCBaIgogICAgICAgaWQ9InBhdGgzNTE1IgogICAgICAgaW5rc2NhcGU6Y29ubmVjdG9yLWN1cnZhdHVyZT0iMCIgLz4KICAgIDxwYXRoCiAgICAgICBzdHlsZT0iZmlsbDojMGMwZTBlIgogICAgICAgZD0ibSA1MDksMTQwNS4wMDg4IGMgLTEzMC43NzIyMSwtNy4yMTc2IC0xOTUuNzc0MDksLTE4LjIwOTQgLTI2MC4yMjg4NCwtNDQuMDA0OCAtMjYuMjk4MjUsLTEwLjUyNDcgLTI1LjgzMzE1LC0xMC4yMTU0IC0yOC41NzcxMywtMTkuMDA0IC0xNS42MDI3NywtNDkuOTczMiAtMzUuNjQ2ODQsLTEzMS44Mjg0IC01MS43NSwtMjExLjMzNDUgLTkuMzc0MjcsLTQ2LjI4MzYgLTEyLjgwNDM4LC02MS42NjkgLTMwLjU4MDQyLC0xMzcuMTY1NSAtNDQuMDUwNDE0LC0xODcuMDg1OTkgLTU3LjI1NTI0NiwtMjgzIC0zOC45NjE2NDgsLTI4MyA0LjMzMDM4OCwwIDUuNjA1NTA4LDMuNzAxNzcgMTMuNjA2MjA4LDM5LjUgMzIuMjQxODIsMTQ0LjI2MjIzIDY3LjYzNjc1LDI3Ni44NTE2IDk2LjQ0MTE1LDM2MS4yNjg0IDguMTU2ODcsMjMuOTA1MyA2LjkyOTUsMjIuMDk1NCAxNC41NjgyMywyMS40ODIzIDguMTAzNDgsLTAuNjUwNSA4LjAzNjI3LC0wLjc5OCAzLjkwNTE4LDguNTY5NCAtNy4zMjc1LDE2LjYxNTIgLTIuNzg4OTgsMjcuOTQ5NSAxOS4xNTQ1Niw0Ny44MzU2IDEyLjM1MjM2LDExLjE5NDEgMTIuMzExNDksMTIuNDgxNiAtMC4zMzc2NywxMC42MzggLTEwLjAxNDMzLC0xLjQ1OTYgLTkuODUyNjIsLTEuNjIxNiAtNy4zNTQ0NSw3LjM2NyAxLjEyMTg5LDQuMDM2NiA0LjMyMjQzLDE3LjY4OTMgNy4xMTIzLDMwLjMzOTMgMTguNjMwNjYsODQuNDc2NCAzNS40ODU4NSwxMTIuMjQ5MiA3Mi43ODQ4NSwxMTkuOTMgMTExLjE2MTY5LDIyLjg5MTEgMjUwLjY1Njk5LDI2LjcyMjYgNDIzLjIxNzY4LDExLjYyNDYgNTkuOTEyNywtNS4yNDIgMTE0Ljg4MDg0LC0yOS4zOTAyIDEyOC40ODUyLC01Ni40NDUxIDIuOTk4MjUsLTUuOTYyNiAyLjg2Njk5LC02LjIxMDEgLTMuNzMwNiwtNy4wMzQ0IC0xMC4zNDE4MywtMS4yOTIxIC0xMC4yMDQwOSwtMi4wNjYyIDEuMjQ1NCwtNi45OTg4IDE3LjExMzIzLC03LjM3MjcgMjIuNDMyMTUsLTEyLjk5OTIgMjIuNjI5NTQsLTIzLjkzODMgMC4wODk3LC00Ljk3MTcgMS4wNjk3NiwtMTAuMTE0MiAzLjE4NzQyLC0xNi43MjUxIDYuNzMzNDEsLTIxLjAyMDQgOC4zMTYxLC00MS4xODA5IDYuMzkxMjcsLTgxLjQxMjkgLTEuNDY0OTgsLTMwLjYyMDYgLTEuMDk2NywtNDIuOTQ5MyAxLjY4ODYsLTU2LjUyNzUgNC43NDM4OCwtMjMuMTI2MiA3LjExMDcsLTQzLjgzNDkgMTEuNjU0NTUsLTEwMS45NzI1IDEuMzk3MDYsLTE3Ljg3NSAzLjg1MDI2LC00Mi40IDUuNDUxNTgsLTU0LjUgMy4wNjc2NCwtMjMuMTgwMDEgNC41NjEzNywtNDAuMjAxNjkgNS40ODQ2OSwtNjIuNSAyLjYwMjA2LC02Mi44NDA2OCA0LjUwNjI0LC04NS4yNzY3MiA5LjExNzYzLC0xMDcuNDI4NTUgMS4yNTI0NiwtNi4wMTY0MyAyLjA4NjI0LC03LjYwOTM4IDYuMzMzNTIsLTEyLjEwMDI2IDkuMzU1NTIsLTkuODkyMDggOS4wMzkxOCwtMTUuMDQyNjUgLTEuOTQ3MjUsLTMxLjcwNDM5IC0xMy4wMjI1NSwtMTkuNzQ5NjYgLTEzLjAyMzU2LC0yNi44MzMyNSAtMC4wMDYsLTQxLjA2NTM5IDYuMDU5MDksLTYuNjI0MzQgNi40MTQ3MiwtMTguMzg0MTIgMi4wNDU1OSwtNjcuNjQ0MDQgLTMuMjM5MDQsLTM2LjUxODY3IC0zLjI1NDMzLC02MC4yNjk4NCAtMC4wMzkzLC02MS4wNDM4MyAxLjM3MDYsLTAuMzI5OTcgMy4wMjUwNSwtMS42NjkxMSAzLjY3NjU0LC0yLjk3NTg3IDAuNjUxNDksLTEuMzA2NzcgMS44OTI1OSwtMi43NzIxOSAyLjc1OCwtMy4yNTY1IDEuMDk0MTMsLTAuNjEyMyAxLjU3MzQ2LC0yLjM1ODc4IDEuNTczNDYsLTUuNzMzMDMgMCwtNC40OTI1OSAwLjIyMjUxLC00LjkzMDA2IDMsLTUuODk4MyAxLjY1LC0wLjU3NTE5IDMsLTEuNzUzODYgMywtMi42MTkyNiAwLC0wLjg2NTQgMS4wNjgyOCwtMi4wNjAyIDIuMzczOTYsLTIuNjU1MTEgMi44NTI2LC0xLjI5OTczIDUuMTQ5NjQsLTcuNTA3NDggNC4zMTc1MiwtMTEuNjY4MDcgLTAuNjA1NTgsLTMuMDI3OTEgMC42ODgzOSwtOC43MjQ1IDQuMTM1NzksLTE4LjIwNzQgMS41OTMwNSwtNC4zODIwNiAyLjE0MDgsLTkuMjYwMzUgMi42OTQ4MSwtMjQgMC43NTk1NiwtMjAuMjA4NjggMS40NjMxNiwtMjYuNjUzNDggNC4xNDg1NSwtMzggMi4xNTM2LC05LjA5OTU3IDIuMjA3NzQsLTY5Ljc4NDA3IDAuMDgzNCwtOTMuNSAtMS4zMjU3NywtMTQuODAwODIgLTI4LjYzNDM4LC0yMC4zNTk4NiAtNDguODUxNzMsLTkuOTQ0NDMgLTMuMzM2OTcsMS43MTkxMiAtODQuMzAyMzEsMTEuMzE2ODcgLTE0Ni45MDIzMSwxNy40MTQgLTYzLjE1MTQ1LDYuMTUwODUgLTE0Mi43OTA5OSwxMS45OTU1MSAtMTg2LDEzLjY1MDM1IC05LjYyNSwwLjM2ODYyIC0xOC4zNDU3MywwLjk3MzkxIC0xOS4zNzk0MSwxLjM0NTA5IC0xLjAzMzY4LDAuMzcxMTggLTQuMTgzNjgsMC4wMzc5IC03LC0wLjc0MDYgLTkuNDA2NDEsLTIuNjAwMjEgLTEzLjA3MzQsLTMuMDYwNzYgLTE5Ljg3MDU5LC0yLjQ5NTU4IC02LjQzNzY0LDAuNTM1MjcgLTYuNzUsMC40NjA1MyAtNi43NSwtMS42MTUxOCAwLC0zLjMwNTkxIDkuNTk5ODMsLTIuODM5MjMgLTE1NywtNy42MzIyOCAtMTUyLjA5MzMxLC00LjM3NTcgLTI0NC4xNDQ5NCwtOS41MTA3MiAtMzIzLjUsLTE4LjA0NjE1IC00Mi4wODQ1ODYsLTQuNTI2NjIgLTQxLjU5MDEwMiwtNC41NTMxNCAtMzcuNTMxOTQ2LDIuMDEzMDkgMi44MDk3MTgsNC41NDYyMiA4LjAwMTc4OSw4Ljk5NTk4IDE0LjEwNTg3NSwxMi4wODkxNSA2LjAyNTE4MiwzLjA1MzE5IDUuNzEwMjI5LDQuMDA5MTggLTEuNjIyNjgyLDQuOTI1MzYgLTcuMjEzMTU5LDAuOTAxMjMgLTcuMTMxNjgyLDAuNDE2NjcgLTMuNDgxMTIxLDIwLjcwMjg0IDEzLjE1NzY4NCw3My4xMTcyNCAzMi45Njk3MDUsODkuODQxNzQgNzQuMTE5MTk0LDYyLjU2ODQzIDEzLjYyNjc4LC05LjAzMTY0IDc0LjU5MzYzLC0xOS42MTQ4NyAxMzkuNDEwNjgsLTI0LjIwMDI4IDQwLjU3NTk0LC0yLjg3MDUgMTA3LjcyOTIyLC01LjQyOTcgMTA2LjM1MjYsLTQuMDUzMDcgLTEuMzY2MTQsMS4zNjYxMyAtMzkuMjk2NjUsNS45NjUzMiAtOTQuODUyNiwxMS41MDExNiAtNDguNTU4OTcsNC44Mzg2MyAtNzkuNTc4MDcsOS4xNzYwMiAtMTAxLjUsMTQuMTkyNyAtNC45NSwxLjEzMjc3IC0xMi45MDE2MSwyLjQwODI2IC0xNy42NzAyNSwyLjgzNDQyIC01OC4yODUwNzksNS4yMDg3OSAtODAuNTA0MTI5LDcwLjY2Nzc5IC0yNS40MzQzNCw3NC45MzE0NyA2LjEwNzUzLDAuNDcyODcgMTEuNzc5NTksMS4xMjc4NyAxMi42MDQ1OSwxLjQ1NTU3IDAuODI1LDAuMzI3NyA3LjQyMzM5LDEuNjg1ODggMTQuNjYzMSwzLjAxODE5IDE4LjYzMDc1LDMuNDI4NTcgMjAuNTU4MDcsNC44NDc0MiAxMS43MjY3Myw4LjYzMjk3IC01LjM3Njg5LDIuMzA0ODEgLTUuMzc2NTUsMi4yOTA3OCAtMC4xMzk4Myw1LjY3MSA2LjczNTYzLDQuMzQ3NzUgMi4zMjkxNCwzLjk3OCAtMTUuNzY1OTksLTEuMzIyOTQgLTUwLjQ5MzMwNiwtMTQuNzkxOTIgLTYxLjI2MTUyNCwtMTUuODc2OTUgLTQ4Ljg3MDE4NywtNC45MjQyNyA1Ljg0OTEyNSw1LjE3MDAzIDUuNTUwMzEyLDUuOTQ0MzYgLTEuNDk2NzQzLDMuODc4NTggLTMuNjc4OTksLTEuMDc4NDcgLTUuNjI5NzgyLC0xLjIzNjg5IC02LjM1MDkyLC0wLjUxNTc1IC0xLjEwMDgzOCwxLjEwMDg0IDEuNDYzMTk3LDIwLjk2NjE3IDguNzMzNzI2LDY3LjY2NjE2IDIuNDc5NDI4LDE1LjkyNTg0IC02Ljg5NzQ5MiwtNy42NjAzNCAtMTAuNTU0NzA5LC0yNi41NDg3MiAtMTEuNDA2MzQ0LC01OC45MTAyIC0yOS40NDY1NjksLTExNS4wMzkyIC0zNC4zOTg5MDQsLTEwNy4wMjYxNSAtMi4zMDM2ODEsMy43Mjc0MyA0LjM4NjYwOSwzNy45NDE4OSAxNC40OTg0NDUsNzQuMTQ1NzEgQyA2My4zNDgyNzcsNjAxLjk2MTEgNjgsNjI0Ljc3Njk1IDY4LDYzOC40MjM3NyA2OCw2NjEuMjI0NzEgNDUuNzA3MzkzLDU3MS45MDM1NSAzNS4wNzQ3MTYsNTA2LjUgMzIuODM5Mzc0LDQ5Mi43NSAyOC41NTg2MDQsNDY2LjQyNSAyNS41NjE4OTQsNDQ4IDE5LjEzMjg5OCw0MDguNDcxOTEgMTQuNTEwMDk4LDM4NC45NDc4NiA4LjQ2NTE5MSwzNjEgMi42MTMzODA3LDMzNy44MTcxMiAyLjg2NDUyNCwzMzguNjk1MDYgMS42Mzg2OTU0LDMzNy4xMzYyMiAtMi4zNDY0MjUxLDMzMi4wNjg1MSAxLjkxMzc3OTMsMzE4LjEzNjgxIDEwLjQyMzE2MywzMDguNDA5MzEgMzEuMDQ3NzIyLDI4NC44MzIzNCA4NCwyNjkuOTIxNzQgODQsMjg3LjY5MTEzIGMgMCw3LjgzNjY3IC0xMS4yMzE0NDgsMTMuMjA0NDYgLTQwLjUsMTkuMzU1OTYgLTI3LjQzNzEyNiw1Ljc2NjU4IC0yOS44NTMwNDUsMTAuNTgxNTYgLTEzLjY2MzkxOCwyNy4yMzI1IDUuMjIwMjg1LDUuMzY5MiA3LjM1ODg3MSw2LjE3NjYxIDMyLjE2MzkxOCwxMi4xNDMyNCA0OS44MDc4MywxMS45ODA4MyAxMDAuOTQ5NzEsMTcuMTkwNTggMTkyLDE5LjU1ODc4IDIxLjcyNSwwLjU2NTA2IDU0LjM1LDEuNDg3NjkgNzIuNSwyLjA1MDI4IDkzLjcwOTM0LDIuOTA0NyAxOTkuMjY4MjEsMy44MDM2NiAyMjkuNSwxLjk1NDQ4IDM4LjQ5NDM2LC0yLjM1NDU4IDQ1LjY5NTg5LC0yLjQyNzI1IDQ5Ljk2MDUsLTAuNTA0MTggMy40NjYxMSwxLjU2MyA0LjU1Mzc5LDEuNjMzNzQgOC40MzA1MiwwLjU0ODMyIDIuNDQ4MDQsLTAuNjg1NDEgNS4wMDYyMywtMC45MDMwMyA1LjY4NDg2LC0wLjQ4MzYxIDAuNjc4NjQsMC40MTk0MiA1LjMyNjY5LDEuMTM1MDEgMTAuMzI5LDEuNTkwMiA1LjAwMjMyLDAuNDU1MiAxMS4yMTUwOCwxLjEwNDQ4IDEzLjgwNjE0LDEuNDQyODYgNC44NTg5NSwwLjYzNDU1IDEyLjUyMTUsLTEuNDI3MTUgMTUuODk5MTMsLTQuMjc3ODUgMS4yNzI4OSwtMS4wNzQzMiAyLjIxNTQzLC0xLjExNzczIDQuNSwtMC4yMDcyNCA1LjY1Mzg4LDIuMjUzMjcgNzQuNzI5NzksMS41NDU3MiA5Ny4zODk4NSwtMC45OTc1NyA2NS40NDc3MywtNy4zNDU2NSAxNDIuODMyMDYsLTI1LjE5NjM5IDE2OC41NzY3MywtMzguODg2NjggMy4wMTYzNCwtMS42MDQgMjIuODYxMTEsLTYuNDE4NiAzNS45MjMyNywtOC43MTU0NSAxNC45MjQyOCwtMi42MjQyOCAxOC45OTA2MywtMy41NzM4NCAyNC4zMDk2NSwtNS42NzY3MSAzLjk0MzgyLC0xLjU1OTE5IDUuNjAwMDMsLTEuODA4NzggNi40Mzg1LC0wLjk3MDMxIDIuNzc2NjUsMi43NzY2MyAzLjMxMjI1LDU5LjU2OTQ1IDAuNzMyMzQsNzcuNjUxODUgLTAuNTQ5MywzLjg1IC0xLjkwNTIzLDE0LjQyNSAtMy4wMTMxOCwyMy41IC0xLjEwNzk1LDkuMDc1IC00LjAyMTE5LDI2LjQgLTYuNDczODcsMzguNSAtMy43MTAxOSwxOC4zMDM4MiAtOS4yNDE1Niw1MS4wMDA4OCAtMTEuMDgwNjUsNjUuNSAtOC4xNTI5MSw2NC4yNzY2IC0xMy44NTA0OSwxMzQuNTg3MSAtMTkuODkzOTYsMjQ1LjUgLTcuNDA1NjQsMTM1LjkxMjAyIC0xMC4wOTAzMSwxNzQuMzU4NDggLTE2Ljk2ODQzLDI0MyAtMS4zMjI2OCwxMy4yIC0yLjY5MzgzLDI4LjcyNSAtMy4wNDY5OSwzNC41IC0yLjQ3NzcxLDQwLjUxNTggLTkuMzMzNTksOTcuMzA4NCAtMjAuNTQ3OTgsMTcwLjIxNDggLTMuMzMwNzYsMjEuNjUzOCAtMy45NTU0MywyOC4xNjIxIC0zLjk1NTQzLDQxLjIxMDggMCw2OS4zMzQyIC0yNC45ODI2OCwxMDcuNDgwNyAtNzUuMDQwMTgsMTE0LjU4MDEgLTQuMDk0OTgsMC41ODA4IC0xMS42NjU5NiwyLjQwNzkgLTE2LjgyNDQsNC4wNjAzIC01My43MDU4NywxNy4yMDM1IC0xMzIuMTE0NjUsMjguMDQ5OSAtMjI3LjEzNTQyLDMxLjQxOTkgLTkuMDc1LDAuMzIxOCAtMjEuNjc1LDEuMDAyMyAtMjgsMS41MTIyIC0xNi42ODk2NCwxLjM0NTMgLTQyLjYwOTY1LDEuODA0OSAtNTcsMS4wMTA3IHogbSAtMy4zNDEzNywtMTMuMDY5MSBjIDEwLjEzNTczLC0zLjg1MzYgLTYuMDU5MTMsLTYuODUxNiAtNTMuNzAxMDIsLTkuOTQxMiAtOC41NDgzMiwtMC41NTQzIC0yMy4yNjQxLC0xLjg5MDUgLTMyLjcwMTc0LC0yLjk2OTMgLTQxLjQwMjk4LC00LjczMjQgLTY3LjIxOTI4LC00LjgyNjMgLTU4LjU5OTE2LC0wLjIxMjkgMTQuMjkxMDYsNy42NDgzIDEzMS41MDEwMywxOC4yNTY0IDE0NS4wMDE5MiwxMy4xMjM0IHogTSAyNjcsMTM0MC45ODU4IGMgMCwtMTcuNTA5MiAtMzMuNzgzNzIsLTEyOC4zNjQ3IC00NS42MzI2NSwtMTQ5LjczNTggLTEzLjEwODU3LC0yMy42NDMgLTAuNjc1MDUsNDkuNzYzNiAxNS45NjM5NSw5NC4yNSAxMi44NjEzLDM0LjM4NjMgMjkuNjY4Nyw2NS44MTkxIDI5LjY2ODcsNTUuNDg1OCB6IG0gLTMwLjg4MDU5LC0xMC40MjY5IGMgMC40NjY4NSwtMjMuNjg5MyAtMi4zMTg1NCwtMzYuNjgyOSAtMTguNjYyNTEsLTg3LjA1ODkgLTExLjQ1Mzk3LC0zNS4zMDM4IC0xNC40ODU1OCwtNDUuOTUwOSAtMTcuNDczMDYsLTYxLjM2NTggLTIuNjI0MzcsLTEzLjU0MTMgLTMuOTQxNDIsLTE1LjAwMTYgLTguODMzNDEsLTkuNzk0MyAtNi42MDg3Niw3LjAzNDcgLTUuMzIzNywxOC4xMzE1IDYuODEyMDgsNTguODIzNyA3LjE2MTc2LDI0LjAxNDEgOS4zMjQ1OSwzMi45MzcxIDEwLjUwNDEyLDQzLjMzNjQgMS45NzkxLDE3LjQ0ODYgMTUuOTMxLDU1LjYyMSAyMy4zMjQ2Nyw2My44MTYzIDIuNDg4ODEsMi43NTg2IDQuMTgwNjIsLTAuMjczNyA0LjMyODExLC03Ljc1NzQgeiBtIC00Ni43MjY0LC0xNzcuMTQwNyBjIDQuMTU2NDYsLTEwLjgzMTYgLTEuMzExMDksLTQ1Ljg4NTcgLTE0LjU1MDAyLC05My4yODQ4IC04LjgxMDQ4LC0zMS41NDM5IC0xMS45MjY4MywtNDQuMTI3OSAtMTQuMjYwODcsLTU3LjU4NjIgLTIuNTMxNjksLTE0LjU5NzkyIC0xMC4wMDg4OCwtMjguMDc5NDIgLTEyLjAzNDI3LC0yMS42OTc5NyAtMS4xMTIxNywzLjUwNDE1IDExLjk5NDk2LDc3LjI2NTc3IDE2LjkwNzg5LDk1LjE1MDc3IDAuODMwOTYsMy4wMjUgMi42NzIxNCwxNC43MjUgNC4wOTE1MywyNiA0Ljk1ODgzLDM5LjM5MDcgMTQuNzM4MjQsNjQuNzI4MiAxOS44NDU3NCw1MS40MTgyIHogTSA0MTMsMTI0Ni4zMDk4IGMgLTEwLjE0NTQzLC0wLjc2ODQgLTM0LjAxMjQzLC00Ljc2NDYgLTU4LjUsLTkuNzk1IC0zMS4wNTU0OSwtNi4zNzk2IC00Mi40MTg5NiwtOC4yMDY4IC02MSwtOS44MDgyIC0xNCwtMS4yMDY2IC0xNCwtMS4yMDY2IC0xNC4yOTQwNSwtNC4yMDY2IC0xLjAwMDM3LC0xMC4yMDU5IDkuNjAyMzksLTEwLjIzMDMgNDMuNzk3MDIsLTAuMTAwNiAyNS45ODYwNSw3LjY5OCAzMy40ODk2Niw5LjU0NzQgNDEuNDk3MDMsMTAuMjI3NyAzLjg1LDAuMzI3MSAxMC4zNzUsMS40NTIyIDE0LjUsMi41MDAyIDguMDM2NzcsMi4wNDE3IDI3LjI4MDc0LDQuNzc2IDUxLjUsNy4zMTc0IDIwLjkwMzk1LDIuMTkzNSAyMy40OTA1NywyLjYzOTkgMjEsMy42MjQzIC0xLjkzMzAyLDAuNzY0IC0yOS4zMjk1LDAuOTM1MyAtMzguNSwwLjI0MDggeiBtIDkwLjUsLTQ1LjQ2NDMgYyAtMTIuNjY5NDcsLTYuNTQ0MyAtMTYuOTI4MDIsLTE1LjU3OTEgLTE5Ljk2NzM3LC00Mi4zNjIzIC0yLjMzMDk3LC0yMC41NDA4IC00LjI5MTEzLC0yNi45OTY0IC0xMC4xNzQ1NSwtMzMuNTA4NiAtNC40MTcyNiwtNC44ODk0IC0xMS42MjMxMSwtOC43NzUxIC0xNy44NTc4MSwtOS42Mjk2IC0yMi4zMjQ4LC0zLjA2IC03Ljk5MDg3LC0zNi45NTAzIDI4LjQ5OTczLC02Ny4zODMxIDYuODc1LC01LjczMzcgMTUuNDgxMzcsLTEzLjIwOTcgMTkuMTI1MjYsLTE2LjYxMzQgNy43NzM1OSwtNy4yNjEyIDEwLjEyNzkxLC03LjkyNDYgMjcuMzc0NzQsLTcuNzE0NCA0Mi45Nzg4OCwwLjUyMzggODcuOTk4OCwzNS40MzEgMTAyLjQ0MzUxLDc5LjQzMTggMy44NzU5MywxMS44MDY3IDQuMDc3MDQsMTEuNTEwNCAtMTcuMTU4OSwyNS4yODAyIC0yMy44NTM4NCwxNS40Njc0IC0yOS4wOTIzOCwyNS4xMzE5IC0yNC43MDY4LDQ1LjU4MTEgNC40MTY5MSwyMC41OTU0IC0xMC44Njc2NiwyOS40NzEyIC0zNy4wNzc4MSwyMS41MzEzIC0xOC41OTI2LC01LjYzMjIgLTMzLjk0MzczLC0zLjg2MzkgLTQwLjIyNjM1LDQuNjMzOCAtMi41MjY2OSwzLjQxNzUgLTQuNzkzNzYsMy41ODM3IC0xMC4yNzM2NSwwLjc1MzIgeiBtIDY2LjIwNTAyLC0xMS4zNjY3IGMgMjcuOTI4NDMsLTExLjY2OTMgMTguNjU2NTgsLTcxLjQ1OTIgLTEwLjI0MDc2LC02Ni4wMzgxIC0xNi43NzEyOSwzLjE0NjMgLTE5LjYxNTksNTMuNzEyIC0zLjYxMTUzLDY0LjE5ODUgNS4xOTI1MywzLjQwMjIgOC45MjU3NiwzLjg5OCAxMy44NTIyOSwxLjgzOTYgeiBtIC01MC43NDE1NiwtNC42MzgyIGMgMTguNjYwNTEsLTguMDE0MyAyMi4wMjE2NiwtNDYuMjMyMyA1LjM1MzEsLTYwLjg2NzUgLTguMDMwNjYsLTcuMDUxIC0yMS4xODg4MSw0LjI3ODMgLTIzLjc5Mjk4LDIwLjQ4NiAtMC4yNjg3MywxLjY3MjUgLTEuMzk2NDcsOC41MTM0IC0yLjUwNjA5LDE1LjIwMTkgLTQuNDA1MTMsMjYuNTUzMiAxLjQyNjAxLDMzLjU2MjkgMjAuOTQ1OTcsMjUuMTc5NiB6IG0gLTI4LjY2NjM2LC02OC43Njg5IGMgMTcuMDY0NDIsLTkuMzA2NCAzMi4wOTI3MSwtOS45NDkyIDY4LjM4OTI1LC0yLjkyNSAzNi4yODY0Niw3LjAyMjIgNjEuMzA0MTQsNC4wMzQ0IDYwLjQ5NjQ1LC03LjIyNDkgLTAuODMxNTMsLTExLjU5MTggLTUuODMyMTIsLTIzLjY1MDcgLTEyLjA4MzU3LC0yOS4xMzk1IC0xMS45OTE2OSwtMTAuNTI4OSAtMjIuMDQyNDMsLTEwLjk3OTkgLTcyLjA5OTIzLC0zLjIzNTUgLTIwLjExMDUyLDMuMTExMyAtNDAuNjAwMDEsMS44MTQxIC01MC4yNjE3MSwtMy4xODIxIC02LjAyODcsLTMuMTE3NiAtMjAuNjgyNjcsNC4wNzY3IC0yNi4wNDA4LDEyLjc4NDYgLTEyLjIwMDYsMTkuODI4MSAxMS4wOTg5Miw0NC4xMDMgMzEuNTk5NjEsMzIuOTIyNCB6IG0gLTExMy43MTIzNSwtNTAuMTExIGMgLTc0Ljk5MDQxLC0xMS43OTEyIC0xMjUuNTY4MjMsLTk4LjEyMjc0IC04OC42NTQzMywtMTUxLjMyNDUzIDEwLjkyOTQ5LC0xNS43NTIwMiAxNS4xNDI0MSwtMTIuMDIwMjIgNy43NjE5LDYuODc1NDggLTMxLjMzNjYxLDgwLjIyODU1IDY0LjcxNzMsMTY0LjkxODE1IDE0Mi4zMjY4NiwxMjUuNDg3OTUgNzMuNzc2NTksLTM3LjQ4MjggNzkuMDQwMzksLTEyNC41NTgwOCA5LjgyOTU5LC0xNjIuNjA0MDMgLTQuNTkxODIsLTIuNTI0MTggLTEwLjU5ODc3LC01Ljg4NTA2IC0xMy4zNDg3NywtNy40Njg2NCAtMjMuMDM3NTcsLTEzLjI2NjA2IC01Mi4yNzQzNCwtMTEuMDIwNDQgLTEwNS44Mjg1Nyw4LjEyODUgLTE4LjIwMDYyLDYuNTA3ODUgLTE4LjYyODc3LDYuMjc4NjYgLTcuOTIxNDMsLTQuMjQwMzQgMzguOTc0MzgsLTM4LjI4ODgzIDExNi41NzY1MSwtMzIuODA2MzcgMTYwLjM4NTMxLDExLjMzMDk2IDcxLjE2Nzg5LDcxLjcwMTYgLTAuMTI5NywxOTAuMjMzNDUgLTEwNC41NTA1NiwxNzMuODE0NjUgeiBNIDY2NywxMDU3Ljg2MzMgQyA1ODMuMTk5MTQsMTA1MC43NDcgNTI3Ljg1NzUzLDk3My44MjcxMyA1NjAuMjU2OTksOTA5LjUgNjEwLjY3NjY4LDgwOS4zOTQ4MyA3NTQuMDU2NjQsODI0Ljk2ODU3IDc4NS4yNzY2MSw5MzMuOTQxMzMgODAyLjg4NTMzLDk5NS40MDQyNCA3MzcuNTUzMywxMDYzLjg1NDYgNjY3LDEwNTcuODYzMyBaIG0gMTUuMjA5NTYsLTE3LjA1MDEgQyA3NjguNTE1MSwxMDQzLjI4ODYgODA1Ljg2NzEsOTQ2LjQxMjk5IDc0Mi40Nzg3Miw4ODQuNSA2OTcuMTMxMiw4NDAuMjA3OTYgNjA2Ljg2Mjg1LDg1My42Mzg4NCA1NzguMDgxNDEsOTA4Ljk2MDQgYyAtMzAuOTU1NzQsNTkuNTAwODUgMTcuNzc1OTQsMTM2Ljc0OTQgODMuNDE4NTksMTMyLjIzMzYgNS41LC0wLjM3ODQgMTQuODE5MywtMC41NDk3IDIwLjcwOTU2LC0wLjM4MDggeiBtIC04Mi45MjM1MiwtNTEuMjYzOTUgYyAtMjEuNDcwMjksLTYuNzA5OTggLTI3LjA3MDUzLC0zMC41NTM0OCAtMTIuNDc4ODEsLTUzLjEyOTcgMTguNzkzMywtMjkuMDc2OSA1Mi4wMTUzNiwtMjIuMzEzODEgNjQuMTg4MTEsMTMuMDY2OTEgNC4yOTkxLDEyLjQ5NTU1IDIuOTU5MzcsMTQuMDIyIC0xMS40NDUxLDEzLjA0MDE5IC0xOC4xMTY2MywtMS4yMzQ4NCAtMjEuNTU3OTMsMS40MzQwNCAtMTEuMzAwMjQsOC43NjM4MiAxMi4wODk4LDguNjM4OTUgMTQuMjQ5NTMsMTIuMzY1NjEgOC43OTk1OCwxNS4xODM4OSAtOC4xNDM5LDQuMjExMzcgLTI4Ljc1NjYzLDUuODg5NzYgLTM3Ljc2MzU0LDMuMDc0ODkgeiBNIDMyNy41LDk5Ni4wNDQ0NyBjIC0yNi44NDU0OSwtMi42Mjc0IC0zNi4xNTg5LC0xNi43NDE2IC0yNS40MjkwNSwtMzguNTM3MDMgMTIuMzUwNiwtMjUuMDg3NjIgNDAuMjczMzEsLTMzLjI0NTU0IDU2Ljc5OTM5LC0xNi41OTQ1NSAyNi45OTAzOSwyNy4xOTQ0MSA4Ljg1Mzg0LDU5LjA2ODM2IC0zMS4zNzAzNCw1NS4xMzE1OCB6IE0gMTA2LjU2MDI0LDI4Ni4wOTc0NiBjIC0wLjMwNjc5LC0wLjQ5NjM5IDEuNDUwMTUsLTMuNTczNyAzLjkwNDMxLC02LjgzODQ2IEMgMTE1LjI0MjU5LDI3Mi45MDI4IDExNywyNjkuMjI4MzggMTE3LDI2NS41OTQ1NyBjIDAsLTIuMTcwMzUgMS4xNjM4NiwtMi41MTM2IDI1LjI1LC03LjQ0Njg0IDY3Ljk4ODEzLC0xMy45MjUwNiA1OC4yNzQzNywtMTMuMjE2NDggMjIwLjc1LC0xNi4xMDI4MiAxMjMuOTE4NTksLTIuMjAxMzcgMTg5LjMyMjAzLC00LjY2OTI3IDI0Mi45NzExNiwtOS4xNjgxNSAxNC41OTU4LC0xLjIyMzk2IDE4LjQ0MjQ2LDAuNTM1ODcgMjAuOTA0OTMsOS41NjM5NCA0LjA0MTcxLDE0LjgxNzkyIC03LjcxODExLDE3LjA5ODA5IC04Ni44NzYwOSwxNi44NDQ4NSAtNjcuMjk5ODEsLTAuMjE1MjkgLTU2LjU4ODM2LDAuNTkyNTcgLTk4LC03LjM5MTIyIC0xNy4zMzI1NiwtMy4zNDE1NiAtMjkuNDAzMTYsLTEuNjM3MTYgLTM1LjQwNDk5LDQuOTk5MjYgLTIuNDE4NDksMi42NzQyMSAtMy4zNjMzLDIuNjQzNzkgLTExLjc0MDM1LC0wLjM3Nzk4IC0xNC45ODc3NywtNS40MDYzOSAtMjUuNTU0NDQsLTYuOTA1NjcgLTQ4LjM1NDY2LC02Ljg2MDkzIC0yMS44NDUwOCwwLjA0MjkgLTI0LjUyMTE5LDAuMzE0MzggLTcxLjUsNy4yNTQyNCAtMTEuMjc1LDEuNjY1NTggLTI2LjU3NSwzLjUwMzI3IC0zNCw0LjA4Mzc1IC0zMi4yMjEzOCwyLjUxOTA4IC02NS42MjY5Nyw4Ljg1NzE5IC0xMTUuODg3MDYsMjEuOTg3NSAtMTYuNDcxMDUsNC4zMDMwMiAtMTcuNjkyOTksNC41MDgzNCAtMTguNTUyNywzLjExNzI5IHoiCiAgICAgICBpZD0icGF0aDM1MTMiCiAgICAgICBpbmtzY2FwZTpjb25uZWN0b3ItY3VydmF0dXJlPSIwIiAvPgogIDwvZz4KPC9zdmc+Cg==) Gin This template demonstrates building the Gin framework for Platform.sh using Go modules. It includes a minimalist application skeleton that demonstrates how to connect to a MariaDB server for data storage. It is intended for you to use as a starting point and modify for your own needs. Gin is a lightweight web framework written in Go that emphasizes performance. ###### Features: - Go 1.14 - MariaDB 10.4 - Git module-based build View the [repository on GitHub](https://github.com/platformsh-templates/gin). ![Deploy on ](https://platform.sh/images/deploy/lg-blue.svg) ### Java p:last-child]:mb-0 [&>h3]:mt-0 rounded-lg" > ###### Note You can now use composable image (BETA) to install runtimes and tools in your application container. To find out more, see the [dedicated documentation page](https://docs.platform.sh/create-apps/app-reference/composable-image.md). Java is a general-purpose programming language, and one of the most popular in the world today. Platform.sh supports Java runtimes that can be used with build management tools such as Gradle, Maven, and Ant. ##### Supported versions You can select the major version. But the latest compatible minor version is applied automatically and can’t be overridden. Patch versions are applied periodically for bug fixes and the like. When you deploy your app, you always get the latest available patches. ###### OpenJDK versions: | Grid and Dedicated Gen 3 | Dedicated Gen 2 | | - 21 - 19 - 18 - 17 - 11 - 8 - 17 - 11 - 8 These versions refer to the headless packages of OpenJDK. To save space and reduce potential vulnerabilities, they don't contain GUI classes, which can't be used on the server. ###### Specify the language To use Java, specify `java` as your [app's `type`](https://docs.platform.sh/create-apps/app-reference/single-runtime-image.md#types): ```yaml {location=".platform.app.yaml"} type: 'java:' ``` For example: ```yaml {location=".platform.app.yaml"} type: 'java:21' ``` ##### Support build automation Platform.sh supports the most common project management tools in the Java ecosystem, including: * [Gradle](https://gradle.org/) * [Maven](https://maven.apache.org/) * [Ant](https://ant.apache.org/) ###### Manage Maven versions Java containers come with a version of Maven already installed. You may need to use a specific different version to manage your project. If the version you need differs from the version on your container, you can install the specific version that you need. Add something like the following to your [app configuration](https://docs.platform.sh/create-apps/_index.md): ```yaml {location=".platform.app.yaml"} variables: env: MAVEN_VERSION: hooks: build: | curl -sfLO "https://dlcdn.apache.org/maven/maven-3/$MAVEN_VERSION/binaries/apache-maven-$MAVEN_VERSION-bin.tar.gz" tar -zxf apache-maven-$MAVEN_VERSION-bin.tar.gz export PATH="$PWD/apache-maven-$MAVEN_VERSION/bin:$PATH" mvn --version mvn clean package ``` ##### Other JVM languages It’s worth remembering that the JVM by its specification [doesn't read Java code](https://docs.oracle.com/javase/specs/jvms/se8/html/index.md), but bytecode. So within the JVM, it’s possible to [run several languages](https://en.wikipedia.org/wiki/List_of_JVM_languages). Platform.sh supports several of them, such as Kotlin, Groovy, and Scala, so long as that language works with any build automation that Platform.sh supports. | Article | Link | | ------------------------------------------------------------ | ------------------------------------------------------------ | | [Kotlin and Spring](https://platform.sh/blog/2019/ready-to-have-fun-try-kotlin-and-spring/) | [Source](https://github.com/platformsh-templates/spring-kotlin) | | [Scala and Spring](https://dzone.com/articles/spring-scala-cloud-psh) | [Source](https://github.com/platformsh-examples/scala) | ##### Accessing services To access various [services](https://docs.platform.sh/add-services.md) with Java, see the following examples. The individual service pages have more information on configuring each service. ```java {} package sh.platform.languages.sample; import org.apache.kafka.clients.consumer.Consumer; import org.apache.kafka.clients.consumer.ConsumerConfig; import org.apache.kafka.clients.consumer.ConsumerRecords; import org.apache.kafka.clients.producer.Producer; import org.apache.kafka.clients.producer.ProducerConfig; import org.apache.kafka.clients.producer.ProducerRecord; import org.apache.kafka.clients.producer.RecordMetadata; import sh.platform.config.Config; import sh.platform.config.Kafka; import java.time.Duration; import java.util.HashMap; import java.util.Map; import java.util.function.Supplier; public class KafkaSample implements Supplier { @Override public String get() { StringBuilder logger = new StringBuilder(); // Create a new config object to ease reading the Platform.sh environment variables. // You can alternatively use getenv() yourself. Config config = new Config(); try { // Get the credentials to connect to the Kafka service. final Kafka kafka = config.getCredential("kafka", Kafka::new); Map configProducer = new HashMap<>(); configProducer.putIfAbsent(ProducerConfig.CLIENT_ID_CONFIG, "animals"); final Producer producer = kafka.getProducer(configProducer); logger.append("
    "); // Sending data into the stream. RecordMetadata metadata = producer.send(new ProducerRecord<>("animals", "lion")).get(); logger.append("
  • Record sent with to partition ").append(metadata.partition()) .append(" with offset ").append(metadata.offset()).append("
  • "); metadata = producer.send(new ProducerRecord<>("animals", "dog")).get(); logger.append("
  • Record sent with to partition ").append(metadata.partition()) .append(" with offset ").append(metadata.offset()).append("
  • "); metadata = producer.send(new ProducerRecord<>("animals", "cat")).get(); logger.append("
  • Record sent with to partition ").append(metadata.partition()) .append(" with offset ").append(metadata.offset()).append("
  • "); logger.append("
"); // Consumer, read data from the stream. final HashMap configConsumer = new HashMap<>(); configConsumer.put(ConsumerConfig.GROUP_ID_CONFIG, "consumerGroup1"); configConsumer.put(ConsumerConfig.AUTO_OFFSET_RESET_CONFIG, "earliest"); Consumer consumer = kafka.getConsumer(configConsumer, "animals"); ConsumerRecords consumerRecords = consumer.poll(Duration.ofSeconds(3)); logger.append("
    "); // Print each record. consumerRecords.forEach(record -> { logger.append("
  • Record: Key " + record.key()); logger.append(" value " + record.value()); logger.append(" partition " + record.partition()); logger.append(" offset " + record.offset()).append("
  • "); }); logger.append("
"); // Commits the offset of record to broker. consumer.commitSync(); return logger.toString(); } catch (Exception exp) { throw new RuntimeException("An error when execute Kafka", exp); } } } ``` ```java {} package sh.platform.languages.sample; import net.spy.memcached.MemcachedClient; import sh.platform.config.Config; import java.util.function.Supplier; import sh.platform.config.Memcached; public class MemcachedSample implements Supplier { @Override public String get() { StringBuilder logger = new StringBuilder(); // Create a new config object to ease reading the Platform.sh environment variables. // You can alternatively use getenv() yourself. Config config = new Config(); // Get the credentials to connect to the Memcached service. Memcached memcached = config.getCredential("memcached", Memcached::new); final MemcachedClient client = memcached.get(); String key = "cloud"; String value = "platformsh"; // Set a value. client.set(key, 0, value); // Read it back. Object test = client.get(key); logger.append("

"); logger.append(String.format("Found value %s for key %s.", test, key)); logger.append("

"); return logger.toString(); } } ``` ```java {} package sh.platform.languages.sample; import com.mongodb.MongoClient; import com.mongodb.client.MongoCollection; import com.mongodb.client.MongoDatabase; import org.bson.Document; import sh.platform.config.Config; import sh.platform.config.MongoDB; import java.util.function.Supplier; import static com.mongodb.client.model.Filters.eq; public class MongoDBSample implements Supplier { @Override public String get() { StringBuilder logger = new StringBuilder(); // Create a new config object to ease reading the Platform.sh environment variables. // You can alternatively use getenv() yourself. Config config = new Config(); // The 'database' relationship is generally the name of primary database of an application. // It could be anything, though, as in the case here here where it's called "mongodb". MongoDB database = config.getCredential("mongodb", MongoDB::new); MongoClient mongoClient = database.get(); final MongoDatabase mongoDatabase = mongoClient.getDatabase(database.getDatabase()); MongoCollection collection = mongoDatabase.getCollection("scientist"); Document doc = new Document("name", "Ada Lovelace") .append("city", "London"); collection.insertOne(doc); Document myDoc = collection.find(eq("_id", doc.get("_id"))).first(); logger.append("

"); logger.append(myDoc.toJson()).append('\n'); logger.append(collection.deleteOne(eq("_id", doc.get("_id")))); logger.append("

"); return logger.toString(); } } ``` ```java {} package sh.platform.languages.sample; import sh.platform.config.Config; import sh.platform.config.MySQL; import javax.sql.DataSource; import java.sql.Connection; import java.sql.ResultSet; import java.sql.SQLException; import java.sql.Statement; import java.util.function.Supplier; public class MySQLSample implements Supplier { @Override public String get() { StringBuilder logger = new StringBuilder(); // Create a new config object to ease reading the Platform.sh environment variables. // You can alternatively use getenv() yourself. Config config = new Config(); // The 'database' relationship is generally the name of primary SQL database of an application. // That's not required, but much of our default automation code assumes it. MySQL database = config.getCredential("database", MySQL::new); DataSource dataSource = database.get(); // Connect to the database try (Connection connection = dataSource.getConnection()) { // Creating a table. String sql = "CREATE TABLE IF NOT EXISTS People (" + " id INT(6) UNSIGNED AUTO_INCREMENT PRIMARY KEY," + "name VARCHAR(30) NOT NULL," + "city VARCHAR(30) NOT NULL)"; final Statement statement = connection.createStatement(); statement.execute(sql); // Insert data. sql = "INSERT INTO People (name, city) VALUES" + "('Neil Armstrong', 'Moon')," + "('Buzz Aldrin', 'Glen Ridge')," + "('Sally Ride', 'La Jolla')"; statement.execute(sql); // Show table. sql = "SELECT * FROM People"; final ResultSet resultSet = statement.executeQuery(sql); logger.append(""); while (resultSet.next()) { String name = resultSet.getString("name"); String city = resultSet.getString("city"); logger.append(String.format("", name, city)); logger.append('\n'); } logger.append("
NameCity
%s%s
"); statement.execute("DROP TABLE People"); return logger.toString(); } catch (SQLException exp) { throw new RuntimeException("An error when execute MySQL", exp); } } } ``` ```java {} package sh.platform.languages.sample; import sh.platform.config.Config; import sh.platform.config.MySQL; import sh.platform.config.PostgreSQL; import javax.sql.DataSource; import java.sql.Connection; import java.sql.ResultSet; import java.sql.SQLException; import java.sql.Statement; import java.util.function.Supplier; public class PostgreSQLSample implements Supplier { @Override public String get() { StringBuilder logger = new StringBuilder(); // Create a new config object to ease reading the Platform.sh environment variables. // You can alternatively use getenv() yourself. Config config = new Config(); // The 'database' relationship is generally the name of primary SQL database of an application. // It could be anything, though, as in the case here here where it's called "postgresql". PostgreSQL database = config.getCredential("postgresql", PostgreSQL::new); DataSource dataSource = database.get(); // Connect to the database try (Connection connection = dataSource.getConnection()) { // Creating a table. String sql = "CREATE TABLE JAVA_FRAMEWORKS (" + " id SERIAL PRIMARY KEY," + "name VARCHAR(30) NOT NULL)"; final Statement statement = connection.createStatement(); statement.execute(sql); // Insert data. sql = "INSERT INTO JAVA_FRAMEWORKS (name) VALUES" + "('Spring')," + "('Jakarta EE')," + "('Eclipse JNoSQL')"; statement.execute(sql); // Show table. sql = "SELECT * FROM JAVA_FRAMEWORKS"; final ResultSet resultSet = statement.executeQuery(sql); logger.append("
    "); while (resultSet.next()) { int id = resultSet.getInt("id"); String name = resultSet.getString("name"); logger.append(String.format("
  • id %d has a name of %s", id, name)); logger.append("
  • "); } logger.append("
"); statement.execute("DROP TABLE JAVA_FRAMEWORKS"); return logger.toString(); } catch (SQLException exp) { throw new RuntimeException("An error when execute PostgreSQL", exp); } } } ``` ```java {} package sh.platform.languages.sample; import sh.platform.config.Config; import sh.platform.config.RabbitMQ; import javax.jms.Connection; import javax.jms.ConnectionFactory; import javax.jms.MessageConsumer; import javax.jms.MessageProducer; import javax.jms.Queue; import javax.jms.Session; import javax.jms.TextMessage; import java.util.function.Supplier; public class RabbitMQSample implements Supplier { @Override public String get() { StringBuilder logger = new StringBuilder(); // Create a new config object to ease reading the Platform.sh environment variables. // You can alternatively use getenv() yourself. Config config = new Config(); try { // Get the credentials to connect to the RabbitMQ service. final RabbitMQ credential = config.getCredential("rabbitmq", RabbitMQ::new); final ConnectionFactory connectionFactory = credential.get(); // Connect to the RabbitMQ server. final Connection connection = connectionFactory.createConnection(); connection.start(); final Session session = connection.createSession(false, Session.AUTO_ACKNOWLEDGE); Queue queue = session.createQueue("cloud"); MessageConsumer consumer = session.createConsumer(queue); // Sending a message into the queue. TextMessage textMessage = session.createTextMessage("Platform.sh"); textMessage.setJMSReplyTo(queue); MessageProducer producer = session.createProducer(queue); producer.send(textMessage); // Receive the message. TextMessage replyMsg = (TextMessage) consumer.receive(100); logger.append("

"); logger.append("Message: ").append(replyMsg.getText()); logger.append("

"); // close connections. producer.close(); consumer.close(); session.close(); connection.close(); return logger.toString(); } catch (Exception exp) { throw new RuntimeException("An error when execute RabbitMQ", exp); } } } ``` ```java {} package sh.platform.languages.sample; import redis.clients.jedis.Jedis; import redis.clients.jedis.JedisPool; import sh.platform.config.Config; import sh.platform.config.Redis; import java.util.Set; import java.util.function.Supplier; public class RedisSample implements Supplier { @Override public String get() { StringBuilder logger = new StringBuilder(); // Create a new config object to ease reading the Platform.sh environment variables. // You can alternatively use getenv() yourself. Config config = new Config(); // The 'database' relationship is generally the name of primary database of an application. // It could be anything, though, as in the case here here where it's called "redis". Redis database = config.getCredential("redis", Redis::new); JedisPool dataSource = database.get(); // Get a Redis Client final Jedis jedis = dataSource.getResource(); // Set a values jedis.sadd("cities", "Salvador"); jedis.sadd("cities", "London"); jedis.sadd("cities", "São Paulo"); // Read it back. Set cities = jedis.smembers("cities"); logger.append("

"); logger.append("cities: " + cities); logger.append("

"); jedis.del("cities"); return logger.toString(); } } ``` ```java {} package sh.platform.languages.sample; import org.apache.solr.client.solrj.SolrQuery; import org.apache.solr.client.solrj.SolrServerException; import org.apache.solr.client.solrj.impl.HttpSolrClient; import org.apache.solr.client.solrj.impl.XMLResponseParser; import org.apache.solr.client.solrj.response.QueryResponse; import org.apache.solr.client.solrj.response.UpdateResponse; import org.apache.solr.common.SolrDocumentList; import org.apache.solr.common.SolrInputDocument; import sh.platform.config.Config; import sh.platform.config.Solr; import java.io.IOException; import java.util.function.Supplier; public class SolrSample implements Supplier { @Override public String get() { StringBuilder logger = new StringBuilder(); // Create a new config object to ease reading the Platform.sh environment variables. // You can alternatively use getenv() yourself. Config config = new Config(); Solr solr = config.getCredential("solr", Solr::new); try { final HttpSolrClient solrClient = solr.get(); solrClient.setParser(new XMLResponseParser()); // Add a document SolrInputDocument document = new SolrInputDocument(); final String id = "123456"; document.addField("id", id); document.addField("name", "Ada Lovelace"); document.addField("city", "London"); solrClient.add(document); final UpdateResponse response = solrClient.commit(); logger.append("Adding one document. Status (0 is success): ") .append(response.getStatus()).append('\n'); SolrQuery query = new SolrQuery(); query.set("q", "city:London"); QueryResponse queryResponse = solrClient.query(query); logger.append("

"); SolrDocumentList results = queryResponse.getResults(); logger.append(String.format("Selecting documents (1 expected): %d \n", results.getNumFound())); logger.append("

"); // Delete one document solrClient.deleteById(id); logger.append("

"); logger.append(String.format("Deleting one document. Status (0 is success): %s \n", solrClient.commit().getStatus())); logger.append("

"); } catch (SolrServerException | IOException exp) { throw new RuntimeException("An error when execute Solr ", exp); } return logger.toString(); } } ``` ###### Configuration reader While you can read the environment directly from your app, you might want to use the[ Java configuration reader library](https://github.com/platformsh/config-reader-java). It decodes service credentials, the correct port, and other information for you. If your Java framework allows, you can instead overwrite configuration following the [twelve-factor app](https://12factor.net/config). That removes the need for an additional dependency. ##### Project templates The following list shows templates available for Java apps. A template is a starting point for building your project. It should help you get a project ready for production. Templates in development. #### Java featured frameworks p:last-child]:mb-0 [&>h3]:mt-0 rounded-lg" > ####### Note You can now use composable image (BETA) to install runtimes and tools in your application container. To find out more, see the [dedicated documentation page](https://docs.platform.sh/create-apps/app-reference/composable-image.md). ###### Hibernate [Hibernate ORM](https://hibernate.org/) is an object-relational mapping tool for the Java programming language. It provides a framework for mapping an object-oriented domain model to a relational database. Hibernate handles object-relational impedance mismatch problems by replacing direct, persistent database accesses with high-level object handling functions. * [Hibernate Best Practices](https://docs.platform.sh/guides/hibernate/deploy.md) ###### Jakarta EE/ Eclipse MicroProfile [Eclipse MicroProfile](https://microprofile.io/) is a semi-new community dedicated to optimizing the Enterprise Java mission for microservice-based architectures. Now Enterprise Java has been standardized under the Eclipse Foundation as [Jakarta EE](https://jakarta.ee/). * [Jakarta EE/ Eclipse MicroProfile Best Practices](https://docs.platform.sh/guides/jakarta/deploy.md) ####### Templates * [Apache TomEE](https://github.com/platformsh-templates/microprofile-tomee) * [Thorntail](https://github.com/platformsh-templates/microprofile-thorntail) * [KumuluzEE](https://github.com/platformsh-templates/microprofile-kumuluzee) * [Helidon](https://github.com/platformsh-templates/microprofile-helidon) * [Open Liberty](https://github.com/platformsh-templates/microprofile-openliberty) * [WildFly](https://github.com/platformsh-templates/microprofile-wildfly/) ###### Payara [Payara](https://www.payara.fish/) Micro is an Open Source, lightweight Java EE (Jakarta EE) microservices deployments. ####### Templates * [Payara Micro](https://github.com/platformsh-templates/microprofile-payara) ####### References | Article | Links | | ------------------------------------------------------------ | -----------------------------------------------------------: | | [Search](https://www.payara.fish/page/payara-platform-and-paas-with-platform-sh/) | [Source](https://github.com/platformsh-examples/payara-micro/tree/master/search) | | [NoSQL](https://dzone.com/articles/whats-new-with-jakarta-nosql-part-i-introduction-t) | [Source](https://github.com/platformsh-examples/payara-micro/tree/master/nosql) | | [JPA](https://platform.sh/blog/2019/eclipse-microprofiles-gain-agility-release-faster/) | [Source](https://github.com/platformsh-examples/payara-micro/tree/master/jpa) | | [Hello World](https://www.payara.fish/page/payara-platform-and-paas-with-platform-sh/) | [Source](https://github.com/platformsh-examples/payara-micro/tree/master/hello) | ###### Quarkus [QuarkusIO](https://quarkus.io/), the Supersonic Subatomic Java, promises to deliver small artifacts, extremely fast boot time, and lower time-to-first-request. ####### Templates * [Quarkus](https://github.com/platformsh-templates/quarkus) ###### Spring The [Spring Framework](https://spring.io/projects/spring-framework) provides a comprehensive programming and configuration model for modern Java-based enterprise applications - on any kind of deployment platform. Platform.sh is flexible, and allows you to use Spring Framework in several flavors such as [Spring MVC](https://docs.spring.io/spring/docs/current/spring-framework-reference/web.md) and [Spring Boot](https://spring.io/projects/spring-boot). * [Spring Best Practices](https://docs.platform.sh/guides/spring.md) ####### Templates * [Spring Boot MySQL](https://github.com/platformsh-templates/spring-boot-maven-mysql) * [Spring Boot MongoDB](https://github.com/platformsh-templates/spring-mvc-maven-mongodb) ####### References | Article | Link | | ------------------------------------------------------------ | ------------------------------------------------------------ | | [Spring Data MongoDB Reactive](https://dzone.com/articles/introduction-to-spring-data-mongodb-reactive-and-h) | [Source](https://github.com/platformsh/java-quick-start/tree/master/spring/spring-mongodb-reactive) | | [Spring Webflux](https://dzone.com/articles/introduction-of-spring-webflux-and-how-to-apply-cl) | [Source](https://github.com/platformsh/java-quick-start/tree/master/spring/spring-webflux) | | [Spring Data Redis](https://platform.sh/blog/2019/spring-data-redis-in-the-cloud/) | [Source](https://github.com/platformsh/java-quick-start/tree/master/spring/spring-boot-maven-redis) | | [Spring with Gradle](https://platform.sh/blog/2019/simplify-your-script-build-with-gradle/) | [Source](https://github.com/platformsh-templates/spring-boot-gradle-mysql) | | [Spring Data ElasticSearch and Spring Data Solr](https://platform.sh/blog/2019/elasticsearch-vs-solr-have-both-with-spring-data-and-platform.sh/) | [Elasticsearch](https://github.com/platformsh/java-quick-start/tree/master/spring/spring-mvc-maven-elasticsearch) and [Solr](https://github.com/platformsh/java-quick-start/tree/master/spring/spring-mvc-maven-solr) | | [Spring MVC and Spring Data MongoDB](https://platform.sh/blog/2019/spring-mvc-and-mongodb-a-match-made-in-platform.sh-heaven/) | [Source](https://github.com/platformsh/java-quick-start/tree/master/spring/spring-mvc-maven-mongodb) | | [Spring Boot and Spring Data JPA](https://platform.sh/blog/2019/java-hello-world-at-platform.sh/) | [Source](https://github.com/platformsh-templates/spring-boot-maven-mysql) | ###### Tomcat Apache Tomcat is an open-source implementation of the Java Servlet, JavaServer Pages, Java Expression Language and WebSocket technologies. **Note**: By default, Spring Boot provides an embedded Apache Tomcat build. So if you want to use Tomcat with Spring, check the [Spring section](#spring). ####### Templates * [Tomcat](https://github.com/platformsh-templates/tomcat) ###### Micronaut [Micronaut](https://micronaut.io/) is a modern, JVM-based, full-stack framework for building modular, testable microservice and serverless applications. ####### Templates * [micronaut](https://github.com/platformsh-templates/micronaut) ####### References | Article | Source | | ----------------------------------------------------------- | ------------------------------------------------------------ | | [JPA](https://dzone.com/articles/micronaut-cloud-jpa) | [Source](https://github.com/platformsh-examples/micronaut/tree/master/jpa) | | [Micronaut Data](https://dzone.com/articles/micronaut-data) | [Source](https://github.com/platformsh-examples/micronaut/tree/master/micronaut-data) | | [MongoDB](https://dzone.com/articles/micronaut-mongodb) | [Source](https://github.com/platformsh-examples/micronaut/tree/master/mongodb) | #### Moving a Java application to Platform.sh p:last-child]:mb-0 [&>h3]:mt-0 rounded-lg" > ####### Note You can now use composable image (BETA) to install runtimes and tools in your application container. To find out more, see the [dedicated documentation page](https://docs.platform.sh/create-apps/app-reference/composable-image.md). It is common to have a Java application that you want to migrate to Platform.sh. Platform.sh supports several styles of Java application, such as monolith, microservices, stateful, and stateless. ###### Minimum Requirement To run a Java application at Platform.sh you need: * [A supported Java version](https://docs.platform.sh/languages/java.md#supported-versions) * [A build management tool](https://docs.platform.sh/languages/java.md#support-build-automation) * [Gradle](https://docs.gradle.org/current/userguide/gradle_wrapper.md) * [Maven](https://maven.apache.org/) * [Maven Wrapper](https://www.baeldung.com/maven-wrapper) * [Ant](https://ant.apache.org/) * A Git Repository: * [GitHub](https://docs.platform.sh/integrations/source/github.md) * [BitBucket](https://docs.platform.sh/integrations/source/bitbucket.md) * [GitLab](https://docs.platform.sh/integrations/source/gitlab.md) * The default Git repository provided by Platform.sh **Note**: A container application can’t be bigger than **8 GB** of memory. For more details, see [tuning](https://docs.platform.sh/languages/java/tuning.md). ###### Monolith/Single Application To start a Java application, you need to understand the [Platform.sh structure](https://docs.platform.sh/learn/overview/structure.md). You will need to configure your [application](https://docs.platform.sh/create-apps/_index.md), [routes](https://docs.platform.sh/define-routes.md), and [services](https://docs.platform.sh/add-services.md). ####### Application ```yaml {location=".platform.app.yaml"} name: myapp type: 'java:' [1] disk: 1024 hooks: build: [2] web: commands: start: [3] ``` 1. [A Java version](https://docs.platform.sh/languages/java.md#supported-versions), e,g.: `java:21` 2. [Hooks define what happens when building the application](https://docs.platform.sh/create-apps/hooks.md). This build process typically generates an executable file such as a uber-jar e.g.: `mvn clean package` 3. [The commands key defines the command to launch the application](https://docs.platform.sh/create-apps/app-reference/single-runtime-image.md#web-commands). E.g.: `java -jar file.jar` 4. In the start's command needs to receive the port where the application will execute thought the `PORT` environment. That's best when your app follows the port bind principle. E.g.: `java -jar jar --port=$PORT` **Note**: Be aware that after the build, it creates a read-only system. You have the [mount option to create a writable folder](https://docs.platform.sh/create-apps/app-reference/single-runtime-image.md#mounts). ####### Route ```yaml {location=".platform/routes.yaml"} "https://{default}/": type: upstream upstream: "myapp:http" [1] "https://www.{default}/": type: redirect to: "https://{default}/" ``` 1. It defines the application will link in the route, e.g.: `"myapp:http"` **Note**: Application instances have a limited amount of memory at build time, which has a maximum of 8 GB. At runtime that limit depends on your plan and configuration. A stateless application can be scaled horizontally to multiple application instances using Varnish in a [load balancer](https://support.platform.sh/hc/en-us/community/posts/16439676899474) configuration. ###### Microservices You have the option to use several languages in microservices. If you're using Java there are several options to aggregate these services into a microservices: * [Maven Modules](https://maven.apache.org/guides/mini/guide-multiple-modules.md) * [Gradle Multi-project](https://guides.gradle.org/creating-multi-project-builds/) * [Git submodules](https://docs.platform.sh/development/submodules.md) [Platform.sh supports multiple applications](https://docs.platform.sh/create-apps/multi-app.md) and there are two options: * One application YAML file to each application * Aggregate all applications in a single file with an `.platform/applications.yaml` file | Article | Content | | ------------------------------------------------------------ | ------------------------------------------------------------ | | [Microservices in the cloud, part two](https://platform.sh/blog/2019/microservices-in-the-cloud-part-two/) | [Source](https://github.com/EventosJEspanol/latin-america-micro-profile) | | [Microservices in the cloud, part one](https://platform.sh/blog/2019/microservices-in-the-cloud-part-one/) | [Source](https://github.com/EventosJEspanol/latin-america-micro-profile) | | [Multiple Applications](https://support.platform.sh/hc/en-us/community/posts/16439649733010) | [Source](https://github.com/platformsh-examples/tomcat-multi-app) | | [Configure multi-applications with `.platform/applications.yaml`](https://support.platform.sh/hc/en-us/community/posts/16439676928274) | [Source](https://github.com/platformsh-examples/tomcat-multi-app-applications) | **Note**: You can load balance to some or [all applications in the project cluster](https://support.platform.sh/hc/en-us/community/posts/16439662235026). ###### Access to managed services Platform.sh provides [managed services](https://docs.platform.sh/add-services.md) such as databases, cache and search engines. However, you can use a database or any services such as a transition process, just be aware of the [firewall](https://docs.platform.sh/create-apps/app-reference/single-runtime-image.md#firewall). When applications need to access a service, it is important to include the [`relationships` key](https://docs.platform.sh/create-apps/app-reference/single-runtime-image.md#relationships). By default an application may not talk to any other container without a `relationship` explicitly allowing access. To connect to a service from your deployed application, you need to pass the relationships information into your application's configuration. The way to do so varies with the application. The most common mechanisms are listed below. ####### Overwrite If you are using a framework that follows the [Twelve-Factor App](https://12factor.net/) methodology, particularly the [third point](https://12factor.net/config), you can configure the application directly from environment variables. Examples of such frameworks include Spring, Eclipse MicroProfile Config, Quarkus, and Micronauts. Service credentials are available within the [**PLATFORM_RELATIONSHIPS** environment variable](https://docs.platform.sh/development/variables/use-variables.md#use-provided-variables). This variable is a base64-encoded JSON object with keys of the relationship name and values of arrays of relationship endpoint definitions. Platform.sh supports the [`jq` tool](https://stedolan.github.io/jq/), which allows to extract information from this JSON. ```shell export DB_HOST=`echo $PLATFORM_RELATIONSHIPS | base64 --decode | jq -r ".postgresql[0].host"` ``` | Article | Source | | ------------------------------------------------------------ | ------------------------------------------------------------ | | [Spring Data MongoDB](https://support.platform.sh/hc/en-us/community/posts/16439654854802) | [Source](https://github.com/platformsh-examples/java-overwrite-configuration/tree/master/spring-mongodb) | | [Jakarta EE/MicroProfile Config](https://support.platform.sh/hc/en-us/community/posts/16439700735122) | [Source](https://github.com/platformsh-examples/java-overwrite-configuration/tree/master/jakarta-nosql) | | [Spring Data JPA](https://support.platform.sh/hc/en-us/community/posts/16439669562130) | [Source](https://github.com/platformsh-examples/java-overwrite-configuration/tree/master/spring-jpa) | | [Payara JPA](https://support.platform.sh/hc/en-us/community/posts/16439658290194) | [Source](https://github.com/platformsh-examples/java-overwrite-configuration/blob/master/payara/README.md) | To reduce the number of lines in the application file and to make it cleaner, you have the option to move the variable environment to another file: a [`.environment` file](https://docs.platform.sh/development/variables/set-variables.md#set-variables-via-script). E.g.: ```shell export DB_HOST=`echo $PLATFORM_RELATIONSHIPS | base64 --decode | jq -r ".postgresql[0].host"` export DB_PASSWORD=`echo $PLATFORM_RELATIONSHIPS | base64 --decode | jq -r ".postgresql[0].password"` export DB_USER=`echo $PLATFORM_RELATIONSHIPS | base64 --decode | jq -r ".postgresql[0].username"` export DB_DATABASE=`echo $PLATFORM_RELATIONSHIPS | base64 --decode | jq -r ".postgresql[0].path"` export JDBC=jdbc:postgresql://${HOST}/${DATABASE} export JAVA_MEMORY=-Xmx$(jq .info.limits.memory /run/config.json)m export JAVA_OPTS="$JAVA_MEMORY -XX:+ExitOnOutOfMemoryError" ``` This `.environment` can interact to each application file. E.g.: ```yaml {location=".platform.app.yaml"} name: myapp type: "java:11" disk: 1024 hooks: build: ./mvnw package -DskipTests -Dquarkus.package.uber-jar=true relationships: postgresql: web: commands: start: java -jar $JAVA_OPTS $CREDENTIAL -Dquarkus.http.port=$PORT jarfile.jar ``` ####### Using Java Config Reader If your framework doesn't support configuration via environment variables, use the [Config Reader](https://docs.platform.sh/development/variables/use-variables.md#access-variables-in-your-app). This library provides a streamlined way to interact with a Platform.sh environment. It offers utility methods to access routes and relationships more cleanly than reading the raw environment variables yourself. [See the maven dependency](https://mvnrepository.com/artifact/sh.platform/config). ```java import Config; Config config = new Config(); MySQL database = config.getCredential("postgresql", MySQL::new); DataSource dataSource = database.get(); ``` #### Performance tuning Java p:last-child]:mb-0 [&>h3]:mt-0 rounded-lg" > ####### Note You can now use composable image (BETA) to install runtimes and tools in your application container. To find out more, see the [dedicated documentation page](https://docs.platform.sh/create-apps/app-reference/composable-image.md). There are a number of settings that can be adjusted for each application to optimize its performance on Platform.sh. ###### Memory limits The JVM generally requires specifying a maximum memory size it is allowed to use, using the `Xmx` parameter. That should be set based on the available memory on the application container, which varies with its size. To extract the container-scaled value on the command line, use `$(jq .info.limits.memory /run/config.json)`. You should also set the `ExitOnOutOfMemoryError`. When you enable this option, the JVM exits on the first occurrence of an out-of-memory error. Platform.sh will restart the application automatically. These are the recommended parameters for running a Java application. Thus, the command to use to start a Java application is: ```bash java -jar -Xmx$(jq .info.limits.memory /run/config.json)m -XX:+ExitOnOutOfMemoryError //The rest of the arguments and the jar file. ``` ###### Garbage collection When migrating the application to a cloud environment, it is often essential to analyze the Garbage Collector's log and behavior. For this, there are two options: * Placing the log into the Platform.sh `/var/log/app.log` file (which captures `STDOUT`). * Creating a log file specifically for the GC. To use the `STDOUT` log, you can add the parameter `-XX: + PrintGCDetails`, E.g.: ```bash java -jar -Xmx$(jq .info.limits.memory /run/config.json)m -XX:+ExitOnOutOfMemoryError -XX:+PrintGCDetails //The rest of the arguments and the jar file. ``` Java supports a number of different garbage collection strategies. Which one is optimal for your application varies depending on your available memory, Java version, and application profile. Determining which is best for your application is out of scope, but the main options and how to enable them are: | Name | Command Flag | Description | | ------------- |:-------------:| -----:| |Serial Garbage Collector|-XX:+UseSerialGC|This is the simplest GC implementation, as it basically works with a single thread.| |Parallel Garbage Collector|-XX:+UseParallelGC|Unlike Serial Garbage Collector, this uses multiple threads for managing heap space. But it also freezes other application threads while performing GC.| |CMS Garbage Collector|-XX:+USeParNewGC|The Concurrent Mark Sweep (CMS) implementation uses multiple garbage collector threads for garbage collection. It's for applications that prefer shorter garbage collection pauses, and that can afford to share processor resources with the garbage collector while the application is running.| |G1 Garbage Collector|-XX:+UseG1GC|Garbage First, G1, is for applications running on multiprocessor machines with large memory space.| The default strategy on Java 9 and later is G1. The GC strategy to use can be set in the start line with: ####### Serial ```bash java -jar -Xmx$(jq .info.limits.memory /run/config.json)m -XX:+ExitOnOutOfMemoryError -XX:+PrintGCDetails -XX:+UseSerialGC //The rest of the arguments and the jar file. ``` ####### Parallel Garbage Collector ```bash java -jar -Xmx$(jq .info.limits.memory /run/config.json)m -XX:+ExitOnOutOfMemoryError -XX:+PrintGCDetails -XX:+UseParallelGC //The rest of the arguments and the jar file. ``` ####### CMS Garbage Collector ```bash java -jar -Xmx$(jq .info.limits.memory /run/config.json)m -XX:+ExitOnOutOfMemoryError -XX:+PrintGCDetails -XX:+USeParNewGC //The rest of the arguments and the jar file. ``` ####### G1 ```bash java -jar -Xmx$(jq .info.limits.memory /run/config.json)m -XX:+ExitOnOutOfMemoryError -XX:+PrintGCDetails -XX:+UseG1GC //The rest of the arguments and the jar file. ``` ###### Java 8 Optimization Ideally, all applications should run the latest LTS release of the JVM at least. That is currently Java 11. Java 11 has a number of performance improvements, particularly on container-based environments such as Platform.sh. However, in many cases, this isn't possible. If you are still running on Java 8 there are two additional considerations. The default garbage collector for Java 8 is Parallel GC. In most cases G1 will offer better performance. We recommend enabling it, as above. Furthermore, there is the `UseStringDeduplication` flag which works to eliminate duplicate `String`s within the GC process. That flag can save between 13% to 30% of memory, depending on application. However, this can impact on the pause time of your app. ```bash java -jar -Xmx$(jq .info.limits.memory /run/config.json)m -XX:+UseG1GC -XX:+UseStringDeduplication -XX:+ExitOnOutOfMemoryError -XX:+PrintGCDetails ``` ###### References * [How to Migrate my Java application to Platform.sh](https://support.platform.sh/hc/en-us/community/posts/16439684444946) * [Introduction to Garbage Collection Tuning](https://docs.oracle.com/en/java/javase/14/gctuning/introduction-garbage-collection-tuning.md#GUID-326EB4CF-8C8C-4267-8355-21AB04F0D304) ### JavaScript/Node.js p:last-child]:mb-0 [&>h3]:mt-0 rounded-lg" > ###### Note You can now use composable image (BETA) to install runtimes and tools in your application container. To find out more, see the [dedicated documentation page](https://docs.platform.sh/create-apps/app-reference/composable-image.md). Node.js is a popular asynchronous JavaScript runtime. Deploy scalable Node.js apps of all sizes on Platform.sh. You can also develop a microservice architecture mixing JavaScript and other apps with [multi-app projects](https://docs.platform.sh/create-apps/multi-app.md). ##### Supported versions You can select the major version. But the latest compatible minor version is applied automatically and can’t be overridden. Patch versions are applied periodically for bug fixes and the like. When you deploy your app, you always get the latest available patches. | Grid and Dedicated Gen 3 | Dedicated Gen 2 | | - 22 - 20 - 18 None available ###### Specify the language To use Node.js, specify `nodejs` as your [app's `type`](https://docs.platform.sh/create-apps/app-reference/single-runtime-image.md#types): ```yaml {location=".platform.app.yaml"} type: 'nodejs:' ``` For example: ```yaml {location=".platform.app.yaml"} type: 'nodejs:22' ``` To use a specific version in a container with a different language, [use a version manager](node-version.md). ###### Deprecated versions The following versions are [deprecated](https://docs.platform.sh/glossary.md#deprecated-versions). They're available, but they aren't receiving security updates from upstream and aren't guaranteed to work. They'll be removed in the future, so migrate to one of the [supported versions](#supported-versions). | Grid | Dedicated Gen 2 | | - 16 - 14 - 12 - 10 - 8 - 6 - 4.8 - 4.7 - 0.12 - 16 - 14 - 12 - 10 - 9.8 ##### Usage example To use JavaScript with Node.js on Platform.sh, configure your [app configuration](https://docs.platform.sh/create-apps.md) (a complete example is included at the end). ###### 1. Specify the version Choose a version from the [list of supported versions](#supported-versions) and add it to your app configuration: ```yaml {location=".platform.app.yaml"} type: 'nodejs:22' ``` ###### 2. Specify any global dependencies Add the following to your app configuration: ```yaml {location=".platform.app.yaml"} type: 'nodejs:22' dependencies: nodejs: sharp: "*" ``` These are now available as commands, the same as installing with `npm install -g`. ###### 3. Build your app Include any commands needed to build and setup your app in the `hooks`, as in the following example: ```yaml {location=".platform.app.yaml"} type: 'nodejs:22' dependencies: nodejs: sharp: "*" hooks: build: | npm run setup-assets npm run build ``` ###### 4. Start your app Specify a command to start serving your app (it must be a process running in the foreground): ```yaml {location=".platform.app.yaml"} type: 'nodejs:22' dependencies: nodejs: sharp: "*" hooks: build: | npm run setup-assets npm run build web: commands: start: node index.js ``` ###### 5. Listen on the right port Make sure your Node.js application is configured to listen over the port given by the environment. The following example uses the [`platformsh-config` helper](#configuration-reader): ```js // Load the http module to create an http server. const http = require('http'); // Load the Platform.sh configuration const config = require('platformsh-config').config(); const server = http.createServer(function (request, response) { response.writeHead(200, {"Content-Type": "application/json"}); response.end("Hello world!"); }); // Listen on the port from the Platform.sh configuration server.listen(config.port); ``` ###### Complete example A complete basic app configuration looks like the following: ```yaml {location=".platform.app.yaml"} name: node-app type: 'nodejs:22' disk: 512 dependencies: nodejs: sharp: "*" hooks: build: | npm run setup-assets npm run build web: commands: start: "node index.js" ``` ##### Dependencies By default, Platform.sh assumes you're using npm as a package manager. If your code has a `package.json`, the following command is run as part of the default [build flavor](https://docs.platform.sh/create-apps/app-reference/single-runtime-image.md#build): ```bash npm prune --userconfig .npmrc && npm install --userconfig .npmrc ``` This means you can specify configuration in a `.npmrc` file in [your app root](https://docs.platform.sh/create-apps/app-reference/single-runtime-image.md#root-directory). ###### Use Yarn as a package manager To switch to Yarn to manage dependencies, follow these steps: 1. Turn off the default use of npm: ```yaml {location=".platform.app.yaml"} build: flavor: none ``` 2. Specify the version of Yarn you want: ```json {location="package.json"} { ... "packageManager": "yarn@3.2.1" } ``` What you do next depends on the versions of Yarn and Node.js you want. - Enable Corepack (which is opt-in): ```yaml {location=".platform.app.yaml"} type: 'nodejs:22' dependencies: nodejs: corepack: "*" ``` - Use Corepack to run Yarn in your build hook: ```yaml {location=".platform.app.yaml"} type: 'nodejs:22' hooks: build: | corepack yarn install ``` - Add Yarn as a global dependency: ```yaml {location=".platform.app.yaml"} type: 'nodejs:22' dependencies: nodejs: yarn: "1.22.19" ``` - Install dependencies in the ``build`` hook: ```yaml {location=".platform.app.yaml"} type: 'nodejs:22' hooks: build: | yarn --frozen-lockfile ``` ###### Use Bun as a package manager **Availability** [Bun is available as a runtime and package manager](https://platform.sh/blog/bun-support-is-here/) for Node.js **versions 20 or above**. To switch to Bun to manage dependencies, use the following configuration: ```yaml {location=".platform.app.yaml"} # The name of your app. name: myapp # Choose Node.js version 20 or above. type: 'nodejs:20' # Override the default Node.js build flavor. build: flavor: none # Use Bun to install the dependencies. hooks: build: bun install ``` ####### Use Bun as a runtime You can even [use Bun as a runtime](https://platform.sh/blog/bun-support-is-here/) by adjusting the `start` command as follows: ```yaml {location=".platform.app.yaml"} # The name of your app. name: myapp # Choose Node.js version 20 or above. type: 'nodejs:20' # Override the default Node.js build flavor. build: flavor: none # Use Bun to install the dependencies. hooks: build: bun install # In the start command replace node with Bun. web: commands: start: 'bun app.js' ``` ##### Connecting to services The following examples show how to use Node.js to access various [services](https://docs.platform.sh/add-services.md). To configure a given service, see the page dedicated to that service. ```js {} const Memcached = require('memcached'); const config = require("platformsh-config").config(); const { promisify } = require('util'); exports.usageExample = async function() { const credentials = config.credentials('memcached'); const client = new Memcached(`${credentials.host}:${credentials.port}`); // The MemcacheD client is not Promise-aware, so make it so. const memcachedGet = promisify(client.get).bind(client); const memcachedSet = promisify(client.set).bind(client); const key = 'Deploy-day'; const value = 'Friday'; // Set a value. await memcachedSet(key, value, 10); // Read it back. const test = await memcachedGet(key); return `Found value ${test} for key ${key}.`; }; ``` ```js {} const mongodb = require("mongodb"); const config = require("platformsh-config").config(); exports.usageExample = async function () { const credentials = config.credentials("mongodb"); const MongoClient = mongodb.MongoClient; const client = await MongoClient.connect( config.formattedCredentials("mongodb", "mongodb") ); const db = client.db(credentials["path"]); const collection = db.collection("startrek"); const documents = [ { name: "James Kirk", rank: "Admiral" }, { name: "Jean-Luc Picard", rank: "Captain" }, { name: "Benjamin Sisko", rank: "Prophet" }, { name: "Katheryn Janeway", rank: "Captain" }, ]; await collection.insertMany(documents, { w: 1 }); const result = await collection.find({ rank: "Captain" }).toArray(); const outputRows = Object.values(result) .map(({ name, rank }) => `${name}${rank}\n`) .join("\n"); // Clean up after ourselves. collection.deleteMany(); return ` ${outputRows}
NameRank
`; }; ``` ```js {} const mysql = require("mysql2/promise"); const config = require("platformsh-config").config(); exports.usageExample = async function () { const credentials = config.credentials("database"); const connection = await mysql.createConnection({ host: credentials.host, port: credentials.port, user: credentials.username, password: credentials.password, database: credentials.path, }); // Creating a table. await connection.query( `CREATE TABLE IF NOT EXISTS People ( id INT(6) UNSIGNED AUTO_INCREMENT PRIMARY KEY, name VARCHAR(30) NOT NULL, city VARCHAR(30) NOT NULL )` ); // Insert data. await connection.query( `INSERT INTO People (name, city) VALUES ('Neil Armstrong', 'Moon'), ('Buzz Aldrin', 'Glen Ridge'), ('Sally Ride', 'La Jolla');` ); // Show table. const [rows] = await connection.query("SELECT * FROM People"); // Drop table. await connection.query("DROP TABLE People"); const outputRows = rows .map(({ name, city }) => `${name}${city}\n`) .join("\n"); return ` ${outputRows}
NameCity
`; }; ``` ```js {} const pg = require("pg"); const config = require("platformsh-config").config(); exports.usageExample = async function () { const credentials = config.credentials("postgresql"); const client = new pg.Client({ host: credentials.host, port: credentials.port, user: credentials.username, password: credentials.password, database: credentials.path, }); client.connect(); // Creating a table. await client.query( `CREATE TABLE IF NOT EXISTS People ( id SERIAL PRIMARY KEY, name VARCHAR(30) NOT NULL, city VARCHAR(30) NOT NULL )` ); // Insert data. await client.query( `INSERT INTO People (name, city) VALUES ('Neil Armstrong', 'Moon'), ('Buzz Aldrin', 'Glen Ridge'), ('Sally Ride', 'La Jolla');` ); // Show table. const result = await client.query("SELECT * FROM People"); // Drop table. await client.query("DROP TABLE People"); const outputRows = result.rows .map(({ name, city }) => `${name}${city}\n`) .join("\n"); return ` ${outputRows}
NameCity
`; }; ``` ```js {} const redis = require('redis'); const config = require("platformsh-config").config(); const { promisify } = require('util'); exports.usageExample = async function() { const credentials = config.credentials('redis'); const client = redis.createClient(credentials.port, credentials.host); // The Redis client is not Promise-aware, so make it so. const redisGet = promisify(client.get).bind(client); const redisSet = promisify(client.set).bind(client); const key = 'Deploy day'; const value = 'Friday'; // Set a value. await redisSet(key, value); // Read it back. const test = await redisGet(key); return `Found value ${test} for key ${key}.`; }; ``` ```js {} const solr = require("solr-node"); const config = require("platformsh-config").config(); exports.usageExample = async function () { const client = new solr(config.formattedCredentials("solr", "solr-node")); // Add a document. const addResult = await client.update({ id: 123, name: "Valentina Tereshkova", }); // Flush writes so that we can query against them. await client.softCommit(); // Select one document: const strQuery = client.query().q(); const writeResult = await client.search(strQuery); // Delete one document. const deleteResult = await client.delete({ id: 123 }); return ` Adding one document. Status (0 is success): ${addResult.responseHeader.status}
Selecting documents (1 expected): ${writeResult.response.numFound}
Deleting one document. Status (0 is success): ${deleteResult.responseHeader.status}
`; }; ``` ###### Configuration reader While you can read the environment directly from your app, you might want to use the[Node.js configuration reader library](https://github.com/platformsh/config-reader-nodejs). It decodes service credentials, the correct port, and other information for you. ##### Project templates The following list shows templates available for Node.js apps. A template is a starting point for building your project. It should help you get a project ready for production. Express ![Express](data:image/svg+xml;base64,PHN2ZyB3aWR0aD0iMjQiIGhlaWdodD0iMjQiIHZpZXdCb3g9IjAgMCAyNCAyNCIgZmlsbD0ibm9uZSIgeG1sbnM9Imh0dHA6Ly93d3cudzMub3JnLzIwMDAvc3ZnIj4KPHBhdGggZD0iTTcuNDQzNjggMTQuMzU1NlY5LjEwNDc3SDcuNzI4NDlWOS45MzA3M0M3Ljc2MjEzIDkuODk0MSA3Ljc5MzE5IDkuODU1MiA3LjgyMTQ2IDkuODE0M0M4LjA1OTMzIDkuMzIwNzcgOC41NjEwNiA5LjAwOTMgOS4xMDg4MiA5LjAxNTQ1QzkuNzU4MTkgOC45OTYwOCAxMC4yODU5IDkuMjM2NDYgMTAuNTk2IDkuODE0M0MxMC43OTMzIDEwLjE3MzMgMTAuOTAxOSAxMC41NzQyIDEwLjkxMjcgMTAuOTgzN0MxMC45MjM1IDExLjM5MzIgMTAuODM2MiAxMS43OTk0IDEwLjY1OCAxMi4xNjgyQzEwLjM2OTEgMTIuODE1OCA5LjY1NTQzIDEzLjEzNzcgOC44OTE0NSAxMy4wMTk1QzguNjUzNjkgMTIuOTk5MyA4LjQyNDc4IDEyLjkxOTggOC4yMjU2MSAxMi43ODg0QzguMDI2NDUgMTIuNjU3IDcuODYzMzcgMTIuNDc3OCA3Ljc1MTI4IDEyLjI2NzFWMTQuMzU1NEw3LjQ0MzY4IDE0LjM1NTZaTTcuNzI4NDkgMTAuOTYyMkw3Ljc5MjI5IDExLjU3ODhDNy45MDQ4NSAxMi4yODA2IDguMzE5NzcgMTIuNjk1MiA4Ljk3MTIgMTIuNzczMkM5LjI3NzExIDEyLjgyMzUgOS41OTEgMTIuNzY2MSA5Ljg1OTM3IDEyLjYxMDlDMTAuMTI3NyAxMi40NTU3IDEwLjMzNCAxMi4yMTIyIDEwLjQ0MjkgMTEuOTIxOUMxMC42OTYzIDExLjMxODEgMTAuNjc3NiAxMC42MzQ2IDEwLjM5MjggMTAuMDQ0OUMxMC4yNzY1IDkuNzg0NjkgMTAuMDc4NyA5LjU2OTQyIDkuODI5MjcgOS40MzE1OUM5LjU3OTg0IDkuMjkzNzYgOS4yOTIzMSA5LjI0MDg2IDkuMDEwMTYgOS4yODA4OUM4Ljc0NTMxIDkuMzAwMTYgOC40OTMwNCA5LjQwMTQzIDguMjg4MzkgOS41NzA2NUM4LjA4MzczIDkuNzM5ODYgNy45MzY4NiA5Ljk2ODYgNy44NjgxNyAxMC4yMjUxQzcuODA3NTEgMTAuNDY3OSA3Ljc2MDg4IDEwLjcxMzkgNy43Mjg0OSAxMC45NjJWMTAuOTYyMlpNMTYuNzI4MiAxMS42NzU4QzE2LjY4NSAxMi4wNDU1IDE2LjUwOSAxMi4zODcgMTYuMjMyOSAxMi42MzY3QzE1Ljk1NjggMTIuODg2MyAxNS41OTk1IDEzLjAyNzIgMTUuMjI3MyAxMy4wMzMyQzE0LjAzMjkgMTMuMDkzMyAxMy40NzI0IDEyLjMwMDIgMTMuMzgzMyAxMS4zODQ5QzEzLjMyMTQgMTAuODg3OCAxMy40MDIgMTAuMzgzNCAxMy42MTU5IDkuOTMwNUMxMy43NjQ4IDkuNjE5OCAxNC4wMDg4IDkuMzY0NTYgMTQuMzEyNCA5LjIwMTc2QzE0LjYxNiA5LjAzODk3IDE0Ljk2MzYgOC45NzcwNiAxNS4zMDQ4IDkuMDI1MDJDMTUuNjI5MSA5LjA1MjU5IDE1LjkzNjYgOS4xODE0NiAxNi4xODM2IDkuMzkzNEMxNi40MzA3IDkuNjA1MzMgMTYuNjA0OSA5Ljg4OTYgMTYuNjgxNSAxMC4yMDZDMTYuNzQyMSAxMC40OTQyIDE2Ljc4NjggMTAuNzg1NSAxNi44MTUyIDExLjA3ODZIMTMuNjc4NEMxMy42MjAzIDExLjkwODUgMTQuMDY2MiAxMi41NzU2IDE0LjY5ODIgMTIuNzM2NUMxNS40ODU1IDEyLjkzMDIgMTYuMTU4MyAxMi41ODkxIDE2LjQwMjYgMTEuODQwNkMxNi40NTY4IDExLjY0ODUgMTYuNTU1NyAxMS42MjE0IDE2LjczMDIgMTEuNjc1OEgxNi43MjgyWk0xMy42NzYxIDEwLjgxM0gxNi40ODE5QzE2LjQ2NDMgOS45Mjg5IDE1LjkxMzggOS4yODYzNiAxNS4xNjcyIDkuMjc5MDdDMTQuMzI0MSA5LjI2NTQgMTMuNzEyOCA5Ljg4MjE5IDEzLjY3NjEgMTAuODEzVjEwLjgxM1pNMTcuMzA4MSAxMS42OTUySDE3LjU4MzFDMTcuNTkzMiAxMS44OTc4IDE3LjY1OSAxMi4wOTM3IDE3Ljc3MzIgMTIuMjYxNEMxNy44ODc1IDEyLjQyOSAxOC4wNDU3IDEyLjU2MTkgMTguMjMwNiAxMi42NDU0QzE4LjQ2MjggMTIuNzQ5OCAxOC43MTU1IDEyLjgwMDYgMTguOTcgMTIuNzkzOUMxOS4yMjQ1IDEyLjc4NzIgMTkuNDc0MiAxMi43MjMyIDE5LjcwMDUgMTIuNjA2NkMxOS44MjM5IDEyLjU1MTEgMTkuOTI3MiAxMi40NTkgMTkuOTk2NiAxMi4zNDI4QzIwLjA2NTkgMTIuMjI2NiAyMC4wOTc5IDEyLjA5MiAyMC4wODgzIDExLjk1N0MyMC4wOTU0IDExLjgyNjkgMjAuMDU5OSAxMS42OTc5IDE5Ljk4NzEgMTEuNTg5OEMxOS45MTQzIDExLjQ4MTcgMTkuODA4MyAxMS40MDAyIDE5LjY4NSAxMS4zNTc4QzE5LjM4MjQgMTEuMjQ1MiAxOS4wNjA3IDExLjE4MzIgMTguNzUyNCAxMS4wODQzQzE4LjQzMTYgMTAuOTkzIDE4LjExNzkgMTAuODc4MyAxNy44MTM5IDEwLjc0MTJDMTcuMzE3MiAxMC40OTg4IDE3LjI4NjQgOS41NTQ1NCAxNy44NDg3IDkuMjU1NkMxOC4xMzY3IDkuMDkzMTIgMTguNDYwNyA5LjAwNTMzIDE4Ljc5MTMgOS4wMDAyNEMxOS4xMjE5IDguOTk1MTQgMTkuNDQ4NSA5LjA3MjkxIDE5Ljc0MTMgOS4yMjY0NEMyMC4xMDQ1IDkuNDI2OTUgMjAuMzA1MiA5LjgzMTg0IDIwLjI0NTUgMTAuMjQyN0gyMC4wMDk3QzIwLjAwOTcgMTAuMjMxMyAxOS45ODgzIDEwLjIyMTIgMTkuOTg4MyAxMC4yMDk2QzE5Ljk1OTEgOS40NTc3MSAxOS4zMjcgOS4yMjI1NiAxOC42NDg1IDkuMjg4NjRDMTguNDQzNCA5LjMxMTQzIDE4LjI0OTEgOS4zNzM0IDE4LjA2NjggOS40NjVDMTcuOTU3MiA5LjUxNTA0IDE3Ljg2NTkgOS41OTc5IDE3LjgwNTUgOS43MDIxMkMxNy43NDUxIDkuODA2MzMgMTcuNzE4NiA5LjkyNjc1IDE3LjcyOTYgMTAuMDQ2N0MxNy43Mjk4IDEwLjE2NjcgMTcuNzY3MiAxMC4yODM4IDE3LjgzNjcgMTAuMzgxN0MxNy45MDYxIDEwLjQ3OTYgMTguMDA0MiAxMC41NTM2IDE4LjExNzQgMTAuNTkzNUMxOC40MTM2IDEwLjcwMjIgMTguNzI4IDEwLjc3MiAxOS4wMzQ1IDEwLjg1NzJMMTkuNzc1IDExLjA1MDhDMTkuOTQzMyAxMS4xMDYxIDIwLjA5MDkgMTEuMjExMSAyMC4xOTgyIDExLjM1MjFDMjAuMzA1NSAxMS40OTMgMjAuMzY3NiAxMS42NjMyIDIwLjM3NjEgMTEuODQwMUMyMC40MzUzIDEyLjIzNzcgMjAuMjMyNSAxMi42Mjg1IDE5Ljg3MzkgMTIuODA5NkMxOS4yMjYzIDEzLjE3NiAxOC4xNTk4IDEzLjA3OTIgMTcuNjg0NyAxMi42MTZDMTcuNDQxNiAxMi4zNzE1IDE3LjMwNiAxMi4wMzk1IDE3LjMwODcgMTEuNjk1TDE3LjMwODEgMTEuNjk1MlpNMjMuODY1NiAxMC4yNDI5SDIzLjYwNzdDMjMuNjA3NyAxMC4yMDggMjMuNTk0IDEwLjE3NDUgMjMuNTkwMSAxMC4xNDc5QzIzLjU4NiA5Ljk1NDUzIDIzLjUxNTYgOS43Njg0OSAyMy4zOTA2IDkuNjIwOTNDMjMuMjY1NiA5LjQ3MzM3IDIzLjA5MzcgOS4zNzMyNiAyMi45MDM2IDkuMzM3NEMyMi41NDUyIDkuMjM0NTkgMjIuMTYyOCA5LjI1MzAxIDIxLjgxNTkgOS4zODk4MUMyMS42Nzg3IDkuNDI5MDcgMjEuNTU3OSA5LjUxMTY3IDIxLjQ3MTYgOS42MjUyN0MyMS4zODUyIDkuNzM4ODcgMjEuMzM4IDkuODc3MzcgMjEuMzM2OSAxMC4wMkMyMS4zMzIgMTAuMTYwMSAyMS4zNzU2IDEwLjI5NzYgMjEuNDYwNCAxMC40MDkzQzIxLjU0NTIgMTAuNTIwOSAyMS42NjU5IDEwLjU5OTkgMjEuODAyMiAxMC42MzI3TDIyLjk4MTEgMTAuOTM1M0MyMy4xMDg2IDEwLjk2NTkgMjMuMjM0MSAxMS4wMDQxIDIzLjM1NzEgMTEuMDQ5N0MyMy43MzMgMTEuMTg2NCAyMy45ODgyIDExLjUzNTUgMjMuOTk5NiAxMS45MzQ1QzI0LjAwNTIgMTIuMTI5NyAyMy45NTE3IDEyLjMyMjIgMjMuODQ1OSAxMi40ODY1QzIzLjc0MDIgMTIuNjUwNyAyMy41ODczIDEyLjc3OTIgMjMuNDA3MiAxMi44NTVDMjMuMTMzNiAxMi45NzkzIDIyLjgzNyAxMy4wNDUgMjIuNTM2NSAxMy4wNDgxQzIyLjIzNiAxMy4wNTExIDIxLjkzODEgMTIuOTkxMyAyMS42NjIxIDEyLjg3MjVDMjEuNDM1IDEyLjc3NDYgMjEuMjQzNCAxMi42MDk1IDIxLjExMzEgMTIuMzk5NEMyMC45ODI3IDEyLjE4OTQgMjAuOTE5OSAxMS45NDQ0IDIwLjkzMjkgMTEuNjk3NUgyMS4xODQ5QzIxLjI3OTcgMTIuMTU0MyAyMS41OTM1IDEyLjUzNDggMjIuMDIzOSAxMi43MTQ4QzIyLjQ1NDMgMTIuODk0OCAyMi45NDU4IDEyLjg1MDYgMjMuMzM3MiAxMi41OTczQzIzLjQ1NDcgMTIuNTM2MiAyMy41NTIyIDEyLjQ0MjcgMjMuNjE4MiAxMi4zMjhDMjMuNjg0MSAxMi4yMTMyIDIzLjcxNTkgMTIuMDgxOSAyMy43MDk1IDExLjk0OTdDMjMuNzE1NCAxMS44MTk1IDIzLjY3ODYgMTEuNjkwOSAyMy42MDQ3IDExLjU4MzRDMjMuNTMwOSAxMS40NzYgMjMuNDI0IDExLjM5NTYgMjMuMzAwMyAxMS4zNTQzQzIyLjk5NzcgMTEuMjQxOCAyMi42NzYgMTEuMTgxOSAyMi4zNjc3IDExLjA4MDlDMjIuMDQ1MSAxMC45OTEgMjEuNzI5NiAxMC44Nzc2IDIxLjQyMzUgMTAuNzQxN0MyMC45Mzg2IDEwLjUwMzEgMjAuODk5OSA5LjU2NjYyIDIxLjQ1MjcgOS4yNjc5MUMyMS43NDQyIDkuMDk4NjEgMjIuMDc0NSA5LjAwNzY2IDIyLjQxMTYgOS4wMDM5MUMyMi43NDg3IDkuMDAwMTUgMjMuMDgxIDkuMDgzNzIgMjMuMzc2MiA5LjI0NjQ5QzIzLjU0NSA5LjM0NzI2IDIzLjY4MDkgOS40OTQ5NSAyMy43Njc0IDkuNjcxNTdDMjMuODUzOCA5Ljg0ODIgMjMuODg3IDEwLjA0NjEgMjMuODYyOSAxMC4yNDEzTDIzLjg2NTYgMTAuMjQyOVpNNi45NzQ5OSAxMi45Mzg0QzYuODczNDYgMTIuOTc2OCA2Ljc2MTM5IDEyLjk3NjcgNi42NTk5MyAxMi45MzgxQzYuNTU4NDcgMTIuODk5NSA2LjQ3NDY1IDEyLjgyNTEgNi40MjQyNyAxMi43MjlMNS40MjE3MyAxMS4zNDI1TDUuMjc2MzYgMTEuMTQ4OEw0LjExMjk1IDEyLjczMUM0LjA2NTUzIDEyLjgyMyAzLjk4NjI0IDEyLjg5NDYgMy44ODk4OCAxMi45MzI1QzMuNzkzNTIgMTIuOTcwMyAzLjY4NjY5IDEyLjk3MTcgMy41ODkzNCAxMi45MzY1TDUuMDg4MTUgMTAuOTI1OEwzLjY5MzcgOS4xMDg4N0MzLjkwMDU5IDkuMDM0MTMgNC4xMzExOCA5LjExNTI1IDQuMjQ2MjQgOS4zMDI1NEw1LjI4NTI0IDEwLjcwNjFMNi4zMzA0IDkuMzA4MDFDNi4zNzgxNyA5LjIxNzU3IDYuNDU3NTEgOS4xNDc4NSA2LjU1MzM0IDkuMTEyMDlDNi42NDkxNyA5LjA3NjM0IDYuNzU0NzkgOS4wNzcwNiA2Ljg1MDEzIDkuMTE0MTFMNi4zMDg5OCA5LjgzMjA3TDUuNTc1OTggMTAuNzg2MUM1LjU1NTY0IDEwLjgwNDIgNS41MzkzNiAxMC44MjY1IDUuNTI4MjIgMTAuODUxNEM1LjUxNzA3IDEwLjg3NjMgNS41MTEzMSAxMC45MDMzIDUuNTExMzEgMTAuOTMwNUM1LjUxMTMxIDEwLjk1NzggNS41MTcwNyAxMC45ODQ4IDUuNTI4MjIgMTEuMDA5N0M1LjUzOTM2IDExLjAzNDYgNS41NTU2NCAxMS4wNTY4IDUuNTc1OTggMTEuMDc1TDYuOTcyMDMgMTIuOTM4NEg2Ljk3NDk5Wk0xMy4zMzg5IDkuMDg5NVY5LjM2MjkyQzEzLjE0MjggOS4zNTAwNiAxMi45NDYxIDkuMzc4NDYgMTIuNzYxNyA5LjQ0NjI5QzEyLjU3NzIgOS41MTQxMiAxMi40MDkgOS42MTk4OCAxMi4yNjggOS43NTY3M0MxMi4xMjY5IDkuODkzNTkgMTIuMDE2MSAxMC4wNTg1IDExLjk0MjcgMTAuMjQwOEMxMS44NjkzIDEwLjQyMzEgMTEuODM1IDEwLjYxODggMTEuODQxOSAxMC44MTUyQzExLjg0MTkgMTEuNDUzOCAxMS44NDE5IDEyLjA5MjQgMTEuODQxOSAxMi43MzFWMTIuOTQ4MkgxMS41NjQ2VjkuMTA2NTlIMTEuODM4VjkuODkzODJDMTIuMTczNCA5LjMxOTYzIDEyLjY5MTEgOS4xMDY1OSAxMy4zNDA3IDkuMDkxMDlMMTMuMzM4OSA5LjA4OTVaTTAuMDAwNDU1Nzc5IDEwLjkwMDdMMC4xMjI1ODQgMTAuMjk3NkMwLjQ1Nzk4MiA5LjEwNDk5IDEuODI1MDkgOC42MDg3MyAyLjc2NTY2IDkuMzQ3NDNDMy4zMTYzOCA5Ljc3OTg5IDMuNDUzNzcgMTAuMzkyNiAzLjQyNjg5IDExLjA4M0gwLjMyNDIzM0MwLjI3NDEwNSAxMi4zMTYxIDEuMTYzODcgMTMuMDYwNyAyLjMwMTk4IDEyLjY4MDdDMi42NzcwMyAxMi41NDQgMi45NTkzNCAxMi4yMzIzIDMuMDUyMyAxMS44NDQ5QzMuMTEyNDUgMTEuNjUxMiAzLjIxMTc5IDExLjYxOCAzLjM5MzYyIDExLjY3NEMzLjM2MzMgMTEuOTEwMSAzLjI3OTg0IDEyLjEzNjIgMy4xNDk1MiAxMi4zMzU0QzMuMDE5MjEgMTIuNTM0NiAyLjg0NTQzIDEyLjcwMTYgMi42NDEyNSAxMi44MjRDMi4zMDM5MyAxMy4wMDg1IDEuOTE2OTIgMTMuMDgxNiAxLjUzNTU1IDEzLjAzMjhDMS4xNTQxOCAxMi45ODQxIDAuNzk3OTkgMTIuODE2IDAuNTE3OTA2IDEyLjU1MjZDMC4yNDA4MzkgMTIuMjQxMSAwLjA3MzU5NjEgMTEuODQ3NCAwLjA0MTAxMzMgMTEuNDMxNkMwLjA0MTAxMzMgMTEuMzYzMiAwLjAxODIyODIgMTEuMjk5NCAwLjAwMjI3ODU3IDExLjIzNzlDMC4wMDA3NTk1NTcgMTEuMTIyOSAwIDExLjAxMDUgMCAxMC45MDA3SDAuMDAwNDU1Nzc5Wk0wLjMyODEwNiAxMC44MTczSDMuMTMzODdDMy4xMTYzMiA5LjkyMzQ0IDIuNTUyMTYgOS4yODkzMyAxLjc5OTggOS4yODM0QzAuOTYyMjE3IDkuMjcyMDEgMC4zNjI5NjcgOS44OTIyMiAwLjMyNjA1NiAxMC44MTM0TDAuMzI4MTA2IDEwLjgxNzNaIiBmaWxsPSJibGFjayIvPgo8L3N2Zz4K) Express This template demonstrates building the Express framework for Platform.sh. It includes a minimalist application skeleton that demonstrates how to connect to a MariaDB server. It is intended for you to use as a starting point and modify for your own needs. Express is a minimalist web framework written in Node.js. ###### Features: - Node.js 14 - MariaDB 10.4 - Automatic TLS certificates - npm-based build View the [repository on GitHub](https://github.com/platformsh-templates/express). ![Deploy on ](https://platform.sh/images/deploy/lg-blue.svg) Gatsby ![Gatsby](data:image/svg+xml,%3Csvg xmlns='http://www.w3.org/2000/svg' width='225' height='225'%3E%3Cg %3E%3Cpath d='M112.5 0A112.5 112.5 0 1 0 225 112.5 112.5 112.5 0 0 0 112.5 0zM24.17 113.67l87.16 87.16a88.35 88.35 0 0 1-87.16-87.16zm108.1 85L26.38 92.73a88.35 88.35 0 0 1 157.54-32.22L171.69 71.3a72.13 72.13 0 0 0-127 16.64l92.38 92.38a72.26 72.26 0 0 0 45.46-50.51h-38.3V112.5h56.61a88.38 88.38 0 0 1-68.57 86.12z' style='fill:%23744c9e' /%3E%3C/g%3E%3C/svg%3E) Gatsby This template builds a simple application using Gatsby. Gatsby is a free and open source framework based on React that helps developers build blazing fast websites and apps. The website is statically generated by a Node.js application during the build step, and then served statically at runtime. Gatsby is a free and open source framework based on React that helps developers build blazing fast websites and apps. ###### Features: - Node.js 16 - Automatic TLS certificates - yarn-based build View the [repository on GitHub](https://github.com/platformsh-templates/gatsby). ![Deploy on ](https://platform.sh/images/deploy/lg-blue.svg) Koa ![Koa](data:image/svg+xml,%3Csvg xmlns='http://www.w3.org/2000/svg' width='105.6' height='225'%3E%3Cg %3E%3Cpath d='M21 0v149.43L87 75h3l-48.89 55.23L105.6 225h-21L29 143.31l-8.1 9.32V225H0V0z' style='fill:%2316111c' /%3E%3C/g%3E%3C/svg%3E) Koa This template demonstrates building the Koa framework for Platform.sh. It includes a minimalist application skeleton that demonstrates how to connect to a MariaDB server for data storage. It is intended for you to use as a starting point and modify for your own needs. Koa is a lightweight web microframework for Node.js. ###### Features: - Node.js 10 - MariaDB 10.2 - Automatic TLS certificates - npm-based build View the [repository on GitHub](https://github.com/platformsh-templates/koa). ![Deploy on ](https://platform.sh/images/deploy/lg-blue.svg) Next.js ![Next.js](data:image/svg+xml;base64,PHN2ZyB3aWR0aD0iMjQiIGhlaWdodD0iMjQiIHZpZXdCb3g9IjAgMCAyNCAyNCIgZmlsbD0ibm9uZSIgeG1sbnM9Imh0dHA6Ly93d3cudzMub3JnLzIwMDAvc3ZnIj4KPHBhdGggZD0iTTUuNjYyOTkgOC43ODE4SDEwLjE4OTZWOS4xNDIxMUg2LjA3NzkzVjExLjg1MzlIOS45NDQ0MlYxMi4yMTQySDYuMDc3OTNWMTUuMTkxNEgxMC4yMzY4VjE1LjU1MThINS42NjI5OVY4Ljc4MThaTTEwLjU5NTEgOC43ODE4SDExLjA3NjFMMTMuMjA3NCAxMS43NTkxTDE1LjM4NTggOC43ODE4TDE4LjM0ODggNUwxMy40ODA4IDEyLjA3MkwxNS45ODkzIDE1LjU1MThIMTUuNDg5NUwxMy4yMDc0IDEyLjM4NDlMMTAuOTE1OCAxNS41NTE4SDEwLjQyNTRMMTIuOTUyNyAxMi4wNzJMMTAuNTk1MSA4Ljc4MThaTTE2LjE2ODUgOS4xNDIxMVY4Ljc4MThIMjEuMzI3VjkuMTQyMTFIMTguOTUwNVYxNS41NTE4SDE4LjUzNTZWOS4xNDIxMUgxNi4xNjg1Wk0wIDguNzgxOEgwLjUxODY3NUw3LjY3MDkgMTkuNUw0LjcxNTIzIDE1LjU1MThMMC40MzM4MDEgOS4yOTM4MkwwLjQxNDk0IDE1LjU1MThIMFY4Ljc4MThaTTIxLjI4NTIgMTUuMDgyN0MyMS4yMDA0IDE1LjA4MjcgMjEuMTM2OCAxNS4wMTY5IDIxLjEzNjggMTQuOTMxOUMyMS4xMzY4IDE0Ljg0NjkgMjEuMjAwNCAxNC43ODExIDIxLjI4NTIgMTQuNzgxMUMyMS4zNzEgMTQuNzgxMSAyMS40MzM1IDE0Ljg0NjkgMjEuNDMzNSAxNC45MzE5QzIxLjQzMzUgMTUuMDE2OSAyMS4zNzEgMTUuMDgyNyAyMS4yODUyIDE1LjA4MjdaTTIxLjY5MjkgMTQuNjg2SDIxLjkxNDlDMjEuOTE4IDE0LjgwNjQgMjIuMDA1OCAxNC44ODc0IDIyLjEzNDkgMTQuODg3NEMyMi4yNzkzIDE0Ljg4NzQgMjIuMzYxIDE0LjgwMDQgMjIuMzYxIDE0LjYzNzRWMTMuNjA1MkgyMi41ODcxVjE0LjYzODRDMjIuNTg3MSAxNC45MzE5IDIyLjQxNzUgMTUuMTAwOSAyMi4xMzcgMTUuMTAwOUMyMS44NzM2IDE1LjEwMDkgMjEuNjkyOSAxNC45MzcgMjEuNjkyOSAxNC42ODZaTTIyLjg4MjggMTQuNjcyOEgyMy4xMDY4QzIzLjEyNiAxNC44MTE1IDIzLjI2MTIgMTQuODk5NSAyMy40NTYgMTQuODk5NUMyMy42Mzc3IDE0Ljg5OTUgMjMuNzcwOSAxNC44MDU0IDIzLjc3MDkgMTQuNjc1OUMyMy43NzA5IDE0LjU2NDYgMjMuNjg2MSAxNC40OTc4IDIzLjQ5MzQgMTQuNDUyMkwyMy4zMDU2IDE0LjQwNjdDMjMuMDQyMiAxNC4zNDUgMjIuOTIyMSAxNC4yMTc0IDIyLjkyMjEgMTQuMDAyOUMyMi45MjIxIDEzLjc0MjggMjMuMTM0MSAxMy41Njk4IDIzLjQ1MiAxMy41Njk4QzIzLjc0NzcgMTMuNTY5OCAyMy45NjM3IDEzLjc0MjggMjMuOTc2OCAxMy45ODg3SDIzLjc1NjhDMjMuNzM1NiAxMy44NTQxIDIzLjYxODUgMTMuNzcwMSAyMy40NDkgMTMuNzcwMUMyMy4yNzAzIDEzLjc3MDEgMjMuMTUxMiAxMy44NTYyIDIzLjE1MTIgMTMuOTg3N0MyMy4xNTEyIDE0LjA5MiAyMy4yMjc5IDE0LjE1MTcgMjMuNDE3NyAxNC4xOTYyTDIzLjU3ODEgMTQuMjM1N0MyMy44NzY5IDE0LjMwNTUgMjQgMTQuNDI2OSAyNCAxNC42NDY1QzI0IDE0LjkyNTkgMjMuNzg0IDE1LjEwMDkgMjMuNDM4OSAxNS4xMDA5QzIzLjExNTkgMTUuMTAwOSAyMi44OTg5IDE0LjkzMzkgMjIuODgyOCAxNC42NzI4WiIgZmlsbD0iYmxhY2siLz4KPC9zdmc+Cg==) Next.js This template builds a simple application using the Next.js web framework. It includes a minimal application skeleton that demonstrates how to set up an optimized build using Next.js and Yarn, as well as how to begin defining individual pages (such as the ``/api/hello``) endpoint that comes pre-defined with this template. Next.js is an open-source web framework written for Javascript. ###### Features: - Node.js 14 - Automatic TLS certificates - yarn-based build View the [repository on GitHub](https://github.com/platformsh-templates/nextjs). ![Deploy on ](https://platform.sh/images/deploy/lg-blue.svg) NuxtJS ![NuxtJS](data:image/svg+xml;base64,PHN2ZyB3aWR0aD0iMjQiIGhlaWdodD0iMjQiIHZpZXdCb3g9IjAgMCAyNCAyNCIgZmlsbD0ibm9uZSIgeG1sbnM9Imh0dHA6Ly93d3cudzMub3JnLzIwMDAvc3ZnIj4KPGcgY2xpcC1wYXRoPSJ1cmwoI2NsaXAwXzY2NzRfMTU0NjApIj4KPHBhdGggZmlsbC1ydWxlPSJldmVub2RkIiBjbGlwLXJ1bGU9ImV2ZW5vZGQiIGQ9Ik03LjMwNDIxIDIwLjM4OUM3LjI4NjQzIDIwLjM1NzEgNy4yNzA3NSAyMC4zMjM5IDcuMjU3MjcgMjAuMjg5OUM3LjE2MTExIDIwLjA2NjMgNy4xMzE0NiAxOS44MTkyIDcuMTcxOTQgMTkuNTc4OUgxLjUwMDQ3TDkuOTI3MTQgNC41OTc2N0wxMi42OTQxIDkuNTEwMjRMMTMuNDk2MiA4LjA3NjMzTDExLjA4NjYgMy43ODUzN0MxMS4wMTgzIDMuNjYxNDcgMTAuNjEwOSAzIDkuOTA5MDEgM0M5LjU4OTAxIDMgOS4xMzY3NCAzLjEzODk3IDguNzY2NjEgMy43OTUwNkwwLjIyNzk0IDE4Ljk1NzNDMC4xNTU0MDcgMTkuMDg4NyAtMC4xOTg3MjcgMTkuNzc4MiAwLjE1MzI3MyAyMC4zODlDMC4zMTMyNzMgMjAuNjY3IDAuNjUzNTQgMjAuOTk3NyAxLjQwMzQxIDIwLjk5NzdIOC41NTAwN0M3LjgwODc0IDIwLjk5NzcgNy40Njc0MSAyMC42NjggNy4zMDQyMSAyMC4zODlaIiBmaWxsPSIjMDBDNThFIi8+CjxwYXRoIGZpbGwtcnVsZT0iZXZlbm9kZCIgY2xpcC1ydWxlPSJldmVub2RkIiBkPSJNMjMuNzQ3IDE4Ljk1NzNMMTYuNzMwNCA2LjQ3MzI5QzE2LjY1NzkgNi4zNDI5MyAxNi4yNTI2IDUuNjc4MjIgMTUuNTQ3NSA1LjY3ODIyQzE1LjIyNzUgNS42NzgyMiAxNC43NzUyIDUuODE1MDQgMTQuNDA2MiA2LjQ3MTEzTDEzLjQ5ODQgOC4wNzYzNEwxNC4zMDU5IDkuNTEwMjVMMTUuNTU1IDcuMjc2OTdMMjIuNDk2OCAxOS41Nzg5SDE5Ljg1NjhDMTkuODkwNyAxOS43ODIxIDE5Ljg3MiAxOS45OTA2IDE5LjgwMjQgMjAuMTg0M0MxOS43ODc3IDIwLjIyNzIgMTkuNzY5MSAyMC4yNjg3IDE5Ljc0NyAyMC4zMDgyTDE5LjcyNDYgMjAuMzUzNUMxOS4zNjk0IDIwLjk2NDMgMTguNjAyNCAyMC45OTk5IDE4LjQ1MiAyMC45OTk5SDIyLjU4MjJDMjIuNzM0NyAyMC45OTk5IDIzLjQ5OTUgMjAuOTY2NSAyMy44NTM2IDIwLjM1MzVDMjQuMDExNSAyMC4wNzU1IDI0LjEyMzUgMTkuNjA5MSAyMy43NDcgMTguOTU3M1oiIGZpbGw9IiMxMDg3NzUiLz4KPHBhdGggZD0iTTE5LjcyNDYgMjAuMzUzOEwxOS43NDcgMjAuMzA4NkMxOS43NjkxIDIwLjI2OSAxOS43ODc3IDIwLjIyNzYgMTkuODAyNCAyMC4xODQ3QzE5Ljg3MiAxOS45OTEgMTkuODkwNyAxOS43ODI0IDE5Ljg1NjggMTkuNTc5MkMxOS44MTgzIDE5LjM1OTcgMTkuNzQwNiAxOS4xNDkgMTkuNjI3NSAxOC45NTc2TDE0LjMxMDIgOS41MTA1N0wxMy40OTg0IDguMDc2NjZMMTIuNjk0MiA5LjUxMDU3TDcuMzc2ODMgMTguOTU3NkM3LjI3MzM5IDE5LjE1MTIgNy4yMDQwOSAxOS4zNjE2IDcuMTcyMDMgMTkuNTc5MkM3LjEyOTIxIDE5LjgxODggNy4xNTYyNiAyMC4wNjU5IDcuMjQ5OSAyMC4yOTAyQzcuMjYzMzcgMjAuMzI0MyA3LjI3OTA1IDIwLjM1NzQgNy4yOTY4MyAyMC4zODk0QzcuNDU2ODMgMjAuNjY3MyA3Ljc5NzEgMjAuOTk4IDguNTQ2OTcgMjAuOTk4SDE4LjQ0NDZDMTguNjAyNCAyMC45OTggMTkuMzY5NCAyMC45NjQ2IDE5LjcyNDYgMjAuMzUzOFpNMTMuNDk4NCAxMC45NDQ1TDE4LjM1NzEgMTkuNTc5Mkg4LjY0MDgzTDEzLjQ5ODQgMTAuOTQ0NVoiIGZpbGw9ImJsYWNrIi8+CjwvZz4KPGRlZnM+CjxjbGlwUGF0aCBpZD0iY2xpcDBfNjY3NF8xNTQ2MCI+CjxyZWN0IHdpZHRoPSIyNCIgaGVpZ2h0PSIyNCIgZmlsbD0id2hpdGUiLz4KPC9jbGlwUGF0aD4KPC9kZWZzPgo8L3N2Zz4K) NuxtJS This template builds a simple application using the NuxtJS web framework that can be used as a starting point. NuxtJS is an open-source web framework based on Vue.js. ###### Features: - Node.js 18 - Automatic TLS certificates - yarn-based build View the [repository on GitHub](https://github.com/platformsh-templates/nuxtjs). ![Deploy on ](https://platform.sh/images/deploy/lg-blue.svg) strapi4 ![strapi4](data:image/svg+xml;base64,PD94bWwgdmVyc2lvbj0iMS4wIiBlbmNvZGluZz0iVVRGLTgiPz4KPHN2ZyB3aWR0aD0iMjQ0cHgiIGhlaWdodD0iMjQ0cHgiIHZpZXdCb3g9IjAgMCAyNDQgMjQ0IiB2ZXJzaW9uPSIxLjEiIHhtbG5zPSJodHRwOi8vd3d3LnczLm9yZy8yMDAwL3N2ZyIgeG1sbnM6eGxpbms9Imh0dHA6Ly93d3cudzMub3JnLzE5OTkveGxpbmsiPgogICAgPCEtLSBHZW5lcmF0b3I6IFNrZXRjaCA1NS4yICg3ODE4MSkgLSBodHRwczovL3NrZXRjaGFwcC5jb20gLS0+CiAgICA8dGl0bGU+TG9nbzwvdGl0bGU+CiAgICA8ZGVzYz5DcmVhdGVkIHdpdGggU2tldGNoLjwvZGVzYz4KICAgIDxnIGlkPSJTb2NpYWwtQ292ZXIiIHN0cm9rZT0ibm9uZSIgc3Ryb2tlLXdpZHRoPSIxIiBmaWxsPSJub25lIiBmaWxsLXJ1bGU9ImV2ZW5vZGQiPgogICAgICAgIDxnIGlkPSJNb25vZ3JhbS1XaGl0ZS1CYWNrZ3JvdW5kIiB0cmFuc2Zvcm09InRyYW5zbGF0ZSgtNTY3LjAwMDAwMCwgLTM1Ny4wMDAwMDApIiBmaWxsPSIjOEU3NUZGIj4KICAgICAgICAgICAgPGcgaWQ9IkxvZ28iIHRyYW5zZm9ybT0idHJhbnNsYXRlKDU2NC4wMDAwMDAsIDM1Ny4wMDAwMDApIj4KICAgICAgICAgICAgICAgIDxnIGlkPSJNb25vZ3JhbSIgdHJhbnNmb3JtPSJ0cmFuc2xhdGUoMC4wMDAwMDAsIDAuNzYwMzA1KSI+CiAgICAgICAgICAgICAgICAgICAgPHBhdGggZD0iTTE2NC44OTI2NjIsMTY1LjA3MjQ4IEwxNjQuODkyNjYyLDg2LjM0MzU2NSBDMTY0Ljg5MjY2Miw4My41Mzk1NTI3IDE2Mi42MTk1NjEsODEuMjY2NDUxNiAxNTkuODE1NTQ5LDgxLjI2NjQ1MTYgTDgxLjE3NzkyNiw4MS4yNjY0NTE2IEw4MS4xNzc5MjYsMCBMMjQwLjk5MzQ3NSwwIEMyNDMuNzk3NDg3LC0xLjU0NTc4NjhlLTE0IDI0Ni4wNzA1ODgsMi4yNzMxMDExIDI0Ni4wNzA1ODgsNS4wNzcxMTM0IEwyNDYuMDcwNTg4LDE2NS4wNzI0OCBMMTY0Ljg5MjY2MiwxNjUuMDcyNDggWiIgaWQ9IkNvbWJpbmVkLVNoYXBlLUNvcHkiPjwvcGF0aD4KICAgICAgICAgICAgICAgICAgICA8cGF0aCBkPSJNODEuMTc3OTI2LDAgTDgxLjE3NzkyNiw4MS4yNjY0NTE2IEw2LjEyMzg5Nzg3LDgxLjI2NjQ1MTYgQzQuNzIxODkxNzEsODEuMjY2NDUxNiAzLjU4NTM0MTE2LDgwLjEyOTkwMSAzLjU4NTM0MTE2LDc4LjcyNzg5NDkgQzMuNTg1MzQxMTYsNzguMDU1MTA3MSAzLjg1MjQxNTgyLDc3LjQwOTgzNDYgNC4zMjc4ODkyNiw3Ni45MzM4NDI3IEw4MS4xNzc5MjYsMCBaIiBpZD0iUmVjdGFuZ2xlLUNvcHktNiIgb3BhY2l0eT0iMC40MDQ5ODkiPjwvcGF0aD4KICAgICAgICAgICAgICAgICAgICA8cGF0aCBkPSJNMjQ2LjA3MDU4OCwxNzEuMjA1ODI0IEwyNDYuMDcwNTg4LDI0Ni4zMzg5MzEgTDE2NC44OTI2NjIsMjQ2LjMzODkzMSBMMjQxLjczNjAyMywxNjkuNDExNzcyIEMyNDIuNzI2ODUxLDE2OC40MTk4NjQgMjQ0LjMzNDE3NiwxNjguNDE4OTg4IDI0NS4zMjYwODQsMTY5LjQwOTgxNiBDMjQ1LjgwMjc1NCwxNjkuODg1OTY3IDI0Ni4wNzA1ODgsMTcwLjUzMjA3OCAyNDYuMDcwNTg4LDE3MS4yMDU4MjQgWiIgaWQ9IlJlY3RhbmdsZS1Db3B5LTciIG9wYWNpdHk9IjAuNDA0OTg5IiB0cmFuc2Zvcm09InRyYW5zbGF0ZSgyMDUuNDgxNjI1LCAyMDUuNzA1NzA2KSBzY2FsZSgtMSwgLTEpIHRyYW5zbGF0ZSgtMjA1LjQ4MTYyNSwgLTIwNS43MDU3MDYpICI+PC9wYXRoPgogICAgICAgICAgICAgICAgICAgIDxwYXRoIGQ9Ik04MS4xNzc5MjYsODEuMjY2NDUxNiBMMTYyLjM1NDEwNiw4MS4yNjY0NTE2IEMxNjMuNzU2MTEyLDgxLjI2NjQ1MTYgMTY0Ljg5MjY2Miw4Mi40MDMwMDIxIDE2NC44OTI2NjIsODMuODA1MDA4MyBMMTY0Ljg5MjY2MiwxNjUuMDcyNDggTDg2LjI1NTAzOTQsMTY1LjA3MjQ4IEM4My40NTEwMjcxLDE2NS4wNzI0OCA4MS4xNzc5MjYsMTYyLjc5OTM3OSA4MS4xNzc5MjYsMTU5Ljk5NTM2NiBMODEuMTc3OTI2LDgxLjI2NjQ1MTYgWiIgaWQ9IlJlY3RhbmdsZS1Db3B5LTgiIG9wYWNpdHk9IjAuNDA0OTg5Ij48L3BhdGg+CiAgICAgICAgICAgICAgICA8L2c+CiAgICAgICAgICAgIDwvZz4KICAgICAgICA8L2c+CiAgICA8L2c+Cjwvc3ZnPg==) strapi4 This template builds a Strapi version 4 backend for Platform.sh, which can be used to quickly create an API that can be served by itself or as a Headless CMS data source for another frontend application in the same project. This repository does not include a frontend application, but you can add one of your choice and access Strapi by defining it in a relationship in your frontend's ``.platform.app.yaml`` file. Strapi is a Headless CMS framework written in Node.js. ###### Features: - Node.js 12 - PostgreSQL 12 - Automatic TLS certificates - yarn-based build View the [repository on GitHub](https://github.com/platformsh-templates/strapi4). ![Deploy on ](https://platform.sh/images/deploy/lg-blue.svg) #### Debugging p:last-child]:mb-0 [&>h3]:mt-0 rounded-lg" > ####### Note You can now use composable image (BETA) to install runtimes and tools in your application container. To find out more, see the [dedicated documentation page](https://docs.platform.sh/create-apps/app-reference/composable-image.md). Effectively debugging web apps takes effort, especially when an HTTP request goes through multiple layers before reaching your web app. Follow the steps below to debug a specific app. You can choose to debug in an environment deployed to Platform.sh or with your app running locally but connected to deployed services. In either case, make sure to debug in a preview environment. For more general information, see how to [troubleshoot development](https://docs.platform.sh/development/troubleshoot.md). ###### 1. Create a new environment Start by creating a new environment completely isolated from production but with the same data for debugging: ```bash platform branch debug-branch ``` ###### 2. Get access To access deployed apps and services, open tunnels to everything your app has relationships with: ```bash {} platform tunnel:open ``` In the same terminal, set the relevant environment variables: ```bash {} export PLATFORM_RELATIONSHIPS="$(platform tunnel:info --encode)" export PORT=8888 ``` ###### 3. Run your app in inspect mode In the same terminal as the previous step, run the following command: ```bash {} node --inspect ``` Replace `` with the file defined for [your app's `start` command](https://docs.platform.sh/languages/nodejs.md#4-start-your-app). You get output something like this: ```bash Debugger listening on ws://127.0.0.1:9229/10701e5d-d627-4180-a967-d47a924c93c0 For help, see: https://nodejs.org/en/docs/inspector Listening on port 8888 ``` ###### 4. (If debugging remotely) Forward the debugger port locally In another terminal, create an SSH tunnel that forwards to the 9229 port: ```bash ssh -N -L 9229:localhost:9229 $(platform ssh --pipe) ``` ###### 5. Connect the debugger You can now connect the debugger as if you were debugging a local application. See examples with some common tools: Use the ``Node.js: Attach`` debugger option. If you haven’t created the option: - On the **Run and Debug** tab, click ``create a launch.json file``. - Select ``Node.js`` as the environment. - In the ``configurations`` array, start IntelliSense (usually ctrl+space). - Select ``Node.js: Attach``. - Make sure the port is the same as in [step 4 above](#4-if-debugging-remotely-forward-the-debugger-port-locally). Once you have the option: In the **Run and Debug** tab, select ``Attach`` from the menu and click **Start Debugging** (the green arrow). See more on [Node.js debugging in Visual Studio Code](https://code.visualstudio.com/docs/nodejs/nodejs-debugging). Now when you load the site at your deployed URL (if debugging remote) or localhost (if debugging locally), the local debugger you've attached is called. Set breakpoints: Directly in your source files. ###### Other issues ####### pm2 process manager blocks other processes If you're using the [`pm2` process manager](https://github.com/unitech/pm2) to start your app from a script, you might find it daemonizes itself and blocks other processes (such as backups) by constantly respawning. This may happen even if you use the `--no-daemon` flag. Instead of using a script, call `pm2 start` directly in your [`start` command](https://docs.platform.sh/languages/nodejs.md#4-start-your-app). #### Manage Node.js versions p:last-child]:mb-0 [&>h3]:mt-0 rounded-lg" > ####### Note You can now use composable image (BETA) to install runtimes and tools in your application container. To find out more, see the [dedicated documentation page](https://docs.platform.sh/create-apps/app-reference/composable-image.md). Each Platform.sh container image includes a specific language in a specific version. A set of dependencies is also provided based on that language version. This ensures that your application container is as small and efficient as possible. Therefore, by default, when you use a Platform.sh container image, you use the Node.js version that's included in that image, if any. If you want to use a different Node.js version, use a version manager to install it yourself. You can use one of the following version managers: - [Use `n`](#use-n) - [Use `nvm`](#use-nvm) Both of the recommendations use a `.nvmrc` file to specify the desired Node.js version. You could also specify a different file or use [environment variables](https://docs.platform.sh/development/variables.md). ###### Use `n` The [`n` package](https://github.com/tj/n) works for various Unix-like systems, including Windows Subsystem for Linux. 1. Add the desired Node.js version to your environment using `.nvmrc`, `.n-node-version`, `.node-version`, or `package.json`. Create a ``.n-node-version`` or ``.node-version`` file in [your app root](https://docs.platform.sh/create-apps/app-reference/single-runtime-image.md#root-directory): ```yaml {location=".n-node-version or .node-version"} 16.13.2 ``` Add an ``engines.node`` property to your ``package.json``. This property accepts either an exact version or a range: ```json {location="package.json"} { "engines": { "node": ">=0.10.3 <15" } } ``` 2. Add it as a dependency: ```yaml {location=".platform.app.yaml"} dependencies: nodejs: n: "*" ``` Adding it as a dependency ensures it's cached for future builds. 3. Set the location of the `n` files using the `N_PREFIX` environment variable: ```yaml {location=".platform.app.yaml"} variables: env: N_PREFIX: /app/.global ``` 4. Install the specified version of Node.js in a [`build` hook](https://docs.platform.sh/create-apps/hooks/hooks-comparison.md#build-hook): ```yaml {location=".platform.app.yaml"} hooks: build: | # Exit the hook on any failure set -e # Install the version specified in the .nvmrc file n auto # Reset the location hash to recognize the newly installed version hash -r ``` Now your hooks should be able to use the specified version of Node.js. You can verify this by running `node -v`. Your final app configuration should look something like this: ```yaml {location=".platform.app.yaml"} name: myapp type: 'python:3.9' dependencies: nodejs: n: "*" variables: env: N_PREFIX: /app/.global hooks: build: | # Exit the hook on any failure set -e # Install the version specified in the .nvmrc file n auto # Reset the location hash to recognize the newly installed version hash -r ``` ###### Use `nvm` [Node Version Manager (`nvm`)](https://github.com/nvm-sh/nvm) is a bash script for managing Node.js versions. You can use it to: - Make a specific version available in the build and optionally the runtime container. - Control the specific versions to be installed with [environment variables](https://docs.platform.sh/development/variables.md), meaning you can also have different versions in different environments. To use `nvm`, follow these steps: 1. Define which `nvm` version to use using an [environment variable](https://docs.platform.sh/development/variables.md). Add it to your [app configuration](https://docs.platform.sh/create-apps/_index.md): ```yaml {location=".platform.app.yaml"} variables: env: # Update for your desired NVM version. NVM_VERSION: v0.39.3 ``` 2. Define your desired Node.js version using an environment variable. For your base version, set it in your app configuration: ```yaml {location=".platform.app.yaml"} variables: env: # Update these for your desired NVM and Node versions. NVM_VERSION: v0.39.3 NODE_VERSION: v18.14.2 ``` To get different versions in different environments, [set environment-specific variables](https://docs.platform.sh/development/variables/set-variables.md#create-environment-specific-variables). 3. Add a `.nvm` directory to your cache in your [build hook](https://docs.platform.sh/create-apps/hooks/_index.md): ```yaml {location=".platform.app.yaml"} hooks: build: | set -e unset NPM_CONFIG_PREFIX export NVM_DIR="$PLATFORM_APP_DIR/.nvm" # Link cache with app if [ ! -d "$PLATFORM_CACHE_DIR/.nvm" ]; then mkdir -p $PLATFORM_CACHE_DIR/.nvm fi ln -s $PLATFORM_CACHE_DIR/.nvm $NVM_DIR ``` **Note**: Instead of using a symlink between your cache and application directories, you might need to copy the content of ``$PLATFORM_CACHE_DIR/.nvm`` into ``$PLATFORM_APP_DIR/.nvm`` manually. To do so, run the following command: ```bash {} rsync -av $PLATFORM_CACHE_DIR/.nvm $PLATFORM_APP_DIR ``` 4. Use the cache directory and install based on the variables if not present: ```yaml {location=".platform.app.yaml"} hooks: build: | ... # Check for Node.js version and install if not present if [ ! -d "$PLATFORM_CACHE_DIR/.nvm/versions/node/$NODE_VERSION" ]; then # Get nvm install script if correct version not present export NVM_INSTALL_FILE="${PLATFORM_CACHE_DIR}/nvm_${NVM_VERSION}_install.sh" if [ ! -f "$NVM_INSTALL_FILE" ]; then wget -nc -O "$NVM_INSTALL_FILE" "https://raw.githubusercontent.com/nvm-sh/nvm/$NVM_VERSION/install.sh" fi # Install, automatically using NODE_VERSION bash $NVM_INSTALL_FILE fi # Activate nvm [ -s "$NVM_DIR/nvm.sh" ] && \. "$NVM_DIR/nvm.sh" # Use the specified version nvm use "$NODE_VERSION" ``` 5. Optional: To use the specified Node.js version in the runtime container and not just the build, activate `nvm` via [script](https://docs.platform.sh/development/variables/set-variables.md#set-variables-via-script): ```bash {location=".environment"} unset NPM_CONFIG_PREFIX export NVM_DIR="$PLATFORM_APP_DIR/.nvm" [ -s "$NVM_DIR/nvm.sh" ] && \. "$NVM_DIR/nvm.sh" ``` Your final app configuration should look something like the following: ```yaml {location=".platform.app.yaml"} name: myapp type: 'python:3.9' variables: env: # Update these for your desired NVM and Node versions. NVM_VERSION: v0.39.3 NODE_VERSION: v18.14.2 hooks: build: | set -e unset NPM_CONFIG_PREFIX export NVM_DIR="$PLATFORM_APP_DIR/.nvm" # Link cache with app if [ ! -d "$PLATFORM_CACHE_DIR/.nvm" ]; then mkdir -p $PLATFORM_CACHE_DIR/.nvm fi ln -s $PLATFORM_CACHE_DIR/.nvm $NVM_DIR # Check for Node.js version and install if not present if [ ! -d "$PLATFORM_CACHE_DIR/.nvm/versions/node/$NODE_VERSION" ]; then # Get nvm install script if correct version not present export NVM_INSTALL_FILE="${PLATFORM_CACHE_DIR}/nvm_${NVM_VERSION}_install.sh" if [ ! -f "$NVM_INSTALL_FILE" ]; then wget -nc -O "$NVM_INSTALL_FILE" "https://raw.githubusercontent.com/nvm-sh/nvm/$NVM_VERSION/install.sh" fi # Install, automatically using NODE_VERSION bash $NVM_INSTALL_FILE fi # Activate nvm [ -s "$NVM_DIR/nvm.sh" ] && \. "$NVM_DIR/nvm.sh" # Use the specified version nvm use "$NODE_VERSION" ``` ### Lisp p:last-child]:mb-0 [&>h3]:mt-0 rounded-lg" > ###### Note You can now use composable image (BETA) to install runtimes and tools in your application container. To find out more, see the [dedicated documentation page](https://docs.platform.sh/create-apps/app-reference/composable-image.md). Platform.sh supports building and deploying applications written in Lisp using Common Lisp (the SBCL version) with ASDF and Quick Lisp support. They’re compiled during the Build phase, and support both committed dependencies and download-on-demand. ##### Supported versions You can select the major and minor version. Patch versions are applied periodically for bug fixes and the like. When you deploy your app, you always get the latest available patches. | Grid and Dedicated Gen 3 | Dedicated Gen 2 | | - 2.1 - 2.0 - 1.5 None available ###### Specify the language To use Lisp, specify `lisp` as your [app's `type`](https://docs.platform.sh/create-apps/app-reference/single-runtime-image.md#types): ```yaml {location=".platform.app.yaml"} type: 'lisp:' ``` For example: ```yaml {location=".platform.app.yaml"} type: 'lisp:2.1' ``` ##### Assumptions Platform.sh is making assumptions about your application to provide a more streamlined experience. These assumptions are the following: - Your `.asd` file is named like your system name. For example `example.asd` has `(defsystem example ...)`. Platform.sh will then run `(asdf:make :example)` on your system to build a binary. If you don't want these assumptions, you can disable this behavior by specifying in your `.platform.app.yaml`: ```yaml {location=".platform.app.yaml"} build: flavor: none ``` ##### Dependencies The recommended way to handle Lisp dependencies on Platform.sh is using ASDF. Commit a `.asd` file in your repository and the system will automatically download the dependencies using QuickLisp. ##### QuickLisp options If you wish to change the distributions that QuickLisp is using, you can specify those as follows, specifying a distribution name, its URL and, an optional version: ```yaml {location=".platform.app.yaml"} runtime: quicklisp: : url: "..." version: "..." ``` For example: ```yaml {location=".platform.app.yaml"} runtime: quicklisp: quicklisp: url: 'http://beta.quicklisp.org/dist/quicklisp.txt' version: '2019-07-11' ``` ##### Built-in variables Platform.sh exposes relationships and other configuration as [environment variables](https://docs.platform.sh/development/variables.md). To get the `PORT` environment variable (the port on which your web application is supposed to listen): ```lisp (parse-integer (uiop:getenv "PORT")) ``` ##### Building and running the application Assuming `example.lisp` and `example.asd` are present in your repository, the app is automatically built on push. You can then start it from the `web.commands.start` directive. Note that the start command _must_ run in the foreground. Should the program terminate for any reason it's automatically restarted. In the example below the app sleeps for a very, very long time. You could also choose to join the thread of your web server, or use other methods to make sure the program doesn't terminate. The following basic `.platform.app.yaml` file is sufficient to run most Lisp applications. ```yaml {location=".platform.app.yaml"} name: myapp type: lisp:1.5 web: commands: start: ./example locations: /: allow: false passthru: true disk: 512 ``` Note that a proxy server is still in front of your app. If desired, certain paths may be served directly by the router without hitting your app (for static files, primarily) or you may route all requests to the Lisp application unconditionally, as in the example above. ##### Accessing Services The services configuration is available in the environment variable `PLATFORM_RELATIONSHIPS`. To parse them, add the dependencies to your `.asd` file: ```lisp :depends-on (:jsown :babel :s-base64) ``` The following is an example of accessing a PostgreSQL instance: ```lisp (defun relationships () (jsown:parse (babel:octets-to-string (with-input-from-string (in (uiop:getenv "PLATFORM_RELATIONSHIPS")) (s-base64:decode-base64-bytes in))))) ``` Given a relationship defined in `.platform.app.yaml`: ```yaml {location=".platform.app.yaml"} relationships: postgresql: ``` The following would access that relationship, and provide your Lisp program the credentials to connect to a PostgreSQL instance. Add this to your `.asd` file: ```lisp :depends-on (:postmodern) ``` Then in your program you could access the PostgreSQL instance as follows: ```lisp (defvar *pg-spec* nil) (defun setup-postgresql () (let* ((pg-relationship (first (jsown:val (relationships) "postgresql"))) (database (jsown:val pg-relationship "path")) (username (jsown:val pg-relationship "username")) (password (jsown:val pg-relationship "password")) (host (jsown:val pg-relationship "host"))) (setf *pg-spec* (list database username password host))) (postmodern:with-connection *pg-spec* (unless (member "example_table" (postmodern:list-tables t) :test #'string=) (postmodern:execute "create table example_table ( a_field TEXT NOT NULL UNIQUE, another_field TEXT NOT NULL UNIQUE ")))) ``` ##### Example The following is a basic example of a Hunchentoot-based web app (you can find the corresponding `.asd` and Platform.sh `.yaml` files in the [template](#project-templates)): ```lisp (defpackage #:example (:use :hunchentoot :cl-who :cl) (:export main)) (in-package #:example) (define-easy-handler (greet :uri "/hello") (name) (with-html-output-to-string (s) (htm (:body (:h1 "hello, " (str name)))))) (defun main () (let ((acceptor (make-instance 'easy-acceptor :port (parse-integer (uiop:getenv "PORT"))))) (start acceptor) (sleep most-positive-fixnum))) ``` Notice how it gets the `PORT` from the environment and how it sleeps at the end, as `(start acceptor)` immediately yields and Platform.sh requires apps to run in the foreground. ##### Project templates The following list shows templates available for Lisp apps. A template is a starting point for building your project. It should help you get a project ready for production. Templates in development. ### PHP **Note**: You can now use the Platform.sh composable image (BETA) to install runtimes and tools in your application container. To find out more about this feature, see the [dedicated documentation page](https://docs.platform.sh/create-apps/app-reference/composable-image.md). Also, see how you can [modify your PHP runtime when using a composable image](#modify-your-php-runtime-when-using-a-composable-image). ##### Supported versions You can select the major and minor version. Patch versions are applied periodically for bug fixes and the like. When you deploy your app, you always get the latest available patches. | Grid and Dedicated Gen 3 | Dedicated Gen 2 | | - 8.4 - 8.3 - 8.2 - 8.1 - 8.2 - 8.1 - 8.0 Note that from PHP versions 7.1 to 8.1, the images support the Zend Thread Safe (ZTS) version of PHP. ###### Specify the language To use PHP, specify `php` as your [app's `type`](https://docs.platform.sh/create-apps/app-reference/single-runtime-image.md#types): ```yaml {location=".platform.app.yaml"} type: 'php:' ``` For example: ```yaml {location=".platform.app.yaml"} type: 'php:8.4' ``` ###### Deprecated versions The following versions are [deprecated](https://docs.platform.sh/glossary.md#deprecated-versions). They're available, but they aren't receiving security updates from upstream and aren't guaranteed to work. They'll be removed in the future, so migrate to one of the [supported versions](#supported-versions). | Grid and Dedicated Gen 3 | Dedicated Gen 2 | | - 8.0 - 7.4 - 7.3 - 7.2 - 7.1 - 7.0 - 5.6 - 5.5 - 5.4 - 7.4 - 7.3 - 7.2 - 7.1 - 7.0 ##### Usage example Configure your app to use PHP on Platform.sh. ###### 1. Specify the version Choose a [supported version](#supported-versions) and add it to your [app configuration](https://docs.platform.sh/create-apps/_index.md): ```yaml {location=".platform.app.yaml"} type: 'php:8.4' ``` ###### 2. Serve your app To serve your app, define what (and how) content should be served by setting the [`locations` parameter](https://docs.platform.sh/create-apps/app-reference/single-runtime-image.md#locations). Usually, it contains the two following (optional) keys: - `root` for the document root, the directory to which all requests for existing `.php` and static files (such as `.css`, `.jpg`) are sent. - `passthru` to [define a front controller](https://docs.platform.sh/create-apps/web/php-basic.md#set-different-rules-for-specific-locations) to handle nonexistent files. The value is a file path relative to the [app root](https://docs.platform.sh/create-apps/app-reference/single-runtime-image.md#root-directory). **Note**: For enhanced security, when setting ``passthru`` to ``true``, you might also want to add the following configuration: - Set ``scripts`` to ``false``. This prevents PHP scripts from being executed from the specified location. - Set ``allow`` to ``false``. By default, when PHP scripts aren’t executed, their source code is delivered. Setting ``allow`` to ``false`` allows you to keep the source code of your PHP scripts confidential. Adjust the `locations` block to fit your needs. In the following example, all requests made to your site's root (`/`) are sent to the `public` directory and nonexistent files are handled by `app.php`: ```yaml {location=".platform.app.yaml"} web: locations: '/': root: 'public' passthru: '/app.php' ``` See how to [create a basic PHP app with a front controller](https://docs.platform.sh/create-apps/web/php-basic.md). To have more control, you can define rules to specify which files you want to allow [from which location](https://docs.platform.sh/create-apps/web/php-basic.md#set-different-rules-for-specific-locations). ###### Complete example A complete basic app configuration looks like the following: ```yaml {location=".platform.app.yaml"} name: 'myapp' type: 'php:8.4' disk: 2048 web: locations: '/': root: 'public' passthru: '/app.php' ``` ##### Dependencies Up to PHP version 8.1, it's assumed that you're using [Composer](https://getcomposer.org/) 1.x to manage dependencies. If you have a `composer.json` file in your code, the default [build flavor is run](https://docs.platform.sh/create-apps/app-reference/single-runtime-image.md#build): ```bash composer --no-ansi --no-interaction install --no-progress --prefer-dist --optimize-autoloader ``` To use Composer 2.x on your project, either use PHP 8.2+ or, in your app configuration, add the following [dependency](https://docs.platform.sh/create-apps/app-reference/single-runtime-image.md#dependencies): ```yaml {location=".platform.app.yaml"} dependencies: php: composer/composer: '^2' ``` Adding a dependency to the [dependencies block](https://docs.platform.sh/create-apps/app-reference/single-runtime-image.md#dependencies) makes it available globally. So you can then use included dependencies as commands within your app container. You can add multiple global dependencies to the dependencies block, such as [Node.js](https://docs.platform.sh/languages/nodejs.md#2-specify-any-global-dependencies). If you want to have more control over Composer or if you don't want to use Composer at all, adapt the [build flavor](#change-the-build-flavor). You can also use a [private, authenticated third-party Composer repository](https://docs.platform.sh/languages/php/composer-auth.md). ###### Change the build flavor If you need more control over the dependency management, you can either use your custom build flavor or interact with Composer itself through [its environment variables](https://getcomposer.org/doc/03-cli.md#environment-variables). You can remove the default build flavor and run your own commands for complete control over your build. Set the build flavor to `none` and add the commands you need to your `build` hook, as in the following example: ```yaml {location=".platform.app.yaml"} build: flavor: none hooks: build: | set -e composer install --no-interaction --no-dev ``` That installs production dependencies with Composer but not development dependencies. The same can be achieved by using the default build flavor and [adding the `COMPOSER_NO_DEV` variable](https://docs.platform.sh/development/variables/set-variables.md). See more on [build flavors](https://docs.platform.sh/create-apps/app-reference/single-runtime-image.md#build). ###### Alternative repositories In addition to the standard `dependencies` format, you can specify alternative repositories for Composer to use as global dependencies. So you can install a forked version of a global dependency from a custom repository. To install from an alternative repository: 1. Set an explicit `require` block: ```yaml {location=".platform.app.yaml"} dependencies: php: require: "platformsh/client": "2.x-dev" ``` This is equivalent to `composer require platformsh/client 2.x-dev`. 2. Add the repository to use: ```yaml {location=".platform.app.yaml"} repositories: - type: vcs url: "git@github.com:platformsh/platformsh-client-php.git" ``` That installs `platformsh/client` from the specified repository URL as a global dependency. For example, to install Composer 2 and the `platformsh/client 2.x-dev` library from a custom repository, use the following: ```yaml {location=".platform.app.yaml"} dependencies: php: composer/composer: '^2' require: "platformsh/client": "2.x-dev" repositories: - type: vcs url: "git@github.com:platformsh/platformsh-client-php.git" ``` ##### Connect to services The following examples show how to use PHP to access various [services](https://docs.platform.sh/add-services.md). The individual service pages have more information on configuring each service. ```php {} credentials('memcached'); try { // Connecting to Memcached server. $memcached = new Memcached(); $memcached->addServer($credentials['host'], $credentials['port']); $memcached->setOption(Memcached::OPT_BINARY_PROTOCOL, true); $key = "Deploy day"; $value = "Friday"; // Set a value. $memcached->set($key, $value); // Read it back. $test = $memcached->get($key); printf('Found value %s for key %s.', $test, $key); } catch (Exception $e) { print $e->getMessage(); } ``` ```php {} credentials('mongodb'); try { $server = sprintf('%s://%s:%s@%s:%d/%s', $credentials['scheme'], $credentials['username'], $credentials['password'], $credentials['host'], $credentials['port'], $credentials['path'] ); $client = new Client($server); $collection = $client->main->starwars; $result = $collection->insertOne([ 'name' => 'Rey', 'occupation' => 'Jedi', ]); $id = $result->getInsertedId(); $document = $collection->findOne([ '_id' => $id, ]); // Clean up after ourselves. $collection->drop(); printf("Found %s (%s)
\n", $document->name, $document->occupation); } catch (\Exception $e) { print $e->getMessage(); } ``` ```php {} credentials('database'); try { // Connect to the database using PDO. If using some other abstraction layer you would // inject the values from $database into whatever your abstraction layer asks for. $dsn = sprintf('mysql:host=%s;port=%d;dbname=%s', $credentials['host'], $credentials['port'], $credentials['path']); $conn = new \PDO($dsn, $credentials['username'], $credentials['password'], [ // Always use Exception error mode with PDO, as it's more reliable. \PDO::ATTR_ERRMODE => \PDO::ERRMODE_EXCEPTION, // So we don't have to mess around with cursors and unbuffered queries by default. \PDO::MYSQL_ATTR_USE_BUFFERED_QUERY => TRUE, // Make sure MySQL returns all matched rows on update queries including // rows that actually didn't have to be updated because the values didn't // change. This matches common behavior among other database systems. \PDO::MYSQL_ATTR_FOUND_ROWS => TRUE, ]); // Creating a table. $sql = "CREATE TABLE People ( id INT(6) UNSIGNED AUTO_INCREMENT PRIMARY KEY, name VARCHAR(30) NOT NULL, city VARCHAR(30) NOT NULL )"; $conn->query($sql); // Insert data. $sql = "INSERT INTO People (name, city) VALUES ('Neil Armstrong', 'Moon'), ('Buzz Aldrin', 'Glen Ridge'), ('Sally Ride', 'La Jolla');"; $conn->query($sql); // Show table. $sql = "SELECT * FROM People"; $result = $conn->query($sql); $result->setFetchMode(\PDO::FETCH_OBJ); if ($result) { print << TABLE; foreach ($result as $record) { printf("\n", $record->name, $record->city); } print "\n
NameCity
%s%s
\n"; } // Drop table $sql = "DROP TABLE People"; $conn->query($sql); } catch (\Exception $e) { print $e->getMessage(); } ``` ```php {} credentials('postgresql'); try { // Connect to the database using PDO. If using some other abstraction layer you would // inject the values from $database into whatever your abstraction layer asks for. $dsn = sprintf('pgsql:host=%s;port=%d;dbname=%s', $credentials['host'], $credentials['port'], $credentials['path']); $conn = new \PDO($dsn, $credentials['username'], $credentials['password'], [ // Always use Exception error mode with PDO, as it's more reliable. \PDO::ATTR_ERRMODE => \PDO::ERRMODE_EXCEPTION, ]); $conn->query("DROP TABLE IF EXISTS People"); // Creating a table. $sql = "CREATE TABLE IF NOT EXISTS People ( id SERIAL PRIMARY KEY, name VARCHAR(30) NOT NULL, city VARCHAR(30) NOT NULL )"; $conn->query($sql); // Insert data. $sql = "INSERT INTO People (name, city) VALUES ('Neil Armstrong', 'Moon'), ('Buzz Aldrin', 'Glen Ridge'), ('Sally Ride', 'La Jolla');"; $conn->query($sql); // Show table. $sql = "SELECT * FROM People"; $result = $conn->query($sql); $result->setFetchMode(\PDO::FETCH_OBJ); if ($result) { print << TABLE; foreach ($result as $record) { printf("\n", $record->name, $record->city); } print "\n
NameCity
%s%s
\n"; } // Drop table. $sql = "DROP TABLE People"; $conn->query($sql); } catch (\Exception $e) { print $e->getMessage(); } ``` ```php {} credentials('rabbitmq'); try { $queueName = 'deploy_days'; // Connect to the RabbitMQ server. $connection = new AMQPStreamConnection($credentials['host'], $credentials['port'], $credentials['username'], $credentials['password']); $channel = $connection->channel(); $channel->queue_declare($queueName, false, false, false, false); $msg = new AMQPMessage('Friday'); $channel->basic_publish($msg, '', 'hello'); echo "[x] Sent 'Friday'
\n"; // In a real application you't put the following in a separate script in a loop. $callback = function ($msg) { printf("[x] Deploying on %s
\n", $msg->body); }; $channel->basic_consume($queueName, '', false, true, false, false, $callback); // This blocks on waiting for an item from the queue, so comment it out in this demo script. //$channel->wait(); $channel->close(); $connection->close(); } catch (Exception $e) { print $e->getMessage(); } ``` ```php {} credentials('redis'); try { // Connecting to Redis server. $redis = new Redis(); $redis->connect($credentials['host'], $credentials['port']); $key = "Deploy day"; $value = "Friday"; // Set a value. $redis->set($key, $value); // Read it back. $test = $redis->get($key); printf('Found value %s for key %s.', $test, $key); } catch (Exception $e) { print $e->getMessage(); } ``` ```php {} credentials('solr'); try { $config = [ 'endpoint' => [ 'localhost' => [ 'host' => $credentials['host'], 'port' => $credentials['port'], 'path' => "/" . $credentials['path'], ] ] ]; $client = new Client($config); // Add a document $update = $client->createUpdate(); $doc1 = $update->createDocument(); $doc1->id = 123; $doc1->name = 'Valentina Tereshkova'; $update->addDocuments(array($doc1)); $update->addCommit(); $result = $client->update($update); print "Adding one document. Status (0 is success): " .$result->getStatus(). "
\n"; // Select one document $query = $client->createQuery($client::QUERY_SELECT); $resultset = $client->execute($query); print "Selecting documents (1 expected): " .$resultset->getNumFound() . "
\n"; // Delete one document $update = $client->createUpdate(); $update->addDeleteById(123); $update->addCommit(); $result = $client->update($update); print "Deleting one document. Status (0 is success): " .$result->getStatus(). "
\n"; } catch (Exception $e) { print $e->getMessage(); } ``` ###### Configuration reader While you can read the environment directly from your app, you might want to use the[PHP configuration reader library](https://github.com/platformsh/config-reader-php). It decodes service credentials, the correct port, and other information for you. ##### PHP settings You can configure your PHP-FPM runtime configuration by specifying the [runtime in your app configuration](https://docs.platform.sh/create-apps/app-reference/single-runtime-image.md#runtime). In addition to changes in runtime, you can also change the PHP settings. Some commonly used settings are: | Name | Default | Description | |------|---------|------------------------------------------------------------------------------------------------------------------------------------------------------------------------------------------------------| | `max_execution_time` | `300` | The maximum execution time, in seconds, for your PHP scripts and apps. A value of `0` means there are no time limits. | | `max_file_uploads` | `20` | The maximum number of files that can be uploaded in each request. | | `max_input_time` | `60` | The maximum time in seconds that your script is allowed to receive input (such as for file uploads). A value of `-1` means there are no time limits. | | `max_input_vars` | `1000` | The maximum number of input variables that are accepted in each request. | | `memory_limit` | `128M` | The memory limit, in megabytes, for PHP. Ensure that the PHP memory limit is set to a lower value than your environment's memory. | | `post_max_size` | `64M` | The maximum size, in megabytes, per uploaded file. To upload larger files, increase the value. | | `zend.assertions` | `-1` | Assertions are optimized and have no impact at runtime. Set assertions to `1` for your local development system. [See more on assertions](https://www.php.net/manual/en/regexp.reference.assertions). | | `opcache.memory_consumption` | `64` | The number of megabytes available for [the OPcache](https://docs.platform.sh/languages/php/tuning.md#opcache-preloading). For large apps with many files, increase this value. | | `opcache.validate_timestamps` | `On` | If your app doesn't generate compiled PHP, you can [disable this setting](https://docs.platform.sh/languages/php/tuning.md#disable-opcache-timestamp-validation). | ###### Retrieve the default values To retrieve the default PHP values, run the following [CLI command](https://docs.platform.sh/administration/cli/_index.md): ```bash platform ssh "php --info" ``` To get specific default values, use grep. For example, to get the value for `opcache.memory_consumption`, run the following command: ```bash platform ssh "php --info" | grep opcache.memory_consumption ``` ###### Retrieve the settings To see the settings used on your environment: 1. Find the PHP configuration files with the following [CLI command](https://docs.platform.sh/administration/cli/_index.md): ```bash platform ssh "php --ini" ``` The output is something like the following: ```bash Configuration File (php.ini) Path: /etc/php/8.0-zts/cli Loaded Configuration File: /etc/php/8.0-zts/cli/php.ini Scan for additional .ini files in: /etc/php/8.0-zts/cli/conf.d Additional .ini files parsed: (none) ``` 2. Display the configuration file by adapting the following command with the output from step 1: ```bash platform ssh "cat " ``` ###### Customize PHP settings For Dedicated Gen 2, see the [configuration options](https://docs.platform.sh/dedicated-environments/dedicated-gen-2/development.md). You can customize PHP values for your app in two ways. The recommended method is to use variables. For more information, see how to use [PHP-specific variables](https://docs.platform.sh/development/variables.md#php-specific-variables). You can provide a custom ``php.ini`` file at the [app root](https://docs.platform.sh/create-apps/app-reference/single-runtime-image.md#root-directory). Using this method isn’t recommended since it offers less flexibility and is more error-prone. Consider using variables instead. For example, to change the PHP memory limit, use the following configuration: ```ini {location="php.ini"} memory_limit = 256M ``` If you're using [PHP-CLI](#execution-mode), you need to take into account the default settings of PHP-CLI when you customize your PHP settings. The default settings of PHP-CLI can't be overwritten and are the following: ```text max_execution_time=0 max_input_time=-1 memory_limit=-1 ``` ###### Disable functions for security A common recommendation for securing PHP installations is disabling built-in functions frequently used in remote attacks. By default, Platform.sh doesn't disable any functions. If you're sure a function isn't needed in your app, you can disable it. For example, to disable `pcntl_exec` and `pcntl_fork`, add the following to your [app configuration](https://docs.platform.sh/create-apps/_index.md): ```yaml {location=".platform.app.yaml"} variables: php: disable_functions: "pcntl_exec,pcntl_fork" ``` Common functions to disable include: | Name | Description | |------|-------------| | `create_function` | This function has been replaced by anonymous functions and shouldn't be used anymore. | | `exec`, `passthru`, `shell_exec`, `system`, `proc_open`, `popen` | These functions allow a PHP script to run a bash shell command. Rarely used by web apps except for build scripts that might need them. | | `pcntl_*` | The `pcntl_*` functions are responsible for process management. Most of them cause a fatal error if used within a web request. Cron tasks or workers may need them. Most are usually safe to disable. | | `curl_exec`, `curl_multi_exec` | These functions allow a PHP script to make arbitrary HTTP requests. If you're using HTTP libraries such as Guzzle, don't disable them. | | `show_source` | This function shows a syntax highlighted version of a named PHP source file. Rarely useful outside of development. | ##### Execution mode PHP has two execution modes you can choose from: - The command line interface mode (PHP-CLI) is the mode used for command line scripts and standalone apps. This is the mode used when you're logged into your container via SSH, for [crons](https://docs.platform.sh/create-apps/app-reference/single-runtime-image.md#crons), and usually also for [alternate start commands](#alternate-start-commands). To use PHP-CLI, run your script with `php `, where is a file path relative to the [app root](https://docs.platform.sh/create-apps/app-reference/single-runtime-image.md#root-directory). - The Common Gateway Interface mode (PHP-CGI) is the mode used for web apps and web requests. This is the default mode when the `start` command isn't explicitly set. To use PHP-CGI, run your script with a symlink: `/usr/bin/start-php-app `, where is a file path relative to the [app root](https://docs.platform.sh/create-apps/app-reference/single-runtime-image.md#root-directory). With PHP-CGI, PHP is run using the FastCGI Process Manager (PHP-FPM). ##### Alternate start commands To specify an alternative process to run your code, set a `start` command. For more information about the start command, see the [web commands reference](https://docs.platform.sh/create-apps/app-reference/single-runtime-image.md#web-commands). By default, start commands use PHP-CLI. Find out how and when to use each [execution mode](#execution-mode). Note that the `start` command must run in the foreground and is executed before the [deploy hook](https://docs.platform.sh/create-apps/hooks/hooks-comparison.md). That means that PHP-FPM can't run simultaneously with another persistent process such as [ReactPHP](https://github.com/platformsh-examples/platformsh-example-reactphp) or [Amp](https://github.com/platformsh-examples/platformsh-example-amphp). If you need multiple processes, they have to run in separate containers. See some generic examples on how to use alternate start commands: - Add your web server’s code in a PHP file. - Specify an alternative ``start`` command by adapting the following: ```yaml {location=".platform.app.yaml"} web: commands: start: /usr/bin/start-php-app ``` - Configure the container to listen on a TCP socket: ```yaml {location=".platform.app.yaml"} web: upstream: socket_family: tcp protocol: http ``` When you listen on a TCP socket, the ``$PORT`` environment variable is automatically set. See more options on how to [configure where requests are sent](https://docs.platform.sh/create-apps/app-reference/single-runtime-image.md#upstream). You might have to configure your app to connect via the ``$PORT`` TCP socket, especially when using web servers such as [Swoole](https://docs.platform.sh/languages/php/swoole.md) or [Roadrunner](https://github.com/roadrunner-server/roadrunner). - Optional: Override redirects to let the custom web server handle them: ```yaml {location=".platform.app.yaml"} locations: "/": passthru: true scripts: false allow: false ``` To execute runtime-specific tasks (such as clearing cache) before your app starts, follow these steps: - Create a separate shell script that includes all the commands to be run. - Specify an alternative ``start`` command by adapting the following: ```yaml {location=".platform.app.yaml"} web: commands: start: bash && /usr/bin/start-php-app ``` is the bash script created in step 1. is a file path relative to the [app root](https://docs.platform.sh/create-apps/app-reference/single-runtime-image.md#root-directory). ##### Foreign function interfaces PHP 7.4 introduced support for [foreign function interfaces (FFIs)](https://en.wikipedia.org/wiki/Foreign_function_interface). FFIs allow your PHP program to call routines or use services written in C or Rust. Note: FFIs are only intended for advanced use cases. Use with caution. If you are using C code, you need `.so` library files. Either place these files directly in your repository or compile them in a makefile using `gcc` in your [build hook](https://docs.platform.sh/create-apps/hooks/hooks-comparison.md#build-hook). Note: The `.so` library files shouldn't be located in a publicly accessible directory. If you are compiling Rust code, use the build hook to [install Rust](https://doc.rust-lang.org/stable/book/ch01-01-installation.md). To leverage FFIs, follow these steps: 1. [Enable and configure OPcache preloading](https://docs.platform.sh/languages/php/tuning.md#enable-opcache-preloading). 2. Enable the FFI extension: ```yaml {location=".platform.app.yaml"} runtime: extensions: - ffi ``` 3. Make sure that your [preload script](https://docs.platform.sh/languages/php/tuning.md#opcache-preloading) calls the `FFI::load()` function. Using this function in preload is considerably faster than loading the linked library on each request or script run. 4. If you are running FFIs from the command line, enable the preloader by adding the following configuration: ```yaml {location=".platform.app.yaml"} variables: php: opcache.enable_cli: true ``` 5. Run your script with the following command: ```bash php ``` See [complete working examples for C and Rust](https://github.com/platformsh-examples/php-ffi). ##### Project templates The following list shows templates available for PHP apps. A template is a starting point for building your project. It should help you get a project ready for production. Drupal 9 ![Drupal 9](data:image/svg+xml,%3Csvg xmlns='http://www.w3.org/2000/svg' width='186.52541' height='243.71308' viewBox='0 0 186.52541 243.71308'%3E%3Ctitle%3ERisorsa 85%3C/title%3E%3Cg id='Livello_2' data-name='Livello 2'%3E%3Cg id='Livello_1-2' data-name='Livello 1'%3E%3Cpath d='M131.64024,51.90954C114.49124,34.76866,98.12945,18.42858,93.26,0,88.39024,18.42858,72.02583,34.76866,54.8797,51.90954,29.16037,77.61263,0,106.7432,0,150.434a93.26271,93.26271,0,1,0,186.52541,0c0-43.688-29.158-72.8214-54.88517-98.52449M39.63956,172.16578c-5.71847-.19418-26.82308-36.57089,12.32937-75.303l25.90873,28.30088a2.21467,2.21467,0,0,1-.173,3.30485c-6.18245,6.34085-32.53369,32.7658-35.809,41.90292-.676,1.886-1.66339,1.81463-2.25619,1.79436M93.26283,220.1092a32.07521,32.07521,0,0,1-32.07544-32.07543A33.42322,33.42322,0,0,1,69.1821,166.8471c5.7836-7.07224,24.07643-26.96358,24.07643-26.96358s18.01279,20.18332,24.03326,26.89607a31.36794,31.36794,0,0,1,8.04647,21.25418A32.07551,32.07551,0,0,1,93.26283,220.1092m61.3923-52.015c-.69131,1.51192-2.25954,4.036-4.37617,4.113-3.77288.13741-4.176-1.79579-6.96465-5.92291-6.12235-9.06007-59.55167-64.89991-69.54517-75.69925-8.79026-9.49851-1.23783-16.195,2.26549-19.70431C80.42989,66.47768,93.25949,53.656,93.25949,53.656s38.25479,36.29607,54.19029,61.09626,10.44364,46.26024,7.20535,53.342' style='fill:%23009cde'/%3E%3C/g%3E%3C/g%3E%3C/svg%3E) Drupal 9 This template builds Drupal 9 using the "Drupal Recommended" Composer project. It is pre-configured to use MariaDB and Redis for caching. The Drupal installer will skip asking for database credentials as they are already provided. Drupal is a flexible and extensible PHP-based CMS framework. ###### Features: - PHP 8.0 - MariaDB 10.4 - Redis 6 - Drush included - Automatic TLS certificates - Composer-based build View the [repository on GitHub](https://github.com/platformsh-templates/drupal9). ![Deploy on ](https://platform.sh/images/deploy/lg-blue.svg) GovCMS 9 ![GovCMS 9](data:image/svg+xml,%3Csvg xmlns='http://www.w3.org/2000/svg' width='199.37' height='225'%3E%3Cdefs%3E%3Cstyle%3E.cls-1%7Bfill:%232ba9e0%7D%3C/style%3E%3C/defs%3E%3Cg %3E%3Cg %3E%3Cpath class='cls-1' d='M93.78 139.31a35.5 35.5 0 1 0 35.5 35.5 35.51 35.51 0 0 0-35.5-35.5zM138 132.51a61.17 61.17 0 0 1-9.26 92.49c29.31-9 53.56-31.06 64.4-57.73 15-36.92 1-64.67-22.43-89.87a45.68 45.68 0 0 1 1.15 10.11 46.88 46.88 0 0 1-33.86 45zM97.82 87.57A27.19 27.19 0 1 0 125 60.43a27.16 27.16 0 0 0-27.18 27.14z'/%3E%3Cpath class='cls-1' d='M47 214.22a61.17 61.17 0 0 1 39.55-100.1 46.82 46.82 0 0 1 44.75-72.89C116 28 100.72 14.62 88.66 0c6.13 64.13-58.4 40.82-82.32 100C-9.62 139.58 4.79 188.56 47 214.22z'/%3E%3C/g%3E%3C/g%3E%3C/svg%3E) GovCMS 9 This template builds the Australian government's GovCMS Drupal 9 distribution using the Drupal Composer project for better flexibility. It is pre-configured to use MariaDB and Redis for caching. The Drupal installer will skip asking for database credentials as they are already provided. GovCMS is a Drupal distribution built for the Australian government, and includes configuration optimized for managing government websites. ###### Features: - PHP 8.0 - MariaDB 10.4 - Redis 6 - Drush included - Automatic TLS certificates - Composer-based build View the [repository on GitHub](https://github.com/platformsh-templates/drupal9-govcms9). ![Deploy on ](https://platform.sh/images/deploy/lg-blue.svg) Laravel ![Laravel](data:image/svg+xml;base64,PHN2ZyB3aWR0aD0iMjQiIGhlaWdodD0iMjQiIHZpZXdCb3g9IjAgMCAyNCAyNCIgZmlsbD0ibm9uZSIgeG1sbnM9Imh0dHA6Ly93d3cudzMub3JnLzIwMDAvc3ZnIj4KPHBhdGggZD0iTTIzLjc3NjIgMTEuNDc2M0MyMy42MDk1IDExLjMwOTYgMjEuNDcwNyA4LjYxNTIgMjEuMTA5NSA4LjE3MDc1QzIwLjcyMDcgNy43MjYzMSAyMC41NTQgNy44MDk2NCAyMC4zMDQgNy44Mzc0MkMyMC4wNTQgNy44NjUyIDE3LjM1OTUgOC4zMzc0MiAxNy4wNTQgOC4zNjUyQzE2Ljc0ODQgOC40MjA3NSAxNi41NTQgOC41MzE4NiAxNi43NDg0IDguODA5NjRDMTYuOTE1MSA5LjA1OTY0IDE4LjY5MjkgMTEuNTU5NiAxOS4wODE4IDEyLjE0M0wxMS45OTg0IDEzLjgzNzRMNi4zODczMyA0LjQyMDc1QzYuMTY1MSA0LjA4NzQyIDYuMTA5NTUgMy45NzYzMSA1LjYwOTU1IDQuMDA0MDlDNS4xMDk1NSA0LjAzMTg2IDEuMTkyODggNC4zNjUyIDAuOTE1MTA2IDQuMzY1MkMwLjYzNzMyOCA0LjM5Mjk4IDAuMzMxNzcyIDQuNTA0MDkgMC42MDk1NSA1LjE3MDc1QzAuODg3MzI4IDUuODM3NDIgNS4zMzE3NyAxNS4zOTMgNS40NDI4OCAxNS42NzA4QzUuNTUzOTkgMTUuOTQ4NSA1Ljg4NzMzIDE2LjM5MyA2LjYzNzMzIDE2LjIyNjNDNy40MTUxIDE2LjAzMTkgMTAuMDgxOCAxNS4zMzc0IDExLjU1NCAxNC45NDg1QzEyLjMzMTggMTYuMzM3NCAxMy44ODczIDE5LjE3MDggMTQuMTkyOSAxOS41ODc0QzE0LjU4MTggMjAuMTQzIDE0Ljg1OTUgMjAuMDMxOSAxNS40NDI5IDE5Ljg2NTJDMTUuOTE1MSAxOS43MjYzIDIyLjcyMDcgMTcuMjgxOSAyMy4wMjYyIDE3LjE0M0MyMy4zMzE4IDE3LjAwNDEgMjMuNTI2MiAxNi45MjA4IDIzLjMwNCAxNi42MTUyQzIzLjEzNzMgMTYuMzkzIDIxLjM1OTUgMTMuOTc2MyAyMC40MTUxIDEyLjcyNjNDMjEuMDU0IDEyLjU1OTYgMjMuMzU5NSAxMS45NDg1IDIzLjYwOTUgMTEuODY1MkMyMy44ODczIDExLjc4MTkgMjMuOTQyOSAxMS42NDMgMjMuNzc2MiAxMS40NzYzWk0xMC45MTUxIDE0LjExNTJDMTAuODMxOCAxNC4xNDMgNi44NTk1NSAxNS4wODc0IDYuNjY1MSAxNS4xNDNDNi40NDI4OCAxNS4xOTg1IDYuNDQyODggMTUuMTcwOCA2LjQ0Mjg4IDE1LjA4NzRDNi4zODczMyAxNS4wMDQxIDEuNzIwNjYgNS4zMzc0MiAxLjYzNzMzIDUuMjI2MzFDMS41ODE3NyA1LjExNTIgMS41ODE3NyA1LjAwNDA5IDEuNjM3MzMgNS4wMDQwOUMxLjY5Mjg4IDUuMDA0MDkgNS4zODczMyA0LjY3MDc1IDUuNDk4NDQgNC42NzA3NUM1LjYzNzMzIDQuNjcwNzUgNS42MDk1NSA0LjY5ODUzIDUuNjY1MSA0Ljc4MTg2QzUuNjY1MSA0Ljc4MTg2IDEwLjg1OTUgMTMuNzU0MSAxMC45NDI5IDEzLjg5M0MxMS4wNTQgMTQuMDMxOSAxMC45OTg0IDE0LjA4NzQgMTAuOTE1MSAxNC4xMTUyWk0yMi4wODE4IDE2LjE5ODVDMjIuMTM3MyAxNi4zMDk2IDIyLjIyMDcgMTYuMzY1MiAyMS45OTg0IDE2LjQyMDhDMjEuODA0IDE2LjUwNDEgMTUuMzA0IDE4LjY5ODUgMTUuMTY1MSAxOC43NTQxQzE1LjAyNjIgMTguODA5NiAxNC45NDI5IDE4LjgzNzQgMTQuNzc2MiAxOC41ODc0QzE0LjYwOTUgMTguMzM3NCAxMi40OTg0IDE0LjY5ODUgMTIuNDk4NCAxNC42OTg1TDE5LjQxNTEgMTIuODkzQzE5LjU4MTggMTIuODM3NCAxOS42MzczIDEyLjgwOTYgMTkuNzQ4NCAxMi45NzYzQzE5Ljg1OTUgMTMuMTcwOCAyMi4wMjYyIDE2LjExNTIgMjIuMDgxOCAxNi4xOTg1Wk0yMi41MjYyIDExLjMwOTZDMjIuMzU5NSAxMS4zMzc0IDE5LjgzMTggMTEuOTc2MyAxOS44MzE4IDExLjk3NjNMMTcuNzQ4NCA5LjE0Mjk3QzE3LjY5MjkgOS4wNTk2NCAxNy42MzczIDguOTc2MzEgMTcuNzc2MiA4Ljk0ODUzQzE3LjkxNTEgOC45MjA3NSAyMC4yNzYyIDguNTA0MDkgMjAuMzg3MyA4LjQ3NjMxQzIwLjQ5ODQgOC40NDg1MyAyMC41ODE4IDguNDIwNzUgMjAuNzIwNyA4LjYxNTJDMjAuODU5NSA4Ljc4MTg2IDIyLjYzNzMgMTEuMDU5NiAyMi43MjA3IDExLjE0M0MyMi44MDQgMTEuMjI2MyAyMi42OTI5IDExLjI4MTkgMjIuNTI2MiAxMS4zMDk2WiIgZmlsbD0iI0ZCNTAzQiIvPgo8L3N2Zz4K) Laravel This template provides a basic Laravel skeleton. It comes pre-configured to use a MariaDB database and Redis for caching and sessions using a Laravel-specific bridge library that runs during Composer autoload. The public files symlink is also replaced with a custom web path definition so it is unnecessary. It is intended for you to use as a starting point and modify for your own needs. Laravel is an opinionated, integrated rapid-application-development framework for PHP. ###### Features: - PHP 8.0 - MariaDB 10.4 - Redis 5.0 - Automatic TLS certificates - Composer-based build View the [repository on GitHub](https://github.com/platformsh-templates/laravel). ![Deploy on ](https://platform.sh/images/deploy/lg-blue.svg) Magento 2 Community Edition ![Magento 2 Community Edition](data:image/svg+xml;base64,PHN2ZyB3aWR0aD0iMjQiIGhlaWdodD0iMjQiIHZpZXdCb3g9IjAgMCAyNCAyNCIgZmlsbD0ibm9uZSIgeG1sbnM9Imh0dHA6Ly93d3cudzMub3JnLzIwMDAvc3ZnIj4KPHBhdGggZmlsbC1ydWxlPSJldmVub2RkIiBjbGlwLXJ1bGU9ImV2ZW5vZGQiIGQ9Ik0xLjc5OTk5IDYuMDA0NTZMMTIuMjAyNSAwTDIyLjU4NDEgNS45OTQxVjE3Ljk5OEwxOS42MTQ1IDE5LjcwOTVWNy43MTg3TDEyLjE4MTUgMy40MjgyTDQuNzQ4NTUgNy43MTg3TDQuNzY5NTIgMTkuNzE0N0wxLjc5OTk5IDE3Ljk5OFY2LjAwNDU2Wk0xMi4xOTIgMjAuNTc0NEwxMy42NzU1IDE5LjcxMjFWNy43MTg2N0wxNi42NDUgOS40MzI3NVYyMS40Mjg5TDEyLjE4OTQgMjRMNy43MzkwMiAyMS40Mjg5TDcuNzMzNzggOS40MzI3NUwxMC43MDA3IDcuNzE4NjdWMTkuNzJMMTIuMTkyIDIwLjU3NDRaIiBmaWxsPSIjRjI2MzIyIi8+Cjwvc3ZnPgo=) Magento 2 Community Edition This template builds Magento 2 CE on Platform.sh. It includes additional scripts to customize Magento to run effectively in a build-and-deploy environment. A MariaDB database and Redis cache server come pre-configured and work out of the box. The installer has been modified to not ask for database information. Background workers are run using a worker container rather than via cron. Magento is a fully integrated ecommerce system and web store written in PHP. This is the Open Source version. ###### Features: - PHP 7.2 - MariaDB 10.2 - Redis 3.2 - Dedicated worker instance for background processing - Automatic TLS certificates - Composer-based build View the [repository on GitHub](https://github.com/platformsh-templates/magento2ce). ![Deploy on ](https://platform.sh/images/deploy/lg-blue.svg) Sylius ![Sylius](data:image/svg+xml;base64,PD94bWwgdmVyc2lvbj0iMS4wIiBlbmNvZGluZz0idXRmLTgiPz4KPHN2ZyB2ZXJzaW9uPSIxLjEiIHhtbG5zPSJodHRwOi8vd3d3LnczLm9yZy8yMDAwL3N2ZyIgdmlld0JveD0iMCAwIDQ4IDQ4Ij4KPHBhdGggZmlsbD0iIzMwYmE5ZCIgZD0iTTEwLjIsMjguMWw5LjYsMTkuMmwxNy43LDBsNC4zLTZMMTAuMiwyOC4xTDEwLjIsMjguMXoiLz4KPHBhdGggZmlsbD0iIzFhOWY4MyIgZD0iTTMuNSwzMC4yTDE2LjQsNDhsMjEuMSwwbDQuMy02LjZMMy41LDMwLjJ6IE0xOSw4LjdsNi4zLDQuOUwzMSwyLjZMMjksMS40QzI5LDEuNCwxOSw4LjcsMTksOC43eiIvPgo8cGF0aCBmaWxsPSIjMzBiYTlkIiBkPSJNMzcuNSw0OEwxOSw4LjdsNC0yLjlsMjEuNSwzMS40TDM3LjUsNDh6IE0yNy4yLDIuN2wxMi4xLDkuN0wzMC44LDBDMzAuOCwwLDI3LjIsMi43LDI3LjIsMi43eiIvPgo8L3N2Zz4K) Sylius This template builds a Sylius application for Platform.sh, which can be used as a starting point for developing complex e-commerce applications. Sylius is a modern e-commerce solution for PHP, based on Symfony Framework. ###### Features: - PHP 8.0 - MySQL 10.2 - Automatic TLS certificates - composer-based build View the [repository on GitHub](https://github.com/platformsh-templates/sylius). ![Deploy on ](https://platform.sh/images/deploy/lg-blue.svg) WooCommerce (Bedrock) for Platform.sh ![WooCommerce (Bedrock) for Platform.sh](data:image/svg+xml,%3Csvg xmlns='http://www.w3.org/2000/svg' width='225' height='225'%3E%3Cdefs%3E%3Cstyle%3E.cls-1%7Bfill:%23525ddc%7D%3C/style%3E%3C/defs%3E%3Cg %3E%3Cg %3E%3Cpath class='cls-1' d='M112.52 74.93V42.67a4.68 4.68 0 0 0-5.48-4.4Q56.94 46.63 6.82 55c-2.25.38-4.33.8-5.69-1.51A6.75 6.75 0 0 1 .05 50.4C0 35.56 0 20.72 0 5.89A6 6 0 0 1 5.92 0h212.81A6 6 0 0 1 225 6.29v43.27a8.1 8.1 0 0 1-6.63 7.7C207.2 59.15 196 61 184.87 62.85l-71.93 12a2.77 2.77 0 0 1-.5 0zM112.47 150.06v31.76a4.68 4.68 0 0 0 5.74 4.86l101.47-17a4.6 4.6 0 0 1 5.33 4.39v45.76c0 2.14-3 5.07-5.14 5.14H6.52c-4 0-6.52-2.47-6.52-6.53V175.7a8.22 8.22 0 0 1 6.88-8q16.62-2.79 33.25-5.54l71.93-12a2.77 2.77 0 0 1 .5 0z'/%3E%3Cpath class='cls-1' d='M112.56 150.15v-37.63l-.08.08 107.04-17.92a4.62 4.62 0 0 1 5.48 4.73v25a8.1 8.1 0 0 1-6.69 7.9c-9.35 1.58-18.71 3.1-28.07 4.66q-35.33 5.88-70.65 11.79c-2.38.4-4.75.87-7.12 1.3zM112.44 74.84v37.76l.08-.08c-9.61 1.56-19.23 3.1-28.83 4.7Q48.58 123.06 13.48 129c-2.47.41-4.94.77-7.4 1.22-3.75.67-6.07-1.2-6.07-5v-25a8.25 8.25 0 0 1 6.37-7.42c10.41-1.8 20.85-3.53 31.28-5.27q35.34-5.88 70.7-11.79c1.4-.23 2.78-.54 4.17-.81z'/%3E%3C/g%3E%3C/g%3E%3C/svg%3E) WooCommerce (Bedrock) for Platform.sh This template builds WordPress on Platform.sh using the Bedrock boilerplate by Roots with Composer. It includes WooCommerce and JetPack as dependencies, which when enabled will quickly allow you to create a store on WordPress. Plugins and themes should be managed with Composer exclusively. The only modifications made to the standard Bedrock boilerplate have been providing database credentials and main site url parameters via environment variables. With this configuration, the database is automatically configured such that the installer will not ask you for database credentials. While Bedrock provides support to replicate this configuration in a ``.env`` file for local development, an example Lando configuration file is included as the recommendated method to do so. WordPress is a blogging and lightweight CMS written in PHP, and Bedrock is a Composer-based WordPress boilerplate project with a slightly modified project structure and configuration protocol. WooCommerce is an open-source eCommerce platform and plugin for WordPress. ###### Features: - PHP 7.4 - MariaDB 10.4 - Automatic TLS certificates - Composer-based build View the [repository on GitHub](https://github.com/platformsh-templates/wordpress-woocommerce). ![Deploy on ](https://platform.sh/images/deploy/lg-blue.svg) WordPress (Bedrock) ![WordPress (Bedrock)](data:image/svg+xml,%3Csvg xmlns='http://www.w3.org/2000/svg' width='225' height='225'%3E%3Cdefs%3E%3Cstyle%3E.cls-1%7Bfill:%23525ddc%7D%3C/style%3E%3C/defs%3E%3Cg %3E%3Cg %3E%3Cpath class='cls-1' d='M112.52 74.93V42.67a4.68 4.68 0 0 0-5.48-4.4Q56.94 46.63 6.82 55c-2.25.38-4.33.8-5.69-1.51A6.75 6.75 0 0 1 .05 50.4C0 35.56 0 20.72 0 5.89A6 6 0 0 1 5.92 0h212.81A6 6 0 0 1 225 6.29v43.27a8.1 8.1 0 0 1-6.63 7.7C207.2 59.15 196 61 184.87 62.85l-71.93 12a2.77 2.77 0 0 1-.5 0zM112.47 150.06v31.76a4.68 4.68 0 0 0 5.74 4.86l101.47-17a4.6 4.6 0 0 1 5.33 4.39v45.76c0 2.14-3 5.07-5.14 5.14H6.52c-4 0-6.52-2.47-6.52-6.53V175.7a8.22 8.22 0 0 1 6.88-8q16.62-2.79 33.25-5.54l71.93-12a2.77 2.77 0 0 1 .5 0z'/%3E%3Cpath class='cls-1' d='M112.56 150.15v-37.63l-.08.08 107.04-17.92a4.62 4.62 0 0 1 5.48 4.73v25a8.1 8.1 0 0 1-6.69 7.9c-9.35 1.58-18.71 3.1-28.07 4.66q-35.33 5.88-70.65 11.79c-2.38.4-4.75.87-7.12 1.3zM112.44 74.84v37.76l.08-.08c-9.61 1.56-19.23 3.1-28.83 4.7Q48.58 123.06 13.48 129c-2.47.41-4.94.77-7.4 1.22-3.75.67-6.07-1.2-6.07-5v-25a8.25 8.25 0 0 1 6.37-7.42c10.41-1.8 20.85-3.53 31.28-5.27q35.34-5.88 70.7-11.79c1.4-.23 2.78-.54 4.17-.81z'/%3E%3C/g%3E%3C/g%3E%3C/svg%3E) WordPress (Bedrock) This template builds WordPress on Platform.sh using the Bedrock boilerplate by Roots with Composer. Plugins and themes should be managed with Composer exclusively. The only modifications made to the standard Bedrock boilerplate have been providing database credentials and main site url parameters via environment variables. With this configuration, the database is automatically configured such that the installer will not ask you for database credentials. While Bedrock provides support to replicate this configuration in a `.env` file for local development, an example Lando configuration file is included as the recommendated method to do so. WordPress is a blogging and lightweight CMS written in PHP, and Bedrock is a Composer-based WordPress boilerplate project with a slightly modified project structure and configuration protocol. ###### Features: - PHP 7.4 - MariaDB 10.4 - Automatic TLS certificates - Composer-based build View the [repository on GitHub](https://github.com/platformsh-templates/wordpress-bedrock). ![Deploy on ](https://platform.sh/images/deploy/lg-blue.svg) WordPress (Composer) ![WordPress (Composer)](data:image/svg+xml;base64,PHN2ZyB3aWR0aD0iMjQiIGhlaWdodD0iMjQiIHZpZXdCb3g9IjAgMCAyNCAyNCIgZmlsbD0ibm9uZSIgeG1sbnM9Imh0dHA6Ly93d3cudzMub3JnLzIwMDAvc3ZnIj4KPGcgY2xpcC1wYXRoPSJ1cmwoI2NsaXAwXzY1MTZfMTQwMzcpIj4KPHBhdGggZmlsbC1ydWxlPSJldmVub2RkIiBjbGlwLXJ1bGU9ImV2ZW5vZGQiIGQ9Ik0xMi4wMjU5IDAuOTk5NDQ0QzE0Ljg2NTIgMC45OTk0NDQgMTcuNTEwOSAyLjA5NjQ1IDE5LjQ0NjggMy45MDMyOUMxOC40Nzg5IDMuOTAzMjkgMTcuNTEwOSA0LjQxOTUzIDE3LjUxMDkgNS43NzQ2NkMxNy40NDY0IDguNDIwMzkgMjAuNjcyOSA5LjAwMTE3IDE4LjkzMDYgMTQuMjkyNkwxNy41MTA5IDE4LjY4MDdMMTMuNTc0NiA3LjEyOTc5QzEzLjUxMDEgNi45MzYyIDEzLjU3NDYgNi44NzE2NyAxMy44MzI3IDYuODcxNjdIMTQuOTI5N0MxNC45OTQzIDYuODcxNjcgMTUuMDU4OCA2LjgwNzE0IDE1LjA1ODggNi43NDI2MVY2LjA5NzMxQzE1LjA1ODggNi4wMzI3OCAxNC45OTQzIDUuOTY4MjUgMTQuOTI5NyA1Ljk2ODI1QzEyLjgwMDMgNi4wMzI3OCAxMC43MzUzIDYuMDMyNzggOC42NzAzNCA1Ljk2ODI1QzguNjA1ODEgNS45NjgyNSA4LjU0MTI4IDYuMDMyNzggOC41NDEyOCA2LjA5NzMxVjYuNzQyNjFDOC41NDEyOCA2LjgwNzE0IDguNjA1ODEgNi44NzE2NyA4LjY3MDM0IDYuODcxNjdIOS43NjczNEMxMC4wMjU1IDYuODcxNjcgMTAuMDkgNi45MzYyIDEwLjE1NDUgNy4xMjk3OUwxMS43Njc4IDExLjUxNzhMOS4zMTU2MyAxOC44MDk3TDUuMzE0NzggNy4wNjUyNkM1LjI1MDI1IDYuOTM2MiA1LjMxNDc4IDYuODA3MTQgNS40NDM4MyA2LjgwNzE0SDYuNzM0NDNDNi43OTg5NiA2LjgwNzE0IDYuODYzNDkgNi43NDI2MSA2Ljg2MzQ5IDYuNjc4MDhWNi4wMzI3OEM2Ljg2MzQ5IDUuOTY4MjUgNi43OTg5NiA1LjkwMzcyIDYuNzM0NDMgNS45MDM3MkM1LjM3OTMgNS45NjgyNSA0LjA4ODcxIDUuOTY4MjUgMi43OTgxMSA2LjAzMjc4QzQuNzM0MDEgMi45OTk4NyA4LjE1NDEgMC45OTk0NDQgMTIuMDI1OSAwLjk5OTQ0NFpNMjEuNjQwOSA2LjgwNzE0QzIyLjQ3OTggOC4zNTU4NiAyMi45MzE1IDEwLjE2MjcgMjIuOTMxNSAxMi4wMzQxQzIyLjkzMTUgMTYuMTY0IDIwLjYwODQgMTkuNzc3NyAxNy4yNTI4IDIxLjY0OUwyMC42NzI5IDExLjk2OTVDMjEuMTg5MiAxMC40MjA4IDIxLjcwNTQgOC40MjAzOSAyMS42NDA5IDYuODA3MTRaTTE1LjcwNDEgMjIuMzU4OUMxNC41NDI2IDIyLjc0NjEgMTMuMzE2NSAyMy4wMDQyIDEyLjAyNTkgMjMuMDA0MkMxMC45Mjg5IDIzLjAwNDIgOS44MzE4NyAyMi44MTA2IDguODYzOTIgMjIuNTUyNUwxMi4yMTk1IDEyLjg3M0wxNS43MDQxIDIyLjM1ODlaTTcuMzE1MjEgMjEuOTA3MkMzLjYzNyAyMC4xNjQ5IDEuMDU1OCAxNi4zNTc2IDEuMDU1OCAxMS45Njk1QzEuMDU1OCAxMC4zNTYzIDEuMzc4NDUgOC44MDc1NyAyLjAyMzc1IDcuMzg3OTFMNy4zMTUyMSAyMS45MDcyWk0xMi4wMjU5IDAuMDMxNDk0MUMxOC42NzI1IDAuMDMxNDk0MSAyNC4wMjg1IDUuMzg3NDggMjQuMDI4NSAxMi4wMzQxQzI0LjAyODUgMTguNjgwNyAxOC42NzI1IDI0LjAzNjcgMTIuMDI1OSAyNC4wMzY3QzUuMzc5MzEgMjQuMDM2NyAwLjAyMzMxNTQgMTguNjE2MSAwLjAyMzMxNTQgMTEuOTY5NUMwLjAyMzMxNTQgNS4zMjI5NSA1LjM3OTMxIDAuMDMxNDk0MSAxMi4wMjU5IDAuMDMxNDk0MVoiIGZpbGw9IiM0NjQzNDIiLz4KPC9nPgo8ZGVmcz4KPGNsaXBQYXRoIGlkPSJjbGlwMF82NTE2XzE0MDM3Ij4KPHJlY3Qgd2lkdGg9IjI0IiBoZWlnaHQ9IjI0IiBmaWxsPSJ3aGl0ZSIvPgo8L2NsaXBQYXRoPgo8L2RlZnM+Cjwvc3ZnPgo=) WordPress (Composer) This template builds WordPress on Platform.sh using the [johnbloch/wordpress](https://github.com/johnpbloch/wordpress) "Composer Fork" of WordPress. Plugins and themes should be managed with Composer exclusively. A custom configuration file is provided that runs on Platform.sh to automatically configure the database, so the installer will not ask you for database credentials. For local-only configuration you can use a `wp-config-local.php` file that gets excluded from Git. WordPress is a blogging and lightweight CMS written in PHP. ###### Features: - PHP 8.1 - MariaDB 10.4 - Automatic TLS certificates - Composer-based build View the [repository on GitHub](https://github.com/platformsh-templates/wordpress-composer). ![Deploy on ](https://platform.sh/images/deploy/lg-blue.svg) WordPress (Vanilla) for Platform.sh ![WordPress (Vanilla) for Platform.sh](data:image/svg+xml;base64,PHN2ZyB3aWR0aD0iMjQiIGhlaWdodD0iMjQiIHZpZXdCb3g9IjAgMCAyNCAyNCIgZmlsbD0ibm9uZSIgeG1sbnM9Imh0dHA6Ly93d3cudzMub3JnLzIwMDAvc3ZnIj4KPGcgY2xpcC1wYXRoPSJ1cmwoI2NsaXAwXzY1MTZfMTQwMzcpIj4KPHBhdGggZmlsbC1ydWxlPSJldmVub2RkIiBjbGlwLXJ1bGU9ImV2ZW5vZGQiIGQ9Ik0xMi4wMjU5IDAuOTk5NDQ0QzE0Ljg2NTIgMC45OTk0NDQgMTcuNTEwOSAyLjA5NjQ1IDE5LjQ0NjggMy45MDMyOUMxOC40Nzg5IDMuOTAzMjkgMTcuNTEwOSA0LjQxOTUzIDE3LjUxMDkgNS43NzQ2NkMxNy40NDY0IDguNDIwMzkgMjAuNjcyOSA5LjAwMTE3IDE4LjkzMDYgMTQuMjkyNkwxNy41MTA5IDE4LjY4MDdMMTMuNTc0NiA3LjEyOTc5QzEzLjUxMDEgNi45MzYyIDEzLjU3NDYgNi44NzE2NyAxMy44MzI3IDYuODcxNjdIMTQuOTI5N0MxNC45OTQzIDYuODcxNjcgMTUuMDU4OCA2LjgwNzE0IDE1LjA1ODggNi43NDI2MVY2LjA5NzMxQzE1LjA1ODggNi4wMzI3OCAxNC45OTQzIDUuOTY4MjUgMTQuOTI5NyA1Ljk2ODI1QzEyLjgwMDMgNi4wMzI3OCAxMC43MzUzIDYuMDMyNzggOC42NzAzNCA1Ljk2ODI1QzguNjA1ODEgNS45NjgyNSA4LjU0MTI4IDYuMDMyNzggOC41NDEyOCA2LjA5NzMxVjYuNzQyNjFDOC41NDEyOCA2LjgwNzE0IDguNjA1ODEgNi44NzE2NyA4LjY3MDM0IDYuODcxNjdIOS43NjczNEMxMC4wMjU1IDYuODcxNjcgMTAuMDkgNi45MzYyIDEwLjE1NDUgNy4xMjk3OUwxMS43Njc4IDExLjUxNzhMOS4zMTU2MyAxOC44MDk3TDUuMzE0NzggNy4wNjUyNkM1LjI1MDI1IDYuOTM2MiA1LjMxNDc4IDYuODA3MTQgNS40NDM4MyA2LjgwNzE0SDYuNzM0NDNDNi43OTg5NiA2LjgwNzE0IDYuODYzNDkgNi43NDI2MSA2Ljg2MzQ5IDYuNjc4MDhWNi4wMzI3OEM2Ljg2MzQ5IDUuOTY4MjUgNi43OTg5NiA1LjkwMzcyIDYuNzM0NDMgNS45MDM3MkM1LjM3OTMgNS45NjgyNSA0LjA4ODcxIDUuOTY4MjUgMi43OTgxMSA2LjAzMjc4QzQuNzM0MDEgMi45OTk4NyA4LjE1NDEgMC45OTk0NDQgMTIuMDI1OSAwLjk5OTQ0NFpNMjEuNjQwOSA2LjgwNzE0QzIyLjQ3OTggOC4zNTU4NiAyMi45MzE1IDEwLjE2MjcgMjIuOTMxNSAxMi4wMzQxQzIyLjkzMTUgMTYuMTY0IDIwLjYwODQgMTkuNzc3NyAxNy4yNTI4IDIxLjY0OUwyMC42NzI5IDExLjk2OTVDMjEuMTg5MiAxMC40MjA4IDIxLjcwNTQgOC40MjAzOSAyMS42NDA5IDYuODA3MTRaTTE1LjcwNDEgMjIuMzU4OUMxNC41NDI2IDIyLjc0NjEgMTMuMzE2NSAyMy4wMDQyIDEyLjAyNTkgMjMuMDA0MkMxMC45Mjg5IDIzLjAwNDIgOS44MzE4NyAyMi44MTA2IDguODYzOTIgMjIuNTUyNUwxMi4yMTk1IDEyLjg3M0wxNS43MDQxIDIyLjM1ODlaTTcuMzE1MjEgMjEuOTA3MkMzLjYzNyAyMC4xNjQ5IDEuMDU1OCAxNi4zNTc2IDEuMDU1OCAxMS45Njk1QzEuMDU1OCAxMC4zNTYzIDEuMzc4NDUgOC44MDc1NyAyLjAyMzc1IDcuMzg3OTFMNy4zMTUyMSAyMS45MDcyWk0xMi4wMjU5IDAuMDMxNDk0MUMxOC42NzI1IDAuMDMxNDk0MSAyNC4wMjg1IDUuMzg3NDggMjQuMDI4NSAxMi4wMzQxQzI0LjAyODUgMTguNjgwNyAxOC42NzI1IDI0LjAzNjcgMTIuMDI1OSAyNC4wMzY3QzUuMzc5MzEgMjQuMDM2NyAwLjAyMzMxNTQgMTguNjE2MSAwLjAyMzMxNTQgMTEuOTY5NUMwLjAyMzMxNTQgNS4zMjI5NSA1LjM3OTMxIDAuMDMxNDk0MSAxMi4wMjU5IDAuMDMxNDk0MVoiIGZpbGw9IiM0NjQzNDIiLz4KPC9nPgo8ZGVmcz4KPGNsaXBQYXRoIGlkPSJjbGlwMF82NTE2XzE0MDM3Ij4KPHJlY3Qgd2lkdGg9IjI0IiBoZWlnaHQ9IjI0IiBmaWxsPSJ3aGl0ZSIvPgo8L2NsaXBQYXRoPgo8L2RlZnM+Cjwvc3ZnPgo=) WordPress (Vanilla) for Platform.sh This template builds WordPress on Platform.sh, installing WordPress to a subdirectory instead of to the project root. It does not use a package management tool like Composer, and updating core, themes, and plugins should be done with care. A custom configuration file is provided that runs on Platform.sh to automatically configure the database, so the installer will not ask you for database credentials. WordPress is a blogging and lightweight CMS written in PHP. ###### Features: - PHP 7.4 - MariaDB 10.4 - Automatic TLS certificates View the [repository on GitHub](https://github.com/platformsh-templates/wordpress-vanilla). ![Deploy on ](https://platform.sh/images/deploy/lg-blue.svg) ##### Modify your PHP runtime when using a composable image **Note**: This section is only relevant when using the Platform.sh [composable image (BETA)](https://docs.platform.sh/create-apps/app-reference/composable-image.md). The following table presents the possible modifications you can make to your PHP primary runtime using the `stack` key and composable image. Each modification should be listed below the stack chosen (i.e. `extensions` are enabled under `.applications.frontend.stack[0]["php@8.3"].extensions` for PHP 8.3). See the example below for more details. | Name | Type | Description | |-----------------------------|----------------------------------------------------------------------------------------------------------------------------------|--------------------------------------------------------------------------------------------| | `extensions` | List of `string`s OR [extensions definitions](https://docs.platform.sh/create-apps/app-reference/composable-image.md#php-extensions-and-python-packages) | [PHP extensions](https://docs.platform.sh/languages/php/extensions.md) to enable. | | `disabled_extensions` | List of `string`s | [PHP extensions](https://docs.platform.sh/languages/php/extensions.md) to disable. | | `request_terminate_timeout` | `integer` | The timeout for serving a single request after which the PHP-FPM worker process is killed. | | `sizing_hints` | A [sizing hints definition](https://docs.platform.sh/create-apps/app-reference/composable-image.md#sizing-hints) | The assumptions for setting the number of workers in your PHP-FPM runtime. | | `xdebug` | An Xdebug definition | The setting to turn on [Xdebug](https://docs.platform.sh/languages/php/xdebug.md). | Here is an example configuration: ```yaml {location=".platform.app.yaml"} name: frontend stack: - "php@8.3": extensions: - apcu # A PHP extension made available to the PHP runtime - sodium - xsl - pdo_sqlite xdebug: idekey: YOUR_KEY disabled_extensions: - gd request_terminate_timeout: 200 sizing_hints: request_memory: 45 reserved_memory: 70 - "php83Extensions.apcu" # A PHP extension made available to all runtimes. - "python@3.12" - "python312Packages.yq" ``` **Note**: You can also set your [app’s runtime timezone](https://docs.platform.sh/create-apps/timezone.md). #### Extensions p:last-child]:mb-0 [&>h3]:mt-0 rounded-lg" > ####### Note You can now use composable image (BETA) to install runtimes and tools in your application container. To find out more, see the [dedicated documentation page](https://docs.platform.sh/create-apps/app-reference/composable-image.md). PHP has a number of [extensions](https://pecl.php.net/) developed by members of the community. Some of them are available for Platform.sh containers. **Warning**: The information on this page applies to Grid and Dedicated Gen 3 plans. See also [PHP extensions on Dedicated Gen 2 plans](https://docs.platform.sh/dedicated-environments/dedicated-gen-2/environment-differences.md#extensions). You can define the PHP extensions you want to enable or disable: ```yaml {location=".platform.app.yaml"} runtime: extensions: - raphf - http - igbinary - redis disabled_extensions: - sqlite3 ``` You can also [include configuration options](https://docs.platform.sh/create-apps/app-reference/single-runtime-image.md#extensions) for specific extensions. The following table shows all extensions that are available (Avail) and on by default (Def). You can turn on the available ones with the `extensions` key and turn off those on by default with the `disabled_extensions` key. (Extensions marked with `*` are built in and can't be turned off.) | Extension | 5.4 | 5.5 | 5.6 | 7.0 | 7.1 | 7.2 | 7.3 | 7.4 | 8.0 | 8.1 | 8.2 | 8.3 | 8.4 | | ``amqp`` | Avail Avail Avail Avail Avail Avail Avail Avail Avail Avail | ``apc`` | Avail | ``apcu`` | Avail Avail Avail Avail Avail Avail Avail Avail Avail Avail Avail Avail Avail | ``apcu_bc`` | Avail Avail Avail Avail Avail | ``applepay`` | Avail Avail Avail Avail | ``bcmath`` | Def Def Def Def Def Def Def Def Def Def | ``blackfire`` | Avail Avail Avail Avail Avail Avail Avail Avail Avail Avail Avail Avail | ``bz2`` | Avail Def Def Def Def Def Def Def Def Def | ``calendar`` | Def Def Def Def Def Def Def Def Def Def | ``ctype`` | Def Def Def Def Def Def Def Def Def Def | ``curl`` | Def Def Def Def Def Def Def Def Def Def Def Def Def | ``datadog`` | Avail Avail | ``dba`` | Def Def Def Def Def Def Def Def Def Def | ``dom`` | Def Def Def Def Def Def Def Def Def Def | ``enchant`` | Avail Avail Avail Avail Avail Avail Avail Avail Avail Avail Avail Avail | ``event`` | Avail Avail Avail Avail Avail Avail Avail Avail | ``exif`` | Def Def Def Def Def Def Def Def Def Def | ``ffi`` | Avail Avail Avail Avail Avail | ``fileinfo`` | Def Def Def Def Def Def Def Def Def Def | ``ftp`` | Def Def Def Def Def Def Def Def Def Def | ``gd`` | Def Def Def Def Def Def Def Def Def Def Def Def Def | ``gearman`` | Avail Avail Avail | ``geoip`` | Avail Avail Avail Avail Avail Avail Avail Avail Avail Avail Avail Avail | ``gettext`` | Def Def Def Def Def Def Def Def Def Def | ``gmp`` | Avail Avail Avail Avail Avail Avail Avail Avail Avail Avail Avail Avail | ``gnupg`` | Avail Avail | ``http`` | Avail Avail Avail Avail Avail Avail Avail Avail | ``iconv`` | Def Def Def Def Def Def Def Def Def Def | ``igbinary`` | Avail Avail Avail Avail Avail Avail Avail Avail Avail Avail | ``imagick`` | Avail Avail Avail Avail Avail Avail Avail Avail Avail with``webp`` Avail with``webp`` Avail with``webp`` Avail with``webp`` | ``imap`` | Avail Avail Avail Avail Avail Avail Avail Avail Avail Avail Avail Avail Avail | ``interbase`` | Avail Avail Avail Avail Avail Avail Avail Avail Avail Avail Avail | ``intl`` | Def Def Def Def Def Def Def Def Def Def Def Def Def | ``ioncube`` | Avail Avail Avail Avail Avail Avail Avail Avail | ``json`` | Def Def Def Def Def Def * * * * * | ``ldap`` | Avail Avail Avail Avail Avail Avail Avail Avail Avail Avail Avail Avail | ``mailparse`` | Avail Avail Avail Avail Avail Avail Avail Avail Avail | ``mbstring`` | Def Def Def Def Def Def Def Def Def Def | ``mcrypt`` | Def Def Def Avail Avail | ``memcache`` | Avail Avail Avail | ``memcached`` | Avail Avail Avail Avail Avail Avail Avail Avail Avail Avail Avail Avail | ``mongo`` | Avail Avail Avail | ``mongodb`` | Avail Avail Avail Avail Avail Avail Avail Avail Avail Avail | ``msgpack`` | Avail Avail Avail Avail Avail Avail Avail Avail Avail Avail | ``mssql`` | Avail Avail Avail | ``mysql`` | Def Def Def Avail Avail Avail Avail Avail Avail Avail Avail Avail | ``mysqli`` | Def Def Def Def Def Def Def Def Def Def Def Def Def | ``mysqlnd`` | Def Def Def Def Def Def Def Def Def Def Def Def Def | ``newrelic`` | Avail Avail Avail Avail Avail Avail Avail Avail Avail Avail | ``oauth`` | Avail Avail Avail Avail Avail Avail Avail Avail Avail | ``odbc`` | Avail Avail Avail Avail Avail Avail Avail Avail Avail Avail Avail Avail | ``opcache`` | Def Def Def Def Def Def Def Def Def Def Def | ``openswoole`` | Avail Avail | ``opentelemetry`` | Avail Avail | ``pdo`` | Def Def Def Def Def Def Def Def Def Def Def Def Def | ``pdo_dblib`` | Avail Avail Avail Avail Avail Avail Avail Avail Avail Avail Avail Avail Avail | ``pdo_firebird`` | Avail Avail Avail Avail Avail Avail Avail Avail | ``pdo_mysql`` | Def Def Def Def Def Def Def Def Def Def Def Def Def | ``pdo_odbc`` | Avail Avail Avail Avail Avail Avail Avail Avail Avail Avail Avail Avail Avail | ``pdo_pgsql`` | Avail Avail Avail Avail Avail Avail Avail Avail Avail Avail Avail Avail Avail | ``pdo_sqlite`` | Def Def Def Def Def Def Def Def Def Def Def Def Def | ``pdo_sqlsrv`` | Avail Avail Avail Avail Avail Avail Avail Avail Avail | ``pecl-http`` | Avail | ``pgsql`` | Avail Avail Avail Avail Avail Avail Avail Avail Avail Avail Avail Avail Avail | ``phar`` | Def Def Def Def Def Def Def Def Def Def | ``phpdbg`` | Avail | ``pinba`` | Avail Avail Avail | ``posix`` | Def Def Def Def Def Def Def Def Def Def | ``propro`` | Avail | ``protobuf`` | Avail | ``pspell`` | Avail Avail Avail Avail Avail Avail Avail Avail Avail Avail Avail Avail | ``pthreads`` | Avail Avail | ``raphf`` | Avail Avail Avail Avail Avail Avail Avail | ``rdkafka`` | Avail Avail Avail | ``readline`` | Avail Avail Avail Avail Avail Avail Avail Avail Avail Avail Avail Avail | ``recode`` | Avail Avail Avail Avail Avail Avail Avail | ``redis`` | Avail Avail Avail Avail Avail Avail Avail Avail Avail Avail Avail Avail Avail | ``shmop`` | Avail Avail Avail Avail Avail Avail Avail Avail Avail Avail | ``simplexml`` | Def Def Def Def Def Def Def Def Def Def | ``snmp`` | Avail Avail Avail Avail Avail Avail Avail Avail Avail Avail Avail Avail | ``soap`` | Def Def Def Def Def Def Def Def Def Def | ``sockets`` | Def Def Def Def Def Def Def Def Def Def | ``sodium`` | Avail Avail Avail Avail Avail Avail Avail Avail | ``sourceguardian`` | Avail Avail Avail Avail Avail Avail Avail Avail Avail Avail | ``spplus`` | Avail Avail | ``sqlite3`` | Def Def Def Def Def Def Def Def Def Def Def Def Def | ``sqlsrv`` | Avail Avail Avail Avail Avail Avail Avail Avail Avail | ``ssh2`` | Avail Avail Avail Avail Avail Avail Avail Avail Avail Avail Avail Avail | ``swoole`` | Avail Avail | ``sybase`` | Avail Avail Avail Avail Avail Avail Avail Avail Avail Avail Avail Avail | ``sysvmsg`` | Def Def Def Def Def Def Def Def Def Def | ``sysvsem`` | Def Def Def Def Def Def Def Def Def Def | ``sysvshm`` | Def Def Def Def Def Def Def Def Def Def | ``tideways`` | Avail Avail Avail Avail Avail Avail Avail Avail | ``tideways_xhprof`` | Avail Avail Avail Avail Avail Avail Avail | ``tidy`` | Avail Avail Avail Avail Avail Avail Avail Avail Avail Avail Avail Avail | ``tokenizer`` | Def Def Def Def Def Def Def Def Def Def | ``uuid`` | Avail Avail Avail Avail Avail Avail Avail Avail | ``uv`` | Avail | ``wddx`` | Avail Avail Avail Avail Avail | ``xcache`` | Avail Avail | ``xdebug`` | Avail Avail Avail Avail Avail Avail Avail Avail Avail Avail Avail Avail | ``xhprof`` | Avail Avail Avail | ``xml`` | Def Def Def Def Def Def Def Def Def Def | ``xmlreader`` | Def Def Def Def Def Def Def Def Def Def | ``xmlrpc`` | Avail Avail Avail Avail Avail Avail Avail Avail Avail Avail Avail Avail Avail | ``xmlwriter`` | Def Def Def Def Def Def Def Def Def Def | ``xsl`` | Avail Avail Avail Avail Avail Avail Avail Avail Avail Avail Avail Avail Avail | ``yaml`` | Avail Avail Avail Avail Avail Avail Avail Avail | ``zbarcode`` | Avail Avail Avail Avail | ``zendopcache`` | Def * * * * * * * * * * * * | ``zip`` | Def Def Def Def Def Def Def Def Def Def Some built-in modules are always on: - `date` - `filter` - `hash` - `json` (from 8.0) - `libxml` - `openssl` - `pcntl` - `pcre` - `Reflection` - `session` - `SPL` - `standard` - `Zend OPcache` (from 5.5) - `zlib` To see a complete list of the compiled PHP extensions, run the following [CLI command](https://docs.platform.sh/administration/cli/_index.md): ```bash platform ssh "php -m" ``` ###### Custom PHP extensions It's possible to use an extension not listed here, but it takes slightly more work: 1. Download the `.so` file for the extension as part of your build hook using `curl` or similar. It can also be added to your Git repository if the file isn't publicly downloadable, but committing large binary blobs to Git is generally not recommended. 2. Load the extension using an absolute path by [customizing the PHP settings](https://docs.platform.sh/languages/php.md#customize-php-settings) For example, if the extension is named `spiffy.so` and is in your [app root](https://docs.platform.sh/create-apps/app-reference/single-runtime-image.md#root-directory), your configuration looks like the following: ```yaml {location=".platform.app.yaml"} variables: php: extension: /app/spiffy.so ``` #### Performance tuning p:last-child]:mb-0 [&>h3]:mt-0 rounded-lg" > ####### Note You can now use composable image (BETA) to install runtimes and tools in your application container. To find out more, see the [dedicated documentation page](https://docs.platform.sh/create-apps/app-reference/composable-image.md). Once your app is up and running it still needs to be kept fast. Platform.sh offers a wide degree of flexibility in how PHP behaves, but that does mean you may need to take a few steps to ensure your site is running optimally. The following recommendations are guidelines only. They're also listed in about the order to investigate them. ###### Upgrade to PHP 8 To make a PHP-based site run faster, the first step is to upgrade the PHP version. Upgrading the PHP version might require changes to your app. For more details and recommendations, see the [PHP migration guides](https://www.php.net/manual/en/migration80.php). To change your PHP version, change the [`type` in your app configuration](https://docs.platform.sh/create-apps/app-reference/single-runtime-image.md#types). Before merging to production, test the change on a branch and make sure that your app is working as expected. ###### Optimize the FPM worker count PHP-FPM uses a fixed number of simultaneous worker processes to handle incoming requests. If more simultaneous requests are received than the number of workers, then some requests wait until worker processes are available. The default worker count is set to a conservative default value. To determine and set the optimal value for your app, see [PHP-FPM sizing](https://docs.platform.sh/languages/php/fpm.md). ###### OPcache preloading OPcache preloading loads selected files into shared memory, making their content (functions, classes) globally available for requests. It also removes the need to include these files later. When OPcache is correctly configured, it can result in significant improvements to both CPU and memory usage. Consult your framework's documentation to see if there are recommendations for optimal preload configuration or ready-to-use preload scripts. OPcache is only available on PHP 7.4+ and uses PHP-CGI. If your PHP version doesn't support OPcache, this is a good reason to upgrade. Note that the only way to clear the preload cache is by [restarting PHP-FPM](#restart-php-fpm). If you have [disabled OPcache timestamp validation](#disable-opcache-timestamp-validation), you need to clear the OPcache explicitly on deployment (which can be done by restarting PHP-FPM). ####### Enable OPcache preloading To enable preloading, add a variable that specifies a preload script: ```yaml {location=".platform.app.yaml"} variables: php: opcache.preload: '' ``` `` is a file path relative to the [app root](https://docs.platform.sh/create-apps/app-reference/single-runtime-image.md#root-directory). It may be any PHP script that calls `opcache_compile_file()`. The following example uses a `preload.php` file as the preload script. This script loads all `.php` files in the `vendor` directory (and subdirectories): ```php {location="preload.php"} $file) { // This is the important part! opcache_compile_file($file[0]); } ``` ####### Configure OPcache OPcache needs to be tuned before production usage and can be configured the [same way as PHP](https://docs.platform.sh/languages/php.md#customize-php-settings). Let the app run for a while before tuning OPcache since the preload script may change some of the configuration. ######## Set the maximum number of cached files `opcache.max_accelerated_files` is the maximum number of files that OPcache can cache at once. If this value is lower than the number of files in the app, the cache becomes less effective because it starts [thrashing](https://en.wikipedia.org/wiki/Thrashing_(computer_science)). To determine the maximum number of files to cache, follow these steps: 1. Connect to the container via SSH using the [CLI](https://docs.platform.sh/development/ssh.md) by running `platform ssh`. 2. Determine roughly how many `.php` files your app has by running this command from [your app root](https://docs.platform.sh/create-apps/app-reference/single-runtime-image.md#root-directory): ```bash find . -type f -name '*.php' | wc -l ``` Note that the returned valued is an approximation. Some apps have PHP code in files that don't end in `.php` or files that are generated at runtime. 3. Set `opcache.max_accelerated_files` to a value slightly higher than the returned number. PHP automatically rounds the value up to the next highest prime number. An example configuration: ```yaml {location=".platform.app.yaml"} variables: php: 'opcache.max_accelerated_files': 22000 ``` ######## Set memory consumption `opcache.memory_consumption` is the total memory (in megabytes) that OPcache can use with FastCGI. If the app uses more than this, the cache starts [thrashing](https://en.wikipedia.org/wiki/Thrashing_(computer_science)) and becomes less effective. Determining the optimal limit to memory consumption requires executing code via a web request to get adequate statistics. [CacheTool](https://github.com/gordalina/cachetool) is an open-source tool to help you get the statistics. To determine the total amount of memory to use, follow these steps: 1. Connect to the container via SSH using the [CLI](https://docs.platform.sh/development/ssh.md) by running `platform ssh`. 2. Change to the `/tmp` directory (or any other non-web-accessible writable directory) with `cd /tmp`. 3. Download CacheTool with `curl -sLO https://github.com/gordalina/cachetool/releases/latest/download/cachetool.phar`. 4. Make CacheTool executable with `chmod +x cachetool.phar`. 5. Check the OPcache status for FastCGI commands by running the following command: ```bash php cachetool.phar opcache:status --fcgi=$SOCKET ``` The `--fcgi=$SOCKET` option ensures the PHP-FPM process on the server connects through the right socket. 6. Analyze the output to determine the optimal value for `opcache.memory_consumption`. The most important values from CacheTool's output are the following: - `Memory used` - `Memory free` - `Oom restarts` (out of memory restarts) If the value is different than 0, you don't have enough memory allocated to OPcache. If `Memory free` is too low or `Oom Restarts` too high, set a higher value for memory consumption. 7. Set `opcache.memory_consumption`. Note: The unit for `opcache.memory_consumption` is megabytes. An example configuration: ```yaml {location=".platform.app.yaml"} variables: php: 'opcache.memory_consumption': 96 ``` 8. [Restart PHP-FPM](#restart-php-fpm) and make sure that OPcache works as expected by rerunning CacheTool with the following command: ```bash php cachetool.phar opcache:status --fcgi=$SOCKET ``` 9. Remove CacheTool by deleting the `cachetools.phar` file with `rm -rf cachetools.phar`. ####### Disable OPcache timestamp validation By default, OPcache checks that the cached version of a file is always up-to-date. This means that every time a cached file is used, OPcache compares it to the file on disk. If that file has changed, it gets reloaded and re-cached. This allows to support apps that generate compiled PHP code from user configuration. If you know your code isn't going to change outside a new deployment, you can disable that check and get a small performance improvement. Timestamp validation can be disabled by adding the following variable to your [app configuration](https://docs.platform.sh/create-apps/_index.md): ```yaml {location=".platform.app.yaml"} variables: php: 'opcache.validate_timestamps': 0 ``` When you have disabled OPcache timestamp validation, you need to explicitly clear OPcache on deployment by [restarting PHP-FPM](#restart-php-fpm). Note: If your app generates PHP code at runtime based on user configuration, don't disable timestamp validation. Doing so would prevent updates to the generated code from being loaded. ###### Restart PHP-FPM To force a restart of PHP-FPM: 1. Connect to your app container via SSH using the [CLI](https://docs.platform.sh/development/ssh.md) by running `platform ssh`. 2. Run `pkill -f -u "$(whoami)" php-fpm`. ###### Optimize your code To optimize your app, consider using a [profiler](https://docs.platform.sh/increase-observability/integrate-observability.md). A profiler helps determine what slow spots can be found and addressed and helps improve performance. The web agency [Pixelant](https://www.pixelant.net/) has released a [log analyzer tool for Platform.sh](https://github.com/pixelant/platformsh-analytics) that offers visualization of access logs to determine how much memory requests are using on average. It also offers additional insights into the operation of your site and can suggest places to further optimize your configuration or when it's time to increase your plan size. Note that this tool is maintained by a third party, not by Platform.sh. #### PHP-FPM sizing p:last-child]:mb-0 [&>h3]:mt-0 rounded-lg" > ####### Note You can now use composable image (BETA) to install runtimes and tools in your application container. To find out more, see the [dedicated documentation page](https://docs.platform.sh/create-apps/app-reference/composable-image.md). PHP-FPM helps improve your app's performance by maintaining pools of workers that can process PHP requests. This is particularly useful when your app needs to handle a high number of simultaneous requests. By default, Platform.sh automatically sets a maximum number of PHP-FPM workers for your app. This number is calculated based on three parameters: - The container memory: the amount of memory you can allot for PHP processing depending on [app size](https://docs.platform.sh/create-apps/app-reference/single-runtime-image.md#sizes). - The request memory: the amount of memory an average PHP request is expected to require. - The reserved memory: the amount of memory you need to reserve for tasks that aren't related to requests. The number is calculated as follows: ![The sum of container memory minus reserved memory divided by request memory](https://docs.platform.sh/images/php/PHP-FPM-Workers-Calculation.png "0.2") Note that when the resulting number is a decimal, it's rounded up to set the maximum number of workers. Also, the minimum number of PHP-FPM workers is 2. **Note**: To ensure that Platform.sh doesn’t add more workers than the CPU can handle, a CPU limit applies as soon as the number of set workers equals or exceeds 25. This limit is calculated as follows: ``number of vCPU cores * 5``. For example, if you have a 2XL container with 8 CPU cores, you can have up to 40 workers as long as you have sufficient memory. To adjust the maximum number of PHP-FPM workers depending on your app's needs, follow the instructions on this page. ###### Before you begin You need: - An up-and-running web app in PHP, complete with [PHP-FPM](https://www.php.net/manual/en/install.fpm.php) - The [Platform.sh CLI](https://docs.platform.sh/administration/cli.md) Note that the memory settings mentioned on this page are different from the [`memory_limit` PHP setting](https://docs.platform.sh/languages/php.md). The `memory_limit` setting is the maximum amount of memory a single PHP process can use before it's automatically terminated. ###### 1. Estimate the optimal request memory for your app To determine what the optimal request memory is for your app, you can refer to your PHP access logs. Run a command similar to: ```bash platform log --lines 5000 php.access | awk '{print $6}' | sort -n | uniq -c ``` This command takes into account the last 5,000 requests that reached PHP-FPM. You can adjust this number depending on the amount of traffic on your site. In the output, you can see how many requests used how much memory, in KB. For example: ```bash 2654 2048 431 4096 584 8192 889 10240 374 12288 68 46384 ``` The output shows that: - The majority of requests peaked at 2,048 KB of memory. - Most other requests used up to around 10 MB of memory. - A few requests used up to around 12 MB of memory. - Only 68 requests peaked at around 46 MB of memory. In this situation, you might want to be cautious and [set your request memory](#2-adjust-the-maximum-number-of-php-fpm-workers) to 12 MB. Setting a lower request memory presents a risk of allowing more concurrent requests. This can result in memory swapping and latencies. For further help in estimating the optimal request memory for your app, use the [log analyzer tool for Platform.sh](https://github.com/pixelant/platformsh-analytics) by [Pixelant](https://www.pixelant.net/). This tool offers a better visualization of access logs. It also provides additional insights into the operation of your app. These can help you further optimize your configuration and provide guidance on when to increase your plan size. Note that this tool is maintained by a third party, not by Platform.sh. ###### 2. Adjust the maximum number of PHP-FPM workers By default, the request memory is set to 45 MB and the reserved memory is set to 70 MB. These values allow most programs to run, but you can amend them to fit your needs. To do so, adjust your [app configuration](https://docs.platform.sh/create-apps.md). Under `runtime` in the [`sizing_hints` setting](https://docs.platform.sh/create-apps/app-reference/single-runtime-image.md#sizing-hints), set the values for `reserved_memory` and `request_memory`. For example, if you estimate your [optimal request memory](#1-estimate-the-optimal-request-memory-for-your-app) to be 110 MB and your reserved memory to be 80 MB, you can use: ```yaml {location=".platform.app.yaml"} runtime: sizing_hints: request_memory: 110 reserved_memory: 80 ``` Note that the minimum value for the `request_memory` key is 10 MB and the minimum value for the `reserved_memory` key is 70 MB. If you set lower values, they're automatically overridden with those minimums. To check the maximum number of PHP-FPM workers available to your app, run the following command, where `children` refers to PHP-FPM workers: ```bash platform ssh "grep -e '^pm.max_children' /etc/php/*/fpm/php-fpm.conf" ``` You get output similar to the following: ```bash pm.max_children = 5 ``` #### Using Xdebug p:last-child]:mb-0 [&>h3]:mt-0 rounded-lg" > ####### Note You can now use composable image (BETA) to install runtimes and tools in your application container. To find out more, see the [dedicated documentation page](https://docs.platform.sh/create-apps/app-reference/composable-image.md). [Xdebug](https://xdebug.org/) is a real-time debugger extension for PHP. While usually used for local development, it can also be helpful for debugging aberrant behavior on the server. As configured on Platform.sh, it avoids any runtime overhead for non-debug requests, even in production, and only allows connections via SSH tunnels to avoid any security issues. Note that Xdebug runs only on your app containers. So you can't use it for [worker containers](https://docs.platform.sh/create-apps/workers.md). Also, note that if you use a [custom start command](https://docs.platform.sh/languages/php.md#alternate-start-commands), Xdebug is automatically disabled. ###### Before you begin The following table shows the PHP versions where Xdebug is available on Grid environments: | 5.4 | 5.5 | 5.6 | 7.0 | 7.1 | 7.2 | 7.3 | 7.4 | 8.0 | 8.1 | 8.2 | 8.3 | 8.4 | | Avail Avail Avail Avail Avail Avail Avail Avail Avail Avail Avail Avail You also need: - The Platform.sh [CLI](https://docs.platform.sh/administration/cli.md) - A Xdebug-compatible IDE installed on your machine. For setup instructions, consult your IDE's Xdebug documentation, such as that for [PHPStorm](https://www.jetbrains.com/help/phpstorm/configuring-xdebug.md). ###### 1. Set up Xdebug Xdebug runs as a second PHP-FPM process used only for debugging requests, leaving the normal process unaffected. To enable Xdebug, add the following to your [app configuration](https://docs.platform.sh/create-apps/app-reference/single-runtime-image.md): ```yaml {location=".platform.app.yaml"} runtime: xdebug: idekey: ``` can be any arbitrary alphanumeric string. When that key is defined, Platform.sh starts a second PHP-FPM process on the container that's identically configured but also has Xdebug enabled. Only incoming requests that have an Xdebug cookie or query parameter set are forwarded to the debug PHP-FPM process. All other requests are directed to the normal PHP-FPM process and thus have no performance impact. If you have enabled the [router cache](https://docs.platform.sh/define-routes/cache.md), you need to explicitly add the Xdebug cookie (`XDEBUG_SESSION`) to the cookie allowlist. Depending on the cookies already listed, the result should look similar to the following: ```yaml {location=".platform/routes.yaml"} "https://{default}/": # ... cache: enabled: true cookies: ['/^SS?ESS/', 'XDEBUG_SESSION'] ``` Xdebug has several configuration options available. They can be set the same way as any other [PHP setting](https://docs.platform.sh/languages/php.md#php-settings). For a full list of available options, consult the [Xdebug documentation](https://xdebug.org/docs/). ###### 2. Use Xdebug ####### Open a tunnel To open an SSH tunnel to the server from a local checkout of your app, run the following [CLI command](https://docs.platform.sh/administration/cli.md) : ```bash platform environment:xdebug ``` That SSH tunnel allows your IDE and the server to communicate debug information securely. By default, Xdebug operates on port `9003`. Generally, it's best to configure your IDE to use that port. To use an alternate port, use the `--port` flag. To close the tunnel and terminate the debug connection, press Ctrl + C. **On Dedicated Gen 3**: Note that because you have several virtual machines running but your tunnel is connected to only one of them, your requests don’t always reach the same host. ####### Install an Xdebug helper While Xdebug can be triggered from the browser by adding a special query parameter, the preferred way is to use a browser plugin helper. Helpers are available for [Firefox](https://addons.mozilla.org/en-US/firefox/addon/xdebug-helper-for-firefox/) and [Chrome](https://chrome.google.com/webstore/detail/xdebug-helper/eadndfjplgieldjbigjakmdgkmoaaaoc). Their respective plugin pages document how to trigger them when needed. ###### 3. Configure your IDE Follow the instructions for your IDE, such as those for [PHPStorm](https://www.jetbrains.com/help/phpstorm/configuring-xdebug.md). The common steps for setup usually include: 1. Configuring the Xdebug debug port and making sure it's set to the expected value (`9003` as default or the value you chose with `--port` when opening the tunnel). 2. Making sure that external connections are allowed. 3. Adding a new server for your Platform.sh environment. The Host should be the hostname of the environment on Platform.sh you are debugging. The Port should always be `443` and the Debugger set to `Xdebug`. 4. Ensuring path mappings is enabled. This lets you define what remote paths on the server correspond to what path on your local machine. In the majority of cases you can just define [your app root](https://docs.platform.sh/create-apps/app-reference/single-runtime-image.md#root-directory) to map to `myapp`. 5. Listening for connections. 6. Starting debugging. While in listen mode, start the `platform xdebug` tunnel. Use the Xdebug helper plugin for your browser to enable debugging. Set a break point in your app, then load a page in your browser. The request should pause at the break point and allow you to examine the running app. ###### What's next Learn more about how to [set up Xdebug on Dedicated server clusters](https://support.platform.sh/hc/en-us/community/posts/16439588829330). #### Custom Redis versions p:last-child]:mb-0 [&>h3]:mt-0 rounded-lg" > ####### Note You can now use composable image (BETA) to install runtimes and tools in your application container. To find out more, see the [dedicated documentation page](https://docs.platform.sh/create-apps/app-reference/composable-image.md). [Redis](https://docs.platform.sh/add-services/redis.md) is a popular structured key-value service, supported by Platform.sh. It's frequently used for caching. ###### Install PhpRedis The [PhpRedis](https://github.com/phpredis/phpredis) extension is available on Platform.sh's PHP container images. The extension has been known to break its API between versions when removing deprecated functionality. The version available on each application image is the latest available at the time that PHP version was built, which if your app is sensitive to PhpRedis versions may not be ideal. It may happen that the version of the PhpRedis extension available for your PHP version isn't compatible with your app and upgrading your app isn't feasible. If so, use the following script as an alternative to download and compile a precise version of the extension. **Note**: Do not use this approach unless you really need to. Using the provided PhpRedis extension is preferred in the majority of cases. To ease the installation of a customer version of PhpRedis, use a [PhpRedis install script](https://github.com/platformsh/snippets/blob/main/src/install-phpredis.sh). Invoke this script from your build hook, specifying a version. Any tagged version of the library is acceptable: ```yaml {location=".platform.app.yaml"} hooks: build: | set -e # Install PhpRedis v5.3.7: curl -fsS https://raw.githubusercontent.com/platformsh/snippets/main/src/install-phpredis.sh | { bash /dev/fd/3 5.3.7 ; } 3<&0 ``` ###### Install Relay Relay is a [Redis](https://docs.platform.sh/add-services/redis.md) client similar to [PhpRedis](https://github.com/phpredis/phpredis) and [Predis](https://github.com/predis/predis). It's intended to be a drop-in replacement for those libraries. That PHP extension is also a shared in-memory cache like APCu. All retrieved keys are held in the PHP master process’ memory, which is shared across all FPM workers. That means if the FPM Worker #1 fetches the `users:count` key from Redis, all other FPM workers instantaneously retrieve that key from Relay without having to communicate with Redis. To ease the installation of a customer version of Relay, use the [Relay install script](https://github.com/platformsh/snippets/blob/main/src/install-relay.sh). Invoke this script from your build hook, specifying a version. Any tagged version of the library is acceptable: ```yaml {location=".platform.app.yaml"} hooks: build: | set -e # Install Relay v0.6.0: curl -fsS https://raw.githubusercontent.com/platformsh/snippets/main/src/install-relay.sh | { bash /dev/fd/3 v0.6.0 ; } 3<&0 ``` ###### Change extension or version To change the Redis extension or the version you are using, update the build hook and clear the build cache: `platform project:clear-build-cache`. The new version is *not* be used until you clear the build cache. There's no need to declare the extension in the `runtime` block. That's only for pre-built extensions. ###### What these scripts do 1. Download the Relay/PhpRedis source code. 2. Check out the version specified in the build hook. 3. Compile the extension. 4. Copy the resulting `relay.so`/`redis.so` file to [your app root](https://docs.platform.sh/create-apps/app-reference/single-runtime-image.md#root-directory). 5. Add a line to the `php.ini` file in your app root to enable the extension, creating the file if necessary. If the script doesn't find a `$PLATFORM_CACHE_DIR` directory defined, it exits silently. So if you run the build hook locally, it has no effect. #### Swoole p:last-child]:mb-0 [&>h3]:mt-0 rounded-lg" > ####### Note You can now use composable image (BETA) to install runtimes and tools in your application container. To find out more, see the [dedicated documentation page](https://docs.platform.sh/create-apps/app-reference/composable-image.md). Swoole is a PHP extension that extends PHP core with a coroutine based asynchronous network application framework designed for building large scale concurrent systems. Unlike PHP-FPM’s stateless operating, Swoole relies on establishing persistent connections with every user, sending and receiving data in real-time. [Swoole](https://github.com/swoole/swoole-src) and [Open Swoole](https://openswoole.com/) are two forked libraries pursuing that goal. **Note**: The ``swoole`` and ``openswoole`` extensions are [available by default](https://docs.platform.sh/languages/php/extensions.md) on Platform.sh PHP 8.2 Platform.sh containers. For other versions of PHP, you can install both extensions manually by following the instructions on this page. You need: - PHP 7.3+ for Swoole - PHP 7.4.0+ for Open Swoole - The [Swoole installation script](https://raw.githubusercontent.com/platformsh/snippets/main/src/install_swoole.sh). **Note**: Currently, the installation script is compatible with PHP <=8.0. It is **not** compatible with PHP 8.3, and the ``swoole`` and ``openswoole`` extensions are **not** available on Platform.sh PHP 8.3 containers yet. Check the documentation related to [Laravel Octane on Platform.sh](https://docs.platform.sh/guides/laravel/deploy/octane.md). ###### Install Install the PHP extension for Swoole or Open Swoole during the build. Take advantage of an [installation script](https://raw.githubusercontent.com/platformsh/snippets/main/src/install_swoole.sh). You need to pass 2 parameters: * Which Swoole project to use: `openswoole` or `swoole` * Which version to install ```yaml {location=".platform.app.yaml"} hooks: build: | set -e ... curl -fsS https://raw.githubusercontent.com/platformsh/snippets/main/src/install_swoole.sh | { bash /dev/fd/3 openswoole 4.11.0 ; } 3 ###### Use Override the default web server with a [custom start command](https://docs.platform.sh/languages/php.md#alternate-start-commands). Octane should listen on a TCP socket. ```yaml {location=".platform.app.yaml"} web: upstream: socket_family: tcp protocol: http commands: start: php --port=$PORT locations: "/": passthru: true scripts: false allow: false ``` #### Authenticated Composer repositories p:last-child]:mb-0 [&>h3]:mt-0 rounded-lg" > ####### Note You can now use composable image (BETA) to install runtimes and tools in your application container. To find out more, see the [dedicated documentation page](https://docs.platform.sh/create-apps/app-reference/composable-image.md). [Packagist](https://packagist.org/) is the primary Composer repository for public PHP packages. But you can also have Composer download PHP packages from a private, third-party Composer repository. To make sure Composer has the necessary credentials to do so, follow the instructions on this page. ###### Before you begin You need: - A Platform.sh project using [PHP](https://docs.platform.sh/languages/php.md) and Composer - Credentials to access a private third-party Composer repository - The [Platform.sh CLI](https://docs.platform.sh/administration/cli.md) ###### 1. Declare a private Composer repository To allow Composer to download packages from a private third-party repository, declare the repository in your Composer setup. ```json {location="composer.json"} { "repositories": [ { "type": "composer", "url": "https://" } ] } ``` ###### 2. Set up Composer authentication using a variable To allow Composer to successfully authenticate when accessing the declared private repository, set an [`env:COMPOSER_AUTH` variable](https://docs.platform.sh/development/variables.md) for your project. To do so, run the following command: ```bash platform variable:create --level project --name env:COMPOSER_AUTH \ --json true --visible-runtime false --sensitive true --visible-build true \ --value '{"http-basic": {"": {"username": "", "password": ""}}}' ``` The [`env:` prefix](https://docs.platform.sh/development/variables.md#top-level-environment-variables) means that the variable is exposed as its own Unix environment variable. The `--visible-runtime false` and `--visible-build true` flags mean the variable is available to Composer only during the build. ###### 3. Clear your project's build cache For security reasons, make sure that the authentication credentials aren't cached in your project's build container. To do so, run the following command: ```bash platform project:clear-build-cache ``` ###### Access dependencies downloaded from a private repository When you download a dependency from a private third-party Composer repository, that dependency is usually hosted in a [private Git repository](https://docs.platform.sh/development/private-repository.md). Access to private Git repositories is restricted through the use of SSH keys. But most private Composer tools mirror tagged releases of dependencies and serve them directly without hitting the Git repository. To avoid having to authenticate against a remote Git repository, make sure your dependencies specify tagged releases. #### Troubleshoot PHP p:last-child]:mb-0 [&>h3]:mt-0 rounded-lg" > ####### Note You can now use composable image (BETA) to install runtimes and tools in your application container. To find out more, see the [dedicated documentation page](https://docs.platform.sh/create-apps/app-reference/composable-image.md). For more general information, see how to [troubleshoot development](https://docs.platform.sh/development/troubleshoot.md). ###### Server reached `max_children` If the server is receiving more concurrent requests than it has PHP processes allocated, you encounter a message like the following: ```text {location="/var/log/app.log"} WARNING: [pool web] server reached max_children setting (2), consider raising it ``` This means some requests have to wait until another finishes. Platform.sh sets the number of workers based on the available memory of your container and the estimated average memory size of each process. You have two ways to increase the number of workers: - Adjust the [worker sizing hints](https://docs.platform.sh/languages/php/fpm.md) for your project. - Upgrade your Platform.sh plan to get more computing resources. ###### Execution timeout If your PHP app can't handle the amount of traffic or is slow, you encounter a message like the following: ```text {location="/var/log/app.log"} WARNING: [pool web] child 120, script '/app/public/index.php' (request: "GET /index.php") execution timed out (358.009855 sec), terminating ``` This means your PHP process is running longer than allowed. You can adjust the `max_execution_time` value in `php.ini`. See also `request_terminate_timeout` in the [App reference](https://docs.platform.sh/create-apps/app-reference/single-runtime-image.md#runtime). The most common causes of a timeout are an infinite loop (which is a bug that you should fix) or the work itself requires a long time to complete. For the latter case, you should consider putting the task into a background job. The following command identifies the 20 slowest requests in the past hour, which can provide an indication of what code paths to investigate. ```bash grep $(date +%Y-%m-%dT%H --date='-1 hours') /var/log/php.access.log | sort -k 4 -r -n | head -20 ``` If you see that the processing time of certain requests is slow (such as taking longer than 1000 ms), you should consider a continuous observability solution like [Blackfire](https://docs.platform.sh/increase-observability/integrate-observability/blackfire.md) to monitor your app and help you improve the performance issue. Otherwise, you may check if the following options are applicable: - Find the most visited pages and see if they can be cached and/or put behind a CDN. Refer to [how caching works](https://docs.platform.sh/define-routes/cache.md). - Upgrade your Platform.sh plan to get more computing resources. ###### Troubleshoot a crashed PHP process If your PHP process crashed with a segmentation fault, you encounter a message like the following: ```text {location="/var/log/app.log"} WARNING: [pool web] child 112 exited on signal 11 (SIGSEGV) after 7.405936 seconds from start ``` Either a PHP extension is hitting a segmentation fault or your PHP app code is crashing. Review recent changes in your app and try to find the root cause. You might want to use a tool such as [Xdebug](https://docs.platform.sh/languages/php/xdebug.md) for quicker troubleshooting. ###### Troubleshoot a killed PHP process If your PHP process is killed by the kernel, you encounter a message like the following: ```text {location="/var/log/app.log"} WARNING: [pool web] child 429 exited on signal 9 (SIGKILL) after 50.938617 seconds from start ``` That means the memory usage of your container exceeds the limit allowed on your plan, so the kernel kills the offending process. To solve this issue, try the following approaches: - Check if the memory usage of your app is as expected and try to optimize it. - Use [sizing hints](https://docs.platform.sh/languages/php/fpm.md) to reduce the amount of PHP workers, which reduces the memory footprint. - Upgrade your Platform.sh plan to get more computing resources. ###### Restart PHP processes stuck during a build or deployment If your [build or deployment is running longer than expected](https://docs.platform.sh/development/troubleshoot.md#stuck-build-or-deployment), it might be because of a PHP process getting stuck. To restart your PHP processes, run the following command in your app container: ```bash pkill -f php-fpm ``` ###### Resource temporarily unavailable If all PHP workers are busy, you encounter a message like the following: ```text {location="/var/log/error.log"} connect() to unix:/run/app.sock failed (11: Resource temporarily unavailable) ``` This can be because too many requests are coming in at once or the requests are taking too long to be processed (such as with calls to external third-party servers without timeouts). To address the issue, you can: - Lower the memory consumption of each request so that the amount of PHP workers gets automatically raised. This can be customized with the `runtime.sizing_hints.request_memory` key in your `.platform.app.yaml` file. For more details, consult [PHP-FPM sizing](https://docs.platform.sh/languages/php/fpm.md). - Add a [CDN](https://docs.platform.sh/domains/cdn.md). - Set up [HTTP caching](https://docs.platform.sh/learn/bestpractices/http-caching.md). - Follow the global [performance tuning recommendations](https://docs.platform.sh/languages/php/tuning.md). - Remove stale plugins and extensions when using a CMS. - Upgrade the container size to get more resources. ### Python p:last-child]:mb-0 [&>h3]:mt-0 rounded-lg" > ###### Note You can now use composable image (BETA) to install runtimes and tools in your application container. To find out more, see the [dedicated documentation page](https://docs.platform.sh/create-apps/app-reference/composable-image.md). Python is a general purpose scripting language often used in web development. You can deploy Python apps on Platform.sh using a server or a project such as [uWSGI](https://uwsgi-docs.readthedocs.io/en/latest/). ##### Supported versions You can select the major and minor version. Patch versions are applied periodically for bug fixes and the like. When you deploy your app, you always get the latest available patches. | Grid and Dedicated Gen 3 | Dedicated Gen 2 | | - 3.12 - 3.11 - 3.10 - 3.9 - 3.8 None available ###### Specify the language To use Python, specify `python` as your [app's `type`](https://docs.platform.sh/create-apps/app-reference/single-runtime-image.md#types): ```yaml {location=".platform.app.yaml"} type: 'python:' ``` For example: ```yaml {location=".platform.app.yaml"} type: 'python:3.9' ``` ###### Deprecated versions The following versions are [deprecated](https://docs.platform.sh/glossary.md#deprecated-versions). They're available, but they aren't receiving security updates from upstream and aren't guaranteed to work. They'll be removed in the future, so migrate to one of the [supported versions](#supported-versions). - 3.7 - 3.6 - 3.5 - 2.7* \* This version doesn't receive any updates at all. You are strongly recommended to upgrade to a supported version. ##### Usage example ###### Run your own server You can define any server to handle requests. Once you have it configured, add the following configuration to get it running on Platform.sh: 1. Specify one of the [supported versions](#supported-versions): ```yaml {location=".platform.app.yaml"} type: 'python:3.9' ``` 2. Install the requirements for your app. ```yaml {location=".platform.app.yaml"} dependencies: python3: pipenv: "2022.12.19" hooks: build: | set -eu pipenv install --system --deploy ``` 3. Define the command to start your web server: ```yaml {location=".platform.app.yaml"} web: # Start your app with the configuration you define # You can replace the file location with your location commands: start: python server.py ``` You can choose from many web servers such as Daphne, Gunicorn, Hypercorn, and Uvicorn. See more about [running Python web servers](https://docs.platform.sh/languages/python/server.md). ###### Use uWSGI You can also use [uWSGI](https://uwsgi-docs.readthedocs.io/en/latest/) to manage your server. Follow these steps to get your server started. 1. Specify one of the [supported versions](#supported-versions): ```yaml {location=".platform.app.yaml"} type: 'python:3.9' ``` 2. Define the conditions for your web server: ```yaml {location=".platform.app.yaml"} web: upstream: # Send requests to the app server through a unix socket # Its location is defined in the SOCKET environment variable socket_family: "unix" # Start your app with the configuration you define # You can replace the file location with your location commands: start: "uwsgi --ini conf/uwsgi.ini" locations: # The folder from which to serve static assets "/": root: "public" passthru: true expires: 1h ``` 3. Create configuration for uWSGI such as the following: ```ini {location="config/uwsgi.ini"} [uwsgi] # Unix socket to use to talk with the web server # Uses the variable defined in the configuration in step 2 socket = $(SOCKET) protocol = http # the entry point to your app wsgi-file = app.py ``` Replace `app.py` with whatever your file is. 4. Install the requirements for your app. ```yaml {location=".platform.app.yaml"} dependencies: python3: pipenv: "2022.12.19" hooks: build: | set -eu pipenv install --system --deploy ``` 5. Define the entry point in your app: ```python # You can name the function differently and pass the new name as a flag # start: "uwsgi --ini conf/uwsgi.ini --callable " def application(env, start_response): start_response('200 OK', [('Content-Type', 'text/html')]) return [b"Hello world from Platform.sh"] ``` ##### Package management Your app container comes with pip pre-installed. For more about managing packages with pip, Pipenv, and Poetry, see how to [manage dependencies](https://docs.platform.sh/languages/python/dependencies.md). To add global dependencies (packages available as commands), add them to the `dependencies` in your [app configuration](https://docs.platform.sh/create-apps/app-reference/single-runtime-image.md#dependencies): ```yaml {location=".platform.app.yaml"} dependencies: python3: : ``` For example, to use `pipenv` to manage requirements and a virtual environment, add the following: ```yaml {location=".platform.app.yaml"} dependencies: python3: pipenv: "2022.12.19" hooks: build: | set -eu pipenv install --system --deploy ``` ##### Connect to services The following examples show how to access various [services](https://docs.platform.sh/add-services.md) with Python. For more information on configuring a given service, see the page for that service. ```python {} from json import dumps from json import loads from kafka import KafkaConsumer, KafkaProducer from platformshconfig import Config def usage_example(): # Create a new Config object to ease reading the Platform.sh environment variables. # You can alternatively use os.environ yourself. config = Config() # Get the credentials to connect to the Kafka service. credentials = config.credentials('kafka') try: kafka_server = '{}:{}'.format(credentials['host'], credentials['port']) # Producer producer = KafkaProducer( bootstrap_servers=[kafka_server], value_serializer=lambda x: dumps(x).encode('utf-8') ) for e in range(10): data = {'number' : e} producer.send('numtest', value=data) # Consumer consumer = KafkaConsumer( bootstrap_servers=[kafka_server], auto_offset_reset='earliest' ) consumer.subscribe(['numtest']) output = '' # For demonstration purposes so it doesn't block. for e in range(10): message = next(consumer) output += str(loads(message.value.decode('UTF-8'))["number"]) + ', ' # What a real implementation would do instead. # for message in consumer: # output += loads(message.value.decode('UTF-8'))["number"] return output except Exception as e: return e ``` ```python {} import pymemcache from platformshconfig import Config def usage_example(): # Create a new Config object to ease reading the Platform.sh environment variables. # You can alternatively use os.environ yourself. config = Config() # Get the credentials to connect to the Memcached service. credentials = config.credentials('memcached') try: # Try connecting to Memached server. memcached = pymemcache.Client((credentials['host'], credentials['port'])) memcached.set('Memcached::OPT_BINARY_PROTOCOL', True) key = "Deploy_day" value = "Friday" # Set a value. memcached.set(key, value) # Read it back. test = memcached.get(key) return 'Found value {0} for key {1}.'.format(test.decode("utf-8"), key) except Exception as e: return e ``` ```python {} from pymongo import MongoClient from platformshconfig import Config def usage_example(): # Create a new Config object to ease reading the Platform.sh environment variables. # You can alternatively use os.environ yourself. config = Config() # The 'database' relationship is generally the name of primary SQL database of an application. # It could be anything, though, as in the case here here where it's called "mongodb". credentials = config.credentials('mongodb') try: formatted = config.formatted_credentials('mongodb', 'pymongo') server = '{0}://{1}:{2}@{3}'.format( credentials['scheme'], credentials['username'], credentials['password'], formatted ) client = MongoClient(server) collection = client.main.starwars post = { "name": "Rey", "occupation": "Jedi" } post_id = collection.insert_one(post).inserted_id document = collection.find_one( {"_id": post_id} ) # Clean up after ourselves. collection.drop() return 'Found {0} ({1})
'.format(document['name'], document['occupation']) except Exception as e: return e ``` ```python {} import pymysql from platformshconfig import Config def usage_example(): # Create a new Config object to ease reading the Platform.sh environment variables. # You can alternatively use os.environ yourself. config = Config() # The 'database' relationship is generally the name of primary SQL database of an application. # That's not required, but much of our default automation code assumes it.' credentials = config.credentials('database') try: # Connect to the database using PDO. If using some other abstraction layer you would inject the values # from `database` into whatever your abstraction layer asks for. conn = pymysql.connect(host=credentials['host'], port=credentials['port'], database=credentials['path'], user=credentials['username'], password=credentials['password']) sql = ''' CREATE TABLE People ( id INT(6) UNSIGNED AUTO_INCREMENT PRIMARY KEY, name VARCHAR(30) NOT NULL, city VARCHAR(30) NOT NULL ) ''' cur = conn.cursor() cur.execute(sql) sql = ''' INSERT INTO People (name, city) VALUES ('Neil Armstrong', 'Moon'), ('Buzz Aldrin', 'Glen Ridge'), ('Sally Ride', 'La Jolla'); ''' cur.execute(sql) # Show table. sql = '''SELECT * FROM People''' cur.execute(sql) result = cur.fetchall() table = '''''' if result: for record in result: table += '''\n'''.format(record[1], record[2]) table += '''\n
NameCity
{0}{1}
\n''' # Drop table sql = '''DROP TABLE People''' cur.execute(sql) # Close communication with the database cur.close() conn.close() return table except Exception as e: return e ``` ```python {} import psycopg2 from platformshconfig import Config def usage_example(): # Create a new Config object to ease reading the Platform.sh environment variables. # You can alternatively use os.environ yourself. config = Config() # The 'database' relationship is generally the name of primary SQL database of an application. # That's not required, but much of our default automation code assumes it.' \ database = config.credentials('postgresql') try: # Connect to the database. conn_params = { 'host': database['host'], 'port': database['port'], 'dbname': database['path'], 'user': database['username'], 'password': database['password'] } conn = psycopg2.connect(**conn_params) # Open a cursor to perform database operations. cur = conn.cursor() cur.execute("DROP TABLE IF EXISTS People") # Creating a table. sql = ''' CREATE TABLE IF NOT EXISTS People ( id SERIAL PRIMARY KEY, name VARCHAR(30) NOT NULL, city VARCHAR(30) NOT NULL ) ''' cur.execute(sql) # Insert data. sql = ''' INSERT INTO People (name, city) VALUES ('Neil Armstrong', 'Moon'), ('Buzz Aldrin', 'Glen Ridge'), ('Sally Ride', 'La Jolla'); ''' cur.execute(sql) # Show table. sql = '''SELECT * FROM People''' cur.execute(sql) result = cur.fetchall() table = '''''' if result: for record in result: table += '''\n'''.format(record[1], record[2]) table += '''\n
NameCity
{0}{1}
\n''' # Drop table sql = "DROP TABLE People" cur.execute(sql) # Close communication with the database cur.close() conn.close() return table except Exception as e: return e ``` ```python {} import pika from platformshconfig import Config def usage_example(): # Create a new Config object to ease reading the Platform.sh environment variables. # You can alternatively use os.environ yourself. config = Config() # Get the credentials to connect to the RabbitMQ service. credentials = config.credentials('rabbitmq') try: # Connect to the RabbitMQ server creds = pika.PlainCredentials(credentials['username'], credentials['password']) parameters = pika.ConnectionParameters(credentials['host'], credentials['port'], credentials=creds) connection = pika.BlockingConnection(parameters) channel = connection.channel() # Check to make sure that the recipient queue exists channel.queue_declare(queue='deploy_days') # Try sending a message over the channel channel.basic_publish(exchange='', routing_key='deploy_days', body='Friday!') # Receive the message def callback(ch, method, properties, body): print(" [x] Received {}".format(body)) # Tell RabbitMQ that this particular function should receive messages from our 'hello' queue channel.basic_consume('deploy_days', callback, auto_ack=False) # This blocks on waiting for an item from the queue, so comment it out in this demo script. # print(' [*] Waiting for messages. To exit press CTRL+C') # channel.start_consuming() connection.close() return " [x] Sent 'Friday!'
" except Exception as e: return e ``` ```python {} from redis import Redis from platformshconfig import Config def usage_example(): # Create a new config object to ease reading the Platform.sh environment variables. # You can alternatively use os.environ yourself. config = Config() # Get the credentials to connect to the Redis service. credentials = config.credentials('redis') try: redis = Redis(credentials['host'], credentials['port']) key = "Deploy day" value = "Friday" # Set a value redis.set(key, value) # Read it back test = redis.get(key) return 'Found value {0} for key {1}.'.format(test.decode("utf-8"), key) except Exception as e: return e ``` ```python {} import pysolr from xml.etree import ElementTree as et import json from platformshconfig import Config def usage_example(): # Create a new Config object to ease reading the Platform.sh environment variables. # You can alternatively use os.environ yourself. config = Config() try: # Get the pysolr-formatted connection string. formatted_url = config.formatted_credentials('solr', 'pysolr') # Create a new Solr Client using config variables client = pysolr.Solr(formatted_url) # Add a document message = '' doc_1 = { "id": 123, "name": "Valentina Tereshkova" } result0 = client.add([doc_1], commit=True) client.commit() message += 'Adding one document. Status (0 is success): {}
'.format(json.loads(result0)['responseHeader']['status']) # Select one document query = client.search('*:*') message += '\nSelecting documents (1 expected): {}
'.format(str(query.hits)) # Delete one document result1 = client.delete(doc_1['id']) client.commit() message += '\nDeleting one document. Status (0 is success): {}'.format(et.fromstring(result1)[0][0].text) return message except Exception as e: return e ``` ###### Configuration reader While you can read the environment directly from your app, you might want to use the [`platformshconfig` library](https://github.com/platformsh/config-reader-python) . It decodes service credentials, the correct port, and other information for you. ##### Sanitizing data By default, data is inherited automatically by each child environment from its parent. If you need to sanitize data in preview environments for compliance, see how to [sanitize databases](https://docs.platform.sh/development/sanitize-db.md). ##### Frameworks All major Python web frameworks can be deployed on Platform.sh. See dedicated guides for deploying and working with them: - [Django](https://docs.platform.sh/guides/django.md) ##### Project templates The following list shows templates available for Python apps. A template is a starting point for building your project. It should help you get a project ready for production. Django 4 ![Django 4](data:image/svg+xml;base64,PD94bWwgdmVyc2lvbj0iMS4wIiBlbmNvZGluZz0idXRmLTgiPz4KPCEtLSBHZW5lcmF0b3I6IEFkb2JlIElsbHVzdHJhdG9yIDIzLjAuMSwgU1ZHIEV4cG9ydCBQbHVnLUluIC4gU1ZHIFZlcnNpb246IDYuMDAgQnVpbGQgMCkgIC0tPgo8c3ZnIHZlcnNpb249IjEuMSIgaWQ9InN2ZzI5NDgiIHhtbG5zOnN2Zz0iaHR0cDovL3d3dy53My5vcmcvMjAwMC9zdmciCgkgeG1sbnM9Imh0dHA6Ly93d3cudzMub3JnLzIwMDAvc3ZnIiB4bWxuczp4bGluaz0iaHR0cDovL3d3dy53My5vcmcvMTk5OS94bGluayIgeD0iMHB4IiB5PSIwcHgiIHZpZXdCb3g9IjAgMCA2NC4xIDgyLjQiCgkgc3R5bGU9ImVuYWJsZS1iYWNrZ3JvdW5kOm5ldyAwIDAgNjQuMSA4Mi40OyIgeG1sOnNwYWNlPSJwcmVzZXJ2ZSI+CjxzdHlsZSB0eXBlPSJ0ZXh0L2NzcyI+Cgkuc3Qwe2ZpbGwtcnVsZTpldmVub2RkO2NsaXAtcnVsZTpldmVub2RkO30KPC9zdHlsZT4KPGcgaWQ9ImxheWVyMSIgdHJhbnNmb3JtPSJ0cmFuc2xhdGUoMTIxLjA2MzA2LC0zNTUuOTM5NzYpIj4KCTxwYXRoIGlkPSJwYXRoMjgzOCIgY2xhc3M9InN0MCIgZD0iTS0xMDcuNCwzOTguMmMwLDguMiw2LDEzLjEsMTUuNiwxMC45di0yMS43Qy0xMDEuNSwzODQuNC0xMDcuMywzOTAuNC0xMDcuNCwzOTguMiBNLTkxLjUsMzU1LjkKCQloMTMuMnY2Mi41Yy0xMi43LDIuMS0yNC44LDMuNC0zMy41LTEuNWMtMTEuMi02LjItMTIuMS0yNi4xLTMuMi0zNC45YzQuNS00LjUsMTMuNS03LjYsMjMuMi01LjZ2LTE5LjcKCQlDLTkxLjgsMzU2LjQtOTEuOSwzNTYtOTEuNSwzNTUuOSIvPgoJPHBhdGggaWQ9InBhdGgyODQwIiBjbGFzcz0ic3QwIiBkPSJNLTU2LjksMzY5LjdoLTEzLjJ2LTEzLjhoMTMuMlYzNjkuN3oiLz4KCTxwYXRoIGlkPSJwYXRoMjg2MCIgY2xhc3M9InN0MCIgZD0iTS01Ni45LDM3Ni43YzAsOS43LDAsMTYuNywwLDI4LjVjLTAuNiwxMS42LTAuNCwyMC45LTQuNywyNi40Yy0wLjgsMS4xLTIuNiwyLjctNC4xLDMuOAoJCWMtMS4zLDAuOS0zLjYsMi45LTUsMi45Yy0xLjQsMC4xLTQuOS0xLjktNi41LTIuNmMtMi4xLTEtNC0yLjMtNi4yLTIuOWM1LTMuMSw5LjgtNS40LDExLjctMTEuN2MxLjctNS41LDEuNS0xMy40LDEuNS0yMS4xCgkJYzAtNy42LDAtMTYuNSwwLTIzLjJMLTU2LjksMzc2LjdMLTU2LjksMzc2Ljd6Ii8+CjwvZz4KPC9zdmc+Cg==) Django 4 This template builds Django 4 on Platform.sh, using the gunicorn application runner. Django is a Python-based web application framework with a built-in ORM. ###### Features: - Python 3.10 - PostgreSQL 12 View the [repository on GitHub](https://github.com/platformsh-templates/django4). ![Deploy on ](https://platform.sh/images/deploy/lg-blue.svg) FastAPI ![FastAPI](data:image/svg+xml,%3Csvg xmlns:dc='http://purl.org/dc/elements/1.1/' xmlns:cc='http://creativecommons.org/ns%23' xmlns:rdf='http://www.w3.org/1999/02/22-rdf-syntax-ns%23' xmlns:svg='http://www.w3.org/2000/svg' xmlns='http://www.w3.org/2000/svg' id='svg8' viewBox='0 0 346.36511 63.977134' height='63.977139mm' width='346.36511mm'%3E%3Cdefs id='defs2' /%3E%3Cmetadata id='metadata5'%3E%3Crdf:RDF%3E%3Ccc:Work rdf:about=''%3E%3Cdc:format%3Eimage/svg+xml%3C/dc:format%3E%3Cdc:type rdf:resource='http://purl.org/dc/dcmitype/StillImage' /%3E%3Cdc:title%3E%3C/dc:title%3E%3C/cc:Work%3E%3C/rdf:RDF%3E%3C/metadata%3E%3Cg transform='translate(30.552089,-55.50154)' id='layer1'%3E%3Cpath style='opacity:0.98000004;fill:%23009688;fill-opacity:1;stroke-width:3.20526505' id='path817' d='m 1.4365174,55.50154 c -17.6610514,0 -31.9886064,14.327532 -31.9886064,31.988554 0,17.661036 14.327555,31.988586 31.9886064,31.988586 17.6609756,0 31.9885196,-14.32755 31.9885196,-31.988586 0,-17.661022 -14.327544,-31.988554 -31.9885196,-31.988554 z m -1.66678692,57.63069 V 93.067264 H -11.384533 L 4.6417437,61.847974 V 81.912929 H 15.379405 Z' /%3E%3Ctext id='text979' y='114.91215' x='52.115433' style='font-style:normal;font-weight:normal;font-size:79.71511078px;line-height:1.25;font-family:sans-serif;letter-spacing:0px;word-spacing:0px;fill:%23009688;fill-opacity:1;stroke:none;stroke-width:1.99287772;' xml:space='preserve'%3E%3Ctspan style='font-style:normal;font-variant:normal;font-weight:normal;font-stretch:normal;font-family:Ubuntu;-inkscape-font-specification:Ubuntu;fill:%23009688;fill-opacity:1;stroke-width:1.99287772;' y='114.91215' x='52.115433' id='tspan977'%3EFastAPI%3C/tspan%3E%3C/text%3E%3C/g%3E%3C/svg%3E) FastAPI This template demonstrates building the FastAPI framework for Platform.sh. It includes a minimalist application skeleton that demonstrates how to connect to a MariaDB server for data storage and Redis for caching. The application starts as a bare Python process with no separate runner. It is intended for you to use as a starting point and modify for your own needs. FastAPI is a modern, fast (high-performance), web framework for building APIs with Python 3.6+ based on standard Python type hints. ###### Features: - Python 3.9 - MariaDB 10.4 - Redis 5.0 View the [repository on GitHub](https://github.com/platformsh-templates/fastapi). ![Deploy on ](https://platform.sh/images/deploy/lg-blue.svg) Flask ![Flask](data:image/svg+xml;base64,PHN2ZyB3aWR0aD0iMjUiIGhlaWdodD0iMjQiIHZpZXdCb3g9IjAgMCAyNSAyNCIgZmlsbD0ibm9uZSIgeG1sbnM9Imh0dHA6Ly93d3cudzMub3JnLzIwMDAvc3ZnIj4KPHBhdGggZD0iTTcuMjU5OCAyMC40Mzk5QzYuMzMyODEgMTkuNzE2MSA1LjM0MjM0IDE5LjAxNzcgNC42NjkzMiAxOC4wMjcyQzMuMjQ3MSAxNi4zMDAyIDIuMTU1MDQgMTQuMjkzOSAxLjQxODUzIDEyLjE4NTlDMC45NjEzODQgMTAuODE0NSAwLjgwOTAwMyA5LjM0MTQ3IDAuMjI0ODc2IDguMDMzNTRDLTAuMzg0NjQ4IDcuMDgxMTYgMC4zMjY0NjMgNi4wMjcxOSAxLjM4MDQzIDUuNzIyNDNDMS44NTAyNyA1LjYzMzU0IDIuNjYyOTcgNS4xODkwOSAxLjY3MjUgNS41MDY1NUMwLjc4MzYwNiA2LjE1NDE3IDAuNjk0NzE3IDQuOTA5NzMgMS42MDkgNC44MzM1NEMyLjIzMTIzIDQuNzQ0NjUgMi40NTk4IDQuMjM2NzEgMi4yNDM5MiAzLjc3OTU3QzEuNTcwOTEgMy4zNDc4MiAzLjg1NjYyIDIuODY1MjggMi43MTM3NiAyLjIxNzY2QzEuNTIwMTEgMC45MjI0MjYgNC4zODk5NiAwLjY4MTE1NiAzLjY3ODg0IDIuMTQxNDdDMy41MTM3NiAzLjI3MTYzIDUuNjg1MTkgMS45MzgzIDUuMTc3MjYgMy4yMzM1NEM1LjY4NTE5IDMuODU1NzYgNy4wOTQ3MiAzLjM3MzIyIDcuMDY5MzIgNC4yNDk0MUM3LjgxODUzIDQuMzAwMiA4LjA3MjUgNC45MzUxMiA4Ljc3MDkxIDQuOTczMjJDOS40OTQ3MiA1LjMwMzM4IDEwLjgxNTQgNS41NTczNSAxMS4wNjkzIDYuMzgyNzRDMTAuMzQ1NSA2Ljk1NDE3IDguNjgyMDIgNS4yMDE3OSA4LjU5MzEzIDYuNzg5MDlDOC44MDkgOS4xMjU2IDguNzU4MjEgMTEuNTI1NiA5LjYwOSAxMy43NjA1QzEwLjAxNTQgMTUuMTA2NiAxMC45OTMxIDE2LjE3MzIgMTEuODgyIDE3LjIxNDVDMTIuNzMyOCAxOC4yNDMxIDEzLjg3NTcgMTguOTY2OSAxNS4wNDM5IDE5LjU3NjRDMTYuMDcyNSAyMC4wNTg5IDE3LjE3NzMgMjAuMzc2NCAxOC4yOTQ3IDIwLjU3OTZDMTguNzUxOSAyMC4yMzY3IDE5LjU1MTkgMTguOTQxNSAyMC4yNTAzIDE5LjQ4NzVDMjAuMjg4NCAyMC4wOTcgMTguODQwNyAyMC43NyAyMC4xODY4IDIwLjY5MzlDMjAuOTc0MSAyMC40NTI2IDIxLjUyMDEgMjEuMzAzNCAyMi4xNjc3IDIwLjU0MTVDMjIuNzY0NiAyMS4yNTI2IDI0LjY0MzkgMjAuMDk3IDI0LjIxMjIgMjEuNTMyQzIzLjY0MDggMjEuOTAwMiAyMi44MDI3IDIxLjY4NDMgMjIuMjMxMiAyMi4xOTIzQzIxLjI5MTUgMjEuNzIyNCAyMC41Mjk2IDIyLjYxMTMgMTkuNDg4NCAyMi40OTdDMTguMzIwMSAyMi43MDAyIDE3LjEzOTIgMjIuNzg5MSAxNS45NTgyIDIyLjc4OTFDMTQuMDI4MSAyMi42MzY3IDEyLjA0NzEgMjIuNTczMiAxMC4yMDU4IDIxLjkwMDJDOS4xODk5NiAyMS42MjA4IDguMTc0MDggMjEuMDM2NyA3LjI1OTggMjAuNDM5OVpNOC44OTc4OSAyMS4xNTFDOS45MTM3NyAyMS41ODI3IDEwLjkwNDIgMjIuMDUyNiAxMi4wMDkgMjIuMTkyM0MxMy43NzQxIDIyLjQzMzUgMTUuNTkgMjIuODE0NSAxNy4zNTUgMjIuNDcxNkMxNi41NTUgMjIuMTE2MSAxNS43Mjk2IDIyLjYxMTMgMTQuOTI5NiAyMi4yMTc3QzEzLjk3NzMgMjIuNDIwOCAxMi45NDg3IDIyLjE2NjkgMTEuOTgzNiAyMi4wMzk5QzEwLjg3ODggMjEuNTQ0NyA5LjY4NTE5IDIxLjIxNDUgOC42NTY2MiAyMC41NjY5QzcuMzYxMzggMjAuMDk3IDkuMzI5NjQgMjEuMTc2NCA5LjY3MjUgMjEuMjY1M0MxMC40ODUyIDIxLjcyMjQgOC43ODM2MSAyMS4wMjQgOC41NDIzNCAyMC44MzM1QzcuODY5MzIgMjAuNDUyNiA3Ljc4MDQzIDIwLjUyODggOC40Nzg4NCAyMC45MjI0QzguNjE4NTMgMjAuOTk4NiA4Ljc1ODIxIDIxLjA4NzUgOC44OTc4OSAyMS4xNTFaTTYuOTY3NzMgMTkuNzkyM0M3Ljk0NTUxIDIwLjE2MDUgNi45Njc3MyAxOS4xMDY2IDYuNTEwNTkgMTkuMTdDNi4zMDc0MiAxOC44MjcyIDUuNzQ4NjkgMTguNjExMyA2LjE0MjM0IDE4LjQyMDhDNS40MzEyMyAxOC42NjIxIDUuMzkzMTMgMTcuNDgxMiA1LjA2Mjk3IDE3LjY0NjJDNC4zMTM3NiAxNy40MDUgNC43NzA5MSAxNi41NjY5IDMuODY5MzIgMTYuMDQ2MkMzLjc5MzEzIDE1LjUwMDIgMi45ODA0MyAxNS4wMzA0IDIuNzEzNzYgMTQuMjA1QzIuNTk5NDggMTMuNzg1OSAxLjc5OTQ4IDEyLjU3OTYgMi4yOTQ3MiAxMy42OTdDMi43MTM3NiAxNC43NzY0IDMuNDUwMjcgMTUuNzAzNCA0LjA1OTggMTYuNjQzMUM0LjU0MjM0IDE3LjUzMiA1LjEwMTA3IDE4LjQ0NjIgNS45NjQ1NiAxOS4wMDVDNi4yODIwMiAxOS4yNzE2IDYuNTYxMzggMTkuNzAzNCA2Ljk2NzczIDE5Ljc5MjNaTTQuMTQ4NjkgMTYuNjkzOUM0LjE4Njc4IDE2LjU0MTUgNC4zMjY0NiAxNy4wMTEzIDQuMTQ4NjkgMTYuNjkzOVYxNi42OTM5Wk04LjE0ODY5IDIwLjIyNEM4LjM2NDU2IDIwLjEzNTEgNy44MzEyMyAyMC4xMDk3IDguMTQ4NjkgMjAuMjI0VjIwLjIyNFpNOC42ODIwMiAyMC40MTQ1QzguNjE4NTMgMjAuMTQ3OCA4LjQ0MDc1IDIwLjU2NjkgOC42ODIwMiAyMC40MTQ1VjIwLjQxNDVaTTkuMzQyMzQgMjAuNjkzOUM5LjY1OTggMjAuNDAxOCA4Ljg1OTggMjAuNTAzNCA5LjM0MjM0IDIwLjY5MzlWMjAuNjkzOVpNMTAuNDg1MiAyMS4zMjg4QzEwLjY3NTcgMjEuMDQ5NCA5Ljg3NTY3IDIxLjIyNzIgMTAuNDg1MiAyMS4zMjg4VjIxLjMyODhaTTguMzAxMDcgMTkuODA1QzguNzgzNjEgMTkuNDg3NSA3LjY1MzQ1IDE5LjgwNSA4LjMwMTA3IDE5LjgwNVYxOS44MDVaTTguNzk2MyAyMC4wNTg5QzguNzgzNjEgMTkuODgxMiA4LjYxODUzIDIwLjEzNTEgOC43OTYzIDIwLjA1ODlWMjAuMDU4OVpNMTEuMjk3OSAyMS42MjA4QzExLjcwNDIgMjEuODc0OCAxMy42NDcxIDIyLjE3OTYgMTIuNDI4MSAyMS43MjI0QzEyLjIxMjIgMjEuNzYwNSAxMC4xNjc3IDIxLjEzODMgMTEuMjk3OSAyMS42MjA4Wk03LjMyMzI5IDE4LjUyMjRDNy4yODUxOSAxOC4zNTczIDYuNzAxMDcgMTguMzQ0NiA3LjMyMzI5IDE4LjUyMjRWMTguNTIyNFpNOC40OTE1NCAxOS4yMDgxQzguNzk2MyAxOC45OTIzIDcuODU2NjIgMTkuMDQzMSA4LjQ5MTU0IDE5LjIwODFWMTkuMjA4MVpNOS40NjkzMiAxOS44MDVDOS45MDEwNyAxOS42Mzk5IDguNzU4MjEgMTkuNjM5OSA5LjQ2OTMyIDE5LjgwNVYxOS44MDVaTTYuODUzNDUgMTguMDE0NUM3LjMyMzI5IDE4LjM3IDguNzU4MjEgMTguMDY1MyA3LjU3NzI2IDE3Ljc5ODZDNy4wNDM5MiAxNy41MDY2IDUuODM3NTcgMTcuMzE2MSA2LjY1MDI3IDE3Ljk3NjRMNi44NTM0NSAxOC4wMTQ1Wk0xMC4xMjk2IDIwLjAwODFDMTAuMzMyOCAxOS42NzggOS4zMDQyNCAxOS44MTc3IDEwLjEyOTYgMjAuMDA4MVYyMC4wMDgxWk05LjEzOTE2IDE5LjIyMDhDMTAuMjk0NyAxOS41NTEgOC4xNzQwOCAxOC40OTcgOC44NTk4IDE5LjEwNjZMOS4wMTIxOCAxOS4xN0w5LjEzOTE2IDE5LjIyMDhaTTExLjEzMjggMjAuMzc2NEMxMi4yMjQ5IDIwLjM4OTEgMTAuMTQyMyAyMC4yMjQgMTEuMTMyOCAyMC4zNzY0VjIwLjM3NjRaTTYuNDM0NCAxNy4zNzk2QzYuMzk2MyAxNy4xNzY0IDYuMTY3NzMgMTcuMzkyMyA2LjQzNDQgMTcuMzc5NlYxNy4zNzk2Wk0xMi45NzQxIDIxLjQwNUMxMy4wMTIyIDIxLjAzNjcgMTIuNjE4NSAyMS42ODQzIDEyLjk3NDEgMjEuNDA1VjIxLjQwNVpNOC4zMDEwNyAxOC41MjI0QzguMjI0ODggMTguMzMyIDcuOTU4MjEgMTguNTA5NyA4LjMwMTA3IDE4LjUyMjRWMTguNTIyNFpNNi41MzU5OSAxNy4yNTI2QzcuMTU4MjEgMTcuMjE0NSA1LjY4NTE5IDE2Ljk3MzIgNi41MzU5OSAxNy4yNTI2VjE3LjI1MjZaTTQuNDUzNDUgMTUuOTA2NkM0LjM3NzI2IDE1LjYwMTggMy43Njc3MyAxNS4zNjA1IDQuNDUzNDUgMTUuOTA2NlYxNS45MDY2Wk05LjkyNjQ2IDE5LjM3MzJDOS44MTIxOCAxOS4yNDYyIDkuODc1NjcgMTkuMzk4NiA5LjkyNjQ2IDE5LjM3MzJWMTkuMzczMlpNMTMuMzI5NiAyMS40Njg1QzEzLjMxNjkgMjEuMjY1MyAxMy4xMzkyIDIxLjU0NDcgMTMuMzI5NiAyMS40Njg1VjIxLjQ2ODVaTTkuNjIxNyAxOS4wNjg1QzkuNjg1MTkgMTguODAxOCA5LjA4ODM3IDE4Ljk5MjMgOS42MjE3IDE5LjA2ODVWMTkuMDY4NVpNNy4wODIwMiAxNy40NTU4QzcuNTUxODYgMTcuNDA1IDYuMzQ1NTEgMTcuMTM4MyA3LjA4MjAyIDE3LjQ1NThWMTcuNDU1OFpNMTEuMzc0MSAyMC4xMjI0QzEyLjA5NzkgMTkuODMwNCAxMC42NjMgMTkuOTgyNyAxMS4zNzQxIDIwLjEyMjRWMjAuMTIyNFpNOS4xMzkxNiAxOC42MTEzQzkuOTc3MjYgMTguNzI1NiA4LjE0ODY5IDE4LjAzOTkgOC45NjEzOCAxOC41NDc4TDkuMTM5MTYgMTguNjExM1pNMTIuMDU5OCAyMC40MDE4QzEyLjg0NzEgMTkuOTMyIDEyLjU4MDQgMjEuNDkzOSAxMy4zODA0IDIwLjUyODhDMTQuMTY3NyAxOS45NTczIDEyLjY5NDcgMjEuMjM5OSAxMy42NzI1IDIwLjYzMDRDMTQuMzgzNiAyMC4xNjA1IDE1LjQyNDkgMjAuODU4OSAxNi4wNzI1IDIxLjA3NDhDMTYuNTQyMyAyMS4wNDk0IDE2Ljk5OTUgMjEuNDgxMiAxNy40OTQ3IDIxLjIyNzJDMTguNDM0NCAyMC45NzMyIDE1LjY2NjEgMjAuODU4OSAxNi4zOSAyMC40MDE4QzE1LjUzOTIgMjAuNjU1OCAxNC45MDQyIDIwLjEwOTcgMTQuNDg1MiAxOS41NjM3QzEzLjUzMjggMTkuMzQ3OCAxMi40MTU0IDE4Ljg1MjYgMTEuOTQ1NSAxOC4wMDE4QzExLjc1NSAxNy42ODQzIDEyLjIyNDkgMTguMDUyNiAxMS43ODA0IDE3LjUzMkMxMS4yMDkgMTcuMDI0IDEwLjkxNjkgMTYuNDM5OSAxMC41MjMzIDE1LjgwNUMxMC4wNjYxIDE1LjU2MzcgMTAuMDAyNyAxNC44MjcyIDkuOTY0NTYgMTUuNzc5NkM5Ljk2NDU2IDE1LjE4MjcgOS40MDU4MyAxNC43NzY0IDkuMjY2MTUgMTQuOTQxNUM5LjI2NjE1IDE0LjM3IDkuODYyOTcgMTQuNjQ5NCA5LjQ0MzkyIDE0LjIzMDRDOS4zNTUwMyAxMy42MzM1IDkuMDUwMjcgMTMuMDExMyA4Ljk2MTM4IDEyLjMzODNDOC44MjE3IDEyLjAwODEgOC45MzU5OSAxMS4zMDk3IDguNDc4ODQgMTIuMDQ2MkM4LjMxMzc3IDEyLjgyMDggOC40MjgwNSAxMS4wOTM5IDguNjgyMDIgMTEuNjY1M0M5LjAyNDg4IDExLjA4MTIgOC41NTUwMyAxMS4xNDQ2IDguNTQyMzQgMTEuMjMzNUM4Ljc1ODIxIDEwLjczODMgOC42ODIwMiAxMC4wMzk5IDguNDc4ODQgMTAuMzA2NkM4LjU5MzEzIDkuNzg1OTIgOC42NjkzMiA4LjM4OTA5IDguMzAxMDcgOC42MzAzNkM4LjUxNjk0IDguMDg0MzMgOC43MjAxMSA2LjEyODc3IDcuNzY3NzMgNi44Nzc5OEM3LjM3NDA4IDYuODc3OTggNi43MDEwNyA3LjAxNzY2IDYuMzgzNjEgNy4xODI3NEM3LjM3NDA4IDcuNzI4NzggNi4yODIwMiA3LjM4NTkyIDUuODc1NjcgNy4yOTcwM0M1LjgyNDg4IDcuODA0OTcgNS40MTg1MyA3LjU4OTA5IDQuOTIzMjkgNy41ODkwOUM1LjcyMzI5IDcuNjkwNjggNC41Mjk2NCA4LjQxNDQ5IDQuMDcyNSA4LjEzNTEyQzMuNDc1NjcgOC40MTQ0OSA0LjU5MzEzIDkuMTM4MyA0LjA4NTE5IDkuMzU0MTdDNC4xNDg2OSA5LjY4NDMzIDMuMTcwOTEgOS4yMzk4OSAzLjI0NzEgMTAuMDAxOEMyLjY2Mjk3IDkuNzYwNTIgMy4xNzA5MSAxMC45MTYxIDMuNDYyOTcgMTAuNTIyNEM0LjQ1MzQ1IDEwLjc4OTEgNC4xNjEzOCAxMS4zOTg2IDQuMTg2NzggMTEuOTdDNC4wMjE3IDEyLjMxMjkgMy4zOTk0OCAxMS4xODI3IDQuMDQ3MSAxMS4yMzM1QzMuNTI2NDYgMTAuMzk1NCAzLjQ3NTY3IDEwLjkyODggMy4wNDM5MiAxMS4zMjI0QzIuOTQyMzQgMTEuMzQ3OCA0LjEzNTk5IDExLjg4MTIgMy4zODY3OCAxMi4xMzUxQzQuMDQ3MSAxMi4yMzY3IDQuMDU5OCAxMi44MDgxIDQuMTk5NDggMTMuMTc2NEM0LjU5MzEzIDEzLjU4MjcgNC41MTY5NCAxMi43MTkzIDQuOTg2NzggMTMuMjE0NUM0LjY4MjAyIDEyLjc3IDMuMzk5NDggMTEuOTcgNC40NDA3NSAxMi4yMjRDNC40NDA3NSAxMS43Nzk2IDQuMjUwMjcgMTEuNDI0IDQuNTY3NzMgMTEuNDM2N0M0Ljg4NTE5IDEwLjg2NTMgNC4yMzc1NyAxMi44MzM1IDQuOTQ4NjkgMTIuMTIyNEM1LjEzOTE2IDEyLjAzMzUgNS4xODk5NiAxMS41NTEgNS41NDU1MSAxMi4xNzMyQzYuMDUzNDUgMTIuNjgxMiA1LjczNTk5IDEzLjAzNjcgNS4wMTIxOCAxMi41Nzk2QzUuMTM5MTYgMTMuMDExMyA1Ljk3NzI2IDEzLjE3NjQgNS44MjQ4OCAxMy44NjIxQzUuOTg5OTUgMTQuNDU4OSA2LjIxODUzIDE0LjI0MzEgNi40MjE3IDE0LjIwNUM2LjU4Njc4IDE0Ljc4OTEgNi42NzU2NyAxNC4zNTczIDYuNjc1NjcgMTQuMDc4QzcuMzk5NDggMTQuMjMwNCA3LjIzNDQgMTQuNjYyMSA3LjQ2Mjk3IDE0Ljk2NjlDNy45NzA5MSAxNS4xOTU0IDYuNzM5MTYgMTMuNDMwNCA3LjYwMjY1IDE0LjQzMzVDOC41MTY5NCAxNS4yNTg5IDcuOTQ1NTEgMTUuNjAxOCA3LjEzMjgxIDE1LjQ2MjFDNy42NTM0NSAxNS40MjQgNy44MTg1MyAxNi4xNjA1IDguNDY2MTUgMTYuMTM1MUM5LjA1MDI3IDE2LjQxNDUgOS40NTY2MiAxNy40OTM5IDguNDQwNzUgMTcuMDM2N0M4LjA4NTE5IDE2LjcxOTMgNi44NDA3NSAxNi4zMjU2IDcuODU2NjIgMTYuOTM1MUM4Ljc5NjMgMTcuMzY2OSA5LjU0NTUxIDE3LjYzMzUgMTAuNDQ3MSAxOC4xNzk2QzExLjA5NDcgMTguNjM2NyAxMS4zNzQxIDE5LjE3IDExLjYxNTQgMTkuMjcxNkMxMS4wNjkzIDE5LjUyNTYgOS45NzcyNiAxOS4wNjg1IDEwLjc5IDE4LjkxNjFDMTAuMjgyIDE4LjgyNzIgOS43MTA1OSAxOC41NjA1IDEwLjE5MzEgMTkuMTk1NEMxMC42MTIyIDE5LjUzODMgMTEuNjUzNCAxOS41MDAyIDExLjg0MzkgMTkuNTM4M0MxMS42Nzg4IDE5Ljg5MzkgMTEuNDEyMiAxOS45MTkzIDExLjg1NjYgMTkuOTQ0N0MxMS4zNjE0IDIwLjIxMTMgMTIuMDA5IDIwLjI0OTQgMTIuMDU5OCAyMC40MDE4Wk0xMS4wNDM5IDE3LjU1NzNDMTAuNzM5MiAxNy4yMzk5IDEwLjY2MyAxNi42NTU4IDEwLjk5MzEgMTcuMTYzN0MxMS4xNTgyIDE3LjIzOTkgMTEuNTI2NSAxOC4xMjg4IDExLjA0MzkgMTcuNTU3M1pNMTQuMzIwMSAxOS42Mzk5QzE0LjUxMDYgMTkuNjI3MiAxNC4zMzI4IDE5Ljc3OTYgMTQuMzIwMSAxOS42Mzk5VjE5LjYzOTlaTTEwLjU3NDEgMTYuNzk1NEMxMC41NjE0IDE2LjMxMjkgMTAuNjg4NCAxNy4xNTEgMTAuNTc0MSAxNi43OTU0VjE2Ljc5NTRaTTEwLjI1NjYgMTYuMzUxQzkuODc1NjcgMTUuNjI3MiAxMC43MjY1IDE2LjU1NDIgMTAuMjU2NiAxNi4zNTFWMTYuMzUxWk02LjMwNzQyIDEzLjYzMzVDNi41MjMyOSAxMy41NyA2LjQwOSAxNC4wMDE4IDYuMzA3NDIgMTMuNjMzNVYxMy42MzM1Wk05LjQ0MzkyIDE1LjMzNTFDOS41ODM2MSAxNC44MTQ1IDkuNjA5IDE1Ljc1NDIgOS40NDM5MiAxNS4zMzUxVjE1LjMzNTFaTTcuMjIxNyAxMy43ODU5QzcuMDY5MzIgMTMuNTA2NiA3LjU1MTg2IDE0LjA1MjYgNy4yMjE3IDEzLjc4NTlWMTMuNzg1OVpNOS4xMjY0NiAxNC4zOTU0QzguNzcwOTEgMTMuNTk1NCA5LjM4MDQzIDEzLjk2MzcgOS4yMDI2NSAxNC41MjI0TDkuMTI2NDYgMTQuMzk1NFpNNS44NTAyNyAxMi4yMTEzQzUuNjg1MTkgMTEuOTQ0NiA1LjQzMTIyIDExLjE4MjcgNS41MDc0MiAxMC45NDE1QzUuNTgzNjEgMTEuMzIyNCA2LjMyMDExIDEyLjU5MjMgNS44NjI5NyAxMS40NjIxQzUuMzY3NzMgMTAuNTIyNCA2LjQ1OTggMTEuNzY2OSA2LjU3NDA4IDEyLjAwODFDNi42MjQ4OCAxMi4yMzY3IDYuMjY5MzIgMTEuOTQ0NiA2LjUxMDU5IDEyLjQ5MDdDNi4wNjYxNSAxMS44Njg1IDYuMjU2NjIgMTIuODMzNSA1Ljg1MDI3IDEyLjIxMTNaTTQuODM0NCAxMS41MTI5QzQuODcyNSAxMC45MDM0IDUuMDYyOTcgMTEuOTMxOSA0LjgzNDQgMTEuNTEyOVYxMS41MTI5Wk01LjI5MTU0IDExLjY2NTNDNS41MDc0MiAxMS4yMDgxIDUuNjU5OCAxMi4zMTI5IDUuMjkxNTQgMTEuNjY1M1YxMS42NjUzWk00LjE4Njc4IDEwLjgxNDVDMy44MDU4MyAxMC40MzM1IDMuNTM5MTYgMTAuMDkwNyA0LjE5OTQ4IDEwLjU4NTlDNC40NTM0NSAxMC41OTg2IDMuNjI4MDUgOS43OTg2MiA0LjI2Mjk3IDEwLjMzMkM0LjkzNTk5IDEwLjQ1ODkgNC42MDU4MyAxMS40MjQgNC4xODY3OCAxMC44MTQ1Wk00Ljc3MDkxIDEwLjgwMThDNC45ODY3OCAxMC41ODU5IDQuODg1MTkgMTEuMDE3NyA0Ljc3MDkxIDEwLjgwMThWMTAuODAxOFpNNS4xMjY0NiAxMC45MTYxQzQuNzk2MyAxMC4yOTM5IDUuNTMyODEgMTEuMTgyNyA1LjEyNjQ2IDEwLjkxNjFWMTAuOTE2MVpNNC40MTUzNSAxMC4yNDMxQzMuMzIzMjkgOS4yNjUyOCA1Ljc5OTQ4IDEwLjc1MSA0LjU5MzEzIDEwLjQyMDhMNC40MTUzNSAxMC4yNDMxWk03LjU2NDU2IDEyLjA3MTZDNy4wOTQ3MiAxMS43OTIzIDcuNDM3NTcgMTAuMDY1MyA3LjYwMjY1IDExLjI0NjJDOC4wNTk4IDExLjA5MzkgNy41NzcyNiAxMS44NTU4IDcuOTIwMTEgMTEuODQzMUM3Ljg2OTMyIDEyLjMyNTYgNy43MTY5NCAxMi40OTA3IDcuNTY0NTYgMTIuMDcxNlpNOC43MzI4MSAxMi43NTczQzguNzcwOTEgMTIuMjM2NyA4LjgyMTcgMTMuMTEyOSA4LjczMjgxIDEyLjc1NzNWMTIuNzU3M1pNOC41Mjk2NCAxMi41NTQyQzguNTgwNDMgMTIuMzM4MyA4LjUyOTY0IDEyLjgyMDggOC41Mjk2NCAxMi41NTQyVjEyLjU1NDJaTTQuNjMxMjIgOS45MjU2QzMuOTIwMTEgOC45NDc4MiA2LjY3NTY3IDEwLjkxNjEgNS4wODgzNyAxMC4xNjY5QzQuOTIzMjkgMTAuMTI4OCA0LjcyMDExIDEwLjEwMzQgNC42MzEyMiA5LjkyNTZaTTYuODc4ODQgMTEuMTA2NkM2LjgwMjY1IDEwLjI5MzkgNy4wMTg1MyAxMS4yNDYyIDYuODc4ODQgMTEuMTA2NlYxMS4xMDY2Wk04LjU4MDQzIDEyLjE5ODZDOC43MDc0MiAxMS43Mjg4IDguNTgwNDMgMTIuNTAzNCA4LjU4MDQzIDEyLjE5ODZWMTIuMTk4NlpNNC43NDU1MSA5LjU0NDY1QzUuMTY0NTYgOS40NTU3NiA2LjQ4NTE5IDEwLjI4MTIgNS4yNzg4NCA5Ljc4NTkyQzUuMTM5MTYgOS42MzM1NCA0Ljg0NzEgOS43MDk3MyA0Ljc0NTUxIDkuNTQ0NjVaTTguMzM5MTYgMTEuMzQ3OEM4LjM4OTk2IDEwLjUwOTcgOC41OTMxMyAxMC44NTI2IDguMzM5MTYgMTEuNDYyMVYxMS4zNDc4Wk01LjA1MDI3IDkuMjUyNTlDNS4yMTUzNSA4Ljk5ODYyIDQuNTkzMTMgOC4xMjI0MyA1LjEzOTE2IDguOTM1MTJDNS4zNjc3MyA5LjEyNTYgNS44MjQ4OCA5LjI1MjU5IDUuNDMxMjMgOS4zMjg3OEM2LjA1MzQ1IDkuODc0ODEgNS4yNzg4NCA5LjQ4MTE2IDUuMDUwMjcgOS4yNTI1OVpNOC4xNjEzOCAxMS4wODEyQzguMjc1NjcgMTAuMTI4OCA4LjI2Mjk3IDExLjYzOTkgOC4xNjEzOCAxMS4wODEyVjExLjA4MTJaTTQuNjk0NzIgOC4zNzYzOUM0LjgyMTcgOC4zMjU2IDQuNzcwOTEgOC41NTQxNyA0LjY5NDcyIDguMzc2MzlWOC4zNzYzOVpNNS41MDc0MiA4Ljg1ODkzQzUuNzEwNTkgOC40MTQ0OSA1Ljg4ODM3IDkuMzQxNDcgNS41MDc0MiA4Ljg1ODkzVjguODU4OTNaTTcuNzkzMTMgMTAuMTI4OEM3Ljc5MzEzIDkuOTYzNyA3Ljg0MzkyIDEwLjM4MjcgNy43OTMxMyAxMC4xMjg4VjEwLjEyODhaTTcuNjY2MTUgOS44MzY3MUM3LjM0ODY5IDkuMDQ5NDEgNy45NTgyMSAxMC4yNTU4IDcuNjY2MTUgOS44MzY3MVY5LjgzNjcxWk03LjQ2Mjk3IDkuMzI4NzhDNy40MTIxOCA4Ljk5ODYyIDcuNjUzNDUgOS43MzUxMiA3LjQ2Mjk3IDkuMzI4NzhWOS4zMjg3OFpNNy43ODA0MyA4LjgwODE0QzcuNTY0NTYgOC40MjcxOSA4LjA1OTggNy4xMTkyNSA4LjExMDU5IDcuOTMxOTVDNy44ODIwMiA4LjU2Njg3IDguMDQ3MSA4LjkyMjQzIDguMTk5NDggOC4wNzE2M0M4LjUwNDI0IDcuMzk4NjIgOC4xNDg2OSA5LjM3OTU3IDcuNzgwNDMgOC44MDgxNFpNOC4xMTA1OSA2Ljg2NTI4QzguMjEyMTggNi43NTEgOC4xMzU5OSA3LjAwNDk3IDguMTEwNTkgNi44NjUyOFY2Ljg2NTI4Wk03LjU2NDU2IDE3LjU5NTRDNy40Mzc1NyAxNy40ODEyIDcuNTg5OTYgMTcuNjcxNiA3LjU2NDU2IDE3LjU5NTRWMTcuNTk1NFpNOC42OTQ3MiAxOC4xNjY5QzkuMzE2OTQgMTguMzMyIDkuMzE2OTQgMTguMDY1MyA4Ljc0NTUxIDE3Ljk4OTFDOC40NDA3NSAxNy43MDk3IDcuNDg4MzcgMTcuNDA1IDguMzM5MTYgMTcuOTUxQzguNDAyNjUgMTguMTAzNCA4LjU4MDQzIDE4LjA5MDcgOC42OTQ3MiAxOC4xNjY5Wk02LjQ3MjQ5IDE2LjY5MzlDNi44MTUzNSAxNi45NDc4IDcuNzY3NzMgMTcuNDE3NyA2Ljk2NzczIDE2Ljc5NTRDNy4yMzQ0IDE2LjQ3OCA2LjQ0NzEgMTYuMzEyOSA2LjcxMzc3IDE2LjA5N0M2LjA0MDc1IDE1LjY5MDcgNi4xOTMxMyAxNS43Mjg4IDYuNjUwMjcgMTUuNzQxNUM1Ljg1MDI3IDE1LjM4NTkgNi43NjQ1NiAxNS40MTEzIDYuNzI2NDYgMTUuMjIwOEM2LjQyMTcgMTUuMTU3MyA1LjE4OTk2IDE0LjY3NDggNS45MTM3NyAxNS4yNTg5QzUuMTc3MjYgMTQuODkwNyA1LjczNTk5IDE1LjM5ODYgNS41MjAxMSAxNS4zNDc4QzQuNzcwOTEgMTUuMTQ0NiA2LjE5MzEzIDE1LjkxOTMgNS40MDU4MyAxNS43Mjg4QzUuODM3NTcgMTYuMDcxNiA2LjU2MTM4IDE2LjYwNSA1LjU4MzYxIDE2LjA4NDNDNS40NDM5MiAxNi4yNzQ4IDYuMjY5MzIgMTYuNTU0MiA2LjQ3MjQ5IDE2LjY5MzlaTTcuNjUzNDUgMTcuMzY2OUM5LjA3NTY3IDE3LjgyNCA2Ljk0MjM0IDE2LjgwODEgNy42NTM0NSAxNy4zNjY5VjE3LjM2NjlaTTEzLjY1OTggMjEuMDExM0MxMy42NzI1IDIwLjcxOTMgMTMuNDU2NiAyMS4yNTI2IDEzLjY1OTggMjEuMDExM1YyMS4wMTEzWk0xNC4yNjkzIDIxLjI2NTNDMTQuNTk5NSAyMC45NDc4IDE0LjI4MiAyMS43NzMyIDE0LjgxNTQgMjEuMTg5MUMxNC44MTU0IDIwLjc3IDE0LjgwMjcgMjAuNTE2MSAxNC4yMDU4IDIxLjAzNjdDMTQuMDQwOCAyMS4xMjU2IDEzLjk2NDYgMjEuNTA2NiAxNC4yNjkzIDIxLjI2NTNaTTQuNDY2MTUgMTUuMTA2NkM0LjM2NDU2IDE0LjcxMjkgMy43Njc3MyAxNC43MTI5IDQuNDY2MTUgMTUuMTA2NlYxNS4xMDY2Wk01LjEyNjQ2IDE1LjUzODNDNC44ODUxOSAxNS4xMzE5IDQuMjUwMjcgMTUuMTcgNS4xMjY0NiAxNS41MzgzVjE1LjUzODNaTTguODg1MTkgMTcuNzk4NkM5LjI1MzQ1IDE4LjEyODggMTAuNTYxNCAxOC4wMzk5IDkuMzI5NjQgMTcuODM2N0M5LjEzOTE2IDE3LjU3IDguMTYxMzggMTcuNjMzNSA4Ljg4NTE5IDE3Ljc5ODZaTTE0LjA0MDggMjAuOTg1OUMxNC41OTk1IDIwLjUxNjEgMTMuNDk0NyAyMS4yMDE4IDE0LjA0MDggMjAuOTg1OVYyMC45ODU5Wk0xNS4yMDkgMjEuNzk4NkMxNS4yMDkgMjEuNjQ2MiAxNC45Njc3IDIxLjg2MjEgMTUuMjA5IDIxLjc5ODZWMjEuNzk4NlpNMTUuMjA5IDIxLjU4MjdDMTUuODMxMiAyMC45MjI0IDE0LjYxMjIgMjEuNjIwOCAxNS4yMDkgMjEuNTgyN1YyMS41ODI3Wk0yLjg1MzQ1IDEzLjc0NzhDMi4zMjAxMSAxMi45ODU5IDIuNTIzMjkgMTIuNjQzMSAyLjAxNTM1IDEyLjAzMzVDMS45MTM3NiAxMS41NjM3IDEuMTM5MTYgMTAuNDg0MyAxLjYwOSAxMS42MjcyQzIuMDQwNzUgMTIuMjg3NSAyLjE2NzczIDEzLjMxNjEgMi44NTM0NSAxMy43NDc4Wk0xNS4wMTg1IDIxLjM2NjlDMTYuMTYxNCAyMC42MzA0IDE0LjU0ODcgMjEuMDQ5NCAxNS4wMTg1IDIxLjM2NjlWMjEuMzY2OVpNMTUuODk0NyAyMS43MDk3QzE2LjQ2NjEgMjEuMjI3MiAxNS41MjY1IDIxLjYwODEgMTUuODk0NyAyMS43MDk3VjIxLjcwOTdaTTQuMjc1NjcgMTQuMjY4NUM0LjQ0MDc1IDE0LjAyNzIgMy44NDM5MiAxNC4yNDMxIDQuMjc1NjcgMTQuMjY4NVYxNC4yNjg1Wk0xNS43MDQyIDIxLjQ4MTJDMTYuMjYzIDIxLjEyNTYgMTUuNTc3MyAyMS4xNzY0IDE1LjYwMjcgMjEuNTE5M0wxNS43MDQyIDIxLjQ4MTJaTTguMTQ4NjkgMTYuNzE5M0M4LjEzNTk5IDE2LjQ3OCA3Ljg1NjYyIDE2Ljc0NDYgOC4xNDg2OSAxNi43MTkzVjE2LjcxOTNaTTguNjE4NTMgMTYuOTg1OUM4LjQ2NjE1IDE2LjY4MTIgOC4zODk5NiAxNy4wMzY3IDguNjE4NTMgMTYuOTg1OVYxNi45ODU5Wk0xNi42MDU4IDIxLjcyMjRDMTcuMzE2OSAyMS4yMDE4IDE2LjE3NDEgMjEuNjIwOCAxNi40NTM0IDIxLjgyNEwxNi42MDU4IDIxLjcyMjRaTTE2LjMyNjUgMjEuNTk1NEMxNi45MTA2IDIxLjEwMDIgMTUuNzE2OSAyMS44MTEzIDE2LjMyNjUgMjEuNTk1NFYyMS41OTU0Wk0xNy43MjMzIDIyLjUyMjRDMTguMTE2OSAyMi4yNTU4IDE3LjI1MzQgMjIuNDMzNSAxNy43MjMzIDIyLjUyMjRWMjIuNTIyNFpNNC42MzEyMiAxNC4wOTA3QzUuMTUxODYgMTQuMjA1IDYuNzI2NDYgMTUuMzczMiA1Ljc5OTQ4IDE0LjE2NjlDNS4zMjk2NCAxNC4wMjcyIDUuNjA5IDEyLjg3MTYgNS4xMjY0NiAxMy4wNzQ4QzUuNDU2NjIgMTMuNjIwOCA1LjM5MzEzIDEzLjg0OTQgNC43MDc0MiAxMy41MDY2QzMuODU2NjIgMTMuMDg3NSA0LjIyNDg4IDEzLjcwOTcgNC4zODk5NiAxMy44ODc1QzQuMTc0MDggMTMuOTM4MyA0LjY5NDcyIDE0LjA5MDcgNC42MzEyMiAxNC4wOTA3Wk0yLjI0MzkyIDEyLjIxMTNDMi4zMzI4MSAxMS44MzA0IDEuMzgwNDMgMTAuMDc4IDEuNzg2NzggMTEuMzM1MUMxLjk1MTg2IDExLjYwMTggMS45MjY0NiAxMi4wOTcgMi4yNDM5MiAxMi4yMTEzWk02LjYyNDg4IDE0LjkwMzRDNi4zNTgyMSAxNC42ODc1IDYuNjEyMTggMTQuODc4IDYuNjI0ODggMTQuOTAzNFYxNC45MDM0Wk03LjI4NTE5IDE1LjA2ODVDNy4yODUxOSAxNC42NDk0IDYuNTQ4NjkgMTQuODkwNyA3LjI4NTE5IDE1LjA2ODVWMTUuMDY4NVpNMTMuMDM3NiAxOC42ODc1QzEyLjkyMzMgMTguNDA4MSAxMi42MDU4IDE4LjY3NDggMTMuMDM3NiAxOC42ODc1VjE4LjY4NzVaTTEzLjMwNDIgMTguODkwN0MxMy4yNjYxIDE4LjcyNTYgMTMuMTUxOSAxOC45MTYxIDEzLjMwNDIgMTguODkwN1YxOC44OTA3Wk0xNS41OSAyMC4zMjU2QzE1LjgwNTggMjAuMTYwNSAxNS4zMTA2IDIwLjMwMDIgMTUuNTkgMjAuMzI1NlYyMC4zMjU2Wk0zLjQzNzU4IDEyLjUxNjFDNC4wNzI1IDEyLjI3NDggMi43NjQ1NiAxMi4zMzgzIDMuNDM3NTggMTIuNTE2MVYxMi41MTYxWk0xMi41Mjk2IDE4LjI0MzFDMTIuNTE2OSAxNy44MzY3IDEyLjEyMzMgMTguMzQ0NyAxMi41Mjk2IDE4LjI0MzFWMTguMjQzMVpNMy4xOTYzMSAxMS45NDQ2QzMuNTg5OTYgMTEuODA1IDIuODE1MzUgMTEuODU1OCAzLjE5NjMxIDExLjk0NDZWMTEuOTQ0NlpNNC4zNjQ1NiAxMi41MDM0QzQuMzUxODYgMTIuMzc2NCA0LjIzNzU3IDEyLjU1NDIgNC4zNjQ1NiAxMi41MDM0VjEyLjUwMzRaTTE4LjYxMjIgMjEuMjM5OUMxOS4xMzI4IDIxLjEzODMgMjAuMzEzOCAyMS41MDY2IDIwLjUwNDIgMjEuMTAwMkMxOS44NjkzIDIxLjA4NzUgMTguMzMyOCAyMC42NTU4IDE4LjI1NjYgMjEuMjAxOEwxOC4zOTYzIDIxLjIyNzJMMTguNjEyMiAyMS4yMzk5Wk00LjczMjgxIDEyLjYwNUM0Ljc0NTUxIDEyLjE4NTkgNC40MTUzNSAxMi41Nzk2IDQuNzMyODEgMTIuNjA1VjEyLjYwNVpNMS42NTk4IDEwLjQ3MTZDMS41MjAxMSA5LjY4NDMzIDEuMTI2NDYgMTAuMzQ0NiAxLjY1OTggMTAuNDcxNlYxMC40NzE2Wk0yLjM5NjMgMTAuNjQ5NEMyLjM5NjMgMTAuMzk1NCAxLjcyMzI5IDEwLjQyMDggMi4zOTYzIDEwLjY0OTRWMTAuNjQ5NFpNMi44MTUzNSAxMC44NTI2QzIuNjg4MzcgMTAuNzYzNyAyLjcxMzc3IDEwLjk3OTYgMi44MTUzNSAxMC44NTI2VjEwLjg1MjZaTTUuNDQzOTIgMTIuNTQxNUM1LjU3MDkxIDEyLjQyNzIgNS4xNTE4NiAxMi40NjUzIDUuNDQzOTIgMTIuNTQxNVYxMi41NDE1Wk0yLjUzNTk5IDEwLjM5NTRDMi40NTk4IDkuNzk4NjIgMS42ODUxOSAxMC4zMDY2IDIuNTM1OTkgMTAuMzk1NFYxMC4zOTU0Wk0xLjAyNDg4IDkuNDE3NjZDMS4wMTIxOCA5LjE1MSAwLjg4NTE5MyA5LjUxOTI1IDEuMDI0ODggOS40MTc2NlY5LjQxNzY2Wk0xLjI1MzQ1IDkuMjUyNTlDMS4yMTUzNSA4LjkyMjQzIDEuMDYyOTcgOS4yOTA2OCAxLjI1MzQ1IDkuMjUyNTlWOS4yNTI1OVpNMi40ODUxOSA5Ljk4OTA5QzMuMDA1ODMgOS43ODU5MiAxLjUzMjgxIDkuNTcwMDUgMi4zODM2MSA5Ljk1MUwyLjQ4NTE5IDkuOTg5MDlaTTE5LjAwNTggMjAuMTg1OUMxOS4zNDg3IDE5Ljg4MTIgMTguNTg2OCAyMC4wOTcgMTkuMDA1OCAyMC4xODU5VjIwLjE4NTlaTTIwLjk5OTUgMjEuMjI3MkMyMS4xMzkyIDIwLjgzMzUgMjAuNjY5MyAyMS4yNzggMjAuOTk5NSAyMS4yMjcyVjIxLjIyNzJaTTIuNjEyMTggOS4zNDE0N0MyLjY3NTY3IDguOTYwNTIgMi4yMDU4MyA5LjQxNzY2IDIuNjEyMTggOS4zNDE0N1Y5LjM0MTQ3Wk0wLjg1OTc5NyA4LjE2MDUyQzAuNzcwOTA4IDcuNjE0NDkgMC43ODM2MDYgNi42NzQ4MSAxLjY4NTE5IDYuOTkyMjdDMC40Nzg4NDQgNy4yMzM1NCAyLjUyMzI5IDguNDkwNjggMi4yNTY2MiA3LjUwMDJDMi43NjQ1NiA3LjUyNTYgMy4yNDcxIDcuMTk1NDQgMi45ODA0MyA3LjY5MDY4QzMuOTgzNjEgNy41NzYzOSA0LjY2OTMyIDYuNzEyOSA1LjYzNDQgNi44Mzk4OUM2LjM4MzYxIDYuNzM4MyA3LjIwOSA2LjY2MjExIDguMDIxNyA2LjM1NzM1QzguNjgyMDIgNi4zMDY1NSA5LjMyOTY0IDUuNTk1NDQgOC45NjEzOCA1LjE2MzdDOC4wNTk4IDUuMDg3NTEgNy4xMDc0MiA1LjIwMTc5IDYuMTA0MjQgNS40MDQ5N0M0Ljk4Njc4IDUuNjMzNTQgMy45NzA5MSA2LjA3Nzk4IDIuODUzNDUgNi4yNjg0NkMxLjc2MTM4IDYuNDIwODQgMy4wNjkzMiA2LjY3NDgxIDIuNzY0NTYgNi43MjU2QzIuMTkzMTMgNi45Mjg3OCAzLjQ1MDI3IDcuMDU1NzYgMi42ODgzNyA3LjI3MTYzQzIuMjE4NTMgNy4xODI3NCAxLjczNTk5IDcuMDE3NjYgMS45MzkxNiA2LjUzNTEyQzAuODk3ODkyIDYuNjc0ODEgLTAuMDI5MDkyMyA3LjEwNjU1IDAuNzk2MzA1IDguMTczMjJMMC44NTk3OTcgOC4xNjA1MlpNMy4zODY3OCA2Ljg3Nzk4QzMuNjI4MDUgNS45NzYzOSA0LjcwNzQyIDcuNjI3MTkgMy43OTMxMyA2Ljk5MjI3QzMuNjc4ODQgNi45MTYwOCAzLjQ4ODM3IDYuODUyNTggMy4zODY3OCA2Ljg3Nzk4Wk0zLjQyNDg4IDYuNDQ2MjRDMy43ODA0MyA2LjE3OTU3IDMuNjE1MzUgNi41ODU5MiAzLjQyNDg4IDYuNDQ2MjRWNi40NDYyNFpNMy44ODIwMiA2LjQ0NjI0QzMuOTIwMTEgNi4wMjcxOSA0LjkxMDU5IDYuNjYyMTEgNC4wNDcxIDYuNTk4NjJMMy44ODIwMiA2LjQ0NjI0Wk00LjQ5MTU0IDYuMjA0OTdDNC43MjAxMSA1LjkzODMgNC41NTUwMyA2LjQzMzU0IDQuNDkxNTQgNi4yMDQ5N1Y2LjIwNDk3Wk00LjY1NjYyIDYuMDkwNjhDNS4wMjQ4OCA1LjY0NjI0IDYuNzc3MjYgNS43OTg2MiA1LjQ5NDcyIDYuMDUyNThDNS4xNTE4NiA1Ljc5ODYyIDQuODg1MTkgNi4yMDQ5NyA0LjY1NjYyIDYuMDkwNjhaTTYuOTI5NjQgNS43NDc4MkM2Ljg2NjE1IDQuNTE2MDggOC4wNTk4IDYuMTc5NTcgNi45Mjk2NCA1Ljc0NzgyVjUuNzQ3ODJaTTcuNTc3MjYgNS43MzUxMkM3LjgxODUzIDUuMTEyOSA4LjQ5MTU0IDUuNDgxMTYgNy42OTE1NCA1LjYwODE0QzcuNzA0MjQgNS42ODQzMyA3LjY1MzQ1IDUuOTM4MyA3LjU3NzI2IDUuNzM1MTJaTTIuMzU4MjEgOS4wMjQwMUMzLjA2OTMyIDguNTkyMjcgMS42MDkgOC42NDMwNiAyLjM1ODIxIDkuMDI0MDFWOS4wMjQwMVpNMi44Nzg4NCA5LjE2MzdDMy4xMzI4MSA4LjkwOTczIDIuMzQ1NTEgOS4wNjIxMSAyLjg3ODg0IDkuMTYzN1Y5LjE2MzdaTTEuMzQyMzQgOC4wNzE2M0MxLjc0ODY5IDcuNzY2ODcgMC44NzI0OTUgNy45NTczNSAxLjM0MjM0IDguMDcxNjNWOC4wNzE2M1pNMjIuMTgwNCAyMS4xMTI5QzIyLjE5MzEgMjAuNzU3MyAyMS44NzU3IDIxLjI3OCAyMi4xODA0IDIxLjExMjlWMjEuMTEyOVpNMjAuMDU5OCAxOS42NjUzQzIwLjEyMzMgMTkuMjU4OSAxOS43OTMxIDE5LjcwMzQgMjAuMDU5OCAxOS42NjUzVjE5LjY2NTNaTTIyLjc2NDYgMjEuMjUyNkMyMy4zMjMzIDIxLjI1MjYgMjQuNDc4OCAyMS4wNzQ4IDIzLjI0NzEgMjEuMDc0OEMyMy4wNTY2IDIxLjExMjkgMjIuMTI5NiAyMS4xMDAyIDIyLjc2NDYgMjEuMjUyNlpNMy4zMzU5OSA4LjkwOTczQzMuNzkzMTMgOC44ODQzMyA0LjA0NzEgOC40MDE3OSAzLjI0NzEgOC40Mzk4OUMyLjAwMjY1IDguMzEyOSA0LjMzOTE2IDguODcxNjMgMy4wODIwMiA4LjcwNjU1QzIuOTI5NjQgOC44MjA4NCAzLjMzNTk5IDguOTQ3ODIgMy4zMzU5OSA4LjkwOTczWk0zLjc0MjM0IDkuMTEyOUMzLjY5MTU0IDguODIwODQgMy42MDI2NSA5LjI3Nzk4IDMuNzQyMzQgOS4xMTI5VjkuMTEyOVpNNC4yMjQ4OCA3Ljg0MzA2QzQuNDE1MzUgNy42MDE3OSAzLjk0NTUxIDcuNzc5NTcgNC4yMjQ4OCA3Ljg0MzA2VjcuODQzMDZaTTIuNzAxMDcgNS4zMDMzOEMzLjUxMzc3IDUuMDI0MDEgNC42MzEyMyA0LjcxOTI1IDUuMDEyMTggNS40NDMwNkM0LjYxODUzIDQuOTczMjIgNC44NTk4IDQuNTAzMzggNS4yMjgwNSA1LjIwMTc5QzUuNzQ4NjkgNS45MDAyIDYuMDE1MzUgNC44ODQzMyA1LjY3MjUgNC42NTU3NkM2LjA2NjE1IDUuMTM4MyA2LjQ5Nzg5IDUuMzY2ODcgNS45MjY0NiA0LjY4MTE2QzYuNTQ4NjkgMy45MzE5NSA0LjY5NDcyIDQuNzgyNzQgNC4yNjI5NyA0Ljc3MDA1QzQuMDcyNSA0Ljg1ODkzIDIuMTgwNDMgNS4yNTI1OCAyLjcwMTA3IDUuMzAzMzhaTTMuMTgzNjEgNC40MDE3OUMzLjY1MzQ1IDQuMDQ2MjQgNC43ODM2MSA0LjYwNDk3IDQuMDU5OCA0LjA1ODkzQzMuOTgzNjEgMy45ODI3NCAyLjQ0NzEgNC40NjUyOCAzLjE4MzYxIDQuNDAxNzlaTTQuODcyNSA0LjQ2NTI4QzUuNDE4NTMgNC40Nzc5OCA0LjY0MzkyIDMuNzI4NzggNS4yOTE1NCA0LjA3MTYzQzUuMTg5OTYgMy43Mjg3OCA0LjU0MjM0IDMuNjY1MjggNC4yMjQ4OCAzLjUyNTZDNC4wMzQ0IDMuODQzMDYgNC41ODA0MyA0LjQ2NTI4IDQuODcyNSA0LjQ2NTI4Wk0zLjQ3NTY3IDIuOTI4NzhDMy42NjYxNSAyLjY3NDgxIDMuMTQ1NTEgMy4wNTU3NiAzLjQ3NTY3IDIuOTI4NzhWMi45Mjg3OFpNNC4xNjEzOCAzLjA5Mzg2QzUuMDM3NTcgMi45Nzk1NyAzLjkzMjgxIDIuNzEyOSAzLjk4MzYxIDMuMDgxMTZMNC4xNjEzOCAzLjA5Mzg2Wk0yLjg3ODg0IDIuMDc3OThDMi4yNTY2MiAxLjI3Nzk4IDQuMDM0NCAyLjIxNzY2IDMuNDEyMTggMS4zNjY4N0MyLjg3ODg0IDAuOTYwNTIxIDIuMzcwOTEgMS44NDk0MSAyLjg3ODg0IDIuMDc3OThaTTEwLjc5IDYuMzQ0NjVDMTEuMDY5MyA1Ljg0OTQxIDkuNjIxNyA1LjY3MTYzIDEwLjU5OTUgNi4xNjY4N0MxMC42ODg0IDYuMjA0OTcgMTAuNjc1NyA2LjM4Mjc0IDEwLjc5IDYuMzQ0NjVaIiBmaWxsPSJibGFjayIvPgo8L3N2Zz4K) Flask This template demonstrates building the Flask framework for Platform.sh. It includes a minimalist application skeleton that demonstrates how to connect to a MariaDB server for data storage and Redis for caching. The application starts as a bare Python process with no separate runner. It is intended for you to use as a starting point and modify for your own needs. Flask is a lightweight web microframework for Python. ###### Features: - Python 3.8 - MariaDB 10.4 - Redis 5.0 - Automatic TLS certificates - Pipfile-based build View the [repository on GitHub](https://github.com/platformsh-templates/flask). ![Deploy on ](https://platform.sh/images/deploy/lg-blue.svg) Pyramid ![Pyramid](data:image/svg+xml,%3Csvg xmlns='http://www.w3.org/2000/svg' width='225' height='219.34'%3E%3Cg %3E%3Cpath d='M120.8 45.3a22.65 22.65 0 1 0-22.65-22.65A22.66 22.66 0 0 0 120.8 45.3zm81.55 160.45a22.65 22.65 0 1 0-22.65-22.65 22.65 22.65 0 0 0 22.65 22.65zm-157-29.82a22.65 22.65 0 1 1-22.65-22.65 22.65 22.65 0 0 1 22.6 22.65zM73.24 75.5a18.88 18.88 0 1 0-18.88-18.88A18.88 18.88 0 0 0 73.24 75.5zm143.08 49.83a18.88 18.88 0 1 1-18.88-18.87 18.88 18.88 0 0 1 18.88 18.87zm-141.57 94a18.88 18.88 0 1 0-18.88-18.88 18.87 18.87 0 0 0 18.88 18.89zm-4.53-118.91a15.1 15.1 0 1 1-15.1-15.1 15.1 15.1 0 0 1 15.1 15.1zm98.15 4.15a15.1 15.1 0 1 0-15.1-15.1 15.1 15.1 0 0 0 15.1 15.1zm-24.16-26.43a11.33 11.33 0 1 1-11.32-11.32 11.32 11.32 0 0 1 11.32 11.32zm4.91 100.43a11.33 11.33 0 1 0-11.33-11.33 11.33 11.33 0 0 0 11.33 11.33zM75.13 137a11.33 11.33 0 1 1-11.33-11.29A11.32 11.32 0 0 1 75.13 137zm10.57 29.49a9.44 9.44 0 1 0-9.44-9.44 9.44 9.44 0 0 0 9.44 9.44zm28.3-78.9a9.44 9.44 0 1 1-9.44-9.44 9.44 9.44 0 0 1 9.44 9.44zm41.15 60a9.44 9.44 0 1 0-9.44-9.44 9.44 9.44 0 0 0 9.45 9.46zM117 160.44a7.55 7.55 0 1 1-7.55-7.55 7.55 7.55 0 0 1 7.55 7.55zm29.83-37a7.55 7.55 0 1 0-7.56-7.55 7.55 7.55 0 0 0 7.59 7.55zM97 105.7a7.55 7.55 0 1 1-7.55-7.55A7.56 7.56 0 0 1 97 105.7zm29.83 52.1a5.66 5.66 0 1 0-5.67-5.66 5.66 5.66 0 0 0 5.69 5.66zM93.62 125a5.66 5.66 0 1 1-5.62-5.71 5.66 5.66 0 0 1 5.62 5.71zM131 111.37a5.67 5.67 0 1 0-5.66-5.67 5.66 5.66 0 0 0 5.66 5.67zm5.66 80.79a15.1 15.1 0 1 1-15.1-15.11 15.1 15.1 0 0 1 15.1 15.11z' style='fill:%23be202d;fill-rule:evenodd' /%3E%3C/g%3E%3C/svg%3E) Pyramid This template builds Pyramid on Platform.sh. It includes a minimalist application skeleton that demonstrates how to connect to a MariaDB server for data storage and Redis for caching. It is intended for you to use as a starting point and modify for your own needs. Pyramid is a web framework written in Python. ###### Features: - Python 3.8 - MariaDB 10.4 - Redis 5.0 - Automatic TLS certificates - Pipfile-based build View the [repository on GitHub](https://github.com/platformsh-templates/pyramid). ![Deploy on ](https://platform.sh/images/deploy/lg-blue.svg) Wagtail ![Wagtail](data:image/svg+xml;base64,PHN2ZyB3aWR0aD0iMjAyNSIgaGVpZ2h0PSIyNTAwIiB2aWV3Qm94PSIwIDAgMjU2IDMxNiIgeG1sbnM9Imh0dHA6Ly93d3cudzMub3JnLzIwMDAvc3ZnIiBwcmVzZXJ2ZUFzcGVjdFJhdGlvPSJ4TWlkWU1pZCI+PHBhdGggZD0iTTIxNC43NSA0Ni4yNWE2LjUgNi41IDAgMSAwIDAtMTMgNi41IDYuNSAwIDAgMCAwIDEzem04LjI1IDU2cy04LjI1LTQxLjUtNjIuMjUtMzAuMjVjLTUuNS0xOC43NS00LjUtMzIuNSA3LjUtNDUuMjVDMTg0LjUgOS41IDIxMCAxOSAyMTAgMTlWNC43NUMyMDEgLjc1IDE5Mi41IDAgMTgzIDBjLTM0Ljc1IDAtNTQgMjYtNjIuMjUgNDMuNUwyMyAyMjMuMjUgNTAuNSAyMTggMCAzMTUuNWwzNS4yNS02LjI1IDI3LTc2Ljc1Yzc2LjUgMCAxNzQuNS0yNy41IDE2MC43NS0xMzAuMjV6bTMzLTM0Ljc1bC0yMS41LTIwLjc1LTE3IDIwLjc1SDI1NnpNNzUgMjEwLjI1czIuNS0uNSA3LTEuNSAxMC43NS0yLjUgMTguMjUtNC41YzMuNzUtMSA3Ljc1LTIuMjUgMTItMy43NXM4Ljc1LTMgMTMtNWM0LjUtMS43NSA5LTQgMTMuNS02LjVzOC43NS01LjI1IDEyLjc1LTguNWMxLS43NSAyLTEuNSAzLTIuNWwzLTIuNWMxLjc1LTEuNzUgMy43NS0zLjUgNS41LTUuNSAxLjc1LTEuNzUgMy4yNS0zLjc1IDQuNzUtNS43NWwyLjI1LTMgMS0xLjUgMS0xLjVjLjUtMSAxLjI1LTIgMS43NS0zczEtMiAxLjc1LTNsLjc1LTEuNS43NS0xLjVjLjUtMSAxLTIgMS4yNS0zbDIuMjUtNmMuNS0yIDEuMjUtNCAxLjc1LTUuNzVzLjc1LTMuNzUgMS4yNS01LjI1Yy4yNS0xLjc1LjUtMy4yNS43NS01IC4yNS0xLjUuNS0zIC41LTQuMjUuMjUtMS4yNS4yNS0yLjUuNS0zLjc1LjI1LTQuNS4yNS03IC4yNS03bDQgLjI1cy0uMjUgMi43NS0uNSA3LjI1Yy0uMjUgMS4yNS0uMjUgMi41LS41IDMuNzUtLjI1IDEuNS0uMjUgMy0uNzUgNC41LS4yNSAxLjUtLjc1IDMuMjUtMSA1LS41IDEuNzUtMSAzLjUtMS41IDUuNXMtMS4yNSAzLjc1LTIgNmMtLjc1IDItMS41IDQtMi41IDYuMjVsLTEuNSAzLS43NSAxLjUtLjc1IDEuNWMtLjUgMS0xLjI1IDItMS43NSAzLjI1LS43NSAxLTEuMjUgMi0yIDMtLjI1LjUtLjc1IDEtMSAxLjVsLTEgMS41LTIuMjUgM2MtMS43NSAyLTMuMjUgNC01LjI1IDUuNzUtMS43NSAyLTMuNzUgMy41LTUuNzUgNS41bC0zIDIuNWMtMSAuNzUtMiAxLjUtMy4yNSAyLjI1LTQuMjUgMy04Ljc1IDUuNzUtMTMuMjUgOC4yNS00LjUgMi4yNS05LjI1IDQuNS0xMy43NSA2LjI1cy05IDMuMjUtMTMuMjUgNC41LTguMjUgMi41LTEyLjI1IDMuMjVjLTcuNSAxLjc1LTE0IDMuMjUtMTguNSA0LTQgMS41LTYuNSAyLTYuNSAyeiIvPjwvc3ZnPg==) Wagtail This template builds the Wagtail CMS on Platform.sh, using the gunicorn application runner. It includes a PostgreSQL database that is configured automatically, and a basic demonstration app that shows how to use it. It is intended for you to use as a starting point and modify for your own needs. You will need to run the command line installation process by logging into the project over SSH after the first deploy. Wagtail is a web CMS built using the Django framework for Python. ###### Features: - Python 3.9 - PostgreSQL 12 - Automatic TLS certificates - Pipfile-based build View the [repository on GitHub](https://github.com/platformsh-templates/wagtail). ![Deploy on ](https://platform.sh/images/deploy/lg-blue.svg) #### Manage Python dependencies p:last-child]:mb-0 [&>h3]:mt-0 rounded-lg" > ####### Note You can now use composable image (BETA) to install runtimes and tools in your application container. To find out more, see the [dedicated documentation page](https://docs.platform.sh/create-apps/app-reference/composable-image.md). You can manage Python packages in different ways. Python images come with pip installed, but they're flexible enough so you can choose what package manager you want. This article describes how to configure major package management tools. This package management is different from global dependencies (packages available as commands), which you can add in your [app configuration](https://docs.platform.sh/create-apps.md). See more about [managing global dependencies](https://docs.platform.sh/languages/python.md#package-management). ###### Pip [pip](https://pip.pypa.io/en/stable/) is the primary package installer for Python and comes installed on every Python container. You can use it to install packages from the Python Package Index and other locations. To manage packages with pip, commit a `requirements.txt` file with all of the dependencies needed for your app. Then install the packages in your [`build` hook](https://docs.platform.sh/create-apps/hooks.md), such as by running the following command: `pip install -r requirements.txt`. The following sections present ideas to keep in mind to ensure repeatable deployments on Platform.sh. ####### pip version The version of pip on Python containers gets updated regularly. But it isn't guaranteed to be the latest version or the version that matches your local environment. You might want to define a specific version of pip in your deployments to further enforce repeatable builds. To do so, modify your [app configuration](https://docs.platform.sh/create-apps.md), as in the following examples: ```yaml {location=".platform.app.yaml"} type: 'python:3.9' variables: env: PIP_VERSION: '22.3.1' hooks: build: | # Fail the build if any errors occur set -eu # Download a specific version of pip python3.9 -m pip install pip==$PIP_VERSION # Install dependencies pip install -r requirements.txt ``` ####### pip freeze You can write `requirements.txt` files in various ways. You can specify anything from the latest major to a specific patch version in a [requirement specifier](https://pip.pypa.io/en/stable/reference/requirement-specifiers/). Use `pip freeze` before committing your requirements to pin specific package versions. This ensures repeatable builds on Platform.sh with the same packages. ###### Pipenv [Pipenv](https://pipenv.pypa.io/en/latest/) is a package manager for Python that creates and manages a virtual environment for Python projects. Dependencies are tracked and defined within a `Pipfile`. It also generates a `Pipfile.lock` file to produce repeatable installs. You can specify the latest or a specific version of Pipenv in your deployments to ensure repeatable builds. Because Pipenv depends on pip, you might want to also specify the pip version. ```yaml {location=".platform.app.yaml"} type: 'python:3.9' variables: env: PIP_VERSION: '22.3.1' dependencies: python3: pipenv: '2022.12.19' hooks: build: | # Fail the build if any errors occur set -eu # Download a specific version of pip python3.9 -m pip install pip==$PIP_VERSION # Install dependencies # Include `--deploy` to fail the build if `Pipfile.lock` isn't up to date pipenv install --deploy ``` ###### Poetry [Poetry](https://python-poetry.org/docs/) is a tool for dependency management and packaging in Python. It allows you to declare the libraries your project depends on and manages them for you. Poetry offers a lock file to ensure repeatable installs and can build your project for distribution. It also creates and manages virtual environments to keep project work isolated from the rest of your system. To set up Poetry on Platform.sh, follow these steps: 1. Configure your virtual environment by setting two variables in your [app configuration](https://docs.platform.sh/create-apps.md). - [`POETRY_VIRTUALENVS_IN_PROJECT`](https://python-poetry.org/docs/configuration/#virtualenvsin-project): Setting this to `true` places the virtual environment at the root of the app container: `/app/.venv`. - [`POETRY_VIRTUALENVS_CREATE`](https://python-poetry.org/docs/configuration/#virtualenvscreate): Setting this to `true` ensures that the same virtual environment created during the build hook is reused in subsequent steps. Set the variables as follows: ```yaml {location=".platform.app.yaml"} variables: env: POETRY_VIRTUALENVS_IN_PROJECT: true POETRY_VIRTUALENVS_CREATE: true ``` 2. Install Poetry. You can specify the latest or a specific version of Poetry in your deployments to ensure repeatable builds. ```yaml {location=".platform.app.yaml"} type: 'python:3.9' dependencies: python3: poetry: '>=1.8' variables: env: POETRY_VIRTUALENVS_IN_PROJECT: true POETRY_VIRTUALENVS_CREATE: true hooks: build: | # Fail the build if any errors occur set -eu # Download the latest version of pip python3.9 -m pip install --upgrade pip # Install dependencies poetry install ``` 3. Make Poetry available outside the build hook. Although step 2 updated the `PATH` to make Poetry available during the build hook, it isn't enough to make it available at subsequent stages. To use Poetry in a start command, a deploy hook, or during SSH sessions, update the `PATH` in a [`.environment` file](https://docs.platform.sh/development/variables/set-variables.md#set-variables-via-script). ```text {location=".environment"} # Updates PATH when Poetry is used, making it available during deploys, start commands, and SSH. if [ -n "$POETRY_VERSION" ]; then export PATH="/app/.local/bin:$PATH" fi ``` ###### Anaconda Some frameworks and tools recommend using Anaconda or Miniconda to manage packages in Python. The following Community resources can help get you started with them: - [Running and installing Anaconda/Miniconda on Platform.sh](https://support.platform.sh/hc/en-us/community/posts/16439726140946) - [Running R Shiny using Miniconda on Platform.sh](https://support.platform.sh/hc/en-us/community/posts/16439711774994) #### Web servers p:last-child]:mb-0 [&>h3]:mt-0 rounded-lg" > ####### Note You can now use composable image (BETA) to install runtimes and tools in your application container. To find out more, see the [dedicated documentation page](https://docs.platform.sh/create-apps/app-reference/composable-image.md). The Python ecosystem offers a number of web servers that can be used to deploy to Platform.sh. The following examples deploy a Django project named `myapp`. They assume a `myapp/wsgi.py` or `myapp/asgi.py` file with a callable `application`. Adjust the examples to fit your framework and app. ###### Gunicorn [Gunicorn](https://docs.gunicorn.org/) is a Python WSGI HTTP Server for Unix that operates on a pre-fork worker model. The Gunicorn server is broadly compatible with various web frameworks, light on server resource usage, and fast. To deploy with Gunicorn on Platform.sh , use one of the following examples to update your [app configuration](https://docs.platform.sh../../create-apps.md). The examples vary based on both your package manager (Pip, Pipenv, or Poetry) and whether your app listens on a TCP (default) or Unix (for running behind a proxy server) socket. For more information on upstream sockets and protocols, see the [application reference](https://docs.platform.sh/create-apps/app-reference/single-runtime-image.md#upstream). The snippets below assume that Gunicorn has been added as a dependency to your `requirements.txt`, `Pipfile.lock`, or `poetry.lock`. ```yaml {location=".platform.app.yaml"} type: 'python:3.9' web: upstream: socket_family: unix commands: start: "gunicorn -w 4 -b unix:$SOCKET myapp.wsgi:application" locations: "/": passthru: true "/static": root: "static" expires: 1h allow: true ``` ```yaml {location=".platform.app.yaml"} type: 'python:3.9' web: commands: start: "pipenv run gunicorn -w 4 -b localhost:$PORT myapp.wsgi:application" locations: "/": passthru: true "/static": root: "static" expires: 1h allow: true ``` ```yaml {location=".platform.app.yaml"} type: 'python:3.9' web: upstream: socket_family: unix commands: start: "pipenv run gunicorn -w 4 -b unix:$SOCKET myapp.wsgi:application" locations: "/": passthru: true "/static": root: "static" expires: 1h allow: true ``` ```yaml {location=".platform.app.yaml"} type: 'python:3.9' web: commands: start: "poetry run gunicorn -w 4 -b localhost:$PORT myapp.wsgi:application" locations: "/": passthru: true "/static": root: "static" expires: 1h allow: true ``` ```yaml {location=".platform.app.yaml"} type: 'python:3.9' web: upstream: socket_family: unix commands: start: "poetry run gunicorn -w 4 -b unix:$SOCKET myapp.wsgi:application" locations: "/": passthru: true "/static": root: "static" expires: 1h allow: true ``` ####### Gunicorn workers These examples define four worker processes with `-w 4`. For more details on what you can configure, see the [Gunicorn documentation](https://docs.gunicorn.org/en/stable/faq.md#worker-processes). Workers can also be defined with a custom [worker class](https://docs.gunicorn.org/en/latest/settings.md#worker-class), such as [Uvicorn](https://www.uvicorn.org/#running-with-gunicorn), [gevent](https://www.gevent.org/), or [Tornado](https://www.tornadoweb.org/). For example, to add a Uvicorn worker class to the pip example for Unix, adjust the start command to the following: ```yaml {location=".platform.app.yaml"} web: upstream: socket_family: unix commands: start: "gunicorn -w 4 -k uvicorn.workers.UvicornWorker -b unix:$SOCKET myapp.wsgi:application" ``` ###### Daphne [Daphne](https://github.com/django/daphne) is a HTTP, HTTP2 ,and WebSocket protocol server for ASGI and ASGI-HTTP, developed to power Django Channels. To deploy with Daphne on Platform.sh , use one of the following examples to update your [app configuration](https://docs.platform.sh../../create-apps.md). The examples vary based on both your package manager (Pip, Pipenv, or Poetry) and whether your app listens on a TCP (default) or Unix (for running behind a proxy server) socket. For more information on upstream sockets and protocols, see the [application reference](https://docs.platform.sh/create-apps/app-reference/single-runtime-image.md#upstream). The snippets below assume that Daphne has been added as a dependency to your `requirements.txt`, `Pipfile.lock`, or `poetry.lock`. ```yaml {location=".platform.app.yaml"} type: 'python:3.9' web: upstream: socket_family: unix commands: start: "daphne -u $SOCKET myapp.asgi:application" locations: "/": passthru: true "/static": root: "static" expires: 1h allow: true ``` ```yaml {location=".platform.app.yaml"} type: 'python:3.9' web: commands: start: "pipenv run daphne -p $PORT myapp.asgi:application" locations: "/": passthru: true "/static": root: "static" expires: 1h allow: true ``` ```yaml {location=".platform.app.yaml"} type: 'python:3.9' web: upstream: socket_family: unix commands: start: "pipenv run daphne -u $SOCKET myapp.asgi:application" locations: "/": passthru: true "/static": root: "static" expires: 1h allow: true ``` ```yaml {location=".platform.app.yaml"} type: 'python:3.9' web: commands: start: "poetry run daphne -p $PORT myapp.asgi:application" locations: "/": passthru: true "/static": root: "static" expires: 1h allow: true ``` ```yaml {location=".platform.app.yaml"} type: 'python:3.9' web: upstream: socket_family: unix commands: start: "poetry run -u $SOCKET myapp.asgi:application" locations: "/": passthru: true "/static": root: "static" expires: 1h allow: true ``` ###### Uvicorn [Uvicorn](https://www.uvicorn.org/) is an ASGI web server implementation for Python. To deploy with Uvicorn on Platform.sh , use one of the following examples to update your [app configuration](https://docs.platform.sh../../create-apps.md). The examples vary based on both your package manager (Pip, Pipenv, or Poetry) and whether your app listens on a TCP (default) or Unix (for running behind a proxy server) socket. For more information on upstream sockets and protocols, see the [application reference](https://docs.platform.sh/create-apps/app-reference/single-runtime-image.md#upstream). The snippets below assume that Uvicorn has been added as a dependency to your `requirements.txt`, `Pipfile.lock`, or `poetry.lock`. ```yaml {location=".platform.app.yaml"} type: 'python:3.9' web: upstream: socket_family: unix commands: start: "uvicorn myapp.asgi:application --uds $SOCKET --workers 4" locations: "/": passthru: true "/static": root: "static" expires: 1h allow: true ``` ```yaml {location=".platform.app.yaml"} type: 'python:3.9' web: commands: start: "pipenv run uvicorn myapp.asgi:application --port $PORT --workers 4" locations: "/": passthru: true "/static": root: "static" expires: 1h allow: true ``` ```yaml {location=".platform.app.yaml"} type: 'python:3.9' web: upstream: socket_family: unix commands: start: "pipenv run uvicorn myapp.asgi:application --uds $SOCKET --workers 4" locations: "/": passthru: true "/static": root: "static" expires: 1h allow: true ``` ```yaml {location=".platform.app.yaml"} type: 'python:3.9' web: commands: start: "poetry run uvicorn myapp.asgi:application --port $PORT --workers 4" locations: "/": passthru: true "/static": root: "static" expires: 1h allow: true ``` ```yaml {location=".platform.app.yaml"} type: 'python:3.9' web: upstream: socket_family: unix commands: start: "poetry run uvicorn myapp.asgi:application --uds $SOCKET --workers 4" locations: "/": passthru: true "/static": root: "static" expires: 1h allow: true ``` ####### Uvicorn workers These examples define four worker processes with `-w 4`. For more recommendations on this and other settings, see the [Uvicorn documentation](https://www.uvicorn.org/settings/#timeouts). Instead of the `-w` flag, you can also use the `WEB_CONCURRENCY` variable. See how to [set variables](https://docs.platform.sh/development/variables/set-variables.md). ###### Hypercorn [Hypercorn](https://hypercorn.readthedocs.io/) is an ASGI and WSGI web server inspired by Gunicorn. To deploy with Hypercorn on Platform.sh , use one of the following examples to update your [app configuration](https://docs.platform.sh../../create-apps.md). The examples vary based on both your package manager (Pip, Pipenv, or Poetry) and whether your app listens on a TCP (default) or Unix (for running behind a proxy server) socket. For more information on upstream sockets and protocols, see the [application reference](https://docs.platform.sh/create-apps/app-reference/single-runtime-image.md#upstream). The snippets below assume that Hypercorn has been added as a dependency to your `requirements.txt`, `Pipfile.lock`, or `poetry.lock`. ```yaml {location=".platform.app.yaml"} type: 'python:3.9' web: upstream: socket_family: unix commands: start: "hypercorn myapp.asgi:application -b unix:$SOCKET -w 4" locations: "/": passthru: true "/static": root: "static" expires: 1h allow: true ``` ```yaml {location=".platform.app.yaml"} type: 'python:3.9' web: commands: start: "pipenv run hypercorn myapp.asgi:application -b localhost:$PORT -w 4" locations: "/": passthru: true "/static": root: "static" expires: 1h allow: true ``` ```yaml {location=".platform.app.yaml"} type: 'python:3.9' web: upstream: socket_family: unix commands: start: "pipenv run hypercorn myapp.asgi:application -b unix:$SOCKET -w 4" locations: "/": passthru: true "/static": root: "static" expires: 1h allow: true ``` ```yaml {location=".platform.app.yaml"} type: 'python:3.9' web: commands: start: "poetry run hypercorn myapp.asgi:application -b localhost:$PORT -w 4" locations: "/": passthru: true "/static": root: "static" expires: 1h allow: true ``` ```yaml {location=".platform.app.yaml"} type: 'python:3.9' web: upstream: socket_family: unix commands: start: "poetry run hypercorn myapp.asgi:application -b unix:$SOCKET -w 4" locations: "/": passthru: true "/static": root: "static" expires: 1h allow: true ``` ####### Hypercorn workers These examples define four worker processes with `-w 4`. For more details on what you can configure, see the [Hypercorn documentation](https://hypercorn.readthedocs.io/en/latest/how_to_guides/configuring.md). Workers can also be defined with a custom [worker class](https://hypercorn.readthedocs.io/en/latest/how_to_guides/configuring.md#configuration-options), such as Asyncio, Uvloop, or Trio. For example, to add a Asyncio worker class to the pip example for Unix, adjust the start command to the following: ```yaml {location=".platform.app.yaml"} web: upstream: socket_family: unix commands: start: "hypercorn myapp.asgi:application -b unix:$SOCKET -w 4 -k asyncio" ``` #### Manage Python versions in non-Python containers p:last-child]:mb-0 [&>h3]:mt-0 rounded-lg" > ####### Note You can now use composable image (BETA) to install runtimes and tools in your application container. To find out more, see the [dedicated documentation page](https://docs.platform.sh/create-apps/app-reference/composable-image.md). You may need to use a specific version of Python that isn't available in an app container for a different language. For example, a container might have a long-term support version, while you want the latest version. In such cases, use the [Pyenv version manager](https://github.com/pyenv/pyenv) to install the specific version you want to use. 1. Add your target Python version as a [variable](https://docs.platform.sh/development/variables/_index.md): ```yaml {location=".platform.app.yaml"} variables: env: # Update for your desired Python version. PYTHON_VERSION: "3.11.0" ``` 2. Add Pyenv in a [`build` hook](https://docs.platform.sh/create-apps/hooks/hooks-comparison.md#build-hook): ```yaml {location=".platform.app.yaml"} hooks: build: | # Exit the hook on any failure set -e # Clone Pyenv to the build cache if not present if [ ! -d "$PLATFORM_CACHE_DIR/.pyenv" ]; then mkdir -p $PLATFORM_CACHE_DIR/.pyenv git clone https://github.com/pyenv/pyenv.git $PLATFORM_CACHE_DIR/.pyenv fi # Pyenv environment variables export PYENV_ROOT="$PLATFORM_CACHE_DIR/.pyenv" export PATH="$PYENV_ROOT/bin:$PATH" # Initialize Pyenv if command -v pyenv 1>/dev/null 2>&1; then eval "$(pyenv init --path)" fi # Install desired Python version mkdir -p $PLATFORM_CACHE_DIR/.pyenv/versions if [ ! -d "$PLATFORM_CACHE_DIR/.pyenv/versions/$PYTHON_VERSION" ]; then pyenv install $PYTHON_VERSION fi # Set global Python version pyenv global $PYTHON_VERSION ``` Now your build hook can use the specified version of Python. You can verify this by running `python --version`. If you want this Python version to be available in the runtime environment, follow these steps: 1. Copy Pyenv to your runtime environment at the end of your build hook: ```yaml {location=".platform.app.yaml"} hooks: build: | ... # Copy Pyenv directory to runtime directory cp -R $PLATFORM_CACHE_DIR/.pyenv $PLATFORM_APP_DIR # Rehash Pyenv for new (runtime) location PYENV_ROOT="$PLATFORM_APP_DIR/.pyenv" $PLATFORM_APP_DIR/.pyenv/bin/pyenv rehash ``` 2. Create an [`.environment` file](https://docs.platform.sh/development/variables/set-variables.md#set-variables-via-script): ```bash touch .environment ``` 3. Update the PATH for the runtime environment: ```yaml {location=".environment"} export PATH=/app/.pyenv/bin:/app/.pyenv/shims:$PATH ``` Now the specified Python version is used in the runtime environment. ### Ruby p:last-child]:mb-0 [&>h3]:mt-0 rounded-lg" > ###### Note You can now use composable image (BETA) to install runtimes and tools in your application container. To find out more, see the [dedicated documentation page](https://docs.platform.sh/create-apps/app-reference/composable-image.md). Platform.sh supports deploying any Ruby application. Your application can use any Ruby application server such as Puma or Unicorn and deploying a Rails or a Sinatra app is very straight forward. ##### Supported versions You can select the major and minor version. Patch versions are applied periodically for bug fixes and the like. When you deploy your app, you always get the latest available patches. ###### Ruby MRI | Grid | Dedicated Gen 3 | Dedicated Gen 2 | | - 3.3 - 3.2 - 3.1 - 3.0 - 3.3 - 3.2 - 3.1 - 3.0 None available ###### Specify the language To use Ruby, specify `ruby` as your [app's `type`](https://docs.platform.sh/create-apps/app-reference/single-runtime-image.md#types): ```yaml {location=".platform.app.yaml"} type: 'ruby:' ``` For example: ```yaml {location=".platform.app.yaml"} type: 'ruby:3.3' ``` ###### Deprecated versions The following versions are [deprecated](https://docs.platform.sh/glossary.md#deprecated-versions). They're available, but they aren't receiving security updates from upstream and aren't guaranteed to work. They'll be removed in the future, so migrate to one of the [supported versions](#supported-versions). - 2.7 - 2.6 - 2.5 - 2.4 - 2.3 ##### Puma based Rails configuration This example uses Puma to run a Ruby application. You could use any Ruby application server such as Unicorn. Configure the `.platform.app.yaml` file with a few key settings as listed below. A complete example is included at the end of this section. 1. Specify the language of your application (available versions are listed above): ```yaml {location=".platform.app.yaml"} type: 'ruby:3.3' ``` 2. Setup environment variables. Rails runs by default on a preview environment. You can change the Rails/Bundler via those environment variables, some of which are defaults on Platform.sh. ```yaml {location=".platform.app.yaml"} variables: env: PIDFILE: "tmp/server.pid" # Allow to start puma directly even if `tmp/pids` directory is not created RAILS_ENV: "production" BUNDLE_WITHOUT: 'development:test' TARGET_RUBY_VERSION: '~>3.3' # this will allow to not fail on PATCH update of the image ``` The `SECRET_KEY_BASE` variable is generated automatically based on the [`PLATFORM_PROJECT_ENTROPY` variable](https://docs.platform.sh/development/variables/use-variables.md#use-provided-variables) but you can change it. Based on TARGET_RUBY_VERSION, we recommand to set on your Gemfile so next PATCH release of ruby doesn't fail the build: ```ruby ruby ENV["TARGET_RUBY_VERSION"] || File.read(File.join(File.dirname(__FILE__), ".ruby-version")).strip ``` 3. Build your application with the build hook. Assuming you have your dependencies stored in the `Gemfile` at [your app root](https://docs.platform.sh/create-apps/app-reference/single-runtime-image.md#root-directory), create a hook like the following: ```yaml {location=".platform.app.yaml"} hooks: build: | set -e bundle install bundle exec rails assets:precompile deploy: bundle exec rake db:migrate ``` These are installed as your project dependencies in your environment. You can also use the `dependencies` key to install global dependencies. These can be Ruby, Python, NodeJS, or PHP libraries. If you have assets, it's likely that you need NodeJS/yarn. ```yaml {location=".platform.app.yaml"} dependencies: nodejs: yarn: "*" ``` 4. Configure the command to start serving your application (this must be a foreground-running process) under the `web` section: ```yaml {location=".platform.app.yaml"} web: upstream: socket_family: unix commands: # for puma start: "bundle exec puma -b unix://$SOCKET" # for unicorn # start: "bundle exec unicorn -l $SOCKET" ``` This assumes you have Unicorn as a dependency in your Gemfile: ```ruby gem "puma", ">= 5.0" ``` 5. Define the web locations your application is using: ```yaml {location=".platform.app.yaml"} web: locations: "/": root: "public" passthru: true expires: 1h allow: true ``` This configuration sets the web server to handle HTTP requests at `/static` to serve static files stored in `/app/static/` folder. Everything else is forwarded to your application server. 6. Create any Read/Write mounts. The root file system is read only. You must explicitly describe writable mounts. ```yaml {location=".platform.app.yaml"} mounts: "/log": source: local source_path: log "/storage": source: local source_path: storage "/tmp": source: local source_path: tmp ``` This setting allows your application writing temporary files to `/app/tmp`, logs stored in `/app/log`, and active storage in `/app/storage`. You can define other read/write mounts (your application code itself being deployed to a read-only file system). Note that the file system is persistent and when you backup your cluster these mounts are also backed up. 7. Then, setup the routes to your application in `.platform/routes.yaml`. ```yaml {location=".platform/routes.yaml"} "https://{default}/": type: upstream upstream: "myapp:http" ``` ###### Complete app configuration Here is a complete `.platform.app.yaml` file: ```yaml {location=".platform.app.yaml"} # The name of the app, which must be unique within a project. name: 'myapp' type: "ruby:3.0" dependencies: nodejs: yarn: "*" # Relationships enable an app container's access to a service. # The example below shows simplified configuration leveraging a default service (identified from the relationship name) and a default endpoint. # See the Application reference for all options for defining relationships and endpoints. relationships: mysql: disk: 2048 variables: env: BUNDLE_CACHE_ALL: '1' # Default, Cache all gems, including path and git gems. BUNDLE_CLEAN: '1' # /!\ if you are working with Ruby ###### Configuration reader While you can read the environment directly from your app, you might want to use the [helper library for Ruby apps](https://github.com/platformsh/platformsh-ruby-helper) or [one for Rails apps](https://github.com/platformsh/platformsh-rails-helper) . It decodes service credentials, the correct port, and other information for you. ##### Other tips - To speed up boot you can use the [Bootsnap gem](https://github.com/Shopify/bootsnap) and configure it with the local `/tmp`: ```ruby {location="config/boot.rb"} Bootsnap.setup(cache_dir: "/tmp/cache") ``` - For garbage collection tuning, you can read [this article](https://shopify.engineering/17489064-tuning-rubys-global-method-cache) and look for [discourse configurations](https://github.com/discourse/discourse_docker/blob/b259c8d38e0f42288fd279c9f9efd3cefbc2c1cb/templates/web.template.yml#L8) - New images are released on a regular basis to apply security patches. To avoid issues when such updates are performed, use ``` ruby ruby ENV["TARGET_RUBY_VERSION"] || File.read(File.join(File.dirname(__FILE__), ".ruby-version")).strip ``` in your `Gemfile`. ##### Troubleshooting By default, deployments have `BUNDLE_DEPLOYMENT=1` to ensure projects have a `Gemfile.lock` file. This is safer for version yank issues and other version upgrade breakages. You may encounter an error like the following during a build: ```txt W: bundler: failed to load command: rake (/app/.global/bin/rake) W: /app/.global/gems/bundler-2.3.5/lib/bundler/resolver.rb:268:in `block in verify_gemfile_dependencies_are_found!': Could not find gem 'rails (= 5.2.6)' in locally installed gems. (Bundler::GemNotFound) ``` To resolve this error: 1. Run `bundle install` with the same `ruby` and `bundler` versions defined in your `.platform.app.yaml` file. 2. Push the `Gemfile.lock` to your repository. ### Rust Platform.sh supports building and deploying applications written in Rust. ##### Supported versions You can select the major version. But the latest compatible minor version is applied automatically and can’t be overridden. Patch versions are applied periodically for bug fixes and the like. When you deploy your app, you always get the latest available patches. | Grid | Dedicated Gen 3 | Dedicated Gen 2 | | - 1 None available None available ##### Dependencies The recommended way to handle Rust dependencies on Platform.sh is using Cargo. Commit a `Cargo.toml` and a `Cargo.lock` file in your repository so the system automatically downloads dependencies using Cargo. ##### Building and running your app Assuming your `Cargo.toml` and `Cargo.lock` files are present in your repository, you can build your app using the `cargo build` command to produce a working executable. You can then start it from the `web.commands.start` directive. Note that the start command _must_ run in the foreground. If the program terminates for any reason it is automatically restarted. The following basic [app configuration](https://docs.platform.sh/create-apps.md) is sufficient to run most Rust apps. See the [complete example](#complete-example) below for more details. ```yaml {location=".platform.app.yaml"} # The app's name, which must be unique within the project. name: 'myapp' # The language and version for your app. type: 'rust:1' # The size of the app's persistent disk (in MB). disk: 2048 hooks: build: cargo build web: commands: # Customize the start command with your own target. start: './target/debug/hello' locations: /: # Route all requests to the Rust app, unconditionally. allow: false passthru: true ``` Note that there is still an Nginx proxy server sitting in front of your application. If desired, certain paths may be served directly by Nginx without hitting your application (for static files, primarily) or you may route all requests to the Rust app unconditionally, as in the example above. ##### Built-in variables Platform.sh exposes relationships and other configuration as [environment variables](https://docs.platform.sh/development/variables.md). To get the `PORT` environment variable (the port on which your app is supposed to listen), use the following snippet: ```rust let port : String = env::var("PORT").unwrap_or(String::from("8888")); ``` Note that some of the environment variables are in JSON format and are base64 encoded. For example, to decode the `PLATFORM_RELATIONSHIPS` environment variable, use the following snippet: ```rust use base64::{Engine as _, engine::{general_purpose}}; use serde_json::Value; let bytes = general_purpose::STANDARD.decode(env::var("PLATFORM_RELATIONSHIPS").unwrap_or(String::new())).unwrap(); let psh_config: Value = serde_json::from_slice(&bytes).unwrap(); println!("{}", psh_config["database"]); ``` ##### Complete example Here is a basic hello world app to illustrate how you can use Rust with Platform.sh. It builds from a `hello.rs` file to serve a static `index.html`. Follow these steps: 1. [Install Rust and Cargo](https://www.rust-lang.org/tools/install). 2. Create a repository for your app and add the following `Cargo.toml` file: ```toml [package] name = "hello_world" version = "0.1.0" edition = "2021" [[bin]] name = "hello" path = "hello.rs" [dependencies] time = "0.1.12" regex = "0.1.41" base64 = "0.21.0" serde = { version = "1.0", features = ["derive"] } serde_json = "1.0" ``` 3. Add the following [app configuration](https://docs.platform.sh/create-apps/_index.md): ```yaml {location=".platform.app.yaml"} # The app's name, which must be unique within the project. name: 'myapp' # The language and version for your app. type: 'rust:1' # The size of the app's persistent disk (in MB). disk: 2048 hooks: build: cargo build web: commands: # Customize the start command with your own target. start: './target/debug/hello' locations: /: # Route all requests to the Rust app, unconditionally. allow: false passthru: true ``` 4. To generate a `Cargo.lock` file, run the following command: ```bash cargo generate-lockfile ``` 5. Add the following `hello.rs` file: ```rust /* Simple HTTP Server */ /* Author : Ramesh Vyas */ use std::io::prelude::*; use std::net::TcpListener; use std::net::TcpStream; use std::fs; use std::env; fn main() { /* Creating a Local TcpListener at Port 8888 */ const HOST : &str ="127.0.0.1"; let port : String = env::var("PORT").unwrap_or(String::from("8888")); /* Concating Host address and Port to Create Final Endpoint */ let end_point : String = HOST.to_owned() + ":" + &port; /*Creating TCP Listener at our end point */ let listener = TcpListener::bind(end_point).unwrap(); println!("Web server is listening at port {}",port); /* Connecting to any incoming connections */ for stream in listener.incoming() { let _stream = stream.unwrap(); // Call Function to process any incomming connections handle_connection(_stream); } } fn handle_connection(mut stream: TcpStream) { let mut buffer = [0; 1024]; stream.read(&mut buffer).unwrap(); let get = b"GET / HTTP/1.1\r\n"; if buffer.starts_with(get) { let contents = fs::read_to_string("index.html").unwrap(); let response = format!( "HTTP/1.1 200 OK\r\nContent-Length: {}\r\n\r\n{}", contents.len(), contents ); stream.write(response.as_bytes()).unwrap(); stream.flush().unwrap(); } else { // some other request } } ``` ### Project templates You can initialize your projects using any of our pre-made template repositories. A template is a starting point for building your project. It should help you get a project ready for production. You can click the **Deploy on Platform.sh** button to launch a new project using a template, or you can visit and clone the repository and push to an empty project you have created using the CLI or in the Console. ##### C#/.NET Core View the [C#/.NET Core documentation](https://docs.platform.sh/languages/dotnet.md). Templates in development. ##### Go View the [Go documentation](https://docs.platform.sh/languages/go.md). Echo ![Echo](data:image/svg+xml;base64,PHN2ZyB3aWR0aD0iMjQiIGhlaWdodD0iMjQiIHZpZXdCb3g9IjAgMCAyNCAyNCIgZmlsbD0ibm9uZSIgeG1sbnM9Imh0dHA6Ly93d3cudzMub3JnLzIwMDAvc3ZnIj4KPHBhdGggZD0iTTE4LjI3NjYgMjEuNzE1NUwxNi42ODU2IDIwLjEyNDVMMTUuNjI1MSAyMS4xODVMMTcuMjE2MSAyMi43NzZDMTcuNTA5MSAyMy4wNjkgMTcuOTg0MSAyMy4wNjkgMTguMjc2NiAyMi43NzZDMTguNTY5MSAyMi40ODMgMTguNTY5NiAyMi4wMDg1IDE4LjI3NjYgMjEuNzE1NVoiIGZpbGw9IiNGRkNDODAiLz4KPHBhdGggZD0iTTE5Ljc3NjYgMTIuNzE1NUwxOC4xODU2IDExLjEyNDVMMTcuMTI1MSAxMi4xODVMMTguNzE2MSAxMy43NzZDMTkuMDA5MSAxNC4wNjkgMTkuNDg0MSAxNC4wNjkgMTkuNzc2NiAxMy43NzZDMjAuMDY5MSAxMy40ODMgMjAuMDY5NiAxMy4wMDg1IDE5Ljc3NjYgMTIuNzE1NVoiIGZpbGw9IiNGRkNDODAiLz4KPHBhdGggZD0iTTYuODQ0NTYgMjEuNzE1NUw4LjQzNTU2IDIwLjEyNDVMOS40OTYwNiAyMS4xODVMNy45MDUwNiAyMi43NzZDNy42MTIwNiAyMy4wNjkgNy4xMzcwNiAyMy4wNjkgNi44NDQ1NiAyMi43NzZDNi41NTIwNiAyMi40ODMgNi41NTE1NiAyMi4wMDg1IDYuODQ0NTYgMjEuNzE1NVoiIGZpbGw9IiNGRkNDODAiLz4KPHBhdGggZD0iTTUuMjE5NTYgMTIuNzE1NUw2LjgxMDU2IDExLjEyNDVMNy44NzEwNiAxMi4xODVMNi4yODAwNiAxMy43NzZDNS45ODcwNiAxNC4wNjkgNS41MTIwNiAxNC4wNjkgNS4yMTk1NiAxMy43NzZDNC45MjcwNiAxMy40ODMgNC45MjY1NiAxMy4wMDg1IDUuMjE5NTYgMTIuNzE1NVoiIGZpbGw9IiNGRkNDODAiLz4KPHBhdGggZD0iTTE5LjUwMzEgNC41QzE5LjUwMzEgMy41MzM1IDE4LjkyODYgMyAxNy44ODc2IDNDMTYuODQ2NiAzIDE2LjAwMzEgNC4yODM1IDE2LjAwMzEgNS4yNUMxNi4wMDMxIDUuNzUgMTYuOTY0NiA2IDE3LjUwMzEgNkMxOC41NDQxIDYgMTkuNTAzMSA1LjQ2NjUgMTkuNTAzMSA0LjVaIiBmaWxsPSIjNEREMEUxIi8+CjxwYXRoIGQ9Ik01LjUwMzA1IDQuNUM1LjUwMzA1IDMuNTMzNSA2LjA3NzU1IDMgNy4xMTg1NSAzQzguMTU5NTUgMyA5LjAwMzA1IDQuMjgzNSA5LjAwMzA1IDUuMjVDOS4wMDMwNSA1Ljc1IDguMDQxNTUgNiA3LjUwMzA1IDZDNi40NjIwNSA2IDUuNTAzMDUgNS40NjY1IDUuNTAzMDUgNC41WiIgZmlsbD0iIzRERDBFMSIvPgo8cGF0aCBkPSJNMTguMDAzMSA1QzE4LjI3OTIgNSAxOC41MDMxIDQuNzc2MTQgMTguNTAzMSA0LjVDMTguNTAzMSA0LjIyMzg2IDE4LjI3OTIgNCAxOC4wMDMxIDRDMTcuNzI2OSA0IDE3LjUwMzEgNC4yMjM4NiAxNy41MDMxIDQuNUMxNy41MDMxIDQuNzc2MTQgMTcuNzI2OSA1IDE4LjAwMzEgNVoiIGZpbGw9IiM0MjQyNDIiLz4KPHBhdGggZD0iTTcuMDAzMDUgNUM3LjI3OTE5IDUgNy41MDMwNSA0Ljc3NjE0IDcuNTAzMDUgNC41QzcuNTAzMDUgNC4yMjM4NiA3LjI3OTE5IDQgNy4wMDMwNSA0QzYuNzI2OTEgNCA2LjUwMzA1IDQuMjIzODYgNi41MDMwNSA0LjVDNi41MDMwNSA0Ljc3NjE0IDYuNzI2OTEgNSA3LjAwMzA1IDVaIiBmaWxsPSIjNDI0MjQyIi8+CjxwYXRoIGQ9Ik0xOS4wMDMxIDE3LjVDMTkuMDAzMSAxOS44ODcgMTcuMzkzNiAyMi41IDEyLjM0ODEgMjIuNUM4LjI4NzA1IDIyLjUgNi4wMDMwNSAxOS44ODcgNi4wMDMwNSAxNy41QzYuMDAzMDUgMTUgNi41MDMwNSAxNC41OTcgNi41MDMwNSAxMi41QzYuNTAzMDUgMTAuMTU2IDYuNTAzMDUgOSA2LjUwMzA1IDcuNUM2LjUwMzA1IDUuMTEzIDguMDQxMDUgMiAxMi4zNDgxIDJDMTYuNjU1MSAyIDE4LjUwMzEgMy45OTU1IDE4LjUwMzEgN0MxOC41MDMxIDguNSAxOC4zODQ2IDkuNzI2NSAxOC41MDMxIDEyQzE4LjU5NjEgMTMuNzgxIDE5LjAwMzEgMTYgMTkuMDAzMSAxNy41WiIgZmlsbD0iIzRERDBFMSIvPgo8cGF0aCBkPSJNMTUuMDAzMSA3LjVDMTYuMTA3NiA3LjUgMTcuMDAzMSA2LjYwNDU3IDE3LjAwMzEgNS41QzE3LjAwMzEgNC4zOTU0MyAxNi4xMDc2IDMuNSAxNS4wMDMxIDMuNUMxMy44OTg1IDMuNSAxMy4wMDMxIDQuMzk1NDMgMTMuMDAzMSA1LjVDMTMuMDAzMSA2LjYwNDU3IDEzLjg5ODUgNy41IDE1LjAwMzEgNy41WiIgZmlsbD0iI0Y1RjVGNSIvPgo8cGF0aCBkPSJNMTAuMDAzMSA3LjVDMTEuMTA3NiA3LjUgMTIuMDAzMSA2LjYwNDU3IDEyLjAwMzEgNS41QzEyLjAwMzEgNC4zOTU0MyAxMS4xMDc2IDMuNSAxMC4wMDMxIDMuNUM4Ljg5ODQ4IDMuNSA4LjAwMzA1IDQuMzk1NDMgOC4wMDMwNSA1LjVDOC4wMDMwNSA2LjYwNDU3IDguODk4NDggNy41IDEwLjAwMzEgNy41WiIgZmlsbD0iI0Y1RjVGNSIvPgo8cGF0aCBkPSJNMTIuNTAzMSAxMC41QzEyLjUwMzEgMTAuNzc2IDEyLjcyNzEgMTEgMTMuMDAzMSAxMUMxMy4yNzkxIDExIDEzLjUwMzEgMTAuNzc2IDEzLjUwMzEgMTAuNVY5SDEyLjUwMzFWMTAuNVoiIGZpbGw9IiNFRUVFRUUiLz4KPHBhdGggZD0iTTExLjUwMzEgMTAuNUMxMS41MDMxIDEwLjc3NiAxMS43MjcxIDExIDEyLjAwMzEgMTFDMTIuMjc5MSAxMSAxMi41MDMxIDEwLjc3NiAxMi41MDMxIDEwLjVWOUgxMS41MDMxVjEwLjVaIiBmaWxsPSIjRUVFRUVFIi8+CjxwYXRoIGQ9Ik0xMy43NTMxIDkuNUMxMy41NDcxIDkuNSAxMy40MjY2IDkuNDU3NSAxMy4yNDc2IDkuMzk3NUMxMi43NjAxIDkuMjMzNSAxMi4yMzcxIDkuMjM0NSAxMS43NDk2IDkuMzk4NUMxMS41NzIxIDkuNDU4IDExLjQ1ODEgOS41IDExLjI1MzEgOS41QzEwLjU4NjEgOS41IDEwLjUwMzEgOSAxMC41MDMxIDguNzVDMTAuNTAzMSA4IDExLjI1MzEgNy41IDEyLjAwMzEgNy41QzEyLjQyMDYgNy41IDEyLjU4NTYgNy41IDEzLjAwMzEgNy41QzEzLjc1MzEgNy41IDE0LjUwMzEgOCAxNC41MDMxIDguNzVDMTQuNTAzMSA5IDE0LjQyMDEgOS41IDEzLjc1MzEgOS41WiIgZmlsbD0iI0ZGQ0M4MCIvPgo8cGF0aCBkPSJNMTQuMDAzMSA2QzE0LjI3OTIgNiAxNC41MDMxIDUuNzc2MTQgMTQuNTAzMSA1LjVDMTQuNTAzMSA1LjIyMzg2IDE0LjI3OTIgNSAxNC4wMDMxIDVDMTMuNzI2OSA1IDEzLjUwMzEgNS4yMjM4NiAxMy41MDMxIDUuNUMxMy41MDMxIDUuNzc2MTQgMTMuNzI2OSA2IDE0LjAwMzEgNloiIGZpbGw9IiM0MjQyNDIiLz4KPHBhdGggZD0iTTkuMDAzMDUgNkM5LjI3OTE5IDYgOS41MDMwNSA1Ljc3NjE0IDkuNTAzMDUgNS41QzkuNTAzMDUgNS4yMjM4NiA5LjI3OTE5IDUgOS4wMDMwNSA1QzguNzI2OTEgNSA4LjUwMzA1IDUuMjIzODYgOC41MDMwNSA1LjVDOC41MDMwNSA1Ljc3NjE0IDguNzI2OTEgNiA5LjAwMzA1IDZaIiBmaWxsPSIjNDI0MjQyIi8+CjxwYXRoIGQ9Ik0xMi41MDMxIDhDMTMuMDU1MyA4IDEzLjUwMzEgNy43NzYxNCAxMy41MDMxIDcuNUMxMy41MDMxIDcuMjIzODYgMTMuMDU1MyA3IDEyLjUwMzEgN0MxMS45NTA4IDcgMTEuNTAzMSA3LjIyMzg2IDExLjUwMzEgNy41QzExLjUwMzEgNy43NzYxNCAxMS45NTA4IDggMTIuNTAzMSA4WiIgZmlsbD0iIzQyNDI0MiIvPgo8L3N2Zz4K) Echo This template demonstrates building the Echo framework for Platform.sh using Go modules. It includes a minimalist application skeleton that demonstrates how to connect to a MariaDB server. It is intended for you to use as a starting point and modify for your own needs. Echo is a lightweight, minimalist web framework written in Go. ###### Features: - Go 1.14 - MariaDB 10.4 - Automatic TLS certificates - Git module-based build View the [repository on GitHub](https://github.com/platformsh-templates/echo). ![Deploy on ](https://platform.sh/images/deploy/lg-blue.svg) Gin ![Gin](data:image/svg+xml;base64,PD94bWwgdmVyc2lvbj0iMS4wIiBlbmNvZGluZz0iVVRGLTgiIHN0YW5kYWxvbmU9Im5vIj8+CjwhLS0gQ3JlYXRlZCB3aXRoIElua3NjYXBlIChodHRwOi8vd3d3Lmlua3NjYXBlLm9yZy8pIC0tPgoKPHN2ZwogICB4bWxuczpkYz0iaHR0cDovL3B1cmwub3JnL2RjL2VsZW1lbnRzLzEuMS8iCiAgIHhtbG5zOmNjPSJodHRwOi8vY3JlYXRpdmVjb21tb25zLm9yZy9ucyMiCiAgIHhtbG5zOnJkZj0iaHR0cDovL3d3dy53My5vcmcvMTk5OS8wMi8yMi1yZGYtc3ludGF4LW5zIyIKICAgeG1sbnM6c3ZnPSJodHRwOi8vd3d3LnczLm9yZy8yMDAwL3N2ZyIKICAgeG1sbnM9Imh0dHA6Ly93d3cudzMub3JnLzIwMDAvc3ZnIgogICB4bWxuczpzb2RpcG9kaT0iaHR0cDovL3NvZGlwb2RpLnNvdXJjZWZvcmdlLm5ldC9EVEQvc29kaXBvZGktMC5kdGQiCiAgIHhtbG5zOmlua3NjYXBlPSJodHRwOi8vd3d3Lmlua3NjYXBlLm9yZy9uYW1lc3BhY2VzL2lua3NjYXBlIgogICBpZD0ic3ZnMzM5MCIKICAgdmVyc2lvbj0iMS4xIgogICBpbmtzY2FwZTp2ZXJzaW9uPSIwLjkxIHIxMzcyNSIKICAgd2lkdGg9IjEwMDAiCiAgIGhlaWdodD0iMTQwNiIKICAgdmlld0JveD0iMCAwIDEwMDAgMTQwNiIKICAgc29kaXBvZGk6ZG9jbmFtZT0iY29sb3IyLnN2ZyI+CiAgPG1ldGFkYXRhCiAgICAgaWQ9Im1ldGFkYXRhMzM5NiI+CiAgICA8cmRmOlJERj4KICAgICAgPGNjOldvcmsKICAgICAgICAgcmRmOmFib3V0PSIiPgogICAgICAgIDxkYzpmb3JtYXQ+aW1hZ2Uvc3ZnK3htbDwvZGM6Zm9ybWF0PgogICAgICAgIDxkYzp0eXBlCiAgICAgICAgICAgcmRmOnJlc291cmNlPSJodHRwOi8vcHVybC5vcmcvZGMvZGNtaXR5cGUvU3RpbGxJbWFnZSIgLz4KICAgICAgICA8ZGM6dGl0bGU+PC9kYzp0aXRsZT4KICAgICAgPC9jYzpXb3JrPgogICAgPC9yZGY6UkRGPgogIDwvbWV0YWRhdGE+CiAgPGRlZnMKICAgICBpZD0iZGVmczMzOTQiIC8+CiAgPHNvZGlwb2RpOm5hbWVkdmlldwogICAgIHBhZ2Vjb2xvcj0iI2ZmZmZmZiIKICAgICBib3JkZXJjb2xvcj0iIzY2NjY2NiIKICAgICBib3JkZXJvcGFjaXR5PSIxIgogICAgIG9iamVjdHRvbGVyYW5jZT0iMTAiCiAgICAgZ3JpZHRvbGVyYW5jZT0iMTAiCiAgICAgZ3VpZGV0b2xlcmFuY2U9IjEwIgogICAgIGlua3NjYXBlOnBhZ2VvcGFjaXR5PSIwIgogICAgIGlua3NjYXBlOnBhZ2VzaGFkb3c9IjIiCiAgICAgaW5rc2NhcGU6d2luZG93LXdpZHRoPSIxNDQwIgogICAgIGlua3NjYXBlOndpbmRvdy1oZWlnaHQ9Ijg1MiIKICAgICBpZD0ibmFtZWR2aWV3MzM5MiIKICAgICBzaG93Z3JpZD0iZmFsc2UiCiAgICAgaW5rc2NhcGU6em9vbT0iMC40NjIzMDQ0MSIKICAgICBpbmtzY2FwZTpjeD0iNDQ5LjMxNTk2IgogICAgIGlua3NjYXBlOmN5PSI4MzguNTQ3NTMiCiAgICAgaW5rc2NhcGU6d2luZG93LXg9IjkiCiAgICAgaW5rc2NhcGU6d2luZG93LXk9IjMwIgogICAgIGlua3NjYXBlOndpbmRvdy1tYXhpbWl6ZWQ9IjAiCiAgICAgaW5rc2NhcGU6Y3VycmVudC1sYXllcj0ic3ZnMzM5MCIgLz4KICA8ZwogICAgIGlkPSJnMzUxMSIKICAgICB0cmFuc2Zvcm09InRyYW5zbGF0ZSgtMC4xMzIxMDg0NSwwLjI5NDAwNDMxKSI+CiAgICA8cGF0aAogICAgICAgc3R5bGU9ImZpbGw6I2YzZDcxZCIKICAgICAgIGQ9Im0gNDkyLDE0MDQuODUzMyBjIC0xMTYuNTA5NzUsLTQuOTg1OCAtMTk3LjUxNDY2LC0yMC40Nzk2IC0yNjIuMTYzMiwtNTAuMTQ0MSAtOS40MzY0LC00LjMyOTkgLTguMDIwNzMsLTEuNDMxOSAtMTguMTk3OTksLTM3LjI1NDEgQyAxOTMuOTEzNDYsMTI1NS4wNjUgMTgwLjQ0MDc2LDExOTguNTM3NCAxNjYuMDA3NjksMTEyNiAxNTguNjkxMTEsMTA4OS4yMjg1IDE1NS4yNjQ4LDEwNzMuODU2OCAxMzguMzY4NDUsMTAwMiAxMDguMDQ5Niw4NzMuMDYwMDUgOTYuNTM0NDQ3LDgxMy43NzMxNCA4OS45MDg2NTQsNzUyLjUgYyAtMS42NzgwMjUsLTE1LjUxNzgyIDEuMzQyODUzLC0zNi43MzYxNCA2LjA4OTI0NCwtNDIuNzcwMiAyLjgwOTYsLTMuNTcxODMgMi44NjY2NDMsLTEyLjY5MDk2IDAuMDgzOTQsLTEzLjQxODY1IC0xLjYyMzQ2MiwtMC40MjQ1NSAtMi4wMjU5NDgsLTEuNzk1NTYgLTIuNjE5NzIxLC04LjkyMzcyIC0wLjQ5Mjk2MiwtNS45MTc5NCAtMS4yNjA2MjcsLTkuMTMyODYgLTIuNTgxODM3LC0xMC44MTI1IEMgODkuNjA1NTY3LDY3NC45NTQ0IDg5LDY3Mi41NjM1MiA4OSw2NjkuMTUxMjkgODksNjY2LjM4MyA4OC41NSw2NjMuODM5OTIgODgsNjYzLjUgYyAtMC42MDA4MjEsLTAuMzcxMzMgLTEsLTcuMTU3MzggLTEsLTE3IDAsLTkuODQyNjIgLTAuMzk5MTc5LC0xNi42Mjg2NyAtMSwtMTcgLTAuNTUsLTAuMzM5OTIgLTEsMC4yODE5NyAtMSwxLjM4MTk3IDAsMTIuMzI2NDEgLTguODU4MzI0LC0xMC4xMjM2MyAtMTQuMDIyMSwtMzUuNTM2ODQgLTEzLjI1MTY1NiwtNjUuMjE3MiAtMzUuMDAwNzI3LC0xMzAuMDI0MTcgLTI5Ljk5NzQ4MywtODkuMzg1MjUgMS43NjAxOCwxNC4yOTcwOSA1LjAwMzgwMywyOC4zNTM1NSAxNC4zMTYxNzQsNjIuMDQwMTIgMTAuOTM5OTc0LDM5LjU3NDI1IDE1LjkyMzcsNjcuNTk0NjkgMTMuNjk4NzU3LDc3LjAxOTcxIEMgNjUuODE1ODM4LDY1OC40ODgzMyA0NS4yNzA0NTMsNTc3LjYwMzcyIDMzLjQyOTE0Miw1MDUgMzAuNDI0MTE1LDQ4Ni41NzUgMjUuOTExOTgzLDQ1OC45IDIzLjQwMjE4MSw0NDMuNSAxNy43OTQxNzksNDA5LjA4OTYyIDEyLjU3NzY4OSwzODMuMjQ4MDMgNS40NTAzMTA4LDM1NC41Njk1NCAtMS42ODM4OTI5LDMyNS44NjM1OSAtMS40ODIzMTE2LDMyMS4yMDczNyA3LjM4MzQ2NjgsMzA5LjkxNjY0IDI1LjY1ODU4MiwyODYuNjQyOTQgNzkuMjg2Mjc1LDI2OC41NDk2IDg1LjA4MzM2NCwyODMuNzAxNjMgODkuMDU2NjM2LDI5NC4wODY2OSA3Ny4zNDYxMjQsMzAxLjI4MDc4IDQ1LjUsMzA4LjAxODc3IDE3Ljg5ODczMSwzMTMuODU4NjQgMTUuMzQ1ODUsMzE4LjAzNDA5IDMwLjMyOTQyLDMzMi44MzE1NCA0NS4zMDk2MTQsMzQ3LjYyNTY1IDEzMi4xOTc0NSwzNjAuODQ4MDUgMjM1LDM2My45Nzc4NSBjIDE4Mi4wNzUyMSw1LjU0MzI0IDI5Ny41MDQyOSw3LjAwMjc0IDMzMCw0LjE3MjU1IDcuOTc1LC0wLjY5NDU4IDE5LjMxMzczLC0xLjUyNTE2IDI1LjE5NzE4LC0xLjg0NTc0IDEwLjY5NzE4LC0wLjU4Mjg4IDEwLjY5NzE4LC0wLjU4Mjg4IDEwLjIxMDUzLC0zLjE5Mzc3IC0wLjM2ODU2LC0xLjk3NzM1IDAuNDgzNzcsLTMuODI0MTUgMy41MTI1NSwtNy42MTA4OSAyLjE5OTU2LC0yLjc1IDUuNDgyOTEsLTcuMDI1IDcuMjk2MzQsLTkuNSA2LjE2ODQ3LC04LjQxODg1IDE2LjUyNzY3LC0xMS42Mjc4NCAyMC44MjQyNiwtNi40NTA3NiA1LjM3NTM0LDYuNDc2ODkgMC42Mjc5MSwyMS40Njc5NiAtOC4yNTI5MSwyNi4wNjA0MSAtNC4xMDA4LDIuMTIwNjEgLTIuOTIzNTEsMi43NzMzNCA2LjU0MjYzLDMuNjI3NDkgNC40OTMxOCwwLjQwNTQzIDEwLjc0Njg1LDEuMDA4OTkgMTMuODk3MDUsMS4zNDEyNSA5LjUyOTc4LDEuMDA1MTQgMTYuNzk1NjYsLTIuNDM3MzYgMTIuNzkxOTMsLTYuMDYwNjkgLTguODIwMTgsLTcuOTgyMTUgNy43NzY3NSwtMjQuMDgyNDggMzMuNDgwNDQsLTMyLjQ3ODY1IDMuODUsLTEuMjU3NjIgNy40Mjc1LC0yLjY4MDg4IDcuOTUsLTMuMTYyODEgMC41MjI1LC0wLjQ4MTkzIDEuNjYyNjcsLTAuODc2MjQgMi41MzM3MiwtMC44NzYyNCAzLjI3ODY0LDAgMTIuNjYwNzEsLTcuMjcxNjkgMjMuMDkyMTUsLTE3Ljg5Nzg1IDUuOTM1ODksLTYuMDQ2NjkgMTIuNjAyNzksLTEyLjEzNjc1IDE0LjgxNTMzLC0xMy41MzM0NyAyLjIxMjU0LC0xLjM5NjcyIDQuNTA3OTksLTMuNDQ2MDUgNS4xMDA5OSwtNC41NTQwOCAxLjc5ODU0LC0zLjM2MDYxIC0xLjcwNTgsLTIuNDU1MSAtOS40OTIxOSwyLjQ1Mjc0IC0zLjg1LDIuNDI2NjkgLTkuMjUsNS43ODcxNSAtMTIsNy40Njc2OCAtNS43MDkzNCwzLjQ4OSAtMTguNDE0NiwxMS45MTMzMyAtMzAuNjM2MjUsMjAuMzEzNjMgLTQuNjAwMDYsMy4xNjE3NSAtOS40ODg3NSw2LjUxMDczIC0xMC44NjM3NSw3LjQ0MjE4IC0xLjM3NSwwLjkzMTQ0IC0zLjMxNjkxLDIuMzc4NDEgLTQuMzE1MzYsMy4yMTU0OSAtMi4yMTEyOCwxLjg1Mzg4IC0xMi40NzM4MiwyLjI5ODk1IC0xOC4xODQ2NCwwLjc4ODYzIC0xNC44MjkyMSwtMy45MjE4MyAtMTUuODk1MjEsLTE2Ljk0MDkzIC0zLjIzODM1LC0zOS41NTAxNCBDIDY2MC44MDMwOSwyODQuMjQ2MDMgNjc2LjA3MzUsMjY0IDY3Ny45OTgxNCwyNjQgYyAwLjQ3ODMyLDAgMi4xMzY5MSwtMS44NzkwNiAzLjY4NTc2LC00LjE3NTY5IDIuODAzMTQsLTQuMTU2NDggNC41Nzg3NSwtNS40OTg2MSAxMy41MDEyNCwtMTAuMjA1MjEgNi40MTY2MSwtMy4zODQ3NiAxMC4xNjU4NSwtMy43NTI3NiAxMS4xODQ2NSwtMS4wOTc4MiAwLjYwNTIyLDEuNTc3MTggLTMuODkxODgsMTEuNDc0MjEgLTguOTU4MTMsMTkuNzE0NjQgLTEwLjYxOTU1LDE3LjI3MzA4IC0xMS41NDU2MSwxOS4wMzAxMyAtMTAuNTUyOTQsMjAuMDIyOCAxLjQxNjY3LDEuNDE2NjcgMTIuMjI4MjYsLTUuMDcwNTkgMTMuODMwMTUsLTguMjk4NDggMC42NzE1MSwtMS4zNTMxMyAyLjQ2ODE5LC01LjE0ODIxIDMuOTkyNjIsLTguNDMzNTEgMTAuMzEzMjgsLTIyLjIyNjE4IDM0Ljk5ODA2LC0yNC40MTQ4NSA1MC4xODE5NSwtNC40NDkzNiA0LjAxMzMxLDUuMjc3MTQgNS4xMzEwMiw1Ljg3NDkyIDUuMTUzMDEsMi43NTU5NiAwLjA2ODgsLTkuNzU5MzkgMTMuNjU3MTIsLTE3Ljc2Njc5IDMwLjIzMzU1LC0xNy44MTYxOSA2Ljg3MTAxLC0wLjAyMDUgNy4zMjI1OSwtMS4xNDQ4NSAxLjM3MjQ2LC0zLjQxNzIyIC04LjEzMzQ2LC0zLjEwNjIgLTguNTk5NzgsLTQuNjU5OTkgLTMuMjM4MDcsLTEwLjc4OTIzIDcuNDMzMTcsLTguNDk3MjMgMy45MDYyNSwtMTAuMTQ4NzEgLTEwLjIxNDg3LC00Ljc4MzExIC0xMy42MjQ2OSw1LjE3Njk4IC0yNi44Njg3LDcuOTc5NzIgLTM1LjkyNTY1LDcuNjAyNyAtNC44MDkxMywtMC4yMDAxOSAtOS44MjQ0NSwwLjA0MDggLTExLjE0NTE2LDAuNTM1NjMgLTEuMzIwNzEsMC40OTQ4IC00Ljg0NzgzLDEuMTA3ODEgLTcuODM4MDUsMS4zNjIyNiAtMi45OTAyMiwwLjI1NDQ1IC01LjgwMDU3LDAuNjg3NDggLTYuMjQ1MjIsMC45NjIyOSAtMC40NDQ2NSwwLjI3NDgxIC0yLjk5MjUzLDAuMjAxNDkgLTUuNjYxOTUsLTAuMTYyOTIgLTE0Ljg0MTg1LC0yLjAyNjExIC0xMy40NjM3OCwtMTQuODk0NjUgNS4xMjE3OSwtNDcuODI3NTQgMi40ODMxMywtNC40IDUuOTA5NzEsLTEwLjkyNSA3LjYxNDY0LC0xNC41IDEuNzA0OTIsLTMuNTc1IDguNjM0MTcsLTE3Ljc1IDE1LjM5ODMzLC0zMS41IDYuNzY0MTUsLTEzLjc1IDE0LjE1Njc3LC0yOS4wNSAxNi40MjgwNCwtMzQgMi4yNzEyNiwtNC45NSA1LjI0NDI1LC0xMS4xMzc3MyA2LjYwNjY0LC0xMy43NTA1MiBDIDc2My44ODUzMiw5OS4xMzY2OTEgNzY1LDk2LjU0Njk4NSA3NjUsOTUuOTk0NTc1IGMgMCwtMC41NTI0MDkgMS4xNTIzNSwtMy4zNjQ2NzUgMi41NjA3OSwtNi4yNDk0NzggOS4wOTExOSwtMTguNjIwOTIzIDIzLjU4ODY4LC02NC41ODYwMzkgMjEuODIyMzYsLTY5LjE4OTAyIEMgNzg5LjAyNDc1LDE5LjYyMjExOSA3ODkuMzI1MDgsMTkgNzkwLjEzNDM1LDE5IGMgMC43NDE1OCwwIDMuNjAyMjMsLTEuNTAwMTI5IDYuMzU2OTksLTMuMzMzNjE5IDIuNzU0NzYsLTEuODMzNDkgNi4yMzQzOCwtNC4wODYxNDUgNy43MzI0OCwtNS4wMDU4OTkgMi4yMzQ1NSwtMS4zNzE4OTE4IDIuNjIyMTQsLTIuMTgwNzAyMiAyLjE1Nzc0LC00LjUwMjY5MDggLTIuNTc5NTEsLTEyLjg5NzUyMjMgMjEuMjM3MTgsLTQuNjUzMzY2IDUwLjg3MTIyLDE3LjYwOTA5MjggNDMuNTkxMjEsMzIuNzQ3NzMzIDgyLjI4NjY1LDg4LjA4NDkzNiAxMTQuNjE5OTMsMTYzLjkxNDU3NiAyOC43MzU2OSw2Ny4zOTIzNyAzNi4yODA4OSwxODEuNjg3NDkgMTcuNjQ3MTksMjY3LjMxODU0IC0xMy4wNjM3NCw2MC4wMzQxMiAtMjEuOTU1MjMsMTUyLjE2NjQ4IC0zMS41MDk3OSwzMjYuNSAtNi4wODMyMiwxMTAuOTk1MDIgLTkuNTYwMjIsMTYxLjA4MzEyIC0xNC41Nzc2OCwyMTAgLTEuMzUzOTUsMTMuMiAtMy4xMjUzNCwzMyAtMy45MzY0Myw0NCAtNC4wNzIyOCw1NS4yMjgzIC0xMC4yMDkyNiwxMDYuNTA0OCAtMjAuNjQ1NSwxNzIuNSAtMy41Njc3MywyMi41NjExIC00LjA2Nzk2LDI3Ljg2MjYgLTQuMzQwMzgsNDYgLTEuMDI3MTMsNjguMzgzMyAtMjYuMDk0NDYsMTA3LjIxNjEgLTczLjYzMDY3LDExNC4wNjQyIC00LjYwODcsMC42NjQgLTE0LjIyOTQ1LDIuOTI0NyAtMjEuMzc5NDUsNS4wMjM4IC01Ny45NTYyMywxNy4wMTUgLTExOS43ODU0NywyNi4wMzc3IC0yMDQuNSwyOS44NDI1IC02OC42OTk3MywzLjA4NTYgLTg4LjU2ODUsMy4zOTYyIC0xMjMsMS45MjI4IHogTSAyNTUuOTk0OTcsMTMwMS40MjQgYyAtMTIuMzM2NjUsLTUwLjMwMTcgLTE5LjU1MzI3LC03NC4xODMyIC0yOC4yMzEzMywtOTMuNDI0IC05LjI4OTI3LC0yMC41OTU5IC0xMS40MDAwMiwtMjMuMzIzOCAtMTAuMjUyNjQsLTEzLjI1IDUuMjczOTgsNDYuMzA0MyAxNy45ODQ0OCw4OS4yNDczIDM4LjY3MjUsMTMwLjY1NjggMTAuOTA4NjUsMjEuODM1IDEwLjkwNDAyLDIxLjI0NjIgLTAuMTg4NTMsLTIzLjk4MjggeiBtIC0yMS42MjUyNiwzMy4zMjYgYyAzLjYwMDQ2LC0xMy40MzUxIC0yLjE1NzgyLC00MS42OTQ4IC0xOC45MjQ3LC05Mi44NzYgLTkuNTYzNTgsLTI5LjE5MjkgLTE2LjYxMTIsLTU0LjU4MTcgLTE3LjkzODUzLC02NC42MjI5IC0wLjg2OTk3LC02LjU4MTIgLTEuNzc0MDgsLTcuMTM3MyAtNS41MTc1NSwtMy4zOTM5IC02LjAwNDQxLDYuMDA0NCAtNC4xODkwMywxOC40Mjg1IDkuMzMzODMsNjMuODc4NyAzLjYzODcyLDEyLjIyOTcgNy4xMzA5NywyNi4xNzk3IDcuNzYwNTQsMzEgMy42OTk3NiwyOC4zMjcxIDIyLjM0Mjg4LDc2Ljk5NzggMjUuMjg2NDEsNjYuMDE0MSB6IG0gMzM5LjA3ODAyLC0xNDguOTIzMiBjIDE4LjI0NjkzLC0xMi4wODYyIDE1Ljg1Mjg1LC00Ny4zMTM2IC0zLjk3ODgyLC01OC41NDYgLTE3Ljg1MzI2LC0xMC4xMTE4IC0yNy40NDEzMiwxMS45MjI4IC0xOS44NjEwOSw0NS42NDMyIDMuNDAwMjMsMTUuMTI1NyAxMi44MDE4MSwyMC4yMTQyIDIzLjgzOTkxLDEyLjkwMjggeiBtIC01My43ODY1MywtMi42NjM5IGMgMTMuNjA2NywtNi45NzY3IDE4LjEyNTg3LC0zMC4yNTY3IDkuNjAwMjQsLTQ5LjQ1NDcgLTguNDA1MzksLTE4LjkyNzIgLTI1LjI2Njg2LC05LjMzNTMgLTI4LjMwNTM0LDE2LjEwMTkgLTAuNDM5NTEsMy42Nzk1IC0xLjQ3NzEzLDExLjAxMDUgLTIuMzA1ODMsMTYuMjkxMiAtMi45NzA1MSwxOC45MjkgNC45MDE2NywyNS4zMjE1IDIxLjAxMDkzLDE3LjA2MTYgeiBtIC0zMzEuMTAwMDYsLTM0LjgwNiBjIDIuMTgxMjIsLTE3LjQ1NzggLTIuMzQyOTYsLTQyLjY4MzIgLTE2Ljk3OTE2LC05NC42NzA2IC00LjE1MTkzLC0xNC43NDc2IC04LjkzOTA5LC0zMy44NzI2IC0xMC42MzgxMywtNDIuNSAtNS41NTU0MSwtMjguMjA5NTEgLTEzLjk2NjM4LC00MS45NTU2IC05LjkwNDA3LC0xNi4xODYzIDEuOTcxODcsMTIuNTA4NiAxMy4xMDM4Nyw2OS41OTE0IDE1LjUwMzY4LDc5LjUgMS4zMzIwOCw1LjUgMy41ODIzNSwxOS4zNzM1IDUuMDAwNjEsMzAuODMgMy41MzE5NSwyOC41MzA1IDYuNjMwMjYsMzkuODM0OSAxMi43MjI4NSw0Ni40MiAzLjAxOTkzLDMuMjY0MSAzLjUxMDk0LDIuODc2MSA0LjI5NDIyLC0zLjM5MzEgeiBtIDIzMS40MzY0OCwtOTYuNDg5OCBDIDQ5Ni4xNzI1NSwxMDM0LjQxMTggNTIwLjczNTI5LDkzOS4xNTUwNyA0NjAuNjExNjksODk0LjM2MTY5IDQyMS44NDQ0OSw4NjUuNDc5MjkgMzk3LjU2NjQsODYzLjM4MDQzIDMzNyw4ODMuNjc1MzYgYyAtMTIuMzc1LDQuMTQ2NjkgLTIzLjUxNTcyLDguMTc4NTggLTI0Ljc1NzE1LDguOTU5NzcgLTQuNDEzNDgsMi43NzcyNSAtMTEuMjQxNTUsMTIuNjI1MTQgLTExLjI0MjIyLDE2LjIxNDI4IC0zLjVlLTQsMS44NDIxNyAtMS43NjcyMiw3LjczMTA4IC0zLjkyNjM5LDEzLjA4NjQ3IC0yOC42MTE0LDcwLjk2NDgxIDQ0LjIzMzY3LDE0Ny45NjI3MiAxMjIuOTIzMzgsMTI5LjkzMTIyIHogTSAzMjMuNSw5OTcuMzUyNTcgYyAtMjkuOTY1NDIsLTQuNDc1MDUgLTM2LjQyMzY2LC0yOS45ODk2MSAtMTMuNDg3NDIsLTUzLjI4NDcyIDE2LjY2MTQxLC0xNi45MjIxIDM2LjA2MjIxLC0xOC4zODcwNiA1MC4zMDUxNSwtMy43OTg1NCAyOC4xODI3NiwyOC44NjY1MyA1Ljg3MTUzLDYzLjQ1ODQ5IC0zNi44MTc3Myw1Ny4wODMyNiB6IG0gMzc5LjkzMjQyLDQwLjQ4OTgzIGMgNTIuMzI0MDksLTguNzg5NCA4NS4xMzIwOSwtNjguOTQzMTcgNjMuNTU1NDIsLTExNi41Mjk0OSAtNTAuNTIyMzYsLTExMS40MjQ2NyAtMjMxLjk2ODc4LC01Ny44OTgzMSAtMTkyLjE3Niw1Ni42OTE1NyAxNy4wMTMyMyw0OC45OTI0MiA2My43NDg2MSw3MC43MzUwMiAxMjguNjIwNTgsNTkuODM3OTIgeiBNIDYwMS41LDk5MS41OTg3OCBjIC0yMy4zMjMzMywtNS43NDI4MSAtMzAuODg4NTYsLTI3LjA1NzE4IC0xOC4zOTA5MywtNTEuODE0ODQgMTUuNjI1MzEsLTMwLjk1MzU4IDQ5LjA1ODQ3LC0zMC41ODgzNyA2NS41NTIyMiwwLjcxNjA2IDkuOTYxODMsMTguOTA3MTEgNy43MDM1MSwyNS4yMDc2OCAtOC40NTE0OCwyMy41NzkwOSAtMTQuNTI5NTQsLTEuNDY0NzMgLTE5LjI5Njc0LDAuNjEyMyAtMTIuMTkzODUsNS4zMTI3NyA1LjE3NTcsMy40MjUxMiAxMS43OTQ4Miw5LjM4NjA2IDEzLjA3MTY4LDExLjc3MTg5IDMuOTg5ODYsNy40NTUxMyAtMjIuOTAxNjUsMTQuNTQzNTUgLTM5LjU4NzY0LDEwLjQzNTAzIHogTSAzNTUuNjE4MDYsNTc4LjE2NjgzIGMgMy45MTA3MiwtMC41Njc4NiA2LjY4NTQxLC0xLjkxMzY2IDExLjc2MjI2LC01LjcwNSAzLjY1NDMxLC0yLjcyOTAxIDkuNDUxMTksLTcuMDIxODggMTIuODgxOTQsLTkuNTM5NzIgMzAuOTMwOTksLTIyLjcwMDMzIDQwLjg4MDMsLTMwLjY1NTQgNTIuMjM3NzQsLTQxLjc2NzE3IDMuODUsLTMuNzY2NzIgMTUuMSwtMTMuOTE1MDEgMjUsLTIyLjU1MTc2IDkuOSwtOC42MzY3NSAxOS44NDc1OCwtMTcuMzY4MTggMjIuMTA1NzQsLTE5LjQwMzE4IDIuMjU4MTUsLTIuMDM1IDYuMzA4MTUsLTUuNjQ5NDEgOSwtOC4wMzIwMyA4LjQ0NTU1LC03LjQ3NTM2IDIzLjM5OTIsLTIxLjE0NDIgMzQuODk0MjYsLTMxLjg5NjE2IDEzLjQ5MzE3LC0xMi42MjA5MSA0Mi42NTk3NiwtNDIuMTIwOCA0Mi40NTcwNiwtNDIuOTQyMjQgLTAuNDg0MywtMS45NjI2MiAtOS4wODY5OCwtMy42MDQ2MiAtMTkuNDU3MDYsLTMuNzEzNzggLTEwLjc2NTQ2LC0wLjExMzMyIC0xMC45OTgyNSwtMC4xNjQyNiAtMTAuOTE4MTEsLTIuMzg4OTMgMC4xMDg2NywtMy4wMTY4MiAwLjIzNDQxLC0zLjAwMDkyIC0yOS4wODE4OSwtMy42Nzc4NCBDIDI3MS45ODA5LDM4MS4xMzM5IDExNC44Mzc0NiwzNzMuMDQ3MTMgMjkuOTA1MDkyLDM2Mi4wMjI5MyAyMC4wMTMwNzksMzYwLjczODk1IDE5LDM2MC43NzAxOSAxOSwzNjIuMzU5MjEgYyAwLDIuNzgwNyA4LjA5NjcxMiwxMC40NzIyOCAxNC40OTY0NzYsMTMuNzcxMTEgOC4wNTMyMTEsNC4xNTExMyA4LjE3NDYwNSw1Ljk2OTg3IDAuNDkxOSw3LjM2OTY4IC04LjIzNjc0NCwxLjUwMDc2IC03Ljk4ODM3OCwwLjUyNzg5IC00Ljc1NDYwNCwxOC42MjQyOSBDIDQyLjIwNjQ2NCw0NzQuNzIwMzIgNjEuMjc4MjksNDkxLjE1Mzg3IDEwMS41NDEsNDY0LjQyOSAxMjQuNjk3MTUsNDQ5LjA1ODgzIDI3My4wNzYzMyw0MzMuMTM5MzggMzcxLDQzNS41MTkwMiBjIDE2LjgwODEyLDAuNDA4NDUgMjguMzk3MjksMC4yMzM5MSAzNCwtMC41MTIwOCA0LjY3NSwtMC42MjI0NiAxMS4wNjQ2MSwtMS4zNjc0OCAxNC4xOTkxNCwtMS42NTU2IDMuMTM0NTMsLTAuMjg4MTIgNi4yMjcxMywtMS4xNjAwNCA2Ljg3MjQ1LC0xLjkzNzYgMC42NDUzMSwtMC43Nzc1NiAyLjg4ODksLTEuNDEzNzQgNC45ODU3NiwtMS40MTM3NCAyLjA5Njg1LDAgNS4wNzkyNSwtMC41MjAzNSA2LjYyNzU1LC0xLjE1NjMzIDEwLjU5OTczLC00LjM1Mzk1IDkxLjMxNTEsLTYuMDI2MDUgOTEuMzE1MSwtMS44OTE2OSAwLDAuNzI1NTkgLTQuMTUzMzQsNC42ODQ0OCAtMTMuNzg3NCwxMy4xNDE5MSAtMi4yNTE2NCwxLjk3NjY1IC0xMy45MDgxLDEwLjk3MjI4IC0yNS45MDMyNCwxOS45OTAyOSAtMTguMTg4ODgsMTMuNjc0NSAtMzAuMzM3NzYsMjMuMTE0NDUgLTM1LjgwOTM2LDI3LjgyNDY2IC0wLjU1LDAuNDczNDcgLTYuNTY0MjgsNi43ODI3NCAtMTMuMzY1MDcsMTQuMDIwNiAtMjcuOTY4OTksMjkuNzY2NSAtNTcuMTc3MTIsNTAuMjUxNTMgLTgyLjI3ODY4LDU3LjcwNTg5IC0zLjUxMDQxLDEuMDQyNDggLTQuOTMyNzQsMi4wNjU2MiAtNS43MzUwNyw0LjEyNTQ4IC0xLjM1MTcxLDMuNDcwMzIgLTUuNzE0MjksMTEuMjMyMyAtNy4wODE0NywxMi41OTk0OCAtMi4yNzU3MiwyLjI3NTcyIC0xLjE2MjQ3LDMuODkxNTggMi4yMTAyOSwzLjIwODIxIDEuNzg3NSwtMC4zNjIxNyA1LjU1MzEzLC0wLjk5MjkzIDguMzY4MDYsLTEuNDAxNjcgeiBNIDQwMy41LDU2OSBjIDAuMzc2NTMsLTAuNjA5MjUgNy45NTg1MywtMSAxOS40MDM0NSwtMSBDIDQ0NS4wNjk3LDU2OCA0NjMsNTY3LjAzNzY5IDQ2Myw1NjUuODQ4MDMgNDYzLDU2NS4zODE2MiA0NjIuMzU3MTQsNTY1IDQ2MS41NzE0Myw1NjUgYyAtNC4yNTkwNSwwIC01LjU4OTAzLC00Ljk3MjgzIC0yLjkwMTUzLC0xMC44NDg4NyAzLjMzNDQxLC03LjI5MDQ4IDYuNDQ0NjMsLTEwLjc5NTMzIDQwLjUxMTAxLC00NS42NTExMyAxMy40Mzg1OCwtMTMuNzUgMjYuMjUyODEsLTI3LjI1IDI4LjQ3NjA1LC0zMCAxOS4yMzM1OCwtMjMuNzkwNjIgMzQuNzQ0MTYsLTQ2LjQzMjIyIDMzLjAwMTg1LC00OC4xNzQ1MyAtMC43NTEyNywtMC43NTEyNyAtMTUuNTEzMzUsMTMuMDYzOCAtMTcuNzY5MTgsMTYuNjI5MjUgLTAuODg1NywxLjM5OTkxIC01LjE2MDcsNi4wNTY5MyAtOS41LDEwLjM0ODk0IC04LjUwNjkyLDguNDE0MjMgLTkuMDAxMzIsOC45NjMwNyAtMjQuOTQ5MjcsMjcuNjk2MzQgLTUuODUyODEsNi44NzUgLTExLjkxNjU1LDEzLjg1IC0xMy40NzQ5OCwxNS41IC0xLjU1ODQ0LDEuNjUgLTUuMDU2Niw1LjQ3NSAtNy43NzM2OCw4LjUgLTguOTM5NzEsOS45NTI3OSAtMjUuMzUyOTEsMjUuODQ2MzUgLTMyLjY5MTcsMzEuNjU2NjYgLTE2LjQ4NTQsMTMuMDUxOTQgLTQxLjk1MTU1LDI1LjkxNTcyIC01MCwyNS4yNTY2NCAtMi43MTU2NCwtMC4yMjIzOSAtOC41LDEuMTY5MjkgLTguNSwyLjA0NTAzIDAsMi4xMDkwMSA2LjI5OTYsMi45ODM5NSA3LjUsMS4wNDE2NyB6IG0gMjI5LjM3MTk3LC0zLjkzNSBjIDEuMjczNzcsLTEuOTE3MTggMi4zNDc1LC0yLjA2NjA4IDE1LC0yLjA4MDA2IDE4LjU3MDQ4LC0wLjAyMDUgMjguNTA4MzIsLTMuODg0ODQgMjEuNjExNjgsLTguNDAzNyAtMS40MDU3OCwtMC45MjExIC0yLjQ4Nzg5LC0yLjU5MzgxIC0yLjQ5MzQyLC0zLjg1NDI5IC0wLjAzNCwtNy43NDkxNyAtNS43NTkwMywtMTQuMTQ3NTIgLTguOTI3MDUsLTkuOTc2OTUgLTkuMjEzMjksMTIuMTI4ODkgLTEwLjkzMjI0LDEzLjkyMjIzIC0xNS41NzU5MiwxNi4yNSAtMzAuMTU1NTksMTUuMTE2MyAtNDguMDY0NDMsLTE5LjY0MTc5IC0zMi45ODc0MiwtNjQuMDIzMTIgMTMuMDAzMDcsLTM4LjI3NjQxIDE0LjA0MzI5LC00MS43Mzg5IDE3LjExNzMsLTU2Ljk3Njg4IDEuNDg4ODksLTcuMzgwNDQgMC4xMDkyMSwtMjEuODkxODUgLTIuMTE3MTQsLTIyLjI2ODEyIC00LjY5NjgzLC0wLjc5Mzc5IC0yNi4zOTE3OCw2Ny44OTYyIC0zNS40NTg2MSwxMTIuMjY4MTIgLTMuOTA0MiwxOS4xMDY2NyAtMy45ODU5MywxOS4zMDY2NSAtOS4yNTMyNywyMi42NDI0MiAtMTguNDk5MjEsMTEuNzE1NDMgLTI1LjkyMTM3LDYuMzAyMDggLTIwLjA3NTk5LC0xNC42NDI0MiAxLjgyOTU0LC02LjU1NTQxIDcuNjkwOTgsLTIyLjc5MjExIDEwLjM3NDgsLTI4LjczOTEgMS4wNTIxOSwtMi4zMzE1MSAxLjkxMzA3LC00LjQ5MzcgMS45MTMwNywtNC44MDQ4NyAwLC0wLjMxMTE2IDAuOTI0NTcsLTIuNjc4NTcgMi4wNTQ2LC01LjI2MDg5IDEzLjE2MDM0LC0zMC4wNzM3NSAxNi4yNTcwMiwtNDEuMDMzMDcgMTEuOTQ1NCwtNDIuMjc1NDMgLTEyLjQzMzA2LC0zLjU4MjQ3IC0yOS41MTc3Myw1Ljk2NzEzIC0zNi45NzczMSwyMC42Njg3NSAtMC44MTI1MiwxLjYwMTM1IC0yLjQ5MTc4LDQuNTc3MDUgLTMuNzMxNjksNi42MTI2NiAtMi44MjI1OSw0LjYzMzk4IC03LjczNjQxLDEzLjc0MDUxIC0xNi4wNzkyNywyOS43OTg4OCAtMTEuMzcwMjIsMjEuODg1NDYgLTEzLjg3NTk3LDI2LjA1ODE5IC0yMS41NDA5MiwzNS44NzEzIC04LjEyNDk5LDEwLjQwMjA5IC0xNi41NzY3NiwxNS40OTAxIC0zMC4xNzA4MSwxOC4xNjI5OSAtOS43MTcxMywxLjkxMDYgLTkuNTU3NDYsMi40MDM2MyAxLDMuMDg3NyAyNy40MjIyNywxLjc3NjgzIDE1Mi45MzU5OCwwLjEwNDM3IDE1NC4zNzE5NywtMi4wNTY5OSB6IG0gLTExMi42NjY0LC01LjExMjYgYyAtNC4yODE3OSwtMS43MTg0MSAtNi40Nzg3NCwtMTAuNjYwOTkgLTQuMDkxNzgsLTE2LjY1NTM1IDQuNzE1OCwtMTEuODQyNyAxMS4wNTI1NywtMjEuNjk5OTIgMzIuOTc2NjYsLTUxLjI5NzA1IDQuNjg1MjUsLTYuMzI1IDEwLjIyNTM0LC0xNC4wODc1IDEyLjMxMTMzLC0xNy4yNSAxMS4xMjI5OSwtMTYuODYzMjUgMTIuNzg3NjUsMTIuOTQxNTYgMi4xMDg0MiwzNy43NSAtMTEuNDA5ODksMjYuNTA1ODEgLTMwLjE0NzIyLDQ5LjEzNSAtNDAuMTA2Myw0OC40MzY2MSAtMC40OTcxNCwtMC4wMzQ5IC0xLjkzNjM5LC0wLjQ3Nzc1IC0zLjE5ODMzLC0wLjk4NDIxIHogbSAyNjUuNTgzODQsLTQuMDMxMDcgYyA1LjU2OTMsLTAuNjE4NjUgMTAuMzgzODgsLTEuNjg0ODMgMTEuMjg5MzMsLTIuNSAxLjA5MDY0LC0wLjk4MTg5IDQuMDg2ODMsLTEuNDIxMzMgOS42OTA5OCwtMS40MjEzMyA0LjQ2MTc0LDAgOC4zOTAzNiwtMC40NSA4LjczMDI4LC0xIDAuMzM5OTIsLTAuNTUgMS40Mzg5OSwtMSAyLjQ0MjM5LC0xIDEuNjY5MzYsMCAzLjYyMzM2LC0zLjc2NzU5IDIuNTI0MTEsLTQuODY2ODQgLTAuMjQ5OCwtMC4yNDk4IC0yLjgxOTQ1LDAuMDczNyAtNS43MTAzNCwwLjcxODk1IC01LjExMjMyLDEuMTQxMDEgLTkuNDk5NzYsMS44MTczNSAtMTguNzU2MTYsMi44OTEzIC0xMi4yODM1OCwxLjQyNTE3IC00Ni41Mjc1NCwwLjQ2ODk1IC01NS45NTQ4OSwtMS41NjI0OCAtMy4zMDk5LC0wLjcxMzIzIC0zLjUwMTE5LC0xLjAwMDUyIC00LjU1ODI3LC02Ljg0NTYxIC0xLjkwNzEyLC0xMC41NDUzOCAtNy40OTMzOSwtMTUuNDk4NzkgLTE0LjY0OTEyLC0xMi45ODk1NCAtNy4wNzQ4MywyLjQ4MDg4IC03LjQ3NDIxLDMuNzgyMjcgLTEuODUxMjIsNi4wMzIxNCA0LjA4MjUzLDEuNjMzNTEgOC4wMTM1LDQuODY0ODYgOC4wMTM1LDYuNTg3MjggMCwxLjgzMDc0IC02LjIxMTYxLDguMDM0OCAtOC4wNDQ1OCw4LjAzNDggLTEuMDEwNTYsMCAtMi4wODgyOSwwLjQwNTk3IC0yLjM5NDk1LDAuOTAyMTYgLTAuNjc2NjIsMS4wOTQ3OCAtMTIuNDM0MjgsNC43Mzk1NyAtMTguMzEwNDcsNS42NzYxIC0xMS4wNDcyMSwxLjc2MDY4IC0xLjAwNDgxLDIuNDIxNzQgMzYuNzg5NDEsMi40MjE3NCAyMi42ODY3NywwIDQ1LjM4MTk1LC0wLjQ4MjM4IDUwLjc1LC0xLjA3ODY3IHogTSA4NTAuNzc2OCw1MDEuNTQxODggQyA4NTYuMTY1ODUsNTAwLjYyNjE1IDg2Miw0OTUuNDU4MzUgODYyLDQ5MS42MDA1NCBjIDAsLTIuODg1ODQgLTIuMjc1NDcsLTQuNDEwNzkgLTQuMjYyNzMsLTIuODU2NzUgLTEuMjM2NDksMC45NjY5NCAtOC45MDQyMiwyLjk4NzcgLTExLjczNzI3LDMuMDkzMjUgLTAuODI1LDAuMDMwNyAtMy4zOTgzMiwwLjM2MjMyIC01LjcxODQ4LDAuNzM2ODYgLTE1LjMzOTY1LDIuNDc2MjUgLTU4LjAwNzI3LC0xMS4wNDgxNSAtNzcuOTYxNywtMjQuNzExNiAtMi4yOTkwOSwtMS41NzQyNiAtNC40NDEyMSwtMi44NjIzIC00Ljc2MDI1LC0yLjg2MjMgLTAuOTMyNiwwIC0xMC44MDgyNCwtNy4wMTc0OCAtMTMuODA5NTcsLTkuODEyODcgLTEwLjM0MzQ2LC05LjYzMzc0IDguOTk0MzIsLTEwLjU2NTE2IDM0LjI1LC0xLjY0OTY3IDE1Ljk2ODQ4LDUuNjM3MDEgMTguMDY4NzksNi40NTExMSAyMi4zNTc5Niw4LjY2NjA3IDYuNjE2MjIsMy40MTY2OCA3LjM4NjQxLDMuNzQ5NzQgMTQuNDQxNDEsNi4yNDUwNyAxNi4yNDYwNyw1Ljc0NjE3IDE3LjU5NDMsNC4zNzMzNSA0LjcwMDYzLC00Ljc4NjM0IC0xOS4yMDI4NiwtMTMuNjQxNzUgLTM5LjYzMzYyLC0yMi4wOTMzOSAtNDcuMjk1MzcsLTE5LjU2NDc4IC04LjMwNDgyLDIuNzQwODQgLTI3LjI3NzkyLC0yLjIwODA5IC00NS4yMDMzNCwtMTEuNzkwNzkgLTMyLjEwNjU0LC0xNy4xNjM3NiAtNDQuMjUxNTksLTIwLjI3NjIxIC0zMy4zMDA1MiwtOC41MzQwMiAxNC42NzQ0OSwxNS43MzQ2MSAzMy43MDU4NSwzMy4yOTA0NiA0NS43MDM4LDQyLjE2MDM3IDcuNDU4NjEsNS41MTQwMyAxNy42MzUyLDEyLjQ2Njg4IDE5LjU5NTQzLDEzLjM4Nzk5IDAuODI1LDAuMzg3NjYgMy41MjUsMS44ODE0NSA2LDMuMzE5NTMgNS43Njg3OSwzLjM1MTkyIDI0Ljg2NTQzLDExLjkzMjI0IDI5Ljc0OTA0LDEzLjM2NjU2IDkuNTQ1NTUsMi44MDM1MyAxNC4zMTQ0NCwzLjkzMDA4IDE5LjMzMDkxLDQuNTY2NTQgMi45ODEwMywwLjM3ODIxIDUuOTcxMTksMC45Nzc4OSA2LjY0NDgsMS4zMzI2MiAxLjYwNzkyLDAuODQ2NzUgMjQuNTYyNDgsMC41Njg0MSAzMC4wNTIwNSwtMC4zNjQ0IHogTSA3MzMsMzU0LjMyNDY1IGMgMi40NzUsLTAuMjEwMDQgNi41MjUsLTAuNTg2NiA5LC0wLjgzNjgyIDQuODExNDksLTAuNDg2NDIgMTkuNjU5MjUsLTMuNDg5MjggMjkuNSwtNS45NjYxOCAzLjMsLTAuODMwNiAxNy40NzUsLTMuMDc5MDYgMzEuNSwtNC45OTY1OCA1MS44NTEzOSwtNy4wODkxOCA2Ny4xOTM2MiwtMTIuODY5NzggODAuMDc3NTYsLTMwLjE3MTM0IDUuNjQyNzksLTcuNTc3NTkgNS42NjY2NSwtOC41NDg5OCAwLjQ1Nzk3LC0xOC42NDQ2MSAtMTAuNDIzMTEsLTIwLjIwMjM1IDAuNTE4MzUsLTI2LjQyNjMxIDI0Ljk2NDQ3LC0xNC4yMDA4NCA4LjU2OTg1LDQuMjg1NzcgOC41LDQuMjg1MzUgOC41LDAuMDUwNyAwLC0zLjg0MjQxIC0wLjc2MTc5LC00LjU2NTgzIC01LjkyMjk0LC01LjYyNDY3IC0yOC4wOTg2NCwtNS43NjQ1OCAtNDEuMDgsLTI3LjAwOTQxIC0yNi4zMjYzMSwtNDMuMDg0NjcgMi42NTExLC0yLjg4ODU4IDIuNDMzNjUsLTYuMDY0MTEgLTEuMzQyMTIsLTE5LjU5OTY4IC0xLjY2Mjc0LC01Ljk2MDY4IC0yLjYyNTA2LC02LjMwMjUgLTcuNDY0MzUsLTIuNjUxMzggLTEuODk0MzUsMS40MjkyNCAtNS4zOTI4NCwzLjQ1MzcgLTcuNzc0NDEsNC40OTg4MSAtNC4zMzAxNCwxLjkwMDE5IC00LjMzMDE0LDEuOTAwMTkgMC4wOTg3LDYuMzI5MDUgMTQuMTE5NzUsMTQuMTE5NzUgLTMuNzM1NDcsMzEuNTk2NDUgLTM0LjI2ODU4LDMzLjU0MjA5IC0yMC4wMDEzLDEuMjc0NTQgLTIxLjczMDY3LDEuODkxMDMgLTEyLjY4Mjk1LDQuNTIxMjcgMTUuMjkwMTYsNC40NDQ5NyAxNy41NzY0NCwxMy45NTk0IDQuODQxOTcsMjAuMTUwMDEgLTExLjg2MDUsNS43NjU3NiAtMTEuMzMxNzUsNi4yMDYzNyAzLjQxMjMyLDIuODQzNTUgMjMuNjQ3NSwtNS4zOTM1MiA0MS44MzUwMiwtNC42MDY5MiA0NC4xMjQ4MiwxLjkwODM4IDYuMzA3OTksMTcuOTQ4NTMgLTUuOTc2NywzNi4zMzYxMyAtMzAuNjk2MTYsNDUuOTQ1NzEgLTUuOTEzNjcsMi4yOTg5MiAtOS40NTE1OCwzLjM3NDQzIC0yMS41LDYuNTM1OTYgLTYuMDkyMDUsMS41OTg1NyAtMjMuNjczMTksNC4yODY3IC0yNC4yNTE4MiwzLjcwODA3IC0wLjI4MTEzLC0wLjI4MTE0IC0xLjI1OTYzLC0wLjExMDU3IC0yLjE3NDQ1LDAuMzc5MDIgLTAuOTE0ODIsMC40ODk2IC01LjI0MzE1LDEuMTg2MjcgLTkuNjE4NTIsMS41NDgxNiAtMjUuNjA0NDYsMi4xMTc3NyAtMzkuMTA5NTgsMy45MDEzOSAtNjcuNjc5NTEsOC45MzgzOSBDIDcwMS45NTk0MywzNTIuMjM1NTcgNzAwLDM1Mi43NDU1IDcwMCwzNTQuMDczMTYgYyAwLDAuOTY5NzMgMTkuNjI1MjEsMS44NDA3MSAyNSwxLjEwOTUxIDEuOTI1LC0wLjI2MTg4IDUuNTI1LC0wLjY0Nzk5IDgsLTAuODU4MDIgeiBtIDg1LjM0MjU0LC0xNDIuMTI4MzcgYyAzLjkzNjYsLTIuNjM3NSAxMi4zMzY0NiwtOC4yMjEwMiAxOC42NjYzNSwtMTIuNDA3ODEgMTkuOTkzMTYsLTEzLjIyNDEyIDMzLjYwMzM3LC0yNy40NzMzNSAzNi40Mzk4OCwtMzguMTUwNzcgMC43NTA2NywtMi44MjU3NCAxLjY1ODg4LC01Ljg3MDMzIDIuMDE4MjQsLTYuNzY1NzYgMS4xMDAyNCwtMi43NDE1MiAtMi41ODA5NSwtMTIuNjUzNzUgLTMuODk0ODEsLTEwLjQ4NzQzIC02LjA0MTEyLDkuOTYwNzUgLTEwLjU4NjM1LDE1LjY2MDUgLTE5LjU0NzI2LDI0LjUxMjQgLTE0Ljg3MjE3LDE0LjY5MTI1IC0yMC4yOTEsMTkuNzgxMTUgLTIyLjA5NjUsMjAuNzU1MjMgLTIuOTc1MTEsMS42MDUwOCAtMTkuMDkyODQsMTkuODUyOCAtMjAuNTA5NiwyMy4yMTk5OCAtMi43OTI2LDYuNjM3MSAtMS44ODkwNiw2LjU2ODY3IDguOTIzNywtMC42NzU4NCB6IE0gMTA1LDI4Ni4xNDM4IGMgMCwtMS4wMjA5MSAxLjUwNzI0LC0zLjgzMzQxIDMuMzQ5NDMsLTYuMjUgQyAxMTIuOTc0MjUsMjczLjgyNjk0IDExNSwyNjkuNjI4MDIgMTE1LDI2Ni4xMDg2OCBjIDAsLTMuOTA5MDggLTEuMzMyOTksLTMuNDA2NjcgMjIuNjE2NjQsLTguNTI0MjMgNTMuNTg0NjcsLTExLjQ0OTk5IDc2LjUzNTkzLC0xNC4zOTI5OSAxMTcuNTU3MTEsLTE1LjA3NDE1IDIxNi4zNzU5OSwtMy41OTI5NSAyNzkuODg1OTgsLTUuNTc4MzUgMzQ4LjY1Njg5LC0xMC44OTk0NCAxNy41MDAxLC0xLjM1NDA2IDE3LjQ2ODA1LC0xLjM2MyAyMi4yNzM2OSw2LjIxNDcgMTAuMzg2NTYsMTYuMzc3OTEgLTE5LjAyMjQ0LDI3LjE0Mjk5IC02NC42MDQzMywyMy42NDgyMSAtNC40LC0wLjMzNzM1IC0yNS4zMjUsLTAuNzQzNTkgLTQ2LjUsLTAuOTAyNzYgLTM4LjUsLTAuMjg5MzggLTM4LjUsLTAuMjg5MzggLTU5LjQwNjc0LC00LjQ5OTYxIC0zMC41MTg3LC02LjE0NTg5IC0zOS40NTU5NCwtNS43ODkyMSAtNDguMjQyMjgsMS45MjUzIC00LjEyMDg0LDMuNjE4MTQgLTIuODAzMTYsMy42MDUzIC0xMi42ODEwMiwwLjEyMzUzIC0yNC45NzIxOCwtOC44MDIyOCAtNTUuODY1NDcsLTkuMzQxMyAtMTA1LjY2OTk2LC0xLjg0MzcyIC0xNi43NzUsMi41MjUzMSAtMzYuMzUsNS4wODc0NyAtNDMuNSw1LjY5MzcgLTM3LjE0ODgyLDMuMTQ5NzIgLTcxLjk4NzI3LDkuNTg3NTcgLTExNi42Nzg4LDIxLjU2MTI0IEMgMTEwLjI0MTI4LDI4OC41MDkzNCAxMDUsMjg5LjA4NDEzIDEwNSwyODYuMTQzOCBaIgogICAgICAgaWQ9InBhdGgzNTI1IgogICAgICAgaW5rc2NhcGU6Y29ubmVjdG9yLWN1cnZhdHVyZT0iMCIgLz4KICAgIDxwYXRoCiAgICAgICBzdHlsZT0iZmlsbDojZDVhZDJkIgogICAgICAgZD0ibSA0OTIsMTQwNC44NTMzIGMgLTExNi41MDk3NSwtNC45ODU4IC0xOTcuNTE0NjYsLTIwLjQ3OTYgLTI2Mi4xNjMyLC01MC4xNDQxIC05LjQzNjQsLTQuMzI5OSAtOC4wMjA3MywtMS40MzE5IC0xOC4xOTc5OSwtMzcuMjU0MSBDIDE5My45MTM0NiwxMjU1LjA2NSAxODAuNDQwNzYsMTE5OC41Mzc0IDE2Ni4wMDc2OSwxMTI2IDE1OC42OTExMSwxMDg5LjIyODUgMTU1LjI2NDgsMTA3My44NTY4IDEzOC4zNjg0NSwxMDAyIDEwOC4wNDk2LDg3My4wNjAwNSA5Ni41MzQ0NDcsODEzLjc3MzE0IDg5LjkwODY1NCw3NTIuNSBjIC0xLjY3ODAyNSwtMTUuNTE3ODIgMS4zNDI4NTMsLTM2LjczNjE0IDYuMDg5MjQ0LC00Mi43NzAyIDIuODA5NiwtMy41NzE4MyAyLjg2NjY0MywtMTIuNjkwOTYgMC4wODM5NCwtMTMuNDE4NjUgLTEuNjIzNDYyLC0wLjQyNDU1IC0yLjAyNTk0OCwtMS43OTU1NiAtMi42MTk3MjEsLTguOTIzNzIgLTAuNDkyOTYyLC01LjkxNzk0IC0xLjI2MDYyNywtOS4xMzI4NiAtMi41ODE4MzcsLTEwLjgxMjUgQyA4OS42MDU1NjcsNjc0Ljk1NDQgODksNjcyLjU2MzUyIDg5LDY2OS4xNTEyOSA4OSw2NjYuMzgzIDg4LjU1LDY2My44Mzk5MiA4OCw2NjMuNSBjIC0wLjYwMDgyMSwtMC4zNzEzMyAtMSwtNy4xNTczOCAtMSwtMTcgMCwtOS44NDI2MiAtMC4zOTkxNzksLTE2LjYyODY3IC0xLC0xNyAtMC41NSwtMC4zMzk5MiAtMSwwLjI4MTk3IC0xLDEuMzgxOTcgMCwxMi4zMjY0MSAtOC44NTgzMjQsLTEwLjEyMzYzIC0xNC4wMjIxLC0zNS41MzY4NCAtMTMuMjUxNjU2LC02NS4yMTcyIC0zNS4wMDA3MjcsLTEzMC4wMjQxNyAtMjkuOTk3NDgzLC04OS4zODUyNSAxLjc2MDE4LDE0LjI5NzA5IDUuMDAzODAzLDI4LjM1MzU1IDE0LjMxNjE3NCw2Mi4wNDAxMiAxMC45Mzk5NzQsMzkuNTc0MjUgMTUuOTIzNyw2Ny41OTQ2OSAxMy42OTg3NTcsNzcuMDE5NzEgQyA2NS44MTU4MzgsNjU4LjQ4ODMzIDQ1LjI3MDQ1Myw1NzcuNjAzNzIgMzMuNDI5MTQyLDUwNSAzMC40MjQxMTUsNDg2LjU3NSAyNS45MTE5ODMsNDU4LjkgMjMuNDAyMTgxLDQ0My41IDE3Ljc5NDE3OSw0MDkuMDg5NjIgMTIuNTc3Njg5LDM4My4yNDgwMyA1LjQ1MDMxMDgsMzU0LjU2OTU0IC0xLjY4Mzg5MjksMzI1Ljg2MzU5IC0xLjQ4MjMxMTYsMzIxLjIwNzM3IDcuMzgzNDY2OCwzMDkuOTE2NjQgMjUuNjU4NTgyLDI4Ni42NDI5NCA3OS4yODYyNzUsMjY4LjU0OTYgODUuMDgzMzY0LDI4My43MDE2MyA4OS4wNTY2MzYsMjk0LjA4NjY5IDc3LjM0NjEyNCwzMDEuMjgwNzggNDUuNSwzMDguMDE4NzcgMTcuODk4NzMxLDMxMy44NTg2NCAxNS4zNDU4NSwzMTguMDM0MDkgMzAuMzI5NDIsMzMyLjgzMTU0IDQ1LjMwOTYxNCwzNDcuNjI1NjUgMTMyLjE5NzQ1LDM2MC44NDgwNSAyMzUsMzYzLjk3Nzg1IGMgMTgyLjA3NTIxLDUuNTQzMjQgMjk3LjUwNDI5LDcuMDAyNzQgMzMwLDQuMTcyNTUgNy45NzUsLTAuNjk0NTggMTkuMzEzNzMsLTEuNTI1MTYgMjUuMTk3MTgsLTEuODQ1NzQgMTAuNjk3MTgsLTAuNTgyODggMTAuNjk3MTgsLTAuNTgyODggMTAuMjEwNTMsLTMuMTkzNzcgLTAuMzY4NTYsLTEuOTc3MzUgMC40ODM3NywtMy44MjQxNSAzLjUxMjU1LC03LjYxMDg5IDIuMTk5NTYsLTIuNzUgNS40ODI5MSwtNy4wMjUgNy4yOTYzNCwtOS41IDYuNTUyODUsLTguOTQzNDYgMTcuMDUwMzQsLTExLjc0MDA3IDIxLjI5OTAzLC01LjY3NDIyIDIuODEyMzksNC4wMTUyNSAxLjUxMTgzLDUuMTYzMjIgLTEuNTg4NDMsMS40MDIwNiAtNC45MjEwNiwtNS45NzAwOSAtMTIuMzc4MzQsLTMuNTc4MDMgLTE5LjQyNzIsNi4yMzE2MyAtMS42NSwyLjI5NjI1IC00LjQ2MjUsNS45ODczMiAtNi4yNSw4LjIwMjM4IC02Ljk2MDAxLDguNjI0OCAtMC42Mzk3MiwxNC43MzQzIDExLjU5NjA5LDExLjIwOTM0IEMgNjI1LjQ5MjUsMzY0Ljg4MDI4IDYzMywzNTYuMDMxOTEgNjMzLDM0OC4zMzIxMiBjIDAsLTEuODI5MSAwLjMzMTkyLC0yLjQwMDIgMS4wMDQyNCwtMS43Mjc4OCAyLjg0ODQ3LDIuODQ4NDcgLTQuMTUwNDksMTUuODY4NjcgLTEwLjIxNjI5LDE5LjAwNTQxIC00LjEwMDgsMi4xMjA2MSAtMi45MjM1MSwyLjc3MzM0IDYuNTQyNjMsMy42Mjc0OSA0LjQ5MzE4LDAuNDA1NDMgMTAuNzQ2ODUsMS4wMDg5OSAxMy44OTcwNSwxLjM0MTI1IDkuNTI5NzgsMS4wMDUxNCAxNi43OTU2NiwtMi40MzczNiAxMi43OTE5MywtNi4wNjA2OSAtOC44MjAxOCwtNy45ODIxNSA3Ljc3Njc1LC0yNC4wODI0OCAzMy40ODA0NCwtMzIuNDc4NjUgMy44NSwtMS4yNTc2MiA3LjQyNzUsLTIuNjgwODggNy45NSwtMy4xNjI4MSAwLjUyMjUsLTAuNDgxOTMgMS42NjI2NywtMC44NzYyNCAyLjUzMzcyLC0wLjg3NjI0IDMuMjc1NjYsMCAxMi42NTY2NCwtNy4yNjc1NSAyMy4wNTg5LC0xNy44NjM5OCAxMC42MTk1NiwtMTAuODE3NzkgMTUuNTEwNDEsLTE0LjkxNjMyIDE2LjU1NDI3LC0xMy44NzI0NyAwLjI5Mzk2LDAuMjkzOTYgLTEuMTgyNTksMS44MDA3NiAtMy4yODEyMSwzLjM0ODQ0IC0xNS41MTkzOCwxMS40NDUxMSAtMTYuMTY0NzYsMTUuODQ5OTEgLTEuMTgxNDksOC4wNjM3MiAyMS43NzQyNSwtMTEuMzE1MTkgMzAuODU2MDQsLTEzLjY0MDkgMjMuODAyNTcsLTYuMDk1NDkgLTkuMDU2OTMsOS42ODg1OSAtMzguOTc3NywyMy45Nzg4NCAtNDIuNjA3MjEsMjAuMzQ5MzMgLTAuNzYwNiwtMC43NjA2IC0yLjY1NTExLC0wLjA1NjggLTYuNTQ1MDUsMi40MzE2IC0zLjAxMTAyLDEuOTI2MTMgLTkuOTMxODIsNS4wNjQyNiAtMTUuMzc5NTQsNi45NzM2MiAtMTguNjkyMjIsNi41NTEzOSAtMjMuNTU4NTQsOS4yODM4NCAtMzQuMzg1MDcsMTkuMzA3MyAtMzQuNjM2MDIsMzIuMDY2ODQgMTUxLjQwMzQyLDE4LjcyMTAyIDI1My42MTU1LC0xOC4xOTM0OSAxNy4xNDYwOCwtNi4xOTI0MSAyMC40MjAzMSwtOS44ODcwNCAxOS4wNDU5NSwtMjEuNDkxMzYgLTIuMzYyMzksLTE5Ljk0NjY0IC00MS4zOTEwMywtNDQuODEwNjYgLTUyLjE0MDg3LC0zMy4yMTc0NCAtMi41NjExLDIuNzYyMDMgLTMuNjEyMTcsMS45OTc3OSAtMS4yOTA0NywtMC45MzgzMSAzLjk5NjIsLTUuMDUzNzEgMTQuODAyNDQsLTQuMDE4MyAyOC4yNSwyLjcwNjgxIDguNTc0NDUsNC4yODgwNyA4LjUsNC4yODc4MyA4LjUsMC4wMjY5IDAsLTMuNzIxOTIgLTEuOTMwNjgsLTUuNDczMTIgLTYuMTg0MjYsLTUuNjA5MzQgLTIuMjQ0OTMsLTAuMDcxOSAtMTEuMTcxMTQsLTMuNzAyNTMgLTkuNDY5NjUsLTMuODUxNjggMC40NjUzNSwtMC4wNDA4IDMuMzM1NjgsMC42NDk1OCA2LjM3ODUsMS41MzQxNSAyMS42MjAyLDYuMjg1MTcgMjkuNjUxNzQsLTQuNTY1NzYgMTkuMjY5OCwtMjYuMDM0MjYgQyA5MjUuOTEwOCwyNDMuMzMzMzIgOTIyLjgwMDgyLDIzMi43MjUgOTIwLjA4MzMxLDIyMiA5MDUuODI1MTcsMTY1LjcyODI2IDg3Ni44NzcyNSwxMDUuMDAzMzEgODY0LjMwOTAyLDEwNS4wMDA0OSBjIC0yLjk3MDg5LC02LjZlLTQgLTIuOTExMjUsMC4xNDM0MiAtNy44NjY1MywtMTkuMDAxNjMgQyA4NDcuOTM4MjUsNTMuMTQyMjY0IDg0MS42NjMyNyw0MS4wNTExMzEgODI5LjUzNDQ4LDM0LjE1MDM2NyA4MDMuMTc4NDcsMTkuMTU0OTE2IDc5Ni43MjgwMiwtOC4xMDA4NDkxIDgyMiwyLjMxNDEwMDcgODc2LjIzNDQ1LDI0LjY2NDkwNCA5MzEuNTE5NjMsOTMuMDQzMzc4IDk3MS44NzI3MSwxODcuNjgxNDYgMTAwMC42MDg0LDI1NS4wNzM4MyAxMDA4LjE1MzYsMzY5LjM2ODk1IDk4OS41MTk5LDQ1NSBjIC0xMy4wNjM3NCw2MC4wMzQxMiAtMjEuOTU1MjMsMTUyLjE2NjQ4IC0zMS41MDk3OSwzMjYuNSAtNi4wODMyMiwxMTAuOTk1MDIgLTkuNTYwMjIsMTYxLjA4MzEyIC0xNC41Nzc2OCwyMTAgLTEuMzUzOTUsMTMuMiAtMy4xMjUzNCwzMyAtMy45MzY0Myw0NCAtNC4wNzIyOCw1NS4yMjgzIC0xMC4yMDkyNiwxMDYuNTA0OCAtMjAuNjQ1NSwxNzIuNSAtMy41Njc3MywyMi41NjExIC00LjA2Nzk2LDI3Ljg2MjYgLTQuMzQwMzgsNDYgLTEuMDI3MTMsNjguMzgzMyAtMjYuMDk0NDYsMTA3LjIxNjEgLTczLjYzMDY3LDExNC4wNjQyIC00LjYwODcsMC42NjQgLTE0LjIyOTQ1LDIuOTI0NyAtMjEuMzc5NDUsNS4wMjM4IC01Ny45NTYyMywxNy4wMTUgLTExOS43ODU0NywyNi4wMzc3IC0yMDQuNSwyOS44NDI1IC02OC42OTk3MywzLjA4NTYgLTg4LjU2ODUsMy4zOTYyIC0xMjMsMS45MjI4IHogTSAyNTUuOTk0OTcsMTMwMS40MjQgYyAtMTIuMzM2NjUsLTUwLjMwMTcgLTE5LjU1MzI3LC03NC4xODMyIC0yOC4yMzEzMywtOTMuNDI0IC05LjI4OTI3LC0yMC41OTU5IC0xMS40MDAwMiwtMjMuMzIzOCAtMTAuMjUyNjQsLTEzLjI1IDUuMjczOTgsNDYuMzA0MyAxNy45ODQ0OCw4OS4yNDczIDM4LjY3MjUsMTMwLjY1NjggMTAuOTA4NjUsMjEuODM1IDEwLjkwNDAyLDIxLjI0NjIgLTAuMTg4NTMsLTIzLjk4MjggeiBtIC0yMS42MjUyNiwzMy4zMjYgYyAzLjYwMDQ2LC0xMy40MzUxIC0yLjE1NzgyLC00MS42OTQ4IC0xOC45MjQ3LC05Mi44NzYgLTkuNTYzNTgsLTI5LjE5MjkgLTE2LjYxMTIsLTU0LjU4MTcgLTE3LjkzODUzLC02NC42MjI5IC0wLjg2OTk3LC02LjU4MTIgLTEuNzc0MDgsLTcuMTM3MyAtNS41MTc1NSwtMy4zOTM5IC02LjAwNDQxLDYuMDA0NCAtNC4xODkwMywxOC40Mjg1IDkuMzMzODMsNjMuODc4NyAzLjYzODcyLDEyLjIyOTcgNy4xMzA5NywyNi4xNzk3IDcuNzYwNTQsMzEgMy42OTk3NiwyOC4zMjcxIDIyLjM0Mjg4LDc2Ljk5NzggMjUuMjg2NDEsNjYuMDE0MSB6IG0gMzM5LjA3ODAyLC0xNDguOTIzMiBjIDE4LjI0NjkzLC0xMi4wODYyIDE1Ljg1Mjg1LC00Ny4zMTM2IC0zLjk3ODgyLC01OC41NDYgLTE3Ljg1MzI2LC0xMC4xMTE4IC0yNy40NDEzMiwxMS45MjI4IC0xOS44NjEwOSw0NS42NDMyIDMuNDAwMjMsMTUuMTI1NyAxMi44MDE4MSwyMC4yMTQyIDIzLjgzOTkxLDEyLjkwMjggeiBtIC01My43ODY1MywtMi42NjM5IGMgMTMuNjA2NywtNi45NzY3IDE4LjEyNTg3LC0zMC4yNTY3IDkuNjAwMjQsLTQ5LjQ1NDcgLTguNDA1MzksLTE4LjkyNzIgLTI1LjI2Njg2LC05LjMzNTMgLTI4LjMwNTM0LDE2LjEwMTkgLTAuNDM5NTEsMy42Nzk1IC0xLjQ3NzEzLDExLjAxMDUgLTIuMzA1ODMsMTYuMjkxMiAtMi45NzA1MSwxOC45MjkgNC45MDE2NywyNS4zMjE1IDIxLjAxMDkzLDE3LjA2MTYgeiBtIC0zMzEuMTAwMDYsLTM0LjgwNiBjIDIuMTgxMjIsLTE3LjQ1NzggLTIuMzQyOTYsLTQyLjY4MzIgLTE2Ljk3OTE2LC05NC42NzA2IC00LjE1MTkzLC0xNC43NDc2IC04LjkzOTA5LC0zMy44NzI2IC0xMC42MzgxMywtNDIuNSAtNS41NTU0MSwtMjguMjA5NTEgLTEzLjk2NjM4LC00MS45NTU2IC05LjkwNDA3LC0xNi4xODYzIDEuOTcxODcsMTIuNTA4NiAxMy4xMDM4Nyw2OS41OTE0IDE1LjUwMzY4LDc5LjUgMS4zMzIwOCw1LjUgMy41ODIzNSwxOS4zNzM1IDUuMDAwNjEsMzAuODMgMy41MzE5NSwyOC41MzA1IDYuNjMwMjYsMzkuODM0OSAxMi43MjI4NSw0Ni40MiAzLjAxOTkzLDMuMjY0MSAzLjUxMDk0LDIuODc2MSA0LjI5NDIyLC0zLjM5MzEgeiBtIDIzMS40MzY0OCwtOTYuNDg5OCBDIDQ5Ni4xNzI1NSwxMDM0LjQxMTggNTIwLjczNTI5LDkzOS4xNTUwNyA0NjAuNjExNjksODk0LjM2MTY5IDQyMS44NDQ0OSw4NjUuNDc5MjkgMzk3LjU2NjQsODYzLjM4MDQzIDMzNyw4ODMuNjc1MzYgYyAtMTIuMzc1LDQuMTQ2NjkgLTIzLjUxNTcyLDguMTc4NTggLTI0Ljc1NzE1LDguOTU5NzcgLTQuNDEzNDgsMi43NzcyNSAtMTEuMjQxNTUsMTIuNjI1MTQgLTExLjI0MjIyLDE2LjIxNDI4IC0zLjVlLTQsMS44NDIxNyAtMS43NjcyMiw3LjczMTA4IC0zLjkyNjM5LDEzLjA4NjQ3IC0yOC42MTE0LDcwLjk2NDgxIDQ0LjIzMzY3LDE0Ny45NjI3MiAxMjIuOTIzMzgsMTI5LjkzMTIyIHogTSAzMjMuNSw5OTcuMzUyNTcgYyAtMjkuOTY1NDIsLTQuNDc1MDUgLTM2LjQyMzY2LC0yOS45ODk2MSAtMTMuNDg3NDIsLTUzLjI4NDcyIDE2LjY2MTQxLC0xNi45MjIxIDM2LjA2MjIxLC0xOC4zODcwNiA1MC4zMDUxNSwtMy43OTg1NCAyOC4xODI3NiwyOC44NjY1MyA1Ljg3MTUzLDYzLjQ1ODQ5IC0zNi44MTc3Myw1Ny4wODMyNiB6IG0gMzc5LjkzMjQyLDQwLjQ4OTgzIGMgNTIuMzI0MDksLTguNzg5NCA4NS4xMzIwOSwtNjguOTQzMTcgNjMuNTU1NDIsLTExNi41Mjk0OSAtNTAuNTIyMzYsLTExMS40MjQ2NyAtMjMxLjk2ODc4LC01Ny44OTgzMSAtMTkyLjE3Niw1Ni42OTE1NyAxNy4wMTMyMyw0OC45OTI0MiA2My43NDg2MSw3MC43MzUwMiAxMjguNjIwNTgsNTkuODM3OTIgeiBNIDYwMS41LDk5MS41OTg3OCBjIC0yMy4zMjMzMywtNS43NDI4MSAtMzAuODg4NTYsLTI3LjA1NzE4IC0xOC4zOTA5MywtNTEuODE0ODQgMTUuNjI1MzEsLTMwLjk1MzU4IDQ5LjA1ODQ3LC0zMC41ODgzNyA2NS41NTIyMiwwLjcxNjA2IDkuOTYxODMsMTguOTA3MTEgNy43MDM1MSwyNS4yMDc2OCAtOC40NTE0OCwyMy41NzkwOSAtMTQuNTI5NTQsLTEuNDY0NzMgLTE5LjI5Njc0LDAuNjEyMyAtMTIuMTkzODUsNS4zMTI3NyA1LjE3NTcsMy40MjUxMiAxMS43OTQ4Miw5LjM4NjA2IDEzLjA3MTY4LDExLjc3MTg5IDMuOTg5ODYsNy40NTUxMyAtMjIuOTAxNjUsMTQuNTQzNTUgLTM5LjU4NzY0LDEwLjQzNTAzIHogTSAzNTUuNjMyNzgsNTc4LjE2NTIxIGMgMy45NDA3MSwtMC41NzE4MiA2LjY2NDM0LC0xLjg5Njc4IDExLjcyNzM1LC01LjcwNSAzLjYyNzAxLC0yLjcyODEyIDkuMTkyMjYsLTYuODUzNjEgMTIuMzY3MjIsLTkuMTY3NzcgMTcuNDU1OTcsLTEyLjcyMzI4IDMyLjQ3MjEzLC0yNC4xNDc4OSAzNy43NzI2NSwtMjguNzM4MjEgNi44NzYwNywtNS45NTQ3OCA4LjUsLTcuMDUwNTkgOC41LC01LjczNTcyIDAsMC41MTUwOSAtMi41ODc1LDMuMDQwMjcgLTUuNzUsNS42MTE1MSAtMy4xNjI1LDIuNTcxMjMgLTYuNTMxNTMsNS4zMTY4NCAtNy40ODY3NCw2LjEwMTM0IC0yLjY2MjY1LDIuMTg2OCAtMjEuNDAxNDYsMTYuMTQyNzEgLTMyLjE1MTMzLDIzLjk0NTAyIC0xMS41MjUwOSw4LjM2NDk2IC0xMS42NTg3NCw4LjgyNzA1IC0yLjM2MTkzLDguMTY2NTIgMTMuMTU0NTIsLTAuOTM0NjMgMTUuODk1MTgsLTEuNjEwMTMgMTUuMjE1OTEsLTMuNzUwMzEgLTAuNjg2MjQsLTIuMTYyMTYgMy40MDQ3MiwtNC4yNjkyNSA2Ljk2ODU1LC0zLjU4OTIxIDEuNjE5ODMsMC4zMDkxIDEuMzU1ODIsMC41NjMzMyAtMS4yMjM1MiwxLjE3ODIgLTEuODA4OTksMC40MzEyMiAtMy4xMjQyOCwxLjI4Njc4IC0yLjkyMjg4LDEuOTAxMjMgMC40OTc3NywxLjUxODY2IDUuNjk2NTEsMi4wMzI2MiA3LjAzMzc2LDAuNjk1MzcgQyA0MDQuMDE1NjIsNTY4LjM4NDM4IDQxMS4wNDY4OSw1NjggNDIzLjA0NDQ0LDU2OCA0NDUuMDg0NDEsNTY4IDQ2Myw1NjcuMDM1MDggNDYzLDU2NS44NDgwMyA0NjMsNTY1LjM4MTYyIDQ2Mi4zNTcxNCw1NjUgNDYxLjU3MTQzLDU2NSA0NTkuOTY5OTQsNTY1IDQ1Nyw1NjIuMzU0OSA0NTcsNTYwLjkyODU3IGMgMCwtMC41MTA3MSAwLjksLTAuMDI4NiAyLDEuMDcxNDMgMS40MjExNywxLjQyMTE3IDMuMzMzMzMsMiA2LjYwNjk5LDIgMy41Mjc3LDAgNC40ODE3MiwwLjMyNjQ1IDQuMDcyMjcsMS4zOTM0NiAtMS40NjQ3OSwzLjgxNzE4IDE2MC42MDc5MiwzLjQ1MzY4IDE2My4xOTI3MSwtMC4zNjYwMiAxLjI2NDcxLC0xLjg2ODkzIDIuNDM3NDMsLTIuMDI4NjIgMTUsLTIuMDQyNSAxOC41NzA0OCwtMC4wMjA1IDI4LjUwODMyLC0zLjg4NDg0IDIxLjYxMTY4LC04LjQwMzcgLTEuNDA1NzgsLTAuOTIxMSAtMi40ODc4OSwtMi41OTM4MSAtMi40OTM0MiwtMy44NTQyOSAtMC4wMDUsLTEuMjI0ODIgLTEuMTA5NjcsLTQuNTg5NDUgLTIuNDUzOTksLTcuNDc2OTUgLTEuMzQ0MzMsLTIuODg3NSAtMi4wNDE0OSwtNS4yNSAtMS41NDkyNSwtNS4yNSAxLjI4NjE2LDAgMi4wNDU2NSwxLjQ4NzM4IDQuNTM3NjMsOC44ODY0NSAyLjE1MTA2LDYuMzg2ODUgMi4zNDA5NSw2LjYwODU1IDYuNTk1MTEsNy42OTk4NiA0LjI1OTUsMS4wOTI2OSA0LjI5NzU2LDEuMTM3MzIgMS4zODAyNywxLjYxODg1IC0xLjY1LDAuMjcyMzUgMS4wNSwwLjUwMzM2IDYsMC41MTMzNyA2LjMxODIsMC4wMTI4IDcuOTU3MDgsLTAuMjAxMzQgNS41LC0wLjcxODUzIC0xLjkyNSwtMC40MDUxOSAtMy4xOTUwNiwtMC43OTU5NiAtMi44MjIzNiwtMC44NjgzNiAwLjM3MjcsLTAuMDcyNCA0LjE3OTE0LC0wLjYxODY1IDguNDU4NzYsLTEuMjEzODkgMTMuNTA4ODIsLTEuODc4OTEgMjMuMTc1NTgsLTUuNDQ2NDUgMjMuNTQ5NDIsLTguNjkwOTggMC4yODM0NywtMi40NjAyNCAwLjcwMzY2LC0yLjcyNjc3IDQuMjk4NzcsLTIuNzI2NzcgNi45Nzk4NCwwIDUuMjQ4NjYsLTYuNzA5MDEgLTIuMDg2MjUsLTguMDg1MDUgLTMuNjQxNjUsLTAuNjgzMTggLTUuOTQwNTksLTIuNzI4NTYgLTQuOTIxMDIsLTQuMzc4MjYgMC45OTEwNywtMS42MDM1OCA2LjUwNTQyLC00LjIxNTYxIDcuODQwNDcsLTMuNzEzODUgMC42NzMzNCwwLjI1MzA2IDAuMzIxMzMsMC43NDA3IC0wLjgxNzc5LDEuMTMyODkgLTYuMjgwMTksMi4xNjIxOSAtNi43MjE1NywzLjgzODM0IC0xLjU1NTA5LDUuOTA1NTUgNC4xMTgyNiwxLjY0NzggOC4wNTUwOSw0Ljg3NTM5IDguMDU1MDksNi42MDM5MiAwLDEuODMwNzQgLTYuMjExNjEsOC4wMzQ4IC04LjA0NDU4LDguMDM0OCAtMS4wMTA1NiwwIC0yLjA4ODI5LDAuNDA1OTcgLTIuMzk0OTUsMC45MDIxNiAtMC42NzY2MiwxLjA5NDc4IC0xMi40MzQyOCw0LjczOTU3IC0xOC4zMTA0Nyw1LjY3NjEgLTExLjA0NzIxLDEuNzYwNjggLTEuMDA0ODEsMi40MjE3NCAzNi43ODk0MSwyLjQyMTc0IDQxLjc3NzUsMCA1OS4xNzkzLC0xLjAwMzggNjIuMDM5MzMsLTMuNTc4NjcgMS4wOTA2NCwtMC45ODE4OSA0LjA4NjgzLC0xLjQyMTMzIDkuNjkwOTgsLTEuNDIxMzMgNC40NjE3NCwwIDguMzkwMzYsLTAuNDUgOC43MzAyOCwtMSAwLjMzOTkyLC0wLjU1IDEuNDM4OTksLTEgMi40NDIzOSwtMSAxLjY2OTM2LDAgMy42MjMzNiwtMy43Njc1OSAyLjUyNDExLC00Ljg2Njg0IC0wLjI0OTgsLTAuMjQ5OCAtMi44MTk0NSwwLjA0MTMgLTUuNzEwMzQsMC42NDY5NyBDIDgwNC4yMzIwMyw1NDcuOTg0ODkgODAzLDU0OC4xNDM4IDgwMyw1NDcuMjk2NDYgYyAwLC0wLjQ3NDM1IDMuMjExNSwtMS40NTYzOSA3LjEzNjY2LC0yLjE4MjMzIDM0LjkwNjcyLC02LjQ1NTc5IDYxLjY4MTY4LC0yNS45OTgzMiA3Mi45MDMxMywtNTMuMjEwNjIgMS41NTc2NCwtMy43NzczMiA2LjA4MjIxLC0xMi44MzgzOCAxMC4wNTQ1OSwtMjAuMTM1NjkgMjQuMjkyNTUsLTQ0LjYyNTY3IDM4LjQ3OTc3LC04My4xODc2IDM0Ljg1NDM4LC05NC43MzY4NSAtMC40MzY5NiwtMS4zOTIwMyAtMS4wNTk5MiwtNC4xNDAyOSAtMS4zODQzNCwtNi4xMDcyNCAtMS4xMjIwMSwtNi44MDI2NSAtMS42Nzk4NiwtNy4wMjY1OSAtMTMuNTY0NDIsLTUuNDQ1NDMgLTUzLjEzMjkzLDcuMDY5MDEgLTE1Ni4zODQzMSwxNy42Mzc2NyAtMjE5LjUsMjIuNDY3NzEgLTQ0LjMyNDczLDMuMzkyMDMgLTEwNC42MjUxLDcuMDMxMDggLTExNi43ODAxMiw3LjA0NzUyIC00Ljc4MDEyLDAuMDA2IC00Ljc4MDEyLDAuMDA2IC0yMi40NjMyLDE2Ljk1OTkzIC0yMi4xMjgwMiwyMS4yMTUgLTIzLjk4NDA5LDIxLjMwNTEgLTIuODQ4MjcsMC4xMzgyNyA4LjY5NzM3LC04LjcxMDE0IDE1LjQyNTk5LC0xNi4wNjMxNSAxNC45NTI1LC0xNi4zNDAwNCAtMy4yMjYzNywtMS44ODY2NyAtMTUuMjE4NCwtMy43NjM5MiAtMjIuNTE3MzgsLTMuNTI0OTEgLTguMTExNjQsMC4yNjU2MyAtOC4zNDEyNSwwLjIxMDA0IC04LjI2MTY0LC0xLjk5OTkyIDAuMTA4NjcsLTMuMDE2ODIgMC4yMzQ0MSwtMy4wMDA5MiAtMjkuMDgxODksLTMuNjc3ODQgQyAyNzEuOTgwOSwzODEuMTMzOSAxMTQuODM3NDYsMzczLjA0NzEzIDI5LjkwNTA5MiwzNjIuMDIyOTMgMjAuMDEzMDc5LDM2MC43Mzg5NSAxOSwzNjAuNzcwMTkgMTksMzYyLjM1OTIxIGMgMCwyLjc4MDcgOC4wOTY3MTIsMTAuNDcyMjggMTQuNDk2NDc2LDEzLjc3MTExIDguMDUzMjExLDQuMTUxMTMgOC4xNzQ2MDUsNS45Njk4NyAwLjQ5MTksNy4zNjk2OCAtOC4yMzY3NDQsMS41MDA3NiAtNy45ODgzNzgsMC41Mjc4OSAtNC43NTQ2MDQsMTguNjI0MjkgQyA0Mi4yMDY0NjQsNDc0LjcyMDMyIDYxLjI3ODI5LDQ5MS4xNTM4NyAxMDEuNTQxLDQ2NC40MjkgMTI0LjY5NzE1LDQ0OS4wNTg4MyAyNzMuMDc2MzMsNDMzLjEzOTM4IDM3MSw0MzUuNTE5MDIgYyAxNi44MDgxMiwwLjQwODQ1IDI4LjM5NzI5LDAuMjMzOTEgMzQsLTAuNTEyMDggNC42NzUsLTAuNjIyNDYgMTEuMDY0NjEsLTEuMzY3NDggMTQuMTk5MTQsLTEuNjU1NiAzLjEzNDUzLC0wLjI4ODEyIDYuMjI3MTMsLTEuMTYwMDQgNi44NzI0NSwtMS45Mzc2IDAuNjQ1MzEsLTAuNzc3NTYgMi44ODg5LC0xLjQxMzc0IDQuOTg1NzYsLTEuNDEzNzQgMi4wOTY4NSwwIDUuMDc5MjUsLTAuNTIwMzUgNi42Mjc1NSwtMS4xNTYzMyAxMC41OTk3MywtNC4zNTM5NSA5MS4zMTUxLC02LjAyNjA1IDkxLjMxNTEsLTEuODkxNjkgMCwwLjcyNTU5IC00LjE1MzM0LDQuNjg0NDggLTEzLjc4NzQsMTMuMTQxOTEgLTIuMjUxNjQsMS45NzY2NSAtMTMuOTA4MSwxMC45NzIyOCAtMjUuOTAzMjQsMTkuOTkwMjkgLTE4LjE4ODg4LDEzLjY3NDUgLTMwLjMzNzc2LDIzLjExNDQ1IC0zNS44MDkzNiwyNy44MjQ2NiAtMC41NSwwLjQ3MzQ3IC02LjU2NDI4LDYuNzgyNzQgLTEzLjM2NTA3LDE0LjAyMDYgLTI3Ljk2ODk5LDI5Ljc2NjUgLTU3LjE3NzEyLDUwLjI1MTUzIC04Mi4yNzg2OCw1Ny43MDU4OSAtMy41MTA0MSwxLjA0MjQ4IC00LjkzMjc0LDIuMDY1NjIgLTUuNzM1MDcsNC4xMjU0OCAtMS4zNTE3MSwzLjQ3MDMyIC01LjcxNDI5LDExLjIzMjMgLTcuMDgxNDcsMTIuNTk5NDggLTIuMjc1NzIsMi4yNzU3MiAtMS4xNjI0NywzLjg5MTU4IDIuMjEwMjksMy4yMDgyMSAxLjc4NzUsLTAuMzYyMTcgNS41NTk3NSwtMC45OTM2NSA4LjM4Mjc4LC0xLjQwMzI5IHogTSAxMDUsMjg2LjE0MzggYyAwLC0xLjAyMDkxIDEuNTA3MjQsLTMuODMzNDEgMy4zNDk0MywtNi4yNSBDIDExMi45NzQyNSwyNzMuODI2OTQgMTE1LDI2OS42MjgwMiAxMTUsMjY2LjEwODY4IGMgMCwtMy45MDkwOCAtMS4zMzI5OSwtMy40MDY2NyAyMi42MTY2NCwtOC41MjQyMyA1My41ODQ2NywtMTEuNDQ5OTkgNzYuNTM1OTMsLTE0LjM5Mjk5IDExNy41NTcxMSwtMTUuMDc0MTUgMjE2LjM3NTk5LC0zLjU5Mjk1IDI3OS44ODU5OCwtNS41NzgzNSAzNDguNjU2ODksLTEwLjg5OTQ0IDE3LjUwMDEsLTEuMzU0MDYgMTcuNDY4MDUsLTEuMzYzIDIyLjI3MzY5LDYuMjE0NyAxMC4zODY1NiwxNi4zNzc5MSAtMTkuMDIyNDQsMjcuMTQyOTkgLTY0LjYwNDMzLDIzLjY0ODIxIC00LjQsLTAuMzM3MzUgLTI1LjMyNSwtMC43NDM1OSAtNDYuNSwtMC45MDI3NiAtMzguNSwtMC4yODkzOCAtMzguNSwtMC4yODkzOCAtNTkuNDA2NzQsLTQuNDk5NjEgLTMwLjUxODcsLTYuMTQ1ODkgLTM5LjQ1NTk0LC01Ljc4OTIxIC00OC4yNDIyOCwxLjkyNTMgLTQuMTIwODQsMy42MTgxNCAtMi44MDMxNiwzLjYwNTMgLTEyLjY4MTAyLDAuMTIzNTMgLTI0Ljk3MjE4LC04LjgwMjI4IC01NS44NjU0NywtOS4zNDEzIC0xMDUuNjY5OTYsLTEuODQzNzIgLTE2Ljc3NSwyLjUyNTMxIC0zNi4zNSw1LjA4NzQ3IC00My41LDUuNjkzNyAtMzcuMTQ4ODIsMy4xNDk3MiAtNzEuOTg3MjcsOS41ODc1NyAtMTE2LjY3ODgsMjEuNTYxMjQgQyAxMTAuMjQxMjgsMjg4LjUwOTM0IDEwNSwyODkuMDg0MTMgMTA1LDI4Ni4xNDM4IFoiCiAgICAgICBpZD0icGF0aDM1MjMiCiAgICAgICBpbmtzY2FwZTpjb25uZWN0b3ItY3VydmF0dXJlPSIwIiAvPgogICAgPHBhdGgKICAgICAgIHN0eWxlPSJmaWxsOiMyOGE4ZGQiCiAgICAgICBkPSJtIDQ5MiwxNDA0Ljg1MzMgYyAtMTE2LjUwOTc1LC00Ljk4NTggLTE5Ny41MTQ2NiwtMjAuNDc5NiAtMjYyLjE2MzIsLTUwLjE0NDEgLTkuNDM2NCwtNC4zMjk5IC04LjAyMDczLC0xLjQzMTkgLTE4LjE5Nzk5LC0zNy4yNTQxIEMgMTkzLjkxMzQ2LDEyNTUuMDY1IDE4MC40NDA3NiwxMTk4LjUzNzQgMTY2LjAwNzY5LDExMjYgMTU4LjY5MTExLDEwODkuMjI4NSAxNTUuMjY0OCwxMDczLjg1NjggMTM4LjM2ODQ1LDEwMDIgMTA4LjA0OTYsODczLjA2MDA1IDk2LjUzNDQ0Nyw4MTMuNzczMTQgODkuOTA4NjU0LDc1Mi41IGMgLTEuNjc4MDI1LC0xNS41MTc4MiAxLjM0Mjg1MywtMzYuNzM2MTQgNi4wODkyNDQsLTQyLjc3MDIgMi44MDk2LC0zLjU3MTgzIDIuODY2NjQzLC0xMi42OTA5NiAwLjA4Mzk0LC0xMy40MTg2NSAtMS42MjM0NjIsLTAuNDI0NTUgLTIuMDI1OTQ4LC0xLjc5NTU2IC0yLjYxOTcyMSwtOC45MjM3MiAtMC40OTI5NjIsLTUuOTE3OTQgLTEuMjYwNjI3LC05LjEzMjg2IC0yLjU4MTgzNywtMTAuODEyNSBDIDg5LjYwNTU2Nyw2NzQuOTU0NCA4OSw2NzIuNTYzNTIgODksNjY5LjE1MTI5IDg5LDY2Ni4zODMgODguNTUsNjYzLjgzOTkyIDg4LDY2My41IGMgLTAuNjAwODIxLC0wLjM3MTMzIC0xLC03LjE1NzM4IC0xLC0xNyAwLC05Ljg0MjYyIC0wLjM5OTE3OSwtMTYuNjI4NjcgLTEsLTE3IC0wLjU1LC0wLjMzOTkyIC0xLDAuMjgxOTcgLTEsMS4zODE5NyAwLDEyLjMyNjQxIC04Ljg1ODMyNCwtMTAuMTIzNjMgLTE0LjAyMjEsLTM1LjUzNjg0IC0xMy4yNTE2NTYsLTY1LjIxNzIgLTM1LjAwMDcyNywtMTMwLjAyNDE3IC0yOS45OTc0ODMsLTg5LjM4NTI1IDEuNzYwMTgsMTQuMjk3MDkgNS4wMDM4MDMsMjguMzUzNTUgMTQuMzE2MTc0LDYyLjA0MDEyIDEwLjkzOTk3NCwzOS41NzQyNSAxNS45MjM3LDY3LjU5NDY5IDEzLjY5ODc1Nyw3Ny4wMTk3MSBDIDY1LjgxNTgzOCw2NTguNDg4MzMgNDUuMjcwNDUzLDU3Ny42MDM3MiAzMy40MjkxNDIsNTA1IDMwLjQyNDExNSw0ODYuNTc1IDI1LjkxMTk4Myw0NTguOSAyMy40MDIxODEsNDQzLjUgMTcuNzk0MTc5LDQwOS4wODk2MiAxMi41Nzc2ODksMzgzLjI0ODAzIDUuNDUwMzEwOCwzNTQuNTY5NTQgLTEuNjgzODkyOSwzMjUuODYzNTkgLTEuNDgyMzExNiwzMjEuMjA3MzcgNy4zODM0NjY4LDMwOS45MTY2NCAyNS42NTg1ODIsMjg2LjY0Mjk0IDc5LjI4NjI3NSwyNjguNTQ5NiA4NS4wODMzNjQsMjgzLjcwMTYzIDg5LjA1NjYzNiwyOTQuMDg2NjkgNzcuMzQ2MTI0LDMwMS4yODA3OCA0NS41LDMwOC4wMTg3NyAxNy44OTg3MzEsMzEzLjg1ODY0IDE1LjM0NTg1LDMxOC4wMzQwOSAzMC4zMjk0MiwzMzIuODMxNTQgNDUuMzA5NjE0LDM0Ny42MjU2NSAxMzIuMTk3NDUsMzYwLjg0ODA1IDIzNSwzNjMuOTc3ODUgYyAxODEuOTE4MTgsNS41Mzg0NiAyOTcuNDM5MTcsNy4wMDExNSAzMzAsNC4xNzgzNyAzMi4xNjE3OCwtMi43ODgxOSAzNC4wOTc0MywtMi43Njk0NyAzOS40NzQ1OSwwLjM4MTc1IDQuNzkzMSwyLjgwODk1IDQuNzkzMSwyLjgwODk1IDEwLjkwOTI1LDEuMjg5ODEgNi4xMjEwNSwtMS41MjAzNiA3LjU4NzIxLC0xLjQ4MjA4IDI4LjkxNzAyLDAuNzU0ODYgNC42NDM1MywwLjQ4Njk4IDYuODc3NTcsMC4xNzEzNiAxMS4xOTc1NiwtMS41ODIgNC43OTE1OCwtMS45NDQ3NiA1LjgyMzA2LC0yLjA0ODU3IDkuMTk5MTQsLTAuOTI1ODYgNy4wMDY3NiwyLjMzMDA5IDczLjc4MTkzLDEuNjU3ODggOTcuMzAyNDQsLTAuOTc5NTIgNjUuNDA2MiwtNy4zMzQxNCAxNDIuODI5MzIsLTI1LjE5Mjg4IDE2OC41NzY3MywtMzguODg0NjQgMy4wMzA4OCwtMS42MTE3MyAyMi45NDM0NywtNi40MzgyMSAzNS45MjMyNywtOC43MDcyIDEyLjQ2MjYxLC0yLjE3ODU4IDIwLjUxNzU4LC00LjA5OTM4IDI2LjUsLTYuMzE5MjEgNS41LC0yLjA0MDgyIDUuNSwtMi4wNDA4MiA2LjE0NjIxLDYuNjM3NDggMi44NzI4OSwzOC41ODE4NiAtMS40MjE3MSwxMDAuODQyODMgLTkuMTUxODEsMTMyLjY3ODMxIC0yLjAyNzM5LDguMzQ5NTQgLTQuNDEzMDUsMjEuNjcyODkgLTcuOTY4MTEsNDQuNSAtMS4xNTYzNiw3LjQyNSAtMi41OTU1NCwxNC40ODI5MyAtMy4xOTgxOSwxNS42ODQyOSAtMC42MDI2NSwxLjIwMTM2IC0wLjgyMzQ2LDMuMjI1NDcgLTAuNDkwNjgsNC40OTgwMiAwLjMzMjc4LDEuMjcyNTQgLTAuNTAxODIsMTEuMzE0NjEgLTEuODU0NjcsMjIuMzE1NyAtNy4xMTgwNSw1Ny44ODI3NCAtMTEuNTk5MTUsMTE2LjU4NzU0IC0xOC40NzI2NCwyNDIuMDAxOTkgLTYuMDgzMjIsMTEwLjk5NTAyIC05LjU2MDIyLDE2MS4wODMxMiAtMTQuNTc3NjgsMjEwIC0xLjM1Mzk1LDEzLjIgLTMuMTI1MzQsMzMgLTMuOTM2NDMsNDQgLTQuMDcyMjgsNTUuMjI4MyAtMTAuMjA5MjYsMTA2LjUwNDggLTIwLjY0NTUsMTcyLjUgLTMuNTY3NzMsMjIuNTYxMSAtNC4wNjc5NiwyNy44NjI2IC00LjM0MDM4LDQ2IC0xLjAyNzEzLDY4LjM4MzMgLTI2LjA5NDQ2LDEwNy4yMTYxIC03My42MzA2NywxMTQuMDY0MiAtNC42MDg3LDAuNjY0IC0xNC4yMjk0NSwyLjkyNDcgLTIxLjM3OTQ1LDUuMDIzOCAtNTcuOTU2MjMsMTcuMDE1IC0xMTkuNzg1NDcsMjYuMDM3NyAtMjA0LjUsMjkuODQyNSAtNjguNjk5NzMsMy4wODU2IC04OC41Njg1LDMuMzk2MiAtMTIzLDEuOTIyOCB6IE0gMjU1Ljk5NDk3LDEzMDEuNDI0IGMgLTEyLjMzNjY1LC01MC4zMDE3IC0xOS41NTMyNywtNzQuMTgzMiAtMjguMjMxMzMsLTkzLjQyNCAtOS4yODkyNywtMjAuNTk1OSAtMTEuNDAwMDIsLTIzLjMyMzggLTEwLjI1MjY0LC0xMy4yNSA1LjI3Mzk4LDQ2LjMwNDMgMTcuOTg0NDgsODkuMjQ3MyAzOC42NzI1LDEzMC42NTY4IDEwLjkwODY1LDIxLjgzNSAxMC45MDQwMiwyMS4yNDYyIC0wLjE4ODUzLC0yMy45ODI4IHogbSAtMjEuNjI1MjYsMzMuMzI2IGMgMy42MDA0NiwtMTMuNDM1MSAtMi4xNTc4MiwtNDEuNjk0OCAtMTguOTI0NywtOTIuODc2IC05LjU2MzU4LC0yOS4xOTI5IC0xNi42MTEyLC01NC41ODE3IC0xNy45Mzg1MywtNjQuNjIyOSAtMC44Njk5NywtNi41ODEyIC0xLjc3NDA4LC03LjEzNzMgLTUuNTE3NTUsLTMuMzkzOSAtNi4wMDQ0MSw2LjAwNDQgLTQuMTg5MDMsMTguNDI4NSA5LjMzMzgzLDYzLjg3ODcgMy42Mzg3MiwxMi4yMjk3IDcuMTMwOTcsMjYuMTc5NyA3Ljc2MDU0LDMxIDMuNjk5NzYsMjguMzI3MSAyMi4zNDI4OCw3Ni45OTc4IDI1LjI4NjQxLDY2LjAxNDEgeiBtIDMzOS4wNzgwMiwtMTQ4LjkyMzIgYyAxOC4yNDY5MywtMTIuMDg2MiAxNS44NTI4NSwtNDcuMzEzNiAtMy45Nzg4MiwtNTguNTQ2IC0xNy44NTMyNiwtMTAuMTExOCAtMjcuNDQxMzIsMTEuOTIyOCAtMTkuODYxMDksNDUuNjQzMiAzLjQwMDIzLDE1LjEyNTcgMTIuODAxODEsMjAuMjE0MiAyMy44Mzk5MSwxMi45MDI4IHogbSAtNTMuNzg2NTMsLTIuNjYzOSBjIDEzLjYwNjcsLTYuOTc2NyAxOC4xMjU4NywtMzAuMjU2NyA5LjYwMDI0LC00OS40NTQ3IC04LjQwNTM5LC0xOC45MjcyIC0yNS4yNjY4NiwtOS4zMzUzIC0yOC4zMDUzNCwxNi4xMDE5IC0wLjQzOTUxLDMuNjc5NSAtMS40NzcxMywxMS4wMTA1IC0yLjMwNTgzLDE2LjI5MTIgLTIuOTcwNTEsMTguOTI5IDQuOTAxNjcsMjUuMzIxNSAyMS4wMTA5MywxNy4wNjE2IHogbSAtMzMxLjEwMDA2LC0zNC44MDYgYyAyLjE4MTIyLC0xNy40NTc4IC0yLjM0Mjk2LC00Mi42ODMyIC0xNi45NzkxNiwtOTQuNjcwNiAtNC4xNTE5MywtMTQuNzQ3NiAtOC45MzkwOSwtMzMuODcyNiAtMTAuNjM4MTMsLTQyLjUgLTUuNTU1NDEsLTI4LjIwOTUxIC0xMy45NjYzOCwtNDEuOTU1NiAtOS45MDQwNywtMTYuMTg2MyAxLjk3MTg3LDEyLjUwODYgMTMuMTAzODcsNjkuNTkxNCAxNS41MDM2OCw3OS41IDEuMzMyMDgsNS41IDMuNTgyMzUsMTkuMzczNSA1LjAwMDYxLDMwLjgzIDMuNTMxOTUsMjguNTMwNSA2LjYzMDI2LDM5LjgzNDkgMTIuNzIyODUsNDYuNDIgMy4wMTk5MywzLjI2NDEgMy41MTA5NCwyLjg3NjEgNC4yOTQyMiwtMy4zOTMxIHogbSAzMDAuNzAwMDYsLTMyLjM1NjQgYyAxMC4xODYzMiwtNS40OTQ0IDIwLjU4MzIxLC04LjAwMTkgMzMuMTQ4NzYsLTcuOTk0NyA5LjY2NzIyLDAuMDEgMTYuOTU2OTYsMS4wMDM0IDQ0LjU5MDA0LDYuMTAzOSAzMy43MjQwOSw2LjIyNDggNTMuNTQ3MTQsMS41Mzg1IDUxLjIwNzQxLC0xMi4xMDU3IC01LjMwMDYxLC0zMC45MTA4IC0yMS4wMTc4MSwtMzcuNjk0NSAtNjkuMjg0MDIsLTI5LjkwMzQgLTI4LjE1MzYsNC41NDQ1IC00OC41NDIxNSw0Ljc1ODQgLTU5Ljk5ODU3LDAuNjI5NSAtOS4wNTAzMiwtMy4yNjE3IC04LjQ5ODgsLTMuMjM1NiAtMTUuMjE2NjUsLTAuNzIyMSAtMjQuMjkwOTQsOS4wODg0IC0yMy4yMjI4MywzOC4wNDYxIDEuNjk0NzQsNDUuOTQ2NSAzLjM1MzQsMS4wNjMyIDYuMTc1MDQsMS45NTg0IDYuMjcwMzEsMS45ODkzIDAuMDk1MywwLjAzMSAzLjUwOTg2LC0xLjc0MzYgNy41ODc5OCwtMy45NDMzIHogbSAtNjkuMjYzNTgsLTY0LjEzMzQgQyA0OTYuMTcyNTUsMTAzNC40MTE4IDUyMC43MzUyOSw5MzkuMTU1MDcgNDYwLjYxMTY5LDg5NC4zNjE2OSA0MjEuODQ0NDksODY1LjQ3OTI5IDM5Ny41NjY0LDg2My4zODA0MyAzMzcsODgzLjY3NTM2IGMgLTEyLjM3NSw0LjE0NjY5IC0yMy41MTU3Miw4LjE3ODU4IC0yNC43NTcxNSw4Ljk1OTc3IC00LjQxMzQ4LDIuNzc3MjUgLTExLjI0MTU1LDEyLjYyNTE0IC0xMS4yNDIyMiwxNi4yMTQyOCAtMy41ZS00LDEuODQyMTcgLTEuNzY3MjIsNy43MzEwOCAtMy45MjYzOSwxMy4wODY0NyAtMjguNjExNCw3MC45NjQ4MSA0NC4yMzM2NywxNDcuOTYyNzIgMTIyLjkyMzM4LDEyOS45MzEyMiB6IE0gMzIzLjUsOTk3LjM1MjU3IGMgLTI5Ljk2NTQyLC00LjQ3NTA1IC0zNi40MjM2NiwtMjkuOTg5NjEgLTEzLjQ4NzQyLC01My4yODQ3MiAxNi42NjE0MSwtMTYuOTIyMSAzNi4wNjIyMSwtMTguMzg3MDYgNTAuMzA1MTUsLTMuNzk4NTQgMjguMTgyNzYsMjguODY2NTMgNS44NzE1Myw2My40NTg0OSAtMzYuODE3NzMsNTcuMDgzMjYgeiBtIDM3OS45MzI0Miw0MC40ODk4MyBjIDUyLjMyNDA5LC04Ljc4OTQgODUuMTMyMDksLTY4Ljk0MzE3IDYzLjU1NTQyLC0xMTYuNTI5NDkgLTUwLjUyMjM2LC0xMTEuNDI0NjcgLTIzMS45Njg3OCwtNTcuODk4MzEgLTE5Mi4xNzYsNTYuNjkxNTcgMTcuMDEzMjMsNDguOTkyNDIgNjMuNzQ4NjEsNzAuNzM1MDIgMTI4LjYyMDU4LDU5LjgzNzkyIHogTSA2MDEuNSw5OTEuNTk4NzggYyAtMjMuMzIzMzMsLTUuNzQyODEgLTMwLjg4ODU2LC0yNy4wNTcxOCAtMTguMzkwOTMsLTUxLjgxNDg0IDE1LjYyNTMxLC0zMC45NTM1OCA0OS4wNTg0NywtMzAuNTg4MzcgNjUuNTUyMjIsMC43MTYwNiA5Ljk2MTgzLDE4LjkwNzExIDcuNzAzNTEsMjUuMjA3NjggLTguNDUxNDgsMjMuNTc5MDkgLTE0LjUyOTU0LC0xLjQ2NDczIC0xOS4yOTY3NCwwLjYxMjMgLTEyLjE5Mzg1LDUuMzEyNzcgNS4xNzU3LDMuNDI1MTIgMTEuNzk0ODIsOS4zODYwNiAxMy4wNzE2OCwxMS43NzE4OSAzLjk4OTg2LDcuNDU1MTMgLTIyLjkwMTY1LDE0LjU0MzU1IC0zOS41ODc2NCwxMC40MzUwMyB6IE0gMzQ5Ljk0MTU1LDU3OS4wMzEyOCBjIDAuOTk1NTQsLTAuNTMyOCA0LjYxNjI1LC0xLjA3OTU0IDguMDQ2MDIsLTEuMjE0OTkgNS4wMjM0OSwtMC4xOTgzOSA2LjM2OTM1LC0wLjYwNjkyIDYuOTIyMTIsLTIuMTAxMTkgMC42MDAwNSwtMS42MjIwOCAyLjA2MDkzLC0xLjg5NjY2IDExLjYzODI0LC0yLjE4NzQxIDE0LjM5OTU4LC0wLjQzNzE1IDIwLjEwMzk4LC0xLjIzOTQ4IDI0Ljk1MjA3LC0zLjUwOTU3IDQuMzI5NjEsLTIuMDI3MyA0NS45NTQ1OSwtMy42NTQyMiA3My41LC0yLjg3Mjc1IDQ4Ljk4NTk0LDEuMzg5NzUgMTU2LjUwMTg0LC0wLjAxNTUgMTU3Ljg2MTUzLC0yLjA2MzM0IDEuMjg3MTQsLTEuOTM4NTUgMi4zMjE1OSwtMi4wODMwNyAxNS4wMTA0NCwtMi4wOTcwOSAxNC4yNTQ4LC0wLjAxNTggMjAuMDcwOSwtMS4xNTY5NyAyMi40NDUzMiwtNC40MDQxOCAxLjIxMDQ2LC0xLjY1NTQgNC42MjU1OCwtMS43NjA3NiA1My4yMzgwNywtMS42NDI0NCA1Mi45Mzk5NCwwLjEyODg2IDcwLjQwMTU0LC0wLjcwNjQyIDczLjUyMzM4LC0zLjUxNjk5IDEuMDkwNjQsLTAuOTgxODkgNC4wODY4MywtMS40MjEzMyA5LjY5MDk4LC0xLjQyMTMzIDQuNDYxNzQsMCA4LjM5MDM2LC0wLjQ1IDguNzMwMjgsLTEgMC4zOTU1MiwtMC42Mzk5NyAxNS4xNjUzMiwtMSA0MS4wMjM4MywtMSAzOC45NDg5NSwwIDQwLjQ0MzE5LC0wLjA2OTkgNDEuNDQyOCwtMS45Mzc2NSAwLjg5NjI3LC0xLjY3NDY5IDIuNDk1NjQsLTIuMDEwNiAxMS43ODUxOCwtMi40NzUyMiAyMi4xMDU4MiwtMS4xMDU2MyAyNy43MjY1NSwtMS43MjY2IDI5LjQxOTMyLC0zLjI1MDIyIDEuMjk4NTUsLTEuMTY4NzggMy44NTA3OCwtMS40NDA3IDExLjQ0NzE4LC0xLjIxOTU5IDkuNzc2MDMsMC4yODQ1NCA5Ljc3NjAzLDAuMjg0NTQgMTAuOTg3MDEsLTQuMTY2MzkgMC42NjYwMywtMi40NDgwMSAyLjExMzMyLC02LjkyNTkzIDMuMjE2MTksLTkuOTUwOTMgMS42MDA4NSwtNC4zOTA4OCAyLjE0NTQ0LC05LjIzMDY5IDIuNzAwNTcsLTI0IDAuNzU5NTYsLTIwLjIwODY4IDEuNDYzMTYsLTI2LjY1MzQ4IDQuMTQ4NTUsLTM4IDIuMTUzNiwtOS4wOTk1NyAyLjIwNzc0LC02OS43ODQwNyAwLjA4MzQsLTkzLjUgLTEuMzI1NzcsLTE0LjgwMDgyIC0yOC42MzQzOCwtMjAuMzU5ODYgLTQ4Ljg1MTczLC05Ljk0NDQzIC0zLjMzNjk3LDEuNzE5MTIgLTg0LjMwMjMxLDExLjMxNjg3IC0xNDYuOTAyMzEsMTcuNDE0IC02My4yOTMxMSw2LjE2NDY1IC0xNDMuMTM3NTUsMTIuMDIwNzkgLTE4NiwxMy42NDIwNiAtMTEuNDA0MzgsMC40MzEzNyAtMTguNDIzODMsMS4xMjgxMSAtMjAuMTUyMjUsMi4wMDAyOCAtMi4yNjg3NCwxLjE0NDgzIC0zLjQyNTUsMS4wOTI3OSAtOCwtMC4zNTk4OSAtMy41ODgzMSwtMS4xMzk1MSAtOC44MDIzMSwtMS43MDcwOSAtMTUuODQ3NzUsLTEuNzI1MTMgLTEwLjI3MDM3LC0wLjAyNjMgLTEwLjQ5ODIxLC0wLjA3NjYgLTEwLjQxODExLC0yLjMwMDAzIDAuMTA4NjcsLTMuMDE2ODIgMC4yMzQ0MSwtMy4wMDA5MiAtMjkuMDgxODksLTMuNjc3ODQgQyAyNzEuOTgwOSwzODEuMTMzOSAxMTQuODM3NDYsMzczLjA0NzEzIDI5LjkwNTA5MiwzNjIuMDIyOTMgMjAuMDEzMDc5LDM2MC43Mzg5NSAxOSwzNjAuNzcwMTkgMTksMzYyLjM1OTIxIGMgMCwyLjc4MDcgOC4wOTY3MTIsMTAuNDcyMjggMTQuNDk2NDc2LDEzLjc3MTExIDguMDUzMjExLDQuMTUxMTMgOC4xNzQ2MDUsNS45Njk4NyAwLjQ5MTksNy4zNjk2OCAtOC4yMzY3NDQsMS41MDA3NiAtNy45ODgzNzgsMC41Mjc4OSAtNC43NTQ2MDQsMTguNjI0MjkgQyA0Mi4yMDY0NjQsNDc0LjcyMDMyIDYxLjI3ODI5LDQ5MS4xNTM4NyAxMDEuNTQxLDQ2NC40MjkgMTI0LjY5NzE1LDQ0OS4wNTg4MyAyNzMuMDc2MzMsNDMzLjEzOTM4IDM3MSw0MzUuNTE5MDIgYyAxNi44MDgxMiwwLjQwODQ1IDI4LjM5NzI5LDAuMjMzOTEgMzQsLTAuNTEyMDggNC42NzUsLTAuNjIyNDYgMTEuMDY0NjEsLTEuMzY3NDggMTQuMTk5MTQsLTEuNjU1NiAzLjEzNDUzLC0wLjI4ODEyIDYuMjI3MTMsLTEuMTYwMDQgNi44NzI0NSwtMS45Mzc2IDAuNjQ1MzEsLTAuNzc3NTYgMi44ODg5LC0xLjQxMzc0IDQuOTg1NzYsLTEuNDEzNzQgMi4wOTY4NSwwIDUuMDc5MjUsLTAuNTIwMzUgNi42Mjc1NSwtMS4xNTYzMyAxMC41OTk3MywtNC4zNTM5NSA5MS4zMTUxLC02LjAyNjA1IDkxLjMxNTEsLTEuODkxNjkgMCwwLjcyNTU5IC00LjE1MzM0LDQuNjg0NDggLTEzLjc4NzQsMTMuMTQxOTEgLTIuMjUxNjQsMS45NzY2NSAtMTMuOTA4MSwxMC45NzIyOCAtMjUuOTAzMjQsMTkuOTkwMjkgLTE4LjE4ODg4LDEzLjY3NDUgLTMwLjMzNzc2LDIzLjExNDQ1IC0zNS44MDkzNiwyNy44MjQ2NiAtMC41NSwwLjQ3MzQ3IC02LjU2NDI4LDYuNzgyNzQgLTEzLjM2NTA3LDE0LjAyMDYgLTI3Ljk2ODk5LDI5Ljc2NjUgLTU3LjE3NzEyLDUwLjI1MTUzIC04Mi4yNzg2OCw1Ny43MDU4OSAtMy41MTA0MSwxLjA0MjQ4IC00LjkzMjc0LDIuMDY1NjIgLTUuNzM1MDcsNC4xMjU0OCAtMS4zNTE3MSwzLjQ3MDMyIC01LjcxNDI5LDExLjIzMjMgLTcuMDgxNDcsMTIuNTk5NDggLTIuOTA1OTEsMi45MDU5MSAwLjc0NTM3LDQuODk1NDcgNC45MDE4NCwyLjY3MDk5IHogTSAxMDUsMjg2LjE0MzggYyAwLC0xLjAyMDkxIDEuNTA3MjQsLTMuODMzNDEgMy4zNDk0MywtNi4yNSBDIDExMi45NzQyNSwyNzMuODI2OTQgMTE1LDI2OS42MjgwMiAxMTUsMjY2LjEwODY4IGMgMCwtMy45MDkwOCAtMS4zMzI5OSwtMy40MDY2NyAyMi42MTY2NCwtOC41MjQyMyA1My41ODQ2NywtMTEuNDQ5OTkgNzYuNTM1OTMsLTE0LjM5Mjk5IDExNy41NTcxMSwtMTUuMDc0MTUgMjE2LjM3NTk5LC0zLjU5Mjk1IDI3OS44ODU5OCwtNS41NzgzNSAzNDguNjU2ODksLTEwLjg5OTQ0IDE3LjUwMDEsLTEuMzU0MDYgMTcuNDY4MDUsLTEuMzYzIDIyLjI3MzY5LDYuMjE0NyAxMC4zODY1NiwxNi4zNzc5MSAtMTkuMDIyNDQsMjcuMTQyOTkgLTY0LjYwNDMzLDIzLjY0ODIxIC00LjQsLTAuMzM3MzUgLTI1LjMyNSwtMC43NDM1OSAtNDYuNSwtMC45MDI3NiAtMzguNSwtMC4yODkzOCAtMzguNSwtMC4yODkzOCAtNTkuNDA2NzQsLTQuNDk5NjEgLTMwLjUxODcsLTYuMTQ1ODkgLTM5LjQ1NTk0LC01Ljc4OTIxIC00OC4yNDIyOCwxLjkyNTMgLTQuMTIwODQsMy42MTgxNCAtMi44MDMxNiwzLjYwNTMgLTEyLjY4MTAyLDAuMTIzNTMgLTI0Ljk3MjE4LC04LjgwMjI4IC01NS44NjU0NywtOS4zNDEzIC0xMDUuNjY5OTYsLTEuODQzNzIgLTE2Ljc3NSwyLjUyNTMxIC0zNi4zNSw1LjA4NzQ3IC00My41LDUuNjkzNyAtMzcuMTQ4ODIsMy4xNDk3MiAtNzEuOTg3MjcsOS41ODc1NyAtMTE2LjY3ODgsMjEuNTYxMjQgQyAxMTAuMjQxMjgsMjg4LjUwOTM0IDEwNSwyODkuMDg0MTMgMTA1LDI4Ni4xNDM4IFoiCiAgICAgICBpZD0icGF0aDM1MjEiCiAgICAgICBpbmtzY2FwZTpjb25uZWN0b3ItY3VydmF0dXJlPSIwIiAvPgogICAgPHBhdGgKICAgICAgIHN0eWxlPSJmaWxsOiMzNjk4YTYiCiAgICAgICBkPSJtIDQ5MiwxNDA0Ljg1MzMgYyAtMTE2LjUwOTc1LC00Ljk4NTggLTE5Ny41MTQ2NiwtMjAuNDc5NiAtMjYyLjE2MzIsLTUwLjE0NDEgLTkuNDM2NCwtNC4zMjk5IC04LjAyMDczLC0xLjQzMTkgLTE4LjE5Nzk5LC0zNy4yNTQxIEMgMTkzLjkxMzQ2LDEyNTUuMDY1IDE4MC40NDA3NiwxMTk4LjUzNzQgMTY2LjAwNzY5LDExMjYgMTU4LjY5MTExLDEwODkuMjI4NSAxNTUuMjY0OCwxMDczLjg1NjggMTM4LjM2ODQ1LDEwMDIgMTA4LjA0OTYsODczLjA2MDA1IDk2LjUzNDQ0Nyw4MTMuNzczMTQgODkuOTA4NjU0LDc1Mi41IGMgLTEuODU0NTgsLTE3LjE1MDU1IDEuNTkyNzYsLTM4LjE1NTI2IDcuMTc4OTQ0LC00My43NDE0NCAzLjY0NzQwMiwtMy42NDc0MSA0LjEyNzg1MiwtMTAuNTQ4MjkgMC45NDEwODMsLTEzLjUxNzIxIC0xLjQ1NzczMywtMS4zNTgwOSAtMi4yMTIwMTYsLTMuOTg3OTcgLTIuODk1MjAyLC0xMC4wOTQ0MiAtMC41MzA0NzcsLTQuNzQxNDkgLTEuNTY1MzQyLC04Ljk3OTQyIC0yLjQzMDI5MSwtOS45NTIzOSAtMS45MTc2NDYsLTIuMTU3MTQgLTIuNjYzNTYyLC04LjQ5MDUyIC0zLjUxNzMzOCwtMjkuODY0NzkgLTAuMzc3MjE4LC05LjQ0MzY0IC0xLjA0NzgxOCwtMTcuNTMwNjEgLTEuNDkwMjIzLC0xNy45NzEwNCAtMC45NjQ0NTgsLTAuOTYwMTYgLTIuNjU4ODU0LDEuNDYyNDYgLTIuNjgwMzE0LDMuODMyMjcgQyA4NC45MDgzNSw2NDMuMDAyODMgNzYuMDgxNjk0LDYyMC40NjMxNCA3MC45Nzc5LDU5NS4zNDUxMyA1Ny43MjYyNDQsNTMwLjEyNzkzIDM1Ljk3NzE3Myw0NjUuMzIwOTYgNDAuOTgwNDE3LDUwNS45NTk4OCA0Mi43NDA1OTcsNTIwLjI1Njk3IDQ1Ljk4NDIyLDUzNC4zMTM0MyA1NS4yOTY1OTEsNTY4IGMgMTAuOTM5OTc0LDM5LjU3NDI1IDE1LjkyMzcsNjcuNTk0NjkgMTMuNjk4NzU3LDc3LjAxOTcxIEMgNjUuODE1ODM4LDY1OC40ODgzMyA0NS4yNzA0NTMsNTc3LjYwMzcyIDMzLjQyOTE0Miw1MDUgMzAuNDI0MTE1LDQ4Ni41NzUgMjUuOTExOTgzLDQ1OC45IDIzLjQwMjE4MSw0NDMuNSAxNy43OTQxNzksNDA5LjA4OTYyIDEyLjU3NzY4OSwzODMuMjQ4MDMgNS40NTAzMTA4LDM1NC41Njk1NCAtMS42ODM4OTI5LDMyNS44NjM1OSAtMS40ODIzMTE2LDMyMS4yMDczNyA3LjM4MzQ2NjgsMzA5LjkxNjY0IDI1LjY1ODU4MiwyODYuNjQyOTQgNzkuMjg2Mjc1LDI2OC41NDk2IDg1LjA4MzM2NCwyODMuNzAxNjMgODkuMDU2NjM2LDI5NC4wODY2OSA3Ny4zNDYxMjQsMzAxLjI4MDc4IDQ1LjUsMzA4LjAxODc3IDE3Ljg5ODczMSwzMTMuODU4NjQgMTUuMzQ1ODUsMzE4LjAzNDA5IDMwLjMyOTQyLDMzMi44MzE1NCA0NS4zMDk2MTQsMzQ3LjYyNTY1IDEzMi4xOTc0NSwzNjAuODQ4MDUgMjM1LDM2My45Nzc4NSBjIDE4MS45MTgxOCw1LjUzODQ2IDI5Ny40MzkxNyw3LjAwMTE1IDMzMCw0LjE3ODM3IDMyLjE2MTc4LC0yLjc4ODE5IDM0LjA5NzQzLC0yLjc2OTQ3IDM5LjQ3NDU5LDAuMzgxNzUgNC43OTMxLDIuODA4OTUgNC43OTMxLDIuODA4OTUgMTAuOTA5MjUsMS4yODk4MSA2LjEyMTA1LC0xLjUyMDM2IDcuNTg3MjEsLTEuNDgyMDggMjguOTE3MDIsMC43NTQ4NiA0LjY0MzUzLDAuNDg2OTggNi44Nzc1NywwLjE3MTM2IDExLjE5NzU2LC0xLjU4MiA0Ljc5MTU4LC0xLjk0NDc2IDUuODIzMDYsLTIuMDQ4NTcgOS4xOTkxNCwtMC45MjU4NiA3LjAwNjc2LDIuMzMwMDkgNzMuNzgxOTMsMS42NTc4OCA5Ny4zMDI0NCwtMC45Nzk1MiA2NS40MDYyLC03LjMzNDE0IDE0Mi44MjkzMiwtMjUuMTkyODggMTY4LjU3NjczLC0zOC44ODQ2NCAzLjAzMDg4LC0xLjYxMTczIDIyLjk0MzQ3LC02LjQzODIxIDM1LjkyMzI3LC04LjcwNzIgMTIuNDYyNjEsLTIuMTc4NTggMjAuNTE3NTgsLTQuMDk5MzggMjYuNSwtNi4zMTkyMSA1LjUsLTIuMDQwODIgNS41LC0yLjA0MDgyIDYuMTQ2MjEsNi42Mzc0OCAyLjg3Mjg5LDM4LjU4MTg2IC0xLjQyMTcxLDEwMC44NDI4MyAtOS4xNTE4MSwxMzIuNjc4MzEgLTIuMDI3MzksOC4zNDk1NCAtNC40MTMwNSwyMS42NzI4OSAtNy45NjgxMSw0NC41IC0xLjE1NjM2LDcuNDI1IC0yLjU5NTU0LDE0LjQ4MjkzIC0zLjE5ODE5LDE1LjY4NDI5IC0wLjYwMjY1LDEuMjAxMzYgLTAuODIzNDYsMy4yMjU0NyAtMC40OTA2OCw0LjQ5ODAyIDAuMzMyNzgsMS4yNzI1NCAtMC41MDE4MiwxMS4zMTQ2MSAtMS44NTQ2NywyMi4zMTU3IC03LjExODA1LDU3Ljg4Mjc0IC0xMS41OTkxNSwxMTYuNTg3NTQgLTE4LjQ3MjY0LDI0Mi4wMDE5OSAtNi4wODMyMiwxMTAuOTk1MDIgLTkuNTYwMjIsMTYxLjA4MzEyIC0xNC41Nzc2OCwyMTAgLTEuMzUzOTUsMTMuMiAtMy4xMjUzNCwzMyAtMy45MzY0Myw0NCAtNC4wNzIyOCw1NS4yMjgzIC0xMC4yMDkyNiwxMDYuNTA0OCAtMjAuNjQ1NSwxNzIuNSAtMy41Njc3MywyMi41NjExIC00LjA2Nzk2LDI3Ljg2MjYgLTQuMzQwMzgsNDYgLTEuMDI3MTMsNjguMzgzMyAtMjYuMDk0NDYsMTA3LjIxNjEgLTczLjYzMDY3LDExNC4wNjQyIC00LjYwODcsMC42NjQgLTE0LjIyOTQ1LDIuOTI0NyAtMjEuMzc5NDUsNS4wMjM4IC01Ny45NTYyMywxNy4wMTUgLTExOS43ODU0NywyNi4wMzc3IC0yMDQuNSwyOS44NDI1IC02OC42OTk3MywzLjA4NTYgLTg4LjU2ODUsMy4zOTYyIC0xMjMsMS45MjI4IHogTSAyNTUuOTk0OTcsMTMwMS40MjQgYyAtMTIuMzM2NjUsLTUwLjMwMTcgLTE5LjU1MzI3LC03NC4xODMyIC0yOC4yMzEzMywtOTMuNDI0IC05LjI4OTI3LC0yMC41OTU5IC0xMS40MDAwMiwtMjMuMzIzOCAtMTAuMjUyNjQsLTEzLjI1IDUuMjczOTgsNDYuMzA0MyAxNy45ODQ0OCw4OS4yNDczIDM4LjY3MjUsMTMwLjY1NjggMTAuOTA4NjUsMjEuODM1IDEwLjkwNDAyLDIxLjI0NjIgLTAuMTg4NTMsLTIzLjk4MjggeiBtIC0yMS42MjUyNiwzMy4zMjYgYyAzLjYwMDQ2LC0xMy40MzUxIC0yLjE1NzgyLC00MS42OTQ4IC0xOC45MjQ3LC05Mi44NzYgLTkuNTYzNTgsLTI5LjE5MjkgLTE2LjYxMTIsLTU0LjU4MTcgLTE3LjkzODUzLC02NC42MjI5IC0wLjg2OTk3LC02LjU4MTIgLTEuNzc0MDgsLTcuMTM3MyAtNS41MTc1NSwtMy4zOTM5IC02LjAwNDQxLDYuMDA0NCAtNC4xODkwMywxOC40Mjg1IDkuMzMzODMsNjMuODc4NyAzLjYzODcyLDEyLjIyOTcgNy4xMzA5NywyNi4xNzk3IDcuNzYwNTQsMzEgMy42OTk3NiwyOC4zMjcxIDIyLjM0Mjg4LDc2Ljk5NzggMjUuMjg2NDEsNjYuMDE0MSB6IG0gMzM5LjA3ODAyLC0xNDguOTIzMiBjIDE4LjI0NjkzLC0xMi4wODYyIDE1Ljg1Mjg1LC00Ny4zMTM2IC0zLjk3ODgyLC01OC41NDYgLTE3Ljg1MzI2LC0xMC4xMTE4IC0yNy40NDEzMiwxMS45MjI4IC0xOS44NjEwOSw0NS42NDMyIDMuNDAwMjMsMTUuMTI1NyAxMi44MDE4MSwyMC4yMTQyIDIzLjgzOTkxLDEyLjkwMjggeiBtIC01My43ODY1MywtMi42NjM5IGMgMTMuNjA2NywtNi45NzY3IDE4LjEyNTg3LC0zMC4yNTY3IDkuNjAwMjQsLTQ5LjQ1NDcgLTguNDA1MzksLTE4LjkyNzIgLTI1LjI2Njg2LC05LjMzNTMgLTI4LjMwNTM0LDE2LjEwMTkgLTAuNDM5NTEsMy42Nzk1IC0xLjQ3NzEzLDExLjAxMDUgLTIuMzA1ODMsMTYuMjkxMiAtMi45NzA1MSwxOC45MjkgNC45MDE2NywyNS4zMjE1IDIxLjAxMDkzLDE3LjA2MTYgeiBtIC0zMzEuMTAwMDYsLTM0LjgwNiBjIDIuMTgxMjIsLTE3LjQ1NzggLTIuMzQyOTYsLTQyLjY4MzIgLTE2Ljk3OTE2LC05NC42NzA2IC00LjE1MTkzLC0xNC43NDc2IC04LjkzOTA5LC0zMy44NzI2IC0xMC42MzgxMywtNDIuNSAtNS41NTU0MSwtMjguMjA5NTEgLTEzLjk2NjM4LC00MS45NTU2IC05LjkwNDA3LC0xNi4xODYzIDEuOTcxODcsMTIuNTA4NiAxMy4xMDM4Nyw2OS41OTE0IDE1LjUwMzY4LDc5LjUgMS4zMzIwOCw1LjUgMy41ODIzNSwxOS4zNzM1IDUuMDAwNjEsMzAuODMgMy41MzE5NSwyOC41MzA1IDYuNjMwMjYsMzkuODM0OSAxMi43MjI4NSw0Ni40MiAzLjAxOTkzLDMuMjY0MSAzLjUxMDk0LDIuODc2MSA0LjI5NDIyLC0zLjM5MzEgeiBtIDMwMC43MDAwNiwtMzIuMzU2NCBjIDEwLjE4NjMyLC01LjQ5NDQgMjAuNTgzMjEsLTguMDAxOSAzMy4xNDg3NiwtNy45OTQ3IDkuNjY3MjIsMC4wMSAxNi45NTY5NiwxLjAwMzQgNDQuNTkwMDQsNi4xMDM5IDMzLjcyNDA5LDYuMjI0OCA1My41NDcxNCwxLjUzODUgNTEuMjA3NDEsLTEyLjEwNTcgLTUuMzAwNjEsLTMwLjkxMDggLTIxLjAxNzgxLC0zNy42OTQ1IC02OS4yODQwMiwtMjkuOTAzNCAtMjguMTUzNiw0LjU0NDUgLTQ4LjU0MjE1LDQuNzU4NCAtNTkuOTk4NTcsMC42Mjk1IC05LjA1MDMyLC0zLjI2MTcgLTguNDk4OCwtMy4yMzU2IC0xNS4yMTY2NSwtMC43MjIxIC0yNC4yOTA5NCw5LjA4ODQgLTIzLjIyMjgzLDM4LjA0NjEgMS42OTQ3NCw0NS45NDY1IDMuMzUzNCwxLjA2MzIgNi4xNzUwNCwxLjk1ODQgNi4yNzAzMSwxLjk4OTMgMC4wOTUzLDAuMDMxIDMuNTA5ODYsLTEuNzQzNiA3LjU4Nzk4LC0zLjk0MzMgeiBtIC02OS4yNjM1OCwtNjQuMTMzNCBjIDc2LjE3NDkzLC0xNy40NTUzIDEwMC43Mzc2NywtMTEyLjcxMjAzIDQwLjYxNDA3LC0xNTcuNTA1NDEgLTM5Ljc1MSwtMjkuNjE1MzUgLTY1LjA4OTUsLTMxLjI5NDU0IC0xMjkuODI3NDksLTguNjAzNzIgLTEzLjU3ODU1LDQuNzU5MzIgLTIwLjAzNzczLDYuNTg4NSAtMjAuNzUsNS44NzYyMyAtMC43MTIyNywtMC43MTIyNyAtMS4wMzQyLC0wLjQ5NTI0IC0xLjAzNDIsMC42OTcxOCAwLDAuOTUyMjcgLTAuNjM3MDgsMS45NzU4NiAtMS40MTU3MywyLjI3NDY2IC0yLjk1MzcsMS4xMzM0NCAtNi4zMTE2Nyw3Ljc4MzAxIC02LjUwODg4LDEyLjg4OTEzIC0wLjExOTkyLDMuMTA1MDMgLTEuNjU2MTcsOC42MjQ0NSAtNC4wNTk5MiwxNC41ODY0NyAtMjguNTUzMTksNzAuODIwNDQgNDQuMzg2NzUsMTQ3Ljc5NTM2IDEyMi45ODIxNSwxMjkuNzg1NDYgeiBNIDMyMy41LDk5Ny4zNTI1NyBjIC0yOS45NjU0MiwtNC40NzUwNSAtMzYuNDIzNjYsLTI5Ljk4OTYxIC0xMy40ODc0MiwtNTMuMjg0NzIgMTYuNjYxNDEsLTE2LjkyMjEgMzYuMDYyMjEsLTE4LjM4NzA2IDUwLjMwNTE1LC0zLjc5ODU0IDI4LjE4Mjc2LDI4Ljg2NjUzIDUuODcxNTMsNjMuNDU4NDkgLTM2LjgxNzczLDU3LjA4MzI2IHogbSAzNzkuOTMyNDIsNDAuNDg5ODMgYyA1Mi4zMjQwOSwtOC43ODk0IDg1LjEzMjA5LC02OC45NDMxNyA2My41NTU0MiwtMTE2LjUyOTQ5IC01MC41MjIzNiwtMTExLjQyNDY3IC0yMzEuOTY4NzgsLTU3Ljg5ODMxIC0xOTIuMTc2LDU2LjY5MTU3IDE3LjAxMzIzLDQ4Ljk5MjQyIDYzLjc0ODYxLDcwLjczNTAyIDEyOC42MjA1OCw1OS44Mzc5MiB6IE0gNjAxLjUsOTkxLjU5ODc4IGMgLTIzLjMyMzMzLC01Ljc0MjgxIC0zMC44ODg1NiwtMjcuMDU3MTggLTE4LjM5MDkzLC01MS44MTQ4NCAxNS42MjUzMSwtMzAuOTUzNTggNDkuMDU4NDcsLTMwLjU4ODM3IDY1LjU1MjIyLDAuNzE2MDYgOS45NjE4MywxOC45MDcxMSA3LjcwMzUxLDI1LjIwNzY4IC04LjQ1MTQ4LDIzLjU3OTA5IC0xNC41Mjk1NCwtMS40NjQ3MyAtMTkuMjk2NzQsMC42MTIzIC0xMi4xOTM4NSw1LjMxMjc3IDUuMTc1NywzLjQyNTEyIDExLjc5NDgyLDkuMzg2MDYgMTMuMDcxNjgsMTEuNzcxODkgMy45ODk4Niw3LjQ1NTEzIC0yMi45MDE2NSwxNC41NDM1NSAtMzkuNTg3NjQsMTAuNDM1MDMgeiBNIDU0My4zMDkxNSw2NDkuNDMwOTkgYyAwLjczNjE5LC0yLjU3ODE1IDAuMzg2ODUsLTMuODQwODkgLTIuMTg0MTksLTcuODk1IC0xOS42NTEyMiwtMzAuOTg2NzYgMi4yNzU5NywtNzQuMDQ4NTEgMzMuMzE3MzQsLTY1LjQzMDMxIDEyLjY5NzUzLDMuNTI1MjkgMTIuNzQwOTEsMTAuNTM4IDAuMjM0MywzNy44NzQ2NCAtMTEuODEzNDEsMjUuODIxNDcgLTEwLjkwNzk1LDMwLjUxOTY4IDUuODgxOSwzMC41MTk2OCAxMS44ODY2NSwwIDExLjMzNjU3LDAuODIyMjkgMTIuNDQ4NDksLTE4LjYwODkyIDIuODU3NzcsLTQ5Ljk0MDc4IDE3LjkxNjMyLC02Ni43OTEzIDQ5Ljk5MzAxLC01NS45NDIxNSA4LjMyNDYyLDIuODE1NiA4LjQ2NjkyLDIuOTgyODYgMTAuOTgwMTIsMTIuOTA1OTQgOS42NDExNSwzOC4wNjcwNyAyMi43ODg4OSw0OC44NjcyMiA1Ny41MTk4OCw0Ny4yNDk0MiAyNC42MzYyMSwtMS4xNDc1OCAzMC4xMTYwMiwtNi4zNjg3NCAzOS41NDk1MywtMzcuNjgyNzMgOC4wMzEsLTI2LjY1ODQ2IDEzLjU5NjgsLTMzLjE5MTc1IDMwLjIxMTQ4LC0zNS40NjMwNSAzLjk4MTQ1LC0wLjU0NDI4IDkuMjYzOTksLTEuNDEzMDEgMTEuNzM4OTksLTEuOTMwNSAxMC40OTUyMywtMi4xOTQ0NSAyMC44OTI0NCwtMC42NDc5OSAyMy42MTg4NCwzLjUxMzAyIDIuMzIwNTQsMy41NDE2IDMuNjgyODMsMS45NTAzMiAzLjE0MjcsLTMuNjcwOTYgQyA4MTkuMjkzNTksNTUwIDgxOS4yOTM1OSw1NTAgODU4LjExMTYxLDU1MCBjIDM3LjM3ODIsMCAzOC44NTY0OSwtMC4wNzE5IDM5Ljg1NTAyLC0xLjkzNzY1IDAuODk2MjcsLTEuNjc0NjkgMi40OTU2NCwtMi4wMTA2IDExLjc4NTE4LC0yLjQ3NTIyIDIyLjEwNTgyLC0xLjEwNTYzIDI3LjcyNjU1LC0xLjcyNjYgMjkuNDE5MzIsLTMuMjUwMjIgMS4yOTg1NSwtMS4xNjg3OCAzLjg1MDc4LC0xLjQ0MDcgMTEuNDQ3MTgsLTEuMjE5NTkgOS43NzYwMywwLjI4NDU0IDkuNzc2MDMsMC4yODQ1NCAxMC45ODcwMSwtNC4xNjYzOSAwLjY2NjAzLC0yLjQ0ODAxIDIuMTEzMzIsLTYuOTI1OTMgMy4yMTYxOSwtOS45NTA5MyAxLjYwMDg1LC00LjM5MDg4IDIuMTQ1NDQsLTkuMjMwNjkgMi43MDA1NywtMjQgMC43NTk1NiwtMjAuMjA4NjggMS40NjMxNiwtMjYuNjUzNDggNC4xNDg1NSwtMzggMi4xNTM2LC05LjA5OTU3IDIuMjA3NzQsLTY5Ljc4NDA3IDAuMDgzNCwtOTMuNSAtMS4zMjU3NywtMTQuODAwODIgLTI4LjYzNDM4LC0yMC4zNTk4NiAtNDguODUxNzMsLTkuOTQ0NDMgLTMuMzM2OTcsMS43MTkxMiAtODQuMzAyMzEsMTEuMzE2ODcgLTE0Ni45MDIzMSwxNy40MTQgLTYzLjI5MzExLDYuMTY0NjUgLTE0My4xMzc1NSwxMi4wMjA3OSAtMTg2LDEzLjY0MjA2IC0xMS40MDQzOCwwLjQzMTM3IC0xOC40MjM4MywxLjEyODExIC0yMC4xNTIyNSwyLjAwMDI4IC0yLjI2ODc0LDEuMTQ0ODMgLTMuNDI1NSwxLjA5Mjc5IC04LC0wLjM1OTg5IC0zLjU4ODMxLC0xLjEzOTUxIC04LjgwMjMxLC0xLjcwNzA5IC0xNS44NDc3NSwtMS43MjUxMyAtMTAuMjcwMzcsLTAuMDI2MyAtMTAuNDk4MjEsLTAuMDc2NiAtMTAuNDE4MTEsLTIuMzAwMDMgMC4xMDg2NywtMy4wMTY4MiAwLjIzNDQxLC0zLjAwMDkyIC0yOS4wODE4OSwtMy42Nzc4NCBDIDI3MS45ODA5LDM4MS4xMzM5IDExNC44Mzc0NiwzNzMuMDQ3MTMgMjkuOTA1MDkyLDM2Mi4wMjI5MyAyMC4wMTMwNzksMzYwLjczODk1IDE5LDM2MC43NzAxOSAxOSwzNjIuMzU5MjEgYyAwLDIuNzgwNyA4LjA5NjcxMiwxMC40NzIyOCAxNC40OTY0NzYsMTMuNzcxMTEgOC4wNTMyMTEsNC4xNTExMyA4LjE3NDYwNSw1Ljk2OTg3IDAuNDkxOSw3LjM2OTY4IC04LjIzNjc0NCwxLjUwMDc2IC03Ljk4ODM3OCwwLjUyNzg5IC00Ljc1NDYwNCwxOC42MjQyOSAxMi45NzI2OTIsNzIuNTk2MDMgMzIuMDQ0NTE4LDg5LjAyOTU4IDcyLjMwNzIyOCw2Mi4zMDQ3MSAxOS4xNTkzNCwtMTIuNzE3MjQgOTYuNTI0MTQsLTIzLjEyNzAyIDIwNy41ODMsLTI3LjkzMTIzIDg4LjUzNTA4LC0zLjgyOTg3IDY4LjY3MDM1LDEuNzk0ODcgLTQ3LjYyNCwxMy40ODQ4NCAtNTcuMjg1NzQsNS43NTgzOSAtODQuMjEzODksOS40Nzc4MyAtMTEyLDE1LjQ2OTk2IC02LjA1LDEuMzA0NjkgLTE0LjE1OTc5LDIuNjAxODEgLTE4LjAyMTc2LDIuODgyNDggLTMzLjYzOTkwNywyLjQ0NDgxIC02NS43NTk2NjUsNDIuOTU4MjQgLTQ4Ljg3NTEzNyw2MS42NDczOSA0Ljk5MDU4NCw1LjUyMzk4IDEyLjIwOTc0Miw4LjAxMzUgMjYuMDI1MTA3LDguOTc0NzMgNi4xMjA1MiwwLjQyNTg0IDExLjU1MjI5LDEuMDM2MzUgMTIuMDcwNTksMS4zNTY2OCAwLjUxODMsMC4zMjAzMyA2Ljk4NTYxLDEuNjg4NDIgMTQuMzcxNzgsMy4wNDAyIDE1LjczMTczLDIuODc5MTUgMTguOTM4OTEsMy45NjYyNCAxOS42NDI4Miw2LjY1Nzk5IDAuNDc0MDIsMS44MTI2NyAxLjM4MDU3LDEuOTg3OTYgMTAuMjgxMjYsMS45ODc5NiA4Ljg2MDkxLDAgOS44OTIzLDAuMTk3MTUgMTEuMTgwNDIsMi4xMzcxNiAxLjE4NTQ5LDEuNzg1NDUgMi42ODA0MiwyLjIxODEyIDkuMDgzNzgsMi42MjkwNiA1Ljc4NTczLDAuMzcxMyA4LjA3OTg0LDAuOTUwNTYgOS4zNTc5MywyLjM2Mjg0IDEuMDg2MjksMS4yMDAzMiAzLjA1MDIzLDEuODcwOTQgNS40NzkxOCwxLjg3MDk0IDIuMDgyMywwIDQuMDY0MTEsMC40NSA0LjQwNDAzLDEgMC4zMzk5MiwwLjU1IDIuOTI0OTcsMSA1Ljc0NDU3LDEgMy45NDA3NSwwIDUuNjc5OTksMC41MjA0MyA3LjUxOTM1LDIuMjUgMi4yODgyMiwyLjE1MTY1IDMuMjU5ODEsMi4yNjQxNiAyMi4yMjY0NCwyLjU3NCAxOC4wNzM2OCwwLjI5NTI2IDE5Ljk4ODI3LDAuNDk0OTEgMjEuNTc2NjEsMi4yNSAxLjgxMTczLDIuMDAxOTUgMTEuNDMzMDMsMi44ODMzIDExLjQzMzAzLDEuMDQ3MzIgMCwtMy41MDQyMyAxNy4yNjIxOSwtNi40MTg0NCAzOS41LC02LjY2ODQgMTUuOTQ1NjEsLTAuMTc5MjMgMjEuOTIxOTMsLTAuNjQ3MTMgMjkuNDgwNzcsLTIuMzA4MSAxMi41NTkyMSwtMi43NTk3NCAxMi45NzQ3OSwtMi4xMTg2NiA2LjA2NDU0LDkuMzU1MTggLTEuNjU2MjIsMi43NSAtMy40NDM5Miw1Ljk3NTk1IC0zLjk3MjY3LDcuMTY4NzcgLTAuNTI4NzUsMS4xOTI4MiAtMi4xODk4NywyLjc2NzgyIC0zLjY5MTM3LDMuNSAtMS41MDE1MSwwLjczMjE4IC00LjUxNDI1LDMuOTUyMTQgLTYuNjk0OTksNy4xNTU0NyAtMy4wMTg0Miw0LjQzMzgxIC01LjE4NTA2LDYuNDAxMzMgLTkuMDc1NjQsOC4yNDE1NyBDIDMwNy44MjkyNSw2MDUuNTAzMzkgMjk0LjIwODA4LDYxOSAzMDIuOTc4NjUsNjE5IGMgMi4yNTA0NCwwIDUuMTY2NiwwLjcwNDI5IDYuNDgwMzQsMS41NjUwOCAyLjE2NzM2LDEuNDIwMTEgMi42Njg5NiwxLjQyMDExIDUuNDE1MTUsMCAxLjY2NDYsLTAuODYwNzkgMy42NTk5MywtMS41NjUwOCA0LjQzNDA2LC0xLjU2NTA4IDAuNzc0MTQsMCAzLjEzNDkyLC0yLjgxMjUgNS4yNDYxOSwtNi4yNSA2LjY1MDAyLC0xMC44MjczOCAzNC4zMTIxOCwtMzYuNTA1OSAzNy44NTk1NCwtMzUuMTQ0NjUgMS4wMzc1NCwwLjM5ODE0IDEuODQ3MDcsLTAuMTM2NjggMi4zNzc1NiwtMS41NzA3NCAwLjc0NzM0LC0yLjAyMDIzIDEuNTgxMDQsLTIuMTk4NzIgMTEuNzU2NDQsLTIuNTE2OTQgMTIuODk5LC0wLjQwMzQgMjEuNTI3NTQsLTEuMzc3OTQgMjMuMDMxMzUsLTIuNjAxMjQgMC42NTIxMSwtMC41MzA0NiAzLjc0MTA3LDAuMTUwNzIgNy44MDQ0MywxLjcyMTA2IDExLjU2MTkyLDQuNDY4MjQgMTIuNDA3MDIsOS40NTUyNyAyLjQ5Mzg3LDE0LjcxNjY1IC0xNy41MzAxLDkuMzA0MDggLTIwLjQ5NzkxLDI5LjQzNTAxIC02LjY1NzUxLDQ1LjE1ODUzIDExLjkyNjc1LDEzLjU0OTUgMzEuOTYzOTMsMTAuODMwNTQgMjAuNjIxODksLTIuNzk4MyAtMjEuNjIxMDYsLTI1Ljk4MDMzIC02LjQ3NDMyLC00Ny43MDUwMiAzOS4xNTk2OCwtNTYuMTY2MDMgMjkuMDkyMTYsLTUuMzkzOTggNzEuNzc2MzgsMy44MzYzNyA2My45MjEwOCwxMy44MjI3OCAtNi44MTg1NSw4LjY2ODM4IC02LjgxNDI0LDIwLjc1MjM3IDAuMDE3Myw0OC42MDM3OSAxLjY4Mjk2LDYuODYxMiAzLjA1OTkzLDEzLjUyMDE4IDMuMDU5OTMsMTQuNzk3NzIgMCw0LjEyNDg0IDEyLjA5NjQsMi45MDU0NSAxMy4zMDkxNSwtMS4zNDE2NCB6IG0gMTQ2LjU3MzEzLC0zNS44MTE1NyBjIC0yOC45ODQxMiwtMTAuMzU3NDggLTI4LjY0OTk5LC00Mi4zNDY3MSAwLjQzMzUzLC00MS41MDU2MiA4LjExNzAxLDAuMjM0NzQgOS44ODEzOCwtMC4wNDQyIDE1LjE4NDE5LC0yLjQwMDM2IDIwLjY4NTM2LC05LjE5MTA4IDQwLjEzMDczLDUuOTI4ODYgMzQuMTIyMjgsMjYuNTMyMSAtMy41MzU0OCwxMi4xMjMzIC0xMC42MDA2NywxNi42ODc1OCAtMjcuNjIyMjgsMTcuODQ0NjUgLTE1LjY5OTEzLDEuMDY3MTcgLTE3Ljk0NzkzLDEuMDE5MzEgLTIyLjExNzcyLC0wLjQ3MDc3IHogTSAxMDUsMjg2LjE0MzggYyAwLC0xLjAyMDkxIDEuNTA3MjQsLTMuODMzNDEgMy4zNDk0MywtNi4yNSBDIDExMi45NzQyNSwyNzMuODI2OTQgMTE1LDI2OS42MjgwMiAxMTUsMjY2LjEwODY4IGMgMCwtMy45MDkwOCAtMS4zMzI5OSwtMy40MDY2NyAyMi42MTY2NCwtOC41MjQyMyA1My41ODQ2NywtMTEuNDQ5OTkgNzYuNTM1OTMsLTE0LjM5Mjk5IDExNy41NTcxMSwtMTUuMDc0MTUgMjE2LjM3NTk5LC0zLjU5Mjk1IDI3OS44ODU5OCwtNS41NzgzNSAzNDguNjU2ODksLTEwLjg5OTQ0IDE3LjUwMDEsLTEuMzU0MDYgMTcuNDY4MDUsLTEuMzYzIDIyLjI3MzY5LDYuMjE0NyAxMC4zODY1NiwxNi4zNzc5MSAtMTkuMDIyNDQsMjcuMTQyOTkgLTY0LjYwNDMzLDIzLjY0ODIxIC00LjQsLTAuMzM3MzUgLTI1LjMyNSwtMC43NDM1OSAtNDYuNSwtMC45MDI3NiAtMzguNSwtMC4yODkzOCAtMzguNSwtMC4yODkzOCAtNTkuNDA2NzQsLTQuNDk5NjEgLTMwLjUxODcsLTYuMTQ1ODkgLTM5LjQ1NTk0LC01Ljc4OTIxIC00OC4yNDIyOCwxLjkyNTMgLTQuMTIwODQsMy42MTgxNCAtMi44MDMxNiwzLjYwNTMgLTEyLjY4MTAyLDAuMTIzNTMgLTI0Ljk3MjE4LC04LjgwMjI4IC01NS44NjU0NywtOS4zNDEzIC0xMDUuNjY5OTYsLTEuODQzNzIgLTE2Ljc3NSwyLjUyNTMxIC0zNi4zNSw1LjA4NzQ3IC00My41LDUuNjkzNyAtMzcuMTQ4ODIsMy4xNDk3MiAtNzEuOTg3MjcsOS41ODc1NyAtMTE2LjY3ODgsMjEuNTYxMjQgQyAxMTAuMjQxMjgsMjg4LjUwOTM0IDEwNSwyODkuMDg0MTMgMTA1LDI4Ni4xNDM4IFoiCiAgICAgICBpZD0icGF0aDM1MTkiCiAgICAgICBpbmtzY2FwZTpjb25uZWN0b3ItY3VydmF0dXJlPSIwIiAvPgogICAgPHBhdGgKICAgICAgIHN0eWxlPSJmaWxsOiMwMDhlY2YiCiAgICAgICBkPSJNIDUxMC41LDE0MDUuMzY1NiBDIDM3OC45MTMzOSwxMzk4LjMyIDMxNi4yNjk4NCwxMzg3Ljk3MDkgMjUxLDEzNjIuNDk0OCBjIC0yOC4zODg4OSwtMTEuMDgwNyAtMjguNDYyODMsLTExLjEyOTQgLTMxLjM2MzAzLC0yMC42NDY3IC0xNy41Nzk4LC01Ny42OTAxIC0zNS45MTYyMywtMTMyLjQyIC01MS4yNDA1LC0yMDguODMgQyAxNTkuNDgzNTksMTA4OC41NzY2IDE1Ni40MDY3NSwxMDc0LjczNTIgMTM4LjU5Miw5OTguOTQwNzggOTMuNDAwMjg3LDgwNi42Njg1NiA4Mi4wMzMwMTUsNzI3LjY5OTI0IDk3LjA4MDk5Miw3MTAuNTYwNTQgYyAzLjY5MjQ5OCwtNC4yMDU1MiA0LjE5Mjk3OCwtMTIuMjk1NzUgMC45NDc2ODksLTE1LjMxOTE5IC0xLjQ1NzczMywtMS4zNTgwOSAtMi4yMTIwMTYsLTMuOTg3OTcgLTIuODk1MjAyLC0xMC4wOTQ0MiAtMC41MzA0NzcsLTQuNzQxNDkgLTEuNTY1MzQyLC04Ljk3OTQyIC0yLjQzMDI5MSwtOS45NTIzOSAtMS45MjEyOTIsLTIuMTYxMjQgLTIuNjY1MTk1LC04LjUwMjYzIC0zLjUxNzMzOCwtMjkuOTgzNDYgLTAuNTM1MTEsLTEzLjQ4OTA2IC0xLjAwNTAzNCwtMTcuNDg1NjQgLTIuMTM4MTA0LC0xOC4xODQwMSAtMi4wMzk5NDEsLTEuMjU3MzMgLTMuMDQyNTE1LC0wLjM1MTY0IC0zLjA3OTU0OSwyLjc4MTk1IEMgODMuODU5MjM0LDYzOS4wMjg3MiA3NS43MjA0MjEsNjE0LjcxODM5IDcwLjk3NTM5LDU5MSA1Ni40MjA2NSw1MTguMjQ3MDQgMzAuNjg1MjM2LDQ1Mi45MTc0NyA0MS41ODMzMDcsNTE2LjM4Nzk1IDQzLjM3NjY1MSw1MjYuODMyNCA0OC42MjQ1NjgsNTQ3LjcyODU1IDU2LjM2MzkzLDU3NS4yNDE0MyA2Mi45ODUzOTYsNTk4Ljc4MDI2IDY2LjY5MjM1Nyw2MTYuNzA1NTIgNjcuODk0ODU2LDYzMSA3MS43MjY1NDQsNjc2LjU0ODQ2IDQ3LjI2NTg2Niw1ODUuMDE5MzggMzQuNDg5MjQ1LDUwNiAxNi45ODA5NjQsMzk3LjcxNjc5IDEyLjAyMzgyNiwzNzIuMTE4MDYgMi4zNDM3MDE3LDM0MCAtMS44MzUzMDgzLDMyNi4xMzQzIDAuMTYwNzE0MDksMzE4Ljg4NDgyIDExLjM4NzU2NywzMDcuMTUzMDIgMzUuMDA5OTM4LDI4Mi40NjgxOCA4OC41MDUyNzksMjY4LjcyMzYgODQuNTgwNDkzLDI4OC4zNDc1MyA4Mi45NjAxOTMsMjk2LjQ0OTA0IDcyLjIzNDk3NCwzMDEuNTUxMjkgNDUuMDU3OTMsMzA3LjE0OTQgMTYuOTQ1NDk5LDMxMi45NDAxOSAxNC4wOTgxNDQsMzE3Ljc3ODE3IDI5LjcxODI1MywzMzMuMjEzMjYgNDIuMDI1Nzk1LDM0NS4zNzUwMyAxMDkuMjI2NDQsMzU4LjA4MDE0IDE4NywzNjIuOTQ5MzIgYyAxNC40NjMzOSwwLjkwNTUxIDMxLjM2MjAxLDEuNDc5OTUgMTIwLDQuMDc5MiAxMTkuMzIzLDMuNDk5MDcgMjI5LjYwMzU1LDQuNDAwNDUgMjU3LjUsMi4xMDQ2NyAzMi40NDE2NywtMi42Njk4MyAzNi4xNzk1LC0yLjY4MTYgNDAuNzIyNjEsLTAuMTI4MjMgMy42NTAzMiwyLjA1MTU5IDQuNTcwMjcsMi4xNzkyNyA4LjY4MDIyLDEuMjA0NzEgNC4zODc2OSwtMS4wNDA0MiA3Ljc2NTA1LC0wLjg4ODQzIDMxLjIzMzQ2LDEuNDA1NTcgNC43MTQ3MSwwLjQ2MDg1IDYuNTM1NTIsMC4xMjU1MyAxMS4xMzU4OSwtMi4wNTA3OSA0LjcwOTksLTIuMjI4MTQgNS45MTA4NSwtMi40Mzc3NSA4LjM2MzcsLTEuNDU5OCA1LjYyNzAxLDIuMjQzNDkgNzQuNzc0MTUsMS41MjgwNyA5Ny4zNjQxMiwtMS4wMDczNSA2NS40NDc3MywtNy4zNDU2NSAxNDIuODMyMDYsLTI1LjE5NjM5IDE2OC41NzY3MywtMzguODg2NjggMy4wMzA4OCwtMS42MTE3MyAyMi45NDM0NywtNi40MzgyMSAzNS45MjMyNywtOC43MDcyIDEyLjYzNTQ1LC0yLjIwODggMjAuNjE2MjksLTQuMDk4NjEgMjUuNzk2OTIsLTYuMTA4NTQgOC43NzI3OCwtMy40MDM1OCAxMC44NDkzOCw0My4wMjE5NyA0LjE2MTcsOTMuMDQwMSAtMy42NTQ3NiwyNy4zMzQzIC00LjQ2ODQsMzIuNjMyMjcgLTYuMzgzMzcsNDEuNTY1MDIgLTEuMTIwMTEsNS4yMjUgLTIuNjY0ODIsMTIuNDI1IC0zLjQzMjY3LDE2IC0xMS4wODM3OSw1MS42MDQxIC0yMC42MjgyNSwxNTQuMTkzNDQgLTI5LjYzMTgzLDMxOC41IC02LjUzNjczLDExOS4yODg2OSAtOS42ODIsMTYzLjQ2OTE2IC0xNS45ODI1MSwyMjQuNSAtMS4wNTA0MiwxMC4xNzUgLTIuMTg0MDUsMjIuNzc1IC0yLjUxOTE5LDI4IC0yLjk1NDg0LDQ2LjA2OCAtOS41NzgxMSwxMDEuNTY2NiAtMjEuMDM0NjIsMTc2LjI1NjIgLTMuNTU0OTUsMjMuMTc2MiAtNC4yOTczNywzMC4yNTg5IC0zLjgyNTk3LDM2LjUgNC44NDc1Niw2NC4xNzg5IC0yNC43NzQwNywxMTEuOTczMiAtNzQuMTQ4NDYsMTE5LjYzODEgLTQuOTUsMC43Njg0IC0xNi45MjA5NSwzLjY5NiAtMjYuNjAyMTIsNi41MDU2IC00OC45MTQ1NywxNC4xOTYgLTEwNC40MDcyLDIyLjY2OTEgLTE3Ny4zOTc4OCwyNy4wODY0IC00Ny4yNDg0MSwyLjg1OTUgLTExMS40MDUzNSw1LjEwNzIgLTEyNSw0LjM3OTMgeiBtIC00LjMzNTMzLC0xNC4xMzAzIGMgMy42NzA1NSwtMy42NzA1IC03LjE3MDAyLC01LjQxNzggLTU0LjE2NDY3LC04LjczMDEgLTExLjI3NSwtMC43OTQ3IC0yNi4xMjUsLTIuMTE0OSAtMzMsLTIuOTMzOCAtMzcuNTYxMDcsLTQuNDc0IC02Ny4zMjMyMiwtNC43MyAtNTYuMzEwMTcsLTAuNDg0MyAxOS45NjIxNCw3LjY5NTcgMTM3LjkzODE3LDE3LjY4NDkgMTQzLjQ3NDg0LDEyLjE0ODIgeiBNIDI2NiwxMzM5LjYyNTggYyAwLC0yLjU4MzggLTE3Ljg1MzUzLC03NC4wOTY3IC0yMi4zNzU1LC04OS42MjU4IC04LjM0MzEzLC0yOC42NTE0IC0yMy4xNTY5NCwtNjQgLTI2LjgyMTAxLC02NCAtMy40MjYxMywwIDUuMDc0MjQsNDguNjQzMiAxMy4yODA5NCw3NiAxMC44MTk2LDM2LjA2NjggMzUuOTE1NTcsOTAuMzA3OCAzNS45MTU1Nyw3Ny42MjU4IHogbSAtMzAuODY4MzEsLTQuMjA4MyBjIDMuNDY5NTMsLTE2LjAyNDQgLTEuNTU4MTcsLTQxLjE4NjEgLTE4LjY2NjI5LC05My40MTc1IC05LjQwNDA2LC0yOC43MTA4IC0xNi41NjM2MiwtNTQuMzU2NiAtMTguMDA2NDYsLTY0LjUgLTAuOTIzMDEsLTYuNDg4OCAtMS44OTI4LC03LjcxNTEgLTQuOTg2NjksLTYuMzA1NCAtOC45MzExNiw0LjA2OTMgLTcuNTUyMDEsMTguMzUxNyA2LjE1NDU2LDYzLjczNTkgMy41NTk3NCwxMS43ODY4IDcuMTYxNDUsMjUuOTYxOCA4LjAwMzgsMzEuNSA1LjM5OTk4LDM1LjUwMzYgMjQuNDIwMjIsODMuMjE2MiAyNy41MDEwOCw2OC45ODcgeiBtIDMzNy45ODE5NCwtMTQ4LjI3NDYgYyAxNS45MzY0NCwtMTAuMTA2NiAxOC43MjQzLC0zMy4yMzcyIDYuMTU4OTEsLTUxLjA5OTcgLTIwLjgzODEzLC0yOS42MjI3IC00Mi4yODA3MSwtMC40NTg5IC0yOS44Mjg0MSw0MC41NjkzIDMuNzcxMDYsMTIuNDI0OSAxMy43MDk4MSwxNi44NDY2IDIzLjY2OTUsMTAuNTMwNCB6IG0gLTUzLjQ1MjQzLC0yLjk4NTcgYyAxNy4zMjIwNCwtOC45MDc2IDIwLjIyODkzLC00Mi45MTc5IDUuMDM0ODMsLTU4LjkwNzIgLTkuMDc5OTYsLTkuNTU1MiAtMjIuNDA4Niw0LjI1ODQgLTI0LjgwODc1LDI1LjcxMTQgLTAuNTA2NzMsNC41MjkyIC0xLjM1MjY2LDEwLjEwMzMgLTEuODc5ODYsMTIuMzg2OCAtNC43MDY3MiwyMC4zODY4IDQuNzY4MjMsMjkuNDkyMSAyMS42NTM3OCwyMC44MDkgeiBtIC0zMzAuMjQ2MTcsLTM1LjczNzEgYyAyLjMyNDkxLC0xNS4wNDE4IC0yLjU0Nzk0LC00My4yNTExIC0xNS40NzU0LC04OS41ODg0IC00Ljk2MTA1LC0xNy43ODI0IC0xMC41Nzc4LC00MC4xMDg2IC0xMi40ODE2NiwtNDkuNjEzOCBDIDE1Ni44MzAyMyw5ODYuMTEzNjIgMTQ5LDk3MC40MzYzNiAxNDksOTg0LjI3NTI3IGMgMCw2Ljk4NTM2IDExLjA5NzQ2LDY3LjM4NzUzIDE2LjQ4NDc4LDg5LjcyNDczIDEuMzkyODIsNS43NzUgMy42NzY5NiwxOS43MjUgNS4wNzU4NSwzMSAzLjcxMjIzLDI5LjkyMDQgNi4wNjk4NywzOC44NzE4IDEyLjA5MDg4LDQ1LjkwNiA0LjUyMTQ3LDUuMjgyMyA1LjYyNTU3LDQuODc2NSA2Ljc2MzUyLC0yLjQ4NTkgeiBtIDI5OS45NjMyNiwtMzIuNDE3OCBjIDE3LjgyNTA1LC05Ljc4MyAzMi43NzY2NSwtMTAuMzY0OCA3Mi4xMjE3MSwtMi44MDY0IDUyLjExMjc0LDEwLjAxMTEgNzIuOTc1MjQsLTUuMDk0IDQ2Ljk3NTY4LC0zNC4wMTE3IC0xMC42NDY1OSwtMTEuODQxNiAtMjEuNzc5NjQsLTEzLjEyMzMgLTYwLjQ3NTY4LC02Ljk2MjUgLTI1LjgyMTIxLDQuMTExIC00OC4wNzM1Miw0LjQ1NzIgLTU3LjUsMC44OTQ3IC0xMS40NzEyLC00LjMzNTQgLTE4LjY3OTc5LC0yLjgyODkgLTI3LjUyOTUyLDUuNzUzMSAtMTUuMTM0NDcsMTQuNjc2NSAtNS4wMTIxOSwzNi43NjE4IDE4LjgyNjYyLDQxLjA3NjcgMC4xNjM0MSwwLjAzIDMuNTc0OTQsLTEuNzQ1MiA3LjU4MTE5LC0zLjk0MzkgeiBtIC02OC4xNTE4NSwtNjMuNDA3OCBjIDEwLjk5ODA3LC0yLjc4OTkgMTMuNzk0NDUsLTQuMDg3NiAzMS4wOTU2MSwtMTQuNDI5OCA1Ny4zNDQ1MywtMzQuMjc5MiA1Ny40NDI4NCwtMTE3LjM3MTY4IDAuMTc3OTUsLTE1MC40MDQwOCAtMy44NSwtMi4yMjA4MiAtOS40NzUsLTUuNDk1NzEgLTEyLjUsLTcuMjc3NTMgLTI3LjQ3MjIsLTE2LjE4MjA1IC01My44NjQ2MSwtMTUuMzA0MzggLTEwNywzLjU1ODI0IC05LjYyNSwzLjQxNjc5IC0xOC43NTk4NCw2LjE4NDc0IC0yMC4yOTk2NCw2LjE1MDk4IC0yLjA3NjY5LC0wLjA0NTUgLTMuMDM4NjcsMC41NjczMSAtMy43MjUyNSwyLjM3MzE2IEMgMzA4LjQ2NjAyLDg5My45MDQ0NiAzMDcuNjY0NjUsODk1IDMwNy4xOTQyNyw4OTUgMzA0Ljk0Mzk0LDg5NSAzMDAsOTAzLjk0MjUyIDMwMCw5MDguMDEyODggYyAwLDIuNTU0MDYgLTEuNTM4ODEsOC4wMDI2NCAtMy45NDcyLDEzLjk3NjE3IC0yOC44MDQ3NSw3MS40NDQzOSA0Ni45MjA3MywxNTAuNDU1ODUgMTI1LjE3MzY0LDEzMC42MDU0NSB6IE0gMzIwLjk0MTg5LDk5NS45OTI3MyBjIC0yNi41NzM0LC00LjUwMDkgLTMxLjYxMTE3LC0yOC41MTU3OSAtMTAuNjM4NjksLTUwLjcxNDMzIDE2LjIxODg0LC0xNy4xNjcwMiAzNC4zOTEyNiwtMTguODE4OTYgNDguNzI4MzMsLTQuNDI5NiAyOS4yMzg3LDI5LjM0NTM0IDYuMjMzMzEsNjIuNjUxMiAtMzguMDg5NjQsNTUuMTQzOTMgeiBtIDM4NC4wNzQ2Myw0Mi41MDgzNyBjIDYzLjUxOTc1LC0xMi42MzQzIDg5LjI4NTY5LC04Mi40NzMzIDUwLjcwOTMzLC0xMzcuNDQ4NDYgLTU4LjYyNTc4LC04My41NDc1OCAtMjAyLjkzOTQ5LC0zNC45NTk1MSAtMTg1LjY3NDg3LDYyLjUxMzcgMTAuMzIwNDcsNTguMjY3NjYgNjUuMjk3OTQsODguNzkxOTYgMTM0Ljk2NTU0LDc0LjkzNDc2IHogTSA2MDIuNDA3MDksOTkwLjk2OTQgYyAtMjcuNzMxNjksLTUuNDk4MTYgLTMyLjgxMjg0LC0zOS40NzY5NiAtOS40MjQ2MiwtNjMuMDI0NTIgMjAuNjI2NjUsLTIwLjc2NzE5IDQ5Ljk0NjU1LC04Ljc5MjgyIDU5LjQ5ODA4LDI0LjI5OTI1IDIuOTc1MzIsMTAuMzA4MjQgMS4xMjY1NCwxMS43NDUyOSAtMTQuMTQ2MDEsMTAuOTk1NjEgLTE3LjYxNDE3LC0wLjg2NDYzIC0xOS4wMTU3OSwwLjc0MTQgLTcuOTE0OTYsOS4wNjkyMSA4LjgwMDIxLDYuNjAxOSAxMS40MzEyLDkuOTYwOTkgOS41NjQwMiwxMi4yMTA4MSAtNC41Nzc3Nyw1LjUxNTg4IC0yNC43ODg5Niw4Ljk4NDkzIC0zNy41NzY1MSw2LjQ0OTY0IHogTSA2MDMuNSw3NDkuNTQwMTQgYyA3LjE1LC0wLjI5NDMxIDE0LjU3NSwtMC43OTgxIDE2LjUsLTEuMTE5NTMgMS45MjUsLTAuMzIxNDQgNC44NSwtMC43MzgyNyA2LjUsLTAuOTI2MjkgMS42NSwtMC4xODgwMiA1LjAyNSwtMC42MDA0NCA3LjUsLTAuOTE2NDggMi40NzUsLTAuMzE2MDQgNi4wNzUsLTAuNzczMjcgOCwtMS4wMTYwNyAxLjkyNSwtMC4yNDI4IDUuMDc1LC0wLjY5NjI3IDcsLTEuMDA3NzEgMS45MjUsLTAuMzExNDQgNC44NSwtMC43NjAxMyA2LjUsLTAuOTk3MSAzLjAzOTg2LC0wLjQzNjU3IDEzLjA0MjA2LC0yLjE3MTY2IDI4LjUsLTQuOTQzOTIgNjYuMjk1MTcsLTExLjg4OTUzIDExMi41MzA2MywtMzMuMjUyMTggMTYyLjEyNDkzLC03NC45MDgyNiAxLjQ0MzcxLC0xLjIxMjYzIDQuNTM0MTgsLTMuNzc5NzggNi44Njc3LC01LjcwNDc4IDIuMzMzNTIsLTEuOTI1IDYuMTQ0ODEsLTUuMyA4LjQ2OTUzLC03LjUgMi4zMjQ3MiwtMi4yIDcuMjY0NDUsLTYuNyAxMC45NzcxOCwtMTAgMy43MTI3MiwtMy4zIDkuMTA5NTMsLTguMjUgMTEuOTkyOSwtMTEgMTAuMzIyNjgsLTkuODQ1MiAyMS4zODExNiwtMTkuODI5MzkgMzAuNjg4MTYsLTI3LjcwNjk0IDIuNDA4NzgsLTIuMDM4ODEgNS43Mjk2LC00Ljg1OTI3IDcuMzc5NiwtNi4yNjc2OCAxLjY1LC0xLjQwODQxIDUuMTE5NTEsLTQuMjQwMjkgNy43MTAwMiwtNi4yOTMwNiAzLjMwMDU4LC0yLjYxNTQ1IDQuOTA3NTksLTQuNzE5MTggNS4zNzAyNywtNy4wMzAxOCAwLjU5Mzg2LC0yLjk2NjI2IDAuOTcwMDgsLTMuMjY3OTIgMy43NDE1OSwtMyAyLjQxOTgxLDAuMjMzOTEgMy4zNDQzMywtMC4yMjE1MSA0LjMwNjI3LC0yLjEyMTI4IDAuNjczNzEsLTEuMzMwNTIgMS45MzI5OCwtMi44MTUzOCAyLjc5ODM5LC0zLjI5OTY5IEMgOTQ3LjU0NCw1NzMuMTU1ODEgOTQ4LDU3MS4zODk4IDk0OCw1NjcuNjg3NDQgYyAwLC00LjQ0NzExIDAuMzMwNjMsLTUuMzU4MjQgMi4yNSwtNi4yMDAzMSAxLjIzNzUsLTAuNTQyOTIgMi4zODU3MiwtMS45Mzc5OCAyLjU1MTYsLTMuMTAwMTIgMC4xNjU4OCwtMS4xNjIxNSAxLjM2Nzc2LC0yLjU5ODc4IDIuNjcwODYsLTMuMTkyNTEgMS45NDkxMiwtMC44ODgwNyAyLjQ5Mzg0LC0yLjEwOTM2IDMuMDcxNzksLTYuODg3IDAuMzg2MzksLTMuMTk0MTMgMS4wMzExMiwtNi4yNTc1IDEuNDMyNzMsLTYuODA3NSAwLjQwMTYxLC0wLjU1IDEuMjA0MTgsLTIuOCAxLjc4MzUsLTUgMC41NzkzMSwtMi4yIDEuOTU2MjEsLTYuNDc1IDMuMDU5NzcsLTkuNSAxLjYwMjU2LC00LjM5Mjc5IDIuMTQ2NDYsLTkuMjI0MjQgMi43MDE4MywtMjQgMC43NTk1NiwtMjAuMjA4NjggMS40NjMxNiwtMjYuNjUzNDggNC4xNDg1NSwtMzggMi4xNTM2LC05LjA5OTU3IDIuMjA3NzQsLTY5Ljc4NDA3IDAuMDgzNCwtOTMuNSAtMS4zMjU3NywtMTQuODAwODIgLTI4LjYzNDM4LC0yMC4zNTk4NiAtNDguODUxNzMsLTkuOTQ0NDMgLTMuMzM3NSwxLjcxOTQgLTg0LjM0NzY2LDExLjMyMjIgLTE0Ni45MDIzMSwxNy40MTM1NiAtNDguMjQ2MTEsNC42OTgwMyAtMTEwLjA1OTQ3LDkuNTM1NjIgLTE1NCwxMi4wNTIyMiAtMTAuNzI1LDAuNjE0MjUgLTI2LjcsMS41NTU3MSAtMzUuNSwyLjA5MjE0IC0yMC44NDQ1OCwxLjI3MDYyIC0yNC4zODQ2MywxLjIyNjk3IC0yNi4yNTQzNSwtMC4zMjM3MSAtMS4wOTU2MiwtMC45MDg2NiAtNC45MzQyMywtMS4yNDU2NSAtMTIuOTkwNzEsLTEuMTQwNDQgLTEwLjg5LDAuMTQyMjEgLTExLjQxMTE3LDAuMDU2MSAtMTAuOTI0NTEsLTEuODA0ODkgMC44MTY5MSwtMy4xMjM4NiAtMS45NjEyLC0zLjUwOSAtMzAuMzMwNDMsLTQuMjA0NzkgQyAyNTcuNjIzNzgsMzc5LjU0Nzk2IDEyMi40NjYwMSwzNzIuNTY4NTQgMjguNTI2MjM0LDM2MC45ODMzNyAxOC4wNDYyMjksMzU5LjY5MDkyIDE4LDM1OS42OTQ5MSAxOCwzNjEuODkxODUgYyAwLDMuMDc1MjEgOC40MDU1NCwxMS41MTI2NiAxNC45Mzc0MSwxNC45OTQxMSA3LjMwNjYwMiwzLjg5NDM3IDcuNTE2MDk0LDQuNzk0MDIgMS4zMTI1OSw1LjYzNjgzIC05Ljg4NjIzNSwxLjM0MzEzIC05LjU5Nzc1MywwLjAzNTUgLTUuMjE0MTM0LDIzLjYzNDA4IDEyLjg3MzA1MSw2OS4zMDAxNCAzNC41MzkzMzcsODYuNjg5NDIgNzMuMzE1MzI0LDU4Ljg0MjYxIDExLjc4MzA5LC04LjQ2MTk3IDc3LjcxMzY1LC0xOS44NTc1NSAxMzguNjQ4ODEsLTIzLjk2NDM2IDI2LjYxNTI0LC0xLjc5Mzc3IDMxLjU4MTM1LC0yLjA1NzkyIDY3LC0zLjU2MzY5IDQwLjkwOTI1LC0xLjczOTIgNTAuNzY5NDIsLTEuODQwODUgNDkuNDM4MjQsLTAuNTA5NjcgLTEuMzEyMDEsMS4zMTIwMSAtMzcuNTIyMDksNi40MDA3OCAtNjcuOTM4MjQsOS41NDc2NyAtODkuMjk0NTIsOS4yMzg1MyAtMTAxLjE3OTgxLDEwLjc0NjEzIC0xMzMuNSwxNi45MzM5NiAtOS42MjUsMS44NDI3NSAtMjEuNTUsMy44NTMwNSAtMjYuNSw0LjQ2NzM1IC01My41Nzk1OTUsNi42NDkyIC03Mi4wMDIxMTUsNjguMTQ0IC0yMS41LDcxLjc2NzUgMTguMDI3NjEsMS4yOTM0NyA0Niw3Ljg5NTUzIDQ2LDEwLjg1Njk0IDAsMS4xOTIzMyAxLjkzMDU3LDEuNDY0ODIgMTAuMzc4MDMsMS40NjQ4MiA5LjQ5MDczLDAgMTAuNDk5MzUsMC4xODI3MiAxMS43OTcwNSwyLjEzNzE2IDEuMTg1NDksMS43ODU0NSAyLjY4MDQyLDIuMjE4MTIgOS4wODM3OCwyLjYyOTA2IDUuNzg1NzMsMC4zNzEzIDguMDc5ODQsMC45NTA1NiA5LjM1NzkzLDIuMzYyODQgMS4wODYyOSwxLjIwMDMyIDMuMDUwMjMsMS44NzA5NCA1LjQ3OTE4LDEuODcwOTQgMi4wODIzLDAgNC4wNjQxMSwwLjQ1IDQuNDA0MDMsMSAwLjMzOTkyLDAuNTUgMi45MjQ5NywxIDUuNzQ0NTcsMSAzLjk0MDc1LDAgNS42Nzk5OSwwLjUyMDQzIDcuNTE5MzQsMi4yNSAyLjI4NjY4LDIuMTUwMiAzLjI2NTMyLDIuMjY0MzMgMjIuMDY0NDUsMi41NzMgMTcuNTQwNzIsMC4yODggMTkuODg4MjksMC41MjQ4NiAyMS42NzE2NCwyLjE4NjU0IDIuNzQ0MjgsMi41NTcwNiAxMS4zOTQ4LDMuMDk1NjYgMTMuNjQxMTIsMC44NDkzNCAzLjU1MzUyLC0zLjU1MzUyIDE5LjExNzIxLC02LjA3Njg3IDM2LjUxMTAyLC01LjkxOTU0IDE0LjM2NDk4LDAuMTI5OTMgMzAuNjk3MzgsLTEuNDA1MzIgMzcuNTk3ODYsLTMuNTM0MjIgNC42NjQ4NywtMS40MzkxNyAtNS41MTQyOSwxOC42MjMzNyAtMTAuNSwyMC42OTQ5MSAtMS41MTI1LDAuNjI4NDQgLTIuNzU4NTUsMS42NTA1MiAtMi43NjksMi4yNzEyOSAtMC4wNTkzLDMuNTIxNDQgLTYuMjg1ODksMTAuNzk3MDkgLTExLjI0NDM2LDEzLjEzODc3IC00Mi43MzExOCwyMC4xODAxOCAtNDMuNDg4Myw2NC4wNjI4OSAtMS41NzUzOSw5MS4zMDk2NSAyNy4xNTA0NSwxNy42NDk5NyAzMi4yMTI1NywyMC43MjM4MyA0My44Mzg3NSwyNi42MjAxNCAyNy4zNzk3NiwxMy44ODU4NiA2My41MDYwOSwyNS4xNjM2IDkzLDI5LjAzMjI4IDIuNDc1LDAuMzI0NjUgNS42MjUsMC43OTEzMiA3LDEuMDM3MDYgMi45Mzg2MiwwLjUyNTE5IDEwLjQ2NTM1LDEuNDIwNyAxNy41LDIuMDgyMSAyLjc1LDAuMjU4NTYgNy4yNSwwLjY5NzQgMTAsMC45NzUyIDIuNzUsMC4yNzc4IDkuMTUyNTIsMC42MjkgMTQuMjI3ODMsMC43ODA0NSA1LjA3NTMsMC4xNTE0NCA5LjQyNTM5LDAuNDcyODMgOS42NjY4NywwLjcxNDE5IDAuNTc5NjMsMC41NzkzNiA2OC40Njk4OCwwLjE2MzczIDg1LjEwNTMsLTAuNTIxMDIgeiBNIDEwNiwyODUuNjQzOCBjIDAsLTAuNzQ1OTEgMS41MDcyNCwtMy4zMzM0MSAzLjM0OTQzLC01Ljc1IEMgMTEzLjk1NzIxLDI3My44NDkzIDExNiwyNjkuNjMwMjIgMTE2LDI2Ni4xNTgwNyBjIDAsLTIuMjIwNTggMC41NTEzLC0zLjA3NiAyLjI1LC0zLjQ5MTE5IDQ3LjgxMjQxLC0xMS42ODYxIDk1LjcxMjI5LC0xOC41MzgzIDEzNC4yNSwtMTkuMjA0OCAyMzQuNzUzNTEsLTQuMDU5OTcgMjg0LjM4NzYzLC01LjYwNDcyIDM1MC41LC0xMC45MDg0OSAxNy41ODcwMiwtMS40MTA5IDE3LjkxNTM3LC0xLjMzMzMzIDIyLjA2NzEyLDUuMjEzMjkgMTAuNzIyMTEsMTYuOTA3MDMgLTUuNTE1OTQsMjIuNzYzNDEgLTYyLjA2NzEyLDIyLjM4NDk3IC05MC4zMzYwNiwtMC42MDQ1MSAtODQuMTEzMzUsLTAuMzE1OTggLTEwNy4yNzAzNywtNC45NzM5NSAtMzAuNDgwMTYsLTYuMTMxIC00MC4wNDI5NiwtNS43MTAyIC00OS4zODA0NCwyLjE3MjkxIC0zLjE1MDgyLDIuNjYwMDYgLTMuMTUwODIsMi42NjAwNiAtMTMuNTUxNzksLTAuODIwMzMgLTI1LjgzOTk2LC04LjY0NjU5IC01MS41MTQyNSwtOC44MTI4NyAtMTA3LjI5NzQsLTAuNjk0OSAtMTkuMjUsMi44MDEzOSAtNDEuMDk0MDYsNS41NDAyMiAtNDguNTQyMzcsNi4wODYyOCAtMjUuOTQ2NzksMS45MDIyNCAtNTQuMTc2NjIsNy4xNDAwMiAtOTcuODg1NzksMTguMTYxOCBDIDExMC44NjczMiwyODcuMTk1NzcgMTA2LDI4OC4wMTQwOCAxMDYsMjg1LjY0MzggWiIKICAgICAgIGlkPSJwYXRoMzUxNyIKICAgICAgIGlua3NjYXBlOmNvbm5lY3Rvci1jdXJ2YXR1cmU9IjAiIC8+CiAgICA8cGF0aAogICAgICAgc3R5bGU9ImZpbGw6IzFiNmY5NSIKICAgICAgIGQ9Ik0gNTEwLjUsMTQwNS4zNjU2IEMgMzc4LjkxMzM5LDEzOTguMzIgMzE2LjI2OTg0LDEzODcuOTcwOSAyNTEsMTM2Mi40OTQ4IGMgLTI4LjM4ODg5LC0xMS4wODA3IC0yOC40NjI4MywtMTEuMTI5NCAtMzEuMzYzMDMsLTIwLjY0NjcgLTE3LjU3OTgsLTU3LjY5MDEgLTM1LjkxNjIzLC0xMzIuNDIgLTUxLjI0MDUsLTIwOC44MyBDIDE1OS40ODM1OSwxMDg4LjU3NjYgMTU2LjQwNjc1LDEwNzQuNzM1MiAxMzguNTkyLDk5OC45NDA3OCA5My41MTE5NCw4MDcuMTQzNiA4Mi4wMTE0MDgsNzI3LjQ0OTEyIDk2Ljk5Mzg1OSw3MTAuNjgwODQgYyA0Ljk3MDIwMSwtNS41NjI2MiA4Ljk2NzA1MSwwLjk2MTExIDEzLjM2Nzc4MSwyMS44MTkxNiAyNS4wOTQzNCwxMTguOTM5MjYgNjYuMTA5NzgsMjc0LjY1MzUgOTYuODAwMjUsMzY3LjUgMTEuNDgwMDksMzQuNzMwMiA5LjUzNTA5LDMxLjM5OTMgMTcuOTI0MTUsMzAuNjk2IDguNjk2OTYsLTAuNzI5MSA4LjgzNzExLC0wLjQyNzYgNC40OTc1Niw5LjY3NTkgLTguMDUxNDQsMTguNzQ1NyAtNC4wNzcwNCwyOC4yNDA5IDIxLjE2NjQsNTAuNTY4MyAxMC43MDQxOSw5LjQ2NzcgOS43MTQ5NywxMi4yNDU0IC0zLjY3Mzk5LDEwLjMxNjUgLTkuMjcyNzcsLTEuMzM1OSAtOC42NTEzLC0yLjYzMzkgLTUuMTkzNDYsMTAuODQ2OSAxLjYwNzc1LDYuMjY4IDMuODU5NjIsMTUuODk2NCA1LjAwNDE3LDIxLjM5NjQgMTcuNjEwMTQsODQuNjIzOCAzNS4yOTI3LDExNC42NzU5IDcxLjg5MjA0LDEyMi4xODMzIDExMy4xMDc3NSwyMy4yMDA4IDI0Mi4xODMwOCwyNy4yMDMyIDQxMi44NDA2NiwxMi44MDEzIDY3LjA0ODkyLC01LjY1ODIgMTE5LjI4NDA1LC0yNi40OTM0IDEzNS45OTQ5LC01NC4yNDQ1IDQuMzIwNTcsLTcuMTc1IDQuNDM3ODMsLTYuODQ1MiAtMi42OTkzOSwtNy41OTEyIC0xMS41MTk4NiwtMS4yMDQxIC0xMS4yMTcwMywtMy45OTU0IDAuOTgyMDQsLTkuMDUxOCAxOC4wNzU3LC03LjQ5MjMgMjMuNzE4MjQsLTEzLjM4NjQgMjMuNDM5MzIsLTI0LjQ4NDUgLTAuMTIxMDQsLTQuODE2MyAwLjU3NzA0LC04Ljc0MiAyLjY3ODU1LC0xNS4wNjMzIDcuMTMzOTIsLTIxLjQ1ODMgOC41ODIxMSwtMzguMTA3NyA2LjkyNDM0LC03OS42MDY3IC0xLjM5ODMyLC0zNS4wMDM5IC0wLjk3NTIzLC00OC45MDIxIDEuODg1NjIsLTYxLjk0MjYgNC40MTkyOCwtMjAuMTQ0MiA2Ljc3ODgyLC00MC4yMzU4IDEwLjY4NjkzLC05MSAyLjY0OTg2LC0zNC40MjAwOCA0LjYwNjYxLC01My43ODgwNiA2Ljk3MTEyLC02OSAyLjIyNTY1LC0xNC4zMTg2NSAzLjM2OTc4LC0yOS41ODcwOCA0Ljk4MzEzLC02Ni41IDEuODI3NzMsLTQxLjgxNzgzIDIuOTg1NDQsLTU3Ljg1NzU3IDUuNTkzNzksLTc3LjUgMy4yNDQxNCwtMjQuNDMwNDIgMy43OTYzMywtMjYuMjYwODYgOS43MDQyNSwtMzIuMTY4NzggOC40NjUxNCwtOC40NjUxNSA4LjIxNTMzLC0xNC40MDE5NiAtMS4xODM0OCwtMjguMTI1NzYgLTE0LjM0OTU1LC0yMC45NTI2NyAtMTQuMzYwMTUsLTMxLjkzNjIxIC0wLjA0MzYsLTQ1LjEzMjc5IDUuNDgyMSwtNS4wNTMyMiA1LjY1ODM3LC0xMi4zOTkyNSAxLjQ1MzQ3LC02MC41NzI2NyAtNC40NTEyNywtNTAuOTk2MDIgLTQuMzY3NDMsLTY3Ljc1MTU5IDAuMzM2NzQsLTY3LjI5NzE1IDIuNDEzODcsMC4yMzMxOCAzLjMzOTcxLC0wLjIyMzYgNC4zMDA5NSwtMi4xMjE5OSAwLjY3MzcxLC0xLjMzMDUyIDEuOTMyOTgsLTIuODE1MzggMi43OTgzOSwtMy4yOTk2OSBDIDk0Ny41NDQsNTczLjE1NTgxIDk0OCw1NzEuMzg5OCA5NDgsNTY3LjY4NzQ0IGMgMCwtNC40NDcxMSAwLjMzMDYzLC01LjM1ODI0IDIuMjUsLTYuMjAwMzEgMS4yMzc1LC0wLjU0MjkyIDIuMzg1NzIsLTEuOTM3OTggMi41NTE2LC0zLjEwMDEyIDAuMTY1ODgsLTEuMTYyMTUgMS4zNjc3NiwtMi41OTg3OCAyLjY3MDg2LC0zLjE5MjUxIDEuOTQ5MTIsLTAuODg4MDcgMi40OTM4NCwtMi4xMDkzNiAzLjA3MTc5LC02Ljg4NyAwLjM4NjM5LC0zLjE5NDEzIDEuMDMxMTIsLTYuMjU3NSAxLjQzMjczLC02LjgwNzUgMC40MDE2MSwtMC41NSAxLjIwNDE4LC0yLjggMS43ODM1LC01IDAuNTc5MzEsLTIuMiAxLjk1NjIxLC02LjQ3NSAzLjA1OTc3LC05LjUgMS42MDI1NiwtNC4zOTI3OSAyLjE0NjQ2LC05LjIyNDI0IDIuNzAxODMsLTI0IDAuNzU5NTYsLTIwLjIwODY4IDEuNDYzMTYsLTI2LjY1MzQ4IDQuMTQ4NTUsLTM4IDIuMTUzNiwtOS4wOTk1NyAyLjIwNzc0LC02OS43ODQwNyAwLjA4MzQsLTkzLjUgLTEuMzI1NzcsLTE0LjgwMDgyIC0yOC42MzQzOCwtMjAuMzU5ODYgLTQ4Ljg1MTczLC05Ljk0NDQzIC0zLjMzNzUsMS43MTk0IC04NC4zNDc2NiwxMS4zMjIyIC0xNDYuOTAyMzEsMTcuNDEzNTYgLTQ4LjI0NjExLDQuNjk4MDMgLTExMC4wNTk0Nyw5LjUzNTYyIC0xNTQsMTIuMDUyMjIgLTEwLjcyNSwwLjYxNDI1IC0yNi43LDEuNTU1NzEgLTM1LjUsMi4wOTIxNCAtMjAuODQ0NTgsMS4yNzA2MiAtMjQuMzg0NjMsMS4yMjY5NyAtMjYuMjU0MzUsLTAuMzIzNzEgLTEuMDk1NjIsLTAuOTA4NjYgLTQuOTM0MjMsLTEuMjQ1NjUgLTEyLjk5MDcxLC0xLjE0MDQ0IC0xMC44OSwwLjE0MjIxIC0xMS40MTExNywwLjA1NjEgLTEwLjkyNDUxLC0xLjgwNDg5IDAuODE2OTEsLTMuMTIzODYgLTEuOTYxMiwtMy41MDkgLTMwLjMzMDQzLC00LjIwNDc5IEMgMjU3LjYyMzc4LDM3OS41NDc5NiAxMjIuNDY2MDEsMzcyLjU2ODU0IDI4LjUyNjIzNCwzNjAuOTgzMzcgMTguMDQ2MjI5LDM1OS42OTA5MiAxOCwzNTkuNjk0OTEgMTgsMzYxLjg5MTg1IGMgMCwzLjA3NTIxIDguNDA1NTQsMTEuNTEyNjYgMTQuOTM3NDEsMTQuOTk0MTEgNy4zMDY2MDIsMy44OTQzNyA3LjUxNjA5NCw0Ljc5NDAyIDEuMzEyNTksNS42MzY4MyAtOS44ODYyMzUsMS4zNDMxMyAtOS41OTc3NTMsMC4wMzU1IC01LjIxNDEzNCwyMy42MzQwOCAxMi44NzMwNTEsNjkuMzAwMTQgMzQuNTM5MzM3LDg2LjY4OTQyIDczLjMxNTMyNCw1OC44NDI2MSAxMS43ODMwOSwtOC40NjE5NyA3Ny43MTM2NSwtMTkuODU3NTUgMTM4LjY0ODgxLC0yMy45NjQzNiAyNi42MTUyNCwtMS43OTM3NyAzMS41ODEzNSwtMi4wNTc5MiA2NywtMy41NjM2OSA0MC45MDkyNSwtMS43MzkyIDUwLjc2OTQyLC0xLjg0MDg1IDQ5LjQzODI0LC0wLjUwOTY3IC0xLjMxMjAxLDEuMzEyMDEgLTM3LjUyMjA5LDYuNDAwNzggLTY3LjkzODI0LDkuNTQ3NjcgLTg5LjI5NDUyLDkuMjM4NTMgLTEwMS4xNzk4MSwxMC43NDYxMyAtMTMzLjUsMTYuOTMzOTYgLTkuNjI1LDEuODQyNzUgLTIxLjU1LDMuODUzMDUgLTI2LjUsNC40NjczNSAtNTMuNTc5NTk1LDYuNjQ5MiAtNzIuMDAyMTE1LDY4LjE0NCAtMjEuNSw3MS43Njc1IDguNzUxNSwwLjYyNzkyIDQxLjAxMjk1LDYuNzIzMTQgNDMuOTc0NzMsOC4zMDgyNCAzLjQ0NDIsMS44NDMyOCAyLjUxMzUzLDQuODg4MTcgLTIuMDkxOSw2Ljg0NDEgLTQuMTE3MTcsMS43NDg1NyAtNC4xMTcxNywxLjc0ODU3IDAuMDcxNCw0LjUyMDQ2IDMuNDI5NDYsMi4yNjk1IDMuOTcyMjMsMy4wMzI2MSAyLjk5NDczLDQuMjEwNDIgLTEuODE3NjcsMi4xOTAxNiAtMi42OTc5NiwyLjAxMjIxIC0zMi41NzAyNSwtNi41ODM5IEMgODIuODQ0OTY4LDU0Ni4xNzY3NiA3NC43NTAyODcsNTQ1LjM4MTA5IDg1LDU1My41IGMgNy44NTEzNDgsNi4yMTkxNCA2LjgxODAwOCw4Ljc4ODI2IC0yLjQwODkzMSw1Ljk4OTE4IC04LjMyNjcwNCwtMi41MjYgLTcuODM0NDMsLTUuMDMzMDMgLTQuMDI3NDQsMjAuNTEwODIgMC45NDI2NjIsNi4zMjUgMS42NzUyNjgsMTMuMTg4ODYgMS42MjgwMTQsMTUuMjUzMDMgLTAuMDQ3MjUsMi4wNjQxNyAwLjU3ODUwMiw2Ljc4OTE3IDEuMzkwNTcsMTAuNSAzLjc4NjY1LDE3LjMwMzUgNC4xNDMxNywyOS4zMTk2MyAwLjczMTg3NSwyNC42NjcwNSBDIDc5Ljk1Mzg2NSw2MjcuMjAxMDMgNzQuMjUxNzE0LDYwNy4zNzY5NSA3MC45NzUzOSw1OTEgNTYuNDIwNjUsNTE4LjI0NzA0IDMwLjY4NTIzNiw0NTIuOTE3NDcgNDEuNTgzMzA3LDUxNi4zODc5NSA0My4zNzY2NTEsNTI2LjgzMjQgNDguNjI0NTY4LDU0Ny43Mjg1NSA1Ni4zNjM5Myw1NzUuMjQxNDMgNjIuOTg1Mzk2LDU5OC43ODAyNiA2Ni42OTIzNTcsNjE2LjcwNTUyIDY3Ljg5NDg1Niw2MzEgNzEuNzI2NTQ0LDY3Ni41NDg0NiA0Ny4yNjU4NjYsNTg1LjAxOTM4IDM0LjQ4OTI0NSw1MDYgMTYuOTgwOTY0LDM5Ny43MTY3OSAxMi4wMjM4MjYsMzcyLjExODA2IDIuMzQzNzAxNywzNDAgLTEuODM1MzA4MywzMjYuMTM0MyAwLjE2MDcxNDA5LDMxOC44ODQ4MiAxMS4zODc1NjcsMzA3LjE1MzAyIDM1LjAwOTkzOCwyODIuNDY4MTggODguNTA1Mjc5LDI2OC43MjM2IDg0LjU4MDQ5MywyODguMzQ3NTMgODIuOTYwMTkzLDI5Ni40NDkwNCA3Mi4yMzQ5NzQsMzAxLjU1MTI5IDQ1LjA1NzkzLDMwNy4xNDk0IDE2Ljk0NTQ5OSwzMTIuOTQwMTkgMTQuMDk4MTQ0LDMxNy43NzgxNyAyOS43MTgyNTMsMzMzLjIxMzI2IDQyLjAyNTc5NSwzNDUuMzc1MDMgMTA5LjIyNjQ0LDM1OC4wODAxNCAxODcsMzYyLjk0OTMyIGMgMTQuNDYzMzksMC45MDU1MSAzMS4zNjIwMSwxLjQ3OTk1IDEyMCw0LjA3OTIgMTE5LjMyMywzLjQ5OTA3IDIyOS42MDM1NSw0LjQwMDQ1IDI1Ny41LDIuMTA0NjcgMzIuNDQxNjcsLTIuNjY5ODMgMzYuMTc5NSwtMi42ODE2IDQwLjcyMjYxLC0wLjEyODIzIDMuNjUwMzIsMi4wNTE1OSA0LjU3MDI3LDIuMTc5MjcgOC42ODAyMiwxLjIwNDcxIDQuMzg3NjksLTEuMDQwNDIgNy43NjUwNSwtMC44ODg0MyAzMS4yMzM0NiwxLjQwNTU3IDQuNzE0NzEsMC40NjA4NSA2LjUzNTUyLDAuMTI1NTMgMTEuMTM1ODksLTIuMDUwNzkgNC43MDk5LC0yLjIyODE0IDUuOTEwODUsLTIuNDM3NzUgOC4zNjM3LC0xLjQ1OTggNS42MjcwMSwyLjI0MzQ5IDc0Ljc3NDE1LDEuNTI4MDcgOTcuMzY0MTIsLTEuMDA3MzUgNjUuNDQ3NzMsLTcuMzQ1NjUgMTQyLjgzMjA2LC0yNS4xOTYzOSAxNjguNTc2NzMsLTM4Ljg4NjY4IDMuMDMwODgsLTEuNjExNzMgMjIuOTQzNDcsLTYuNDM4MjEgMzUuOTIzMjcsLTguNzA3MiAxMi42MzU0NSwtMi4yMDg4IDIwLjYxNjI5LC00LjA5ODYxIDI1Ljc5NjkyLC02LjEwODU0IDguNzcyNzgsLTMuNDAzNTggMTAuODQ5MzgsNDMuMDIxOTcgNC4xNjE3LDkzLjA0MDEgLTMuNjU0NzYsMjcuMzM0MyAtNC40Njg0LDMyLjYzMjI3IC02LjM4MzM3LDQxLjU2NTAyIC0xLjEyMDExLDUuMjI1IC0yLjY2NDgyLDEyLjQyNSAtMy40MzI2NywxNiAtMTEuMDgzNzksNTEuNjA0MSAtMjAuNjI4MjUsMTU0LjE5MzQ0IC0yOS42MzE4MywzMTguNSAtNi41MzY3MywxMTkuMjg4NjkgLTkuNjgyLDE2My40NjkxNiAtMTUuOTgyNTEsMjI0LjUgLTEuMDUwNDIsMTAuMTc1IC0yLjE4NDA1LDIyLjc3NSAtMi41MTkxOSwyOCAtMi45NTQ4NCw0Ni4wNjggLTkuNTc4MTEsMTAxLjU2NjYgLTIxLjAzNDYyLDE3Ni4yNTYyIC0zLjU1NDk1LDIzLjE3NjIgLTQuMjk3MzcsMzAuMjU4OSAtMy44MjU5NywzNi41IDQuODQ3NTYsNjQuMTc4OSAtMjQuNzc0MDcsMTExLjk3MzIgLTc0LjE0ODQ2LDExOS42MzgxIC00Ljk1LDAuNzY4NCAtMTYuOTIwOTUsMy42OTYgLTI2LjYwMjEyLDYuNTA1NiAtNDguOTE0NTcsMTQuMTk2IC0xMDQuNDA3MiwyMi42NjkxIC0xNzcuMzk3ODgsMjcuMDg2NCAtNDcuMjQ4NDEsMi44NTk1IC0xMTEuNDA1MzUsNS4xMDcyIC0xMjUsNC4zNzkzIHogbSAtNC4zMzUzMywtMTQuMTMwMyBjIDMuNjcwNTUsLTMuNjcwNSAtNy4xNzAwMiwtNS40MTc4IC01NC4xNjQ2NywtOC43MzAxIC0xMS4yNzUsLTAuNzk0NyAtMjYuMTI1LC0yLjExNDkgLTMzLC0yLjkzMzggLTM3LjU2MTA3LC00LjQ3NCAtNjcuMzIzMjIsLTQuNzMgLTU2LjMxMDE3LC0wLjQ4NDMgMTkuOTYyMTQsNy42OTU3IDEzNy45MzgxNywxNy42ODQ5IDE0My40NzQ4NCwxMi4xNDgyIHogTSAyNjYsMTMzOS42MjU4IGMgMCwtMi41ODM4IC0xNy44NTM1MywtNzQuMDk2NyAtMjIuMzc1NSwtODkuNjI1OCAtOC4zNDMxMywtMjguNjUxNCAtMjMuMTU2OTQsLTY0IC0yNi44MjEwMSwtNjQgLTMuNDI2MTMsMCA1LjA3NDI0LDQ4LjY0MzIgMTMuMjgwOTQsNzYgMTAuODE5NiwzNi4wNjY4IDM1LjkxNTU3LDkwLjMwNzggMzUuOTE1NTcsNzcuNjI1OCB6IG0gLTMwLjg2ODMxLC00LjIwODMgYyAzLjQ2OTUzLC0xNi4wMjQ0IC0xLjU1ODE3LC00MS4xODYxIC0xOC42NjYyOSwtOTMuNDE3NSAtOS40MDQwNiwtMjguNzEwOCAtMTYuNTYzNjIsLTU0LjM1NjYgLTE4LjAwNjQ2LC02NC41IC0wLjkyMzAxLC02LjQ4ODggLTEuODkyOCwtNy43MTUxIC00Ljk4NjY5LC02LjMwNTQgLTguOTMxMTYsNC4wNjkzIC03LjU1MjAxLDE4LjM1MTcgNi4xNTQ1Niw2My43MzU5IDMuNTU5NzQsMTEuNzg2OCA3LjE2MTQ1LDI1Ljk2MTggOC4wMDM4LDMxLjUgNS4zOTk5OCwzNS41MDM2IDI0LjQyMDIyLDgzLjIxNjIgMjcuNTAxMDgsNjguOTg3IHogbSAtNDUuNzE2NjYsLTE4Ni45OTc0IGMgMi4zMjQ5MSwtMTUuMDQxOCAtMi41NDc5NCwtNDMuMjUxMSAtMTUuNDc1NCwtODkuNTg4NCAtNC45NjEwNSwtMTcuNzgyNCAtMTAuNTc3OCwtNDAuMTA4NiAtMTIuNDgxNjYsLTQ5LjYxMzggQyAxNTYuODMwMjMsOTg2LjExMzYyIDE0OSw5NzAuNDM2MzYgMTQ5LDk4NC4yNzUyNyBjIDAsNi45ODUzNiAxMS4wOTc0Niw2Ny4zODc1MyAxNi40ODQ3OCw4OS43MjQ3MyAxLjM5MjgyLDUuNzc1IDMuNjc2OTYsMTkuNzI1IDUuMDc1ODUsMzEgMy43MTIyMywyOS45MjA0IDYuMDY5ODcsMzguODcxOCAxMi4wOTA4OCw0NS45MDYgNC41MjE0Nyw1LjI4MjMgNS42MjU1Nyw0Ljg3NjUgNi43NjM1MiwtMi40ODU5IHogTSA0MDksMTI0Ny4zNjY1IGMgLTEuMzc1LC0wLjE5ODYgLTYuNTUsLTAuODQ5MyAtMTEuNSwtMS40NDYxIC00Ljk1LC0wLjU5NjcgLTIzLjYyNSwtMy45OTI1IC00MS41LC03LjU0NjEgLTM3LjE1MDgzLC03LjM4NTggLTU2LjI0MjA2LC0xMC4zMzYyIC02Ny4wMjc0OSwtMTAuMzU4NyAtMTEuOTQxNjgsLTAuMDI1IC0xNS44NjkwOCwtNS4yNzI5IC05LjA0OTQzLC0xMi4wOTI1IDQuOTk4NTEsLTQuOTk4NSAxNC42NzEzNiwtMy44ODM0IDQ0LjU5MjE0LDUuMTQwNyAyMC41MDQ1Nyw2LjE4NDEgMzUuNzc0NTQsOS44OTc5IDQ0Ljk0OTg2LDEwLjkzMjEgMy44NjkyLDAuNDM2MiAxMS41MzQ5MiwxLjc2MDcgMTcuMDM0OTIsMi45NDM1IDguMTk5NjgsMS43NjM0IDY2LjY1NTQ5LDkuMDYwNiA3Mi41ODE0NCw5LjA2MDYgMC45MjY5MSwwIDEuOTIwNjUsMC45IDIuMjA4MzEsMiAwLjQ5NDc5LDEuODkyMSAtNDEuMTIyMDUsMi45Nzk3IC01Mi4yODk3NSwxLjM2NjUgeiBtIDk0LjUsLTQ0LjczOTUgYyAtMTMuMzQyNDMsLTYuMjgwMyAtMTguMjA5OTMsLTE1LjczODQgLTIxLjAxMzYyLC00MC44MzE4IC0zLjc4NzA3LC0zMy44OTQ3IC05LjEyMTAxLC00MS40NTI3IC0zMi42MzUxMSwtNDYuMjQyOSAtNS41NjM3OCwtMS4xMzM0IC02LjQwMTEyLC0xOS4zMDI5IC0xLjM5MzY0LC0zMC4yNDA3IDUuMzAyODEsLTExLjU4MjkgMTcuMzgxNzksLTI0LjkyMTYgMzYuOTU3MiwtNDAuODExNiA1LjQyMDUxLC00LjQgMTIuNzQ5MzQsLTEwLjc5NzcgMTYuMjg2MjksLTE0LjIxNzEgNy43OTIwOSwtNy41MzMgOC44NjEwNiwtNy44MTggMjguNzk4ODgsLTcuNjc2MyA0NC43NjYxMiwwLjMxOCA5MC40NzA0NCwzNS42NzM3IDEwNC4zODM5NCw4MC43NDg3IDMuNjcxNCwxMS44OTQyIDMuMjcyMjgsMTIuNTA4MyAtMTYuMzgzOTQsMjUuMjA5MSAtMjQuNDAwMDMsMTUuNzY2MSAtMjkuNTY0NzIsMjMuODAyMSAtMjYuNTI4Nyw0MS4yNzcyIDQuNjkwMTksMjYuOTk2MiAtNy41MDgwNywzNS4zMzQ5IC0zOS41Nzg4OCwyNy4wNTU4IC0yMS4zODIwMiwtNS41MTk4IC0zMS4xOTAxOCwtNC4yNzM0IC0zOC4xNDcyOSw0Ljg0NzkgLTIuOTUzMjEsMy44NzE4IC00LjE3ODg4LDMuOTcyNCAtMTAuNzQ1MTMsMC44ODE3IHogbSA2OS42MTM2MywtMTUuNDg0MSBjIDE1LjkzNjQ0LC0xMC4xMDY2IDE4LjcyNDMsLTMzLjIzNzIgNi4xNTg5MSwtNTEuMDk5NyAtMjAuODM4MTMsLTI5LjYyMjcgLTQyLjI4MDcxLC0wLjQ1ODkgLTI5LjgyODQxLDQwLjU2OTMgMy43NzEwNiwxMi40MjQ5IDEzLjcwOTgxLDE2Ljg0NjYgMjMuNjY5NSwxMC41MzA0IHogbSAtNTMuNDUyNDMsLTIuOTg1NyBjIDE3LjMyMjA0LC04LjkwNzYgMjAuMjI4OTMsLTQyLjkxNzkgNS4wMzQ4MywtNTguOTA3MiAtOS4wNzk5NiwtOS41NTUyIC0yMi40MDg2LDQuMjU4NCAtMjQuODA4NzUsMjUuNzExNCAtMC41MDY3Myw0LjUyOTIgLTEuMzUyNjYsMTAuMTAzMyAtMS44Nzk4NiwxMi4zODY4IC00LjcwNjcyLDIwLjM4NjggNC43NjgyMywyOS40OTIxIDIxLjY1Mzc4LDIwLjgwOSB6IG0gLTMwLjI4MjkxLC02OC4xNTQ5IGMgMTcuODI1MDUsLTkuNzgzIDMyLjc3NjY1LC0xMC4zNjQ4IDcyLjEyMTcxLC0yLjgwNjQgNTIuMTEyNzQsMTAuMDExMSA3Mi45NzUyNCwtNS4wOTQgNDYuOTc1NjgsLTM0LjAxMTcgLTEwLjY0NjU5LC0xMS44NDE2IC0yMS43Nzk2NCwtMTMuMTIzMyAtNjAuNDc1NjgsLTYuOTYyNSAtMjUuODIxMjEsNC4xMTEgLTQ4LjA3MzUyLDQuNDU3MiAtNTcuNSwwLjg5NDcgLTExLjQ3MTIsLTQuMzM1NCAtMTguNjc5NzksLTIuODI4OSAtMjcuNTI5NTIsNS43NTMxIC0xNS4xMzQ0NywxNC42NzY1IC01LjAxMjE5LDM2Ljc2MTggMTguODI2NjIsNDEuMDc2NyAwLjE2MzQxLDAuMDMgMy41NzQ5NCwtMS43NDUyIDcuNTgxMTksLTMuOTQzOSB6IG0gLTExNi40NTg5LC00OS4wMTI4IGMgLTcwLjE4Nzc3LC0xMS44NzkgLTExOC4wOTcyOSwtODkuODQ3MDQgLTkwLjAyNTE4LC0xNDYuNTA3MDMgMTEuNjI5MzQsLTIzLjQ3MjMzIDIyLjcxNzY2LC0yMi4yMDI3OCAxMy4xNTg1OSwxLjUwNjU4IC0zMC45OTcsNzYuODgxODIgNjQuMTg4NTMsMTYzLjE0NjY1IDEzOS4wNTE4NywxMjYuMDIwMTUgNzMuMTUyOTUsLTM2LjI3ODQgODIuNTMxNTcsLTEyMi42NzU3MSAxNy4zOTUzMywtMTYwLjI0ODU4IC0zLjg1LC0yLjIyMDgyIC05LjQ3NSwtNS40OTU3MSAtMTIuNSwtNy4yNzc1MyAtMjcuMzcwNzYsLTE2LjEyMjMgLTUzLjY3NjQ3LC0xNS4yOTYwNSAtMTA2LjUsMy4zNDUxIC0xNi44MDIwMSw1LjkyOTM0IC0xOC44MDQ0Nyw2LjUyMjA5IC0yMS4yNSw2LjI5MDI5IC0yLjE5NzEzLC0wLjIwODI1IC0xLjM4NzIyLC0xLjUyNjYgNS4wMDI5LC04LjE0MzU5IDU4LjcxNjgxLC02MC44MDE0NSAxODUuNzc5ODQsLTE3LjI4NDQgMTkzLjY4MDU1LDY2LjMzMjQ5IDYuOTE2Myw3My4xOTg1MiAtNjEuMTExNiwxMzEuNjk3NjIgLTEzOC4wMTQwNiwxMTguNjgyMTIgeiBNIDY2NCwxMDU5LjMyNjggQyA1NzUuNjgyOTMsMTA1MC40MTYzIDUyMi4zNzE2MSw5NjUuNzI2NzMgNTYzLjc4ODM1LDkwMC4xMzIxMyA2MTguOTQxMDIsODEyLjc4Mjk5IDc0NS45ODAzNyw4MjQuMzAyMjcgNzgyLjQ4NTY5LDkxOS45NjI1IDgwOS42MDAyMiw5OTEuMDE0NjYgNzQ0LjYwNzgsMTA2Ny40NTk1IDY2NCwxMDU5LjMyNjggWiBtIDQxLjAxNjUyLC0yMC44MjU3IGMgNjMuNTE5NzUsLTEyLjYzNDMgODkuMjg1NjksLTgyLjQ3MzMgNTAuNzA5MzMsLTEzNy40NDg0NiAtNTguNjI1NzgsLTgzLjU0NzU4IC0yMDIuOTM5NDksLTM0Ljk1OTUxIC0xODUuNjc0ODcsNjIuNTEzNyAxMC4zMjA0Nyw1OC4yNjc2NiA2NS4yOTc5NCw4OC43OTE5NiAxMzQuOTY1NTQsNzQuOTM0NzYgeiBNIDYwMi40MDcwOSw5OTAuOTY5NCBjIC0yNy43MzE2OSwtNS40OTgxNiAtMzIuODEyODQsLTM5LjQ3Njk2IC05LjQyNDYyLC02My4wMjQ1MiAyMC42MjY2NSwtMjAuNzY3MTkgNDkuOTQ2NTUsLTguNzkyODIgNTkuNDk4MDgsMjQuMjk5MjUgMi45NzUzMiwxMC4zMDgyNCAxLjEyNjU0LDExLjc0NTI5IC0xNC4xNDYwMSwxMC45OTU2MSAtMTcuNjE0MTcsLTAuODY0NjMgLTE5LjAxNTc5LDAuNzQxNCAtNy45MTQ5Niw5LjA2OTIxIDguODAwMjEsNi42MDE5IDExLjQzMTIsOS45NjA5OSA5LjU2NDAyLDEyLjIxMDgxIC00LjU3Nzc3LDUuNTE1ODggLTI0Ljc4ODk2LDguOTg0OTMgLTM3LjU3NjUxLDYuNDQ5NjQgeiBtIC0yODEuNDY1Miw1LjAyMzMzIGMgLTI2LjU3MzQsLTQuNTAwOSAtMzEuNjExMTcsLTI4LjUxNTc5IC0xMC42Mzg2OSwtNTAuNzE0MzMgMTYuMjE4ODQsLTE3LjE2NzAyIDM0LjM5MTI2LC0xOC44MTg5NiA0OC43MjgzMywtNC40Mjk2IDI5LjIzODcsMjkuMzQ1MzQgNi4yMzMzMSw2Mi42NTEyIC0zOC4wODk2NCw1NS4xNDM5MyB6IE0gMTA2LDI4NS42NDM4IGMgMCwtMC43NDU5MSAxLjUwNzI0LC0zLjMzMzQxIDMuMzQ5NDMsLTUuNzUgQyAxMTMuOTU3MjEsMjczLjg0OTMgMTE2LDI2OS42MzAyMiAxMTYsMjY2LjE1ODA3IGMgMCwtMi4yMjA1OCAwLjU1MTMsLTMuMDc2IDIuMjUsLTMuNDkxMTkgNDcuODEyNDEsLTExLjY4NjEgOTUuNzEyMjksLTE4LjUzODMgMTM0LjI1LC0xOS4yMDQ4IDIzNC43NTM1MSwtNC4wNTk5NyAyODQuMzg3NjMsLTUuNjA0NzIgMzUwLjUsLTEwLjkwODQ5IDE3LjU4NzAyLC0xLjQxMDkgMTcuOTE1MzcsLTEuMzMzMzMgMjIuMDY3MTIsNS4yMTMyOSAxMC43MjIxMSwxNi45MDcwMyAtNS41MTU5NCwyMi43NjM0MSAtNjIuMDY3MTIsMjIuMzg0OTcgLTkwLjMzNjA2LC0wLjYwNDUxIC04NC4xMTMzNSwtMC4zMTU5OCAtMTA3LjI3MDM3LC00Ljk3Mzk1IC0zMC40ODAxNiwtNi4xMzEgLTQwLjA0Mjk2LC01LjcxMDIgLTQ5LjM4MDQ0LDIuMTcyOTEgLTMuMTUwODIsMi42NjAwNiAtMy4xNTA4MiwyLjY2MDA2IC0xMy41NTE3OSwtMC44MjAzMyAtMjUuODM5OTYsLTguNjQ2NTkgLTUxLjUxNDI1LC04LjgxMjg3IC0xMDcuMjk3NCwtMC42OTQ5IC0xOS4yNSwyLjgwMTM5IC00MS4wOTQwNiw1LjU0MDIyIC00OC41NDIzNyw2LjA4NjI4IC0yNS45NDY3OSwxLjkwMjI0IC01NC4xNzY2Miw3LjE0MDAyIC05Ny44ODU3OSwxOC4xNjE4IEMgMTEwLjg2NzMyLDI4Ny4xOTU3NyAxMDYsMjg4LjAxNDA4IDEwNiwyODUuNjQzOCBaIgogICAgICAgaWQ9InBhdGgzNTE1IgogICAgICAgaW5rc2NhcGU6Y29ubmVjdG9yLWN1cnZhdHVyZT0iMCIgLz4KICAgIDxwYXRoCiAgICAgICBzdHlsZT0iZmlsbDojMGMwZTBlIgogICAgICAgZD0ibSA1MDksMTQwNS4wMDg4IGMgLTEzMC43NzIyMSwtNy4yMTc2IC0xOTUuNzc0MDksLTE4LjIwOTQgLTI2MC4yMjg4NCwtNDQuMDA0OCAtMjYuMjk4MjUsLTEwLjUyNDcgLTI1LjgzMzE1LC0xMC4yMTU0IC0yOC41NzcxMywtMTkuMDA0IC0xNS42MDI3NywtNDkuOTczMiAtMzUuNjQ2ODQsLTEzMS44Mjg0IC01MS43NSwtMjExLjMzNDUgLTkuMzc0MjcsLTQ2LjI4MzYgLTEyLjgwNDM4LC02MS42NjkgLTMwLjU4MDQyLC0xMzcuMTY1NSAtNDQuMDUwNDE0LC0xODcuMDg1OTkgLTU3LjI1NTI0NiwtMjgzIC0zOC45NjE2NDgsLTI4MyA0LjMzMDM4OCwwIDUuNjA1NTA4LDMuNzAxNzcgMTMuNjA2MjA4LDM5LjUgMzIuMjQxODIsMTQ0LjI2MjIzIDY3LjYzNjc1LDI3Ni44NTE2IDk2LjQ0MTE1LDM2MS4yNjg0IDguMTU2ODcsMjMuOTA1MyA2LjkyOTUsMjIuMDk1NCAxNC41NjgyMywyMS40ODIzIDguMTAzNDgsLTAuNjUwNSA4LjAzNjI3LC0wLjc5OCAzLjkwNTE4LDguNTY5NCAtNy4zMjc1LDE2LjYxNTIgLTIuNzg4OTgsMjcuOTQ5NSAxOS4xNTQ1Niw0Ny44MzU2IDEyLjM1MjM2LDExLjE5NDEgMTIuMzExNDksMTIuNDgxNiAtMC4zMzc2NywxMC42MzggLTEwLjAxNDMzLC0xLjQ1OTYgLTkuODUyNjIsLTEuNjIxNiAtNy4zNTQ0NSw3LjM2NyAxLjEyMTg5LDQuMDM2NiA0LjMyMjQzLDE3LjY4OTMgNy4xMTIzLDMwLjMzOTMgMTguNjMwNjYsODQuNDc2NCAzNS40ODU4NSwxMTIuMjQ5MiA3Mi43ODQ4NSwxMTkuOTMgMTExLjE2MTY5LDIyLjg5MTEgMjUwLjY1Njk5LDI2LjcyMjYgNDIzLjIxNzY4LDExLjYyNDYgNTkuOTEyNywtNS4yNDIgMTE0Ljg4MDg0LC0yOS4zOTAyIDEyOC40ODUyLC01Ni40NDUxIDIuOTk4MjUsLTUuOTYyNiAyLjg2Njk5LC02LjIxMDEgLTMuNzMwNiwtNy4wMzQ0IC0xMC4zNDE4MywtMS4yOTIxIC0xMC4yMDQwOSwtMi4wNjYyIDEuMjQ1NCwtNi45OTg4IDE3LjExMzIzLC03LjM3MjcgMjIuNDMyMTUsLTEyLjk5OTIgMjIuNjI5NTQsLTIzLjkzODMgMC4wODk3LC00Ljk3MTcgMS4wNjk3NiwtMTAuMTE0MiAzLjE4NzQyLC0xNi43MjUxIDYuNzMzNDEsLTIxLjAyMDQgOC4zMTYxLC00MS4xODA5IDYuMzkxMjcsLTgxLjQxMjkgLTEuNDY0OTgsLTMwLjYyMDYgLTEuMDk2NywtNDIuOTQ5MyAxLjY4ODYsLTU2LjUyNzUgNC43NDM4OCwtMjMuMTI2MiA3LjExMDcsLTQzLjgzNDkgMTEuNjU0NTUsLTEwMS45NzI1IDEuMzk3MDYsLTE3Ljg3NSAzLjg1MDI2LC00Mi40IDUuNDUxNTgsLTU0LjUgMy4wNjc2NCwtMjMuMTgwMDEgNC41NjEzNywtNDAuMjAxNjkgNS40ODQ2OSwtNjIuNSAyLjYwMjA2LC02Mi44NDA2OCA0LjUwNjI0LC04NS4yNzY3MiA5LjExNzYzLC0xMDcuNDI4NTUgMS4yNTI0NiwtNi4wMTY0MyAyLjA4NjI0LC03LjYwOTM4IDYuMzMzNTIsLTEyLjEwMDI2IDkuMzU1NTIsLTkuODkyMDggOS4wMzkxOCwtMTUuMDQyNjUgLTEuOTQ3MjUsLTMxLjcwNDM5IC0xMy4wMjI1NSwtMTkuNzQ5NjYgLTEzLjAyMzU2LC0yNi44MzMyNSAtMC4wMDYsLTQxLjA2NTM5IDYuMDU5MDksLTYuNjI0MzQgNi40MTQ3MiwtMTguMzg0MTIgMi4wNDU1OSwtNjcuNjQ0MDQgLTMuMjM5MDQsLTM2LjUxODY3IC0zLjI1NDMzLC02MC4yNjk4NCAtMC4wMzkzLC02MS4wNDM4MyAxLjM3MDYsLTAuMzI5OTcgMy4wMjUwNSwtMS42NjkxMSAzLjY3NjU0LC0yLjk3NTg3IDAuNjUxNDksLTEuMzA2NzcgMS44OTI1OSwtMi43NzIxOSAyLjc1OCwtMy4yNTY1IDEuMDk0MTMsLTAuNjEyMyAxLjU3MzQ2LC0yLjM1ODc4IDEuNTczNDYsLTUuNzMzMDMgMCwtNC40OTI1OSAwLjIyMjUxLC00LjkzMDA2IDMsLTUuODk4MyAxLjY1LC0wLjU3NTE5IDMsLTEuNzUzODYgMywtMi42MTkyNiAwLC0wLjg2NTQgMS4wNjgyOCwtMi4wNjAyIDIuMzczOTYsLTIuNjU1MTEgMi44NTI2LC0xLjI5OTczIDUuMTQ5NjQsLTcuNTA3NDggNC4zMTc1MiwtMTEuNjY4MDcgLTAuNjA1NTgsLTMuMDI3OTEgMC42ODgzOSwtOC43MjQ1IDQuMTM1NzksLTE4LjIwNzQgMS41OTMwNSwtNC4zODIwNiAyLjE0MDgsLTkuMjYwMzUgMi42OTQ4MSwtMjQgMC43NTk1NiwtMjAuMjA4NjggMS40NjMxNiwtMjYuNjUzNDggNC4xNDg1NSwtMzggMi4xNTM2LC05LjA5OTU3IDIuMjA3NzQsLTY5Ljc4NDA3IDAuMDgzNCwtOTMuNSAtMS4zMjU3NywtMTQuODAwODIgLTI4LjYzNDM4LC0yMC4zNTk4NiAtNDguODUxNzMsLTkuOTQ0NDMgLTMuMzM2OTcsMS43MTkxMiAtODQuMzAyMzEsMTEuMzE2ODcgLTE0Ni45MDIzMSwxNy40MTQgLTYzLjE1MTQ1LDYuMTUwODUgLTE0Mi43OTA5OSwxMS45OTU1MSAtMTg2LDEzLjY1MDM1IC05LjYyNSwwLjM2ODYyIC0xOC4zNDU3MywwLjk3MzkxIC0xOS4zNzk0MSwxLjM0NTA5IC0xLjAzMzY4LDAuMzcxMTggLTQuMTgzNjgsMC4wMzc5IC03LC0wLjc0MDYgLTkuNDA2NDEsLTIuNjAwMjEgLTEzLjA3MzQsLTMuMDYwNzYgLTE5Ljg3MDU5LC0yLjQ5NTU4IC02LjQzNzY0LDAuNTM1MjcgLTYuNzUsMC40NjA1MyAtNi43NSwtMS42MTUxOCAwLC0zLjMwNTkxIDkuNTk5ODMsLTIuODM5MjMgLTE1NywtNy42MzIyOCAtMTUyLjA5MzMxLC00LjM3NTcgLTI0NC4xNDQ5NCwtOS41MTA3MiAtMzIzLjUsLTE4LjA0NjE1IC00Mi4wODQ1ODYsLTQuNTI2NjIgLTQxLjU5MDEwMiwtNC41NTMxNCAtMzcuNTMxOTQ2LDIuMDEzMDkgMi44MDk3MTgsNC41NDYyMiA4LjAwMTc4OSw4Ljk5NTk4IDE0LjEwNTg3NSwxMi4wODkxNSA2LjAyNTE4MiwzLjA1MzE5IDUuNzEwMjI5LDQuMDA5MTggLTEuNjIyNjgyLDQuOTI1MzYgLTcuMjEzMTU5LDAuOTAxMjMgLTcuMTMxNjgyLDAuNDE2NjcgLTMuNDgxMTIxLDIwLjcwMjg0IDEzLjE1NzY4NCw3My4xMTcyNCAzMi45Njk3MDUsODkuODQxNzQgNzQuMTE5MTk0LDYyLjU2ODQzIDEzLjYyNjc4LC05LjAzMTY0IDc0LjU5MzYzLC0xOS42MTQ4NyAxMzkuNDEwNjgsLTI0LjIwMDI4IDQwLjU3NTk0LC0yLjg3MDUgMTA3LjcyOTIyLC01LjQyOTcgMTA2LjM1MjYsLTQuMDUzMDcgLTEuMzY2MTQsMS4zNjYxMyAtMzkuMjk2NjUsNS45NjUzMiAtOTQuODUyNiwxMS41MDExNiAtNDguNTU4OTcsNC44Mzg2MyAtNzkuNTc4MDcsOS4xNzYwMiAtMTAxLjUsMTQuMTkyNyAtNC45NSwxLjEzMjc3IC0xMi45MDE2MSwyLjQwODI2IC0xNy42NzAyNSwyLjgzNDQyIC01OC4yODUwNzksNS4yMDg3OSAtODAuNTA0MTI5LDcwLjY2Nzc5IC0yNS40MzQzNCw3NC45MzE0NyA2LjEwNzUzLDAuNDcyODcgMTEuNzc5NTksMS4xMjc4NyAxMi42MDQ1OSwxLjQ1NTU3IDAuODI1LDAuMzI3NyA3LjQyMzM5LDEuNjg1ODggMTQuNjYzMSwzLjAxODE5IDE4LjYzMDc1LDMuNDI4NTcgMjAuNTU4MDcsNC44NDc0MiAxMS43MjY3Myw4LjYzMjk3IC01LjM3Njg5LDIuMzA0ODEgLTUuMzc2NTUsMi4yOTA3OCAtMC4xMzk4Myw1LjY3MSA2LjczNTYzLDQuMzQ3NzUgMi4zMjkxNCwzLjk3OCAtMTUuNzY1OTksLTEuMzIyOTQgLTUwLjQ5MzMwNiwtMTQuNzkxOTIgLTYxLjI2MTUyNCwtMTUuODc2OTUgLTQ4Ljg3MDE4NywtNC45MjQyNyA1Ljg0OTEyNSw1LjE3MDAzIDUuNTUwMzEyLDUuOTQ0MzYgLTEuNDk2NzQzLDMuODc4NTggLTMuNjc4OTksLTEuMDc4NDcgLTUuNjI5NzgyLC0xLjIzNjg5IC02LjM1MDkyLC0wLjUxNTc1IC0xLjEwMDgzOCwxLjEwMDg0IDEuNDYzMTk3LDIwLjk2NjE3IDguNzMzNzI2LDY3LjY2NjE2IDIuNDc5NDI4LDE1LjkyNTg0IC02Ljg5NzQ5MiwtNy42NjAzNCAtMTAuNTU0NzA5LC0yNi41NDg3MiAtMTEuNDA2MzQ0LC01OC45MTAyIC0yOS40NDY1NjksLTExNS4wMzkyIC0zNC4zOTg5MDQsLTEwNy4wMjYxNSAtMi4zMDM2ODEsMy43Mjc0MyA0LjM4NjYwOSwzNy45NDE4OSAxNC40OTg0NDUsNzQuMTQ1NzEgQyA2My4zNDgyNzcsNjAxLjk2MTEgNjgsNjI0Ljc3Njk1IDY4LDYzOC40MjM3NyA2OCw2NjEuMjI0NzEgNDUuNzA3MzkzLDU3MS45MDM1NSAzNS4wNzQ3MTYsNTA2LjUgMzIuODM5Mzc0LDQ5Mi43NSAyOC41NTg2MDQsNDY2LjQyNSAyNS41NjE4OTQsNDQ4IDE5LjEzMjg5OCw0MDguNDcxOTEgMTQuNTEwMDk4LDM4NC45NDc4NiA4LjQ2NTE5MSwzNjEgMi42MTMzODA3LDMzNy44MTcxMiAyLjg2NDUyNCwzMzguNjk1MDYgMS42Mzg2OTU0LDMzNy4xMzYyMiAtMi4zNDY0MjUxLDMzMi4wNjg1MSAxLjkxMzc3OTMsMzE4LjEzNjgxIDEwLjQyMzE2MywzMDguNDA5MzEgMzEuMDQ3NzIyLDI4NC44MzIzNCA4NCwyNjkuOTIxNzQgODQsMjg3LjY5MTEzIGMgMCw3LjgzNjY3IC0xMS4yMzE0NDgsMTMuMjA0NDYgLTQwLjUsMTkuMzU1OTYgLTI3LjQzNzEyNiw1Ljc2NjU4IC0yOS44NTMwNDUsMTAuNTgxNTYgLTEzLjY2MzkxOCwyNy4yMzI1IDUuMjIwMjg1LDUuMzY5MiA3LjM1ODg3MSw2LjE3NjYxIDMyLjE2MzkxOCwxMi4xNDMyNCA0OS44MDc4MywxMS45ODA4MyAxMDAuOTQ5NzEsMTcuMTkwNTggMTkyLDE5LjU1ODc4IDIxLjcyNSwwLjU2NTA2IDU0LjM1LDEuNDg3NjkgNzIuNSwyLjA1MDI4IDkzLjcwOTM0LDIuOTA0NyAxOTkuMjY4MjEsMy44MDM2NiAyMjkuNSwxLjk1NDQ4IDM4LjQ5NDM2LC0yLjM1NDU4IDQ1LjY5NTg5LC0yLjQyNzI1IDQ5Ljk2MDUsLTAuNTA0MTggMy40NjYxMSwxLjU2MyA0LjU1Mzc5LDEuNjMzNzQgOC40MzA1MiwwLjU0ODMyIDIuNDQ4MDQsLTAuNjg1NDEgNS4wMDYyMywtMC45MDMwMyA1LjY4NDg2LC0wLjQ4MzYxIDAuNjc4NjQsMC40MTk0MiA1LjMyNjY5LDEuMTM1MDEgMTAuMzI5LDEuNTkwMiA1LjAwMjMyLDAuNDU1MiAxMS4yMTUwOCwxLjEwNDQ4IDEzLjgwNjE0LDEuNDQyODYgNC44NTg5NSwwLjYzNDU1IDEyLjUyMTUsLTEuNDI3MTUgMTUuODk5MTMsLTQuMjc3ODUgMS4yNzI4OSwtMS4wNzQzMiAyLjIxNTQzLC0xLjExNzczIDQuNSwtMC4yMDcyNCA1LjY1Mzg4LDIuMjUzMjcgNzQuNzI5NzksMS41NDU3MiA5Ny4zODk4NSwtMC45OTc1NyA2NS40NDc3MywtNy4zNDU2NSAxNDIuODMyMDYsLTI1LjE5NjM5IDE2OC41NzY3MywtMzguODg2NjggMy4wMTYzNCwtMS42MDQgMjIuODYxMTEsLTYuNDE4NiAzNS45MjMyNywtOC43MTU0NSAxNC45MjQyOCwtMi42MjQyOCAxOC45OTA2MywtMy41NzM4NCAyNC4zMDk2NSwtNS42NzY3MSAzLjk0MzgyLC0xLjU1OTE5IDUuNjAwMDMsLTEuODA4NzggNi40Mzg1LC0wLjk3MDMxIDIuNzc2NjUsMi43NzY2MyAzLjMxMjI1LDU5LjU2OTQ1IDAuNzMyMzQsNzcuNjUxODUgLTAuNTQ5MywzLjg1IC0xLjkwNTIzLDE0LjQyNSAtMy4wMTMxOCwyMy41IC0xLjEwNzk1LDkuMDc1IC00LjAyMTE5LDI2LjQgLTYuNDczODcsMzguNSAtMy43MTAxOSwxOC4zMDM4MiAtOS4yNDE1Niw1MS4wMDA4OCAtMTEuMDgwNjUsNjUuNSAtOC4xNTI5MSw2NC4yNzY2IC0xMy44NTA0OSwxMzQuNTg3MSAtMTkuODkzOTYsMjQ1LjUgLTcuNDA1NjQsMTM1LjkxMjAyIC0xMC4wOTAzMSwxNzQuMzU4NDggLTE2Ljk2ODQzLDI0MyAtMS4zMjI2OCwxMy4yIC0yLjY5MzgzLDI4LjcyNSAtMy4wNDY5OSwzNC41IC0yLjQ3NzcxLDQwLjUxNTggLTkuMzMzNTksOTcuMzA4NCAtMjAuNTQ3OTgsMTcwLjIxNDggLTMuMzMwNzYsMjEuNjUzOCAtMy45NTU0MywyOC4xNjIxIC0zLjk1NTQzLDQxLjIxMDggMCw2OS4zMzQyIC0yNC45ODI2OCwxMDcuNDgwNyAtNzUuMDQwMTgsMTE0LjU4MDEgLTQuMDk0OTgsMC41ODA4IC0xMS42NjU5NiwyLjQwNzkgLTE2LjgyNDQsNC4wNjAzIC01My43MDU4NywxNy4yMDM1IC0xMzIuMTE0NjUsMjguMDQ5OSAtMjI3LjEzNTQyLDMxLjQxOTkgLTkuMDc1LDAuMzIxOCAtMjEuNjc1LDEuMDAyMyAtMjgsMS41MTIyIC0xNi42ODk2NCwxLjM0NTMgLTQyLjYwOTY1LDEuODA0OSAtNTcsMS4wMTA3IHogbSAtMy4zNDEzNywtMTMuMDY5MSBjIDEwLjEzNTczLC0zLjg1MzYgLTYuMDU5MTMsLTYuODUxNiAtNTMuNzAxMDIsLTkuOTQxMiAtOC41NDgzMiwtMC41NTQzIC0yMy4yNjQxLC0xLjg5MDUgLTMyLjcwMTc0LC0yLjk2OTMgLTQxLjQwMjk4LC00LjczMjQgLTY3LjIxOTI4LC00LjgyNjMgLTU4LjU5OTE2LC0wLjIxMjkgMTQuMjkxMDYsNy42NDgzIDEzMS41MDEwMywxOC4yNTY0IDE0NS4wMDE5MiwxMy4xMjM0IHogTSAyNjcsMTM0MC45ODU4IGMgMCwtMTcuNTA5MiAtMzMuNzgzNzIsLTEyOC4zNjQ3IC00NS42MzI2NSwtMTQ5LjczNTggLTEzLjEwODU3LC0yMy42NDMgLTAuNjc1MDUsNDkuNzYzNiAxNS45NjM5NSw5NC4yNSAxMi44NjEzLDM0LjM4NjMgMjkuNjY4Nyw2NS44MTkxIDI5LjY2ODcsNTUuNDg1OCB6IG0gLTMwLjg4MDU5LC0xMC40MjY5IGMgMC40NjY4NSwtMjMuNjg5MyAtMi4zMTg1NCwtMzYuNjgyOSAtMTguNjYyNTEsLTg3LjA1ODkgLTExLjQ1Mzk3LC0zNS4zMDM4IC0xNC40ODU1OCwtNDUuOTUwOSAtMTcuNDczMDYsLTYxLjM2NTggLTIuNjI0MzcsLTEzLjU0MTMgLTMuOTQxNDIsLTE1LjAwMTYgLTguODMzNDEsLTkuNzk0MyAtNi42MDg3Niw3LjAzNDcgLTUuMzIzNywxOC4xMzE1IDYuODEyMDgsNTguODIzNyA3LjE2MTc2LDI0LjAxNDEgOS4zMjQ1OSwzMi45MzcxIDEwLjUwNDEyLDQzLjMzNjQgMS45NzkxLDE3LjQ0ODYgMTUuOTMxLDU1LjYyMSAyMy4zMjQ2Nyw2My44MTYzIDIuNDg4ODEsMi43NTg2IDQuMTgwNjIsLTAuMjczNyA0LjMyODExLC03Ljc1NzQgeiBtIC00Ni43MjY0LC0xNzcuMTQwNyBjIDQuMTU2NDYsLTEwLjgzMTYgLTEuMzExMDksLTQ1Ljg4NTcgLTE0LjU1MDAyLC05My4yODQ4IC04LjgxMDQ4LC0zMS41NDM5IC0xMS45MjY4MywtNDQuMTI3OSAtMTQuMjYwODcsLTU3LjU4NjIgLTIuNTMxNjksLTE0LjU5NzkyIC0xMC4wMDg4OCwtMjguMDc5NDIgLTEyLjAzNDI3LC0yMS42OTc5NyAtMS4xMTIxNywzLjUwNDE1IDExLjk5NDk2LDc3LjI2NTc3IDE2LjkwNzg5LDk1LjE1MDc3IDAuODMwOTYsMy4wMjUgMi42NzIxNCwxNC43MjUgNC4wOTE1MywyNiA0Ljk1ODgzLDM5LjM5MDcgMTQuNzM4MjQsNjQuNzI4MiAxOS44NDU3NCw1MS40MTgyIHogTSA0MTMsMTI0Ni4zMDk4IGMgLTEwLjE0NTQzLC0wLjc2ODQgLTM0LjAxMjQzLC00Ljc2NDYgLTU4LjUsLTkuNzk1IC0zMS4wNTU0OSwtNi4zNzk2IC00Mi40MTg5NiwtOC4yMDY4IC02MSwtOS44MDgyIC0xNCwtMS4yMDY2IC0xNCwtMS4yMDY2IC0xNC4yOTQwNSwtNC4yMDY2IC0xLjAwMDM3LC0xMC4yMDU5IDkuNjAyMzksLTEwLjIzMDMgNDMuNzk3MDIsLTAuMTAwNiAyNS45ODYwNSw3LjY5OCAzMy40ODk2Niw5LjU0NzQgNDEuNDk3MDMsMTAuMjI3NyAzLjg1LDAuMzI3MSAxMC4zNzUsMS40NTIyIDE0LjUsMi41MDAyIDguMDM2NzcsMi4wNDE3IDI3LjI4MDc0LDQuNzc2IDUxLjUsNy4zMTc0IDIwLjkwMzk1LDIuMTkzNSAyMy40OTA1NywyLjYzOTkgMjEsMy42MjQzIC0xLjkzMzAyLDAuNzY0IC0yOS4zMjk1LDAuOTM1MyAtMzguNSwwLjI0MDggeiBtIDkwLjUsLTQ1LjQ2NDMgYyAtMTIuNjY5NDcsLTYuNTQ0MyAtMTYuOTI4MDIsLTE1LjU3OTEgLTE5Ljk2NzM3LC00Mi4zNjIzIC0yLjMzMDk3LC0yMC41NDA4IC00LjI5MTEzLC0yNi45OTY0IC0xMC4xNzQ1NSwtMzMuNTA4NiAtNC40MTcyNiwtNC44ODk0IC0xMS42MjMxMSwtOC43NzUxIC0xNy44NTc4MSwtOS42Mjk2IC0yMi4zMjQ4LC0zLjA2IC03Ljk5MDg3LC0zNi45NTAzIDI4LjQ5OTczLC02Ny4zODMxIDYuODc1LC01LjczMzcgMTUuNDgxMzcsLTEzLjIwOTcgMTkuMTI1MjYsLTE2LjYxMzQgNy43NzM1OSwtNy4yNjEyIDEwLjEyNzkxLC03LjkyNDYgMjcuMzc0NzQsLTcuNzE0NCA0Mi45Nzg4OCwwLjUyMzggODcuOTk4OCwzNS40MzEgMTAyLjQ0MzUxLDc5LjQzMTggMy44NzU5MywxMS44MDY3IDQuMDc3MDQsMTEuNTEwNCAtMTcuMTU4OSwyNS4yODAyIC0yMy44NTM4NCwxNS40Njc0IC0yOS4wOTIzOCwyNS4xMzE5IC0yNC43MDY4LDQ1LjU4MTEgNC40MTY5MSwyMC41OTU0IC0xMC44Njc2NiwyOS40NzEyIC0zNy4wNzc4MSwyMS41MzEzIC0xOC41OTI2LC01LjYzMjIgLTMzLjk0MzczLC0zLjg2MzkgLTQwLjIyNjM1LDQuNjMzOCAtMi41MjY2OSwzLjQxNzUgLTQuNzkzNzYsMy41ODM3IC0xMC4yNzM2NSwwLjc1MzIgeiBtIDY2LjIwNTAyLC0xMS4zNjY3IGMgMjcuOTI4NDMsLTExLjY2OTMgMTguNjU2NTgsLTcxLjQ1OTIgLTEwLjI0MDc2LC02Ni4wMzgxIC0xNi43NzEyOSwzLjE0NjMgLTE5LjYxNTksNTMuNzEyIC0zLjYxMTUzLDY0LjE5ODUgNS4xOTI1MywzLjQwMjIgOC45MjU3NiwzLjg5OCAxMy44NTIyOSwxLjgzOTYgeiBtIC01MC43NDE1NiwtNC42MzgyIGMgMTguNjYwNTEsLTguMDE0MyAyMi4wMjE2NiwtNDYuMjMyMyA1LjM1MzEsLTYwLjg2NzUgLTguMDMwNjYsLTcuMDUxIC0yMS4xODg4MSw0LjI3ODMgLTIzLjc5Mjk4LDIwLjQ4NiAtMC4yNjg3MywxLjY3MjUgLTEuMzk2NDcsOC41MTM0IC0yLjUwNjA5LDE1LjIwMTkgLTQuNDA1MTMsMjYuNTUzMiAxLjQyNjAxLDMzLjU2MjkgMjAuOTQ1OTcsMjUuMTc5NiB6IG0gLTI4LjY2NjM2LC02OC43Njg5IGMgMTcuMDY0NDIsLTkuMzA2NCAzMi4wOTI3MSwtOS45NDkyIDY4LjM4OTI1LC0yLjkyNSAzNi4yODY0Niw3LjAyMjIgNjEuMzA0MTQsNC4wMzQ0IDYwLjQ5NjQ1LC03LjIyNDkgLTAuODMxNTMsLTExLjU5MTggLTUuODMyMTIsLTIzLjY1MDcgLTEyLjA4MzU3LC0yOS4xMzk1IC0xMS45OTE2OSwtMTAuNTI4OSAtMjIuMDQyNDMsLTEwLjk3OTkgLTcyLjA5OTIzLC0zLjIzNTUgLTIwLjExMDUyLDMuMTExMyAtNDAuNjAwMDEsMS44MTQxIC01MC4yNjE3MSwtMy4xODIxIC02LjAyODcsLTMuMTE3NiAtMjAuNjgyNjcsNC4wNzY3IC0yNi4wNDA4LDEyLjc4NDYgLTEyLjIwMDYsMTkuODI4MSAxMS4wOTg5Miw0NC4xMDMgMzEuNTk5NjEsMzIuOTIyNCB6IG0gLTExMy43MTIzNSwtNTAuMTExIGMgLTc0Ljk5MDQxLC0xMS43OTEyIC0xMjUuNTY4MjMsLTk4LjEyMjc0IC04OC42NTQzMywtMTUxLjMyNDUzIDEwLjkyOTQ5LC0xNS43NTIwMiAxNS4xNDI0MSwtMTIuMDIwMjIgNy43NjE5LDYuODc1NDggLTMxLjMzNjYxLDgwLjIyODU1IDY0LjcxNzMsMTY0LjkxODE1IDE0Mi4zMjY4NiwxMjUuNDg3OTUgNzMuNzc2NTksLTM3LjQ4MjggNzkuMDQwMzksLTEyNC41NTgwOCA5LjgyOTU5LC0xNjIuNjA0MDMgLTQuNTkxODIsLTIuNTI0MTggLTEwLjU5ODc3LC01Ljg4NTA2IC0xMy4zNDg3NywtNy40Njg2NCAtMjMuMDM3NTcsLTEzLjI2NjA2IC01Mi4yNzQzNCwtMTEuMDIwNDQgLTEwNS44Mjg1Nyw4LjEyODUgLTE4LjIwMDYyLDYuNTA3ODUgLTE4LjYyODc3LDYuMjc4NjYgLTcuOTIxNDMsLTQuMjQwMzQgMzguOTc0MzgsLTM4LjI4ODgzIDExNi41NzY1MSwtMzIuODA2MzcgMTYwLjM4NTMxLDExLjMzMDk2IDcxLjE2Nzg5LDcxLjcwMTYgLTAuMTI5NywxOTAuMjMzNDUgLTEwNC41NTA1NiwxNzMuODE0NjUgeiBNIDY2NywxMDU3Ljg2MzMgQyA1ODMuMTk5MTQsMTA1MC43NDcgNTI3Ljg1NzUzLDk3My44MjcxMyA1NjAuMjU2OTksOTA5LjUgNjEwLjY3NjY4LDgwOS4zOTQ4MyA3NTQuMDU2NjQsODI0Ljk2ODU3IDc4NS4yNzY2MSw5MzMuOTQxMzMgODAyLjg4NTMzLDk5NS40MDQyNCA3MzcuNTUzMywxMDYzLjg1NDYgNjY3LDEwNTcuODYzMyBaIG0gMTUuMjA5NTYsLTE3LjA1MDEgQyA3NjguNTE1MSwxMDQzLjI4ODYgODA1Ljg2NzEsOTQ2LjQxMjk5IDc0Mi40Nzg3Miw4ODQuNSA2OTcuMTMxMiw4NDAuMjA3OTYgNjA2Ljg2Mjg1LDg1My42Mzg4NCA1NzguMDgxNDEsOTA4Ljk2MDQgYyAtMzAuOTU1NzQsNTkuNTAwODUgMTcuNzc1OTQsMTM2Ljc0OTQgODMuNDE4NTksMTMyLjIzMzYgNS41LC0wLjM3ODQgMTQuODE5MywtMC41NDk3IDIwLjcwOTU2LC0wLjM4MDggeiBtIC04Mi45MjM1MiwtNTEuMjYzOTUgYyAtMjEuNDcwMjksLTYuNzA5OTggLTI3LjA3MDUzLC0zMC41NTM0OCAtMTIuNDc4ODEsLTUzLjEyOTcgMTguNzkzMywtMjkuMDc2OSA1Mi4wMTUzNiwtMjIuMzEzODEgNjQuMTg4MTEsMTMuMDY2OTEgNC4yOTkxLDEyLjQ5NTU1IDIuOTU5MzcsMTQuMDIyIC0xMS40NDUxLDEzLjA0MDE5IC0xOC4xMTY2MywtMS4yMzQ4NCAtMjEuNTU3OTMsMS40MzQwNCAtMTEuMzAwMjQsOC43NjM4MiAxMi4wODk4LDguNjM4OTUgMTQuMjQ5NTMsMTIuMzY1NjEgOC43OTk1OCwxNS4xODM4OSAtOC4xNDM5LDQuMjExMzcgLTI4Ljc1NjYzLDUuODg5NzYgLTM3Ljc2MzU0LDMuMDc0ODkgeiBNIDMyNy41LDk5Ni4wNDQ0NyBjIC0yNi44NDU0OSwtMi42Mjc0IC0zNi4xNTg5LC0xNi43NDE2IC0yNS40MjkwNSwtMzguNTM3MDMgMTIuMzUwNiwtMjUuMDg3NjIgNDAuMjczMzEsLTMzLjI0NTU0IDU2Ljc5OTM5LC0xNi41OTQ1NSAyNi45OTAzOSwyNy4xOTQ0MSA4Ljg1Mzg0LDU5LjA2ODM2IC0zMS4zNzAzNCw1NS4xMzE1OCB6IE0gMTA2LjU2MDI0LDI4Ni4wOTc0NiBjIC0wLjMwNjc5LC0wLjQ5NjM5IDEuNDUwMTUsLTMuNTczNyAzLjkwNDMxLC02LjgzODQ2IEMgMTE1LjI0MjU5LDI3Mi45MDI4IDExNywyNjkuMjI4MzggMTE3LDI2NS41OTQ1NyBjIDAsLTIuMTcwMzUgMS4xNjM4NiwtMi41MTM2IDI1LjI1LC03LjQ0Njg0IDY3Ljk4ODEzLC0xMy45MjUwNiA1OC4yNzQzNywtMTMuMjE2NDggMjIwLjc1LC0xNi4xMDI4MiAxMjMuOTE4NTksLTIuMjAxMzcgMTg5LjMyMjAzLC00LjY2OTI3IDI0Mi45NzExNiwtOS4xNjgxNSAxNC41OTU4LC0xLjIyMzk2IDE4LjQ0MjQ2LDAuNTM1ODcgMjAuOTA0OTMsOS41NjM5NCA0LjA0MTcxLDE0LjgxNzkyIC03LjcxODExLDE3LjA5ODA5IC04Ni44NzYwOSwxNi44NDQ4NSAtNjcuMjk5ODEsLTAuMjE1MjkgLTU2LjU4ODM2LDAuNTkyNTcgLTk4LC03LjM5MTIyIC0xNy4zMzI1NiwtMy4zNDE1NiAtMjkuNDAzMTYsLTEuNjM3MTYgLTM1LjQwNDk5LDQuOTk5MjYgLTIuNDE4NDksMi42NzQyMSAtMy4zNjMzLDIuNjQzNzkgLTExLjc0MDM1LC0wLjM3Nzk4IC0xNC45ODc3NywtNS40MDYzOSAtMjUuNTU0NDQsLTYuOTA1NjcgLTQ4LjM1NDY2LC02Ljg2MDkzIC0yMS44NDUwOCwwLjA0MjkgLTI0LjUyMTE5LDAuMzE0MzggLTcxLjUsNy4yNTQyNCAtMTEuMjc1LDEuNjY1NTggLTI2LjU3NSwzLjUwMzI3IC0zNCw0LjA4Mzc1IC0zMi4yMjEzOCwyLjUxOTA4IC02NS42MjY5Nyw4Ljg1NzE5IC0xMTUuODg3MDYsMjEuOTg3NSAtMTYuNDcxMDUsNC4zMDMwMiAtMTcuNjkyOTksNC41MDgzNCAtMTguNTUyNywzLjExNzI5IHoiCiAgICAgICBpZD0icGF0aDM1MTMiCiAgICAgICBpbmtzY2FwZTpjb25uZWN0b3ItY3VydmF0dXJlPSIwIiAvPgogIDwvZz4KPC9zdmc+Cg==) Gin This template demonstrates building the Gin framework for Platform.sh using Go modules. It includes a minimalist application skeleton that demonstrates how to connect to a MariaDB server for data storage. It is intended for you to use as a starting point and modify for your own needs. Gin is a lightweight web framework written in Go that emphasizes performance. ###### Features: - Go 1.14 - MariaDB 10.4 - Git module-based build View the [repository on GitHub](https://github.com/platformsh-templates/gin). ![Deploy on ](https://platform.sh/images/deploy/lg-blue.svg) ##### Java View the [Java documentation](https://docs.platform.sh/languages/java.md). Templates in development. ##### Lisp View the [Lisp documentation](https://docs.platform.sh/languages/lisp.md). Templates in development. ##### Node.js View the [Node.js documentation](https://docs.platform.sh/languages/nodejs.md). Express ![Express](data:image/svg+xml;base64,PHN2ZyB3aWR0aD0iMjQiIGhlaWdodD0iMjQiIHZpZXdCb3g9IjAgMCAyNCAyNCIgZmlsbD0ibm9uZSIgeG1sbnM9Imh0dHA6Ly93d3cudzMub3JnLzIwMDAvc3ZnIj4KPHBhdGggZD0iTTcuNDQzNjggMTQuMzU1NlY5LjEwNDc3SDcuNzI4NDlWOS45MzA3M0M3Ljc2MjEzIDkuODk0MSA3Ljc5MzE5IDkuODU1MiA3LjgyMTQ2IDkuODE0M0M4LjA1OTMzIDkuMzIwNzcgOC41NjEwNiA5LjAwOTMgOS4xMDg4MiA5LjAxNTQ1QzkuNzU4MTkgOC45OTYwOCAxMC4yODU5IDkuMjM2NDYgMTAuNTk2IDkuODE0M0MxMC43OTMzIDEwLjE3MzMgMTAuOTAxOSAxMC41NzQyIDEwLjkxMjcgMTAuOTgzN0MxMC45MjM1IDExLjM5MzIgMTAuODM2MiAxMS43OTk0IDEwLjY1OCAxMi4xNjgyQzEwLjM2OTEgMTIuODE1OCA5LjY1NTQzIDEzLjEzNzcgOC44OTE0NSAxMy4wMTk1QzguNjUzNjkgMTIuOTk5MyA4LjQyNDc4IDEyLjkxOTggOC4yMjU2MSAxMi43ODg0QzguMDI2NDUgMTIuNjU3IDcuODYzMzcgMTIuNDc3OCA3Ljc1MTI4IDEyLjI2NzFWMTQuMzU1NEw3LjQ0MzY4IDE0LjM1NTZaTTcuNzI4NDkgMTAuOTYyMkw3Ljc5MjI5IDExLjU3ODhDNy45MDQ4NSAxMi4yODA2IDguMzE5NzcgMTIuNjk1MiA4Ljk3MTIgMTIuNzczMkM5LjI3NzExIDEyLjgyMzUgOS41OTEgMTIuNzY2MSA5Ljg1OTM3IDEyLjYxMDlDMTAuMTI3NyAxMi40NTU3IDEwLjMzNCAxMi4yMTIyIDEwLjQ0MjkgMTEuOTIxOUMxMC42OTYzIDExLjMxODEgMTAuNjc3NiAxMC42MzQ2IDEwLjM5MjggMTAuMDQ0OUMxMC4yNzY1IDkuNzg0NjkgMTAuMDc4NyA5LjU2OTQyIDkuODI5MjcgOS40MzE1OUM5LjU3OTg0IDkuMjkzNzYgOS4yOTIzMSA5LjI0MDg2IDkuMDEwMTYgOS4yODA4OUM4Ljc0NTMxIDkuMzAwMTYgOC40OTMwNCA5LjQwMTQzIDguMjg4MzkgOS41NzA2NUM4LjA4MzczIDkuNzM5ODYgNy45MzY4NiA5Ljk2ODYgNy44NjgxNyAxMC4yMjUxQzcuODA3NTEgMTAuNDY3OSA3Ljc2MDg4IDEwLjcxMzkgNy43Mjg0OSAxMC45NjJWMTAuOTYyMlpNMTYuNzI4MiAxMS42NzU4QzE2LjY4NSAxMi4wNDU1IDE2LjUwOSAxMi4zODcgMTYuMjMyOSAxMi42MzY3QzE1Ljk1NjggMTIuODg2MyAxNS41OTk1IDEzLjAyNzIgMTUuMjI3MyAxMy4wMzMyQzE0LjAzMjkgMTMuMDkzMyAxMy40NzI0IDEyLjMwMDIgMTMuMzgzMyAxMS4zODQ5QzEzLjMyMTQgMTAuODg3OCAxMy40MDIgMTAuMzgzNCAxMy42MTU5IDkuOTMwNUMxMy43NjQ4IDkuNjE5OCAxNC4wMDg4IDkuMzY0NTYgMTQuMzEyNCA5LjIwMTc2QzE0LjYxNiA5LjAzODk3IDE0Ljk2MzYgOC45NzcwNiAxNS4zMDQ4IDkuMDI1MDJDMTUuNjI5MSA5LjA1MjU5IDE1LjkzNjYgOS4xODE0NiAxNi4xODM2IDkuMzkzNEMxNi40MzA3IDkuNjA1MzMgMTYuNjA0OSA5Ljg4OTYgMTYuNjgxNSAxMC4yMDZDMTYuNzQyMSAxMC40OTQyIDE2Ljc4NjggMTAuNzg1NSAxNi44MTUyIDExLjA3ODZIMTMuNjc4NEMxMy42MjAzIDExLjkwODUgMTQuMDY2MiAxMi41NzU2IDE0LjY5ODIgMTIuNzM2NUMxNS40ODU1IDEyLjkzMDIgMTYuMTU4MyAxMi41ODkxIDE2LjQwMjYgMTEuODQwNkMxNi40NTY4IDExLjY0ODUgMTYuNTU1NyAxMS42MjE0IDE2LjczMDIgMTEuNjc1OEgxNi43MjgyWk0xMy42NzYxIDEwLjgxM0gxNi40ODE5QzE2LjQ2NDMgOS45Mjg5IDE1LjkxMzggOS4yODYzNiAxNS4xNjcyIDkuMjc5MDdDMTQuMzI0MSA5LjI2NTQgMTMuNzEyOCA5Ljg4MjE5IDEzLjY3NjEgMTAuODEzVjEwLjgxM1pNMTcuMzA4MSAxMS42OTUySDE3LjU4MzFDMTcuNTkzMiAxMS44OTc4IDE3LjY1OSAxMi4wOTM3IDE3Ljc3MzIgMTIuMjYxNEMxNy44ODc1IDEyLjQyOSAxOC4wNDU3IDEyLjU2MTkgMTguMjMwNiAxMi42NDU0QzE4LjQ2MjggMTIuNzQ5OCAxOC43MTU1IDEyLjgwMDYgMTguOTcgMTIuNzkzOUMxOS4yMjQ1IDEyLjc4NzIgMTkuNDc0MiAxMi43MjMyIDE5LjcwMDUgMTIuNjA2NkMxOS44MjM5IDEyLjU1MTEgMTkuOTI3MiAxMi40NTkgMTkuOTk2NiAxMi4zNDI4QzIwLjA2NTkgMTIuMjI2NiAyMC4wOTc5IDEyLjA5MiAyMC4wODgzIDExLjk1N0MyMC4wOTU0IDExLjgyNjkgMjAuMDU5OSAxMS42OTc5IDE5Ljk4NzEgMTEuNTg5OEMxOS45MTQzIDExLjQ4MTcgMTkuODA4MyAxMS40MDAyIDE5LjY4NSAxMS4zNTc4QzE5LjM4MjQgMTEuMjQ1MiAxOS4wNjA3IDExLjE4MzIgMTguNzUyNCAxMS4wODQzQzE4LjQzMTYgMTAuOTkzIDE4LjExNzkgMTAuODc4MyAxNy44MTM5IDEwLjc0MTJDMTcuMzE3MiAxMC40OTg4IDE3LjI4NjQgOS41NTQ1NCAxNy44NDg3IDkuMjU1NkMxOC4xMzY3IDkuMDkzMTIgMTguNDYwNyA5LjAwNTMzIDE4Ljc5MTMgOS4wMDAyNEMxOS4xMjE5IDguOTk1MTQgMTkuNDQ4NSA5LjA3MjkxIDE5Ljc0MTMgOS4yMjY0NEMyMC4xMDQ1IDkuNDI2OTUgMjAuMzA1MiA5LjgzMTg0IDIwLjI0NTUgMTAuMjQyN0gyMC4wMDk3QzIwLjAwOTcgMTAuMjMxMyAxOS45ODgzIDEwLjIyMTIgMTkuOTg4MyAxMC4yMDk2QzE5Ljk1OTEgOS40NTc3MSAxOS4zMjcgOS4yMjI1NiAxOC42NDg1IDkuMjg4NjRDMTguNDQzNCA5LjMxMTQzIDE4LjI0OTEgOS4zNzM0IDE4LjA2NjggOS40NjVDMTcuOTU3MiA5LjUxNTA0IDE3Ljg2NTkgOS41OTc5IDE3LjgwNTUgOS43MDIxMkMxNy43NDUxIDkuODA2MzMgMTcuNzE4NiA5LjkyNjc1IDE3LjcyOTYgMTAuMDQ2N0MxNy43Mjk4IDEwLjE2NjcgMTcuNzY3MiAxMC4yODM4IDE3LjgzNjcgMTAuMzgxN0MxNy45MDYxIDEwLjQ3OTYgMTguMDA0MiAxMC41NTM2IDE4LjExNzQgMTAuNTkzNUMxOC40MTM2IDEwLjcwMjIgMTguNzI4IDEwLjc3MiAxOS4wMzQ1IDEwLjg1NzJMMTkuNzc1IDExLjA1MDhDMTkuOTQzMyAxMS4xMDYxIDIwLjA5MDkgMTEuMjExMSAyMC4xOTgyIDExLjM1MjFDMjAuMzA1NSAxMS40OTMgMjAuMzY3NiAxMS42NjMyIDIwLjM3NjEgMTEuODQwMUMyMC40MzUzIDEyLjIzNzcgMjAuMjMyNSAxMi42Mjg1IDE5Ljg3MzkgMTIuODA5NkMxOS4yMjYzIDEzLjE3NiAxOC4xNTk4IDEzLjA3OTIgMTcuNjg0NyAxMi42MTZDMTcuNDQxNiAxMi4zNzE1IDE3LjMwNiAxMi4wMzk1IDE3LjMwODcgMTEuNjk1TDE3LjMwODEgMTEuNjk1MlpNMjMuODY1NiAxMC4yNDI5SDIzLjYwNzdDMjMuNjA3NyAxMC4yMDggMjMuNTk0IDEwLjE3NDUgMjMuNTkwMSAxMC4xNDc5QzIzLjU4NiA5Ljk1NDUzIDIzLjUxNTYgOS43Njg0OSAyMy4zOTA2IDkuNjIwOTNDMjMuMjY1NiA5LjQ3MzM3IDIzLjA5MzcgOS4zNzMyNiAyMi45MDM2IDkuMzM3NEMyMi41NDUyIDkuMjM0NTkgMjIuMTYyOCA5LjI1MzAxIDIxLjgxNTkgOS4zODk4MUMyMS42Nzg3IDkuNDI5MDcgMjEuNTU3OSA5LjUxMTY3IDIxLjQ3MTYgOS42MjUyN0MyMS4zODUyIDkuNzM4ODcgMjEuMzM4IDkuODc3MzcgMjEuMzM2OSAxMC4wMkMyMS4zMzIgMTAuMTYwMSAyMS4zNzU2IDEwLjI5NzYgMjEuNDYwNCAxMC40MDkzQzIxLjU0NTIgMTAuNTIwOSAyMS42NjU5IDEwLjU5OTkgMjEuODAyMiAxMC42MzI3TDIyLjk4MTEgMTAuOTM1M0MyMy4xMDg2IDEwLjk2NTkgMjMuMjM0MSAxMS4wMDQxIDIzLjM1NzEgMTEuMDQ5N0MyMy43MzMgMTEuMTg2NCAyMy45ODgyIDExLjUzNTUgMjMuOTk5NiAxMS45MzQ1QzI0LjAwNTIgMTIuMTI5NyAyMy45NTE3IDEyLjMyMjIgMjMuODQ1OSAxMi40ODY1QzIzLjc0MDIgMTIuNjUwNyAyMy41ODczIDEyLjc3OTIgMjMuNDA3MiAxMi44NTVDMjMuMTMzNiAxMi45NzkzIDIyLjgzNyAxMy4wNDUgMjIuNTM2NSAxMy4wNDgxQzIyLjIzNiAxMy4wNTExIDIxLjkzODEgMTIuOTkxMyAyMS42NjIxIDEyLjg3MjVDMjEuNDM1IDEyLjc3NDYgMjEuMjQzNCAxMi42MDk1IDIxLjExMzEgMTIuMzk5NEMyMC45ODI3IDEyLjE4OTQgMjAuOTE5OSAxMS45NDQ0IDIwLjkzMjkgMTEuNjk3NUgyMS4xODQ5QzIxLjI3OTcgMTIuMTU0MyAyMS41OTM1IDEyLjUzNDggMjIuMDIzOSAxMi43MTQ4QzIyLjQ1NDMgMTIuODk0OCAyMi45NDU4IDEyLjg1MDYgMjMuMzM3MiAxMi41OTczQzIzLjQ1NDcgMTIuNTM2MiAyMy41NTIyIDEyLjQ0MjcgMjMuNjE4MiAxMi4zMjhDMjMuNjg0MSAxMi4yMTMyIDIzLjcxNTkgMTIuMDgxOSAyMy43MDk1IDExLjk0OTdDMjMuNzE1NCAxMS44MTk1IDIzLjY3ODYgMTEuNjkwOSAyMy42MDQ3IDExLjU4MzRDMjMuNTMwOSAxMS40NzYgMjMuNDI0IDExLjM5NTYgMjMuMzAwMyAxMS4zNTQzQzIyLjk5NzcgMTEuMjQxOCAyMi42NzYgMTEuMTgxOSAyMi4zNjc3IDExLjA4MDlDMjIuMDQ1MSAxMC45OTEgMjEuNzI5NiAxMC44Nzc2IDIxLjQyMzUgMTAuNzQxN0MyMC45Mzg2IDEwLjUwMzEgMjAuODk5OSA5LjU2NjYyIDIxLjQ1MjcgOS4yNjc5MUMyMS43NDQyIDkuMDk4NjEgMjIuMDc0NSA5LjAwNzY2IDIyLjQxMTYgOS4wMDM5MUMyMi43NDg3IDkuMDAwMTUgMjMuMDgxIDkuMDgzNzIgMjMuMzc2MiA5LjI0NjQ5QzIzLjU0NSA5LjM0NzI2IDIzLjY4MDkgOS40OTQ5NSAyMy43Njc0IDkuNjcxNTdDMjMuODUzOCA5Ljg0ODIgMjMuODg3IDEwLjA0NjEgMjMuODYyOSAxMC4yNDEzTDIzLjg2NTYgMTAuMjQyOVpNNi45NzQ5OSAxMi45Mzg0QzYuODczNDYgMTIuOTc2OCA2Ljc2MTM5IDEyLjk3NjcgNi42NTk5MyAxMi45MzgxQzYuNTU4NDcgMTIuODk5NSA2LjQ3NDY1IDEyLjgyNTEgNi40MjQyNyAxMi43MjlMNS40MjE3MyAxMS4zNDI1TDUuMjc2MzYgMTEuMTQ4OEw0LjExMjk1IDEyLjczMUM0LjA2NTUzIDEyLjgyMyAzLjk4NjI0IDEyLjg5NDYgMy44ODk4OCAxMi45MzI1QzMuNzkzNTIgMTIuOTcwMyAzLjY4NjY5IDEyLjk3MTcgMy41ODkzNCAxMi45MzY1TDUuMDg4MTUgMTAuOTI1OEwzLjY5MzcgOS4xMDg4N0MzLjkwMDU5IDkuMDM0MTMgNC4xMzExOCA5LjExNTI1IDQuMjQ2MjQgOS4zMDI1NEw1LjI4NTI0IDEwLjcwNjFMNi4zMzA0IDkuMzA4MDFDNi4zNzgxNyA5LjIxNzU3IDYuNDU3NTEgOS4xNDc4NSA2LjU1MzM0IDkuMTEyMDlDNi42NDkxNyA5LjA3NjM0IDYuNzU0NzkgOS4wNzcwNiA2Ljg1MDEzIDkuMTE0MTFMNi4zMDg5OCA5LjgzMjA3TDUuNTc1OTggMTAuNzg2MUM1LjU1NTY0IDEwLjgwNDIgNS41MzkzNiAxMC44MjY1IDUuNTI4MjIgMTAuODUxNEM1LjUxNzA3IDEwLjg3NjMgNS41MTEzMSAxMC45MDMzIDUuNTExMzEgMTAuOTMwNUM1LjUxMTMxIDEwLjk1NzggNS41MTcwNyAxMC45ODQ4IDUuNTI4MjIgMTEuMDA5N0M1LjUzOTM2IDExLjAzNDYgNS41NTU2NCAxMS4wNTY4IDUuNTc1OTggMTEuMDc1TDYuOTcyMDMgMTIuOTM4NEg2Ljk3NDk5Wk0xMy4zMzg5IDkuMDg5NVY5LjM2MjkyQzEzLjE0MjggOS4zNTAwNiAxMi45NDYxIDkuMzc4NDYgMTIuNzYxNyA5LjQ0NjI5QzEyLjU3NzIgOS41MTQxMiAxMi40MDkgOS42MTk4OCAxMi4yNjggOS43NTY3M0MxMi4xMjY5IDkuODkzNTkgMTIuMDE2MSAxMC4wNTg1IDExLjk0MjcgMTAuMjQwOEMxMS44NjkzIDEwLjQyMzEgMTEuODM1IDEwLjYxODggMTEuODQxOSAxMC44MTUyQzExLjg0MTkgMTEuNDUzOCAxMS44NDE5IDEyLjA5MjQgMTEuODQxOSAxMi43MzFWMTIuOTQ4MkgxMS41NjQ2VjkuMTA2NTlIMTEuODM4VjkuODkzODJDMTIuMTczNCA5LjMxOTYzIDEyLjY5MTEgOS4xMDY1OSAxMy4zNDA3IDkuMDkxMDlMMTMuMzM4OSA5LjA4OTVaTTAuMDAwNDU1Nzc5IDEwLjkwMDdMMC4xMjI1ODQgMTAuMjk3NkMwLjQ1Nzk4MiA5LjEwNDk5IDEuODI1MDkgOC42MDg3MyAyLjc2NTY2IDkuMzQ3NDNDMy4zMTYzOCA5Ljc3OTg5IDMuNDUzNzcgMTAuMzkyNiAzLjQyNjg5IDExLjA4M0gwLjMyNDIzM0MwLjI3NDEwNSAxMi4zMTYxIDEuMTYzODcgMTMuMDYwNyAyLjMwMTk4IDEyLjY4MDdDMi42NzcwMyAxMi41NDQgMi45NTkzNCAxMi4yMzIzIDMuMDUyMyAxMS44NDQ5QzMuMTEyNDUgMTEuNjUxMiAzLjIxMTc5IDExLjYxOCAzLjM5MzYyIDExLjY3NEMzLjM2MzMgMTEuOTEwMSAzLjI3OTg0IDEyLjEzNjIgMy4xNDk1MiAxMi4zMzU0QzMuMDE5MjEgMTIuNTM0NiAyLjg0NTQzIDEyLjcwMTYgMi42NDEyNSAxMi44MjRDMi4zMDM5MyAxMy4wMDg1IDEuOTE2OTIgMTMuMDgxNiAxLjUzNTU1IDEzLjAzMjhDMS4xNTQxOCAxMi45ODQxIDAuNzk3OTkgMTIuODE2IDAuNTE3OTA2IDEyLjU1MjZDMC4yNDA4MzkgMTIuMjQxMSAwLjA3MzU5NjEgMTEuODQ3NCAwLjA0MTAxMzMgMTEuNDMxNkMwLjA0MTAxMzMgMTEuMzYzMiAwLjAxODIyODIgMTEuMjk5NCAwLjAwMjI3ODU3IDExLjIzNzlDMC4wMDA3NTk1NTcgMTEuMTIyOSAwIDExLjAxMDUgMCAxMC45MDA3SDAuMDAwNDU1Nzc5Wk0wLjMyODEwNiAxMC44MTczSDMuMTMzODdDMy4xMTYzMiA5LjkyMzQ0IDIuNTUyMTYgOS4yODkzMyAxLjc5OTggOS4yODM0QzAuOTYyMjE3IDkuMjcyMDEgMC4zNjI5NjcgOS44OTIyMiAwLjMyNjA1NiAxMC44MTM0TDAuMzI4MTA2IDEwLjgxNzNaIiBmaWxsPSJibGFjayIvPgo8L3N2Zz4K) Express This template demonstrates building the Express framework for Platform.sh. It includes a minimalist application skeleton that demonstrates how to connect to a MariaDB server. It is intended for you to use as a starting point and modify for your own needs. Express is a minimalist web framework written in Node.js. ###### Features: - Node.js 14 - MariaDB 10.4 - Automatic TLS certificates - npm-based build View the [repository on GitHub](https://github.com/platformsh-templates/express). ![Deploy on ](https://platform.sh/images/deploy/lg-blue.svg) Gatsby ![Gatsby](data:image/svg+xml,%3Csvg xmlns='http://www.w3.org/2000/svg' width='225' height='225'%3E%3Cg %3E%3Cpath d='M112.5 0A112.5 112.5 0 1 0 225 112.5 112.5 112.5 0 0 0 112.5 0zM24.17 113.67l87.16 87.16a88.35 88.35 0 0 1-87.16-87.16zm108.1 85L26.38 92.73a88.35 88.35 0 0 1 157.54-32.22L171.69 71.3a72.13 72.13 0 0 0-127 16.64l92.38 92.38a72.26 72.26 0 0 0 45.46-50.51h-38.3V112.5h56.61a88.38 88.38 0 0 1-68.57 86.12z' style='fill:%23744c9e' /%3E%3C/g%3E%3C/svg%3E) Gatsby This template builds a simple application using Gatsby. Gatsby is a free and open source framework based on React that helps developers build blazing fast websites and apps. The website is statically generated by a Node.js application during the build step, and then served statically at runtime. Gatsby is a free and open source framework based on React that helps developers build blazing fast websites and apps. ###### Features: - Node.js 16 - Automatic TLS certificates - yarn-based build View the [repository on GitHub](https://github.com/platformsh-templates/gatsby). ![Deploy on ](https://platform.sh/images/deploy/lg-blue.svg) Koa ![Koa](data:image/svg+xml,%3Csvg xmlns='http://www.w3.org/2000/svg' width='105.6' height='225'%3E%3Cg %3E%3Cpath d='M21 0v149.43L87 75h3l-48.89 55.23L105.6 225h-21L29 143.31l-8.1 9.32V225H0V0z' style='fill:%2316111c' /%3E%3C/g%3E%3C/svg%3E) Koa This template demonstrates building the Koa framework for Platform.sh. It includes a minimalist application skeleton that demonstrates how to connect to a MariaDB server for data storage. It is intended for you to use as a starting point and modify for your own needs. Koa is a lightweight web microframework for Node.js. ###### Features: - Node.js 10 - MariaDB 10.2 - Automatic TLS certificates - npm-based build View the [repository on GitHub](https://github.com/platformsh-templates/koa). ![Deploy on ](https://platform.sh/images/deploy/lg-blue.svg) Next.js ![Next.js](data:image/svg+xml;base64,PHN2ZyB3aWR0aD0iMjQiIGhlaWdodD0iMjQiIHZpZXdCb3g9IjAgMCAyNCAyNCIgZmlsbD0ibm9uZSIgeG1sbnM9Imh0dHA6Ly93d3cudzMub3JnLzIwMDAvc3ZnIj4KPHBhdGggZD0iTTUuNjYyOTkgOC43ODE4SDEwLjE4OTZWOS4xNDIxMUg2LjA3NzkzVjExLjg1MzlIOS45NDQ0MlYxMi4yMTQySDYuMDc3OTNWMTUuMTkxNEgxMC4yMzY4VjE1LjU1MThINS42NjI5OVY4Ljc4MThaTTEwLjU5NTEgOC43ODE4SDExLjA3NjFMMTMuMjA3NCAxMS43NTkxTDE1LjM4NTggOC43ODE4TDE4LjM0ODggNUwxMy40ODA4IDEyLjA3MkwxNS45ODkzIDE1LjU1MThIMTUuNDg5NUwxMy4yMDc0IDEyLjM4NDlMMTAuOTE1OCAxNS41NTE4SDEwLjQyNTRMMTIuOTUyNyAxMi4wNzJMMTAuNTk1MSA4Ljc4MThaTTE2LjE2ODUgOS4xNDIxMVY4Ljc4MThIMjEuMzI3VjkuMTQyMTFIMTguOTUwNVYxNS41NTE4SDE4LjUzNTZWOS4xNDIxMUgxNi4xNjg1Wk0wIDguNzgxOEgwLjUxODY3NUw3LjY3MDkgMTkuNUw0LjcxNTIzIDE1LjU1MThMMC40MzM4MDEgOS4yOTM4MkwwLjQxNDk0IDE1LjU1MThIMFY4Ljc4MThaTTIxLjI4NTIgMTUuMDgyN0MyMS4yMDA0IDE1LjA4MjcgMjEuMTM2OCAxNS4wMTY5IDIxLjEzNjggMTQuOTMxOUMyMS4xMzY4IDE0Ljg0NjkgMjEuMjAwNCAxNC43ODExIDIxLjI4NTIgMTQuNzgxMUMyMS4zNzEgMTQuNzgxMSAyMS40MzM1IDE0Ljg0NjkgMjEuNDMzNSAxNC45MzE5QzIxLjQzMzUgMTUuMDE2OSAyMS4zNzEgMTUuMDgyNyAyMS4yODUyIDE1LjA4MjdaTTIxLjY5MjkgMTQuNjg2SDIxLjkxNDlDMjEuOTE4IDE0LjgwNjQgMjIuMDA1OCAxNC44ODc0IDIyLjEzNDkgMTQuODg3NEMyMi4yNzkzIDE0Ljg4NzQgMjIuMzYxIDE0LjgwMDQgMjIuMzYxIDE0LjYzNzRWMTMuNjA1MkgyMi41ODcxVjE0LjYzODRDMjIuNTg3MSAxNC45MzE5IDIyLjQxNzUgMTUuMTAwOSAyMi4xMzcgMTUuMTAwOUMyMS44NzM2IDE1LjEwMDkgMjEuNjkyOSAxNC45MzcgMjEuNjkyOSAxNC42ODZaTTIyLjg4MjggMTQuNjcyOEgyMy4xMDY4QzIzLjEyNiAxNC44MTE1IDIzLjI2MTIgMTQuODk5NSAyMy40NTYgMTQuODk5NUMyMy42Mzc3IDE0Ljg5OTUgMjMuNzcwOSAxNC44MDU0IDIzLjc3MDkgMTQuNjc1OUMyMy43NzA5IDE0LjU2NDYgMjMuNjg2MSAxNC40OTc4IDIzLjQ5MzQgMTQuNDUyMkwyMy4zMDU2IDE0LjQwNjdDMjMuMDQyMiAxNC4zNDUgMjIuOTIyMSAxNC4yMTc0IDIyLjkyMjEgMTQuMDAyOUMyMi45MjIxIDEzLjc0MjggMjMuMTM0MSAxMy41Njk4IDIzLjQ1MiAxMy41Njk4QzIzLjc0NzcgMTMuNTY5OCAyMy45NjM3IDEzLjc0MjggMjMuOTc2OCAxMy45ODg3SDIzLjc1NjhDMjMuNzM1NiAxMy44NTQxIDIzLjYxODUgMTMuNzcwMSAyMy40NDkgMTMuNzcwMUMyMy4yNzAzIDEzLjc3MDEgMjMuMTUxMiAxMy44NTYyIDIzLjE1MTIgMTMuOTg3N0MyMy4xNTEyIDE0LjA5MiAyMy4yMjc5IDE0LjE1MTcgMjMuNDE3NyAxNC4xOTYyTDIzLjU3ODEgMTQuMjM1N0MyMy44NzY5IDE0LjMwNTUgMjQgMTQuNDI2OSAyNCAxNC42NDY1QzI0IDE0LjkyNTkgMjMuNzg0IDE1LjEwMDkgMjMuNDM4OSAxNS4xMDA5QzIzLjExNTkgMTUuMTAwOSAyMi44OTg5IDE0LjkzMzkgMjIuODgyOCAxNC42NzI4WiIgZmlsbD0iYmxhY2siLz4KPC9zdmc+Cg==) Next.js This template builds a simple application using the Next.js web framework. It includes a minimal application skeleton that demonstrates how to set up an optimized build using Next.js and Yarn, as well as how to begin defining individual pages (such as the ``/api/hello``) endpoint that comes pre-defined with this template. Next.js is an open-source web framework written for Javascript. ###### Features: - Node.js 14 - Automatic TLS certificates - yarn-based build View the [repository on GitHub](https://github.com/platformsh-templates/nextjs). ![Deploy on ](https://platform.sh/images/deploy/lg-blue.svg) NuxtJS ![NuxtJS](data:image/svg+xml;base64,PHN2ZyB3aWR0aD0iMjQiIGhlaWdodD0iMjQiIHZpZXdCb3g9IjAgMCAyNCAyNCIgZmlsbD0ibm9uZSIgeG1sbnM9Imh0dHA6Ly93d3cudzMub3JnLzIwMDAvc3ZnIj4KPGcgY2xpcC1wYXRoPSJ1cmwoI2NsaXAwXzY2NzRfMTU0NjApIj4KPHBhdGggZmlsbC1ydWxlPSJldmVub2RkIiBjbGlwLXJ1bGU9ImV2ZW5vZGQiIGQ9Ik03LjMwNDIxIDIwLjM4OUM3LjI4NjQzIDIwLjM1NzEgNy4yNzA3NSAyMC4zMjM5IDcuMjU3MjcgMjAuMjg5OUM3LjE2MTExIDIwLjA2NjMgNy4xMzE0NiAxOS44MTkyIDcuMTcxOTQgMTkuNTc4OUgxLjUwMDQ3TDkuOTI3MTQgNC41OTc2N0wxMi42OTQxIDkuNTEwMjRMMTMuNDk2MiA4LjA3NjMzTDExLjA4NjYgMy43ODUzN0MxMS4wMTgzIDMuNjYxNDcgMTAuNjEwOSAzIDkuOTA5MDEgM0M5LjU4OTAxIDMgOS4xMzY3NCAzLjEzODk3IDguNzY2NjEgMy43OTUwNkwwLjIyNzk0IDE4Ljk1NzNDMC4xNTU0MDcgMTkuMDg4NyAtMC4xOTg3MjcgMTkuNzc4MiAwLjE1MzI3MyAyMC4zODlDMC4zMTMyNzMgMjAuNjY3IDAuNjUzNTQgMjAuOTk3NyAxLjQwMzQxIDIwLjk5NzdIOC41NTAwN0M3LjgwODc0IDIwLjk5NzcgNy40Njc0MSAyMC42NjggNy4zMDQyMSAyMC4zODlaIiBmaWxsPSIjMDBDNThFIi8+CjxwYXRoIGZpbGwtcnVsZT0iZXZlbm9kZCIgY2xpcC1ydWxlPSJldmVub2RkIiBkPSJNMjMuNzQ3IDE4Ljk1NzNMMTYuNzMwNCA2LjQ3MzI5QzE2LjY1NzkgNi4zNDI5MyAxNi4yNTI2IDUuNjc4MjIgMTUuNTQ3NSA1LjY3ODIyQzE1LjIyNzUgNS42NzgyMiAxNC43NzUyIDUuODE1MDQgMTQuNDA2MiA2LjQ3MTEzTDEzLjQ5ODQgOC4wNzYzNEwxNC4zMDU5IDkuNTEwMjVMMTUuNTU1IDcuMjc2OTdMMjIuNDk2OCAxOS41Nzg5SDE5Ljg1NjhDMTkuODkwNyAxOS43ODIxIDE5Ljg3MiAxOS45OTA2IDE5LjgwMjQgMjAuMTg0M0MxOS43ODc3IDIwLjIyNzIgMTkuNzY5MSAyMC4yNjg3IDE5Ljc0NyAyMC4zMDgyTDE5LjcyNDYgMjAuMzUzNUMxOS4zNjk0IDIwLjk2NDMgMTguNjAyNCAyMC45OTk5IDE4LjQ1MiAyMC45OTk5SDIyLjU4MjJDMjIuNzM0NyAyMC45OTk5IDIzLjQ5OTUgMjAuOTY2NSAyMy44NTM2IDIwLjM1MzVDMjQuMDExNSAyMC4wNzU1IDI0LjEyMzUgMTkuNjA5MSAyMy43NDcgMTguOTU3M1oiIGZpbGw9IiMxMDg3NzUiLz4KPHBhdGggZD0iTTE5LjcyNDYgMjAuMzUzOEwxOS43NDcgMjAuMzA4NkMxOS43NjkxIDIwLjI2OSAxOS43ODc3IDIwLjIyNzYgMTkuODAyNCAyMC4xODQ3QzE5Ljg3MiAxOS45OTEgMTkuODkwNyAxOS43ODI0IDE5Ljg1NjggMTkuNTc5MkMxOS44MTgzIDE5LjM1OTcgMTkuNzQwNiAxOS4xNDkgMTkuNjI3NSAxOC45NTc2TDE0LjMxMDIgOS41MTA1N0wxMy40OTg0IDguMDc2NjZMMTIuNjk0MiA5LjUxMDU3TDcuMzc2ODMgMTguOTU3NkM3LjI3MzM5IDE5LjE1MTIgNy4yMDQwOSAxOS4zNjE2IDcuMTcyMDMgMTkuNTc5MkM3LjEyOTIxIDE5LjgxODggNy4xNTYyNiAyMC4wNjU5IDcuMjQ5OSAyMC4yOTAyQzcuMjYzMzcgMjAuMzI0MyA3LjI3OTA1IDIwLjM1NzQgNy4yOTY4MyAyMC4zODk0QzcuNDU2ODMgMjAuNjY3MyA3Ljc5NzEgMjAuOTk4IDguNTQ2OTcgMjAuOTk4SDE4LjQ0NDZDMTguNjAyNCAyMC45OTggMTkuMzY5NCAyMC45NjQ2IDE5LjcyNDYgMjAuMzUzOFpNMTMuNDk4NCAxMC45NDQ1TDE4LjM1NzEgMTkuNTc5Mkg4LjY0MDgzTDEzLjQ5ODQgMTAuOTQ0NVoiIGZpbGw9ImJsYWNrIi8+CjwvZz4KPGRlZnM+CjxjbGlwUGF0aCBpZD0iY2xpcDBfNjY3NF8xNTQ2MCI+CjxyZWN0IHdpZHRoPSIyNCIgaGVpZ2h0PSIyNCIgZmlsbD0id2hpdGUiLz4KPC9jbGlwUGF0aD4KPC9kZWZzPgo8L3N2Zz4K) NuxtJS This template builds a simple application using the NuxtJS web framework that can be used as a starting point. NuxtJS is an open-source web framework based on Vue.js. ###### Features: - Node.js 18 - Automatic TLS certificates - yarn-based build View the [repository on GitHub](https://github.com/platformsh-templates/nuxtjs). ![Deploy on ](https://platform.sh/images/deploy/lg-blue.svg) strapi4 ![strapi4](data:image/svg+xml;base64,PD94bWwgdmVyc2lvbj0iMS4wIiBlbmNvZGluZz0iVVRGLTgiPz4KPHN2ZyB3aWR0aD0iMjQ0cHgiIGhlaWdodD0iMjQ0cHgiIHZpZXdCb3g9IjAgMCAyNDQgMjQ0IiB2ZXJzaW9uPSIxLjEiIHhtbG5zPSJodHRwOi8vd3d3LnczLm9yZy8yMDAwL3N2ZyIgeG1sbnM6eGxpbms9Imh0dHA6Ly93d3cudzMub3JnLzE5OTkveGxpbmsiPgogICAgPCEtLSBHZW5lcmF0b3I6IFNrZXRjaCA1NS4yICg3ODE4MSkgLSBodHRwczovL3NrZXRjaGFwcC5jb20gLS0+CiAgICA8dGl0bGU+TG9nbzwvdGl0bGU+CiAgICA8ZGVzYz5DcmVhdGVkIHdpdGggU2tldGNoLjwvZGVzYz4KICAgIDxnIGlkPSJTb2NpYWwtQ292ZXIiIHN0cm9rZT0ibm9uZSIgc3Ryb2tlLXdpZHRoPSIxIiBmaWxsPSJub25lIiBmaWxsLXJ1bGU9ImV2ZW5vZGQiPgogICAgICAgIDxnIGlkPSJNb25vZ3JhbS1XaGl0ZS1CYWNrZ3JvdW5kIiB0cmFuc2Zvcm09InRyYW5zbGF0ZSgtNTY3LjAwMDAwMCwgLTM1Ny4wMDAwMDApIiBmaWxsPSIjOEU3NUZGIj4KICAgICAgICAgICAgPGcgaWQ9IkxvZ28iIHRyYW5zZm9ybT0idHJhbnNsYXRlKDU2NC4wMDAwMDAsIDM1Ny4wMDAwMDApIj4KICAgICAgICAgICAgICAgIDxnIGlkPSJNb25vZ3JhbSIgdHJhbnNmb3JtPSJ0cmFuc2xhdGUoMC4wMDAwMDAsIDAuNzYwMzA1KSI+CiAgICAgICAgICAgICAgICAgICAgPHBhdGggZD0iTTE2NC44OTI2NjIsMTY1LjA3MjQ4IEwxNjQuODkyNjYyLDg2LjM0MzU2NSBDMTY0Ljg5MjY2Miw4My41Mzk1NTI3IDE2Mi42MTk1NjEsODEuMjY2NDUxNiAxNTkuODE1NTQ5LDgxLjI2NjQ1MTYgTDgxLjE3NzkyNiw4MS4yNjY0NTE2IEw4MS4xNzc5MjYsMCBMMjQwLjk5MzQ3NSwwIEMyNDMuNzk3NDg3LC0xLjU0NTc4NjhlLTE0IDI0Ni4wNzA1ODgsMi4yNzMxMDExIDI0Ni4wNzA1ODgsNS4wNzcxMTM0IEwyNDYuMDcwNTg4LDE2NS4wNzI0OCBMMTY0Ljg5MjY2MiwxNjUuMDcyNDggWiIgaWQ9IkNvbWJpbmVkLVNoYXBlLUNvcHkiPjwvcGF0aD4KICAgICAgICAgICAgICAgICAgICA8cGF0aCBkPSJNODEuMTc3OTI2LDAgTDgxLjE3NzkyNiw4MS4yNjY0NTE2IEw2LjEyMzg5Nzg3LDgxLjI2NjQ1MTYgQzQuNzIxODkxNzEsODEuMjY2NDUxNiAzLjU4NTM0MTE2LDgwLjEyOTkwMSAzLjU4NTM0MTE2LDc4LjcyNzg5NDkgQzMuNTg1MzQxMTYsNzguMDU1MTA3MSAzLjg1MjQxNTgyLDc3LjQwOTgzNDYgNC4zMjc4ODkyNiw3Ni45MzM4NDI3IEw4MS4xNzc5MjYsMCBaIiBpZD0iUmVjdGFuZ2xlLUNvcHktNiIgb3BhY2l0eT0iMC40MDQ5ODkiPjwvcGF0aD4KICAgICAgICAgICAgICAgICAgICA8cGF0aCBkPSJNMjQ2LjA3MDU4OCwxNzEuMjA1ODI0IEwyNDYuMDcwNTg4LDI0Ni4zMzg5MzEgTDE2NC44OTI2NjIsMjQ2LjMzODkzMSBMMjQxLjczNjAyMywxNjkuNDExNzcyIEMyNDIuNzI2ODUxLDE2OC40MTk4NjQgMjQ0LjMzNDE3NiwxNjguNDE4OTg4IDI0NS4zMjYwODQsMTY5LjQwOTgxNiBDMjQ1LjgwMjc1NCwxNjkuODg1OTY3IDI0Ni4wNzA1ODgsMTcwLjUzMjA3OCAyNDYuMDcwNTg4LDE3MS4yMDU4MjQgWiIgaWQ9IlJlY3RhbmdsZS1Db3B5LTciIG9wYWNpdHk9IjAuNDA0OTg5IiB0cmFuc2Zvcm09InRyYW5zbGF0ZSgyMDUuNDgxNjI1LCAyMDUuNzA1NzA2KSBzY2FsZSgtMSwgLTEpIHRyYW5zbGF0ZSgtMjA1LjQ4MTYyNSwgLTIwNS43MDU3MDYpICI+PC9wYXRoPgogICAgICAgICAgICAgICAgICAgIDxwYXRoIGQ9Ik04MS4xNzc5MjYsODEuMjY2NDUxNiBMMTYyLjM1NDEwNiw4MS4yNjY0NTE2IEMxNjMuNzU2MTEyLDgxLjI2NjQ1MTYgMTY0Ljg5MjY2Miw4Mi40MDMwMDIxIDE2NC44OTI2NjIsODMuODA1MDA4MyBMMTY0Ljg5MjY2MiwxNjUuMDcyNDggTDg2LjI1NTAzOTQsMTY1LjA3MjQ4IEM4My40NTEwMjcxLDE2NS4wNzI0OCA4MS4xNzc5MjYsMTYyLjc5OTM3OSA4MS4xNzc5MjYsMTU5Ljk5NTM2NiBMODEuMTc3OTI2LDgxLjI2NjQ1MTYgWiIgaWQ9IlJlY3RhbmdsZS1Db3B5LTgiIG9wYWNpdHk9IjAuNDA0OTg5Ij48L3BhdGg+CiAgICAgICAgICAgICAgICA8L2c+CiAgICAgICAgICAgIDwvZz4KICAgICAgICA8L2c+CiAgICA8L2c+Cjwvc3ZnPg==) strapi4 This template builds a Strapi version 4 backend for Platform.sh, which can be used to quickly create an API that can be served by itself or as a Headless CMS data source for another frontend application in the same project. This repository does not include a frontend application, but you can add one of your choice and access Strapi by defining it in a relationship in your frontend's ``.platform.app.yaml`` file. Strapi is a Headless CMS framework written in Node.js. ###### Features: - Node.js 12 - PostgreSQL 12 - Automatic TLS certificates - yarn-based build View the [repository on GitHub](https://github.com/platformsh-templates/strapi4). ![Deploy on ](https://platform.sh/images/deploy/lg-blue.svg) ##### PHP View the [PHP documentation](https://docs.platform.sh/languages/php.md). Drupal 9 ![Drupal 9](data:image/svg+xml,%3Csvg xmlns='http://www.w3.org/2000/svg' width='186.52541' height='243.71308' viewBox='0 0 186.52541 243.71308'%3E%3Ctitle%3ERisorsa 85%3C/title%3E%3Cg id='Livello_2' data-name='Livello 2'%3E%3Cg id='Livello_1-2' data-name='Livello 1'%3E%3Cpath d='M131.64024,51.90954C114.49124,34.76866,98.12945,18.42858,93.26,0,88.39024,18.42858,72.02583,34.76866,54.8797,51.90954,29.16037,77.61263,0,106.7432,0,150.434a93.26271,93.26271,0,1,0,186.52541,0c0-43.688-29.158-72.8214-54.88517-98.52449M39.63956,172.16578c-5.71847-.19418-26.82308-36.57089,12.32937-75.303l25.90873,28.30088a2.21467,2.21467,0,0,1-.173,3.30485c-6.18245,6.34085-32.53369,32.7658-35.809,41.90292-.676,1.886-1.66339,1.81463-2.25619,1.79436M93.26283,220.1092a32.07521,32.07521,0,0,1-32.07544-32.07543A33.42322,33.42322,0,0,1,69.1821,166.8471c5.7836-7.07224,24.07643-26.96358,24.07643-26.96358s18.01279,20.18332,24.03326,26.89607a31.36794,31.36794,0,0,1,8.04647,21.25418A32.07551,32.07551,0,0,1,93.26283,220.1092m61.3923-52.015c-.69131,1.51192-2.25954,4.036-4.37617,4.113-3.77288.13741-4.176-1.79579-6.96465-5.92291-6.12235-9.06007-59.55167-64.89991-69.54517-75.69925-8.79026-9.49851-1.23783-16.195,2.26549-19.70431C80.42989,66.47768,93.25949,53.656,93.25949,53.656s38.25479,36.29607,54.19029,61.09626,10.44364,46.26024,7.20535,53.342' style='fill:%23009cde'/%3E%3C/g%3E%3C/g%3E%3C/svg%3E) Drupal 9 This template builds Drupal 9 using the "Drupal Recommended" Composer project. It is pre-configured to use MariaDB and Redis for caching. The Drupal installer will skip asking for database credentials as they are already provided. Drupal is a flexible and extensible PHP-based CMS framework. ###### Features: - PHP 8.0 - MariaDB 10.4 - Redis 6 - Drush included - Automatic TLS certificates - Composer-based build View the [repository on GitHub](https://github.com/platformsh-templates/drupal9). ![Deploy on ](https://platform.sh/images/deploy/lg-blue.svg) GovCMS 9 ![GovCMS 9](data:image/svg+xml,%3Csvg xmlns='http://www.w3.org/2000/svg' width='199.37' height='225'%3E%3Cdefs%3E%3Cstyle%3E.cls-1%7Bfill:%232ba9e0%7D%3C/style%3E%3C/defs%3E%3Cg %3E%3Cg %3E%3Cpath class='cls-1' d='M93.78 139.31a35.5 35.5 0 1 0 35.5 35.5 35.51 35.51 0 0 0-35.5-35.5zM138 132.51a61.17 61.17 0 0 1-9.26 92.49c29.31-9 53.56-31.06 64.4-57.73 15-36.92 1-64.67-22.43-89.87a45.68 45.68 0 0 1 1.15 10.11 46.88 46.88 0 0 1-33.86 45zM97.82 87.57A27.19 27.19 0 1 0 125 60.43a27.16 27.16 0 0 0-27.18 27.14z'/%3E%3Cpath class='cls-1' d='M47 214.22a61.17 61.17 0 0 1 39.55-100.1 46.82 46.82 0 0 1 44.75-72.89C116 28 100.72 14.62 88.66 0c6.13 64.13-58.4 40.82-82.32 100C-9.62 139.58 4.79 188.56 47 214.22z'/%3E%3C/g%3E%3C/g%3E%3C/svg%3E) GovCMS 9 This template builds the Australian government's GovCMS Drupal 9 distribution using the Drupal Composer project for better flexibility. It is pre-configured to use MariaDB and Redis for caching. The Drupal installer will skip asking for database credentials as they are already provided. GovCMS is a Drupal distribution built for the Australian government, and includes configuration optimized for managing government websites. ###### Features: - PHP 8.0 - MariaDB 10.4 - Redis 6 - Drush included - Automatic TLS certificates - Composer-based build View the [repository on GitHub](https://github.com/platformsh-templates/drupal9-govcms9). ![Deploy on ](https://platform.sh/images/deploy/lg-blue.svg) Laravel ![Laravel](data:image/svg+xml;base64,PHN2ZyB3aWR0aD0iMjQiIGhlaWdodD0iMjQiIHZpZXdCb3g9IjAgMCAyNCAyNCIgZmlsbD0ibm9uZSIgeG1sbnM9Imh0dHA6Ly93d3cudzMub3JnLzIwMDAvc3ZnIj4KPHBhdGggZD0iTTIzLjc3NjIgMTEuNDc2M0MyMy42MDk1IDExLjMwOTYgMjEuNDcwNyA4LjYxNTIgMjEuMTA5NSA4LjE3MDc1QzIwLjcyMDcgNy43MjYzMSAyMC41NTQgNy44MDk2NCAyMC4zMDQgNy44Mzc0MkMyMC4wNTQgNy44NjUyIDE3LjM1OTUgOC4zMzc0MiAxNy4wNTQgOC4zNjUyQzE2Ljc0ODQgOC40MjA3NSAxNi41NTQgOC41MzE4NiAxNi43NDg0IDguODA5NjRDMTYuOTE1MSA5LjA1OTY0IDE4LjY5MjkgMTEuNTU5NiAxOS4wODE4IDEyLjE0M0wxMS45OTg0IDEzLjgzNzRMNi4zODczMyA0LjQyMDc1QzYuMTY1MSA0LjA4NzQyIDYuMTA5NTUgMy45NzYzMSA1LjYwOTU1IDQuMDA0MDlDNS4xMDk1NSA0LjAzMTg2IDEuMTkyODggNC4zNjUyIDAuOTE1MTA2IDQuMzY1MkMwLjYzNzMyOCA0LjM5Mjk4IDAuMzMxNzcyIDQuNTA0MDkgMC42MDk1NSA1LjE3MDc1QzAuODg3MzI4IDUuODM3NDIgNS4zMzE3NyAxNS4zOTMgNS40NDI4OCAxNS42NzA4QzUuNTUzOTkgMTUuOTQ4NSA1Ljg4NzMzIDE2LjM5MyA2LjYzNzMzIDE2LjIyNjNDNy40MTUxIDE2LjAzMTkgMTAuMDgxOCAxNS4zMzc0IDExLjU1NCAxNC45NDg1QzEyLjMzMTggMTYuMzM3NCAxMy44ODczIDE5LjE3MDggMTQuMTkyOSAxOS41ODc0QzE0LjU4MTggMjAuMTQzIDE0Ljg1OTUgMjAuMDMxOSAxNS40NDI5IDE5Ljg2NTJDMTUuOTE1MSAxOS43MjYzIDIyLjcyMDcgMTcuMjgxOSAyMy4wMjYyIDE3LjE0M0MyMy4zMzE4IDE3LjAwNDEgMjMuNTI2MiAxNi45MjA4IDIzLjMwNCAxNi42MTUyQzIzLjEzNzMgMTYuMzkzIDIxLjM1OTUgMTMuOTc2MyAyMC40MTUxIDEyLjcyNjNDMjEuMDU0IDEyLjU1OTYgMjMuMzU5NSAxMS45NDg1IDIzLjYwOTUgMTEuODY1MkMyMy44ODczIDExLjc4MTkgMjMuOTQyOSAxMS42NDMgMjMuNzc2MiAxMS40NzYzWk0xMC45MTUxIDE0LjExNTJDMTAuODMxOCAxNC4xNDMgNi44NTk1NSAxNS4wODc0IDYuNjY1MSAxNS4xNDNDNi40NDI4OCAxNS4xOTg1IDYuNDQyODggMTUuMTcwOCA2LjQ0Mjg4IDE1LjA4NzRDNi4zODczMyAxNS4wMDQxIDEuNzIwNjYgNS4zMzc0MiAxLjYzNzMzIDUuMjI2MzFDMS41ODE3NyA1LjExNTIgMS41ODE3NyA1LjAwNDA5IDEuNjM3MzMgNS4wMDQwOUMxLjY5Mjg4IDUuMDA0MDkgNS4zODczMyA0LjY3MDc1IDUuNDk4NDQgNC42NzA3NUM1LjYzNzMzIDQuNjcwNzUgNS42MDk1NSA0LjY5ODUzIDUuNjY1MSA0Ljc4MTg2QzUuNjY1MSA0Ljc4MTg2IDEwLjg1OTUgMTMuNzU0MSAxMC45NDI5IDEzLjg5M0MxMS4wNTQgMTQuMDMxOSAxMC45OTg0IDE0LjA4NzQgMTAuOTE1MSAxNC4xMTUyWk0yMi4wODE4IDE2LjE5ODVDMjIuMTM3MyAxNi4zMDk2IDIyLjIyMDcgMTYuMzY1MiAyMS45OTg0IDE2LjQyMDhDMjEuODA0IDE2LjUwNDEgMTUuMzA0IDE4LjY5ODUgMTUuMTY1MSAxOC43NTQxQzE1LjAyNjIgMTguODA5NiAxNC45NDI5IDE4LjgzNzQgMTQuNzc2MiAxOC41ODc0QzE0LjYwOTUgMTguMzM3NCAxMi40OTg0IDE0LjY5ODUgMTIuNDk4NCAxNC42OTg1TDE5LjQxNTEgMTIuODkzQzE5LjU4MTggMTIuODM3NCAxOS42MzczIDEyLjgwOTYgMTkuNzQ4NCAxMi45NzYzQzE5Ljg1OTUgMTMuMTcwOCAyMi4wMjYyIDE2LjExNTIgMjIuMDgxOCAxNi4xOTg1Wk0yMi41MjYyIDExLjMwOTZDMjIuMzU5NSAxMS4zMzc0IDE5LjgzMTggMTEuOTc2MyAxOS44MzE4IDExLjk3NjNMMTcuNzQ4NCA5LjE0Mjk3QzE3LjY5MjkgOS4wNTk2NCAxNy42MzczIDguOTc2MzEgMTcuNzc2MiA4Ljk0ODUzQzE3LjkxNTEgOC45MjA3NSAyMC4yNzYyIDguNTA0MDkgMjAuMzg3MyA4LjQ3NjMxQzIwLjQ5ODQgOC40NDg1MyAyMC41ODE4IDguNDIwNzUgMjAuNzIwNyA4LjYxNTJDMjAuODU5NSA4Ljc4MTg2IDIyLjYzNzMgMTEuMDU5NiAyMi43MjA3IDExLjE0M0MyMi44MDQgMTEuMjI2MyAyMi42OTI5IDExLjI4MTkgMjIuNTI2MiAxMS4zMDk2WiIgZmlsbD0iI0ZCNTAzQiIvPgo8L3N2Zz4K) Laravel This template provides a basic Laravel skeleton. It comes pre-configured to use a MariaDB database and Redis for caching and sessions using a Laravel-specific bridge library that runs during Composer autoload. The public files symlink is also replaced with a custom web path definition so it is unnecessary. It is intended for you to use as a starting point and modify for your own needs. Laravel is an opinionated, integrated rapid-application-development framework for PHP. ###### Features: - PHP 8.0 - MariaDB 10.4 - Redis 5.0 - Automatic TLS certificates - Composer-based build View the [repository on GitHub](https://github.com/platformsh-templates/laravel). ![Deploy on ](https://platform.sh/images/deploy/lg-blue.svg) Magento 2 Community Edition ![Magento 2 Community Edition](data:image/svg+xml;base64,PHN2ZyB3aWR0aD0iMjQiIGhlaWdodD0iMjQiIHZpZXdCb3g9IjAgMCAyNCAyNCIgZmlsbD0ibm9uZSIgeG1sbnM9Imh0dHA6Ly93d3cudzMub3JnLzIwMDAvc3ZnIj4KPHBhdGggZmlsbC1ydWxlPSJldmVub2RkIiBjbGlwLXJ1bGU9ImV2ZW5vZGQiIGQ9Ik0xLjc5OTk5IDYuMDA0NTZMMTIuMjAyNSAwTDIyLjU4NDEgNS45OTQxVjE3Ljk5OEwxOS42MTQ1IDE5LjcwOTVWNy43MTg3TDEyLjE4MTUgMy40MjgyTDQuNzQ4NTUgNy43MTg3TDQuNzY5NTIgMTkuNzE0N0wxLjc5OTk5IDE3Ljk5OFY2LjAwNDU2Wk0xMi4xOTIgMjAuNTc0NEwxMy42NzU1IDE5LjcxMjFWNy43MTg2N0wxNi42NDUgOS40MzI3NVYyMS40Mjg5TDEyLjE4OTQgMjRMNy43MzkwMiAyMS40Mjg5TDcuNzMzNzggOS40MzI3NUwxMC43MDA3IDcuNzE4NjdWMTkuNzJMMTIuMTkyIDIwLjU3NDRaIiBmaWxsPSIjRjI2MzIyIi8+Cjwvc3ZnPgo=) Magento 2 Community Edition This template builds Magento 2 CE on Platform.sh. It includes additional scripts to customize Magento to run effectively in a build-and-deploy environment. A MariaDB database and Redis cache server come pre-configured and work out of the box. The installer has been modified to not ask for database information. Background workers are run using a worker container rather than via cron. Magento is a fully integrated ecommerce system and web store written in PHP. This is the Open Source version. ###### Features: - PHP 7.2 - MariaDB 10.2 - Redis 3.2 - Dedicated worker instance for background processing - Automatic TLS certificates - Composer-based build View the [repository on GitHub](https://github.com/platformsh-templates/magento2ce). ![Deploy on ](https://platform.sh/images/deploy/lg-blue.svg) Sylius ![Sylius](data:image/svg+xml;base64,PD94bWwgdmVyc2lvbj0iMS4wIiBlbmNvZGluZz0idXRmLTgiPz4KPHN2ZyB2ZXJzaW9uPSIxLjEiIHhtbG5zPSJodHRwOi8vd3d3LnczLm9yZy8yMDAwL3N2ZyIgdmlld0JveD0iMCAwIDQ4IDQ4Ij4KPHBhdGggZmlsbD0iIzMwYmE5ZCIgZD0iTTEwLjIsMjguMWw5LjYsMTkuMmwxNy43LDBsNC4zLTZMMTAuMiwyOC4xTDEwLjIsMjguMXoiLz4KPHBhdGggZmlsbD0iIzFhOWY4MyIgZD0iTTMuNSwzMC4yTDE2LjQsNDhsMjEuMSwwbDQuMy02LjZMMy41LDMwLjJ6IE0xOSw4LjdsNi4zLDQuOUwzMSwyLjZMMjksMS40QzI5LDEuNCwxOSw4LjcsMTksOC43eiIvPgo8cGF0aCBmaWxsPSIjMzBiYTlkIiBkPSJNMzcuNSw0OEwxOSw4LjdsNC0yLjlsMjEuNSwzMS40TDM3LjUsNDh6IE0yNy4yLDIuN2wxMi4xLDkuN0wzMC44LDBDMzAuOCwwLDI3LjIsMi43LDI3LjIsMi43eiIvPgo8L3N2Zz4K) Sylius This template builds a Sylius application for Platform.sh, which can be used as a starting point for developing complex e-commerce applications. Sylius is a modern e-commerce solution for PHP, based on Symfony Framework. ###### Features: - PHP 8.0 - MySQL 10.2 - Automatic TLS certificates - composer-based build View the [repository on GitHub](https://github.com/platformsh-templates/sylius). ![Deploy on ](https://platform.sh/images/deploy/lg-blue.svg) WooCommerce (Bedrock) for Platform.sh ![WooCommerce (Bedrock) for Platform.sh](data:image/svg+xml,%3Csvg xmlns='http://www.w3.org/2000/svg' width='225' height='225'%3E%3Cdefs%3E%3Cstyle%3E.cls-1%7Bfill:%23525ddc%7D%3C/style%3E%3C/defs%3E%3Cg %3E%3Cg %3E%3Cpath class='cls-1' d='M112.52 74.93V42.67a4.68 4.68 0 0 0-5.48-4.4Q56.94 46.63 6.82 55c-2.25.38-4.33.8-5.69-1.51A6.75 6.75 0 0 1 .05 50.4C0 35.56 0 20.72 0 5.89A6 6 0 0 1 5.92 0h212.81A6 6 0 0 1 225 6.29v43.27a8.1 8.1 0 0 1-6.63 7.7C207.2 59.15 196 61 184.87 62.85l-71.93 12a2.77 2.77 0 0 1-.5 0zM112.47 150.06v31.76a4.68 4.68 0 0 0 5.74 4.86l101.47-17a4.6 4.6 0 0 1 5.33 4.39v45.76c0 2.14-3 5.07-5.14 5.14H6.52c-4 0-6.52-2.47-6.52-6.53V175.7a8.22 8.22 0 0 1 6.88-8q16.62-2.79 33.25-5.54l71.93-12a2.77 2.77 0 0 1 .5 0z'/%3E%3Cpath class='cls-1' d='M112.56 150.15v-37.63l-.08.08 107.04-17.92a4.62 4.62 0 0 1 5.48 4.73v25a8.1 8.1 0 0 1-6.69 7.9c-9.35 1.58-18.71 3.1-28.07 4.66q-35.33 5.88-70.65 11.79c-2.38.4-4.75.87-7.12 1.3zM112.44 74.84v37.76l.08-.08c-9.61 1.56-19.23 3.1-28.83 4.7Q48.58 123.06 13.48 129c-2.47.41-4.94.77-7.4 1.22-3.75.67-6.07-1.2-6.07-5v-25a8.25 8.25 0 0 1 6.37-7.42c10.41-1.8 20.85-3.53 31.28-5.27q35.34-5.88 70.7-11.79c1.4-.23 2.78-.54 4.17-.81z'/%3E%3C/g%3E%3C/g%3E%3C/svg%3E) WooCommerce (Bedrock) for Platform.sh This template builds WordPress on Platform.sh using the Bedrock boilerplate by Roots with Composer. It includes WooCommerce and JetPack as dependencies, which when enabled will quickly allow you to create a store on WordPress. Plugins and themes should be managed with Composer exclusively. The only modifications made to the standard Bedrock boilerplate have been providing database credentials and main site url parameters via environment variables. With this configuration, the database is automatically configured such that the installer will not ask you for database credentials. While Bedrock provides support to replicate this configuration in a ``.env`` file for local development, an example Lando configuration file is included as the recommendated method to do so. WordPress is a blogging and lightweight CMS written in PHP, and Bedrock is a Composer-based WordPress boilerplate project with a slightly modified project structure and configuration protocol. WooCommerce is an open-source eCommerce platform and plugin for WordPress. ###### Features: - PHP 7.4 - MariaDB 10.4 - Automatic TLS certificates - Composer-based build View the [repository on GitHub](https://github.com/platformsh-templates/wordpress-woocommerce). ![Deploy on ](https://platform.sh/images/deploy/lg-blue.svg) WordPress (Bedrock) ![WordPress (Bedrock)](data:image/svg+xml,%3Csvg xmlns='http://www.w3.org/2000/svg' width='225' height='225'%3E%3Cdefs%3E%3Cstyle%3E.cls-1%7Bfill:%23525ddc%7D%3C/style%3E%3C/defs%3E%3Cg %3E%3Cg %3E%3Cpath class='cls-1' d='M112.52 74.93V42.67a4.68 4.68 0 0 0-5.48-4.4Q56.94 46.63 6.82 55c-2.25.38-4.33.8-5.69-1.51A6.75 6.75 0 0 1 .05 50.4C0 35.56 0 20.72 0 5.89A6 6 0 0 1 5.92 0h212.81A6 6 0 0 1 225 6.29v43.27a8.1 8.1 0 0 1-6.63 7.7C207.2 59.15 196 61 184.87 62.85l-71.93 12a2.77 2.77 0 0 1-.5 0zM112.47 150.06v31.76a4.68 4.68 0 0 0 5.74 4.86l101.47-17a4.6 4.6 0 0 1 5.33 4.39v45.76c0 2.14-3 5.07-5.14 5.14H6.52c-4 0-6.52-2.47-6.52-6.53V175.7a8.22 8.22 0 0 1 6.88-8q16.62-2.79 33.25-5.54l71.93-12a2.77 2.77 0 0 1 .5 0z'/%3E%3Cpath class='cls-1' d='M112.56 150.15v-37.63l-.08.08 107.04-17.92a4.62 4.62 0 0 1 5.48 4.73v25a8.1 8.1 0 0 1-6.69 7.9c-9.35 1.58-18.71 3.1-28.07 4.66q-35.33 5.88-70.65 11.79c-2.38.4-4.75.87-7.12 1.3zM112.44 74.84v37.76l.08-.08c-9.61 1.56-19.23 3.1-28.83 4.7Q48.58 123.06 13.48 129c-2.47.41-4.94.77-7.4 1.22-3.75.67-6.07-1.2-6.07-5v-25a8.25 8.25 0 0 1 6.37-7.42c10.41-1.8 20.85-3.53 31.28-5.27q35.34-5.88 70.7-11.79c1.4-.23 2.78-.54 4.17-.81z'/%3E%3C/g%3E%3C/g%3E%3C/svg%3E) WordPress (Bedrock) This template builds WordPress on Platform.sh using the Bedrock boilerplate by Roots with Composer. Plugins and themes should be managed with Composer exclusively. The only modifications made to the standard Bedrock boilerplate have been providing database credentials and main site url parameters via environment variables. With this configuration, the database is automatically configured such that the installer will not ask you for database credentials. While Bedrock provides support to replicate this configuration in a `.env` file for local development, an example Lando configuration file is included as the recommendated method to do so. WordPress is a blogging and lightweight CMS written in PHP, and Bedrock is a Composer-based WordPress boilerplate project with a slightly modified project structure and configuration protocol. ###### Features: - PHP 7.4 - MariaDB 10.4 - Automatic TLS certificates - Composer-based build View the [repository on GitHub](https://github.com/platformsh-templates/wordpress-bedrock). ![Deploy on ](https://platform.sh/images/deploy/lg-blue.svg) WordPress (Composer) ![WordPress (Composer)](data:image/svg+xml;base64,PHN2ZyB3aWR0aD0iMjQiIGhlaWdodD0iMjQiIHZpZXdCb3g9IjAgMCAyNCAyNCIgZmlsbD0ibm9uZSIgeG1sbnM9Imh0dHA6Ly93d3cudzMub3JnLzIwMDAvc3ZnIj4KPGcgY2xpcC1wYXRoPSJ1cmwoI2NsaXAwXzY1MTZfMTQwMzcpIj4KPHBhdGggZmlsbC1ydWxlPSJldmVub2RkIiBjbGlwLXJ1bGU9ImV2ZW5vZGQiIGQ9Ik0xMi4wMjU5IDAuOTk5NDQ0QzE0Ljg2NTIgMC45OTk0NDQgMTcuNTEwOSAyLjA5NjQ1IDE5LjQ0NjggMy45MDMyOUMxOC40Nzg5IDMuOTAzMjkgMTcuNTEwOSA0LjQxOTUzIDE3LjUxMDkgNS43NzQ2NkMxNy40NDY0IDguNDIwMzkgMjAuNjcyOSA5LjAwMTE3IDE4LjkzMDYgMTQuMjkyNkwxNy41MTA5IDE4LjY4MDdMMTMuNTc0NiA3LjEyOTc5QzEzLjUxMDEgNi45MzYyIDEzLjU3NDYgNi44NzE2NyAxMy44MzI3IDYuODcxNjdIMTQuOTI5N0MxNC45OTQzIDYuODcxNjcgMTUuMDU4OCA2LjgwNzE0IDE1LjA1ODggNi43NDI2MVY2LjA5NzMxQzE1LjA1ODggNi4wMzI3OCAxNC45OTQzIDUuOTY4MjUgMTQuOTI5NyA1Ljk2ODI1QzEyLjgwMDMgNi4wMzI3OCAxMC43MzUzIDYuMDMyNzggOC42NzAzNCA1Ljk2ODI1QzguNjA1ODEgNS45NjgyNSA4LjU0MTI4IDYuMDMyNzggOC41NDEyOCA2LjA5NzMxVjYuNzQyNjFDOC41NDEyOCA2LjgwNzE0IDguNjA1ODEgNi44NzE2NyA4LjY3MDM0IDYuODcxNjdIOS43NjczNEMxMC4wMjU1IDYuODcxNjcgMTAuMDkgNi45MzYyIDEwLjE1NDUgNy4xMjk3OUwxMS43Njc4IDExLjUxNzhMOS4zMTU2MyAxOC44MDk3TDUuMzE0NzggNy4wNjUyNkM1LjI1MDI1IDYuOTM2MiA1LjMxNDc4IDYuODA3MTQgNS40NDM4MyA2LjgwNzE0SDYuNzM0NDNDNi43OTg5NiA2LjgwNzE0IDYuODYzNDkgNi43NDI2MSA2Ljg2MzQ5IDYuNjc4MDhWNi4wMzI3OEM2Ljg2MzQ5IDUuOTY4MjUgNi43OTg5NiA1LjkwMzcyIDYuNzM0NDMgNS45MDM3MkM1LjM3OTMgNS45NjgyNSA0LjA4ODcxIDUuOTY4MjUgMi43OTgxMSA2LjAzMjc4QzQuNzM0MDEgMi45OTk4NyA4LjE1NDEgMC45OTk0NDQgMTIuMDI1OSAwLjk5OTQ0NFpNMjEuNjQwOSA2LjgwNzE0QzIyLjQ3OTggOC4zNTU4NiAyMi45MzE1IDEwLjE2MjcgMjIuOTMxNSAxMi4wMzQxQzIyLjkzMTUgMTYuMTY0IDIwLjYwODQgMTkuNzc3NyAxNy4yNTI4IDIxLjY0OUwyMC42NzI5IDExLjk2OTVDMjEuMTg5MiAxMC40MjA4IDIxLjcwNTQgOC40MjAzOSAyMS42NDA5IDYuODA3MTRaTTE1LjcwNDEgMjIuMzU4OUMxNC41NDI2IDIyLjc0NjEgMTMuMzE2NSAyMy4wMDQyIDEyLjAyNTkgMjMuMDA0MkMxMC45Mjg5IDIzLjAwNDIgOS44MzE4NyAyMi44MTA2IDguODYzOTIgMjIuNTUyNUwxMi4yMTk1IDEyLjg3M0wxNS43MDQxIDIyLjM1ODlaTTcuMzE1MjEgMjEuOTA3MkMzLjYzNyAyMC4xNjQ5IDEuMDU1OCAxNi4zNTc2IDEuMDU1OCAxMS45Njk1QzEuMDU1OCAxMC4zNTYzIDEuMzc4NDUgOC44MDc1NyAyLjAyMzc1IDcuMzg3OTFMNy4zMTUyMSAyMS45MDcyWk0xMi4wMjU5IDAuMDMxNDk0MUMxOC42NzI1IDAuMDMxNDk0MSAyNC4wMjg1IDUuMzg3NDggMjQuMDI4NSAxMi4wMzQxQzI0LjAyODUgMTguNjgwNyAxOC42NzI1IDI0LjAzNjcgMTIuMDI1OSAyNC4wMzY3QzUuMzc5MzEgMjQuMDM2NyAwLjAyMzMxNTQgMTguNjE2MSAwLjAyMzMxNTQgMTEuOTY5NUMwLjAyMzMxNTQgNS4zMjI5NSA1LjM3OTMxIDAuMDMxNDk0MSAxMi4wMjU5IDAuMDMxNDk0MVoiIGZpbGw9IiM0NjQzNDIiLz4KPC9nPgo8ZGVmcz4KPGNsaXBQYXRoIGlkPSJjbGlwMF82NTE2XzE0MDM3Ij4KPHJlY3Qgd2lkdGg9IjI0IiBoZWlnaHQ9IjI0IiBmaWxsPSJ3aGl0ZSIvPgo8L2NsaXBQYXRoPgo8L2RlZnM+Cjwvc3ZnPgo=) WordPress (Composer) This template builds WordPress on Platform.sh using the [johnbloch/wordpress](https://github.com/johnpbloch/wordpress) "Composer Fork" of WordPress. Plugins and themes should be managed with Composer exclusively. A custom configuration file is provided that runs on Platform.sh to automatically configure the database, so the installer will not ask you for database credentials. For local-only configuration you can use a `wp-config-local.php` file that gets excluded from Git. WordPress is a blogging and lightweight CMS written in PHP. ###### Features: - PHP 8.1 - MariaDB 10.4 - Automatic TLS certificates - Composer-based build View the [repository on GitHub](https://github.com/platformsh-templates/wordpress-composer). ![Deploy on ](https://platform.sh/images/deploy/lg-blue.svg) WordPress (Vanilla) for Platform.sh ![WordPress (Vanilla) for Platform.sh](data:image/svg+xml;base64,PHN2ZyB3aWR0aD0iMjQiIGhlaWdodD0iMjQiIHZpZXdCb3g9IjAgMCAyNCAyNCIgZmlsbD0ibm9uZSIgeG1sbnM9Imh0dHA6Ly93d3cudzMub3JnLzIwMDAvc3ZnIj4KPGcgY2xpcC1wYXRoPSJ1cmwoI2NsaXAwXzY1MTZfMTQwMzcpIj4KPHBhdGggZmlsbC1ydWxlPSJldmVub2RkIiBjbGlwLXJ1bGU9ImV2ZW5vZGQiIGQ9Ik0xMi4wMjU5IDAuOTk5NDQ0QzE0Ljg2NTIgMC45OTk0NDQgMTcuNTEwOSAyLjA5NjQ1IDE5LjQ0NjggMy45MDMyOUMxOC40Nzg5IDMuOTAzMjkgMTcuNTEwOSA0LjQxOTUzIDE3LjUxMDkgNS43NzQ2NkMxNy40NDY0IDguNDIwMzkgMjAuNjcyOSA5LjAwMTE3IDE4LjkzMDYgMTQuMjkyNkwxNy41MTA5IDE4LjY4MDdMMTMuNTc0NiA3LjEyOTc5QzEzLjUxMDEgNi45MzYyIDEzLjU3NDYgNi44NzE2NyAxMy44MzI3IDYuODcxNjdIMTQuOTI5N0MxNC45OTQzIDYuODcxNjcgMTUuMDU4OCA2LjgwNzE0IDE1LjA1ODggNi43NDI2MVY2LjA5NzMxQzE1LjA1ODggNi4wMzI3OCAxNC45OTQzIDUuOTY4MjUgMTQuOTI5NyA1Ljk2ODI1QzEyLjgwMDMgNi4wMzI3OCAxMC43MzUzIDYuMDMyNzggOC42NzAzNCA1Ljk2ODI1QzguNjA1ODEgNS45NjgyNSA4LjU0MTI4IDYuMDMyNzggOC41NDEyOCA2LjA5NzMxVjYuNzQyNjFDOC41NDEyOCA2LjgwNzE0IDguNjA1ODEgNi44NzE2NyA4LjY3MDM0IDYuODcxNjdIOS43NjczNEMxMC4wMjU1IDYuODcxNjcgMTAuMDkgNi45MzYyIDEwLjE1NDUgNy4xMjk3OUwxMS43Njc4IDExLjUxNzhMOS4zMTU2MyAxOC44MDk3TDUuMzE0NzggNy4wNjUyNkM1LjI1MDI1IDYuOTM2MiA1LjMxNDc4IDYuODA3MTQgNS40NDM4MyA2LjgwNzE0SDYuNzM0NDNDNi43OTg5NiA2LjgwNzE0IDYuODYzNDkgNi43NDI2MSA2Ljg2MzQ5IDYuNjc4MDhWNi4wMzI3OEM2Ljg2MzQ5IDUuOTY4MjUgNi43OTg5NiA1LjkwMzcyIDYuNzM0NDMgNS45MDM3MkM1LjM3OTMgNS45NjgyNSA0LjA4ODcxIDUuOTY4MjUgMi43OTgxMSA2LjAzMjc4QzQuNzM0MDEgMi45OTk4NyA4LjE1NDEgMC45OTk0NDQgMTIuMDI1OSAwLjk5OTQ0NFpNMjEuNjQwOSA2LjgwNzE0QzIyLjQ3OTggOC4zNTU4NiAyMi45MzE1IDEwLjE2MjcgMjIuOTMxNSAxMi4wMzQxQzIyLjkzMTUgMTYuMTY0IDIwLjYwODQgMTkuNzc3NyAxNy4yNTI4IDIxLjY0OUwyMC42NzI5IDExLjk2OTVDMjEuMTg5MiAxMC40MjA4IDIxLjcwNTQgOC40MjAzOSAyMS42NDA5IDYuODA3MTRaTTE1LjcwNDEgMjIuMzU4OUMxNC41NDI2IDIyLjc0NjEgMTMuMzE2NSAyMy4wMDQyIDEyLjAyNTkgMjMuMDA0MkMxMC45Mjg5IDIzLjAwNDIgOS44MzE4NyAyMi44MTA2IDguODYzOTIgMjIuNTUyNUwxMi4yMTk1IDEyLjg3M0wxNS43MDQxIDIyLjM1ODlaTTcuMzE1MjEgMjEuOTA3MkMzLjYzNyAyMC4xNjQ5IDEuMDU1OCAxNi4zNTc2IDEuMDU1OCAxMS45Njk1QzEuMDU1OCAxMC4zNTYzIDEuMzc4NDUgOC44MDc1NyAyLjAyMzc1IDcuMzg3OTFMNy4zMTUyMSAyMS45MDcyWk0xMi4wMjU5IDAuMDMxNDk0MUMxOC42NzI1IDAuMDMxNDk0MSAyNC4wMjg1IDUuMzg3NDggMjQuMDI4NSAxMi4wMzQxQzI0LjAyODUgMTguNjgwNyAxOC42NzI1IDI0LjAzNjcgMTIuMDI1OSAyNC4wMzY3QzUuMzc5MzEgMjQuMDM2NyAwLjAyMzMxNTQgMTguNjE2MSAwLjAyMzMxNTQgMTEuOTY5NUMwLjAyMzMxNTQgNS4zMjI5NSA1LjM3OTMxIDAuMDMxNDk0MSAxMi4wMjU5IDAuMDMxNDk0MVoiIGZpbGw9IiM0NjQzNDIiLz4KPC9nPgo8ZGVmcz4KPGNsaXBQYXRoIGlkPSJjbGlwMF82NTE2XzE0MDM3Ij4KPHJlY3Qgd2lkdGg9IjI0IiBoZWlnaHQ9IjI0IiBmaWxsPSJ3aGl0ZSIvPgo8L2NsaXBQYXRoPgo8L2RlZnM+Cjwvc3ZnPgo=) WordPress (Vanilla) for Platform.sh This template builds WordPress on Platform.sh, installing WordPress to a subdirectory instead of to the project root. It does not use a package management tool like Composer, and updating core, themes, and plugins should be done with care. A custom configuration file is provided that runs on Platform.sh to automatically configure the database, so the installer will not ask you for database credentials. WordPress is a blogging and lightweight CMS written in PHP. ###### Features: - PHP 7.4 - MariaDB 10.4 - Automatic TLS certificates View the [repository on GitHub](https://github.com/platformsh-templates/wordpress-vanilla). ![Deploy on ](https://platform.sh/images/deploy/lg-blue.svg) ##### Python View the [Python documentation](https://docs.platform.sh/languages/python.md). Django 4 ![Django 4](data:image/svg+xml;base64,PD94bWwgdmVyc2lvbj0iMS4wIiBlbmNvZGluZz0idXRmLTgiPz4KPCEtLSBHZW5lcmF0b3I6IEFkb2JlIElsbHVzdHJhdG9yIDIzLjAuMSwgU1ZHIEV4cG9ydCBQbHVnLUluIC4gU1ZHIFZlcnNpb246IDYuMDAgQnVpbGQgMCkgIC0tPgo8c3ZnIHZlcnNpb249IjEuMSIgaWQ9InN2ZzI5NDgiIHhtbG5zOnN2Zz0iaHR0cDovL3d3dy53My5vcmcvMjAwMC9zdmciCgkgeG1sbnM9Imh0dHA6Ly93d3cudzMub3JnLzIwMDAvc3ZnIiB4bWxuczp4bGluaz0iaHR0cDovL3d3dy53My5vcmcvMTk5OS94bGluayIgeD0iMHB4IiB5PSIwcHgiIHZpZXdCb3g9IjAgMCA2NC4xIDgyLjQiCgkgc3R5bGU9ImVuYWJsZS1iYWNrZ3JvdW5kOm5ldyAwIDAgNjQuMSA4Mi40OyIgeG1sOnNwYWNlPSJwcmVzZXJ2ZSI+CjxzdHlsZSB0eXBlPSJ0ZXh0L2NzcyI+Cgkuc3Qwe2ZpbGwtcnVsZTpldmVub2RkO2NsaXAtcnVsZTpldmVub2RkO30KPC9zdHlsZT4KPGcgaWQ9ImxheWVyMSIgdHJhbnNmb3JtPSJ0cmFuc2xhdGUoMTIxLjA2MzA2LC0zNTUuOTM5NzYpIj4KCTxwYXRoIGlkPSJwYXRoMjgzOCIgY2xhc3M9InN0MCIgZD0iTS0xMDcuNCwzOTguMmMwLDguMiw2LDEzLjEsMTUuNiwxMC45di0yMS43Qy0xMDEuNSwzODQuNC0xMDcuMywzOTAuNC0xMDcuNCwzOTguMiBNLTkxLjUsMzU1LjkKCQloMTMuMnY2Mi41Yy0xMi43LDIuMS0yNC44LDMuNC0zMy41LTEuNWMtMTEuMi02LjItMTIuMS0yNi4xLTMuMi0zNC45YzQuNS00LjUsMTMuNS03LjYsMjMuMi01LjZ2LTE5LjcKCQlDLTkxLjgsMzU2LjQtOTEuOSwzNTYtOTEuNSwzNTUuOSIvPgoJPHBhdGggaWQ9InBhdGgyODQwIiBjbGFzcz0ic3QwIiBkPSJNLTU2LjksMzY5LjdoLTEzLjJ2LTEzLjhoMTMuMlYzNjkuN3oiLz4KCTxwYXRoIGlkPSJwYXRoMjg2MCIgY2xhc3M9InN0MCIgZD0iTS01Ni45LDM3Ni43YzAsOS43LDAsMTYuNywwLDI4LjVjLTAuNiwxMS42LTAuNCwyMC45LTQuNywyNi40Yy0wLjgsMS4xLTIuNiwyLjctNC4xLDMuOAoJCWMtMS4zLDAuOS0zLjYsMi45LTUsMi45Yy0xLjQsMC4xLTQuOS0xLjktNi41LTIuNmMtMi4xLTEtNC0yLjMtNi4yLTIuOWM1LTMuMSw5LjgtNS40LDExLjctMTEuN2MxLjctNS41LDEuNS0xMy40LDEuNS0yMS4xCgkJYzAtNy42LDAtMTYuNSwwLTIzLjJMLTU2LjksMzc2LjdMLTU2LjksMzc2Ljd6Ii8+CjwvZz4KPC9zdmc+Cg==) Django 4 This template builds Django 4 on Platform.sh, using the gunicorn application runner. Django is a Python-based web application framework with a built-in ORM. ###### Features: - Python 3.10 - PostgreSQL 12 View the [repository on GitHub](https://github.com/platformsh-templates/django4). ![Deploy on ](https://platform.sh/images/deploy/lg-blue.svg) FastAPI ![FastAPI](data:image/svg+xml,%3Csvg xmlns:dc='http://purl.org/dc/elements/1.1/' xmlns:cc='http://creativecommons.org/ns%23' xmlns:rdf='http://www.w3.org/1999/02/22-rdf-syntax-ns%23' xmlns:svg='http://www.w3.org/2000/svg' xmlns='http://www.w3.org/2000/svg' id='svg8' viewBox='0 0 346.36511 63.977134' height='63.977139mm' width='346.36511mm'%3E%3Cdefs id='defs2' /%3E%3Cmetadata id='metadata5'%3E%3Crdf:RDF%3E%3Ccc:Work rdf:about=''%3E%3Cdc:format%3Eimage/svg+xml%3C/dc:format%3E%3Cdc:type rdf:resource='http://purl.org/dc/dcmitype/StillImage' /%3E%3Cdc:title%3E%3C/dc:title%3E%3C/cc:Work%3E%3C/rdf:RDF%3E%3C/metadata%3E%3Cg transform='translate(30.552089,-55.50154)' id='layer1'%3E%3Cpath style='opacity:0.98000004;fill:%23009688;fill-opacity:1;stroke-width:3.20526505' id='path817' d='m 1.4365174,55.50154 c -17.6610514,0 -31.9886064,14.327532 -31.9886064,31.988554 0,17.661036 14.327555,31.988586 31.9886064,31.988586 17.6609756,0 31.9885196,-14.32755 31.9885196,-31.988586 0,-17.661022 -14.327544,-31.988554 -31.9885196,-31.988554 z m -1.66678692,57.63069 V 93.067264 H -11.384533 L 4.6417437,61.847974 V 81.912929 H 15.379405 Z' /%3E%3Ctext id='text979' y='114.91215' x='52.115433' style='font-style:normal;font-weight:normal;font-size:79.71511078px;line-height:1.25;font-family:sans-serif;letter-spacing:0px;word-spacing:0px;fill:%23009688;fill-opacity:1;stroke:none;stroke-width:1.99287772;' xml:space='preserve'%3E%3Ctspan style='font-style:normal;font-variant:normal;font-weight:normal;font-stretch:normal;font-family:Ubuntu;-inkscape-font-specification:Ubuntu;fill:%23009688;fill-opacity:1;stroke-width:1.99287772;' y='114.91215' x='52.115433' id='tspan977'%3EFastAPI%3C/tspan%3E%3C/text%3E%3C/g%3E%3C/svg%3E) FastAPI This template demonstrates building the FastAPI framework for Platform.sh. It includes a minimalist application skeleton that demonstrates how to connect to a MariaDB server for data storage and Redis for caching. The application starts as a bare Python process with no separate runner. It is intended for you to use as a starting point and modify for your own needs. FastAPI is a modern, fast (high-performance), web framework for building APIs with Python 3.6+ based on standard Python type hints. ###### Features: - Python 3.9 - MariaDB 10.4 - Redis 5.0 View the [repository on GitHub](https://github.com/platformsh-templates/fastapi). ![Deploy on ](https://platform.sh/images/deploy/lg-blue.svg) Flask ![Flask](data:image/svg+xml;base64,PHN2ZyB3aWR0aD0iMjUiIGhlaWdodD0iMjQiIHZpZXdCb3g9IjAgMCAyNSAyNCIgZmlsbD0ibm9uZSIgeG1sbnM9Imh0dHA6Ly93d3cudzMub3JnLzIwMDAvc3ZnIj4KPHBhdGggZD0iTTcuMjU5OCAyMC40Mzk5QzYuMzMyODEgMTkuNzE2MSA1LjM0MjM0IDE5LjAxNzcgNC42NjkzMiAxOC4wMjcyQzMuMjQ3MSAxNi4zMDAyIDIuMTU1MDQgMTQuMjkzOSAxLjQxODUzIDEyLjE4NTlDMC45NjEzODQgMTAuODE0NSAwLjgwOTAwMyA5LjM0MTQ3IDAuMjI0ODc2IDguMDMzNTRDLTAuMzg0NjQ4IDcuMDgxMTYgMC4zMjY0NjMgNi4wMjcxOSAxLjM4MDQzIDUuNzIyNDNDMS44NTAyNyA1LjYzMzU0IDIuNjYyOTcgNS4xODkwOSAxLjY3MjUgNS41MDY1NUMwLjc4MzYwNiA2LjE1NDE3IDAuNjk0NzE3IDQuOTA5NzMgMS42MDkgNC44MzM1NEMyLjIzMTIzIDQuNzQ0NjUgMi40NTk4IDQuMjM2NzEgMi4yNDM5MiAzLjc3OTU3QzEuNTcwOTEgMy4zNDc4MiAzLjg1NjYyIDIuODY1MjggMi43MTM3NiAyLjIxNzY2QzEuNTIwMTEgMC45MjI0MjYgNC4zODk5NiAwLjY4MTE1NiAzLjY3ODg0IDIuMTQxNDdDMy41MTM3NiAzLjI3MTYzIDUuNjg1MTkgMS45MzgzIDUuMTc3MjYgMy4yMzM1NEM1LjY4NTE5IDMuODU1NzYgNy4wOTQ3MiAzLjM3MzIyIDcuMDY5MzIgNC4yNDk0MUM3LjgxODUzIDQuMzAwMiA4LjA3MjUgNC45MzUxMiA4Ljc3MDkxIDQuOTczMjJDOS40OTQ3MiA1LjMwMzM4IDEwLjgxNTQgNS41NTczNSAxMS4wNjkzIDYuMzgyNzRDMTAuMzQ1NSA2Ljk1NDE3IDguNjgyMDIgNS4yMDE3OSA4LjU5MzEzIDYuNzg5MDlDOC44MDkgOS4xMjU2IDguNzU4MjEgMTEuNTI1NiA5LjYwOSAxMy43NjA1QzEwLjAxNTQgMTUuMTA2NiAxMC45OTMxIDE2LjE3MzIgMTEuODgyIDE3LjIxNDVDMTIuNzMyOCAxOC4yNDMxIDEzLjg3NTcgMTguOTY2OSAxNS4wNDM5IDE5LjU3NjRDMTYuMDcyNSAyMC4wNTg5IDE3LjE3NzMgMjAuMzc2NCAxOC4yOTQ3IDIwLjU3OTZDMTguNzUxOSAyMC4yMzY3IDE5LjU1MTkgMTguOTQxNSAyMC4yNTAzIDE5LjQ4NzVDMjAuMjg4NCAyMC4wOTcgMTguODQwNyAyMC43NyAyMC4xODY4IDIwLjY5MzlDMjAuOTc0MSAyMC40NTI2IDIxLjUyMDEgMjEuMzAzNCAyMi4xNjc3IDIwLjU0MTVDMjIuNzY0NiAyMS4yNTI2IDI0LjY0MzkgMjAuMDk3IDI0LjIxMjIgMjEuNTMyQzIzLjY0MDggMjEuOTAwMiAyMi44MDI3IDIxLjY4NDMgMjIuMjMxMiAyMi4xOTIzQzIxLjI5MTUgMjEuNzIyNCAyMC41Mjk2IDIyLjYxMTMgMTkuNDg4NCAyMi40OTdDMTguMzIwMSAyMi43MDAyIDE3LjEzOTIgMjIuNzg5MSAxNS45NTgyIDIyLjc4OTFDMTQuMDI4MSAyMi42MzY3IDEyLjA0NzEgMjIuNTczMiAxMC4yMDU4IDIxLjkwMDJDOS4xODk5NiAyMS42MjA4IDguMTc0MDggMjEuMDM2NyA3LjI1OTggMjAuNDM5OVpNOC44OTc4OSAyMS4xNTFDOS45MTM3NyAyMS41ODI3IDEwLjkwNDIgMjIuMDUyNiAxMi4wMDkgMjIuMTkyM0MxMy43NzQxIDIyLjQzMzUgMTUuNTkgMjIuODE0NSAxNy4zNTUgMjIuNDcxNkMxNi41NTUgMjIuMTE2MSAxNS43Mjk2IDIyLjYxMTMgMTQuOTI5NiAyMi4yMTc3QzEzLjk3NzMgMjIuNDIwOCAxMi45NDg3IDIyLjE2NjkgMTEuOTgzNiAyMi4wMzk5QzEwLjg3ODggMjEuNTQ0NyA5LjY4NTE5IDIxLjIxNDUgOC42NTY2MiAyMC41NjY5QzcuMzYxMzggMjAuMDk3IDkuMzI5NjQgMjEuMTc2NCA5LjY3MjUgMjEuMjY1M0MxMC40ODUyIDIxLjcyMjQgOC43ODM2MSAyMS4wMjQgOC41NDIzNCAyMC44MzM1QzcuODY5MzIgMjAuNDUyNiA3Ljc4MDQzIDIwLjUyODggOC40Nzg4NCAyMC45MjI0QzguNjE4NTMgMjAuOTk4NiA4Ljc1ODIxIDIxLjA4NzUgOC44OTc4OSAyMS4xNTFaTTYuOTY3NzMgMTkuNzkyM0M3Ljk0NTUxIDIwLjE2MDUgNi45Njc3MyAxOS4xMDY2IDYuNTEwNTkgMTkuMTdDNi4zMDc0MiAxOC44MjcyIDUuNzQ4NjkgMTguNjExMyA2LjE0MjM0IDE4LjQyMDhDNS40MzEyMyAxOC42NjIxIDUuMzkzMTMgMTcuNDgxMiA1LjA2Mjk3IDE3LjY0NjJDNC4zMTM3NiAxNy40MDUgNC43NzA5MSAxNi41NjY5IDMuODY5MzIgMTYuMDQ2MkMzLjc5MzEzIDE1LjUwMDIgMi45ODA0MyAxNS4wMzA0IDIuNzEzNzYgMTQuMjA1QzIuNTk5NDggMTMuNzg1OSAxLjc5OTQ4IDEyLjU3OTYgMi4yOTQ3MiAxMy42OTdDMi43MTM3NiAxNC43NzY0IDMuNDUwMjcgMTUuNzAzNCA0LjA1OTggMTYuNjQzMUM0LjU0MjM0IDE3LjUzMiA1LjEwMTA3IDE4LjQ0NjIgNS45NjQ1NiAxOS4wMDVDNi4yODIwMiAxOS4yNzE2IDYuNTYxMzggMTkuNzAzNCA2Ljk2NzczIDE5Ljc5MjNaTTQuMTQ4NjkgMTYuNjkzOUM0LjE4Njc4IDE2LjU0MTUgNC4zMjY0NiAxNy4wMTEzIDQuMTQ4NjkgMTYuNjkzOVYxNi42OTM5Wk04LjE0ODY5IDIwLjIyNEM4LjM2NDU2IDIwLjEzNTEgNy44MzEyMyAyMC4xMDk3IDguMTQ4NjkgMjAuMjI0VjIwLjIyNFpNOC42ODIwMiAyMC40MTQ1QzguNjE4NTMgMjAuMTQ3OCA4LjQ0MDc1IDIwLjU2NjkgOC42ODIwMiAyMC40MTQ1VjIwLjQxNDVaTTkuMzQyMzQgMjAuNjkzOUM5LjY1OTggMjAuNDAxOCA4Ljg1OTggMjAuNTAzNCA5LjM0MjM0IDIwLjY5MzlWMjAuNjkzOVpNMTAuNDg1MiAyMS4zMjg4QzEwLjY3NTcgMjEuMDQ5NCA5Ljg3NTY3IDIxLjIyNzIgMTAuNDg1MiAyMS4zMjg4VjIxLjMyODhaTTguMzAxMDcgMTkuODA1QzguNzgzNjEgMTkuNDg3NSA3LjY1MzQ1IDE5LjgwNSA4LjMwMTA3IDE5LjgwNVYxOS44MDVaTTguNzk2MyAyMC4wNTg5QzguNzgzNjEgMTkuODgxMiA4LjYxODUzIDIwLjEzNTEgOC43OTYzIDIwLjA1ODlWMjAuMDU4OVpNMTEuMjk3OSAyMS42MjA4QzExLjcwNDIgMjEuODc0OCAxMy42NDcxIDIyLjE3OTYgMTIuNDI4MSAyMS43MjI0QzEyLjIxMjIgMjEuNzYwNSAxMC4xNjc3IDIxLjEzODMgMTEuMjk3OSAyMS42MjA4Wk03LjMyMzI5IDE4LjUyMjRDNy4yODUxOSAxOC4zNTczIDYuNzAxMDcgMTguMzQ0NiA3LjMyMzI5IDE4LjUyMjRWMTguNTIyNFpNOC40OTE1NCAxOS4yMDgxQzguNzk2MyAxOC45OTIzIDcuODU2NjIgMTkuMDQzMSA4LjQ5MTU0IDE5LjIwODFWMTkuMjA4MVpNOS40NjkzMiAxOS44MDVDOS45MDEwNyAxOS42Mzk5IDguNzU4MjEgMTkuNjM5OSA5LjQ2OTMyIDE5LjgwNVYxOS44MDVaTTYuODUzNDUgMTguMDE0NUM3LjMyMzI5IDE4LjM3IDguNzU4MjEgMTguMDY1MyA3LjU3NzI2IDE3Ljc5ODZDNy4wNDM5MiAxNy41MDY2IDUuODM3NTcgMTcuMzE2MSA2LjY1MDI3IDE3Ljk3NjRMNi44NTM0NSAxOC4wMTQ1Wk0xMC4xMjk2IDIwLjAwODFDMTAuMzMyOCAxOS42NzggOS4zMDQyNCAxOS44MTc3IDEwLjEyOTYgMjAuMDA4MVYyMC4wMDgxWk05LjEzOTE2IDE5LjIyMDhDMTAuMjk0NyAxOS41NTEgOC4xNzQwOCAxOC40OTcgOC44NTk4IDE5LjEwNjZMOS4wMTIxOCAxOS4xN0w5LjEzOTE2IDE5LjIyMDhaTTExLjEzMjggMjAuMzc2NEMxMi4yMjQ5IDIwLjM4OTEgMTAuMTQyMyAyMC4yMjQgMTEuMTMyOCAyMC4zNzY0VjIwLjM3NjRaTTYuNDM0NCAxNy4zNzk2QzYuMzk2MyAxNy4xNzY0IDYuMTY3NzMgMTcuMzkyMyA2LjQzNDQgMTcuMzc5NlYxNy4zNzk2Wk0xMi45NzQxIDIxLjQwNUMxMy4wMTIyIDIxLjAzNjcgMTIuNjE4NSAyMS42ODQzIDEyLjk3NDEgMjEuNDA1VjIxLjQwNVpNOC4zMDEwNyAxOC41MjI0QzguMjI0ODggMTguMzMyIDcuOTU4MjEgMTguNTA5NyA4LjMwMTA3IDE4LjUyMjRWMTguNTIyNFpNNi41MzU5OSAxNy4yNTI2QzcuMTU4MjEgMTcuMjE0NSA1LjY4NTE5IDE2Ljk3MzIgNi41MzU5OSAxNy4yNTI2VjE3LjI1MjZaTTQuNDUzNDUgMTUuOTA2NkM0LjM3NzI2IDE1LjYwMTggMy43Njc3MyAxNS4zNjA1IDQuNDUzNDUgMTUuOTA2NlYxNS45MDY2Wk05LjkyNjQ2IDE5LjM3MzJDOS44MTIxOCAxOS4yNDYyIDkuODc1NjcgMTkuMzk4NiA5LjkyNjQ2IDE5LjM3MzJWMTkuMzczMlpNMTMuMzI5NiAyMS40Njg1QzEzLjMxNjkgMjEuMjY1MyAxMy4xMzkyIDIxLjU0NDcgMTMuMzI5NiAyMS40Njg1VjIxLjQ2ODVaTTkuNjIxNyAxOS4wNjg1QzkuNjg1MTkgMTguODAxOCA5LjA4ODM3IDE4Ljk5MjMgOS42MjE3IDE5LjA2ODVWMTkuMDY4NVpNNy4wODIwMiAxNy40NTU4QzcuNTUxODYgMTcuNDA1IDYuMzQ1NTEgMTcuMTM4MyA3LjA4MjAyIDE3LjQ1NThWMTcuNDU1OFpNMTEuMzc0MSAyMC4xMjI0QzEyLjA5NzkgMTkuODMwNCAxMC42NjMgMTkuOTgyNyAxMS4zNzQxIDIwLjEyMjRWMjAuMTIyNFpNOS4xMzkxNiAxOC42MTEzQzkuOTc3MjYgMTguNzI1NiA4LjE0ODY5IDE4LjAzOTkgOC45NjEzOCAxOC41NDc4TDkuMTM5MTYgMTguNjExM1pNMTIuMDU5OCAyMC40MDE4QzEyLjg0NzEgMTkuOTMyIDEyLjU4MDQgMjEuNDkzOSAxMy4zODA0IDIwLjUyODhDMTQuMTY3NyAxOS45NTczIDEyLjY5NDcgMjEuMjM5OSAxMy42NzI1IDIwLjYzMDRDMTQuMzgzNiAyMC4xNjA1IDE1LjQyNDkgMjAuODU4OSAxNi4wNzI1IDIxLjA3NDhDMTYuNTQyMyAyMS4wNDk0IDE2Ljk5OTUgMjEuNDgxMiAxNy40OTQ3IDIxLjIyNzJDMTguNDM0NCAyMC45NzMyIDE1LjY2NjEgMjAuODU4OSAxNi4zOSAyMC40MDE4QzE1LjUzOTIgMjAuNjU1OCAxNC45MDQyIDIwLjEwOTcgMTQuNDg1MiAxOS41NjM3QzEzLjUzMjggMTkuMzQ3OCAxMi40MTU0IDE4Ljg1MjYgMTEuOTQ1NSAxOC4wMDE4QzExLjc1NSAxNy42ODQzIDEyLjIyNDkgMTguMDUyNiAxMS43ODA0IDE3LjUzMkMxMS4yMDkgMTcuMDI0IDEwLjkxNjkgMTYuNDM5OSAxMC41MjMzIDE1LjgwNUMxMC4wNjYxIDE1LjU2MzcgMTAuMDAyNyAxNC44MjcyIDkuOTY0NTYgMTUuNzc5NkM5Ljk2NDU2IDE1LjE4MjcgOS40MDU4MyAxNC43NzY0IDkuMjY2MTUgMTQuOTQxNUM5LjI2NjE1IDE0LjM3IDkuODYyOTcgMTQuNjQ5NCA5LjQ0MzkyIDE0LjIzMDRDOS4zNTUwMyAxMy42MzM1IDkuMDUwMjcgMTMuMDExMyA4Ljk2MTM4IDEyLjMzODNDOC44MjE3IDEyLjAwODEgOC45MzU5OSAxMS4zMDk3IDguNDc4ODQgMTIuMDQ2MkM4LjMxMzc3IDEyLjgyMDggOC40MjgwNSAxMS4wOTM5IDguNjgyMDIgMTEuNjY1M0M5LjAyNDg4IDExLjA4MTIgOC41NTUwMyAxMS4xNDQ2IDguNTQyMzQgMTEuMjMzNUM4Ljc1ODIxIDEwLjczODMgOC42ODIwMiAxMC4wMzk5IDguNDc4ODQgMTAuMzA2NkM4LjU5MzEzIDkuNzg1OTIgOC42NjkzMiA4LjM4OTA5IDguMzAxMDcgOC42MzAzNkM4LjUxNjk0IDguMDg0MzMgOC43MjAxMSA2LjEyODc3IDcuNzY3NzMgNi44Nzc5OEM3LjM3NDA4IDYuODc3OTggNi43MDEwNyA3LjAxNzY2IDYuMzgzNjEgNy4xODI3NEM3LjM3NDA4IDcuNzI4NzggNi4yODIwMiA3LjM4NTkyIDUuODc1NjcgNy4yOTcwM0M1LjgyNDg4IDcuODA0OTcgNS40MTg1MyA3LjU4OTA5IDQuOTIzMjkgNy41ODkwOUM1LjcyMzI5IDcuNjkwNjggNC41Mjk2NCA4LjQxNDQ5IDQuMDcyNSA4LjEzNTEyQzMuNDc1NjcgOC40MTQ0OSA0LjU5MzEzIDkuMTM4MyA0LjA4NTE5IDkuMzU0MTdDNC4xNDg2OSA5LjY4NDMzIDMuMTcwOTEgOS4yMzk4OSAzLjI0NzEgMTAuMDAxOEMyLjY2Mjk3IDkuNzYwNTIgMy4xNzA5MSAxMC45MTYxIDMuNDYyOTcgMTAuNTIyNEM0LjQ1MzQ1IDEwLjc4OTEgNC4xNjEzOCAxMS4zOTg2IDQuMTg2NzggMTEuOTdDNC4wMjE3IDEyLjMxMjkgMy4zOTk0OCAxMS4xODI3IDQuMDQ3MSAxMS4yMzM1QzMuNTI2NDYgMTAuMzk1NCAzLjQ3NTY3IDEwLjkyODggMy4wNDM5MiAxMS4zMjI0QzIuOTQyMzQgMTEuMzQ3OCA0LjEzNTk5IDExLjg4MTIgMy4zODY3OCAxMi4xMzUxQzQuMDQ3MSAxMi4yMzY3IDQuMDU5OCAxMi44MDgxIDQuMTk5NDggMTMuMTc2NEM0LjU5MzEzIDEzLjU4MjcgNC41MTY5NCAxMi43MTkzIDQuOTg2NzggMTMuMjE0NUM0LjY4MjAyIDEyLjc3IDMuMzk5NDggMTEuOTcgNC40NDA3NSAxMi4yMjRDNC40NDA3NSAxMS43Nzk2IDQuMjUwMjcgMTEuNDI0IDQuNTY3NzMgMTEuNDM2N0M0Ljg4NTE5IDEwLjg2NTMgNC4yMzc1NyAxMi44MzM1IDQuOTQ4NjkgMTIuMTIyNEM1LjEzOTE2IDEyLjAzMzUgNS4xODk5NiAxMS41NTEgNS41NDU1MSAxMi4xNzMyQzYuMDUzNDUgMTIuNjgxMiA1LjczNTk5IDEzLjAzNjcgNS4wMTIxOCAxMi41Nzk2QzUuMTM5MTYgMTMuMDExMyA1Ljk3NzI2IDEzLjE3NjQgNS44MjQ4OCAxMy44NjIxQzUuOTg5OTUgMTQuNDU4OSA2LjIxODUzIDE0LjI0MzEgNi40MjE3IDE0LjIwNUM2LjU4Njc4IDE0Ljc4OTEgNi42NzU2NyAxNC4zNTczIDYuNjc1NjcgMTQuMDc4QzcuMzk5NDggMTQuMjMwNCA3LjIzNDQgMTQuNjYyMSA3LjQ2Mjk3IDE0Ljk2NjlDNy45NzA5MSAxNS4xOTU0IDYuNzM5MTYgMTMuNDMwNCA3LjYwMjY1IDE0LjQzMzVDOC41MTY5NCAxNS4yNTg5IDcuOTQ1NTEgMTUuNjAxOCA3LjEzMjgxIDE1LjQ2MjFDNy42NTM0NSAxNS40MjQgNy44MTg1MyAxNi4xNjA1IDguNDY2MTUgMTYuMTM1MUM5LjA1MDI3IDE2LjQxNDUgOS40NTY2MiAxNy40OTM5IDguNDQwNzUgMTcuMDM2N0M4LjA4NTE5IDE2LjcxOTMgNi44NDA3NSAxNi4zMjU2IDcuODU2NjIgMTYuOTM1MUM4Ljc5NjMgMTcuMzY2OSA5LjU0NTUxIDE3LjYzMzUgMTAuNDQ3MSAxOC4xNzk2QzExLjA5NDcgMTguNjM2NyAxMS4zNzQxIDE5LjE3IDExLjYxNTQgMTkuMjcxNkMxMS4wNjkzIDE5LjUyNTYgOS45NzcyNiAxOS4wNjg1IDEwLjc5IDE4LjkxNjFDMTAuMjgyIDE4LjgyNzIgOS43MTA1OSAxOC41NjA1IDEwLjE5MzEgMTkuMTk1NEMxMC42MTIyIDE5LjUzODMgMTEuNjUzNCAxOS41MDAyIDExLjg0MzkgMTkuNTM4M0MxMS42Nzg4IDE5Ljg5MzkgMTEuNDEyMiAxOS45MTkzIDExLjg1NjYgMTkuOTQ0N0MxMS4zNjE0IDIwLjIxMTMgMTIuMDA5IDIwLjI0OTQgMTIuMDU5OCAyMC40MDE4Wk0xMS4wNDM5IDE3LjU1NzNDMTAuNzM5MiAxNy4yMzk5IDEwLjY2MyAxNi42NTU4IDEwLjk5MzEgMTcuMTYzN0MxMS4xNTgyIDE3LjIzOTkgMTEuNTI2NSAxOC4xMjg4IDExLjA0MzkgMTcuNTU3M1pNMTQuMzIwMSAxOS42Mzk5QzE0LjUxMDYgMTkuNjI3MiAxNC4zMzI4IDE5Ljc3OTYgMTQuMzIwMSAxOS42Mzk5VjE5LjYzOTlaTTEwLjU3NDEgMTYuNzk1NEMxMC41NjE0IDE2LjMxMjkgMTAuNjg4NCAxNy4xNTEgMTAuNTc0MSAxNi43OTU0VjE2Ljc5NTRaTTEwLjI1NjYgMTYuMzUxQzkuODc1NjcgMTUuNjI3MiAxMC43MjY1IDE2LjU1NDIgMTAuMjU2NiAxNi4zNTFWMTYuMzUxWk02LjMwNzQyIDEzLjYzMzVDNi41MjMyOSAxMy41NyA2LjQwOSAxNC4wMDE4IDYuMzA3NDIgMTMuNjMzNVYxMy42MzM1Wk05LjQ0MzkyIDE1LjMzNTFDOS41ODM2MSAxNC44MTQ1IDkuNjA5IDE1Ljc1NDIgOS40NDM5MiAxNS4zMzUxVjE1LjMzNTFaTTcuMjIxNyAxMy43ODU5QzcuMDY5MzIgMTMuNTA2NiA3LjU1MTg2IDE0LjA1MjYgNy4yMjE3IDEzLjc4NTlWMTMuNzg1OVpNOS4xMjY0NiAxNC4zOTU0QzguNzcwOTEgMTMuNTk1NCA5LjM4MDQzIDEzLjk2MzcgOS4yMDI2NSAxNC41MjI0TDkuMTI2NDYgMTQuMzk1NFpNNS44NTAyNyAxMi4yMTEzQzUuNjg1MTkgMTEuOTQ0NiA1LjQzMTIyIDExLjE4MjcgNS41MDc0MiAxMC45NDE1QzUuNTgzNjEgMTEuMzIyNCA2LjMyMDExIDEyLjU5MjMgNS44NjI5NyAxMS40NjIxQzUuMzY3NzMgMTAuNTIyNCA2LjQ1OTggMTEuNzY2OSA2LjU3NDA4IDEyLjAwODFDNi42MjQ4OCAxMi4yMzY3IDYuMjY5MzIgMTEuOTQ0NiA2LjUxMDU5IDEyLjQ5MDdDNi4wNjYxNSAxMS44Njg1IDYuMjU2NjIgMTIuODMzNSA1Ljg1MDI3IDEyLjIxMTNaTTQuODM0NCAxMS41MTI5QzQuODcyNSAxMC45MDM0IDUuMDYyOTcgMTEuOTMxOSA0LjgzNDQgMTEuNTEyOVYxMS41MTI5Wk01LjI5MTU0IDExLjY2NTNDNS41MDc0MiAxMS4yMDgxIDUuNjU5OCAxMi4zMTI5IDUuMjkxNTQgMTEuNjY1M1YxMS42NjUzWk00LjE4Njc4IDEwLjgxNDVDMy44MDU4MyAxMC40MzM1IDMuNTM5MTYgMTAuMDkwNyA0LjE5OTQ4IDEwLjU4NTlDNC40NTM0NSAxMC41OTg2IDMuNjI4MDUgOS43OTg2MiA0LjI2Mjk3IDEwLjMzMkM0LjkzNTk5IDEwLjQ1ODkgNC42MDU4MyAxMS40MjQgNC4xODY3OCAxMC44MTQ1Wk00Ljc3MDkxIDEwLjgwMThDNC45ODY3OCAxMC41ODU5IDQuODg1MTkgMTEuMDE3NyA0Ljc3MDkxIDEwLjgwMThWMTAuODAxOFpNNS4xMjY0NiAxMC45MTYxQzQuNzk2MyAxMC4yOTM5IDUuNTMyODEgMTEuMTgyNyA1LjEyNjQ2IDEwLjkxNjFWMTAuOTE2MVpNNC40MTUzNSAxMC4yNDMxQzMuMzIzMjkgOS4yNjUyOCA1Ljc5OTQ4IDEwLjc1MSA0LjU5MzEzIDEwLjQyMDhMNC40MTUzNSAxMC4yNDMxWk03LjU2NDU2IDEyLjA3MTZDNy4wOTQ3MiAxMS43OTIzIDcuNDM3NTcgMTAuMDY1MyA3LjYwMjY1IDExLjI0NjJDOC4wNTk4IDExLjA5MzkgNy41NzcyNiAxMS44NTU4IDcuOTIwMTEgMTEuODQzMUM3Ljg2OTMyIDEyLjMyNTYgNy43MTY5NCAxMi40OTA3IDcuNTY0NTYgMTIuMDcxNlpNOC43MzI4MSAxMi43NTczQzguNzcwOTEgMTIuMjM2NyA4LjgyMTcgMTMuMTEyOSA4LjczMjgxIDEyLjc1NzNWMTIuNzU3M1pNOC41Mjk2NCAxMi41NTQyQzguNTgwNDMgMTIuMzM4MyA4LjUyOTY0IDEyLjgyMDggOC41Mjk2NCAxMi41NTQyVjEyLjU1NDJaTTQuNjMxMjIgOS45MjU2QzMuOTIwMTEgOC45NDc4MiA2LjY3NTY3IDEwLjkxNjEgNS4wODgzNyAxMC4xNjY5QzQuOTIzMjkgMTAuMTI4OCA0LjcyMDExIDEwLjEwMzQgNC42MzEyMiA5LjkyNTZaTTYuODc4ODQgMTEuMTA2NkM2LjgwMjY1IDEwLjI5MzkgNy4wMTg1MyAxMS4yNDYyIDYuODc4ODQgMTEuMTA2NlYxMS4xMDY2Wk04LjU4MDQzIDEyLjE5ODZDOC43MDc0MiAxMS43Mjg4IDguNTgwNDMgMTIuNTAzNCA4LjU4MDQzIDEyLjE5ODZWMTIuMTk4NlpNNC43NDU1MSA5LjU0NDY1QzUuMTY0NTYgOS40NTU3NiA2LjQ4NTE5IDEwLjI4MTIgNS4yNzg4NCA5Ljc4NTkyQzUuMTM5MTYgOS42MzM1NCA0Ljg0NzEgOS43MDk3MyA0Ljc0NTUxIDkuNTQ0NjVaTTguMzM5MTYgMTEuMzQ3OEM4LjM4OTk2IDEwLjUwOTcgOC41OTMxMyAxMC44NTI2IDguMzM5MTYgMTEuNDYyMVYxMS4zNDc4Wk01LjA1MDI3IDkuMjUyNTlDNS4yMTUzNSA4Ljk5ODYyIDQuNTkzMTMgOC4xMjI0MyA1LjEzOTE2IDguOTM1MTJDNS4zNjc3MyA5LjEyNTYgNS44MjQ4OCA5LjI1MjU5IDUuNDMxMjMgOS4zMjg3OEM2LjA1MzQ1IDkuODc0ODEgNS4yNzg4NCA5LjQ4MTE2IDUuMDUwMjcgOS4yNTI1OVpNOC4xNjEzOCAxMS4wODEyQzguMjc1NjcgMTAuMTI4OCA4LjI2Mjk3IDExLjYzOTkgOC4xNjEzOCAxMS4wODEyVjExLjA4MTJaTTQuNjk0NzIgOC4zNzYzOUM0LjgyMTcgOC4zMjU2IDQuNzcwOTEgOC41NTQxNyA0LjY5NDcyIDguMzc2MzlWOC4zNzYzOVpNNS41MDc0MiA4Ljg1ODkzQzUuNzEwNTkgOC40MTQ0OSA1Ljg4ODM3IDkuMzQxNDcgNS41MDc0MiA4Ljg1ODkzVjguODU4OTNaTTcuNzkzMTMgMTAuMTI4OEM3Ljc5MzEzIDkuOTYzNyA3Ljg0MzkyIDEwLjM4MjcgNy43OTMxMyAxMC4xMjg4VjEwLjEyODhaTTcuNjY2MTUgOS44MzY3MUM3LjM0ODY5IDkuMDQ5NDEgNy45NTgyMSAxMC4yNTU4IDcuNjY2MTUgOS44MzY3MVY5LjgzNjcxWk03LjQ2Mjk3IDkuMzI4NzhDNy40MTIxOCA4Ljk5ODYyIDcuNjUzNDUgOS43MzUxMiA3LjQ2Mjk3IDkuMzI4NzhWOS4zMjg3OFpNNy43ODA0MyA4LjgwODE0QzcuNTY0NTYgOC40MjcxOSA4LjA1OTggNy4xMTkyNSA4LjExMDU5IDcuOTMxOTVDNy44ODIwMiA4LjU2Njg3IDguMDQ3MSA4LjkyMjQzIDguMTk5NDggOC4wNzE2M0M4LjUwNDI0IDcuMzk4NjIgOC4xNDg2OSA5LjM3OTU3IDcuNzgwNDMgOC44MDgxNFpNOC4xMTA1OSA2Ljg2NTI4QzguMjEyMTggNi43NTEgOC4xMzU5OSA3LjAwNDk3IDguMTEwNTkgNi44NjUyOFY2Ljg2NTI4Wk03LjU2NDU2IDE3LjU5NTRDNy40Mzc1NyAxNy40ODEyIDcuNTg5OTYgMTcuNjcxNiA3LjU2NDU2IDE3LjU5NTRWMTcuNTk1NFpNOC42OTQ3MiAxOC4xNjY5QzkuMzE2OTQgMTguMzMyIDkuMzE2OTQgMTguMDY1MyA4Ljc0NTUxIDE3Ljk4OTFDOC40NDA3NSAxNy43MDk3IDcuNDg4MzcgMTcuNDA1IDguMzM5MTYgMTcuOTUxQzguNDAyNjUgMTguMTAzNCA4LjU4MDQzIDE4LjA5MDcgOC42OTQ3MiAxOC4xNjY5Wk02LjQ3MjQ5IDE2LjY5MzlDNi44MTUzNSAxNi45NDc4IDcuNzY3NzMgMTcuNDE3NyA2Ljk2NzczIDE2Ljc5NTRDNy4yMzQ0IDE2LjQ3OCA2LjQ0NzEgMTYuMzEyOSA2LjcxMzc3IDE2LjA5N0M2LjA0MDc1IDE1LjY5MDcgNi4xOTMxMyAxNS43Mjg4IDYuNjUwMjcgMTUuNzQxNUM1Ljg1MDI3IDE1LjM4NTkgNi43NjQ1NiAxNS40MTEzIDYuNzI2NDYgMTUuMjIwOEM2LjQyMTcgMTUuMTU3MyA1LjE4OTk2IDE0LjY3NDggNS45MTM3NyAxNS4yNTg5QzUuMTc3MjYgMTQuODkwNyA1LjczNTk5IDE1LjM5ODYgNS41MjAxMSAxNS4zNDc4QzQuNzcwOTEgMTUuMTQ0NiA2LjE5MzEzIDE1LjkxOTMgNS40MDU4MyAxNS43Mjg4QzUuODM3NTcgMTYuMDcxNiA2LjU2MTM4IDE2LjYwNSA1LjU4MzYxIDE2LjA4NDNDNS40NDM5MiAxNi4yNzQ4IDYuMjY5MzIgMTYuNTU0MiA2LjQ3MjQ5IDE2LjY5MzlaTTcuNjUzNDUgMTcuMzY2OUM5LjA3NTY3IDE3LjgyNCA2Ljk0MjM0IDE2LjgwODEgNy42NTM0NSAxNy4zNjY5VjE3LjM2NjlaTTEzLjY1OTggMjEuMDExM0MxMy42NzI1IDIwLjcxOTMgMTMuNDU2NiAyMS4yNTI2IDEzLjY1OTggMjEuMDExM1YyMS4wMTEzWk0xNC4yNjkzIDIxLjI2NTNDMTQuNTk5NSAyMC45NDc4IDE0LjI4MiAyMS43NzMyIDE0LjgxNTQgMjEuMTg5MUMxNC44MTU0IDIwLjc3IDE0LjgwMjcgMjAuNTE2MSAxNC4yMDU4IDIxLjAzNjdDMTQuMDQwOCAyMS4xMjU2IDEzLjk2NDYgMjEuNTA2NiAxNC4yNjkzIDIxLjI2NTNaTTQuNDY2MTUgMTUuMTA2NkM0LjM2NDU2IDE0LjcxMjkgMy43Njc3MyAxNC43MTI5IDQuNDY2MTUgMTUuMTA2NlYxNS4xMDY2Wk01LjEyNjQ2IDE1LjUzODNDNC44ODUxOSAxNS4xMzE5IDQuMjUwMjcgMTUuMTcgNS4xMjY0NiAxNS41MzgzVjE1LjUzODNaTTguODg1MTkgMTcuNzk4NkM5LjI1MzQ1IDE4LjEyODggMTAuNTYxNCAxOC4wMzk5IDkuMzI5NjQgMTcuODM2N0M5LjEzOTE2IDE3LjU3IDguMTYxMzggMTcuNjMzNSA4Ljg4NTE5IDE3Ljc5ODZaTTE0LjA0MDggMjAuOTg1OUMxNC41OTk1IDIwLjUxNjEgMTMuNDk0NyAyMS4yMDE4IDE0LjA0MDggMjAuOTg1OVYyMC45ODU5Wk0xNS4yMDkgMjEuNzk4NkMxNS4yMDkgMjEuNjQ2MiAxNC45Njc3IDIxLjg2MjEgMTUuMjA5IDIxLjc5ODZWMjEuNzk4NlpNMTUuMjA5IDIxLjU4MjdDMTUuODMxMiAyMC45MjI0IDE0LjYxMjIgMjEuNjIwOCAxNS4yMDkgMjEuNTgyN1YyMS41ODI3Wk0yLjg1MzQ1IDEzLjc0NzhDMi4zMjAxMSAxMi45ODU5IDIuNTIzMjkgMTIuNjQzMSAyLjAxNTM1IDEyLjAzMzVDMS45MTM3NiAxMS41NjM3IDEuMTM5MTYgMTAuNDg0MyAxLjYwOSAxMS42MjcyQzIuMDQwNzUgMTIuMjg3NSAyLjE2NzczIDEzLjMxNjEgMi44NTM0NSAxMy43NDc4Wk0xNS4wMTg1IDIxLjM2NjlDMTYuMTYxNCAyMC42MzA0IDE0LjU0ODcgMjEuMDQ5NCAxNS4wMTg1IDIxLjM2NjlWMjEuMzY2OVpNMTUuODk0NyAyMS43MDk3QzE2LjQ2NjEgMjEuMjI3MiAxNS41MjY1IDIxLjYwODEgMTUuODk0NyAyMS43MDk3VjIxLjcwOTdaTTQuMjc1NjcgMTQuMjY4NUM0LjQ0MDc1IDE0LjAyNzIgMy44NDM5MiAxNC4yNDMxIDQuMjc1NjcgMTQuMjY4NVYxNC4yNjg1Wk0xNS43MDQyIDIxLjQ4MTJDMTYuMjYzIDIxLjEyNTYgMTUuNTc3MyAyMS4xNzY0IDE1LjYwMjcgMjEuNTE5M0wxNS43MDQyIDIxLjQ4MTJaTTguMTQ4NjkgMTYuNzE5M0M4LjEzNTk5IDE2LjQ3OCA3Ljg1NjYyIDE2Ljc0NDYgOC4xNDg2OSAxNi43MTkzVjE2LjcxOTNaTTguNjE4NTMgMTYuOTg1OUM4LjQ2NjE1IDE2LjY4MTIgOC4zODk5NiAxNy4wMzY3IDguNjE4NTMgMTYuOTg1OVYxNi45ODU5Wk0xNi42MDU4IDIxLjcyMjRDMTcuMzE2OSAyMS4yMDE4IDE2LjE3NDEgMjEuNjIwOCAxNi40NTM0IDIxLjgyNEwxNi42MDU4IDIxLjcyMjRaTTE2LjMyNjUgMjEuNTk1NEMxNi45MTA2IDIxLjEwMDIgMTUuNzE2OSAyMS44MTEzIDE2LjMyNjUgMjEuNTk1NFYyMS41OTU0Wk0xNy43MjMzIDIyLjUyMjRDMTguMTE2OSAyMi4yNTU4IDE3LjI1MzQgMjIuNDMzNSAxNy43MjMzIDIyLjUyMjRWMjIuNTIyNFpNNC42MzEyMiAxNC4wOTA3QzUuMTUxODYgMTQuMjA1IDYuNzI2NDYgMTUuMzczMiA1Ljc5OTQ4IDE0LjE2NjlDNS4zMjk2NCAxNC4wMjcyIDUuNjA5IDEyLjg3MTYgNS4xMjY0NiAxMy4wNzQ4QzUuNDU2NjIgMTMuNjIwOCA1LjM5MzEzIDEzLjg0OTQgNC43MDc0MiAxMy41MDY2QzMuODU2NjIgMTMuMDg3NSA0LjIyNDg4IDEzLjcwOTcgNC4zODk5NiAxMy44ODc1QzQuMTc0MDggMTMuOTM4MyA0LjY5NDcyIDE0LjA5MDcgNC42MzEyMiAxNC4wOTA3Wk0yLjI0MzkyIDEyLjIxMTNDMi4zMzI4MSAxMS44MzA0IDEuMzgwNDMgMTAuMDc4IDEuNzg2NzggMTEuMzM1MUMxLjk1MTg2IDExLjYwMTggMS45MjY0NiAxMi4wOTcgMi4yNDM5MiAxMi4yMTEzWk02LjYyNDg4IDE0LjkwMzRDNi4zNTgyMSAxNC42ODc1IDYuNjEyMTggMTQuODc4IDYuNjI0ODggMTQuOTAzNFYxNC45MDM0Wk03LjI4NTE5IDE1LjA2ODVDNy4yODUxOSAxNC42NDk0IDYuNTQ4NjkgMTQuODkwNyA3LjI4NTE5IDE1LjA2ODVWMTUuMDY4NVpNMTMuMDM3NiAxOC42ODc1QzEyLjkyMzMgMTguNDA4MSAxMi42MDU4IDE4LjY3NDggMTMuMDM3NiAxOC42ODc1VjE4LjY4NzVaTTEzLjMwNDIgMTguODkwN0MxMy4yNjYxIDE4LjcyNTYgMTMuMTUxOSAxOC45MTYxIDEzLjMwNDIgMTguODkwN1YxOC44OTA3Wk0xNS41OSAyMC4zMjU2QzE1LjgwNTggMjAuMTYwNSAxNS4zMTA2IDIwLjMwMDIgMTUuNTkgMjAuMzI1NlYyMC4zMjU2Wk0zLjQzNzU4IDEyLjUxNjFDNC4wNzI1IDEyLjI3NDggMi43NjQ1NiAxMi4zMzgzIDMuNDM3NTggMTIuNTE2MVYxMi41MTYxWk0xMi41Mjk2IDE4LjI0MzFDMTIuNTE2OSAxNy44MzY3IDEyLjEyMzMgMTguMzQ0NyAxMi41Mjk2IDE4LjI0MzFWMTguMjQzMVpNMy4xOTYzMSAxMS45NDQ2QzMuNTg5OTYgMTEuODA1IDIuODE1MzUgMTEuODU1OCAzLjE5NjMxIDExLjk0NDZWMTEuOTQ0NlpNNC4zNjQ1NiAxMi41MDM0QzQuMzUxODYgMTIuMzc2NCA0LjIzNzU3IDEyLjU1NDIgNC4zNjQ1NiAxMi41MDM0VjEyLjUwMzRaTTE4LjYxMjIgMjEuMjM5OUMxOS4xMzI4IDIxLjEzODMgMjAuMzEzOCAyMS41MDY2IDIwLjUwNDIgMjEuMTAwMkMxOS44NjkzIDIxLjA4NzUgMTguMzMyOCAyMC42NTU4IDE4LjI1NjYgMjEuMjAxOEwxOC4zOTYzIDIxLjIyNzJMMTguNjEyMiAyMS4yMzk5Wk00LjczMjgxIDEyLjYwNUM0Ljc0NTUxIDEyLjE4NTkgNC40MTUzNSAxMi41Nzk2IDQuNzMyODEgMTIuNjA1VjEyLjYwNVpNMS42NTk4IDEwLjQ3MTZDMS41MjAxMSA5LjY4NDMzIDEuMTI2NDYgMTAuMzQ0NiAxLjY1OTggMTAuNDcxNlYxMC40NzE2Wk0yLjM5NjMgMTAuNjQ5NEMyLjM5NjMgMTAuMzk1NCAxLjcyMzI5IDEwLjQyMDggMi4zOTYzIDEwLjY0OTRWMTAuNjQ5NFpNMi44MTUzNSAxMC44NTI2QzIuNjg4MzcgMTAuNzYzNyAyLjcxMzc3IDEwLjk3OTYgMi44MTUzNSAxMC44NTI2VjEwLjg1MjZaTTUuNDQzOTIgMTIuNTQxNUM1LjU3MDkxIDEyLjQyNzIgNS4xNTE4NiAxMi40NjUzIDUuNDQzOTIgMTIuNTQxNVYxMi41NDE1Wk0yLjUzNTk5IDEwLjM5NTRDMi40NTk4IDkuNzk4NjIgMS42ODUxOSAxMC4zMDY2IDIuNTM1OTkgMTAuMzk1NFYxMC4zOTU0Wk0xLjAyNDg4IDkuNDE3NjZDMS4wMTIxOCA5LjE1MSAwLjg4NTE5MyA5LjUxOTI1IDEuMDI0ODggOS40MTc2NlY5LjQxNzY2Wk0xLjI1MzQ1IDkuMjUyNTlDMS4yMTUzNSA4LjkyMjQzIDEuMDYyOTcgOS4yOTA2OCAxLjI1MzQ1IDkuMjUyNTlWOS4yNTI1OVpNMi40ODUxOSA5Ljk4OTA5QzMuMDA1ODMgOS43ODU5MiAxLjUzMjgxIDkuNTcwMDUgMi4zODM2MSA5Ljk1MUwyLjQ4NTE5IDkuOTg5MDlaTTE5LjAwNTggMjAuMTg1OUMxOS4zNDg3IDE5Ljg4MTIgMTguNTg2OCAyMC4wOTcgMTkuMDA1OCAyMC4xODU5VjIwLjE4NTlaTTIwLjk5OTUgMjEuMjI3MkMyMS4xMzkyIDIwLjgzMzUgMjAuNjY5MyAyMS4yNzggMjAuOTk5NSAyMS4yMjcyVjIxLjIyNzJaTTIuNjEyMTggOS4zNDE0N0MyLjY3NTY3IDguOTYwNTIgMi4yMDU4MyA5LjQxNzY2IDIuNjEyMTggOS4zNDE0N1Y5LjM0MTQ3Wk0wLjg1OTc5NyA4LjE2MDUyQzAuNzcwOTA4IDcuNjE0NDkgMC43ODM2MDYgNi42NzQ4MSAxLjY4NTE5IDYuOTkyMjdDMC40Nzg4NDQgNy4yMzM1NCAyLjUyMzI5IDguNDkwNjggMi4yNTY2MiA3LjUwMDJDMi43NjQ1NiA3LjUyNTYgMy4yNDcxIDcuMTk1NDQgMi45ODA0MyA3LjY5MDY4QzMuOTgzNjEgNy41NzYzOSA0LjY2OTMyIDYuNzEyOSA1LjYzNDQgNi44Mzk4OUM2LjM4MzYxIDYuNzM4MyA3LjIwOSA2LjY2MjExIDguMDIxNyA2LjM1NzM1QzguNjgyMDIgNi4zMDY1NSA5LjMyOTY0IDUuNTk1NDQgOC45NjEzOCA1LjE2MzdDOC4wNTk4IDUuMDg3NTEgNy4xMDc0MiA1LjIwMTc5IDYuMTA0MjQgNS40MDQ5N0M0Ljk4Njc4IDUuNjMzNTQgMy45NzA5MSA2LjA3Nzk4IDIuODUzNDUgNi4yNjg0NkMxLjc2MTM4IDYuNDIwODQgMy4wNjkzMiA2LjY3NDgxIDIuNzY0NTYgNi43MjU2QzIuMTkzMTMgNi45Mjg3OCAzLjQ1MDI3IDcuMDU1NzYgMi42ODgzNyA3LjI3MTYzQzIuMjE4NTMgNy4xODI3NCAxLjczNTk5IDcuMDE3NjYgMS45MzkxNiA2LjUzNTEyQzAuODk3ODkyIDYuNjc0ODEgLTAuMDI5MDkyMyA3LjEwNjU1IDAuNzk2MzA1IDguMTczMjJMMC44NTk3OTcgOC4xNjA1MlpNMy4zODY3OCA2Ljg3Nzk4QzMuNjI4MDUgNS45NzYzOSA0LjcwNzQyIDcuNjI3MTkgMy43OTMxMyA2Ljk5MjI3QzMuNjc4ODQgNi45MTYwOCAzLjQ4ODM3IDYuODUyNTggMy4zODY3OCA2Ljg3Nzk4Wk0zLjQyNDg4IDYuNDQ2MjRDMy43ODA0MyA2LjE3OTU3IDMuNjE1MzUgNi41ODU5MiAzLjQyNDg4IDYuNDQ2MjRWNi40NDYyNFpNMy44ODIwMiA2LjQ0NjI0QzMuOTIwMTEgNi4wMjcxOSA0LjkxMDU5IDYuNjYyMTEgNC4wNDcxIDYuNTk4NjJMMy44ODIwMiA2LjQ0NjI0Wk00LjQ5MTU0IDYuMjA0OTdDNC43MjAxMSA1LjkzODMgNC41NTUwMyA2LjQzMzU0IDQuNDkxNTQgNi4yMDQ5N1Y2LjIwNDk3Wk00LjY1NjYyIDYuMDkwNjhDNS4wMjQ4OCA1LjY0NjI0IDYuNzc3MjYgNS43OTg2MiA1LjQ5NDcyIDYuMDUyNThDNS4xNTE4NiA1Ljc5ODYyIDQuODg1MTkgNi4yMDQ5NyA0LjY1NjYyIDYuMDkwNjhaTTYuOTI5NjQgNS43NDc4MkM2Ljg2NjE1IDQuNTE2MDggOC4wNTk4IDYuMTc5NTcgNi45Mjk2NCA1Ljc0NzgyVjUuNzQ3ODJaTTcuNTc3MjYgNS43MzUxMkM3LjgxODUzIDUuMTEyOSA4LjQ5MTU0IDUuNDgxMTYgNy42OTE1NCA1LjYwODE0QzcuNzA0MjQgNS42ODQzMyA3LjY1MzQ1IDUuOTM4MyA3LjU3NzI2IDUuNzM1MTJaTTIuMzU4MjEgOS4wMjQwMUMzLjA2OTMyIDguNTkyMjcgMS42MDkgOC42NDMwNiAyLjM1ODIxIDkuMDI0MDFWOS4wMjQwMVpNMi44Nzg4NCA5LjE2MzdDMy4xMzI4MSA4LjkwOTczIDIuMzQ1NTEgOS4wNjIxMSAyLjg3ODg0IDkuMTYzN1Y5LjE2MzdaTTEuMzQyMzQgOC4wNzE2M0MxLjc0ODY5IDcuNzY2ODcgMC44NzI0OTUgNy45NTczNSAxLjM0MjM0IDguMDcxNjNWOC4wNzE2M1pNMjIuMTgwNCAyMS4xMTI5QzIyLjE5MzEgMjAuNzU3MyAyMS44NzU3IDIxLjI3OCAyMi4xODA0IDIxLjExMjlWMjEuMTEyOVpNMjAuMDU5OCAxOS42NjUzQzIwLjEyMzMgMTkuMjU4OSAxOS43OTMxIDE5LjcwMzQgMjAuMDU5OCAxOS42NjUzVjE5LjY2NTNaTTIyLjc2NDYgMjEuMjUyNkMyMy4zMjMzIDIxLjI1MjYgMjQuNDc4OCAyMS4wNzQ4IDIzLjI0NzEgMjEuMDc0OEMyMy4wNTY2IDIxLjExMjkgMjIuMTI5NiAyMS4xMDAyIDIyLjc2NDYgMjEuMjUyNlpNMy4zMzU5OSA4LjkwOTczQzMuNzkzMTMgOC44ODQzMyA0LjA0NzEgOC40MDE3OSAzLjI0NzEgOC40Mzk4OUMyLjAwMjY1IDguMzEyOSA0LjMzOTE2IDguODcxNjMgMy4wODIwMiA4LjcwNjU1QzIuOTI5NjQgOC44MjA4NCAzLjMzNTk5IDguOTQ3ODIgMy4zMzU5OSA4LjkwOTczWk0zLjc0MjM0IDkuMTEyOUMzLjY5MTU0IDguODIwODQgMy42MDI2NSA5LjI3Nzk4IDMuNzQyMzQgOS4xMTI5VjkuMTEyOVpNNC4yMjQ4OCA3Ljg0MzA2QzQuNDE1MzUgNy42MDE3OSAzLjk0NTUxIDcuNzc5NTcgNC4yMjQ4OCA3Ljg0MzA2VjcuODQzMDZaTTIuNzAxMDcgNS4zMDMzOEMzLjUxMzc3IDUuMDI0MDEgNC42MzEyMyA0LjcxOTI1IDUuMDEyMTggNS40NDMwNkM0LjYxODUzIDQuOTczMjIgNC44NTk4IDQuNTAzMzggNS4yMjgwNSA1LjIwMTc5QzUuNzQ4NjkgNS45MDAyIDYuMDE1MzUgNC44ODQzMyA1LjY3MjUgNC42NTU3NkM2LjA2NjE1IDUuMTM4MyA2LjQ5Nzg5IDUuMzY2ODcgNS45MjY0NiA0LjY4MTE2QzYuNTQ4NjkgMy45MzE5NSA0LjY5NDcyIDQuNzgyNzQgNC4yNjI5NyA0Ljc3MDA1QzQuMDcyNSA0Ljg1ODkzIDIuMTgwNDMgNS4yNTI1OCAyLjcwMTA3IDUuMzAzMzhaTTMuMTgzNjEgNC40MDE3OUMzLjY1MzQ1IDQuMDQ2MjQgNC43ODM2MSA0LjYwNDk3IDQuMDU5OCA0LjA1ODkzQzMuOTgzNjEgMy45ODI3NCAyLjQ0NzEgNC40NjUyOCAzLjE4MzYxIDQuNDAxNzlaTTQuODcyNSA0LjQ2NTI4QzUuNDE4NTMgNC40Nzc5OCA0LjY0MzkyIDMuNzI4NzggNS4yOTE1NCA0LjA3MTYzQzUuMTg5OTYgMy43Mjg3OCA0LjU0MjM0IDMuNjY1MjggNC4yMjQ4OCAzLjUyNTZDNC4wMzQ0IDMuODQzMDYgNC41ODA0MyA0LjQ2NTI4IDQuODcyNSA0LjQ2NTI4Wk0zLjQ3NTY3IDIuOTI4NzhDMy42NjYxNSAyLjY3NDgxIDMuMTQ1NTEgMy4wNTU3NiAzLjQ3NTY3IDIuOTI4NzhWMi45Mjg3OFpNNC4xNjEzOCAzLjA5Mzg2QzUuMDM3NTcgMi45Nzk1NyAzLjkzMjgxIDIuNzEyOSAzLjk4MzYxIDMuMDgxMTZMNC4xNjEzOCAzLjA5Mzg2Wk0yLjg3ODg0IDIuMDc3OThDMi4yNTY2MiAxLjI3Nzk4IDQuMDM0NCAyLjIxNzY2IDMuNDEyMTggMS4zNjY4N0MyLjg3ODg0IDAuOTYwNTIxIDIuMzcwOTEgMS44NDk0MSAyLjg3ODg0IDIuMDc3OThaTTEwLjc5IDYuMzQ0NjVDMTEuMDY5MyA1Ljg0OTQxIDkuNjIxNyA1LjY3MTYzIDEwLjU5OTUgNi4xNjY4N0MxMC42ODg0IDYuMjA0OTcgMTAuNjc1NyA2LjM4Mjc0IDEwLjc5IDYuMzQ0NjVaIiBmaWxsPSJibGFjayIvPgo8L3N2Zz4K) Flask This template demonstrates building the Flask framework for Platform.sh. It includes a minimalist application skeleton that demonstrates how to connect to a MariaDB server for data storage and Redis for caching. The application starts as a bare Python process with no separate runner. It is intended for you to use as a starting point and modify for your own needs. Flask is a lightweight web microframework for Python. ###### Features: - Python 3.8 - MariaDB 10.4 - Redis 5.0 - Automatic TLS certificates - Pipfile-based build View the [repository on GitHub](https://github.com/platformsh-templates/flask). ![Deploy on ](https://platform.sh/images/deploy/lg-blue.svg) Pyramid ![Pyramid](data:image/svg+xml,%3Csvg xmlns='http://www.w3.org/2000/svg' width='225' height='219.34'%3E%3Cg %3E%3Cpath d='M120.8 45.3a22.65 22.65 0 1 0-22.65-22.65A22.66 22.66 0 0 0 120.8 45.3zm81.55 160.45a22.65 22.65 0 1 0-22.65-22.65 22.65 22.65 0 0 0 22.65 22.65zm-157-29.82a22.65 22.65 0 1 1-22.65-22.65 22.65 22.65 0 0 1 22.6 22.65zM73.24 75.5a18.88 18.88 0 1 0-18.88-18.88A18.88 18.88 0 0 0 73.24 75.5zm143.08 49.83a18.88 18.88 0 1 1-18.88-18.87 18.88 18.88 0 0 1 18.88 18.87zm-141.57 94a18.88 18.88 0 1 0-18.88-18.88 18.87 18.87 0 0 0 18.88 18.89zm-4.53-118.91a15.1 15.1 0 1 1-15.1-15.1 15.1 15.1 0 0 1 15.1 15.1zm98.15 4.15a15.1 15.1 0 1 0-15.1-15.1 15.1 15.1 0 0 0 15.1 15.1zm-24.16-26.43a11.33 11.33 0 1 1-11.32-11.32 11.32 11.32 0 0 1 11.32 11.32zm4.91 100.43a11.33 11.33 0 1 0-11.33-11.33 11.33 11.33 0 0 0 11.33 11.33zM75.13 137a11.33 11.33 0 1 1-11.33-11.29A11.32 11.32 0 0 1 75.13 137zm10.57 29.49a9.44 9.44 0 1 0-9.44-9.44 9.44 9.44 0 0 0 9.44 9.44zm28.3-78.9a9.44 9.44 0 1 1-9.44-9.44 9.44 9.44 0 0 1 9.44 9.44zm41.15 60a9.44 9.44 0 1 0-9.44-9.44 9.44 9.44 0 0 0 9.45 9.46zM117 160.44a7.55 7.55 0 1 1-7.55-7.55 7.55 7.55 0 0 1 7.55 7.55zm29.83-37a7.55 7.55 0 1 0-7.56-7.55 7.55 7.55 0 0 0 7.59 7.55zM97 105.7a7.55 7.55 0 1 1-7.55-7.55A7.56 7.56 0 0 1 97 105.7zm29.83 52.1a5.66 5.66 0 1 0-5.67-5.66 5.66 5.66 0 0 0 5.69 5.66zM93.62 125a5.66 5.66 0 1 1-5.62-5.71 5.66 5.66 0 0 1 5.62 5.71zM131 111.37a5.67 5.67 0 1 0-5.66-5.67 5.66 5.66 0 0 0 5.66 5.67zm5.66 80.79a15.1 15.1 0 1 1-15.1-15.11 15.1 15.1 0 0 1 15.1 15.11z' style='fill:%23be202d;fill-rule:evenodd' /%3E%3C/g%3E%3C/svg%3E) Pyramid This template builds Pyramid on Platform.sh. It includes a minimalist application skeleton that demonstrates how to connect to a MariaDB server for data storage and Redis for caching. It is intended for you to use as a starting point and modify for your own needs. Pyramid is a web framework written in Python. ###### Features: - Python 3.8 - MariaDB 10.4 - Redis 5.0 - Automatic TLS certificates - Pipfile-based build View the [repository on GitHub](https://github.com/platformsh-templates/pyramid). ![Deploy on ](https://platform.sh/images/deploy/lg-blue.svg) Wagtail ![Wagtail](data:image/svg+xml;base64,PHN2ZyB3aWR0aD0iMjAyNSIgaGVpZ2h0PSIyNTAwIiB2aWV3Qm94PSIwIDAgMjU2IDMxNiIgeG1sbnM9Imh0dHA6Ly93d3cudzMub3JnLzIwMDAvc3ZnIiBwcmVzZXJ2ZUFzcGVjdFJhdGlvPSJ4TWlkWU1pZCI+PHBhdGggZD0iTTIxNC43NSA0Ni4yNWE2LjUgNi41IDAgMSAwIDAtMTMgNi41IDYuNSAwIDAgMCAwIDEzem04LjI1IDU2cy04LjI1LTQxLjUtNjIuMjUtMzAuMjVjLTUuNS0xOC43NS00LjUtMzIuNSA3LjUtNDUuMjVDMTg0LjUgOS41IDIxMCAxOSAyMTAgMTlWNC43NUMyMDEgLjc1IDE5Mi41IDAgMTgzIDBjLTM0Ljc1IDAtNTQgMjYtNjIuMjUgNDMuNUwyMyAyMjMuMjUgNTAuNSAyMTggMCAzMTUuNWwzNS4yNS02LjI1IDI3LTc2Ljc1Yzc2LjUgMCAxNzQuNS0yNy41IDE2MC43NS0xMzAuMjV6bTMzLTM0Ljc1bC0yMS41LTIwLjc1LTE3IDIwLjc1SDI1NnpNNzUgMjEwLjI1czIuNS0uNSA3LTEuNSAxMC43NS0yLjUgMTguMjUtNC41YzMuNzUtMSA3Ljc1LTIuMjUgMTItMy43NXM4Ljc1LTMgMTMtNWM0LjUtMS43NSA5LTQgMTMuNS02LjVzOC43NS01LjI1IDEyLjc1LTguNWMxLS43NSAyLTEuNSAzLTIuNWwzLTIuNWMxLjc1LTEuNzUgMy43NS0zLjUgNS41LTUuNSAxLjc1LTEuNzUgMy4yNS0zLjc1IDQuNzUtNS43NWwyLjI1LTMgMS0xLjUgMS0xLjVjLjUtMSAxLjI1LTIgMS43NS0zczEtMiAxLjc1LTNsLjc1LTEuNS43NS0xLjVjLjUtMSAxLTIgMS4yNS0zbDIuMjUtNmMuNS0yIDEuMjUtNCAxLjc1LTUuNzVzLjc1LTMuNzUgMS4yNS01LjI1Yy4yNS0xLjc1LjUtMy4yNS43NS01IC4yNS0xLjUuNS0zIC41LTQuMjUuMjUtMS4yNS4yNS0yLjUuNS0zLjc1LjI1LTQuNS4yNS03IC4yNS03bDQgLjI1cy0uMjUgMi43NS0uNSA3LjI1Yy0uMjUgMS4yNS0uMjUgMi41LS41IDMuNzUtLjI1IDEuNS0uMjUgMy0uNzUgNC41LS4yNSAxLjUtLjc1IDMuMjUtMSA1LS41IDEuNzUtMSAzLjUtMS41IDUuNXMtMS4yNSAzLjc1LTIgNmMtLjc1IDItMS41IDQtMi41IDYuMjVsLTEuNSAzLS43NSAxLjUtLjc1IDEuNWMtLjUgMS0xLjI1IDItMS43NSAzLjI1LS43NSAxLTEuMjUgMi0yIDMtLjI1LjUtLjc1IDEtMSAxLjVsLTEgMS41LTIuMjUgM2MtMS43NSAyLTMuMjUgNC01LjI1IDUuNzUtMS43NSAyLTMuNzUgMy41LTUuNzUgNS41bC0zIDIuNWMtMSAuNzUtMiAxLjUtMy4yNSAyLjI1LTQuMjUgMy04Ljc1IDUuNzUtMTMuMjUgOC4yNS00LjUgMi4yNS05LjI1IDQuNS0xMy43NSA2LjI1cy05IDMuMjUtMTMuMjUgNC41LTguMjUgMi41LTEyLjI1IDMuMjVjLTcuNSAxLjc1LTE0IDMuMjUtMTguNSA0LTQgMS41LTYuNSAyLTYuNSAyeiIvPjwvc3ZnPg==) Wagtail This template builds the Wagtail CMS on Platform.sh, using the gunicorn application runner. It includes a PostgreSQL database that is configured automatically, and a basic demonstration app that shows how to use it. It is intended for you to use as a starting point and modify for your own needs. You will need to run the command line installation process by logging into the project over SSH after the first deploy. Wagtail is a web CMS built using the Django framework for Python. ###### Features: - Python 3.9 - PostgreSQL 12 - Automatic TLS certificates - Pipfile-based build View the [repository on GitHub](https://github.com/platformsh-templates/wagtail). ![Deploy on ](https://platform.sh/images/deploy/lg-blue.svg) ##### Ruby View the [Ruby documentation](https://docs.platform.sh/languages/ruby.md). Templates in development. ### Set up your local development environment To make changes to your app's code and test them without affecting your production environment, set up a local development environment on your computer. For the most effective testing, you want your local environment to match your Platform.sh environments. The best way to do this is to use a cross-platform tool based on Docker. This ensures the changes you make locally appear as they would on your Platform.sh environments. It also means you don't have to worry about configuring your machine with the various dependencies, certificates, and connections your app needs to run. The **recommended tool** for local development with Platform.sh is **[DDEV](https://docs.platform.sh/development/local/ddev.md)**. The integration with DDEV is maintained by Platform.sh to ensure it works smoothly. Other Docker-based tools are also supported, such as [Docksal](https://docs.platform.sh/development/local/docksal.md) and [Lando](https://docs.platform.sh/development/local/lando.md). If you choose to use a Docker-based tool, follow the steps on its page. Otherwise, follow these steps to run your app on your computer. ##### Before you begin You need to have: - A Platform.sh account: new users can sign up for a [free trial account](https://auth.api.platform.sh/register) - A working project - [Git](https://git-scm.com/downloads) - The [Platform.sh CLI](https://docs.platform.sh/administration/cli.md) ##### 1. Get your code If you don't have your app code on your computer, download a copy. 1. Get your project ID by running `platform projects`. 2. Get the code by running the following command: ```bash platform get ``` Or pull from your [integrated Git repository](https://docs.platform.sh/integrations/source.md). You can now access your code from the project directory on your computer. The CLI created a `.platform/applications.yaml/local` directory that's excluded from Git. It contains builds and local metadata about your project. You can now make changes to your project without pushing to Platform.sh each time to test them. Instead, you can locally build your application using the Platform.sh CLI. Note that if your app contains services, you need to open an SSH tunnel to connect to them. For more information, see how to [connect services](https://docs.platform.sh/add-services#2-connect-the-service). ##### 2. Connect to services If your app requires services to run, you have two options for developing locally: - [Tethered local development](https://docs.platform.sh/development/local/tethered.md) involves running your app on a local web server but keeping all other services on Platform.sh and connecting to them over an SSH tunnel. - [Untethered local development](https://docs.platform.sh/development/local/untethered.md) involves running your entire site locally, including all services. Choose the option that works for you and get your services running. ##### 3. Build your site locally If you want your local development environment to be enclosed so your main system remains unaffected by the build and its dependencies, you can use a local virtual machine. To build your site locally: 1. Install any dependencies or tools needed for the build process. 2. Run the following command: ```bash platform build ``` Your app is built in the `.platform/applications.yaml/local/builds` directory. Unless you specify otherwise with the `--destination` flag, a symbolic link from your build is created as the `_www` directory at your project root. 3. To check that the build was successful, move to the `_www` directory and run a web server. #### Use DDEV for local development [DDEV](https://ddev.readthedocs.io/en/stable/) is an open-source tool for local development environments. It allows you to use Docker in your workflows while maintaining a GitOps workflow. You get fully containerized environments to run everything locally without having to install tools (including the Platform.sh CLI, PHP, and Composer) on your machine. This guide assumes you have a project already running with Platform.sh and you have the code on your computer. If you're starting from scratch, first [create a project from a PHP template]( https://console.platform.sh/org/create-project/template?_utm_campaign=cta_deploy_marketplace_template&utm_source=public_documentation&_utm_medium=organic ). ###### Before you begin Make sure your computer meets the [system requirements for DDEV](https://ddev.readthedocs.io/en/stable/#system-requirements). For the integration to run smoothly, you also need the following tools: - `jq` - `base64` - `perl` If you don't have these already installed, use your normal package manager. ###### 1. Install DDEV To install DDEV, follow the [DDEV documentation for your operating system](https://ddev.readthedocs.io/en/stable/users/install/ddev-installation/). This installs the self-contained `ddev` command-line interface (CLI). For more information on `ddev`, run `ddev help`. ###### 2. Add DDEV configuration to your project Get basic configuration set up for your project by running the following command: ```bash ddev config ``` If you started with a Drupal template, your repository already had DDEV configuration files. Otherwise, you have to answer a couple of questions about what your repository is so the correct files are added. ###### 3. Add an API token To connect DDEV with your Platform.sh account, use a Platform.sh API token. First [create an API token](https://docs.platform.sh/administration/cli/api-tokens.md#2-create-an-api-token) in the Console. Then add the token to your DDEV configuration. You can do so globally (easiest for most people): ```bash ddev config global --web-environment-add=PLATFORMSH_CLI_TOKEN= ``` You can also add the token only to the project: ```bash ddev config --web-environment-add=PLATFORMSH_CLI_TOKEN= ``` ###### 4. Connect DDEV to your project The best way to connect your local DDEV to your Platform.sh project is through the [Platform.sh DDEV add-on](https://github.com/ddev/ddev-platformsh). To add it, run the following command: ```bash ddev get ddev/ddev-platformsh ``` Answer the interactive prompts with your project ID and the name of the environment to pull data from. With the add-on, you can now run `ddev platform ` from your computer without needing to install the Platform.sh CLI. ###### 5. Optional: Get your project data To get your environment data (files, database), run the following command: ```bash ddev pull platform ``` To skip pulling files, add `--skip-files` to the command. To skip pulling a database, add `--skip-db` to the command. ###### 6. Run your project Now your project is ready to run: ```bash ddev start ``` This runs all your hooks and builds your project like on Platform.sh. The command returns the project URL `http://.ddev.site/` as well as a specific port on `http://127.0.0.1`. To see your project running, open one of these URLs. ###### What's next You've got a project running on a local web server. Now you can add customizations. For more ideas and options, see the [DDEV documentation](https://ddev.readthedocs.io/en/stable/). ####### Add environment variables If your project requires environment variables for its hooks or runtime, add them to the project's DDEV environment: ```yaml {location=".ddev/config.yaml"} web_environment: - : ``` To apply your changes, run the following command: ```bash ddev restart ``` #### Tethered local development To test changes locally, you can connect your locally running web server to service containers on an active Platform.sh environment. This method requires less configuration than tools such as [DDEV](https://docs.platform.sh/development/local/ddev.md), but may not perform well enough for everyday use. Because it replies on a local web server, it's also less consistent across your team. ###### Before you begin You need: - A local copy of the repository for a project running on Platform.sh. To get one, run ``platform get ``. Alternatively, you can clone an integrated source repository and set the remote branch. To do so, run ``platform project:set-remote ``. - The [Platform.sh CLI](https://docs.platform.sh/administration/cli.md) ###### Create the tethered connection 1. Create a new environment based on production. ```bash platform branch new-feature ``` If you're using a [source integration](https://docs.platform.sh/integrations/source.md), open a merge/pull request. 1. To open an SSH tunnel to the new environment's services, run the following command: ```bash platform tunnel:open ``` This command returns the addresses for SSH tunnels to all of your services. 1. Export the `PLATFORMSH_RELATIONSHIPS` environment variable with information from the open tunnel: ```bash export PLATFORM_RELATIONSHIPS="$(platform tunnel:info --encode)" ``` 1. Run your application locally. Make sure it's set up to read configuration from Platform.sh environment variables. If you app relies on other Platform.sh environment configuration, such as routes or secret variables, make sure to mock those variables as well. Your options for running the app depend on the language and configuration. You can use the server for your language, install a copy of Nginx, or use a virtual machine or Docker image. 1. When you've finished your work, close the tunnels to your services by running the following command: ```bash platform tunnel:close --all -y ``` ###### Connect to services directly With open tunnels to all your services, you can also connect to the running services directly. To get information on all running services, run the following command: ```bash platform tunnels ``` You get a response similar to the following: ```bash +-------+---------------+-------------+-----+--------------+ | Port | Project | Environment | App | Relationship | +-------+---------------+-------------+-----+--------------+ | 30000 | abcdefg123456 | new-feature | app | cache | | 30001 | abcdefg123456 | new-feature | app | database | +-------+---------------+-------------+-----+--------------+ ``` You can use the port information to connect directly to a service. If you need more detailed information, such as a path or password, run the following command: ```bash platform tunnel:info ``` You can use the information returned to connect to the remote database as if it were local. For example, the following command would connect to a MySQL database running through a tethered connection: ```bash mysql --host=127.0.0.1 --port= --user= --password= --database= ``` ###### Next steps You can now use your local environment to develop changes for review on Platform.sh environments. The following examples show how you can take advantage of that. ####### Onboard collaborators It's essential for every developer on your team to have a local development environment to work on. Place the local configuration into a script to ensure everyone has this. You can merge this change into production. 1. Create a new environment called `local-config`. 1. To set up a local environment for a new Platform.sh environment, create an executable script. ```bash touch init-local.sh && chmod +x init-local.sh ``` 1. Fill it with something similar to the following example, depending on your app and configuration: ```bash {location="init-local.sh"} #!/usr/bin/env bash ENVIRONMENT=$1 PARENT=$2 # Create the new environment platform branch $ENVIRONMENT $PARENT # Open a tunnel to the current environment platform tunnel:open --no-interaction # Mock Platform.sh environment variables export PLATFORM_RELATIONSHIPS="$(platform tunnel:info --encode)" # Add any other variables you need # If necessary, install dependencies here # Add the command to run the server ``` 1. To commit and push the revisions, run the following command: ```bash git add . && git commit -m "Add local configuration" && git push platform local-config ``` 1. Merge the change into production. Once the script is merged into production, any user can set up their local environment by running the following commands: ```bash platform cd ./init-local.sh another-new-feature ``` #### Untethered local development It's possible to run your entire site locally on your computer. That way you get better performance as there's no extra latency to connect to a remote database and doesn't require an active Internet connection to work. But it does require running all necessary services (databases, search servers, and so on) locally. These can be set up however you prefer, although Platform.sh recommends using a virtual machine to make it easier to share configuration between developers. If you already have a development workflow in place that works for you, you can keep using it with virtually no changes. To synchronize data from an environment on Platform.sh, consult the documentation for each [service](https://docs.platform.sh/add-services.md). Each service type has its own native data import/export process and Platform.sh doesn't get in the way of that. It's also straightforward to [download user files](https://docs.platform.sh/learn/tutorials/exporting.md) from your application using rsync. #### Use Docksal for local development [Docksal](https://docksal.io) is a Docker-based local development tool that plays nicely with Platform.sh. It allows you to have fully containerized environments to run everything locally without having to install tools (such as the Platform.sh CLI) on your machine. It's maintained by a community of developers and is a viable option for most Platform.sh projects. This guide assumes you have a project already running within Platform.sh. If you're starting from scratch, first [create a project from a template]( https://console.platform.sh/org/create-project/template?_utm_campaign=cta_deploy_marketplace_template&utm_source=public_documentation&_utm_medium=organic ). ###### Before you begin Make sure your computer meets the [system requirements for Docksal](https://docs.docksal.io/getting-started/setup/#system-requirements). ###### 1. Install Docksal To install Docksal, follow the [Docksal documentation for your operating system](https://docs.docksal.io/getting-started/setup/#install). This installs Docksal and `fin`, its command-line interface (CLI). For more information on `fin`, run `fin help`. ###### 2. Create a projects directory Create a directory to store all of your Docksal projects. It's recommended to be `~/Projects` on Linux/macOS and `C:\Projects` on Windows. See all [restrictions on the projects directory](https://docs.docksal.io/getting-started/project-setup/#projects-directory). ###### 3. Add an API token To connect Docksal with your Platform.sh account, use a Platform.sh API token. 1. [Create an API token](https://docs.platform.sh/administration/cli/api-tokens.md#2-create-an-api-token) in the Console. 2. Add the token to your Docksal configuration by running this command: ```bash fin config set --global SECRET_PLATFORMSH_CLI_TOKEN="" ``` Now you can run `fin platform ` from your computer without needing to install the Platform.sh CLI. ###### 4. Get your project To get your project, pull it with the following command: ```bash fin pull init --hosting-platform='platformsh' --hosting-site= --hosting-env= ``` This creates a directory with the specified name with all your files and code. It also adds a `.docksal` directory with all necessary Docksal configuration. These files are ignored by Platform.sh. ###### 5. Add commands Docksal doesn't automatically copy over any commands you have in your [build flavor](https://docs.platform.sh/create-apps/app-reference/single-runtime-image.md#build) and [hooks](https://docs.platform.sh/create-apps/hooks.md). To get your project running like on Platform.sh, you have to add the commands to Docksal. The `.docksal/commands` directory should already have one command (`init`) such as the following: ```bash {location=".docksal/commands/init"} #!/usr/bin/env bash fin project rm -f fin project start ``` This command removes any running Docksal containers and starts new ones. You can add new commands here that run on `fin init` or create a new file to run on `fin `. You can add your build flavor and hook commands after these commands. That way the Docksal CLI container is running and can process commands. For example, to install dependencies, use a command like the following depending on your dependency manager: ```bash {location=".docksal/commands/init"} #!/usr/bin/env bash fin project rm -f fin project start cd "$PROJECT_ROOT" echo "Installing dependencies..." fin composer install ``` ###### 6. Run your project Now your project is ready to run. In your project directory, run `fin init`. The command returns the project URL `http://.docksal/`. Open this URL to see your project running. ###### What's next You've got a project running on a local web server. Now you can add customizations. For more ideas and options, see the [Docksal documentation](https://docs.docksal.io/). ####### Add environment variables If your project requires environment variables for its hooks, add them to the Docksal environment. ```txt {location=".docksal/docksal.env"} = HOSTING_PLATFORM="platformsh" ``` To apply your changes, run the following command: ```bash fin project restart ``` ####### Customize your stack Docksal comes configured with a default PHP container (known as the CLI container), web container, and database container. You can customize the versions for each. Check the available versions for each by running `fin image registry `. For example, to check the available containers for the app, run `fin image registry docksal/cli`. You can then use the version you want by adding it as an [environment variable](#add-environment-variables). For example, to use the latest version, run the following command: ```bash fin config set CLI_IMAGE='docksal/cli:latest' ``` You can also customize the `.docksal/docksal.yml` file. Use it for a docker-compose definition for your [custom configurations](https://docs.docksal.io/stack/custom-configuration/#custom-configuration). ####### Import MySQL data into Docksal To download your data from Platform.sh and load it into your Docksal database container, run the following commands: ```bash fin platform db:dump --gzip -f /tmp/database.sql.gz fin exec 'zcat < /tmp/database.sql.gz | mysql -u user -p user -h db default' ``` You can also set the username, password, and database name using [specific environment variables](https://docs.docksal.io/stack/configuration-variables/#mysql-user). #### Use Lando for local development [Lando](https://docs.lando.dev) is a third-party local development tool for which several stacks are available (LAMP, LEMP, MEAN). Lando works with most services supported by Platform.sh [except for](https://docs.lando.dev/platformsh/caveats.md#unsupported-things) Vault KMS and network storage. See a list of [supported services](https://docs.lando.dev/platformsh/config.md#services-yaml). **Note**: Lando used to support Platform.sh PHP projects out of the box through a plugin. However, this plugin is now deprecated. It’s still available, but it’s no longer receiving updates and isn’t guaranteed to work. For a seamless experience, switch to [DDEV](https://docs.platform.sh/development/local/ddev.md), which is the recommended tool for local development with Platform.sh. The integration with DDEV is maintained by Platform.sh to ensure it works smoothly. Note that a Platform.sh migration guide from Lando to DDEV will be released soon. For a complete reference, consult the following resources: - [Lando Platform.sh plugin documentation](https://docs.lando.dev/platformsh/) and [source code](https://github.com/lando/platformsh) - [Lando documentation](https://docs.lando.dev/) ###### Before you begin You need : - Hardware that meets the [requirements](https://docs.lando.dev/getting-started/installation.md#hardware-requirements). - A PHP project. Lando doesn't automatically pull and set up environment variables that have been set in the Console. To use a build hook that requires environment variables, manually [add them](https://docs.lando.dev/platformsh/config.md#environment-variables). ###### 1. Install Lando Follow the [Lando installation instructions](https://docs.lando.dev/getting-started/installation.md). ###### 2. Create an access token To authorize Lando to communicate with Platform.sh, create an [API token](https://docs.platform.sh/administration/cli/api-tokens.md#2-create-an-api-token). Copy the value. ###### 3. Initialize Lando For a quicker start, create a project based on the Platform.sh [PHP template](https://github.com/platformsh-templates/php). The template provides the most basic configuration for running a custom PHP project built with Composer. It also includes the required Platform.sh configuration files out of the box. - [Create a new project based on the PHP template](https://console.platform.sh/org/create-project/template?query=php&_utm_campaign=cta_deploy_marketplace_template&utm_source=public_documentation&_utm_medium=organic). - Clone that project locally in one of these ways: - Using the [Platform.sh CLI](https://docs.platform.sh/administration/cli.md) by running ``platform get ``. - Using [Git](https://docs.platform.sh/administration/web/configure-environment.md#actions-on-environments) - In the project’s folder, run ``lando init –recipe platformsh –source platformsh –platformsh-auth ``. - Follow the instructions provided by the interactive prompt. On the ``Which project?`` step, select the project created in the first step. The `init` command generates the `.lando.yml` file required to start Lando. It also adds to your account a [public SSH key](https://docs.platform.sh/development/ssh/ssh-keys.md). ###### 4. Start Lando To start your app and services, run `lando start`. ###### 5. Access your local app The last lines of the `lando start` command from the previous step contains URL to the different app and services. Access your app and services by opening the according URLs in your browser. ###### What's next - [Import data and download files](https://docs.lando.dev/platformsh/sync.md) from your remote Platform.sh site. - If you make changes in the Platform.sh [configuration files](https://docs.platform.sh/learn/overview/structure.md) during development, run `lando rebuild` for these to be taken into account in Lando. - To keep your Lando image up-to-date, see how to [update Lando](https://docs.lando.dev/getting-started/updating.md). ###### Troubleshooting **Note**: Lando used to support Platform.sh PHP projects out of the box through a plugin. However, this plugin is now deprecated. It’s still available, but it’s no longer receiving updates and isn’t guaranteed to work. For a seamless experience, switch to [DDEV](https://docs.platform.sh/development/local/ddev.md), which is the recommended tool for local development with Platform.sh. The integration with DDEV is maintained by Platform.sh to ensure it works smoothly. Note that a Platform.sh migration guide from Lando to DDEV will be released soon. - Make sure that the [Platform.sh configuration files](https://docs.platform.sh/learn/overview/structure.md) are present in your local repository. - Check that your [services](https://docs.lando.dev/platformsh/config.md#services-yaml) are supported by Lando. - Check [caveats and known issues](https://docs.lando.dev/platformsh/caveats.md). - Carefully check the output of the Lando commands you run to spot warnings and errors. - Run `lando rebuild`. - Restart Lando in debug mode by running `lando restart -vvv`. - Check that you don't face common issues, such as [DNS rebinding protection](https://docs.lando.dev/help/dns-rebind.md). - For more extensive troubleshooting, check the [Lando documentation](https://docs.lando.dev/help/logs.md#install-logs). ####### Access logs Access the global logs by running `lando logs`. To access specific logs: 1. Run `lando list` to get a list of the services you are using. 2. Choose the one you'd like to inspect. 3. Run ``lando logs -s ``. For more guidance regarding logs, check the [Lando logs documentation](https://docs.lando.dev/help/logs.md) ####### Untrusted SSL certificate When you access your local Lando sites through HTTPS, you get an error message in your browser. This is expected behavior. Find out how to solve it in the [Lando blog](https://lando.dev/blog/2020/03/20/5-things-to-do-after-you-install-lando.md). ####### Something still wrong? [Get in touch with Lando](https://docs.lando.dev/platformsh/support.md). ### Variables overview Variables give you control over your project’s build process and runtime environment. You can set them in your code to make changes across your project or independent of the code for environment-specific settings. In this way, your app has additional information, such as database credentials, the host or port it can use, and which server to connect to. ##### Variable types You can set variables at different levels. All variables can be strings or base64-encoded JSON-serialized values. The following table defines what types of variables are available to you: | Type | Definer | Scope | Precedence | Build | Runtime | Uses | |----------------------------------------------------------------------------------| ----------- | ----------- | ---------- | ----- | -------- |----- | | [Application](https://docs.platform.sh/development/variables/set-variables.md#set-variables-in-your-app) | Application | Application | 4 | Yes | Yes | Non-secret values that are the same across all environments | | [Project](https://docs.platform.sh/development/variables/set-variables.md#create-project-variables) | User | Project | 3 | Yes | Yes | Secret values that are the same across all environments, such as database credentials | | [Environment](https://docs.platform.sh/development/variables/set-variables.md#create-environment-specific-variables) | User | Environment | 2 | Some | Yes | Values that vary by environment, such as which database to connect to or which payment API keys to use | | [Platform.sh](https://docs.platform.sh/development/variables/use-variables.md#use-provided-variables) | Pre-defined | Environment | 1 | Some | Yes | For information about your Platform.sh project | If there are conflicts between variables with the same name, variables [take precedence](#overrides) from 1 down. So Platform.sh-provided values (1) override environment variables (2), which override project variables (3), which override application-provided variables (4). All of the variables can also be [overridden via a script](https://docs.platform.sh/development/variables/set-variables.md#set-variables-via-script). ###### Choosing a variable type Choose how to set the variable based on what you are trying to do. Some environment variables should be the same for all environments. For example: - Build tool versions. If you have scripts that use specific versions of build tools (such as a [specific Node.js version](https://docs.platform.sh/languages/nodejs/node-version.md)), You want the tools to be versioned along with your code so you can track the impact of changes. Set those variables [in the application](https://docs.platform.sh/development/variables/set-variables.md#set-variables-in-your-app). - Credentials for common services. If you have credentials for services shared across your environments, you don't want to commit these secrets to code. Set them as sensitive [project variables](https://docs.platform.sh/development/variables/set-variables.md#create-project-variables). Other configurations should vary between environment types. For example: - Service configuration for databases and such. This information be read from the Platform.sh-provided [`PLATFORM_RELATIONSHIPS` variable](https://docs.platform.sh/development/variables/use-variables.md#use-provided-variables). It varies by environment automatically. - Mode toggles such as enabling `debug` mode, disabling certain caches, and displaying more verbose errors. This information might vary by environment type and should be set on the [environment level](https://docs.platform.sh/development/variables/set-variables.md#create-environment-specific-variables). - API keys for remote services, especially payment gateways. If you have a different payment gateway for production and for testing, set its keys on the [environment level](https://docs.platform.sh/development/variables/set-variables.md#create-environment-specific-variables). ##### Overrides If the names of variables at different levels match, an environment variable overrides a variable with the same name in a parent environment and both override a project variable. All variables can also be [overridden via script](https://docs.platform.sh/development/variables/set-variables.md#set-variables-via-script). For an example of how the different levels work, suppose you have the following inheritable variables defined for the `main` environment: ```sh platform var -e main Variables on the project Example (abcdef123456), environment main: +----------------+-------------+--------+---------+ | Name | Level | Value | Enabled | +----------------+-------------+--------+---------+ | system_name | project | Spiffy | | | system_version | project | 1.5 | | | api_key | environment | abc123 | true | | debug_mode | environment | 1 | true | +----------------+-------------+--------+---------+ ``` And the following variables defined for the `feature-x` environment, a child environment of `main`: ```sh platform var -e feature-x Variables on the project Example (abcdef123456), environment feature-x: +----------------+-------------+--------+---------+ | Name | Level | Value | Enabled | +----------------+-------------+--------+---------+ | system_name | project | Spiffy | | | system_version | project | 1.5 | | | api_key | environment | def456 | true | | system_version | environment | 1.7 | true | +----------------+-------------+--------+---------+ ``` In the `main` environment, you can access `$PLATFORM_VARIABLES`: ```bash echo $PLATFORM_VARIABLES | base64 --decode | jq ``` The output looks like this: ```json { "system_name": "Spiffy", "system_version": "1.5", "api_key": "abc123", "debug_mode": "1" } ``` While in the `feature-x` environment, it looks like this: ```json { "system_name": "Spiffy", "system_version": "1.7", "api_key": "def456", "debug_mode": "1" } ``` To get a visual overview of which variables are overridden in an environment, navigate in the Console to that environment's variables settings. This example shows how it looks within the `feature-x` environment: ![The Console showing the variables split into environment and project ones, with the environment variables `api_key` and `system_version` labeled as overridden and `debug_mode` as inherited the project variable `system_version` labeled as inactive.](https://docs.platform.sh/images/management-console/variables-overridden.png "0.5") Project variables that conflict with environment variables are labeled as **Inactive**. Environment variables are labeled as **Inherited** when they get their value from a parent environment and as **Overridden** when there is a conflict and the parent environment's value doesn't apply. ##### Variable prefixes Certain variable name prefixes have special meanings. Some are defined by Platform.sh and apply automatically. Others are just available as a convention for your application code to follow. ###### Top-level environment variables By default, project and environment variables are only added to the `PLATFORM_VARIABLES` environment variable. You can also expose a variable as its own environment variable by giving it the prefix `env:`. For example, the variable `env:foo` creates an environment variable called `FOO`. (Note the automatic upper-casing.) ```bash platform variable:create --name env:foo --value bar ``` You can then access that variable directly in your app container: ```bash echo $FOO bar ``` Note that environment variables with the `env:` prefix aren't added to the `PLATFORM_VARIABLES` environment variable. ###### PHP-specific variables Any variable with the prefix `php` is added to the PHP configuration for all PHP-based application containers in the project. Using variables, you can use the same files for all your environments and override values on any given environment if needed. You can set the PHP memory limit to 256 MB on a specific environment by running the following [CLI command](https://docs.platform.sh/administration/cli/_index.md): ```bash platform variable:create --level environment --prefix php --name memory_limit --value 256M --environment ``` To use variables across environments, set them in your [app configuration](https://docs.platform.sh/create-apps.md). For example, to change the PHP memory limit for all environments, use the following configuration: ```yaml {location=".platform.app.yaml"} applications: : variables: php: memory_limit: "256M" ``` ###### Framework-specific variables For specific frameworks, you can implement logic to override global configurations with [environment-specific variables](https://docs.platform.sh/development/variables/set-variables.md#create-environment-specific-variables). So you can use the same codebase and settings for all your environments, but still adapt the behavior to each environment. ####### Implementation example The [Drupal template](https://github.com/platformsh-templates/drupal10/) shows an example of overriding Drupal configuration using environment variables. These variables are parsed in the [settings.platformsh.php](https://github.com/platformsh-templates/drupal10/blob/386ea35b034b5d78da8060925940e793bea479d9/web/sites/default/settings.platformsh.php#L126-L164). For example, the site name is overridden by a variable named ``drupalsettings:system.site:name``. Variables for the override are composed of three distinct parts each separated by colons: - A prefix (``drupalsettings``) - The configuration object to override (``system.site``) - The property to set (``name``) Setting the ``drupalsettings:system.site:name`` variable overrides the ``name`` property of the ``system.site`` configuration object located in the global ``$settings`` array. You can do this by running the following [CLI command](https://docs.platform.sh/administration/cli.md): ```bash {} platform variable:create --name "drupalsettings:system.site:name" --value "" ``` The same logic applies for other configuration options, such as the global ``$config`` array, which uses the variable prefix ``drupalconfig``. You need to name your Platform.sh variables to match the ones used in your script. Make sure that the Platform.sh variables start with a string present in your ``switch`` statement. You can apply similar logic for [other frameworks and languages](https://docs.platform.sh/development/variables/use-variables.md#access-variables-in-your-app). #### Set variables To set variables, determine which [type of variable](https://docs.platform.sh/development/variables.md#variable-types) to use. Remember to take into account the order of precedence. All of the variables can also be [overridden via script](#set-variables-via-script). ###### Set variables in your app Set variables [in code](https://docs.platform.sh/create-apps/app-reference/single-runtime-image.md#variables) using the `.platform.app.yaml` file. These values are the same across all environments and present in the Git repository, which makes them a poor fit for API keys and other such secrets. They're better fits for uses such as configuration for consistent builds across every environment, including setting [PHP configuration values](https://docs.platform.sh/development/variables.md#php-specific-variables). Application variables are available at both build time and runtime. ###### Create project variables Add secrets for all environments in project variables using [the Console](https://docs.platform.sh/administration/web/configure-project.md#variables) or the [CLI](https://docs.platform.sh/administration/cli.md). For example, you may need to vary API credentials between production and other environments. To do so, set the non-production credentials as a project variable and then override these credentials for the production environment by setting a [variable specific to that environment](#create-environment-specific-variables). To specify other options, use the [flags for variable options](#variable-options). To add a project variable, follow these steps: - Select the project where you want to create a variable. - Click Settings **Settings**. - Under **Project settings**, click **Variables**. - Click **+ Create variable**. - Enter a name for the variable. - Enter the variable value. - Ensure you have selected the right [other options](#variable-options). - Click **Create variable**. When naming variables, be sure to take [variable prefixes](https://docs.platform.sh/development/variables.md#variable-prefixes) into account. In particular, to expose a variable as its own environment variable, [use the prefix `env:`](https://docs.platform.sh/development/variables.md#top-level-environment-variables). ####### Variable options Variables have several Boolean options you can set in the Console or the CLI: | Option | CLI flag | Default | Description | |-----------|---------------------|---------|--------------------------------------------------------------------------------------------------------------------------------------------------------| | JSON | `--json` | `false` | Whether the variable is a JSON-serialized value (`true`) or a string (`false`). | | Sensitive | `--sensitive` | `false` | If set to `true`, the variable's value is hidden in the Console and in CLI responses for added security. It's still readable within the app container. | | Runtime | `--visible-runtime` | `true` | Whether the variable is available at runtime. | | Build | `--visible-build` | `true` | Whether the variable is available at build time. | So if you want the `foo` variable to be visible at build time but hidden during runtime, you can set it by running the following command: ```bash platform variable:create --level project --name foo --value bar --visible-build true --visible-runtime false ``` You can also change the variable options after you create them (except for sensitive values, which can't be set to non-sensitive). For example, to make the `foo` variable visible at runtime and hidden during the build, run the following command: ```bash platform variable:update foo --visible-build false --visible-runtime true ``` Note that for changes to project variables to have effect, you need to [redeploy](https://docs.platform.sh/development/troubleshoot.md#force-a-redeploy) your environments. ###### Create environment-specific variables Set variables for specific environments using [the Console](https://docs.platform.sh/administration/web/configure-environment.md#variables) or the CLI. Variables can be inherited or overridden from parent environments and project variables. See [more on overriding values](https://docs.platform.sh/development/variables.md#overrides). To specify the environment for the variable, use the ``-e`` flag to specify its name. To specify other options, use the [flags for variable options](#environment-variable-options). To add a project variable, follow these steps: - Select the project where you want to create a variable. - Click Settings **Settings**. - Under **Environments**, click the environment where you want to create a variable. - Click **Variables**. - Click **+ Create variable**. - Enter a name for the variable. - Enter the variable value. - Ensure you have selected the right [other options](#environment-variable-options). - Click **Create variable**. When naming variables, be sure to take [variable prefixes](https://docs.platform.sh/development/variables.md#variable-prefixes) into account. In particular, to expose a variable as its own environment variable, [use the prefix `env:`](https://docs.platform.sh/development/variables.md#top-level-environment-variables). ####### Environment variable options Environment variables share all of the [options available for project variables](#variable-options). Environment variables have one additional option: | Option | CLI flag | Default | Description | |-------------|-----------------|---------|----------------------------------------------------------| | Inheritable | `--inheritable` | `true` | Whether the variable is inherited by child environments. | This option is useful for setting production-only values such as credentials. For example, to set a PayPal secret value for only the `main` branch and have it not be readable elsewhere, run the following command: ```bash platform variable:create -e main --name paypal_id --inheritable false --sensitive true ``` Other environments don't inherit it and get either a project variable of the same name if it exists or no value at all. Note that changing an environment variable causes that environment to be redeployed so the new value is available. But child environments are *not* redeployed. To make the new value accessible to those environments, [trigger a redeploy](https://docs.platform.sh/development/troubleshoot.md#force-a-redeploy). ####### Example environment variable Environment variables are a good place to store values that apply only on Platform.sh and not on your local development environment. This includes API credentials for third-party services, mode settings, and which server (development vs. production) to use. One example would be to define a Node.js application's build on a production branch (`NODE_ENV=production`), but use development mode (`NODE_ENV=development`) for each of your preview environments. Assuming you have a `main` environment for production and a `staging` environment with more child environments for development, run the following commands: ```bash platform variable:create -l environment -e main --prefix env: --name NODE_ENV --value production --visible-build true --inheritable false platform variable:create -l environment -e staging --prefix env: --name NODE_ENV --value development --visible-build true --inheritable true ``` Now `NODE_ENV` is `production` on the default branch but `development` on `staging` and each of its child environments. Note that build visible environment variables change the application's build configuration ID: value updates trigger a rebuild of the application in the same way that a commit would. ###### Set variables via script You can also provide a `.environment` file as in [your app root](https://docs.platform.sh/create-apps/app-reference/single-runtime-image.md#root-directory). This file runs as a script in dash when the container starts and on all SSH logins. It can be used to set any environment variables directly, such as the PATH variable. For example, the following `.environment` file allows any executable installed in the `vendor/bin` directory (such as executables installed using Composer) to be run regardless of the current directory: ```bash {location=".environment"} export PATH=/app/vendor/bin:$PATH ``` You can also dynamically define environment variables based on the current environment. For example, you might want to get the [defined route](https://docs.platform.sh/define-routes.md) with the id `api` for the current environment. To define it as the `URL` environment variable, you might add something like: ```bash {location=".environment"} URL=$(echo $PLATFORM_ROUTES | base64 --decode | jq -r 'to_entries[] | select (.value.id == "api") | .key') ``` Note that the file is sourced after all other environment variables above are defined and so they're available to the script. This also means the `.environment` script has the last word on environment variable values and can override anything it wants to. ####### Testing `.environment` scripts You may find that a command that works during an SSH session provides a `bad substitution` error when placed in a `.environment` file. Remember, `.environment` is sourced using dash, not bash. When testing your `.environment` logic, be sure to first enter a `dash` session in your terminal or within the SSH session. When testing, you might print to stdout (using an `echo` or `printf` command) to check what's happening. The following example looks for a `deploy/environment.tracker.txt` file. It displays a different message if it's found or not, which helps you track what variables are being set. ```bash {location=".environment"} if [ -f "deploy/environment.tracker.txt" ]; then echo "File found." export DEPLOY='Friday' else echo "File not found." export DEPLOY='Never on a Friday' fi ``` While sanity checks like this are useful during troubleshooting, you shouldn't include such commands in your final code. Because the `.environment` file is run at the start of an SSH session, the message is printed at the start of the session. Even when your SSH command executes successfully, you might later attempt to download data from one of your mounts, such as by using the CLI command `platform mount:download`. When you do, you see this error: ```bash protocol version mismatch -- is your shell clean? (see the rsync man page for an explanation) rsync error: protocol incompatibility (code 2) at .../rsync/compat.c(61) [receiver=2.6.9] [ProcessFailedException] The command failed with the exit code: 2 ``` This failure comes because `mount:download` and `rsync` don't expect output when the SSH connection is made. To solve the issue, remove the printed output from your `.environment` file. ###### Map variables If your app needs different names for environment variable than those set by Platform.sh, which is common for database connections, map the Platform.sh's variable names to those required by the application. Do this in the app with the help of the [Config Reader library](https://docs.platform.sh/development/variables/use-variables.md#access-variables-in-your-app) or via a shell script. For example, the following [`.environment` script](#set-variables-via-script) exports variables that are visible to the application. It uses the `jq` library, which is included in all app containers for this purpose. ```bash {location=".environment"} export APP_DATABASE_HOST=$(echo $PLATFORM_RELATIONSHIPS | base64 --decode | jq -r ".database[0].host") export APP_DATABASE_USER=$(echo $PLATFORM_RELATIONSHIPS | base64 --decode | jq -r ".database[0].username") ``` This sets environment variables with names your app needs and the values from `PLATFORM_RELATIONSHIPS`. ###### Use `.env` files Many applications use a `.env` file in the application root for configuration. These are useful for local development to set variables without needing them to be global across the development computer. Read more about [the use cases for `.env` files](https://platform.sh/blog/2021/we-need-to-talk-about-the-env/). You shouldn't need to use a `.env` file in production. Add it to your `.gitignore` file to avoid confusion as its values can vary for each local developer. #### Use variables Get a list of all variables defined on a given environment in [the Console](https://docs.platform.sh/administration/web/configure-environment.md#variables) or use the CLI: ```bash platform var ``` You get output similar to the following: ```bash Variables on the project Example (abcdef123456), environment main: +------+---------+-------+---------+ | Name | Level | Value | Enabled | +------+---------+-------+---------+ | foo | project | bar | true | +------+---------+-------+---------+ ``` ###### Access variables in a shell Project and environment variables with the [prefix](https://docs.platform.sh/development/variables.md#top-level-environment-variables) `env:` are available as Unix environment variables in all caps. Access these variables and Platform.sh-provided variables directly like this: ```bash echo $FOO bar echo $PLATFORM_APPLICATION_NAME Sample Project ``` Other project and environment variables are listed together in the `PLATFORM_VARIABLES` variable as a base64-encoded JSON object. Access them like this: ```bash echo $PLATFORM_VARIABLES | base64 --decode {"theanswer": "42"} ``` You can also get the value for a single variable within the array, such as with this command, which uses the [`jq` processor](https://stedolan.github.io/jq/): ```bash echo $PLATFORM_VARIABLES | base64 --decode | jq '.theanswer' "42" ``` Variable availability depends on the type and configuration. Variables available during builds can be accessed in `build` hooks and those available at runtime can be accessed in `deploy` hooks. ###### Access variables in your app To access environment variables in your app, you can use the Platform.sh Config Reader for the given language: * [PHP](https://github.com/platformsh/config-reader-php) * [Python](https://github.com/platformsh/config-reader-python) * [Node.js](https://github.com/platformsh/config-reader-nodejs) * [Go](https://github.com/platformsh/config-reader-go) * [Java](https://github.com/platformsh/config-reader-java) * [Ruby](https://github.com/platformsh/platformsh-ruby-helper) * [Elixir](https://github.com/platformsh/config-reader-elixir) Alternatively, use a built-in method for the given language. ```python {} import os import json import base64 # A simple variable. project_id = os.getenv('PLATFORM_PROJECT') # An encoded JSON object. variables = json.loads(base64.b64decode(os.getenv('PLATFORM_VARIABLES')).decode('utf-8')) ``` ```js {} const { env } = process; // Utility to assist in decoding a packed JSON variable. function read_base64_json(varName) { try { return JSON.parse(Buffer.from(env[varName], "base64").toString()); } catch (err) { throw new Error(`no ${varName} environment variable`); } }; // A simple variable. const projectId = env.PLATFORM_PROJECT; // An encoded JSON object. const variables = read_base64_json('PLATFORM_VARIABLES'); ``` ```ruby {} # A simple variable. project_id = ENV["PLATFORM_PROJECT"] || nil # An encoded JSON object. variables = JSON.parse(Base64.decode64(ENV["PLATFORM_VARIABLES"])) ``` ```java {} import com.fasterxml.jackson.databind.ObjectMapper; import java.io.IOException; import java.util.Base64; import java.util.Map; import static java.lang.System.getenv; import static java.util.Base64.getDecoder; public class App { public static void main(String[] args) throws IOException { // A simple variable. final String project = getenv("PLATFORM_PROJECT"); // An encoded JSON object. ObjectMapper mapper = new ObjectMapper(); final Map variables = mapper.readValue( String.valueOf(getDecoder().decode(getenv("PLATFORM_VARIABLES"))), Map.class); } } ``` ####### Access complex values Variables can have nested structures. The following example shows nested structures in an [app configuration](https://docs.platform.sh/create-apps/app-reference/single-runtime-image.md#variables): ```yaml {location=".platform.app.yaml"} variables: env: BASIC: "a string" INGREDIENTS: - 'peanut butter' - 'jelly' QUANTITIES: "milk": "1 liter" "cookies": "1 kg" stuff: STEPS: ['one', 'two', 'three'] COLORS: red: '#FF0000' green: '#00FF00' blue: '#0000FF' ``` You can access these nested variables as follows: ```php {} string(2) "one" [1]=> string(4) "two" [2]=> string(5) "three" } */ print_r($variables['stuff:COLORS']); /* array(3) { ["red"]=> string(7) "#FF0000" ["green"]=> string(7) "#00FF00" ["blue"]=> string(7) "#0000FF" } */ ``` ```python {} import os import json import base64 print os.getenv('BASIC') # a string print os.getenv('INGREDIENTS') # ["peanut butter", "jelly"] print os.getenv('QUANTITIES') # {"milk": "1 liter", "cookies": "1 kg"} variables = json.loads(base64.b64decode(os.getenv('PLATFORM_VARIABLES')).decode('utf-8')) print variables['stuff:STEPS'] # [u'one', u'two', u'three'] print variables['stuff:COLORS'] # {u'blue': u'#0000FF', u'green': u'#00FF00', u'red': u'#FF0000'} ``` ```java {} scriptconst { BASIC, INGREDIENTS, QUANTITIES, PLATFORM_VARIABLES } = process.env; const { "stuff:STEPS": stuffSteps, "stuff:COLORS": stuffColors } = JSON.parse( Buffer.from(PLATFORM_VARIABLES, "base64").toString() ); console.log(BASIC); // "a string" console.log(INGREDIENTS); // ["peanut butter", "jelly"] console.log(QUANTITIES); // {"cookies": "1 kg", "milk": "1 liter"} console.log(stuffSteps); // [ 'one', 'two', 'three' ] console.log(stuffColors); // { blue: '#0000FF', green: '#00FF00', red: '#FF0000' } ``` ###### Use provided variables Platform.sh also provides a series of variables to inform your app about its runtime configuration. They're mostly prefixed with `PLATFORM_` to differentiate them from user-provided values. You can't set or update them directly. The most important of these variables is the relationship information in `PLATFORM_RELATIONSHIPS`, which tells the app how to connect to databases and other services defined in `.platform/services.yaml`. The following table presents all available variables and whether they're available at build time (during [build hooks](https://docs.platform.sh/create-apps/hooks/hooks-comparison.md#build-hook)) and at runtime. | Variable name | Build | Runtime | Description | | --------------------------- | ----- | ------- | ----------- | | `PLATFORM_APP_DIR` | Yes | Yes | The absolute path to the app directory. | | `PLATFORM_APPLICATION` | Yes | Yes | A base64-encoded JSON object that describes the app. It maps certain attributes from your [app configuration](https://docs.platform.sh/create-apps.md), some with more structure. See [notes](#platform_application). | | `PLATFORM_APPLICATION_NAME` | Yes | Yes | The app name as set in your [app configuration](https://docs.platform.sh/create-apps.md). | | `PLATFORM_BRANCH` | No | Yes | The name of the Git branch. | | `PLATFORM_CACHE_DIR` | Yes | No | The directory where files are cached from one build to the next. The directory is shared among all branches, so the same cache is used for all environments. | | `PLATFORM_DOCUMENT_ROOT` | No | Yes | The absolute path to the web document root, if applicable. | | `PLATFORM_ENVIRONMENT` | No | Yes | The name of the Platform.sh environment. | | `PLATFORM_ENVIRONMENT_TYPE` | No | Yes | The environment type of the Platform.sh environment (`development`, `staging`, or `production`). | | `PLATFORM_OUTPUT_DIR` | Yes | No | The output directory for compiled languages at build time. Equivalent to `PLATFORM_APP_DIR` in most cases. | | `PLATFORM_PROJECT` | Yes | Yes | The project ID. | | `PLATFORM_PROJECT_ENTROPY` | Yes | Yes | A random, 56-character value created at project creation and then stable throughout the project's life. Can be used for Drupal hash salts, Symfony secrets, and other similar values. | | `PLATFORM_RELATIONSHIPS` | No | Yes | A base64-encoded JSON object of relationships. The keys are the relationship name and the values are arrays of relationship endpoint definitions. The exact format is defined differently for each [service](https://docs.platform.sh/add-services.md). | | `PLATFORM_ROUTES` | No | Yes | A base64-encoded JSON object that describes the routes for the environment. It maps the content of your [routes configuration](https://docs.platform.sh/define-routes.md). Note that this information is also available in your `/run/config.json` file. | | `PLATFORM_SMTP_HOST` | No | Yes | The SMTP host to send email messages through. Is empty when mail is disabled for the current environment. | | `PLATFORM_SOURCE_DIR` | Yes | No | The path to the root directory of your code repository in the context of a running [source operation](https://docs.platform.sh/create-apps/source-operations.md). The directory contains a writable copy of your repository that you can commit to during the operation. | | `PLATFORM_TREE_ID` | Yes | Yes | The ID of the tree the application was built from, essentially the SHA hash of the tree in Git. Use when you need a unique ID for each build. | | `PLATFORM_VARIABLES` | Some | Some | A base64-encoded JSON object with all user-defined project and environment variables that don't use a [prefix](https://docs.platform.sh/development/variables.md#variable-prefixes). The keys are the variable names and the values are the variable values. Availability during builds and at runtime depends on the settings for each variable. See how to [access individual variables](#access-variables-in-a-shell). | | `PLATFORM_VENDOR` | Yes | No | Allows you to change the behavior of the build according to the vendor (Platform.sh or Upsun). | | `PORT` | No | Yes | A `string` representing the port to which requests are sent if the [`web.upstream.socket_family` property](https://docs.platform.sh/create-apps/app-reference/single-runtime-image.md#upstream) is unset or set to `tcp`. | | `SOCKET` | No | Yes | A `string` representing the path to the Unix socket file to use if the [`web.upstream.socket_family` property](https://docs.platform.sh/create-apps/app-reference/single-runtime-image.md#upstream) is set to `unix`. | ####### Variables on Dedicated Gen 2 environments [Dedicated Gen 2 instances](https://docs.platform.sh/dedicated-environments/dedicated-gen-2/overview.md) also have the following variables available: | Variable name | Build | Runtime | Description | | ---------------- | ----- | ------- | ----------- | | `PLATFORM_CLUSTER` | No | Yes | The cluster ID. In older Dedicated Gen 2 instances, this is used to get the project ID. When several projects are linked, this provides the main project/cluster they're linked to, while `PLATFORM_PROJECT` offers the specific project ID. | | `PLATFORM_MODE` | No | Yes | `enterprise` in all Dedicated Gen 2 production and staging environments. Note that an Enterprise support plan doesn't always imply a Dedicated Gen 2 environment, but a Dedicated Gen 2 environment always implies an Enterprise support plan. | **Note**: The ``PLATFORM_CLUSTER`` environment variable isn’t yet available on [Dedicated Gen 3](https://docs.platform.sh/dedicated-environments/dedicated-gen-3.md). If your application depends on whether it’s running on a Dedicated Gen 3 host, use ``PLATFORM_MODE``. ######## Distinguish Dedicated Gen 2 environment types While both production and staging Dedicated Gen 2 environments have `enterprise` for the `PLATFORM_MODE` variable, you can distinguish them by environment type. Make sure that the environment type is set correctly via the CLI or Console. Then run different code based on the type: ```bash if [ "$PLATFORM_ENVIRONMENT_TYPE" = production ] ; then echo "This is live on production" else if [ "$PLATFORM_ENVIRONMENT_TYPE" = staging ] ; then echo "This is on staging" else echo "We're on development" fi ``` ####### `PLATFORM_APPLICATION` The `PLATFORM_APPLICATION` variable is available both at build time and in the runtime environment. But the specific attributes it contains differ in each case. Each environment's build is associated with a configuration ID that identifies it uniquely so builds can be reused. The ID is a product of your app code and some of its [configuration for Platform.sh](https://docs.platform.sh/create-apps.md). Not every attribute your app configuration is relevant to the build. Only those attributes that are relevant to builds are accessible at build time from `PLATFORM_APPLICATION`. Attributes that are **not** available in `PLATFORM_APPLICATION` during builds: - Everything under `access` - Everything under `relationship` - Everything under `firewall` - `hooks.deploy` and `hooks.post_deploy` - Everything under `crons` - Everything under `web`, except `web.mounts` - Everything under `workers`, except `workers.mounts` These attributes aren't visible during build because they aren't included as a part of the configuration component of the build slug. So modifying these values in your [app configuration](https://docs.platform.sh/create-apps.md) doesn't trigger an app rebuild, only a redeploy. For more information, read about [how builds work](https://docs.platform.sh/learn/overview/build-deploy.md#the-build). ###### Use variables in static files Some apps require configuration values to be specified in a static, non-executable file (such as a `.ini`, `.xml`, or `.yaml` file) and don't support reading from environment variables. To populate these files with variables you set yourself, make sure the variables are set to be [visible at build time](https://docs.platform.sh/development/variables/set-variables.md#variable-options). The files can't be populated with Platform.sh-provided variables not available at build time (such as `PLATFORM_RELATIONSHIPS`). You also can't write to them in a `deploy` hook as the file system is read only. One workaround is to create a symbolic link to a writable location and then write to it in a [`deploy` hook](https://docs.platform.sh/create-apps/hooks/hooks-comparison.md#deploy-hook). The following example shows the process, though you have to modify it to fit your needs. 1. Create a mount that isn't accessible to the web in your [app configuration](https://docs.platform.sh/create-apps/_index.md): ```yaml {location=".platform.app.yaml"} mounts: /config: source: local source_path: config ``` 2. Create a symbolic link from the config file the application wants to a location in that mount: ```bash # From the application root... ln -s config/db.yaml db.yaml ``` This example assumes the app wants a `db.yaml` file in its root for configuration. 3. Commit the symbolic link and an empty `config` directory to Git. 4. Configure a script to read from environment variables and write to `config/db.yaml`. Create a file with a shell script similar to this: ```bash {location="export-config.sh"} #!/bin/bash # Ensure the file is empty. cat '' > config/db.yaml # Map the database information from the PLATFORM_RELATIONSHIPS variable into the YAML file. # Use this process to use whatever variable names your app needs. printf "host: %s\n" $(echo $PLATFORM_RELATIONSHIPS | base64 --decode | jq -r ".database[0].host") >> config/db.yaml printf "user: %s\n" $(echo $PLATFORM_RELATIONSHIPS | base64 --decode | jq -r ".database[0].username") >> config/db.yaml ``` 5. Call the script from the `deploy` hook your [app configuration](https://docs.platform.sh/create-apps/_index.md): ```yaml {location=".platform.app.yaml"} hooks: deploy: | bash export-config.sh ``` Now, when your app starts and attempts to parse `db.yaml`, the symbolic link redirects it to `config/db.yaml`. Your script writes to that file on each deploy with updated information. Your app reads the exported values and proceeds as expected. ### Access your site Once you have an environment running, you can view it in a web browser. To find which URLs you can use to access your site, follow these steps: - Run the following command: ```bash {} platform url ``` - Select the URL to open in a browser. For more information about URLs in your project and how you can control access to your web applications, see how to [define routes](https://docs.platform.sh/define-routes/). ### Transfer files to and from your app After your app is built, its file system is read-only. This means that the only way you can edit your app's code is through Git. However, you can transfer files to and from your built app without using Git. To do so, you need to configure mounts or use an SSH client. [Mounts](https://docs.platform.sh/create-apps/app-reference/single-runtime-image.md#mounts) let you set up directories that remain writable after the build is complete. You can then transfer files directly to and from mounts inside your app with a single command via the [Platform.sh CLI](https://docs.platform.sh/administration/cli.md). Alternatively, you can transfer files to and from your built app using an SSH client such as `scp` or `rsync`. ##### Transfer files using the CLI ###### View the mounts inside your app Before you start transferring files, you may want to view a list of all the mounts inside your app. To do so, run the following command: ```bash platform mounts ``` The output is similar to the following: ```bash Mounts on abcdefgh1234567-main-abcd123--app@ssh.eu.platform.sh: +-------------------------+----------------------+ | Mount path | Definition | +-------------------------+----------------------+ | web/sites/default/files | source: local | | | source_path: files | | private | source: local | | | source_path: local | | tmp | source: tmp | | | source_path: temp | +-------------------------+----------------------+ ``` ###### Transfer a file to a mount To transfer a file to a mount using the CLI, you can use the `mount:upload` command. For example, to upload the files contained in the local `private` directory to the `private` mount, run the following command: ```bash platform mount:upload --mount private --source ./private ``` You get the following output: ```bash Uploading files from ./private to the remote mount private Are you sure you want to continue? [Y/n] sending incremental file list example.sh sent 2.35K bytes received 20 bytes 1.58K bytes/sec total size is 1.77M speedup is 745.09 ``` ###### Transfer a file from a mount To transfer a file from a mount using the CLI, you can use the `mount:download` command. For example, to download a file from the `private` mount to your local `private` directory, run the following command: ```bash platform mount:download --mount private --target ./private ``` You get the following output: ```bash Downloading files from the remote mount private to ./private Are you sure you want to continue? [Y/n] receiving incremental file list example.sh sent 2.35K bytes received 20 bytes 1.58K bytes/sec total size is 1.77M speedup is 745.09 ``` ##### Transfer files using an SSH client Another way to transfer files to and from your built app is to use an SSH client such as [`scp`](file-transfer.md#scp), [`rsync`](file-transfer.md#rsync), or [`sftp`](file-transfer.md#sftp). ###### scp You can use `scp` to copy files to and from a remote environment. For example, to download a `diagram.png` file from the `web/uploads` directory (relative to the [app root](https://docs.platform.sh/create-apps/app-reference/single-runtime-image.md#root-directory)), run the following command: ```bash scp "$(platform ssh --pipe)":web/uploads/diagram.png . ``` The `diagram.png` file is copied to the current local directory. To copy files from your local directory to the Platform.sh environment, reverse the order of the parameters: ```bash scp diagram.png "$(platform ssh --pipe)":web/uploads ``` For other options, see the [`scp` documentation](https://www.man7.org/linux/man-pages/man1/scp.1.md). ###### rsync You can use `rsync` to copy files to and from a remote environment. For example, to copy all the files in the `web/uploads` directory on the remote environment to the local `uploads` directory, run the following command: ```bash rsync -azP "$(platform ssh --pipe)":web/uploads/ ./uploads/ ``` To copy files from your local directory to the Platform.sh environment, reverse the order of the parameters: ```bash rsync -azP uploads/ "$(platform ssh --pipe)":web/uploads/ ``` Note that `rsync` is very sensitive about trailing `/` characters. If you're using UTF-8 encoded files on macOS, add the `--iconv=utf-8-mac,utf-8` flag to your `rsync` call. For more options, consult the [rsync documentation](https://man7.org/linux/man-pages/man1/rsync.1.md). ###### sftp You can use `sftp` to copy files to and from a remote environment. **Note**: ``sftp`` is supported on the Grid, but the following limitations apply: - You can only create ``sftp`` accounts with an existing Platform.sh user and an SSH key. Custom users and passwords aren’t supported. - ``sftp`` access cannot be limited to a specific directory. Instead, access is given to **the whole application directory** and its mounts. ``sftp`` is also supported on Dedicated projects with different limitations and requirements. For more information, see the [Dedicated Gen 2](https://docs.platform.sh/dedicated-environments/dedicated-gen-2/overview.md#sftp) and [Dedicated Gen 3](https://docs.platform.sh/dedicated-environments/dedicated-gen-3/overview.md#sftp) sections. ####### Open an `sftp` connection Run the following command: ```bash sftp "$(platform ssh --pipe)" ``` When prompted, select the project and environment you want to connect to. The `sftp` connection is open once the `sftp>` prompt is displayed in your terminal. ####### Download a file Say you want to download a `diagram.png` file from the `web/uploads` directory (relative to the [app root](https://docs.platform.sh/create-apps/app-reference/single-runtime-image.md#root-directory)). To do so, run the following command: ``` sftp> get web/uploads/diagram.png ``` The `diagram.png` file is copied to the current local directory. ####### Upload a file Say you want to upload a `diagram.png` file to the `web/uploads` directory (relative to the [app root](https://docs.platform.sh/create-apps/app-reference/single-runtime-image.md#root-directory)). To do so, run the following command: ```bash sftp> put diagram.png web/uploads ``` For other options, see the [`sftp` documentation](https://man7.org/linux/man-pages/man1/sftp.1.md). ### HTTP Headers Platform.sh adds a number of HTTP headers to both inbound and outbound messages. We don’t modify or block existing headers on either request or response. ##### Request headers Platform.sh adds the following HTTP headers in the router to give the application information about the connection. These are stable and may be examined by the application as necessary. * `X-Forwarded-Proto`: The protocol forwarded to the application, for example: `http`, `https`. * `X-Client-IP`: The remote IP address of the request. * `X-Client-SSL`: Set "on" only if the client is using SSL connection, otherwise the header isn't added. * `X-Original-Route`: The route in `.platform/routes.yaml` which is used currently, for example: `https://{default}/`. ##### Response headers Platform.sh adds a number of response headers automatically to assist in debugging connections. These headers should be treated as a semi-private API. Do not code against them, but they may be inspected to help determine how Platform.sh handled the request to aid in debugging. - `X-Platform-Cache`: Either `HIT` or `MISS` to indicate if the router in your cluster served the response from its own cache or if the request was passed through to the application. - `X-Platform-Cluster`: The ID of the cluster that received the request. The cluster name is formed from the project ID and environment ID. - `X-Platform-Processor`: The ID of the container that generated the response. The container ID is the cluster ID plus the container name. - `X-Platform-Router`: The ID of the router that served the request. The router ID is the processor ID of the router container, specifically. - `X-Debug-Info`: This is a header added by the edge layer. It doesn't contain any sensitive information or anything that could be misused. It has no relation to the PHP debugging tool [Xdebug](https://xdebug.org). ##### Classification data headers Platform.sh sends classification data to your backend system through the following HTTP headers. | HTTP header | Type | Description | | -------------------- | ------- | --------------------------------------------------------------------------------------------------------- | | `Client-Cdn` | string | When a CDN that is supported by Platform.sh is used, this header displays its name (Fastly, Cloudflare, or Cloudfront). | | `Client-Country` | string | The two-character ISO 3166-1 country code of the end-client IP (after CDN handling for the CDNs that Platform.sh supports). The geolocation data sent through this header is provided by [MaxMind GeoLite2](https://dev.maxmind.com/geoip/geolite2-free-geolocation-data).| | `Client-Abuse-Score` | integer | The abuse score of the end-client IP. A score >= 100 indicates a near certainty that the request comes from an abusive IP. The abuse data sent through this header is provided by [AbuseIPDB](https://www.abuseipdb.com/). | | `Client-Asn` | integer | The Autonomous System number of the end-client IP. The geolocation data sent through this header is provided by [MaxMind GeoLite2](https://dev.maxmind.com/geoip/geolite2-free-geolocation-data).| ##### Custom headers Apart from those listed above, your application is responsible for setting its own response headers. You can also [add headers to static files](https://docs.platform.sh/create-apps/web/custom-headers.md). ### Send email You can configure your Platform.sh environments to send emails via an SMTP proxy. Emails aren't guaranteed to be deliverable and you can't white-label them. The SMTP proxy is intended as a zero-configuration, best-effort service. **Note**: All preview environments are limited to 12,000 email credits per calendar month. ##### 1. Turn on outgoing email You can turn on outgoing email for each environment. By default, email is turned on for your Production environment and blocked for other environments. To turn it on for a specific environment, follow these steps: To turn on outgoing email, run the following command: ```bash {} platform environment:info --environment enable_smtp true ``` To turn off outgoing email, replace ``true`` with ``false``. Changing the setting rebuilds the environment. ##### 2. Recommended: Improve deliverability Improve deliverability of your email with [Sender Policy Framework (SPF)](https://docs.sendgrid.com/ui/account-and-settings/spf-records). If you don't have an SPF record, add the following `TXT` record to your domain's DNS records: ```txt v=spf1 include:sendgrid.net -all ``` Having several, conflicting `TXT` records isn't supported due to [rfc4408 section 3.1.2](https://datatracker.ietf.org/doc/html/rfc4408#section-3.1.2). If you already have an SPF record, please add SendGrid into your existing record. ##### 3. (Optional) Validate your email **Tier availability** This feature is available for **Enterprise and Elite** customers. [Compare the tiers](https://platform.sh/pricing/) on our pricing page, or [contact our sales team](https://platform.sh/contact/) for more information. If you're on an Enterprise or Elite plan, you can request for DomainKeys Identified Mail (DKIM) to be enabled on your domain. DKIM improves your delivery rate as an email sender. Learn more about [how DKIM works](https://docs.sendgrid.com/glossary/dkim). To have DKIM enabled for your domain: 1. Open a [support ticket](https://docs.platform.sh/learn/overview/get-support.md) with the domain where you want DKIM. 2. Update your DNS configuration with the `CNAME` and `TXT` records that you get in the ticket. Checks for the expected DNS records run every 15 minutes before validation. The `TXT` record looks similar to the following: ```txt v=spf1 include:u17504801.wl.sendgrid.net -all ``` ##### 4. Test the email service To test the email service, use the [CLI](https://docs.platform.sh/administration/cli.md) to connect to your app by running `platform ssh`. Run the following command: ```bash printf "From: \nSubject: Test \nThis is a test message" | /usr/sbin/sendmail ``` Replace the variables with actual email addresses as in the following example: ```bash printf "From: someone@example.com\nSubject: Test \nThis is a test message" | /usr/sbin/sendmail someone@example.net ``` In a little while, the test message should arrive at the recipient address. Be careful to test with real email addresses. If you send emails to fake domains (such as `example.com`), they fail and hurt your sending reputation. Make sure your test emails are deliverable. ##### 5. Send email from your app You can use `/usr/sbin/sendmail` on your app container to send emails as with the example in the previous step. Or use the `PLATFORM_SMTP_HOST` environment variable in your SMTP configuration. When outgoing emails are on, `PLATFORM_SMTP_HOST` is the address of the SMTP host that should be used. When outgoing emails are off, the variable is empty. When using `PLATFORM_SMTP_HOST`, send email through port 25 (often the default). Your emails are proxied through the Platform.sh SMTP host and encrypted over port 465 before being sent to the outside world. The precise way to send email depends on the language and framework you use. See some examples for given languages. JavaMail is a Java API used to send and receive email via SMTP, POP3, and IMAP. JavaMail is built into the [Jakarta EE](https://jakarta.ee/) platform, but also provides an optional package for use in Java SE. [Jakarta Mail](https://projects.eclipse.org/projects/ee4j.mail) defines a platform-independent and protocol-independent framework to build mail and messaging applications. The following example sends email using Jakarta Mail: ```java {} import sh.platform.config.Config; import javax.mail.Message; import javax.mail.MessagingException; import javax.mail.Session; import javax.mail.Transport; import javax.mail.internet.InternetAddress; import javax.mail.internet.MimeMessage; import java.util.Properties; import java.util.logging.Level; import java.util.logging.Logger; public class JavaEmailSender { private static final Logger LOGGER = Logger.getLogger(JavaEmailSender.class.getName()); public void send() { Config config = new Config(); String to = "";//change accordingly String from = "";//change accordingly String host = config.getSmtpHost(); //or IP address //Get the session object Properties properties = System.getProperties(); properties.setProperty("mail.smtp.host", host); Session session = Session.getDefaultInstance(properties); //compose the message try { MimeMessage message = new MimeMessage(session); message.setFrom(new InternetAddress(from)); message.addRecipient(Message.RecipientType.TO, new InternetAddress(to)); message.setSubject("Ping"); message.setText("Hello, this is example of sending email "); // Send message Transport.send(message); System.out.println("message sent successfully...."); } catch (MessagingException exp) { exp.printStackTrace(); LOGGER.log(Level.SEVERE, "there is an error to send an message", exp); } } } ``` Guides on using JavaMail: - [Send email with HTML formatting and attachments](https://mkyong.com/java/java-how-to-send-email/) - [JavaMail API](https://javaee.github.io/javamail/) ##### Alternative: Use a different email server If you need more options, use your own SMTP server or email delivery service provider. Bear in mind that TCP port 25 is blocked for security reasons. Use port 465 or 587 instead to send email to your own external email server. ### Pull code from a private Git repository To complete its build, your Platform.sh project may need to access pieces of code stored in private Git repositories. Examples include themes, libraries, and modules. Configure these repositories to grant access to your project. To grant access to a private Git repository, add the project's public SSH key to your Git repository's deploy keys. ##### 1. Get your project's public key 1. In the Console, open the project you want. 2. Click **Settings Settings**. 3. Under **Project settings**, click **Deploy key**. 4. Click ** Copy**. ![Deploy Key](https://docs.platform.sh/images/management-console/settings-deploy-key.png "0.5") ##### 2. Add the key to your repository in your Git provider * [GitHub deploy key](https://docs.github.com/en/developers/overview/managing-deploy-keys#deploy-keys) * [GitLab deploy key](https://docs.gitlab.com/ee/user/project/deploy_keys/#grant-project-access-to-a-public-deploy-key) * [Bitbucket access key](https://support.atlassian.com/bitbucket-cloud/docs/configure-repository-settings/) If you're only pulling code, the key doesn't need write permissions. Now your Platform.sh project can access your private repository via SSH, including to add dependencies. This means you can access the private repository through links like: ``git@:/.git``. For example, you can clone a repository in your [`build` hook](https://docs.platform.sh/create-apps/hooks/_index.md): ```yaml {location=".platform.app.yaml"} hooks: build: | set -e git clone git@bitbucket.org:username/module.git ``` You can also use [private repositories as submodules](https://docs.platform.sh/development/submodules.md#use-private-git-repositories). ##### Using multiple private GitHub repositories GitHub requires a separate deploy key for each repository. To grant your project access to multiple repositories, create an automated user account, known as a machine user, with its own SSH key. You can then add the machine account as collaborator to specific repositories or to a team with access to the repositories. See more information about [machine users on GitHub](https://docs.github.com/en/developers/overview/managing-deploy-keys#machine-users). ### Use Git submodules ##### Clone submodules during deployment Platform.sh allows you to use submodules in your Git repository. They're usually listed in a `.gitmodules` file at the root of your Git repository. When you push via Git, Platform.sh tries to clone them automatically. The following example is based on [a Bigfoot multi-app project](https://github.com/platformsh-templates/bigfoot-multiapp/tree/multiapp-subfolders-applications) which uses the following submodules: - A [BigFoot app](https://github.com/platformsh-templates/bigfoot-multiapp-api/tree/without-platform-app-yaml) - An [API Platform v3, Admin component](https://github.com/platformsh-templates/bigfoot-multiapp-admin/tree/without-platform-app-yaml) - A [Gatsby frontend](https://github.com/platformsh-templates/bigfoot-multiapp-gatsby/tree/without-platform-app-yaml) - A [Mercure Rocks server](https://github.com/platformsh-templates/bigfoot-multiapp-mercure/tree/without-platform-app-yaml) ![Diagram of a project containing multiple apps](https://docs.platform.sh/images/config-diagrams/multiple-app.png "0.5") To import all the submodules, run the following commands from your multiple application project's root folder: ```bash touch .gitmodules git submodule add --name admin https://github.com/platformsh-templates/bigfoot-multiapp-admin.git admin git submodule add --name api https://github.com/platformsh-templates/bigfoot-multiapp-api.git api git submodule add --name gatsby https://github.com/platformsh-templates/bigfoot-multiapp-gatsby.git gatsby git submodule add --name mercure https://github.com/platformsh-templates/bigfoot-multiapp-mercure.git mercure git add . git commit -m "Adding submodules for Bigfoot App, API Platform Admin, Gatsby frontend and Mercure Rocks server" git push ``` Here is an example of a `.gitmodules` file: ```ini [submodule "admin"] path = admin url = https://github.com/platformsh-templates/bigfoot-multiapp-admin.git [submodule "api"] path = api url = https://github.com/platformsh-templates/bigfoot-multiapp-api.git [submodule "gatsby"] path = gatsby url = https://github.com/platformsh-templates/bigfoot-multiapp-gatsby.git [submodule "mercure"] path = mercure url = https://github.com/platformsh-templates/bigfoot-multiapp-mercure.git ``` When you run `git push`, you can see the output of the logs: ```bash Validating submodules Updating submodule ttps://github.com/platformsh-templates/bigfoot-multiapp-admin.git Updated submodule https://github.com/platformsh-templates/bigfoot-multiapp-admin.git: 549 references updated. Updating submodule ttps://github.com/platformsh-templates/bigfoot-multiapp-api.git Updated submodule https://github.com/platformsh-templates/bigfoot-multiapp-api.git: 898 references updated. Updating submodule https://github.com/platformsh-templates/bigfoot-multiapp-gatsby.git Updated submodule https://github.com/platformsh-templates/bigfoot-multiapp-gatsby.git: 257 references updated. Updating submodule https://github.com/platformsh-templates/bigfoot-multiapp-mercure.git Updated submodule https://github.com/platformsh-templates/bigfoot-multiapp-mercure.git: 124 references updated. ... ``` **Note**: If your submodule contains an independent app, see [how to configure it properly](https://docs.platform.sh/create-apps/multi-app/project-structure.md#split-your-code-source-into-multiple-git-submodule-repositories). ##### Update submodules **Note**: To specify which submodule needs to be updated, replace ``[submodule]`` with your submodule path. **Tier availability**: This feature is available for **Elite** and **Enterprise** customers. [Compare the Platform.sh tiers](https://platform.sh/pricing/) on our pricing page, or [contact our Sales team](https://platform.sh/contact/) for more information. Automate your submodule updates using a [source operation](https://docs.platform.sh/create-apps/source-operations.md). To do so, follow these steps: - Define a source operation. Add the following configuration to your ``.platform.app.yaml`` file: ```yaml {location=".platform.app.yaml"} source: operations: rebuild: command: | set -e git submodule update --init --recursive git submodule update --remote --checkout git add admin api gatsby mercure if ! git diff-index --quiet HEAD; then git commit -m "Updating submodules admin, api, gatsby and mercure" fi ``` For multiple app projects, make sure you define your source operation in the configuration of an app whose source code **is not** in a submodule. If you use [Git submodules for each of your apps](https://docs.platform.sh/create-apps/multi-app/project-structure.md#split-your-code-source-into-multiple-git-submodule-repositories), define a new app at the top level of your project repository. Don’t define routes so your app isn’t exposed to the web. To define a source operation, add the following configuration to your [app configuration](https://docs.platform.sh/create-apps/app-reference/single-runtime-image.md): ```yaml {location=".platform.app.yaml"} # The type of the application to build. type: 'nodejs:22' # The web key configures the web server running in front of your app. web: # Commands are run once after deployment to start the application process. commands: # The command to launch your app. If it terminates, it’s restarted immediately. # As this app will handle source operation only, no need to keep it alive (sleep) start: | sleep infinity source: operations: update-submodules: command: | set -e git submodule update --init --recursive git submodule update --remote --checkout git add . if ! git diff-index --quiet HEAD; then git commit -m "Updating submodules" fi # "git push" is automatic at the end of this command ``` - Run your source operation. To do so, in the [Console](https://docs.platform.sh/administration/web.md), navigate to the environment where you want to run the source operation. Click More **More**. Click **Run Source Operation**. Select the operation you want to run. Click **Run**. Alternatively, to run your source operation from the [Platform.sh CLI](https://docs.platform.sh/administration/cli.md), run the following command: ```bash {} platform source-operation:run ``` ##### Error when validating submodules Using an SSH URL (`git@github.com:...`) to fetch submodules triggers the following error: ```bash Validating submodules. Found unresolvable links, updating submodules. E: Error validating submodules in tree: - admin: Exception: commit 03567c6 not found. This might be due to the following errors fetching submodules: - git@github.com:platformsh-templates/bigfoot-multiapp-admin.git: HangupException: The remote server unexpectedly closed the connection. ``` This is due to the fact that the Platform.sh Git server can't connect to GitHub via SSH without being granted an SSH key to do so. To solve this issue, use an HTTPS URL (`https://github.com/...`) instead. ##### Use private Git repositories When using Git submodules that are private repositories, URLs with the HTTPS protocol fail with errors such as the following: ```bash GitProtocolError: unexpected http resp 401 for https://bitbucket.org/myusername/mymodule.git/info/refs?service=git-upload-pack ``` To fix this, follow these steps: 1. Change your module declarations to use SSH for URLs. Your existing declaration might look like this: ```bash {location=".gitmodules"} [submodule "support/module"] path = support/module url = https://bitbucket.org/username/module.git branch = submodule/branch ``` Change this to the following: ```bash {location=".gitmodules"} [submodule "support/module"] path = support/module url = git@bitbucket.org:username/module.git branch = submodule/branch ``` 2. Add the [project's public key to your remote Git repository](https://docs.platform.sh/development/private-repository.md). This allows your Platform.sh project to pull the repository from the remote Git service. **Note**: Deploy keys only grant access to a single repository, which can cause issues when attempting to pull several repositories to the same server. If your server needs access to multiple repositories, follow these steps: - [Create a machine user](https://docs.github.com/en/authentication/connecting-to-github-with-ssh/managing-deploy-keys#machine-users) with access rights to each of the private repositories. - Attach the deploy key to your machine user. ##### Removing submodules These steps aren't specific to Platform.sh, but kept as a reference for Git so that submodules are effectively removed before entering the build process. 1. In your `.gitmodules` and `.git/config` files, delete the information related to the submodule you want to remove. ```bash git submodule deinit -f path_to_submodule ``` 2. Stage changes to `.gitmodules`: ```bash git add .gitmodules ``` 3. Remove the submodule from the repository (without trailing slash): ```bash git rm --cached path_to_submodule ``` 4. Remove the submodule files in `.git` from the repository (without trailing slash): ```bash rm -rf .git/modules/path_to_submodule ``` 5. Commit the changes: ```bash git commit -m "Removed submodule." ``` 6. Remove the submodule code locally, now no longer tracked: ```bash rm -rf path_to_submodule ``` ### Connect securely with SSH When you interact with a deployed environment, you need to guard your connection against unauthorized access. Use Secure Shell (SSH) to provide a secure channel. You can securely log in to your deployed app to troubleshoot and read logs. And create a tunnel to export data through. And interact with your project through the CLI. All secured through SSH. ##### Connect to apps To connect to an app securely with SSH, follow two steps. ###### 1. Authenticate with the CLI To authenticate with the CLI: 1. Install the [Platform.sh CLI](https://docs.platform.sh/administration/cli.md). 2. Run `platform login`. 3. In the open browser window, log in with your Platform.sh account credentials. (This webpage is encrypted with [HTTPS](https://docs.platform.sh/define-routes/https.md), making it secure.) 4. Authorize the CLI to use your account. A certificate gets stored in your local SSH configuration. The certificate is automatically cycled every hour for a new certificate as long as your session is active. If you are inactive for an extended period, your certificate expires and you are asked to login again the next time you use a command that requires authentication. You are now ready to run CLI commands and connect to an environment. ###### 2. Connect to an app with SSH To access an app in a given environment via the CLI, run the following command: ```bash platform ssh --project --environment --app ``` Replace each of ````, ````, and ```` with the values you want to access. To find these values in the Console, navigate to the environment you want to access and click **SSH** in the top right-hand corner. Alternatively, just run `platform ssh` and select the values from each list presented to you. Once you've connected, you get a welcome message detailing which environment you're connected to. Now you can interact with the environment as you want. Note that your app's file system is read-only, except for any [mounts you've defined]/create-apps/app-reference/single-runtime-image.md#mounts). ##### Connect to services To connect to a service, you need the [service credentials](https://docs.platform.sh/add-services.md#connect-to-a-service). Then you can connect either with a [direct tunnel](#use-a-direct-tunnel) or a [tunnel in your app](#use-an-app-tunnel). ###### Use a direct tunnel To open SSH tunnels for all of your services, run the following command: ```bash platform tunnel:open ``` You get output similar to the following: ```bash SSH tunnel opened to database at: http://127.0.0.1:30000 Logs are written to: ~/.platform/tunnels.log List tunnels with: platform tunnels View tunnel details with: platform tunnel:info Close tunnels with: platform tunnel:close Save encoded tunnel details to the PLATFORM_RELATIONSHIPS variable using: export PLATFORM_RELATIONSHIPS="$(platform tunnel:info --encode)" ``` Use the returned host (in this case `http://127.0.0.1:30000`) for your connection and fill in the details with the rest of your [service credentials](https://docs.platform.sh/add-services.md#connect-to-a-service). The `tunnel:open` command connects all relationships defined in your [app configuration](https://docs.platform.sh/create-apps.md). To open only one connection when you have multiple relationships defined, run `tunnel:single`. By default, this opens a tunnel at `http://127.0.0.1:30000`. You can specify the port for the connection using the `--port` flag. ###### Use an app tunnel Many database applications (such as MySQL Workbench) support establishing their own SSH tunnel. You need to use [SSH keys](https://docs.platform.sh/development/ssh/ssh-keys.md) for authentication. Consult the documentation for your application for how to enter SSH credentials. ####### Get SSH connection details To get the host and username for connections, follow these steps: You get output similar to the following: ```bash {} jyu7waly36ncj-main-7rqtwti--app@ssh.us.platform.sh ``` - Navigate to the environment you want to connect to. - Click **SSH** in the top right-hand corner. - You get output similar to the following: ``jyu7waly36ncj-main-7rqtwti--app@ssh.us.platform.sh`` The host is everything after the `@` and the username is what's before it. In this case, the host is `ssh.us.platform.sh` and the username is `jyu7waly36ncj-main-7rqtwti--app`. The host is the same for the entire project, while the username varies by environment. To connect to a service, fill in the details with the rest of your [service credentials](https://docs.platform.sh/add-services.md#connect-to-a-service). ##### Alternative authentication methods There are three basic ways to authenticate with Platform.sh: * [Through the CLI](#1-authenticate-with-the-cli) * The fastest and easiest method. * Supports multifactor authentication. * Automatically generates new certificates to keep your connection safe. * Necessary when using the CLI and when your organization has multifactor authentication set up. * [Using SSH keys](https://docs.platform.sh/development/ssh/ssh-keys.md) * Requires more setup on your part. * Represents only a single authentication method. * Requires you to regularly change the keys to maintain security. * Useful for checking out code as part of an automated process. * [Using API tokens](https://docs.platform.sh/administration/cli/api-tokens.md) * Good for letting automation tools use the CLI. * Requires you to regularly change the tokens to maintain security. ##### SSH into an MFA-protected environment For enhanced security, as an organization owner or admin user, you can [enforce Multi-Factor Authentication (MFA) within your organization](https://docs.platform.sh/administration/security/mfa.md#enforce-mfa-within-your-organization). As a project contributor, if you haven't enabled MFA on your user account and SSH into an environment that is protected by MFA, you get an error message. See how you can [troubleshoot that error message](https://docs.platform.sh/development/ssh/troubleshoot-ssh.md#mfa-related-error-message). #### Authenticate with SSH keys To connect to your app using SSH keys, you need two keys: * A **private key** you must keep _secret_ * A **public key** stored in your Platform.sh account A given SSH key pair can only be linked to a single user account. A key pair is valid for as long as you have access to the private key on the system from which you are connecting. If you have a key pair available, you aren't prompted to login. To keep connection secure, you need to regularly update the keys you use. A well-encrypted key is no substitute for regular key rotation. If you used GitHub to sign up for your Platform.sh account your public keys from GitHub are automatically synced to your Platform.sh account. So you can use them already with the CLI or to [connect to your app](https://docs.platform.sh/development/ssh.md#2-connect-to-an-app-with-ssh). ###### Add SSH keys If you don't have keys already added, you might be able to [find existing keys](#1a-find-your-keys) or else you need to [generate new keys](#1b-generate-new-keys). ####### 1A. Find your keys If you haven't used SSH keys before or it's been a while since you created the key, skip right to [generating new keys](#1b-generate-new-keys). If you have generated SSH keys before and want to find them on your system, follow these instructions. A public key file has a name ending in `.pub`. It contains seemingly random lines of characters, like this example of a public [RSA key](https://en.wikipedia.org/wiki/RSA_%28cryptosystem%29) (note the email address at the end, which wouldn't be present in a private key): ```text ssh-rsa AAAAB3NzaC1yc2EAAAADAQABAAABAQC2nDRLgPANWParTiaGIgySG+thTtnqFGI1tMWyqDdfvH+5hL91w2tK9PzaP+NJ5hA/cOyh30YRFb52Y64toU16Ko5K1mLqNFJajjWEI5Y4VukG6betrWfqdQ7XBr/s7nBuDOFQ5+eKbvug4rRSCSo8CsEI1eI0VNQkC9HJWYK28k7KurMdTN7X/Z/4vknM4/Rm2bnMk2idoORQgomeZS1p3GkG8dQs/c0j/b4H7azxnqdcCaR4ahbytX3d49BN0WwE84C+ItsnkCt1g5tVADPrab+Ywsm/FTnGY3cJKKdOAHt7Ls5lfpyyug2hNAFeiZF0MoCekjDZ2GH2xdFc7AX/ your_email_address@example.com ``` To find your public key file: 1. Open a terminal. 2. Run the following commands: ```bash cd ~/.ssh ls -a ``` If you find a file ending in `.pub`, copy the location and [add it to your Platform.sh account](#2-add-an-ssh-key-to-your-account). If you don't find an existing key, [generate new keys](#1b-generate-new-keys). ####### 1B. Generate new keys If you're logged in using the [Platform.sh CLI](https://docs.platform.sh/development/ssh.md#1-authenticate-with-the-cli), generate a key and have it added to your Platform.sh account automatically. 1. In a terminal, run `platform ssh-key:add`. 1. If necessary, log in to a browser. 1. Press `Y` and `enter` to create a new SSH key. 1. Copy the location of the generated key. 1. Run the following commands (replacing `` with the location you copied): ```bash eval $(ssh-agent) ssh-add '' ``` To generate a key otherwise, GitHub has a good [walk-through for creating SSH key pairs](https://docs.github.com/en/authentication/connecting-to-github-with-ssh/generating-a-new-ssh-key-and-adding-it-to-the-ssh-agent) on various operating systems. Then you need to [add it to your Platform.sh account](#2-add-an-ssh-key-to-your-account). ####### 2. Add an SSH key to your account Once you have the location of your public key, add it to your Platform.sh account. If you're logged in using the [Platform.sh CLI](https://docs.platform.sh/development/ssh.md#1-authenticate-with-the-cli), in a terminal run the following command (replacing `` with the location of your public key): ```bash platform ssh-key:add '' ``` You can also add it in the Console, similar to this [video](https://docs.platform.sh/videos/management-console/add-ssh-mc.mp4). Now you are ready to use the key to [connect to an environment](https://docs.platform.sh/development/ssh.md#2-connect-to-an-app-with-ssh). ####### 3. Connect to your server with SSH keys To connect to a server using SSH keys, find the details in the Console: 1. Open the [Platform.sh Console](https://console.platform.sh/). 1. Select a project. 1. In the **Environment** dropdown, select the environment you want to access. 1. Click the **SSH** dropdown. 1. Copy the ssh command for where you want access. (Example: `ssh abcdefghi5k-main-7rqtwti--app@ssh.us-2.platform.sh`) 1. Enter the command into a terminal. Note that if you have just added your SSH key, you need to [redeploy your environment](https://docs.platform.sh/development/ssh/troubleshoot-ssh.md#redeploy-your-environment) before you can access it using SSH keys. ###### Forwarding keys by default It may be helpful to set your SSH client to always forward keys to Platform.sh servers, which can simplify other SSH or rsync commands. To do so, include a block in your local `~/.ssh/config` file like so: ```text Host *.us.platform.sh ForwardAgent yes Host *.eu.platform.sh ForwardAgent yes ``` Include one `Host` entry for each Platform.sh region you want to connect to, such as `us-2` or `eu-4`. (You can include other configuration as desired.) #### Troubleshoot SSH While trying to use SSH, you may get a response indicating permission is denied. Or if you get an error with a code of 255, it means there's a problem with your SSH connection. ```txt The command failed with the exit code: 255 ``` There are several places to check to try to solve such issues. ###### Check your environment If your environment is [inactive](https://docs.platform.sh/glossary.md#inactive-environment) or the deployment has failed, you can't log in to it. To make sure the environment is active and the deployment has succeeded, check it using `platform environment:list` or in the [Console](https://console.platform.sh/) . ###### Redeploy your environment If you have just added your SSH key or made changes to [access rules](https://docs.platform.sh/administration/users.md), you need to redeploy your environment before you can access it using SSH keys. You can do this in the [Console](https://console.platform.sh/), by running `platform redeploy`, or by pushing an empty git commit: ```bash git commit --allow-empty -m 'chore: force redeploy' git push origin main ``` ###### Check your public key Make sure your public key has been uploaded to your user account. Check it in the [Platform.sh Console](https://console.platform.sh/). ###### SSH key can not be duplicated A given SSH key pair can only be linked to a single user account. If you add an already used SSH key to another account, you see the error: `SSH key can not be duplicated`. [Generate a new pair of SSH keys](https://docs.platform.sh/development/ssh/ssh-keys.md#add-ssh-keys) for the second user account you want to add. ###### Check your SSH agent Check that your key is properly added to your SSH agent. This is an authentication agent that manages your private key. 1. Run `ssh-add -l` in your terminal: ```bash ssh-add -l ``` You get output similar to the following: ```bash 2048 12:b0:13:83:7f:56:18:9b:78:ca:54:90:a7:ff:12:69 /Users/your_username/.ssh/id_rsa (RSA) ``` 1. Check that the file exists and that the file name or comment matches your private key file. 1. If you don't see your private key file, add your private key: ```bash ssh-add path-to-your-key ``` ###### Specify your identity file If your identity (SSH key) associated with Platform.sh isn't in a default file name (as may be explained in your SSH software manual, for example), you may have to append a specification like the one below so that the SSH software finds the correct key. ```bash Host platform.sh IdentityFile ~/.ssh/id_platformsh ``` Be aware that, above, `platformsh` stands for a hostname. Each different hostname you connect to Platform.sh at may have to be specified in the host line, separated by spaces. ###### Check your Git integrations If your project is integrated with another Git provider (such as GitHub), that provider controls Git operations. Make sure you have added your public SSH key to your provider and that your user there has access. ###### Generate SSH debug information If your private key and public key both look OK but you don't have any luck logging in, print debugging information. These lines often give clues about what's going wrong. Run the SSH command with the `-v` option, like so: ```bash ssh -v [SSH-URL] ``` You get output similar to the following: ```bash OpenSSH_6.7.8, OpenSSL 1.2.3 1 Sep 2014 debug1: Connecting to ssh.eu.platform.sh [54.32.10.98] port 22. debug1: Connection established. debug1: identity file /Users/your_username/.ssh/id_rsa type 1 ...(many more lines of this light reading)... debug1: Offering RSA public key: /Users/your_username/.ssh/id_rsa debug1: Authentications that can continue: publickey debug1: No more authentication methods to try. Permission denied (publickey). ``` Alternatively, you can run the following command: ```bash GIT_SSH_COMMAND="ssh -v" git clone ``` You can use this information to make one last check of the private key file. ###### MFA-related error message If you haven't enabled MFA on your user account and try to SSH into an environment that is protected by MFA, you get the following error message: ```bash Error: Access denied Service: abcdefg123456-main-bvxea6i--app User: () Parameters: {"amr":["mfa","sso:acme"]} Detail: Additional authentication is required: - Multi-factor authentication (MFA) - Single sign-on (SSO), provider: "acme" ``` To solve this, [enable MFA on your user account](https://docs.platform.sh/administration/security/mfa.md#enable-mfa-on-your-user-account). Alternatively, open the Console and select the desired organization. Follow the instructions so you can effectively access its contents. Similarly for bot users and CLI tokens, you may see the message: ```bash [RequestException] Multi-factor authentication (MFA) is required. The API token may need to be re-created after enabling MFA. ``` In this case, as described, it will be necessary to: 1. Enable MFA on the (bot) user account associated with the token. 2. Generate a new access token, and then replace its value in your workflow that requires the token (such as updating a GitHub workflow secret variable). ###### Something still wrong? For more general information, see how to [troubleshoot development](https://docs.platform.sh/development/troubleshoot.md). If you're still stuck, open a [support ticket](https://docs.platform.sh/learn/overview/get-support.md) and provide the full SSH debug information. ### Transfer data to and from a {{% names/dedicated-gen-2 %}} cluster Transferring data to and from [a Dedicated Gen 2 cluster](https://docs.platform.sh/glossary.md#dedicated-gen-2) slightly differs from the process on the Grid. ##### Back up your files Platform.sh automatically creates backups of the Staging and Production environments of a Dedicated Gen 2 cluster every six hours. These are only useful to fully restore an environment and are managed by the support team. You can make a manual local backup yourself by downloading data from your environment to your local system by running the following command: ```bash platform scp -r remote: ``` This command copies all files from the `` in the environment you want to back up to your ``. Before running the command, make sure that you don't overwrite local data (or do a backup first). ##### Back up your database To back up your database, adapt and run the following command on your local computer: ```bash platform db:dump --gzip ``` For more backup options and examples, see how to [export data from an SQL database](https://docs.platform.sh/add-services/mysql.md#exporting-data). ##### Synchronize files from Development to Staging/Production To transfer data into either the Staging or Production environment, download data from your Development environment to your local system and from there to your Production/Staging environment. **Note**: Be aware that synchronizing files is a destructive operation that overwrites data. [Back up your Staging/Production files first](#back-up-your-files). 1. To download data from your Development environment to your local system, adapt the following command: ```bash platform scp --environment -r remote: ``` 2. To copy the local directory to the remote Staging/Production mount, adapt the following command: ```bash platform scp --environment -r remote: ``` ##### Synchronize a database from Development to Staging/Production To synchronize a database into either the Staging or Production environment, export the database from your Development environment to your local system and from there to your Staging/Production environment. **Note**: Be aware that this is a destructive operation that overwrites data. [Back up your Staging/Production database first](#back-up-your-database). To synchronize your database: 1. Export the Development database to your local computer: ```bash platform db:dump --environment --file=dump.sql ``` For more backup options and examples, see how to [export data from an SQL database](https://docs.platform.sh/add-services/mysql.md#exporting-data). 2. Import the Development database dump file into the remote Staging/Production database: ```bash platform sql --environment < dump.sql ``` ##### What's next? For more granular connection options, see [SSH connection details](https://docs.platform.sh/development/ssh.md#get-ssh-connection-details). ### Regions Platform.sh offers several regions for hosting project data. You can choose a region based on criteria such as its closeness to your users and its environmental impact. ##### Environmental impact At Platform.sh, we are committed to reducing our environmental impact. Whenever you create a project with us, we provide information about the electricity grid provider for that region. You can view the average carbon intensity of the energy grid in grams of CO2 equivalent per kilowatt-hour. These data are sourced from an annual average, which we update as new information becomes available. If you want to see real-time emissions generated by each power grid, we recommend checking out [Electricity Maps](https://app.electricitymap.org/map). You can also access a public GitHub page of Electricity Maps [data sources](https://github.com/electricitymap/electricitymap-contrib/blob/master/DATA_SOURCES.md). Summary of data being used in Platform.sh’s Region Picker when creating a new Project: | Source | Last update of this page | Previous versions of this page | |--------|--------------------------|--------------------------------| | Electricity Maps 2022 annual averages (previous to May 2023, we had used annual averages from the IEA).
See our [blog post](https://platform.sh/blog/platformsh-is-now-using-annual-carbon-intensities-from-electricity-maps/) for more information.| 11 May 2023 | Available [here](https://github.com/platformsh/platformsh-docs/commits/main/docs/src/development/regions.md) | Information on carbon intensity is also available in the Platform.sh API. For example, to get a list of the regions and their carbon intensities, run the following command: ```bash platform api:curl regions | jq -r '.regions[] | select(.available) | "\(.label): \(.environmental_impact.carbon_intensity)"' ``` See all available information in the [API documentation](https://api.platform.sh/docs/#tag/Regions). ##### Region availability The regions listed here may be different from those available to you when you create a new project. Each organization can have its own rules for what regions to allow. When adding a new project, you only see regions allowed by your organization. ##### Region location To find out where a given region is hosted, use the following command: ``` bash platform api:curl regions | jq '.regions[] | select(.available) | .id + ": " + .provider.name + " - " + .zone + " - " + .timezone' | sort ``` The returned list contains, for each available region, its name, provider, geographic zone and its timezone. ##### Public IP addresses The public IP addresses for regions are stable, but not guaranteed to never change. Before any change, you are notified well in advance regarding affected projects. They're useful for cases such as when you have a corporate firewall that blocks outgoing SSH connections. In such cases, add the inbound IP addresses for your region to your allow list. ##### Regions ###### Europe Region | Provider | Available to new orgs | Outbound IPs | Inbound IPs | Region ####### [Switzerland (ch-1)](#switzerland-ch-1-ch-1) ch-1.platform.sh Provider Google Cloud Platform Available to new orgs ✅ Outbound ips - 34.65.197.163 - 34.65.144.16 - 34.65.72.28 Inbound ips ``gw.ch-1.platformsh.site`` - 34.65.236.213 - 34.65.152.61 - 34.65.244.185 Region ####### [Germany (de-2)](#germany-de-2-de-2) de-2.platform.sh Provider Google Cloud Platform Available to new orgs ✅ Outbound ips - 34.159.207.210 - 34.159.181.149 - 34.107.79.7 Inbound ips ``gw.de-2.platformsh.site`` - 35.246.248.138 - 35.246.184.45 - 35.242.229.239 Region ####### [Ireland (eu)](#ireland-eu-eu) eu.platform.sh Provider AWS Available to new orgs ✅ Outbound ips - 54.72.94.105 - 54.76.137.67 - 54.76.137.94 Inbound ips ``gw.eu.platformsh.site`` - 54.76.137.79 - 54.76.136.188 - 54.76.137.151 Region ####### [Sweden (eu-5)](#sweden-eu-5-eu-5) eu-5.platform.sh Provider AWS Available to new orgs ✅ Outbound ips - 13.48.116.14 - 13.51.46.87 - 13.48.202.56 Inbound ips ``gw.eu-5.platformsh.site`` - 13.51.62.86 Region ####### [France (fr-3)](#france-fr-3-fr-3) fr-3.platform.sh Provider OVHcloud Available to new orgs ✅ Outbound ips - 135.125.91.125 - 135.125.89.47 - 135.125.90.255 Inbound ips ``gw.fr-3.platformsh.site`` - 94.23.123.122 Region ####### [France (fr-4)](#france-fr-4-fr-4) fr-4.platform.sh Provider Azure Available to new orgs ✅ Outbound ips - 20.188.46.156 - 20.188.46.158 - 20.188.46.165 Inbound ips ``gw.fr-4.platformsh.site`` - 20.74.41.190 - 20.74.41.218 - 20.74.42.30 Region ####### [United Kingdom (uk-1)](#united-kingdom-uk-1-uk-1) uk-1.platform.sh Provider Google Cloud Platform Available to new orgs ✅ Outbound ips - 35.246.36.142 - 34.147.217.161 - 34.89.33.176 Inbound ips ``gw.uk-1.platformsh.site`` - 35.242.142.110 - 35.189.126.202 - 35.242.183.249 Region ####### [Ireland (eu-2)](#ireland-eu-2-eu-2) eu-2.platform.sh Provider AWS Available to new orgs Outbound ips - 52.208.123.9 - 52.214.63.84 - 52.30.200.164 Inbound ips ``gw.eu-2.platformsh.site`` - 34.248.104.12 - 34.241.191.143 - 52.210.208.94 Region ####### [Ireland (eu-4)](#ireland-eu-4-eu-4) eu-4.platform.sh Provider AWS Available to new orgs Outbound ips - 18.200.158.188 - 18.200.157.200 - 18.200.184.206 Inbound ips ``gw.eu-4.platformsh.site`` - 52.215.88.119 - 52.208.179.40 - 18.200.179.139 Region ####### [France (fr-1)](#france-fr-1-fr-1) fr-1.platform.sh Provider Orange Available to new orgs Outbound ips - 90.84.46.222 - 90.84.47.148 - 90.84.46.40 Inbound ips ``gw.fr-1.platformsh.site`` - 90.84.46.40 - 90.84.47.148 - 90.84.46.222 ###### United States Region | Provider | Available to new orgs | Outbound IPs | Inbound IPs | Region ####### [East (us)](#east-us-us) us.platform.sh Provider AWS Available to new orgs ✅ Outbound ips - 54.88.149.31 - 54.209.114.37 - 54.210.53.51 Inbound ips ``gw.us.platformsh.site`` - 54.210.49.244 - 54.88.225.116 - 54.210.55.162 Region ####### [East (us-2)](#east-us-2-us-2) us-2.platform.sh Provider AWS Available to new orgs ✅ Outbound ips - 34.238.64.193 - 52.4.246.137 - 54.157.66.30 Inbound ips ``gw.us-2.platformsh.site`` - 34.226.46.235 - 34.238.11.122 - 54.89.106.200 Region ####### [West (us-3)](#west-us-3-us-3) us-3.platform.sh Provider Azure Available to new orgs ✅ Outbound ips - 52.148.128.255 - 52.250.13.106 - 40.91.69.215 Inbound ips ``gw.us-3.platformsh.site`` - 52.137.90.183 - 52.156.93.30 - 51.143.107.76 Region ####### [East (us-4)](#east-us-4-us-4) us-4.platform.sh Provider Google Cloud Platform Available to new orgs ✅ Outbound ips - 104.196.203.234 - 34.148.171.57 - 35.243.131.172 Inbound ips ``gw.us-4.platformsh.site`` - 34.73.189.215 - 34.74.8.155 - 34.75.104.115 ###### Canada Region | Provider | Available to new orgs | Outbound IPs | Inbound IPs | Region ####### [Canada (ca-1)](#canada-ca-1-ca-1) ca-1.platform.sh Provider AWS Available to new orgs ✅ Outbound ips - 35.182.24.224 - 52.60.213.255 - 35.182.220.113 Inbound ips ``gw.ca-1.platformsh.site`` - 35.182.174.169 - 35.182.59.77 - 52.60.219.22 ###### Australia Region | Provider | Available to new orgs | Outbound IPs | Inbound IPs | Region ####### [Australia (au)](#australia-au-au) au.platform.sh Provider AWS Available to new orgs ✅ Outbound ips - 13.55.135.0 - 13.54.121.225 - 13.55.215.151 Inbound ips ``gw.au.platformsh.site`` - 13.54.88.239 - 13.55.140.143 - 13.54.222.56 Region ####### [Australia (au-2)](#australia-au-2-au-2) au-2.platform.sh Provider Azure Available to new orgs ✅ Outbound ips - 104.210.116.116 - 40.126.245.226 - 104.210.117.92 Inbound ips ``gw.au-2.platformsh.site`` - 20.92.240.74 - 20.191.224.199 - 20.92.240.236 ### Troubleshoot development ##### Common tasks ###### Force a redeploy There are times where you might want to trigger a redeployment of your application, such as to add custom TLS certificates. A redeploy reuses your built app and services. To trigger a redeploy, follow these steps: Run the following command: ```sh {} platform redeploy ``` The redeploy takes place after any scheduled activities (either *Running* or *Pending*). **Note**: Despite the name, redeployment doesn’t rerun the ``deploy`` hook, only the ``post_deploy`` hook. Both your ``build`` and ``deploy`` hooks are tied to individual commits in code. They’re reused until another commit is pushed to the environment. See [more about hooks](https://docs.platform.sh/create-apps/hooks.md) and their reuse. To rerun the ``build`` and ``deploy`` hooks, [manually trigger a build](#manually-trigger-builds). **Is there a way to redeploy the production environment without knowing its name?**: It’s often desirable that the production environment, like many other values, is not hardcoded into your external workflows and management scripts. You can use the CLI, along with the [environment type distinction](https://docs.platform.sh/glossary.md#environment-type) to identify a production environment (assuming there is only one) and redeploy it in a single line. To do so, run the following command: ```bash {} platform redeploy -e $(platform environment:list --type production --pipe) ``` ###### Manually trigger builds To increase performance and keep applications the same across environments, Platform.sh reuses built applications if its code and build time configuration (variables and such) remain the same. There may be times where you want to force your application to be built again without changing its code, for example to test an issue in a build hook or when external dependencies change. To force a rebuild without changing the code, use an [environment variable](https://docs.platform.sh/development/variables/set-variables.md#create-environment-specific-variables). Assuming you want to do this for your `main` environment, first create a `REBUILD_DATE` environment variable: ```bash platform variable:create --environment main --level environment --prefix env --name REBUILD_DATE --value "$(date)" --visible-build true ``` This triggers a build right away to propagate the variable. To force a rebuild at any time, update the variable with a new value: ```bash platform variable:update --environment main --value "$(date)" "env:REBUILD_DATE" ``` This forces your application to be built even if no code has changed. ###### Clear the build cache You may find that you need to clear the build cache, such as when it's grown too big or, in rare circumstances, when it's corrupted. It may get corrupted when code is downloaded from a third-party language service like Packagist or npm while that service is experiencing issues. To clear the build cache, run the following command: ```sh platform project:clear-build-cache ``` The next build for each environment is likely to take longer as the cache rebuilds. ##### Access denied or permission denied In most cases, issues accessing a project are caused by missing permissions for a given user. For more information see how to [manage user permissions](https://docs.platform.sh/administration/users.md). If you are using the CLI, make sure that [you are authenticated](https://docs.platform.sh/administration/cli.md#2-authenticate). If you are using SSH, see how to [troubleshoot SSH access](https://docs.platform.sh/development/ssh/troubleshoot-ssh.md). ##### HTTP responses 502 Bad Gateway or 503 Service Unavailable If you see these errors when accessing your application, it indicates your application is crashing or unavailable. Typical causes and potential solutions include: - Your app is listening at the wrong place. - Check your app's [upstream properties](https://docs.platform.sh/create-apps/app-reference/single-runtime-image.md#upstream). - If your app listening at a port, make sure it's using the [`PORT` environment variable](https://docs.platform.sh/development/variables/use-variables.md#use-provided-variables). - Your `.platform.app.yaml` configuration has an error and a process isn't starting or requests can't be forwarded to it correctly. - Check your `web.commands.start` entry or your `passthru` configuration. - The amount of traffic coming to your site exceeds the processing power of your application. - You may want to [check if bots are overwhelming your site](https://support.platform.sh/hc/en-us/community/posts/16439634723858). - Alternatively, you may need to [increase your plan size](https://docs.platform.sh/administration/pricing.md). - Certain code paths in your application are too slow and timing out. - Check your code is running smoothly. - Consider adding an [observability solution](https://docs.platform.sh/increase-observability/integrate-observability.md) to get a better view of your application. - A PHP process is crashing because of a segmentation fault. - See [how to deal with crashed processes](https://docs.platform.sh/languages/php/troubleshoot.md#troubleshoot-a-crashed-php-process). - A PHP process is killed by the kernel out-of-memory killer. - See [how to deal with killed processes](https://docs.platform.sh/languages/php/troubleshoot.md#troubleshoot-a-killed-php-process). ##### Site outage If you can't access some part of your project, whether it's the live site, development environment, or Console, check the [Platform.sh status page](https://status.platform.sh/). There you can see planned maintenance and subscribe to updates for any potential outages. If the status is operational, [contact support](https://docs.platform.sh/learn/overview/get-support.md). ##### Command not found When you've added a command line tool (such as [Drush](https://docs.platform.sh/glossary.md#drush)), you might encounter an error like the following: ```bash -bash: drush: command not found ``` If you see this, add the command you want to run to your path with a [`.environment` file script](https://docs.platform.sh/development/variables/set-variables.md#set-variables-via-script). As a Linux or Unix-like operating system user (MacOS included), to be able to run your scripts directly and quickly get past this error you may need to run the `chmod +x ` command. However, regardless of which operating system you're using, it's best if you **don't rely on scripts having execute permissions**. Instead, call the app/shell/runtime directly passing your script file to that executable. ##### Missing commits If you push code to Platform.sh without the full Git history, sometimes commits are missing. This can happen if you're pushing code from an external CI/CD pipeline, such as a GitHub action. Such pipelines often do only shallow clones by default. In such cases, your build might fail with an internal error. Or you might see an error like `unexpected disconnect while reading sideband packet`. To avoid the error, make sure you do a full clone of the repository before pushing code. For example, for the [Checkout GitHub action](https://github.com/actions/checkout), set `fetch-depth: 0` to clone the full history. For GitLab, set clones to have a limit of `0` either in [repository settings](https://docs.gitlab.com/ee/ci/pipelines/settings.md#limit-the-number-of-changes-fetched-during-clone) or using the [`GIT_DEPTH` variable](https://docs.gitlab.com/ee/user/project/repository/monorepos/index.md#shallow-cloning). ##### Large JSON file upload failing When trying to upload a large JSON file to your API, you might see a 400 response code (`Malformed request`). Platform.sh enforces a 10 MB limit on files with the `application/json` `Content-Type` header. To send large files, use the `multipart/form-data` header instead: ```bash curl -XPOST 'https://example.com/graphql' --header 'Content-Type: multipart/form-data' --form file=large_file.json ``` ##### Databases For MySQL specific errors, see how to [troubleshoot MySQL](https://docs.platform.sh/add-services/mysql/troubleshoot.md). ###### Permission error creating a database If you try to use a user to create a database, you get an error saying `permission denied to create database`. The database is created for you and can be found in the `path` key of the `PLATFORM_RELATIONSHIPS` [environment variable](https://docs.platform.sh/development/variables/use-variables.md#use-provided-variables). ##### Storage If you're having trouble with storage, see how to [troubleshoot mounts](https://docs.platform.sh/create-apps/troubleshoot-mounts.md) and [disks](https://docs.platform.sh/create-apps/troubleshoot-disks.md). ###### Can't write to file system If you attempt to write to disk outside a `build` hook, you may encounter a `read-only file system` error. Except where you define it, the file system is all read-only, with code changes necessary through git. This gives you benefits like repeatable deployments, consistent backups, and traceability. To generate anything you need later, [write to disk during a `build` hook](https://docs.platform.sh/create-apps/app-reference/single-runtime-image.md#writable-directories-during-build). Or [declare mounts](https://docs.platform.sh/create-apps/app-reference/single-runtime-image.md#mounts), which are writable even during and after deploy. They can be used for your data: file uploads, logs, and temporary files. ###### Platform.sh push fails due to lack of disk space You might see the following message when attempting to run `platform push`: `There isn't enough free space to complete the push` This usually indicates that large files are present in the repository (where they shouldn't be). Make sure that the paths for files like media files, dependencies, and databases are set to be ignored in your `.gitignore` file. If large files are already in the repository, the open-source tool [bfg-repo-cleaner](https://rtyley.github.io/bfg-repo-cleaner/) can help in cleaning up the repository by purging older commits, removing unnecessary files, and more. If none of these suggestions work, open a [support ticket](https://docs.platform.sh/learn/overview/get-support.md). ##### Stuck build or deployment If you see a build or deployment running longer than expected, it may be one of the following cases: - The build is blocked by a process in your `build` hook. - The deployment is blocked by a long-running process in your `deploy` hook. - The deployment is blocked by a long-running cron job in the environment. - The deployment is blocked by a long-running cron job in the parent environment. To determine if your environment is being stuck in the build or the deployment, check your [activity log](https://docs.platform.sh/increase-observability/logs/access-logs.md#activity-logs). If the activity has the result `success`, the build has completed successfully and the system is trying to deploy. If the result is still `running`, the build is stuck. In most regions, stuck builds terminate after one hour. When a deployment is blocked, you should try the following: 1. Connect to your environment using [SSH](https://docs.platform.sh/development/ssh.md). 2. Find any long-running cron jobs or deploy hooks on the environment by running `ps afx`. 3. Kill any long-running processes with `kill `. Replace `` with the process ID shown by `ps afx`. If a `sync` of `activate` process is stuck, try the above on the parent environment. Note that, for PHP apps, you can [restart processes that get stuck during a build or deployment](https://docs.platform.sh/languages/php/troubleshoot.md#restart-php-processes-stuck-during-a-build-or-deployment) from your app container. ##### Slow or failing build or deployment Builds can take long time or fail. Most of the time, it's related to an application issue. Here are a few tips that can help you find the exact cause. ###### Check for errors in the logs Invisible errors during the build and deploy phase can cause increased wait times, failed builds, and other problems. Investigate [each log](https://docs.platform.sh/increase-observability/logs/access-logs.md#container-logs) and fix any errors you find. ###### Build and deploy hooks [`build` and `deploy` hooks](https://docs.platform.sh/create-apps/hooks.md) can cause long build times. If they run into issues, they can cause the build to fail or hang indefinitely. `build` hooks can be tested in your local environment. `deploy` hooks can be tested either locally or by logging into the application over [SSH](https://docs.platform.sh/development/ssh.md) and running them there. Be careful not to test the scripts on production environments. You can also test your hooks with these Linux commands to help debug issues: ```text time # Print execution time strace -T # Print a system call report ``` ###### Cron jobs Containers can't be shutdown while long-running [cron jobs and scheduled tasks](https://docs.platform.sh/create-apps/app-reference/single-runtime-image.md#crons) are active. That means long-running cron jobs block a container from being shut down to make way for a new deploy. Make sure your custom cron jobs run quickly and properly. Cron jobs may invoke other services in unexpected ways, which can increase execution time. ##### Cache configuration A common source of performance issues is a misconfigured cache. The most common issue isn't allowing the right cookies as part of the router cache. Some cookies, such as session cookies, need to be allowed. Others, such as marketing and analytics cookies, usually shouldn't be part of the cache key. See more about [router cache](https://docs.platform.sh/define-routes/cache.md) and [cookie entry](https://docs.platform.sh/define-routes/cache.md#cookies). Because the router cache follows cache headers from your app, your app needs to send the correct `cache-control` header. For static assets, set cache headers using the `expires` key in your [app configuration](https://docs.platform.sh/create-apps/app-reference/single-runtime-image.md#locations). ##### Language-specific troubleshooting For language-specific troubleshooting for your apps: - [PHP](https://docs.platform.sh/languages/php/troubleshoot.md) - [Node JS](https://docs.platform.sh/languages/nodejs/debug.md) ### Deploy on Platform.sh Platform.sh offers a number of project templates as part of the Project Creation Wizard to help bootstrap a new project. However, you can also create arbitrary links to spawn projects on Platform.sh from an arbitrary Git repository or prepared template. There are two ways to create such a link, shown below. In each case, when a user clicks on the link they are redirected to create a new Platform.sh project, with the template selection step skipped in favor of the template specified. If the user doesn't have a Platform.sh account yet they're prompted to create one. You may include the link on your own project's website, your company's internal Wiki, or anywhere else a link can go to make launching your code base as straightforward as possible. ##### Preparation To have a deployable template, you need to first prepare the repository. The Deploy on Platform.sh button works with any Git repository that's deployable on Platform.sh. It needs [app configuration](https://docs.platform.sh/create-apps.md) and [`.platform/routes.yaml` file](https://docs.platform.sh/define-routes.md). If you are using any [services](https://docs.platform.sh/add-services.md), you also need a [`.platform/services.yaml` file](https://docs.platform.sh/add-services.md), The repository must be available at a publicly accessible Git URL. That may be hosted with GitHub, GitLab, Bitbucket, your own custom Git hosting, or any other publicly accessible Git URL. ###### (Optional) Make a template definition file You can create a Deploy on Platform.sh button for any compatible repository; however, you can also provide a YAML template definition file. A template definition file is a YAML file that references a Git repository but can also include additional information, such as limiting the resulting project to a certain minimum project size or only allowing it to be deployed in certain regions. Use this mechanism when you want more control over how the template gets deployed. The template definition file may be at any publicly accessible URL. It can be in the template repository itself or separate. Note that if it's in the template repository then it's included in every deployed user project from that template. (It doesn't hurt anything as it has no effect at runtime, but users have a copy of the file in their code base and may be confused by it.) A list of all [Platform.sh-supported templates](https://github.com/platformsh/template-builder/tree/master/templates) is available on GitHub. [3rd party templates](https://github.com/platformsh/templates-external/) are also available. You can also create your own template file and host it anywhere you wish. The template definition file's format is [documented](https://github.com/platformsh/templates-external/blob/master/template-definition.yaml) in the 3rd party template repository. ##### Making a button (with a widget) The easiest way to make a Deploy on Platform.sh button is to use the [button builder widget](https://platform.sh/deploy/). You provide it with either the Git URL of the repository or a URL to a corresponding template definition file. The button builder widget gives you an HTML fragment to copy and paste to wherever you want the button hosted. It also includes a tracking code to know whose Deploy on Platform.sh button was clicked, but doesn't add any cookies to the site. ##### Making a button manually ###### Arbitrary Git repository Create a link in the following form: ```text https://console.platform.sh/org/create-project?template=GIT_URL ``` Where `GIT_URL` is the URL of a publicly visible Git repository. For example, to install Platform.sh's [Drupal 10 template on GitHub](https://github.com/platformsh-templates/drupal10) you would use: ```text https://console.platform.sh/org/create-project/?template=https://github.com/platformsh-templates/drupal10.git ``` (Note that's the URL of the Git repository as if you were cloning it, NOT the URL of the repository's home page on GitHub.) A new project is created and then initialized with whatever code is at the tip of the default branch of that repository. This method works for any publicly visible Git repository, provided that it includes the necessary Platform.sh YAML configuration files. If those are missing the project still initializes but fails to build. ###### Defined Template Create a link in the following form: ```text https://console.platform.sh/org/create-project?template=TEMPLATE_URL ``` Where `TEMPLATE_URL` is the URL of a publicly visible template definition file. For example, to install Platform.sh's [Drupal 10 template](https://github.com/platformsh-templates/drupal10) you would use: ```text https://console.platform.sh/org/create-project/?template=https://github.com/platformsh/template-builder/blob/master/templates/drupal10/.platform.template.yaml ``` A new project is created, initialized with whatever code is at the tip of the default branch of the repository referenced by that file, provided that it includes the necessary Platform.sh YAML configuration files. If those are missing the project still initializes but fail to build. ##### Listing a repository Platform.sh welcomes project templates produced by the application vendor. If you have a Free Software application you want available in the Platform.sh setup wizard, create a template definition file and submit a pull request against the [3rd party templates repository](https://github.com/platformsh/templates-external/). The Developer Relations team reviews and evaluate the application and template, and may offer feedback before merging. Generally speaking, any Free Software application that's actively maintained and runs well on Platform.sh is welcome. Projects released under a non-Free license aren't accepted. ### Sanitize databases When working on a new feature on your website, you want to use a new branch. Using a new branch makes sure that you don't risk breaking your live, production website. Creating a branch on Platform.sh copies both the code and the database to that new development branch. These code and database changes need to be tested before being merged into production. Depending on your processes, internal or external teams may interact with the preview environment branch. Databases of live websites often contain personally identifiable information (PII) such as full names, mailing addresses, and phone numbers. To ensure people reviewing code changes can't access information they shouldn't, sanitize your databases of any PII that they may contain. ##### Examples #### Sanitizing databases: MariaDB and Drupal Databases of live websites often contain personally identifiable information (PII) such as full names, mailing addresses, and phone numbers. To ensure people reviewing code changes can't access information they shouldn't, sanitize your databases of any PII that they may contain. This example goes through the process for a MySQL database using Drupal. ###### Before you begin You need: - A project with a [MySQL database](https://docs.platform.sh../../add-services/mysql.md). - A command interface installed: - If doing it manually, the [Platform CLI](https://docs.platform.sh../../administration/cli.md). - Otherwise, make sure [Drush](https://www.drush.org/latest/install/) is installed in your environment. This guide is about sanitizing MySQL databases. This guide doesn't address: - Sanitizing NoSQL Databases (such as [MongoDB](https://docs.platform.sh../../add-services/mongodb.md)) - Input validation and input sanitization, which both help prevent security vulnerabilities ###### Sanitize the database Make sure that you only sanitize preview environments and **never** the production environment. Otherwise you may lose most or even all of the relevant data stored in your database. First, take a [database dump](https://docs.platform.sh../../add-services/mysql.md#exporting-data) of your preview environment. This is just a safety precaution. Production data isn't altered. To get a database dump, run the following command: ``platform db:dump -e ``. You see output like the following: ```sql {} +----+------------+---------------+---------------------------+---------------+ | ID | first_name | last_name | user_email | display_name | +----+------------+---------------+---------------------------+---------------+ | 1 | admin | admin | admin@yourcompany.com | admin | | 2 | john | doe | john.doe@gmail.com | john | | 3 | jane | doe | janedoe@ymail.com | jane | +----+------------+---------------+---------------------------+---------------+ ``` - Change the fields where PII is contained with the [UPDATE](https://mariadb.com/kb/en/update/). For example, to change the display name of users with an email address not in your company’s domain to a random value, run the following query: ```sql {} UPDATE users SET display_name==substring(md5(display_name||'$PLATFORM_PROJECT_ENTROPY') for 8); WHERE email NOT LIKE '%@yourcompany%' ``` Adapt and run that query for all fields that you need to sanitize. If you modify fields that you shouldn’t alter, [you can restore them](https://docs.platform.sh/environments/restore.md) from the dump you took in step 1. You can create a script to automate the sanitization process to be run automatically on each new deployment. Once you have a working script, add your script to sanitize the database to [a ](https://docs.platform.sh/create-apps/hooks/hooks-comparison.md#deploy-hook): ```yaml {location=".platform.app.yaml"} hooks: deploy: | # ... cd /app/public if [ "$PLATFORM_ENVIRONMENT_TYPE" = production ]; then # Do whatever you want on the production site. else # The sanitization of the database should happen here (since it's non-production) sanitize_the_database.sh fi ``` To sanitize your database and get rid of sensitive, live information, use the ``drush sql:sanitize`` command. Add your script to sanitize the database to [a ](https://docs.platform.sh/create-apps/hooks/hooks-comparison.md#deploy-hook) for preview environments: ```yaml {location=".platform.app.yaml"} hooks: deploy: | # ... cd /app/public if [ "$PLATFORM_ENVIRONMENT_TYPE" = production ]; then # Do whatever you want on the production site. else drush -y sql:sanitize fi drush -y updatedb ``` More options are available. These are described in the [Drush documentation](https://www.drush.org/latest/commands/sql_sanitize/). To sanitize only on the initial deploy and not all future deploys, use [Drush state](https://www.drush.org/latest/commands/state_set/) as in the following example: ```yaml {location=".platform.app.yaml"} hooks: deploy: | # ... cd /app/public if [ "$PLATFORM_ENVIRONMENT_TYPE" = production ] || [ "$(drush state:get --format=string mymodule.sanitized)" != yes ]; then # Do whatever you want on the production site. else drush -y sql:sanitize drush state:set --input-format=string mymodule.sanitized yes fi ``` ###### What's next You learned how to remove sensitive data from a database. To replace sensitive data that with other meaningful data, you can add a `faker` to the process. A `faker` is a program that generates fake data that looks real. Having meaningful PII-free data allows you to keep your current Q&A, external reviews, and other processes. To add a faker, adapt your sanitizing queries to replace each value that contains PII with a new value generated by the faker. You might also want to make sure that you [implement input validation](https://cheatsheetseries.owasp.org/cheatsheets/Input_Validation_Cheat_Sheet.md#goals-of-input-validation). If your database contains a lot of data, consider using the [`OPTIMIZE TABLE` statement](https://mariadb.com/kb/en/optimize-table/) to reduce its size and help improve performance. #### Sanitizing databases: PostgreSQL and Django Databases of live websites often contain personally identifiable information (PII) such as full names, mailing addresses, and phone numbers. To ensure people reviewing code changes can't access information they shouldn't, sanitize your databases of any PII that they may contain. This example goes through the process for a PostgreSQL database using Django. ###### Before you begin You need: - A project with a [PostgreSQL database](https://docs.platform.sh../../add-services/postgresql.md). - A command interface installed: - If doing it manually, the [Platform CLI](https://docs.platform.sh../../administration/cli.md). - Otherwise, make sure ``pqsl`` is installed in your environment. This guide is about sanitizing PostgreSQL databases. This guide doesn't address: - Sanitizing NoSQL Databases (such as [MongoDB](https://docs.platform.sh../../add-services/mongodb.md)) - Input validation and input sanitization, which both help prevent security vulnerabilities ###### Sanitize the database Make sure that you only sanitize preview environments and **never** the production environment. Otherwise you may lose most or even all of the relevant data stored in your database. First, take a [database dump](https://docs.platform.sh../../add-services/postgresql.md#exporting-data) of your preview environment. This is just a safety precaution. Production data isn't altered. To get a database dump, run the following command: ``platform db:dump -e ``. You see output like the following: ```sql {} id | user_email | display_name -----+-----------------------------------------+----------------------- 3501 | daniel02@yourcompany.com | Jason Brown 3502 | ismith@kim.com | Sandra Griffin 3503 | olee@coleman-rodriguez.com | Miss Christine Morgan ``` - Change the fields where PII is contained with the [UPDATE](https://mariadb.com/kb/en/update/). For example, to change the display name of users with an email address not in your company’s domain to a random value, run the following query: ```sql {} UPDATE users SET display_name==substring(md5(display_name||'$PLATFORM_PROJECT_ENTROPY') for 8); WHERE email NOT LIKE '%@yourcompany%' ``` Adapt and run that query for all fields that you need to sanitize. If you modify fields that you shouldn’t alter, [you can restore them](https://docs.platform.sh/environments/restore.md) from the dump you took in step 1. You can create a script to automate the sanitization process to be run automatically on each new deployment. Once you have a working script, add your script to sanitize the database to [a ](https://docs.platform.sh/create-apps/hooks/hooks-comparison.md#deploy-hook): ```yaml {location=".platform.app.yaml"} hooks: deploy: | # ... cd /app/public if [ "$PLATFORM_ENVIRONMENT_TYPE" = production ]; then # Do whatever you want on the production site. else # The sanitization of the database should happen here (since it's non-production) sanitize_the_database.sh fi ``` Assumptions: - ``users`` is the table where all of your PII is stored in the ``staging`` development database. - ``database`` is the relationship name for the PostgreSQL service. Set up a script by following these steps: - Retrieve service credentials from the ``PLATFORM_RELATIONSHIPS`` environment variable to use the ``psql`` command interface. Export these values to a [.environment](https://docs.platform.sh/development/variables/set-variables.md#set-variables-via-script) or include them directly in the sanitization script. ```bash {location=".environment"} # Pull credentials from the PLATFORM_RELATIONSHIPS environment variable. DB_USER=$(echo $PLATFORM_RELATIONSHIPS | base64 --decode | jq -r '.database[0].username') DB_HOST=$(echo $PLATFORM_RELATIONSHIPS | base64 --decode | jq -r '.database[0].host') DB_PORT=$(echo $PLATFORM_RELATIONSHIPS | base64 --decode | jq -r '.database[0].port') DB_PASS=$(echo $PLATFORM_RELATIONSHIPS | base64 --decode | jq -r '.database[0].password') ``` - Create an executable sanitizing script by running the following command: ```bash {} touch sanitize.sh && chmod +x sanitize.sh ``` - Make the script sanitize environments with an [environment type](https://docs.platform.sh/administration/users.md#environment-type-roles) other than ``production``. The following example runs only in preview environments and sanitizes the ``display_name`` and ``email`` columns of the ``users`` table. Adjust the details to fit your data. ```bash {location="sanitize.sh"} #!/usr/bin/env bash if [ "$PLATFORM_ENVIRONMENT_TYPE" != production ]; then # Sanitize data PGPASSWORD=$DB_PASS psql -c "UPDATE users SET display_name=substring(md5(display_name||'$PLATFORM_PROJECT_ENTROPY') for 8);" -U $DB_USER -h $DB_HOST -p $DB_PORT PGPASSWORD=$DB_PASS psql -c "UPDATE users SET email=substring(md5(email||'$PLATFORM_PROJECT_ENTROPY') for 8);" -U $DB_USER -h $DB_HOST -p $DB_PORT fi ``` To sanitize only on the initial deploy and not all future deploys, on sanitization create a file on a [mount](https://docs.platform.sh/create-apps/app-reference/single-runtime-image.md#mounts). Then add a check for the file as in the following example: ```bash {location="sanitize.sh"} #!/usr/bin/env bash if [ "$PLATFORM_ENVIRONMENT_TYPE" != production ] && [ ! -f /is_sanitized ]; then # Sanitize data touch /is_sanitized fi ``` - Update the deploy hook to run your script on each deploy. ```yaml {location=".platform.app.yaml"} hooks: build: ... deploy: | python manage.py migrate bash sanitize.sh ``` - Commit your changes by running the following command: ```bash {} git add .environment sanitize.sh .platform.app.yaml&& git commit -m "Add sanitization." ``` Push the changes to ``staging`` and verify that environment’s database was sanitized. Once merged to production, all data from future preview environments are sanitized on environment creation. ###### What's next You learned how to remove sensitive data from a database. To replace sensitive data that with other meaningful data, you can add a `faker` to the process. A `faker` is a program that generates fake data that looks real. Having meaningful PII-free data allows you to keep your current Q&A, external reviews, and other processes. To add a faker, adapt your sanitizing queries to replace each value that contains PII with a new value generated by the faker. You might also want to make sure that you [implement input validation](https://cheatsheetseries.owasp.org/cheatsheets/Input_Validation_Cheat_Sheet.md#goals-of-input-validation). If your database contains a lot of data, consider using the [`REINDEX` statement](https://www.postgresql.org/docs/current/sql-reindex.md) to help improve performance. #### Sanitizing databases: PostgreSQL and Symfony Databases of live websites often contain personally identifiable information (PII) such as full names, mailing addresses, and phone numbers. To ensure people reviewing code changes can't access information they shouldn't, sanitize your databases of any PII that they may contain. This example goes through the process for a PostgreSQL database using Symfony. ###### Before you begin You need: - A project with a [PostgreSQL database](https://docs.platform.sh../../add-services/postgresql.md). - A command interface installed: - If doing it manually, the [Symfony CLI](https://symfony.com/download). - Otherwise, make sure ``pqsl`` is installed in your environment. This guide is about sanitizing PostgreSQL databases. This guide doesn't address: - Sanitizing NoSQL Databases (such as [MongoDB](https://docs.platform.sh../../add-services/mongodb.md)) - Input validation and input sanitization, which both help prevent security vulnerabilities ###### Sanitize the database Make sure that you only sanitize preview environments and **never** the production environment. Otherwise you may lose most or even all of the relevant data stored in your database. First, take a [database dump](https://docs.platform.sh../../add-services/postgresql.md#exporting-data) of your preview environment. This is just a safety precaution. Production data isn't altered. To get a database dump, run the following command: ``symfony db:dump -e ``. You see output like the following: ```sql {} id | user_email | display_name -----+-----------------------------------------+----------------------- 3501 | daniel02@yourcompany.com | Jason Brown 3502 | ismith@kim.com | Sandra Griffin 3503 | olee@coleman-rodriguez.com | Miss Christine Morgan ``` - Change the fields where PII is contained with the [UPDATE](https://mariadb.com/kb/en/update/). For example, to change the display name of users with an email address not in your company’s domain to a random value, run the following query: ```sql {} UPDATE users SET display_name==substring(md5(display_name||'$PLATFORM_PROJECT_ENTROPY') for 8); WHERE email NOT LIKE '%@yourcompany%' ``` Adapt and run that query for all fields that you need to sanitize. If you modify fields that you shouldn’t alter, [you can restore them](https://docs.platform.sh/environments/restore.md) from the dump you took in step 1. You can create a script to automate the sanitization process to be run automatically on each new deployment. Once you have a working script, add your script to sanitize the database to [a ](https://docs.platform.sh/create-apps/hooks/hooks-comparison.md#deploy-hook): ```yaml {location=".platform.app.yaml"} hooks: deploy: | # ... cd /app/public if [ "$PLATFORM_ENVIRONMENT_TYPE" = production ]; then # Do whatever you want on the production site. else # The sanitization of the database should happen here (since it's non-production) sanitize_the_database.sh fi ``` Assumptions: - An Entity User exist and contains all of your PII (Personally Identifiable Information) - [fakerphp/faker](https://fakerphp.github.io/) has been installed as a dependency on your Symfony application Set up a script by following these steps: - Create a Symfony command to sanitize data ```php {location="src/Command/SanitizeDataCommand.php"} setDescription('This command allows you to sanitize user data (username and email).'); } protected function execute(InputInterface $input, OutputInterface $output) { $io = new SymfonyStyle($input, $output); $users = $this->userRepository->findAll(); $io->progressStart(count($users)); /** @var User $user */ foreach ($users as $user) { $io->progressAdvance(); // initialize faker $faker = Faker\Factory::create(); // sanitize user info $user->setUsername(uniqid($faker->userName())); $user->setEmail($faker->email()); // adapt to your needs $this->entityManager->flush(); } $io->progressFinish(); return static::SUCCESS; } } ``` - Update the deploy hook to run your Symfony Command on each deploy. ```yaml {location=".platform.app.yaml"} hooks: build: ... deploy: | if [ "$PLATFORM_ENVIRONMENT_TYPE" != production ]; then # The sanitization of the database should happen here (since it's non-production) php bin/console app:sanitize-data fi ``` To sanitize only on the initial deploy and not all future deploys, on sanitization create a file on a mount. Then add a check for the file as in the following example: ```yaml {location=".platform.app.yaml"} hooks: build: ... deploy: | if [ "$PLATFORM_ENVIRONMENT_TYPE" != production ] && [ ! -f MOUNT_PATH/is_sanitized ]; then # The sanitization of the database should happen here (since it's non-production) php bin/console app:sanitize-data touch MOUNT_PATH/is_sanitized fi ``` - Commit your changes by running the following command: ```bash {} git add src/Command/SanitizeDataCommand.php .platform.app.yaml && git commit -m "Add sanitization." ``` Push the changes to ``staging`` and verify that environment’s database was sanitized. Once merged to production, all data from future preview environments are sanitized on environment creation. This example show you how to sanitize data on multiple projects inside an organization, except for production environments. Assumptions: - Symfony Command from previous tab ``Using a Symfony Command`` has already been pushed to all of your environments. Set up a script by following these steps: - Create an executable sanitizing script by running the following command: ```bash {} touch sanitize_fleet.sh && chmod +x sanitize_fleet.sh ``` - Make the script sanitize environments with an [environment type](https://docs.platform.sh/administration/users.md#environment-type-roles) other than ``production``. The following example runs only in preview environments and sanitizes data using the Symfony Command from previous tab, already pushed to all of your environments. ```bash {location="sanitize_fleet.sh"} if [ -n "$ZSH_VERSION" ]; then emulate -L ksh; fi ###################################################### # fleet sanitization demo script, using the Symfony CLI. # # Enables the following workflow on a project: # . # └── main # ├── staging # | └── new-feature # └── auto-updates # # Usage # 1. source this script: `. sanitize_fleet.sh` or `source sanitize_fleet.sh` depending of your local machine # 2. define ORGANIZATION var: ORGANIZATION= # 3. run `sanitize_organization_data $ORGANIZATION` ###################################################### # Utility functions. # list_org_projects: Print list of projects operation will be applied to before starting. # $1: Organization, as it appears in console.platform.sh. list_org_projects () { symfony project:list -o $1 --columns="ID, Title" } # get_org_projects: Retrieve an array of project IDs for a given organization. # Note: Makes array variable PROJECTS available to subsequent scripts. # $1: Organization, as it appears in console.platform.sh. get_org_projects () { PROJECTS_LIST=$(symfony project:list -o $1 --pipe) PROJECTS=($PROJECTS_LIST) } # get_project_envs: Retrieve an array of envs IDs for a project. # Note: Makes array variable ENVS available to subsequent scripts. # $1: ProjectId, as it appears in console.platform.sh. get_project_envs () { ENV_LIST=$(symfony environment:list -p $1 --pipe) ENVS=($ENV_LIST) } # list_project_envs: Print list of envs operation will be applied to before starting. # $1: ProjectId, as it appears in console.platform.sh. list_project_envs () { symfony environment:list -p $1 } # add_env_var: Add environment level environment variable. # $1: Variable name. # $2: Variable value. # $3: Target project ID. # $4: Target environment ID. add_env_var () { VAR_STATUS=$(symfony project:curl -p $3 /environments/$4/variables/env:$1 | jq '.status') if [ "$VAR_STATUS" != "null" ]; then symfony variable:create \ --name $1 \ --value "$2" \ --prefix env: \ --project $3 \ --environment $4 \ --level environment \ --json false \ --sensitive false \ --visible-build true \ --visible-runtime true \ --enabled true \ --inheritable true \ -q else printf "\nVariable $1 already exists. Skipping." fi } # Main functions. sanitize_organization_data () { list_org_projects $1 get_org_projects $1 for PROJECT in "${PROJECTS[@]}" do printf "\n### Project $PROJECT." # get environments list list_project_envs $PROJECT get_project_envs $PROJECT for ENVIRONMENT in "${ENVS[@]}" do unset -f ENV_CHECK ENV_CHECK=$(symfony project:curl -p $PROJECT /environments/$ENVIRONMENT | jq -r '.status') unset -f ENV_TYPE ENV_TYPE=$(symfony project:curl -p $PROJECT /environments/$ENVIRONMENT | jq -r '.type') if [ "$ENV_CHECK" = active -a "$ENV_TYPE" != production ]; then unset -f DATA_SANITIZED DATA_SANITIZED=$(symfony variable:get -p $PROJECT -e $ENVIRONMENT env:DATA_SANITIZED --property=value) if [ "$DATA_SANITIZED" != true ]; then printf "\nEnvironment $ENVIRONMENT exists and isn't sanitized yet. Sanitizing data." printf "\n" # do sanitization here symfony ssh -p $PROJECT -e $ENVIRONMENT -- php bin/console app:sanitize-data printf "\nSanitizing data is finished, redeploying" add_env_var DATA_SANITIZED true $PROJECT $ENVIRONMENT else printf "\nEnvironment $ENVIRONMENT exists and doesn't need to be sanitized. skipping." fi elif [ "$ENV_TYPE" == production ]; then printf "\nEnvironment $ENVIRONMENT is production one, skipping." else printf "\nEnvironment $ENVIRONMENT isn't active $ENV_CHECK, skipping." fi done done } ``` - use this shell script Depending on the machine you want to run this script on, adapt this to your needs. ```bash {} . sanitize_fleet.sh # or source sanitize_fleet.sh ORGANIZATION= sanitize_organization_data $ORGANIZATION ``` **Note**: You can find the organization identifier for a specific project, within the Platform.sh console, by clicking on your name, and then on “Settings”, in the top right corner. - [Option] Commit your changes by running the following command: ```bash {} git add sanitize_fleet.sh && git commit -m "Add sanitization." ``` Push the changes to ``staging`` and verify that environment’s database was sanitized. Once merged to production, all data from future preview environments are sanitized on environment creation. ###### What's next You learned how to remove sensitive data from a database. To replace sensitive data that with other meaningful data, you can add a `faker` to the process. A `faker` is a program that generates fake data that looks real. Having meaningful PII-free data allows you to keep your current Q&A, external reviews, and other processes. To add a faker, adapt your sanitizing queries to replace each value that contains PII with a new value generated by the faker. You might also want to make sure that you [implement input validation](https://cheatsheetseries.owasp.org/cheatsheets/Input_Validation_Cheat_Sheet.md#goals-of-input-validation). If your database contains a lot of data, consider using the [`REINDEX` statement](https://www.postgresql.org/docs/current/sql-reindex.md) to help improve performance. ### External Integrations Platform.sh can be integrated with external services. Platform.sh supports native integrations with multiple services, first and foremost Git hosting services such as GitHub, GitLab, or Bitbucket. You can continue to use those tools for your development workflow, and have Platform.sh environments created automatically for your pull requests and branches. You can also add native integrations with performance monitoring tools. Platform.sh recommends [Blackfire](https://docs.platform.sh/increase-observability/integrate-observability//blackfire.md), which is part of the standard Platform.sh Observability Suite. Note that only a project administrator (someone with `admin` level access to the project) can add or remove integrations. See [User administration](https://docs.platform.sh/administration/users.md) for more details. ##### List active integrations With the CLI, you can list all your active integrations using the following command: ```bash platform integrations ``` You get output similar to the following: ```bash +---------------+-------------+-------------------------------------------------------------------------------------+ | ID | Type | Summary | +---------------+-------------+-------------------------------------------------------------------------------------+ | abcdefghijklm | github | Repository: platformsh/platformsh-docs | | | | Hook URL: | | | | https://eu-3.platform.sh/api/projects/123abcdefgh3i/integrations/abcdefghijklm/hook | +---------------+-------------+-------------------------------------------------------------------------------------+ ``` ##### Validate integrations Once your integration has been configured, you can check that it's working as expected. To do so, follow these steps: 1. Run the `platform integration:validate` command. 2. When prompted, select the integration you want to validate: ```bash Enter a number to choose an integration: [0] 5aut2djgt6kdd (health.slack) [1] a6535j9qp4sl8 (github) > 1 ``` You get output similar to: ```bash Validating the integration a6535j9qp4sl8 (type: github)... The integration is valid. ``` ##### Debug integrations When integrations run, they trigger "activities." Activities are actions that happen on Platform.sh, and they get logged. Usually these are triggered nearly instantaneously on the webhook endpoint. These activities may be delayed due to the external services having latency. Those logs are available via the CLI. In most cases they aren't necessary but may be useful for debugging an integration if it is misbehaving for some reason. There are a handful of CLI commands available, all under the `integrations` section. ###### List all activities To list all the updates triggered by [activities](https://docs.platform.sh/integrations/activity/reference.md) on a given project and integration, follow these steps: 1. Run the `platform integration:activities` command. 2. When prompted, select an integration. ```bash Enter a number to choose an integration: [0] dxr45hfldrkoe (webhook) [1] n2ukd4p7qofg4 (health.email) [2] c4opi5tjv3yfd (github) > 2 ``` You get output similar to the following: ```bash Activities on the project Platform.sh | Docs (6b2eocegfkwwg), integration c4opi5tjv3yfd (github): +---------------+---------------------------+-------------------------------------------------------------+----------+---------+ | ID | Created | Description | State | Result | +---------------+---------------------------+-------------------------------------------------------------+----------+---------+ | 6456zmdtoykxa | 2020-04-14T16:38:09-05:00 | Fetching from https://github.com/platformsh/platformsh-docs | complete | success | | wcwp34yjvydgk | 2020-04-14T16:35:22-05:00 | Fetching from https://github.com/platformsh/platformsh-docs | complete | success | | w2bp3oa5xbfoe | 2020-04-14T16:33:13-05:00 | Fetching from https://github.com/platformsh/platformsh-docs | complete | success | | uqqvdyxmcdmsa | 2020-04-14T16:31:45-05:00 | Fetching from https://github.com/platformsh/platformsh-docs | complete | success | | 7x3wefhh4fwqc | 2020-04-14T16:30:36-05:00 | Fetching from https://github.com/platformsh/platformsh-docs | complete | success | | a46aah3ga65gc | 2020-04-14T16:29:46-05:00 | Fetching from https://github.com/platformsh/platformsh-docs | complete | success | | r7erid2jlixgi | 2020-04-14T16:24:50-05:00 | Fetching from https://github.com/platformsh/platformsh-docs | complete | success | | ieufk3vvde5oc | 2020-04-14T16:24:49-05:00 | Fetching from https://github.com/platformsh/platformsh-docs | complete | success | | bc7ghg36ty4ea | 2020-04-14T15:30:17-05:00 | Fetching from https://github.com/platformsh/platformsh-docs | complete | success | | 4qojtv7a6rk2w | 2020-04-14T15:27:26-05:00 | Fetching from https://github.com/platformsh/platformsh-docs | complete | success | +---------------+---------------------------+-------------------------------------------------------------+----------+---------+ ``` You may also specify an integration to display in the command line directly: `platform integration:activities c4opi5tjv3yfd`. The ID is an internal identifier for the activity event. The Description field is an arbitrary string of text produced by the integration code. The State and Result fields indicate if the activity completed successfully, failed for some reason, or is currently in progress. See the `--help` output of the command for more options. ###### Show detailed information on an activity To show detailed information on a specific activity, run the following command: ```bash platform integration:activity:log -t ``` The `-t` option specifies that timestamps must be included in the display of the results. You get output similar to the following: ```bash Integration ID: ceopz5tgj3yfc Activity ID: 6456zmdtoykxa Type: integration.github.fetch Description: Fetching from https://github.com/platformsh/platformsh-docs Created: 2020-04-15T08:44:07-05:00 State: complete Log: [2020-04-15T13:44:17-05:00] Waiting for other activities to complete [2020-04-15T13:46:07-05:00] Fetching from GitHub repository platformsh/platformsh-docs [2020-04-15T13:46:09-05:00] No changes since last fetch [2020-04-15T13:46:09-05:00] [2020-04-15T13:46:09-05:00] Synchronizing branches [2020-04-15T13:46:09-05:00] [2020-04-15T13:46:09-05:00] Synchronizing pull requests [2020-04-15T13:46:59-05:00] [2020-04-15T13:46:59-05:00] W: No changes found, scheduling a retry.. ``` That shows the full output of the activity, including timestamps. That can be especially helpful if trying to determine why an integration isn't behaving as expected. See the `--help` output of the command for more options. If you omit the activity ID (the second random-seeming string), the command will default to the most recent activity recorded. ### Activity scripts Platform.sh supports custom scripts that can fire in response to any activity. These scripts allow you to take arbitrary actions in response to actions in your project, such as when it deploys, when a new branch is created, etc. Check out examples from other users on the Platform.sh [Community site](https://community.platform.sh/c/activity-scripts/10). ##### Installing Activity scripts are configured as integrations. That means they're at the *project level*, not at the level of an individual environment. While you can store the scripts in your Git repository for access, they have no effect there. To install a new activity script, use [`integration:add` command](https://docs.platform.sh/administration/cli/reference.md#integrationadd) from the [Platform.sh CLI](https://docs.platform.sh/administration/cli.md). ```bash platform integration:add --type script --file ./my_script.js ``` That installs and enables the `my_script.js` file as an activity script on the current project. Don't run the `integration:add` command a second time, or it installs a second integration with the same code. ##### Updating To update an existing activity script, follow these steps: 1. Get the activity script's ID by running the following command: ```bash platform integrations ``` This returns something like the following: ```bash +---------------+--------------+--------------+ | ID | Type | Summary | +---------------+--------------+--------------+ | nadbowmhd67do | script | ... | | rcqf6b69jdcx6 | health.email | From: | | | | To: #admins | +---------------+--------------+--------------+ ``` 2. Update the integration by running the following command: ```bash platform integration:update --file ./my_script.js ``` This [`integration:update` command](https://docs.platform.sh/administration/cli/reference.md#integrationupdate) updates the integration in place, permanently overwriting the previous version. 3. Test the activity script update by [triggering a redeployment](https://docs.platform.sh/administration/cli/reference.md#environmentredeploy) with the following command: ```bash platform redeploy ``` ##### Removing To disable an activity script, follow these steps: 1. Get the activity script's ID by running the following command: ```bash platform integrations ``` This returns something like the following: ```bash +---------------+--------------+--------------+ | ID | Type | Summary | +---------------+--------------+--------------+ | nadbowmhd67do | script | ... | | rcqf6b69jdcx6 | health.email | From: | | | | To: #admins | +---------------+--------------+--------------+ ``` 2. [Delete the integration](https://docs.platform.sh/administration/cli/reference.md#integrationdelete) by running the following command: ```bash platform integration:delete ``` ##### Debugging Get activity logs by running the following command: ```bash platform integration:activities ``` Every time your activity script runs it generates a new log entry, including the output from the script. Any output produced by `console.log` is available in the activity log, which is the recommended way to debug scripts. See the [activity log](https://docs.platform.sh/integrations/overview.md#debug-integrations) documentation for further details. To get a more readable output of a variable you're trying to debug, you can make `JSON.stringify` use human-friendly formatting. ```javascript console.log(JSON.stringify(project, null, 2)); ``` ##### Configuring scripts There are many types of activity to which a script could respond. By default, it will activate only after a successful `git push` operation. That trigger is configurable via command line switches when adding or updating a script. For example, to have a script trigger any time an environment is activated or deactivated, run: ```bash platform integration:update --events='environment.activate,environment.deactivate' ``` A complete list of possible events is available in the [Activity script type documentation](https://docs.platform.sh/integrations/activity/reference.md#type). Any of those Activity Script types can be added to the `--events=event1,event2,...` option. Scripts can also trigger only when an action reaches a [given state](https://docs.platform.sh/integrations/activity/reference.md#state), such as `pending`, `in_progress`, `complete`, `cancelled`, or `scheduled`. The default is only when they reach `complete`. To have a script execute when a synchronize action first starts, for example, you would run: ```bash platform integration:update --events=environment.synchronize --states=in_progress ``` It's also possible to restrict scripts to certain environments by name. Most commonly, that's used to have them execute only for your production environment or for all other environments. The following example executes only for backup actions on the `production` environment: ```bash platform integration:update --events=environment.backup --environments=production ``` As a general rule, it's better to have an activity script only execute on the specific events and branches you're interested in rather than firing on all activities and then filtering out undesired use cases in the script itself. ##### Activity script variables Some activities don't have access to [project and environment variables](https://docs.platform.sh/development/variables.md#variable-types). In this case, to avoid hardcoding sensitive variables (such as API tokens) and therefore prevent security breaches, add a variable to your activity script. You can add activity script variables through the Platform.sh CLI. Activity script variables are only visible in the activity script itself, inside the `variables` variable. ###### Add an activity script variable To add a variable to your activity script at the integration level, use the following `POST` request: ```bash POST /api/projects//integrations//variables ``` You get a payload similar to the following: ```json { "name": "string", "attributes": { "property1": "string", "property2": "string" }, "value": "string", "is_json": true, "is_sensitive": true } ``` ###### Delete or patch an activity script variable To delete an activity script variable, use the following `DELETE` request: ``` DELETE /api/projects//integrations//variables ``` You can also patch your activity script variable. To do so, send the same request using the `PATCH` method instead of the `DELETE` one. ###### List an activity script variable To list all your activity script variables at the integration level, use the following `GET` request: ``` GET /api/projects//integrations//variables ``` ##### Available APIs Activity scripts can be written in ES2021 and don't support installing additional packages. There are a series of [utility functions you can reuse](https://docs.platform.sh/integrations/activity/utility.md) as well as the following libraries, APIs, and global variables to facilitate building out custom functionality. ###### `underscore.js` [`Underscore.js`](https://github.com/jashkenas/underscore) is available out-of-the-box to make writing Activity scripts more pleasant. See [Underscore's documentation](https://underscorejs.org/) for available functions and utilities. ###### `activity` Every activity script has a global variable `activity` that contains detailed information about the activity, including embedded, JSON-ified versions of the routes configuration and relevant `.platform.app.yaml` files. The `activity` variable is the same as the [webhook payload](https://docs.platform.sh/integrations/activity/webhooks.md). See the documentation there for details and a complete example. Several of the utility functions below work by pulling out common portions of the `activity` object. ###### `project` The `project` global variable includes information about the project subscription itself. That includes its ID and name, how many users are associated with the project, its SSH public key, and various other values. An example of this object is below: ```json { "attributes": {}, "created_at": "2024-03-15T19:50:09.514267+00:00", "default_domain": null, "description": "", "id": "azertyuiopqsdfghjklm", "owner": "...", "region": "eu-1.platform.sh", "repository": { "client_ssh_key": "ssh-rsa ...", "url": "azertyuiopqsdfghjklm@git.eu-1.platform.sh:kqyhl5f5nuzky.git" }, "status": { "code": "provisioned", "message": "ok" }, "subscription": { "environments": 3, "included_users": 1, "license_uri": "...", "plan": "development", "restricted": false, "storage": 5120, "subscription_management_uri": "...", "suspended": false, "user_licenses": 1 }, "timezone": "Europe/Dublin", "title": "Activity script examples", "updated_at": "2020-04-21T17:15:35.526498+00:00" } ``` ###### Storage API Activity scripts have access to a limited key/value storage API to persist values from one execution to another. The API is similar to the JavaScript `LocalStorage` API. ```javascript // Access the storage API. // It isn't pre-required. var storage = require("storage"); // Retrieve a stored value. If the value isn't set it will return null. var counter = storage.get('counter') || 0; if (counter) { // Generate debug output. console.log("Counter is: " + counter); } // Write a value into the storage. Only string-safe values are supported. // To save an object or array, run JSON.stringify() on it first. storage.set('counter', counter + 1); // Remove a value completely. storage.remove('counter'); // Remove all values in storage, unconditionally. storage.clear(); ``` ###### Fetch API Activity scripts support a modified version of the browser "Fetch API" for issuing HTTP requests. Unlike the typical browser version, however, they only support synchronous requests. That means the return value of `fetch()` is a `Response`, not a `Promise` for one. The returned `Response` is also a bit different: only the `ok`, `status` and `statusText` properties as well as the `text` and `json` methods are available. Note that because of the synchronous nature of our `fetch` implementation, the `Response.text` and `Response.json` methods are also synchronous, so they directly return a `string` and an `object`, respectively. The API is otherwise essentially the same as that [in the MDN Web Docs](https://developer.mozilla.org/en-US/docs/Web/API/Fetch_API/Using_Fetch). For instance, this example sends a GET request every time it executes: ```javascript var resp = fetch("http://example.com/site-deployed"); // The fetch call above being synchronous, we can directly access resp properties. // resp.ok is true if the response was a 2xx, false otherwise. if (!resp.ok) { console.log("Well that didn't work."); } ``` While this example sends a POST request with a JSON string as the body: ```javascript var body = JSON.stringify({ "some": "value", }); var resp = fetch("http://example.com/", { method: "POST", headers: { 'Content-Type': 'application/json', }, body: body, } ) if (!resp.ok) { console.log("Couldn't POST."); } else { // resp.json() is synchronous so this will log an object, not `Promise { }` console.log(resp.json()); } ``` For more `fetch()` options, see the [MDN Web Docs](https://developer.mozilla.org/en-US/docs/Web/API/Fetch_API/Using_Fetch). ###### Cryptographic API A minimalist cryptographic API is also available to activity scripts. Its main use is for signing requests to 3rd party APIs. The `crypto.createHmac()` function allows you to create a secure HMAC hash and digest. ```javascript var h = crypto.createHmac("sha256", "foo"); h.update("bar"); h.digest("hex") ``` * The available hashing functions are `'sha256'`, `'sha1'` and `'md5'` as hashing functions. * The available digest formats are `'base64'`, `'hex'` or `''` (empty). An empty digest will yield a byte string. For example, if you wanted to call an AWS API, you would calculate the signature like so: ```Javascript function HMAC(key, value) { var h = crypto.createHmac("sha256", key); h.update(value); return h.digest(); } var kSecret = "wJalrXUtnFEMI/K7MDENG+bPxRfiCYEXAMPLEKEY"; HMAC(HMAC(HMAC(HMAC("AWS4" + kSecret,"20150830"),"us-east-1"),"iam"),"aws4_request"); ``` > Example taken from the [AWS documentation for signing API requests](https://docs.aws.amazon.com/general/latest/gr/sigv4-calculate-signature.md). #### Activity reference Activities log changes to your project, including when you deploy your app, when you [push code](#push), and when a [cron job is run](#cron). To automate your workflows, you can parse and react to the activity's JSON object through [activity scripts](https://docs.platform.sh/integrations/activity.md). ###### Activity schema Every activity has a corresponding JSON object containing all information for that activity, including timestamps, configuration, and sometimes logs. In practice, you can ignore much of the JSON object's content. The most commonly used values are documented in this reference. The response differs depending on the activity and doesn't always include all fields. ####### Example response The following is a shortened example of a response for an [environment sync activity](https://docs.platform.sh/glossary.md#sync). You can also see [complete examples of responses](#examples). ``` json { "id": "abcdefg123456", ... "created_at": "2022-12-16T14:28:17.890467+00:00", "updated_at": null, "type": "environment.synchronize", "parameters": { ... }, "project": "abcdefgh1234567", "environments": [ "feature" ], "state": "complete", "result": "success", "started_at": "2022-12-16T14:28:18.188888+00:00", "completed_at": "2022-12-16T14:31:48.809068+00:00", "completion_percent": 100, "cancelled_at": null, "timings": { "wait": 0, "build": 0.349, "deploy": 209.986, "execute": 210.508 }, "log": "Building application 'myapp' (runtime type: php:8.2, tree: 9851a01)\n Reusing existing build for this tree ID\n\n...\nRedeploying environment test, as a clone of main\n ...\n Closing all services\n Opening application myapp and its relationships\n Executing deploy hook for application myapp\n ... Environment configuration\n myapp (type: php:8.0, size: S, disk: 2048)\n\n ...", "payload": { ... }, "description": "Cloé Weber synchronized test's **data** from Main", "text": "Cloé Weber synchronized test's **data** from Main", "expires_at": "2023-12-16T14:28:17.890467+00:00" } ``` ####### `id` A unique `id` value to identify the activity itself. ####### `*_at` `created_at`, `started_at`, `updated_at`, `cancelled_at`, `completed_at`, and `expires_at` are all timestamps in UTC. For when a given activity occurred, use `completed_at`. You can use these properties to calculate the duration of the activity. To calculate the timing for steps in the activity, see the [`timings` property](#timings). ####### `parameters` The `parameters` property includes detailed information about what triggered the activity, such as the user, the impacted environment, the git commits, or the cron commands. The response changes based on the activity. ####### `project` The ID of the project in which the activity took place. Use this value to distinguish multiple projects sent the same URL. Different from [`project` activities](#type). ####### `type` The type of the activity in one of the following categories: - [Project](#project-activity-types) - [Environment](#environment-activity-types) - [Integration](#integration-activity-types) - [Maintenance](#maintenance-activity-types) ######## `project` activity types Activities that happened on a given project. The following table presents the possible activity types: | Name | Description | |-----------------------------|------------------------------------------------------------------------------------------------------------------------------------------------------------------------------------------------------------------------------------| | `project.clear_build_cache` | The build cache is cleared. | | `project.create` | A new project is created. | | `project.metrics.enable` | A metric from the [continuous profiling](https://docs.platform.sh/increase-observability.md) has been enabled. | | `project.metrics.update` | A metric from the [continuous profiling](https://docs.platform.sh/increase-observability.md) has been updated. | | `project.metrics.disable` | A metric from the [continuous profiling](https://docs.platform.sh/increase-observability.md) has been disabled. | | `project.modify.title` | The project title has changed. | | `project.variable.create` | A new [project variable](https://docs.platform.sh/administration/web/configure-project.md#variables) has been created. The value is visible only if the variable is not [set as sensitive](https://docs.platform.sh/development/variables/set-variables.md#variable-options). | | `project.variable.delete` | A [project variable](https://docs.platform.sh/administration/web/configure-project.md#variables) has been deleted. | | `project.variable.update` | A [project variable](https://docs.platform.sh/administration/web/configure-project.md#variables) has been modified. | ######## `environment` activity types Activities that happened on an environment. The following table presents the possible activity types: | Name | Description | |--------------------------------------|----------------------------------------------------------------------------------------------------------------------------------------------------------------------------------------------------------------------------------| | `environment.activate` | The environment has been made [active](https://docs.platform.sh/glossary.md#active-environment). | | `environment.backup` | A user triggered a [backup](https://docs.platform.sh/environments/backup.md). | | `environment.backup.delete` | A user deleted a [backup](https://docs.platform.sh/environments/backup.md). | | `environment.branch` | A [new branch](https://docs.platform.sh/environments.md#create-environments) has been created via the CLI, Console, or API. A branch created via Git shows up as `environment.push`. | | `environment.certificate.renewal` | An environment's SSL certificate has been [renewed](https://docs.platform.sh/define-routes/https.md#certificate-renewals). | | `environment.cron` | A [cron job](https://docs.platform.sh/create-apps/app-reference/single-runtime-image.md#crons) has completed. | | `environment.deactivate` | An environment has been made [inactive](https://docs.platform.sh/glossary.md#inactive-environment). | | `environment.delete` | An environment's code was deleted through Git. | | `environment.domain.create` | A new [domain](administration/web/configure-project.md#domains) has been associated with the environment. | | `environment.domain.delete` | A [domain](administration/web/configure-project.md#domains) associated with the environment has been removed. | | `environment.domain.update` | A [domain](administration/web/configure-project.md#domains) associated with the environment has been updated, such as having its SSL certificate modified. | | `environment.initialize` | The [default branch](https://docs.platform.sh/environments.md#default-environment) of the project has just been initialized with its first commit. | | `environment.merge` | An environment was [merged](https://docs.platform.sh/glossary.md#merge) through the CLI, Console, or API. A basic Git merge doesn't trigger this activity. | | `environment.merge-pr` | A Pull Request/Merge Request was merged through the CLI, Console, or API. A basic Git merge doesn't trigger this activity. | | `environment.operation` | A [source operation](https://docs.platform.sh/create-apps/runtime-operations.md) has been triggered | | `environment.pause` | An environment has been [paused](https://docs.platform.sh/environments.md#pause-an-environment). | | `environment.push` | A user [pushed](https://docs.platform.sh/administration/cli/reference.md#environmentpush) code to a branch, either existing or new. | | `environment.redeploy` | An environment was [redeployed](https://docs.platform.sh/administration/cli/reference.md#environmentredeploy). | | `environment.restore` | A user restored a [backup](https://docs.platform.sh/environments/backup.md). | | `environment.resume` | An inactive environment was [resumed](https://docs.platform.sh/environments.md#resume-a-paused-environment) | | `environment.route.create` | A new [route](https://docs.platform.sh/administration/web/configure-environment.md#routes) has been created through the API. Edits made using Git to the `.platform/routes.yaml` file don't trigger this activity. | | `environment.route.delete` | A [route](https://docs.platform.sh/administration/web/configure-environment.md#routes) has been deleted through the API. Edits made using Git to the `.platform/routes.yaml` file don't trigger this activity. | | `environment.route.update` | A [route](https://docs.platform.sh/administration/web/configure-environment.md#routes) has been modified through the API. Edits made using Git to the `.platform/routes.yaml` file don't trigger this activity. | | `environment.source-operation` | A [source operation](https://docs.platform.sh/create-apps/source-operations.md) has been triggered. | | `environment.subscription.update` | The production environment has been resized because the plan has changed. The content of the environment hasn't changed. | | `environment.synchronize` | An environment has had its data and/or code replaced with the data and/or code from its parent environment. | | `environment.update.http_access` | [HTTP access rules](https://docs.platform.sh/administration/web/configure-environment.md#http-access-control) for an environment have been modified. | | `environment.update.restrict_robots` | The option to [hide from search engines](https://docs.platform.sh/environments/search-engine-visibility.md) has been enabled or disabled for an environment. | | `environment.update.smtp` | Email sending has been enabled or disabled for an environment. | | `environment.variable.create` | A [new variable](https://docs.platform.sh/development/variables/set-variables.md#variable-options) has been created. The value is visible only if the variable is not [set as sensitive](https://docs.platform.sh/development/variables/set-variables.md#variable-options). | | `environment.variable.delete` | A [variable](https://docs.platform.sh/development/variables/set-variables.md#variable-options) has been deleted. | | `environment.variable.update` | A [variable](https://docs.platform.sh/development/variables/set-variables.md#variable-options) has been modified. | | `environment_type.access.create` | A [new access](https://docs.platform.sh/administration/users.md#manage-project-access) has been added to the environment | | `environment_type.access.delete` | An [existing access](https://docs.platform.sh/administration/users.md#manage-project-access) to the environment has been deleted | | `environment_type.access.update` | An [existing access](https://docs.platform.sh/administration/users.md#manage-project-access) to the environment has been updated | ######## `integration` activity types Activities that relate to an integration. The following table presents the possible activity types: | Name | Description | |-----------------------------------------------|-----------------------------------------------------------------------------------------------------------------------| | `integration.bitbucket.fetch` | A fetch has been triggered on your [Bitbucket Cloud](https://docs.platform.sh/integrations/source/bitbucket.md#bitbucket-cloud) repository. | | `integration.bitbucket.register_hooks` | An integration hook has been registered with [Bitbucket Cloud](https://docs.platform.sh/integrations/source/bitbucket.md#bitbucket-cloud). | | `integration.bitbucket_server.fetch` | A fetch has been triggered on your [Bitbucket Server](https://docs.platform.sh/integrations/source/bitbucket.md#bitbucket-server) repository. | | `integration.bitbucket_server.register_hooks` | An integration hook has been registered with [Bitbucket Server](https://docs.platform.sh/integrations/source/bitbucket.md#bitbucket-server). | | `integration.github.fetch` | A fetch has been triggered on your [GitHub](https://docs.platform.sh/integrations/source/github.md) repository. | | `integration.gitlab.fetch` | A fetch has been triggered on your [GitLab](https://docs.platform.sh/integrations/source/gitlab.md) repository. | | `integration.health.email` | A [health notification](https://docs.platform.sh/integrations/notifications.md) was sent by email. | | `integration.health.pagerduty` | A [health notification](https://docs.platform.sh/integrations/notifications.md) was sent to PagerDuty. | | `integration.health.slack` | A [health notification](https://docs.platform.sh/integrations/notifications.md) was sent to Slack. | | `integration.health.webhook` | A [health notification](https://docs.platform.sh/integrations/notifications.md) was sent to a webhook. | | `integration.script` | An [activity script](https://docs.platform.sh/integrations/activity.md) has been triggered. | | `integration.webhook` | A [webhook](https://docs.platform.sh/integrations/activity/webhooks.md) was triggered. | ######## `maintenance` activity types Activities that relate to a maintenance. The following table presents the possible types: | Name | Description | |-----------------------|-----------------------------------------------------------| | `maintenance.upgrade` | An upgrade is triggered for API Server and Metrics Server | ####### `environments` An array listing the environments that were involved in the activity. It's usually only a single value representing one environment. ####### `state` The current state of the activity. Its value can be `pending`, `in_progress`, `complete`, `cancelled`, or `scheduled`. ####### `completion_percent` What percentage of the activity is complete. ####### `result` Whether or not the activity completed successfully. If it did, the value is `success`. Note that certain activities, such as deploy hooks, can be marked as successful activities even if some commands failed. ####### `timings` The amount of time required by the activity. It can include the following properties: | Name | Description | |-----------|--------------------------------------------------------------| | `wait` | The delay if a command is set to wait before being executed. | | `build` | The execution time for the build hook. | | `deploy` | The execution time for the deploy hook. | | `execute` | The execution time for your script or cron job. | ####### `log` A human-friendly record of what happened in the activity. The log shouldn't be parsed for data as its structure isn't guaranteed. ####### `description` A short machine-readable description of the activity. ####### `text` A short human-readable description of the activity. ####### `payload` Contains settings and details related to the completed activity. Its content varies based on the activity type. | Name | Description | |-------------------------|---------------------------------------------------------------------------------------------------------------------------------| | `payload.user` | The user that triggered the activity. For details on its properties, see the [`user` payload](#user-payload). | | `payload.environment` | The environment affected by the activity. For details on its properties, see the [`environment` payload](#environment-payload). | | `payload.commits` | A list of changes with their Git metadata. | | `payload.commits_count` | The number of Git commits. | | `payload.deployment` | Information about the deployed environment. For details on its properties, see the [`deployment` payload](#deployment-payload). | | `payload.project` | Information about the project. For details on its properties, see the [`project` payload](#project-payload). | ######## `user` payload Contains information about the Platform.sh user that triggered the activity. | Name | Description | |-----------------------------|---------------------------------------------| | `payload.user.created_at` | The date the user was created. | | `payload.user.display_name` | The user's name in a human-friendly format. | | `payload.user.id` | The user's ID. | | `payload.user.updated_at` | The date the user was last updated. | ######## `environment` payload Contains information about the environment associated with the activity, including its settings, state, and deployment. The following table presents the most notable properties of the environment: | Name | Description | |-------------------------------------|---------------------------------------------------------------------------------------------| | `payload.environment.name` | The environment name. | | `payload.environment.type` | The [environment type](https://docs.platform.sh/administration/users.md#environment-type-roles). | | `payload.environment.head_commit` | The ID of the environment's latest Git commit. | | `payload.environment.edge_hostname` | The URL you should target when setting up a [custom domain](https://docs.platform.sh/domains/steps.md). | Different from [`environment` activities](#type). ######## `project` payload Contains information about the project associated with the activity, including plan details, timezone, and region. The following table presents the most notable properties of the project: | Name | Description | |--------------------------------|------------------------------------------------------------------------------------| | `payload.project.timezone` | Your project's [timezone](https://docs.platform.sh/projects/change-project-timezone.md). | | `payload.project.region` | Your project's [region](https://docs.platform.sh/development/regions.md#regions). | | `payload.project.title` | Your project's name. | | `payload.project.subscription` | All of the details about your project's [plan](https://docs.platform.sh/administration/pricing.md). | Different from [`project` activities](#type). ######## `deployment` payload Contains information about the deployed environment, if one is associated with the activity. The following table presents the most notable properties of the deployment: | Name | Description | |--------------------------------|----------------------------------------------------------------------------------------------------------------------------------------| | `payload.deployment.routes` | All the URLs connected to the environment. The list includes redirects. To exclude redirects, find objects whose `type` is `upstream`. | | `payload.deployment.services` | All the services on your environment. | | `payload.deployment.variables` | All the [variables for the environment](https://docs.platform.sh/development/variables.md). | The `payload.deployment` property includes the configuration extracted from the following sources: - Your [app configuration](https://docs.platform.sh/create-apps.md) - Your [routes](https://docs.platform.sh/define-routes.md) - Your [services](https://docs.platform.sh/add-services.md) ###### Maximum activities and parallelism Project activities are distributed across separate queues, which enables *two* simultaneous activities to occur in parallel across your environments. For a given environment, only one activity can run at a time. Those queues include the following types of activities: | Name | Description | |----------------|------------------------------------------------------------------------------------------------------| | `default` | The most common activities on repositories (pushes, merges) and environments (syncs, redeployments). | | `integrations` | Source and webhook integration activities. | | `backup` | Backup activities. | | `cron` | Cron activities. | Production activities are prioritized across all queues. When an activity for the production environment is triggered, it's placed at the top of the queue. This makes it unlikely that activities on preview environments block activities for the production environment for long, though there may be a temporary wait. ###### Examples The response is often usually long, so the following examples are shortened using ellipses. Remember that the response differs depending on the activity and not all fields are always available. To test responses, [set up a webhook](https://docs.platform.sh/integrations/activity/webhooks.md#setup). ####### Cron When a cron job is triggered, the activity contains all the [job's information](https://docs.platform.sh/create-apps/app-reference/single-runtime-image.md#crons). The following example response was triggered by a setting where the cron is scheduled to run every five minutes (`5 * * * *`) with the command `sleep 60 && echo sleep-60-finished && date` and times out after 86,400 seconds. To get details about the configured cron job, see the `parameters` property: ``` json ... "parameters": { "user": "admin", "cluster": "abcdefgh1234567-main-abcd123", "environment": "main", "application": "myapp", "cron": "saybye", "spec": { "spec": "5 * * * *", "commands": { "start": "sleep 60 && echo sleep-60-finished && date", "stop": null }, "shutdown_timeout": null, "timeout": 86400 } ... ``` The following example shows the full activity response to a cron job: ``` json { "id": "ypalrypnezbye", "_links": { "self": { "href": "https://eu-3.platform.sh/api/projects/abcdefgh1234567/activities/ypalrypnezbye" }, "log": { "href": "/api/projects/abcdefgh1234567/activities/ypalrypnezbye/log" } }, "created_at": "2022-12-13T16:06:08.081312+00:00", "updated_at": null, "type": "environment.cron", "parameters": { "user": "admin", "cluster": "abcdefgh1234567-main-abcd123", "environment": "main", "application": "myapp", "cron": "saybye", "spec": { "spec": "5 * * * *", "commands": { "start": "sleep 60 && echo sleep-60-finished && date", "stop": null }, "shutdown_timeout": null, "timeout": 86400 } }, "project": "abcdefgh1234567", "environments": [ "main" ], "state": "complete", "result": "success", "started_at": "2022-12-13T16:06:08.258090+00:00", "completed_at": "2022-12-13T16:07:09.658339+00:00", "completion_percent": 100, "cancelled_at": null, "timings": { "wait": 0, "execute": 61.244 }, "log": "hello world\nTue Dec 13 16:07:09 UTC 2022", "payload": { "user": { "id": "admin", "created_at": "2022-12-13T16:06:08.066085+00:00", "updated_at": null, "display_name": "Platform.sh Bot" }, "project": { "id": "abcdefgh1234567", "created_at": "2022-03-22T15:47:28.739099+00:00", "updated_at": "2022-12-01T09:42:19.860188+00:00", "attributes": {}, "title": "php-test", "description": "", "owner": "c9926428-44dc-4b10-be03-a26dd43b44c1", "namespace": "platformsh", "organization": "01FF4NBNVMMDWP1NVK0G4EGJW0", "default_branch": "main", "status": { "code": "provisioned", "message": "ok" }, "timezone": "Europe/Dublin", "region": "eu-3.platform.sh", "repository": { "url": "abcdefgh1234567@git.eu-3.platform.sh:abcdefgh1234567.git", "client_ssh_key": "ssh-rsa aaaaaaabbbbbbbcccccccddddddd abcdefgh1234567@platformsh" }, "default_domain": null, "subscription": { "license_uri": "https://accounts.platform.sh/api/v1/licenses/2291467", "plan": "development", "environments": 3, "storage": 5120, "included_users": 1, "subscription_management_uri": "https://console.platform.sh-/users/abcd12345/billing/plan/12345678", "restricted": false, "suspended": false, "user_licenses": 1 } }, "environment": { "id": "main", "created_at": "2022-03-22T15:47:43.750880+00:00", "updated_at": "2022-11-29T16:16:37.085719+00:00", "name": "main", "machine_name": "main-abcd123", "title": "Main", "attributes": {}, "type": "production", "parent": null, "default_domain": null, "clone_parent_on_create": true, "deployment_target": "local", "is_pr": false, "status": "active", "enable_smtp": true, "restrict_robots": true, "edge_hostname": "main-abcd123-abcdefgh1234567.eu-3.platformsh.site", "deployment_state": { "last_deployment_successful": true, "last_deployment_at": "2022-11-29T16:16:37.085609+00:00", "crons": { "enabled": true, "status": "running" } }, "resources_overrides": {}, "last_active_at": "2022-12-13T15:07:10.862854+00:00", "last_backup_at": null, "project": "abcdefgh1234567", "is_main": true, "is_dirty": false, "has_code": true, "head_commit": "6aac318907b50252976c47e4e62ed95d438af0ea", "merge_info": { "commits_ahead": 0, "commits_behind": 0, "parent_ref": null }, "has_deployment": true }, "cron": "saybye" }, "description": "Platform.sh Bot ran cron **saybye**", "text": "Platform.sh Bot ran cron **saybye**", "expires_at": "2023-01-12T16:06:08.081293+00:00" } ``` ####### Push A push activity contains several properties. The `commits` property contains everything related to the Git push that triggered the activity: ``` json ... "commits": [ { "sha": "2bab04e050279ac078d5d34016f5dd9c466e948d", "author": { "email": "cloeweber@example.com", "name": "Cloé Weber", "date": 1671032461 }, "parents": [ "6aac318907b50252976c47e4e62ed95d438af0ea" ], "message": "Add cron" } ], ... ``` The `environment` property contains the settings for the environment that was pushed to: ``` json ... "environment": { "id": "main", "created_at": "2022-03-22T15:47:43.750880+00:00", "updated_at": "2022-11-29T16:16:37.085719+00:00", "name": "main", "machine_name": "main-abcd123", "title": "Main", "attributes": {}, "type": "production", "parent": null, "default_domain": null, "clone_parent_on_create": true, "deployment_target": "local", "is_pr": false, "status": "active", "enable_smtp": true, "restrict_robots": true, "edge_hostname": "main-abcd123-abcdefgh1234567.eu-3.platformsh.site", "deployment_state": { "last_deployment_successful": true, "last_deployment_at": "2022-11-29T16:16:37.085609+00:00", "crons": { "enabled": true, "status": "sleeping" } }, "resources_overrides": {}, "last_active_at": "2022-12-13T16:07:09.788910+00:00", "last_backup_at": null, "project": "abcdefgh1234567", "is_main": true, "is_dirty": false, "has_code": true, "head_commit": "6aac318907b50252976c47e4e62ed95d438af0ea", "merge_info": { "commits_ahead": 0, "commits_behind": 0, "parent_ref": null }, "has_deployment": true }, ... ``` The `deployment` property contains the settings for the deployment, including the [image type](https://docs.platform.sh/create-apps/app-reference/single-runtime-image.md#types) and [resource allocation](https://docs.platform.sh/create-apps/app-reference/single-runtime-image.md#sizes). The following example shows a shortened excerpt of the `deployment` property: ``` json ... "deployment": { "id": "current", "created_at": "2022-03-22T15:48:05.396979+00:00", "updated_at": "2022-12-14T15:41:57.264813+00:00", "cluster_name": "abcdefgh1234567-main-abcd123", "project_info": { "deployment": { "id": "current", "created_at": "2022-03-22T15:48:05.396979+00:00", "updated_at": "2022-12-14T15:41:57.264813+00:00", "cluster_name": "abcdefgh1234567-main-abcd123", "project_info": { "name": "abcdefgh1234567", "settings": { "initialize": { "values": { "initialize": true, "start": false, "base": { "files": [], "profile": "PHP", "config": null, "repository": "https://github.com/platformsh-templates/php.git@master", "title": "PHP" } } }, ... "application_config_file": ".platform.app.yaml", "project_config_dir": ".platform", ... "development_service_size": "S", "development_application_size": "S", "enable_certificate_provisioning": true, "certificate_style": "ecdsa", "certificate_renewal_activity": true, ... "cron_minimum_interval": 5, "cron_maximum_jitter": 20, "concurrency_limits": { "internal": null, "integration": 4, "backup": 2, "cron": 10, "default": 2 }, ... "build_resources": { "cpu": 1, "memory": 2048 }, ... "max_allowed_routes": 50000, "max_allowed_redirects_paths": 50000, "enable_incremental_backups": true, ... } }, ... ``` The following example shows the full activity response to a Git push: ``` json { "id": "a1kz6ffxui7em", "_links": { "self": { "href": "https://eu-3.platform.sh/api/projects/abcdefgh1234567/activities/a1kz6ffxui7em" }, "log": { "href": "/api/projects/abcdefgh1234567/activities/a1kz6ffxui7em/log" } }, "created_at": "2022-12-14T15:41:05.821145+00:00", "updated_at": null, "type": "environment.push", "parameters": { "user": "c9926428-44dc-4b10-be03-a26dd43b44c1", "environment": "main", "old_commit": "6aac318907b50252976c47e4e62ed95d438af0ea", "new_commit": "2bab04e050279ac078d5d34016f5dd9c466e948d" }, "project": "abcdefgh1234567", "environments": [ "main" ], "state": "complete", "result": "success", "started_at": "2022-12-14T15:41:05.969872+00:00", "completed_at": "2022-12-14T15:41:57.635442+00:00", "completion_percent": 100, "cancelled_at": null, "timings": { "wait": 0, "parse_commits": 0.63, "build": 0.506, "deploy": 49.954, "execute": 51.516 }, "log": "Found 1 new commit\n\nBuilding application 'myapp' (runtime type: php:8.0, tree: 9851a01)\n Reusing existing build for this tree ID\n\nProvisioning certificates\n Certificates\n - certificate 5093946: expiring on 2023-02-23 11:09:20+00:00, covering {,www}.main-abcd123-abcdefgh1234567.eu-3.platformsh.site\n\n\nRedeploying environment main\n Preparing deployment\n Closing service myapp\n Opening application myapp and its relationships\n Executing deploy hook for application myapp\n hello world\n\n Opening environment\n Environment configuration\n app (type: php:8.0, size: S, disk: 2048)\n\n Environment routes\n http://main-abcd123-abcdefgh1234567.eu-3.platformsh.site/ redirects to https://main-abcd123-abcdefgh1234567.eu-3.platformsh.site/\n http://www.main-abcd123-abcdefgh1234567.eu-3.platformsh.site/ redirects to https://www.main-abcd123-abcdefgh1234567.eu-3.platformsh.site/\n https://main-abcd123-abcdefgh1234567.eu-3.platformsh.site/ is served by application `myapp`\n https://www.main-abcd123-abcdefgh1234567.eu-3.platformsh.site/ redirects to https://main-abcd123-abcdefgh1234567.eu-3.platformsh.site/\n", "payload": { "user": { "id": "c9926428-44dc-4b10-be03-a26dd43b44c1", "created_at": "2022-12-14T15:40:16.891889+00:00", "updated_at": null, "display_name": "Cloé Weber" }, "environment": { "id": "main", "created_at": "2022-03-22T15:47:43.750880+00:00", "updated_at": "2022-11-29T16:16:37.085719+00:00", "name": "main", "machine_name": "main-abcd123", "title": "Main", "attributes": {}, "type": "production", "parent": null, "default_domain": null, "clone_parent_on_create": true, "deployment_target": "local", "is_pr": false, "status": "active", "enable_smtp": true, "restrict_robots": true, "edge_hostname": "main-abcd123-abcdefgh1234567.eu-3.platformsh.site", "deployment_state": { "last_deployment_successful": true, "last_deployment_at": "2022-11-29T16:16:37.085609+00:00", "crons": { "enabled": true, "status": "sleeping" } }, "resources_overrides": {}, "last_active_at": "2022-12-13T16:07:09.788910+00:00", "last_backup_at": null, "project": "abcdefgh1234567", "is_main": true, "is_dirty": false, "has_code": true, "head_commit": "6aac318907b50252976c47e4e62ed95d438af0ea", "merge_info": { "commits_ahead": 0, "commits_behind": 0, "parent_ref": null }, "has_deployment": true }, "commits": [ { "sha": "2bab04e050279ac078d5d34016f5dd9c466e948d", "author": { "email": "cloeweber@example.com", "name": "Cloé Weber", "date": 1671032461 }, "parents": [ "6aac318907b50252976c47e4e62ed95d438af0ea" ], "message": "Add cron" } ], "commits_count": 1, "deployment": { "id": "current", "created_at": "2022-03-22T15:48:05.396979+00:00", "updated_at": "2022-12-14T15:41:57.264813+00:00", "cluster_name": "abcdefgh1234567-main-abcd123", "project_info": { "name": "abcdefgh1234567", "settings": { "initialize": { "values": { "initialize": true, "start": false, "base": { "files": [], "profile": "PHP", "config": null, "repository": "https://github.com/platformsh-templates/php.git@master", "title": "PHP" } } }, "product_name": "Platform.sh", "product_code": "platformsh", "variables_prefix": "PLATFORM_", "bot_email": "bot@platform.sh", "application_config_file": ".platform.app.yaml", "project_config_dir": ".platform", "use_drupal_defaults": false, "use_legacy_subdomains": false, "development_service_size": "S", "development_application_size": "S", "enable_certificate_provisioning": true, "certificate_style": "ecdsa", "certificate_renewal_activity": true, "development_domain_template": null, "enable_state_api_deployments": true, "temporary_disk_size": null, "cron_minimum_interval": 5, "cron_maximum_jitter": 20, "concurrency_limits": { "internal": null, "integration": 4, "backup": 2, "cron": 10, "default": 2 }, "flexible_build_cache": false, "strict_configuration": true, "has_sleepy_crons": true, "crons_in_git": true, "custom_error_template": null, "app_error_page_template": null, "environment_name_strategy": "name-and-hash", "data_retention": null, "enable_codesource_integration_push": true, "enforce_mfa": false, "systemd": true, "router_gen2": false, "chorus": { "enabled": true, "exposed": true }, "build_resources": { "cpu": 1, "memory": 2048 }, "outbound_restrictions_default_policy": "allow", "self_upgrade": true, "additional_hosts": {}, "max_allowed_routes": 50000, "max_allowed_redirects_paths": 50000, "enable_incremental_backups": true, "sizing_api_enabled": false, "enable_cache_grace_period": true, "enable_zero_downtime_deployments": false, "enable_admin_agent": true, "certifier_url": "https://api.platform.sh/", "centralized_permissions": false, "glue_server_max_request_size": 10 } }, "environment_info": { "name": "main", "is_main": true, "is_production": false, "reference": "refs/heads/main", "machine_name": "main-abcd123", "environment_type": "production" }, "deployment_target": "local", "vpn": null, "http_access": { "is_enabled": true, "addresses": [], "basic_auth": {} }, "enable_smtp": true, "restrict_robots": true, "variables": [ { "name": "php:memory_limit", "value": "512M", "is_sensitive": false } ], "access": [ { "entity_id": "c9926428-44dc-4b10-be03-a26dd43b44c1", "role": "admin" } ], "subscription": { "license_uri": "https://accounts.platform.sh/api/v1/licenses/12345678", "plan": "development", "environments": 3, "storage": 5120, "included_users": 1, "subscription_management_uri": "https://console.platform.sh//-/users/abcd12345/billing/plan/12345678", "restricted": false, "suspended": false, "user_licenses": 1 }, "services": {}, "routes": { "https://main-abcd123-abcdefgh1234567.eu-3.platformsh.site/": { "primary": true, "id": null, "production_url": "https://main-abcd123-abcdefgh1234567.eu-3.platformsh.site/", "attributes": {}, "type": "upstream", "tls": { "strict_transport_security": { "enabled": null, "include_subdomains": null, "preload": null }, "min_version": null, "client_authentication": null, "client_certificate_authorities": [] }, "original_url": "https://{default}/", "restrict_robots": true, "cache": { "enabled": true, "default_ttl": 0, "cookies": [ "*" ], "headers": [ "Accept", "Accept-Language" ] }, "ssi": { "enabled": false }, "upstream": "myapp:http", "redirects": { "expires": "-1s", "paths": {} } }, "https://www.main-abcd123-abcdefgh1234567.eu-3.platformsh.site/": { "primary": false, "id": null, "production_url": "https://www.main-abcd123-abcdefgh1234567.eu-3.platformsh.site/", "attributes": {}, "type": "redirect", "tls": { "strict_transport_security": { "enabled": null, "include_subdomains": null, "preload": null }, "min_version": null, "client_authentication": null, "client_certificate_authorities": [] }, "original_url": "https://www.{default}/", "restrict_robots": true, "to": "https://main-abcd123-abcdefgh1234567.eu-3.platformsh.site/", "redirects": { "expires": "-1s", "paths": {} } }, "http://main-abcd123-abcdefgh1234567.eu-3.platformsh.site/": { "primary": false, "id": null, "production_url": "http://main-abcd123-abcdefgh1234567.eu-3.platformsh.site/", "attributes": {}, "type": "redirect", "tls": { "strict_transport_security": { "enabled": null, "include_subdomains": null, "preload": null }, "min_version": null, "client_authentication": null, "client_certificate_authorities": [] }, "original_url": "http://{default}/", "restrict_robots": true, "to": "https://main-abcd123-abcdefgh1234567.eu-3.platformsh.site/", "redirects": { "expires": "-1s", "paths": {} } }, "http://www.main-abcd123-abcdefgh1234567.eu-3.platformsh.site/": { "primary": false, "id": null, "production_url": "http://www.main-abcd123-abcdefgh1234567.eu-3.platformsh.site/", "attributes": {}, "type": "redirect", "tls": { "strict_transport_security": { "enabled": null, "include_subdomains": null, "preload": null }, "min_version": null, "client_authentication": null, "client_certificate_authorities": [] }, "original_url": "http://www.{default}/", "restrict_robots": true, "to": "https://www.main-abcd123-abcdefgh1234567.eu-3.platformsh.site/", "redirects": { "expires": "-1s", "paths": {} } } }, "webapps": { "myapp": { "resources": null, "size": "AUTO", "disk": 2048, "access": { "ssh": "contributor" }, "relationships": {}, "additional_hosts": {}, "mounts": { "/web/uploads": { "source": "local", "source_path": "uploads" }, "/private": { "source": "local", "source_path": "private" } }, "timezone": null, "variables": {}, "firewall": null, "initial_size": null, "container_profile": null, "instance_count": null, "name": "myapp", "type": "php:8.0", "runtime": {}, "preflight": { "enabled": true, "ignored_rules": [] }, "tree_id": "9851a01081f3c2f943f75f62c38b67f8bc0ec15c", "slug_id": "abcdefgh1234567-app-9851a01081f3c2f943f75f62c38b67f8bc0ec15c-73985064e66fd2299f4b83931cff46891249a964", "app_dir": "/app", "web": { "locations": { "/": { "root": "web", "expires": "-1s", "passthru": "/index.php", "scripts": true, "allow": true, "headers": {}, "rules": {} } }, "move_to_root": false }, "hooks": { "build": "set -e\n", "deploy": "set -e\n", "post_deploy": null }, "crons": { "saybye": { "spec": "5 * * * *", "commands": { "start": "sleep 60 && echo sleep-60-finished && date", "stop": null }, "shutdown_timeout": null, "timeout": 86400 } } } }, "workers": {}, } } }, "description": "Cloé Weber pushed to Main", "text": "Cloé Weber pushed to Main", "expires_at": "2023-12-14T15:41:05.821145+00:00" } ``` #### Utility routines The following utility routines can help simplify common tasks in your activity scripts. They’re free to copy, modify, bend, fold, spindle, and mutilate as needed for your own scripts. They also demonstrate some common patterns for working with the ``activity`` and ``project`` data structures. ###### Route access ```javascript /** * Returns just those routes that point to a valid upstream. * * This method is similar to routes(), but filters out redirect routes that are rarely * useful for app configuration. If desired it can also filter to just those routes * whose upstream is a given application name. To retrieve routes that point to the * current application where the code is being run, use: * * routes = getUpstreamRoutes(applicationName); * * @param {string} [appName] * The name of the upstream app on which to filter, if any. * @return {object} * An object map of route definitions. The generated URLs of the routes are added as a "url" key. */ function getUpstreamRoutes(appName) { return Object.entries(activity.payload.deployment.routes).reduce( (upstreams, [url, route]) => route.type === "upstream" && (!appName || appName === route.upstream.split(":")[0]) ? { ...upstreams, [url]: { ...route, url, }, } : upstreams, {} ); } ``` ```javascript /** * Returns the primary route. * * The primary route is the one marked primary in `.platform/routes.yaml`, or else * the first non-redirect route in that file if none are marked. * * @return {object} * The route definition. The generated URL of the route is added as a "url" key. */ function getPrimaryRoute() { return Object.entries(activity.payload.deployment.routes).reduce( (primary, [url, route]) => route.primary ? { ...route, url, } : primary, {} ); } ``` ```javascript /** * Returns the route definition that has the specified id. * * Note: If no route ID was specified in .platform/routes.yaml then it will not be possible * to look up a route by ID. * * @param {string} id * The ID of the route to load. * @return {object} * The route definition. The generated URL of the route is added as a "url" key. * @throws {Error} * If there is no route by that ID, an exception is thrown. */ function getRoute(id) { const found = Object.entries(activity.payload.deployment.routes).reduce( (foundRoute, [url, route]) => route.id === id ? { ...route, url, } : foundRoute, null ); if (found === null) { throw new Error(`No such route id found: ${id}`); } return found; } ``` #### Example: Discord The following example activity script posts a message to a Discord channel every time it's triggered. To use it, follow these steps: 1. In your Discord administrative interface, [create a new Discord webhook](https://support.discord.com/hc/en-us/articles/228383668-Intro-to-Webhooks). Give it a name and specify the channel where it should post messages. Copy the URL for the webhook. 2. Replace `DISCORD_URL` in the following script with your webhook URL. 3. Paste the code into a `.js` file. 4. Add it as a new [script integration](https://docs.platform.sh/integrations/activity.md#installing). Specify which events should trigger it using the `--events` flag. Optionally specify environments with the `--environments` flag. Now, any activities that meet the events/environment criteria you specified are reported to Discord. Once you have it working, you're free to modify the code below as desired. For more on the message format, see the [Discord webhook API reference](https://discord.com/developers/docs/resources/webhook#execute-webhook). ```javascript /** * Sends a message to Discord. * * To control what events trigger it, use the --events switch in * the Platform.sh CLI. * * @param {string} title * The title of the message block to send. * @param {string} message * The message body to send. */ function sendDiscordMessage(title, message) { const url = DISCORD_URL; const messageTitle = title + (new Date().getDay() === 5) ? " (On a Friday! :calendar:)" : ""; const body = { content: messageTitle, embeds: [ { description: message, }, ], }; const resp = fetch(url, { method: "POST", headers: { "Content-Type": "application/json", }, body: JSON.stringify(body), }); if (!resp.ok) { console.log("Sending Discord message failed: " + resp.body.text()); } } sendDiscordMessage(activity.text, activity.log); ``` Common properties you may want to send to Discord (in the last line of the script) include: - `activity.text`: A brief, one-line statement of what happened. - `activity.log`: The complete build and deploy log output, as it would be seen in the Console log screen. For more properties, see the [activity reference](https://docs.platform.sh/integrations/activity/reference.md). #### Example: Slack The following example activity script posts a message to a Slack channel every time it's triggered. To use it, follow these steps: 1. In your Slack administrative interface, [create a new Slack webhook](https://api.slack.com/messaging/webhooks). You get a URL starting with `https://hooks.slack.com/`. 2. Replace `SLACK_URL` in the following script with your webhook URL. 3. Paste the code into a `.js` file. 4. Add it as a new [script integration](https://docs.platform.sh/integrations/activity.md#installing). Specify which events should trigger it using the `--events` flag. Optionally specify environments with the `--environments` flag. Now, any activities that meet the events/environment criteria you specified are reported to Slack. Once you have it working, you're free to modify the code below as desired. For formatting more complex messages, see the [Slack messaging documentation](https://api.slack.com/messaging/composing/layouts). ```javascript /** * Sends a color-coded formatted message to Slack. * * To control what events trigger it, use the --events switch in * the Platform.sh CLI. * * @param {string} title * The title of the message block to send. * @param {string} message * The message body to send. */ function sendSlackMessage(title, message) { const url = SLACK_URL; const messageTitle = title + (new Date().getDay() === 5) ? " (On a Friday! :calendar:)" : ""; const color = activity.result === "success" ? "#66c000" : "#ff0000"; const body = { attachments: [ { title: messageTitle, text: message, color: color, }, ], }; const resp = fetch(url, { method: "POST", headers: { "Content-Type": "application/json", }, body: JSON.stringify(body), }); if (!resp.ok) { console.log("Sending slack message failed: " + resp.body.text()); } } sendSlackMessage(activity.text, activity.log); ``` Common properties you may want to send to Slack (in the last line of the script) include: - `activity.text`: A brief, one-line statement of what happened. - `activity.log`: The complete build and deploy log output, as it would be seen in the Console log screen. For more properties, see the [activity reference](https://docs.platform.sh/integrations/activity/reference.md). #### Webhooks Webhooks allow you to host a script yourself externally that receives the same payload as an activity script and responds to the same events, but can be hosted on your own server in your own language. ###### Setup ```bash platform integration:add --type=webhook --url= ``` The webhook URL receives a POST message for every activity that's triggered. The message contains complete information about the entire state of the project at that time. It's possible to set the integration to only send certain activity types, or only activities on certain branches. The CLI prompts you to specify which to include or exclude. Leave at the default values to get all events on all environments in a project. For testing purposes, you can generate a URL from a service such as [webhook.site](https://webhook.site/) and use the generated URL as ``. ###### Webhook schema See the [activity script](https://docs.platform.sh/integrations/activity/reference.md) reference for a description of the webhook payload. ###### Validate the integration To verify your integration is functioning properly, run the following [CLI command](https://docs.platform.sh/integrations/overview.md#validate-integrations): ```bash platform integration:validate ``` ### Source integrations You might want to keep your code in a third-party repository that's linked to your Platform.sh project. This means you keep all your workflows where you want and use Platform.sh for deploying. Your Platform.sh project becomes a mirror of your code repository elsewhere. This means you shouldn't push code directly to Platform.sh. Any changes you push directly get overwritten by the integration when changes happen in the third-party repository. #### Integrate with Bitbucket If you have code in a Bitbucket repository, you might want to connect it to a Platform.sh project. This means you can keep your Bitbucket workflows and treat the Bitbucket repository as the source of truth for your code. Your Platform.sh project becomes a mirror of your Bitbucket repository. This means you shouldn't push code directly to Platform.sh. Any changes you push directly get overwritten by the integration when changes happen in the Bitbucket repository. When you set up an integration with Bitbucket, it automates the following processes for you: - Creating a new environment when a branch is created or a pull request is opened. - Rebuilding the environment when new code is pushed to Bitbucket. - Deleting the environment when a pull request is merged. You can set up an integration with either Bitbucket Cloud or a self-hosted [Bitbucket Server](https://confluence.atlassian.com/bitbucketserver/). ###### Before you begin To manage source integrations, you need to be a [project admin](https://docs.platform.sh../../administration/users.md). You also need a Bitbucket Cloud or Bitbucket Server repository with working code. ###### Bitbucket Cloud ####### 1. Create an OAuth consumer To integrate your Platform.sh project with an existing Bitbucket Cloud repository, [create an OAuth consumer](https://support.atlassian.com/bitbucket-cloud/docs/use-oauth-on-bitbucket-cloud/): ![A screenshot of how to setup the Bitbucket OAuth consumer](https://docs.platform.sh/images/integrations/bitbucket/bitbucket-oauth-consumer.svg "0.35") **Note**: Be sure to define the above as a private consumer by checking the **This is a private consumer** box. The **Callback URL** isn't important in this case. You can set it to `http://localhost`. Copy the **Key** and **Secret** for your consumer. ####### 2. Enable the Cloud integration To enable the integration, use either the [CLI](https://docs.platform.sh/administration/cli.md) or the [Console](https://docs.platform.sh/administration/web.md). - ``PROJECT_ID`` is the ID of your Platform.sh project. - ``OWNER/REPOSITORY`` is the name of your repository in Bitbucket. - ``CONSUMER_KEY`` is the key of the [OAuth consumer you created](#1-create-an-oauth-consumer). - ``CONSUMER_SECRET`` is the secret of the [OAuth consumer you created](#1-create-an-oauth-consumer). For example, if your repository is located at ``https://bitbucket.org/platformsh/platformsh-docs``, the command is similar to the following: ```bash {} platform integration:add \ --project abcdefgh1234567 \ --type bitbucket \ --repository platformsh/platformsh-docs \ --key abc123 \ --secret abcd1234 \ ``` - Select the project where you want to enable the integration. - Click **Settings Settings**. - Under **Project settings**, click **Integrations**. - Click **+ Add integration**. - Under **Bitbucket**, click **+ Add**. - Complete the form with: - The repository in the form ``owner/repository`` - The [key and secret you generated](#1-create-an-oauth-consumer) - Check that the other options match what you want. - Click **Add integration**. In both the CLI and Console, you can choose from the following options: | CLI flag | Default | Description | | ---------------- | ------- | ------------------------------------------------------------------------- | | `fetch-branches` | `true` | Whether to mirror and update branches on Platform.sh and create inactive environments from them. When enabled, merging on a Platform.sh isn't possible. That is, merging environments must be done on the source repository rather than on the Platform.sh project. See note below for details related to this flag and synchronizing code from a parent environment. | | `prune-branches` | `true` | Whether to delete branches from Platform.sh that don’t exist in the Bitbucket repository. When enabled, branching (creating environments) must be done on the source repository rather than on the Platform.sh project. Branches created on Platform.sh that are not on the source repository will not persist and will be quickly pruned. Automatically disabled when fetching branches is disabled. | | `build-pull-requests` | `true` | Whether to track all pull requests and create active environments from them, which builds the pull request. | | `resync-pull-requests` | `false` | Whether to sync data from the parent environment on every push to a pull request. | To [keep your repository clean](https://docs.platform.sh/learn/bestpractices/clean-repository.md) and avoid performance issues, make sure you enable both the `fetch-branches` and `prune-branches` options. ####### 3. Validate the integration Verify that your integration is functioning properly [using the CLI](https://docs.platform.sh../overview.md#validate-integrations): ```bash platform integration:validate ``` ######## Add the webhook manually If the integration was added with the correct permissions, the necessary webhook is added automatically. If you see a message that the webhook wasn't added, add one manually. To configure a webhook on a Bitbucket repository, you need to have Admin [user permissions](https://support.atlassian.com/bitbucket-cloud/docs/manage-webhooks/). 1. Get the webhook URL by running this command: `platform integration:get --property hook_url`. 1. Copy the returned URL. 1. Follow the [Bitbucket instructions to create a webhook](https://support.atlassian.com/bitbucket-cloud/docs/manage-webhooks/#Create-webhooks) using the URL you copied. Make sure to update the triggers to include all pull request events except comments and approval. You can now start pushing code, creating new branches, and opening pull requests directly in your Bitbucket repository. Your Platform.sh environments are automatically created and updated. ###### Bitbucket Server ####### 1. Generate a token To integrate your Platform.sh project with a repository on a Bitbucket Server instance, you first need to create an access token associated with your account. [Generate a token](https://confluence.atlassian.com/display/BitbucketServer/HTTP+access+tokens). and give it at least read access to projects and admin access to repositories. Copy the token. ####### 2. Enable the Server integration To enable the integration, use either the [CLI](https://docs.platform.sh/administration/cli.md) or the [Console](https://docs.platform.sh/administration/web.md). - ``PROJECT_ID`` is the ID of your Platform.sh project. - ``OWNER/REPOSITORY`` is the name of the repository in Bitbucket server. - ``BITBUCKET_SERVER_ACCESS_TOKEN`` is the [token you generated](#1-generate-a-token). - ``BITBUCKET_SERVER_URL`` is the base URL for your Bitbucket server. For example, if your repository is located at ``https://example.com/platformsh/platformsh-docs``, the command is similar to the following: ```bash {} platform integration:add \ --project abcdefgh1234567 \ --type bitbucket_server \ --repository platformsh/platformsh-docs \ --username user@example.com \ --token abc123 ``` - Select the project where you want to enable the integration. - Click Settings **Settings**. - Under **Project settings**, click **Integrations**. - Click **+ Add integration**. - Under **Bitbucket server**, click **+ Add**. - Complete the form with: - Your server URL - Your Bitbucket username - The [token you generated](#1-generate-a-token) - The Bitbucket server project name - The repository in the form ``owner/repository`` - Check that the other options match what you want. - Click **Add integration**. In both the CLI and Console, you can choose from the following options: | CLI flag | Default | Description | | ``fetch-branches`` | ``true`` | Whether to mirror and update branches on Platform.sh and create inactive environments from them. | | ``prune-branches`` | ``true`` | Whether to delete branches from Platform.sh that don’t exist in the Bitbucket server repository. Automatically disabled when fetching branches is disabled. | | ``build-pull-requests`` | ``true`` | Whether to track all pull requests and create active environments from them, which builds the pull request. | | ``pull-requests-clone-parent-data`` | ``true`` | Whether to clone data from the parent environment when creating a pull request environment. | To [keep your repository clean ](https://docs.platform.sh/learn/bestpractices/clean-repository.md) and avoid performance issues, make sure you enable both the ``fetch-branches`` and ``prune-branches`` options. ####### 3. Validate the integration Verify that your integration is functioning properly [using the CLI](https://docs.platform.sh../overview.md#validate-integrations): ```bash platform integration:validate ``` ######## Add the webhook manually If the integration was added with the correct permissions, the necessary webhook is added automatically. If you see a message that the webhook wasn't added, add one manually. To configure a webhook on a Bitbucket repository, you need to have Admin [user permissions](https://support.atlassian.com/bitbucket-cloud/docs/manage-webhooks/). 1. Get the webhook URL by running this command: `platform integration:get --property hook_url`. 1. Copy the returned URL. 1. Follow the [Bitbucket instructions to create a webhook](https://confluence.atlassian.com/bitbucketserver076/managing-webhooks-in-bitbucket-server-1026535073.md#ManagingwebhooksinBitbucketServer-creatingwebhooksCreatingwebhooks) using the URL you copied. Send all events except comments and approval. You can now start pushing code, creating new branches, and opening pull requests directly in your Bitbucket repository. Your Platform.sh environments are automatically created and updated. ###### Environment parent and status When a **branch** is created in Bitbucket, an environment is created in Platform.sh with the default branch as its parent. It starts as an [inactive environment](https://docs.platform.sh/glossary.md#inactive-environment) with no data or services. When a **pull request** is opened in Bitbucket, an environment is created in Platform.sh with the pull request's target branch as its parent. It starts as an [active environment](https://docs.platform.sh/glossary.md#active-environment) with a copy of its parent's data. ###### Source of truth When you add an integration, your Bitbucket repository is considered to be the source of truth for the project. Your Platform.sh project is only a mirror of that repository and you can only push commits to Bitbucket. To clone your code, follow these steps: - In the Console, open the project you want to clone. - Click **Code**. - Click **Git**. - Run the command you find using Git. When you do this, you're cloning from your integrated Bitbucket repository, if you have the [appropriate access to do so](https://docs.platform.sh/integrations/source/troubleshoot.md). ####### Sync, fetch, and prune An integration from Bitbucket to Platform.sh establishes that: - Bitbucket is the source of truth, where Git operations occur - Platform.sh is a mirror of that repository - provisioning infrastructure according to configuration, and orchestrating environments according to the branch structure of the Bitbucket repository Actions that take place on Platform.sh don't affect commits on Bitbucket. Because of this, the Bitbucket integration enables both `fetch-branches` (track branches on Bitbucket) and `prune-branches` (delete branches that don't exist on Bitbucket) by default. You can change these settings but it is recommend to keep them. When enabled by default, you are limited by design as to what actions can be performed within the context of a Platform.sh project with a Bitbucket integration: | Action | Observation | Recommendation | | :---------------- | :---------------- | :------- | | Branch from parent | Running [`environment:branch`](https://docs.platform.sh/administration/cli/reference#environmentbranch) with the CLI, or selecting **Branch** in Console produces a new child environment, but it's deleted shortly after automatically. | Contribute to the Bitbucket repository itself by creating a branch and pull request. When the PR has been opened, a new environment will be provisioned for it. | | Merge in parent | Running [`environment:merge`](https://docs.platform.sh/administration/cli/reference#environmentmerge) with the CLI fails locally, and the **Merge** option in Console is not clickable. | Review and merge pull requests and/or branches on the Bitbucket repository. | | Merge into child (sync code) | Running [`environment:synchronize`](https://docs.platform.sh/administration/cli/reference#environmentsynchronize) with the CLI fails locally, and the **Sync** option in Console won't allow me to include `code` in that sync. | Perform the merge locally from a matching branch on Bitbucket. For example, clone the most recent parent (`git pull origin parent-branch`), switch to the pull request branch (`git checkout ga-staging`), and then merge the parent into the current branch (`git merge main`). | ###### Pull request URLs When a pull request is deployed, the integration reports the primary URL for the deployed environment. So you get a link to the deployed environment right in the pull request. If you have multiple routes, ensure the correct one is reported by [specifying the primary route](https://docs.platform.sh/define-routes.md#route-configuration-reference). #### Integrate with GitHub If you have code in a GitHub repository, you might want to connect it to a Platform.sh project. This means you can keep your GitHub workflows and treat the GitHub repository as the source of truth for your code. Your Platform.sh project becomes a mirror of your GitHub repository. This means you shouldn't push code directly to Platform.sh. Any changes you push directly get overwritten by the integration when changes happen in the GitHub repository. When you set up an integration with GitHub, it automates the following processes for you: - Creating a new environment when a branch is created or a pull request is opened. - Rebuilding the environment when new code is pushed to GitHub. - Deleting the environment when a pull request is merged. ###### Before you begin To manage source integrations, you need to be a [project admin](https://docs.platform.sh../../administration/users.md). You also need a GitHub repository with working code. ###### 1. Generate a token To integrate your Platform.sh project with an existing GitHub repository, you need to [generate a new token](https://github.com/settings/tokens/new). You can generate a classic personal access token, or a [fine-grained personal access token](https://github.blog/changelog/2022-10-18-introducing-fine-grained-personal-access-tokens/) for even greater control over the permissions you grant. For the integration to work, your GitHub user needs to have permission to push code to the repository. When you set up or update an integration, it also needs permission to manage its webhooks. This means your user needs to be a repository admin to create the integration. You can remove this permission after setup. Make sure you give your token a description, and set it to "No expiration". If you're generating a classic personal access token, ensure the token has the appropriate scopes based on what you want to do: | Scope | Purpose | | --------------------- | ---------------------------------------------------------------------- | | `admin:repo_hook` | To create webhooks for events in repositories. Always needed. | | `public_repo` | To integrate with public repositories. | | `repo` | To integrate with your private repositories. | | `repo` and `read:org` | To integrate with private repositories in organizations you belong to. | If you're generating a fine-grained personal access token, ensure the token has the right [repository permissions](https://docs.github.com/en/rest/overview/permissions-required-for-fine-grained-personal-access-tokens?apiVersion=2022-11-28) for the integration to work: | Permission | Access level | | ------------------| ----------------| | `Commit statuses` | Read and write | | `Contents` | Read and write | | `Metadata` | Read-only | | `Pull request` | Read and write | | `Webhooks` | Read and write | After you've set the needed scopes or permissions, generate and copy your token. ###### 2. Enable the integration To enable the integration, use either the [CLI](https://docs.platform.sh/administration/cli.md) or the [Console](https://docs.platform.sh/administration/web.md). - ``PROJECT_ID`` is the ID of your Platform.sh project. - ``OWNER/REPOSITORY`` is the name of your repository in GitHub. - ``GITHUB_ACCESS_TOKEN`` is the [token you generated](#1-generate-a-token). - ``GITHUB_URL`` is the base URL for your GitHub server if you self-host. If you use the public ``https://github.com``, omit the ``--base-url`` flag when running the command. For example, if your repository is located at ``https://github.com/platformsh/platformsh-docs``, the command is similar to the following: ```bash {} platform integration:add \ --project abcdefgh1234567 \ --type github \ --repository platformsh/platformsh-docs \ --token abc123 ``` - Select the project where you want to enable the integration. - Click **Settings Settings**. - Under **Project settings**, click **Integrations**. - Click **+ Add integration**. - Under **GitHub**, click **+ Add**. - Add the [token you generated](#1-generate-a-token). - Optional: If your GitHub project isn’t hosted at ``github.com``, enter your GitHub custom domain. - Click **Continue**. - Choose the repository to use for the project. - Check that the other options match what you want. - Click **Add integration**. In both the CLI and Console, you can choose from the following options: | CLI flag | Default | Description | | ---------------- | ------- | ------------------------------------------------------------------------- | | `fetch-branches` | `true` | Whether to mirror and update branches on Platform.sh and create inactive environments from them. When enabled, merging on a Platform.sh isn't possible. That is, merging environments must be done on the source repository rather than on the Platform.sh project. See note below for details related to this flag and synchronizing code from a parent environment. | | `prune-branches` | `true` | Whether to delete branches from Platform.sh that don’t exist in the GitHub repository. When enabled, branching (creating environments) must be done on the source repository rather than on the Platform.sh project. Branches created on Platform.sh that are not on the source repository will not persist and will be quickly pruned. Automatically disabled when fetching branches is disabled. | | `build-pull-requests` | `true` | Whether to track all pull requests and create active environments from them, which builds the pull request. | | `build-draft-pull-requests` | `true` | Whether to also track and build draft pull requests. Automatically disabled when pull requests aren’t built. | | `pull-requests-clone-parent-data` | `true` | Whether to clone data from the parent environment when creating a pull request environment. | | `build-pull-requests-post-merge`| `false` | Whether to build what would be the result of merging each pull request. Turning it on forces rebuilds any time something is merged to the target branch. | To [keep your repository clean](https://docs.platform.sh/learn/bestpractices/clean-repository.md) and avoid performance issues, make sure you enable both the `fetch-branches` and `prune-branches` options. ###### 3. Validate the integration Verify that your integration is functioning properly [using the CLI](https://docs.platform.sh../overview.md#validate-integrations): ```bash platform integration:validate ``` ####### Add the webhook manually If the integration was added with the correct permissions, the necessary webhook is added automatically. If you see a message that the webhook wasn't added, add one manually. To configure a webhook on a GitHub repository, you need to have Admin [user permissions](https://docs.github.com/en/organizations/managing-user-access-to-your-organizations-repositories/repository-roles-for-an-organization#permissions-for-each-role). 1. Get the webhook URL by running this command: `platform integration:get --property hook_url`. 1. Copy the returned URL. 1. In your GitHub repository, click **Settings** > **Webhooks** > **Add webhook**. 1. In the **Payload URL** field, paste the URL you copied. 1. For the content type, select **application/json**. 1. Select **Send me everything**. 1. Click **Add webhook**. You can now start pushing code, creating new branches, and opening pull requests directly in your GitHub repository. Your Platform.sh environments are automatically created and updated. ###### Environment parent and status When a **branch** is created in GitHub, an environment is created in Platform.sh with the default branch as its parent. It starts as an [inactive environment](https://docs.platform.sh/glossary.md#inactive-environment) with no data or services. When a **pull request** is opened in GitHub, an environment is created in Platform.sh with the pull request's target branch as its parent. It starts as an [active environment](https://docs.platform.sh/glossary.md#active-environment) with a copy of its parent's data. ###### Source of truth When you add an integration, your GitHub repository is considered to be the source of truth for the project. Your Platform.sh project is only a mirror of that repository and you can only push commits to GitHub. To clone your code, follow these steps: - In the Console, open the project you want to clone. - Click **Code**. - Click **Git**. - Run the command you find using Git. When you do this, you're cloning from your integrated GitHub repository, if you have the [appropriate access to do so](https://docs.platform.sh/integrations/source/troubleshoot.md). ####### Sync, fetch, and prune An integration from GitHub to Platform.sh establishes that: - GitHub is the source of truth, where Git operations occur - Platform.sh is a mirror of that repository - provisioning infrastructure according to configuration, and orchestrating environments according to the branch structure of the GitHub repository Actions that take place on Platform.sh don't affect commits on GitHub. Because of this, the GitHub integration enables both `fetch-branches` (track branches on GitHub) and `prune-branches` (delete branches that don't exist on GitHub) by default. You can change these settings but it is recommend to keep them. When enabled by default, you are limited by design as to what actions can be performed within the context of a Platform.sh project with a GitHub integration: | Action | Observation | Recommendation | | :---------------- | :---------------- | :------- | | Branch from parent | Running [`environment:branch`](https://docs.platform.sh/administration/cli/reference#environmentbranch) with the CLI, or selecting **Branch** in Console produces a new child environment, but it's deleted shortly after automatically. | Contribute to the GitHub repository itself by creating a branch and pull request. When the PR has been opened, a new environment will be provisioned for it. | | Merge in parent | Running [`environment:merge`](https://docs.platform.sh/administration/cli/reference#environmentmerge) with the CLI fails locally, and the **Merge** option in Console is not clickable. | Review and merge pull requests and/or branches on the GitHub repository. | | Merge into child (sync code) | Running [`environment:synchronize`](https://docs.platform.sh/administration/cli/reference#environmentsynchronize) with the CLI fails locally, and the **Sync** option in Console won't allow me to include `code` in that sync. | Perform the merge locally from a matching branch on GitHub. For example, clone the most recent parent (`git pull origin parent-branch`), switch to the pull request branch (`git checkout ga-staging`), and then merge the parent into the current branch (`git merge main`). | ###### Pull request URLs When a pull request is deployed, the integration reports the primary URL for the deployed environment. So you get a link to the deployed environment right in the pull request. If you have multiple routes, ensure the correct one is reported by [specifying the primary route](https://docs.platform.sh/define-routes.md#route-configuration-reference). #### Integrate with GitLab If you have code in a GitLab repository, you might want to connect it to a Platform.sh project. This means you can keep your GitLab workflows and treat the GitLab repository as the source of truth for your code. Your Platform.sh project becomes a mirror of your GitLab repository. This means you shouldn't push code directly to Platform.sh. Any changes you push directly get overwritten by the integration when changes happen in the GitLab repository. When you set up an integration with GitLab, it automates the following processes for you: - Creating a new environment when a branch is created or a merge request is opened. - Rebuilding the environment when new code is pushed to GitLab. - Deleting the environment when a merge request is merged. ###### Before you begin To manage source integrations, you need to be a [project admin](https://docs.platform.sh../../administration/users.md). You also need a GitLab repository with working code. ###### 1. Generate a token To integrate your Platform.sh project with an existing GitLab repository, generate a [project access token](https://docs.gitlab.com/ee/user/project/settings/project_access_tokens.md#create-a-project-access-token). Ensure the token has the following scopes: - `api` to access your API - `read_repository` to read the repository For the integration to work, your GitLab user needs push access to the repository and to configure a webhook on a GitLab repository, you need to have Maintainer or Owner user permissions. Copy the token. **Note**: To create a project access token, you need to have a [sufficient GitLab license tier](https://docs.gitlab.com/ee/user/project/settings/project_access_tokens.md). If you don’t see **Access Tokens** under **Settings**, upgrade your GitLab tier. Alternatively, you can create a [personal access token](https://docs.gitlab.com/ee/user/profile/personal_access_tokens.md), but that’s attached to a specific user rather than the project as a whole and grants more permissions. ###### 2. Enable the integration To enable the integration, use either the [CLI](https://docs.platform.sh/administration/cli.md) or the [Console](https://docs.platform.sh/administration/web.md). - ``PROJECT_ID`` is the ID of your Platform.sh project. - ``PROJECT/SUBPROJECT`` is the name of your repository in GitLab. - ``GITLAB_ACCESS_TOKEN`` is the [token you generated](#1-generate-a-token). - ``GITLAB_URL`` is the base URL for your GitLab server if you self-host. If you use the public ``https://gitlab.com``, omit the ``--base-url`` flag when running the command. For example, if your repository is located at ``https://gitlab.com/platformsh/platformsh-docs``, the command is similar to the following: ```bash {} platform integration:add \ --project abcdefgh1234567 \ --type gitlab \ --server-project platformsh/platformsh-docs \ --token abc123 ``` - Select the project where you want to enable the integration. - Click **Settings Settings**. - Under **Project settings**, click **Integrations**. - Click **+ Add integration**. - Under **GitLab**, click **+ Add**. - Add the [token you generated](#1-generate-a-token). - Optional: If your GitLab project isn’t hosted at ``gitlab.com``, enter your GitLab custom domain. - Click **Continue**. - Choose the repository to use for the project. - Check that the other options match what you want. - Click **Add integration**. In both the CLI and Console, you can choose from the following options: | CLI flag | Default | Description | | ---------------- | ------- | ------------------------------------------------------------------------- | | `fetch-branches` | `true` | Whether to mirror and update branches on Platform.sh and create inactive environments from them. When enabled, merging on a Platform.sh isn't possible. That is, merging environments must be done on the source repository rather than on the Platform.sh project. See note below for details related to this flag and synchronizing code from a parent environment. | | `prune-branches` | `true` | Whether to delete branches from Platform.sh that don’t exist in the GitLab repository. When enabled, branching (creating environments) must be done on the source repository rather than on the Platform.sh project. Branches created on Platform.sh that are not on the source repository will not persist and will be quickly pruned. Automatically disabled when fetching branches is disabled. | | `build-merge-requests` | `true` | Whether to track all merge requests and create active environments from them, which builds the merge request. | | `build-wip-merge-requests` | `true` | Whether to also track and build draft merge requests. Automatically disabled when merge requests aren’t built. | | `merge-requests-clone-parent-data` | `true` | Whether to clone data from the parent environment when creating a merge request environment. | To [keep your repository clean](https://docs.platform.sh/learn/bestpractices/clean-repository.md) and avoid performance issues, make sure you enable both the `fetch-branches` and `prune-branches` options. ###### 3. Validate the integration Verify that your integration is functioning properly [using the CLI](https://docs.platform.sh../overview.md#validate-integrations): ```bash platform integration:validate ``` ####### Add the webhook manually If the integration was added with the correct permissions, the necessary webhook is added automatically. If you see a message that the webhook wasn't added, add one manually. To configure a webhook on a GitLab repository, you need to have Maintainer or Owner [user permissions](https://docs.gitlab.com/ee/user/permissions.md). 1. Get the webhook URL by running this command: `platform integration:get --property hook_url`. 1. Copy the returned URL. 1. In your GitLab repository, click **Settings** > **Webhooks**. 1. In the **URL** field, paste the URL you copied. 1. Under **Trigger**, select **Push events** and **Merge request events**. 1. Click **Add webhook**. You can now start pushing code, creating new branches, and opening merge requests directly in your GitLab repository. Your Platform.sh environments are automatically created and updated. ###### Environment parent and status When a **branch** is created in GitLab, an environment is created in Platform.sh with the default branch as its parent. It starts as an [inactive environment](https://docs.platform.sh/glossary.md#inactive-environment) with no data or services. When a **merge request** is opened in GitLab, an environment is created in Platform.sh with the merge request's target branch as its parent. It starts as an [active environment](https://docs.platform.sh/glossary.md#active-environment) with a copy of its parent's data. ###### Source of truth When you add an integration, your GitLab repository is considered to be the source of truth for the project. Your Platform.sh project is only a mirror of that repository and you can only push commits to GitLab. To clone your code, follow these steps: - In the Console, open the project you want to clone. - Click **Code**. - Click **Git**. - Run the command you find using Git. When you do this, you're cloning from your integrated GitLab repository, if you have the [appropriate access to do so](https://docs.platform.sh/integrations/source/troubleshoot.md). ####### Sync, fetch, and prune An integration from GitLab to Platform.sh establishes that: - GitLab is the source of truth, where Git operations occur - Platform.sh is a mirror of that repository - provisioning infrastructure according to configuration, and orchestrating environments according to the branch structure of the GitLab repository Actions that take place on Platform.sh don't affect commits on GitLab. Because of this, the GitLab integration enables both `fetch-branches` (track branches on GitLab) and `prune-branches` (delete branches that don't exist on GitLab) by default. You can change these settings but it is recommend to keep them. When enabled by default, you are limited by design as to what actions can be performed within the context of a Platform.sh project with a GitLab integration: | Action | Observation | Recommendation | | :---------------- | :---------------- | :------- | | Branch from parent | Running [`environment:branch`](https://docs.platform.sh/administration/cli/reference#environmentbranch) with the CLI, or selecting **Branch** in Console produces a new child environment, but it's deleted shortly after automatically. | Contribute to the GitLab repository itself by creating a branch and pull request. When the PR has been opened, a new environment will be provisioned for it. | | Merge in parent | Running [`environment:merge`](https://docs.platform.sh/administration/cli/reference#environmentmerge) with the CLI fails locally, and the **Merge** option in Console is not clickable. | Review and merge pull requests and/or branches on the GitLab repository. | | Merge into child (sync code) | Running [`environment:synchronize`](https://docs.platform.sh/administration/cli/reference#environmentsynchronize) with the CLI fails locally, and the **Sync** option in Console won't allow me to include `code` in that sync. | Perform the merge locally from a matching branch on GitLab. For example, clone the most recent parent (`git pull origin parent-branch`), switch to the pull request branch (`git checkout ga-staging`), and then merge the parent into the current branch (`git merge main`). | ###### Merge request URLs When a merge request is deployed, the integration reports the primary URL for the deployed environment. So you get a link to the deployed environment right in the merge request. If you have multiple routes, ensure the correct one is reported by [specifying the primary route](https://docs.platform.sh/define-routes.md#route-configuration-reference). #### Resolve access issues with source integrations If you [add a user](https://docs.platform.sh/administration/users.md#add-a-user-to-a-project) to a Platform.sh project, but you haven’t added them to the remote repository on GitHub, GitLab, or Bitbucket, they can't clone the project locally. That user might try to clone the repository using the CLI with the following command: ```bash platform get ``` In this case, the user gets an error similar to the following: ```txt Failed to connect to the Git repository: git@github.com:organization/repository.git Please make sure you have the correct access rights and the repository exists. ``` ###### Solution: Check external repository access rights To enable the user to clone the repository, grant them the correct access rights for the integrated repository. ### Health notifications Platform.sh can notify you when various events happen on your project, in any environment. At this time the only notification provided is a low disk space warning, but others may be added in the future. To add or modify an integration for a project, you need to be a [project admin](https://docs.platform.sh/administration/users.md#project-roles). ##### Default low-disk email notifications When you create a new project, Platform.sh creates a default [low-disk email notification](#low-disk-warning) for all [project admins](https://docs.platform.sh/administration/users.md#project-roles). ##### Available notifications ###### Low-disk warning Platform.sh monitors disk space usage on all applications and services in your cluster. * When available disk space drops below 20% or 4 GB, whichever is smaller, a warning notification is generated. * When available disk space drops below 10% or 2 GB, whichever is smaller, a critical notification is generated. * When available disk space returns above 20% or 4 GB, whichever is smaller, an all-clear notification is generated. Notifications are generated every 5 minutes, so there may be a brief delay between when the threshold is crossed and when the notification is triggered. ##### Configuring notifications Health notifications can be set up via the [Platform.sh CLI](https://docs.platform.sh/administration/cli.md), through a number of different channels. ###### Email notifications A notification can trigger an email to be sent, from an address of your choosing to one or more addresses of your choosing. You can view an email notification by running `platform integration:get`. ```bash platform integration:get +--------------+---------------+ | Property | Value | +--------------+---------------+ | id | abcdefghijklm | | type | health.email | | role | | | from_address | | | recipients | - '#admins' | +--------------+---------------+ ``` To edit the `recipients` that receive the default email notification, use the `integration:update` command. ```bash platform integration:update abcdefghijklm --recipients you@example.com ``` The `recipients` field may be any valid email address, or one of the following special values. * `#admins` maps to all project admins and up. * `#viewers` maps to everyone with access to the project. To add a new email notification, register a `health.email` integration as follows: ```bash platform integration:add --type health.email --recipients them@example.com --recipients others@example.com ``` You must specify one or more `recipients`, each as its own switch. The default `from-address` points to the "Platform.sh Bot". You can also configure a custom `--from-address`. The `--from-address` is whatever address you want the email to appear to be from. It is completely fine to use the same email address for both `from-address` and `recipients`. Note that depending on the configuration of the recipient mail server (including SPF and DKIM DNS entries) when using a custom `from-address`, the email can be marked as spam or lost. ###### Slack notifications A notification can trigger a message to be posted to a Slack channel via a [Slack app](https://api.slack.com/apps). ####### 1. Optional: Create a Slack app **Note**: If you are already have a Slack app, you can jump to [enabling notifications](#2-enable-notifications). 1. Open the [Slack API website](https://api.slack.com/) and go to **Your apps**. 2. Click **Create an App**. 3. Choose if you want to build your app from scratch, or via [an app manifest](https://api.slack.com/concepts/manifests). 4. Give your app a name. 5. Select a workspace to install your app in. **Note**: If you are not an admin of the selected workspace, request approval to install your app there. 6. Click **Create App**. ####### 2. Enable notifications 1. Open the [Slack API website](https://api.slack.com/) and go to **Your apps**. 2. Go to **Features** > **OAuth & Permissions** in the sidebar. 3. Scroll down to the **Scopes** area and select **User Token Scopes**. 4. Click **Add an OAuth Scope** to add the `chat:write` scope. ![Slack app scopes](https://docs.platform.sh/images/slack/slack-app-scopes.png "0.30") 5. Go to **Settings** > **Install app** in the sidebar. **Note**: If you are not an admin of the workspace, you need to provide a link to install the app into the workspace and onto a channel. Once the app is approved and installed, a **User OAuth Token** is provided in your app settings. Copy the token, and use it in the next step. 6. Using the **User OAuth Token**, run the following command: ```bash platform integration:add --type health.slack --token --channel --project ``` For example, if you want your Slack app to post messages in the `project-notifications` channel, write the channel name in the command as you would reference it within Slack: ```bash platform integration:add --type health.slack ... --channel '#project-notifications' ... ``` 6. When the integration is successfully configured, Platform.sh then sends an initial message to the channel. **Bot users v. Slack apps**: Previously, Platform.sh allowed for the configuration of health notifications sent to Slack via bot users and their associated API tokens. As of June 2024, Slack has deprecated bot users, and integrations must be configured using Slack apps as described above. If you already have defined an integration using a bot user API token, it will continue to work properly, though you should consider upgrading your processes to the above settings to avoid any future retirement. ###### PagerDuty notifications A notification can trigger a message to be sent via PagerDuty, if you are using that service. First, create a new PagerDuty "[integration](https://support.pagerduty.com/docs/services-and-integrations)" that uses the Events API v2. Copy the "Integration Key" as known as the "routing key" for the integration. Now register a `health.pagerduty` integration as follows: ```bash platform integration:add --type health.pagerduty --routing-key YOUR_ROUTING_KEY ``` Any notification will now trigger an alert in PagerDuty. ##### Validate the integration You can then verify that your integration is functioning properly [using the CLI](https://docs.platform.sh/integrations/overview.md#validate-integrations) command ```bash platform integration:validate ``` ### Infrastructure metrics Platform.sh projects are accompanied by live infrastructure metrics that provide an overview of resource usage for environments. Within the Console, metrics can be found for an environment under **Metrics**. The information under **Metrics** shows usage metrics for: [Dedicated Gen 2 environments](https://docs.platform.sh/dedicated-environments/dedicated-gen-2/overview/_index.md): each of the three hosts in your [N+1 configuration](https://docs.platform.sh/dedicated-environments/dedicated-gen-2/overview.md) and their average for the Production environment. Metrics aren't available for other Dedicated Gen 2 environments (such as a staging environment), but are available for Grid environments (such as your preview environments). ![A screenshot of what the metrics dashboard displays for Dedicated Gen 2 environments](https://docs.platform.sh/images/metrics/dg2-dashboard.png "0.45") [Dedicated Gen 3 environments](https://docs.platform.sh/dedicated-environments/dedicated-gen-3/_index.md): each of the three hosts and their average. These metrics are available for all of your Dedicated Gen 3 environments. ![A screenshot of what the metrics dashboard displays for Dedicated Gen 3 environments](https://docs.platform.sh/images/metrics/dg3-dashboard.png "0.45") Grid environments: your service, app, and worker containers. These metrics are available for all of your Grid environments. ![A screenshot of what the metrics dashboard displays for Grid environments](https://docs.platform.sh/images/metrics/grid-metrics-RAM.png "0.45") ##### Default thresholds All of the graphs show color-coded lines for the following thresholds: - Usage up to _100%_ results. - Usage that crosses _80%_ results. - Usage that crosses _90%_ results. - Usage that crosses _50%_ results. On Dedicated Gen 3 and Grid environments, usage that crosses _100%_ will mean that you have crossed into a **burst** state. The burst capability is available for containerized environments and allows a container to get more resources than it's allocated. Burst is considered useful for infrequent activities that cause usage spikes. On the Grid, resources are shared between customers, so these additional resources aren't guaranteed and burst can only be temporary. On Dedicated Gen 3, resources are dedicated to a single customer, but they're shared between services. Therefore, burst is allowed until the dedicated resource usage is exceeded. ###### Recommendations The default thresholds aim to give you an idea of when your hosts/containers are close to running out of resources. The impact differs based on your specific apps and service. ####### Dedicated Gen 2 environments For Dedicated Gen 2 environments, the thresholds are set for each host. If the resources are high and hovering close to the 100% threshold, you might want to consider: * [Optimizing your code](https://docs.platform.sh/increase-observability.md) (if possible) * [Increasing your plan](https://docs.platform.sh/administration/pricing.md) ####### Dedicated Gen 3 environments For Dedicated Gen 3 environments, the thresholds are set for each container. If you have one container in a temporary burst state but your host still has plenty of available resources, it might not be an issue as long as the site is functioning properly. Burst allows your container to use additional resources when they aren't needed elsewhere. If you have a container in a prolonged burst state, you might want to consider: * [Optimizing your code](https://docs.platform.sh/increase-observability.md) * Changing your [app size](https://docs.platform.sh/create-apps/app-reference/single-runtime-image.md#sizes) or [service size](https://docs.platform.sh/add-services.md#size) * [Increasing your plan](https://docs.platform.sh/administration/pricing.md) You can reallocate your existing resources if other containers have resources they aren't using. If you have multiple containers in a burst state, review your configuration or plan size. ####### Grid environments For Grid environments, the thresholds are set for each container. If the resources are high and hovering close to the 100% threshold, you might want to consider: * [Optimizing your code](https://docs.platform.sh/increase-observability.md) (if possible) * Changing your [app size](https://docs.platform.sh/create-apps/app-reference/single-runtime-image.md#sizes) or [service size](https://docs.platform.sh/add-services.md#size) * [Increasing your plan](https://docs.platform.sh/administration/pricing.md) Review your configuration or plan size if your containers are in a prolonged burst state, because burst isn't guaranteed for long periods. If the burst threshold is triggered for short, infrequent activities, it might not be an issue as long as the site is functioning properly. Burst allows your container to use additional resources when they aren't required on the container's host. ##### Time intervals Measurements are taken for each metric every 1 minute. You can select a time frame over which to see these measurements for the entire **Metrics** view. In the primary three views, averages are shown over larger intervals. | View | Time between measurements | Example | | :-------------------------------------------------------------------- | :-------------------------------------------- | :--------------------------- | | The last 15 minutes (*15m*) | 1 minute | 10:00, 10:01, 10:02 | | The last hour (*1hr*) | 1 minute | 10:00, 10:01, 10:02 | | The last 24 hours (*24hr*) for Dedicated and 8 hours (*8hr*) for Grid | 20 minutes for Dedicated, 10 minutes for Grid | 10:00, 10:20, 10:40, 11:00 | To zoom in on smaller intervals, select specific ranges in a graph. The interval between measurements then changes based on the range you choose. | View | Time between measurements | | :----------- | :------------------------ | | < 2 hours | 1 minute | | 2 to 5 hours | 5 minutes | | 5+ hours | 20 minutes | ###### Longer time intervals **Observability Suite** This feature is available as part of the [Observability Suite](https://platform.sh/features/observability-suite/). To add the Observability Suite to your project and take advantage of this feature, [contact Sales](https://platform.sh/contact/). If you have the Observability Suite, you can access historical data for up to 30 days. These data should help you understand trends over time and whether a given measurement is normal, something that occurs occasionally, or a true anomaly. To see data over a given time frame, use the date picker to select the range to display. ##### Deployments Sometimes deployment activities (pushes, merges, syncs) can influence the underlying infrastructure. You don't want to confuse a spike caused by a successful deploy with an issue that needs your attention. To see how deployment activity influences the infrastructure, turn on **Deployments** on your metrics. Each deployment activity appears as a line on each graph corresponding to the time the activity finished. To see information about the deployment activity, hover over the line. To see the build log for a specific deployment activity, click the line. #### Monitor {{% names/dedicated-gen-2 %}} metrics For Dedicated Gen 2 environments, infrastructure metrics report CPU, RAM, and disk space per host and mount point. The graphs differ when the environment has multiple clusters. Metrics are available for Production environments and [Grid environments](https://docs.platform.sh/increase-observability/metrics/grid.md) (such as your preview environments). They aren't available for other Dedicated Gen 2 environments (such as a staging environment). By default, the graphs include all hosts and an average over the hosts. To select metrics for specific hosts, click **Filter**. ![Clicking Filter reveals a list of hosts you can filter](https://docs.platform.sh/images/metrics/DG2-filter-metrics.png "0.4") ###### Host IDs The IDs for the hosts in a list for metrics filtering will *not* match the IDs for interacting with a host, such as for accessing the environment using SSH. For example: | Host ID under **Metrics** | SSH connection string under **Overview** | | :------------------------ | :------------------------------------------------------------------ | | `Host i-04353f1e6f` | `ssh 3.ent-abcde3clusterID-production-qwerty8@ssh.us-4.platform.sh` | | `Host i-04d1ac8319` | `ssh 2.ent-abcde3clusterID-production-qwerty8@ssh.us-4.platform.sh` | | `Host i-0b1e1b96cf` | `ssh 1.ent-abcde3clusterID-production-qwerty8@ssh.us-4.platform.sh` | To get the host ID from an SSH connection, SSH into the host: ```bash ssh 3.ent-abcde3clusterID-production-qwerty8@ssh.us-4.platform.sh ``` You get output similar to the following: ```bash Welcome to Platform.sh. This is environment production-qwerty8 of project abcde3clusterID. abcde3clusterID@i-04d1ac8319f6ab9a6:~$ ``` The relevant string for the host ID is shown after the `@` and before the 7-character string at the end (`f6ab9a6`). In this example, the ID is: `i-04d1ac8319`. You can then match this ID with the one under **Metrics** for your investigations. ###### Multiple clusters Standard Dedicated Gen 2 environments have a single cluster of three hosts, where each additional cluster adds at least three additional hosts to the project. Dedicated Gen 2 environments with two clusters display metrics in two separate groups: one for the web hosts that handle web requests and one for the service hosts that handle database, cache, and other services. ![Metrics split into Web hosts and Service hosts](https://docs.platform.sh/images/metrics/DG2-multiple-clusters.png "0.75") ###### Example of how to read metrics This example should give you an idea of how the metrics appear. Dedicated Gen 2 environments metrics show the resource usage per host within the cluster. This reference project has a single PHP application and three services: MySQL, Redis, and Solr. The metrics below are for a single Production environment. Once you've read the metrics, see [recommendations for action](https://docs.platform.sh/increase-observability/metrics.md#dedicated-gen-2-environments). ![All of the metrics available for a Dedicated Gen 2 environment](https://docs.platform.sh/images/metrics/DG2-how-to-read-metrics.png) ####### CPU The project has 2 virtual CPUs allocated per host, as seen in the upper limit for the CPU metric. ![A closeup of the CPU metrics](https://docs.platform.sh/images/metrics/DG2-CPU.png) ####### RAM RAM measures overall RAM usage, displaying the percentage of the RAM available for each host. For this example, each host has been granted 30.69 GB of memory. 9.3% of that memory has been used. ![A closeup of the RAM metrics](https://docs.platform.sh/images/metrics/DG2-RAM.png) ####### Disk Disk represents the plan space for all services and mounts, which for Dedicated Gen 2 production environments is [50 GB](https://docs.platform.sh/dedicated-environments/dedicated-gen-2/overview.md). This example has the following persistent disk space configured: * App: 14.68 GB for the mount `exports` * MySQL: 9.78 GB * Root (`/`) folder: 58.88 GB ![All of the metrics for disks](https://docs.platform.sh/images/metrics/DG2-disks.png) For each host, you first see metrics for the root (`/`) folder. Utilizing this folder doesn't count against the space set aside for your plan: it's infrastructure disk, including the `/tmp` directory. It's included in the metrics so you can keep track of build artifacts you write to `/tmp` and make sure that they don't get too large and fill up. Next to this space comes the other defined directories: for the MySQL service and the `exports` mount. ![A closeup of the metrics for the MySQL service disk](https://docs.platform.sh/images/metrics/DG2-mysql-disk.png "0.4") #### Monitor {{% names/dedicated-gen-3 %}} metrics Dedicated Gen 3 environments consist of various containers running across dedicated hosts: * App containers: one or more [app containers](https://docs.platform.sh/create-apps.md) * Service containers: zero or more [service containers](https://docs.platform.sh/add-services.md) * Worker containers: zero or more [worker instances](https://docs.platform.sh/create-apps/app-reference/single-runtime-image.md#workers). Infrastructure metrics report CPU, RAM, and disk space for all containers. By default, the graphs include all hosts and an average over the hosts. To select metrics for specific hosts, click **Filter**. ![Clicking Filter reveals a list of hosts you can filter](https://docs.platform.sh/images/metrics/DG3-filter-metrics.png "0.4") The ID numbers for the hosts in the list for filtering match the numbers for interacting with a host, such as for accessing the environment using SSH. ###### Example of how to read metrics This example should give you an idea of how the metrics appear. Dedicated Gen 3 environments metrics show resource usage for each app, service, and worker container across all hosts. This reference project has a single app, two services (PostgreSQL and Redis), and one worker. Once you've read the metrics, see [recommendations for action](https://docs.platform.sh/increase-observability/metrics.md#dedicated-gen-3-environments). ####### App container Metrics graphs for the app container show CPU, RAM, and disk allocation and usage across all hosts. The persistent disk has been configured in the [app configuration](https://docs.platform.sh/create-apps/app-reference/single-runtime-image.md#top-level-properties) at 9.58 GB, while the temporary disk is 49.04 GB. ![All of the metrics for the app container](https://docs.platform.sh/images/metrics/DG3-app-container.png) ####### Service containers Metrics graphs for the service containers show CPU, RAM, and disk allocation and usage across all hosts. ######## PostgreSQL Metrics graphs for the PostgreSQL service container show CPU, RAM, and disk allocation and usage across all hosts. The persistent disk has been configured in the [services configuration](https://docs.platform.sh/add-services.md) as 2.81 GB, while the temporary disk is 49.04 GB. ![All of the metrics for the MySQL container](https://docs.platform.sh/images/metrics/DG3-postgresql.png) ######## Redis Metrics graphs for the Redis service container show CPU, RAM, and disk allocation and usage across all hosts. No persistent disk has been configured for Redis, while the temporary disk is 49.04 GB. ![All of the metrics for the Redis container](https://docs.platform.sh/images/metrics/DG3-redis.png) ####### Worker container Metrics graphs for the Scheduler worker container show CPU, RAM, and disk allocation and usage across all hosts. The persistent disk has been configured in the [app configuration](https://docs.platform.sh/create-apps/app-reference/single-runtime-image.md#top-level-properties) at 9.51 GB, while the temporary disk is 49.04 GB. ![All of the metrics for the Scheduler worker container](https://docs.platform.sh/images/metrics/DG3-worker-container.png) #### Monitor Grid metrics Grid environments consist of: * App containers: one or more [app containers](https://docs.platform.sh/create-apps.md) * Service containers: zero or more [service containers](https://docs.platform.sh/add-services.md) * Worker containers: zero or more [worker instances](https://docs.platform.sh/create-apps/app-reference/single-runtime-image.md#workers). Infrastructure metrics report CPU, RAM, and disk space for app and worker containers and CPU and disk space for service containers. These metrics are available for all of your Grid environments. You can see summaries of the metrics for each container separately in the Console under **Services** for a given environment. The full details are available under **Metrics**. App containers are shown first, with the app name and an image corresponding to the app type. Service containers follow next with the same pattern and worker containers are shown last. You can collapse the graphs by clicking **Hide metrics**. The graphs switch to an overview of the average resource utilization for the selected container. ![How service container metrics look when minimized](https://docs.platform.sh/images/metrics/grid-postgresql-hidden.png "0.65") ###### Start metrics collection To start collecting metrics on Grid environments, you need to redeploy the environment. If a redeploy is required for the specific environment, you see a note in the Console: ![Screenshot showing the text "Your metrics are almost here" and a prompt to redeploy](https://docs.platform.sh/images/metrics/metrics-redeploy-prompt.png "0.3") ###### Example of how to read metrics This example should give you an idea of how the metrics appear. Grid environment metrics show resource usage for each app, service, and worker container. Note that resources are spread across all containers within the project. So the resources you see for a given container don't equal the total resources for the project. This reference project has a single app, two services (PostgreSQL and Redis), and two workers. The plan size for this project is [Medium](https://platform.sh/pricing/). The appropriate resources have been [allocated automatically](https://docs.platform.sh/create-apps/app-reference/single-runtime-image.md#sizes) for each container based on the number and type of containers for this plan size. The graphs show the current average usage in relation to the allocated resources. Once you've read the metrics, see [recommendations for action](https://docs.platform.sh/increase-observability/metrics.md#grid-environments). ####### App container Metrics graphs for the app container show CPU, RAM, and disk allocation and usage. The persistent disk has been configured in the [app configuration](https://docs.platform.sh/create-apps/app-reference/single-runtime-image.md#top-level-properties) at 9.57 GB, while the temporary disk is 7.99 GB. ![All of the metrics for the app container](https://docs.platform.sh/images/metrics/grid-appcontainer.png) By default, the graphs include all instances and an average over the instances. To select metrics for specific instances, click **Filter**. ![Clicking Filter reveals a list of instances you can filter](https://docs.platform.sh/images/metrics/filtering-gen3.png "0.4") ####### Service containers Metrics graphs for the cache service container show CPU, RAM and disk allocation and usage. The temporary disk is 7.99 GB. ![All of the metrics for the Redis container](https://docs.platform.sh/images/metrics/grid-services.png) ######## PostgreSQL Metrics graphs for the PostgreSQL service container show CPU, RAM, disk allocation and usage. The persistent disk has been configured in the [services configuration](https://docs.platform.sh/add-services.md) as 2.81GB, while the temporary disk is 7.99 GB. ![All of the metrics for the PostgreSQL container](https://docs.platform.sh/images/metrics/grid-postgresql-full.png) ####### Worker containers Metrics graphs for the worker container show CPU, RAM, and disk allocation and usage. The persistent disk has been configured in the [app configuration](https://docs.platform.sh/create-apps/app-reference/single-runtime-image.md#top-level-properties) at 9.51 GB, while the temporary disk is 7.99 GB. ![All of the metrics for the worker container](https://docs.platform.sh/images/metrics/grid-workers.png) ### Integrate observability As the **official Platform.sh observability service**, [Blackfire](https://www.blackfire.io/) allows you to best optimize your code. From development to testing, staging, and production, Blackfire offers a unique blend of monitoring and profiling features. Blackfire works integrally with the Platform.sh workflow, offering a smooth user experience. Platform.sh also supports third-party services such as New Relic and Tideways. Note that these third-party services have their own associated cost, are language-specific, and may not be available for all languages.#### Blackfire As the **official Platform.sh observability service**, [Blackfire](https://www.blackfire.io/) helps you improve the performance of your apps at each stage of their lifecycle. With Blackfire's unique Application Performance Monitoring (APM) and Profiling features, you can achieve the following goals: - Avoid performance bottlenecks by proactively identifying issues in your code - Promptly solve identified issues by taking advantage of actionable recommendations - Create performance budgets for critical parts of your app and get alerted of any problem before a change hits your production Blackfire is installed natively on Platform.sh and [works integrally with the Platform.sh workflow](https://www.youtube.com/watch?v=Bq-LFjgD6L0). This results in an effortless setup process and smooth user experience. **Note**: Blackfire.io can be bundled with Enterprise and Elite subscriptions as part of the Observability Suite. To learn more, [contact Sales](https://platform.sh/contact/). All customers can also subscribe to Blackfire separately. ###### Set up Blackfire ####### On a Grid or Dedicated Gen 3 infrastructure If you're using a plan with the [Observability Suite](https://platform.sh/features/observability-suite/), the [Blackfire automated integration](#automated-integration) is enabled on your environments by default. Note that as an Observability Suite user, you can only access your Blackfire environments after you've been granted access to the related Platform.sh project. Therefore, to access your Blackfire environments, make sure you log in using your Platform.sh account. If you have a Dedicated Gen 3 cluster or Grid environments without the Observability suite, you need to enable the integration yourself. To do so, follow these steps: 1. Create a [Blackfire account](https://blackfire.io/signup?target=/login), preferably using your Platform.sh login. 2. In your Blackfire account, create an organization. If you subscribed to Blackfire independently, your organization is automatically activated. If you subscribed to Blackfire through Platform.sh, [ask **Platform.sh** Support](https://console.platform.sh/-/users/~/tickets/open) to activate your organization. 3. In your organization, create an environment. 4. In your environment, click **Settings/Environment Credentials**. 5. Retrieve your Blackfire server ID and server token. 6. Follow [the instructions from the Blackfire documentation](https://blackfire.io/docs/integrations/paas/platformsh). If you're using the [Managed Fastly CDN](https://docs.platform.sh/domains/cdn/managed-fastly.md), it's already configured to operate with Blackfire. If you're using a different [Content Delivery Network (CDN)](https://docs.platform.sh/domains/cdn.md), make sure you [configure it](https://blackfire.io/docs/integrations/proxies/index) to let Blackfire profile the code running on your servers. ####### On Dedicated Gen 2 infrastructure To install Blackfire on your Dedicated Gen 2 environments: 1. Create a [Blackfire account](https://blackfire.io/signup?target=/login), preferably using your Platform.sh login. 2. In your Blackfire account, create an organization. If you subscribed to Blackfire independently, your organization is automatically activated. If you subscribed to Blackfire through Platform.sh, [ask **Platform.sh** Support](https://console.platform.sh/-/users/~/tickets/open) to activate your organization. 3. In your organization, create an environment. 4. In your environment, click **Settings/Environment Credentials**. 5. Retrieve your Blackfire server ID and server token. 6. Send those credentials to [Support](https://console.platform.sh/-/users/~/tickets/open) so they complete the installation. If you're using the [Managed Fastly CDN](https://docs.platform.sh/domains/cdn/managed-fastly.md), it's already configured to operate with Blackfire. If you're using a different [Content Delivery Network (CDN)](https://docs.platform.sh/domains/cdn.md), make sure you [configure it](https://blackfire.io/docs/integrations/proxies/index) to let Blackfire profile the code running on your servers. ####### Automated integration **Observability Suite** This feature is available as part of the [Observability Suite](https://platform.sh/features/observability-suite/). To add the Observability Suite to your project and take advantage of this feature, [contact Sales](https://platform.sh/contact/). The Blackfire automated integration is available for Grid and Dedicated Gen 3 environments. When you create a new environment, it automatically triggers the creation of a Blackfire environment with the same settings. On this Blackfire environment, you have access to [all the features provided by Blackfire](https://www.blackfire.io/features/). This includes monitoring, profiling, alerting, and build-related features. When a Blackfire environment is created based on a Grid environment, user access settings are replicated from the Platform.sh Console to Blackfire. This includes all [access levels](https://blackfire.io/docs/up-and-running/access-management). To access the Blackfire environment, each project user needs a Blackfire account. When a project user doesn't already have a Blackfire account, a new one is automatically created using the user's Platform.sh credentials. You might have Blackfire variables already set on your project. In this case, the existing variables override the settings of the automated integration. Note that to trigger the synchronization of changes to users and their access levels, you need to redeploy the environment. ###### Get started with Blackfire Monitoring Once Blackfire is [set up on your infrastructure](#set-up-blackfire), to start monitoring your environment follow these steps: ####### 1. Activate Blackfire Monitoring If you want to monitor a PHP or Python app, Blackfire Monitoring is available by default on your environments. You only need to [specify which environments](#2-enable-blackfire-monitoring-on-your-environments) you want to monitor. You can override the default behavior and deactivate Blackfire Monitoring by setting a `env:BLACKFIRE_APM_ENABLED` [environment variable](https://docs.platform.sh/development/variables/set-variables.md#create-environment-specific-variables) with a value of `0`. To do so, create the following : ```bash platform variable:create --level environment --prefix env: --name BLACKFIRE_APM_ENABLED --value 0 ``` ####### 2. Enable Blackfire Monitoring on your environments To enable Blackfire Monitoring on your environments, follow these steps: 1. Go to your [organizations list](https://blackfire.io/my/organizations) and select the organization where you want to enable Blackfire monitoring. 2. Click **Organization Monitoring Usage**. ![A screenshot of where to find Organization Monitoring Usage](https://docs.platform.sh/images/integrations/blackfire/blackfire-organization-monitoring.png "0.40") 3. In the **Monitoring Activation** section, enable monitoring on the environments of your choice. ![A screenshot of what's seen in Monitoring Activation](https://docs.platform.sh/images/integrations/blackfire/blackfire-monitoring-activation.png "0.40") For more information on Blackfire monitoring features, see the [Blackfire documentation](https://blackfire.io/docs/monitoring-cookbooks/index). ###### Blackfire Profiling While your code is running, the Blackfire profiler collects deep performance metrics and provides full details and context of your code's behavior. This helps you find the root cause of performance bottlenecks. Blackfire lets you profile your application anywhere it's deployed, including on your local development machines. Using a browser extension or CLI command, you can profile HTTP requests, CLI scripts, Consumers, and Daemons. For more information on Blackfire profiling features, see the [Blackfire documentation](https://blackfire.io/docs/profiling-cookbooks/index). ###### Test the performance of each new deployment Blackfire's native integration with Platform.sh enables you to test your app's performance every time you deploy a branch in production, staging, or development. Follow these steps: 1. Set up the [Blackfire Builds integration](https://blackfire.io/docs/integrations/paas/platformsh#builds-level-production). 2. Optional: set up an [integration with your Git provider](https://blackfire.io/docs/integrations/git/index) and get commit status updates from build reports. 3. To test business-critical use cases, [write scenarios](https://blackfire.io/docs/builds-cookbooks/scenarios). ###### Troubleshooting ####### Bypass your reverse proxy, load balancer or CDN To use [Blackfire profiling](#blackfire-profiling), you need to bypass any reverse proxy, load balancer or [CDN](https://docs.platform.sh/domains/cdn.md) that sits in front of your app. See [how to configure a bypass](https://blackfire.io/docs/reference-guide/reverse-proxies#documentation). ####### Configure your HTTP cache To take advantage of Blackfire features while using the HTTP cache with cookies, allow the `__blackfire` cookie to go through the cache. To do so, add [a configuration](https://docs.platform.sh/define-routes/cache.md#allowing-only-specific-cookies) similar to the following: ```yaml {location=".platform/routes.yaml"} cache: enabled: true cookies: ["/SESS.*/", "__blackfire"] ``` ###### Get support If you're experiencing issues with Blackfire and [troubleshooting](#troubleshooting) information doesn't help, follow these steps: 1. Retrieve [startup errors](#1-retrieve-startup-errors). 2. Retrieve your [Blackfire logs](#2-retrieve-your-blackfire-logs). 3. Send this data to [Blackfire Support](https://support.blackfire.io). ####### 1. Retrieve startup errors To retrieve startup errors, run the following command: ```bash platform ssh -- php -d display_startup_errors=on --ri blackfire ``` ####### 2. Retrieve your Blackfire logs To retrieve your Blackfire logs, follow these steps: 1. On the environment where you're facing issues, create the following [variable](https://docs.platform.sh/development/variables/set-variables.md): ```bash platform variable:create php:blackfire.log_file --value /tmp/blackfire.log ``` 2. To set the verbosity of the logs to level 4 (debug level), create the following variable: ```bash platform variable:create php:blackfire.log_level --value 4 ``` 3. Start a profile or build. 4. To display the logs, run the following command: ```bash platform ssh -- cat /tmp/blackfire.log > blackfire.log ``` After you've retrieved the logs, you can disable them. To do so, run the following commands: ```bash platform variable:delete php:blackfire.log_file platform variable:delete php:blackfire.log_level ``` #### New Relic Platform.sh supports [New Relic application performance monitoring](https://newrelic.com/products/application-monitoring). On a Dedicated Gen 2 cluster Open a [support ticket](https://docs.platform.sh/learn/overview/get-support.md) and let us know what your license key is. Our support team will install it and let you know when it’s complete. On a Grid plan or Dedicated Gen 3 infrastructure On Grid plans and Dedicated Gen 3 infrastructure, configure your project. The configuration for New Relic varies a bit by language. See language-specific instructions: - [Java](https://docs.platform.sh/increase-observability/integrate-observability/new-relic/java.md) - [Node.js](https://docs.platform.sh/increase-observability/integrate-observability/new-relic/nodejs.md) - [PHP](https://docs.platform.sh/increase-observability/integrate-observability/new-relic/php.md) For more languages, see the [New Relic Documentation](https://docs.newrelic.com/docs/agents/). Install the specific agent in the [build hook](https://docs.platform.sh/create-apps/hooks.md). #### Tideways Platform.sh supports [Tideways APM](https://tideways.com/) for PHP. This functionality is only available on PHP 7.0 and later. **Note**: The Tideways upstream is available as a plugin on Platform.sh: - [tideways](https://tideways.com): The bundle proprietary full version of the product and plugins, which the rest of the guide is mostly aimed to cover. ###### Get Started ####### 1. Get your license key Sign up at [Tideways](https://app.tideways.io/register/) and get your license key. ####### 2. Add your license key Add your Tideways license key as a project level variable: ```bash platform variable:create --visible-build false php:tideways.api_key --value '' ``` ####### 3. Enable the Tideways extension Enable the Tideways extension in your `.platform.app.yaml` as follows: ```yaml {location=".platform.app.yaml"} runtime: extensions: - tideways ``` Enabling the extension also activates the Tideways background process. Push the changes to your Platform.sh environment to enable Tideways as follows: ```bash git add .platform.app.yaml git commit -m "Enable Tideways." git push ``` Tideways should now be enabled. Give it a few hours to a day to get a decent set of data before checking your Tideways dashboard. ###### Deployment Integration Tideways integrates with Platform.sh deployment hooks and provides performance comparisons before and after deployments were released. You can find the Platform.sh CLI command to register this hook for your application in Tideways "Application Settings" screen under the section "Exports & Integrations". Here is an example: ```bash platform integration:add --type=webhook ``` ### Consume logs #### Access your logs ###### Activity logs Changes to your environments, such as deployments, cron jobs, and code or variable updates, are each logged as activities. You can access the logs either in the Console or using the [CLI](https://docs.platform.sh/administration/cli/_index.md): - Get a list of activities by running ```bash {} platform activity:list -e ``` Pass the ``--start`` flag to get activities from a specific date in the past. - To see details about the activity’s state and timing, run ```bash {} platform activity:get ``` Where comes from the list in step 1. - Get a log of any given activity by running ```bash {} platform activity:log ``` If a running activity is stuck, you can [cancel the activity](https://docs.platform.sh/environments/cancel-activity.md). ####### Sharing activity logs When trying to identify and resolve failures, it can often help to have another person's perspective. Troubleshoot collaboratively by sharing the logs of specific activities. To share a log, open the log and click Share **Copy URL**. Share specific lines in the log on clicking the line number. To select multiple lines, hold Shift. After selecting multiple lines, hovering on the next unselected line gives you the amount of time that passed between the selected lines. ![An activity log with multiple lines selected showing the duration of part of the activity](https://docs.platform.sh/images/management-console/activity-lines.png "0.5") ###### Container logs Events that occur within an app container are logged within that container. The logs can be written to, but you should do so only with standard logging mechanisms. If your app has its own logging mechanism, use it to write to a dedicated logs [mount](https://docs.platform.sh/create-apps/app-reference/single-runtime-image.md#mounts). To access the logs of various types of events: To get other logs, just replace ``access`` with the [type of log](#types-of-container-logs). To view more lines, use the ``--lines`` flag. - Access the container by running ```bash {} platform ssh -e ``` - Change to the right directory by running ``cd /var/log``. If you’re on a Dedicated Gen 2 cluster, run ```bash {} cd /var/log/platform// ``` - Read the desired log, such as by running ``tail access.log``. All log files are trimmed to 100 MB automatically. If you need larger logs, set up a [cron job](https://docs.platform.sh/create-apps/app-reference/single-runtime-image.md#crons) to upload them to third-party storage. See an example of [uploading logs to Amazon S3](https://gitlab.com/contextualcode/platformsh-store-logs-at-s3) from Contextual Code. ####### Types of container logs | Type | Always present | Description | | ------------- | -------------- | ----------- | | `access` | Yes | The raw access log for the nginx instance running on the container. It doesn't include requests that are redirected or cached by the [router](https://docs.platform.sh/define-routes.md). | | `app` | Yes | All log messages generated by the app including language errors and exceptions. | | `cron` | No | The output of cron jobs. Only exists after a cron job has run. | | `deploy` | No | The output of the [`deploy` hook](https://docs.platform.sh/create-apps/hooks/hooks-comparison.md#deploy-hook). Only exists after a `deploy` hook has run. | | `dns` | Yes | All DNS queries made by processes in the container (such as the app and cron jobs). | | `error` | Yes | nginx-level errors that occur once nginx has fully started such as HTTP errors for missing directories and excluded file types. | | `nginx/error` | No | All nginx startup log messages. Only useful when debugging possible nginx configuration errors. Not currently available using the `platform log` command. | | `php.access` | No | A record of all requests to the PHP service. See [PHP access record format](#php-access-record-format). | | `post-deploy` | No | The output of the [`post_deploy` hook](https://docs.platform.sh/create-apps/hooks/hooks-comparison.md#post-deploy-hook). Only exists after a `post_deploy` hook has run. | ######## PHP access record format The formatting of `php.access.log` is determined by the PHP settings. To determine the format, run the following: ```bash platform ssh cat -n /etc/php/-zts/fpm/php-fpm.conf | grep "access.format" ``` You get a response such as the following: ```bash Connection to ssh.eu.platform.sh closed. access.format = "%{%FT%TZ}t %m %s %{mili}d ms %{kilo}M kB %C%% %{REQUEST_URI}e" ``` See what [each value in this string means](https://www.php.net/manual/en/install.fpm.configuration.php#access-format). ###### Timezones UTC is the default timezone for all logs. #### Forward Platform.sh and Blackfire logs You might use a service to analyze logs from various parts of your fleet. You might want to consolidate all your logs in one place that everyone has access to without needing to grant them access to each project individually. In such cases, forward your logs from Platform.sh and Blackfire to a third-party service. You can use a [service with an integration](#use-a-log-forwarding-integration) or any service that supports a [syslog endpoint](#forward-to-a-syslog-endpoint) or [HTTP endpoint](#forward-to-an-http-endpoint). Log forwarding is available for Grid and Dedicated Gen 3 projects. For Dedicated Gen 2 projects, see how to [log remotely with ](https://docs.platform.sh/dedicated-environments/dedicated-gen-2/overview.md#remote-logging). Logs to `stdout` and `stderr` are forwarded. Logs in files can't be forwarded. To enable log forwarding in a project, you need to be a [project admin](https://docs.platform.sh/administration/users.md). You also need your project to have the capability for log forwarding. To get a price quote, [contact Sales](https://platform.sh/contact/). ###### Use a log forwarding integration Certain services have a specific integration for forwarding logs. If your third-party service isn't supported, you can forward to a [syslog endpoint](#forward-to-a-syslog-endpoint). ####### Integrated third-party services Integrations exist for the following third-party services to enable log forwarding: - [New Relic](https://newrelic.com/) - [Splunk](https://www.splunk.com/) - [Sumo Logic](https://www.sumologic.com/) ####### Enable a log forwarding integration ######## Using the CLI To enable log forwarding for a specific project using the [Platform.sh CLI](https://docs.platform.sh/administration/cli.md), follow the steps for your selected service. View your logs in the **Logs** dashboard. - In Splunk, get an Event Collector token on [Splunk Platform](https://docs.splunk.com/Documentation/Splunk/latest/Data/UsetheHTTPEventCollector#Create_an_Event_Collector_token_on_Splunk_Cloud_Platform) or [Splunk Enterprise](https://docs.splunk.com/Documentation/Splunk/latest/Data/UsetheHTTPEventCollector#Create_an_Event_Collector_token_on_Splunk_Enterprise). - Determine your host, which is the Splunk instance that’s collecting data. - Choose an index name. - Create the integration with the following command: ```bash {} platform integration:add --type splunk --url https://http-inputs..splunkcloud.com/services/collector/event --index --token ``` View your logs in the **Apps->Search & Reporting** dashboard. Filter by the index name to find the relevant events. - In Sumo Logic, [configure an HTTP source](https://help-opensource.sumologic.com/docs/send-data/hosted-collectors/http-source/logs-metrics/#configure-an-httplogs-and-metrics-source). Make sure to copy the Source Category and collector URL. - Create the integration with the following command: ```bash {} platform integration:add --type sumologic --url --category ``` View your logs in the **Log Search** tab. To start forwarding logs, [trigger a redeploy](https://docs.platform.sh/development/troubleshoot.md#force-a-redeploy). ######## In the Console To enable log forwarding for a specific project from the Console, follow these steps: 1. Navigate to your project. 2. Click Settings **Settings**. 3. Click **Integrations**. 4. Click **Add Integration**. 5. Select the integration you want to enable. 6. In the **Configure your integration** window, specify your configuration options. 7. Click **Add Integration**. The new integration overview is displayed, and you can view your logs in the **Activity** section. ###### Forward to a syslog endpoint Syslog is a standard protocol for transferring log messages. Many third-party services offer endpoints for ingesting syslog events. You can forward your Platform.sh and Blackfire logs to any of those endpoints. ``type``, ``syslog-host``, and ``syslog-port`` are the only properties required for all endpoints. The following table shows the other available properties: | Property | Type | Default | Description | | ``auth-token`` | ``string`` | | The token to authenticate with the given service. | | ``auth-mode`` | ``string`` | ``prefix`` | The mode for authentication with the given service. Can be ``prefix`` or ``structured_data``. Defaults to ``prefix``. | | ``facility`` | ``string`` | ``1`` (user) | A [syslog facility code](https://en.wikipedia.org/wiki/Syslog#Facility) to attach with each log to identify the source. Can be a number from 0 to 23. | | ``message-format`` | ``string`` | ``rfc5424`` | The standard to use for the message format. Can be ``rfc5424`` or ``rfc3164``. | | ``protocol`` | ``string`` | ``tls`` | The network protocol to use in the connection. Can be one of ``tls``, ``tcp``, or ``udp``. Defaults to ``tls``. | | ``verify-tls`` | ``boolean`` | ``true`` | Whether to verify Transport Layer Security (TLS) certification when using the TLS protocol. | To include a property, add it as a flag, for example ``--protocol tcp``. This should let you connect to any service that has syslog endpoints. To start forwarding logs, once you’ve added the service [trigger a redeploy](https://docs.platform.sh/development/troubleshoot.md#force-a-redeploy). To enable log forwarding to a syslog endpoint for a specific project using the [Platform.sh CLI](https://docs.platform.sh/administration/cli.md), follow these steps: - Navigate to your project. - Click Settings **Settings**. - Click **Integrations**. - Click **Add Integration**. - Select the syslog integration. - In the **Configure your integration** window, specify your configuration options. - Click **Add Integration**. The new integration overview is displayed, and you can view your logs in the **Activity** section. ###### Forward to an HTTP endpoint Some third-party services, such as [Elasticsearch](https://docs.platform.sh/add-services/elasticsearch.md) and [OpenSearch](https://docs.platform.sh/add-services/opensearch.md), support ingesting log messages through an HTTP endpoint. You can use HTTP forwarding to forward Platform.sh and Blackfire logs to such third-party services. HTTP forwarding makes a `POST` HTTP request with an `application/json` body while forwarding the log messages to the endpoint. As an example, to forward logs to Elasticsearch using HTTP log forwarding, run the following command: ``` platform integration:add --type httplog --url "https:////_doc" --header "Authorization: Basic " --header "Content-Type: application/json" ``` `type` and `url` are the only properties required for all endpoints. Optionally, you can use the `headers` property to pass additional headers in the HTTP requests. Note that if your endpoint URL includes a `PORT`, that can also be included in the `--url` flag: ``` platform integration:add --type httplog --url "https://://_doc" --header "Authorization: Basic " --header "Content-Type: application/json" ``` Once you've [added the service](https://docs.platform.sh/add-services.md), to start forwarding logs [trigger a redeploy](https://docs.platform.sh/development/troubleshoot.md#force-a-redeploy). ###### Log levels Your app may output logs with distinct severity levels. But as Plaform.sh only reads logs from `stdout`, this distinction is lost and everything gets logged at `INFO` level. To preserve the original log level, use a language-specific syslog module/package for logging. The following example code snippets show how logs can be written to Syslog: Using the logging module: ```python {} import logging import logging.handlers logger = logging.getLogger(__name__) logger.setLevel(logging.DEBUG) handler = logging.handlers.SysLogHandler(address="/dev/log") logger.addHandler(handler) logger.info("Operation started") logger.error("Operation failed") ``` Using the Syslog module: ```python {} import syslog syslog.openlog(logoption=syslog.LOG_PID, facility=syslog.LOG_LOCAL0) syslog.syslog(syslog.LOG_INFO, "Operation started") syslog.syslog(syslog.LOG_ERR, "Operation failed") syslog.closelog() ``` Using the log package: ```go {} package main import ( "log" "log/syslog" ) func main() { logger, err := syslog.NewLogger(syslog.LOG_LOCAL0|syslog.LOG_INFO, log.LstdFlags) if err != nil { panic(err) } logger.Println("Operation started...") logger.Fatalln("Operation failed") } ``` Using the Syslog package: ```go {} package main import ( "fmt" "log" "log/syslog" ) func main() { syslogWriter, err := syslog.Dial("", "", syslog.LOG_LOCAL0|syslog.LOG_INFO, "") if err != nil { log.Fatal(err) } defer syslogWriter.Close() fmt.Fprintf(syslogWriter, "Operation has started") syslogWriter.Err("Operation failed") } ``` #### Forward your Fastly CDN logs When you use a Fastly Content delivery network (CDN), [forwarding your CDN logs](https://docs.fastly.com/en/guides/about-fastlys-realtime-log-streaming-features) to a third-party service can help you diagnose caching issues, and therefore improve your site's overall performance. To enable log forwarding on your Fastly CDN, follow these directions: - If you've subscribed to [Fastly through Platform.sh](https://docs.platform.sh/domains/cdn/managed-fastly.md), [contact Support](https://console.platform.sh/-/users/~/tickets/open). - If you've subscribed to Fastly independently, see the official [Fastly documentation](https://developer.fastly.com/reference/api/logging/). ### Back up an environment When you're making changes to your apps, you want to be sure those changes only improve things and don't make you lose any data. You also want to have a disaster recovery plan in place. Backups help you protect yourself against potential data loss. You might want to create backups of your live environment before merging a different environment into it or each time you increase the storage space of your services. You also have regularly scheduled automated backups of your production environments to cover most cases. You can only create backups and restore active environments. To work with an [inactive environment](https://docs.platform.sh/glossary.md#inactive-environment), first activate it. ##### How backup and restore works 1. As an [admin user](https://docs.platform.sh/administration/users.md), you can do a backup of your environment. This backup includes the complete data and code of the environment. All persistent data from all running [services](https://docs.platform.sh/add-services.md) and any files stored on [mounts](https://docs.platform.sh/create-apps/app-reference/single-runtime-image.md#mounts) are included. The backup is stored internally on Platform.sh. That is, the backup can be applied to environments on Platform.sh, but it can't be downloaded. If you need to download backups, instead [export your mount and service data](https://docs.platform.sh/learn/tutorials/exporting.md)). 2. You restore your environment using the backup. At this point, the data and code from the backup are restored to ensure a consistent state. The latest code in your repository may have been modified such that it no longer works correctly with the old, restored data. **Warning**: Platform.sh does not modify your Git repository. Any further changes you make use the latest code in your repository. 3. Depending on your needs, you can do the following: a) To use the code from the time of the backup as a baseline for future changes, make sure you restore it yourself in your Git repository. To do so, use Git commands such as `revert`. b) To use your latest code instead, just redeploy your environment or push a new change. ##### Backups and downtime By default, creating a manual backup causes a momentary pause in site availability so that all requests can complete. This means the environment is backed up in a known consistent state. The total interruption is usually only 15 to 30 seconds. Any requests during that time are held temporarily, not dropped. To avoid this downtime, use [live backups](#live-backups). For consistent backups, create the backups during non-peak hours for your site. ##### Retention For information on how long backups are retained, see the [data retention policy](https://docs.platform.sh/security/data-retention.md). ##### Backup schedule Backups for Dedicated environments have a [specific frequency](https://docs.platform.sh/dedicated-environments/dedicated-gen-2/environment-differences.md#backups). On Grid environments, preview environments can have up to 2 [manual backups](#create-a-manual-backup). The number of available backups for Production environments depends on your schedule. | Schedule | Manual backups | Automated backups | |----------|----------------|------------------------------------------------------------------------| | Basic | 2 | 2 daily backups (1 backup for each of the last 2 days) | | Advanced | 4 | 21 backups: - 6 daily backups (1 backup for each of the last 6 days) - 3 weekly backups (1 backup for each of the last 3 weeks) - 12 monthly backups (1 backup for each of the last 12 months) | | Premium | 4 | 44 backups: - 3 backups for the last 24 hours - 30 daily backups (1 backup for each of the last 30 days) - 11 monthly backups (1 backup for each of the last 11 months) | Note that [backup retention](https://docs.platform.sh/security/data-retention.md#grid-backups) also depends on your schedule. The schedules available to you depend on your [tier](https://platform.sh/pricing/). | Tier | Default schedule | Possible upgrade | | ---------------- | ---------------- | ---------------- | | Professional | Basic | Advanced | | Enterprise/Elite | Advanced | Premium | An upgrade comes at an additional cost. The exact cost depends on the size of your storage. ###### Change your backup schedule To upgrade to the higher schedule, follow these steps: 1. In the [Console](https://console.platform.sh/), navigate to the project where you want to change the schedule. 2. Click **Settings Settings**. 3. Click **Edit plan**. 4. For **Backups**, click the name of your current schedule. If clicking has no effect, you are already on the highest available schedule. 5. Select the target schedule. 6. Click **Save**. To downgrade to the lower schedule, [contact support](https://docs.platform.sh/learn/overview/get-support.md). ##### Use automated backups For Dedicated environments, see more about [backups of Dedicated environments](https://docs.platform.sh/dedicated-environments/dedicated-gen-2/environment-differences.md#backups). For Grid environments, automated backups are taken for production environments at least once every day. The exact number of backups depends on your [backup schedule](#backup-schedule). Daily backups are taken at around 4:00 every day based on the [project timezone](https://docs.platform.sh/projects/change-project-timezone.md). The time for 6-hourly backups is based on the daily backup. Automated backups are always [live](#live-backups). **Note**: Automated backups are only available for production environments. If you’re on a [development plan](https://docs.platform.sh/administration/pricing.md#development-plans), all your environments are [development environments](https://docs.platform.sh/glossary.md#environment-type). This includes your future production environment. If you want to enable automated backups for it, [upgrade to a non-development plan](https://platform.sh/pricing/). ##### Live backups You can create backups without any downtime. This means your environment is running and open to connections during the backup. Because the connections may come in during backup creation, live backups may have data inconsistencies among containers. They may make restorations less reliable. To avoid such issues, schedule [manual backups](#create-a-manual-backup) during non-peak hours, when the short amount of downtime is least noticed. Automated backups are always live, including those taken on [Dedicated Gen 3](https://docs.platform.sh/dedicated-environments/dedicated-gen-3.md) and [Dedicated Gen 2](https://docs.platform.sh/dedicated-environments/dedicated-gen-2/overview.md) environments. You can create a manual live backup on a Grid project: When [creating the backup](#create-a-manual-backup), select **Run live backup** in the last step. ##### Create a manual backup You can create a manual backup using the [CLI](https://docs.platform.sh/administration/cli.md) or in the [Console](https://docs.platform.sh/administration/web.md). - Navigate to the environment you want to back up. - Click **Backups**. - Click **Backup**. - Click **Backup**. ###### Automate manual backups You can also automate the process of creating manual backups through [cron jobs](https://docs.platform.sh/create-apps/app-reference/single-runtime-image.md#crons). The cron job uses the CLI command to back up the environment. It requires you to [set up the CLI on the environment with an API token](https://docs.platform.sh/administration/cli/api-tokens.md#authenticate-in-an-environment). Although this process is automated, backups created in this way count as manual for the [backup schedule](#backup-schedule). They don't affect the automated backups taken as part of the schedule. ##### Physical storage location Backups are stored as binary large objects separate from your environments. This storage is replicated over multiple data centers in different locations [within the region your project is hosted in](https://platform.sh/trust-center/security/data-security/). This means that in the rare event a data center becomes unavailable, your backups are still available. ### Restore an environment from a backup Once you have [backups of your environment](https://docs.platform.sh/environments/backup.md), you can restore data from a previous point. To restore an environment, you need an [Admin role for that environment type](https://docs.platform.sh/administration/users.md). ##### 1. List available backups To restore an environment, first select one of the available backups: You get a response similar to the following: ```bash {} Backups on the project My Project (1234567abcdef), environment main (type: production): +---------------------------+----------------------------+------------+ | Created | Backup ID | Restorable | +---------------------------+----------------------------+------------+ | 2022-08-15T09:48:58+01:00 | 5ouvtgo4v75axijww7sqnftste | true | | 2022-07-09T14:17:17+01:00 | 7jks7dru5xpx5p5id5wtypur2y | true | | 2022-06-22T18:33:29+01:00 | f3jbyxlhtmalco67fmfoxs7n4m | true | +---------------------------+----------------------------+------------+ ``` Select one of the backups marked as **Restorable** and copy its **Backup ID**. - Navigate to the environment where you want to see backups. - Click **Backups**. Select one of the backups marked as having completed successfully . ##### 2. Restore from a backup To restore the backup you've selected, follow these steps: - Press ``enter`` to agree with the consequences and continue. - Next to the backup you’ve selected, click **More** More. - Click **Restore**. - Read through the consequences and click **Yes, Restore**. The data is restored and your backed-up environment is deployed. This deployment uses the built app, including variables, from when the backup was taken. **Warning**: The code is also initially restored, but Platform.sh doesn’t modify your Git repository. So any future (re)deployments use the current Git repository to build the environment. To restore your code to its previous state when the backup was taken, use Git commands such as [revert](https://git-scm.com/docs/git-revert). See [how backup and restore works on Platform.sh](https://docs.platform.sh/environments/backup.md#how-backup-and-restore-works). ##### Restore to a different environment You can restore backups to a different environment than they were created on using the CLI: 1. Switch to the branch where the backup was created. 2. To restore your backup to an existing environment, run the following command: ```bash platform backup:restore --target= ``` If your target environment doesn't exist yet, you can create it by [branching an existing environment](https://docs.platform.sh/glossary.md#branch). The new target environment will be an exact copy of the existing (parent) environment. To do so, use the `--branch-from` option to specify the parent of your new target environment: ```bash platform backup:restore --target= --branch-from= ``` ### Cancel an activity If you have a stuck activity or you pushed a change you know doesn't work, you can cancel a running or pending activity on an environment. This works for activities such as builds, cron jobs, and source operations. You can cancel activities using the [CLI](https://docs.platform.sh/administration/cli.md) or in the [Console](https://docs.platform.sh/administration/web.md). If you have more than one running or pending activity, choose which activity to cancel. You can also cancel a specific activity by specifying its ID: ```bash {} platform activity:cancel ``` Get the ID from the [activity log](https://docs.platform.sh/increase-observability/logs/access-logs.md#activity-logs). - Open the environment where you want to cancel an activity. - In the [activity log](https://docs.platform.sh/increase-observability/logs/access-logs.md#activity-logs), click More **More** next to the activity you want to cancel. - Click **Cancel**. ##### Non-cancellable activities An activity can finish in between when you load the Console and when you click **Cancel**. For example, when the activity is a [source operation](https://docs.platform.sh/create-apps/source-operations.md) and the related build hook has already completed. In such cases, you get a message that the activity can't be cancelled. ### Change an environment's parent All environments default to having another environment as their parent. If you [branched](https://docs.platform.sh/glossary.md#branch) the environment from another, its parent starts as the environment it was created from. If you pushed a branch through Git or a [source integration](https://docs.platform.sh/integrations/source.md), the parent defaults to the default environment. To change the environment's parent, follow these steps: Run the following command: ```bash {} platform environment:info -e parent ``` So if you have the environment ``new-feature`` and want to change its parent to ``main``, run the following: ```bash {} platform environment:info -e new-feature parent main ``` If you're not using a [source integration](https://docs.platform.sh/integrations/source.md), you can also set a parent for your environment when pushing changes to it. To do so, run the following command: ```bash git push -o "environment.parent=" ``` Learn more about how to [trigger actions on `push`](https://docs.platform.sh/environments.md#push-options). ### Configure HTTP access control When developing your site, you might want to hide your preview environments from outside viewers. Or you may find you have performance issues from [excessive bot access](https://support.platform.sh/hc/en-us/community/posts/16439634723858). You can control access with a username and password **or** by allowing/denying specific IP addresses or networks. This setting applies to the entire environment. The settings for a specific environment are inherited by all of its children. So if you have a `staging` environment and you [branch environments from it](https://docs.platform.sh/glossary.md#branch), all of the environments branched from it inherit the same authentication information. Changing access control triggers a new deploy of the current environment. The changes don't propagate to child environments until they're [redeployed manually](https://docs.platform.sh/development/troubleshoot.md#force-a-redeploy). ##### Use a username and password You can set up one or more combinations of a username and password. To add a username and password, follow these steps: Run the following command: ```bash {} platform environment:http-access -e --auth : ``` For example, to add the username ``name`` with the password ``12321`` to the ``test`` environment, run: ```bash {} platform environment:http-access -e test --auth name:12321 ``` ##### Filter IP addresses Alternatively, you can control access to environments by allowing or denying specific IP addresses or ranges of IP addresses. The addresses should be in the [CIDR format](https://en.wikipedia.org/wiki/Classless_Inter-Domain_Routing). Both`4.5.6.7` and `4.5.6.0/8` are accepted formats. Note that `allow` entries should come before `deny` entries in case they both match. For example, the following configuration allows only the IP `198.51.100.0` to access your website. ```txt 198.51.100.0 allow 0.0.0.0/0 deny ``` **Pick your authentication method**: When you set up IP filtering authentication, make sure no [username and password are defined](#use-a-username-and-password) for your environment. Otherwise, your environment will remain accessible through the defined username and password combination, regardless of your IP filtering settings. To control access based on IP address, follow these steps: Run the following command: ```bash {} platform environment:http-access -e --access allow: --access deny: ``` ### Deactivate an environment If you have environments you aren't using, you may want to deactivate them to save resources for what you need. To deactivate an environment, you need to be an admin for the project or the given environment. **Note**: Your default environment is protected. It can’t be deactivated through the Console or the CLI. To change which environment is the default, see how to [rename the default branch](https://docs.platform.sh/environments/default-environment.md). Deactivating the project results in the following: * The environment becomes [inactive](https://docs.platform.sh/glossary.md#inactive-environment). Unless it's reactivated, it's no longer deployed and isn't accessible from the web or via SSH. * All services running on this environment are deleted. * All data specific to the environment is deleted. If the environment is reactivated, it syncs data from its parent environment. ##### Deactivate an environment To deactivate an environment, follow these steps: Run the following command: ```bash {} platform environment:deactivate ``` ##### Delete the branch Inactive environments still have branches in Git. To delete the branch entirely, run the following command: ```bash git push origin --delete ``` ##### Reactivate an environment Reactivating an environment [syncs](https://docs.platform.sh/glossary.md#sync) data from its parent environment. To reactivate an inactive environment, follow these steps: Run the following command: ```bash {} platform environment:activate ``` If you're not using a [source integration](https://docs.platform.sh/integrations/source.md), you can also activate an environment when pushing changes to it. To do so, run the following command: ```bash git push -o "environment.status=active" ``` Learn more about how to [trigger actions on `push`](https://docs.platform.sh/environments.md#push-options). ### Rename the default environment You can set the name of your default/production environment when creating a project. To change it after project creation, follow the steps below. For consistency, the steps are all given using the [CLI](https://docs.platform.sh/administration/cli.md). The examples below are based off of changing the default environment from `old` to `main`. Replace these names with what suits your situation. If your site is already live, remember that deactivating an environment is a destructive operation that can result in data loss. To minimize potential issues, take the following steps: - Switch the default environment during non-peak hours. - Keep your data by taking a [backup of the `old` environment](https://docs.platform.sh/environments/backup.md) - Reduce your DNS time-to-live (TTL) to a minimum. ##### Requirements If you have a domain set for your default environment, remove it before changing the default branch. Otherwise you get an error that `default domain must be a valid project domain`. To change the default branch, you need to be an [admin for the project](https://docs.platform.sh/administration/users.md) ##### Note on source integrations The following steps depend of whether your project has a [source integration](https://docs.platform.sh/integrations/source.md). If it doesn't, Platform.sh is your primary remote repository for the project. If it does, GitHub, GitLab, or BitBucket hosts your primary remote repository for the project. ##### 1. Create a `main` environment Without a source integration With a source integration In your local copy of your repository, create a new environment from ``old`` called ``main``: ```bash {} platform environment:branch main old ``` In your local copy of the external repository, make sure your default branch is up to date: ```bash {} git checkout old && git pull origin old ``` Then create the ``main`` branch off of your default branch and push it to the remote repository: ```bash {} git checkout -b main git push origin main ``` Source integrations include all branches, but don’t activate the corresponding environments in Platform.sh. Activate the ``main`` environment by running the following command: ```bash {} platform environment:activate main ``` ##### 2. Copy settings If you have variables or other settings specific to your default environment, add those to the `main` environment. For example, you may have variables for your production environment set to not be inheritable (such as if you set them with `--inheritable=false` through the CLI). These variables aren't added automatically to child environments and so you need to add them to the `main` environment manually. If you want the `main` environment to send emails, [turn on outgoing email](https://docs.platform.sh/development/email.md). ##### 3. Make `main` a top-level branch To have `main` be your default, it needs to not be a child of `old`. Use the following command to remove its parent and make it a top-level branch: ```bash platform environment:info -e main parent - ``` ##### 4. Make `main` the parent for other environments Without a source integration With a source integration You probably have other environments that are children of ``old``. For each environment, update its parent to ``main``: ```bash {} platform environment:info -e parent main ``` To preserve your data on Platform.sh, it’s best to switch your work in progress to be based off of ``main``. Close any open pull/merge requests and resubmit them against ``main``. If you want to continue working on branches after switching the default branch, rebase them by running ``git rebase --onto main ``. Once you resubmit a request, it appears under the ``main`` environment on Platform.sh. ##### 5. Deactivate the `old` branch To change your default branch, you first need to deactivate the existing default branch to remove protections. Deactivate the `old` environment without deleting it by running the following CLI command: ```bash platform environment:delete --no-delete-branch old ``` ##### 6. Set `main` as the default branch Without a source integration With a source integration Set the project’s default branch to ``main``: ```bash {} platform project:info default_branch main ``` Once ``old`` has been deactivated, set the project’s default branch in Platform.sh to ``main``: ```bash {} platform project:info default_branch main ``` Follow the instructions to change the default branch to ``main`` for your provider: - [GitHub](https://docs.github.com/en/repositories/configuring-branches-and-merges-in-your-repository/managing-branches-in-your-repository/changing-the-default-branch) - [GitLab](https://docs.gitlab.com/ee/user/project/repository/branches/default.md#change-the-default-branch-name-for-a-project) - [BitBucket](https://community.atlassian.com/t5/Bitbucket-questions/How-to-change-MAIN-branch-in-BitBucket/qaq-p/977418) ##### 7. Update DNS records Whether or not you're using a CDN, if your site is live you have probably added a Platform.sh address somewhere when configuring a [custom domain](https://docs.platform.sh/domains/steps.md). If you have a CDN, it's with the CDN provider. If you don't have a CDN, it's probably a `CNAME` record. In either case, the setting probably has the old environment name as part of it. Update the setting to use the new environment name. Verify that the new URL is correct by comparing it to the result from this command: ```bash platform environment:info edge_hostname ``` ##### 8. Optional: Delete the `old` environment If you no longer want the `old` environment, such as to stop accidental use, delete it completely: ```bash platform environment:delete --delete-branch old ``` ### Scale your live site Your production environment gets a [pool of resources](https://docs.platform.sh/create-apps/app-reference/single-runtime-image.md#sizes) based on your [plan size](https://docs.platform.sh/administration/pricing.md). These resources are split up between the apps and services you've defined. You might occasionally get increased load on your site, such as during a major product launch or a sales event like Black Friday. This pressure might cause problems in your site or even bring it down. At such times, you want your site to have enough resources to handle the additional load. How your site handles the need to scale depends on your plan. On higher tiers with the Observability Suite, everything is taken care of automatically. When your site starts experiencing pressure, it gets the resources needed to handle that pressure. On self-service tiers, you have to handle that yourself, often after your site has gone down. If you know a spike in traffic is likely coming, scale your plan up in advance to handle the event and downscale after it. You're only charged for the time when the plan was higher. ##### Auto-scaling Dedicated environments **Observability Suite** This feature is available as part of the [Observability Suite](https://platform.sh/features/observability-suite/). To add the Observability Suite to your project and take advantage of this feature, [contact Sales](https://platform.sh/contact/). If you have the Observability Suite on a Dedicated environment, your site is monitored for traffic spikes. If these spikes are causing application errors, your site is automatically scaled up to the next largest size to handle the traffic. The process is initiated and run automatically and a support ticket is opened. The upscaling process is then monitored by the Platform.sh team. The team determines whether the upscaling is working as intended and is necessary or can be avoided by, for example, blocking a malicious bot. Autoscaling uses HTTP, CPU, and memory metrics to scale your Dedicated clusters. There are two classes of measurement that trigger an autoscaling event: - HTTP error rate trigger: A daily error rate (`50x` requests/total requests) for the last 24 hours. This value is compared against 5 minute intervals of requests for the last hour of requests. As soon as two interval error rates in that hour are greater than the daily error rate, an autoscaling event is triggered. - CPU load/request trigger: autoscaling occurs when CPU usage and traffic reaches a predefined threshold. ##### Managed scaling for Dedicated and Grid environments **Tier availability** This feature is available for **Enterprise and Elite** customers. [Compare the tiers](https://platform.sh/pricing/) on our pricing page, or [contact our sales team](https://platform.sh/contact/) for more information. If your plan includes managed scaling, Platform.sh monitors your application to make ensure it doesn't fail due to a lack of resources. If the monitoring determines that a lack of resources is causing issues for your site, a support ticket is opened. The Platform.sh team determines whether upscaling is necessary or can be avoided by, for example, blocking a malicious bot. If upscaling is necessary, it's handled for you and you're kept up to date in the support ticket. When the traffic spike passes, your plan is downgraded again to use only the necessary resources. On Dedicated environments, the upscaling is handled by cycling through each node in the redundant architecture. One at a time, they're removed from the cluster, upsized, and returned. On Split Architecture dedicated environments, additional web servers may be added to provide additional capacity (Horizontal scaling). ##### Manually scale Grid environments To increase the pool of resources available to your project, [upgrade your plan](https://docs.platform.sh/administration/pricing.md#switch-plans) and redeploy your site. ### Set an environment's visibility to search engines When you have preview environments, you don't want search engines indexing them and diluting the SEO of your production site. Search engine indexers are told to ignore all preview environments. When you're ready to go live, give your production environment a [custom domain](https://docs.platform.sh/domains/steps.md) and then set it to be visible to search engines. To change your production environment's visibility to search engines, follow these steps: - Select the project where you want to change visibility. - From the **Environment** menu, select your production environment. - Click Settings **Settings**. - In the row with **Hide from search engines**, click **Edit **. - Select or clear the **Hide from search engines** checkbox. Platform.sh can't guarantee that indexers follow the instructions. If you're concerned about access, set up [HTTP access control](https://docs.platform.sh/environments/http-access-control.md). ##### How it's done When the **Hide from search engines** is activated, search engines are turned away from environments by including a `X-Robots-Tag` header: ```txt X-Robots-Tag: noindex, nofollow ``` That tells search engine indexers to not index these sites and not traverse links from these sites. This helps keep non-Production sites out of search engine indexes. It's automatically on for all `platform.site` domains, and it's automatically off for production environments with a custom domain. ##### Alternative method You can also send instructions to search engine indexers using a `robots.txt` file. Your app can serve this as a static file from its disk or as a dynamic response from its `passthru`. Control either with the [`location` section of your app configuration](https://docs.platform.sh/create-apps/app-reference/single-runtime-image.md#locations). If your `robots.txt` file includes instructions to ignore a page, search engine indexers may ignore it even if you have configured Platform.sh to not send the header. ### Change a project's region To host your project data, Platform.sh offers several [regions](https://docs.platform.sh/development/regions.md). You specify a region when you create a project. You can also change the project's region after it's created. ##### Why migrate between regions - Different data centers are located in different geographic areas. You may want your site close to your users for improved performance. - You may want to move to a region with a lower [environmental impact](https://docs.platform.sh/development/regions.md#environmental-impact). ##### 1. Plan the migration Before starting the migration process, you need to plan for it: - Plan a time frame in which to handle the migration. Your code shouldn't change during this time to ensure all changes are copied to the new project. Prepare for a brief site outage when you migrate, just as with a relaunch of a site. - Set your DNS Time-to-Live as low as possible. This ensures the switch to the new site propagates as quickly as possible. ##### 2. Create a new project In the target region, [create a new project from scratch]( https://console.platform.sh/org/create-project/info?_utm_campaign=cta_deploy_marketplace_template&utm_source=public_documentation&_utm_medium=organic ). If you plan to test for long, start with a Development plan and upsize it before switching the DNS. Otherwise, use the desired plan size from the start. ##### 3. Add code and environments Select your newly created blank project. - Push the code for your production branch: ```bash {} platform push --target ``` - (Optional) Checkout other branches and then push their code: ```bash {} platform push --activate --target --parent ``` For a [source integration](https://docs.platform.sh/integrations/source.md) with GitHub, BitBucket, or GitLab, add the integration to your new project. Your new project then mirrors the configured repository automatically. ##### 4. Copy files If you have files in a mount, first download them: ```bash platform mount:download ``` Then upload them to your new project: ```bash platform mount:upload ``` See more options on [how to export files](https://docs.platform.sh/learn/tutorials/exporting.md) and [how to import files](https://docs.platform.sh/learn/tutorials/migrating.md#5-import-data). ##### 5. Copy data from services For services with generated data such as Solr and Redis, you don't need to copy data directly. Just rebuild the data in the new project. To download data from persistent services such as databases, see how to export and then import data for each service: - [InfluxDB](https://docs.platform.sh/add-services/influxdb.md#export-data) - [MongoDB](https://docs.platform.sh/add-services/mongodb.md#exporting-data) - [MariaDB/MySQL](https://docs.platform.sh/add-services/mysql.md#exporting-data) - [PostgreSQL](https://docs.platform.sh/add-services/postgresql.md#exporting-data) ##### 6. Migrate variables and project settings Make sure anything else connected to your old project is moved to your new project: - If you have project or environment variables defined on your old project, add them to your new project. Get a list of all variables set outside of code by running `platform variables`. - Add any users to your new project that you want to continue to have access. - Add any existing [integrations](https://docs.platform.sh/integrations.md). ##### 7. Test the site Verify that the new site is working as desired before continuing. You can leave the two projects running for as long as you need. After you have finished all your testing, sync all your data (code, files, database) for the last time. ##### 8. Switch to the new site Now that you know the new project works, switch public traffic to that site: 1. Make sure your new project has the right plan size. 2. If possible, put your site into read-only mode or maintenance mode. 3. Add your domain names to your new project and remove them from the old project. 4. (Optional) Add any custom SSL certificates you have. 5. Update your DNS provider's records to point to the new site. See more on [setting custom domains](https://docs.platform.sh/domains/steps.md). It may take some time for the DNS change and SSL change to propagate. Until it does, some browsers may not see the new site or may get an SSL mismatch error. In most cases that resolves itself in 1--3 hours. ##### 9. Remove the old project Once the new project is running and the DNS has fully propagated, delete the old project. ##### Alternative process Although not directly supported by Platform.sh, an agency named [Contextual Code](https://www.contextualcode.com/) has built a bash migration script. This script automates most common configurations. If your site is a typical single app with a single SQL database, the script should take care of most of the process for you. See more at the [Platform.sh Project Migration repository](https://gitlab.com/contextualcode/platformsh-migration). ### Change the project timezone The project timezone affects [automated backups](https://docs.platform.sh/environments/backup.md). The project timezone doesn't affect: - [App runtime](https://docs.platform.sh/create-apps/timezone.md). - [Cron jobs](https://docs.platform.sh/create-apps/app-reference/single-runtime-image.md#crons). - [System logs](https://docs.platform.sh/increase-observability/logs.md). UTC is the default timezone for all logs. To change the timezone for a project, follow these steps: 1. Open the project where you want to change the timezone. 2. Click Settings **Settings**. 3. Select the timezone from the list. 4. Click **Save**. ### Delete a project To delete a project, you must be an organization owner or have the [manage plans permission](https://docs.platform.sh/administration/users.md#organization-permissions). To delete a Platform.sh project, including all data, code, and active environments: - Run the following command: ```bash {} platform project:delete --project ``` - Read the consequences to deletion and enter ``y``. - Enter the project title to confirm. You are billed only for the portion of a month when the project was active. When you remove all your projects from your user account, you stop being charged. ### Set up a custom domain Once your project is ready for production, replace the automatically generated domain with your own custom domain. Note that adding a domain disables the automatically generated URL for your Production environment only. If you are an Enterprise or Elite customer and have a Grid or Dedicated Gen 3 project, you can [customize the URLs for your non-production environments](https://docs.platform.sh/domains/steps/custom-domains-preview-environments.md). Dedicated Gen 2 customers can also customize the domain for their Staging environment. ##### Before you begin You need: - A project that's ready to go live - A domain with access to its settings with the registrar - A registrar that allows `CNAME` records or [one of the alternatives](https://docs.platform.sh/domains/steps/dns.md) on [apex domains](https://docs.platform.sh/glossary.md#apex-domain) - Optional: The [CLI](https://docs.platform.sh/administration/cli.md) installed locally - If you are on a development plan, you need to [upgrade your tier to a production plan](#optional-change-your-plan-to-a-production-plan). If you are planning to use several subdomains of the same domain on different projects, see how to [manage multiple subdomains](https://docs.platform.sh/domains/steps/subdomains.md) *before* you add your domain to Platform.sh. ##### Optional: Change your plan to a production plan If you are on a Development plan, you can't add a domain. You need to upgrade your subscription to a [production plan](https://docs.platform.sh/glossary.md#production-plan). To upgrade your plan tier, you must be an organization owner or have the [manage plans permission](https://docs.platform.sh/administration/users.md#organization-permissions). To upgrade your plan tier: - On the tile of the project you want to upgrade, click **More More**. - Click **Edit plan**. - Change the plan to at least Standard . - Check the change to the monthly cost. - Click **Save**. You can find [more information on plan tiers](https://platform.sh/pricing). ##### 1. Get the target for your project You want to point your DNS record to the automatically generated URL. Your domain needs to point to that target for your site to go live. For Dedicated plans, get the target for your project from your Platform.sh contact. - Navigate to your production environment and click **Settings Settings**. - Select the **Domains** tab. - In the **Configure your domain** section, copy the content of the **CNAME record** field. ##### 2. Configure your DNS provider Your DNS provider (usually your registrar) is where you manage your domain. Most registrars offer similar functionalities regarding DNS configuration but use different terminology or configuration. For example, some registrars require you to use an `@` to create custom records on the apex domain, while others don't. Check your registrar's documentation. Note that depending on your registrar and the time to live (TTL) you set, it can take anywhere from 15 minutes to 72 hours for DNS changes to be taken into account. To configure your CDN and your domain name to point to your project: - Open your CDN’s management system. - Point the CDN at your [target](#1-get-the-target-for-your-project). - Open your registrar’s domain management system. - Open your registrar’s domain management system and configure your DNS zone settings to point at your CDN. The address or ``CNAME`` record to use varies by CDN provider. Refer to the official documentation of your DNS provider and CDN provider. - Check that redirects and subdomains are set correctly for the [TLS certificate ownership verification](https://docs.platform.sh/domains/troubleshoot.md#ownership-verification). - [Disable the router cache](https://docs.platform.sh/domains/cdn.md#disable-the-router-cache). - Optional: For increased security and to prevent the CDN from being bypassed, you can force all traffic to [go through the CDN](https://docs.platform.sh/domains/cdn.md#prevent-direct-access-to-your-server). - Optional: If you have multiple domains you want to be served by the same app, add a ``CNAME`` record for each of them. That includes the ``www`` subdomain if you are using it in your [routes configuration](https://docs.platform.sh/define-routes.md). Adding a custom domain sets your site as [visible to search engines](https://docs.platform.sh/environments/search-engine-visibility.md#how-its-done). See how you can further [configure your CDN](https://docs.platform.sh/domains/cdn.md). ##### 3. Set your domain Add a single domain to your project: - Select the project where you want to add a domain. - Click Settings **Settings**. - Click **Domains**. - In the **Domain** field, enter your domain. - Click **Add domain**. ##### What's next * [Use a content delivery network](https://docs.platform.sh/domains/cdn.md) * [Use subdomains across multiple projects](https://docs.platform.sh/domains/steps/subdomains.md) * [Use a custom TLS certificate](https://docs.platform.sh/domains/steps/tls.md) #### DNS management and apex domains Using `CNAME` records helps [prevent downtime](#cname-records) during maintenance operations. But `CNAME` records can't point to apex domains, so you need to [set up a workaround](#workarounds-for-apex-domains). Available workarounds depend on your DNS provider. ###### `CNAME` records Each site on Platform.sh is made up of a set of containers. To map incoming requests to the appropriate container, Platform.sh runs routers in [each region](https://docs.platform.sh/development/regions.md). A router's IP address can change in two cases: - During an upgrade or maintenance operation, routers can be taken offline while changes are applied. - During a region upscale or downscale, routers can be added or removed. In such situations, using `A` records can cause downtime. `A` records map a domain to an IP address. When a router's IP address changes, you need to manually update your `A` records. Your site remains offline until you do, or until the router is back from maintenance. To prevent downtime, create `CNAME` records through your DNS provider. `CNAME` records map a domain to another. Set up your `CNAME` records to point at your project's [target URL](https://docs.platform.sh/domains/steps.md#1-get-the-target-for-your-project). The DNS record for this target URL automatically resolves to the IP addresses of the routers in your project's region. When a router's IP address changes, the DNS record is automatically and immediately updated. This prevents downtime without intervention from you. Note that `CNAME` records can't point to [apex domains](https://docs.platform.sh/glossary.md#apex-domain). Check with your DNS provider if they offer [workarounds](#workarounds-for-apex-domains). ###### Workarounds for apex domains Although `CNAME` records can't point to apex domains, most DNS providers offer workarounds. Contact your DNS provider and choose the option that works for you. If you use a CDN, you likely already have a workaround in place, such as with [Fastly](https://docs.platform.sh/domains/cdn/fastly.md#3-handle-apex-domains) and [Cloudflare](https://docs.platform.sh/domains/cdn/cloudflare.md#3-handle-apex-domains). ####### Custom records Some DNS providers offer custom records such as `ANAME`, `ALIAS` or `HTTPS` records, which you can manage like `CNAME` records. But unlike `CNAME` records, these custom records can point to apex domains. To use custom records, follow the instructions on [how to set up a custom domain](https://docs.platform.sh/domains/steps.md). When you come to configuring your DNS provider, instead of a `CNAME` record, add a custom record pointing from your domain to [your project's target URL](https://docs.platform.sh/domains/steps.md#2-get-the-target-for-your-project). ####### Domain forwarding If your DNS provider doesn't support custom records, consider using domain forwarding. If your domain is `example.com`, domain forwarding redirects all requests from `example.com` to `www.example.com`. To use domain forwarding, follow these steps: 1. Make the `www.` version of your site the default (canonical) version and configure your app and routes to [use the `www` subdomain as `upstream`](https://docs.platform.sh/define-routes.md). 2. Follow the instructions on [how to set up a custom domain](https://docs.platform.sh/domains/steps.md). When you come to configuring your DNS provider, instead of a `CNAME` record, add a record forwarding requests from `` to `www.`. ####### Redirection service If your DNS provider doesn't support custom records or domain forwarding, consider using a redirection service. If your domain is `example.com`, a redirection service uses an `A` record to redirect all requests from `example.com` to `www.example.com`. To use a redirection service, follow these steps: 1. Make the `www.` version of your site the default (canonical) version and configure your app and routes to [use the `www` subdomain as `upstream`](https://docs.platform.sh/define-routes.md). 2. Follow the instructions on [how to set up a custom domain](https://docs.platform.sh/domains/steps.md). When you come to configuring your DNS provider, instead of a `CNAME` record, add an `A` record pointing from your domain to the redirection service. ####### `A` records If your DNS provider doesn't support any other workaround, consider using `A` records, but only as a last resort. When you use `A` records, [if a router's IP address changes](#cname-records), you need to update your `A` records manually. Until you do, your site can appear offline because requests are lost. To use `A` records, follow these steps: 1. [Get the IP addresses](https://docs.platform.sh/development/regions.md#public-ip-addresses) of your project's production environment. 2. Follow the instructions on [how to set up a custom domain](https://docs.platform.sh/domains/steps.md). When you come to configuring your DNS provider, instead of a `CNAME` record, add `A` records pointing from your domain to each of the IP addresses from step 1. When a request comes in, one of those IP addresses is used at random. #### Configure a third-party TLS certificate Platform.sh automatically provides standard Transport Layer Security (TLS) certificates for all sites and environments. These certificates are issued at no charge by [Let's Encrypt](https://letsencrypt.org/) and cover most needs. To use them, you need to [specify HTTPS routes](https://docs.platform.sh/define-routes/https.md#enable-https). Note that some [limitations](https://docs.platform.sh/define-routes/https.md#lets-encrypt-limitations) apply. Platform.sh allows you to use third-party TLS certificates free of charge. You can use many kinds of custom certificates, including domain-validated, extended validation, high-assurance, or wildcard certificates. Consult your TLS issuer for pricing and instructions on how to generate a TLS certificate. Seven days before a third-party custom certificate is due to expire, Platform.sh replaces it with a new default Let’s Encrypt certificate. This helps prevent downtime. To avoid switching to a default certificate, make sure you replace your custom certificate with an updated one more than seven days before its expiration date. Note that custom certificates aren't necessary for preview environments. Wildcard certificates that cover all `*.platform.sh` domains, including preview environments, are automatically provided. ####### Add a custom certificate You can add a custom certificate using the [CLI](https://docs.platform.sh/administration/cli.md) or in the [Console](https://docs.platform.sh/administration/web.md). Your certificate has to be in PKCS #1 format and start with `-----BEGIN RSA PRIVATE KEY-----`. If it doesn't start that way, [change the format](#change-the-private-key-format). To add your custom certificate, follow these steps: For example: ```bash {} platform domain:add secure.example.com --cert /etc/TLS/private/secure-example-com.crt --key /etc/TLS/private/secure-example-com.key ``` You can optionally include intermediate SSL certificates by adding ``‐‐chain `` for each one. - Redeploy your production environment with the following command: ```bash {} platform environment:redeploy ``` - Open the project where you want to add a certificate. - Click Settings **Settings**. - Click **Certificates**. - Click **+ Add**. - Fill in your private key, public key certificate, and (optionally) intermediate SSL certificates. - Click **Add Certificate**. - Access your production environment. - Click More **More**. - Click **Redeploy**. ####### Change the private key format The expected format for your certificate’s private key is PKCS #1. Private keys in PKCS #1 format start with `-----BEGIN RSA PRIVATE KEY-----`. If your private key starts with `-----BEGIN PRIVATE KEY-----`, it’s in PKCS #8 format, which isn’t appropriate. To convert your private key (`private.key`) from PKCS #8 to PKCS #1 format (`private.rsa.key`), run the following command: ```bash openTLS rsa -in private.key -out private.rsa.key ``` #### Handle subdomains across different projects You can host multiple subdomains, such as `foo.example.com` and `bar.example.com`, within a single project using [routes](https://docs.platform.sh/define-routes.md). If you try to use a subdomain that's used in another project, you get an error like the following: ```text This domain is already claimed by another service ``` You need to add a DNS record to make it clear you explicitly allow multiple projects to use the domain. ###### Enable subdomains across multiple projects To ensure multiple projects can use subdomains of the same apex domain, add a specific `TXT` DNS record for your apex domain. The `TXT` record should look like the following: ```text _public-suffix-root. TXT "public-suffix-root=" ``` This adds your domain to the [Platform.sh implementation of the Public Suffix List](#why-this-is-necessary). After you add your subdomains, remove the `TXT` record to reinstate [subdomain hijacking protection](#subdomain-hijacking-protection). This ensures no other users can possibly add a subdomain of your domain to their project. Even if you don’t remove the record, your DNS records should prevent others from using a subdomain as long as you don’t use wildcards records pointing at Platform.sh. **Apex domain cannot be re-added**: If you don’t remove the ``TXT`` record, restrictions apply on the apex domain. For example, you can’t add the apex domain to another project until you remove the ``TXT`` record. Note that depending on your registrar and the time to live (TTL) you set, it can take anywhere from 15 minutes to 72 hours for DNS changes to be taken into account, so take this into account if you need to add the apex domain to another project. You can see an error like ``YOUR_APEX_DOMAIN is a root domain``. ###### Bypass locked domains In certain cases (such as if your domain was added manually by Platform.sh support), your domain may be reserved for the project you added it to. Then you can't set up a second project with the bare domain (`example.com`) or a subdomain (`foo.example.com`). If that happens, [contact support](https://docs.platform.sh/learn/overview/get-support.md). Include the project ID of the project that already has the domain. ###### Why this is necessary ####### The Public Suffix List Domain names are segmented into different hierarchical levels, separated by a `.`. The right-most portion of the domain, such as `.com`, `.edu`, and `.fr`, is known as the top-level domain (TLD). Most applications, including web browsers, handle TLDs specially, such as by restricting certain actions. For example, a webpage at `foo.bar.baz.example.com` can usually set a cookie that's keyed to any of the following: - `foo.bar.baz.example.com` - `bar.baz.example.com` - `baz.example.com` - `example.com` So a single site can be segmented across different subdomains but use a single account login cookie. But this webpage *can't* set cookies keyed to all `.com` domains, which would be a security risk. Other restrictions apply to TLDs, but cookies are the most basic example. Aside from true TLDs, browser makers have a list of domain suffixes that should get the same special handling called the [Public Suffix List (PSL)](https://publicsuffix.org/). If you add the `example.com` domain to the PSL, browsers refuse to set a cookie on `example.com` from a page at `foo.example.com`. They still accept cookies from a page at `example.com`. ####### Subdomain hijacking protection By default, a given domain can be used by only one project at a time. This security measure prevents malicious actions such as registering a project with the `evil.example.com` subdomain and using that to set cookies on your `example.com` website. When you add a domain to a project, the first level of the domain not in the [PSL](#the-public-suffix-list) is reserved. So if you add `foo.bar.baz.example.com` to a project, that project has `example.com` reserved within Platform.sh and no other project can have a domain anywhere in `*.example.com`. You can add multiple subdomains within that one project. Subdomain hijacking protection ensures that no other users can add a subdomain to their project as long as you don't use wildcard DNS records pointing at Platform.sh. In most cases, that's a desirable added layer of security. But you may run into a problem when you want multiple subdomains from the same organization as separate projects. One option would be to add `example.com` to the PSL, but you might not want or be able to do that. To limit what domains get protected, Platform.sh supports a small extension to the PSL. When you add a `TXT` record for your domain, Platform.sh treats that domain as part of the PSL. So when you add a `TXT` record for `example.com`, Platform.sh treats `example.com` as a top-level domain. That means it isn't reserved and is open for other projects. Then when you add a domain, the next level down from `example.com` is reserved. So if you add `foo.bar.baz.example.com` to a project, `*.baz.example.com` is reserved for that project. You can add `beep.example.com` to a different project without any issues. You can do the same for any level of subdomain. So if you set a `TXT` record for `baz.example.com` and add `foo.bar.baz.example.com` to a project, `*.bar.baz.example.com` is reserved for that project. Nothing at a higher level is reserved. #### Set up a custom domain on a preview environment [Preview environments](https://docs.platform.sh/glossary.md#preview-environment) in your project can't use the custom domain [set up on your production environment](https://docs.platform.sh/domains/steps.md). By default and for each preview environment, Platform.sh automatically replaces the custom production domain with an automatically generated URL. If you don't want to use these default URLs, you can add a custom domain to each of your preview environments (`staging` or `development` [environment types](https://docs.platform.sh/glossary.md#environment-type)). To do so, no need to modify your [routes configuration](https://docs.platform.sh/define-routes.md). When you add a new custom domain for a preview environment, just attach it to the custom production domain it replaces. If you have multiple custom production domains, you need to select which one you're replacing. **Example**: You have two environments, a production environment and a staging environment. You’ve added the ``example.com`` custom domain to your production environment. You want to add the ``staging.example.com`` custom domain to your staging environment. To do so, you need to attach the new ``staging.example.com`` custom domain to its corresponding custom production domain ``example.com``. You can then access your staging environment through ``staging.example.com``, and still access your production environment through ``example.com``. If you have multiple custom domains on your production environment, when you set up a custom domain on a preview environment, you don't need to update your [routes configuration](https://docs.platform.sh/define-routes.md) either. Platform.sh automatically figures out the routing of your preview environment based on the following elements: - The custom production domains in your existing [routes configuration](https://docs.platform.sh/define-routes.md) - The custom domains for preview environments attached to each of those custom production domains ###### Before you start You need: - A Grid or Dedicated Gen 3 project on which you have **admin rights**
**Note**: If you have a Dedicated Gen 2 project, currently you can only add a custom domain to the dedicated environments of your project (production and staging). To do so, [contact Support](https://console.platform.sh/-/users/~/tickets/open). If you use a [Managed Fastly](https://docs.platform.sh/domains/cdn/managed-fastly.md) CDN, it needs to be configured to operate with custom domains for preview environments. For more information, [contact Support](https://console.platform.sh/-/users/~/tickets/open). - A production environment with at least one custom domain already set up - At least one preview (staging or development) environment - Optional: The [Platform.sh CLI](https://docs.platform.sh/administration/cli.md) (v4.8.0+) To prevent abuse, by default you can add custom domains to up to 5 preview environments per project only. This limit doesn't include the production environment, and you can increase it without charge. To do so, [contact Support](https://docs.platform.sh/learn/overview/get-support.md). **Note**: If you delete a custom production domain, all of the attached custom domains for preview environments are deleted too. You need to rebuild the affected preview environments for the deletion to be complete. If you downgrade from an Elite or Enterprise plan to a Professional plan, all of the custom domains set up on preview environments are automatically removed. Downgrading your plan doesn't affect custom domains set up on your production environments. ###### Add a custom domain to a preview environment To add a custom domain to a preview environment, follow these steps: - [Configure your DNS provider](https://docs.platform.sh/domains/steps.md#2-configure-your-dns-provider). In particular, make sure your DNS record points to the target of your preview environment. **Note**: Using the target of your production environment to configure your DNS provider is technically possible, but Platform.sh recommends using the target of your preview environment as a best practice. - Run a command similar to the following: ```bash {} platform domain:add staging.example.com --environment --attach ``` - Get the target for your preview environment. To do so, navigate to your preview environment and click **Settings Settings**. Select the **Domains** tab. In the **Configure your domain** section, copy the content of the **CNAME record** field. Save it for later use at step 7. - Click **Add domain**. - Name the custom domain for your preview environment. - Attach the custom domain for your preview environment to the desired production custom domain. - Click **Add**. - Click **Okay**. - [Configure your DNS provider](https://docs.platform.sh/domains/steps.md#2-configure-your-dns-provider). In particular, make sure your DNS record points to the target of your preview environment. **Note**: Using the target of your production environment to configure your DNS provider is technically possible, but Platform.sh recommends using the target of your preview environment as a best practice. **Note**: You can’t update a custom domain when it’s used on a preview environment. You can only delete it and create a new one as a replacement. ####### Example You've added the `mysite.com` custom domain to your production environment. You now want to add the `mydev.com` custom domain to a preview environment called `Dev`. To do so, follow these steps: - Get the target for ``Dev``. To do so, navigate to ``Dev`` and click **Settings Settings**. Select the **Domains** tab. In the **Configure your domain** section, copy the content of the **CNAME record** field. Save it for later use at step 7. - Click **Add domain**. - Enter ``mydev.com`` as a name for the custom domain you want to add to ``Dev``. - Select ``mysite.com`` as the production custom domain you want to attach ``mydev.com`` to. - Click **Add**. - Click **Okay**. - [Configure your DNS provider](https://docs.platform.sh/domains/steps.md#2-configure-your-dns-provider). In particular, make sure your DNS record points to ``Dev``’s target. In the above example, the `Dev` environment needs to exist for you to add the `mydev.com` custom domain successfully. If the `Dev` environment is later removed, the `mydev.com` custom domain is removed too. ###### List the custom domains of a preview environment - Navigate to your preview environment and click **Settings Settings**. - Select the **Domains** tab. All the custom domains for your preview environment are displayed. ###### Get a specific custom domain used on a preview environment - Navigate to your preview environment and click **Settings Settings**. - Select the **Domains** tab. All the custom domains for the selected environment are displayed. - To see which actions you can perform on a displayed custom domain, click **More More** next to it. ###### Remove a custom domain from a preview environment - Navigate to your preview environment and click **Settings Settings**. - Select the **Domains** tab. All the custom domains for the selected environment are displayed. - Click **More More** on the custom domain you want to delete. - Click **Delete**. - Click **Yes, delete**. ### Content delivery networks (CDNs) Using a CDN speeds up the delivery of your site's content to its users. The CDN deploys edge servers at many locations around the world. These edge servers behave like local caches to nearby users. Bringing content closer to users helps enhance your site's perceived performance and so can improve user engagement and retention. Fastly is the recommended CDN for Platform.sh projects. By default, Dedicated projects include a [Fastly CDN managed by Platform.sh](https://docs.platform.sh/domains/cdn/managed-fastly.md). Self-service Grid plans don't include a CDN by default, but you can set up one at any time, such as [Fastly](https://docs.platform.sh/domains/cdn/fastly.md) or [Cloudflare](https://docs.platform.sh/domains/cdn/cloudflare.md). ##### DNS records To start routing client traffic through your CDN, [set up a custom domain](https://docs.platform.sh/domains/steps.md). If you use `CNAME` records for your custom domain, these records [can't point to apex domains](https://docs.platform.sh/domains/steps/dns.md). But most CDN providers offer workarounds. For example, Fastly offers [Anycast options](https://docs.platform.sh/domains/cdn/fastly.md#3-handle-apex-domains) and Cloudflare offers [`CNAME` flattening](https://docs.platform.sh/domains/cdn/cloudflare.md#3-handle-apex-domains). ##### Host header forwarding When an HTTP request is made to a website, the client adds a `Host` header to the request. The value of this header is the domain name the request is made to. When a server hosts multiple websites, like what a CDN does, it can use the `Host` header to identify which domain to access to handle the request. When a request is made from a client to fetch a resource on a CDN edge server, the `Host` header value is rewritten to point to the CDN. If the requested resource isn't cached on the edge server, the edge server makes a request to the Platform.sh server to pull and cache the resource. For this process to be successful, set an `X-Forwarded-Host` header to forward the original `Host` header value to the Platform.sh server. Use your root domain as the value of your `X-Forwarded-Host` header, for example: `example.com`. To ensure your app handles the `X-Forwarded-Host` header, you might need to adjust your app configuration. For more information on how to set up an `X-Forwarded-Host` HTTP header, see your CDN provider's official documentation. ##### Disable the router cache When you use a CDN, the Platform.sh router [HTTP caching](https://docs.platform.sh/define-routes/cache.md) becomes redundant. To disable it, change your cache configuration for the routes behind a CDN to the following: ```yaml {location=".platform/routes.yaml"} "https://{default}/": type: upstream upstream: "myapp:http" cache: # Disable the HTTP cache on this route. It's handled by the CDN instead. enabled: false ``` ##### Configure your CDN to support high SLA **Tier availability** This feature is available for **Enterprise and Elite** customers. [Compare the tiers](https://platform.sh/pricing/) on our pricing page, or [contact our sales team](https://platform.sh/contact/) for more information. If your plan includes high SLA, configure your CDN so that Platform.sh can perform automated monitoring using NodePing. To do so, [add all NodePing IP addresses](https://nodeping.com/faq.md#ip-addresses) to your CDN's allowlist. If you want Platform.sh to limit checks to one or more of the following regions, [contact Support](https://docs.platform.sh/learn/overview/get-support.md): - North America - Europe - East Asia / Oceania ##### Prevent direct access to your server When you use a CDN, you might want to prevent direct access to your Platform.sh server for security purposes. ###### IP filtering and HTTP auth While using password or IP based authentication might be possible, it is insecure, and unreliable. There are many scenarios in which the implementation can fail, and the security features circumvented. Furthermore, IP based filtering will usually be impossible due to the fact that most CDNs use the `x-forwarded` HTTP header, which your project origin will use as the visitor IP address. Both methods are highly insecure, and we highly recommend against them. ###### Enable mTLS If your CDN provider supports it, you can secure your site through [mTLS](https://docs.platform.sh/define-routes/https.md#enable-mtls). To enable mTLS, follow these steps: 1. Obtain an Origin Certificate Authority (CA) certificate from your CDN provider. 2. Check that the CA certificate is a `.crt` file. If the file is a `.pem` file, rename it to `cdn.crt`. 3. Add the `cdn.crt` file to your Git repository. 4. Change your routing configuration for the routes behind a CDN to the following: ```yaml {location=".platform/routes.yaml"} "https://{default}": tls: client_authentication: "require" client_certificate_authorities: - !include type: string path: cdn.crt ``` The procedure can vary depending on your CDN. Contact your CDN provider for specific assistance. Note that mTLS is a mutual authentication process. It allows your CDN to check that it's communicating with your Platform.sh server and vice versa. So in addition to the CA certificate supplied by your CDN provider, you need to [create your own TLS certificate](https://docs.platform.sh/define-routes/https.md). #### Set up your Fastly CDN You can [use a CDN](https://docs.platform.sh/domains/cdn.md) to deliver your site's content to users more quickly. To set up a Fastly CDN with your own Fastly subscription, follow the instructions on this page. If you are using a Fastly CDN provided by Platform.sh, for example as part of a Dedicated project, see guidance about [Fastly CDNs managed by Platform.sh](https://docs.platform.sh/domains/cdn/managed-fastly.md). ###### Before you begin You need: - An up-and-running Platform.sh project - A [Fastly](https://www.fastly.com/) CDN subscription ###### 1. Avoid double-caching To avoid stale content that can't be cleared, avoid using Fastly with [HTTP caching](https://docs.platform.sh/define-routes/cache.md). For routes where Fastly is used, disable HTTP caching using the following configuration: ```yaml {location=".platform/routes.yaml"} https://{default}/: type: upstream ... cache: enabled: false ``` ###### 2. Set up your Fastly CDN To properly configure your Fastly CDN, see the Fastly official documentation on [how to get started](https://docs.fastly.com/en/guides/getting-started#_basics). Then set up a [custom domain](https://docs.platform.sh/domains/steps.md). To get the [DNS challenge to succeed](https://docs.platform.sh/domains/troubleshoot.md#ownership-verification), have your CDN point to your [project's target URL](https://docs.platform.sh/domains/steps.md#1-get-the-target-for-your-project). ###### 3. Handle apex domains To start routing client traffic through Fastly, [create `CNAME` records for your domain names](https://docs.platform.sh/domains/steps/dns.md) through your DNS provider. `CNAME` records can't point to apex domains. As a workaround, Fastly offers [Anycast options](https://docs.fastly.com/en/guides/using-fastly-with-apex-domains). ###### 4. Optional: Protect your site from on-path attacks An on-path attack occurs when a hacker intercepts or modifies the communication between a client and a server. This can lead to sensitive data leaks. To prevent such attacks, make sure all communication with your site is encrypted through HTTPS and can't be downgraded to HTTP. To do so, enable HTTP strict transport security (HSTS). HSTS forces clients to always communicate with your site over HTTPS. You can [enable HSTS](https://docs.fastly.com/en/guides/enabling-hsts-through-fastly#forcing-tls-and-enabling-hsts) in your Fastly account. All HTTP requests are then automatically redirected to HTTPS. #### Managed Fastly CDN Instead of starting your own Fastly subscription and [managing your CDN yourself](https://docs.platform.sh/domains/cdn/fastly.md), you can take advantage of a Fastly CDN provided by Platform.sh. For example, Dedicated projects include a managed Fastly CDN by default. These CDNs are exclusively set up and managed by Platform.sh. To modify any settings for a managed Fastly CDN, open a [support ticket](https://docs.platform.sh/learn/overview/get-support.md). To add a managed Fastly CDN to your project, [contact sales](https://platform.sh/contact/). ####### Domain control validation When you request for a new domain to be added to your Fastly service, Platform.sh support provides you with a [`CNAME` record](https://docs.platform.sh/domains/steps/dns.md) for [domain control validation](https://docs.platform.sh/domains/troubleshoot.md#ownership-verification). To add this `CNAME` record to your domain settings, see how to [configure your DNS provider](https://docs.platform.sh/domains/steps.md#2-configure-your-dns-provider). ####### Transport Layer Security (TLS) certificates By default, Enterprise and Elite plans include two [TLS certificates](https://docs.platform.sh/glossary.md#transport-layer-security-tls), an apex and a wildcard one. This allows for encryption of all traffic between your users and your app. If you use a Fastly CDN provided by Platform.sh, you can provide your own third-party TLS certificates for an additional fee. To do so, if you don't have one, set up a [mount](https://docs.platform.sh/create-apps/app-reference/single-runtime-image.md#mounts) that isn't accessible to the web. Use an environment with access limited to Platform.sh support and trusted users. [Transfer](https://docs.platform.sh/development/file-transfer.md) each certificate, its unencrypted private key, and the intermediate certificate to the mount. To notify Platform.sh that a certificate is to be added to your CDN configuration, open a [support ticket](https://docs.platform.sh/learn/overview/get-support.md). If you need an Extended Validation TLS certificate, you can get it from any TLS provider. To add it to your CDN configuration, open a [support ticket](https://docs.platform.sh/learn/overview/get-support.md). Note that when you add your own third-party TLS certificates, you are responsible for renewing them in due time. Failure to do so may result in outages and compromised security for your site. ####### Retrieve your Fastly API token The API token for your managed Fastly CDN is stored in the `FASTLY_API_TOKEN` environment variable. This variable is usually set in the `/master/settings/variables` folder of your project, and you can access it [from a shell](https://docs.platform.sh/development/variables/use-variables.md#access-variables-in-a-shell) or directly [in your app](https://docs.platform.sh/development/variables/use-variables.md#access-variables-in-your-app). **Note**: Older projects may not have the ``FASTLY_API_TOKEN`` environment variable set. In this case, the Fastly API token is stored in a text file called ``fastly_tokens.txt`` on the server, typically located at ``/mnt/shared/fastly_tokens.txt``. #### Set up your Cloudflare CDN You can [use a CDN](https://docs.platform.sh/domains/cdn.md) to deliver your site's content to users more quickly. ###### Before you begin You need: - An up-and-running Platform.sh project - A [Cloudflare](https://www.cloudflare.com/) CDN subscription ###### 1. Avoid double-caching To avoid stale content that can't be cleared, avoid using Cloudflare with [HTTP caching](https://docs.platform.sh/define-routes/cache.md). For routes where Cloudflare is used, disable HTTP caching using the following configuration: ```yaml {location=".platform/routes.yaml"} https://{default}/: type: upstream ... cache: enabled: false ``` ###### 2. Set up your Cloudflare CDN To properly configure your Cloudflare CDN, see the Cloudflare official documentation on [how to get started](https://developers.cloudflare.com/cache/get-started/). Then set up a [custom domain](https://docs.platform.sh/domains/steps.md). To get the [DNS challenge to succeed](https://docs.platform.sh/domains/troubleshoot.md#ownership-verification), have your CDN point to your [project's target URL](https://docs.platform.sh/domains/steps.md#1-get-the-target-for-your-project). ###### 3. Handle apex domains To start routing client traffic through Cloudflare, you need to [create `CNAME` records for your domain names](https://docs.platform.sh/domains/steps/dns.md) through your DNS provider. But `CNAME` records can't point to apex domains. As a workaround, Cloudflare offers [`HTTPS` records](https://developers.cloudflare.com/dns/manage-dns-records/reference/dns-record-types/#svcb-and-https) and [`CNAME` flattening](https://developers.cloudflare.com/dns/additional-options/cname-flattening/). ###### 4. Mitigate security risks Like all networks exposed to the internet, your origin server may become the target of security attacks. The best way to protect your site from threats like on-path attacks, spoofing attacks, or credential stuffing, is to configure mutual TLS (mTLS). [mTLS](https://www.cloudflare.com/en-gb/learning/access-management/what-is-mutual-tls/) not only has both parties in a connection authenticate each other through the TLS protocol. It also ensures that requests can't be sent directly to the origin server (Platform.sh). Instead, requests must transit through Cloudflare first. **Note**: mTLS is only compatible with environments where you have attached domains you own, meaning: - Your production environment - Each preview environment where you have [attached a custom domain](https://docs.platform.sh/domains/steps/custom-domains-preview-environments.md) Therefore, mTLS is **not** compatible with preview environments created by a [source code integration](https://docs.platform.sh/integrations/source.md). If you can't use mTLS, you can still take the following measures to protect your site from on-path attacks: 1. [Enable full strict SSL/TLS encryption](https://developers.cloudflare.com/ssl/origin-configuration/ssl-modes/full-strict/). Any communication between a client and Cloudflare or between Cloudflare and your Platform.sh server is then encrypted through HTTPS. In addition, Cloudflare checks that your Platform.sh server's [TLS certificate](https://docs.platform.sh/glossary.md#transport-layer-security-tls) was issued by a trusted certificate authority. This confirms the client is truly communicating with your Platform.sh server. 2. [Enable HTTP strict transport security (HSTS)](https://developers.cloudflare.com/ssl/edge-certificates/additional-options/http-strict-transport-security/). This ensures that your HTTPS connections can't be downgraded to HTTP. ### Going Live - Troubleshooting If your site doesn’t resolve after you’ve made DNS changes, check potential solutions to common issues. ##### Verify DNS On the command line using macOS, Linux, or the Windows Subsystem for Linux, run the following command: ```bash host www. ``` If your domain is `example.com`, the response should be something like the following: ```text www.example.com is an alias for main-abcd123.abcdefgh1234567.eu.platformsh.site main-abcd123.abcdefgh1234567.eu.platformsh.site has address 192.0.2.1 ``` If it isn't, try the following steps: - Your DNS server might not be correctly configured or the old DNS records are still cached. Try removing your local DNS cache. - Set your computer's DNS server to any Public DNS resolver (like [CloudFlare](https://developers.cloudflare.com/1.1.1.1/) or [Google](https://developers.google.com/speed/public-dns/docs/using)) to see if the issue is with the DNS server you are using. - Run `ping www.`. If the result is different from what you got from running `host www.`, you might need to remove your test settings. ##### Verify SSL/TLS encryption To find out where your domain is pointing to, you can use [the certificate checker tool](https://certcheck.pltfrm.sh/). This tool provides guidance on certificates, including when you use a [CDN](https://docs.platform.sh/domains/cdn.md). Check both the apex and the `www` domains to ensure they both point to your project. For further investigations, run the following command in a shell: ```bash curl -I -v https://www. ``` Look for error messages. Often the problem is caused by a mismatch between the certificate and the domain name or an expired [custom certificate](steps/tls.md). ###### Error provisioning certificates When a Let's Encrypt certificate fails to provision after the build hook has completed, you get output similar to the following: ```bash Provisioning certificates Validating 2 new domains E: Error validating domains: urn:ietf:params:acme:error:rejectedIdentifier :: The server will not issue certificates for the identifier :: NewOrder request did not include a SAN short enough to fit in CN Unable to validate domains domain a-new-and-really-awesome-feature-abc1234-defghijk56789.eu3.platformsh.site, www.domain a-new-and-really-awesome-feature-abc1234-defghijk56789.eu3.platformsh.site, will retry in the background. (Next refresh will be at 2023-04-28 02:22:50.639301+00:00.) E: Error: TLS Certificate provisioning failed ``` The renewal may fail because of the 64-character limit Let's Encrypt places on URLs. If you have a branch with a long name, the environment URL is over this limit and the certificate is rejected. To solve this, shorten your branch name so it doesn't exceed 20 characters. Generated URLs for environments have the following pattern: ```bash -..platformsh.site ``` If you have a [default domain](https://docs.platform.sh/define-routes.md#default) set up, the generated URL has the following pattern: ```bash .-..platformsh.site ``` The generated URLs consist of: - `` = the amount of characters your domain has - `` = `` + 7 character hash - `` = 13 characters - `` = 2 to 4 characters, depending on the region - `platformsh.site` = 15 characters - extra characters like `.` and `-` = 4 to 5 characters, depending on if you have a default domain This leaves you with 21 to 23 characters for your branch name (``) without exceeding the 64-character limit, depending on the region. To ensure your renewals succeed, keep your branch names under 20 characters. ###### Ownership verification To provide a valid TLS-certificate, the certificate issuer checks that the requester is entitled to receive the requested certificate. This check is known as the _Challenge_ step. The certificate request is generated based on your [routes definition](https://docs.platform.sh/define-routes.md). If you want your site to be available with `example.com` and its `www.example.com` subdomain, make sure both are defined in your routes. To pass this verification, there are requirements you need to meet. When you use a CDN, to ensure the challenge succeeds, check that: - Your domains and subdomains point to your CDN - The [_acme-challenge.](https://www.rfc-editor.org/rfc/rfc8555#section-8.4), as in ``_acme-challenge.example.com``, points to your CDN - The [/.well-known/](https://www.rfc-editor.org/rfc/rfc8555#section-8.3), as in ``https://www.example.com/.well-known/``, is accessible with no redirects If you don’t follow those requirements, you get an error message similar to: ```text {} W: Failed to verify the challenge at the gateway for the domain 'www.example.com' E: Error validating domain www.example.com: Couldn't complete challenge [HTTP01: The client lacks sufficient authorization] ``` For more information, see how to [setup your CDN](https://docs.platform.sh/domains/cdn.md). For more details regarding the challenge step, consult your certificate issuer’s documentation. A common issuer is [Let’s Encrypt](https://letsencrypt.org/docs/challenge-types/). Make sure that the [apex domain](https://docs.platform.sh/glossary.md#apex-domain) and its `www` subdomain are both pointing where needed. Note that it can take up to 72 hours for DNS changes to be effective. For more information, see how to [set up a custom domain](https://docs.platform.sh/domains/steps.md). If the changes take longer than expected, [redeploy](https://docs.platform.sh/development/troubleshoot.md#force-a-redeploy) the impacted environment. Also make sure that no conflicting DNS records exist for your domain. For example, a conflicting AAAA (IPv6) DNS record can result in a `[HTTP01: The client lacks sufficient authorization]` error. If the certificate generation issue persists, check if an outage is ongoing with your certificate issuer (the most common one is [Let's Encrypt](https://letsencrypt.status.io/)) and with your CDN provider if you have one. If not, [contact Support](https://docs.platform.sh/learn/overview/get-support.md). ###### Check your routes configuration Certificates are generated based on your [routes configuration](https://docs.platform.sh/define-routes.md). When a certificate is renewed, the renewal bot checks that all of the defined routes can be accessed. If at least one of the routes defined in your `.platform/routes.yaml` file can't be accessed, the renewal fails and the following error is displayed: ``` Provisioning certificates Validating 2 new domains W: Failed to verify the challenge at the gateway for the domain 'www.example.com' E: Error validating domain www.example.com: Couldn't complete challenge [HTTP01: There was a problem with a DNS query during identifier validation] Unable to validate domains www.example.com, will retry in the background. (Next refresh will be at 2023-07-04 17:43:10.259891+00:00.) Certificates - certificate 61bc4c8: expiring on 2023-09-02 01:11:12+00:00, covering sdgs.un.org E: Error: TLS Certificate provisioning failed ``` For example, if you add `example.com` and `www.example.com` to your routes configuration but the `www` subdomain doesn't point to your project through [a `CNAME` record](https://docs.platform.sh/domains/steps/dns.md#cname-records), the certificate renewal fails. For the renewal to succeed, add the missing `CNAME` record to your DNS or remove `www.example.com` (and any other `www` route) from your `.platform/routes.yaml` file. ##### Verify your application Check your app's logs and look for anomalies. On the command line type `platform logs app` and `platform logs error`. ##### Use ASCII for the domain Platform.sh expects an ASCII representation of your domain. To use an internationalized domain name (IDN), convert it to ASCII. Use a tool such as the [conversion tool provided by Verisign](https://www.verisign.com/en_US/channel-resources/domain-registry-products/idn/idn-conversion-tool/index.xhtml). ##### Something still wrong? For more general information, see how to [troubleshoot development](https://docs.platform.sh/development/troubleshoot.md). If your website is still not working as expected, [contact support](https://docs.platform.sh/learn/overview/get-support.md). ### Command line interface (CLI) See how to use and manage your Platform.sh projects directly from your terminal. Anything you can do within the Console can be done with the CLI. The CLI uses the git interface and the [Platform.sh REST API](https://api.platform.sh/docs/) to accomplish tasks. Its source code is hosted on [GitHub](https://github.com/platformsh/cli). ##### 1. Install To install the CLI, use a [Bash installation script](https://github.com/platformsh/cli#user-content-bash-installer). You can also install with [Homebrew](https://brew.sh/) (on Linux, macOS, or the Windows Subsystem for Linux) or [Scoop](https://scoop.sh/) (on Windows). ```bash {} brew install platformsh/tap/platformsh-cli ``` ```bash {} scoop bucket add platformsh https://github.com/platformsh/homebrew-tap.git scoop install platform ``` If you have issues with installation on a Mac, such as missing libraries, see how to [troubleshoot CLI installation on M1 Macs](https://community.platform.sh/t/troubleshoot-cli-installation-on-m1-macs/1202). ##### 2. Authenticate To list and manage your projects, authenticate by running the following command: ```bash platform ``` This process opens a browser tab for you to log in. It also creates certificates on your computer for [SSH](https://docs.platform.sh/development/ssh.md). Once you are logged in, a list of your projects appears, along with some tips for getting started. If you experience authentication issues or want to force a login, run the command `platform login`. ##### 3. Use Now you can run actions on your projects such as branching and merging. You can also simulate a local build of your codebase as if you were pushing a change to Platform.sh, including your services and data. Get a list of all available commands with: ```bash platform list ``` To get more information on a specific command, preface it with `help`: ```bash platform help get ``` You get output similar to the following: ```bash Command: project:get Aliases: get Description: Clone a project locally Usage: platform get [-e|--environment ENVIRONMENT] [--depth DEPTH] [--build] [-p|--project PROJECT] [--host HOST] [-i|--identity-file IDENTITY-FILE] [--] [] [] Arguments: project The project ID directory The directory to clone to. Defaults to the project title Options: -e, --environment=ENVIRONMENT The environment ID to clone. Defaults to the project default, or the first available environment --depth=DEPTH Create a shallow clone: limit the number of commits in the history --build Build the project after cloning -p, --project=PROJECT The project ID or URL --host=HOST The project's API hostname -i, --identity-file=IDENTITY-FILE An SSH identity (private key) to use -h, --help Display this help message -q, --quiet Do not output any message -V, --version Display this application version -y, --yes Answer "yes" to any yes/no questions; disable interaction -n, --no Answer "no" to any yes/no questions; disable interaction -v|vv|vvv, --verbose Increase the verbosity of messages Examples: Clone the project "abc123" into the directory "my-project": platform get abc123 my-project ``` ###### Select the right project and environment When you are in an empty directory or a directory not associated with a specific Platform.sh project, if you run a command that requires a specific project and environment, you are prompted to select them. For example, if you run the following command: ```bash platform environment:info ``` You get the following output: ```bash Enter a number to choose a project: [0] My project (xb3pfo734qxbeg) [1] A great project (3p5fmol45kxp6) [2] An even better project (rjify4y564xaa) > ``` If your working directory is inside a local checkout of your project repository, your project and environment are detected automatically. You can always specify the project and environment in two ways: * As arguments for the command: ```bash platform environment:info --project=my-project --environment=staging ``` * With environment variables: ```bash export PLATFORM_PROJECT=my-project; export PLATFORM_BRANCH=staging; platform environment:info ``` In [multi-app](https://docs.platform.sh/create-apps/multi-app.md) projects, this applies also to selecting the right app (the environment variable would be `PLATFORM_APPLICATION_NAME`). ####### RootNotFoundException If you check out a project via Git directly and not using the `platform get` command, the CLI may be unable to determine what project it's in. You might run a CLI command from within a project directory you've checked out and get an error like this: ```text [RootNotFoundException] Project root not found. This can only be run from inside a project directory. ``` Then the CLI hasn't been able to determine the project to use. To fix this, run: ```bash platform project:set-remote --project ``` Replace `` with the ID of your project. You can find that in the Console or by running `platform projects` to list all accessible projects. ###### Choose between the CLI and Git commands Some CLI commands (especially many within the `environment` namespace) have some overlap with Git commands. Generally, they offer more options than the Git commands alone. For example, `platform push` offers options such as `--activate` (to activate an environment before pushing) and `--no-wait` (so you can continue working without waiting for the push to complete). For all of them, you don't need to configure a Git remote. It's enough to have a project ID. An example of how this affects commands is that when you run `platform merge`, it doesn't affect your local codebase. You don't even need the code locally. The code is only merged between environments remotely. ###### Customize the CLI You can customize how the CLI operates and what it returns with a configuration file (`~/.platformsh/config.yaml`) or environment variables. For details, see the [customization instructions on GitHub](https://github.com/platformsh/legacy-cli#user-content-customization). ####### Automate repetitive tasks You might want to use the CLI in a script to automate repetitive tasks such as synchronizing your files locally. In such cases, you want to customize the CLI to bypass any confirmation questions. You can set the answer to every question as `yes` using the `PLATFORMSH_CLI_NO_INTERACTION` environment variable. For instance, to locally sync every mount point for your app named `myapp`, you could use this command: ```bash export PLATFORM_PROJECT=my-project; export PLATFORM_BRANCH=main; export PLATFORMSH_CLI_NO_INTERACTION=1; platform mount:download --all --app myapp --target local-backup ``` ###### Autocomplete commands The CLI provides tab autocompletion for commands, options, and some values (your projects, valid regions). To enable autocompletion, follow this step: Add the following to your shell’s startup (``.bashrc``, ``.zshrc``, or the equivalent): ```bash {} eval $(platform completion) ``` ###### Run commands on your container You can use the Platform.sh CLI to run commands on your container. You can use any command you've added in [dependencies](https://docs.platform.sh/create-apps/app-reference/single-runtime-image.md#dependencies) or a [hook](https://docs.platform.sh/create-apps/app-reference/single-runtime-image.md#hooks). The syntax looks like the following: ```bash platform ssh -- ``` For example, to run a specific Python script named `my-script.py` on your current environment, run the following command: ```bash platform ssh -- python my-script.py ``` Or to use [Drush](https://www.drush.org/latest/install/) to rebuild the cache on the `feature` environment, run this command: ```bash platform ssh -e feature -- drush -y cache-rebuild ``` ###### Update the CLI To update to the latest version, use the same tool as for [installation](#1-install): ```bash {} $ scoop update platform ``` ##### Upgrade from the legacy CLI To upgrade from the legacy CLI, follow the [installation instructions](#1-install). Once you've installed the latest version, the CLI guides you through removing the installed legacy CLI. #### Authenticate the CLI using an API token You need to set up an API token to authenticate the Platform.sh CLI for any of the following tasks: - Running automated tasks on a CI system - Running automated tasks directly on app container, for example in a cron job ###### Before you begin You might need the [Platform.sh CLI](https://docs.platform.sh/administration/cli.md) to perform certain tasks. For example, you need the CLI to do the following: - [Check the validity of an API token](#optional-check-the-validity-of-your-api-token). - [Load the CLI SSH certificate for non-CLI commands](#use-the-cli-ssh-certificate-for-non-cli-commands). ###### 1. Create a machine user To safely run automated tasks, first create machine users. Each machine user has its own Platform.sh account associated with a unique email address. You can grant them restrictive [access permissions](https://docs.platform.sh/administration/users.md) to handle specific automated tasks. For security purposes, create a machine user for each type of task you want to automate. To create a machine user, follow these steps: This sets your machine user as a viewer on your project and a contributor on development environments, with no access to other environment types. Note that you can further [adjust user roles](https://docs.platform.sh/administration/users.md#environment-type-roles) depending on your needs and each environment type. - In the email invitation, click **Create account**. - To create a Platform.sh account for the machine user, click **Sign up** and follow the instructions. - Go to your project and click Settings **Settings**. - In the **Project Settings** menu, click **Access**. - Click **Add**. - Enter your machine user’s email address. - For each [environment type](https://docs.platform.sh/administration/users.md#environment-type-roles), assign a role to your machine user and click **Save**. ###### 2. Create an API token 1. Log in to the Console as your machine user. 2. Open the user menu (your name or profile picture). 3. Click **My profile**. 4. Go to the **API tokens** tab and click **Create API token**. 5. Enter a name for your API token and click **Create API token**. 6. To copy the API token to your clipboard, click ** Copy**. Note that after you close the **API tokens** tab, you can't display the API token again. 7. Store the API token somewhere secure on your computer. ####### Optional: check the validity of your API token To check that your API token is valid, run the following command: ```bash platform auth:api-token-login ``` When prompted, enter your API token. You get output similar to this: ```bash The API token is valid. You are logged in. ``` For security reasons, rotate your API tokens regularly. When an API token is compromised, revoke it immediately. ###### 3. Authenticate the CLI using your API token After you create your API token, you can use it to do the following: - Allow a CI system to run automated tasks using the Platform.sh CLI. - Run automated tasks on an app container using the Platform.sh CLI, for example in a cron job. Note that when running CLI commands in these cases, some operations might take time to complete. To avoid waiting for an operation to complete before moving on to the next one, use the `--no-wait` flag. ####### Authenticate in a CI system You can allow your CI system to run automated tasks using the Platform.sh CLI. To do so, create an environment variable named `PLATFORMSH_CLI_TOKEN` with your API token as its value. For more information, see your CI system's official documentation. To run SSH-based commands that aren't specific to the Platform.sh CLI, see how to [load the proper SSH certificate](#use-the-cli-ssh-certificate-for-non-cli-commands). ####### Authenticate in an environment You can run automated tasks on an app container using the Platform.sh CLI. To do so, set your API token as a [top-level environment variable](https://docs.platform.sh/development/variables.md#top-level-environment-variables). **Note**: Once you add the token as an environment variable, anyone with [SSH access](https://docs.platform.sh/development/ssh.md) can read its value. Make sure your [machine user has only the necessary permissions](#1-create-a-machine-user). - Open the environment where you want to add the variable. - Click Settings **Settings**. - Click **Variables**. - Click **+ Add variable**. - In the **Variable name** field, enter ``env:PLATFORMSH_CLI_TOKEN``. - In the **Value** field, enter your API token. - Make sure the **Available at runtime** and **Sensitive variable** options are selected. - Click **Add variable**. Then add a build hook to your app configuration to install the CLI as part of the build process. ```yaml {location=".platform.app.yaml"} hooks: build: | set -e echo "Installing Platform.sh CLI" curl -fsSL https://raw.githubusercontent.com/platformsh/cli/main/installer.sh | bash echo "Testing Platform.sh CLI" platform ``` You can now call the CLI from within the shell on the app container or in a cron job. To run SSH-based commands that aren't specific to the Platform.sh CLI, see how to [load the proper SSH certificate](#use-the-cli-ssh-certificate-for-non-cli-commands). You can set up a cron job on a specific type of environment. For example, to run the `update` source operation on your production environment, use the following cron job: ```yaml {location=".platform.app.yaml"} crons: update: spec: '0 0 * * *' commands: start: | if [ "$PLATFORM_ENVIRONMENT_TYPE" = production ]; then platform backup:create --yes --no-wait platform source-operation:run update --no-wait --yes fi ``` ###### Use the CLI SSH certificate for non-CLI commands When you set a `PLATFORMSH_CLI_TOKEN` environment variable, the CLI authentication isn't complete until your run a CLI command or load the CLI SSH certificate. For example, after setting a `PLATFORMSH_CLI_TOKEN` environment variable, you might need to run `ssh`, `git`, `rsync`, or `scp` commands before you run any CLI commands. In this case, to ensure all your commands work, load the CLI SSH certificate first. To do so, run the following command: ```bash platform ssh-cert:load --no-interaction ``` #### CLI Command reference #TableOfContents > ul > li > ul { display: none; } # Platform.sh CLI 5.0.15 - [Installation](https://docs.platform.sh/administration/cli.md#1-install) - [Open an issue](https://github.com/platformsh/cli/issues) ###### All commands * [`clear-cache`](#clear-cache) * [`decode`](#decode) * [`docs`](#docs) * [`help`](#help) * [`list`](#list) * [`multi`](#multi) * [`web`](#web) **activity** * [`activity:cancel`](#activitycancel) * [`activity:get`](#activityget) * [`activity:list`](#activitylist) * [`activity:log`](#activitylog) **app** * [`app:config-get`](#appconfig-get) * [`app:config-validate`](#appconfig-validate) * [`app:list`](#applist) **auth** * [`auth:api-token-login`](#authapi-token-login) * [`auth:browser-login`](#authbrowser-login) * [`auth:info`](#authinfo) * [`auth:logout`](#authlogout) * [`auth:verify-phone-number`](#authverify-phone-number) **backup** * [`backup:create`](#backupcreate) * [`backup:delete`](#backupdelete) * [`backup:get`](#backupget) * [`backup:list`](#backuplist) * [`backup:restore`](#backuprestore) **certificate** * [`certificate:add`](#certificateadd) * [`certificate:delete`](#certificatedelete) * [`certificate:get`](#certificateget) * [`certificate:list`](#certificatelist) **commit** * [`commit:get`](#commitget) * [`commit:list`](#commitlist) **db** * [`db:dump`](#dbdump) * [`db:sql`](#dbsql) **domain** * [`domain:add`](#domainadd) * [`domain:delete`](#domaindelete) * [`domain:get`](#domainget) * [`domain:list`](#domainlist) * [`domain:update`](#domainupdate) **environment** * [`environment:activate`](#environmentactivate) * [`environment:branch`](#environmentbranch) * [`environment:checkout`](#environmentcheckout) * [`environment:delete`](#environmentdelete) * [`environment:drush`](#environmentdrush) * [`environment:http-access`](#environmenthttp-access) * [`environment:info`](#environmentinfo) * [`environment:init`](#environmentinit) * [`environment:list`](#environmentlist) * [`environment:logs`](#environmentlogs) * [`environment:merge`](#environmentmerge) * [`environment:pause`](#environmentpause) * [`environment:push`](#environmentpush) * [`environment:redeploy`](#environmentredeploy) * [`environment:relationships`](#environmentrelationships) * [`environment:resume`](#environmentresume) * [`environment:scp`](#environmentscp) * [`environment:ssh`](#environmentssh) * [`environment:synchronize`](#environmentsynchronize) * [`environment:url`](#environmenturl) * [`environment:xdebug`](#environmentxdebug) **integration** * [`integration:activity:get`](#integrationactivityget) * [`integration:activity:list`](#integrationactivitylist) * [`integration:activity:log`](#integrationactivitylog) * [`integration:add`](#integrationadd) * [`integration:delete`](#integrationdelete) * [`integration:get`](#integrationget) * [`integration:list`](#integrationlist) * [`integration:update`](#integrationupdate) * [`integration:validate`](#integrationvalidate) **local** * [`local:build`](#localbuild) * [`local:dir`](#localdir) * [`local:drush-aliases`](#localdrush-aliases) **metrics** * [`metrics:all`](#metricsall) * [`metrics:cpu`](#metricscpu) * [`metrics:disk-usage`](#metricsdisk-usage) * [`metrics:memory`](#metricsmemory) **mount** * [`mount:download`](#mountdownload) * [`mount:list`](#mountlist) * [`mount:upload`](#mountupload) **operation** * [`operation:list`](#operationlist) * [`operation:run`](#operationrun) **organization** * [`organization:billing:address`](#organizationbillingaddress) * [`organization:billing:profile`](#organizationbillingprofile) * [`organization:create`](#organizationcreate) * [`organization:delete`](#organizationdelete) * [`organization:info`](#organizationinfo) * [`organization:list`](#organizationlist) * [`organization:subscription:list`](#organizationsubscriptionlist) * [`organization:user:add`](#organizationuseradd) * [`organization:user:delete`](#organizationuserdelete) * [`organization:user:get`](#organizationuserget) * [`organization:user:list`](#organizationuserlist) * [`organization:user:projects`](#organizationuserprojects) * [`organization:user:update`](#organizationuserupdate) **project** * [`project:clear-build-cache`](#projectclear-build-cache) * [`project:create`](#projectcreate) * [`project:delete`](#projectdelete) * [`project:get`](#projectget) * [`project:info`](#projectinfo) * [`project:init`](#projectinit) * [`project:list`](#projectlist) * [`project:set-remote`](#projectset-remote) **repo** * [`repo:cat`](#repocat) * [`repo:ls`](#repols) * [`repo:read`](#reporead) **resources** * [`resources:build:get`](#resourcesbuildget) **route** * [`route:get`](#routeget) * [`route:list`](#routelist) **service** * [`service:list`](#servicelist) * [`service:mongo:dump`](#servicemongodump) * [`service:mongo:export`](#servicemongoexport) * [`service:mongo:restore`](#servicemongorestore) * [`service:mongo:shell`](#servicemongoshell) * [`service:redis-cli`](#serviceredis-cli) **source-operation** * [`source-operation:list`](#source-operationlist) * [`source-operation:run`](#source-operationrun) **ssh-cert** * [`ssh-cert:load`](#ssh-certload) **ssh-key** * [`ssh-key:add`](#ssh-keyadd) * [`ssh-key:delete`](#ssh-keydelete) * [`ssh-key:list`](#ssh-keylist) **subscription** * [`subscription:info`](#subscriptioninfo) **team** * [`team:create`](#teamcreate) * [`team:delete`](#teamdelete) * [`team:get`](#teamget) * [`team:list`](#teamlist) * [`team:project:add`](#teamprojectadd) * [`team:project:delete`](#teamprojectdelete) * [`team:project:list`](#teamprojectlist) * [`team:update`](#teamupdate) * [`team:user:add`](#teamuseradd) * [`team:user:delete`](#teamuserdelete) * [`team:user:list`](#teamuserlist) **tunnel** * [`tunnel:close`](#tunnelclose) * [`tunnel:info`](#tunnelinfo) * [`tunnel:list`](#tunnellist) * [`tunnel:open`](#tunnelopen) * [`tunnel:single`](#tunnelsingle) **user** * [`user:add`](#useradd) * [`user:delete`](#userdelete) * [`user:get`](#userget) * [`user:list`](#userlist) * [`user:update`](#userupdate) **variable** * [`variable:create`](#variablecreate) * [`variable:delete`](#variabledelete) * [`variable:get`](#variableget) * [`variable:list`](#variablelist) * [`variable:update`](#variableupdate) **worker** * [`worker:list`](#workerlist) ###### `clear-cache` Clear the CLI cache Aliases: `cc` ####### Usage ``` platform cc ``` ######## Options * `--help` (`-h`) Display this help message * `--verbose` (`-v|-vv|-vvv`) Increase the verbosity of messages * `--version` (`-V`) Display this application version * `--yes` (`-y`) Answer "yes" to confirmation questions; accept the default value for other questions; disable interaction * `--no-interaction` Do not ask any interactive questions; accept default values. Equivalent to using the environment variable: PLATFORMSH_CLI_NO_INTERACTION=1 ###### `decode` Decode an encoded string such as PLATFORM_VARIABLES ####### Usage ``` platform decode [-P|--property PROPERTY] [--] ``` ######## Arguments * `value`(required) The variable value to decode ######## Options * `--property` (`-P`) (expects a value) The property to view within the variable * `--help` (`-h`) Display this help message * `--verbose` (`-v|-vv|-vvv`) Increase the verbosity of messages * `--version` (`-V`) Display this application version * `--yes` (`-y`) Answer "yes" to confirmation questions; accept the default value for other questions; disable interaction * `--no-interaction` Do not ask any interactive questions; accept default values. Equivalent to using the environment variable: PLATFORMSH_CLI_NO_INTERACTION=1 ####### Examples * View "foo" in PLATFORM_VARIABLES: ``` platform decode "$PLATFORM_VARIABLES" -P foo ``` ###### `docs` Open the online documentation ####### Usage ``` platform docs [--browser BROWSER] [--pipe] [--] []... ``` ######## Arguments * `search`(optional; multiple values allowed) Search term(s) ######## Options * `--browser` (expects a value) The browser to use to open the URL. Set 0 for none. * `--pipe` Output the URL to stdout. * `--help` (`-h`) Display this help message * `--verbose` (`-v|-vv|-vvv`) Increase the verbosity of messages * `--version` (`-V`) Display this application version * `--yes` (`-y`) Answer "yes" to confirmation questions; accept the default value for other questions; disable interaction * `--no-interaction` Do not ask any interactive questions; accept default values. Equivalent to using the environment variable: PLATFORMSH_CLI_NO_INTERACTION=1 ####### Examples * Search for information about the CLI: ``` platform docs CLI ``` ###### `help` Displays help for a command ####### Usage ``` platform help [--format FORMAT] [--raw] [--] [] ``` The help command displays help for a given command: platform help list You can also output the help in other formats by using the --format option: platform help --format=json list To display the list of available commands, please use the list command. ######## Arguments * `command_name`(optional) The command name ######## Options * `--format` (expects a value) The output format (txt, json, or md) * `--raw` To output raw command help * `--help` (`-h`) Display this help message * `--verbose` (`-v|-vv|-vvv`) Increase the verbosity of messages * `--version` (`-V`) Display this application version * `--yes` (`-y`) Answer "yes" to confirmation questions; accept the default value for other questions; disable interaction * `--no-interaction` Do not ask any interactive questions; accept default values. Equivalent to using the environment variable: PLATFORMSH_CLI_NO_INTERACTION=1 ###### `list` Lists commands ####### Usage ``` platform list [--raw] [--format FORMAT] [--all] [--] [] ``` The list command lists all commands: platform list You can also display the commands for a specific namespace: platform list project You can also output the information in other formats by using the --format option: platform list --format=xml It's also possible to get raw list of commands (useful for embedding command runner): platform list --raw ######## Arguments * `command`(required) The command to execute * `namespace`(optional) The namespace name ######## Options * `--raw` To output raw command list * `--format` (expects a value) The output format (txt, xml, json, or md) * `--all` Show all commands, including hidden ones * `--help` (`-h`) Display this help message * `--verbose` (`-v|-vv|-vvv`) Increase the verbosity of messages * `--version` (`-V`) Display this application version * `--yes` (`-y`) Answer "yes" to confirmation questions; accept the default value for other questions; disable interaction * `--no-interaction` Do not ask any interactive questions; accept default values. Equivalent to using the environment variable: PLATFORMSH_CLI_NO_INTERACTION=1 ###### `multi` Execute a command on multiple projects ####### Usage ``` platform multi [-p|--projects PROJECTS] [--continue] [--sort SORT] [--reverse] [--] ()... ``` ######## Arguments * `cmd`(required; multiple values allowed) The command to execute ######## Options * `--projects` (`-p`) (expects a value) A list of project IDs, separated by commas and/or whitespace * `--continue` Continue running commands even if an exception is encountered * `--sort` (expects a value) A property by which to sort the list of project options * `--reverse` Reverse the order of project options * `--help` (`-h`) Display this help message * `--verbose` (`-v|-vv|-vvv`) Increase the verbosity of messages * `--version` (`-V`) Display this application version * `--yes` (`-y`) Answer "yes" to confirmation questions; accept the default value for other questions; disable interaction * `--no-interaction` Do not ask any interactive questions; accept default values. Equivalent to using the environment variable: PLATFORMSH_CLI_NO_INTERACTION=1 ####### Examples * List variables on the "main" environment for multiple projects: ``` platform multi -p l7ywemwizmmgb,o43m25zns6k2d,3nyujoslhydhx -- var -e main ``` ###### `web` Open the project in the Web Console ####### Usage ``` platform web [--browser BROWSER] [--pipe] [-p|--project PROJECT] [-e|--environment ENVIRONMENT] ``` ######## Options * `--browser` (expects a value) The browser to use to open the URL. Set 0 for none. * `--pipe` Output the URL to stdout. * `--project` (`-p`) (expects a value) The project ID or URL * `--environment` (`-e`) (expects a value) The environment ID. Use "." to select the project's default environment. * `--help` (`-h`) Display this help message * `--verbose` (`-v|-vv|-vvv`) Increase the verbosity of messages * `--version` (`-V`) Display this application version * `--yes` (`-y`) Answer "yes" to confirmation questions; accept the default value for other questions; disable interaction * `--no-interaction` Do not ask any interactive questions; accept default values. Equivalent to using the environment variable: PLATFORMSH_CLI_NO_INTERACTION=1 ###### `activity:cancel` Cancel an activity ####### Usage ``` platform activity:cancel [-t|--type TYPE] [-x|--exclude-type EXCLUDE-TYPE] [-a|--all] [-p|--project PROJECT] [-e|--environment ENVIRONMENT] [--] [] ``` ######## Arguments * `id`(optional) The activity ID. Defaults to the most recent cancellable activity. ######## Options * `--type` (`-t`) (expects a value) Filter by type (when selecting a default activity). Values may be split by commas (e.g. "a,b,c") and/or whitespace. The % or * characters can be used as a wildcard for the type, e.g. '%var%' to select variable-related activities. * `--exclude-type` (`-x`) (expects a value) Exclude by type (when selecting a default activity). Values may be split by commas (e.g. "a,b,c") and/or whitespace. The % or * characters can be used as a wildcard to exclude types. * `--all` (`-a`) Check recent activities on all environments (when selecting a default activity) * `--project` (`-p`) (expects a value) The project ID or URL * `--environment` (`-e`) (expects a value) The environment ID. Use "." to select the project's default environment. * `--help` (`-h`) Display this help message * `--verbose` (`-v|-vv|-vvv`) Increase the verbosity of messages * `--version` (`-V`) Display this application version * `--yes` (`-y`) Answer "yes" to confirmation questions; accept the default value for other questions; disable interaction * `--no-interaction` Do not ask any interactive questions; accept default values. Equivalent to using the environment variable: PLATFORMSH_CLI_NO_INTERACTION=1 ###### `activity:get` View detailed information on a single activity ####### Usage ``` platform activity:get [-P|--property PROPERTY] [-t|--type TYPE] [-x|--exclude-type EXCLUDE-TYPE] [--state STATE] [--result RESULT] [-i|--incomplete] [-a|--all] [-p|--project PROJECT] [-e|--environment ENVIRONMENT] [--format FORMAT] [-c|--columns COLUMNS] [--no-header] [--date-fmt DATE-FMT] [--] [] ``` ######## Arguments * `id`(optional) The activity ID. Defaults to the most recent activity. ######## Options * `--property` (`-P`) (expects a value) The property to view * `--type` (`-t`) (expects a value) Filter by type (when selecting a default activity). Values may be split by commas (e.g. "a,b,c") and/or whitespace. The % or * characters can be used as a wildcard for the type, e.g. '%var%' to select variable-related activities. * `--exclude-type` (`-x`) (expects a value) Exclude by type (when selecting a default activity). Values may be split by commas (e.g. "a,b,c") and/or whitespace. The % or * characters can be used as a wildcard to exclude types. * `--state` (expects a value) Filter by state (when selecting a default activity): in_progress, pending, complete, or cancelled. Values may be split by commas (e.g. "a,b,c") and/or whitespace. * `--result` (expects a value) Filter by result (when selecting a default activity): success or failure * `--incomplete` (`-i`) Include only incomplete activities (when selecting a default activity). This is a shorthand for --state=in_progress,pending * `--all` (`-a`) Check recent activities on all environments (when selecting a default activity) * `--project` (`-p`) (expects a value) The project ID or URL * `--environment` (`-e`) (expects a value) The environment ID. Use "." to select the project's default environment. * `--format` (expects a value) The output format: table, csv, tsv, or plain * `--columns` (`-c`) (expects a value) Columns to display. The % or * characters may be used as a wildcard. Values may be split by commas (e.g. "a,b,c") and/or whitespace. * `--no-header` Do not output the table header * `--date-fmt` (expects a value) The date format (as a PHP date format string) * `--help` (`-h`) Display this help message * `--verbose` (`-v|-vv|-vvv`) Increase the verbosity of messages * `--version` (`-V`) Display this application version * `--yes` (`-y`) Answer "yes" to confirmation questions; accept the default value for other questions; disable interaction * `--no-interaction` Do not ask any interactive questions; accept default values. Equivalent to using the environment variable: PLATFORMSH_CLI_NO_INTERACTION=1 ####### Examples * Find the time a project was created: ``` platform activity:get --all --type project.create -P completed_at ``` * Find the duration (in seconds) of the last activity: ``` platform activity:get -P duration ``` ###### `activity:list` Get a list of activities for an environment or project Aliases: `activities`, `act` ####### Usage ``` platform activities [-t|--type TYPE] [-x|--exclude-type EXCLUDE-TYPE] [--limit LIMIT] [--start START] [--state STATE] [--result RESULT] [-i|--incomplete] [-a|--all] [--format FORMAT] [-c|--columns COLUMNS] [--no-header] [--date-fmt DATE-FMT] [-p|--project PROJECT] [-e|--environment ENVIRONMENT] ``` ######## Options * `--type` (`-t`) (expects a value) Filter activities by type For a list of types see: https://docs.platform.sh/integrations/activity/reference.html#type Values may be split by commas (e.g. "a,b,c") and/or whitespace. The first part of the activity name can be omitted, e.g. 'cron' can select 'environment.cron' activities. The % or * characters can be used as a wildcard, e.g. '%var%' to select variable-related activities. * `--exclude-type` (`-x`) (expects a value) Exclude activities by type. Values may be split by commas (e.g. "a,b,c") and/or whitespace. The first part of the activity name can be omitted, e.g. 'cron' can exclude 'environment.cron' activities. The % or * characters can be used as a wildcard to exclude types. * `--limit` (expects a value) Limit the number of results displayed * `--start` (expects a value) Only activities created before this date will be listed * `--state` (expects a value) Filter activities by state: in_progress, pending, complete, or cancelled. Values may be split by commas (e.g. "a,b,c") and/or whitespace. * `--result` (expects a value) Filter activities by result: success or failure * `--incomplete` (`-i`) Only list incomplete activities * `--all` (`-a`) List activities on all environments * `--format` (expects a value) The output format: table, csv, tsv, or plain * `--columns` (`-c`) (expects a value) Columns to display. Available columns: id*, created*, description*, progress*, state*, result*, completed, environments, time_build, time_deploy, time_execute, time_wait, type (* = default columns). The character "+" can be used as a placeholder for the default columns. The % or * characters may be used as a wildcard. Values may be split by commas (e.g. "a,b,c") and/or whitespace. * `--no-header` Do not output the table header * `--date-fmt` (expects a value) The date format (as a PHP date format string) * `--project` (`-p`) (expects a value) The project ID or URL * `--environment` (`-e`) (expects a value) The environment ID. Use "." to select the project's default environment. * `--help` (`-h`) Display this help message * `--verbose` (`-v|-vv|-vvv`) Increase the verbosity of messages * `--version` (`-V`) Display this application version * `--yes` (`-y`) Answer "yes" to confirmation questions; accept the default value for other questions; disable interaction * `--no-interaction` Do not ask any interactive questions; accept default values. Equivalent to using the environment variable: PLATFORMSH_CLI_NO_INTERACTION=1 ####### Examples * List recent activities for the current environment: ``` platform activity:list ``` * List all recent activities for the current project: ``` platform activity:list --all ``` * List recent pushes: ``` platform activity:list --type push ``` * List all recent activities excluding crons and redeploys: ``` platform activity:list --exclude-type '*.cron,*.backup*' ``` * List pushes made before 15 March: ``` platform activity:list --type push --start 2015-03-15 ``` * List up to 25 incomplete activities: ``` platform activity:list --limit 25 -i ``` ###### `activity:log` Display the log for an activity ####### Usage ``` platform activity:log [--refresh REFRESH] [-t|--timestamps] [--type TYPE] [-x|--exclude-type EXCLUDE-TYPE] [--state STATE] [--result RESULT] [-i|--incomplete] [-a|--all] [--date-fmt DATE-FMT] [-p|--project PROJECT] [-e|--environment ENVIRONMENT] [--] [] ``` ######## Arguments * `id`(optional) The activity ID. Defaults to the most recent activity. ######## Options * `--refresh` (expects a value) Activity refresh interval (seconds). Set to 0 to disable refreshing. * `--timestamps` (`-t`) Display a timestamp next to each message * `--type` (expects a value) Filter by type (when selecting a default activity). Values may be split by commas (e.g. "a,b,c") and/or whitespace. The % or * characters can be used as a wildcard for the type, e.g. '%var%' to select variable-related activities. * `--exclude-type` (`-x`) (expects a value) Exclude by type (when selecting a default activity). Values may be split by commas (e.g. "a,b,c") and/or whitespace. The % or * characters can be used as a wildcard to exclude types. * `--state` (expects a value) Filter by state (when selecting a default activity): in_progress, pending, complete, or cancelled. Values may be split by commas (e.g. "a,b,c") and/or whitespace. * `--result` (expects a value) Filter by result (when selecting a default activity): success or failure * `--incomplete` (`-i`) Include only incomplete activities (when selecting a default activity). This is a shorthand for --state=in_progress,pending * `--all` (`-a`) Check recent activities on all environments (when selecting a default activity) * `--date-fmt` (expects a value) The date format (as a PHP date format string) * `--project` (`-p`) (expects a value) The project ID or URL * `--environment` (`-e`) (expects a value) The environment ID. Use "." to select the project's default environment. * `--help` (`-h`) Display this help message * `--verbose` (`-v|-vv|-vvv`) Increase the verbosity of messages * `--version` (`-V`) Display this application version * `--yes` (`-y`) Answer "yes" to confirmation questions; accept the default value for other questions; disable interaction * `--no-interaction` Do not ask any interactive questions; accept default values. Equivalent to using the environment variable: PLATFORMSH_CLI_NO_INTERACTION=1 ####### Examples * Display the log for the last push on the current environment: ``` platform activity:log --type environment.push ``` * Display the log for the last activity on the current project: ``` platform activity:log --all ``` * Display the log for the last push, with microsecond timestamps: ``` platform activity:log -a -t --type %push --date-fmt 'Y-m-d\TH:i:s.uP' ``` ###### `app:config-get` View the configuration of an app ####### Usage ``` platform app:config-get [-P|--property PROPERTY] [--refresh] [-p|--project PROJECT] [-e|--environment ENVIRONMENT] [-A|--app APP] [-i|--identity-file IDENTITY-FILE] ``` ######## Options * `--property` (`-P`) (expects a value) The configuration property to view * `--refresh` Whether to refresh the cache * `--project` (`-p`) (expects a value) The project ID or URL * `--environment` (`-e`) (expects a value) The environment ID. Use "." to select the project's default environment. * `--app` (`-A`) (expects a value) The remote application name * `--identity-file` (`-i`) (expects a value) [Deprecated option, no longer used] * `--help` (`-h`) Display this help message * `--verbose` (`-v|-vv|-vvv`) Increase the verbosity of messages * `--version` (`-V`) Display this application version * `--yes` (`-y`) Answer "yes" to confirmation questions; accept the default value for other questions; disable interaction * `--no-interaction` Do not ask any interactive questions; accept default values. Equivalent to using the environment variable: PLATFORMSH_CLI_NO_INTERACTION=1 ###### `app:config-validate` Validate the config files of a project Aliases: `validate` ####### Usage ``` platform app:config-validate ``` ######## Options * `--help` (`-h`) Display this help message * `--verbose` (`-v|vv|vvv`) Increase the verbosity of messages * `--version` (`-V`) Display this application version * `--yes` (`-y`) Answer "yes" to confirmation questions; accept the default value for other questions; disable interaction * `--no-interaction` Do not ask any interactive questions; accept default values. Equivalent to using the environment variable: PLATFORMSH_CLI_NO_INTERACTION=1 ####### Examples * Validate the project configuration files in your current directory: ``` platform app:config-validate ``` ###### `app:list` List apps in the project Aliases: `apps` ####### Usage ``` platform apps [--refresh] [--pipe] [-p|--project PROJECT] [-e|--environment ENVIRONMENT] [--format FORMAT] [-c|--columns COLUMNS] [--no-header] ``` ######## Options * `--refresh` Whether to refresh the cache * `--pipe` Output a list of app names only * `--project` (`-p`) (expects a value) The project ID or URL * `--environment` (`-e`) (expects a value) The environment ID. Use "." to select the project's default environment. * `--format` (expects a value) The output format: table, csv, tsv, or plain * `--columns` (`-c`) (expects a value) Columns to display. Available columns: name*, type*, disk, path, size (* = default columns). The character "+" can be used as a placeholder for the default columns. The % or * characters may be used as a wildcard. Values may be split by commas (e.g. "a,b,c") and/or whitespace. * `--no-header` Do not output the table header * `--help` (`-h`) Display this help message * `--verbose` (`-v|-vv|-vvv`) Increase the verbosity of messages * `--version` (`-V`) Display this application version * `--yes` (`-y`) Answer "yes" to confirmation questions; accept the default value for other questions; disable interaction * `--no-interaction` Do not ask any interactive questions; accept default values. Equivalent to using the environment variable: PLATFORMSH_CLI_NO_INTERACTION=1 ###### `auth:api-token-login` Log in to Platform.sh using an API token ####### Usage ``` platform auth:api-token-login ``` Use this command to log in to your Platform.sh account using an API token. You can create an account at: https://auth.api.platform.sh/register Alternatively, to log in to the CLI with a browser, run: platform auth:browser-login ######## Options * `--help` (`-h`) Display this help message * `--verbose` (`-v|-vv|-vvv`) Increase the verbosity of messages * `--version` (`-V`) Display this application version * `--yes` (`-y`) Answer "yes" to confirmation questions; accept the default value for other questions; disable interaction * `--no-interaction` Do not ask any interactive questions; accept default values. Equivalent to using the environment variable: PLATFORMSH_CLI_NO_INTERACTION=1 ###### `auth:browser-login` Log in to Platform.sh via a browser Aliases: `login` ####### Usage ``` platform login [-f|--force] [--method METHOD] [--max-age MAX-AGE] [--browser BROWSER] [--pipe] ``` Use this command to log in to the Platform.sh CLI using a web browser. It launches a temporary local website which redirects you to log in if necessary, and then captures the resulting authorization code. Your system's default browser will be used. You can override this using the --browser option. Alternatively, to log in using an API token (without a browser), run: platform auth:api-token-login To authenticate non-interactively, configure an API token using the PLATFORMSH_CLI_TOKEN environment variable. ######## Options * `--force` (`-f`) Log in again, even if already logged in * `--method` (expects a value) Require specific authentication method(s) * `--max-age` (expects a value) The maximum age (in seconds) of the web authentication session * `--browser` (expects a value) The browser to use to open the URL. Set 0 for none. * `--pipe` Output the URL to stdout. * `--help` (`-h`) Display this help message * `--verbose` (`-v|-vv|-vvv`) Increase the verbosity of messages * `--version` (`-V`) Display this application version * `--yes` (`-y`) Answer "yes" to confirmation questions; accept the default value for other questions; disable interaction * `--no-interaction` Do not ask any interactive questions; accept default values. Equivalent to using the environment variable: PLATFORMSH_CLI_NO_INTERACTION=1 ###### `auth:info` Display your account information ####### Usage ``` platform auth:info [--no-auto-login] [-P|--property PROPERTY] [--refresh] [--format FORMAT] [-c|--columns COLUMNS] [--no-header] [--] [] ``` ######## Arguments * `property`(optional) The account property to view ######## Options * `--no-auto-login` Skips auto login. Nothing will be output if not logged in, and the exit code will be 0, assuming no other errors. * `--property` (`-P`) (expects a value) The account property to view (alternate syntax) * `--refresh` Whether to refresh the cache * `--format` (expects a value) The output format: table, csv, tsv, or plain * `--columns` (`-c`) (expects a value) Columns to display. The % or * characters may be used as a wildcard. Values may be split by commas (e.g. "a,b,c") and/or whitespace. * `--no-header` Do not output the table header * `--help` (`-h`) Display this help message * `--verbose` (`-v|-vv|-vvv`) Increase the verbosity of messages * `--version` (`-V`) Display this application version * `--yes` (`-y`) Answer "yes" to confirmation questions; accept the default value for other questions; disable interaction * `--no-interaction` Do not ask any interactive questions; accept default values. Equivalent to using the environment variable: PLATFORMSH_CLI_NO_INTERACTION=1 ####### Examples * Print your user ID: ``` platform auth:info id ``` * Print your email address: ``` platform auth:info email ``` * Print your user ID (or nothing if not logged in): ``` platform auth:info id --no-auto-login ``` ###### `auth:logout` Log out of Platform.sh Aliases: `logout` ####### Usage ``` platform logout [-a|--all] [--other] ``` ######## Options * `--all` (`-a`) Log out from all local sessions * `--other` Log out from other local sessions * `--help` (`-h`) Display this help message * `--verbose` (`-v|-vv|-vvv`) Increase the verbosity of messages * `--version` (`-V`) Display this application version * `--yes` (`-y`) Answer "yes" to confirmation questions; accept the default value for other questions; disable interaction * `--no-interaction` Do not ask any interactive questions; accept default values. Equivalent to using the environment variable: PLATFORMSH_CLI_NO_INTERACTION=1 ###### `auth:verify-phone-number` Verify your phone number interactively ####### Usage ``` platform auth:verify-phone-number ``` ######## Options * `--help` (`-h`) Display this help message * `--verbose` (`-v|-vv|-vvv`) Increase the verbosity of messages * `--version` (`-V`) Display this application version * `--yes` (`-y`) Answer "yes" to confirmation questions; accept the default value for other questions; disable interaction * `--no-interaction` Do not ask any interactive questions; accept default values. Equivalent to using the environment variable: PLATFORMSH_CLI_NO_INTERACTION=1 ###### `backup:create` Make a backup of an environment Aliases: `backup` ####### Usage ``` platform backup [--live] [-p|--project PROJECT] [-e|--environment ENVIRONMENT] [-W|--no-wait] [--wait] [--] [] ``` ######## Arguments * `environment`(optional) The environment ######## Options * `--live` Live backup: do not stop the environment. If set, this leaves the environment running and open to connections during the backup. This reduces downtime, at the risk of backing up data in an inconsistent state. * `--project` (`-p`) (expects a value) The project ID or URL * `--environment` (`-e`) (expects a value) The environment ID. Use "." to select the project's default environment. * `--no-wait` (`-W`) Do not wait for the operation to complete * `--wait` Wait for the operation to complete (default) * `--help` (`-h`) Display this help message * `--verbose` (`-v|-vv|-vvv`) Increase the verbosity of messages * `--version` (`-V`) Display this application version * `--yes` (`-y`) Answer "yes" to confirmation questions; accept the default value for other questions; disable interaction * `--no-interaction` Do not ask any interactive questions; accept default values. Equivalent to using the environment variable: PLATFORMSH_CLI_NO_INTERACTION=1 ####### Examples * Make a backup of the current environment: ``` platform backup:create ``` * Request a backup (and exit quickly): ``` platform backup:create --no-wait ``` * Make a backup avoiding downtime (but risking inconsistency): ``` platform backup:create --live ``` ###### `backup:delete` Delete an environment backup ####### Usage ``` platform backup:delete [-p|--project PROJECT] [-e|--environment ENVIRONMENT] [-W|--no-wait] [--wait] [--] [] ``` ######## Arguments * `backup`(optional) The ID of the backup. Required in non-interactive mode. ######## Options * `--project` (`-p`) (expects a value) The project ID or URL * `--environment` (`-e`) (expects a value) The environment ID. Use "." to select the project's default environment. * `--no-wait` (`-W`) Do not wait for the operation to complete * `--wait` Wait for the operation to complete (default) * `--help` (`-h`) Display this help message * `--verbose` (`-v|-vv|-vvv`) Increase the verbosity of messages * `--version` (`-V`) Display this application version * `--yes` (`-y`) Answer "yes" to confirmation questions; accept the default value for other questions; disable interaction * `--no-interaction` Do not ask any interactive questions; accept default values. Equivalent to using the environment variable: PLATFORMSH_CLI_NO_INTERACTION=1 ###### `backup:get` View an environment backup ####### Usage ``` platform backup:get [-P|--property PROPERTY] [-p|--project PROJECT] [-e|--environment ENVIRONMENT] [--date-fmt DATE-FMT] [--] [] ``` ######## Arguments * `backup`(optional) The ID of the backup. Defaults to the most recent one. ######## Options * `--property` (`-P`) (expects a value) The backup property to display. * `--project` (`-p`) (expects a value) The project ID or URL * `--environment` (`-e`) (expects a value) The environment ID. Use "." to select the project's default environment. * `--date-fmt` (expects a value) The date format (as a PHP date format string) * `--help` (`-h`) Display this help message * `--verbose` (`-v|-vv|-vvv`) Increase the verbosity of messages * `--version` (`-V`) Display this application version * `--yes` (`-y`) Answer "yes" to confirmation questions; accept the default value for other questions; disable interaction * `--no-interaction` Do not ask any interactive questions; accept default values. Equivalent to using the environment variable: PLATFORMSH_CLI_NO_INTERACTION=1 ###### `backup:list` List available backups of an environment Aliases: `backups` ####### Usage ``` platform backups [--format FORMAT] [-c|--columns COLUMNS] [--no-header] [--date-fmt DATE-FMT] [-p|--project PROJECT] [-e|--environment ENVIRONMENT] ``` ######## Options * `--format` (expects a value) The output format: table, csv, tsv, or plain * `--columns` (`-c`) (expects a value) Columns to display. Available columns: created_at*, id*, restorable*, automated, commit_id, expires_at, index, live, status, updated_at (* = default columns). The character "+" can be used as a placeholder for the default columns. The % or * characters may be used as a wildcard. Values may be split by commas (e.g. "a,b,c") and/or whitespace. * `--no-header` Do not output the table header * `--date-fmt` (expects a value) The date format (as a PHP date format string) * `--project` (`-p`) (expects a value) The project ID or URL * `--environment` (`-e`) (expects a value) The environment ID. Use "." to select the project's default environment. * `--help` (`-h`) Display this help message * `--verbose` (`-v|-vv|-vvv`) Increase the verbosity of messages * `--version` (`-V`) Display this application version * `--yes` (`-y`) Answer "yes" to confirmation questions; accept the default value for other questions; disable interaction * `--no-interaction` Do not ask any interactive questions; accept default values. Equivalent to using the environment variable: PLATFORMSH_CLI_NO_INTERACTION=1 ####### Examples * Display backups including the "live" and "commit_id" columns: ``` platform backup:list -c+live,commit_id ``` ###### `backup:restore` Restore an environment backup ####### Usage ``` platform backup:restore [--target TARGET] [--branch-from BRANCH-FROM] [--no-code] [-p|--project PROJECT] [-e|--environment ENVIRONMENT] [-W|--no-wait] [--wait] [--] [] ``` ######## Arguments * `backup`(optional) The ID of the backup. Defaults to the most recent one ######## Options * `--target` (expects a value) The environment to restore to. Defaults to the backup's current environment * `--branch-from` (expects a value) If the --target does not yet exist, this specifies the parent of the new environment * `--no-code` Do not restore code, only data. * `--project` (`-p`) (expects a value) The project ID or URL * `--environment` (`-e`) (expects a value) The environment ID. Use "." to select the project's default environment. * `--no-wait` (`-W`) Do not wait for the operation to complete * `--wait` Wait for the operation to complete (default) * `--help` (`-h`) Display this help message * `--verbose` (`-v|-vv|-vvv`) Increase the verbosity of messages * `--version` (`-V`) Display this application version * `--yes` (`-y`) Answer "yes" to confirmation questions; accept the default value for other questions; disable interaction * `--no-interaction` Do not ask any interactive questions; accept default values. Equivalent to using the environment variable: PLATFORMSH_CLI_NO_INTERACTION=1 ####### Examples * Restore the most recent backup: ``` platform backup:restore ``` * Restore a specific backup: ``` platform backup:restore 92c9a4b2aa75422efb3d ``` ###### `certificate:add` Add an SSL certificate to the project ####### Usage ``` platform certificate:add [--cert CERT] [--key KEY] [--chain CHAIN] [-p|--project PROJECT] [-W|--no-wait] [--wait] ``` ######## Options * `--cert` (expects a value) The path to the certificate file * `--key` (expects a value) The path to the certificate private key file * `--chain` (expects a value) The path to the certificate chain file * `--project` (`-p`) (expects a value) The project ID or URL * `--no-wait` (`-W`) Do not wait for the operation to complete * `--wait` Wait for the operation to complete (default) * `--help` (`-h`) Display this help message * `--verbose` (`-v|-vv|-vvv`) Increase the verbosity of messages * `--version` (`-V`) Display this application version * `--yes` (`-y`) Answer "yes" to confirmation questions; accept the default value for other questions; disable interaction * `--no-interaction` Do not ask any interactive questions; accept default values. Equivalent to using the environment variable: PLATFORMSH_CLI_NO_INTERACTION=1 ###### `certificate:delete` Delete a certificate from the project ####### Usage ``` platform certificate:delete [-p|--project PROJECT] [-W|--no-wait] [--wait] [--] ``` ######## Arguments * `id`(required) The certificate ID (or the start of it) ######## Options * `--project` (`-p`) (expects a value) The project ID or URL * `--no-wait` (`-W`) Do not wait for the operation to complete * `--wait` Wait for the operation to complete (default) * `--help` (`-h`) Display this help message * `--verbose` (`-v|-vv|-vvv`) Increase the verbosity of messages * `--version` (`-V`) Display this application version * `--yes` (`-y`) Answer "yes" to confirmation questions; accept the default value for other questions; disable interaction * `--no-interaction` Do not ask any interactive questions; accept default values. Equivalent to using the environment variable: PLATFORMSH_CLI_NO_INTERACTION=1 ###### `certificate:get` View a certificate ####### Usage ``` platform certificate:get [-P|--property PROPERTY] [--date-fmt DATE-FMT] [-p|--project PROJECT] [--] ``` ######## Arguments * `id`(required) The certificate ID (or the start of it) ######## Options * `--property` (`-P`) (expects a value) The certificate property to view * `--date-fmt` (expects a value) The date format (as a PHP date format string) * `--project` (`-p`) (expects a value) The project ID or URL * `--help` (`-h`) Display this help message * `--verbose` (`-v|-vv|-vvv`) Increase the verbosity of messages * `--version` (`-V`) Display this application version * `--yes` (`-y`) Answer "yes" to confirmation questions; accept the default value for other questions; disable interaction * `--no-interaction` Do not ask any interactive questions; accept default values. Equivalent to using the environment variable: PLATFORMSH_CLI_NO_INTERACTION=1 ###### `certificate:list` List project certificates Aliases: `certificates`, `certs` ####### Usage ``` platform certificates [--domain DOMAIN] [--exclude-domain EXCLUDE-DOMAIN] [--issuer ISSUER] [--only-auto] [--no-auto] [--ignore-expiry] [--only-expired] [--no-expired] [--pipe-domains] [--date-fmt DATE-FMT] [--format FORMAT] [-c|--columns COLUMNS] [--no-header] [-p|--project PROJECT] ``` ######## Options * `--domain` (expects a value) Filter by domain name (case-insensitive search) * `--exclude-domain` (expects a value) Exclude certificates, matching by domain name (case-insensitive search) * `--issuer` (expects a value) Filter by issuer * `--only-auto` Show only auto-provisioned certificates * `--no-auto` Show only manually added certificates * `--ignore-expiry` Show both expired and non-expired certificates * `--only-expired` Show only expired certificates * `--no-expired` Show only non-expired certificates (default) * `--pipe-domains` Only return a list of domain names covered by the certificates * `--date-fmt` (expects a value) The date format (as a PHP date format string) * `--format` (expects a value) The output format: table, csv, tsv, or plain * `--columns` (`-c`) (expects a value) Columns to display. Available columns: created, domains, expires, id, issuer. The % or * characters may be used as a wildcard. Values may be split by commas (e.g. "a,b,c") and/or whitespace. * `--no-header` Do not output the table header * `--project` (`-p`) (expects a value) The project ID or URL * `--help` (`-h`) Display this help message * `--verbose` (`-v|-vv|-vvv`) Increase the verbosity of messages * `--version` (`-V`) Display this application version * `--yes` (`-y`) Answer "yes" to confirmation questions; accept the default value for other questions; disable interaction * `--no-interaction` Do not ask any interactive questions; accept default values. Equivalent to using the environment variable: PLATFORMSH_CLI_NO_INTERACTION=1 ####### Examples * Output a list of domains covered by valid certificates: ``` platform certificate:list --pipe-domains --no-expired ``` ###### `commit:get` Show commit details ####### Usage ``` platform commit:get [-P|--property PROPERTY] [-p|--project PROJECT] [-e|--environment ENVIRONMENT] [--date-fmt DATE-FMT] [--] [] ``` ######## Arguments * `commit`(optional) The commit SHA. This can also accept "HEAD", and caret (^) or tilde (~) suffixes for parent commits. ######## Options * `--property` (`-P`) (expects a value) The commit property to display. * `--project` (`-p`) (expects a value) The project ID or URL * `--environment` (`-e`) (expects a value) The environment ID. Use "." to select the project's default environment. * `--date-fmt` (expects a value) The date format (as a PHP date format string) * `--help` (`-h`) Display this help message * `--verbose` (`-v|-vv|-vvv`) Increase the verbosity of messages * `--version` (`-V`) Display this application version * `--yes` (`-y`) Answer "yes" to confirmation questions; accept the default value for other questions; disable interaction * `--no-interaction` Do not ask any interactive questions; accept default values. Equivalent to using the environment variable: PLATFORMSH_CLI_NO_INTERACTION=1 ####### Examples * Display the current commit on the environment: ``` platform commit:get ``` * Display the previous commit: ``` platform commit:get HEAD~ ``` * Display the 3rd commit before the current one: ``` platform commit:get HEAD~3 ``` * Display the email address of the last commit author: ``` platform commit:get -P author.email ``` ###### `commit:list` List commits Aliases: `commits` ####### Usage ``` platform commits [--limit LIMIT] [-p|--project PROJECT] [-e|--environment ENVIRONMENT] [--format FORMAT] [-c|--columns COLUMNS] [--no-header] [--date-fmt DATE-FMT] [--] [] ``` ######## Arguments * `commit`(optional) The starting Git commit SHA. This can also accept "HEAD", and caret (^) or tilde (~) suffixes for parent commits. ######## Options * `--limit` (expects a value) The number of commits to display. * `--project` (`-p`) (expects a value) The project ID or URL * `--environment` (`-e`) (expects a value) The environment ID. Use "." to select the project's default environment. * `--format` (expects a value) The output format: table, csv, tsv, or plain * `--columns` (`-c`) (expects a value) Columns to display. Available columns: author, date, sha, summary. The % or * characters may be used as a wildcard. Values may be split by commas (e.g. "a,b,c") and/or whitespace. * `--no-header` Do not output the table header * `--date-fmt` (expects a value) The date format (as a PHP date format string) * `--help` (`-h`) Display this help message * `--verbose` (`-v|-vv|-vvv`) Increase the verbosity of messages * `--version` (`-V`) Display this application version * `--yes` (`-y`) Answer "yes" to confirmation questions; accept the default value for other questions; disable interaction * `--no-interaction` Do not ask any interactive questions; accept default values. Equivalent to using the environment variable: PLATFORMSH_CLI_NO_INTERACTION=1 ####### Examples * Display commits on an environment: ``` platform commit:list ``` * Display commits starting from two before the current one: ``` platform commit:list HEAD~2 ``` ###### `db:dump` Create a local dump of the remote database ####### Usage ``` platform db:dump [--schema SCHEMA] [-f|--file FILE] [-d|--directory DIRECTORY] [-z|--gzip] [-t|--timestamp] [-o|--stdout] [--table TABLE] [--exclude-table EXCLUDE-TABLE] [--schema-only] [--charset CHARSET] [-p|--project PROJECT] [-e|--environment ENVIRONMENT] [-A|--app APP] [-r|--relationship RELATIONSHIP] ``` ######## Options * `--schema` (expects a value) The schema to dump. Omit to use the default schema (usually "main"). * `--file` (`-f`) (expects a value) A custom filename for the dump * `--directory` (`-d`) (expects a value) A custom directory for the dump * `--gzip` (`-z`) Compress the dump using gzip * `--timestamp` (`-t`) Add a timestamp to the dump filename * `--stdout` (`-o`) Output to STDOUT instead of a file * `--table` (expects a value) Table(s) to include * `--exclude-table` (expects a value) Table(s) to exclude * `--schema-only` Dump only schemas, no data * `--charset` (expects a value) The character set encoding for the dump * `--project` (`-p`) (expects a value) The project ID or URL * `--environment` (`-e`) (expects a value) The environment ID. Use "." to select the project's default environment. * `--app` (`-A`) (expects a value) The remote application name * `--relationship` (`-r`) (expects a value) The service relationship to use * `--help` (`-h`) Display this help message * `--verbose` (`-v|-vv|-vvv`) Increase the verbosity of messages * `--version` (`-V`) Display this application version * `--yes` (`-y`) Answer "yes" to confirmation questions; accept the default value for other questions; disable interaction * `--no-interaction` Do not ask any interactive questions; accept default values. Equivalent to using the environment variable: PLATFORMSH_CLI_NO_INTERACTION=1 ####### Examples * Create an SQL dump file: ``` platform db:dump ``` * Create a gzipped SQL dump file named "dump.sql.gz": ``` platform db:dump --gzip -f dump.sql.gz ``` ###### `db:sql` Run SQL on the remote database Aliases: `sql` ####### Usage ``` platform sql [--raw] [--schema SCHEMA] [-p|--project PROJECT] [-e|--environment ENVIRONMENT] [-A|--app APP] [-r|--relationship RELATIONSHIP] [--] [] ``` ######## Arguments * `query`(optional) An SQL statement to execute ######## Options * `--raw` Produce raw, non-tabular output * `--schema` (expects a value) The schema to use. Omit to use the default schema (usually "main"). Pass an empty string to not use any schema. * `--project` (`-p`) (expects a value) The project ID or URL * `--environment` (`-e`) (expects a value) The environment ID. Use "." to select the project's default environment. * `--app` (`-A`) (expects a value) The remote application name * `--relationship` (`-r`) (expects a value) The service relationship to use * `--help` (`-h`) Display this help message * `--verbose` (`-v|-vv|-vvv`) Increase the verbosity of messages * `--version` (`-V`) Display this application version * `--yes` (`-y`) Answer "yes" to confirmation questions; accept the default value for other questions; disable interaction * `--no-interaction` Do not ask any interactive questions; accept default values. Equivalent to using the environment variable: PLATFORMSH_CLI_NO_INTERACTION=1 ####### Examples * Open an SQL console on the remote database: ``` platform db:sql ``` * View tables on the remote database: ``` platform db:sql 'SHOW TABLES' ``` * Import a dump file into the remote database: ``` platform db:sql ``` ######## Arguments * `name`(required) The domain name ######## Options * `--cert` (expects a value) The path to a custom certificate file * `--key` (expects a value) The path to the private key for the custom certificate * `--chain` (expects a value) The path to the chain file(s) for the custom certificate * `--attach` (expects a value) The production domain that this one replaces in the environment's routes. Required for non-production environment domains. * `--project` (`-p`) (expects a value) The project ID or URL * `--environment` (`-e`) (expects a value) The environment ID. Use "." to select the project's default environment. * `--no-wait` (`-W`) Do not wait for the operation to complete * `--wait` Wait for the operation to complete (default) * `--help` (`-h`) Display this help message * `--verbose` (`-v|-vv|-vvv`) Increase the verbosity of messages * `--version` (`-V`) Display this application version * `--yes` (`-y`) Answer "yes" to confirmation questions; accept the default value for other questions; disable interaction * `--no-interaction` Do not ask any interactive questions; accept default values. Equivalent to using the environment variable: PLATFORMSH_CLI_NO_INTERACTION=1 ####### Examples * Add the domain example.com: ``` platform domain:add example.com ``` * Add the domain example.org with a custom SSL/TLS certificate: ``` platform domain:add example.org --cert example-org.crt --key example-org.key ``` ###### `domain:delete` Delete a domain from the project ####### Usage ``` platform domain:delete [-p|--project PROJECT] [-e|--environment ENVIRONMENT] [-W|--no-wait] [--wait] [--] ``` ######## Arguments * `name`(required) The domain name ######## Options * `--project` (`-p`) (expects a value) The project ID or URL * `--environment` (`-e`) (expects a value) The environment ID. Use "." to select the project's default environment. * `--no-wait` (`-W`) Do not wait for the operation to complete * `--wait` Wait for the operation to complete (default) * `--help` (`-h`) Display this help message * `--verbose` (`-v|-vv|-vvv`) Increase the verbosity of messages * `--version` (`-V`) Display this application version * `--yes` (`-y`) Answer "yes" to confirmation questions; accept the default value for other questions; disable interaction * `--no-interaction` Do not ask any interactive questions; accept default values. Equivalent to using the environment variable: PLATFORMSH_CLI_NO_INTERACTION=1 ####### Examples * Delete the domain example.com: ``` platform domain:delete example.com ``` ###### `domain:get` Show detailed information for a domain ####### Usage ``` platform domain:get [-P|--property PROPERTY] [--format FORMAT] [-c|--columns COLUMNS] [--no-header] [--date-fmt DATE-FMT] [-p|--project PROJECT] [-e|--environment ENVIRONMENT] [--] [] ``` ######## Arguments * `name`(optional) The domain name ######## Options * `--property` (`-P`) (expects a value) The domain property to view * `--format` (expects a value) The output format: table, csv, tsv, or plain * `--columns` (`-c`) (expects a value) Columns to display. The % or * characters may be used as a wildcard. Values may be split by commas (e.g. "a,b,c") and/or whitespace. * `--no-header` Do not output the table header * `--date-fmt` (expects a value) The date format (as a PHP date format string) * `--project` (`-p`) (expects a value) The project ID or URL * `--environment` (`-e`) (expects a value) The environment ID. Use "." to select the project's default environment. * `--help` (`-h`) Display this help message * `--verbose` (`-v|-vv|-vvv`) Increase the verbosity of messages * `--version` (`-V`) Display this application version * `--yes` (`-y`) Answer "yes" to confirmation questions; accept the default value for other questions; disable interaction * `--no-interaction` Do not ask any interactive questions; accept default values. Equivalent to using the environment variable: PLATFORMSH_CLI_NO_INTERACTION=1 ###### `domain:list` Get a list of all domains Aliases: `domains` ####### Usage ``` platform domains [--format FORMAT] [-c|--columns COLUMNS] [--no-header] [-p|--project PROJECT] [-e|--environment ENVIRONMENT] ``` ######## Options * `--format` (expects a value) The output format: table, csv, tsv, or plain * `--columns` (`-c`) (expects a value) Columns to display. Available columns: name*, ssl*, created_at*, registered_name, replacement_for, type, updated_at (* = default columns). The character "+" can be used as a placeholder for the default columns. The % or * characters may be used as a wildcard. Values may be split by commas (e.g. "a,b,c") and/or whitespace. * `--no-header` Do not output the table header * `--project` (`-p`) (expects a value) The project ID or URL * `--environment` (`-e`) (expects a value) The environment ID. Use "." to select the project's default environment. * `--help` (`-h`) Display this help message * `--verbose` (`-v|-vv|-vvv`) Increase the verbosity of messages * `--version` (`-V`) Display this application version * `--yes` (`-y`) Answer "yes" to confirmation questions; accept the default value for other questions; disable interaction * `--no-interaction` Do not ask any interactive questions; accept default values. Equivalent to using the environment variable: PLATFORMSH_CLI_NO_INTERACTION=1 ###### `domain:update` Update a domain ####### Usage ``` platform domain:update [--cert CERT] [--key KEY] [--chain CHAIN] [-p|--project PROJECT] [-e|--environment ENVIRONMENT] [-W|--no-wait] [--wait] [--] ``` ######## Arguments * `name`(required) The domain name ######## Options * `--cert` (expects a value) The path to a custom certificate file * `--key` (expects a value) The path to the private key for the custom certificate * `--chain` (expects a value) The path to the chain file(s) for the custom certificate * `--project` (`-p`) (expects a value) The project ID or URL * `--environment` (`-e`) (expects a value) The environment ID. Use "." to select the project's default environment. * `--no-wait` (`-W`) Do not wait for the operation to complete * `--wait` Wait for the operation to complete (default) * `--help` (`-h`) Display this help message * `--verbose` (`-v|-vv|-vvv`) Increase the verbosity of messages * `--version` (`-V`) Display this application version * `--yes` (`-y`) Answer "yes" to confirmation questions; accept the default value for other questions; disable interaction * `--no-interaction` Do not ask any interactive questions; accept default values. Equivalent to using the environment variable: PLATFORMSH_CLI_NO_INTERACTION=1 ####### Examples * Update the custom certificate for the domain example.org: ``` platform domain:update example.org --cert example-org.crt --key example-org.key ``` ###### `environment:activate` Activate an environment ####### Usage ``` platform environment:activate [--parent PARENT] [-p|--project PROJECT] [-e|--environment ENVIRONMENT] [-W|--no-wait] [--wait] [--] []... ``` ######## Arguments * `environment`(optional; multiple values allowed) The environment(s) to activate ######## Options * `--parent` (expects a value) Set a new environment parent before activating * `--project` (`-p`) (expects a value) The project ID or URL * `--environment` (`-e`) (expects a value) The environment ID. Use "." to select the project's default environment. * `--no-wait` (`-W`) Do not wait for the operation to complete * `--wait` Wait for the operation to complete (default) * `--help` (`-h`) Display this help message * `--verbose` (`-v|-vv|-vvv`) Increase the verbosity of messages * `--version` (`-V`) Display this application version * `--yes` (`-y`) Answer "yes" to confirmation questions; accept the default value for other questions; disable interaction * `--no-interaction` Do not ask any interactive questions; accept default values. Equivalent to using the environment variable: PLATFORMSH_CLI_NO_INTERACTION=1 ####### Examples * Activate the environments "develop" and "stage": ``` platform environment:activate develop stage ``` ###### `environment:branch` Branch an environment Aliases: `branch` ####### Usage ``` platform branch [--title TITLE] [--type TYPE] [--no-clone-parent] [--no-checkout] [-p|--project PROJECT] [-e|--environment ENVIRONMENT] [-W|--no-wait] [--wait] [--] [] [] ``` ######## Arguments * `id`(optional) The ID (branch name) of the new environment * `parent`(optional) The parent of the new environment ######## Options * `--title` (expects a value) The title of the new environment * `--type` (expects a value) The type of the new environment * `--no-clone-parent` Do not clone the parent environment's data * `--no-checkout` Do not check out the branch locally * `--project` (`-p`) (expects a value) The project ID or URL * `--environment` (`-e`) (expects a value) The environment ID. Use "." to select the project's default environment. * `--no-wait` (`-W`) Do not wait for the operation to complete * `--wait` Wait for the operation to complete (default) * `--help` (`-h`) Display this help message * `--verbose` (`-v|-vv|-vvv`) Increase the verbosity of messages * `--version` (`-V`) Display this application version * `--yes` (`-y`) Answer "yes" to confirmation questions; accept the default value for other questions; disable interaction * `--no-interaction` Do not ask any interactive questions; accept default values. Equivalent to using the environment variable: PLATFORMSH_CLI_NO_INTERACTION=1 ####### Examples * Create a new branch "sprint-2", based on "develop": ``` platform environment:branch sprint-2 develop ``` ###### `environment:checkout` Check out an environment Aliases: `checkout` ####### Usage ``` platform checkout [] ``` ######## Arguments * `id`(optional) The ID of the environment to check out. For example: "sprint2" ######## Options * `--help` (`-h`) Display this help message * `--verbose` (`-v|-vv|-vvv`) Increase the verbosity of messages * `--version` (`-V`) Display this application version * `--yes` (`-y`) Answer "yes" to confirmation questions; accept the default value for other questions; disable interaction * `--no-interaction` Do not ask any interactive questions; accept default values. Equivalent to using the environment variable: PLATFORMSH_CLI_NO_INTERACTION=1 ####### Examples * Check out the environment "develop": ``` platform environment:checkout develop ``` ###### `environment:delete` Delete one or more environments ####### Usage ``` platform environment:delete [--delete-branch] [--no-delete-branch] [--type TYPE] [-t|--only-type ONLY-TYPE] [--exclude EXCLUDE] [--exclude-type EXCLUDE-TYPE] [--inactive] [--status STATUS] [--only-status ONLY-STATUS] [--exclude-status EXCLUDE-STATUS] [--merged] [--allow-delete-parent] [-p|--project PROJECT] [-e|--environment ENVIRONMENT] [-W|--no-wait] [--wait] [--] []... ``` When a Platform.sh environment is deleted, it will become "inactive": it will exist only as a Git branch, containing code but no services, databases nor files. This command allows you to delete environments as well as their Git branches. ######## Arguments * `environment`(optional; multiple values allowed) The environment(s) to delete. The % or * characters may be used as a wildcard. Values may be split by commas (e.g. "a,b,c") and/or whitespace. ######## Options * `--delete-branch` Delete Git branch(es) for inactive environments, without confirmation * `--no-delete-branch` Do not delete any Git branch(es) (inactive environments) * `--type` (expects a value) Delete all environments of a type (adding to any others selected) Values may be split by commas (e.g. "a,b,c") and/or whitespace. * `--only-type` (`-t`) (expects a value) Only delete environments of a specific type Values may be split by commas (e.g. "a,b,c") and/or whitespace. * `--exclude` (expects a value) Environment(s) not to delete. The % or * characters may be used as a wildcard. Values may be split by commas (e.g. "a,b,c") and/or whitespace. * `--exclude-type` (expects a value) Environment type(s) of which not to delete Values may be split by commas (e.g. "a,b,c") and/or whitespace. * `--inactive` Delete all inactive environments (adding to any others selected) * `--status` (expects a value) Delete all environments of a status (adding to any others selected) Values may be split by commas (e.g. "a,b,c") and/or whitespace. * `--only-status` (expects a value) Only delete environments of a specific status Values may be split by commas (e.g. "a,b,c") and/or whitespace. * `--exclude-status` (expects a value) Environment status(es) of which not to delete Values may be split by commas (e.g. "a,b,c") and/or whitespace. * `--merged` Delete all merged environments (adding to any others selected) * `--allow-delete-parent` Allow environments that have children to be deleted * `--project` (`-p`) (expects a value) The project ID or URL * `--environment` (`-e`) (expects a value) The environment ID. Use "." to select the project's default environment. * `--no-wait` (`-W`) Do not wait for the operation to complete * `--wait` Wait for the operation to complete (default) * `--help` (`-h`) Display this help message * `--verbose` (`-v|-vv|-vvv`) Increase the verbosity of messages * `--version` (`-V`) Display this application version * `--yes` (`-y`) Answer "yes" to confirmation questions; accept the default value for other questions; disable interaction * `--no-interaction` Do not ask any interactive questions; accept default values. Equivalent to using the environment variable: PLATFORMSH_CLI_NO_INTERACTION=1 ####### Examples * Delete the currently checked out environment: ``` platform environment:delete ``` * Delete the environments "test" and "example-1": ``` platform environment:delete test example-1 ``` * Delete all inactive environments: ``` platform environment:delete --inactive ``` * Delete all environments merged with their parent: ``` platform environment:delete --merged ``` ###### `environment:drush` Run a drush command on the remote environment Aliases: `drush` ####### Usage ``` platform drush [-p|--project PROJECT] [-e|--environment ENVIRONMENT] [-A|--app APP] [--] []... ``` ######## Arguments * `cmd`(optional; multiple values allowed) A command to pass to Drush ######## Options * `--project` (`-p`) (expects a value) The project ID or URL * `--environment` (`-e`) (expects a value) The environment ID. Use "." to select the project's default environment. * `--app` (`-A`) (expects a value) The remote application name * `--help` (`-h`) Display this help message * `--verbose` (`-v|-vv|-vvv`) Increase the verbosity of messages * `--version` (`-V`) Display this application version * `--yes` (`-y`) Answer "yes" to confirmation questions; accept the default value for other questions; disable interaction * `--no-interaction` Do not ask any interactive questions; accept default values. Equivalent to using the environment variable: PLATFORMSH_CLI_NO_INTERACTION=1 ####### Examples * Run "drush status" on the remote environment: ``` platform environment:drush status ``` * Enable the Overlay module on the remote environment: ``` platform environment:drush en overlay ``` * Get a one-time login link (using -- before options): ``` platform environment:drush user-login -- --mail=name@example.com ``` * Alternative syntax (quoting the whole command): ``` platform environment:drush 'user-login --mail=name@example.com' ``` ###### `environment:http-access` Update HTTP access settings for an environment Aliases: `httpaccess` ####### Usage ``` platform httpaccess [--access ACCESS] [--auth AUTH] [--enabled ENABLED] [-p|--project PROJECT] [-e|--environment ENVIRONMENT] [-W|--no-wait] [--wait] ``` ######## Options * `--access` (expects a value) Access restriction in the format "permission:address". Use 0 to clear all addresses. * `--auth` (expects a value) HTTP Basic auth credentials in the format "username:password". Use 0 to clear all credentials. * `--enabled` (expects a value) Whether access control should be enabled: 1 to enable, 0 to disable * `--project` (`-p`) (expects a value) The project ID or URL * `--environment` (`-e`) (expects a value) The environment ID. Use "." to select the project's default environment. * `--no-wait` (`-W`) Do not wait for the operation to complete * `--wait` Wait for the operation to complete (default) * `--help` (`-h`) Display this help message * `--verbose` (`-v|-vv|-vvv`) Increase the verbosity of messages * `--version` (`-V`) Display this application version * `--yes` (`-y`) Answer "yes" to confirmation questions; accept the default value for other questions; disable interaction * `--no-interaction` Do not ask any interactive questions; accept default values. Equivalent to using the environment variable: PLATFORMSH_CLI_NO_INTERACTION=1 ####### Examples * Require a username and password: ``` platform environment:http-access --auth myname:mypassword ``` * Restrict access to only one IP address: ``` platform environment:http-access --access allow:69.208.1.192 --access deny:any ``` * Remove the password requirement, keeping IP restrictions: ``` platform environment:http-access --auth 0 ``` * Disable all HTTP access control: ``` platform environment:http-access --enabled 0 ``` ###### `environment:info` Read or set properties for an environment ####### Usage ``` platform environment:info [--refresh] [--date-fmt DATE-FMT] [--format FORMAT] [-c|--columns COLUMNS] [--no-header] [-p|--project PROJECT] [-e|--environment ENVIRONMENT] [-W|--no-wait] [--wait] [--] [] [] ``` ######## Arguments * `property`(optional) The name of the property * `value`(optional) Set a new value for the property ######## Options * `--refresh` Whether to refresh the cache * `--date-fmt` (expects a value) The date format (as a PHP date format string) * `--format` (expects a value) The output format: table, csv, tsv, or plain * `--columns` (`-c`) (expects a value) Columns to display. The % or * characters may be used as a wildcard. Values may be split by commas (e.g. "a,b,c") and/or whitespace. * `--no-header` Do not output the table header * `--project` (`-p`) (expects a value) The project ID or URL * `--environment` (`-e`) (expects a value) The environment ID. Use "." to select the project's default environment. * `--no-wait` (`-W`) Do not wait for the operation to complete * `--wait` Wait for the operation to complete (default) * `--help` (`-h`) Display this help message * `--verbose` (`-v|-vv|-vvv`) Increase the verbosity of messages * `--version` (`-V`) Display this application version * `--yes` (`-y`) Answer "yes" to confirmation questions; accept the default value for other questions; disable interaction * `--no-interaction` Do not ask any interactive questions; accept default values. Equivalent to using the environment variable: PLATFORMSH_CLI_NO_INTERACTION=1 ####### Examples * Read all environment properties: ``` platform environment:info ``` * Show the environment's status: ``` platform environment:info status ``` * Show the date the environment was created: ``` platform environment:info created_at ``` * Enable email sending: ``` platform environment:info enable_smtp true ``` * Change the environment title: ``` platform environment:info title "New feature" ``` * Change the environment's parent branch: ``` platform environment:info parent sprint-2 ``` * Unset the environment's parent branch: ``` platform environment:info parent - ``` ###### `environment:init` Initialize an environment from a public Git repository ####### Usage ``` platform environment:init [--profile PROFILE] [-p|--project PROJECT] [-e|--environment ENVIRONMENT] [-W|--no-wait] [--wait] [--] ``` ######## Arguments * `url`(required) A URL to a Git repository ######## Options * `--profile` (expects a value) The name of the profile * `--project` (`-p`) (expects a value) The project ID or URL * `--environment` (`-e`) (expects a value) The environment ID. Use "." to select the project's default environment. * `--no-wait` (`-W`) Do not wait for the operation to complete * `--wait` Wait for the operation to complete (default) * `--help` (`-h`) Display this help message * `--verbose` (`-v|-vv|-vvv`) Increase the verbosity of messages * `--version` (`-V`) Display this application version * `--yes` (`-y`) Answer "yes" to confirmation questions; accept the default value for other questions; disable interaction * `--no-interaction` Do not ask any interactive questions; accept default values. Equivalent to using the environment variable: PLATFORMSH_CLI_NO_INTERACTION=1 ####### Examples * Initialize using the Platform.sh Go template: ``` platform environment:init https://github.com/platformsh-templates/golang ``` ###### `environment:list` Get a list of environments Aliases: `environments`, `env` ####### Usage ``` platform environments [-I|--no-inactive] [--status STATUS] [--pipe] [--refresh REFRESH] [--sort SORT] [--reverse] [--type TYPE] [--format FORMAT] [-c|--columns COLUMNS] [--no-header] [-p|--project PROJECT] ``` ######## Options * `--no-inactive` (`-I`) Do not show inactive environments * `--status` (expects a value) Filter environments by status (active, inactive, dirty, paused, deleting). Values may be split by commas (e.g. "a,b,c") and/or whitespace. * `--pipe` Output a simple list of environment IDs. * `--refresh` (expects a value) Whether to refresh the list. * `--sort` (expects a value) A property to sort by * `--reverse` Sort in reverse (descending) order * `--type` (expects a value) Filter the list by environment type(s). Values may be split by commas (e.g. "a,b,c") and/or whitespace. * `--format` (expects a value) The output format: table, csv, tsv, or plain * `--columns` (`-c`) (expects a value) Columns to display. Available columns: id*, title*, status*, type*, created, machine_name, updated (* = default columns). The character "+" can be used as a placeholder for the default columns. The % or * characters may be used as a wildcard. Values may be split by commas (e.g. "a,b,c") and/or whitespace. * `--no-header` Do not output the table header * `--project` (`-p`) (expects a value) The project ID or URL * `--help` (`-h`) Display this help message * `--verbose` (`-v|-vv|-vvv`) Increase the verbosity of messages * `--version` (`-V`) Display this application version * `--yes` (`-y`) Answer "yes" to confirmation questions; accept the default value for other questions; disable interaction * `--no-interaction` Do not ask any interactive questions; accept default values. Equivalent to using the environment variable: PLATFORMSH_CLI_NO_INTERACTION=1 ###### `environment:logs` Read an environment's logs Aliases: `log` ####### Usage ``` platform log [--lines LINES] [--tail] [-p|--project PROJECT] [-e|--environment ENVIRONMENT] [-A|--app APP] [--worker WORKER] [-I|--instance INSTANCE] [--] [] ``` ######## Arguments * `type`(optional) The log type, e.g. "access" or "error" ######## Options * `--lines` (expects a value) The number of lines to show * `--tail` Continuously tail the log * `--project` (`-p`) (expects a value) The project ID or URL * `--environment` (`-e`) (expects a value) The environment ID. Use "." to select the project's default environment. * `--app` (`-A`) (expects a value) The remote application name * `--worker` (expects a value) A worker name * `--instance` (`-I`) (expects a value) An instance ID * `--help` (`-h`) Display this help message * `--verbose` (`-v|-vv|-vvv`) Increase the verbosity of messages * `--version` (`-V`) Display this application version * `--yes` (`-y`) Answer "yes" to confirmation questions; accept the default value for other questions; disable interaction * `--no-interaction` Do not ask any interactive questions; accept default values. Equivalent to using the environment variable: PLATFORMSH_CLI_NO_INTERACTION=1 ####### Examples * Display a choice of logs that can be read: ``` platform environment:logs ``` * Read the deploy log: ``` platform environment:logs deploy ``` * Read the access log continuously: ``` platform environment:logs access --tail ``` * Read the last 500 lines of the cron log: ``` platform environment:logs cron --lines 500 ``` ###### `environment:merge` Merge an environment Aliases: `merge` ####### Usage ``` platform merge [-p|--project PROJECT] [-e|--environment ENVIRONMENT] [-W|--no-wait] [--wait] [--] [] ``` This command will initiate a Git merge of the specified environment into its parent environment. ######## Arguments * `environment`(optional) The environment to merge ######## Options * `--project` (`-p`) (expects a value) The project ID or URL * `--environment` (`-e`) (expects a value) The environment ID. Use "." to select the project's default environment. * `--no-wait` (`-W`) Do not wait for the operation to complete * `--wait` Wait for the operation to complete (default) * `--help` (`-h`) Display this help message * `--verbose` (`-v|-vv|-vvv`) Increase the verbosity of messages * `--version` (`-V`) Display this application version * `--yes` (`-y`) Answer "yes" to confirmation questions; accept the default value for other questions; disable interaction * `--no-interaction` Do not ask any interactive questions; accept default values. Equivalent to using the environment variable: PLATFORMSH_CLI_NO_INTERACTION=1 ####### Examples * Merge the environment "sprint-2" into its parent: ``` platform environment:merge sprint-2 ``` ###### `environment:pause` Pause an environment ####### Usage ``` platform environment:pause [-p|--project PROJECT] [-e|--environment ENVIRONMENT] [-W|--no-wait] [--wait] ``` Pausing an environment helps to reduce resource consumption and carbon emissions. The environment will be unavailable until it is resumed. No data will be lost. ######## Options * `--project` (`-p`) (expects a value) The project ID or URL * `--environment` (`-e`) (expects a value) The environment ID. Use "." to select the project's default environment. * `--no-wait` (`-W`) Do not wait for the operation to complete * `--wait` Wait for the operation to complete (default) * `--help` (`-h`) Display this help message * `--verbose` (`-v|-vv|-vvv`) Increase the verbosity of messages * `--version` (`-V`) Display this application version * `--yes` (`-y`) Answer "yes" to confirmation questions; accept the default value for other questions; disable interaction * `--no-interaction` Do not ask any interactive questions; accept default values. Equivalent to using the environment variable: PLATFORMSH_CLI_NO_INTERACTION=1 ###### `environment:push` Push code to an environment Aliases: `push` ####### Usage ``` platform push [--target TARGET] [-f|--force] [--force-with-lease] [-u|--set-upstream] [--activate] [--parent PARENT] [--type TYPE] [--no-clone-parent] [-W|--no-wait] [--wait] [-p|--project PROJECT] [-e|--environment ENVIRONMENT] [--] [] ``` ######## Arguments * `source`(optional) The Git source ref, e.g. a branch name or a commit hash. ######## Options * `--target` (expects a value) The target branch name. Defaults to the current branch. * `--force` (`-f`) Allow non-fast-forward updates * `--force-with-lease` Allow non-fast-forward updates, if the remote-tracking branch is up to date * `--set-upstream` (`-u`) Set the target environment as the upstream for the source branch. This will also set the target project as the remote for the local repository. * `--activate` Activate the environment. Paused environments will be resumed. This will ensure the environment is active even if no changes were pushed. * `--parent` (expects a value) Set the environment parent (only used with --activate) * `--type` (expects a value) Set the environment type (only used with --activate ) * `--no-clone-parent` Do not clone the parent branch's data (only used with --activate) * `--no-wait` (`-W`) Do not wait for the operation to complete * `--wait` Wait for the operation to complete (default) * `--project` (`-p`) (expects a value) The project ID or URL * `--environment` (`-e`) (expects a value) The environment ID. Use "." to select the project's default environment. * `--help` (`-h`) Display this help message * `--verbose` (`-v|-vv|-vvv`) Increase the verbosity of messages * `--version` (`-V`) Display this application version * `--yes` (`-y`) Answer "yes" to confirmation questions; accept the default value for other questions; disable interaction * `--no-interaction` Do not ask any interactive questions; accept default values. Equivalent to using the environment variable: PLATFORMSH_CLI_NO_INTERACTION=1 ####### Examples * Push code to the current environment: ``` platform environment:push ``` * Push code, without waiting for deployment: ``` platform environment:push --no-wait ``` * Push code, branching or activating the environment as a child of 'develop': ``` platform environment:push --activate --parent develop ``` ###### `environment:redeploy` Redeploy an environment Aliases: `redeploy` ####### Usage ``` platform redeploy [-p|--project PROJECT] [-e|--environment ENVIRONMENT] [-W|--no-wait] [--wait] ``` ######## Options * `--project` (`-p`) (expects a value) The project ID or URL * `--environment` (`-e`) (expects a value) The environment ID. Use "." to select the project's default environment. * `--no-wait` (`-W`) Do not wait for the operation to complete * `--wait` Wait for the operation to complete (default) * `--help` (`-h`) Display this help message * `--verbose` (`-v|-vv|-vvv`) Increase the verbosity of messages * `--version` (`-V`) Display this application version * `--yes` (`-y`) Answer "yes" to confirmation questions; accept the default value for other questions; disable interaction * `--no-interaction` Do not ask any interactive questions; accept default values. Equivalent to using the environment variable: PLATFORMSH_CLI_NO_INTERACTION=1 ###### `environment:relationships` Show an environment's relationships Aliases: `relationships`, `rel` ####### Usage ``` platform relationships [-P|--property PROPERTY] [--refresh] [-p|--project PROJECT] [-e|--environment ENVIRONMENT] [-A|--app APP] [--] [] ``` ######## Arguments * `environment`(optional) The environment ######## Options * `--property` (`-P`) (expects a value) The relationship property to view * `--refresh` Whether to refresh the relationships * `--project` (`-p`) (expects a value) The project ID or URL * `--environment` (`-e`) (expects a value) The environment ID. Use "." to select the project's default environment. * `--app` (`-A`) (expects a value) The remote application name * `--help` (`-h`) Display this help message * `--verbose` (`-v|-vv|-vvv`) Increase the verbosity of messages * `--version` (`-V`) Display this application version * `--yes` (`-y`) Answer "yes" to confirmation questions; accept the default value for other questions; disable interaction * `--no-interaction` Do not ask any interactive questions; accept default values. Equivalent to using the environment variable: PLATFORMSH_CLI_NO_INTERACTION=1 ####### Examples * View all the current environment's relationships: ``` platform environment:relationships ``` * View the 'main' environment's relationships: ``` platform environment:relationships main ``` * View the 'main' environment's database port: ``` platform environment:relationships main --property database.0.port ``` ###### `environment:resume` Resume a paused environment ####### Usage ``` platform environment:resume [-p|--project PROJECT] [-e|--environment ENVIRONMENT] [-W|--no-wait] [--wait] ``` ######## Options * `--project` (`-p`) (expects a value) The project ID or URL * `--environment` (`-e`) (expects a value) The environment ID. Use "." to select the project's default environment. * `--no-wait` (`-W`) Do not wait for the operation to complete * `--wait` Wait for the operation to complete (default) * `--help` (`-h`) Display this help message * `--verbose` (`-v|-vv|-vvv`) Increase the verbosity of messages * `--version` (`-V`) Display this application version * `--yes` (`-y`) Answer "yes" to confirmation questions; accept the default value for other questions; disable interaction * `--no-interaction` Do not ask any interactive questions; accept default values. Equivalent to using the environment variable: PLATFORMSH_CLI_NO_INTERACTION=1 ###### `environment:scp` Copy files to and from an environment using scp Aliases: `scp` ####### Usage ``` platform scp [-r|--recursive] [-p|--project PROJECT] [-e|--environment ENVIRONMENT] [-A|--app APP] [--worker WORKER] [-I|--instance INSTANCE] [--] []... ``` ######## Arguments * `files`(optional; multiple values allowed) Files to copy. Use the remote: prefix to define remote locations. ######## Options * `--recursive` (`-r`) Recursively copy entire directories * `--project` (`-p`) (expects a value) The project ID or URL * `--environment` (`-e`) (expects a value) The environment ID. Use "." to select the project's default environment. * `--app` (`-A`) (expects a value) The remote application name * `--worker` (expects a value) A worker name * `--instance` (`-I`) (expects a value) An instance ID * `--help` (`-h`) Display this help message * `--verbose` (`-v|-vv|-vvv`) Increase the verbosity of messages * `--version` (`-V`) Display this application version * `--yes` (`-y`) Answer "yes" to confirmation questions; accept the default value for other questions; disable interaction * `--no-interaction` Do not ask any interactive questions; accept default values. Equivalent to using the environment variable: PLATFORMSH_CLI_NO_INTERACTION=1 ####### Examples * Copy local files a.txt and b.txt to remote mount var/files: ``` platform environment:scp a.txt b.txt remote:var/files ``` * Copy remote files c.txt to current directory: ``` platform environment:scp remote:c.txt . ``` * Copy subdirectory dump/ to remote mount var/files: ``` platform environment:scp -r dump remote:var/logs ``` * Copy files inside subdirectory dump/ to remote mount var/files: ``` platform environment:scp -r dump/* remote:var/logs ``` ###### `environment:ssh` SSH to the current environment Aliases: `ssh` ####### Usage ``` platform ssh [--pipe] [--all] [-o|--option OPTION] [-p|--project PROJECT] [-e|--environment ENVIRONMENT] [-A|--app APP] [--worker WORKER] [-I|--instance INSTANCE] [--] []... ``` ######## Arguments * `cmd`(optional; multiple values allowed) A command to run on the environment. ######## Options * `--pipe` Output the SSH URL only. * `--all` Output all SSH URLs (for every app). * `--option` (`-o`) (expects a value) Pass an extra option to SSH * `--project` (`-p`) (expects a value) The project ID or URL * `--environment` (`-e`) (expects a value) The environment ID. Use "." to select the project's default environment. * `--app` (`-A`) (expects a value) The remote application name * `--worker` (expects a value) A worker name * `--instance` (`-I`) (expects a value) An instance ID * `--help` (`-h`) Display this help message * `--verbose` (`-v|-vv|-vvv`) Increase the verbosity of messages * `--version` (`-V`) Display this application version * `--yes` (`-y`) Answer "yes" to confirmation questions; accept the default value for other questions; disable interaction * `--no-interaction` Do not ask any interactive questions; accept default values. Equivalent to using the environment variable: PLATFORMSH_CLI_NO_INTERACTION=1 ####### Examples * Open a shell over SSH: ``` platform environment:ssh ``` * Pass an extra option to SSH: ``` platform environment:ssh -o 'RequestTTY force' ``` * List files: ``` platform environment:ssh ls ``` * Monitor the app log (use '--' before flags): ``` platform environment:ssh tail /var/log/app.log -- -n50 -f ``` * Display relationships (use quotes for complex syntax): ``` platform environment:ssh 'echo $PLATFORM_RELATIONSHIPS | base64 --decode' ``` ###### `environment:synchronize` Synchronize an environment's code and/or data from its parent Aliases: `sync` ####### Usage ``` platform sync [--rebase] [-p|--project PROJECT] [-e|--environment ENVIRONMENT] [-W|--no-wait] [--wait] [--] []... ``` This command synchronizes to a child environment from its parent environment. Synchronizing "code" means there will be a Git merge from the parent to the child. Synchronizing "data" means that all files in all services (including static files, databases, logs, search indices, etc.) will be copied from the parent to the child. ######## Arguments * `synchronize`(optional; multiple values allowed) What to synchronize: "code", "data" or both ######## Options * `--rebase` Synchronize code by rebasing instead of merging * `--project` (`-p`) (expects a value) The project ID or URL * `--environment` (`-e`) (expects a value) The environment ID. Use "." to select the project's default environment. * `--no-wait` (`-W`) Do not wait for the operation to complete * `--wait` Wait for the operation to complete (default) * `--help` (`-h`) Display this help message * `--verbose` (`-v|-vv|-vvv`) Increase the verbosity of messages * `--version` (`-V`) Display this application version * `--yes` (`-y`) Answer "yes" to confirmation questions; accept the default value for other questions; disable interaction * `--no-interaction` Do not ask any interactive questions; accept default values. Equivalent to using the environment variable: PLATFORMSH_CLI_NO_INTERACTION=1 ####### Examples * Synchronize data from the parent environment: ``` platform environment:synchronize data ``` * Synchronize code and data from the parent environment: ``` platform environment:synchronize code data ``` ###### `environment:url` Get the public URLs of an environment Aliases: `url` ####### Usage ``` platform url [-1|--primary] [--browser BROWSER] [--pipe] [-p|--project PROJECT] [-e|--environment ENVIRONMENT] ``` ######## Options * `--primary` (`-1`) Only return the URL for the primary route * `--browser` (expects a value) The browser to use to open the URL. Set 0 for none. * `--pipe` Output the URL to stdout. * `--project` (`-p`) (expects a value) The project ID or URL * `--environment` (`-e`) (expects a value) The environment ID. Use "." to select the project's default environment. * `--help` (`-h`) Display this help message * `--verbose` (`-v|-vv|-vvv`) Increase the verbosity of messages * `--version` (`-V`) Display this application version * `--yes` (`-y`) Answer "yes" to confirmation questions; accept the default value for other questions; disable interaction * `--no-interaction` Do not ask any interactive questions; accept default values. Equivalent to using the environment variable: PLATFORMSH_CLI_NO_INTERACTION=1 ####### Examples * Give a choice of URLs to open (or print all URLs if there is no browser): ``` platform environment:url ``` * Print all URLs: ``` platform environment:url --pipe ``` * Print and/or open the primary route URL: ``` platform environment:url --primary ``` * Print the primary route URL: ``` platform environment:url --primary --pipe ``` ###### `environment:xdebug` Open a tunnel to Xdebug on the environment Aliases: `xdebug` ####### Usage ``` platform xdebug [--port PORT] [-p|--project PROJECT] [-e|--environment ENVIRONMENT] [-A|--app APP] [--worker WORKER] [-I|--instance INSTANCE] ``` ######## Options * `--port` (expects a value) The local port * `--project` (`-p`) (expects a value) The project ID or URL * `--environment` (`-e`) (expects a value) The environment ID. Use "." to select the project's default environment. * `--app` (`-A`) (expects a value) The remote application name * `--worker` (expects a value) A worker name * `--instance` (`-I`) (expects a value) An instance ID * `--help` (`-h`) Display this help message * `--verbose` (`-v|-vv|-vvv`) Increase the verbosity of messages * `--version` (`-V`) Display this application version * `--yes` (`-y`) Answer "yes" to confirmation questions; accept the default value for other questions; disable interaction * `--no-interaction` Do not ask any interactive questions; accept default values. Equivalent to using the environment variable: PLATFORMSH_CLI_NO_INTERACTION=1 ####### Examples * Connect to Xdebug on the environment, listening locally on port 9000.: ``` platform environment:xdebug ``` ###### `integration:activity:get` View detailed information on a single integration activity ####### Usage ``` platform integration:activity:get [-P|--property PROPERTY] [-p|--project PROJECT] [-e|--environment ENVIRONMENT] [--format FORMAT] [-c|--columns COLUMNS] [--no-header] [--date-fmt DATE-FMT] [--] [] [] ``` ######## Arguments * `integration`(optional) An integration ID. Leave blank to choose from a list. * `activity`(optional) The activity ID. Defaults to the most recent integration activity. ######## Options * `--property` (`-P`) (expects a value) The property to view * `--project` (`-p`) (expects a value) The project ID or URL * `--environment` (`-e`) (expects a value) [Deprecated option, not used] * `--format` (expects a value) The output format: table, csv, tsv, or plain * `--columns` (`-c`) (expects a value) Columns to display. The % or * characters may be used as a wildcard. Values may be split by commas (e.g. "a,b,c") and/or whitespace. * `--no-header` Do not output the table header * `--date-fmt` (expects a value) The date format (as a PHP date format string) * `--help` (`-h`) Display this help message * `--verbose` (`-v|-vv|-vvv`) Increase the verbosity of messages * `--version` (`-V`) Display this application version * `--yes` (`-y`) Answer "yes" to confirmation questions; accept the default value for other questions; disable interaction * `--no-interaction` Do not ask any interactive questions; accept default values. Equivalent to using the environment variable: PLATFORMSH_CLI_NO_INTERACTION=1 ###### `integration:activity:list` Get a list of activities for an integration Aliases: `integration:activities` ####### Usage ``` platform integration:activities [--type TYPE] [-x|--exclude-type EXCLUDE-TYPE] [--limit LIMIT] [--start START] [--state STATE] [--result RESULT] [-i|--incomplete] [--format FORMAT] [-c|--columns COLUMNS] [--no-header] [--date-fmt DATE-FMT] [-p|--project PROJECT] [-e|--environment ENVIRONMENT] [--] [] ``` ######## Arguments * `id`(optional) An integration ID. Leave blank to choose from a list. ######## Options * `--type` (expects a value) Filter activities by type. Values may be split by commas (e.g. "a,b,c") and/or whitespace. * `--exclude-type` (`-x`) (expects a value) Exclude activities by type. Values may be split by commas (e.g. "a,b,c") and/or whitespace. The % or * characters can be used as a wildcard to exclude types. * `--limit` (expects a value) Limit the number of results displayed * `--start` (expects a value) Only activities created before this date will be listed * `--state` (expects a value) Filter activities by state. Values may be split by commas (e.g. "a,b,c") and/or whitespace. * `--result` (expects a value) Filter activities by result * `--incomplete` (`-i`) Only list incomplete activities * `--format` (expects a value) The output format: table, csv, tsv, or plain * `--columns` (`-c`) (expects a value) Columns to display. Available columns: id*, created*, description*, type*, state*, result*, completed, progress, time_build, time_deploy, time_execute, time_wait (* = default columns). The character "+" can be used as a placeholder for the default columns. The % or * characters may be used as a wildcard. Values may be split by commas (e.g. "a,b,c") and/or whitespace. * `--no-header` Do not output the table header * `--date-fmt` (expects a value) The date format (as a PHP date format string) * `--project` (`-p`) (expects a value) The project ID or URL * `--environment` (`-e`) (expects a value) [Deprecated option, not used] * `--help` (`-h`) Display this help message * `--verbose` (`-v|-vv|-vvv`) Increase the verbosity of messages * `--version` (`-V`) Display this application version * `--yes` (`-y`) Answer "yes" to confirmation questions; accept the default value for other questions; disable interaction * `--no-interaction` Do not ask any interactive questions; accept default values. Equivalent to using the environment variable: PLATFORMSH_CLI_NO_INTERACTION=1 ###### `integration:activity:log` Display the log for an integration activity ####### Usage ``` platform integration:activity:log [-t|--timestamps] [--date-fmt DATE-FMT] [-p|--project PROJECT] [-e|--environment ENVIRONMENT] [--] [] [] ``` ######## Arguments * `integration`(optional) An integration ID. Leave blank to choose from a list. * `activity`(optional) The activity ID. Defaults to the most recent integration activity. ######## Options * `--timestamps` (`-t`) Display a timestamp next to each message * `--date-fmt` (expects a value) The date format (as a PHP date format string) * `--project` (`-p`) (expects a value) The project ID or URL * `--environment` (`-e`) (expects a value) [Deprecated option, not used] * `--help` (`-h`) Display this help message * `--verbose` (`-v|-vv|-vvv`) Increase the verbosity of messages * `--version` (`-V`) Display this application version * `--yes` (`-y`) Answer "yes" to confirmation questions; accept the default value for other questions; disable interaction * `--no-interaction` Do not ask any interactive questions; accept default values. Equivalent to using the environment variable: PLATFORMSH_CLI_NO_INTERACTION=1 ###### `integration:add` Add an integration to the project ####### Usage ``` platform integration:add [--type TYPE] [--base-url BASE-URL] [--bitbucket-url BITBUCKET-URL] [--username USERNAME] [--token TOKEN] [--key KEY] [--secret SECRET] [--license-key LICENSE-KEY] [--server-project SERVER-PROJECT] [--repository REPOSITORY] [--build-merge-requests BUILD-MERGE-REQUESTS] [--build-pull-requests BUILD-PULL-REQUESTS] [--build-draft-pull-requests BUILD-DRAFT-PULL-REQUESTS] [--build-pull-requests-post-merge BUILD-PULL-REQUESTS-POST-MERGE] [--build-wip-merge-requests BUILD-WIP-MERGE-REQUESTS] [--merge-requests-clone-parent-data MERGE-REQUESTS-CLONE-PARENT-DATA] [--pull-requests-clone-parent-data PULL-REQUESTS-CLONE-PARENT-DATA] [--resync-pull-requests RESYNC-PULL-REQUESTS] [--fetch-branches FETCH-BRANCHES] [--prune-branches PRUNE-BRANCHES] [--resources-init RESOURCES-INIT] [--url URL] [--shared-key SHARED-KEY] [--file FILE] [--events EVENTS] [--states STATES] [--environments ENVIRONMENTS] [--excluded-environments EXCLUDED-ENVIRONMENTS] [--from-address FROM-ADDRESS] [--recipients RECIPIENTS] [--channel CHANNEL] [--routing-key ROUTING-KEY] [--category CATEGORY] [--index INDEX] [--sourcetype SOURCETYPE] [--protocol PROTOCOL] [--syslog-host SYSLOG-HOST] [--syslog-port SYSLOG-PORT] [--facility FACILITY] [--message-format MESSAGE-FORMAT] [--auth-mode AUTH-MODE] [--auth-token AUTH-TOKEN] [--verify-tls VERIFY-TLS] [--header HEADER] [-p|--project PROJECT] [-W|--no-wait] [--wait] ``` ######## Options * `--type` (expects a value) The integration type ('bitbucket', 'bitbucket_server', 'github', 'gitlab', 'webhook', 'health.email', 'health.pagerduty', 'health.slack', 'health.webhook', 'httplog', 'script', 'newrelic', 'splunk', 'sumologic', 'syslog') * `--base-url` (expects a value) The base URL of the server installation * `--bitbucket-url` (expects a value) The base URL of the Bitbucket Server installation * `--username` (expects a value) The Bitbucket Server username * `--token` (expects a value) An authentication or access token for the integration * `--key` (expects a value) A Bitbucket OAuth consumer key * `--secret` (expects a value) A Bitbucket OAuth consumer secret * `--license-key` (expects a value) The New Relic Logs license key * `--server-project` (expects a value) The project (e.g. 'namespace/repo') * `--repository` (expects a value) The repository to track (e.g. 'owner/repository') * `--build-merge-requests` (expects a value) GitLab: build merge requests as environments * `--build-pull-requests` (expects a value) Build every pull request as an environment * `--build-draft-pull-requests` (expects a value) Build draft pull requests * `--build-pull-requests-post-merge` (expects a value) Build pull requests based on their post-merge state * `--build-wip-merge-requests` (expects a value) GitLab: build WIP merge requests * `--merge-requests-clone-parent-data` (expects a value) GitLab: clone data for merge requests * `--pull-requests-clone-parent-data` (expects a value) Clone the parent environment's data for pull requests * `--resync-pull-requests` (expects a value) Re-sync pull request environment data on every build * `--fetch-branches` (expects a value) Fetch all branches from the remote (as inactive environments) * `--prune-branches` (expects a value) Delete branches that do not exist on the remote * `--resources-init` (expects a value) The resources to use when initializing a new service ('minimum', 'default', 'manual', 'parent') * `--url` (expects a value) The URL or API endpoint for the integration * `--shared-key` (expects a value) Webhook: the JWS shared secret key * `--file` (expects a value) The name of a local file that contains the script to upload * `--events` (expects a value) A list of events to act on, e.g. environment.push * `--states` (expects a value) A list of states to act on, e.g. pending, in_progress, complete * `--environments` (expects a value) The environment IDs to include * `--excluded-environments` (expects a value) The environment IDs to exclude * `--from-address` (expects a value) [Optional] Custom From address for alert emails * `--recipients` (expects a value) The recipient email address(es) * `--channel` (expects a value) The Slack channel * `--routing-key` (expects a value) The PagerDuty routing key * `--category` (expects a value) The Sumo Logic category, used for filtering * `--index` (expects a value) The Splunk index * `--sourcetype` (expects a value) The Splunk event source type * `--protocol` (expects a value) Syslog transport protocol ('tcp', 'udp', 'tls') * `--syslog-host` (expects a value) Syslog relay/collector host * `--syslog-port` (expects a value) Syslog relay/collector port * `--facility` (expects a value) Syslog facility * `--message-format` (expects a value) Syslog message format ('rfc3164' or 'rfc5424') * `--auth-mode` (expects a value) Authentication mode ('prefix' or 'structured_data') * `--auth-token` (expects a value) Authentication token * `--verify-tls` (expects a value) Whether HTTPS certificate verification should be enabled (recommended) * `--header` (expects a value) HTTP header(s) to use in POST requests. Separate names and values with a colon (:). * `--project` (`-p`) (expects a value) The project ID or URL * `--no-wait` (`-W`) Do not wait for the operation to complete * `--wait` Wait for the operation to complete (default) * `--help` (`-h`) Display this help message * `--verbose` (`-v|-vv|-vvv`) Increase the verbosity of messages * `--version` (`-V`) Display this application version * `--yes` (`-y`) Answer "yes" to confirmation questions; accept the default value for other questions; disable interaction * `--no-interaction` Do not ask any interactive questions; accept default values. Equivalent to using the environment variable: PLATFORMSH_CLI_NO_INTERACTION=1 ####### Examples * Add an integration with a GitHub repository: ``` platform integration:add --type github --repository myuser/example-repo --token 9218376e14c2797e0d06e8d2f918d45f --fetch-branches 0 ``` * Add an integration with a GitLab repository: ``` platform integration:add --type gitlab --server-project mygroup/example-repo --token 22fe4d70dfbc20e4f668568a0b5422e2 --base-url https://gitlab.example.com ``` ###### `integration:delete` Delete an integration from a project ####### Usage ``` platform integration:delete [-p|--project PROJECT] [-W|--no-wait] [--wait] [--] [] ``` ######## Arguments * `id`(optional) The integration ID. Leave blank to choose from a list. ######## Options * `--project` (`-p`) (expects a value) The project ID or URL * `--no-wait` (`-W`) Do not wait for the operation to complete * `--wait` Wait for the operation to complete (default) * `--help` (`-h`) Display this help message * `--verbose` (`-v|-vv|-vvv`) Increase the verbosity of messages * `--version` (`-V`) Display this application version * `--yes` (`-y`) Answer "yes" to confirmation questions; accept the default value for other questions; disable interaction * `--no-interaction` Do not ask any interactive questions; accept default values. Equivalent to using the environment variable: PLATFORMSH_CLI_NO_INTERACTION=1 ###### `integration:get` View details of an integration ####### Usage ``` platform integration:get [-P|--property [PROPERTY]] [--format FORMAT] [-c|--columns COLUMNS] [--no-header] [-p|--project PROJECT] [--] [] ``` ######## Arguments * `id`(optional) An integration ID. Leave blank to choose from a list. ######## Options * `--property` (`-P`) (expects a value) The integration property to view * `--format` (expects a value) The output format: table, csv, tsv, or plain * `--columns` (`-c`) (expects a value) Columns to display. The % or * characters may be used as a wildcard. Values may be split by commas (e.g. "a,b,c") and/or whitespace. * `--no-header` Do not output the table header * `--project` (`-p`) (expects a value) The project ID or URL * `--help` (`-h`) Display this help message * `--verbose` (`-v|-vv|-vvv`) Increase the verbosity of messages * `--version` (`-V`) Display this application version * `--yes` (`-y`) Answer "yes" to confirmation questions; accept the default value for other questions; disable interaction * `--no-interaction` Do not ask any interactive questions; accept default values. Equivalent to using the environment variable: PLATFORMSH_CLI_NO_INTERACTION=1 ###### `integration:list` View a list of project integration(s) Aliases: `integrations` ####### Usage ``` platform integrations [-t|--type TYPE] [--format FORMAT] [-c|--columns COLUMNS] [--no-header] [-p|--project PROJECT] ``` ######## Options * `--type` (`-t`) (expects a value) Filter by type * `--format` (expects a value) The output format: table, csv, tsv, or plain * `--columns` (`-c`) (expects a value) Columns to display. Available columns: id, summary, type. The % or * characters may be used as a wildcard. Values may be split by commas (e.g. "a,b,c") and/or whitespace. * `--no-header` Do not output the table header * `--project` (`-p`) (expects a value) The project ID or URL * `--help` (`-h`) Display this help message * `--verbose` (`-v|-vv|-vvv`) Increase the verbosity of messages * `--version` (`-V`) Display this application version * `--yes` (`-y`) Answer "yes" to confirmation questions; accept the default value for other questions; disable interaction * `--no-interaction` Do not ask any interactive questions; accept default values. Equivalent to using the environment variable: PLATFORMSH_CLI_NO_INTERACTION=1 ###### `integration:update` Update an integration ####### Usage ``` platform integration:update [--type TYPE] [--base-url BASE-URL] [--bitbucket-url BITBUCKET-URL] [--username USERNAME] [--token TOKEN] [--key KEY] [--secret SECRET] [--license-key LICENSE-KEY] [--server-project SERVER-PROJECT] [--repository REPOSITORY] [--build-merge-requests BUILD-MERGE-REQUESTS] [--build-pull-requests BUILD-PULL-REQUESTS] [--build-draft-pull-requests BUILD-DRAFT-PULL-REQUESTS] [--build-pull-requests-post-merge BUILD-PULL-REQUESTS-POST-MERGE] [--build-wip-merge-requests BUILD-WIP-MERGE-REQUESTS] [--merge-requests-clone-parent-data MERGE-REQUESTS-CLONE-PARENT-DATA] [--pull-requests-clone-parent-data PULL-REQUESTS-CLONE-PARENT-DATA] [--resync-pull-requests RESYNC-PULL-REQUESTS] [--fetch-branches FETCH-BRANCHES] [--prune-branches PRUNE-BRANCHES] [--resources-init RESOURCES-INIT] [--url URL] [--shared-key SHARED-KEY] [--file FILE] [--events EVENTS] [--states STATES] [--environments ENVIRONMENTS] [--excluded-environments EXCLUDED-ENVIRONMENTS] [--from-address FROM-ADDRESS] [--recipients RECIPIENTS] [--channel CHANNEL] [--routing-key ROUTING-KEY] [--category CATEGORY] [--index INDEX] [--sourcetype SOURCETYPE] [--protocol PROTOCOL] [--syslog-host SYSLOG-HOST] [--syslog-port SYSLOG-PORT] [--facility FACILITY] [--message-format MESSAGE-FORMAT] [--auth-mode AUTH-MODE] [--auth-token AUTH-TOKEN] [--verify-tls VERIFY-TLS] [--header HEADER] [-p|--project PROJECT] [-W|--no-wait] [--wait] [--] [] ``` ######## Arguments * `id`(optional) The ID of the integration to update ######## Options * `--type` (expects a value) The integration type ('bitbucket', 'bitbucket_server', 'github', 'gitlab', 'webhook', 'health.email', 'health.pagerduty', 'health.slack', 'health.webhook', 'httplog', 'script', 'newrelic', 'splunk', 'sumologic', 'syslog') * `--base-url` (expects a value) The base URL of the server installation * `--bitbucket-url` (expects a value) The base URL of the Bitbucket Server installation * `--username` (expects a value) The Bitbucket Server username * `--token` (expects a value) An authentication or access token for the integration * `--key` (expects a value) A Bitbucket OAuth consumer key * `--secret` (expects a value) A Bitbucket OAuth consumer secret * `--license-key` (expects a value) The New Relic Logs license key * `--server-project` (expects a value) The project (e.g. 'namespace/repo') * `--repository` (expects a value) The repository to track (e.g. 'owner/repository') * `--build-merge-requests` (expects a value) GitLab: build merge requests as environments * `--build-pull-requests` (expects a value) Build every pull request as an environment * `--build-draft-pull-requests` (expects a value) Build draft pull requests * `--build-pull-requests-post-merge` (expects a value) Build pull requests based on their post-merge state * `--build-wip-merge-requests` (expects a value) GitLab: build WIP merge requests * `--merge-requests-clone-parent-data` (expects a value) GitLab: clone data for merge requests * `--pull-requests-clone-parent-data` (expects a value) Clone the parent environment's data for pull requests * `--resync-pull-requests` (expects a value) Re-sync pull request environment data on every build * `--fetch-branches` (expects a value) Fetch all branches from the remote (as inactive environments) * `--prune-branches` (expects a value) Delete branches that do not exist on the remote * `--resources-init` (expects a value) The resources to use when initializing a new service ('minimum', 'default', 'manual', 'parent') * `--url` (expects a value) The URL or API endpoint for the integration * `--shared-key` (expects a value) Webhook: the JWS shared secret key * `--file` (expects a value) The name of a local file that contains the script to upload * `--events` (expects a value) A list of events to act on, e.g. environment.push * `--states` (expects a value) A list of states to act on, e.g. pending, in_progress, complete * `--environments` (expects a value) The environment IDs to include * `--excluded-environments` (expects a value) The environment IDs to exclude * `--from-address` (expects a value) [Optional] Custom From address for alert emails * `--recipients` (expects a value) The recipient email address(es) * `--channel` (expects a value) The Slack channel * `--routing-key` (expects a value) The PagerDuty routing key * `--category` (expects a value) The Sumo Logic category, used for filtering * `--index` (expects a value) The Splunk index * `--sourcetype` (expects a value) The Splunk event source type * `--protocol` (expects a value) Syslog transport protocol ('tcp', 'udp', 'tls') * `--syslog-host` (expects a value) Syslog relay/collector host * `--syslog-port` (expects a value) Syslog relay/collector port * `--facility` (expects a value) Syslog facility * `--message-format` (expects a value) Syslog message format ('rfc3164' or 'rfc5424') * `--auth-mode` (expects a value) Authentication mode ('prefix' or 'structured_data') * `--auth-token` (expects a value) Authentication token * `--verify-tls` (expects a value) Whether HTTPS certificate verification should be enabled (recommended) * `--header` (expects a value) HTTP header(s) to use in POST requests. Separate names and values with a colon (:). * `--project` (`-p`) (expects a value) The project ID or URL * `--no-wait` (`-W`) Do not wait for the operation to complete * `--wait` Wait for the operation to complete (default) * `--help` (`-h`) Display this help message * `--verbose` (`-v|-vv|-vvv`) Increase the verbosity of messages * `--version` (`-V`) Display this application version * `--yes` (`-y`) Answer "yes" to confirmation questions; accept the default value for other questions; disable interaction * `--no-interaction` Do not ask any interactive questions; accept default values. Equivalent to using the environment variable: PLATFORMSH_CLI_NO_INTERACTION=1 ####### Examples * Switch on the "fetch branches" option for a specific integration: ``` platform integration:update ZXhhbXBsZSB --fetch-branches 1 ``` ###### `integration:validate` Validate an existing integration ####### Usage ``` platform integration:validate [-p|--project PROJECT] [--] [] ``` This command allows you to check whether an integration is valid. An exit code of 0 means the integration is valid, while 4 means it is invalid. Any other exit code indicates an unexpected error. Integrations are validated automatically on creation and on update. However, because they involve external resources, it is possible for a valid integration to become invalid. For example, an access token may be revoked, or an external repository may be deleted. ######## Arguments * `id`(optional) An integration ID. Leave blank to choose from a list. ######## Options * `--project` (`-p`) (expects a value) The project ID or URL * `--help` (`-h`) Display this help message * `--verbose` (`-v|-vv|-vvv`) Increase the verbosity of messages * `--version` (`-V`) Display this application version * `--yes` (`-y`) Answer "yes" to confirmation questions; accept the default value for other questions; disable interaction * `--no-interaction` Do not ask any interactive questions; accept default values. Equivalent to using the environment variable: PLATFORMSH_CLI_NO_INTERACTION=1 ###### `local:build` Build the current project locally Aliases: `build` ####### Usage ``` platform build [-a|--abslinks] [-s|--source SOURCE] [-d|--destination DESTINATION] [-c|--copy] [--clone] [--run-deploy-hooks] [--no-clean] [--no-archive] [--no-backup] [--no-cache] [--no-build-hooks] [--no-deps] [--working-copy] [--concurrency CONCURRENCY] [--lock] [--] []... ``` ######## Arguments * `app`(optional; multiple values allowed) Specify application(s) to build ######## Options * `--abslinks` (`-a`) Use absolute links * `--source` (`-s`) (expects a value) The source directory. Defaults to the current project root. * `--destination` (`-d`) (expects a value) The destination, to which the web root of each app will be symlinked. Default: _www * `--copy` (`-c`) Copy to a build directory, instead of symlinking from the source * `--clone` Use Git to clone the current HEAD to the build directory * `--run-deploy-hooks` Run deploy and/or post_deploy hooks * `--no-clean` Do not remove old builds * `--no-archive` Do not create or use a build archive * `--no-backup` Do not back up the previous build * `--no-cache` Disable caching * `--no-build-hooks` Do not run post-build hooks * `--no-deps` Do not install build dependencies locally * `--working-copy` Drush: use git to clone a repository of each Drupal module rather than simply downloading a version * `--concurrency` (expects a value) Drush: set the number of concurrent projects that will be processed at the same time * `--lock` Drush: create or update a lock file (only available with Drush version 7+) * `--help` (`-h`) Display this help message * `--verbose` (`-v|-vv|-vvv`) Increase the verbosity of messages * `--version` (`-V`) Display this application version * `--yes` (`-y`) Answer "yes" to confirmation questions; accept the default value for other questions; disable interaction * `--no-interaction` Do not ask any interactive questions; accept default values. Equivalent to using the environment variable: PLATFORMSH_CLI_NO_INTERACTION=1 ####### Examples * Build the current project: ``` platform local:build ``` * Build the app "example" without symlinking the source files: ``` platform local:build example --copy ``` * Rebuild the current project without using an archive: ``` platform local:build --no-archive ``` ###### `local:dir` Find the local project root Aliases: `dir` ####### Usage ``` platform dir [] ``` ######## Arguments * `subdir`(optional) The subdirectory to find ('local', 'web' or 'shared') ######## Options * `--help` (`-h`) Display this help message * `--verbose` (`-v|-vv|-vvv`) Increase the verbosity of messages * `--version` (`-V`) Display this application version * `--yes` (`-y`) Answer "yes" to confirmation questions; accept the default value for other questions; disable interaction * `--no-interaction` Do not ask any interactive questions; accept default values. Equivalent to using the environment variable: PLATFORMSH_CLI_NO_INTERACTION=1 ###### `local:drush-aliases` Find the project's Drush aliases Aliases: `drush-aliases` ####### Usage ``` platform drush-aliases [-r|--recreate] [-g|--group GROUP] [--pipe] ``` ######## Options * `--recreate` (`-r`) Recreate the aliases. * `--group` (`-g`) (expects a value) Recreate the aliases with a new group name. * `--pipe` Output the current group name (do nothing else). * `--help` (`-h`) Display this help message * `--verbose` (`-v|-vv|-vvv`) Increase the verbosity of messages * `--version` (`-V`) Display this application version * `--yes` (`-y`) Answer "yes" to confirmation questions; accept the default value for other questions; disable interaction * `--no-interaction` Do not ask any interactive questions; accept default values. Equivalent to using the environment variable: PLATFORMSH_CLI_NO_INTERACTION=1 ####### Examples * Change the alias group to @example: ``` platform local:drush-aliases -g example ``` ###### `metrics:all` Show CPU, disk and memory metrics for an environment Aliases: `metrics`, `met` ####### Usage ``` platform metrics [-B|--bytes] [-r|--range RANGE] [-i|--interval INTERVAL] [--to TO] [-1|--latest] [-s|--service SERVICE] [--type TYPE] [-p|--project PROJECT] [-e|--environment ENVIRONMENT] [--format FORMAT] [-c|--columns COLUMNS] [--no-header] [--date-fmt DATE-FMT] ``` ######## Options * `--bytes` (`-B`) Show sizes in bytes * `--range` (`-r`) (expects a value) The time range. Metrics will be loaded for this duration until the end time (--to). You can specify units: hours (h), minutes (m), or seconds (s). Minimum 5m, maximum 8h or more (depending on the project), default 10m. * `--interval` (`-i`) (expects a value) The time interval. Defaults to a division of the range. You can specify units: hours (h), minutes (m), or seconds (s). Minimum 1m. * `--to` (expects a value) The end time. Defaults to now. * `--latest` (`-1`) Show only the latest single data point * `--service` (`-s`) (expects a value) Filter by service or application name The % or * characters may be used as a wildcard. * `--type` (expects a value) Filter by service type (if --service is not provided). The version is not required. The % or * characters may be used as a wildcard. * `--project` (`-p`) (expects a value) The project ID or URL * `--environment` (`-e`) (expects a value) The environment ID. Use "." to select the project's default environment. * `--format` (expects a value) The output format: table, csv, tsv, or plain * `--columns` (`-c`) (expects a value) Columns to display. Available columns: timestamp*, service*, cpu_percent*, mem_percent*, disk_percent*, tmp_disk_percent*, cpu_limit, cpu_used, disk_limit, disk_used, inodes_limit, inodes_percent, inodes_used, mem_limit, mem_used, tmp_disk_limit, tmp_disk_used, tmp_inodes_limit, tmp_inodes_percent, tmp_inodes_used, type (* = default columns). The character "+" can be used as a placeholder for the default columns. The % or * characters may be used as a wildcard. Values may be split by commas (e.g. "a,b,c") and/or whitespace. * `--no-header` Do not output the table header * `--date-fmt` (expects a value) The date format (as a PHP date format string) * `--help` (`-h`) Display this help message * `--verbose` (`-v|-vv|-vvv`) Increase the verbosity of messages * `--version` (`-V`) Display this application version * `--yes` (`-y`) Answer "yes" to confirmation questions; accept the default value for other questions; disable interaction * `--no-interaction` Do not ask any interactive questions; accept default values. Equivalent to using the environment variable: PLATFORMSH_CLI_NO_INTERACTION=1 ####### Examples * Show metrics for the last 10m: ``` platform metrics:all ``` * Show metrics in five-minute intervals over the last hour: ``` platform metrics:all -i 5m -r 1h ``` * Show metrics for all SQL services: ``` platform metrics:all --type mariadb,%sql ``` ###### `metrics:cpu` Show CPU usage of an environment Aliases: `cpu` ####### Usage ``` platform cpu [-r|--range RANGE] [-i|--interval INTERVAL] [--to TO] [-1|--latest] [-s|--service SERVICE] [--type TYPE] [-p|--project PROJECT] [-e|--environment ENVIRONMENT] [--format FORMAT] [-c|--columns COLUMNS] [--no-header] [--date-fmt DATE-FMT] ``` ######## Options * `--range` (`-r`) (expects a value) The time range. Metrics will be loaded for this duration until the end time (--to). You can specify units: hours (h), minutes (m), or seconds (s). Minimum 5m, maximum 8h or more (depending on the project), default 10m. * `--interval` (`-i`) (expects a value) The time interval. Defaults to a division of the range. You can specify units: hours (h), minutes (m), or seconds (s). Minimum 1m. * `--to` (expects a value) The end time. Defaults to now. * `--latest` (`-1`) Show only the latest single data point * `--service` (`-s`) (expects a value) Filter by service or application name The % or * characters may be used as a wildcard. * `--type` (expects a value) Filter by service type (if --service is not provided). The version is not required. The % or * characters may be used as a wildcard. * `--project` (`-p`) (expects a value) The project ID or URL * `--environment` (`-e`) (expects a value) The environment ID. Use "." to select the project's default environment. * `--format` (expects a value) The output format: table, csv, tsv, or plain * `--columns` (`-c`) (expects a value) Columns to display. Available columns: timestamp*, service*, used*, limit*, percent*, type (* = default columns). The character "+" can be used as a placeholder for the default columns. The % or * characters may be used as a wildcard. Values may be split by commas (e.g. "a,b,c") and/or whitespace. * `--no-header` Do not output the table header * `--date-fmt` (expects a value) The date format (as a PHP date format string) * `--help` (`-h`) Display this help message * `--verbose` (`-v|-vv|-vvv`) Increase the verbosity of messages * `--version` (`-V`) Display this application version * `--yes` (`-y`) Answer "yes" to confirmation questions; accept the default value for other questions; disable interaction * `--no-interaction` Do not ask any interactive questions; accept default values. Equivalent to using the environment variable: PLATFORMSH_CLI_NO_INTERACTION=1 ###### `metrics:disk-usage` Show disk usage of an environment Aliases: `disk` ####### Usage ``` platform disk [-B|--bytes] [-r|--range RANGE] [-i|--interval INTERVAL] [--to TO] [-1|--latest] [-s|--service SERVICE] [--type TYPE] [--tmp] [-p|--project PROJECT] [-e|--environment ENVIRONMENT] [--format FORMAT] [-c|--columns COLUMNS] [--no-header] [--date-fmt DATE-FMT] ``` ######## Options * `--bytes` (`-B`) Show sizes in bytes * `--range` (`-r`) (expects a value) The time range. Metrics will be loaded for this duration until the end time (--to). You can specify units: hours (h), minutes (m), or seconds (s). Minimum 5m, maximum 8h or more (depending on the project), default 10m. * `--interval` (`-i`) (expects a value) The time interval. Defaults to a division of the range. You can specify units: hours (h), minutes (m), or seconds (s). Minimum 1m. * `--to` (expects a value) The end time. Defaults to now. * `--latest` (`-1`) Show only the latest single data point * `--service` (`-s`) (expects a value) Filter by service or application name The % or * characters may be used as a wildcard. * `--type` (expects a value) Filter by service type (if --service is not provided). The version is not required. The % or * characters may be used as a wildcard. * `--tmp` Report temporary disk usage (shows columns: timestamp, service, tmp_used, tmp_limit, tmp_percent, tmp_ipercent) * `--project` (`-p`) (expects a value) The project ID or URL * `--environment` (`-e`) (expects a value) The environment ID. Use "." to select the project's default environment. * `--format` (expects a value) The output format: table, csv, tsv, or plain * `--columns` (`-c`) (expects a value) Columns to display. Available columns: timestamp*, service*, used*, limit*, percent*, ipercent*, tmp_percent*, ilimit, iused, tmp_ilimit, tmp_ipercent, tmp_iused, tmp_limit, tmp_used, type (* = default columns). The character "+" can be used as a placeholder for the default columns. The % or * characters may be used as a wildcard. Values may be split by commas (e.g. "a,b,c") and/or whitespace. * `--no-header` Do not output the table header * `--date-fmt` (expects a value) The date format (as a PHP date format string) * `--help` (`-h`) Display this help message * `--verbose` (`-v|-vv|-vvv`) Increase the verbosity of messages * `--version` (`-V`) Display this application version * `--yes` (`-y`) Answer "yes" to confirmation questions; accept the default value for other questions; disable interaction * `--no-interaction` Do not ask any interactive questions; accept default values. Equivalent to using the environment variable: PLATFORMSH_CLI_NO_INTERACTION=1 ###### `metrics:memory` Show memory usage of an environment Aliases: `mem`, `memory` ####### Usage ``` platform mem [-B|--bytes] [-r|--range RANGE] [-i|--interval INTERVAL] [--to TO] [-1|--latest] [-s|--service SERVICE] [--type TYPE] [-p|--project PROJECT] [-e|--environment ENVIRONMENT] [--format FORMAT] [-c|--columns COLUMNS] [--no-header] [--date-fmt DATE-FMT] ``` ######## Options * `--bytes` (`-B`) Show sizes in bytes * `--range` (`-r`) (expects a value) The time range. Metrics will be loaded for this duration until the end time (--to). You can specify units: hours (h), minutes (m), or seconds (s). Minimum 5m, maximum 8h or more (depending on the project), default 10m. * `--interval` (`-i`) (expects a value) The time interval. Defaults to a division of the range. You can specify units: hours (h), minutes (m), or seconds (s). Minimum 1m. * `--to` (expects a value) The end time. Defaults to now. * `--latest` (`-1`) Show only the latest single data point * `--service` (`-s`) (expects a value) Filter by service or application name The % or * characters may be used as a wildcard. * `--type` (expects a value) Filter by service type (if --service is not provided). The version is not required. The % or * characters may be used as a wildcard. * `--project` (`-p`) (expects a value) The project ID or URL * `--environment` (`-e`) (expects a value) The environment ID. Use "." to select the project's default environment. * `--format` (expects a value) The output format: table, csv, tsv, or plain * `--columns` (`-c`) (expects a value) Columns to display. Available columns: timestamp*, service*, used*, limit*, percent*, type (* = default columns). The character "+" can be used as a placeholder for the default columns. The % or * characters may be used as a wildcard. Values may be split by commas (e.g. "a,b,c") and/or whitespace. * `--no-header` Do not output the table header * `--date-fmt` (expects a value) The date format (as a PHP date format string) * `--help` (`-h`) Display this help message * `--verbose` (`-v|-vv|-vvv`) Increase the verbosity of messages * `--version` (`-V`) Display this application version * `--yes` (`-y`) Answer "yes" to confirmation questions; accept the default value for other questions; disable interaction * `--no-interaction` Do not ask any interactive questions; accept default values. Equivalent to using the environment variable: PLATFORMSH_CLI_NO_INTERACTION=1 ###### `mount:download` Download files from a mount, using rsync ####### Usage ``` platform mount:download [-a|--all] [-m|--mount MOUNT] [--target TARGET] [--source-path] [--delete] [--exclude EXCLUDE] [--include INCLUDE] [--refresh] [-p|--project PROJECT] [-e|--environment ENVIRONMENT] [-A|--app APP] [--worker WORKER] [-I|--instance INSTANCE] ``` ######## Options * `--all` (`-a`) Download from all mounts * `--mount` (`-m`) (expects a value) The mount (as an app-relative path) * `--target` (expects a value) The directory to which files will be downloaded. If --all is used, the mount path will be appended * `--source-path` Use the mount's source path (rather than the mount path) as a subdirectory of the target, when --all is used * `--delete` Whether to delete extraneous files in the target directory * `--exclude` (expects a value) File(s) to exclude from the download (pattern) * `--include` (expects a value) File(s) not to exclude (pattern) * `--refresh` Whether to refresh the cache * `--project` (`-p`) (expects a value) The project ID or URL * `--environment` (`-e`) (expects a value) The environment ID. Use "." to select the project's default environment. * `--app` (`-A`) (expects a value) The remote application name * `--worker` (expects a value) A worker name * `--instance` (`-I`) (expects a value) An instance ID * `--help` (`-h`) Display this help message * `--verbose` (`-v|-vv|-vvv`) Increase the verbosity of messages * `--version` (`-V`) Display this application version * `--yes` (`-y`) Answer "yes" to confirmation questions; accept the default value for other questions; disable interaction * `--no-interaction` Do not ask any interactive questions; accept default values. Equivalent to using the environment variable: PLATFORMSH_CLI_NO_INTERACTION=1 ###### `mount:list` Get a list of mounts Aliases: `mounts` ####### Usage ``` platform mounts [--paths] [--refresh] [--format FORMAT] [-c|--columns COLUMNS] [--no-header] [-p|--project PROJECT] [-e|--environment ENVIRONMENT] [-A|--app APP] [--worker WORKER] [-I|--instance INSTANCE] ``` ######## Options * `--paths` Output the mount paths only (one per line) * `--refresh` Whether to refresh the cache * `--format` (expects a value) The output format: table, csv, tsv, or plain * `--columns` (`-c`) (expects a value) Columns to display. Available columns: definition, path. The % or * characters may be used as a wildcard. Values may be split by commas (e.g. "a,b,c") and/or whitespace. * `--no-header` Do not output the table header * `--project` (`-p`) (expects a value) The project ID or URL * `--environment` (`-e`) (expects a value) The environment ID. Use "." to select the project's default environment. * `--app` (`-A`) (expects a value) The remote application name * `--worker` (expects a value) A worker name * `--instance` (`-I`) (expects a value) An instance ID * `--help` (`-h`) Display this help message * `--verbose` (`-v|-vv|-vvv`) Increase the verbosity of messages * `--version` (`-V`) Display this application version * `--yes` (`-y`) Answer "yes" to confirmation questions; accept the default value for other questions; disable interaction * `--no-interaction` Do not ask any interactive questions; accept default values. Equivalent to using the environment variable: PLATFORMSH_CLI_NO_INTERACTION=1 ###### `mount:upload` Upload files to a mount, using rsync ####### Usage ``` platform mount:upload [--source SOURCE] [-m|--mount MOUNT] [--delete] [--exclude EXCLUDE] [--include INCLUDE] [--refresh] [-p|--project PROJECT] [-e|--environment ENVIRONMENT] [-A|--app APP] [--worker WORKER] [-I|--instance INSTANCE] ``` ######## Options * `--source` (expects a value) A directory containing files to upload * `--mount` (`-m`) (expects a value) The mount (as an app-relative path) * `--delete` Whether to delete extraneous files in the mount * `--exclude` (expects a value) File(s) to exclude from the upload (pattern) * `--include` (expects a value) File(s) not to exclude (pattern) * `--refresh` Whether to refresh the cache * `--project` (`-p`) (expects a value) The project ID or URL * `--environment` (`-e`) (expects a value) The environment ID. Use "." to select the project's default environment. * `--app` (`-A`) (expects a value) The remote application name * `--worker` (expects a value) A worker name * `--instance` (`-I`) (expects a value) An instance ID * `--help` (`-h`) Display this help message * `--verbose` (`-v|-vv|-vvv`) Increase the verbosity of messages * `--version` (`-V`) Display this application version * `--yes` (`-y`) Answer "yes" to confirmation questions; accept the default value for other questions; disable interaction * `--no-interaction` Do not ask any interactive questions; accept default values. Equivalent to using the environment variable: PLATFORMSH_CLI_NO_INTERACTION=1 ###### `operation:list` List runtime operations on an environment Aliases: `ops` ####### Usage ``` platform ops [--full] [-p|--project PROJECT] [-e|--environment ENVIRONMENT] [-A|--app APP] [--worker WORKER] [--format FORMAT] [-c|--columns COLUMNS] [--no-header] ``` ######## Options * `--full` Do not limit the length of command to display. The default limit is 24 lines. * `--project` (`-p`) (expects a value) The project ID or URL * `--environment` (`-e`) (expects a value) The environment ID. Use "." to select the project's default environment. * `--app` (`-A`) (expects a value) The remote application name * `--worker` (expects a value) A worker name * `--format` (expects a value) The output format: table, csv, tsv, or plain * `--columns` (`-c`) (expects a value) Columns to display. Available columns: service*, name*, start*, role, stop (* = default columns). The character "+" can be used as a placeholder for the default columns. The % or * characters may be used as a wildcard. Values may be split by commas (e.g. "a,b,c") and/or whitespace. * `--no-header` Do not output the table header * `--help` (`-h`) Display this help message * `--verbose` (`-v|-vv|-vvv`) Increase the verbosity of messages * `--version` (`-V`) Display this application version * `--yes` (`-y`) Answer "yes" to confirmation questions; accept the default value for other questions; disable interaction * `--no-interaction` Do not ask any interactive questions; accept default values. Equivalent to using the environment variable: PLATFORMSH_CLI_NO_INTERACTION=1 ###### `operation:run` Run an operation on the environment ####### Usage ``` platform operation:run [-p|--project PROJECT] [-e|--environment ENVIRONMENT] [-A|--app APP] [--worker WORKER] [-W|--no-wait] [--wait] [--] [] ``` ######## Arguments * `operation`(optional) The operation name ######## Options * `--project` (`-p`) (expects a value) The project ID or URL * `--environment` (`-e`) (expects a value) The environment ID. Use "." to select the project's default environment. * `--app` (`-A`) (expects a value) The remote application name * `--worker` (expects a value) A worker name * `--no-wait` (`-W`) Do not wait for the operation to complete * `--wait` Wait for the operation to complete (default) * `--help` (`-h`) Display this help message * `--verbose` (`-v|-vv|-vvv`) Increase the verbosity of messages * `--version` (`-V`) Display this application version * `--yes` (`-y`) Answer "yes" to confirmation questions; accept the default value for other questions; disable interaction * `--no-interaction` Do not ask any interactive questions; accept default values. Equivalent to using the environment variable: PLATFORMSH_CLI_NO_INTERACTION=1 ###### `organization:billing:address` View or change an organization's billing address ####### Usage ``` platform organization:billing:address [-o|--org ORG] [-p|--project PROJECT] [--date-fmt DATE-FMT] [--format FORMAT] [-c|--columns COLUMNS] [--no-header] [--] [] [] []... ``` ######## Arguments * `property`(optional) The name of a property to view or change * `value`(optional) A new value for the property * `properties`(optional; multiple values allowed) Additional property/value pairs ######## Options * `--org` (`-o`) (expects a value) The organization name (or ID) * `--project` (`-p`) (expects a value) The project ID or URL, to auto-select the organization if --org is not used * `--date-fmt` (expects a value) The date format (as a PHP date format string) * `--format` (expects a value) The output format: table, csv, tsv, or plain * `--columns` (`-c`) (expects a value) Columns to display. The % or * characters may be used as a wildcard. Values may be split by commas (e.g. "a,b,c") and/or whitespace. * `--no-header` Do not output the table header * `--help` (`-h`) Display this help message * `--verbose` (`-v|-vv|-vvv`) Increase the verbosity of messages * `--version` (`-V`) Display this application version * `--yes` (`-y`) Answer "yes" to confirmation questions; accept the default value for other questions; disable interaction * `--no-interaction` Do not ask any interactive questions; accept default values. Equivalent to using the environment variable: PLATFORMSH_CLI_NO_INTERACTION=1 ###### `organization:billing:profile` View or change an organization's billing profile ####### Usage ``` platform organization:billing:profile [-o|--org ORG] [-p|--project PROJECT] [--date-fmt DATE-FMT] [--format FORMAT] [-c|--columns COLUMNS] [--no-header] [--] [] [] ``` ######## Arguments * `property`(optional) The name of a property to view or change * `value`(optional) A new value for the property ######## Options * `--org` (`-o`) (expects a value) The organization name (or ID) * `--project` (`-p`) (expects a value) The project ID or URL, to auto-select the organization if --org is not used * `--date-fmt` (expects a value) The date format (as a PHP date format string) * `--format` (expects a value) The output format: table, csv, tsv, or plain * `--columns` (`-c`) (expects a value) Columns to display. The % or * characters may be used as a wildcard. Values may be split by commas (e.g. "a,b,c") and/or whitespace. * `--no-header` Do not output the table header * `--help` (`-h`) Display this help message * `--verbose` (`-v|-vv|-vvv`) Increase the verbosity of messages * `--version` (`-V`) Display this application version * `--yes` (`-y`) Answer "yes" to confirmation questions; accept the default value for other questions; disable interaction * `--no-interaction` Do not ask any interactive questions; accept default values. Equivalent to using the environment variable: PLATFORMSH_CLI_NO_INTERACTION=1 ###### `organization:create` Create a new organization ####### Usage ``` platform organization:create [--label LABEL] [--name NAME] [--country COUNTRY] ``` Organizations allow you to manage your Platform.sh projects, users and billing. Projects are owned by organizations. You can add other users to your organization, for collaboratively managing the organization as well as its projects and billing information. Access to individual projects (API and SSH) is managed separately, for now. ######## Options * `--label` (expects a value) The full name of the organization, e.g. "ACME Inc." * `--name` (expects a value) The organization machine name, used for URL paths and similar purposes. * `--country` (expects a value) The organization country. Used as the default for the billing address. * `--help` (`-h`) Display this help message * `--verbose` (`-v|-vv|-vvv`) Increase the verbosity of messages * `--version` (`-V`) Display this application version * `--yes` (`-y`) Answer "yes" to confirmation questions; accept the default value for other questions; disable interaction * `--no-interaction` Do not ask any interactive questions; accept default values. Equivalent to using the environment variable: PLATFORMSH_CLI_NO_INTERACTION=1 ###### `organization:delete` Delete an organization ####### Usage ``` platform organization:delete [-o|--org ORG] [-p|--project PROJECT] ``` ######## Options * `--org` (`-o`) (expects a value) The organization name (or ID) * `--project` (`-p`) (expects a value) The project ID or URL, to auto-select the organization if --org is not used * `--help` (`-h`) Display this help message * `--verbose` (`-v|-vv|-vvv`) Increase the verbosity of messages * `--version` (`-V`) Display this application version * `--yes` (`-y`) Answer "yes" to confirmation questions; accept the default value for other questions; disable interaction * `--no-interaction` Do not ask any interactive questions; accept default values. Equivalent to using the environment variable: PLATFORMSH_CLI_NO_INTERACTION=1 ###### `organization:info` View or change organization details ####### Usage ``` platform organization:info [-o|--org ORG] [-p|--project PROJECT] [--date-fmt DATE-FMT] [--format FORMAT] [-c|--columns COLUMNS] [--no-header] [--] [] [] ``` ######## Arguments * `property`(optional) The name of a property to view or change * `value`(optional) A new value for the property ######## Options * `--org` (`-o`) (expects a value) The organization name (or ID) * `--project` (`-p`) (expects a value) The project ID or URL, to auto-select the organization if --org is not used * `--date-fmt` (expects a value) The date format (as a PHP date format string) * `--format` (expects a value) The output format: table, csv, tsv, or plain * `--columns` (`-c`) (expects a value) Columns to display. The % or * characters may be used as a wildcard. Values may be split by commas (e.g. "a,b,c") and/or whitespace. * `--no-header` Do not output the table header * `--help` (`-h`) Display this help message * `--verbose` (`-v|-vv|-vvv`) Increase the verbosity of messages * `--version` (`-V`) Display this application version * `--yes` (`-y`) Answer "yes" to confirmation questions; accept the default value for other questions; disable interaction * `--no-interaction` Do not ask any interactive questions; accept default values. Equivalent to using the environment variable: PLATFORMSH_CLI_NO_INTERACTION=1 ####### Examples * View the organization "acme": ``` platform organization:info --org acme ``` * Show the organization's label: ``` platform organization:info --org acme label ``` * Change the organization label: ``` platform organization:info --org acme label "ACME Inc." ``` ###### `organization:list` List organizations Aliases: `orgs`, `organizations` ####### Usage ``` platform orgs [--my] [--sort SORT] [--reverse] [--format FORMAT] [-c|--columns COLUMNS] [--no-header] ``` ######## Options * `--my` List only the organizations you own * `--sort` (expects a value) An organization property to sort by * `--reverse` Sort in reverse order * `--format` (expects a value) The output format: table, csv, tsv, or plain * `--columns` (`-c`) (expects a value) Columns to display. Available columns: name*, label*, owner_email*, created_at, id, owner_id, owner_username, updated_at (* = default columns). The character "+" can be used as a placeholder for the default columns. The % or * characters may be used as a wildcard. Values may be split by commas (e.g. "a,b,c") and/or whitespace. * `--no-header` Do not output the table header * `--help` (`-h`) Display this help message * `--verbose` (`-v|-vv|-vvv`) Increase the verbosity of messages * `--version` (`-V`) Display this application version * `--yes` (`-y`) Answer "yes" to confirmation questions; accept the default value for other questions; disable interaction * `--no-interaction` Do not ask any interactive questions; accept default values. Equivalent to using the environment variable: PLATFORMSH_CLI_NO_INTERACTION=1 ###### `organization:subscription:list` List subscriptions within an organization Aliases: `org:subs` ####### Usage ``` platform org:subs [--page PAGE] [-c|--count COUNT] [-o|--org ORG] [-p|--project PROJECT] [--format FORMAT] [--columns COLUMNS] [--no-header] ``` ######## Options * `--page` (expects a value) Page number. This enables pagination, despite configuration or --count. * `--count` (`-c`) (expects a value) The number of items to display per page. Use 0 to disable pagination. Ignored if --page is specified. * `--org` (`-o`) (expects a value) The organization name (or ID) * `--project` (`-p`) (expects a value) The project ID or URL, to auto-select the organization if --org is not used * `--format` (expects a value) The output format: table, csv, tsv, or plain * `--columns` (expects a value) Columns to display. Available columns: id*, project_id*, project_title*, project_region*, created_at, updated_at (* = default columns). The character "+" can be used as a placeholder for the default columns. The % or * characters may be used as a wildcard. Values may be split by commas (e.g. "a,b,c") and/or whitespace. * `--no-header` Do not output the table header * `--help` (`-h`) Display this help message * `--verbose` (`-v|-vv|-vvv`) Increase the verbosity of messages * `--version` (`-V`) Display this application version * `--yes` (`-y`) Answer "yes" to confirmation questions; accept the default value for other questions; disable interaction * `--no-interaction` Do not ask any interactive questions; accept default values. Equivalent to using the environment variable: PLATFORMSH_CLI_NO_INTERACTION=1 ###### `organization:user:add` Invite a user to an organization ####### Usage ``` platform organization:user:add [-o|--org ORG] [--permission PERMISSION] [--] [] ``` ######## Arguments * `email`(optional) The email address of the user ######## Options * `--org` (`-o`) (expects a value) The organization name (or ID) * `--permission` (expects a value) Permission(s) for the user on the organization. Valid permissions are: billing, members, plans, projects:create, projects:list * `--help` (`-h`) Display this help message * `--verbose` (`-v|-vv|-vvv`) Increase the verbosity of messages * `--version` (`-V`) Display this application version * `--yes` (`-y`) Answer "yes" to confirmation questions; accept the default value for other questions; disable interaction * `--no-interaction` Do not ask any interactive questions; accept default values. Equivalent to using the environment variable: PLATFORMSH_CLI_NO_INTERACTION=1 ###### `organization:user:delete` Remove a user from an organization ####### Usage ``` platform organization:user:delete [-o|--org ORG] [--] ``` ######## Arguments * `email`(required) The email address of the user ######## Options * `--org` (`-o`) (expects a value) The organization name (or ID) * `--help` (`-h`) Display this help message * `--verbose` (`-v|-vv|-vvv`) Increase the verbosity of messages * `--version` (`-V`) Display this application version * `--yes` (`-y`) Answer "yes" to confirmation questions; accept the default value for other questions; disable interaction * `--no-interaction` Do not ask any interactive questions; accept default values. Equivalent to using the environment variable: PLATFORMSH_CLI_NO_INTERACTION=1 ###### `organization:user:get` View an organization user ####### Usage ``` platform organization:user:get [-o|--org ORG] [-P|--property PROPERTY] [--date-fmt DATE-FMT] [--format FORMAT] [-c|--columns COLUMNS] [--no-header] [--] [] ``` ######## Arguments * `email`(optional) The email address of the user ######## Options * `--org` (`-o`) (expects a value) The organization name (or ID) * `--property` (`-P`) (expects a value) A property to display * `--date-fmt` (expects a value) The date format (as a PHP date format string) * `--format` (expects a value) The output format: table, csv, tsv, or plain * `--columns` (`-c`) (expects a value) Columns to display. The % or * characters may be used as a wildcard. Values may be split by commas (e.g. "a,b,c") and/or whitespace. * `--no-header` Do not output the table header * `--help` (`-h`) Display this help message * `--verbose` (`-v|-vv|-vvv`) Increase the verbosity of messages * `--version` (`-V`) Display this application version * `--yes` (`-y`) Answer "yes" to confirmation questions; accept the default value for other questions; disable interaction * `--no-interaction` Do not ask any interactive questions; accept default values. Equivalent to using the environment variable: PLATFORMSH_CLI_NO_INTERACTION=1 ###### `organization:user:list` List organization users Aliases: `org:users` ####### Usage ``` platform org:users [-c|--count COUNT] [--sort SORT] [--reverse] [-o|--org ORG] [--date-fmt DATE-FMT] [--format FORMAT] [--columns COLUMNS] [--no-header] ``` ######## Options * `--count` (`-c`) (expects a value) The number of items to display per page. Use 0 to disable pagination. * `--sort` (expects a value) A property to sort by (created_at or updated_at) * `--reverse` Reverse the sort order * `--org` (`-o`) (expects a value) The organization name (or ID) * `--date-fmt` (expects a value) The date format (as a PHP date format string) * `--format` (expects a value) The output format: table, csv, tsv, or plain * `--columns` (expects a value) Columns to display. Available columns: id*, email*, owner*, permissions*, created_at, first_name, last_name, mfa_enabled, sso_enabled, updated_at, username (* = default columns). The character "+" can be used as a placeholder for the default columns. The % or * characters may be used as a wildcard. Values may be split by commas (e.g. "a,b,c") and/or whitespace. * `--no-header` Do not output the table header * `--help` (`-h`) Display this help message * `--verbose` (`-v|-vv|-vvv`) Increase the verbosity of messages * `--version` (`-V`) Display this application version * `--yes` (`-y`) Answer "yes" to confirmation questions; accept the default value for other questions; disable interaction * `--no-interaction` Do not ask any interactive questions; accept default values. Equivalent to using the environment variable: PLATFORMSH_CLI_NO_INTERACTION=1 ###### `organization:user:projects` List the projects a user can access Aliases: `oups` ####### Usage ``` platform oups [-o|--org ORG] [--list-all] [--format FORMAT] [-c|--columns COLUMNS] [--no-header] [--date-fmt DATE-FMT] [--] [] ``` ######## Arguments * `email`(optional) The email address of the user ######## Options * `--org` (`-o`) (expects a value) The organization name (or ID) * `--list-all` List access across all organizations * `--format` (expects a value) The output format: table, csv, tsv, or plain * `--columns` (`-c`) (expects a value) Columns to display. Available columns: project_id*, project_title*, roles*, updated_at*, granted_at, organization_id, organization_label, organization_name, region (* = default columns). The character "+" can be used as a placeholder for the default columns. The % or * characters may be used as a wildcard. Values may be split by commas (e.g. "a,b,c") and/or whitespace. * `--no-header` Do not output the table header * `--date-fmt` (expects a value) The date format (as a PHP date format string) * `--help` (`-h`) Display this help message * `--verbose` (`-v|-vv|-vvv`) Increase the verbosity of messages * `--version` (`-V`) Display this application version * `--yes` (`-y`) Answer "yes" to confirmation questions; accept the default value for other questions; disable interaction * `--no-interaction` Do not ask any interactive questions; accept default values. Equivalent to using the environment variable: PLATFORMSH_CLI_NO_INTERACTION=1 ###### `organization:user:update` Update an organization user ####### Usage ``` platform organization:user:update [-o|--org ORG] [--permission PERMISSION] [--] [] ``` ######## Arguments * `email`(optional) The email address of the user ######## Options * `--org` (`-o`) (expects a value) The organization name (or ID) * `--permission` (expects a value) Permission(s) for the user on the organization. Valid permissions are: billing, members, plans, projects:create, projects:list * `--help` (`-h`) Display this help message * `--verbose` (`-v|-vv|-vvv`) Increase the verbosity of messages * `--version` (`-V`) Display this application version * `--yes` (`-y`) Answer "yes" to confirmation questions; accept the default value for other questions; disable interaction * `--no-interaction` Do not ask any interactive questions; accept default values. Equivalent to using the environment variable: PLATFORMSH_CLI_NO_INTERACTION=1 ###### `project:clear-build-cache` Clear a project's build cache ####### Usage ``` platform project:clear-build-cache [-p|--project PROJECT] ``` ######## Options * `--project` (`-p`) (expects a value) The project ID or URL * `--help` (`-h`) Display this help message * `--verbose` (`-v|-vv|-vvv`) Increase the verbosity of messages * `--version` (`-V`) Display this application version * `--yes` (`-y`) Answer "yes" to confirmation questions; accept the default value for other questions; disable interaction * `--no-interaction` Do not ask any interactive questions; accept default values. Equivalent to using the environment variable: PLATFORMSH_CLI_NO_INTERACTION=1 ###### `project:create` Create a new project Aliases: `create` ####### Usage ``` platform create [-o|--org ORG] [--title TITLE] [--region REGION] [--plan PLAN] [--environments ENVIRONMENTS] [--storage STORAGE] [--default-branch DEFAULT-BRANCH] [--set-remote] [--no-set-remote] ``` Use this command to create a new project. An interactive form will be presented with the available options. If the command is run non-interactively (with --yes), the form will not be displayed, and the --region option will be required. A project subscription will be requested, and then checked periodically (every 3 seconds) until the project has been activated, or until the process times out (15 minutes by default). If known, the project ID will be output to STDOUT. All other output will be sent to STDERR. ######## Options * `--org` (`-o`) (expects a value) The organization name (or ID) * `--title` (expects a value) The initial project title * `--region` (expects a value) The region where the project will be hosted. * `--plan` (expects a value) The subscription plan * `--environments` (expects a value) The number of environments * `--storage` (expects a value) The amount of storage per environment, in GiB * `--default-branch` (expects a value) The default Git branch name for the project (the production environment) * `--set-remote` Set the new project as the remote for this repository. This is the default if no remote project is already set. * `--no-set-remote` Do not set the new project as the remote for this repository * `--help` (`-h`) Display this help message * `--verbose` (`-v|-vv|-vvv`) Increase the verbosity of messages * `--version` (`-V`) Display this application version * `--yes` (`-y`) Answer "yes" to confirmation questions; accept the default value for other questions; disable interaction * `--no-interaction` Do not ask any interactive questions; accept default values. Equivalent to using the environment variable: PLATFORMSH_CLI_NO_INTERACTION=1 ###### `project:delete` Delete a project ####### Usage ``` platform project:delete [-p|--project PROJECT] [--] [] ``` ######## Arguments * `project`(optional) The project ID ######## Options * `--project` (`-p`) (expects a value) The project ID or URL * `--help` (`-h`) Display this help message * `--verbose` (`-v|-vv|-vvv`) Increase the verbosity of messages * `--version` (`-V`) Display this application version * `--yes` (`-y`) Answer "yes" to confirmation questions; accept the default value for other questions; disable interaction * `--no-interaction` Do not ask any interactive questions; accept default values. Equivalent to using the environment variable: PLATFORMSH_CLI_NO_INTERACTION=1 ###### `project:get` Clone a project locally Aliases: `get` ####### Usage ``` platform get [-e|--environment ENVIRONMENT] [--depth DEPTH] [--build] [-p|--project PROJECT] [--] [] [] ``` ######## Arguments * `project`(optional) The project ID * `directory`(optional) The directory to clone to. Defaults to the project title ######## Options * `--environment` (`-e`) (expects a value) The environment ID to clone. Defaults to the project default, or the first available environment * `--depth` (expects a value) Create a shallow clone: limit the number of commits in the history * `--build` Build the project after cloning * `--project` (`-p`) (expects a value) The project ID or URL * `--help` (`-h`) Display this help message * `--verbose` (`-v|-vv|-vvv`) Increase the verbosity of messages * `--version` (`-V`) Display this application version * `--yes` (`-y`) Answer "yes" to confirmation questions; accept the default value for other questions; disable interaction * `--no-interaction` Do not ask any interactive questions; accept default values. Equivalent to using the environment variable: PLATFORMSH_CLI_NO_INTERACTION=1 ####### Examples * Clone the project "abc123" into the directory "my-project": ``` platform project:get abc123 my-project ``` ###### `project:info` Read or set properties for a project ####### Usage ``` platform project:info [--refresh] [--date-fmt DATE-FMT] [--format FORMAT] [-c|--columns COLUMNS] [--no-header] [-p|--project PROJECT] [-W|--no-wait] [--wait] [--] [] [] ``` ######## Arguments * `property`(optional) The name of the property * `value`(optional) Set a new value for the property ######## Options * `--refresh` Whether to refresh the cache * `--date-fmt` (expects a value) The date format (as a PHP date format string) * `--format` (expects a value) The output format: table, csv, tsv, or plain * `--columns` (`-c`) (expects a value) Columns to display. The % or * characters may be used as a wildcard. Values may be split by commas (e.g. "a,b,c") and/or whitespace. * `--no-header` Do not output the table header * `--project` (`-p`) (expects a value) The project ID or URL * `--no-wait` (`-W`) Do not wait for the operation to complete * `--wait` Wait for the operation to complete (default) * `--help` (`-h`) Display this help message * `--verbose` (`-v|-vv|-vvv`) Increase the verbosity of messages * `--version` (`-V`) Display this application version * `--yes` (`-y`) Answer "yes" to confirmation questions; accept the default value for other questions; disable interaction * `--no-interaction` Do not ask any interactive questions; accept default values. Equivalent to using the environment variable: PLATFORMSH_CLI_NO_INTERACTION=1 ####### Examples * Read all project properties: ``` platform project:info ``` * Show the project's Git URL: ``` platform project:info git ``` * Change the project's title: ``` platform project:info title "My project" ``` ###### `project:init` Initialize a project Aliases: `ify` ####### Usage ``` platform project:init ``` ######## Options * `--help` (`-h`) Display this help message * `--verbose` (`-v|vv|vvv`) Increase the verbosity of messages * `--version` (`-V`) Display this application version * `--yes` (`-y`) Answer "yes" to confirmation questions; accept the default value for other questions; disable interaction * `--no-interaction` Do not ask any interactive questions; accept default values. Equivalent to using the environment variable: PLATFORMSH_CLI_NO_INTERACTION=1 ####### Examples * Create the starter YAML files for your project: ``` platform project:init ``` ###### `project:list` Get a list of all active projects Aliases: `projects`, `pro` ####### Usage ``` platform projects [--pipe] [--region REGION] [--title TITLE] [--my] [--refresh REFRESH] [--sort SORT] [--reverse] [--page PAGE] [-c|--count COUNT] [-o|--org ORG] [--format FORMAT] [--columns COLUMNS] [--no-header] [--date-fmt DATE-FMT] ``` ######## Options * `--pipe` Output a simple list of project IDs. Disables pagination. * `--region` (expects a value) Filter by region (exact match) * `--title` (expects a value) Filter by title (case-insensitive search) * `--my` Display only the projects you own (through organizations you own) * `--refresh` (expects a value) Whether to refresh the list * `--sort` (expects a value) A property to sort by * `--reverse` Sort in reverse (descending) order * `--page` (expects a value) Page number. This enables pagination, despite configuration or --count. Ignored if --pipe is specified. * `--count` (`-c`) (expects a value) The number of projects to display per page. Use 0 to disable pagination. Ignored if --page is specified. * `--org` (`-o`) (expects a value) Filter by organization name or ID * `--format` (expects a value) The output format: table, csv, tsv, or plain * `--columns` (expects a value) Columns to display. Available columns: id*, title*, region*, organization_name*, created_at, organization_id, organization_label, status (* = default columns). The character "+" can be used as a placeholder for the default columns. The % or * characters may be used as a wildcard. Values may be split by commas (e.g. "a,b,c") and/or whitespace. * `--no-header` Do not output the table header * `--date-fmt` (expects a value) The date format (as a PHP date format string) * `--help` (`-h`) Display this help message * `--verbose` (`-v|-vv|-vvv`) Increase the verbosity of messages * `--version` (`-V`) Display this application version * `--yes` (`-y`) Answer "yes" to confirmation questions; accept the default value for other questions; disable interaction * `--no-interaction` Do not ask any interactive questions; accept default values. Equivalent to using the environment variable: PLATFORMSH_CLI_NO_INTERACTION=1 ###### `project:set-remote` Set the remote project for the current Git repository Aliases: `set-remote` ####### Usage ``` platform set-remote [] ``` ######## Arguments * `project`(optional) The project ID ######## Options * `--help` (`-h`) Display this help message * `--verbose` (`-v|-vv|-vvv`) Increase the verbosity of messages * `--version` (`-V`) Display this application version * `--yes` (`-y`) Answer "yes" to confirmation questions; accept the default value for other questions; disable interaction * `--no-interaction` Do not ask any interactive questions; accept default values. Equivalent to using the environment variable: PLATFORMSH_CLI_NO_INTERACTION=1 ####### Examples * Set the remote project for this repository to "abcdef123456": ``` platform project:set-remote abcdef123456 ``` * Unset the remote project for this repository: ``` platform project:set-remote - ``` ###### `repo:cat` Read a file in the project repository ####### Usage ``` platform repo:cat [-c|--commit COMMIT] [-p|--project PROJECT] [-e|--environment ENVIRONMENT] [--] ``` ######## Arguments * `path`(required) The path to the file ######## Options * `--commit` (`-c`) (expects a value) The commit SHA. This can also accept "HEAD", and caret (^) or tilde (~) suffixes for parent commits. * `--project` (`-p`) (expects a value) The project ID or URL * `--environment` (`-e`) (expects a value) The environment ID. Use "." to select the project's default environment. * `--help` (`-h`) Display this help message * `--verbose` (`-v|-vv|-vvv`) Increase the verbosity of messages * `--version` (`-V`) Display this application version * `--yes` (`-y`) Answer "yes" to confirmation questions; accept the default value for other questions; disable interaction * `--no-interaction` Do not ask any interactive questions; accept default values. Equivalent to using the environment variable: PLATFORMSH_CLI_NO_INTERACTION=1 ####### Examples * Read the services configuration file: ``` platform repo:cat .platform/services.yaml ``` ###### `repo:ls` List files in the project repository ####### Usage ``` platform repo:ls [-d|--directories] [-f|--files] [--git-style] [-c|--commit COMMIT] [-p|--project PROJECT] [-e|--environment ENVIRONMENT] [--] [] ``` ######## Arguments * `path`(optional) The path to a subdirectory ######## Options * `--directories` (`-d`) Show directories only * `--files` (`-f`) Show files only * `--git-style` Style output similar to "git ls-tree" * `--commit` (`-c`) (expects a value) The commit SHA. This can also accept "HEAD", and caret (^) or tilde (~) suffixes for parent commits. * `--project` (`-p`) (expects a value) The project ID or URL * `--environment` (`-e`) (expects a value) The environment ID. Use "." to select the project's default environment. * `--help` (`-h`) Display this help message * `--verbose` (`-v|-vv|-vvv`) Increase the verbosity of messages * `--version` (`-V`) Display this application version * `--yes` (`-y`) Answer "yes" to confirmation questions; accept the default value for other questions; disable interaction * `--no-interaction` Do not ask any interactive questions; accept default values. Equivalent to using the environment variable: PLATFORMSH_CLI_NO_INTERACTION=1 ###### `repo:read` Read a directory or file in the project repository Aliases: `read` ####### Usage ``` platform read [-c|--commit COMMIT] [-p|--project PROJECT] [-e|--environment ENVIRONMENT] [--] [] ``` ######## Arguments * `path`(optional) The path to the directory or file ######## Options * `--commit` (`-c`) (expects a value) The commit SHA. This can also accept "HEAD", and caret (^) or tilde (~) suffixes for parent commits. * `--project` (`-p`) (expects a value) The project ID or URL * `--environment` (`-e`) (expects a value) The environment ID. Use "." to select the project's default environment. * `--help` (`-h`) Display this help message * `--verbose` (`-v|-vv|-vvv`) Increase the verbosity of messages * `--version` (`-V`) Display this application version * `--yes` (`-y`) Answer "yes" to confirmation questions; accept the default value for other questions; disable interaction * `--no-interaction` Do not ask any interactive questions; accept default values. Equivalent to using the environment variable: PLATFORMSH_CLI_NO_INTERACTION=1 ###### `resources:build:get` View the build resources of a project Aliases: `build-resources:get`, `build-resources` ####### Usage ``` platform build-resources:get [-p|--project PROJECT] [--format FORMAT] [-c|--columns COLUMNS] [--no-header] ``` ######## Options * `--project` (`-p`) (expects a value) The project ID or URL * `--format` (expects a value) The output format: table, csv, tsv, or plain * `--columns` (`-c`) (expects a value) Columns to display. Available columns: cpu, memory. The % or * characters may be used as a wildcard. Values may be split by commas (e.g. "a,b,c") and/or whitespace. * `--no-header` Do not output the table header * `--help` (`-h`) Display this help message * `--verbose` (`-v|-vv|-vvv`) Increase the verbosity of messages * `--version` (`-V`) Display this application version * `--yes` (`-y`) Answer "yes" to confirmation questions; accept the default value for other questions; disable interaction * `--no-interaction` Do not ask any interactive questions; accept default values. Equivalent to using the environment variable: PLATFORMSH_CLI_NO_INTERACTION=1 ###### `route:get` View detailed information about a route ####### Usage ``` platform route:get [--id ID] [-1|--primary] [-P|--property PROPERTY] [--refresh] [--date-fmt DATE-FMT] [-p|--project PROJECT] [-e|--environment ENVIRONMENT] [-A|--app APP] [-i|--identity-file IDENTITY-FILE] [--] [] ``` ######## Arguments * `route`(optional) The route's original URL ######## Options * `--id` (expects a value) A route ID to select * `--primary` (`-1`) Select the primary route * `--property` (`-P`) (expects a value) The property to display * `--refresh` Bypass the cache of routes * `--date-fmt` (expects a value) The date format (as a PHP date format string) * `--project` (`-p`) (expects a value) The project ID or URL * `--environment` (`-e`) (expects a value) The environment ID. Use "." to select the project's default environment. * `--app` (`-A`) (expects a value) [Deprecated option, no longer used] * `--identity-file` (`-i`) (expects a value) [Deprecated option, no longer used] * `--help` (`-h`) Display this help message * `--verbose` (`-v|-vv|-vvv`) Increase the verbosity of messages * `--version` (`-V`) Display this application version * `--yes` (`-y`) Answer "yes" to confirmation questions; accept the default value for other questions; disable interaction * `--no-interaction` Do not ask any interactive questions; accept default values. Equivalent to using the environment variable: PLATFORMSH_CLI_NO_INTERACTION=1 ####### Examples * View the URL to the https://{default}/ route: ``` platform route:get 'https://{default}/' -P url ``` ###### `route:list` List all routes for an environment Aliases: `routes` ####### Usage ``` platform routes [--refresh] [--format FORMAT] [-c|--columns COLUMNS] [--no-header] [-p|--project PROJECT] [-e|--environment ENVIRONMENT] [--] [] ``` ######## Arguments * `environment`(optional) The environment ID ######## Options * `--refresh` Bypass the cache of routes * `--format` (expects a value) The output format: table, csv, tsv, or plain * `--columns` (`-c`) (expects a value) Columns to display. Available columns: route*, type*, to*, url (* = default columns). The character "+" can be used as a placeholder for the default columns. The % or * characters may be used as a wildcard. Values may be split by commas (e.g. "a,b,c") and/or whitespace. * `--no-header` Do not output the table header * `--project` (`-p`) (expects a value) The project ID or URL * `--environment` (`-e`) (expects a value) The environment ID. Use "." to select the project's default environment. * `--help` (`-h`) Display this help message * `--verbose` (`-v|-vv|-vvv`) Increase the verbosity of messages * `--version` (`-V`) Display this application version * `--yes` (`-y`) Answer "yes" to confirmation questions; accept the default value for other questions; disable interaction * `--no-interaction` Do not ask any interactive questions; accept default values. Equivalent to using the environment variable: PLATFORMSH_CLI_NO_INTERACTION=1 ###### `service:list` List services in the project Aliases: `services` ####### Usage ``` platform services [--refresh] [--pipe] [-p|--project PROJECT] [-e|--environment ENVIRONMENT] [--format FORMAT] [-c|--columns COLUMNS] [--no-header] ``` ######## Options * `--refresh` Whether to refresh the cache * `--pipe` Output a list of service names only * `--project` (`-p`) (expects a value) The project ID or URL * `--environment` (`-e`) (expects a value) The environment ID. Use "." to select the project's default environment. * `--format` (expects a value) The output format: table, csv, tsv, or plain * `--columns` (`-c`) (expects a value) Columns to display. Available columns: disk, name, size, type. The % or * characters may be used as a wildcard. Values may be split by commas (e.g. "a,b,c") and/or whitespace. * `--no-header` Do not output the table header * `--help` (`-h`) Display this help message * `--verbose` (`-v|-vv|-vvv`) Increase the verbosity of messages * `--version` (`-V`) Display this application version * `--yes` (`-y`) Answer "yes" to confirmation questions; accept the default value for other questions; disable interaction * `--no-interaction` Do not ask any interactive questions; accept default values. Equivalent to using the environment variable: PLATFORMSH_CLI_NO_INTERACTION=1 ###### `service:mongo:dump` Create a binary archive dump of data from MongoDB Aliases: `mongodump` ####### Usage ``` platform mongodump [-c|--collection COLLECTION] [-z|--gzip] [-o|--stdout] [-r|--relationship RELATIONSHIP] [-p|--project PROJECT] [-e|--environment ENVIRONMENT] [-A|--app APP] ``` ######## Options * `--collection` (`-c`) (expects a value) The collection to dump * `--gzip` (`-z`) Compress the dump using gzip * `--stdout` (`-o`) Output to STDOUT instead of a file * `--relationship` (`-r`) (expects a value) The service relationship to use * `--project` (`-p`) (expects a value) The project ID or URL * `--environment` (`-e`) (expects a value) The environment ID. Use "." to select the project's default environment. * `--app` (`-A`) (expects a value) The remote application name * `--help` (`-h`) Display this help message * `--verbose` (`-v|-vv|-vvv`) Increase the verbosity of messages * `--version` (`-V`) Display this application version * `--yes` (`-y`) Answer "yes" to confirmation questions; accept the default value for other questions; disable interaction * `--no-interaction` Do not ask any interactive questions; accept default values. Equivalent to using the environment variable: PLATFORMSH_CLI_NO_INTERACTION=1 ###### `service:mongo:export` Export data from MongoDB Aliases: `mongoexport` ####### Usage ``` platform mongoexport [-c|--collection COLLECTION] [--jsonArray] [--type TYPE] [-f|--fields FIELDS] [-r|--relationship RELATIONSHIP] [-p|--project PROJECT] [-e|--environment ENVIRONMENT] [-A|--app APP] ``` ######## Options * `--collection` (`-c`) (expects a value) The collection to export * `--jsonArray` Export data as a single JSON array * `--type` (expects a value) The export type, e.g. "csv" * `--fields` (`-f`) (expects a value) The fields to export * `--relationship` (`-r`) (expects a value) The service relationship to use * `--project` (`-p`) (expects a value) The project ID or URL * `--environment` (`-e`) (expects a value) The environment ID. Use "." to select the project's default environment. * `--app` (`-A`) (expects a value) The remote application name * `--help` (`-h`) Display this help message * `--verbose` (`-v|-vv|-vvv`) Increase the verbosity of messages * `--version` (`-V`) Display this application version * `--yes` (`-y`) Answer "yes" to confirmation questions; accept the default value for other questions; disable interaction * `--no-interaction` Do not ask any interactive questions; accept default values. Equivalent to using the environment variable: PLATFORMSH_CLI_NO_INTERACTION=1 ####### Examples * Export a CSV from the "users" collection: ``` platform service:mongo:export -c users --type csv -f name,email ``` ###### `service:mongo:restore` Restore a binary archive dump of data into MongoDB Aliases: `mongorestore` ####### Usage ``` platform mongorestore [-c|--collection COLLECTION] [-r|--relationship RELATIONSHIP] [-p|--project PROJECT] [-e|--environment ENVIRONMENT] [-A|--app APP] ``` ######## Options * `--collection` (`-c`) (expects a value) The collection to restore * `--relationship` (`-r`) (expects a value) The service relationship to use * `--project` (`-p`) (expects a value) The project ID or URL * `--environment` (`-e`) (expects a value) The environment ID. Use "." to select the project's default environment. * `--app` (`-A`) (expects a value) The remote application name * `--help` (`-h`) Display this help message * `--verbose` (`-v|-vv|-vvv`) Increase the verbosity of messages * `--version` (`-V`) Display this application version * `--yes` (`-y`) Answer "yes" to confirmation questions; accept the default value for other questions; disable interaction * `--no-interaction` Do not ask any interactive questions; accept default values. Equivalent to using the environment variable: PLATFORMSH_CLI_NO_INTERACTION=1 ###### `service:mongo:shell` Use the MongoDB shell Aliases: `mongo` ####### Usage ``` platform mongo [--eval EVAL] [-r|--relationship RELATIONSHIP] [-p|--project PROJECT] [-e|--environment ENVIRONMENT] [-A|--app APP] ``` ######## Options * `--eval` (expects a value) Pass a JavaScript fragment to the shell * `--relationship` (`-r`) (expects a value) The service relationship to use * `--project` (`-p`) (expects a value) The project ID or URL * `--environment` (`-e`) (expects a value) The environment ID. Use "." to select the project's default environment. * `--app` (`-A`) (expects a value) The remote application name * `--help` (`-h`) Display this help message * `--verbose` (`-v|-vv|-vvv`) Increase the verbosity of messages * `--version` (`-V`) Display this application version * `--yes` (`-y`) Answer "yes" to confirmation questions; accept the default value for other questions; disable interaction * `--no-interaction` Do not ask any interactive questions; accept default values. Equivalent to using the environment variable: PLATFORMSH_CLI_NO_INTERACTION=1 ####### Examples * Display collection names: ``` platform service:mongo:shell --eval 'printjson(db.getCollectionNames())' ``` ###### `service:redis-cli` Access the Redis CLI Aliases: `redis` ####### Usage ``` platform redis [-r|--relationship RELATIONSHIP] [-p|--project PROJECT] [-e|--environment ENVIRONMENT] [-A|--app APP] [--] [] ``` ######## Arguments * `args`(optional) Arguments to add to the Redis command ######## Options * `--relationship` (`-r`) (expects a value) The service relationship to use * `--project` (`-p`) (expects a value) The project ID or URL * `--environment` (`-e`) (expects a value) The environment ID. Use "." to select the project's default environment. * `--app` (`-A`) (expects a value) The remote application name * `--help` (`-h`) Display this help message * `--verbose` (`-v|-vv|-vvv`) Increase the verbosity of messages * `--version` (`-V`) Display this application version * `--yes` (`-y`) Answer "yes" to confirmation questions; accept the default value for other questions; disable interaction * `--no-interaction` Do not ask any interactive questions; accept default values. Equivalent to using the environment variable: PLATFORMSH_CLI_NO_INTERACTION=1 ####### Examples * Open the redis-cli shell: ``` platform service:redis-cli ``` * Ping the Redis server: ``` platform service:redis-cli ping ``` * Show Redis status information: ``` platform service:redis-cli info ``` * Scan keys: ``` platform service:redis-cli -- --scan ``` * Scan keys matching a pattern: ``` platform service:redis-cli -- "--scan --pattern '*-11*'" ``` ###### `source-operation:list` List source operations on an environment Aliases: `source-ops` ####### Usage ``` platform source-ops [--full] [-p|--project PROJECT] [-e|--environment ENVIRONMENT] [--format FORMAT] [-c|--columns COLUMNS] [--no-header] ``` ######## Options * `--full` Do not limit the length of command to display. The default limit is 24 lines. * `--project` (`-p`) (expects a value) The project ID or URL * `--environment` (`-e`) (expects a value) The environment ID. Use "." to select the project's default environment. * `--format` (expects a value) The output format: table, csv, tsv, or plain * `--columns` (`-c`) (expects a value) Columns to display. Available columns: app, command, operation. The % or * characters may be used as a wildcard. Values may be split by commas (e.g. "a,b,c") and/or whitespace. * `--no-header` Do not output the table header * `--help` (`-h`) Display this help message * `--verbose` (`-v|-vv|-vvv`) Increase the verbosity of messages * `--version` (`-V`) Display this application version * `--yes` (`-y`) Answer "yes" to confirmation questions; accept the default value for other questions; disable interaction * `--no-interaction` Do not ask any interactive questions; accept default values. Equivalent to using the environment variable: PLATFORMSH_CLI_NO_INTERACTION=1 ###### `source-operation:run` Run a source operation ####### Usage ``` platform source-operation:run [--variable VARIABLE] [-p|--project PROJECT] [-e|--environment ENVIRONMENT] [-W|--no-wait] [--wait] [--] [] ``` ######## Arguments * `operation`(optional) The operation name ######## Options * `--variable` (expects a value) A variable to set during the operation, in the format type:name=value * `--project` (`-p`) (expects a value) The project ID or URL * `--environment` (`-e`) (expects a value) The environment ID. Use "." to select the project's default environment. * `--no-wait` (`-W`) Do not wait for the operation to complete * `--wait` Wait for the operation to complete (default) * `--help` (`-h`) Display this help message * `--verbose` (`-v|-vv|-vvv`) Increase the verbosity of messages * `--version` (`-V`) Display this application version * `--yes` (`-y`) Answer "yes" to confirmation questions; accept the default value for other questions; disable interaction * `--no-interaction` Do not ask any interactive questions; accept default values. Equivalent to using the environment variable: PLATFORMSH_CLI_NO_INTERACTION=1 ####### Examples * Run the "update" operation, setting environment variable FOO=bar: ``` platform source-operation:run update --variable env:FOO=bar ``` ###### `ssh-cert:load` Generate an SSH certificate ####### Usage ``` platform ssh-cert:load [--refresh-only] [--new] [--new-key] ``` This command checks if a valid SSH certificate is present, and generates a new one if necessary. Certificates allow you to make SSH connections without having previously uploaded a public key. They are more secure than keys and they allow for other features. Normally the certificate is loaded automatically during login, or when making an SSH connection. So this command is seldom needed. If you want to set up certificates without login and without an SSH-related command, for example if you are writing a script that uses an API token via an environment variable, then you would probably want to run this command explicitly. For unattended scripts, remember to turn off interaction via --yes or the PLATFORMSH_CLI_NO_INTERACTION environment variable. ######## Options * `--refresh-only` Only refresh the certificate, if necessary (do not write SSH config) * `--new` Force the certificate to be refreshed * `--new-key` Force a new key pair to be generated * `--help` (`-h`) Display this help message * `--verbose` (`-v|-vv|-vvv`) Increase the verbosity of messages * `--version` (`-V`) Display this application version * `--yes` (`-y`) Answer "yes" to confirmation questions; accept the default value for other questions; disable interaction * `--no-interaction` Do not ask any interactive questions; accept default values. Equivalent to using the environment variable: PLATFORMSH_CLI_NO_INTERACTION=1 ###### `ssh-key:add` Add a new SSH key ####### Usage ``` platform ssh-key:add [--name NAME] [--] [] ``` This command lets you add an SSH key to your account. It can generate a key using OpenSSH. Notice: SSH keys are no longer needed by default, as SSH certificates are supported. Certificates offer more security than keys. To load or check your SSH certificate, run: platform ssh-cert:load ######## Arguments * `path`(optional) The path to an existing SSH public key ######## Options * `--name` (expects a value) A name to identify the key * `--help` (`-h`) Display this help message * `--verbose` (`-v|-vv|-vvv`) Increase the verbosity of messages * `--version` (`-V`) Display this application version * `--yes` (`-y`) Answer "yes" to confirmation questions; accept the default value for other questions; disable interaction * `--no-interaction` Do not ask any interactive questions; accept default values. Equivalent to using the environment variable: PLATFORMSH_CLI_NO_INTERACTION=1 ###### `ssh-key:delete` Delete an SSH key ####### Usage ``` platform ssh-key:delete [] ``` This command lets you delete SSH keys from your account. Notice: SSH keys are no longer needed by default, as SSH certificates are supported. Certificates offer more security than keys. To load or check your SSH certificate, run: platform ssh-cert:load ######## Arguments * `id`(optional) The ID of the SSH key to delete ######## Options * `--help` (`-h`) Display this help message * `--verbose` (`-v|-vv|-vvv`) Increase the verbosity of messages * `--version` (`-V`) Display this application version * `--yes` (`-y`) Answer "yes" to confirmation questions; accept the default value for other questions; disable interaction * `--no-interaction` Do not ask any interactive questions; accept default values. Equivalent to using the environment variable: PLATFORMSH_CLI_NO_INTERACTION=1 ####### Examples * Delete the key 123: ``` platform ssh-key:delete 123 ``` ###### `ssh-key:list` Get a list of SSH keys in your account Aliases: `ssh-keys` ####### Usage ``` platform ssh-keys [--format FORMAT] [-c|--columns COLUMNS] [--no-header] ``` This command lets you list SSH keys in your account. Notice: SSH keys are no longer needed by default, as SSH certificates are supported. Certificates offer more security than keys. To load or check your SSH certificate, run: platform ssh-cert:load ######## Options * `--format` (expects a value) The output format: table, csv, tsv, or plain * `--columns` (`-c`) (expects a value) Columns to display. Available columns: id*, title*, path*, fingerprint (* = default columns). The character "+" can be used as a placeholder for the default columns. The % or * characters may be used as a wildcard. Values may be split by commas (e.g. "a,b,c") and/or whitespace. * `--no-header` Do not output the table header * `--help` (`-h`) Display this help message * `--verbose` (`-v|-vv|-vvv`) Increase the verbosity of messages * `--version` (`-V`) Display this application version * `--yes` (`-y`) Answer "yes" to confirmation questions; accept the default value for other questions; disable interaction * `--no-interaction` Do not ask any interactive questions; accept default values. Equivalent to using the environment variable: PLATFORMSH_CLI_NO_INTERACTION=1 ###### `subscription:info` Read or modify subscription properties ####### Usage ``` platform subscription:info [-s|--id ID] [--date-fmt DATE-FMT] [--format FORMAT] [-c|--columns COLUMNS] [--no-header] [-p|--project PROJECT] [--] [] [] ``` ######## Arguments * `property`(optional) The name of the property * `value`(optional) Set a new value for the property ######## Options * `--id` (`-s`) (expects a value) The subscription ID * `--date-fmt` (expects a value) The date format (as a PHP date format string) * `--format` (expects a value) The output format: table, csv, tsv, or plain * `--columns` (`-c`) (expects a value) Columns to display. The % or * characters may be used as a wildcard. Values may be split by commas (e.g. "a,b,c") and/or whitespace. * `--no-header` Do not output the table header * `--project` (`-p`) (expects a value) The project ID or URL * `--help` (`-h`) Display this help message * `--verbose` (`-v|-vv|-vvv`) Increase the verbosity of messages * `--version` (`-V`) Display this application version * `--yes` (`-y`) Answer "yes" to confirmation questions; accept the default value for other questions; disable interaction * `--no-interaction` Do not ask any interactive questions; accept default values. Equivalent to using the environment variable: PLATFORMSH_CLI_NO_INTERACTION=1 ####### Examples * View all subscription properties: ``` platform subscription:info ``` * View the subscription status: ``` platform subscription:info status ``` * View the storage limit (in MiB): ``` platform subscription:info storage ``` ###### `team:create` Create a new team ####### Usage ``` platform team:create [--label LABEL] [--no-check-unique] [-r|--role ROLE] [--output-id] [-o|--org ORG] ``` ######## Options * `--label` (expects a value) The team label * `--no-check-unique` Do not error if another team exists with the same label in the organization * `--role` (`-r`) (expects a value) Set the team's project and environment type roles Values may be split by commas (e.g. "a,b,c") and/or whitespace. The % or * characters may be used as a wildcard. * `--output-id` Output the new team's ID to stdout (instead of displaying the team info) * `--org` (`-o`) (expects a value) The organization name (or ID) * `--help` (`-h`) Display this help message * `--verbose` (`-v|-vv|-vvv`) Increase the verbosity of messages * `--version` (`-V`) Display this application version * `--yes` (`-y`) Answer "yes" to confirmation questions; accept the default value for other questions; disable interaction * `--no-interaction` Do not ask any interactive questions; accept default values. Equivalent to using the environment variable: PLATFORMSH_CLI_NO_INTERACTION=1 ###### `team:delete` Delete a team ####### Usage ``` platform team:delete [-o|--org ORG] [-t|--team TEAM] ``` ######## Options * `--org` (`-o`) (expects a value) The organization name (or ID) * `--team` (`-t`) (expects a value) The team ID * `--help` (`-h`) Display this help message * `--verbose` (`-v|-vv|-vvv`) Increase the verbosity of messages * `--version` (`-V`) Display this application version * `--yes` (`-y`) Answer "yes" to confirmation questions; accept the default value for other questions; disable interaction * `--no-interaction` Do not ask any interactive questions; accept default values. Equivalent to using the environment variable: PLATFORMSH_CLI_NO_INTERACTION=1 ###### `team:get` View a team ####### Usage ``` platform team:get [-o|--org ORG] [-p|--project PROJECT] [-t|--team TEAM] [-P|--property PROPERTY] [--date-fmt DATE-FMT] [--format FORMAT] [-c|--columns COLUMNS] [--no-header] ``` ######## Options * `--org` (`-o`) (expects a value) The organization name (or ID) * `--project` (`-p`) (expects a value) The project ID or URL, to auto-select the organization if --org is not used * `--team` (`-t`) (expects a value) The team ID * `--property` (`-P`) (expects a value) The name of a property to view * `--date-fmt` (expects a value) The date format (as a PHP date format string) * `--format` (expects a value) The output format: table, csv, tsv, or plain * `--columns` (`-c`) (expects a value) Columns to display. The % or * characters may be used as a wildcard. Values may be split by commas (e.g. "a,b,c") and/or whitespace. * `--no-header` Do not output the table header * `--help` (`-h`) Display this help message * `--verbose` (`-v|-vv|-vvv`) Increase the verbosity of messages * `--version` (`-V`) Display this application version * `--yes` (`-y`) Answer "yes" to confirmation questions; accept the default value for other questions; disable interaction * `--no-interaction` Do not ask any interactive questions; accept default values. Equivalent to using the environment variable: PLATFORMSH_CLI_NO_INTERACTION=1 ###### `team:list` List teams Aliases: `teams` ####### Usage ``` platform teams [-c|--count COUNT] [--sort SORT] [--reverse] [-o|--org ORG] [-p|--project PROJECT] [--date-fmt DATE-FMT] [--format FORMAT] [--columns COLUMNS] [--no-header] ``` ######## Options * `--count` (`-c`) (expects a value) The number of items to display per page. Use 0 to disable pagination. * `--sort` (expects a value) A team property to sort by * `--reverse` Sort in reverse order * `--org` (`-o`) (expects a value) The organization name (or ID) * `--project` (`-p`) (expects a value) The project ID or URL, to auto-select the organization if --org is not used * `--date-fmt` (expects a value) The date format (as a PHP date format string) * `--format` (expects a value) The output format: table, csv, tsv, or plain * `--columns` (expects a value) Columns to display. Available columns: id*, label*, member_count*, project_count*, project_permissions*, created_at, updated_at (* = default columns). The character "+" can be used as a placeholder for the default columns. The % or * characters may be used as a wildcard. Values may be split by commas (e.g. "a,b,c") and/or whitespace. * `--no-header` Do not output the table header * `--help` (`-h`) Display this help message * `--verbose` (`-v|-vv|-vvv`) Increase the verbosity of messages * `--version` (`-V`) Display this application version * `--yes` (`-y`) Answer "yes" to confirmation questions; accept the default value for other questions; disable interaction * `--no-interaction` Do not ask any interactive questions; accept default values. Equivalent to using the environment variable: PLATFORMSH_CLI_NO_INTERACTION=1 ###### `team:project:add` Add project(s) to a team ####### Usage ``` platform team:project:add [--all] [-o|--org ORG] [-t|--team TEAM] [--] []... ``` ######## Arguments * `projects`(optional; multiple values allowed) The project ID(s). Values may be split by commas (e.g. "a,b,c") and/or whitespace. ######## Options * `--all` Add all the projects that currently exist in the organization * `--org` (`-o`) (expects a value) The organization name (or ID) * `--team` (`-t`) (expects a value) The team ID * `--help` (`-h`) Display this help message * `--verbose` (`-v|-vv|-vvv`) Increase the verbosity of messages * `--version` (`-V`) Display this application version * `--yes` (`-y`) Answer "yes" to confirmation questions; accept the default value for other questions; disable interaction * `--no-interaction` Do not ask any interactive questions; accept default values. Equivalent to using the environment variable: PLATFORMSH_CLI_NO_INTERACTION=1 ###### `team:project:delete` Remove a project from a team ####### Usage ``` platform team:project:delete [-o|--org ORG] [-t|--team TEAM] [--] [] ``` ######## Arguments * `project`(optional) The project ID ######## Options * `--org` (`-o`) (expects a value) The organization name (or ID) * `--team` (`-t`) (expects a value) The team ID * `--help` (`-h`) Display this help message * `--verbose` (`-v|-vv|-vvv`) Increase the verbosity of messages * `--version` (`-V`) Display this application version * `--yes` (`-y`) Answer "yes" to confirmation questions; accept the default value for other questions; disable interaction * `--no-interaction` Do not ask any interactive questions; accept default values. Equivalent to using the environment variable: PLATFORMSH_CLI_NO_INTERACTION=1 ###### `team:project:list` List projects in a team Aliases: `team:projects`, `team:pro` ####### Usage ``` platform team:projects [-c|--count COUNT] [-o|--org ORG] [-t|--team TEAM] [--date-fmt DATE-FMT] [--format FORMAT] [--columns COLUMNS] [--no-header] ``` ######## Options * `--count` (`-c`) (expects a value) The number of items to display per page (max: 200). Use 0 to disable pagination * `--org` (`-o`) (expects a value) The organization name (or ID) * `--team` (`-t`) (expects a value) The team ID * `--date-fmt` (expects a value) The date format (as a PHP date format string) * `--format` (expects a value) The output format: table, csv, tsv, or plain * `--columns` (expects a value) Columns to display. Available columns: id*, title*, granted_at*, updated_at (* = default columns). The character "+" can be used as a placeholder for the default columns. The % or * characters may be used as a wildcard. Values may be split by commas (e.g. "a,b,c") and/or whitespace. * `--no-header` Do not output the table header * `--help` (`-h`) Display this help message * `--verbose` (`-v|-vv|-vvv`) Increase the verbosity of messages * `--version` (`-V`) Display this application version * `--yes` (`-y`) Answer "yes" to confirmation questions; accept the default value for other questions; disable interaction * `--no-interaction` Do not ask any interactive questions; accept default values. Equivalent to using the environment variable: PLATFORMSH_CLI_NO_INTERACTION=1 ###### `team:update` Update a team ####### Usage ``` platform team:update [--label LABEL] [--no-check-unique] [-r|--role ROLE] [-t|--team TEAM] [-o|--org ORG] [-W|--no-wait] [--wait] ``` ######## Options * `--label` (expects a value) Set a new team label * `--no-check-unique` Do not error if another team exists with the same label in the organization * `--role` (`-r`) (expects a value) Set the team's project and environment type roles Values may be split by commas (e.g. "a,b,c") and/or whitespace. The % or * characters may be used as a wildcard. * `--team` (`-t`) (expects a value) The team ID * `--org` (`-o`) (expects a value) The organization name (or ID) * `--no-wait` (`-W`) Do not wait for the operation to complete * `--wait` Wait for the operation to complete (default) * `--help` (`-h`) Display this help message * `--verbose` (`-v|-vv|-vvv`) Increase the verbosity of messages * `--version` (`-V`) Display this application version * `--yes` (`-y`) Answer "yes" to confirmation questions; accept the default value for other questions; disable interaction * `--no-interaction` Do not ask any interactive questions; accept default values. Equivalent to using the environment variable: PLATFORMSH_CLI_NO_INTERACTION=1 ###### `team:user:add` Add a user to a team ####### Usage ``` platform team:user:add [-o|--org ORG] [-t|--team TEAM] [--] [] ``` ######## Arguments * `user`(optional) The user email address or ID ######## Options * `--org` (`-o`) (expects a value) The organization name (or ID) * `--team` (`-t`) (expects a value) The team ID * `--help` (`-h`) Display this help message * `--verbose` (`-v|-vv|-vvv`) Increase the verbosity of messages * `--version` (`-V`) Display this application version * `--yes` (`-y`) Answer "yes" to confirmation questions; accept the default value for other questions; disable interaction * `--no-interaction` Do not ask any interactive questions; accept default values. Equivalent to using the environment variable: PLATFORMSH_CLI_NO_INTERACTION=1 ###### `team:user:delete` Remove a user from a team ####### Usage ``` platform team:user:delete [-o|--org ORG] [-t|--team TEAM] [--] [] ``` ######## Arguments * `user`(optional) The user email address or ID ######## Options * `--org` (`-o`) (expects a value) The organization name (or ID) * `--team` (`-t`) (expects a value) The team ID * `--help` (`-h`) Display this help message * `--verbose` (`-v|-vv|-vvv`) Increase the verbosity of messages * `--version` (`-V`) Display this application version * `--yes` (`-y`) Answer "yes" to confirmation questions; accept the default value for other questions; disable interaction * `--no-interaction` Do not ask any interactive questions; accept default values. Equivalent to using the environment variable: PLATFORMSH_CLI_NO_INTERACTION=1 ###### `team:user:list` List users in a team Aliases: `team:users` ####### Usage ``` platform team:users [-c|--count COUNT] [-o|--org ORG] [-t|--team TEAM] [--date-fmt DATE-FMT] [--format FORMAT] [--columns COLUMNS] [--no-header] ``` ######## Options * `--count` (`-c`) (expects a value) The number of items to display per page. Use 0 to disable pagination * `--org` (`-o`) (expects a value) The organization name (or ID) * `--team` (`-t`) (expects a value) The team ID * `--date-fmt` (expects a value) The date format (as a PHP date format string) * `--format` (expects a value) The output format: table, csv, tsv, or plain * `--columns` (expects a value) Columns to display. Available columns: id*, email*, created_at*, updated_at (* = default columns). The character "+" can be used as a placeholder for the default columns. The % or * characters may be used as a wildcard. Values may be split by commas (e.g. "a,b,c") and/or whitespace. * `--no-header` Do not output the table header * `--help` (`-h`) Display this help message * `--verbose` (`-v|-vv|-vvv`) Increase the verbosity of messages * `--version` (`-V`) Display this application version * `--yes` (`-y`) Answer "yes" to confirmation questions; accept the default value for other questions; disable interaction * `--no-interaction` Do not ask any interactive questions; accept default values. Equivalent to using the environment variable: PLATFORMSH_CLI_NO_INTERACTION=1 ###### `tunnel:close` Close SSH tunnels ####### Usage ``` platform tunnel:close [-a|--all] [-p|--project PROJECT] [-e|--environment ENVIRONMENT] [-A|--app APP] ``` ######## Options * `--all` (`-a`) Close all tunnels * `--project` (`-p`) (expects a value) The project ID or URL * `--environment` (`-e`) (expects a value) The environment ID. Use "." to select the project's default environment. * `--app` (`-A`) (expects a value) The remote application name * `--help` (`-h`) Display this help message * `--verbose` (`-v|-vv|-vvv`) Increase the verbosity of messages * `--version` (`-V`) Display this application version * `--yes` (`-y`) Answer "yes" to confirmation questions; accept the default value for other questions; disable interaction * `--no-interaction` Do not ask any interactive questions; accept default values. Equivalent to using the environment variable: PLATFORMSH_CLI_NO_INTERACTION=1 ###### `tunnel:info` View relationship info for SSH tunnels ####### Usage ``` platform tunnel:info [-P|--property PROPERTY] [-c|--encode] [-p|--project PROJECT] [-e|--environment ENVIRONMENT] [-A|--app APP] ``` ######## Options * `--property` (`-P`) (expects a value) The relationship property to view * `--encode` (`-c`) Output as base64-encoded JSON * `--project` (`-p`) (expects a value) The project ID or URL * `--environment` (`-e`) (expects a value) The environment ID. Use "." to select the project's default environment. * `--app` (`-A`) (expects a value) The remote application name * `--help` (`-h`) Display this help message * `--verbose` (`-v|-vv|-vvv`) Increase the verbosity of messages * `--version` (`-V`) Display this application version * `--yes` (`-y`) Answer "yes" to confirmation questions; accept the default value for other questions; disable interaction * `--no-interaction` Do not ask any interactive questions; accept default values. Equivalent to using the environment variable: PLATFORMSH_CLI_NO_INTERACTION=1 ###### `tunnel:list` List SSH tunnels Aliases: `tunnels` ####### Usage ``` platform tunnels [-a|--all] [-p|--project PROJECT] [-e|--environment ENVIRONMENT] [-A|--app APP] [--format FORMAT] [-c|--columns COLUMNS] [--no-header] ``` ######## Options * `--all` (`-a`) View all tunnels * `--project` (`-p`) (expects a value) The project ID or URL * `--environment` (`-e`) (expects a value) The environment ID. Use "." to select the project's default environment. * `--app` (`-A`) (expects a value) The remote application name * `--format` (expects a value) The output format: table, csv, tsv, or plain * `--columns` (`-c`) (expects a value) Columns to display. Available columns: port*, project*, environment*, app*, relationship*, url (* = default columns). The character "+" can be used as a placeholder for the default columns. The % or * characters may be used as a wildcard. Values may be split by commas (e.g. "a,b,c") and/or whitespace. * `--no-header` Do not output the table header * `--help` (`-h`) Display this help message * `--verbose` (`-v|-vv|-vvv`) Increase the verbosity of messages * `--version` (`-V`) Display this application version * `--yes` (`-y`) Answer "yes" to confirmation questions; accept the default value for other questions; disable interaction * `--no-interaction` Do not ask any interactive questions; accept default values. Equivalent to using the environment variable: PLATFORMSH_CLI_NO_INTERACTION=1 ###### `tunnel:open` Open SSH tunnels to an app's relationships ####### Usage ``` platform tunnel:open [-g|--gateway-ports] [-p|--project PROJECT] [-e|--environment ENVIRONMENT] [-A|--app APP] ``` This command opens SSH tunnels to all of the relationships of an application. Connections can then be made to the application's services as if they were local, for example a local MySQL client can be used, or the Solr web administration endpoint can be accessed through a local browser. This command requires the posix and pcntl PHP extensions (as multiple background CLI processes are created to keep the SSH tunnels open). The tunnel:single command can be used on systems without these extensions. ######## Options * `--gateway-ports` (`-g`) Allow remote hosts to connect to local forwarded ports * `--project` (`-p`) (expects a value) The project ID or URL * `--environment` (`-e`) (expects a value) The environment ID. Use "." to select the project's default environment. * `--app` (`-A`) (expects a value) The remote application name * `--help` (`-h`) Display this help message * `--verbose` (`-v|-vv|-vvv`) Increase the verbosity of messages * `--version` (`-V`) Display this application version * `--yes` (`-y`) Answer "yes" to confirmation questions; accept the default value for other questions; disable interaction * `--no-interaction` Do not ask any interactive questions; accept default values. Equivalent to using the environment variable: PLATFORMSH_CLI_NO_INTERACTION=1 ###### `tunnel:single` Open a single SSH tunnel to an app relationship ####### Usage ``` platform tunnel:single [--port PORT] [-g|--gateway-ports] [-p|--project PROJECT] [-e|--environment ENVIRONMENT] [-A|--app APP] [-r|--relationship RELATIONSHIP] ``` ######## Options * `--port` (expects a value) The local port * `--gateway-ports` (`-g`) Allow remote hosts to connect to local forwarded ports * `--project` (`-p`) (expects a value) The project ID or URL * `--environment` (`-e`) (expects a value) The environment ID. Use "." to select the project's default environment. * `--app` (`-A`) (expects a value) The remote application name * `--relationship` (`-r`) (expects a value) The service relationship to use * `--help` (`-h`) Display this help message * `--verbose` (`-v|-vv|-vvv`) Increase the verbosity of messages * `--version` (`-V`) Display this application version * `--yes` (`-y`) Answer "yes" to confirmation questions; accept the default value for other questions; disable interaction * `--no-interaction` Do not ask any interactive questions; accept default values. Equivalent to using the environment variable: PLATFORMSH_CLI_NO_INTERACTION=1 ###### `user:add` Add a user to the project ####### Usage ``` platform user:add [-r|--role ROLE] [--force-invite] [-p|--project PROJECT] [-W|--no-wait] [--wait] [--] [] ``` ######## Arguments * `email`(optional) The user's email address ######## Options * `--role` (`-r`) (expects a value) The user's project role ('admin' or 'viewer') or environment type role (e.g. 'staging:contributor' or 'production:viewer'). To remove a user from an environment type, set the role as 'none'. The % or * characters can be used as a wildcard for the environment type, e.g. '%:viewer' to give the user the 'viewer' role on all types. The role can be abbreviated, e.g. 'production:v'. * `--force-invite` Send an invitation, even if one has already been sent * `--project` (`-p`) (expects a value) The project ID or URL * `--no-wait` (`-W`) Do not wait for the operation to complete * `--wait` Wait for the operation to complete (default) * `--help` (`-h`) Display this help message * `--verbose` (`-v|-vv|-vvv`) Increase the verbosity of messages * `--version` (`-V`) Display this application version * `--yes` (`-y`) Answer "yes" to confirmation questions; accept the default value for other questions; disable interaction * `--no-interaction` Do not ask any interactive questions; accept default values. Equivalent to using the environment variable: PLATFORMSH_CLI_NO_INTERACTION=1 ####### Examples * Add Alice as a project admin: ``` platform user:add alice@example.com -r admin ``` * Add Bob as a viewer on the "production" environment type, and a contributor on "development" environments: ``` platform user:add bob@example.com -r production:v -r development:c ``` * Add Charlie as viewer on "production" and "development": ``` platform user:add charlie@example.com -r prod%:v -r dev%:v ``` ###### `user:delete` Delete a user from the project ####### Usage ``` platform user:delete [-p|--project PROJECT] [-W|--no-wait] [--wait] [--] ``` ######## Arguments * `email`(required) The user's email address ######## Options * `--project` (`-p`) (expects a value) The project ID or URL * `--no-wait` (`-W`) Do not wait for the operation to complete * `--wait` Wait for the operation to complete (default) * `--help` (`-h`) Display this help message * `--verbose` (`-v|-vv|-vvv`) Increase the verbosity of messages * `--version` (`-V`) Display this application version * `--yes` (`-y`) Answer "yes" to confirmation questions; accept the default value for other questions; disable interaction * `--no-interaction` Do not ask any interactive questions; accept default values. Equivalent to using the environment variable: PLATFORMSH_CLI_NO_INTERACTION=1 ####### Examples * Delete Alice from the project: ``` platform user:delete alice@example.com ``` ###### `user:get` View a user's role(s) ####### Usage ``` platform user:get [-l|--level LEVEL] [--pipe] [-p|--project PROJECT] [-e|--environment ENVIRONMENT] [-W|--no-wait] [--wait] [-r|--role ROLE] [--] [] ``` ######## Arguments * `email`(optional) The user's email address ######## Options * `--level` (`-l`) (expects a value) The role level ('project' or 'environment') * `--pipe` Output the role to stdout (after making any changes) * `--project` (`-p`) (expects a value) The project ID or URL * `--environment` (`-e`) (expects a value) The environment ID. Use "." to select the project's default environment. * `--no-wait` (`-W`) Do not wait for the operation to complete * `--wait` Wait for the operation to complete (default) * `--role` (`-r`) (expects a value) [Deprecated: use user:update to change a user's role(s)] * `--help` (`-h`) Display this help message * `--verbose` (`-v|-vv|-vvv`) Increase the verbosity of messages * `--version` (`-V`) Display this application version * `--yes` (`-y`) Answer "yes" to confirmation questions; accept the default value for other questions; disable interaction * `--no-interaction` Do not ask any interactive questions; accept default values. Equivalent to using the environment variable: PLATFORMSH_CLI_NO_INTERACTION=1 ####### Examples * View Alice's role on the project: ``` platform user:get alice@example.com ``` * View Alice's role on the current environment: ``` platform user:get alice@example.com --level environment --pipe ``` ###### `user:list` List project users Aliases: `users` ####### Usage ``` platform users [--format FORMAT] [-c|--columns COLUMNS] [--no-header] [-p|--project PROJECT] ``` ######## Options * `--format` (expects a value) The output format: table, csv, tsv, or plain * `--columns` (`-c`) (expects a value) Columns to display. Available columns: email*, name*, role*, id*, granted_at, permissions, updated_at (* = default columns). The character "+" can be used as a placeholder for the default columns. The % or * characters may be used as a wildcard. Values may be split by commas (e.g. "a,b,c") and/or whitespace. * `--no-header` Do not output the table header * `--project` (`-p`) (expects a value) The project ID or URL * `--help` (`-h`) Display this help message * `--verbose` (`-v|-vv|-vvv`) Increase the verbosity of messages * `--version` (`-V`) Display this application version * `--yes` (`-y`) Answer "yes" to confirmation questions; accept the default value for other questions; disable interaction * `--no-interaction` Do not ask any interactive questions; accept default values. Equivalent to using the environment variable: PLATFORMSH_CLI_NO_INTERACTION=1 ###### `user:update` Update user role(s) on a project ####### Usage ``` platform user:update [-r|--role ROLE] [-p|--project PROJECT] [-W|--no-wait] [--wait] [--] [] ``` ######## Arguments * `email`(optional) The user's email address ######## Options * `--role` (`-r`) (expects a value) The user's project role ('admin' or 'viewer') or environment type role (e.g. 'staging:contributor' or 'production:viewer'). To remove a user from an environment type, set the role as 'none'. The % or * characters can be used as a wildcard for the environment type, e.g. '%:viewer' to give the user the 'viewer' role on all types. The role can be abbreviated, e.g. 'production:v'. * `--project` (`-p`) (expects a value) The project ID or URL * `--no-wait` (`-W`) Do not wait for the operation to complete * `--wait` Wait for the operation to complete (default) * `--help` (`-h`) Display this help message * `--verbose` (`-v|-vv|-vvv`) Increase the verbosity of messages * `--version` (`-V`) Display this application version * `--yes` (`-y`) Answer "yes" to confirmation questions; accept the default value for other questions; disable interaction * `--no-interaction` Do not ask any interactive questions; accept default values. Equivalent to using the environment variable: PLATFORMSH_CLI_NO_INTERACTION=1 ####### Examples * Make Bob an admin on the "development" and "staging" environment types: ``` platform user:update bob@example.com -r development:a,staging:a ``` * Make Charlie a contributor on all environment types: ``` platform user:update charlie@example.com -r %:c ``` ###### `variable:create` Create a variable ####### Usage ``` platform variable:create [-u|--update] [-l|--level LEVEL] [--name NAME] [--value VALUE] [--json JSON] [--sensitive SENSITIVE] [--prefix PREFIX] [--enabled ENABLED] [--inheritable INHERITABLE] [--visible-build VISIBLE-BUILD] [--visible-runtime VISIBLE-RUNTIME] [-p|--project PROJECT] [-e|--environment ENVIRONMENT] [-W|--no-wait] [--wait] [--] [] ``` ######## Arguments * `name`(optional) The variable name ######## Options * `--update` (`-u`) Update the variable if it already exists * `--level` (`-l`) (expects a value) The level at which to set the variable ('project' or 'environment') * `--name` (expects a value) The variable name * `--value` (expects a value) The variable's value * `--json` (expects a value) Whether the variable value is JSON-formatted * `--sensitive` (expects a value) Whether the variable value is sensitive * `--prefix` (expects a value) The variable name's prefix which can determine its type, e.g. 'env'. Only applicable if the name does not already contain a prefix. (e.g. 'none' or 'env:') * `--enabled` (expects a value) Whether the variable should be enabled on the environment * `--inheritable` (expects a value) Whether the variable is inheritable by child environments * `--visible-build` (expects a value) Whether the variable should be visible at build time * `--visible-runtime` (expects a value) Whether the variable should be visible at runtime * `--project` (`-p`) (expects a value) The project ID or URL * `--environment` (`-e`) (expects a value) The environment ID. Use "." to select the project's default environment. * `--no-wait` (`-W`) Do not wait for the operation to complete * `--wait` Wait for the operation to complete (default) * `--help` (`-h`) Display this help message * `--verbose` (`-v|-vv|-vvv`) Increase the verbosity of messages * `--version` (`-V`) Display this application version * `--yes` (`-y`) Answer "yes" to confirmation questions; accept the default value for other questions; disable interaction * `--no-interaction` Do not ask any interactive questions; accept default values. Equivalent to using the environment variable: PLATFORMSH_CLI_NO_INTERACTION=1 ###### `variable:delete` Delete a variable ####### Usage ``` platform variable:delete [-l|--level LEVEL] [-p|--project PROJECT] [-e|--environment ENVIRONMENT] [-W|--no-wait] [--wait] [--] ``` ######## Arguments * `name`(required) The variable name ######## Options * `--level` (`-l`) (expects a value) The variable level ('project', 'environment', 'p' or 'e') * `--project` (`-p`) (expects a value) The project ID or URL * `--environment` (`-e`) (expects a value) The environment ID. Use "." to select the project's default environment. * `--no-wait` (`-W`) Do not wait for the operation to complete * `--wait` Wait for the operation to complete (default) * `--help` (`-h`) Display this help message * `--verbose` (`-v|-vv|-vvv`) Increase the verbosity of messages * `--version` (`-V`) Display this application version * `--yes` (`-y`) Answer "yes" to confirmation questions; accept the default value for other questions; disable interaction * `--no-interaction` Do not ask any interactive questions; accept default values. Equivalent to using the environment variable: PLATFORMSH_CLI_NO_INTERACTION=1 ####### Examples * Delete the variable "example": ``` platform variable:delete example ``` ###### `variable:get` View a variable Aliases: `vget` ####### Usage ``` platform vget [-P|--property PROPERTY] [-l|--level LEVEL] [--format FORMAT] [-c|--columns COLUMNS] [--no-header] [-p|--project PROJECT] [-e|--environment ENVIRONMENT] [--pipe] [--] [] ``` ######## Arguments * `name`(optional) The name of the variable ######## Options * `--property` (`-P`) (expects a value) View a single variable property * `--level` (`-l`) (expects a value) The variable level ('project', 'environment', 'p' or 'e') * `--format` (expects a value) The output format: table, csv, tsv, or plain * `--columns` (`-c`) (expects a value) Columns to display. The % or * characters may be used as a wildcard. Values may be split by commas (e.g. "a,b,c") and/or whitespace. * `--no-header` Do not output the table header * `--project` (`-p`) (expects a value) The project ID or URL * `--environment` (`-e`) (expects a value) The environment ID. Use "." to select the project's default environment. * `--pipe` [Deprecated option] Output the variable value only * `--help` (`-h`) Display this help message * `--verbose` (`-v|-vv|-vvv`) Increase the verbosity of messages * `--version` (`-V`) Display this application version * `--yes` (`-y`) Answer "yes" to confirmation questions; accept the default value for other questions; disable interaction * `--no-interaction` Do not ask any interactive questions; accept default values. Equivalent to using the environment variable: PLATFORMSH_CLI_NO_INTERACTION=1 ####### Examples * View the variable "example": ``` platform variable:get example ``` ###### `variable:list` List variables Aliases: `variables`, `var` ####### Usage ``` platform variables [-l|--level LEVEL] [--format FORMAT] [-c|--columns COLUMNS] [--no-header] [-p|--project PROJECT] [-e|--environment ENVIRONMENT] ``` ######## Options * `--level` (`-l`) (expects a value) The variable level ('project', 'environment', 'p' or 'e') * `--format` (expects a value) The output format: table, csv, tsv, or plain * `--columns` (`-c`) (expects a value) Columns to display. Available columns: is_enabled, level, name, value. The % or * characters may be used as a wildcard. Values may be split by commas (e.g. "a,b,c") and/or whitespace. * `--no-header` Do not output the table header * `--project` (`-p`) (expects a value) The project ID or URL * `--environment` (`-e`) (expects a value) The environment ID. Use "." to select the project's default environment. * `--help` (`-h`) Display this help message * `--verbose` (`-v|-vv|-vvv`) Increase the verbosity of messages * `--version` (`-V`) Display this application version * `--yes` (`-y`) Answer "yes" to confirmation questions; accept the default value for other questions; disable interaction * `--no-interaction` Do not ask any interactive questions; accept default values. Equivalent to using the environment variable: PLATFORMSH_CLI_NO_INTERACTION=1 ###### `variable:update` Update a variable ####### Usage ``` platform variable:update [--allow-no-change] [-l|--level LEVEL] [--value VALUE] [--json JSON] [--sensitive SENSITIVE] [--enabled ENABLED] [--inheritable INHERITABLE] [--visible-build VISIBLE-BUILD] [--visible-runtime VISIBLE-RUNTIME] [-p|--project PROJECT] [-e|--environment ENVIRONMENT] [-W|--no-wait] [--wait] [--] ``` ######## Arguments * `name`(required) The variable name ######## Options * `--allow-no-change` Return success (zero exit code) if no changes were provided * `--level` (`-l`) (expects a value) The variable level ('project', 'environment', 'p' or 'e') * `--value` (expects a value) The variable's value * `--json` (expects a value) Whether the variable value is JSON-formatted * `--sensitive` (expects a value) Whether the variable value is sensitive * `--enabled` (expects a value) Whether the variable should be enabled on the environment * `--inheritable` (expects a value) Whether the variable is inheritable by child environments * `--visible-build` (expects a value) Whether the variable should be visible at build time * `--visible-runtime` (expects a value) Whether the variable should be visible at runtime * `--project` (`-p`) (expects a value) The project ID or URL * `--environment` (`-e`) (expects a value) The environment ID. Use "." to select the project's default environment. * `--no-wait` (`-W`) Do not wait for the operation to complete * `--wait` Wait for the operation to complete (default) * `--help` (`-h`) Display this help message * `--verbose` (`-v|-vv|-vvv`) Increase the verbosity of messages * `--version` (`-V`) Display this application version * `--yes` (`-y`) Answer "yes" to confirmation questions; accept the default value for other questions; disable interaction * `--no-interaction` Do not ask any interactive questions; accept default values. Equivalent to using the environment variable: PLATFORMSH_CLI_NO_INTERACTION=1 ###### `worker:list` Get a list of all deployed workers Aliases: `workers` ####### Usage ``` platform workers [--refresh] [--pipe] [-p|--project PROJECT] [-e|--environment ENVIRONMENT] [--format FORMAT] [-c|--columns COLUMNS] [--no-header] ``` ######## Options * `--refresh` Whether to refresh the cache * `--pipe` Output a list of worker names only * `--project` (`-p`) (expects a value) The project ID or URL * `--environment` (`-e`) (expects a value) The environment ID. Use "." to select the project's default environment. * `--format` (expects a value) The output format: table, csv, tsv, or plain * `--columns` (`-c`) (expects a value) Columns to display. Available columns: commands, name, type. The % or * characters may be used as a wildcard. Values may be split by commas (e.g. "a,b,c") and/or whitespace. * `--no-header` Do not output the table header * `--help` (`-h`) Display this help message * `--verbose` (`-v|-vv|-vvv`) Increase the verbosity of messages * `--version` (`-V`) Display this application version * `--yes` (`-y`) Answer "yes" to confirmation questions; accept the default value for other questions; disable interaction * `--no-interaction` Do not ask any interactive questions; accept default values. Equivalent to using the environment variable: PLATFORMSH_CLI_NO_INTERACTION=1 ### Console Platform.sh provides a web console so you can interact with your projects and manage your environments. ![Overview of projects in the Console](https://docs.platform.sh/images/management-console/psh-console-main-view.png "0.6") This Console offers you ways to manage projects and environments other than the [command line interface (CLI))](https://docs.platform.sh/administration/cli.md). ##### Project list Opening the [Console](https://console.platform.sh) takes you to the first organization you joined as a Platform.sh user. You get an overview of all your projects within that organization. You can narrow the list down by searching for specific projects, or switch to a different organization from the menu in the top left-hand corner. Once you select a project, you can [configure the project settings](https://docs.platform.sh/administration/web/configure-project.md). You can also choose individual environments within the project and [configure each environment](https://docs.platform.sh/administration/web/configure-environment.md). You can also create a new project by clicking **+ Create project**. ##### Display settings You can personalize the display settings for the Console. To do so: 1. Open the user menu (your name or profile picture). 2. Click **My Profile**. 3. Choose the mode you want. 4. Click **Save**. The Console can be displayed in three ways: * Light mode (default) * High contrast mode * Dark mode To meet our [commitment to accessibility](https://platform.sh/trust-center/legal/wcag/), all three options are compliant with level AA of the Web Content Accessibility Guidelines 2.0. #### Configure a project Each project has settings that apply to everything within that project, including all its environments. You can only see and update settings for projects where you are a [Project Admin](https://docs.platform.sh/administration/users.md). To access the settings, click Settings **Settings** from the main project page. The settings are divided into several sections. ###### General The **General** section shows you the project's region and allows you to update the project name and [timezone](https://docs.platform.sh/projects/change-project-timezone.md). ![configure project](https://docs.platform.sh/images/management-console/settings-general.png "0.5") ###### Access The **Access** section allows you to [manage user access to the project](https://docs.platform.sh/administration/users.md). ![Project configure icon](https://docs.platform.sh/images/management-console/settings-project-access.png "0.7") ###### Certificates The **Certificates** section shows a list of your project's TLS certificates. To see details about a certificate or delete one, click **Edit **. See how to [add custom certificates](https://docs.platform.sh/domains/steps/tls.md). ![A list of certificates in a project](https://docs.platform.sh/images/management-console/settings-certificates.png "0.7") ###### Domains The **Domains** section allows you to manage the domains where your project is accessible. See how to [set up your domain](https://docs.platform.sh/domains/steps.md). ![project domain](https://docs.platform.sh/images/management-console/settings-domains.png "0.7") ###### Deploy Key The **Deploy Key** section shows you the public SSH key you can add to your private repositories. Adding it lets Platform.sh access the repositories during the build process. This is useful if you want to reuse some code components across multiple projects and manage those components as dependencies of your project. ![Project deploy key](https://docs.platform.sh/images/management-console/settings-deploy-key.png "0.7") ###### Integrations The **Integrations** section allows you to manage all of your [integrations](https://docs.platform.sh/integrations.md). ![Integrations](https://docs.platform.sh/images/management-console/settings-integrations.png "0.7") ###### Variables The **Variables** section allows you to manage all project-wide [variables](https://docs.platform.sh/development/variables.md). ![Project variables](https://docs.platform.sh/images/management-console/settings-variables-project.png "0.7") #### Configure environments From your project's main page in the Console, you can see all your environments as a list or a project tree: ![List of all environments as a tree](https://docs.platform.sh/images/management-console/environments.png "0.5") In this overview, the names of inactive environments are lighter. Selecting an environment allows you to see details about it, such as its [activity feed](#activity-feed), [services](#service-information), [metrics](https://docs.platform.sh/increase-observability/metrics.md), and [backups](https://docs.platform.sh/environments/backup.md). ###### Activity Feed When you access an environment in the Console, you can see its [activity feed](https://docs.platform.sh/increase-observability/logs/access-logs.md#activity-logs). This allows you to check which activities have happened or are currently happening on the selected environment: ![Environment activity list](https://docs.platform.sh/images/management-console/activity.png "0.5") You can filter activities by type (such as merge, sync, or redeploy). ###### Actions on environments Each environment offers ways to keep environments up to date with one another: * [Branch **Branch**](https://docs.platform.sh/glossary.md#branch) to create a new child environment. * [Merge **Merge**](https://docs.platform.sh/glossary.md#merge) to copy the current environment into its parent. * [ **Sync**](https://docs.platform.sh/glossary.md#sync) to copy changes from its parent environment into the current environment. There are also additional options: * Settings **Settings** to [configure the environment](#environment-settings). * More **More** to get more options. * **URLs** to access the deployed environment from the web. * **SSH** to access your project using SSH. * **Code** * **CLI** for the command to get your project set up locally with the [Platform.sh CLI](https://docs.platform.sh/administration/cli.md). * **Git** for the command to clone the codebase via Git. If you're using Platform.sh as your primary remote repository, the command clones from the project. If you have set up an [external integration](https://docs.platform.sh/integrations/source.md), the command clones directly from the integrated remote repository. If the project uses an external integration to a repository that you haven't been given access to, you can't clone until your access has been updated. See how to [troubleshoot source integrations](https://docs.platform.sh/integrations/source/troubleshoot.md). ###### Environment URL When you access an environment in the Console, you can view its URL: ![Environment URL and details](https://docs.platform.sh/images/management-console/env-url.png "0.25") While the environment is loading in the Console, a `Waiting for URL...` message is displayed instead of the URL. If this message isn't updated once your [default environment](https://docs.platform.sh/environments/_index.md#default-environment)'s information is loaded, follow these steps: 1. Check that [you have defined routes](https://docs.platform.sh/define-routes.md) for your default environment. 2. Verify that your [application](https://docs.platform.sh/create-apps/app-reference/single-runtime-image.md), [services](https://docs.platform.sh/add-services.md), and [routes](https://docs.platform.sh/define-routes.md) configurations are correct. 3. Check that your default environment is [active](https://docs.platform.sh/environments/deactivate-environment.md#reactivate-an-environment). ###### Environment settings To access the settings of an environment, click Settings **Settings** within that environment. ![Settings for an environment](https://docs.platform.sh/images/management-console/env-settings.png "0.75") ####### Environment name Under **Environment name**, you can edit the name and type of your environment and view its parent environment: ![Environment status](https://docs.platform.sh/images/management-console/env-name.png "0.5") ####### Status Under **Status**, you can check whether or not your environment is [active](https://docs.platform.sh/glossary.md#active-environment). ![Environment status](https://docs.platform.sh/images/management-console/env-status.png "0.5") For preview environments, you can [change their status](https://docs.platform.sh/environments/deactivate-environment.md). ####### Outgoing emails Under **Outgoing emails**, you can allow your environment to [send emails](https://docs.platform.sh/development/email.md): ![Environment email](https://docs.platform.sh/images/management-console/env-email.png "0.75") ####### Hide from search engines Under **Hide from search engines**, you can tell [search engines to ignore the site](https://docs.platform.sh/environments/search-engine-visibility.md): ![Environment search](https://docs.platform.sh/images/management-console/env-search.png "0.5") ####### HTTP access control Under **HTTP access control**, you can [control access to your environment using HTTP methods](https://docs.platform.sh/environments/http-access-control.md): ![Settings control access with password and by IP](https://docs.platform.sh/images/management-console/settings-basics-access-control.png "0.5") ####### Variables Under **Variables**, you can define [environment variables](https://docs.platform.sh/development/variables/_index.md): ![Configure Platform.sh environment variables](https://docs.platform.sh/images/management-console/settings-variables-environment.png "0.6") ###### Service information For each environment, you can view information about how your routes, services, and apps are currently configured. To do so, click **Services**. By default, you see configured routes. ####### Routes The **Router** section shows a list of all the [routes configured on your environment](https://docs.platform.sh/define-routes.md). You can see each route's type and check if caching and server side includes have been enabled for it: ![Services: routes](https://docs.platform.sh/images/management-console/service-tab/routes.png "0.5") To view the configuration file where your routes are set up, click **Configuration**. ####### Applications To see detailed information about an app container, select it in the tree or list on the left-hand side: ![Services: app overview](https://docs.platform.sh/images/management-console/service-tab/app-overview.png "0.5") The **Overview** tab gives you information about your app. You can see: * The language version, the container size, the amount of persistent disk, the number of cron jobs, and the command to SSH into the container. * A summary of [metrics for the environment](https://docs.platform.sh/increase-observability/metrics.md). * All cron jobs with their name, frequency, and command. * All workers with their name, size, amount of persistent disk, and command to SSH into the container. To view [the configuration file where your app is set up](https://docs.platform.sh/create-apps/), click **Configuration**. ####### Services To see detailed information about a [running service](https://docs.platform.sh/add-services.md), select it in the tree or list on the left-hand side: ![Services: service overview](https://docs.platform.sh/images/management-console/service-tab/service-overview.png "0.5") The **Overview** gives you information about the selected service. You can see the service version, the container size, and the disk size, if you've configured a persistent disk. You can also see a summary of [metrics for the environment](https://docs.platform.sh/increase-observability/metrics.md). To view the configuration file where your services are set up, click **Configuration**. ### Organizations Organizations allow you to manage your Platform.sh projects, users, and billing. You can group multiple projects in one organization and manage them together. To manage users within your organization, see how to [manage organization users](https://docs.platform.sh/administration/users.md#manage-organization-users). ##### Manage your organization settings As an organization owner, you can manage the basic settings for your organization such as its name and URL. To change the name (URL) and label of the ``acme`` organization, run: ```bash {} platform organization:info --org acme label "Acme Corp" name acme-corp ``` To verify the changes, run: ```bash {} platform organization:info --org acme-corp ``` ##### Manage your organization billing As an organization owner or an organization user with the **Manage billing** permission, you can access and download invoices and edit billing information such as the stored credit card and billing address. ##### Create a new organization When you create a new project, if you don't already have an organization, one is created for you automatically. You can create new organizations with different payment methods and billing addresses and organize your projects as you want. To create an organization with the label ``Acme`` and the name (URL) ``acme``, run: ```bash {} platform organization:create --label "Acme" --name acme --country "United States" ``` To verify the changes, run: ```bash {} platform organization:info --org acme ``` ##### Delete an existing organization As an organization owner, you can delete your own organization. Note that if your organization owns projects or owes remaining invoices, you can not delete it yourself. To have it deleted, [contact support](https://docs.platform.sh/learn/overview/get-support.md). To delete the organization ``acme``, run: ```bash {} platform organization:delete --org acme ``` ##### Transfer project ownership You can transfer your plan ownership to a different organization at anytime. You have to be an organization owner or have the [manage plan permission](https://docs.platform.sh/administration/users.md#organization-permissions). 1. Make the new organization owner a [project admin](https://docs.platform.sh/administration/users.md#) for the project you want to transfer. 2. To ask for the transfer, from your organization account open a [support ticket](https://docs.platform.sh/learn/overview/get-support.md). Once the transfer is completed, the new organization can administer all project settings and billing and receives future invoices. Ownership transfer automatically transfers subscription charges to the new organization. ##### Transfer organization ownership To transfer an organization to a different owner, first make sure that user is part of the organization. If they aren't yet, [add them](https://docs.platform.sh/administration/users.md#add-a-user-to-an-organization). Then open a [support ticket](https://docs.platform.sh/learn/overview/get-support.md) from the current organization to ask for the transfer. ### Administer teams Organizations on Platform.sh are made up of both [projects](https://docs.platform.sh/projects/) and [users](https://docs.platform.sh/administration/users.md). While organizations by themselves allow you to assign project and environment type permissions to individual users on individual projects, having many users and many projects calls for another method to group common access control settings. **Teams** provide a grouping that connects a subset of an organization's users to another subset of that organization's projects. That relationship enables organization owners to set default project and environment type access settings for each user and project from one place. There is no limit to the number of teams that can be defined within a single organization. ##### Create a new team As an organization owner or member with **Manage users** permissions, you can create new teams. Teams must belong to an organization, so [create one](https://docs.platform.sh/administration/organizations.md#create-a-new-organization) first. You can create new organizations with different payment methods and billing addresses and organize your projects as you want, but keep in mind that both users and teams are restricted to single organizations. - Run the following command: ```bash {} platform team:create -o ``` - Enter a team name. - Define your team’s project role (admin or viewer). - If your team has viewer rights on the project, define its role on each type of environment. - Enter ``Y`` to confirm. **Note**: To view a list of all the existing teams in your organization, run the following command: ```bash {} platform team:list -o ``` ##### Delete an existing team As an organization owner or member with **Manage users** permissions, you can delete existing teams. Note that deleting teams and deleting users are not equivalent. Deleting a team will remove member access permissions to projects described by the team, but it will _not_ [remove users from the organization](https://docs.platform.sh/administration/users.md#remove-a-user-from-an-organization) (or your billing). - Run the following command: ```bash {} platform team:delete -o ``` - Select the team you want to delete. - Enter ``Y`` to confirm. ##### Manage team settings As an organization owner or member with **Manage users** permissions, you can manage the settings of existing teams such as: - [It's name](#team-name) - [The environment type permissions granted to members on individual projects](#project--environment-type-permissions) - [Team members](#team-members) - [Project access](#team-access-to-projects) ###### Team name - Run the following command: ```bash {} platform team:update -o ``` - Select the team you want to rename. - Enter the new name. - Confirm or adjust the team permissions. - Enter ``Y`` to confirm. ###### Project & environment type permissions The primary purpose of teams is to allow organizations to quickly apply, audit, and update project and environment type permissions for groups of users. - Run the following command: ```bash {} platform team:update -o ``` - Select the team whose permissions you want to update. - Confirm or adjust the team name. - Adjust the team permissions. - Enter ``Y`` to confirm. ###### Team members ####### Add users to a team To join a team, a user must already have been added [to the organization](https://docs.platform.sh/administration/users.md#manage-organization-access), where their [organization permissions](https://docs.platform.sh/administration/users.md#organization-permissions) are defined. - Run the following command: ```bash {} platform team:user:add -o ``` - Select the team you want to add a user to. - Enter the user’s email address. - Enter ``Y`` to confirm. **Note**: To view a list of all the users on a team, follow these steps: - Run the following command: ```bash {} platform team:user:list -o ``` - Select the team whose users you want to display. ####### Remove users from a team Note that deleting users from teams and deleting users from organizations are not equivalent. Deleting users from a team will remove member access permissions to projects described by the team, but it will _not_ [remove users from the organization](https://docs.platform.sh/administration/users.md#remove-a-user-from-an-organization) (or your billing). - Run the following command: ```bash {} platform team:user:delete -o ``` - Select a team. - Select the user you want to remove from the team. - Enter ``Y`` to confirm. ###### Team access to projects ####### Adding projects to a team's access - Run the following command: ```bash {} platform team:project:add -o ``` - Select a team. - Select the project you want the team to access. - Enter ``Y`` to confirm. **Note**: To view a list of all the projects added to a team, follow these steps: - Run the following command: ```bash {} platform team:project:list -o ``` - Select the team whose projects you want to display. ####### Remove project from team's access - Run the following command: ```bash {} platform team:project:delete -o ``` - Select a team. - Select the project whose access you want to revoke for the team. - Enter ``Y`` to confirm. ### Administer users Platform.sh offers very granular and flexible user permissions across projects and organizations. When a user is added to a project, they are automatically added to your organization. ##### Manage project access If you have set up an external integration to GitHub, GitLab, or Bitbucket and your users can't clone the project locally, see how to [troubleshoot source integrations](https://docs.platform.sh/integrations/source/troubleshoot.md). ###### Project roles A user can have one of the following roles to control their access at project level: | Role | View environment | Push code | Manage user access | Change settings | Execute actions on all environments | |----------------|------------------|-----------|--------------------|-----------------|-------------------------------------| | Project admin | Yes | Yes | Yes | Yes | Yes | | Project viewer | Yes | No | No | No | No | By default, organization owners have **Project admin** access on all of the projects within their organization. ###### Environment type roles An environment type (Production, Staging, and Development) groups one or more environments together so that you can manage access for all environments of that type: - A role assigned to an environment type applies to all environments of that type. - Only one environment per project can be of the type: Production. It is set automatically as the default branch and can't be overridden separately. - You can change an environment's type (except for the Production environment). - You can have multiple preview (staging and development) environments. A user can have one of the following roles on an environment type which grants them permissions on all environments of this type: | Role | View environment | Force push | Push code | Branch environment | SSH access | Change settings | Execute actions | |-------------|------------------|------------|-----------|--------------------|------------|-----------------|-----------------| | Admin | Yes | Yes | Yes | Yes | Yes | Yes | Yes | | Contributor | Yes | No | Yes | Yes | Yes | No | No | | Viewer | Yes | No | No | Yes | No | No | No | To customize which roles can use SSH, set [`access` in your app configuration](https://docs.platform.sh/create-apps/app-reference/single-runtime-image.md#access). ###### View a user's permissions across all of the projects in your organization For each user, you can view a summary of their roles and permissions across all projects in your organization. - Navigate to your organization. - Open the user menu (your name or profile picture). - Click **Users**. - For the user whose user permissions you want to view, click **More More**. - Click **Edit user**. ###### Add a user to a project To invite a user, you need to be a [project admin](#project-roles). To add a user, follow these steps: For example, if you want to add ``user1@example.com`` to the project as a project admin, run the following command: ```bash {} platform user:add user1@example.com -r admin ``` If you want to add ``user2@example.com`` to the project as a contributor for Development environments and a viewer for Staging environments, run the following command: ```bash {} platform user:add user2@example.com -r development:contributor -r staging:viewer ``` - Select the project where you want to add a new user. - Click Settings **Settings**. - Click **Access**. - Click **+ Add**. - Add the user’s details and choose their permissions. - Click **Save**. The user has to create an account before they can access the project. Once you add a user to a project, they receive an invitation email with instructions. To apply SSH access changes after you add a user to a project, [trigger a redeploy](https://docs.platform.sh/development/troubleshoot.md#force-a-redeploy). ###### Manage project users To manage user permissions on a project, you need to be a [project admin](#project-roles), be an organization owner, or have the [**Manage users** permission for the organization](#organization-permissions). To change user permissions, follow these steps: If you want ``user1@example.com`` to be a viewer for Production environments and a contributor for Development environments, run the following command: ```bash {} platform user:update user1@example.com -r production:viewer,development:contributor ``` - Select the project where you want to update user access. - Click Settings **Settings**. - Click **Access**. - Click the user you want to update permissions for. - Update environment type permissions, or click **Remove user**. - Click **Accept**. To apply SSH access changes after you add a remove a user from a project or environment type, [trigger a redeploy](https://docs.platform.sh/development/troubleshoot.md#force-a-redeploy). ###### Remove a user from a project To remove a user from a project, you need to be a [project admin](#project-roles), be an organization owner, or have the [**Manage users** permission for the organization](#organization-permissions). To remove a user, follow these steps: - Navigate to your organization or a project in it. - Open the user menu (your name or profile picture). - Click **Users**. - For the user you want to remove, click **More More**. - For the project you want to remove them from, click **More More**. - Click **Remove from project**. - Click **Yes**. To apply SSH access changes after changing a user's permissions for an environment type, [trigger a redeploy](https://docs.platform.sh/development/troubleshoot.md#force-a-redeploy). ##### Manage organization access All users who are added to any project within an organization become members of that organization. By default, such users have no [organization permissions](#organization-permissions). You can also have organization users who aren't part of any projects. Users who are a part of an organization with the **List projects** permission can see all projects in that organization at the organization's URL, which takes the form `https://console.platform.sh/`. They can only access projects they've been explicitly invited to. For more information on project access control, see how to [manage project users](#manage-project-users). ###### Organization permissions As an organization owner or an organization user with the **Manage users** permission, you can invite other users to your organization and grant them the following permissions: - **Manage billing** (`billing`): Add, remove, and edit billing information. Access invoices and vouchers. Users with this permission receive monthly invoices by email. - **Manage plans** (`plans`): View and edit plans and plan options for existing projects. Plan options include the amount of storage, number of environments, and number of user licenses on a project. - **Manage users** (`members`): Add, remove, and edit organization-level users and permissions, except their own. Users with this permission can't grant other users permissions that they themselves don't have. - **Create projects** (`projects:create`): Create new projects within the organization. - **List projects** (`projects:list`): See all projects in an organization, even those the user can't access. **Note**: Users with the **Manage users** (``members``) permission can add, edit, or remove any user’s permissions except their own. Users with the **Manage billing** (``billing``) permission automatically are granted **List projects** (``projects:list``) permission. That is, they are able to see all organization projects once given billing rights. Users without any of these permissions can only access [projects where they're users](#project-roles). They can't access or manage the rest of the organization. Organization owners have all permissions within their organization. Their permission level can't be edited. Organization owners can't be removed from their organization, except through an [ownership transfer](https://docs.platform.sh/administration/organizations.md#transfer-project-ownership). ###### Add a user to an organization For example, to invite ``alice@example.com`` to the ``acme`` organization with the **Manage billing** and **Create projects** permissions, run the following command: ```bash {} platform organization:user:add alice@example.com --org acme --permission billing,projects:create ``` - Navigate to the organization you want to manage (or a project in it). - Open the user menu (your name or profile picture). - Click **Users**. - Click **+ Invite users**. - Enter the users’ email addresses separated by commas. - Select which organization-wide permissions they should have. - Click **Invite**. All users you invite receive an invitation email with instructions. ###### Manage organization users For example, to update the permissions for ``alice@example.com`` in your ``acme`` organization so that she has only the **Manage billing** permission, run the following command: ```bash {} platform organization:user:update alice@example.com --org acme --permission billing ``` - Navigate to the organization you want to manage (or a project in it). - Open the user menu (your name or profile picture). - Click **Users**. - Next to the user you want to manage, click **More More**. - Click **Edit user**. You see all the projects the user is a part of and their permissions in those projects. You also see their permissions across the organization. To edit their organization permissions, follow these steps: - Select or clear the checkboxes for the relevant permissions. - Click **Save**. - Click **Yes**. ###### Remove a user from an organization For example, to remove ``alice@example.com`` from your ``acme`` organization, run the following command: ```bash {} platform organization:user:delete alice@example.com --org acme ``` - Navigate to the organization you want to manage (or a project in it). - Open the user menu (your name or profile picture). - Click **Users**. - Next to the user you want to remove, click **More More**. - Click **Remove from organization**. To delete users in bulk, select the users to remove and click **Remove users from organization**. Remove a user from an organization will remove them from all projects they were a member of. ### Pricing Platform.sh offers a variety of plans to fit your needs, including a free trial. Full pricing information is available at https://platform.sh/pricing/. The resources listed there are for [production environments](#production-environments). You can switch between plans freely, adding or removing resources, including [extras](#extras). You are always billed for the prorated cost over the period it was used. You may cancel your plan at any time. You are only billed for the actual period used. ##### Plans ###### Production plans Any plan larger than a Development plan counts as a Production plan: it comes with a [production environment](#production-environments). ###### Development plans A Development plan provides all the tools you need to build your website before it's ready to go live. With a Development plan, you can't use [custom domain names](https://docs.platform.sh/domains/steps.md). You also can't use a Development plan for production since it doesn’t allow for full production-level resources. After your project is complete and ready for production, choose [another plan](https://docs.platform.sh/administration/pricing.md) to go live. ###### Production environments Production environments are the live environments available to your users. Each Production plan has one Production environment that can be mapped to a [custom domain name](https://docs.platform.sh/domains/steps.md). The production environment has more resources than the project's preview environments. See the main [pricing page](https://platform.sh/pricing) for the resources available per plan for Production environments. ###### Preview environments Preview environments can't use the same custom domain as a production environment. Instead, you can set up specific [custom domains for each of your preview environments](https://docs.platform.sh/domains/steps/custom-domains-preview-environments.md). Preview environments use resources that are separate from production environments. App containers on preview environments default to a size of Standard . If you have the [manage plans permission](https://docs.platform.sh/administration/users.md#organization-permissions), you can increase the size to match your production environment. To do so, follow these steps: 1. In your project in the Console, click **Settings Settings**. 2. Click **Edit plan**. 3. Under **Environments application size**, select a new size. 4. Click **Save** to accept the new plan cost. This increases the size for all app containers. It doesn't affect service containers. ##### Switch plans To switch plans, follow these steps: 1. In your project in the Console, click **Settings Settings**. 2. Click **Edit plan**. 3. Under **Plans**, select a new plan. 4. Click **Save** to accept the new plan cost. ##### Extras In addition to the included resources for a plan, you can add extras to help scale your project. All extra consumption is prorated to the time it was actually used. For example, if you add an extra user for 10 days, you're billed around 1/3 of the current price for a full month. You can add the following extras: * Users -- for an additional fee per user, except at certain [agency levels](#agencies). * Environments -- extra preview environments can be added in multiples of 3. * Storage -- extra storage can be added for a fee per 5 GB per environment. So if you have added 3 additional environments for a total of 6 preview environments, the fee is multiplied by 6. To ensure environments are available on demand, the fee applies to all environments you have added even if you aren't currently actively using them. You can make any changes up to 100 GB yourself. For storage over 100 GB, open a [support ticket](https://docs.platform.sh/learn/overview/get-support.md). You currently can't reduce your storage on your own for technical reasons. If you need to reduce storage, open a [support ticket](https://docs.platform.sh/learn/overview/get-support.md). ##### Multiple apps in a single project All plans support multiple containers, but the containers share the plan's global resources. The resources of a Standard plan can support a single app with services. But they **aren't sufficient to run more than one app** with a service. Useful multi-app projects start at Medium . For example, a Medium plan can support 3 apps with a MySQL service and a Redis service. If you aren't sure whether a specific setup would fit into a plan, don't hesitate to [contact support](https://console.platform.sh/-/users/~/tickets). Dedicated Gen 3 For more resources along with triple redundancy on every element of the stack, use a Dedicated Gen 3 plan. Learn more about [Dedicated Gen 3](https://docs.platform.sh/dedicated-environments/dedicated-gen-3.md). To discuss how Dedicated Gen 3 could work for you, [contact Sales](https://platform.sh/contact/). ##### Enterprise overages **The following applies to all Enterprise and Elite subscriptions.** If your apps happen to receive and send more traffic during the month than your plan includes, you are charged the overage rate for additional bandwidth consumption. If you experience repeated overages, please reach out to your Customer Success Manager to review your existing contract. Plans with a Fastly CDN service or the extra Fastly Service include the following: - 1 TB of egress (outgoing) bandwidth on the CDN (Fastly) per month - 50 million ingress (incoming) requests on the CDN per month *Plans without the Fastly Service are instead charged at the following origin prices.* ###### Overage prices | SKU | Description | USD | EUR | AUD | CAD | GBP | |-----------------|-----------------------------------------------------------------------------------------|------|------|--------|--------|------| | `EDGE-ORN-OVERAGE-1TB` | Origin Egress Bandwidth: 1TB | $209 | €155 | AU$303 | CA$284 | £161 | | `EDGE-BDW-OVERAGE-1TB` | Edge Egress Bandwidth: 1TB | $88 | €65 | AU$128 | CA$119 | £68 | | `EDGE-REQ-OVERAGE-50M` | Ingress Requests: 50M | $66 | €49 | AU$96 | CA$90 | £51 | ###### DDoS surge protection If your site is suffering from a DDoS attack, overages may apply. You can contact your Customer Success Manager to add DDoS surge protection to your plan. | SKU | Description | USD | EUR | AUD | CAD | GBP | |------------------------|--------------------------------------------|--------|--------|----------|----------|--------| | `EDGE-DDOS-PROTECTION` | Surge protection for DDoS related overages | $2,400 | €1778 | AU$3,480 | CA$3,257 | £1,847 | ##### Agencies Agencies have access to several partner levels with many perks. * Agency partner levels: Registered, Bronze, Silver, Gold, Platinum, and Diamond * Free user licenses: Silver and above * Free development plan: Gold and above * Access to an agency-specific Small plan price: Bronze and above * Agency discounts for plans depending on the combination of the account tier and agency partner level: | Discount | Registered | Bronze | Silver | Gold | Platinum | Diamond | |-------------------|------------|--------|--------|------|----------|---------| | User license | – | – | Free | Free | Free | Free | | Development plan | – | – | – | Free | Free | Free | | Professional tier | – | – | 10% | 10% | 10% | 10% | | Premier tier | – | – | 10% | 10% | 10% | 10% | | Enterprise tier | – | – | 10% | 18% | 20% | 20% | | Elite tier | – | – | – | – | 25% | 30% | * Agency partners may host their own agency website for free. The size of the plan depends on the agency tier as seen in the following table: | Registered | Bronze | Silver | Gold | Platinum | Diamond | |------------|------------|---------------|-------------|------------|------------| | – | Small plan | Standard plan | Medium plan | Large plan | Large plan | [Learn more and join today](https://platform.sh/solutions/digital-agencies/). If you have any questions, don't hesitate to [contact Sales](https://platform.sh/contact/). ##### Sponsored sites Platform.sh provides sponsored hosting for Free Software projects, tech community events and organizations as part of our effort to support the Free Software community. That offering can include either a project on Platform.sh, or profilable environments through Blackfire.io, depending on the needs of the project. ##### Dunning process In instances where a payment has failed, Platform.sh will make three separate attempts to take the outstanding balance from your account. These attempts will be made on the 4th, 11th and 15th of the month. If your payment fails after the third attempt, your projects will be suspended the following day. All projects on the billing subscription will be affected. ### Server upgrades Platform.sh runs a variety of servers to deliver its services. To ensure your projects get the newest features, these servers are occasionally updated. You don't have to do anything to get the updates. When they're ready for your project, you see an activity about the server being updated in your [activity logs](https://docs.platform.sh/increase-observability/logs/access-logs.md#activity-logs). These activities don't cause downtime for your project. The log of the specific activity includes a description of what has changed with the update. ##### Affected servers ###### Project API server The project API server responds to API calls to make the CLI and Console work for your project. It acts as the Git server, mirroring the source repository in the case of [source integrations](https://docs.platform.sh/integrations/source.md). It stores your app code and project configuration, provides API interfaces, and orchestrates the build and deploy process and other tasks for your environments. ###### Project metrics server The project metrics server retrieves information about your environments' use of RAM, CPU, and disk. You can view this information as part of [environment metrics](https://docs.platform.sh/increase-observability/metrics.md). ### Security #### Multifactor Authentication (MFA) Multifactor Authentication (MFA) enhances security by protecting both your organization and every user account that interacts with it through SSH or the Platform.sh API. When MFA is enforced within an organization, every project contributor **must** enable MFA on their user account so they can run Git commands, SSH into an environment, or trigger actions through the Platform.sh API. ###### Enable MFA on your user account To access an organization that enforces MFA or any of its projects, you **must** enable MFA on your user account. Failure to do so results in forbidden access to the organization from the Console or API, and an [error message](https://docs.platform.sh/development/ssh/troubleshoot-ssh.md#mfa-related-error-message) when trying to SSH into its environments. To enable MFA on your user account, follow these steps: 1. In the Console, open the user menu (your name or profile picture). 2. Click **My profile** 4. Click **Authentication settings**. 5. Follow the instructions for the chosen authentication app. 6. Click **Verify & save**. 7. Refresh your SSH credentials by running `platform login -f` in the CLI. ###### Enforce MFA within your organization **Tier availability** This feature is available for **Elite and Enterprise** customers. [Compare the tiers](https://platform.sh/pricing/) on our pricing page, or [contact our sales team](https://platform.sh/contact/) for more information. TO enable MFA within your organization, follow these steps: 1. In the Console, open the organization dropdown menu on the leftmost navigation. 2. In the expanded navigation on the right hand side, click **Security**. This will take you to the **User security settings** view. 3. In the **MFA required** area, set the **Enable** toggle on. **Note**: Under **User security settings**, you can view which users in your organization have [activated MFA for their user accounts](#enable-mfa-on-your-user-account). ####### Send email reminders You can send email reminders to users who haven't enabled MFA on their user account yet. To do so, follow these steps: 1. In the Console, open the organization dropdown menu on the leftmost navigation. 2. In the expanded navigation on the right hand side, click **Security**. This will take you to the **User security settings** view. 3. In the **User security settings** area, find the user you want to send a reminder to. 4. Click **More More** next to that user. 5. Select **Remind**. An email is sent to the user with instructions on how to enable MFA on their user account. **Note**: You can send reminders to multiple users at once. To do so, in the **User security settings** user list, select the desired users by checking the boxes in front of their names. Click **Remind** at the top of the list to trigger the reminder emails. #### Single Sign-On (SSO) Platform.sh allows you to set up mandatory SSO with a third-party identity provider (IdP) for all your users. Your SSO provider can be enabled for a specific email domain, for example `@example.com`. Every user with a matching email address needs to log in or register on Platform.sh using your SSO provider. Such users can't use an alternative provider, or register a password, or change their email address. ###### Mitigation controls If you deactivate a user on your identity provider, they can't log in or register on Platform.sh. If the user is already logged in to Platform.sh, they are automatically deactivated after their access token has expired (generally after 1 hour). A deactivated user can no longer use SSH, Git, or other Platform.sh APIs. ###### Service users If you have a service user with an email address under your SSO domain, such as `machine-user@example.com`, you can exclude that user from the SSO enforcement rule so they aren't required to authenticate through your identity provider. Please open a [support ticket](https://docs.platform.sh/learn/overview/get-support.md) if you need to exclude a service user. ###### SSO providers ####### Google **Tier availability** This feature is available for **Enterprise** customers. [Compare the tiers](https://platform.sh/pricing/) on our pricing page, or [contact our sales team](https://platform.sh/contact/) for more information. Enforce your users to authenticate with Google. Please open a [support ticket](https://docs.platform.sh/learn/overview/get-support.md) to enable Google SSO. ######## Issue with re-authenticating every 15 minutes If your organization has Google SSO enabled on Platform.sh, you may be required to re-authenticate with Google every 15 minutes. This happens when Platform.sh doesn't possess a valid refresh token from your Google account. To resolve that, you need to: 1. Go to [https://myaccount.google.com/permissions](https://myaccount.google.com/permissions) and revoke the access from the `Platform.sh` application that has `Access given to auth.api.platform.sh`. 2. Go to [https://auth.api.platform.sh/auth/authorize/google?prompt=consent](https://auth.api.platform.sh/auth/authorize/google?prompt=consent) for the system to obtain a valid refresh token for your Google account. ####### OpenId Connect **Tier availability** This feature is available for **Elite** customers. [Compare the tiers](https://platform.sh/pricing/) on our pricing page, or [contact our sales team](https://platform.sh/contact/) for more information. Enforce your users to authenticate with your OpenID Connect provider, such as Okta, Azure Active Directory or Ping Identity. To enable SSO with your OpenID Connect provider, [contact Support](https://console.platform.sh/-/users/~/tickets). ### Backup and restore The frequency of backups varies based on the [backup schedule](https://docs.platform.sh/environments/backup.md#backup-schedule). Retention is governed by the [data retention policy](https://docs.platform.sh/security/data-retention.md). This section details the recovery point objective (RPO) and recovery time objective (RTO) for each option. ##### Preview environments For preview environments, users can manage their own manual backup and restore functions. See how to [back up](https://docs.platform.sh/environments/backup.md#create-a-manual-backup) and [restore](https://docs.platform.sh/environments/restore.md). **RPO**: User defined. The RPO is configured by plan owners. **RTO**: Variable. Recovery time depends on the size of the data being recovered. ##### Basic and Advanced schedules **RPO**: 24 hours. Production environments on Basic and Advanced schedules are backed up every 24 hours. **RTO**: Variable. Recovery time depends on the size of the data being recovered. ##### Premium schedule **RPO**: 6 hours. Production environments on a Premium schedule are backed up every 6 hours. **RTO**: Variable. Recovery time depends on the size of the data being recovered. ##### Dedicated environments **RPO**: 6 hours. Dedicated environments are backed up every 6 hours. **RTO**: Variable. Recovery time depends on the size of the data being recovered. ### Data retention Platform.sh logs and stores various types of data as a normal part of its business. This information is only retained as needed to perform relevant business functions. Retention periods vary depending on the type of data stored. If a legal obligation, law enforcement request, or ongoing business need so requires, data may be retained after the original purpose for which it was collected ceases to exist. ##### Account information Information relating to customer accounts (login information, billing information, etc.) is retained for as long as the account is active with Platform.sh. Customers may request that their account be deleted and all related data be purged by opening a [support ticket](https://docs.platform.sh/learn/overview/get-support.md). ##### System logs System level access and security logs are maintained by Platform.sh for diagnostic purposes. These logs aren't customer-accessible. These logs are retained for at least 6 months and at most 2 years depending upon legal and standards compliance required for each system. ##### Application logs Application logs on each customer environment are retained with the environment. Individual log files are truncated at 100 MB, regardless of their age. See how to [access logs](https://docs.platform.sh/increase-observability/logs/access-logs.md). When an environment is deleted, its application logs are deleted as well. ##### Grid Backups [Automated backups](https://docs.platform.sh/environments/backup.md#use-automated-backups) are retained for a specific amount of time depending on their type and your [backup schedule](https://docs.platform.sh/environments/backup.md#backup-schedule). | Type | Basic | Advanced | Premium | | -------- | ------ | -------- | ------- | | 6-hourly | – | – | 1 day | | Daily | 2 days | 1 week | 1 month | | Weekly | – | 4 weeks | – | | Monthly | – | 1 year | 1 year | [Manual backups](https://docs.platform.sh/environments/backup.md#create-a-manual-backup) are retained until you delete them or replace them with another backup. For example, if you currently have 10 manual backups and are on the Advanced schedule, you keep all 10 manual backups until there are 15 automated backups. Then the automated backups start replacing the manual ones until you have only your allocated 4 manual backups. Backups associated with an environment are retained according to the [backup cycles](#backup-cycles) outlined below, so long as the environment still exists in the project. That is, backups are deleted when the corresponding environment is deleted. ###### Backup cycles Backups are created and retained in a cycle. As the cycle restarts, the first backup of that stage passes down to the next stage. The following is an example of the cycle using the shortest stage (6-hourly backups) from the Premium schedule. The times are just for understanding as actual backup times vary by project. The first cycle is 4 backups (6-hourly backups) made in one day. ![Four 6-hourly backups get taken on a Monday.](https://docs.platform.sh/images/backup-cycles/first-cycle.png "0.215-inline") The first backup doesn’t expire after one day but is retained for the next cycle. ![The first 6-hourly backup is a daily backup.](https://docs.platform.sh/images/backup-cycles/retain.png "0.215-inline") As additional backups are created, the oldest backups are replaced and no longer available. ![When two backups are taken on Tuesday, the 6-hourly backups from Monday start becoming unavailable.](https://docs.platform.sh/images/backup-cycles/replace-backup.png "0.3-inline") When the next cycle completes, it has replaced the previous cycle. ![When two backups are taken on Tuesday, the 6-hourly backups from Monday start becoming unavailable.](https://docs.platform.sh/images/backup-cycles/replace-cycle.png "0.375-inline") ####### Advanced schedule retention The following diagram shows how the cycle works for the entire Advanced schedule: ![Daily backups are retained for 1 week. The first daily backup is the weekly backup. Weekly backups are retained for 1 month. The first weekly backup is the monthly backup. Monthly backups are retained for 1 year.](https://docs.platform.sh/images/backup-cycles/advanced-retention.png "0.6") ####### Premium schedule retention The following diagram shows how the cycle works for the entire Premium schedule: ![Each 6-hourly backup is retained for 1 day. The first 6-hourly backup is the daily backup. Daily backups are retained for 30 days. The first daily backup is the monthly backup. Monthly backups are retained for 1 year.](https://docs.platform.sh/images/backup-cycles/premium-retention.png "0.6") ##### Dedicated Gen 2 backups Backups for Dedicated Gen 2 environments are retained based on when they were taken. | When taken | Retention | | ------------ | -------------------- | | Days 1--3 | Every backup | | Days 4--6 | One backup per day | | Weeks 2--6 | One backup per week | | Weeks 8--12 | One bi-weekly backup | | Weeks 12--22 | One backup per month | See more about [backups of Dedicated Gen 2 environments](https://docs.platform.sh/dedicated-environments/dedicated-gen-2/environment-differences.md#backups). ##### Tombstone backups When a project is deleted, Platform.sh takes a final backup of active environments, as well as the Git repository holding user code. This final backup is to allow Platform.sh to recover a recently deleted project in case of accident. These "tombstone" backups are retained for between 7 days and 6 months depending upon legal and standards compliance required for each system. ##### Analytics Platform.sh uses Google Analytics on various web pages, and so Google Analytics stores collected data for a period of time. We have configured our Google Analytics account to store data for 14 months from the time you last accessed our site, which is the minimum Google allows. ### Project isolation Platform.sh handles project isolation slightly differently based on which underlying architecture your project lives on. All Dedicated Gen 2 and Dedicated Gen 3 clusters are single-tenant. They provide three hosts that are exclusively used by a single customer. Each cluster is launched into its own isolated network (VPC on AWS, equivalent on other providers). **For all projects**, regardless of the underlying architecture: - The network is behind a firewall for incoming connections. Only a few ports are opened to incoming traffic by default: ports 22, 80, and 443. - Outgoing TCP traffic is not blocked, **with the exception of port 25**. - Both incoming and outgoing UDP traffic is blocked. **Note**: For containers to be allowed to connect to each other, the following requirements must be met: - The containers must live in the same environment. - You need to define an explicit relationship between the containers in your app configuration. ### Web Application Firewall (WAF) To protect your app from common security threats, Platform. sh provides its own Web Application Firewall (WAF). You can also subscribe to the Fastly Next-Gen WAF through Platform.sh.#### Platform.sh WAF Enterprise and Elite projects on Platform.sh come with a web application firewall (WAF) at no additional cost. This WAF monitors requests to your app and blocks suspicious ones. All traffic to Platform.sh endpoints is also filtered using a system that takes into account traffic patterns and abuse scores. **Note**: The Platform.sh WAF is not configurable. If you are looking for more advanced, configurable options that can be added to the Platform.sh WAF, see [the Fastly Next-Gen WAF](https://docs.platform.sh/security/web-application-firewall/fastly-waf.md). ###### CRLF injection prevention Carriage return and line feed (CRLF) injection occurs when an attacker injects a CRLF character sequence to manipulate HTTP requests. CRLF injection can lead to [request smuggling](#request-smuggling), [header injection](#header-injection), and [response splitting](#response-splitting) attacks. To protect your app from such attacks, the WAF detects and blocks requests containing CRLF character sequences. ####### Request smuggling When a frontend server forwards HTTP requests to a backend server, it usually sends a series of requests at once. The backend server then parses the request headers to determine where one request ends and the next one begins. The [HTTP protocol](https://tools.ietf.org/html/rfc2616) provides two different headers to specify where an HTTP request ends: `Content-Length` and `Transfer-Encoding`. When the frontend and backend servers don’t agree on which header they should interpret as the end of a request, attackers can smuggle requests. If a malicious request is injected, the backend server may misinterpret the boundaries of the individual requests within the concatenated request, thereby processing a request differently from what was intended. This can lead to various security risks such as data leakage, privilege escalation, and even remote code execution. The WAF detects and blocks requests that contain [both the `Content-Length` and `Transfer-Encoding` headers](#content-length-and-transfer-encoding-headers-together). It also detects and blocks requests that include **both** of the following features of an attempt to inject a malicious request: - A [CRLF character](#crlf-injection-prevention) or `http/\d` - An `HTTP` or `WEBDAV` method name ####### Header injection During a header injection attack, the attacker tricks your app into inserting extra HTTP headers into legitimate HTTP responses. These attacks can happen when HTTP response headers are generated based on user input. Header injection attacks can have various impacts, including cookie injection, [cross-origin resource sharing](https://developer.mozilla.org/en-US/docs/Web/HTTP/CORS) header injection, and bypassing your content security policy. Such attacks enable [response splitting](#response-splitting), which in turn can lead to [cross-site scripting](https://developer.mozilla.org/en-US/docs/Glossary/Cross-site_scripting), web cache poisoning, and so on. The WAF detects header injection attempts occurring through the payload and the header itself. By [blocking requests containing CRLF](#crlf-injection-prevention) character sequences, the WAF prevents malicious data from being returned in a response header and interpreted by the client. ####### Response splitting When a user makes an HTTP request, the web server usually returns a single HTTP response. But when an attacker succeeds in [injecting headers](#header-injection), they can launch a [response splitting attack](https://www.cs.montana.edu/courses/csci476/topics/http_response_splitting.pdf). During a response splitting attack, the attacker uses CRLF characters to inject additional HTTP responses into legitimate user requests. This enables further attacks such as [cross-site scripting](https://developer.mozilla.org/en-US/docs/Glossary/Cross-site_scripting), web cache poisoning, browser cache poisoning, and cross-user attacks. As the WAF [blocks requests containing CRLF](#crlf-injection-prevention) character sequences, your app is protected from response splitting attacks. ###### HTTP protocol enforcement In addition to protecting your site against [CRLF injection-related](#crlf-injection-prevention) attacks, the WAF implements additional rules to enforce the HTTP protocol. ####### Uniform Resource Identifier (URI) syntax [RFC 3986](https://www.rfc-editor.org/rfc/rfc3986) defines the generic syntax for URIs. When the WAF detects a URI with incorrect syntax, the incoming connection is terminated. The request is then reconstructed on the internal Platform.sh network, enforcing the valid format in transit. ####### File upload limit The WAF enforces a file upload limit. By default, this limit is set at 250 MB. You can customize the file upload limit by amending your [app configuration](https://docs.platform.sh/create-apps.md). In the [`web.locations` dictionary](https://docs.platform.sh/create-apps/app-reference/single-runtime-image.md#locations), add your desired value for the `max_request_size` property. ####### File extension restriction The WAF enforces any file extension restriction you may have defined in your [app configuration](https://docs.platform.sh/create-apps.md). To set up a file extension restriction, adjust the [`web.locations` dictionary](https://docs.platform.sh/create-apps/app-reference/single-runtime-image.md#locations). Set up [rules](https://docs.platform.sh/create-apps/app-reference/single-runtime-image.md#rules) to allow only certain file extensions on a given path. ####### Disallowed requests and headers ######## `GET` requests with a body The [HTTP specification](https://tools.ietf.org/html/rfc2616) allows for `GET` requests to have a body. This enables attackers to try and force a request body on unsuspecting applications, which could result in a [request smuggling attack](#request-smuggling). To prevent such attacks, when the WAF detects a `GET` request, it scans the request for a potential `Content-Length` or `Transfer-Encoding` header. If one of those headers is found and the payload isn't `0` or empty, all body-related headers are removed from the request. The request is then passed through otherwise unaltered. ######## `Content-Length` and `Transfer-Encoding` headers together According to the [HTTP specification](https://tools.ietf.org/html/rfc2616), requests mustn't contain [both a `Content-Length` and a `Transfer-Encoding` header](https://tools.ietf.org/html/rfc7230#section-3.3.2). This rule helps protect apps from [request smuggling](#request-smuggling). The WAF detects and blocks requests featuring both headers and forces requests to use [chunked transfer encoding](https://developer.mozilla.org/en-US/docs/Web/HTTP/Headers/Transfer-Encoding) only on the internal Platform.sh network. ######## Missing or empty `host` headers As [routes are mapped](https://docs.platform.sh/define-routes.md) based on host names, the Platform.sh WAF blocks requests with an empty or absent `host` header. ######## Other restricted HTTP headers The following headers are disallowed: `Connection`, `Proxy-Authorization`, `TE`, and `Upgrade`. ###### Slowloris DDoS attack prevention Slowloris DDoS attacks use partial HTTP requests to open connections between a single computer and a targeted web server. These connections are then kept open for as long as possible to overwhelm the web server. While Apache web servers are vulnerable to Slowloris attacks, Nginx servers aren't. Since Platform.sh router services use Nginx processes, your projects are protected against such attacks. #### Fastly Next-Gen WAF On top of the [Platform.sh Web Application Firewall (WAF)](https://docs.platform.sh/security/web-application-firewall/waf.md) included in Enterprise and Elite plans, you can subscribe to the Fastly Next-Gen WAF to further protect your app from security threats. ###### Available offers If you want to subscribe to the Fastly Next-Gen WAF through Platform.sh, you can choose from two offers: - If you subscribe to the **Basic** offer, your WAF is fully managed by Platform.sh - If you subscribe to the **Basic configurable** offer, your WAF is fully managed by Platform.sh too, but with additional flexibility and visibility provided To view a list of all the features included in each offer, see the following table. **Note**: Links to the official [Fastly Next-Gen WAF documentation](https://docs.fastly.com/products/fastly-next-gen-waf) are provided for reference only. The offers described on this page have been designed specifically for Platform.sh customers. Included features may present limitations compared to those advertised by Fastly to their direct customers. | Capability | Basic offer | Basic configurable offer | |----------------------------------------------------------------------------------------------------------------------------------------------------------|-----------------|-----------------------------------| | Available modes | Block mode only | Block, not blocking, off modes | | [Default attack signals](https://docs.fastly.com/signalsciences/using-signal-sciences/signals/using-system-signals/#attacks) | Yes | Yes | | [Default anomaly signals](https://docs.fastly.com/signalsciences/using-signal-sciences/signals/using-system-signals/#anomalies) | Yes | Yes | | [Virtual patching](https://docs.fastly.com/signalsciences/using-signal-sciences/rules/working-with-templated-rules/#working-with-virtual-patching-rules) | No | Yes, in block mode only | | [Default dashboards](https://docs.fastly.com/signalsciences/using-signal-sciences/web-interface/about-the-site-overview-page/) | No | During quarterly business reviews | | [Custom response codes](https://docs.fastly.com/signalsciences/using-signal-sciences/custom-response-codes/) | No | No | | [Custom signals](https://docs.fastly.com/signalsciences/using-signal-sciences/signals/working-with-custom-signals/) | No | No | | [Standard API & ATO signals](https://docs.fastly.com/signalsciences/using-signal-sciences/rules/working-with-templated-rules/) | No | No | To subscribe to a Fastly Next-Gen WAF offer through Platform.sh, [contact Sales](https://platform.sh/contact/). ### Overview Our Dedicated Environments are well-suited for those who need more resources and redundancy, along with stricter isolation requirements. When you create a project on Platform.sh, you can choose to deploy it using one of three types of architecture offerings: Professional (known as [Grid](https://docs.platform.sh/glossary.md#grid)), [Dedicated Generation 2](https://docs.platform.sh/dedicated-environments/dedicated-gen-2.md) (DG2) or [Dedicated Generation 3](https://docs.platform.sh/dedicated-environments/dedicated-gen-3.md) (DG3).  ##### What is Dedicated? DG2 and DG3 are classified as Dedicated Environments (Dedicated). This is because your production environment is replicated across at least three virtual servers that are dedicated solely to your project. In the diagram below, we can see that the Dedicated architecture provides three virtual servers that act as isolated hosts for a site in a failover configuration. Within each server, all the data of your site is synced. ![The dedicated architecture](https://docs.platform.sh/images/dedicated/dedicated-architecture.svg "0.50") Having three isolated hosts means that when one becomes unavailable, the others take over, so your site will always remain up and running. This differs from the Grid architecture, where a single host runs multiple projects from various customers simultaneously.  From the Grid architecture diagram below, we can see that projects hosted in Grid share resources. The CPU, memory, and networking with other projects are all running on the same host. There is only one host that can be relied on in a failover configuration, and this host also holds the resources of various other sites. There is also a [Ceph](https://docs.platform.sh/glossary.md#ceph) storage dependency. ![The grid architecture](https://docs.platform.sh/images/dedicated/grid-architecture.svg "0.50") ##### Deployment With a Dedicated Environment, you are given the freedom to deploy into **any public region of supported IaaS providers** (currently **AWS, Azure, GCP, OVH**). This differs from the Grid architecture, which is solely available in [public regions](https://platform.sh/regions/). For a full list of public regions and IP addresses, visit the [Regions page](https://docs.platform.sh/development/regions.md#regions). In a Grid region, incoming and outgoing traffic is handled via central region gateways, and [publicly available IP addresses](https://docs.platform.sh/development/regions.md#public-ip-addresses) can be used for external firewalls. The public IP addresses for these public regions are stable but not guaranteed never to change. ##### Grid vs Dedicated Whether you choose a Grid or Dedicated Environment depends on the needs you have. In the table below, you can see the different ways in which either might work for you:  | FEATURE | GRID | DEDICATED | | --- | --- | --- | | **Availability** | All support tiers | Just with [Enterprise or Elite](https://platform.sh/pricing/) | | **Uptime SLA** | 99.9% with [Enterprise or Elite](https://platform.sh/pricing/)| 99.99% with [Enterprise or Elite](https://platform.sh/pricing/) | | **Infrastructure** | Containers with dedicated resources on top of a shared redundant infrastructure| Dedicated 3 node clusters| | **Functioning** | A single container is deployed per runtime and per service| At least 3 nodes are running all applications and services are replicated across all of them | | **Resource Allocation** | Resources are spread through one container with fixed sizes after deployment| Resources are deployed across a least 3 nodes | **Usable regions** | Any public region can be used to deploy | Any public region of supported IaaS providers can be used to deploy | | **Autonomous upsize** | Yes | Managed through Platform.sh | | **Upsize and downsize methods** | Redeploy - possible downtime depending on the hooks | No downtime - each instance is altered in a rolling fashion | | **Multi-app support** | Supported natively | Supported through docroots on Dedicated Gen 2 and supported natively on Dedicated Gen 3 | | **Custom domains name** | On all branches for Enterprise and Elite customers | On all branches for Enterprise and Elite customers | | **Sync and merge functionalities** | Yes on all branches | Only on development environments on Dedicated Gen 2 and on all branches on Dedicated Gen3| | **Environment clone** | Yes on all branches | Only on development environments on Dedicated Gen 2 and on all branches on Dedicated Gen3| | **MySQL Replication** | None: standalone service container | Yes: at least 3 services nodes cluster that follow the leader-follower principle| | **Redis Replication** | None: standalone service container | Yes: at least 3 services nodes cluster | | **MongoDB** | Standalone service container | Yes | | **CDN** | A managed Fastly CDN service can be purchased through Platform.sh | Fastly | | **PHP version upgrade** | Self-service | Self-service | | **NodeJS version upgrade**| Self-service | Self-service | | **Routes management** | Self-service | Self-service | | **Cron management** | Self-service | Self-service | | **Cron tasks interrupted by deploys** | No: a running Cron task will block a deployment until it is complete | Yes: a deploy will terminate a running Cron task | | **Mounts management** | Self-service | Self-service | | **Workers management** | Self-service | Managed by Platform.sh | | **Storage increase** | Self-service | Managed by Platform.sh | | **Storage allocation between mounts, DB and services** | Self-service | Managed by Platform.sh on Dedicated Gen 2, Self-service on Dedicated Gen 3| For more information about our Dedicated offerings, explore our [Dedicated Gen 2](https://docs.platform.sh/dedicated-environments/dedicated-gen-2/_index.md) and [Dedicated Gen 3](https://docs.platform.sh/dedicated-environments/dedicated-gen-3.md) pages. ### {{% names/dedicated-gen-2 %}} #### Dedicated Gen 2 Overview Dedicated Generation 2 is a robust, redundant layer. It’s well-suited for those who like the Platform.sh development experience but need more resources and redundancy for their production environment. Dedicated Generation 2 consists of two parts: a development environment and a Dedicated Gen 2 cluster. ####### Key features - **High Availability:** 99.99% SLA (service-level agreement) with [Enterprise or Elite](https://platform.sh/pricing/) - **Dedicated hosts:** Each DG2 cluster is provisioned with 3 dedicated hosts as the typical configuration - **Headless architecture:** Seamless headless architecture with multi-app support - **Isolation:** On DG2, services run as processes on the base operating system (OS) - **Storage:** Storage allocation between mounts, DB and services is done through Platform.sh once a ticket is raised. Storage management is not self-service ###### Dedicated Generation 2 vs Grid Much of the tooling used on Grid is used for DG2, but there are still some differences. Please find a list of the similarities and differences between these two environments below:  | Feature | Dedicated Generation 2 | Grid | | --- | --- | --- | | **Source Operations** | Yes | Yes | | **PHP version upgrade** | Self-service via YAML config files | Self-service via YAML config files | | **Node.js version upgrade** | Self-service via YAML config files | Self-service via YAML config files | | **Cron management** | Self-service via YAML config files | Self-service via YAML config files | | **Web server internal config : locations** | Self-service via YAML config files | Self-service via YAML config files | | **CDN** | Fastly | A managed Fastly CDN service can be purchased through Platform.sh | | **Dedicated IP** | Yes | No | | **Configuration management** | Split responsibility between Platform.sh and customer | only YAML files | | **Usable regions** | Any region needed | Only publicly available | | **Autonomous upsize** | Managed through Platform.sh| Yes | | **Autoscaling** | Yes | No | | **Upsize or Downsize methods** | No downtime - each instance is altered in a rolling fashion | Redeploy - possible downtime depending on the hooks | | **Multi availability zones** | Yes | No | | **New Relic** | APM + New Relic infrastructure | APM Supported only | | **Multi-app support** | Supported through docroots | Supported natively | | **Routes management** | Self-service | Self-service | | **Environment clone** | Only on development environments | Yes on all branches | | **Services : Add, remove, upgrade** | Managed by Platform.sh | Self-service | | **Relationships : Add, remove, update** | Managed by Platform.sh | Self-service | | **Workers management** | Managed by Platform.sh | Self-service | | **Web server internal config : domains** | Managed by Platform.sh | Self-service | | **Storage allocation between mounts, DB and services** | Managed by Platform.sh | Self-service | | **Cron tasks interrupted by deploys** | Yes: a deploy will terminate a running Cron task | No: a running Cron task will block a deployment until it is complete | | **Log exports** | Managed by Platform.sh with Rsyslog exports and Fastly log exports | Log forwarding feature and Fastly log export also available| | **Sync and merge functionalities** | Only on development environments | Yes on all branches | | **SLA** | 99.99% with [Enterprise or Elite](https://platform.sh/pricing/)| 99.9% with [Enterprise or Elite](https://platform.sh/pricing/)| | **Infrastructure** | Dedicated 3 node cluster | Containers with dedicated resources on top of a shared redundant infrastructure | | **Functioning** | 3 nodes are running all applications and services and are replicated | A single container is deployed per runtimes and per services | | **Resources allocation** | Resources deployed on 3 nodes | Resources are spread through the container with fixed sizes after deployment | | **MySQL Replication** | Yes: 3 services nodes cluster | None: standalone service container | | **Redis Replication** | Yes: 3 services nodes cluster | None: standalone service container | | **High Availability (HA)** | Yes | No | | **Split Architecture** | Yes | No | | **Storage** | Local disks are accessed either locally or via glusterfs | 100 GB self service max (can be extended upon request) | | **Automated backup** | Yes | Yes | | **Custom domains name** | On all branches for [Enterprise or Elite](https://platform.sh/pricing/) customers | On all branches for [Enterprise or Elite](https://platform.sh/pricing/) customers | | **MongoDB** | Yes | Standalone service container | ####### Dedicated Gen 2 vs Dedicated Gen 3 Just like Dedicated Gen 3, [Dedicated Gen 2](https://docs.platform.sh/dedicated-environments/dedicated-gen-2/overview.md) ensures increased uptime and availability for your apps and services. But as a Dedicated Gen 2 user, you have to go through the Platform.sh Customer Success team to make configuration or application topology changes. To understand the differences and similarities between Dedicated Generation 2 and Dedicated Generation 3, please head to [Dedicated Gen 3 vs Dedicated Gen 2](https://docs.platform.sh/dedicated-environments/dedicated-gen-3/overview.md#dedicated-gen-3-vs-dedicated-gen-2). ####### Optional features You can enable the following features on your Dedicated Gen 2 projects, as well as [multiple availability zones](https://docs.platform.sh/dedicated-environments/dedicated-gen-3/overview.md#multiple-availability-zones). To enable an optional feature or get more information on potential fees, [contact Sales](https://platform.sh/contact/). ######## Multiple applications You can create multiple apps within a single project so they can share data. This can be useful if you have several apps that are closely related, such as a backend-only CMS and a frontend system for content delivery and display. For more information, see how to [configure multiple apps in a single project](https://docs.platform.sh/create-apps/multi-app.md). ######## Staging environments  A dedicated single-node staging machine is provisioned for your application with an identical software configuration to your production hardware, but reduced hardware specs. This gives the advantages of isolating the staging load from the production hardware as well as having an identical software configuration to perform UAT, but this option doesn’t provide a bed for performance testing as the physical hardware configuration isn’t the same as production. ######## Additional application servers (Split Architecture) For especially high-traffic sites we can also add additional application-only servers. These servers contain just the application code; data storage services (such as SQL, Solr, Redis) are limited to the standard three. The cluster begins to look more like a standard N-Tier architecture at this point, with a horizontal line of web application servers in front of a 3 node (N+1) cluster of Galera database servers. Speak to your sales representative about the costs associated with adding additional application servers. This configuration requires a separate setup from the default so advanced planning is required. ######## SFTP  In addition to SSH accounts, you can create SFTP accounts with a custom user/password that are restricted to certain directories. These directories must be one of the writeable mounts. There is no cost for this configuration, and you can request it at any time via a [support ticket](https://docs.platform.sh/learn/overview/get-support.md). SSH public key based authentication is also supported on the SFTP account. See how to [transfer files through sftp](https://docs.platform.sh/development/file-transfer.md). ######## Error handling  On Grid projects, incoming requests are held at the edge router temporarily during a deploy. That allows a site to “respond slowly” rather than be offline during a deploy, provided the deploy time is short (a few seconds). On Dedicated Gen 2 projects, incoming requests aren’t held during deploy and receive a 503 error. As the Dedicated Gen 2 cluster is almost always fronted by a CDN, the CDN continues to serve cached pages during the few seconds of deploy, so for the vast majority of users there is no downtime or even slow down. If a request does pass the CDN during a deploy, it isn’t counted as downtime covered by our Service Level Agreement. By default, Platform.sh serves generic Platform.sh-branded error pages for errors generated before a request reaches the application. (5XX errors, some 4XX errors, etc.) Alternatively you may provide a static error page for each desired error code via a ticket for us to configure with the CDN. This file may be any static HTML file but is limited to 64 KB in size. ######## Remote logging  Dedicated Gen 2 supports sending logs to a remote logging service such as Loggly, Papertrail, or Logz.io using the rsyslog service. This is an optional feature and you can request that it be enabled via a [support ticket](https://docs.platform.sh/learn/overview/get-support.md). Once enabled and configured your application can direct log output to the system syslog facility and is replicated to the remote service you have configured. When contacting support to enable rsyslog, you need: - The name of the remote logging service to use. - The message template format used by your logging service. - The specific log files you want forwarded to your logging service. There is no cost for this functionality. ######## IP restrictions  Platform.sh supports [project-level IP restrictions (allow/deny) and HTTP Basic authentication](https://docs.platform.sh/environments/http-access-control.md). These may be configured through the development environment and are automatically replicated from the production and staging branches to the production and staging environments, respectively. Changing access control triggers a new deployment of the current environment. However, the changes aren’t propagated to child environments until they’re manually redeployed. ####### Updates Platform.sh updates the core software of the Dedicated Gen 2 cluster (operating system, web server, PHP, MySQL, etc.) periodically, and after any significant security vulnerability is disclosed. These updates are deployed automatically with no additional work required by you. We attempt to maintain parity with your development environment, but we don’t guarantee absolute parity of point versions of your Dedicated Gen 2 Environments with their corresponding development environments. For example, your development environment may have a PHP container running 8.1.30, but your production environment may lag behind at 8.1.26. We can upgrade point releases on request and always upgrade the underlying software in the event of security release. Updates to application software (PHP code, JavaScript, etc.) are the responsibility of the customer. #### Dedicated Gen 2 Development Learn about the [cluster infrastructure](#cluster-infrastructure) of Dedicated Generation 2, and discover key details about [split architecture](#split-architecture), [deployment](#deployment), [storage limits](#storage) and [memory](#memory). ####### Cluster infrastructure Dedicated Gen 2 clusters (sometimes referred to below as DG2) are launched into a Triple Redundant configuration consisting of 3 hosts. This is an N+1 configuration that’s sized to withstand the total loss of any one of the 3 members of the cluster without incurring any downtime. Every service is replicated across all three hosts in a failover configuration (as opposed to sharding), allowing a site to remain up even if one of the hosts is lost entirely. Each instance hosts the entire application stack, allowing this architecture superior fault tolerance to traditional N-Tier installations. Moreover, the Cores assigned to production are solely for production.  ######### Build process The build process for your application is identical for both the Grid Environment and the Dedicated Gen 2 cluster. However, because the hosts are provisioned by Platform.sh, not as a container, service configuration must be done by Platform.sh’s Customer Success team. For more information, learn about [default storage settings](#storage) and how your app can [connect to services](dedicated-environments/dedicated-gen-3/overview.md#available-services). ####### Split architecture Split architecture works under Dedicated Generation 2 and allows you to give more resources globally to a project. Services (data services, caching service or search engines) are split from application runtimes. Services will be running on a cluster of core nodes, and the application will be running on a cluster of web nodes. This allows us to grant more room for the application or the services regarding resources. Both clusters can differ in size. Split architecture clusters can horizontally scale the application by adding additional nodes.  ![Split architecture](https://docs.platform.sh/images/dedicated/split-architecture.svg "0.50") ####### Deployment The production branch of your Git repository is designated for production and a staging branch is designated for staging. Any code merged to those branches automatically triggers a rebuild of the production or staging environment in the Dedicated Gen 2 cluster.  Any defined users or environment variables are also propagated to the Dedicated Gen 2 cluster. **Note**: There is no automatic cloning of data from the Dedicated Gen 2 cluster to the development environments like there is between the grid-based development branches.   Production data may still be replicated to the development environment [manually](https://docs.platform.sh/administration/cli/reference.md#environmentsynchronize). Deployments of other branches don’t trigger rebuilds of the Dedicated Gen 2 cluster Environments. ######## Deployment process  When deploying to the Dedicated Gen 2 cluster the process is slightly different than when working with Platform.sh on the Grid. - The new application image is built in the exact same fashion as for the Grid. - Any active background tasks on the cluster, including cron tasks, are terminated. - The cluster (production or staging) is closed, meaning it doesn’t accept new requests. Incoming requests receive an HTTP 503 response. - The application image on all three servers is replaced with the new image. - The deploy hook is run on one, and only one, of the three servers. - The cluster is opened to allow new requests. The deploy usually takes approximately 30-90 seconds, although that is dependent on how your deploy hook has been configured. During the deploy process the cluster is unavailable. All Dedicated Gen 2 instances are fronted by the Fastly Content Delivery Network (CDN) unless you decide to bring your own CDN. You can also decide that you'd rather not use Fastly. Fastly can be configured to allow a “grace period”, meaning that requests to the origin that fail are served from the existing cache, even if that cache item is stale. We configure a default grace period that is longer than a typical deployment, and can extend that time upon request. That means anonymous users should see no interruption in service at all. Authenticated traffic that can’t be served by the CDN still sees a brief interruption. For more information about deployment, see the [overview of the build and deploy phases](https://docs.platform.sh/learn/overview/build-deploy.md). ####### Storage The development environment for a Dedicated Gen 2 project provides production and staging branches linked to the Dedicated Gen 2 cluster and 3 additional active environments for development. This number can be increased if needed for an [additional fee](https://platform.sh/pricing/). The default storage for Dedicated Gen 2 contracts is 50GB per environment (production, staging, and each development environment). This comprises total storage for your project and is inclusive of any databases, uploaded files, writable application logging directories, search index cores, and so on. The storage amount for your development environment reflects the amount in your Enterprise contract and can be altered based on the terms you agree. A project may have up to six users associated with it at no additional charge. Additional users may be added for an additional fee. These users have access to both the development environment and the Dedicated Gen 2 cluster. **Note**: While your DG2 production and staging Environments are on dedicated virtual machines, your development environments run on the [Grid](https://docs.platform.sh/glossary.md#grid). This means that, by default, all containers in development environments are standard sized, as they have limited traffic needs. For more resource-intensive applications this size can be increased for an additional fee. ####### Memory Dedicated Generation 2 includes a single node dedicated staging with 2 CPUs. This runs the same software configuration as the production cluster but only on a single node. This is usually enough for functional testing before moving to production. You can choose to upgrade your staging to a more powerful machine or add more than one dedicated staging system. Those will still be a single machine. #### Environment differences With Dedicated Gen 2 plans, your Production and Staging environments are on dedicated virtual machines, while your development environments run on the [Grid](https://docs.platform.sh/glossary.md#grid), meaning shared redundant infrastructure. This difference means a few configuration options and tools function differently in the different environments. This is not the case with [Dedicated Gen 3](https://docs.platform.sh/dedicated-environments/dedicated-gen-3.md) projects. ###### Syncing data between environments Because of the differences between Dedicated Gen 2 and Grid Environments, basic [syncs](https://docs.platform.sh/glossary/_index.md#sync) and [merges](https://docs.platform.sh/glossary.md#merge) aren't available between development environments and production or staging environments. So you don't see working buttons with those options in the Console. To transfer data between environments, backup your Production/Staging data and then synchronize Development data. See how to [back up and transfer data](https://docs.platform.sh/development/transfer-dedicated.md#synchronize-files-from-development-to-stagingproduction). ###### Backups Production environments are [backed up automatically](https://docs.platform.sh/environments/backup.md#backup-schedule). For other environments, trigger a [manual backup](https://docs.platform.sh/environments/backup.md). ###### PHP ####### Extensions The following table shows all of the extensions that are enabled by default in each PHP version. To add any other extension with a pre-existing package in the Debian Apt repository, open a [support ticket](https://docs.platform.sh/learn/overview/get-support.md). | Extension | 5.x | 7.0 | 7.1 | 7.2-7.3 | 7.4 | 8.0 | 8.1 | 8.2 | 8.3 | | ``amqp`` | ✅ ✅ ✅ ✅ ✅ ✅ ✅ ✅ | ``apcu`` | ✅ ✅ ✅ ✅ ✅ ✅ ✅ ✅ ✅ | ``apcu-bc`` | ✅ ✅ ✅ ✅ ✅ | ``bcmath`` | ✅ ✅ ✅ ✅ ✅ ✅ ✅ ✅ ✅ | ``bz2`` | ✅ ✅ ✅ ✅ ✅ ✅ ✅ ✅ ✅ | ``cgi`` | ✅ ✅ ✅ ✅ ✅ ✅ ✅ ✅ ✅ | ``cli`` | ✅ ✅ ✅ ✅ ✅ ✅ ✅ ✅ ✅ | ``common`` | ✅ ✅ ✅ ✅ ✅ ✅ ✅ ✅ ✅ | ``curl`` | ✅ ✅ ✅ ✅ ✅ ✅ ✅ ✅ ✅ | ``dba`` | ✅ ✅ ✅ ✅ ✅ ✅ ✅ ✅ ✅ | ``dev`` | ✅ ✅ ✅ ✅ ✅ ✅ ✅ ✅ ✅ | ``enchant`` | ✅ ✅ ✅ ✅ ✅ ✅ ✅ ✅ ✅ | ``event`` | ✅ ✅ ✅ ✅ ✅ ✅ | ``fpm`` | ✅ ✅ ✅ ✅ ✅ ✅ ✅ ✅ ✅ | ``gd`` | ✅ ✅ ✅ ✅ ✅ ✅ ✅ ✅ ✅ | ``geoip`` | ✅ ✅ ✅ ✅ ✅ | ``gmp`` | ✅ ✅ ✅ ✅ ✅ ✅ ✅ ✅ ✅ | ``igbinary`` | ✅ ✅ ✅ ✅ ✅ ✅ ✅ ✅ ✅ | ``imagick`` | ✅ ✅ ✅ ✅ ✅ ✅ ✅ ✅ ✅ | ``imap`` | ✅ ✅ ✅ ✅ ✅ ✅ ✅ ✅ ✅ | ``interbase`` | ✅ ✅ ✅ ✅ ✅ ✅ | ``intl`` | ✅ ✅ ✅ ✅ ✅ ✅ ✅ ✅ ✅ | ``json`` | ✅ ✅ ✅ ✅ ✅ ✅ ✅ | ``ldap`` | ✅ ✅ ✅ ✅ ✅ ✅ ✅ ✅ ✅ | ``mailparse`` | ✅ ✅ ✅ ✅ ✅ ✅ ✅ ✅ | ``mbstring`` | ✅ ✅ ✅ ✅ ✅ ✅ ✅ ✅ ✅ | ``mcrypt`` | ✅ ✅ | ``memcached`` | ✅ ✅ ✅ ✅ ✅ ✅ ✅ ✅ ✅ | ``mongodb`` | ✅ ✅ ✅ ✅ ✅ | ``msgpack`` | ✅ ✅ ✅ ✅ ✅ ✅ ✅ ✅ ✅ | ``mysql`` | ✅ ✅ ✅ ✅ ✅ ✅ ✅ ✅ ✅ | ``oauth`` | ✅ ✅ ✅ ✅ ✅ ✅ ✅ | ``odbc`` | ✅ ✅ ✅ ✅ ✅ ✅ ✅ ✅ ✅ | ``opcache`` | ✅ ✅ ✅ ✅ ✅ ✅ ✅ ✅ ✅ | ``openswoole`` | ✅ ✅ | ``pdo-sqlsrv`` | ✅ ✅ ✅ ✅ | ``pgsql`` | ✅ ✅ ✅ ✅ ✅ ✅ ✅ ✅ ✅ | ``phpdbg`` | ✅ ✅ ✅ ✅ ✅ ✅ ✅ ✅ ✅ | ``pspell`` | ✅ ✅ ✅ ✅ ✅ ✅ ✅ ✅ ✅ | ``readline`` | ✅ ✅ ✅ ✅ ✅ ✅ ✅ ✅ ✅ | ``recode`` | ✅ ✅ ✅ | ``redis`` | ✅ ✅ ✅ ✅ ✅ ✅ ✅ ✅ ✅ | ``snmp`` | ✅ ✅ ✅ ✅ ✅ ✅ ✅ ✅ ✅ | ``soap`` | ✅ ✅ ✅ ✅ ✅ ✅ ✅ ✅ ✅ | ``sodium`` | ✅ ✅ ✅ ✅ ✅ ✅ ✅ | ``sqlite3`` | ✅ ✅ ✅ ✅ ✅ ✅ ✅ ✅ ✅ | ``sqlsrv`` | ✅ ✅ ✅ ✅ ✅ ✅ ✅ | ``ssh2`` | ✅ ✅ ✅ ✅ ✅ ✅ ✅ ✅ ✅ | ``swoole`` | ✅ ✅ | ``sybase`` | ✅ ✅ ✅ ✅ ✅ ✅ ✅ ✅ ✅ | ``tideways-xhprof`` | ✅ ✅ ✅ ✅ ✅ ✅ | ``tidy`` | ✅ ✅ ✅ ✅ ✅ ✅ ✅ ✅ ✅ | ``twig`` | ✅ | ``uuid`` | ✅ ✅ ✅ ✅ ✅ ✅ | ``xcache`` | ✅ | ``xdebug`` | ✅ ✅ ✅ ✅ ✅ ✅ ✅ ✅ ✅ | ``xml`` | ✅ ✅ ✅ ✅ ✅ ✅ ✅ ✅ ✅ | ``xmlrpc`` | ✅ ✅ ✅ ✅ | ``xsl`` | ✅ ✅ ✅ ✅ ✅ ✅ ✅ ✅ | ``zbarcode`` | ✅ ✅ ✅ | ``zip`` | ✅ ✅ ✅ ✅ ✅ ✅ ✅ ✅ ✅ | ``zts`` | ✅ ✅ ✅ ✅ ✅ ####### Configuration options **Note**: Most Dedicated Gen 2 projects allow you to use custom ``php.ini`` files on your production or staging environments. However, **for a small set of projects**, this isn’t supported yet. If your project doesn't support PHP configuration through a `php.ini` file, you can still change all PHP options that can be changed at runtime. For example, change the memory limit using `ini_set('memory_limit','1024M');`. For other PHP options, such as the following, [open a support ticket](https://docs.platform.sh/learn/overview/get-support.md): * `max_execution_time` * `max_input_time` * `max_input_vars` * `memory_limit` * `post_max_size` * `request_order` * `upload_max_filesize` ####### Xdebug All Dedicated Gen 2 clusters that have [Xdebug](https://docs.platform.sh/languages/php/xdebug.md) enabled have a second PHP-FPM process. This second process is used only when requests include the correct Xdebug key in a header. So you can keep Xdebug always on and not worry about performance issues as it's ignored on most requests. **To obtain the Xdebug key:** 1. Open a [support ticket](https://docs.platform.sh/learn/overview/get-support.md). **Note**: Staging and Production environments have separate keys. 2. Set that key in the Xdebug helper for your browser. Whenever you have Xdebug enabled, the request uses the alternate development PHP-FPM process with Xdebug. ###### Solr On Grid environments, [Solr](https://docs.platform.sh/add-services/solr.md) runs as a standalone instance. On Dedicated Gen 2 Environments, it runs as [SolrCloud](https://solr.apache.org/guide/6_6/solrcloud.md): a cluster of Solr servers to ensure high availability. This shouldn't affect you most of the time, but may influence certain advanced use cases. ###### Cron tasks interrupted by deploys How [cron tasks](https://docs.platform.sh/create-apps/app-reference/single-runtime-image.md#crons) interact with deploys changes based on the environment. On Grid environments, a running cron task blocks a deploy until the cron is complete. On Dedicated Gen 2 environments, a deploy terminates a running cron task. Specifically, when a deploy to either Production or Staging begins, any active cron tasks are sent a `SIGTERM` message so that they can terminate gracefully. If they're still running 2 seconds later, a `SIGKILL` message is sent to forcibly terminate the process. So it's best to ensure your cron tasks can receive a `SIGTERM` message and terminate gracefully. ###### Configuration & change management You can't manage some configuration settings via YAML configuration files on Dedicated Gen 2 Environments. In these cases, you need to open a [support ticket](https://docs.platform.sh/learn/overview/get-support.md). You can have some settings different between staging and production environments. It's assumed you want the settings the same, unless you state otherwise in the ticket. The following settings require a [support ticket](https://docs.platform.sh/learn/overview/get-support.md): * [Worker instances](https://docs.platform.sh/create-apps/app-reference/single-runtime-image.md#workers) * [Service configuration](https://docs.platform.sh/add-services.md) * Relationships among services and apps * Plan upsizing * Increasing storage * Allocating storage among mounts and services * [PHP extensions](https://docs.platform.sh/languages/php/extensions.md) * Web server configuration (the [`web.locations` section of your app configuration](https://docs.platform.sh/create-apps/app-reference/single-runtime-image.md#locations)) ###### Logs Dedicated Gen 2 Environments have a slightly different location for [container logs](https://docs.platform.sh/increase-observability/logs/access-logs.md). The difference shouldn't be noticeable if you use the CLI. ### {{% names/dedicated-gen-3 %}} #### Dedicated Gen 3 Overview **Limited access phase**: Dedicated Gen 3 is currently in a limited access phase. During this period, we are limiting new customers to ensure the platform meets our rigorous standards for performance and reliability. If you need more information, have any questions, or you think you have the perfect use case for Dedicated Gen 3, please [contact](https://platform.sh/contact/) our team. Designed to cater to the needs of organizations that build demanding apps, Dedicated Generation 3 (DG3) offers increased resources and High Availability (HA) for all your services, along with stricter isolation requirements and additional compliance frameworks. ####### Key features - **High Availability:** 99.99% SLA (service-level agreement) with [Enterprise or Elite](https://platform.sh/pricing/) - **Dedicated hosts:** Each DG3 cluster is provisioned with 3 dedicated hosts as the typical configuration - **Headless architecture:** Seamless headless architecture with multi-app support - **Self-service:** Customers may edit their application and service YAML files and push changes. Customers can also take advantage of MariaDB Galera multi-leader and adding, upgrading or removing services on their own - **Data sync from Dedicated to Grid:** Customers can initiate data syncs themselves via Console (restore a Grid HA backup on DG3 and restore a DG3 backup on a Grid HA environment) - **Better containerization:** DG3 is containerized and decouples the base operating system (OS) version and [control plane](https://docs.platform.sh/glossary.md#control-plane) from the service versions, so the OS and services can be upgraded independently - **Better staging:** Dedicated Gen 3 comes with HA staging as default. This allows the data sync between Dedicated and Grid to be simpler, consistent and seamless **Note**: Existing Grid and Dedicated Gen 2 projects cannot be migrated to Dedicated Gen 3.   ####### Dedicated Gen 3 vs Grid Much of the tooling used on Grid is used for DG3, but there are still some differences. Please find a list of the similarities and differences below:  | Feature | DG3 | Grid | | --- | --- | --- | | **Source Operations** | Yes | Yes | | **PHP version upgrade** | Self-service via YAML config files | Self-service via YAML config files | | **NodeJS version upgrade** | Self-service via YAML config files | Self-service via YAML config files | | **Cron management** | Self-service via YAML config files | Self-service via YAML config files | | **Web server internal config : locations** | Self-service via YAML config files | Self-service via YAML config files | | **CDN** | Fastly | A managed Fastly CDN service can be purchased through Platform.sh | | **Dedicated IP** | Yes | No | | **Configuration management** | Self-service via YAML config files | Self-service via YAML config files | | **Usable regions** | Any region needed | Only the publicly available | | **Autonomous upsize** | Managed through Platform.sh | Yes | | **Upsize or downsize methods** | No downtime - each instance is altered in a rolling fashion | Redeploy - possible downtime depending on the hooks | | **Production branch** | Self-service | Self-service | | **Autoscaling** | Yes | No | | **Multi availability zones** | Yes | No | | **New Relic** | APM + New Relic Infrastructure | APM Supported only | | **Multi-app support** | Supported natively | Supported natively | | **Routes management** | Self-service via YAML config files | Self-service via YAML config files | | **Environment clone** | Yes on all branches | Yes on all branches | | **Services : Add, remove, upgrade** | Self-service via YAML config files | Self-service via YAML config files | | **Relationships : Add, remove, update** | Self-service via YAML config files | Self-service via YAML config files | | **Mounts management** | Self-service via YAML config files | Self-service via YAML config files | | **Workers management**| Self-service via YAML config files | Self-service via YAML config files | | **Web server internal config : domains** | Self-service via YAML config files | Self-service via YAML config files | | **Storage allocation between mounts, DB and services** | Self-service via YAML config files | Self-service via YAML config files | | **Storage increase responsibility** | Shared responsibility with Platform.sh | Self-service | | **Cron tasks interrupted by deploys** | No: a running Cron task will block a deployment until it is complete | No: a running Cron task will block a deployment until it is complete | | **Sync and merge functionalities** | Yes on all branches | Yes on all branches | | **SLA** | 99.99% with [Enterprise or Elite](https://platform.sh/pricing/) | 99.9% with [Enterprise or Elite](https://platform.sh/pricing/)| | **Infrastructure** | Dedicated 3 node cluster | Containers with dedicated resources on top of a shared redundant infrastructure | | **Functioning** | 3 nodes are running all applications and services are replicated across all 3| A single container is deployed per runtimes and per services | | **Resources allocation** | Resources are deployed on all 3 nodes | Resources are spread through one container with fixed sizes after deployment | | **MySQL Replication** | Yes: 3 services nodes cluster | None: standalone service container | | **Redis Replication** | Yes: 3 services nodes cluster | None: standalone service container | | **High availability (HA)** | Yes | No | | **Split Architecture** | No | No | | **Automated backup** | Yes | Yes | | **Elasticsearch premium** | Yes | Yes | | **SFTP password access** | Yes | No | | **Custom domains name** | On all branches for [Enterprise or Elite](https://platform.sh/pricing/) customers | On all branches for [Enterprise or Elite](https://platform.sh/pricing/) customers | ######## Available services Your app can connect to each service by referencing the exact same [environment variables](https://docs.platform.sh/development/variables.md) as for Grid environments.  | Service | Supported versions | | --- | --- | | **Headless Chrome** | 95 | | **MariaDB/MySQL** | 10.11 Galera, 10.6 Galera, 10.5 Galera, 10.4 Galera, 10.3 Galera | | **Network Storage** | 2 | | **OpenSearch** | 2 | | **PostgreSQL** | 16, 15, 14, 13, 12 | | **RabbitMQ** | 3.13, 3.12, 4.0 | | **Redis** | 7.2, 7.0, 6.2 | | **Solr** | 9.6, 9.4, 9.2, 9.1, 8.11 | | **Vault KMS** | 1.12 | See the [services documentation](https://docs.platform.sh/add-services.md) for service-specific details. ######## Local mounts  Dedicated Gen 3 provides a redundant infrastructure and local mounts aren’t shared between the three hosts. If you need a folder to be shared between your hosts, such as for common assets, set up a [network storage mount](https://docs.platform.sh/add-services/network-storage.md). ####### Dedicated Gen 3 vs Dedicated Gen 2 Just like [Dedicated Gen 2](https://docs.platform.sh/dedicated-environments/dedicated-gen-2.md), Dedicated Gen 3 ensures increased uptime and availability for your apps and services. But as a Dedicated Gen 2 user, you have to go through the Platform.sh Customer Success team to make configuration or application topology changes. Dedicated Gen 3 gives you both the high availability of Dedicated Gen 2 and the self-service flexibility and features of Grid projects. As a Dedicated Gen 3 user, you can edit your configuration yourself and see those changes reflected in your environments on every push without opening a ticket. See the table below for more differences and similarities between Dedicated Den 3 and Dedicated Gen 2: | Feature | Dedicated Gen 2 | Dedicated Gen 3 | | --- | --- | --- | | **Source Operations** | Yes | Yes | | **PHP version upgrade** | Self-service via YAML config files | Self-service via YAML config files | | **NodeJS version upgrade** | Self-service via YAML config files | Self-service via YAML config files | | **Cron management** | Self-service via YAML config files | Self-service via YAML config files | | **Web server internal config : locations** | Self-service via YAML config files | Self-service via YAML config files | | **CDN** | Fastly | Fastly | | **Dedicated IP** | Yes | Yes | | **Usable regions** | Any region needed | Any region needed | | **Autonomous upsize** | Managed through Platform.sh | Managed through Platform.sh| | **Multiple availability zones** | Yes | Yes | | **New Relic** | APM + New Relic infrastructure | APM + New Relic infrastructure | | **Multi-app support (PWA)** | Supported through docroots | Supported natively | | **Routes management** | Managed by Platform.sh | Self-service via YAML config files | | **Environment clone** | Only on development environments | Yes on all branches | | **Services : Add, remove, upgrade** | Managed by Platform.sh | Self-service via YAML config files | | **Relationships : Add, remove, update** | Managed by Platform.sh| Self-service via YAML config files | | **Mounts management** | Self-service or managed by Platform.sh | Self-service via YAML config files | | **Workers management** | Managed by Platform.sh | Self-service via YAML config files | | **Web server internal config: domains** | Managed by Platform.sh | Self-service via YAML config files | | **Storage allocation between mounts, DB and services** | Managed by Platform.sh | Self-service via YAML config files | | **Storage increase responsibility** | Managed by Platform.sh | Self-service | | **Cron tasks interrupted by deploys** | Yes: a deploy will terminate a running Cron task | No: a running Cron task will block a deployment until it is complete | | **Sync and Merge functionalities** | Only on development environments | Yes on all branches | | **Functioning** | 3 nodes are running all applications and services are replicated | 3 nodes are running all applications and service are replicated | | **Resources allocation** | Resources deployed on the 3 nodes | Resources deployed on the 3 nodes | | **MySQL Replication** | Yes: 3 services nodes cluster | Yes: 3 services nodes cluster | | **Redis Replication** | Yes: 3 services nodes cluster | Yes: 3 services nodes cluster | | **Split Architecture** | Yes | No | | **VPN** | AWS/Azure PrivateLink | AWS/Azure PrivateLink | | **Automated backup** | Yes | Yes | | **Elasticsearch premium** | Yes | Yes | | **SFTP password access** | Yes | Yes | | **Custom domains name** | Available only on Dedicated Environments for [Enterprise or Elite](https://platform.sh/pricing/) customers | On all branches for [Enterprise or Elite](https://platform.sh/pricing/) customers | | **On-demand backup** | Not supported | Same as grid | ######## Optional features You can enable the following features on your Dedicated Gen 3 projects. To enable an optional feature or get more information on potential fees, [contact Sales](https://platform.sh/contact/). ######### Multiple availability zones  The default configuration for Dedicated clusters is to launch them into a single availability zone (AZ) for the following reasons: - The members of your cluster communicate with each other via TCP to perform DB replication, cache lookup, and other associated tasks. Therefore, the latency between data centers or AZs can become a significant performance liability. When your entire cluster is deployed within a single AZ, the latency between cluster members is minimal. This has a direct effect on perceived end-user performance. - Network traffic between AZs is billed, whereas intra-AZ traffic isn’t. Launching Dedicated clusters across multiple AZs leads to higher costs and decreased performance. If you prefer the peace of mind of hosting across multiple AZs, you can request a different configuration. **Note**: Platform.sh is responsible for meeting the 99.99% uptime SLA, so multiple-AZ deployments should only be considered in cases where they’re truly appropriate. Multi-AZ deployments are available only on select AWS regions.   ######### SFTP  In addition to SSH accounts, you can create SFTP accounts with a custom user/password to [transfer files](https://docs.platform.sh/development/file-transfer.md).  **Note**: On Dedicated Gen 3 projects, SFTP access cannot be limited to a specific directory. Instead, access is given to the whole application directory and its mounts. However, write access is restricted to the mounts declared in your YAML config files. SSH public key based authentication is also supported on the SFTP account. #### Dedicated Gen 3 Development **Limited access phase**: Dedicated Gen 3 is currently in a limited access phase. During this period, we are limiting new customers to ensure the platform meets our rigorous standards for performance and reliability. If you need more information, have any questions, or you think you have the perfect use case for Dedicated Gen 3, please [contact](https://platform.sh/contact/) our team. Learn about the [cluster infrastructure](#cluster-infrastructure) of Dedicated Generation 3, and discover key details about [deployment](#deployment), which [regions](#providers-and-regions) are supported and [storage limits](#storage). ###### Cluster infrastructure  Clusters in a DG3 environment can be imagined as a mini-Grid region that has no [Ceph](https://docs.platform.sh/glossary.md#ceph) dependency, so it can run anywhere. The cluster nodes function as entrypoint, coordinator, storage and host all in one. These clusters usually only contain a single branch while the remainder of the project remains on a Grid host.  For more information about the Dedicated clusters, visit [Dedicated Gen 2 Development](https://docs.platform.sh/dedicated-environments/dedicated-gen-2/development.md#cluster-infrastructure). ![Dedicated cluster architecture](https://docs.platform.sh/images/dedicated/cluster-infrastructure.svg "0.50") On a DG3 cluster, the services (MariaDB, PHP, Redis) run in Highly Available (HA) mode instead of as single, isolated applications. These clusters can be in either of your production or staging environments. ####### HTTP clusters With a HTTP connection, a cloud load balancer sits in front of the hosts and, if Fastly is enabled, Fastly sits in front of the cloud load balancer. Therefore, the web request flow looks like this: ![HTTP cluster architecture](https://docs.platform.sh/images/dedicated/http-cluster.svg "0.50") ####### SSH clusters On DG3, customers have direct access to the application containers. This connection is proxied through the Grid region and then to the DG3 cluster like in the diagram below: ![SSH cluster architecture](https://docs.platform.sh/images/dedicated/ssh-cluster.svg "0.50") In the diagram, there are only 3 hosts. Host 1 has both the entry point and app container, and the same goes for hosts 2 and 3. Each service is run on 3 High availability containers spread across each of the 3 dedicated hosts. ###### Deployment On Grid, all project branches are deployed into that same Grid region. On DG3, this behaves the same but the projects deployed are Highly Available (HA), and branches set as default and (optionally) labelled staging are deployed into their own dedicated clusters instead. While HA environments connected to a DG3 cluster **can** deploy multiple instances of applications and services, they **cannot** dynamically change the number of those instances (for example, from 1 to 3 or 3 to 1). **Note**: Existing non-HA projects cannot be converted to HA projects and vice-versa. HA projects must be created as HA. ###### Providers and regions Unlike Grid, you can deploy into [any region](https://docs.platform.sh/development/regions.md#regions) of supported IaaS providers with a Dedicated Generation 3 environment. Currently, these providers are listed below: - Amazon Web Services (AWS) - Microsoft Azure (Azure) - Google Cloud Platform (GCP) - OVHcloud (OVH)  For more details on specific regions, consult the region [documentation](https://docs.platform.sh/development/regions.md#regions). ###### Storage Each Dedicated Gen 3 cluster comes with 50GB of storage per environment by default. This storage is intended for your data (databases, search indexes, user uploaded files, etc.) and you can subdivide it as you want. Additional storage can be purchased and added to your cluster at any time. ### Security and monitoring We use a combination of three trusted methods to ensure your site is secure and running at all times:  - [Project isolation](#project-isolation) - [Encryption](#encryption) - [Performance monitoring](#performance-monitoring) Security is handled in a similar way for both Dedicated Gen 2 and Dedicated Gen 3 projects, with strict procedures that are followed to handle incidents. ###### Project isolation  All Dedicated clusters are single-tenant. The [three hosts](https://docs.platform.sh/dedicated-environments/dedicated-gen-2/overview.md) are exclusively used by a single customer and each cluster is launched into its own isolated network (VPC on AWS, equivalent on other providers). The network is behind a firewall for incoming connections. Only ports 22 (SSH), 80 (HTTP), and 443 (HTTPS), and 2221 (SFTP) are opened to incoming traffic. There are no exceptions for this rule, so any incoming web service requests, ETL jobs, or otherwise need to transact over one of these protocols. Outgoing TCP traffic isn’t behind a firewall. Outgoing UDP traffic is disallowed. For containers to be allowed to connect to each other, the following requirement must be met: - The containers must live in the same environment - You need to define an explicit relationship between the containers in your [app configuration](https://docs.platform.sh/create-apps/app-reference/single-runtime-image.md#relationships) All Dedicated projects are isolated and their data is fully encrypted. Should a security breach occur, Platform.sh follows a strict security incident handling procedure to deal with the issue as promptly and efficiently as possible. ###### Encryption  All sites and tools supported and maintained by Platform.sh are fully encrypted by default. For more information about Encryption at Platform.sh, visit the [Platform.sh Trust Center](https://platform.sh/trust-center/security/encryption/). ###### Performance monitoring All of our Dedicated clusters are monitored 24/7 to ensure uptime and to measure server metrics such as available disk space, memory and disk usage, and several dozen other metrics that give us a complete picture of the health of your application’s infrastructure. As soon as a metric goes out of bounds (i.e., an outage is detected), Support and Operations teams are alerted, a Point in Time report is generated, and the Platform.sh teams can triage the cause of the outage. ####### Automated monitoring On top of internal Platform.sh tools, a third-party availability monitoring system is configured for every Dedicated project. This further guarantees that issues are spotted and addressed as quickly as possible. If you’re using a CDN, [make sure it’s configured](https://docs.platform.sh/domains/cdn.md#configure-your-cdn-to-support-high-sla) to support automated monitoring and guarantee high SLA. Automated monitoring is used to keep an eye on your production environment at all times. If automated monitoring triggers an alert, or if a customer files an urgent priority ticket, an on-call engineer is immediately paged so they can respond and begin to triage the issue. Cloud infrastructure issues are handled by the Platform.sh Customer Success team. Note that application problems are returned to the user and may be downgraded. ####### Observability services As the official, in-house Platform.sh observability tool, [Blackfire](https://docs.platform.sh/increase-observability/integrate-observability/blackfire.md) provides unparalleled monitoring, profiling, and performance testing technologies. Using Blackfire on Platform.sh enhances your experience and allows you to enjoy greater support as well as unique upcoming features. As an Enterprise or Elite customer, you can use the Platform.sh [Observability Suite](https://platform.sh/features/observability-suite/), which offers application performance monitoring by Blackfire packaged with infrastructure monitoring. The Observability Suite includes all Blackfire features, support, and usage that scales with your needs. Platform.sh also supports third-party observability services such as [New Relic](https://docs.platform.sh/increase-observability/integrate-observability/new-relic.md) and [Tideways](https://docs.platform.sh/increase-observability/integrate-observability/tideways.md). You need to get your own license for them. These third-party services have their own associated cost, are language-specific, and may not be available for all languages.### Dedicated backup and restores Backups are retained for different periods depending on various factors and whether you’re using a Dedicated Gen 2 or Dedicated Gen 3 Environment. These processes can be either manual or automated. ##### Dedicated Generation 2 Backups Platform.sh takes a byte-for-byte snapshot of Dedicated Gen 2 production environments every 6 hours. Backups are retained for different durations depending on when they were taken.  | Backup retention period | Retention | # of backups from time period available | |----------------|---------------------|--------------------| | 1–3 days ago | Every backup taken in that period | 6 (1 day) to 18 (3 days) | | 4-6 days ago | One backup per day in that period | 1 (4 days) to 3 (6 days) | | 2–6 weeks ago | One backup per week | 1 (2 weeks) to 5 (6 weeks) | | 8–12 weeks ago | One bi-weekly backup | 1 (8 weeks) to 3 (12 weeks) | | 12–22 weeks ago | One backup per month | 1 (12 weeks) to 3 (22 weeks) | Put another way, the number of backups available for restoration - in each of the backup age groupings described above - might look as follows for a few Dedicated environment ages: | Environment age | 72 hours old or younger | 4-6 days old | 2-6 weeks old | 8-12 weeks old | 12-22 old | Total | |----------------|---------------|--------------|----------------|-----------------|-------------------|-----| | 1 week | 18 | 3 | 0 | 0 | 0 | 21 | | 12 weeks | 18 | 3 | 5 | 3 | 0 | 29 | | 52+ weeks | 18 | 3 | 5 | 3 | 3 | 32 | Backups are created using snapshots saved to encrypted elastic block storage (EBS) volumes. An EBS snapshot is immediate, but the time it takes to write to the storage service depends on the volume of changes. - Recovery Point Objective (RPO) is 6 hours (maximum time to last backup). - Recovery Time Objective (RTO) depends on the size of the storage. Large EBS volumes take more time to restore. These backups are only used in cases of catastrophic failure and can only be restored by Platform.sh. To request a restoration, open a [support ticket](https://docs.platform.sh/learn/overview/get-support.md). ##### Dedicated Generation 2 restoration   The restoration process for Dedicated Generation 2 Environments may take a few hours, depending on the infrastructure provider in use. In the ticket, specify if you want backups of files, MySQL, or both. Uploaded files are placed in an SSH-accessible directory on the Dedicated Gen 2 cluster.  MySQL is provided as a MySQL dump file on the server. You may restore these to your site at your leisure. You are also free to make your own backups using standard tools (mysqldump, rsync, etc.). **Note**: Platform.sh does not proactively overwrite your production site with a backup. You are responsible for determining a “safe” time to restore the backup, or for selectively restoring individual files if desired.   ##### Dedicated Generation 3  For Dedicated Generation 3 Environments, [automated backups](environments/backup.md#use-automated-backups) are retained for a specific amount of time depending on their type and your [backup schedule](https://docs.platform.sh/environments/backup.md#backup-schedule). [Manual backups](https://docs.platform.sh/environments/backup.md#create-a-manual-backup) are retained until you delete them or replace them with another backup. |Type |Basic |Advanced |Premium | |----------------|---------------------|-----------------|-----------| | 6-hourly | - | - |1 day | | Daily | 2 days | 1 week |1 month | | Weekly | - | 4 weeks |- | | Monthly | - | 1 year |1 year | ##### Dedication Generation 3 restores Dedicated Generation 3 Environments allow for backups and restores the same way as Grid, so you can use them with the management console and the [Platform.sh CLI](https://docs.platform.sh/administration/cli.md).